
sak
-
Posts
609 -
Joined
-
Last visited
Content Type
Profiles
Forums
Events
Gallery
Everything posted by sak
-
I noticed that too. I think it used to be called chrome bumper paint I beleieve. And if you mist light coats over a shiny black base, it makes a great stainless steel look.
-
Lowslow, would you say the enamel thinner works better than even acetone? Jeff
-
And apparently he is not to bad too, he just got promoted to level 4 ogre. And he has well over 500 super dragon breath points!
-
Thst looks like its going to to be OFF THE CHAIN !!!!! Doesnt appear to be too cheesy, minus the part of the guy that shoots down the fighter jet in a tank turret of a tank thats floating to earth on a parachute, after the plane it was in exploded. But serious , this has the potential to be one of the better tv to mivie addaptations, even better than Miami vice.
-
Truly amazing stuff. I would very much like to see a tutorial someday on how you do this stuff with basic tools, especially the U-joints. And also where you find that super small gauge wire.
-
Nice!!!! Looking good. Is that bare metal foil around the trim in photo number 1 ?
-
Pic is a lil small, but looks great to me.Good job !
-
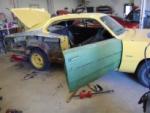
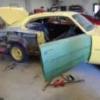
I was just wondering if there is some kind of formula for determining the proper color of a chassis. I understand 50's era cars used were sprayed with red oxide. Up to what point was this done? After unibody construction I would assume the subframe would have not been this color. But on my 73 plymouth the chassis and subframe are both yellow, same as body color, the subframe being heavily oversprayed with flat black paint from the engine bay. I thought that mopar chassis were grey primer oversprayed with body color only at the rockers. And on Gm cars, when would the chassis be body color, if at all. Or is flat or semi-flat the correct choice? I don't suppose anybody out there knows of a assembly line image database. I tried ebay, but full chassis shots are few and far between. I sent a picture of the coronet that I am working on, and I doubt its correct and thats ok for me, but for future reference.
-
Remember to install a B pillar, as no American car company has the balls to produce a true hardtop. But it is only a concept, and looking good so far.
-
Best Way To Clean Sable Brushes Used in Acrylic
sak replied to Bruce Poage's topic in Tips, Tricks, and Tutorials
Yes, never believe a label that says water clean up, when it comes to acrylic paint. I usually put the brush in a bowl or jar of water immediately after using it, but to get completely clean, I have had sucess with rubbing alcohol or methyl hydrate. On airbrushes water won't even make a dent in the paint thats dried on the sides of the cup or the needle tip. I go straight to the lacquer thinner for that. -
Michaels , is a little pricey even with the coupon. Hellonwheelz, do yourself a favor and look here first. http://www.badgerairbrush.com/Garage_Sale.asp A 150 for 35 dollars? Not gonna get a better deal than that. Just make sure you get the addapter so you can use a decent airhose with it.
-
Yes, I was told by the people at BMF that the adhesize is applied to the sheets with a roller. Its the texture on that roller that transfers to the foil. And yes it will not burnish out, makes thin round trim look like chromed rebar. But bare metal foil is still the best thing for small things like scripts. Jeff
-
Paint Blush... What is the cause?????
sak replied to Dragline's topic in Model Building Questions and Answers
Sometimes it is humid even though it doesn't feel like it. Basements can be humid areas. Word of advice, not really safe to be using that stuff indoors period, let alone in a furnace room. Jeff -
The REAL original "pony car"...
sak replied to Harry P.'s topic in General Automotive Talk (Trucks and Cars)
Before you can answer this question, you must first define pony car. Then find out if the barracuda fits these criteria or not. I don't think engine size options make a difference here and neither do lack of body style options, as long as the one style offered is a "pony car" style. For example, I would consider corvettes to be in a sportscar class, even though the original 'vettes did not have a v8 motor. Jeff -
Flea markets are the best places to look. And the only places I buy my kits. Even scour the antique stores. Sometimes they have a few kicking around. Price range from only a few dollars to 10 dollars I have found, unless its a dealer selling something obviously vintage. But most of the time, the vendors just assume its a 90's era kit and charge about 10. I usually haggle the half built, pieces missing kits to a few bucks, great for spare parts. Jeff
-
My all time biggest modeling pet peeve
sak replied to Peter Lombardo's topic in General Automotive Talk (Trucks and Cars)
So far very good points, all of them. Some of my peeves, aside from the ones already mentioned - under-detailed, molded in wiper arms and blades. Example, AMT 1971 duster. - "Bucket" style interiors on older kits. - embossed gauge numbers, rather than decals - inner fenders with molded in hoses, batteries etc. - floating alternators. Be nice if they molded them with the brackets at least, like the Revell 67 coronet - no steering shaft on most model kits Things I would like to see - vent windows frames and fuel tanks as seperate pieces, especially the fuel tank. I find it a PITA to mask this off and alclad. Am I being too nitpicky? Probably. Personally, I think the AMT 66 olds and the AMT 71 duster and 2 of the best kits I have ever seen so far. Be nice if the kit companies could take the best elements of the best kits and drop all the worst and agree on a common configuration and build the kits to that standard. Production defects will always be there to some degree but if fixing a sink hole or two if the only issue with the kit, rather than having to scratch build things or wasting time masking off washer fluid bottles, all in all, building the kit should prove to be considerably more enjoyable. Jeff -
I have a question about wire gauges. I have some detail master race ignition wire, which they advertise as being ".016" Dia. wire". According to a wire gauge chart I found, that would make it 26 gauge wire. But yet , it is slightly smaller than the 30 gauge wire I bought today. Just wondering because I found a place online that sells 30,32 and 36 gauge wire and I am a little worried about what I will get if I order it. The website says this about their 36 gauge wire. "The 36 gauge wire is made of 7 strands of tinned 44 gauge copper wire, and has outside diameter of .016" (.041mm)". I am guessing that this is the same size as the detail master stuff.
-
Thats true, the madmax car was based on a Ford falcon, and I wish somebody did make one because they look awesome. http://upload.wikimedia.org/wikipedia/comm...Ford_Falcon.jpg Has some styling of the 71 mustang and torino cobra. You can actually buy those fiberglass panels to create you're own madmax car. Even that fake hoodscoop. Providing you can get you're hands on a ford falcon. But back to the kit, you did an amazing job. One of my fav movie cars. Jeff
-
http://www.minutemanbuick.citymax.com/cata...638/5225646.htm Is it me , or did full size buick share some of the styling with cadillac? http://www.seriouswheels.com/pics-1970-197...nt-Angle-PO.jpg But again, I dont think these exist either. Jeff
-
All these problems, and NASA is spending millions blasting rockets into the moon to see if there is water in the spacedust.
-
Two things that I use are methyl hydrate and isopropyl alcohol. If you are worried test out diffrent things over something is already painted. Jeff
-
Airbrush guys, which one do you use and why
sak replied to Bridgebuster's topic in Tips, Tricks, and Tutorials
Not a big fan of badger needle bearings. The badger bearing is just a little teflon tube that is pressed into the bore of the airbrush, and if you press it in too hard the needle starts to stick, and if it's not pressed enough, it leaks. Badger says that they will change the bearing free of charge, but it's not really free because it cost money to have it shipped there. My Iwata needle bearing however, is a screw in type, but hopefully it last awhile as this is not listed in any replacement parts lists. -
Airbrush guys, which one do you use and why
sak replied to Bridgebuster's topic in Tips, Tricks, and Tutorials
I recommend that you get a decent gravity feed airbrush, dual or single action. And as far as the switching colors go, changing color cups would be faster but remember that you will have paint remaining inside the airbrush from the previous color. Thats why those guys at the carnivals that airbrush hats usually have a different airbrush for the different colors. For instance, if you just used some black paint, you will ruin whatever color is next. You should always run some laquour thinner or airbrush cleaner thru the air brush after every color in my opinion. I make sure that I only add as much paint that I think I will need to avoid having to pour out the cup to clean it. Even if I know I will need a full cup, I only add 8-10 drops at a time, then run some lacquor thinner thru it, then add some more drops, especially with acrylics, which for me, always seem to dry on the needle rapidly and splatter the paint everywhere. Jeff -
Yes also try an arts supply store, they should have airbrush hoses in many different styles if you decide to get one in the future.