-
Posts
922 -
Joined
-
Last visited
Content Type
Profiles
Forums
Events
Gallery
Posts posted by Ryan S.
-
-
Congrats Mike to you and the whole family!
-
This is super cool, Mark. What a seamless blending of the 2 cars. Very inspired.
-
Wow, beautiful truck. One of my favorite years. Any chassis shots? That stance is perfect.
-
Great advice and your points make a lot of sense for getting a clean, crisp mold. Thanks Mark and Bill. I'll keep this in mind when I start playing around with the molds and casting.
Cheers!
-
I've recently got a resin casting kit from Alumilite to try my hand at casting some parts. My question is, can a mold be made from plated or painted parts or is it best strip them and make a mold from the bare plastic piece?
Thanks for any advice!
-
This is looking great, keep it up!
-
You know, I hadn't considered making it a 2 door. As cool as that would be, it might be more work that I want to take on with this. Mainly due to all the windows coming in a tinted color rather than clear, and I like that as I don't intend to super-detail the interior. If I changed the side windows it would mean making all new glass, except for the windshield. I'll keep it in mind though and if I'm up for the challenge might give it a try. I do have a spare body now I could try it on. So we'll see.
Thank you for the suggestion!
-
I've finally had a chance to resurrect this one and get back to a little building. Something I hope to do more of than I have.
I've decided to start over somewhat with another Magnum body and a better approach with the wheel arches. I didn't like the way it looked after I last left off. I've also removed the old chin spoiler/ splitter and will scratch build a new one that is thinner and looks better.
Not much to look at, at this point, but at least it's something!


-
Looks great. I've always loved these Firebirds and I agree, it's a well engineered kit that goes together quite smoothly. Nicely done!
-
Looks great! Where did you source the wheels?
-
Thanks for the reviews and the comments. I haven't bought or built anything from Moebius yet, but I'm a sucker for the 60's bubble tops so I might have to spring for this one.
-
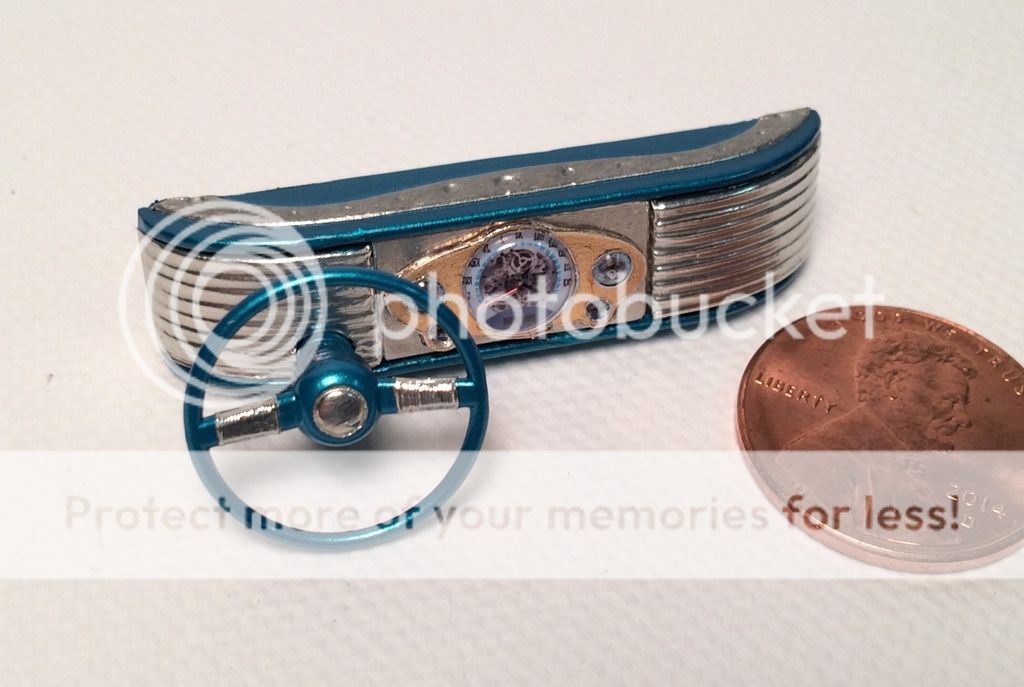
Wrapped up the dashboard last night.. Had to make some modifications, evidently when i mocked it up previously I had the seat much further back.
Had to carefully cut about 1/8" off the back of the dash, to make it all fit and look natural.... eek
Then I re-did the the gauge panel, cut out a new bezel and used some brass BMF on it, glued that on some printed gauge faces I drew up in illustrator.. I cut a new piece of .020 and covered it in BMF and glued the brass bezel and faces to it. Once that was in place I drilled out the center of the speedo for the needle, and added a piece of red armature wire to create the needle. Final step was to add the domed lenses, those are made from craft store 4mm and 7mm googly eyes, cut the googly part off and used the clear domes. Pretty happy with how it turned out... especially considering everything here was made from raw materials with the exception of the steering wheel.
That gauge looks amazing with the "exposed" gearing showing. Very nice touch on that. The whole dash is a work of art unto itself.
-
Sorry for your loss Bill. I'm a cat person too, but it's always hard to lose any pet.
-
Amt 32 phantom vickie has the front suspension in 1/25, the revell 37 ford has it in 1/24. No 4-link in either though. I think one of the revell willys has both however.
-
You're off to a great start lots of cool work so far. a rootbeer metallic with red accents might look sweet on this.
-
Your wife has a great eye for detail and clean building and kudos to her for coming out with such great results on a difficult kit!
Can you tell us about the air filter? Was it scratchbuilt or is that an aftermarket piece. It looks great.
-
Nice build of a cool little kit. Thanks for sharing Mark.
-
It's not quite right for a replica Back to the Future train, but would still make a cool piece in a BTTF diroama, just the same.
Here's more info on the BTTF train: http://backtothefuture.wikia.com/wiki/Locomotive_131
-
Looks great so far. What clear did you use?
-
Really awsome job on this one. Great detailing and I like the color choice.
-
Brilliant execution on the luggage gas tank. That is such a cool touch. This build is a pleasure to watch!
-
Certainly outrageous!
-
I'm saying real, but there is a real photoshop look to the picture. Cool car though.
-
The kit featured in this thread came from Fundemonium Toys, Hobbies & Games in Rohnert Park, California; and at least one other participant here has gotten it from his LHS.
The difference is whether or not your LHS is a Revell Preferred Partner (the RPP reference I made in post 1). The RPP shops tend to get the klits earlier as Brett explained before, and "It's not out yet" might just be the company line from the shop, the distributor, or Revell.
I don't mean to go off topic, but I had no idea there was a hobby shop over in Rohnert Park. Must be fairly new! I live in Napa and having Loose Caboose Hobbies is great, but other options are good to know of. Thanks Chuck.


Twisted Fish - 3/13, main pieces put together.
in WIP: Model Cars
Posted
Some nice work going on so far with this. Nice job on the corrections you've made. It will improve the over all look.
Beware of the hood fit with the shaker scoop. It's not great and it's very tricky to get the hood to close even most of the way with the scoop in place on the engine. If you haven't yet, do A LOT of test fitting with the body on and the engine in and do it before body paint to avoid any major issues.
Keep it going!