
mario lucchini
-
Posts
28 -
Joined
-
Last visited
Content Type
Profiles
Forums
Events
Gallery
Everything posted by mario lucchini
-
 From Dan Megard, very good friend and owner of the Scale Motorcars Forum.... Cheers Mario
 -
More reinforcements for parts attaching.... http:// Monocoque painted stippled aluminium and the dashboard scale bolted.... http:// http:// http:// http:// http:// http:// Thanks for looking............ Mario
-
New additons to the Lola, specially made hardware located in the rear bulkhead to receive some oil pipes...they screw & unscrew, so we can paint afterwards... http:// http:// Note the special attaching flange on the upper/right of the picture... http:// Attaching miniature Allen bolts holding the fuel tanks to the monocoque structure... http:// http:// http:// Continued inmediately.................. Special reinforcements all over the monocoque structure to receive varied parts scale bolted.... http:// http:// http:// http://
-
Hey Harry!............beautiful Alfa, though I've seen it before.... You should have listened to Paul Koo and moved the engine backwards 10 mm....no more problems with the hood fitting! I have the Pocher Sedanca Rolls started and the Star of India virgin in the box, once you finish your Mercedes we could go Rolls Roycing together.... Cheers............ Mario
-
The front bulkheads and the special reinforcements made, so scale hardware may be used safely in order to dissassemble things any time you want.... All holes are allready drilled & tapped accordingly.... http:// http:// http:// http:// http:// The front bulkhead and some of the many scale bolts and nuts used to keep things together............. http:// http:// Also at this stage, all parts are sanded, puttied, etc, preparing them for the primer coats and final paint..... Cheers Mario
-
The front bulkhead, with every lighting hole opened and chamfered...scale bolt & nut assembly... Part of the engine being assembled... To be continued after my homework for the client!... Mario
-
Busy as I am with my client, assembling the Fiat 806 and some Protar motorcycles in 1/9 scale, I couldn't resist buying from a friend the most sought kit of the Lola T 70 Mk lll coupe... The kit was already begun but with little work done ...Thanks for that!!!....The kit is most complete, every part flawless and even the box is in pristine condition, I was very lucky with this one..... I managed to dissasemble everything without much destruction and bagged every bit & piece...Now comes the sanding and deflashing part, which I enjoy a lot, besides being a boring stage, it makes me feel like an archeologist discovering something important! I've googled this kit and there are very few offerings in Ebay, with some prices that knocked me out! Anyway, here are some images of the kit itself................ The original box with a beautiful artwork... The box with all the bagged goodies inside... I couldn't resist assembling something too, so..............part of the engine bulkhead, after carefully studying the scale hardware locations... The spare tire carrier and its tube structure being held by scale bolts and scratchbuilt flanges... Continued inmediately.... Mario
-
Since I began the assembly of my client's Protar Fiat 806, I became more and more involved with Protar kits... They are extremely well done, solved and complete...the motorcycle kits are of very famous machines, lots of them of the Golden Era, they have many metal parts and are becoming very difficult to find... My client brought from Italy a lot of them, which I'm buying from him little by little... Tarquinio Provini, a great Italian motorcycle champion, when retired began the production of these kits...if you join the first 3 letters of his name and surname;inverted; you have the "PROTAR" brand... Sadly, as happened with Pocher, these kit's production ceased many years ago due to a lot of factors...so, they are becoming collectors items and hence their prices will begin skyrocketing very soon... Enough for the story, let's go back to the kits....all in scale 1/9, they are big enough for my tastes and of course they are potentially very prone for superdetailing....they are detailed from the box already, but I will work them to excruciating detailing from now on..... My first motorbike kit will be the Suzuki RG 500, a very famous Grand Prix machine that was produced by the factory in the mid 70's, and it had among other curiosities a 2 stroke, 4 cylinder, water cooled engine... It won a lot of competitions till the 80's and was raced by very famous pilots of the time... Let's begin with the frame, which you can see already cleaned, deflashed (metal parts comes with a LOT of it!), and with the first coats of primer...the frame is being assembled only with scale hardware... The rear oscilating frame has received the same treatment and is also assembled with scale hardware... The front lower part of the front fork's dampers, semi-polished and with the brake calipers bolted in place... Part of the front fork's parts...notice the specially built bolts, washers, spacers, etc... http:// I was warned of no more picture capacity, so I'll leave now till the next post... Thanks for watching... Mario
-
New parts added to the Fiat....handmade brass leaf suspensions for the rear train... The kit's suspensions are plastic and besides the asthetics, no way they will support the model's weight... The ones I made are from 0.4 mm thick brass plate, cut to 4 mm width from a K&S 1/4" wide strip, the remnant of the cut was used to make the leaf pack ties... Once cut, I heated the leafs to obtain a brownish color and inmediately submerged in W 90 oil, this gives them a certain appropiate elasticity...they were then polished and degreased to be blued before final assembly with cold gun blue... Here you can see them mounted on the frame....notice the real wood floor made with wood veneer table by table... The floor was treated with a slight wood stain and then hand rubbed with Tung oil... Thanks for looking... Mario
-
Hey Harry! It's 90% metal and the rest is plastic, mainly the engine parts....it is a delight to build, though you need a lot of elbow grease!! Cheers Mario
-
The brake drum painted as foundry aluminum... A finished wheel seen from both sides... The 2 rear wheels ready to mount on the rear axle... The frame sides being polished & cleaned... The frame assembled with only scale hardware...the naked engine block in place...
-
A client and friend of mine gave me this kit to assemble & superdetailing it... At first I looked at it as one more small scale kit (I'm used to 1/8 scale), but as I moved on in the assembly and knowing the kit better I was more & more surprised with the quality of Protar's product and its great potential... I searched the Web as alwayas do, trying to find as much data as possible on the prototype, but alas, little I found... However, lets see some images... The wheels are assembled in four layers and a central hub...this is how they came out of the box...lots of flash to clean here!!.. One layer cleaned and polished, ready to receive primer & paint... The hub as it comes... The hub being trued & polished on the lathe... The hub ready... One wheel set complete & painted.. Continued ....
-
The 16 ventilation holes made on the block's rear upper section as in the prototype, including micro wire mesh ... The clutch & kickstarter cover out, showing the hardware and the special reinforcements applied to the block to allow drilling & tapping to receive the hardware... The left cylinder being unscrewed from its position on the block... Both cylinders out...1.5 mm round head brass screws were used here, attached to special reinforcements on the block which were tapped accordingly...these screws are way out of scale, but not to worry, they will never be seen once the model is assembled... The reinforcements before mentioned to receive the cylinders... The front cover out with its hardware... The reinforcements made on the central block to receive the intermediate cover... The intermediate cover with its attaching non-scale hardware, used for the same reasons as above.... By the way, all the parts shown have at this stage, received at least 3 coats of primer with sanding in between.... Still having a ball....thanks for looking. Mario
-
We continue our restoration working on some elements of the engine block... A lot of effort was made to insure the engine's block assembly by means of scale hardware, avoiding the use of glue as much as possible...this of course allows the dissasembly of elements any time, great help for fixing details and painting of separate parts... Some images of the bare engine block and cylinders mounted on the frame.... The engine has been attached to the frame by means of specially made 2 mm studs, with nickled hex nuts, for which the holes in the engine block were lined with brass tube, drilled and tapped 2 mm... Back view of the engine showing the clutch and kickstarter cover which has been already treated with polished aluminum paint (I'm using Marson's chrome spray for this effect) Here you can see the 2 mm studs holding the engine to the frame...the 2 front studs are short, the 2 rear studs are longer since they hold not only the engine but also the side pedals and the silencer brackets... http:// A walk arround of the engine out of the frame... The front cover held in place with scale hardware, including scale Allen bolts just as it is in the prototype... The clutch and kickstarter cover in place with rectified and polished scale hardware... No more place for pics....to be continued :blink: Mario
-
Hey Don!............I'm far away from the painting stage yet....too busy drilling & tapping hundreds of holes for the scale hardware.... however I've been thinking on colors myself...difficult choice.... I personally think the orange version is a little far away from serious for this wonderful piece of machinery....I agree with you in the dark brown... nevertheless I'm thinking in other liveries.... What's up buddy?.... Cheers Mario
-
A beautiful model of a BMW R 90 S motorcycle, from a Tamiya kit at 1/6 scale standing on a high shelf, came plummeting down during the earthquake... This is what I could find after hours of crawling under desks on the floor... http:// This model was assembled by a son of mine when he was 13, luckily he used styrene cement which as we all know doesn't work very well, so more than destroying or breaking parts, it just disassembled.... After looking arround in the Web, I discovered this is a long time discontinued model, whose prices have been skyrocketing on Ebay, besides it's a very detailed kit, with lots of very well molded parts and with lots of potential for superdetailing.... So I decided to restore it using a Pocherlike approach....why not?....better than crying over the bits & pieces!.... I went searching for prototype data and found a lot of it.... Here's the prototype cycle... And here's a page of the kits manual... We begin the restoration then.....first thing was to completely dissasemble the wreckage...trying to break as little parts as possible.... The first goal was to have the frame assembled correctly, squared, thoroughly sanded and given many coats of acrylic automotive primer....all holes were redrilled and tapped where needed... Some images of the frame, which is yet to be sanded again...priming is essential for detecting surface flaws, besides having a good base for the final color coats... I'm having a real ball with this affair....thanks for looking.... Mario
-
Harry, this Merc is a jewell!...........I have the same kit in standby....if you have more pics or reference photos, I would be eternally grateful if you could mail them to me... Best regards & thanks....................... Mario
-
I ran out of pics space, so I continue here the engine's stand affair... More of the finished stand... The finished stand painted and scale bolted to the wooden base which was oiled with Tung, polished after 48 hours... For all the Pocher kits parts, I use automotive acrylic lacquer applied with airbrush, after a lot of primer coats sanded in between...in this case, the color used was the factory Alfa red, which was not easy to achieve, lots of trial and error samples!!! Once achieved, this is the definitive color to be used on the model... Cheers...............Mario
-
Let's go back to the beggining of the Alfa build, which I started with the engine... I assembled the 2 block halves using rectified 2 mm Allen bolts, after a long session of sanding & rectifying the plastic parts (By the way, Pocher plastics are VERY hard, which is an advantage when drilling for tapping threads, but not when sanding! ) As in all my subassemblies, this are joined with scale hardware so I can dissasemble everything anytime....sometimes special reinforcements have to be made in order to drill holes for threading purposes...this is studied beforehand using the reference photographs... This is the block front receiving the engine's front cover which is a metal casting, the appropiate holes were drilled and tapped...the casting was rectified and polished... The front cover in place...of course, nothing is painted yet, just sanded & rectified...later, everything is taken apart and every bit and piece are primed & painted...as you can see in the pics, there's a lot of sanding pending!! Here you can see some special scale hardware holding everything tight and in place!...you can also see the metal cylinder liners held in place by the 2 block halves...good Pocher engineering! http:// A plan view of the block with the front cover, cylinder liners, and oil pan in place... One of the most useful accesories one can make to ease the pocher kit assembly, is to make a good engine stand...I did a little Web search and found some pics of the original stand used in the Alfa factory, so back to Autocad and made some scale drawings, which printed and used as templates were put to work...I used 0.8 mm thick styrene sheet to do the whole stand... Some stages of the styrene formers... The curved parts were formed over a wooden template, using a heat gun, everything was glued using Medium CA... The finished stand, bolted to a wooden base...the engine block in place...this is a very practical "third hand" for working on the engine from now on...... Thanks.... Mario
-
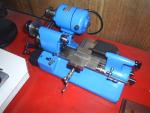
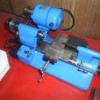
How about making some useful tools for our hobby? Sometimes the market doesn't have what you want or need, so my personal feeling about this, is DIY! I needed a third hand to grab very tiny parts for filing, drilling, etc... I looked arround the Web for ideas, and came up with the following "Minivise" I designed and made with some scrap brass and some chunks of black acrylic.... The greatest advantage of this vice is that it rotates 360º both in the horizontal & vertical planes....besides, I mounted it in a bigger swiveling vise to have the best of both worlds... The Minivise The parts and bits... The minivise mounted on the bigger vise... The holes seen in the jaws upper edge, are for inserting short 3 mm diameter steel pins to grab ackward formed parts... This apparatus tends to be very user friendly, hee, hee.............. More DIY tools coming next... Thanks Mario P.S. If anyone wants to try his hands in toolmaking, PM me for the plans...
-
Harry and Don greatly exaggerate...anything I can do, anyone can also do with lots of perseverence, careful planning and a little bit of luck... Taking Don words about making your own scale fasteners, I'm showing a pictorial sequence of making yourselves a scale bolt, hex head, 2 mm AF in brass.... First a 2 mm AF hexagon brass bar is grabbed in the 3 jaw chuck of the lathe, drilled with a 1.6 mm drill held in the tailstock...notice the slight chamfer in the bar made with a jewellers file (that's for looks!...) http:// Second step, using the 2 mm tap held in the taistock, headstock rotated by hand, carefully doing the thread on the bolt's head... http:// A 2 mm brass rod is held in the collet chuck to ensure concentricity and being tapped using a clockmakers die...(The one shown can make threads from 0.3mm to 2.5 mm diameter threads in steps of 0.5 mm) http:// The threaded stud thus made is cut to the needed length, and is held on the tailstock and fed by hand slowly rotating the headstock to ensure absolute concentricity between the bolt's head and the foot thread...I first dabbed some Loctite in the stud... http:// The threaded stud is held in the headstock and rotating rapidly, is given a touch with a Dremel sanding drum to round its point... http:// The brass bar is held in the headstock once more, and a "V" tool is used to turn the bolt's head...you can also preform the bolt's head as needed at this stage... http:// Here, the parting tool is definitely separating the bolt's preformed head from the bar... http:// The complete bolt is now reversed, held in the headstock and given its final form and then polished.. http:// The finished product, with the added satisfaction of telling friends "I made it!".... http:// http:// WHOA!! Mario
-
Here's a sequence of pictures showing the Alfa's mainframe and the central body after sanding and fitting (Many hours but worth the effort... ) The subassembly shown has the complete mainframe,the central body & tail, the naked engine block, the floorboard, the firewall and the seat, already upholstered in Capretta leather....I'll go into the seat's detail later... You can see the scale hardware joining every part, for which holes were drilled and tapped and studied against the prototypes pics to maintain scale accuracy... The big advantage of this, is that you can dissasemble everything any time you want too...for correcting things, painting or simply add more details, hee, hee... Also note the new position of the engine's mounting bolts, which in this particular kit MUST be moved backwards 10 mm, this is the only way everything will fit OK later... Besides from the scale hardware, bought or homemde, I used some 2 mm Allen bolts to eliminate completely the use of the Pocher screws which are weak, ugly and non-scale... Thanks for looking... Mario
-
Thanks for your welcome Harry and Rick!...Hope I can make a little contribution here... Speaking of scratchbuilding parts for the Pochers, her's one example....homemade spring suspensions... The Pocher Alfa's kit suspension is made from hard rubber...ugly, non scale and unable to support the finished kit's weight...so, I scratchbuilt them from brass strips 1/4" wide... I first took precise measures using the kit's parts, and then draw them in 1/8 scale in Autocad, mighty useful when you print the drawings and use them as templates...I stick the drawings to the brass sheet using 3M's spray contact cement...this is especially useful to locate precise hole templates for drilling holes... Once the part is drilled and cut, you simply soak it in Zippo's lighter fluid and everything is spic & span... Then the fun begins when you spend hours filing, sanding, rectifying, beveling and polishing every part you made...but as a superdetailing freak I am, I enjoy it....besides, a self made part which ends beutifully made is most gratifying!! The first pics shows the parts on top of the Autocad plans and the last ones, the finished product... You can see the kits hardware used on the finished leaf springs which are OK.... These suspensions were later blued, using a cold gun blue used in firearms made by Outers, which gave the parts a beautiful aged patina but always showing the "metal look", which make these parts stand out when installed on the model... Thanks for viewing... Mario

-
I registered in this Forum a long time ago, but haven't posted anything in a long time... Thanks to my good friend Don Garret, AKA Grandpamcgurk, I'll be posting here a series of builds I call "Making the most of Pocher Kits" I bought my first Pocher kit about 3 years ago and got addicted inmediately seeing the enormous potential these kits have for superdetailing.... Nowadays, I'm working on the Alfa 8C Monza, The Rolls Royce Sedanca, the Rolls Royce Star of India, the Mercedes True roadster and the Bugatti T50.... One of the things I've managed to achieve is that I assemble this kits using no glue at all, but only scale hardware, scratchbuilding a lot of parts and superdetailing at a psichopatic level.... As a sample, the pics shows some engine images of the Alfa Monza, which is almost ready...the first 3 pics shows the engine on its stand, and the last3 pics shows the engine in its craddle, the unpainted frame... Thanks Mario
-
[img


