eferrari
-
Posts
112 -
Joined
-
Last visited
Content Type
Profiles
Forums
Events
Gallery
Everything posted by eferrari
-
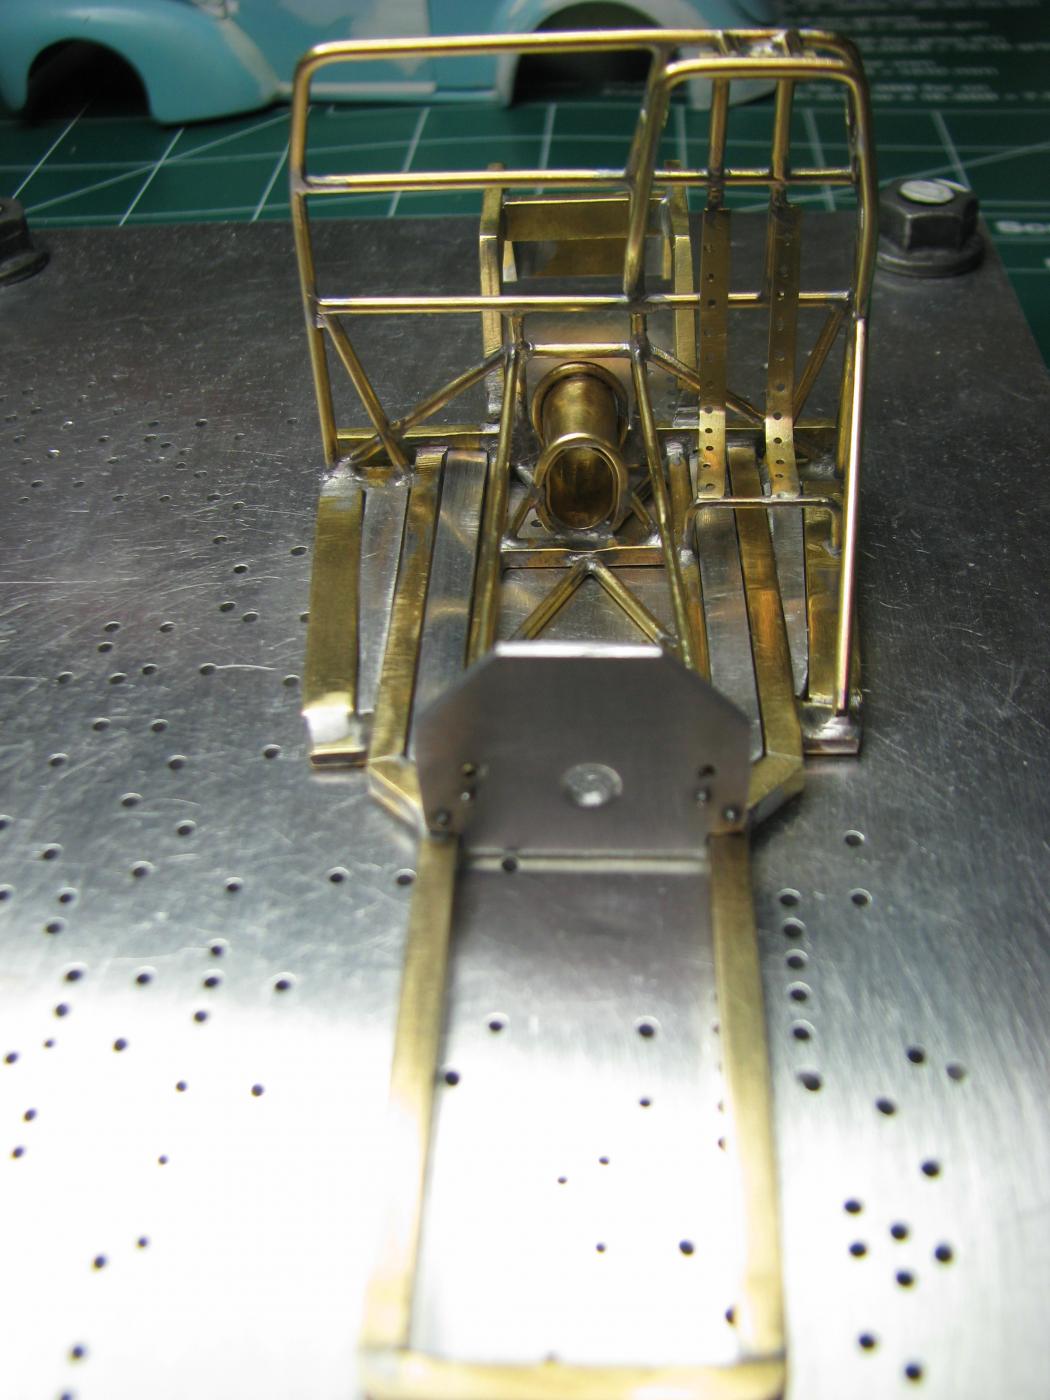
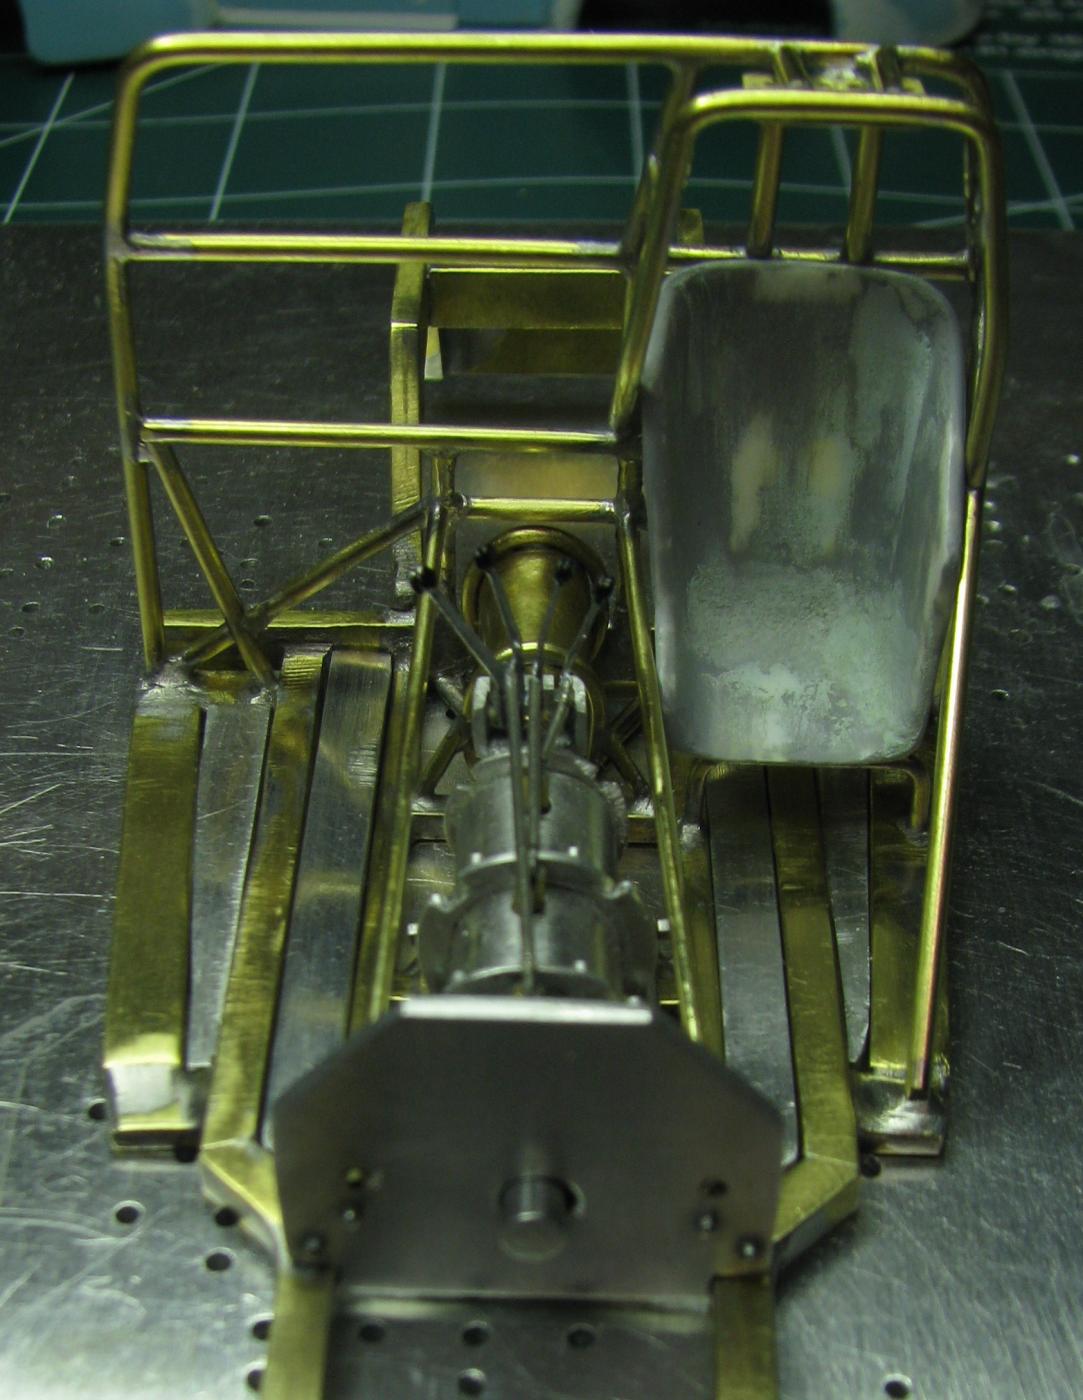
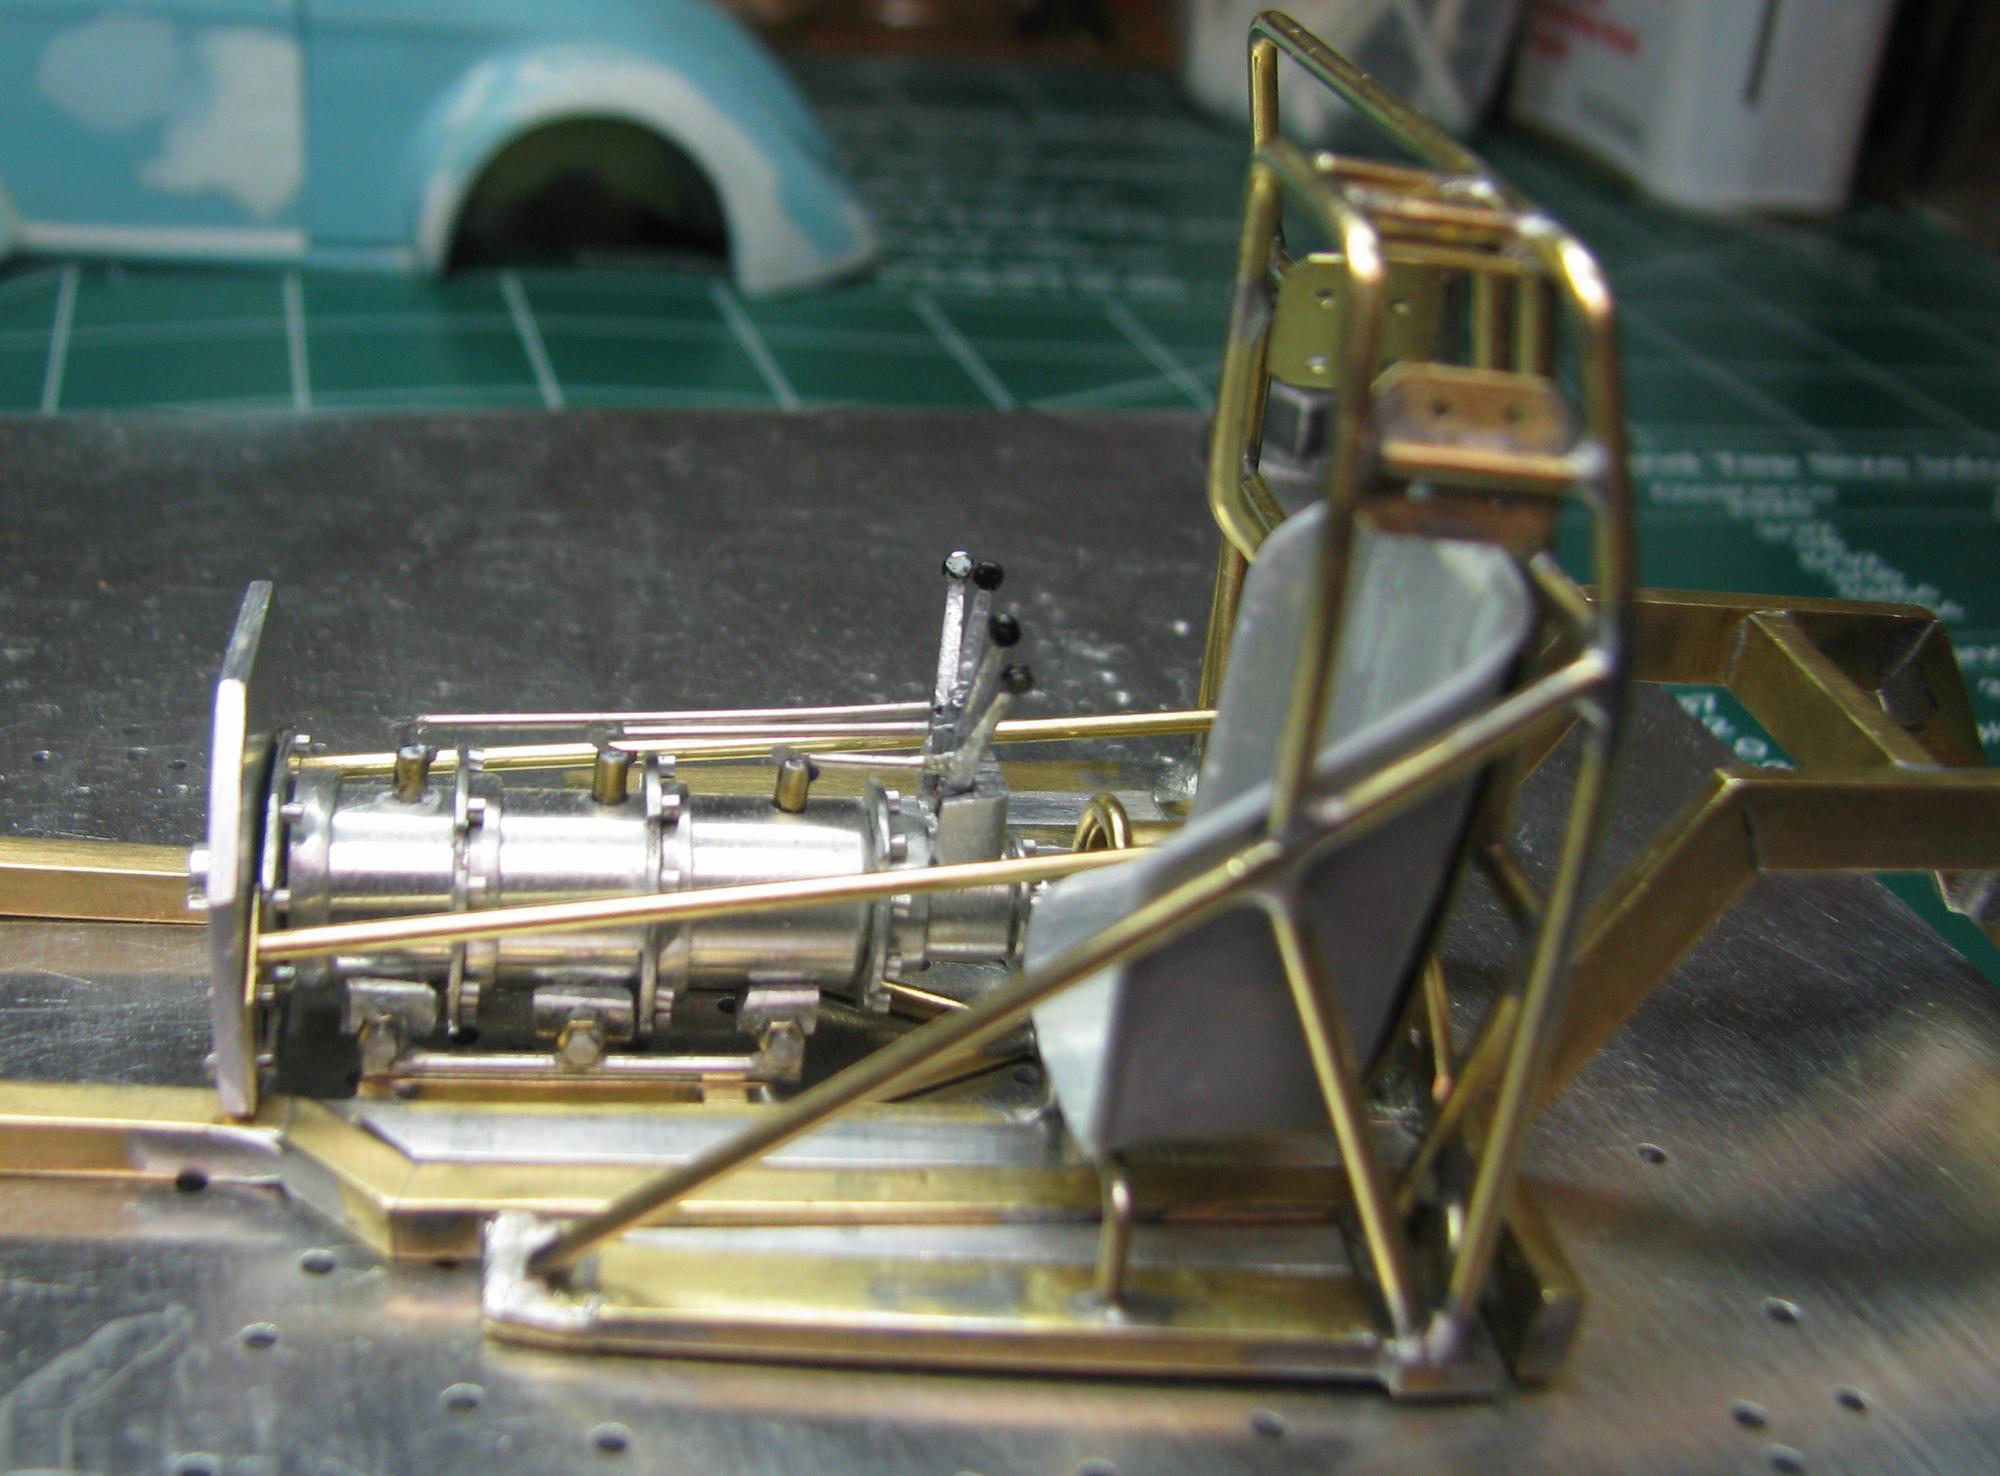
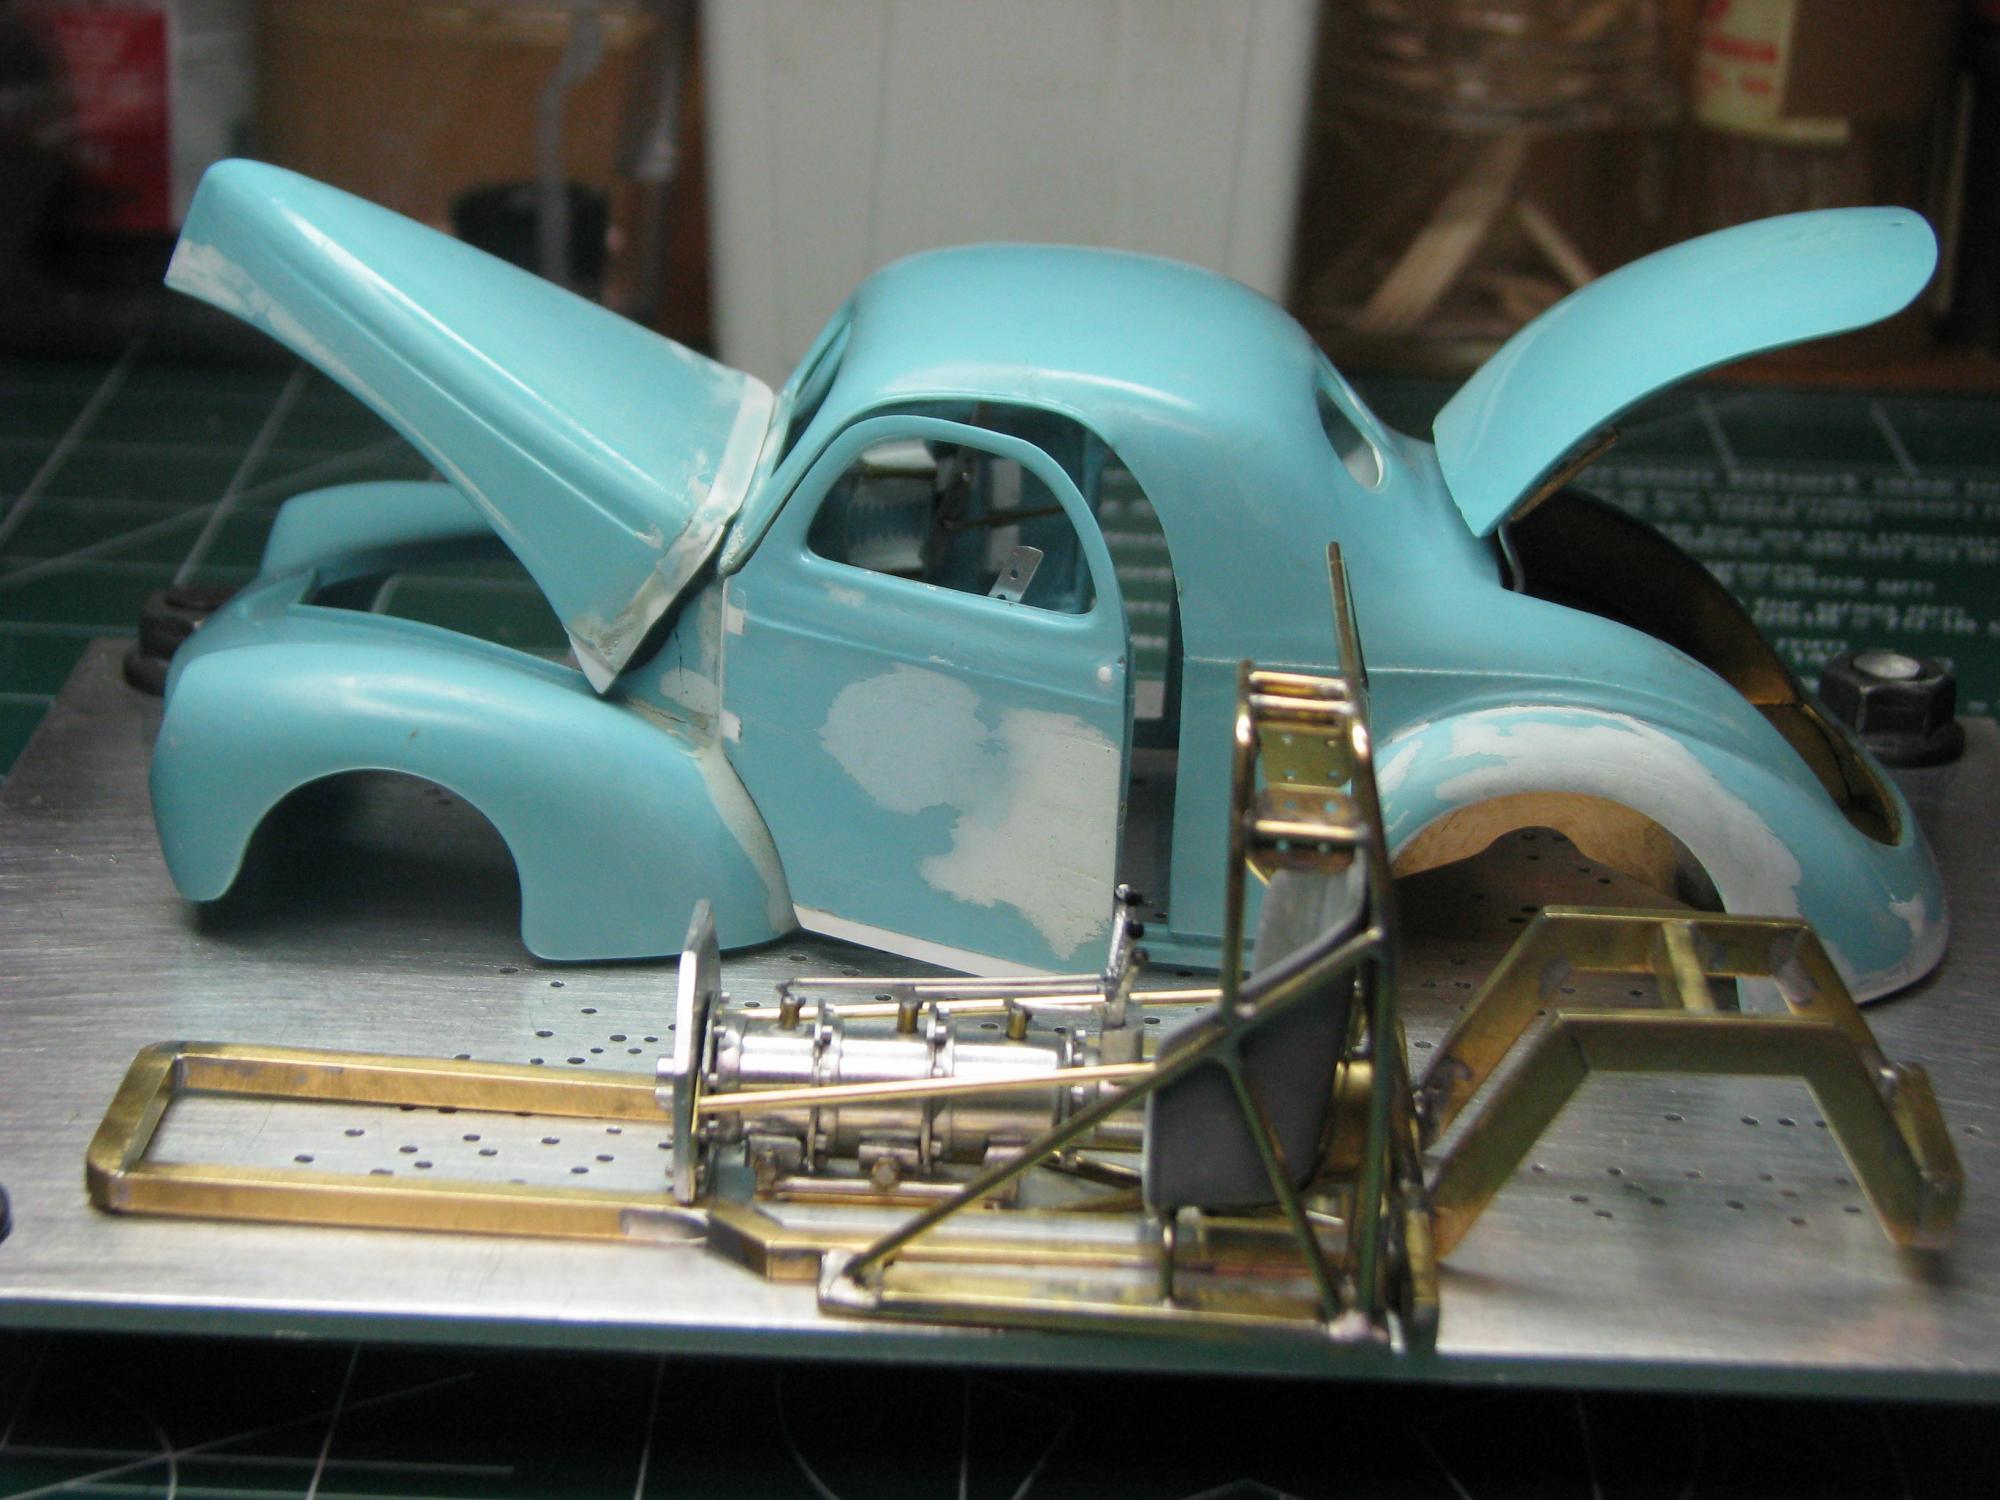
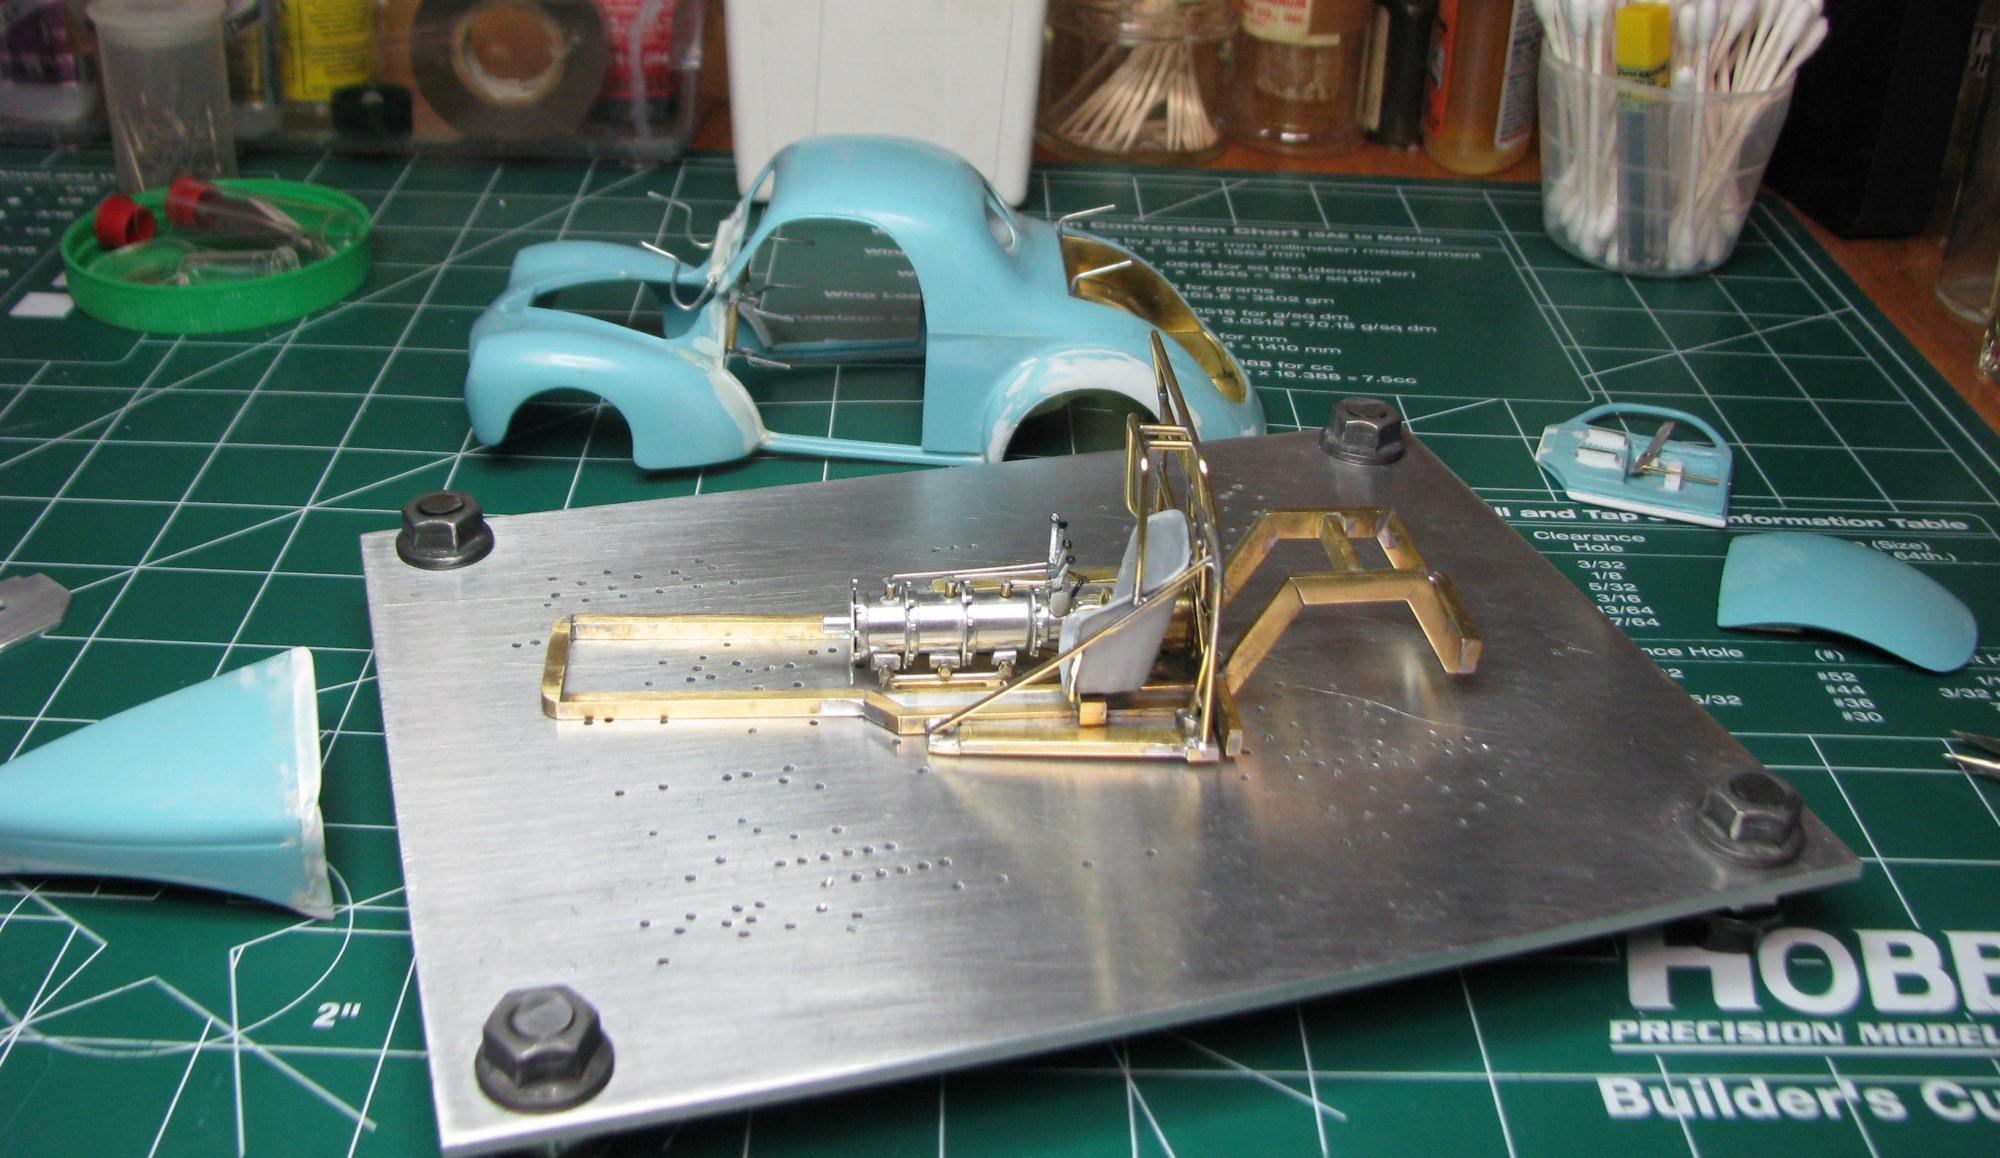
I appreciate everyone's interest in my work including Michael, Gergo K, Dave, Le Roy, Bob, Bruce and Rob. Michael, the locking door idea came from a builder that was building a 1/16 model. It was a struggle in 1/25 scale. Here are some picks of my latest work. I re-did the seat frame. The other version just would not work out. Thanks for your interest.

-
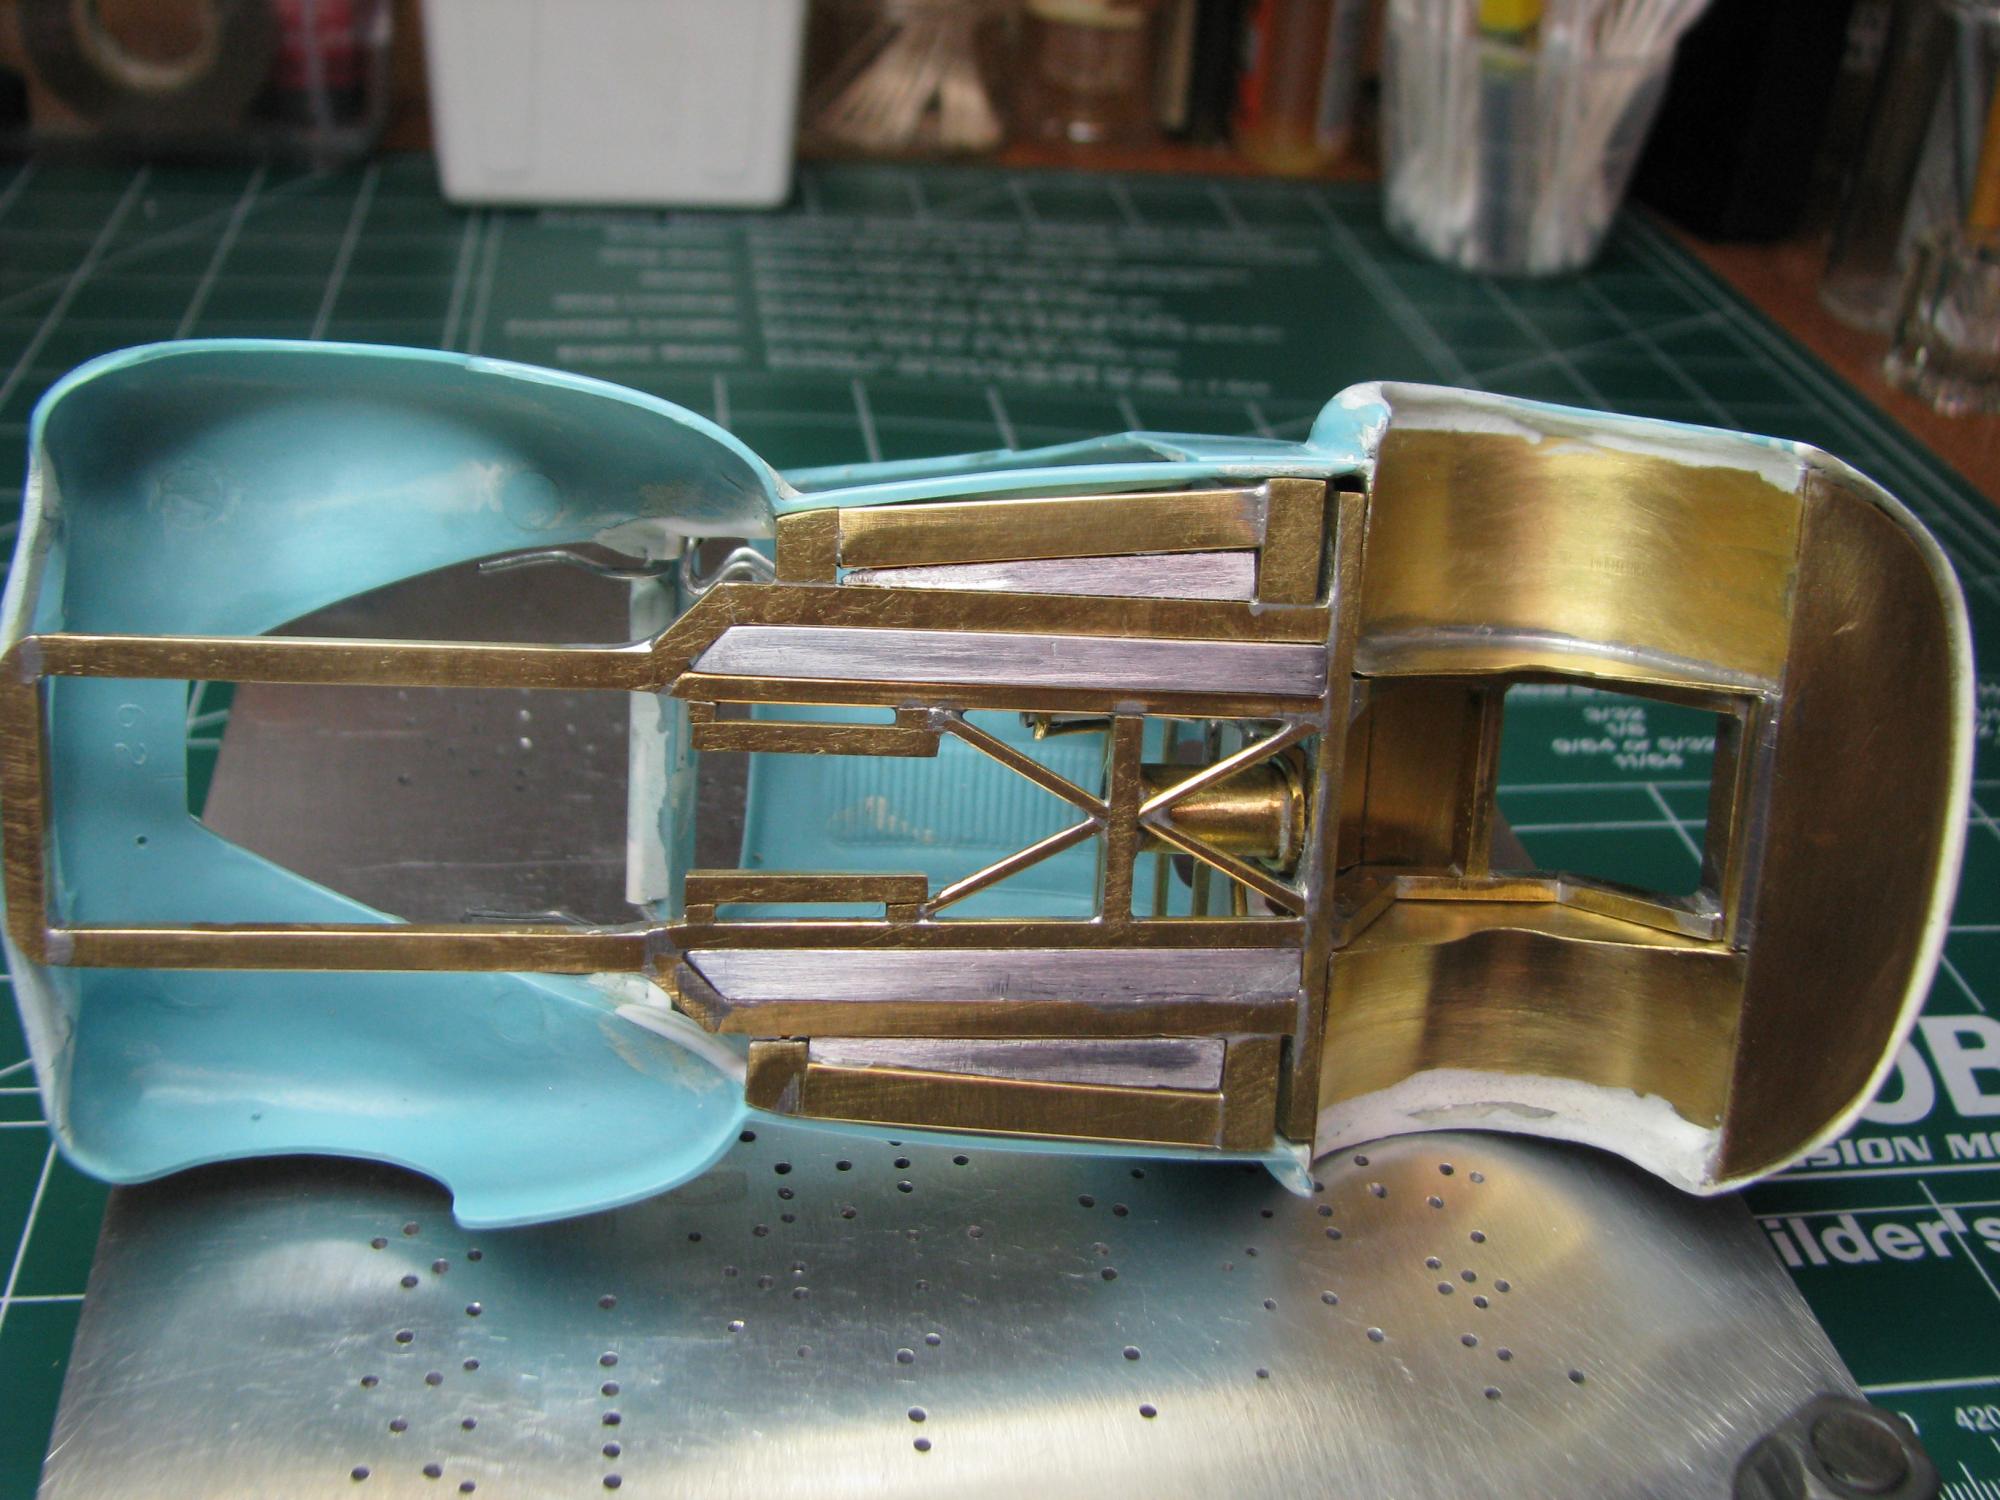
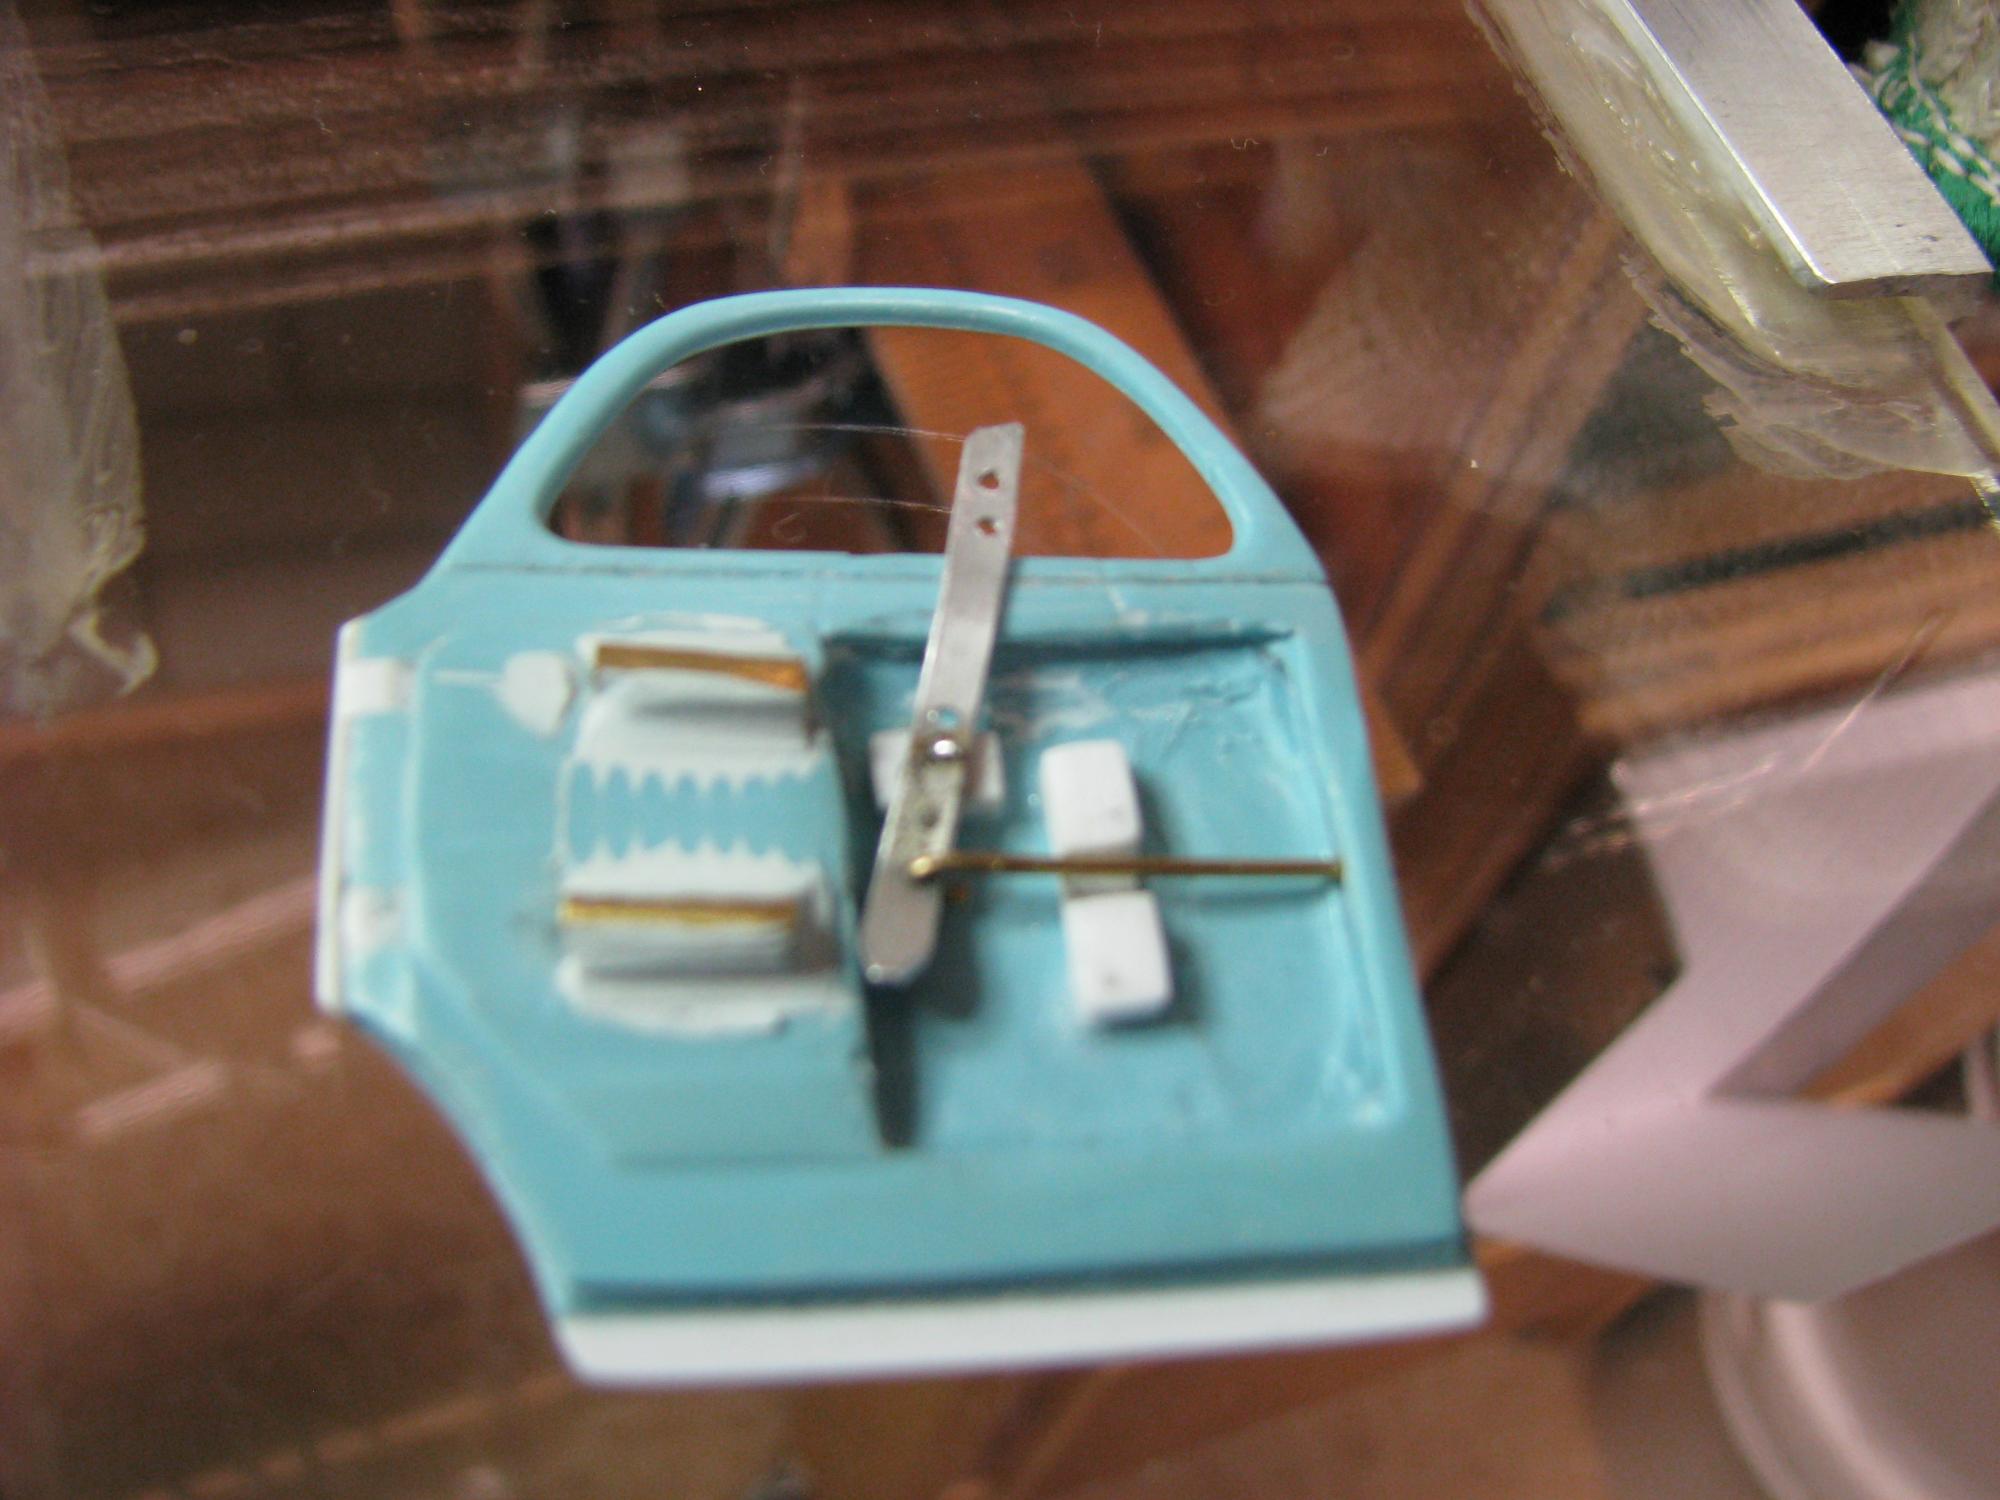
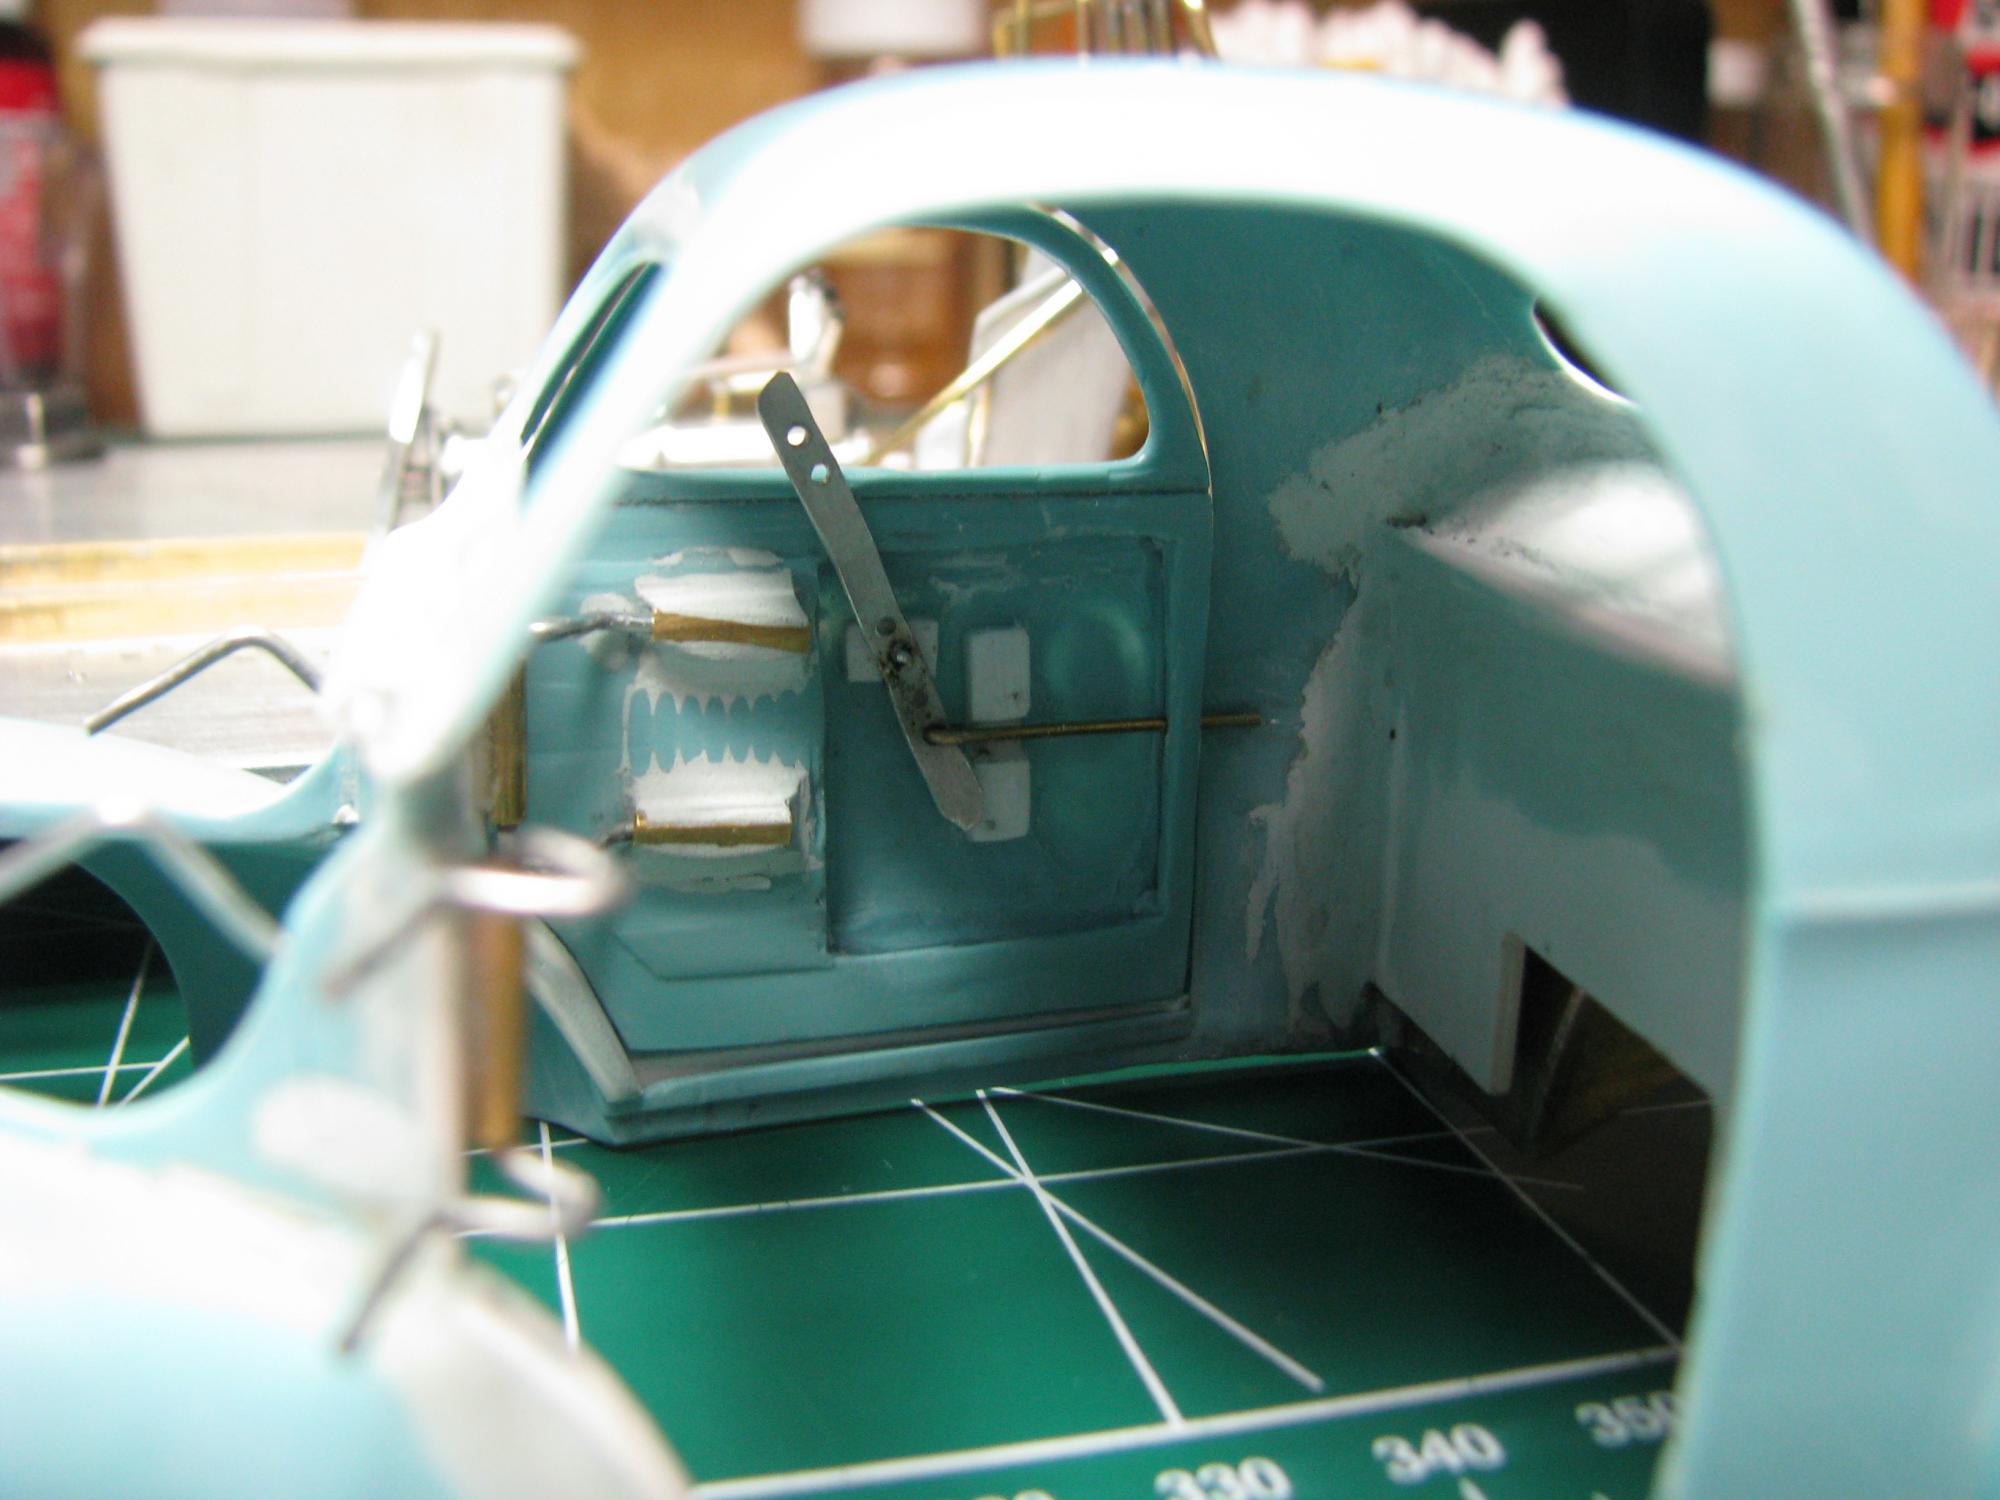
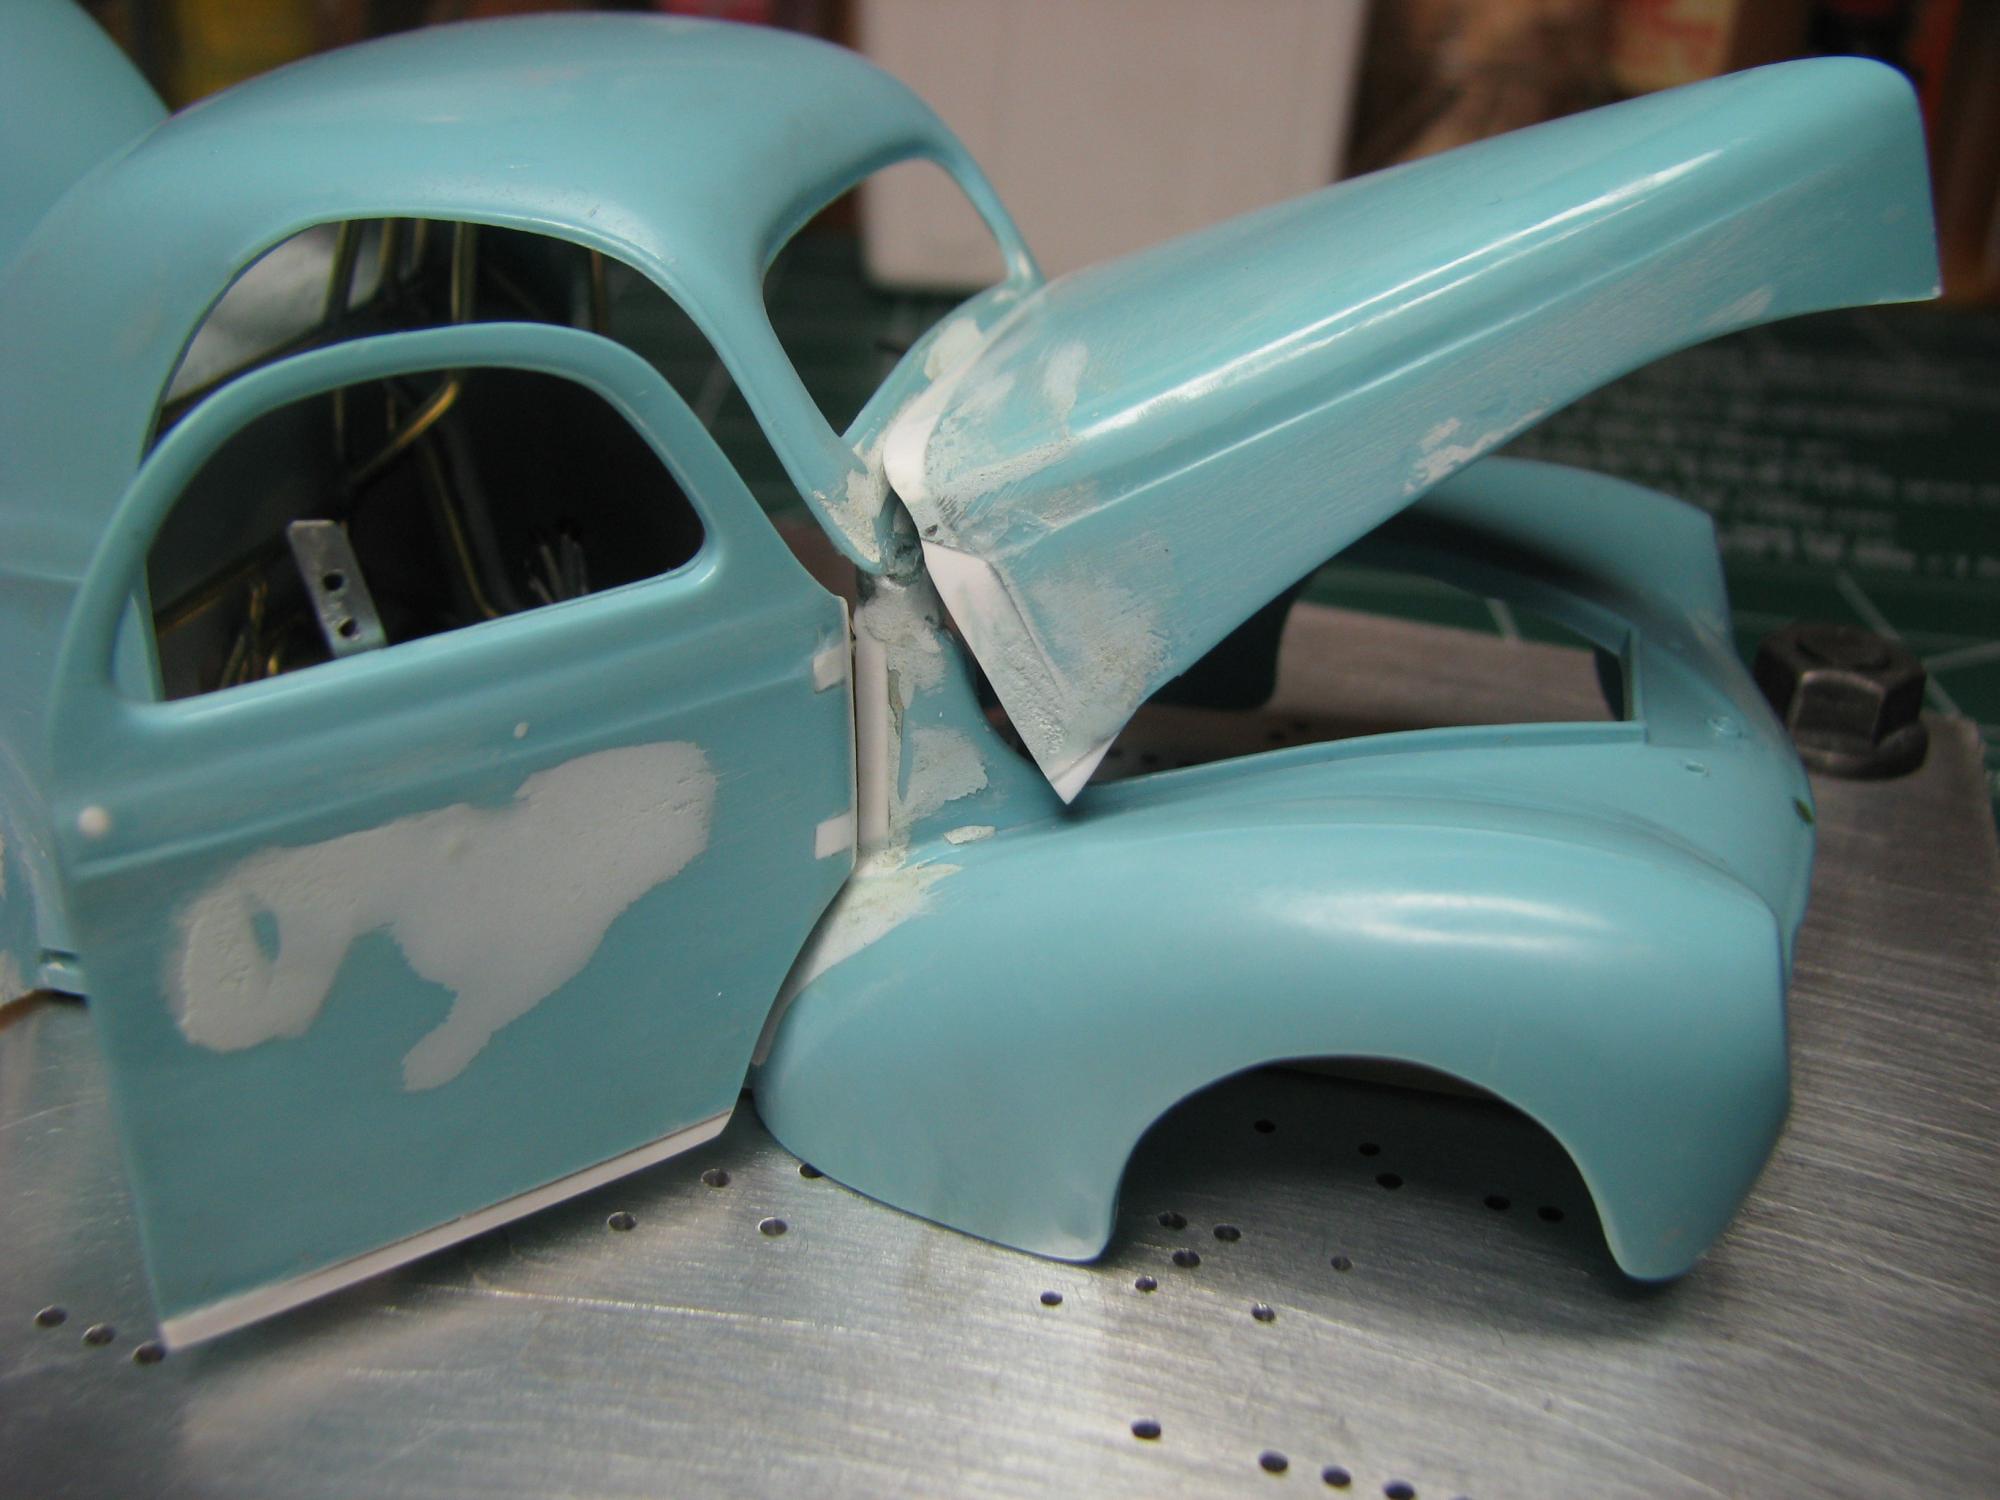
Thanks for the interest in my 41 Willys,and the comments by Tony, Dave, Scott, Ray, Michael, Stephen and Gene. Thanks for following up on my build Randy I still watch with astonishment the great work you do. Tim thanks for sharing your enormous workmanship and machining skills. Stephen I did make the jig. I also use Ceramic Honeycomb Perforated Board. Here are some new images of my latest work. I don't like the seat frame so I am re-doing it. The doors, I made so they lock. I changed the door and hood hinges. The frame fits so it can be removed.
-
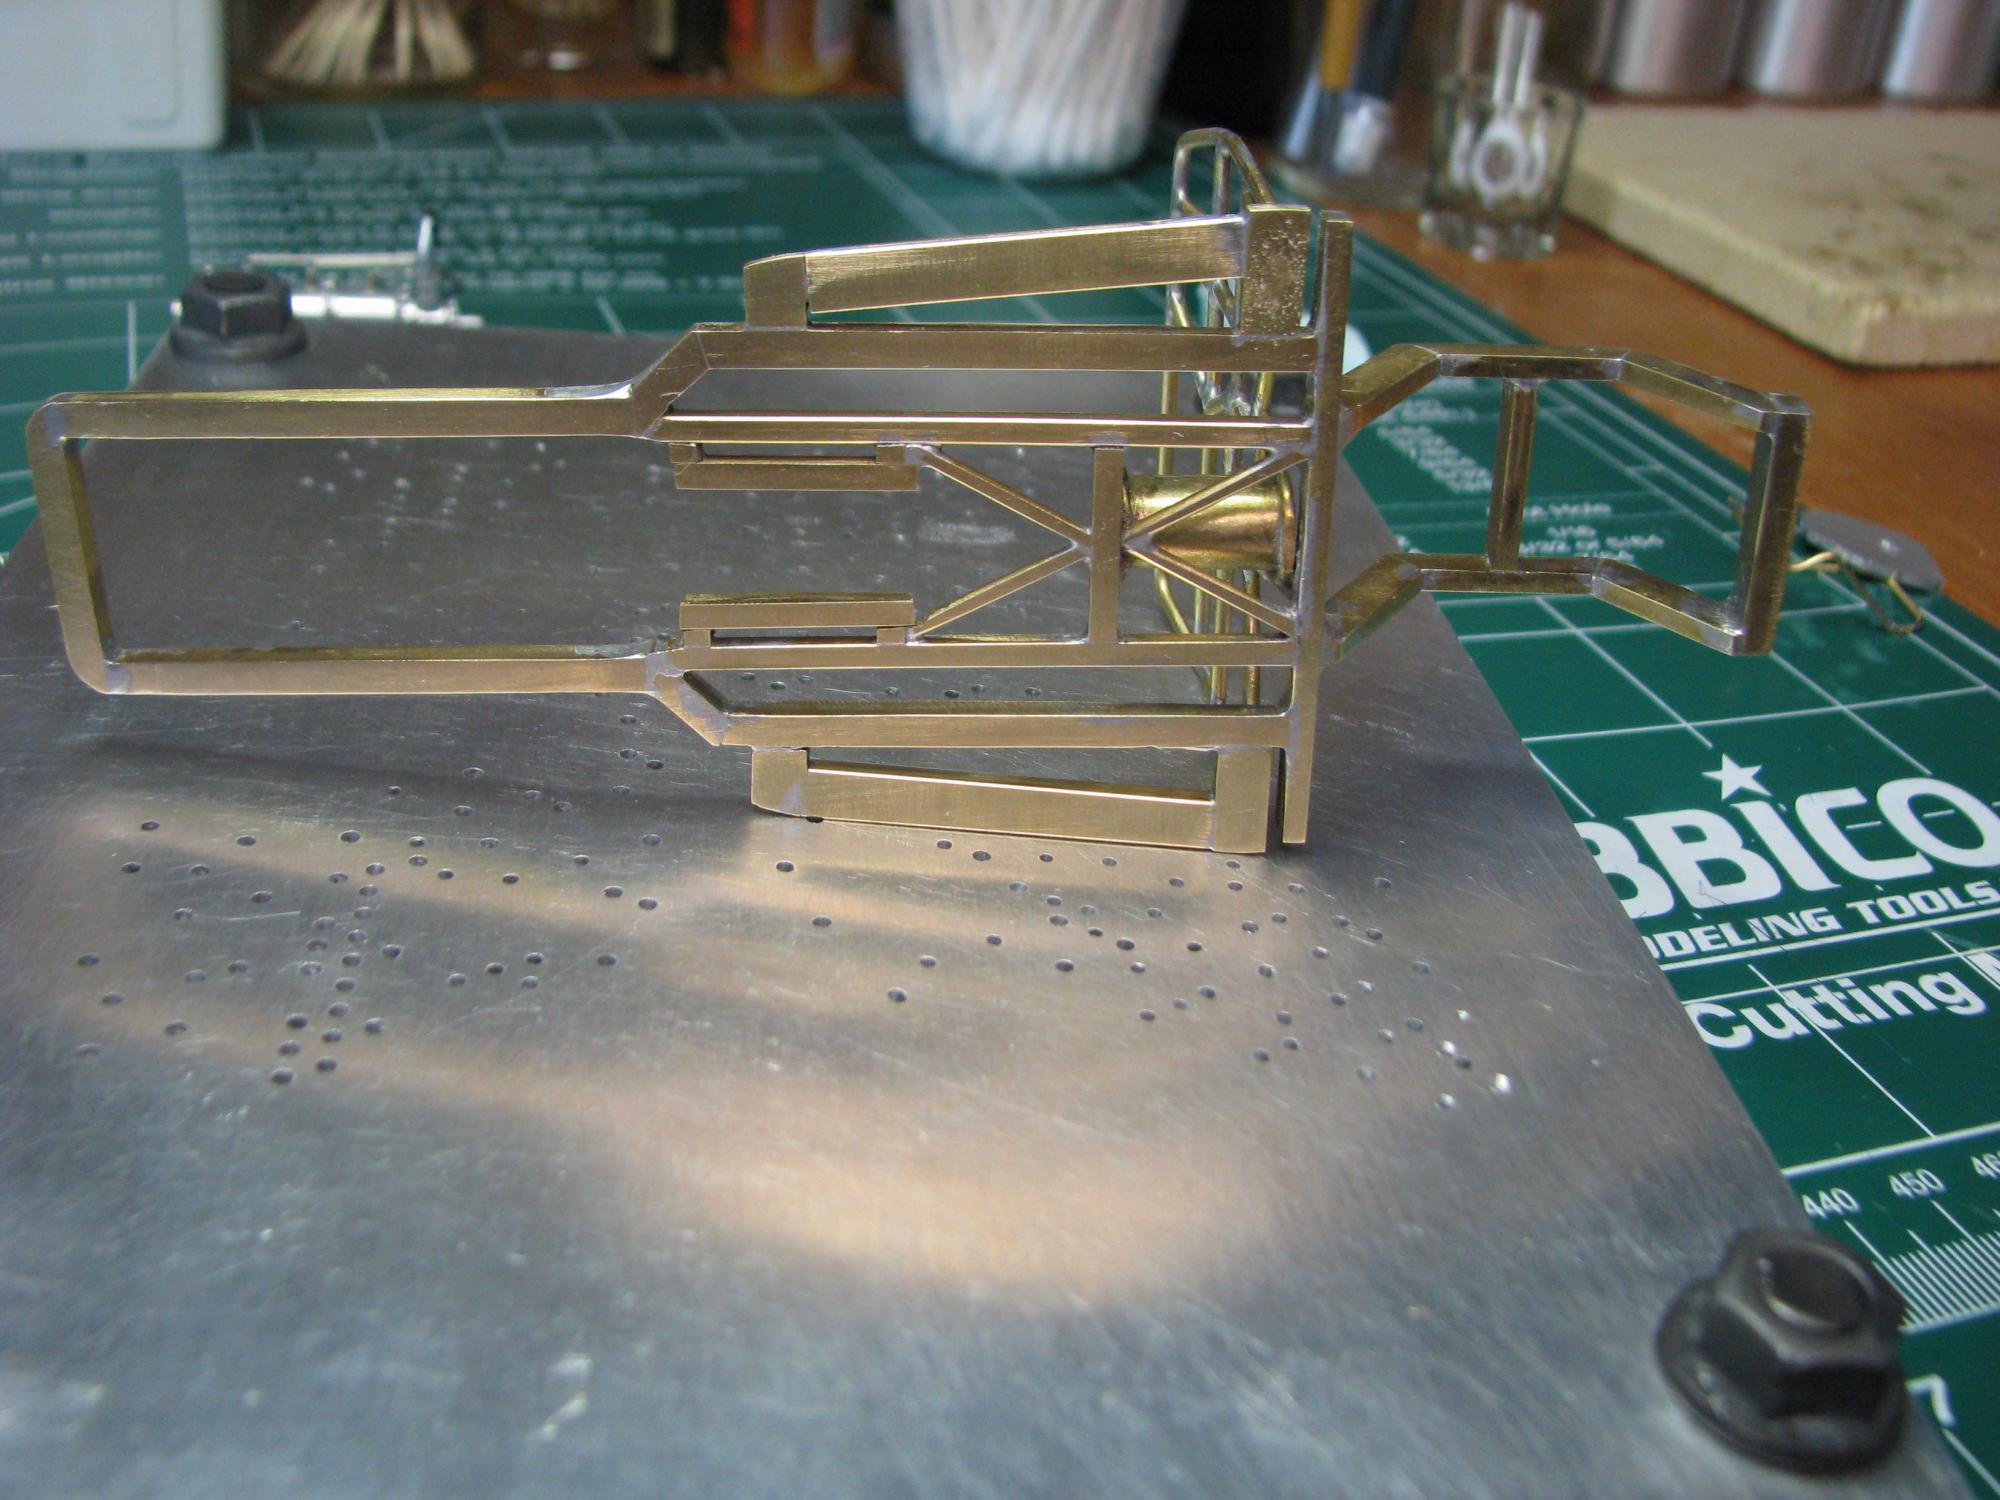
I have been working on-and-off since August on this project. The chassis main section is made from 1/8" square tube. The box 4-link rear is 3/16x 3/32 rectangular tubing. I started the roll bar using 1/16" brass rod. I tried to use some of the the online sources from Tim McAmis and others. Here are some images. Thanks for viewing.
-
Jim, Burbank Hobbies has them. They are $2.97 for a pack of 15. They are called "swizzle sticks. User ID burbankshouseofhobbies Best, Ron Berke
-
The Construction of my 426 Supercharger Hemi Alcohol Engine
eferrari replied to eferrari's topic in WIP: Drag Racing Models
Michael, Appreciate your interest. Wanted to tell you what a fantastic job you did on those wheels. Your Bantam Fuel Altered is sure coming along nicely. The hardware I use is from both Scale Hardware .08mm for valve covers, and RB Motion (Socket Head #1711) for the blower end covers . I also used RB Motion spark plugs and recessed them in the valve covers so just the tip was showing. I used a little larger black wire I had and split the copper wire out. RB Motions also makes spark plug, but for the life of me I was unable to find a adhesive. I also would recommend getting the Irwin 61 to 81 drill set. Irwin/Hansen for the money I have found them a very good drill set. Because you are in Europe it would not be worth it to purchase aluminum from here in the U.S. Not having a mill, I use 2011 which machinist call cheese. I am going try 6061 but I only have a dremel tool and floor grinder and large set of vintage files. So I struggle to get things square. My sources are McMaster Carr and BobDude6061 on eBay. The idler arm and pulley I needed to make myself,but the other two pulleys and belt are from MAS that Ted handles. Best, Ron mcmaster Carr .com 6061dude rbmotion.com scalehardware.com/ tedsmodelingmarketplace.com/ -
Harry, Great job on the Pocher Alfa Romeo and Bugatti. Your work on the Pocher really came out "museum-quality." Your Pocher brought back fond memories. Back in 1971, my late dad and I built-up this same Pocher Alfa Romeo 8c 2300 Mona with the wire wheels. It was a early kit. The parts came in clear plastic box containers. My last year in high school, I had a job at K-Mart in 1975 and to my amazement, the Pocher kits were selling in the store. The manager knew I was a model builder, and asked how I thought the kits would sell. One customer actually went store-to-store with a trailer, buying them up! Much continued success with your large-scale models. Best, Ron
-
The Construction of my 426 Supercharger Hemi Alcohol Engine
eferrari replied to eferrari's topic in WIP: Drag Racing Models
Michael, Wonderful job on your Nostalgic 33 Willy's and the progress you are making on your Bantam Fuel Altered. Thanks for viewing the engine and Lenco Transmission. Harry, Great job on the vintage models the Pocher Alfa Romeo, and Bugatti. Thanks for your input on my engine. Best, Ron -
The Construction of my 426 Supercharger Hemi Alcohol Engine
eferrari replied to eferrari's topic in WIP: Drag Racing Models
Here are some other images of the engine, crankshaft bearing support, idler arm and pulley and construction of the and Lenco transmission concept. After making the first Lenco, I was incorrect and this would need to be scraped. The magnesium cases were all the same size. The one image I am providing shows the same concept, but I used a single precision aluminum ground rod to simulate the three cases. The difference can be seen be seen with both images. Thanks for your interest Ron -
The Construction of my 426 Supercharger Hemi Alcohol Engine
eferrari replied to eferrari's topic in WIP: Drag Racing Models
John, Thank you for your compliment on my work. It much appreciated. Randy, I saw both of your models on the GSL site on you-tube,"Adventures in Soldering:The Ford GT40 Project and your Rat Rod tow-truck on top of that Machinest Chest. Randy you belong in that elite group of modelers here in the U.S. I am humbled by your comments about my engine and transmission work. Much continued success on your two projects. Best, Ron -
The Construction of my 426 Supercharger Hemi Alcohol Engine
eferrari replied to eferrari's topic in WIP: Drag Racing Models
Thanks for the feedback Mike, Clayton, Carl and Todd. Here are a couple more images. -
The Construction of my 426 Supercharger Hemi Alcohol Engine
eferrari replied to eferrari's topic in WIP: Drag Racing Models
-
The Construction of my 426 Supercharger Hemi Alcohol Engine Construction began with the block proceeded to the heads and blower manifold. A Kobelco supercharger was made. I used valve cover made by Scale Repro Plus which I modified with bolts. The block and heads, blower manifold and oil pan were all made using the softest aluminum possible. This is 2011. The injection system is all scratch built from aluminum stock, barrel valve, injector hat block, manifold block, fuel pump system and alternator with a Crank support. This engine is running a electrical water pump scratch built large capacity oil pump connected to a high volume oil filter. The bird catcher is a modified Scale Repro Plus. The ProMag body is by Terry at MAS,as are the top and bottom pulleys. They are modified all modified with socket head by RB Motion. The blower cover for the front and back are all done with socket heads detail. The idler pulley and bracket are scratch done with bolts and nuts. The crank support is all scratch built. The alternator is by Terry at MAS. The belts are from Model Car Garage. The trigger wheel is by Scott at Futurattraction. The blower belt is from Terry at MAS. Construction of Lenco CS 1 Transmission With the exception of the shifter levers and the rod towers by Scott the remainder of the Lenco is from scratch. I decided to do the manual over the servo tower style. Thanks for your interest.
-
Art, Sorry about that. Thanks for the correction. I like so many others wish I had the opportunity to meet Jim Clark. I was fortunate to meet Denny Hulme at Watkins Glen. My late dad had the camera ready. What a humble man. I also met Phil Hill, Jacky, Ickx, Stirling Moss. (Sir. Stirling). Best, Ron
-
A racing gentleman, Jim Clark, perished forth-eight years ago today, April 7th. A museum is in the works in his memory. Jim Clark Museum - Promoting the legacy of Jim Clark Ron Berke
-
Found some piks of the set-up at the Grand National Roadster Show in Pomona, Ca. Credit for images to Autoweek http://autoweek.com/gallery/car-life/photo-roadster-show-setup-day Ron
-
Henry J Twin Turbo - Didn't see that coming..........
eferrari replied to Codi's topic in WIP: Drag Racing Models
Tim, Your work is quite astonishing. I did go into your FOTKI account that you had on page 1 of the Henry J. The progress that you are keeping on this build is great. Ron -
Adventures in soldering:The GT40 project New pics 2/13/17
eferrari replied to Randy D's topic in WIP: Model Cars
Hi Randy, I couldn't find my first response to your wonderful brass soldering GT40 project---Randy. your work is a real Masterpiece. I love that one image with the Hot Rod wrecker off to the side. It looks like a life-size garage. Thanks again for all the help that you've given me in the past. Much continued success with this project, Ron -
Hi Art, Your knowledge---from a 40 Willy's-to-now a Midget racer in brass no less---is quite impressive. Much continued success. Ron
-
Art, I find your explanation unbelievable for this reason, My praise of Bill's work appeared for over ONE MONTH and then it was TRASHED. In between my post, Bill sure had the time to respond to whom he wanted to. Seasons Greetings Art Ron Berke MCM Ohana Members 2,635 posts Location:Richmond Mo, Full Name:Bill Davis Posted 17 November 2014 - 02:28 PM Hi Lewis, thanks so much for taking 3 hours out of your life to go through the entire thread, your comment is very humbling, thank you Chris, thanks to you also for taking the time to go through, I appreciate the kind words I agree Kevin, updated mean progress, thanks for checking in Hi Jake, man that would be pretty cool to start it up huh, thanks for checking in thanks Hemi, can't have too many Hemi guys around, might have to do that someday, thanks for looking at the progress Hey John, hope all is good your way, thanks brother, I think Randy take more breaks than me LOL, but I'm sure he is not sitting on front of the T.V. like me, he is doing some thing else COOL Edited by vintagedragfan, 17 November 2014 - 02:35 PM.
-
Bill, It was quite a shock and disappointment after my praise of your great work, that it appeared for over one month and then it disappeared on your thread. If you don't want certain people like myself from responding to you great work, them you need to learn how to block them. Merry Christmas
-
1/16 Scale Army Vega Funny Car - Finished 10/14/2018
eferrari replied to Mooneyzs's topic in WIP: Drag Racing Models
Chris, Your ability to use different materials is really tremendous. Your latest work with the brass fittings is a miniature masterpiece. Best, Ron -
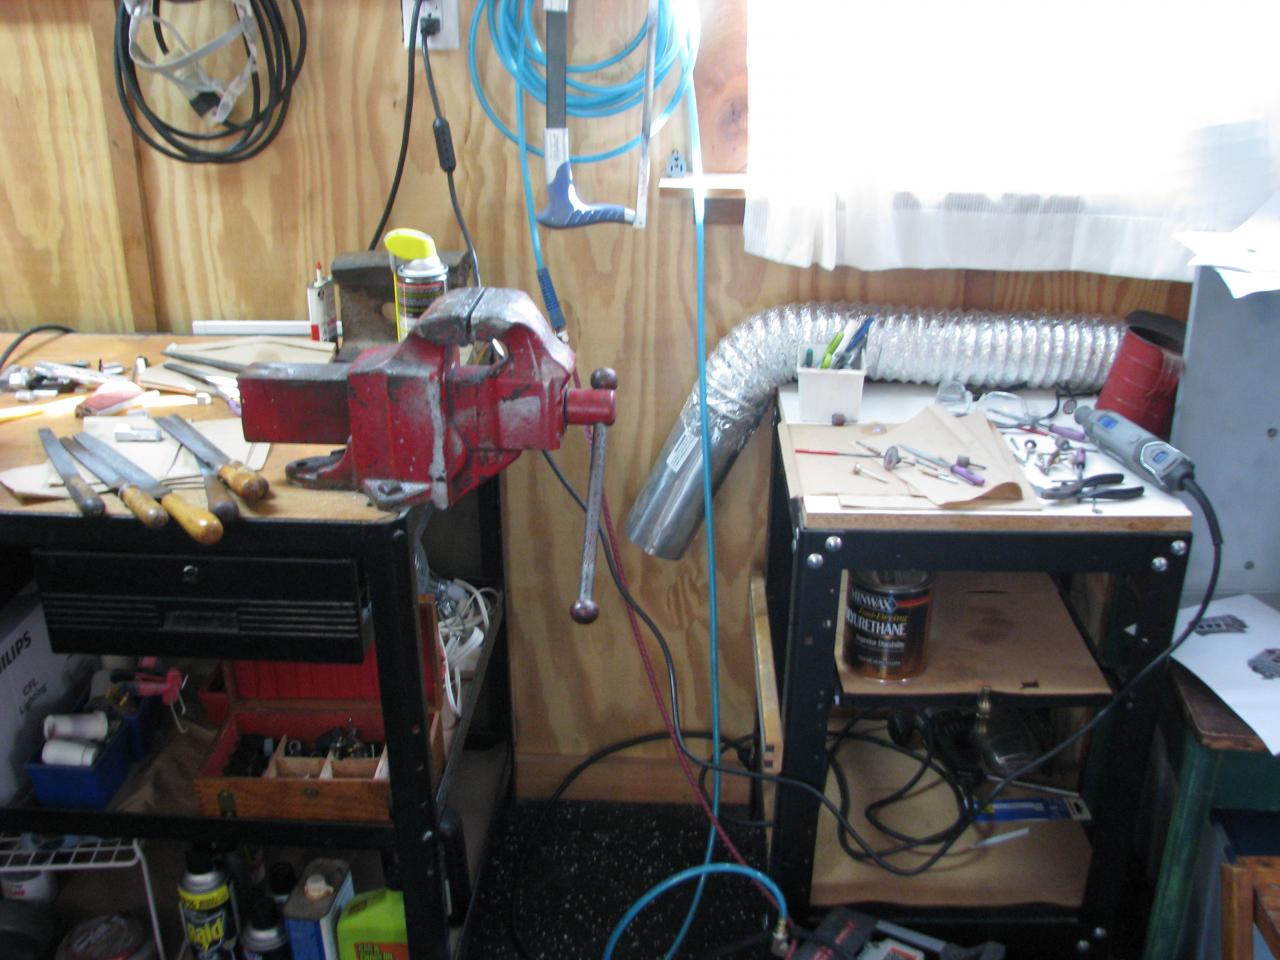
Thanks for your comments Joe and Andy. The only motor tools I use are my Dremel and a Grinder. The rest is virtually by hand with my late dads vintage file set. Here is a pik. of my garage workspace.
-
My model cars are not judged buy the time it takes me to complete them, but my first intention was only to assist fellow builders with this link. Ron
-
I did go to a small tool shop in the Buffalo, NY area. He recommened McMaster-Carr. Special Shapes could not help, and On-Line Metals was not one that was suggested to me. Although I purchased from them in the past. I found the on-line catalog of McMaster Carr much more user-friendly. I know there are different grades of aluminum, from my late-Dad's days at Bell Aerospace as a Rocket Engineer. I wanted the softest possible. Which is 2011. I thought the easiest way to get this was to purchase this, rather than, run around looking for scrap cutoff or going to tech. schools, and not know what the metal was. Ron "Very Easy-to-Machine 2011 Aluminum Alloy 2011 has the best machinability of all aluminum alloys. It is the most widely selected aluminum for screws, tube fittings, hose parts, and other items that require extensive machining. It is nonmagnetic and heat treatable. Maximum temperature is 212° F; minimum temperature is not rated".
-
Mcmaster Carr worked for me. I thought it would be helpful. Ron