

Codi
-
Posts
2,484 -
Joined
-
Last visited
Content Type
Profiles
Forums
Events
Gallery
Posts posted by Codi
-
-
Congratulations John on your amazing accomplishments at the GSL. You're going to need a bigger suitcase my friend to get that haul of trophies home in the future!
Truly deserved.
Tim
-
I want to acknowledge the comments posted in reply to my recent pics.
Scott- I took the ice off and the "blue" finally left my hand.

Joe - "man up"........man you are TOUGH. Can't wait to meet you someday, I'm sure I'll be laughing for a week.
Jason- No minions or lilliputians here. If you took a peek at my first pass of the bracket, you'll see I can make some pretty bad stuff too.
Dave (GoatGuy) - Thank you very much for your continued interest and positive comments. I DO appreciate them.
Mike (Foxer) - I think Joe is going to have some competition at the "Laugh Factory", that was funny.
ClayK - Thank you Clay. I recently visited your site again and took a moment to look at your Jeff Gordon "superdetailed" nascar build. Guys, if you've not looked in on it, you should, it's just so impressive. I must have spent 25 / 30 minutes going over and over the pics and the detail you put into it. Can't wait to see what you decide to tackle next.
John (Mr. Teresi) - At the rate I'm going it will take me a century to complete it. And thanks too for your continued support and interest. I took a look at the GSL and the cars you've been showing....unbelievable how fast and creative you are at the same time.
Darren, thanks for peeking at the build and your comment.
Chris (mooneyz) Appreciate the comment on the bracket. The walls at the top of the machined recess are only .5mm (half of a millimeter) wide. I drew them up that way and I made sure the mill was dialed in as best as I could. There is nothing more satisfying than making that cut and seeing it come out the way you hoped & planned for. I can't wait to see your next Vega Funny updates. I'll check out your GSL dragster later today. I'm sure its quite impressive.
Cheers to all, Tim
-
Appreciate the comments fellas. I want to answer the questions that Chris asked and share pics of the new 4 link axle bracket I made today.
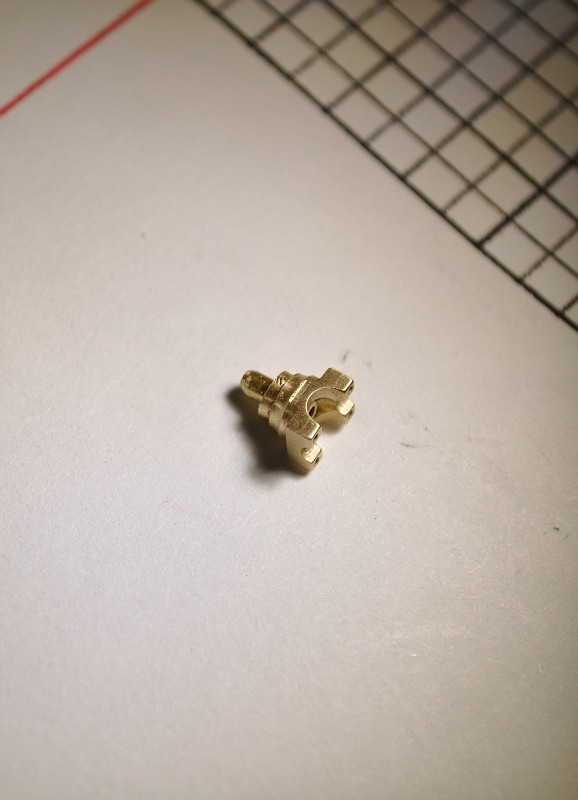
Chris, Caswell has sooo many options it's a bit confusing. I emailed them and they suggested a simple $49. kit that uses a low voltage power supply and anodes. What I learned on this session was "less is more". Don't put the parts too close to the anodes, don't use too much of the nickel solution, move the parts around in the solution while they're in process AND the biggest difference was heating the solution for 20 seconds in the microwave before plating each part. The pinion yoke was immersed for only 30 seconds and it came out as you see it. No polishing or anything other than a dip in soapy water and a rinse afterwards. It's definitely something that you have to experiment with and I'm sure that anyone that tries it will get better with each attempt.
The new bracket was one that I saw on a real 1:1 10.5 outlaw car. Always liked it so I thought I'd try to replicate it. It's VERY close and I can't deny that it looks much better than my earlier attempt. Comments welcome and thanks for checking it out.
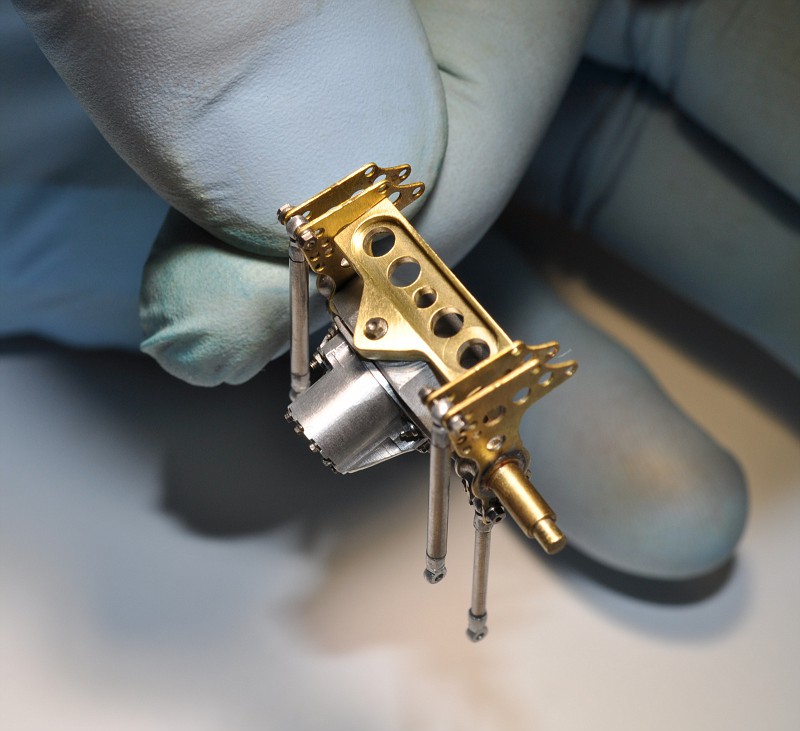
Ignore the glove in the pic please...it's to keep goop out of the stitches.
-
Tyrone, sharp looking for sure. That red and your black wheels and other accents (the decals come to mind) really set it off. Nice job. Tim
-
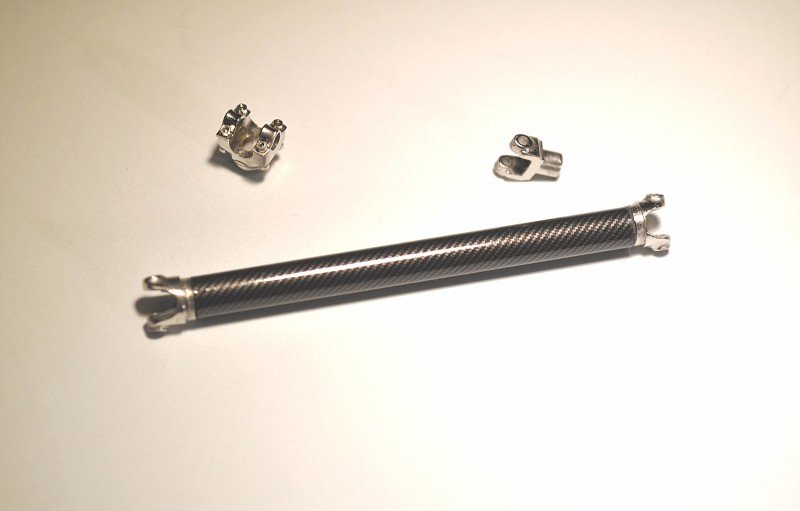
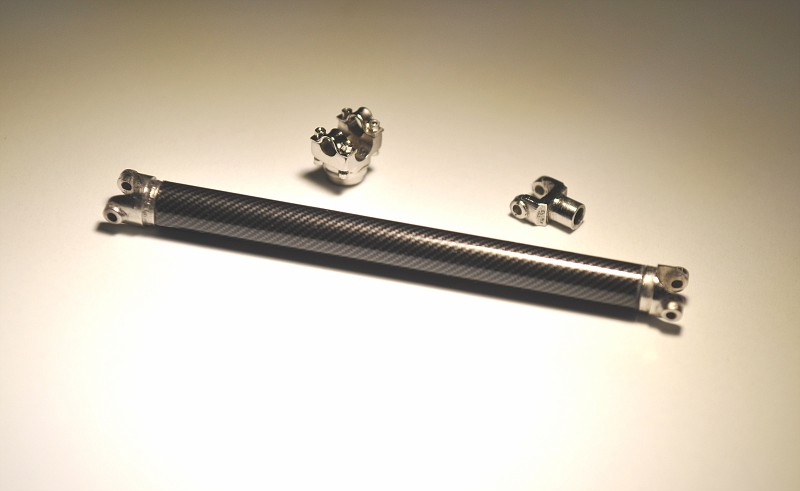
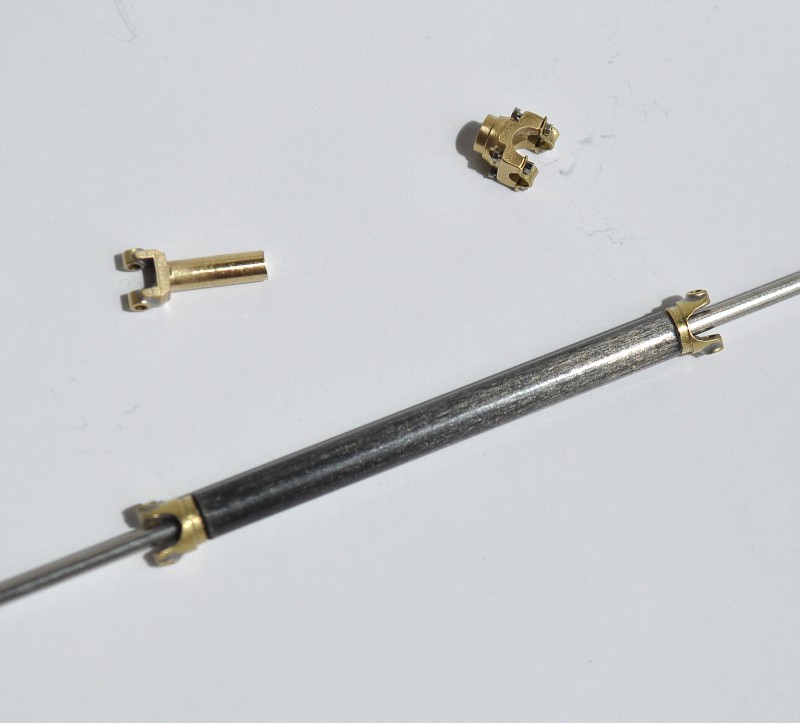
Trying to ease back into it and got the driveshaft done with the CF decals and the nickel plating I wanted to put on the yokes. I tried some different techniques on the nickel and I think it came out better than my first pass at this. Cheers
-
Congratulations Chris, sounds like you had the perfect weekend. Which dragster btw was yours at the show? I'd like to go back and check it out on the posted pics.
Cheers, Tim
-
Thanks Joe. Went well and I'm going to try to get back to the bench on Friday. Day by day. I'm sure you had an awesome time at the GSL and I'll be sure to check out your pics. Cheers
-
Thanks Joe & Michael. Woke up today and just not all that thrilled with it. Ever do that? Sure you have. So, when I get back to the bench after my surgery, I'm going to re-do it with some important but subtle changes. I know I can do better and this gives me the chance to apply the lessons I learned when making this one. oh well.
-
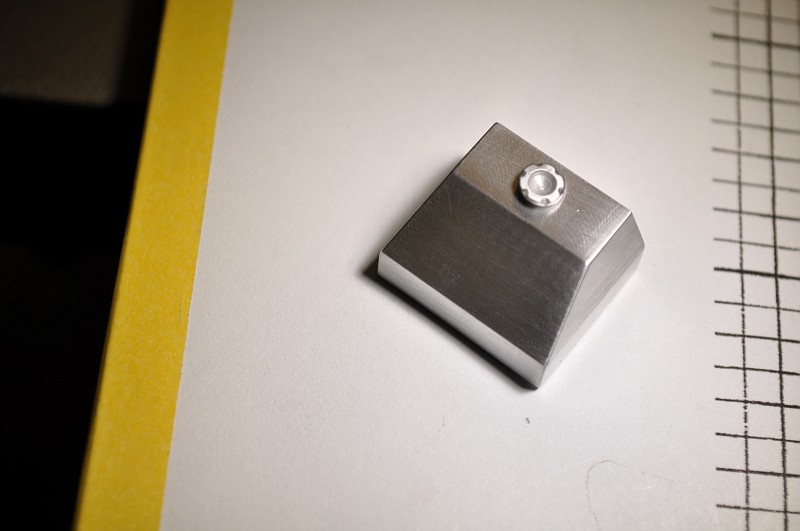
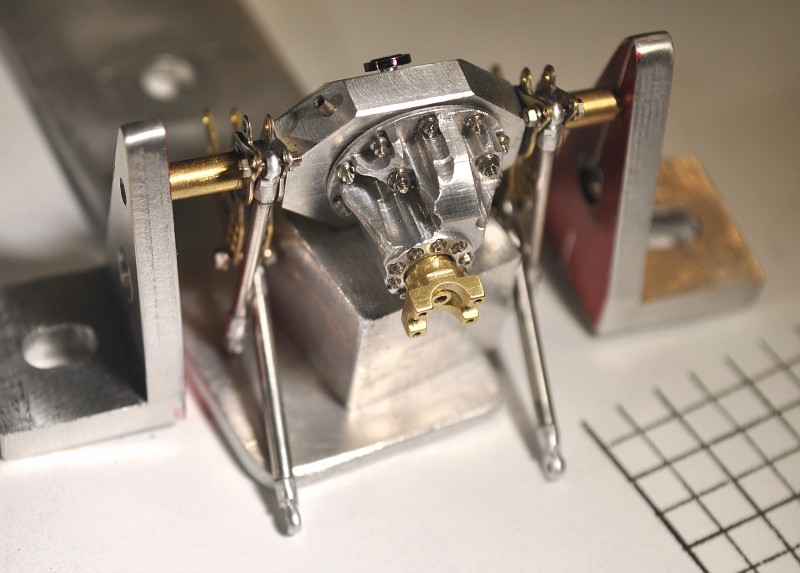
Well this is it till I get over my minor hand surgery. This is the 4 link axle brace that was machined from aluminum. . I tried something different by anodizing the insides of the cut-outs and the outer edges. The bolt hole secures to the axle housing itself. I receessed it a little so it had a "cleaner" look to it. Overall dimensions are 16.5mm x 8mm. The making of this was time comsuming but i gathered alot of experience while working on it. I'm hopeful it will help when I tackle the wing struts when I get back to the bench. They're quite a bit more comlicated than this piece was. I'll be sure to visit the forum often and to check on everyones progress iwth YOUR builds! Cheers fellas.
-
Randy, you are truly a genius. The detail in your builds is something to aspire to achieve some day. I'm not blowing smoke either. This is just fantastic at any level and deserves all the praise heaped upon it and YOU! You must/should & will be proud of this work. Can't wait to meet you someday so I can pick your brains and get to know you personally. I truly look forward to your next update(s) Cheers my friend. Tim
-
Thanks to all.
Chris, I chose to setup the mill and work in metric as the scale I'm working in primarily (so far) is 1/25th as you know. It most closely replicates 1 scale inch quickly and reasonably accurately. Takes me a little bit of extra time to do my drawings but it's working well for me.
Jeff, I post my pics on Fotki and post them on the forum by transferring them from my account. The pics were taken with the same camera I use for all my pics but the lighting at my milling table is not conducive for truly sharp pictures unfortunately.
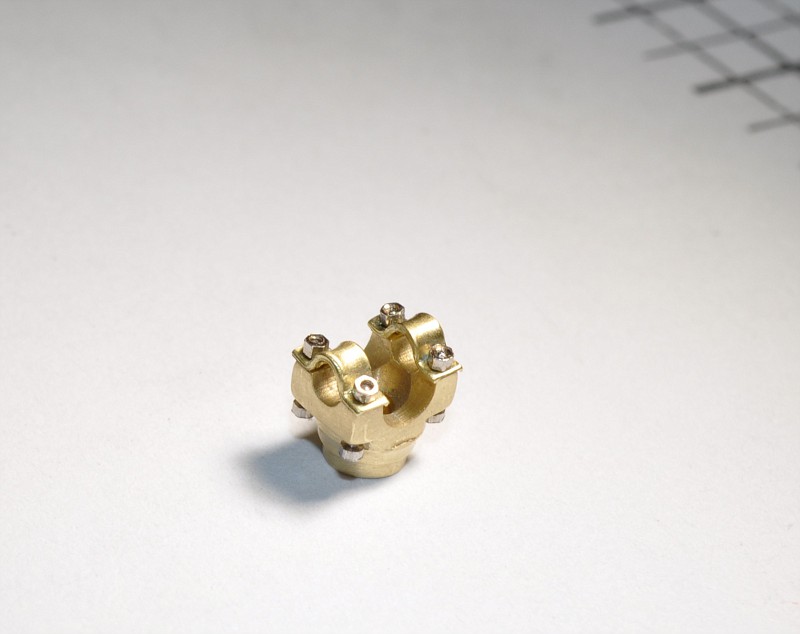
I finished the last yoke (tranny) and heres a pic of the 4 different yokes together. Cheers
-
Joe, the 3 fellas that made suggestions above are giving you excellent advice. From what I've read and tried, you should start removing the tape in 20 to 30 minutes after you sprayed your last coat. Just enough time to allow it to set a little bit. I think the glue from your tape is having a reaction to the paint as it's beginning to gas out. At least that makes sense based upon all the research that's available on the forum. Letting the paint gas out before applying a second coat is critical if using enamels in particular and also lacquers. If you use a dehydrator, you can let it "cook" for 8 to 12 hours and then let it set a few days (at least I do, but I'm VERY cautious) and then tape and spray the next coat. Paint is just a bear to get right. I wish you luck and have nothing else to offer but to slow down your process in one regard (gassing out between coat) and speeding up (when removing your tape). Undoubtedly, you'll get others that have different experiences which are likely true as well. But someone painting in Arizona is going to get a different result than someone in Penna. like myself. The weather does play a part too......you might want to think about the paint conditions (heat and humidity) on the day(s) you painted the truck. Cheers
-
Clayton, I thought it was obvious to everyone, but since you might not have any in your town, I got them at the Giant Pencil & Penny Store......
I know I just posted some pics earlier today but I wanted to share with Ray how I did a simple gas cap for the fuel tank. I just didn't like the other one and this piece, once I dychem it red will look much better. I promised some pics while I was machining some parts and this one was simple so I'll share the few steps I took to fab it.
This was the final result:
Here I took alum. rod and thinned the base down to 3mm. The top portion I eventually narrowed it down to a width of 3.8mm and a depth of .75mm
Here I used a round dremel ball type mill and put the indent in the middle.
You'll note I started wtih 2 pieces. Sure enough, I had the wrong angle on the tilting table...even though I've made similar things before like this...can you say "dummy"....sure you can. And that's why I made two. The rotary table with chuck spins the piece 360 degrees and I eventually settled upon a correct 35 degree angle to cut the 6 seperate notches on the edge of the cap. All of this was about 90 minutes. Comp1839 could have made this in 30 minutes I'm sure. Hope this helps Ray and I'll make an honest effort to share more in the future. If this is kind of what you were looking for. Comments always welcome.
-
Ray, I know I promised some milling shots & setup procedures....but to be honest I keep forgetting to do it as I'm milling. I get so caught up in what I'm doing so I don't make a mistake that I just completely forget to do so. I'm going to do some machining today or tomorrow and I PROMISE to take some pics....a pretty basic piece.
Dave - I DO wear a jewellers loop....I can't see it either.
Joe - as always I got a very hearty chuckle. You're a very funny guy. And thank you all for your well wishes on my upcoming minor surgery and to Clayton as well!
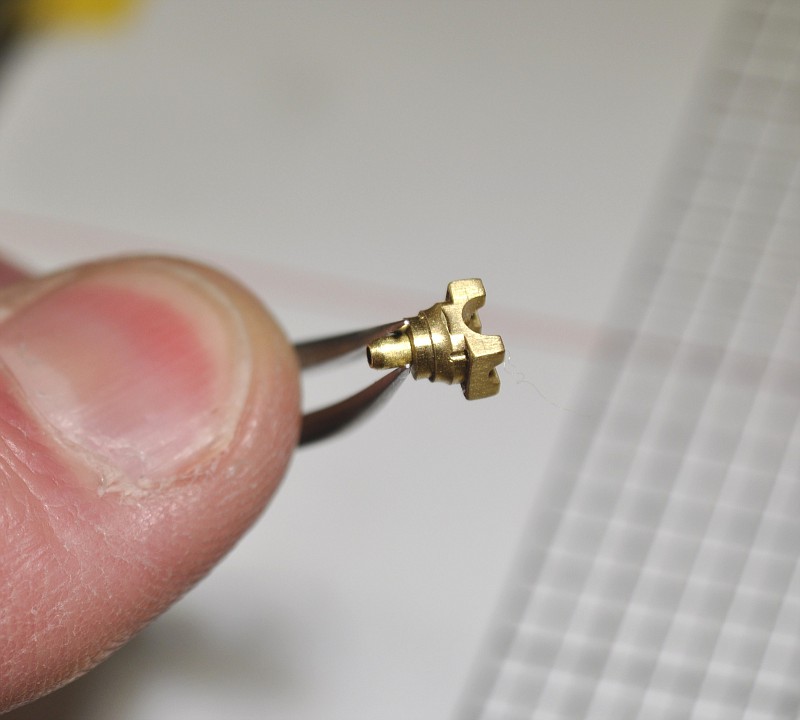
These pics are just of the pinion yoke u-joint "straps" as I call them. These things were SUCH a PAIN to do.....no way to machine them as they were too small and had to do them by hand. Much trial and effort but I got em' on. Had to free hand chamfer the back sides where the bolts feed through to get the bolt heads to fit. I didn't allow enough tolerance (a few thousandth was all I needed) when I machined the yoke. Turned out well but it sure tested my abilities to not mess it up. Feel kinda silly posting them but they DO complete the pinion yoke. I'm convinced that Randy D. completed his entire front brakes and discs on his GT-40 in the time it took me to figure out how to make and fab these buggars. Cheers, Tim
-
Better be careful Joe, the "metal" can be really addictive.
Glad to see that you're having fun with this build even with the challenges it recently threw at you. I've no doubt it'll be very sweet when completed. Cheers -
Dale, one of my all time favorite race cars. Just looked right from the beginning. You're doing it justice for sure. Nice work and glad to see another central pa. builder and their work. Cheers, Tim
-
Shame on me sir for not following this thread before...my lose. Very cool build you have going on and most ambitious. Fantastic work and can't wait to see more of this great subject you've chosen. Cheers
-
Hi, I wanted to reply to all of the recent comments and to answer some of your questions.......I also want to thank each of you for your continued interest and comments. Tim
DaveWilly - I agree, there are no proper yokes/driveline pieces available. Not sure who or how might provide them....if in metal, you'd have to have cnc equipment I believe and they would probably be too expensive.
Randy D. - You rascal you....I found a thread on your wrecker build somewhere else on the interwebs. I LOVE that build. Are you sharing that here somewhere that I've not noticed? I don't know how you can build that AND your GT-40 at the same time. I know I wouldn't have the "bandwidth" to pull that off.
Brad- Yup, tranny yoke is next and I want to do the u-joints and carbon fibre the driveshaft. Sorry but no resin copies to be made.
Tyrone, Scott, Ray Kurn, GoatGuy, DeeCee, hansb57, Bob Taber and Mr. Teresi - Thanks fellas......no one has to bother to comment or express their appreciation but just the fact that you take time to do so says a lot. I personally get caught up with everything and at times I miss or neglect to take a moment to comment on others work.......I have to work on that and MAKE the time somehow. Now where's my mill and soldering gun?
Clayton - I've looked high and low and can't find a straightjacket in yellow (my favorite color) please let me know if you find one........
Chris - Can I have your funny if you're giving it away? Just kidding, I am anxiously waiting to see paint soon on your build. Your last update was fantastic.
Michael - I'm trying to keep what I can in metal and avoid painting as many parts as possible. I might anneal the pinion yoke but do the driveshaft and tranny yoke in nickel plate. I agree, whereever it makes sense keep the natural beauty of the metal visible. The chassis frame itself might still need to be painted......
Joe - I just got bad news, the capuccino maker is on BACKORDER.....and no idea when it will be available...what should I do? In light of the constant interruptions and distractions I've caused you, I've decided to quit on this build and go do something else.
Art - Thank you sir for following too.....but I'm REALLY looking forward to your next update on your brass midget build..........hint-hint
i'm going to try to wrap up some loose ends in the coming few days and then I'll be taking a week off as I'm having trigger finger surgery and won't be able to build. It's my 9th one and its more of a nuisance than anything. Great time to do some research and planning though. Cheers to all, Tim
-
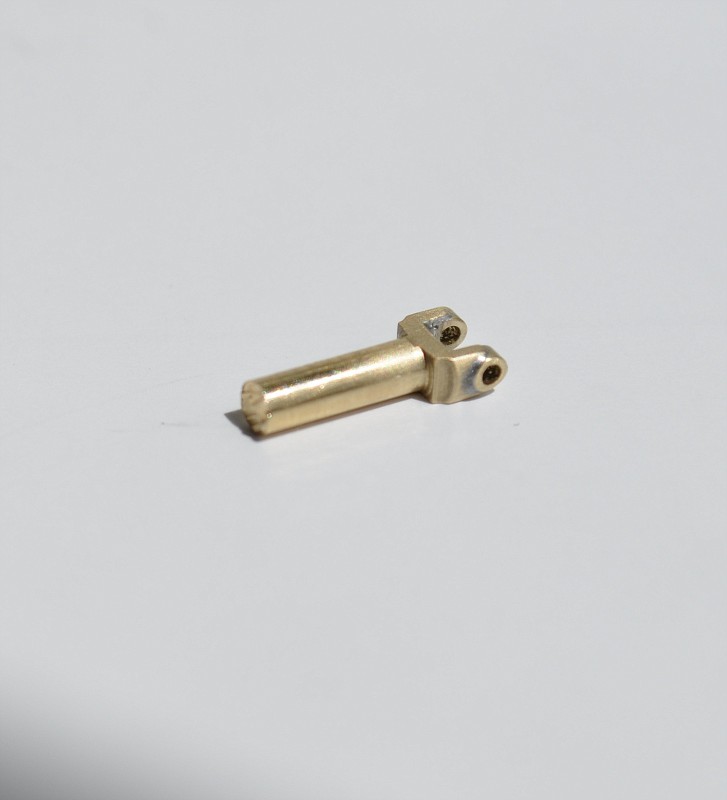
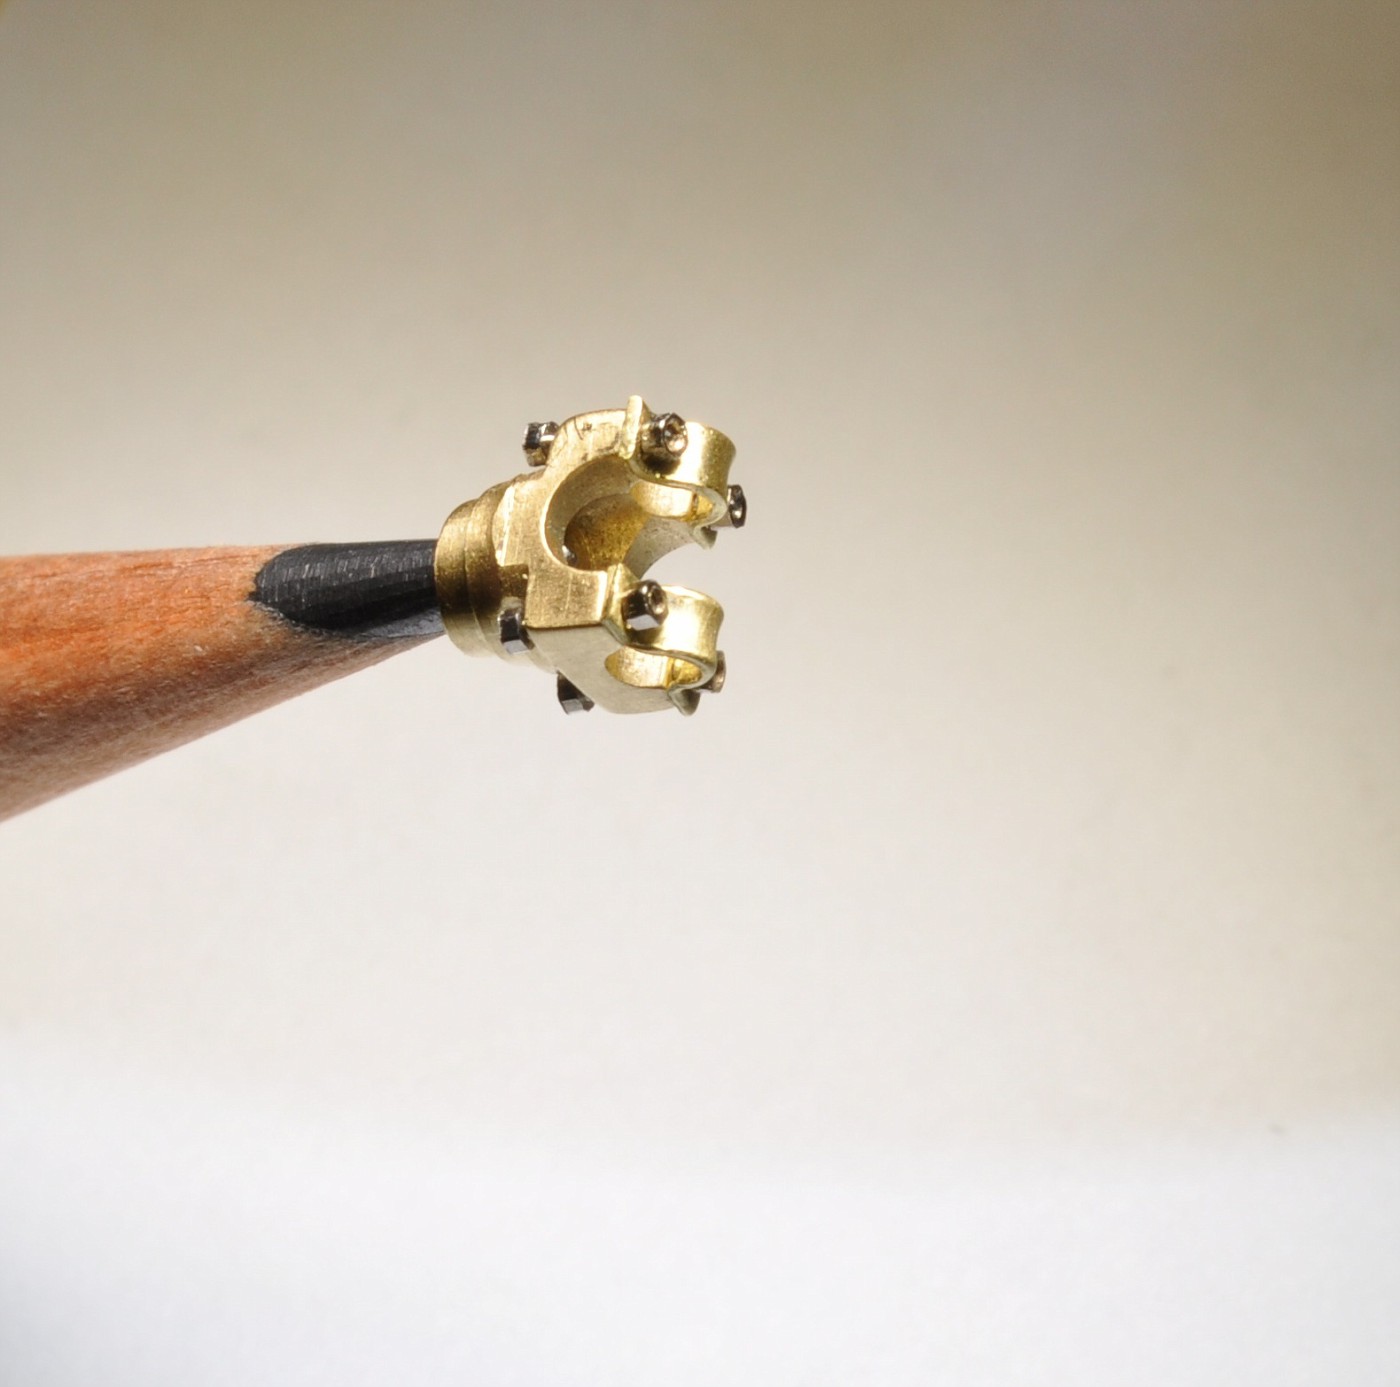
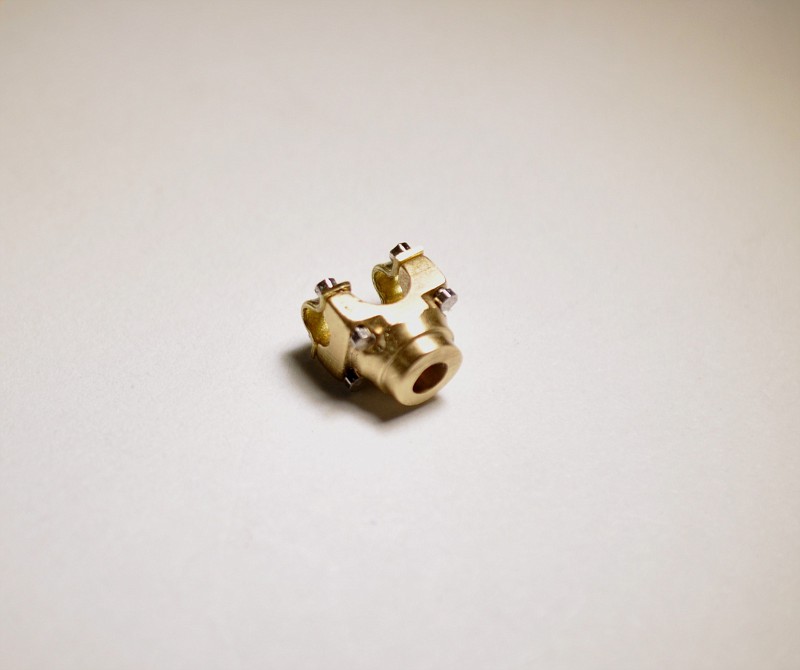
Hi Guys....I have to run to dinner...I'll answer your questions and I want to acknowledge your appreciation for the build again. All day to make the pinion yoke. ONE very COMPLICATED little piece I assure you. It's 3.6mm x 4.5mm in dimension. the bolt holes are drilled to accept threaded .5mm nuts and bolts. I have to make the clamps that secure the u-joints.....then it's done. I think it looks great with the rear end that Dave made for the car. I spent so much time as I think it kinda desrves it.
Cheers, Tim
-
Thanks Doc for posting Donn's work. It deserves more attention. The man can simply lay down the paint let alone build such clean cars. His reputation is well deserved. Cheers to you both Doc and Donn! Tim
-
i LOVE em. don't tell my wife. Cheers.
-
Trying to figure out how to make the driveshaft, trans and pinion yokes. Got the driveshaft yokes made out of brass today. Started by machining some 5/32" rod. These particular parts should be great candidates for nickel plating once I get the other yokes made. I'm leaning towards a carbon fibre driveshaft at this point. I dropped these little buggars on the floor half a dozen times and thankfully didn't lose one. Cheers
-
I'm in AWE Randy. Just fantastic YOUR builds AND abilities. Now get something done so I can ogle some more.
Cheers -
To everyone who commented on the tank, thankyou and I'll try to address a few questions. (and Randy, thanks for the comment on my progress on learning how to machine...only been 6 months at it but I DO have a great mentor, which is priceless)
Micheal, the P-Etch piece on top is the filler. It's not affixed yet and the plumbing (which is quite simple to be honest) will be done after I make the ti-strap I want to do for it.
Wed. I'm hoping to start & finish a 4 link brace in aluminum that I've drawn up and want to machine. Then the wing struts and drive shaft and it's yokes. Cheers to each of you and again, thanks for following along. Tim


 Glad to see that you're having fun with this build even with the challenges it recently threw at you. I've no doubt it'll be very sweet when completed. Cheers


1:8 scratch deuce
in WIP: Model Cars
Posted
Every time you post an update Ray it affirms why I've been following along with your build. I love this stuff. Glad to see you back at it again now that time has permitted. Will be sure to keep checking in of course and thanks for posting. Cheers, Tim