Hary Bare
-
Posts
29 -
Joined
-
Last visited
Content Type
Profiles
Forums
Events
Gallery
Everything posted by Hary Bare
-
Cat 3406 powered Freightliner C.O.E.
Hary Bare replied to OlSchoolRedo's topic in Model Trucks: Big Rigs and Heavy Equipment
What a great job on this kit! Mine pales in comparison, I should try it again just because. Very nice! -
What an outstanding model! I truely enjoy the classic kits built to such standards. Yours are simply inspirational. Thank you for sharing!
-
The Freightliner was my first truck too. I had a lot of questions answered on this forum and made building this model a lot less complicated. I never did weather mine or put better stacks on it but I like the way it looks and I get a lot of compliments,,,. Yours is looking really nice, enjoy the build and the finished model.

-
Ben, I recently completed this kit. It was fun to build but I too asked a lot of questions and received tons of useful replies. About the cab, I glued small strips to the inside of the cab, about 1 inch aprt and made sure they were flat and left overnite. I put sandpaper on a piece of glass and lightly ran both haves to flatten. After piecing together I glued from the inside between the strips, rubber band them and set overnite. Removed strips and finished glueing inside. I had a nice crisp seam when dried and used spot putty to fill the seam. I used sanding sticks and blocks to clean up. It came out nice. The front axle is too wide so I found center and cut 3 3/2 from each side, drilled and pinned the axle and reglued, then cleaned up with putty. You will have to modifly the axle mounting pads to fit. Or delete the brakes and you are closer to correct. Put the grill on the frame and test fit the cab, then place your rear mounts appropriatly. At this point do youself a favor and test fit the front bumper. Towards the end of my build I found I needed to trim the frame horns and lose the mounting spots on the bumper itself to make the cab clear the bumper when tilted. To the interior tub, gently test fit. If it starts binding, start trimming until it fits easily. Then test fit the privacy curtain and tub for fit, I had to trim my curtain. The steps on each side are terrible! take your time and be carefull you use the right pieces for the correct side. I should have taken advice and bought aftermarket or sturrups. I ended up modifying mine and painting black. Exhaust pipes are too small. buy some tubing at hobby shop and replace them. I still haven't done mine. Paint? The engine is supposed to be cummins beige, rocker cover painted I guess, I painted mine. Be carefull with the air intake grill to motor, mine was finicky fit. My truck is black and gold, so I painted frame gloss black w/ flat and semi gloss black particulars. Other than that, just test fit EVERYTHING and you will be happy with your results! Lets see some pics? Enjoy.
-
Freightliner cabover
Hary Bare replied to Hary Bare's topic in WIP: Model Trucks: Big Rigs and Heavy Equipment
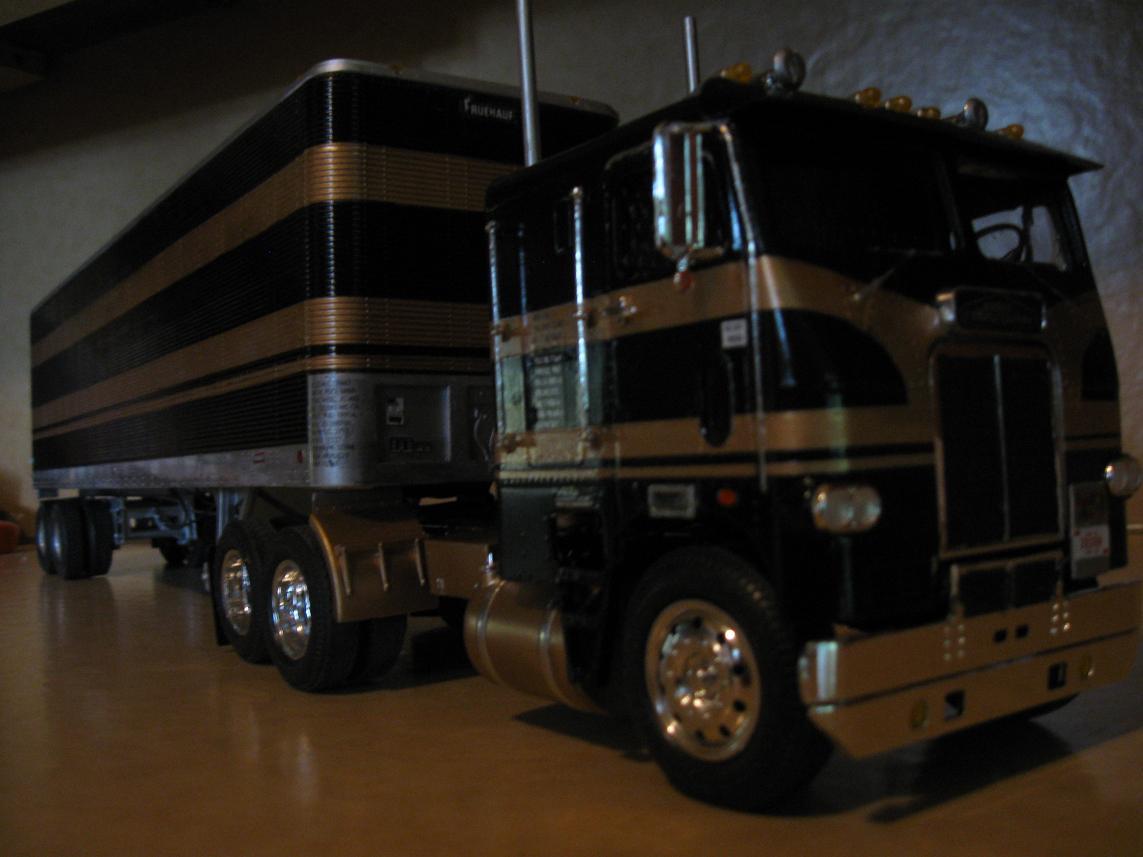
Trailer is finished. as promised here are some pics. Sorry for the pic quality, looked good on camera but dark here. Other than finding something to use for airlines, its done enough. Thanks again for all the input and suggestions. Decided not to weather it much, so many things learned on this build but I will share future builds with yas. -
Freightliner cabover
Hary Bare replied to Hary Bare's topic in WIP: Model Trucks: Big Rigs and Heavy Equipment
Chuck, this is my first semi and I share the same thoughts about this kit. So many things to do different next time. I put that front plate on, no interferance but It looks like armor plate. If any interest I will post pics when trailer is finished . -
Superb!
-
Freightliner cabover
Hary Bare replied to Hary Bare's topic in WIP: Model Trucks: Big Rigs and Heavy Equipment
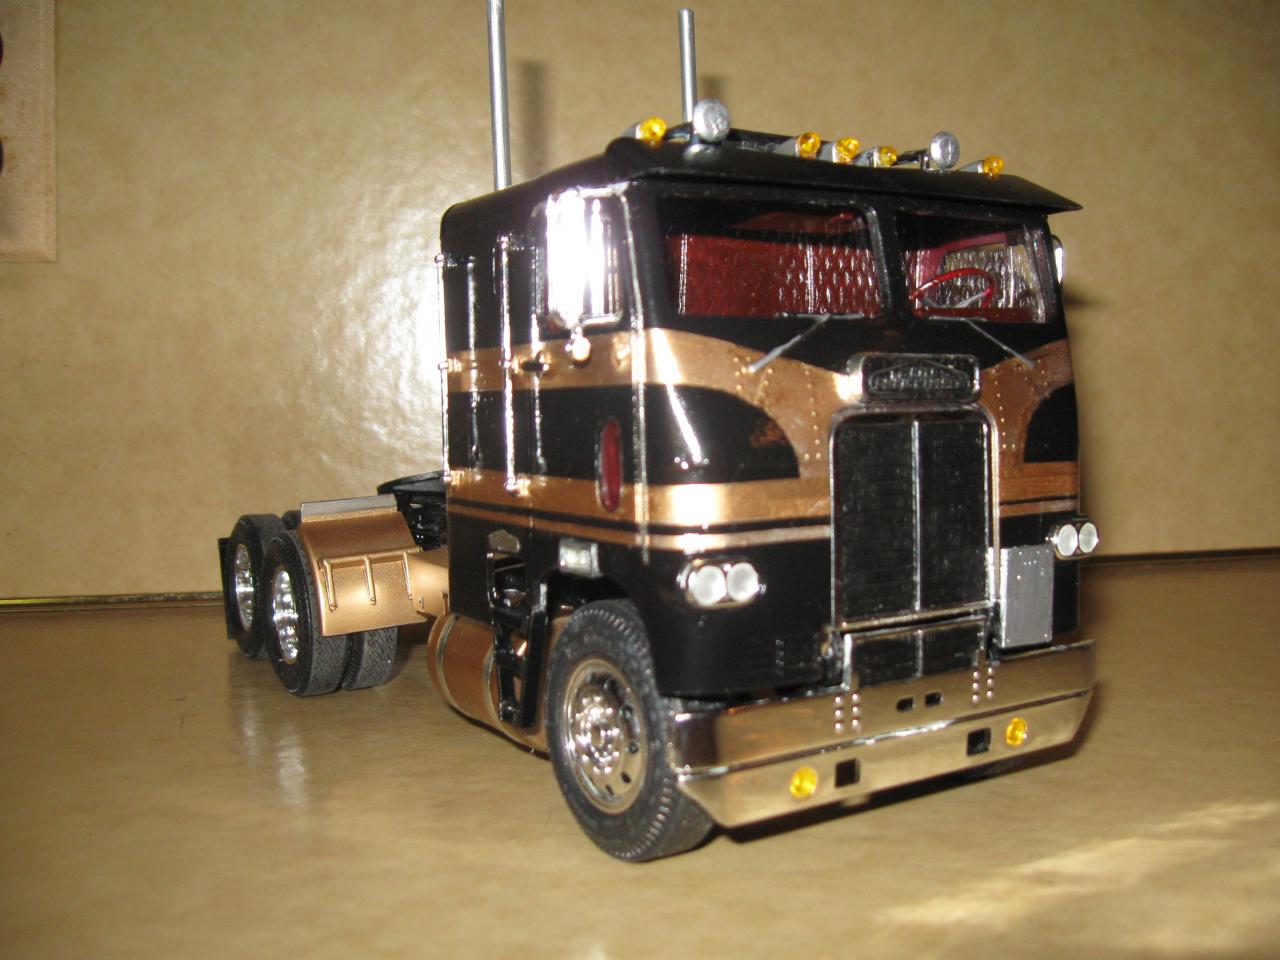
After a short hiatus, got back to the Freightliner. A few small things to do but here it is. Posting a couple pics. I really enjoyed this model, a real learning experience on this one. Thanks to all who gave me imput and advice as it really helped bunches. IMy next project will be a painted to match the truck. -
Freightliner cabover
Hary Bare replied to Hary Bare's topic in WIP: Model Trucks: Big Rigs and Heavy Equipment
After I made my cut, I did pin the axle. If I remember right, 3/32 cut off center put me where I needed to be. I did move the spring perches also but not correctly. It was a little off center. This kit was a learning experience for me and I will have better insight on how to proceed with my next build. A fun kit with lots of basic modeling challenges but its going to turn out nice, not as well as I would have liked, certainly entertaining to view. The hardest part other than lining up the body panels, was figuring out instructions. All pieces should and will have to be test fit to ensure all corrosponding parts go together. Since I have limited knowlege of big rigs, more researsh should have been made. I didn't research much and the kit shows its flaws. Ladders are mounted along with the front bumper. That is another area that needs some trimming to fit well. I had to trim the frame horns and the mounting area on the bumper to make it visually correct and to allow the cab to tilt without interferance. It took some test fitting to get it right. Some new stacks, finish the air conditioner and put on lights and fun chrome parts. some weathering and I call it complete. -
Kenworth K-123 (WIP)
Hary Bare replied to camaro73's topic in WIP: Model Trucks: Big Rigs and Heavy Equipment
Very nice! Love the paint job! Believe this will be my second big rig. -
White Freightliner wrecker
Hary Bare replied to Kodiak Island Modeler's topic in Model Trucks: Big Rigs and Heavy Equipment
Very Nice! If I hade an old beater truck laying around I would donate ,,,wait,,,I am building one LOL! Seriously, a different and excellent build! -
Freightliner cabover
Hary Bare replied to Hary Bare's topic in WIP: Model Trucks: Big Rigs and Heavy Equipment
There it is as of now. Over all I am ok with this kit, I did 1/48 scale aircraft for years and had a handle on those. In the last 14 months I have done 3 automotive models and what a differance! My first was a '57 corvette gasser, its complete minus wiring and plumbing, a 1932 Chrysler Imperial Roadster, and this kit. The Chrysler was easy! LOL! Next issue to fix here is exhaust, figure out the ladders and add more pieces. I am going to attempt an air conditioning unit for the roof and some wheel flairs. The pics shown almost everything is in mock up and held in place minimally. I still have to figure out my weathering and I purchased a trailer for this kit. Going to have to decide if a generic paint on trailer or match the black and gold, Hmmm? All comments and critics are welcomed and encouraged, Sorry for the photo quality but thats the way it is. Thanks for looking. -
Freightliner cabover
Hary Bare replied to Hary Bare's topic in WIP: Model Trucks: Big Rigs and Heavy Equipment
here are some pics -
1968 AEC Routemaster(London Bus)
Hary Bare replied to Volvoman's topic in Model Trucks: Big Rigs and Heavy Equipment
Truely a manificent build! The Gilmore museum in Hickory Corners Mi. has one and other than the paint and advertising it looks like the real bus there. Nice! -
Freightliner cabover
Hary Bare replied to Hary Bare's topic in WIP: Model Trucks: Big Rigs and Heavy Equipment
Thanks for the suggestion Robert. From the muffler and guard up, a larger diameter pipe seems in order. I will take a side to the hobby shop and see what will look "right". Still debating over straight, bologna cut or maybe clackers on top? Put the steps together,,,are you kidding ?? Made sure the notches were correct per side and they just don't jive! Any alternative suggestions? These look terrible. I am not building a show quality model here but this kit is kinda cranky! Did I pick the the most finicky kit of the bunch for a first truck build lol? I will take pics sunday. Lots done since last pics. I did touch up my bleed thru tonight and the color is right and stripes are straight. installed the tanks and test fited the fenders to see how they look. slowly but not surely. -
Freightliner cabover
Hary Bare replied to Hary Bare's topic in WIP: Model Trucks: Big Rigs and Heavy Equipment
After working on this kit off and on I finally have made some progress. The cab is painted black with gold striping. I had a little bleed thru which I hope will touch up and I will be satisfied with the finished result. The interior is finished and installed in the cab and I am now adding tanks, bumpers, stacks,,,,. Speaking of stacks, I am unhappy with the look of the kit supplied stacks, is replacement with tubing the way to go? I would prefer to put clackers on the tops or bolgna cut the ends instead of straight cuts. I am also thinking of putting some flares on the front wheel openings. Any experiance with these? My front axle sectioning seems to be just right but to get the "well used owner/operator look " I want I think this would be a nice touch. I plan on weathering this model soon, looking for the "nice truck but needs a good cleaning and polish and touch up" any suggestions would be welcome. I will post some pics soon. Thanks in advance! -
Freightliner cabover
Hary Bare replied to Hary Bare's topic in WIP: Model Trucks: Big Rigs and Heavy Equipment
Thats all I've done in the mock up stage so far. The body isn't flush with top of grill in pics, I put the interior tub in for shfter alignment, that was my focus. Time to the the paint stirred up! -
Freightliner cabover
Hary Bare replied to Hary Bare's topic in WIP: Model Trucks: Big Rigs and Heavy Equipment
Thanks for the input Ben. Gunna try to load some pics. A little more filling on front axle, Cab supports good with interior tub in, shifter mount lines up nice. The top seam still shows a line after second primer coat, I don't like it but,,,,,? Had to use what filler I had that wasn't dried up, have to get some bondo putty tomorrow. Axle will be finished then. -
Cummins finished!
Hary Bare replied to Ben's topic in WIP: Model Trucks: Big Rigs and Heavy Equipment
DANG! That look Great! Makes me want to go that route on my engine,,,,,,,do I want to? Then the rest of the truck has to match. Can't wait to see the rest of the build! Thanks for sharing. -
SUPERB!!
-
Transcraft 45' split axle step deck
Hary Bare replied to Ben's topic in WIP: Model Trucks: Big Rigs and Heavy Equipment
Trailer is truely a piece of work! That old Pete looks great too! Thanks for sharing! -
Freightliner cabover
Hary Bare replied to Hary Bare's topic in WIP: Model Trucks: Big Rigs and Heavy Equipment
I will post some pics Sunday afternoon. Did some more seam work and prepped and light primer coat on cab. As careful as I was the top has a noticeable line across the roof. Not a seam but noticeable. Hopefully second prime and sand will reduce it more. Pretty good luck keeping rivet detail, hopefully will stay that way. Front axle is stable now. Did some filler work on it. Got the front wheels to support the chassis, body mounts on and adjusted. Had to raise them a smidge to get a level cab. Thinned the front of the cab somewhat to get the grill to fit flush with the front panels. A little more work needed here. When finished should have reall nice cab tilt and cab mount detail should be nice. I am really having fun with this build so far, put the engine block together and am wondering about the color it should be? The box art shows a pale federal yellow shade, is it even close? Is the chrome on the engine correct? (?) I am going to look around here but is someone knows, please share lol.I have a ton of questions but I will address them as the build progresses. Have to look at air conditioners so I can make a dandy. Thanks for sharing and your suggestions! Billy -
Freightliner cabover
Hary Bare replied to Hary Bare's topic in WIP: Model Trucks: Big Rigs and Heavy Equipment
Sectioned the front axle, got it where I want it. Started to putty body seams and cleaning up mold lines. If all goes well tomorrow I can put the chassis on wheels and mock up the body. Looking for an air conditioning unit to put on the roof. Any ideas where to find one or is it easier to just build one? Going to look at some builds to check ride height front wheels to body . -
Freightliner cabover
Hary Bare replied to Hary Bare's topic in WIP: Model Trucks: Big Rigs and Heavy Equipment
I am going back to the bench to ponder the issue, I will take some pics and post if interested. I am a slow poke but am looking forward to this build. -
Freightliner cabover
Hary Bare replied to Hary Bare's topic in WIP: Model Trucks: Big Rigs and Heavy Equipment
Thanks for your input on this matter. I prefer to use what the kit was supplied with if possible. I checked out Dave's builds and they are very very nice. The aftermarket axle is right on. Most likely I will have to both section the axle and trim some brake hardware to get the results I need. The cab really wasn't an issue, as I sanded both halves and glued small sterene strips to the inside for alignment. My seam is minimal and should be able to fill with putty and smooth out if I am carefull. My plan is a black cab with gold striping, alclad the wheels and give the truck a owners pride look, but well used. The interior will be a dark red or maroon, hopefully I can make some accessories to add to both the interior and exterior for added appeal. I have two older trailer kits which prompted this build, a '50's car hauler and the two trailer kit, unfortunately neither is actually a good fit, for this kit or my Ford Aero, which really looks like a nightmare to build. Thanks to all who input on these forums. The information is priceless for our hobby. The pics are fun too!