Search the Community
Showing results for tags 'AMT'.
-
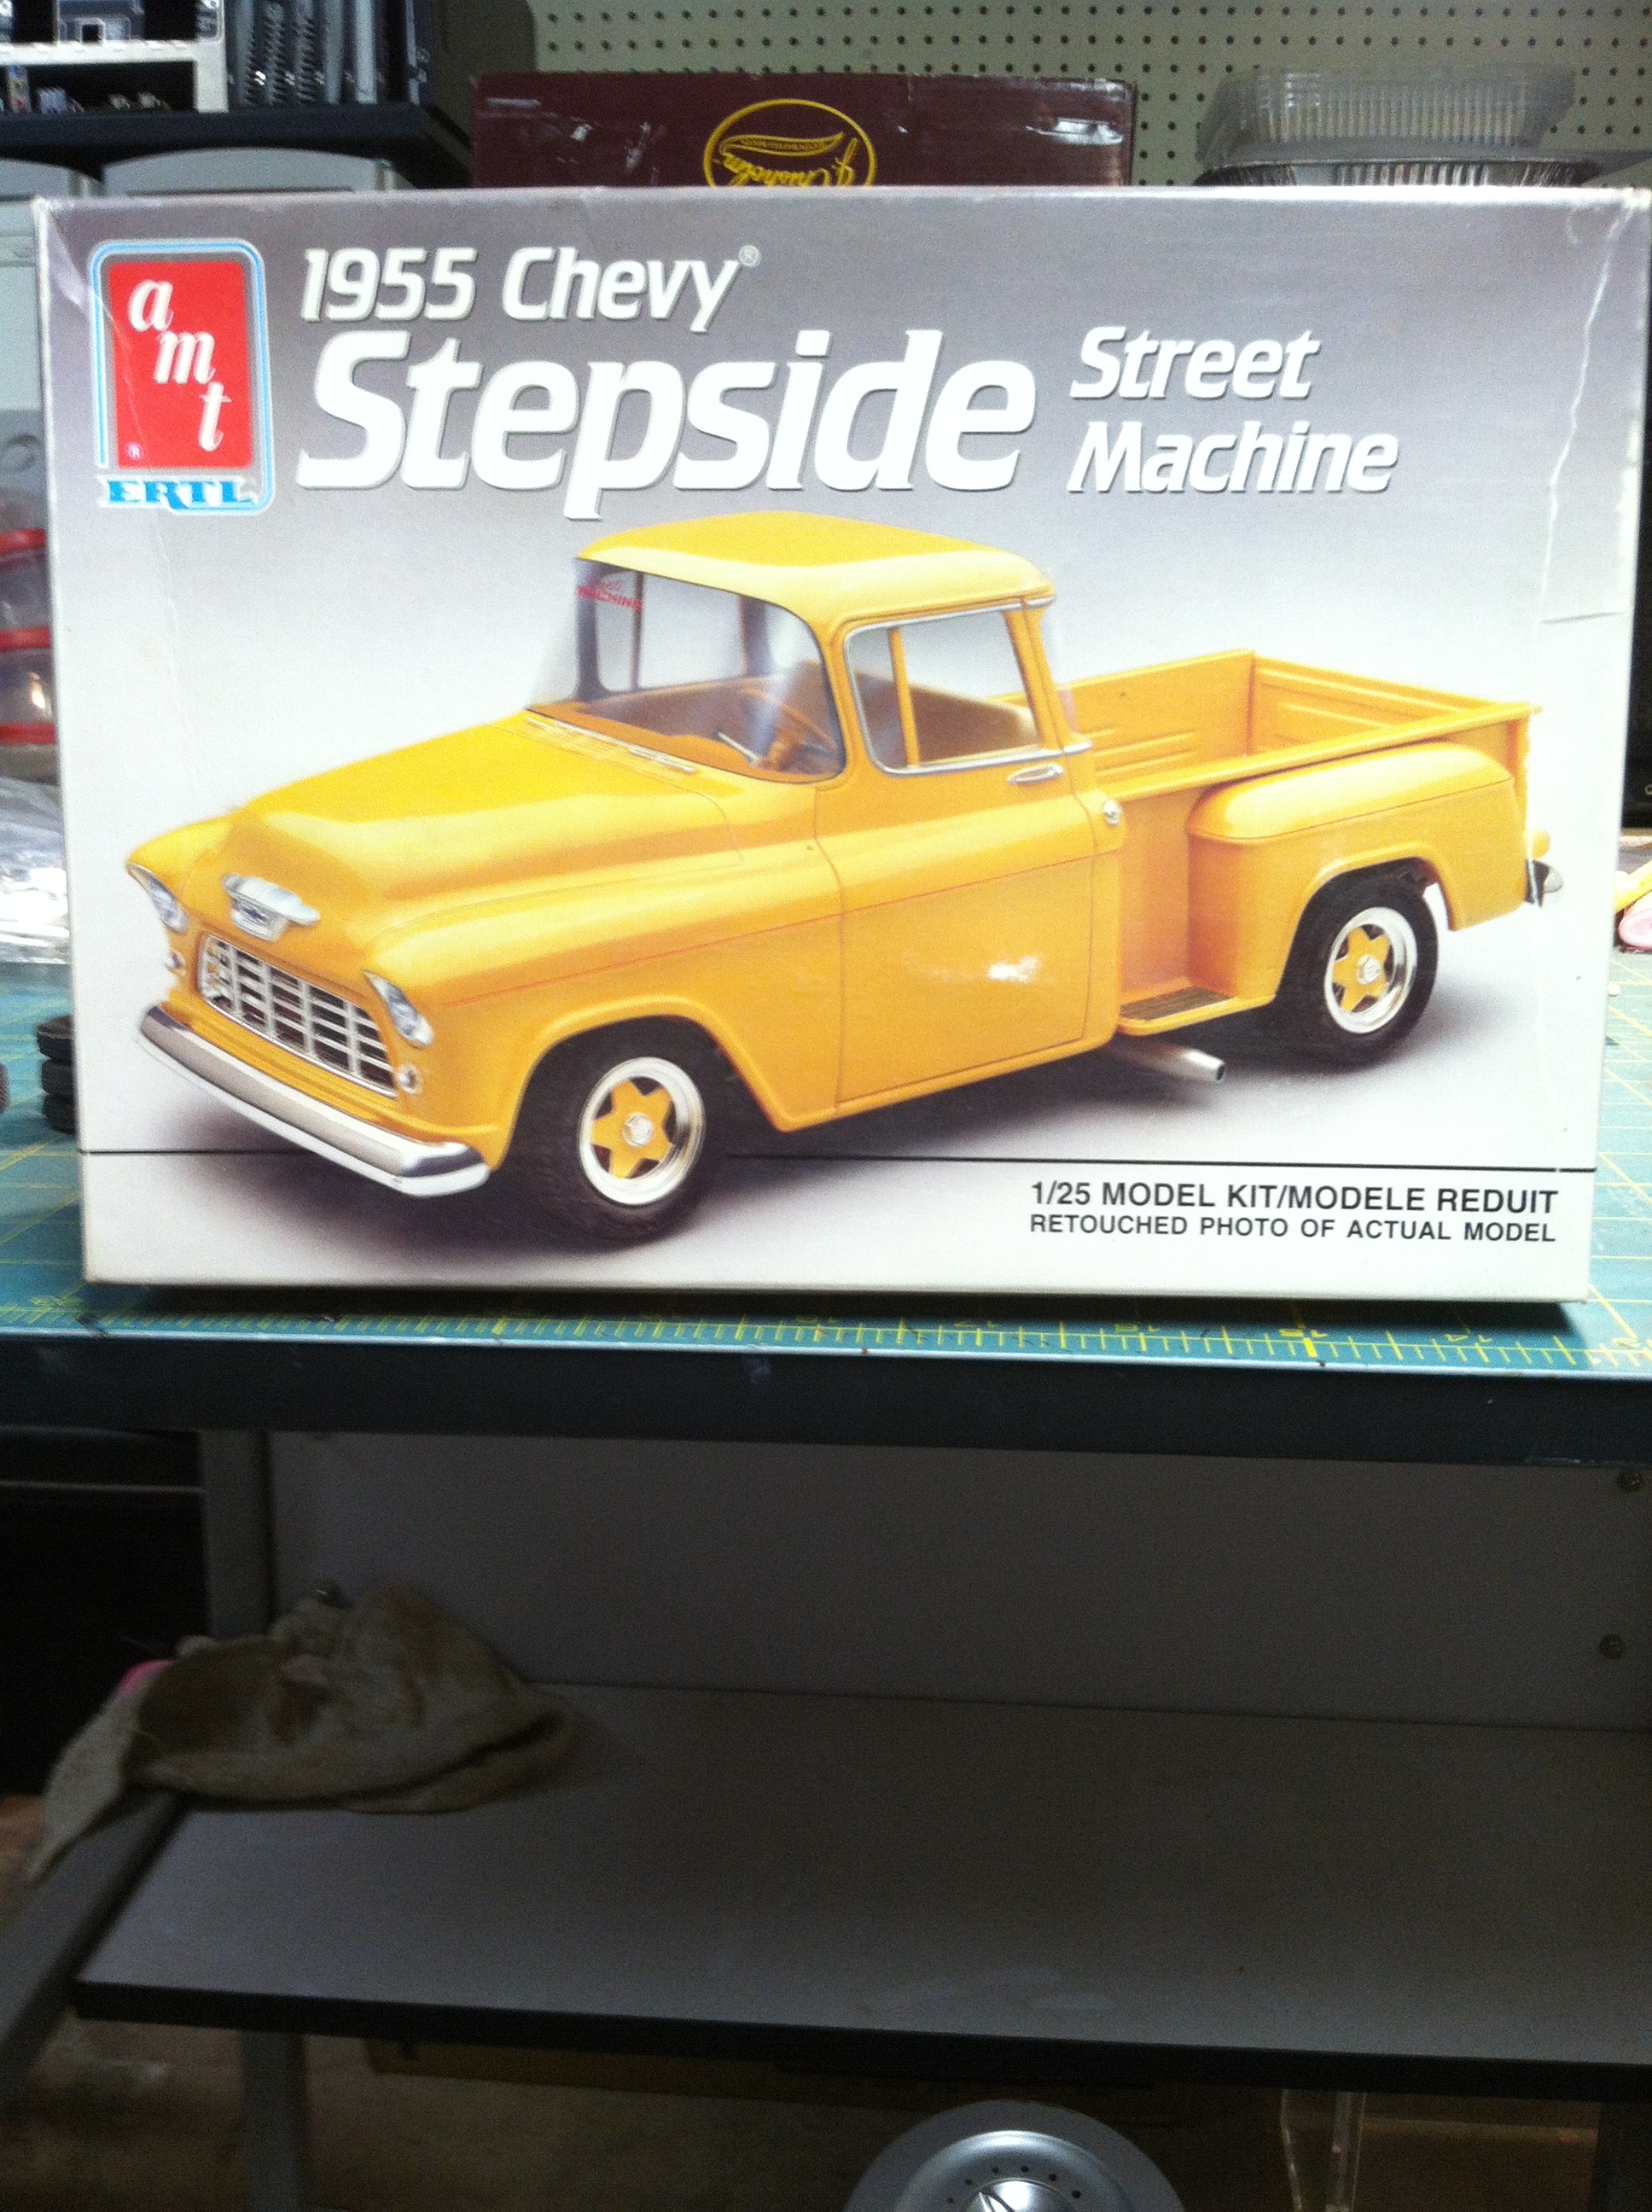
 Ok, so I decided to see if I could create Philo Beddoe's pickup from the movie "Every Which Way But Loose". I knew from memory it was a tri five Chevy. After a quick search on the internet, I discovered that it was a 55 Chevy step side 3204. The model kit I am using is a Chevy model 3104 with a 114 inch wheelbase (short box). The build requires a stepside 3204 which has a 123.25 inch wheelbase. To do this I will use the amt 55 Chevy Stepside Street Machine for the majority of the build. I will use an old busted up Chevy Cheyenne stepside pickup for the longer 90 inch bed required. I will have to cut it down a bit but the floor and sides will work great for my needs.
-
 Trying to find out the kit number for these decals which are supposed to be for an AMT 32 Ford. Not sure if they were for a coupe, roadster or ? Thanks in advance
-
Anybody (looking at you, Erik Smith ) have any content pics of the 1/25 AMT Mazda Rx-7 kit(s)? Not expecting much from a kit with a "one piece engine compartment", but I think this is the only 1/25 scale first gen RX-7, and it does have a separate hood, so maybe a halfway decent engine compartment? The body looks a bit "stubby" to my eyes, but hard to tell for sure. Mikado version:
-
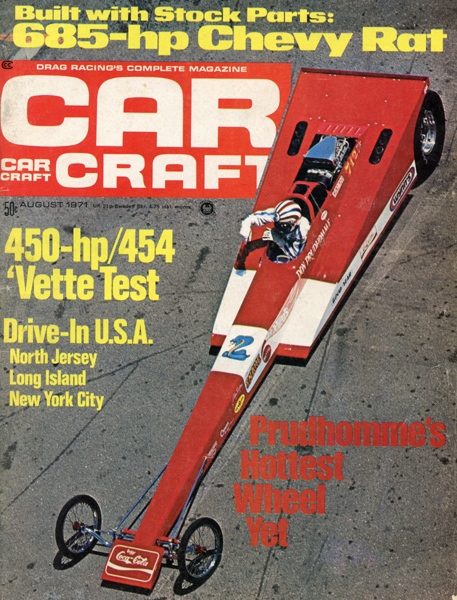
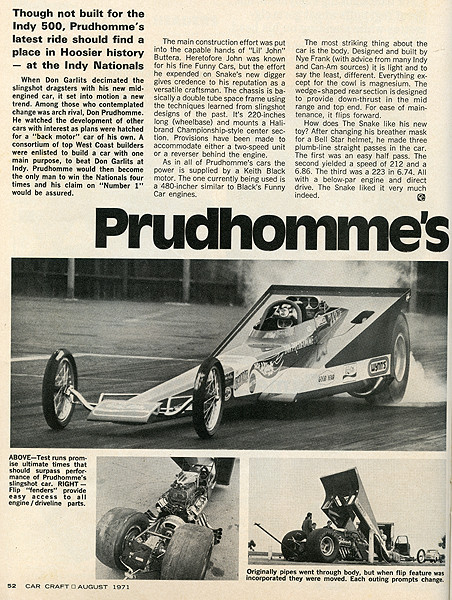
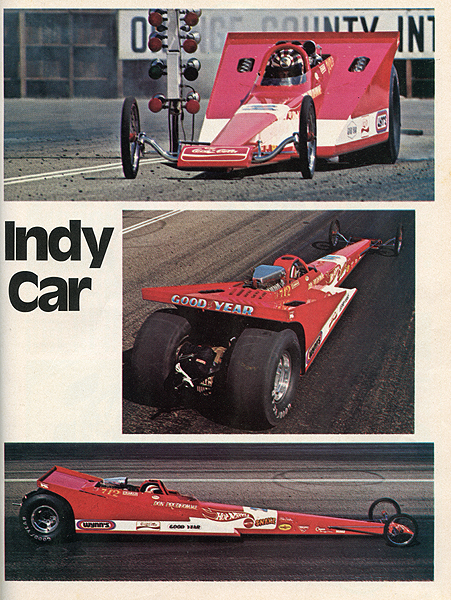
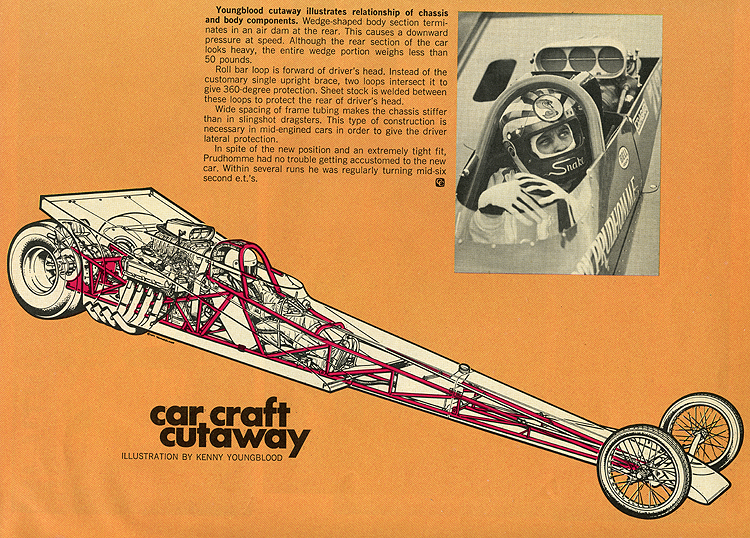
I did a search and didn't find anything on this new kit so I hope I'm not going over covered ground. I got my hands on this kit yesterday and have been digging in to it. The frame, engine, etc are all from the original MPC Garlits mid-engined Swamp Rat 1R. That makes the frame incorrect as Prodhomme's car was built by Lil' John Buttera and didn't use a Garlits' frame. I don't see this as any problem however on a full body car like this because the only part of the frame that really shows is the roll cage. It's different from the kit but that difference is easy enough to correct with some Evergreen rod. The body, which on the 1:1 car was built by Nye Frank, appears to be an all new piece. It's very close in my initial inspection although the coming around the cockpit may be a little too high, but we'll see. The engine is typical for MPC and would probably best be replaced by one from the early Revell funny car and dragster series kits. The valve covers and injector from Revell are much closer to correct than what's in this kit. Anyway, that's just my first impressions upon opening the box, so here are some reference photos so you can decide for yourself.
-
Nice to see this one come back. Same kit but with new decals. Here is the kit!
-
I got this gift for my birthday from my Mother In Law back in the summer, and I've been thinking I wanted to tackle a (mostly) box stock showrod build for a while...so here goes! I'm going for a straight replica of the box art - I think it'll look great with the miniature display box that comes with this kit: This is really nicely done kit, for the most part - a huge sheet of decals, the miniature box, an AMT toolbox sticker and 4 (!) sets of glass in various colors First up, was ordering some supplies, so I got some Tamiya rattle can black for the 'body' and chassis, and spent some time looking for a yellow/gold candy that would match the box art nicely. I think I found it!! First up, gluing the engine halves and prepping the engine parts You can't see the engine in the box top art, but it's on the side of the box so I'm going to replicate that. Candy yellow block with plenty of chrome. Whilst I'm working on the yellow parts I figured I'd prep all of them and paint them all in one go - especially as they're going to be a multi-coat process. Next up was the pontoons - I smoothed out some little imperfections with some putty, and added some thin styrene strips to help locate them good and square One of the pontoons has a little red and white flag on, and the other a chromed speargun. Fun thing to note - the instructions show them reversed, not that it makes any difference to the build. The flag has a locating hole, but the speargun doesn't, so I drilled some holes in the back of the gun, carefully so as to not mark the chrome on the top, mounted pins, and made a couple of holes in the pontoon to help locate it when it's done. Excuse the wonky pin - it moved when I was photographing it as the glue was still drying. Next up, the rear aqualungs. I clamped them together overnight to dry, smoothed them out and primed to check them. Then, I assembled the regulator valve and some of the pipework The headlamps have some little shark fins to attach to the top of them. I was trying to think of a decent way to be able to keep the parts separate so I can paint the lamps black and the fins yellow like the box art easily...but they're too small to pin really and there's no holes or pegs or anything to locate them so I decided to glue them now and mask later. A harder painting job, but it'll look better in the end With them done, I glued up the 'body' and used a bunch of rubber bands to keep it in place overnight. As this will be gloss black, I really want to make sure that seam doesn't show so I'm going to prep this part carefully Whilst I was looking at the body, I came up with the idea of having a little working interior light in thereto illuminate it - kinda like a fish tank has! There's not much interior detail, but I figured it could be a cool detail to have the windows glow a little. I spent some time researching LED lighting kits for trains, dolls houses and stuff like that but couldn't find anything cheap enough or small enough. Then, I was getting off the train the other day and walking past a local grocery store and they had some little 50 cent light up keychains. Perfect! That little light, in the bottom of the pic, will work perfect! Small enough that I can hide it in the 'lid' of the body, but bright enough that it'll look cool and I can mount it in there with some poster tack or similar so that I keep this thing basically box stock. And a quick test...excuse the blurry photo... Perfect! You can see a little filler showing through the body here - there were some sink marks that I cleaned up in there before gluing it. Whilst I was messing with the interior, I decided to mock up the floor (which incorporates a seat and the pedals) with the periscope that also acts as steering in this design. The fit of the periscope to the floor wasn't great - really sloppy...so I found some plastic rod that gave a nice snug fit, drilled out the floor and inserted a short length of bar in there Worked perfect! Now it fits without even needing any glue, although it'll get a tiny drop when it's assembled anyway. So, with most of the candy yellow parts prepped and test fitted I'm just racking them all up ready for primer, then silver, then candy yellow Need to wait for the snow to clear here though, its way too cold to do any painting at the moment. Plus, I ran out of room on my turntable pretty quickly, so I need to find something else to mount them on. More soon though!
-
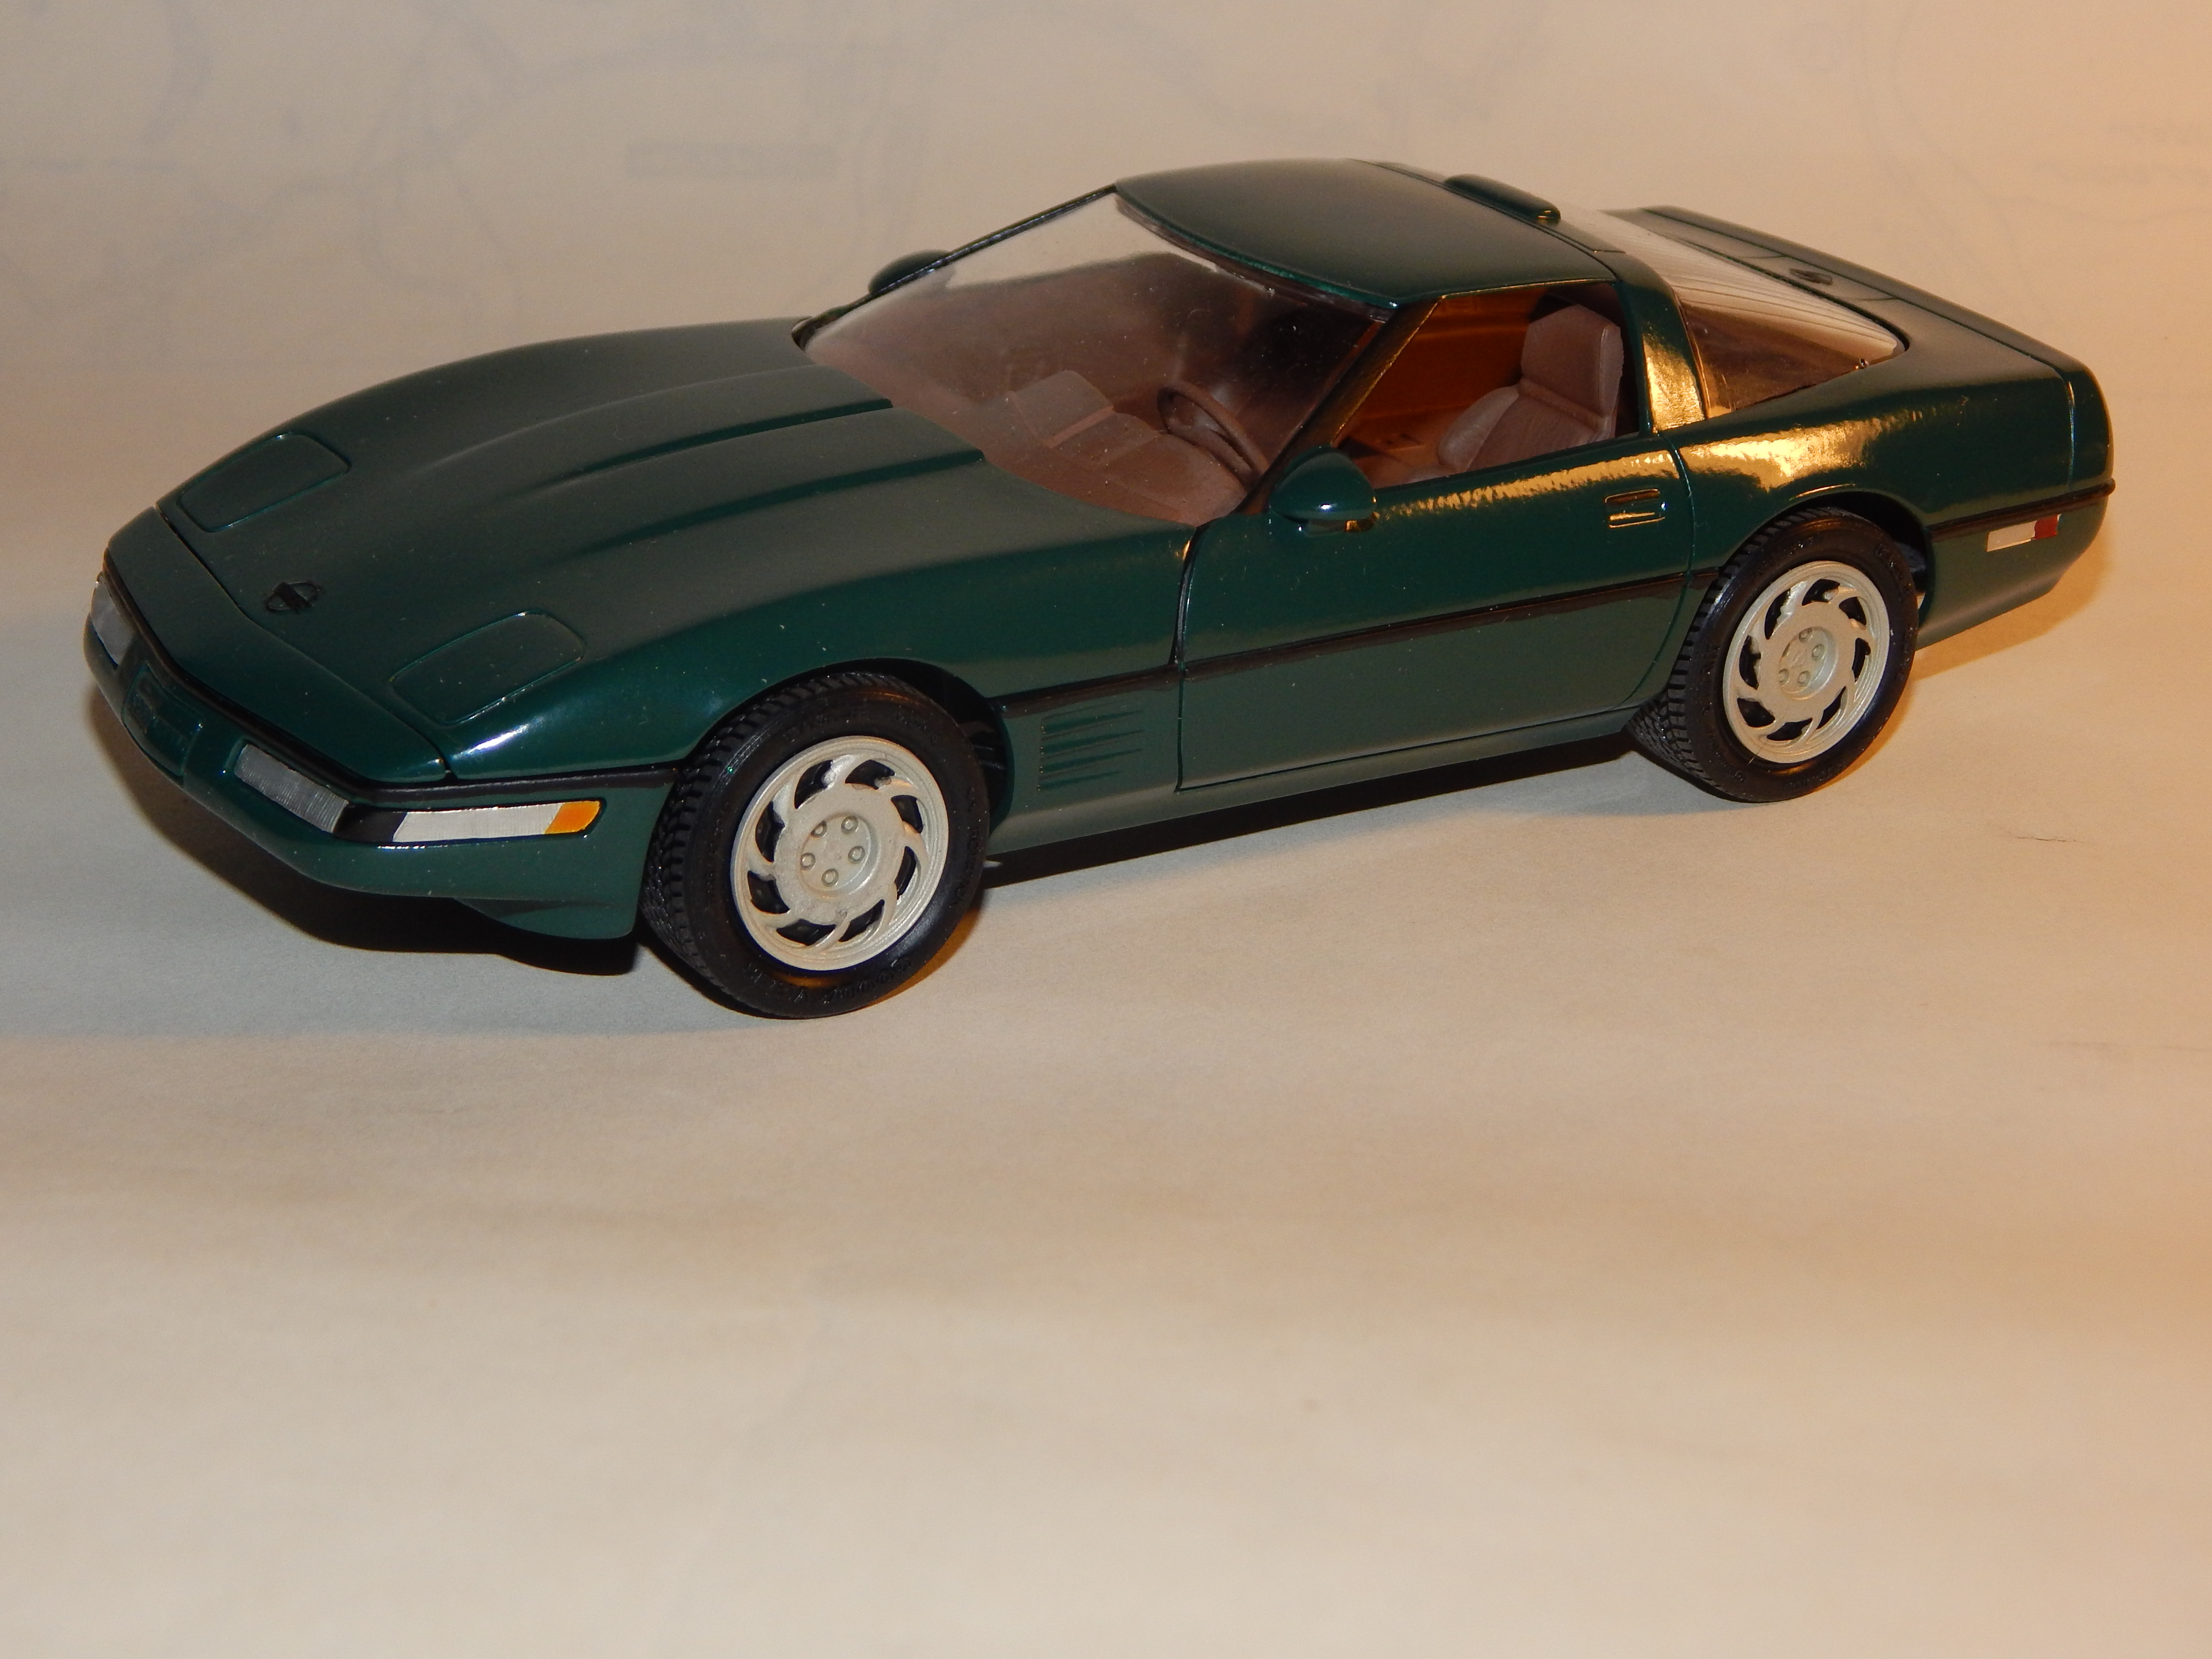
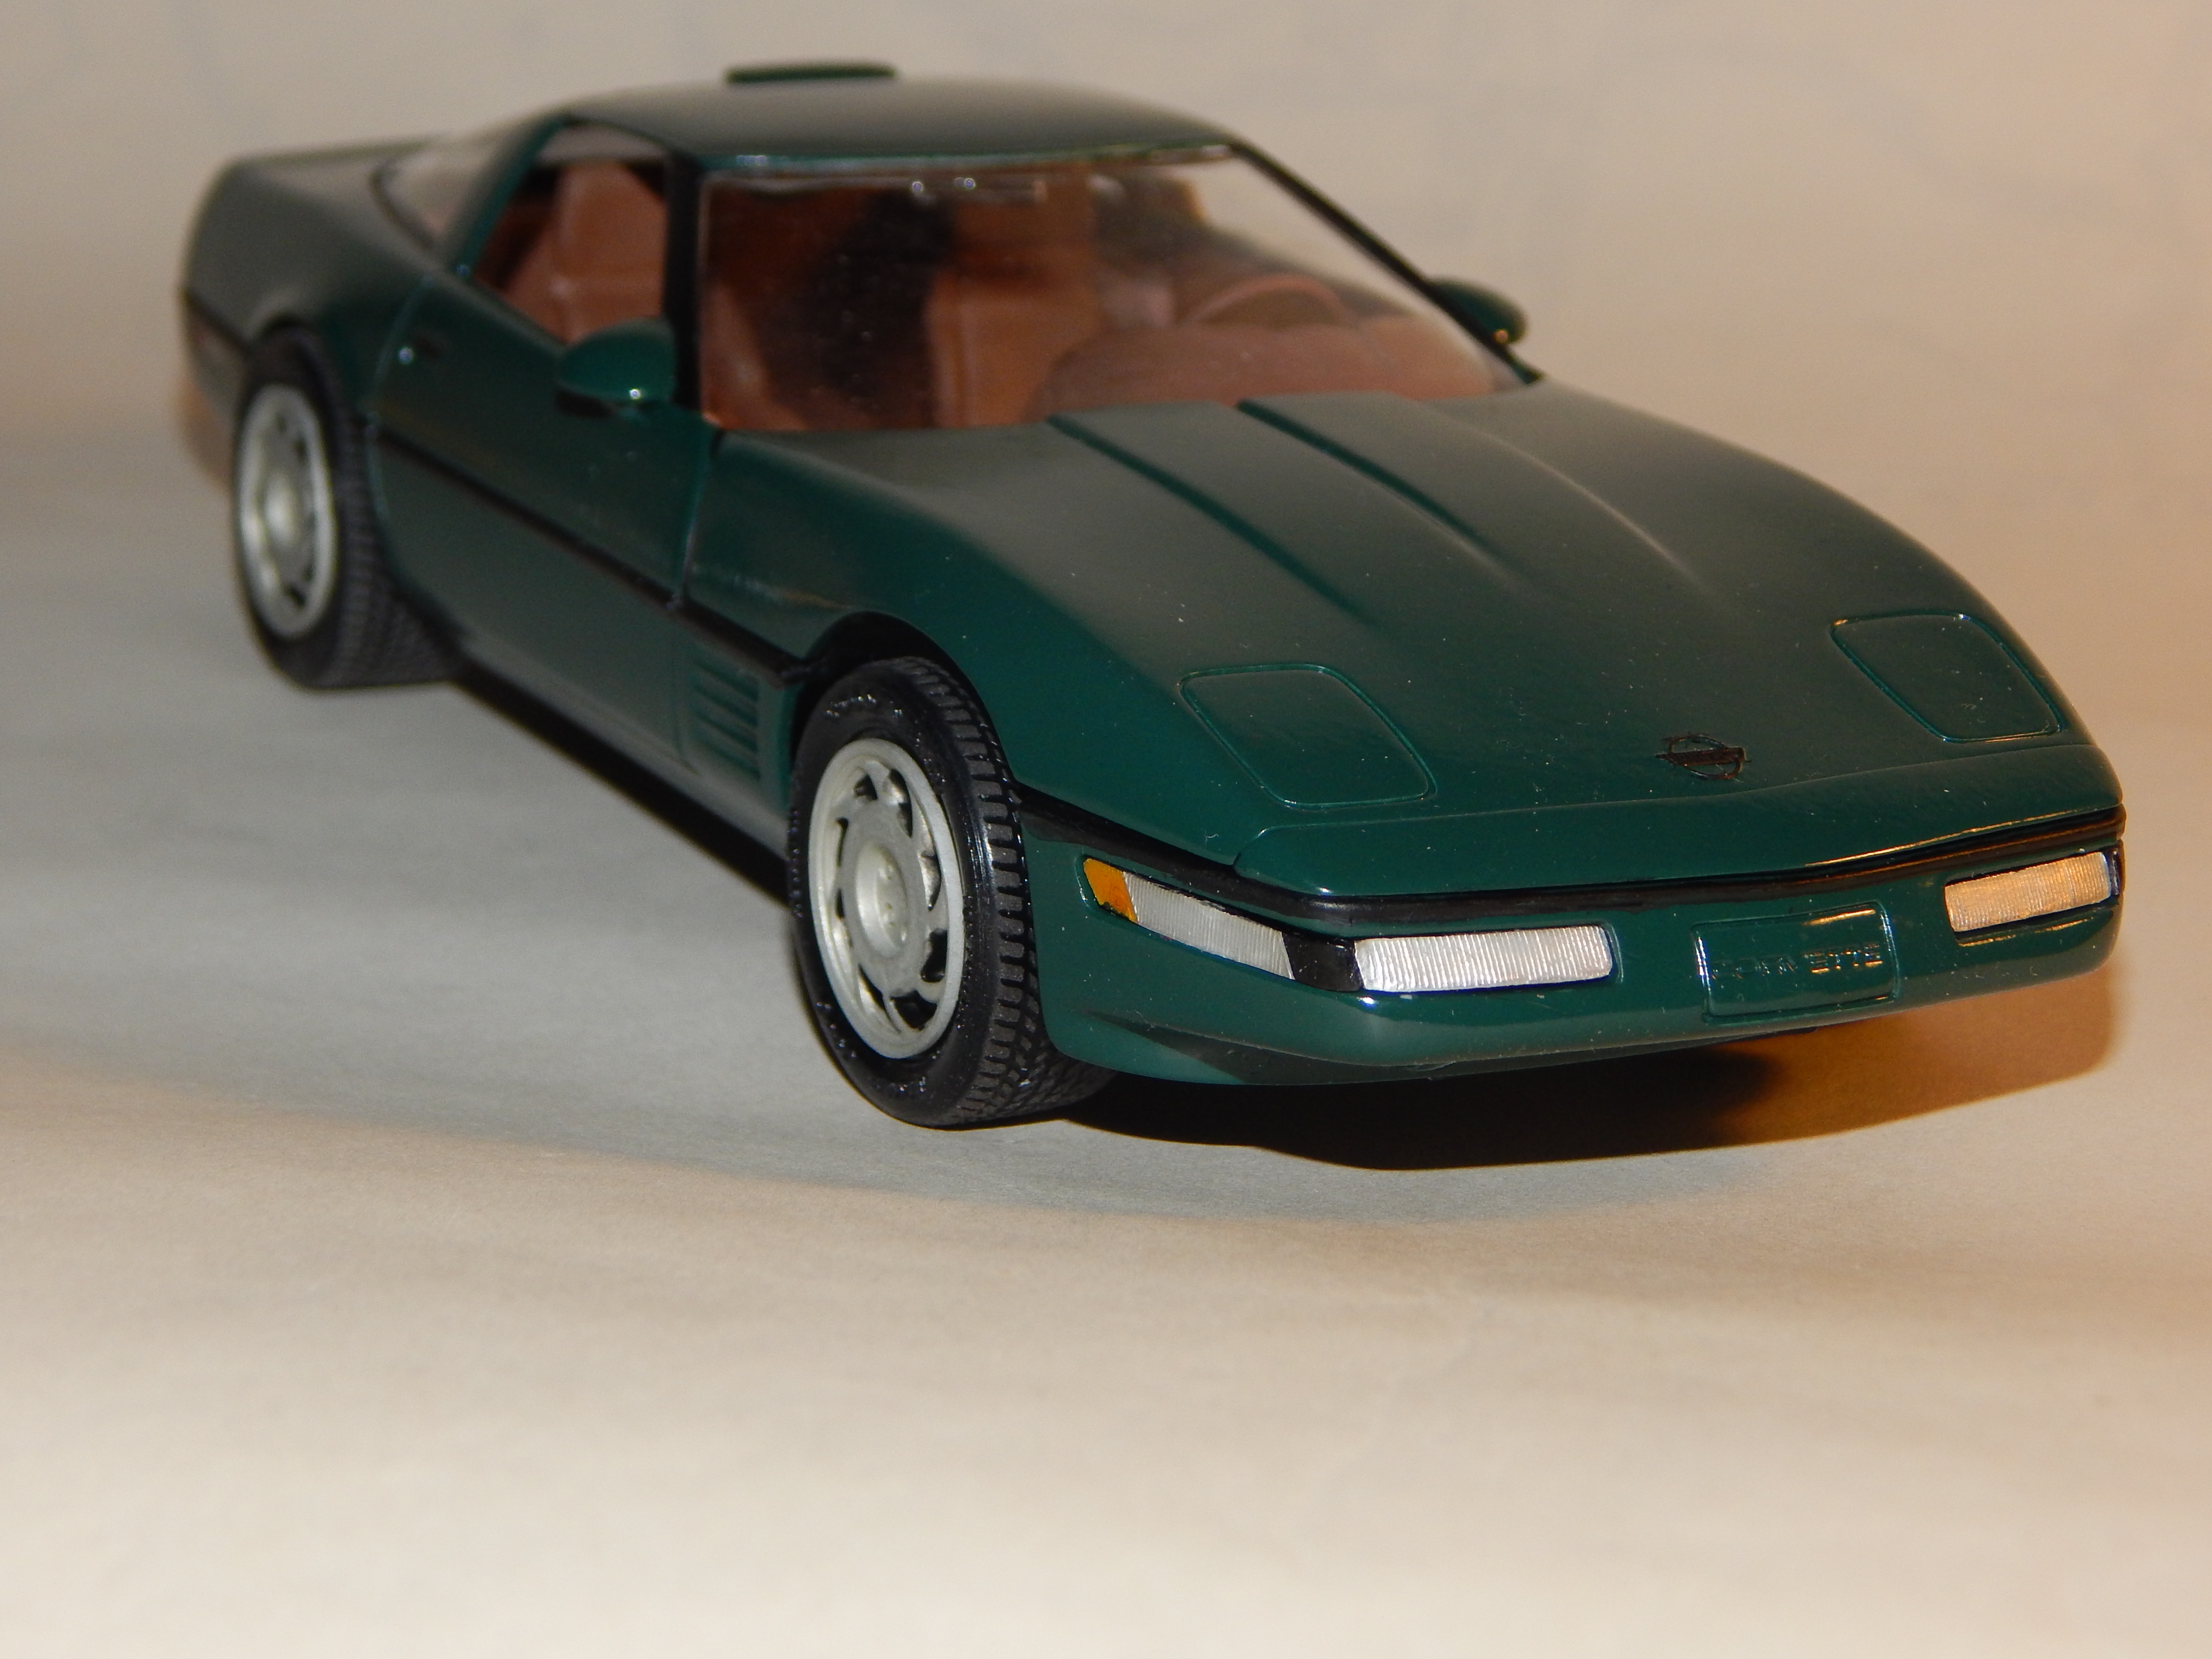
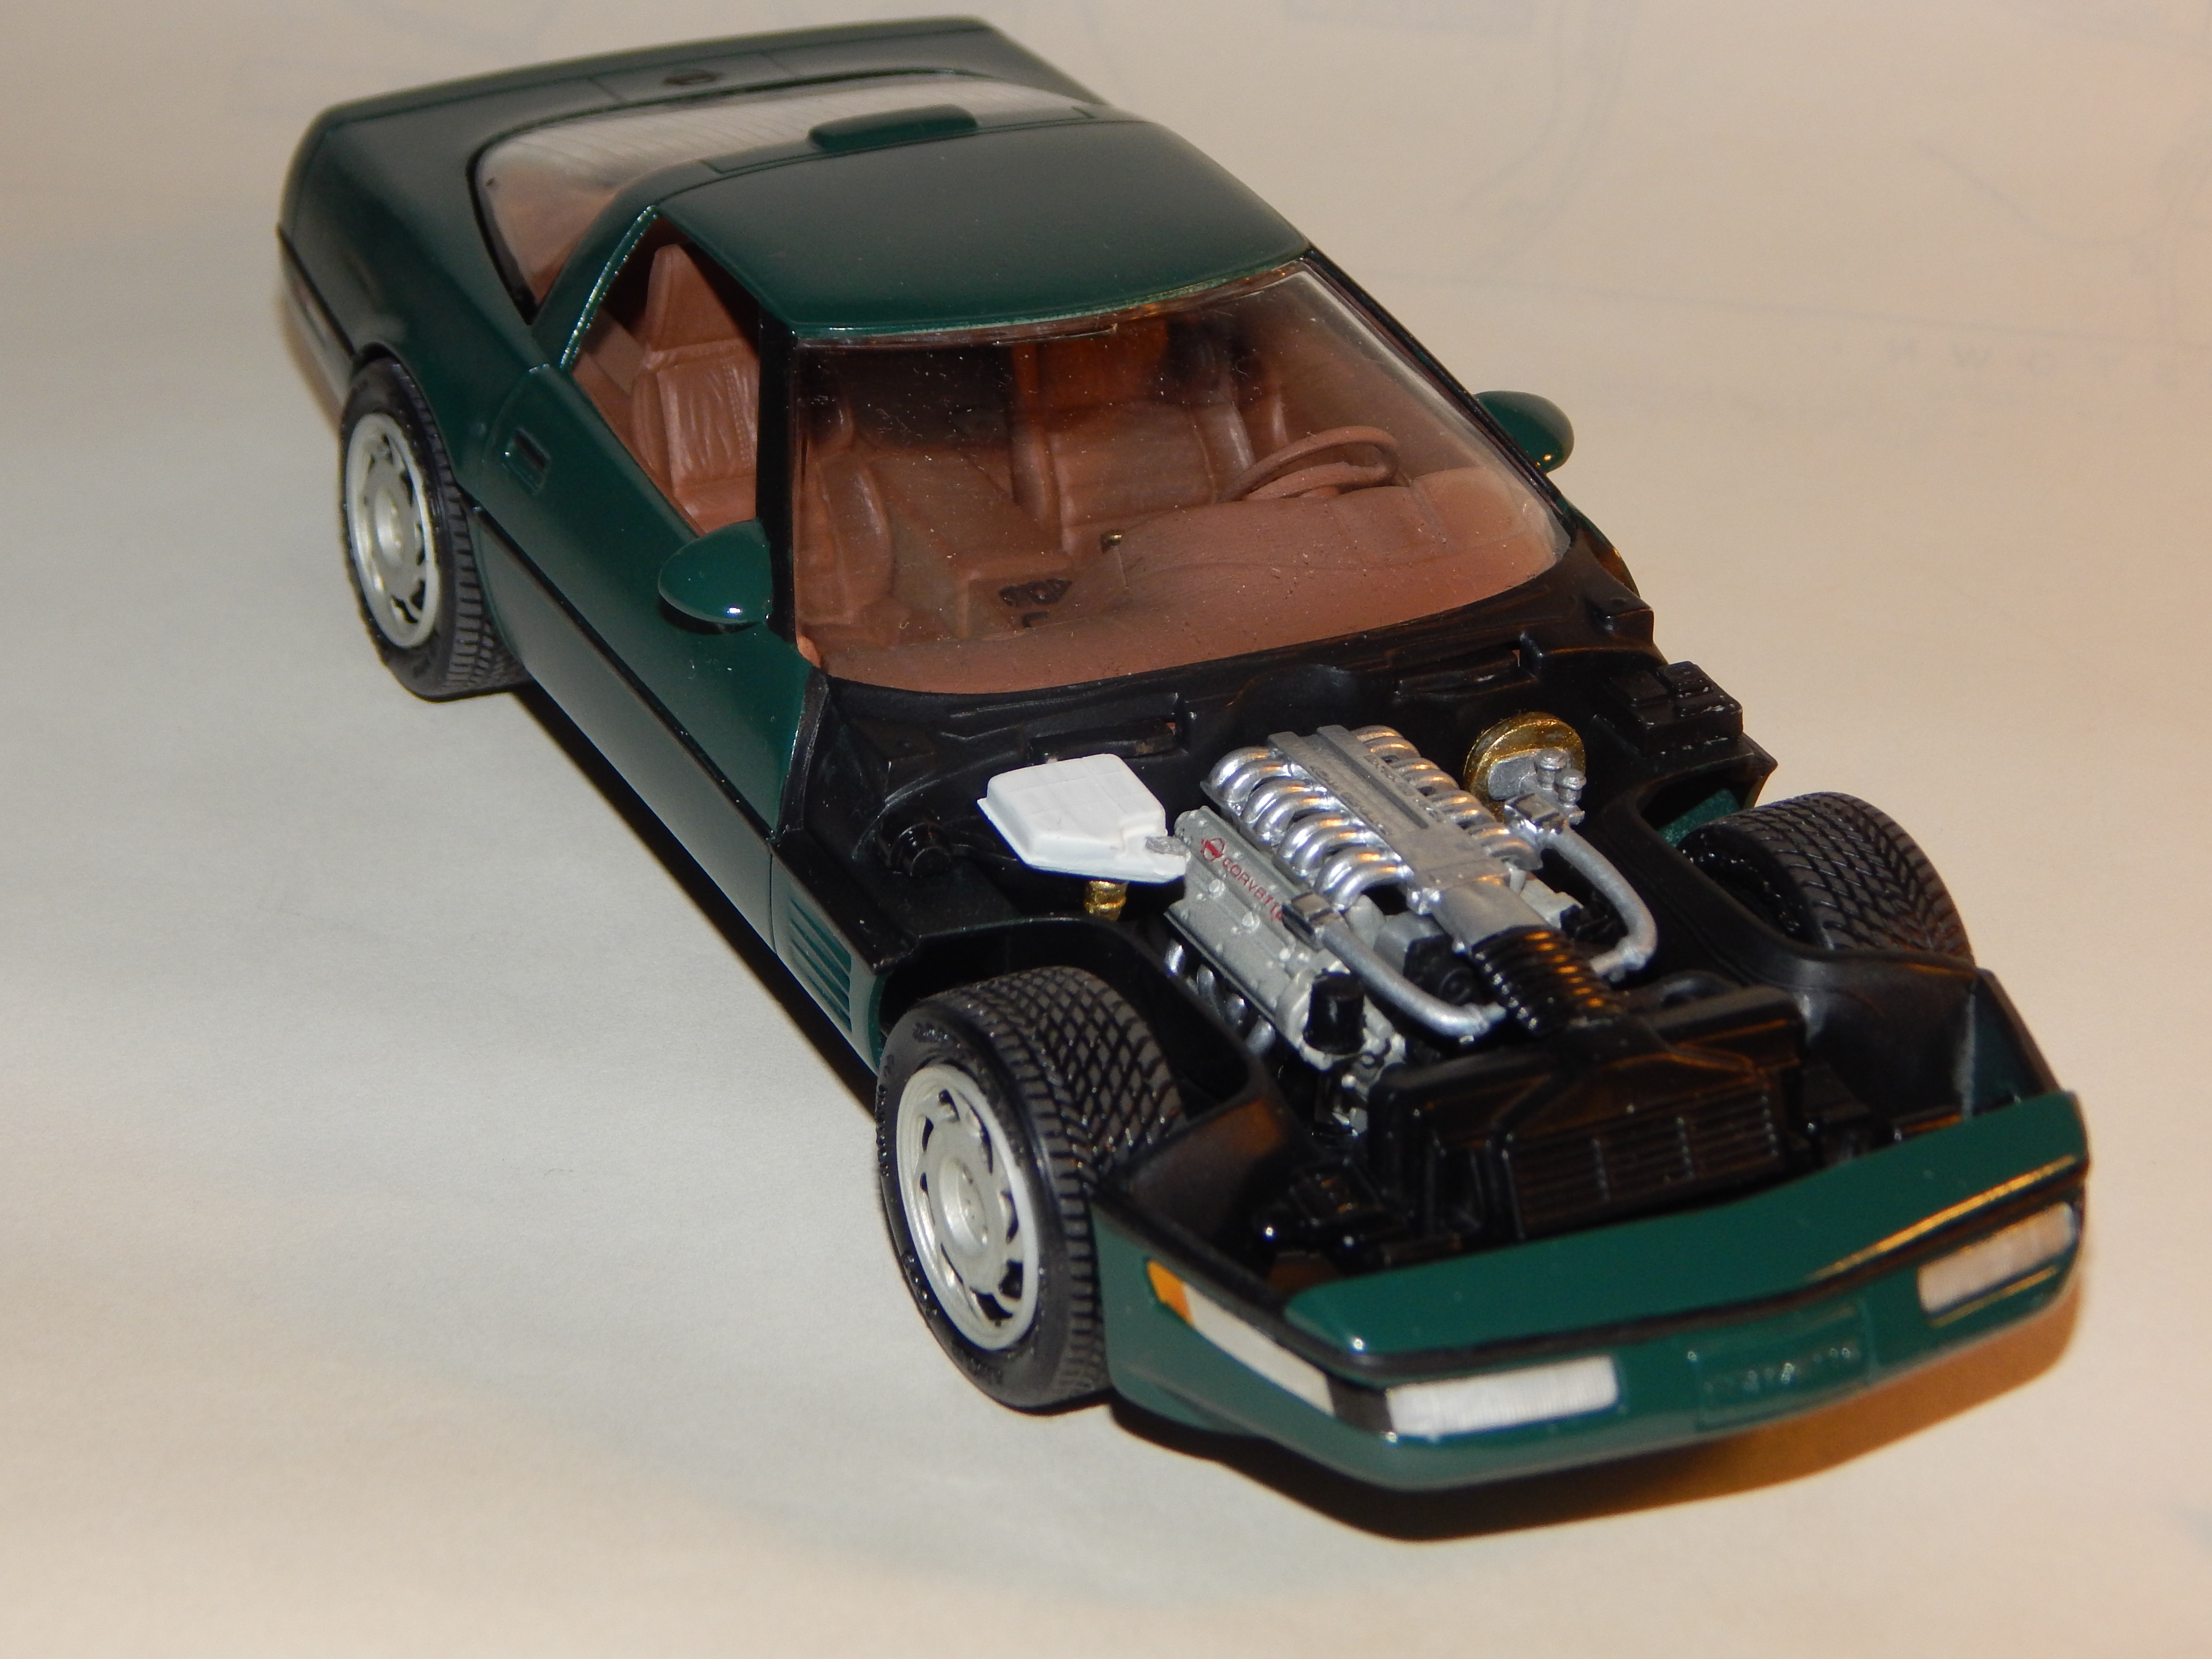
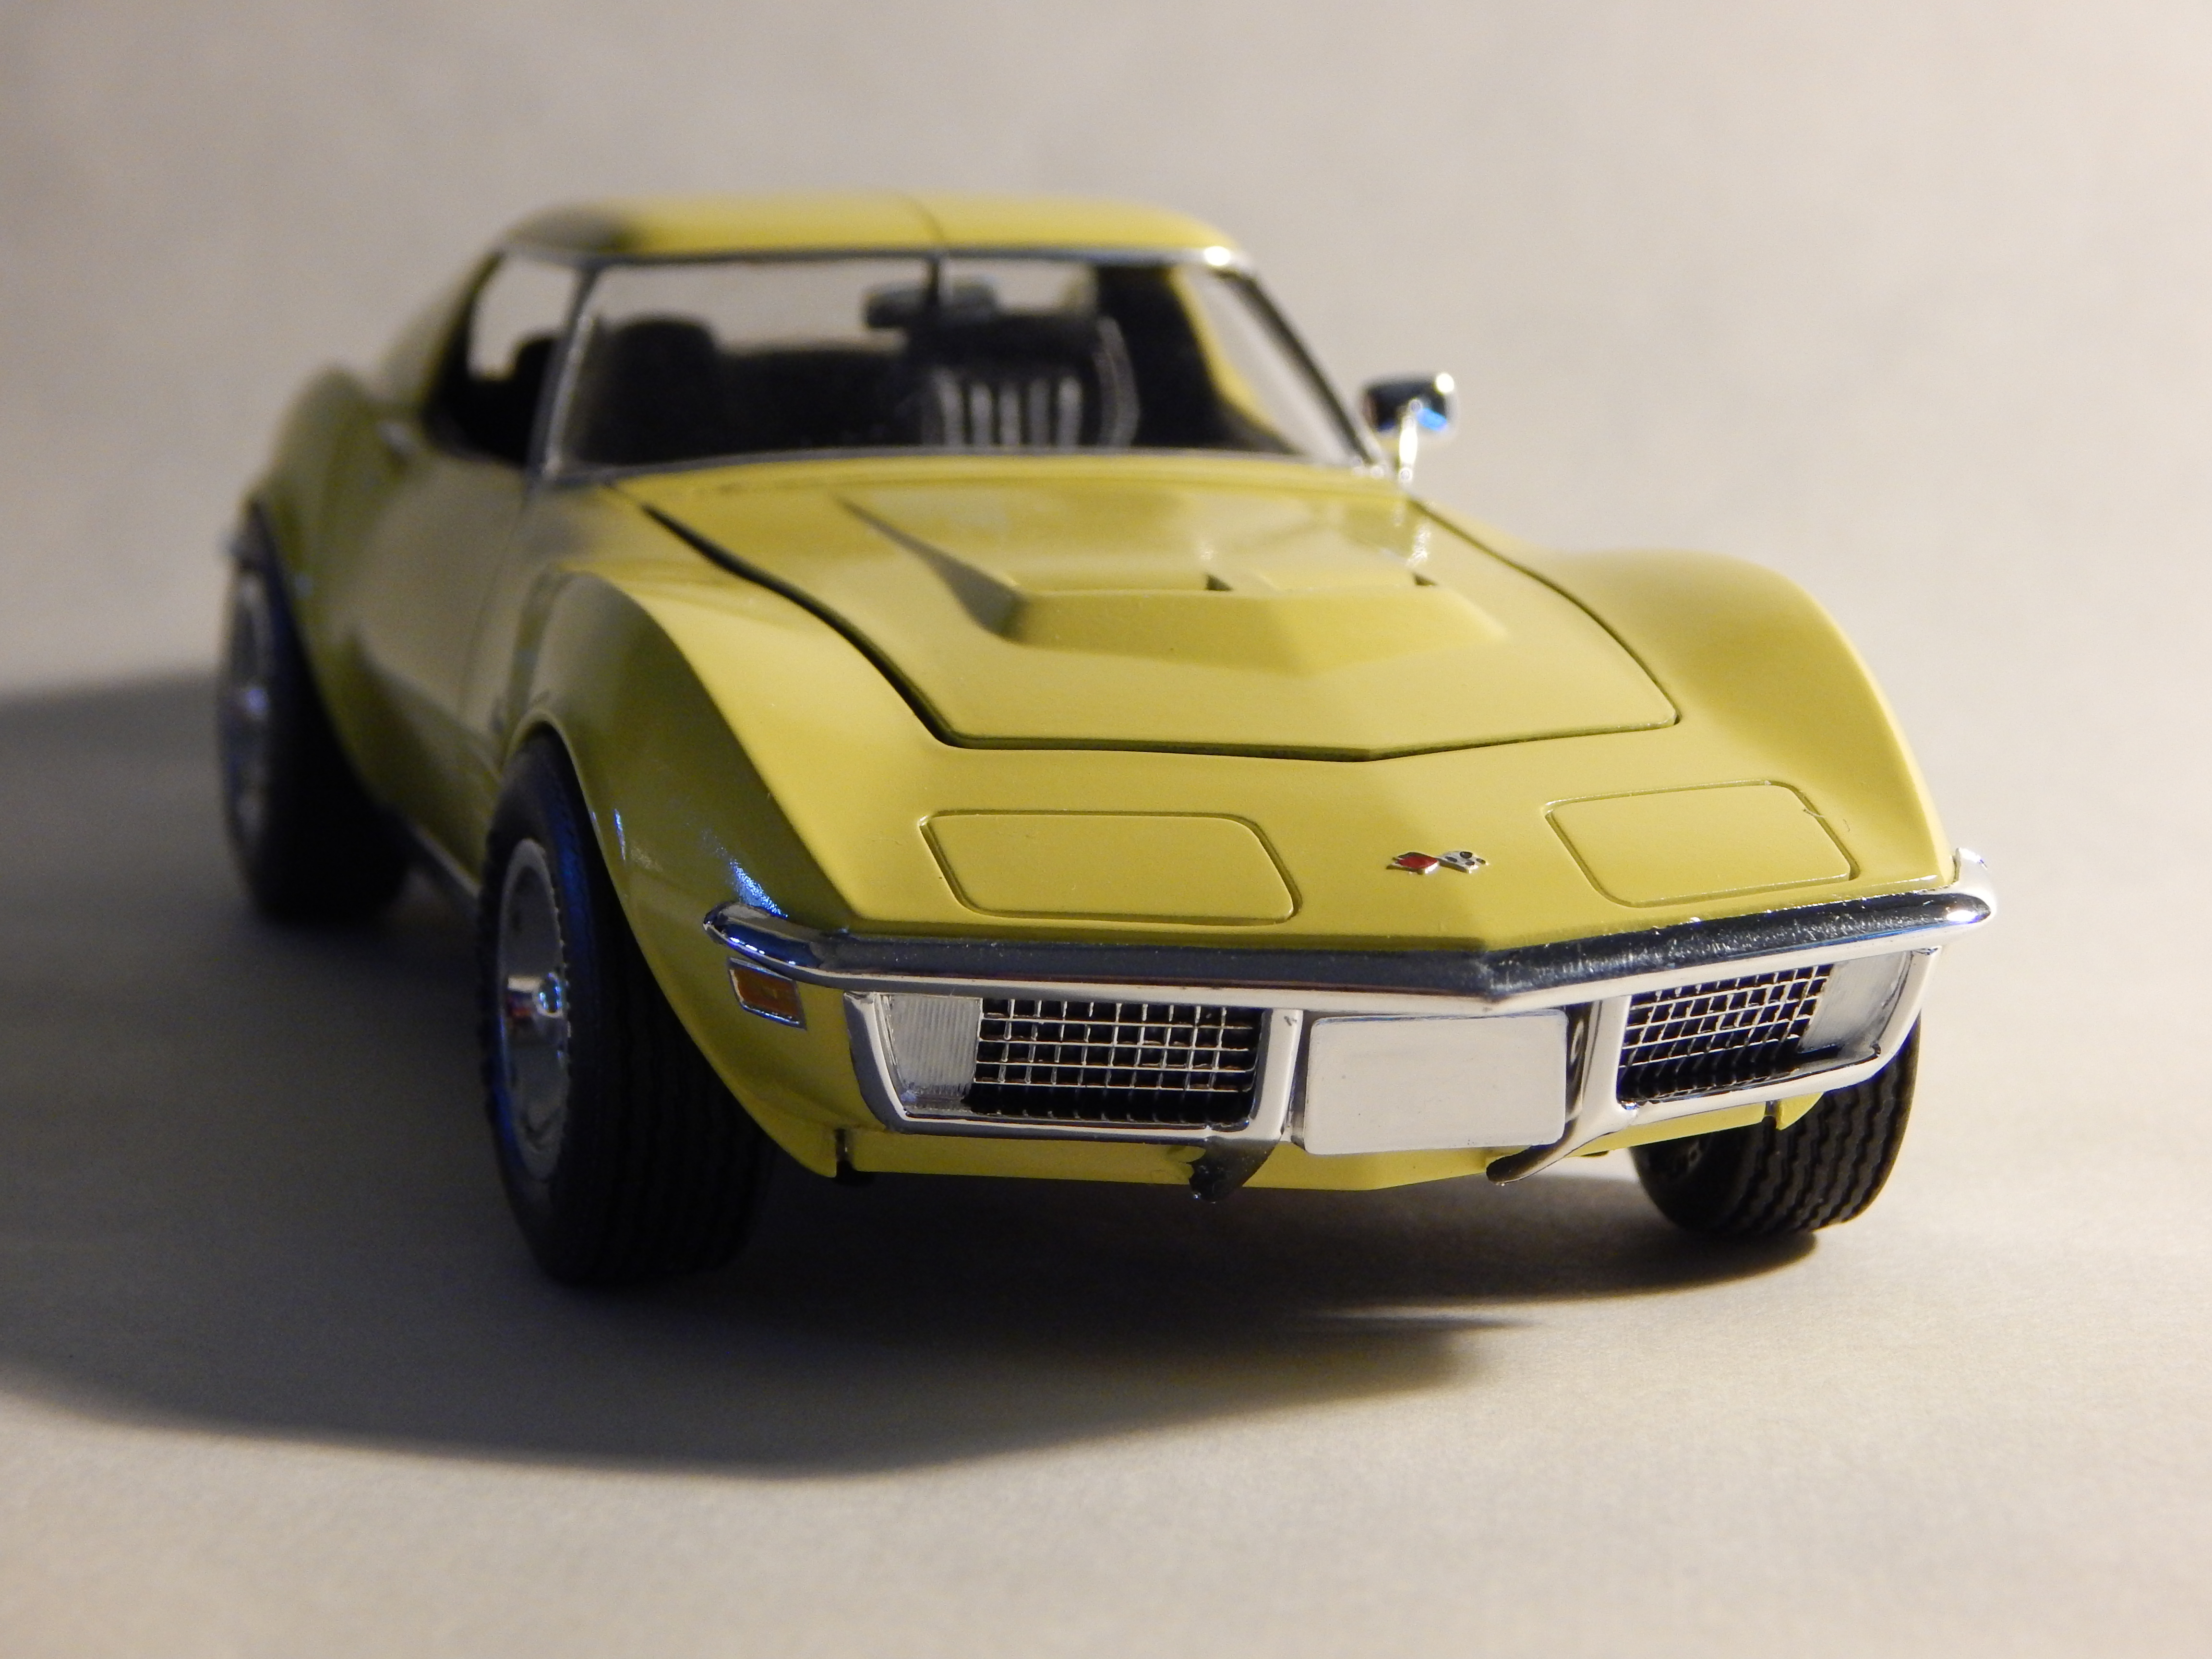
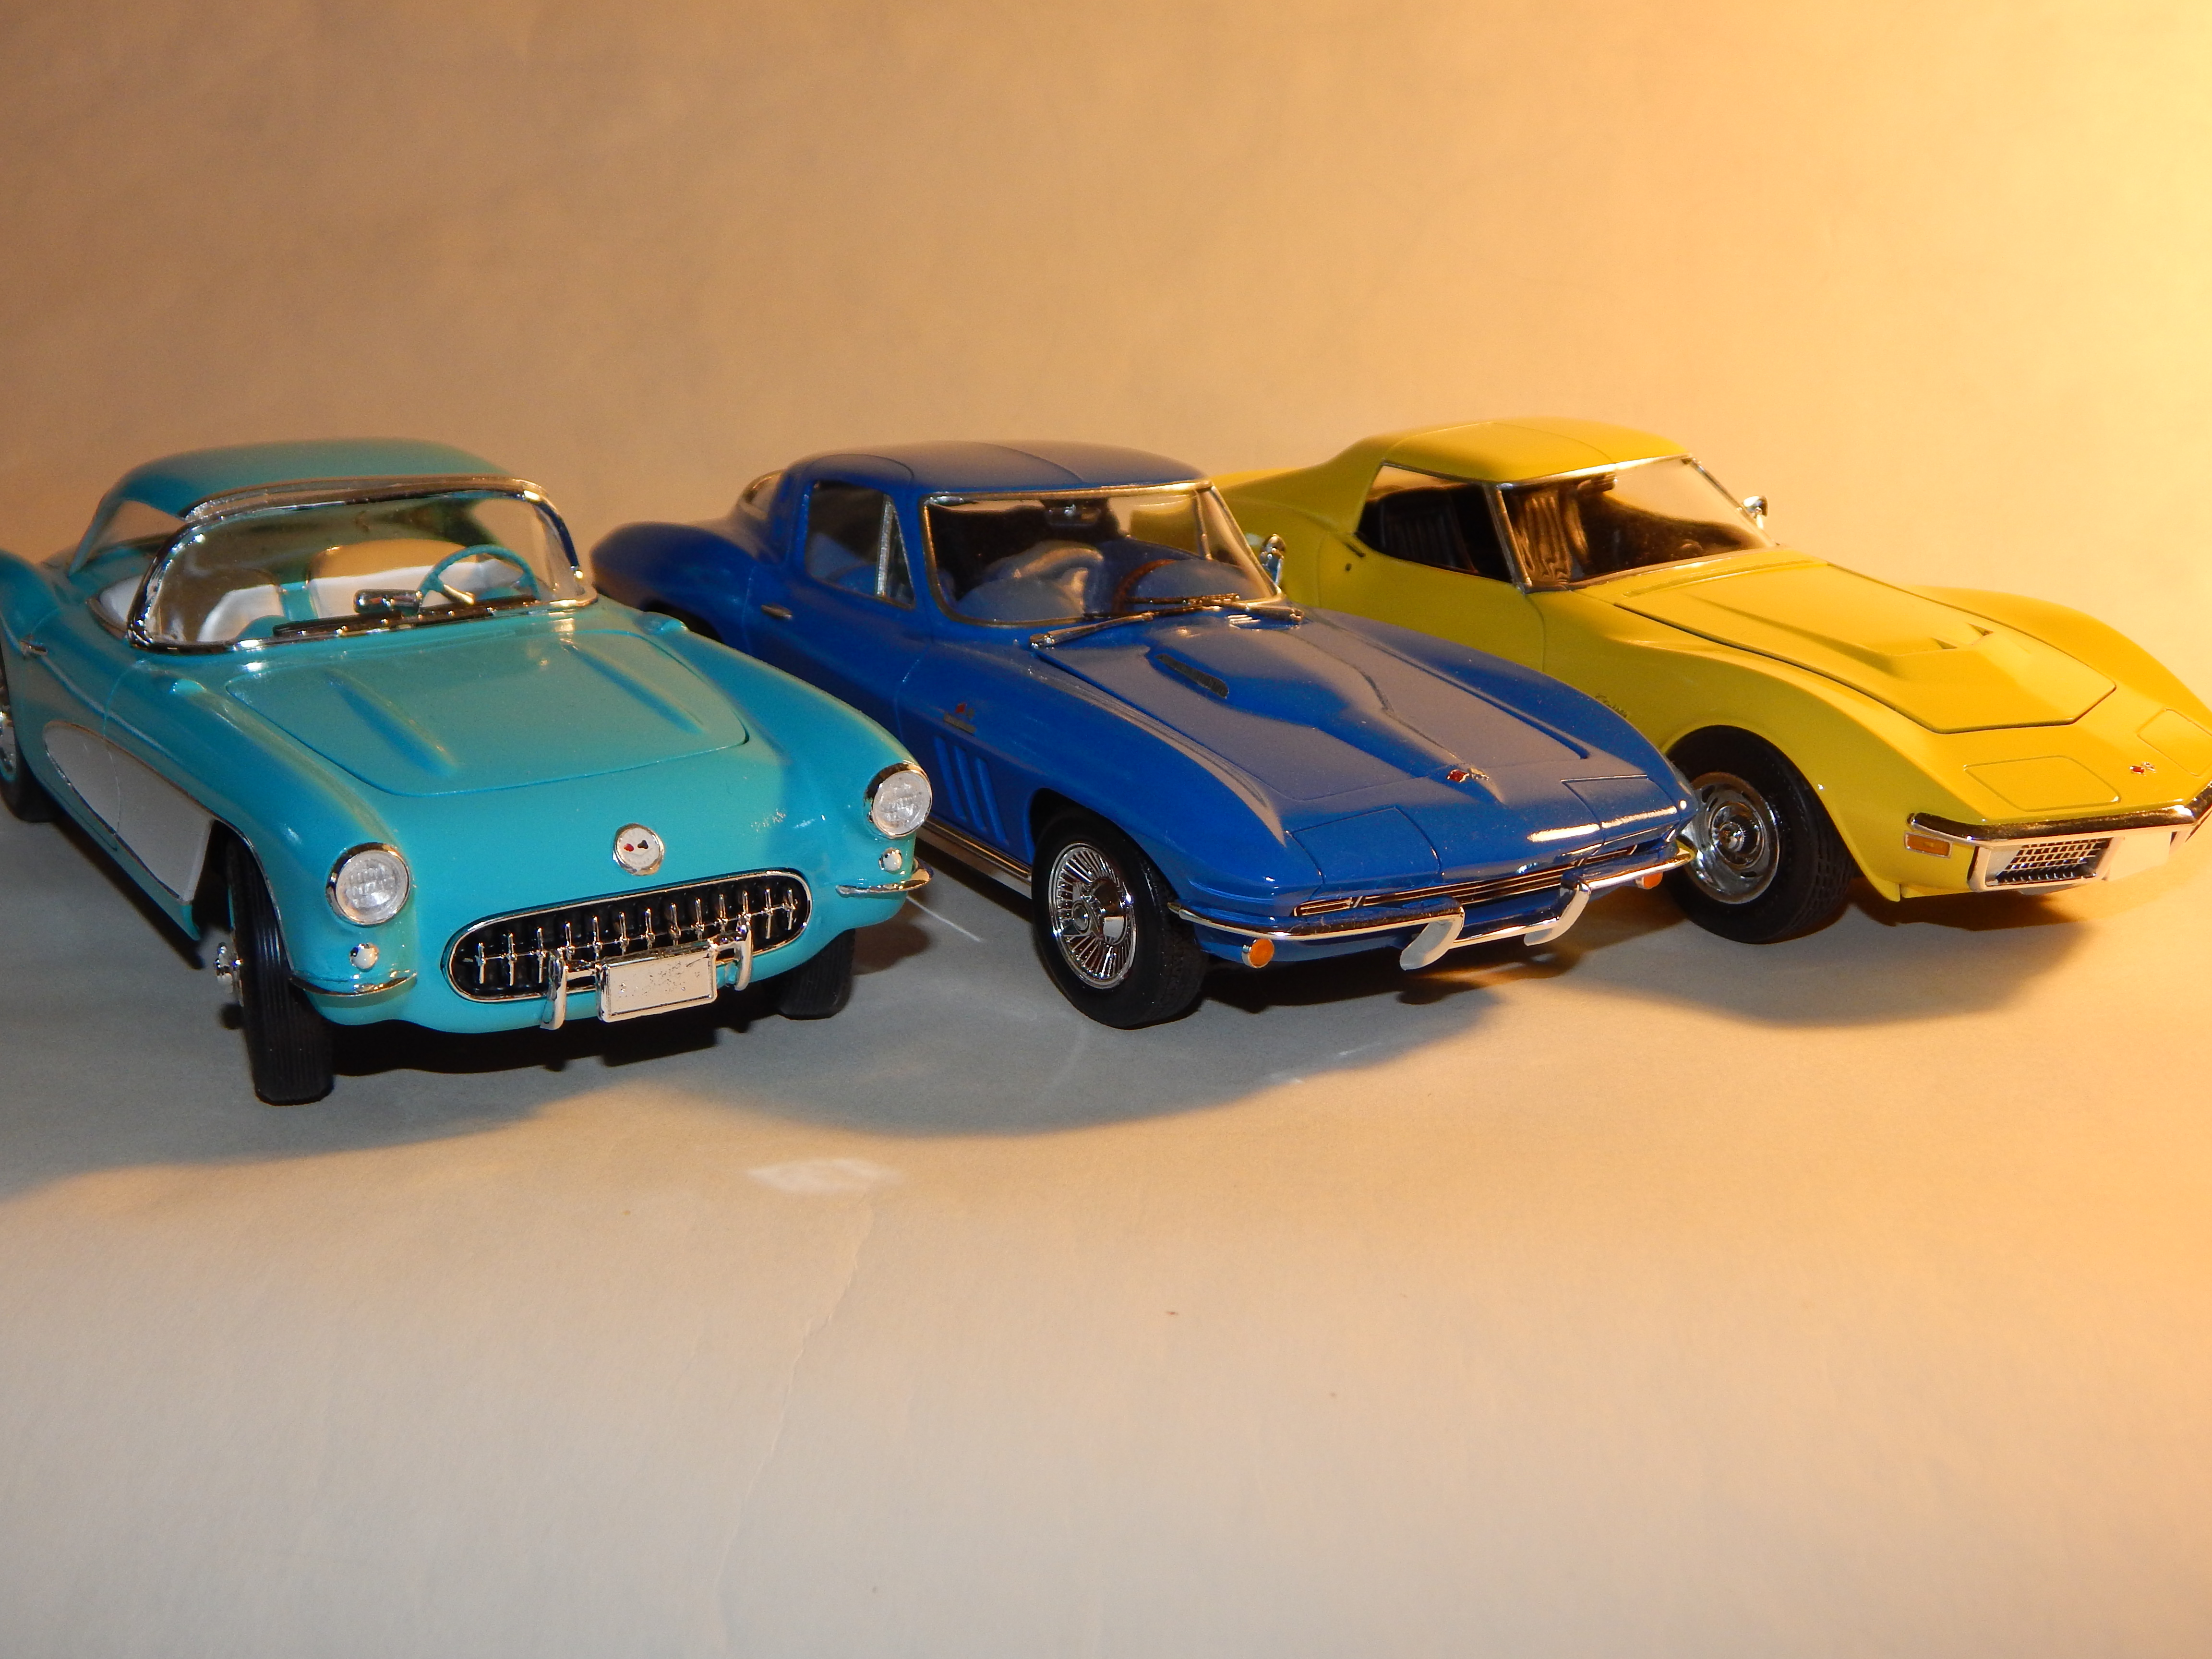
The latest in my project to build all the Corvette generations. This AMT kit is possibly the worst I have ever tried to build. The body and interior went together pretty well, but the engine and suspension gave me fits. Vague instructions, no positive assembly points for the suspensions and engine made it difficult for me to get the stance right, still sits too high for my taste but I'm done with it! Comments welcome as always, thanks for looking.
-
Full build and paint review of the limited run (500 kits) Streetle Beetle. I used tires from another kit, kit tires are only plain walls, wanted something a bit flashier. https://www.youtube.com/watch?v=eqvPwJmq0xw
-
Partly glued up.
-
The perennial favorite is back. Nice moldings, everything has stayed straight, no warps. GREAT decal sheet though not as big or as much as I had hoped for given other new decal sheets from Round2, but still nice. Aftermarket can fill those extra wants as needed. Tires are Firestone Transports. Two chrome trees, but the tanks are molded in white. https://www.youtube.com/watch?v=3uvxeBj1m-I
-
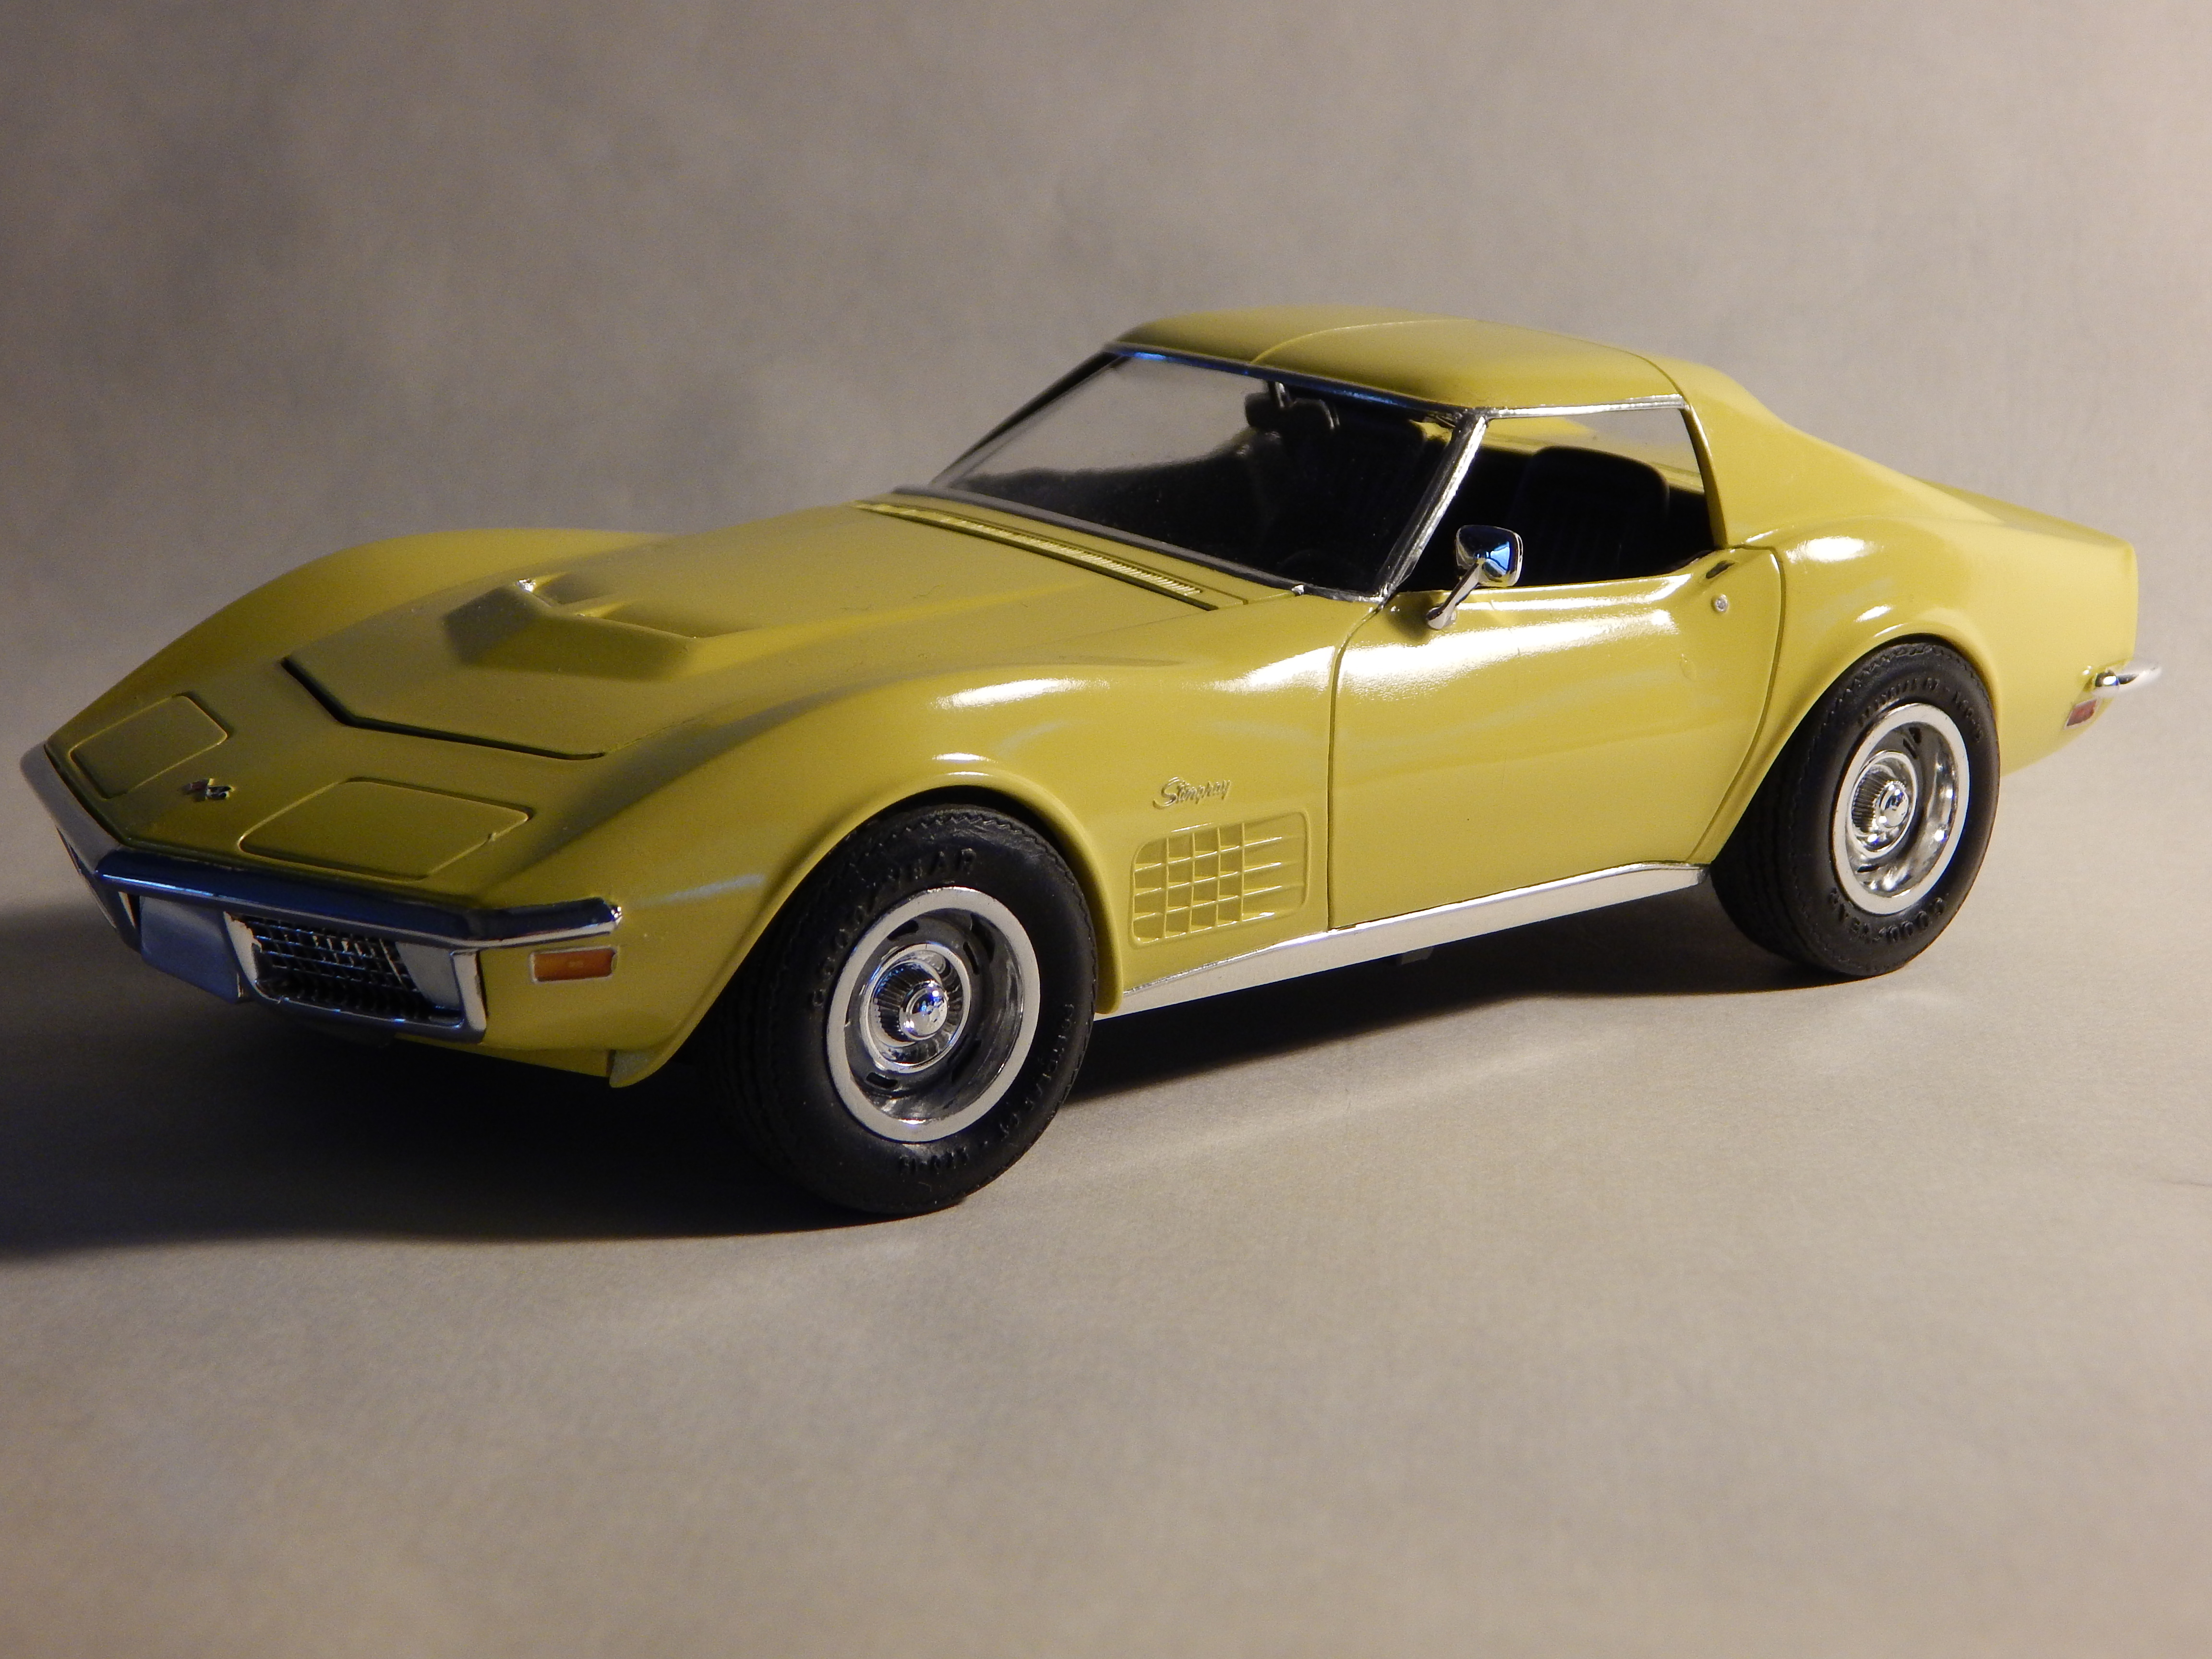
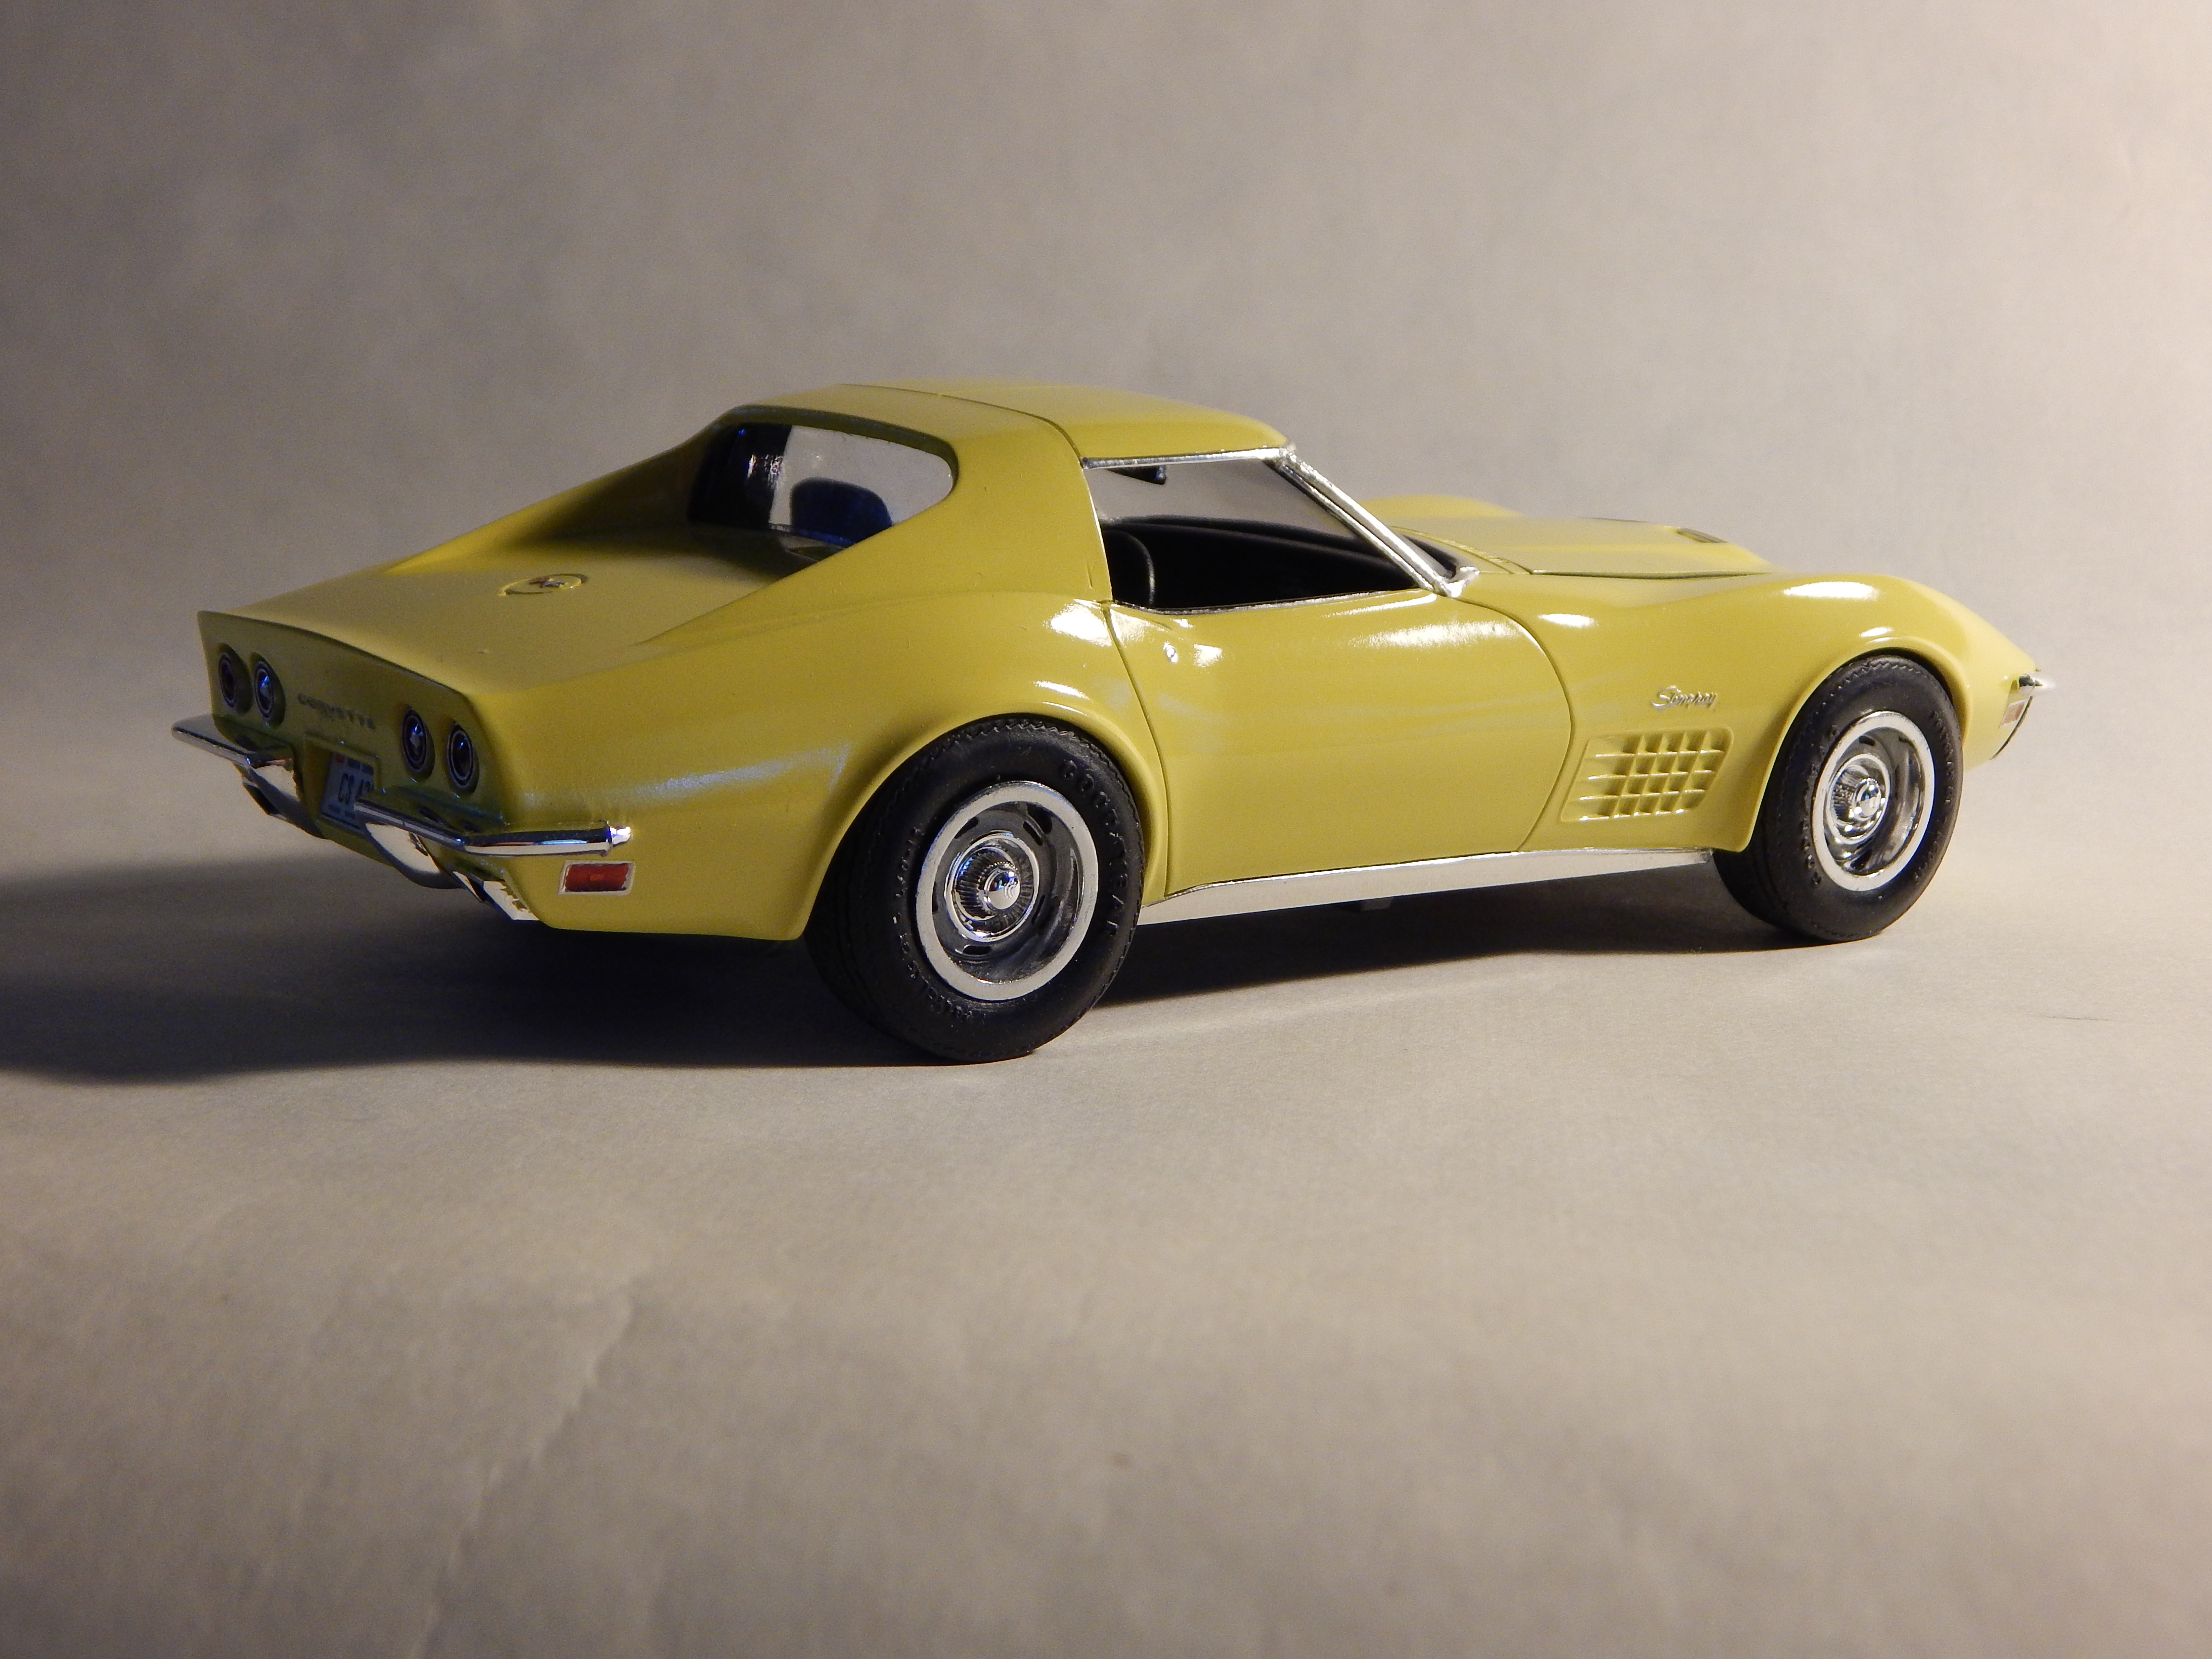
Entry number 3 in my Corvette project, C3 Stingray. AMT kit went together very well, I was impressed by the details under the hood and the LT-1 small block. This kit also has some of the best Chevy Rallye wheels I've seen. Comments welcome, thanks for looking.
-
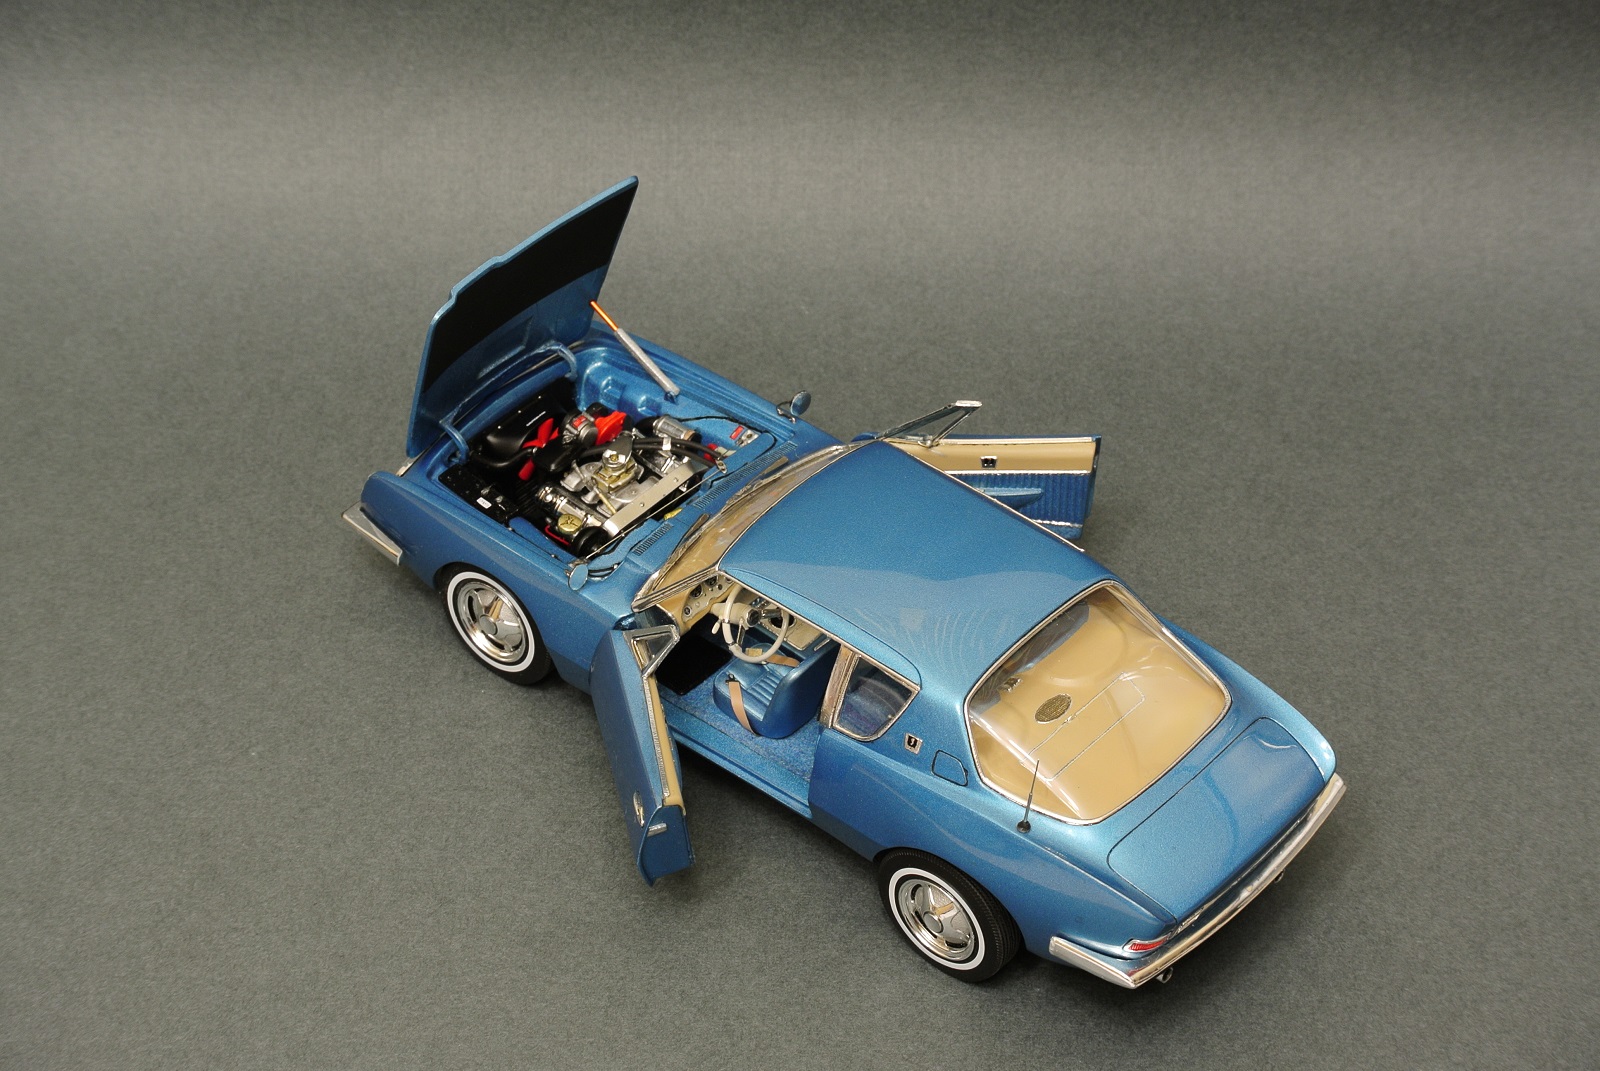
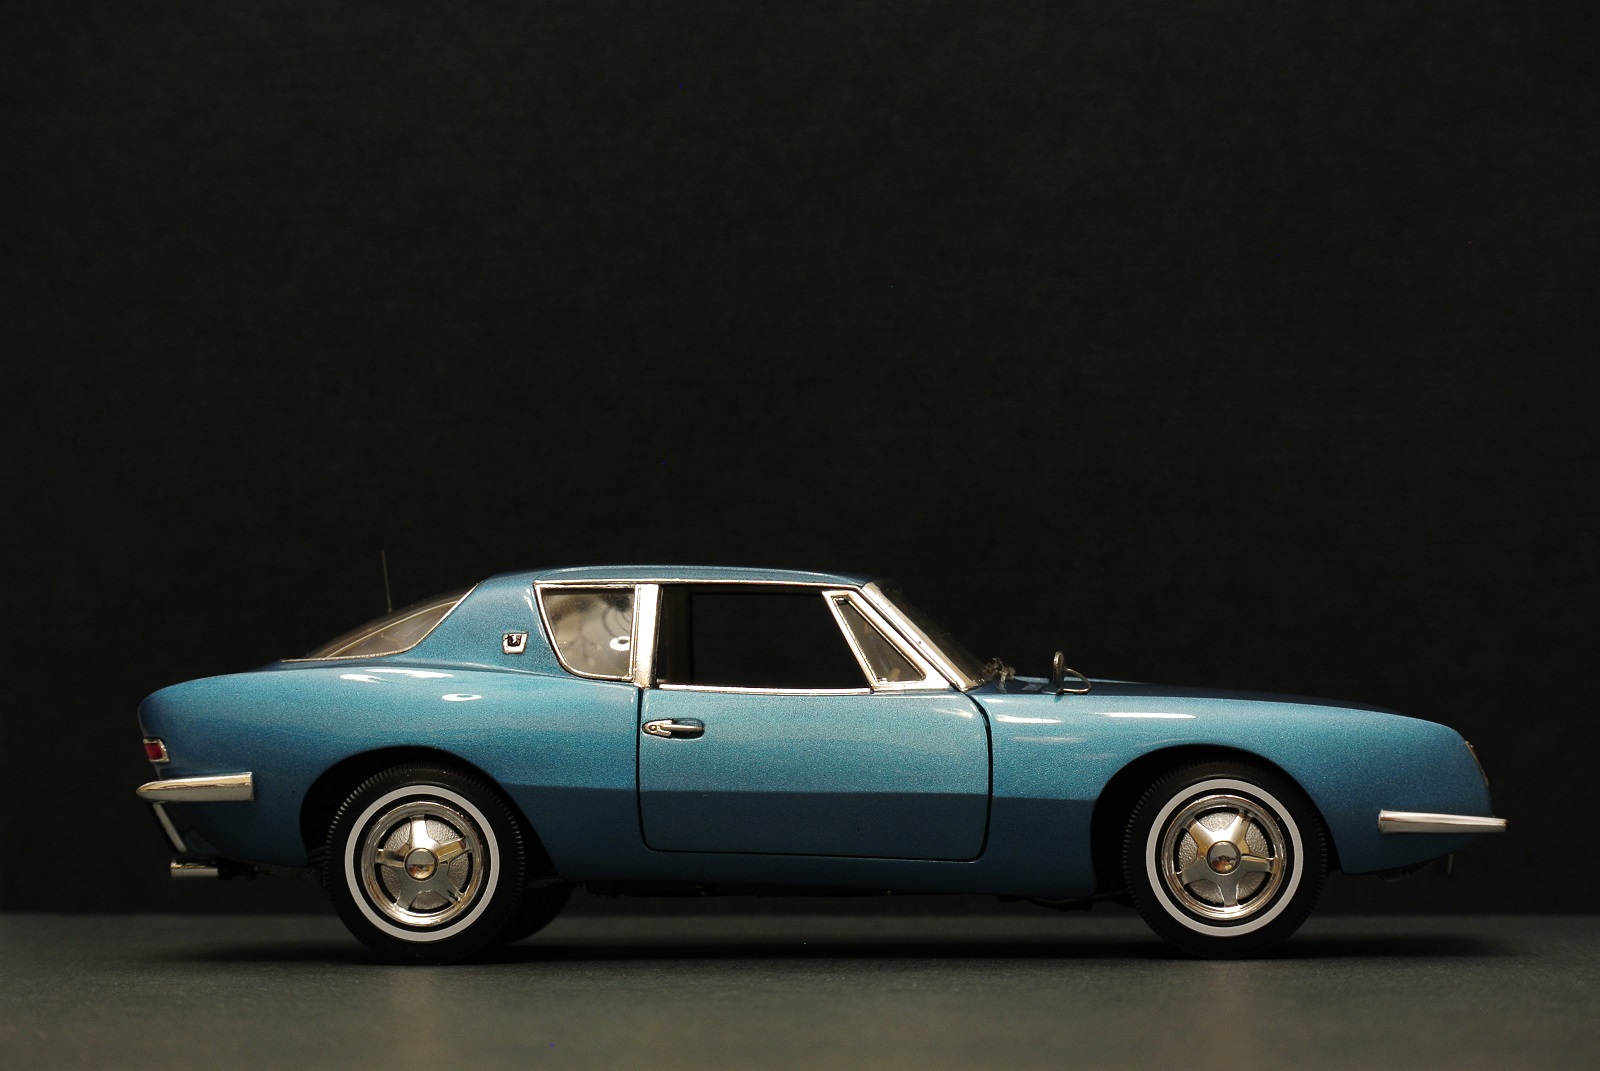
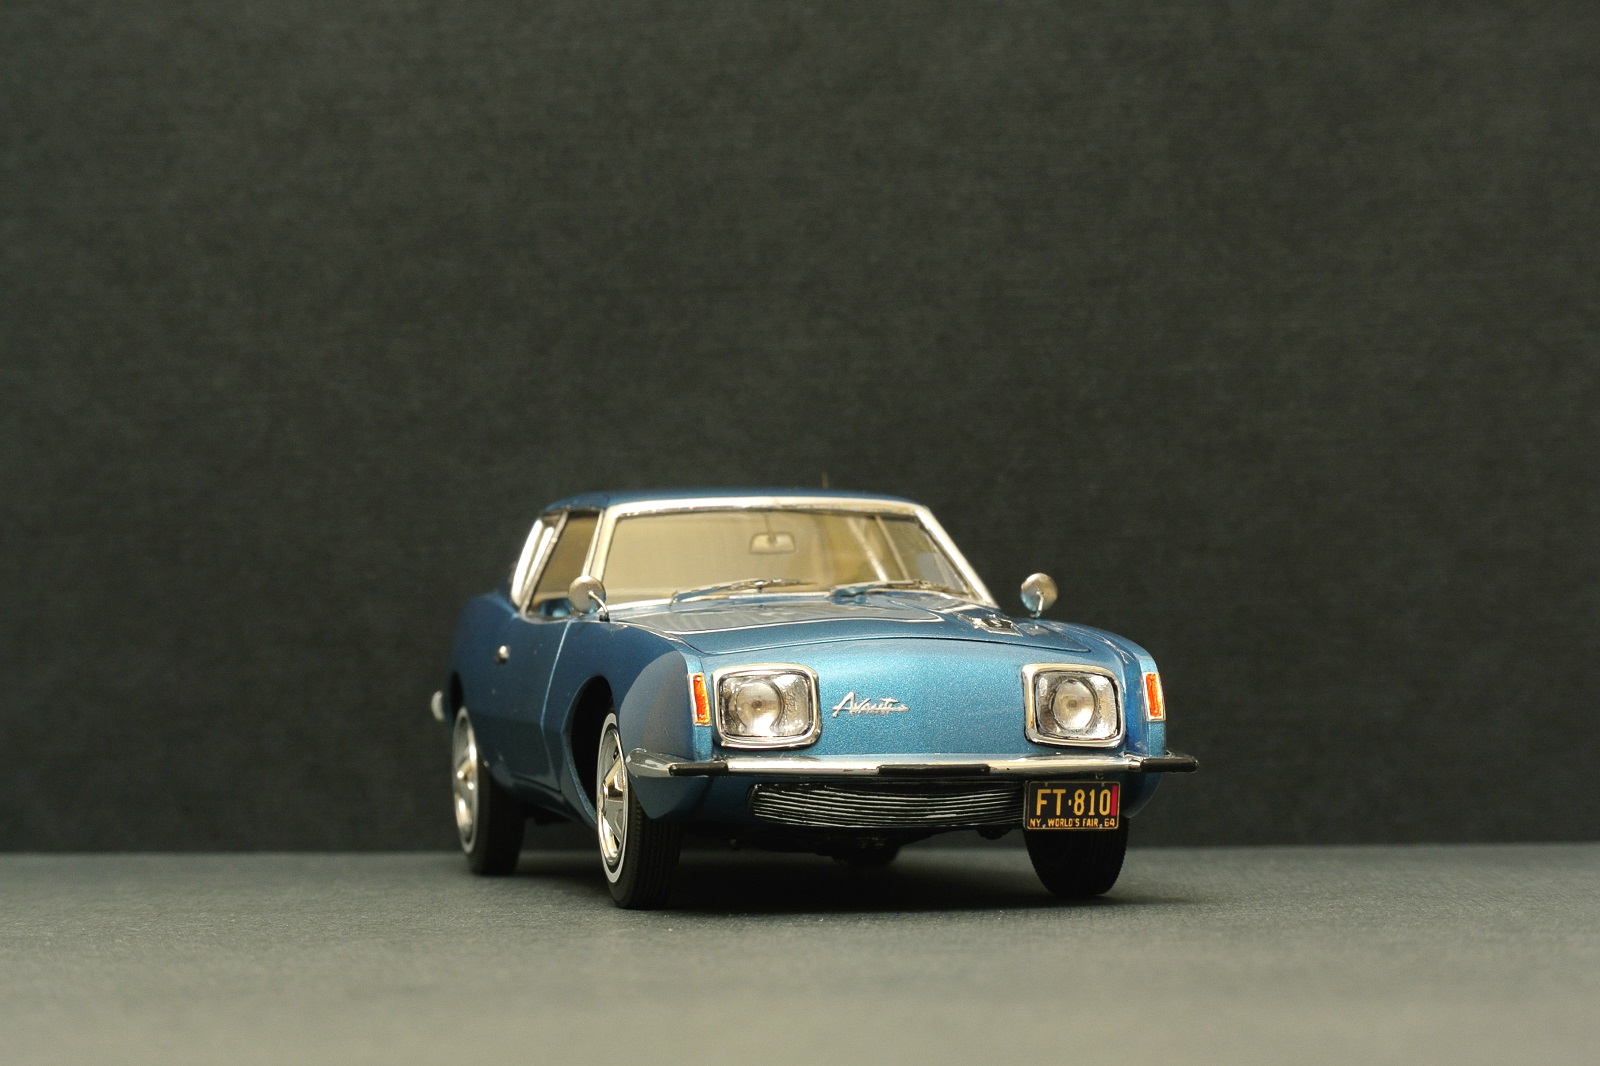
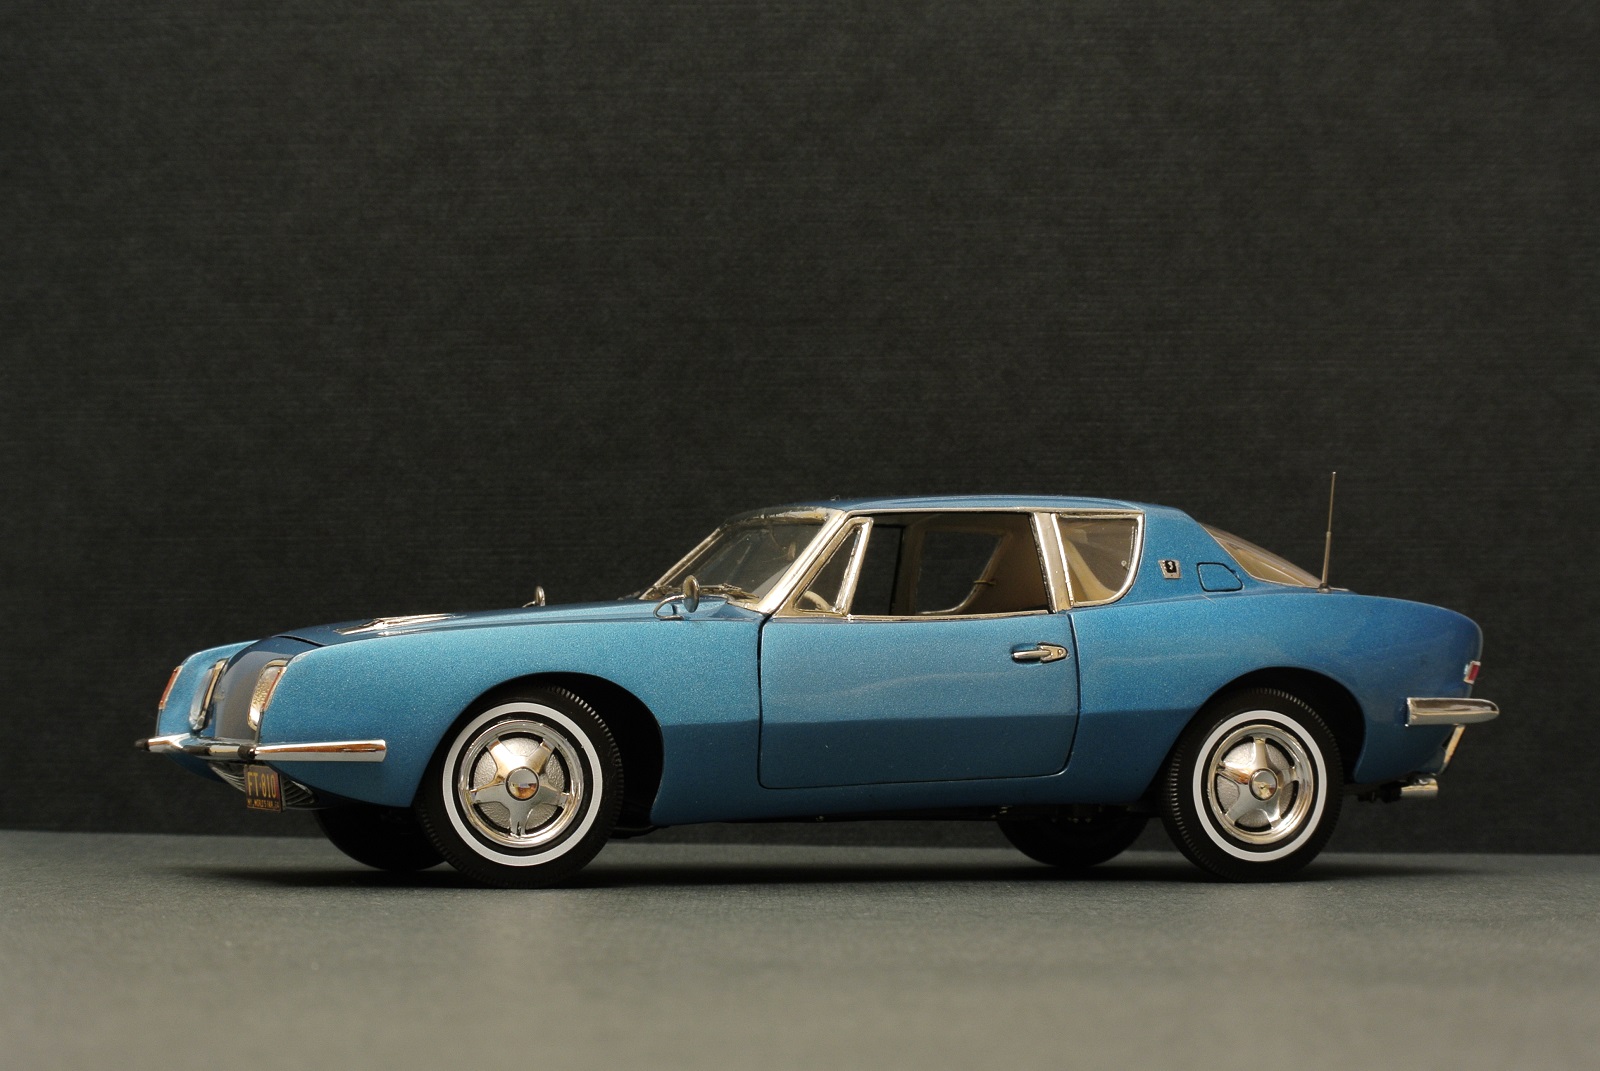
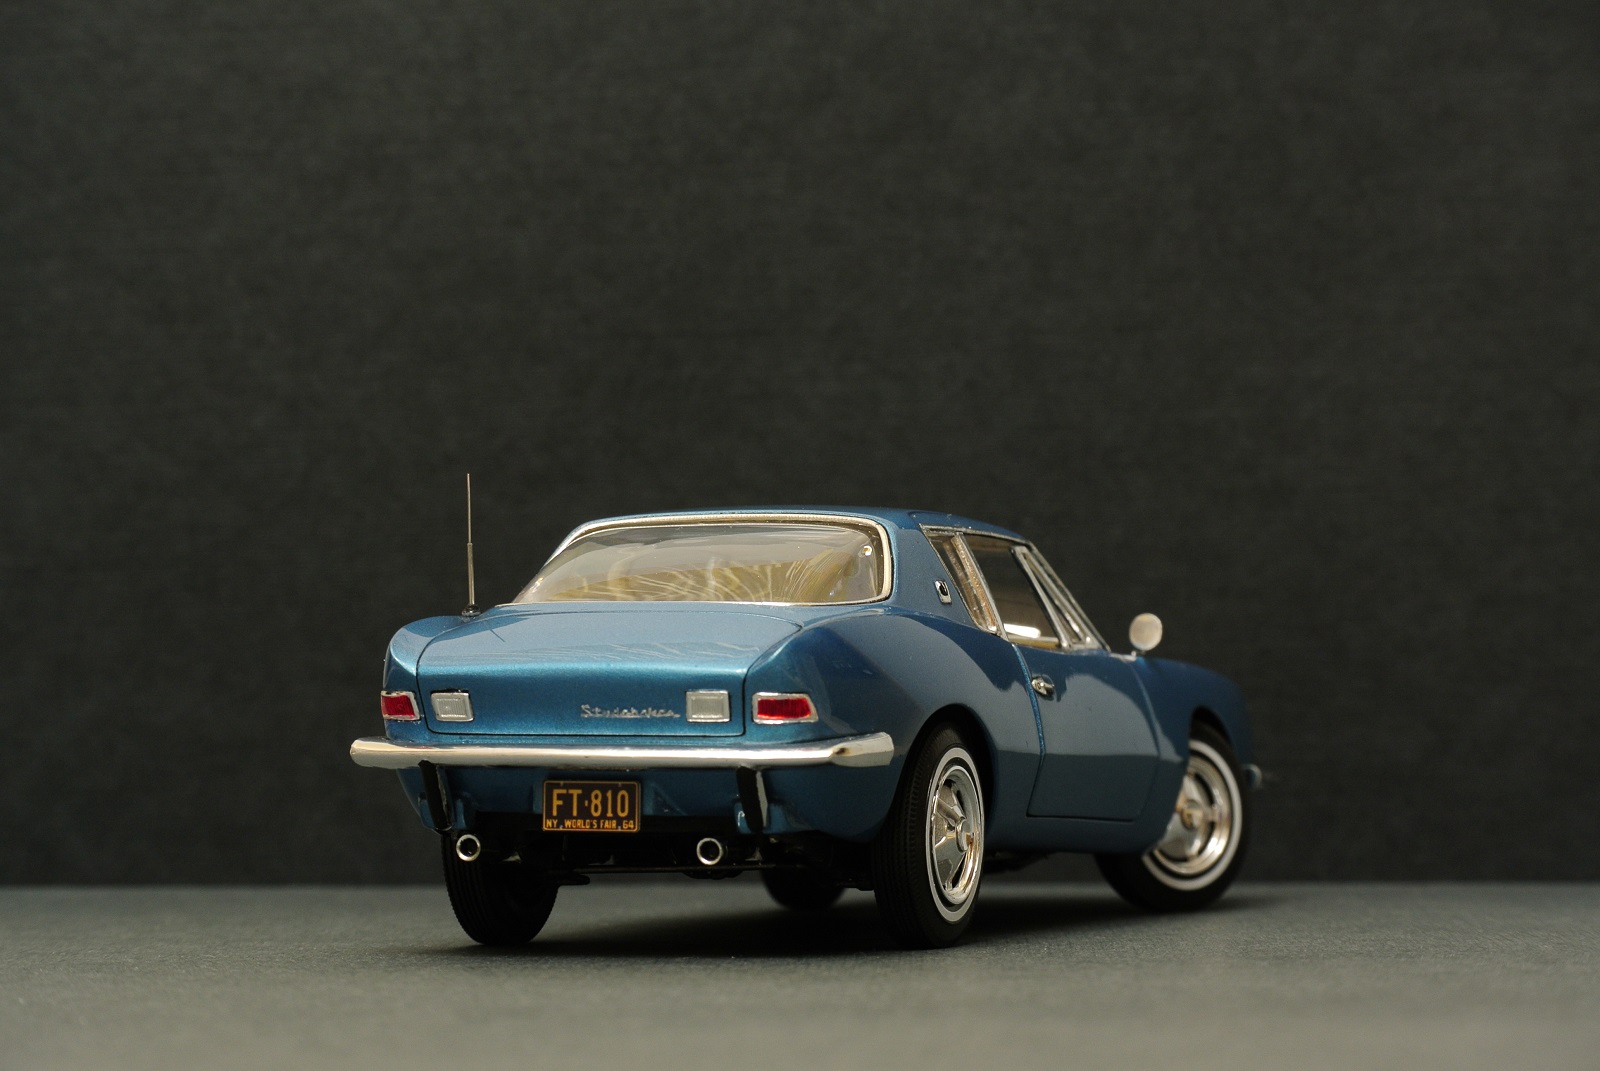
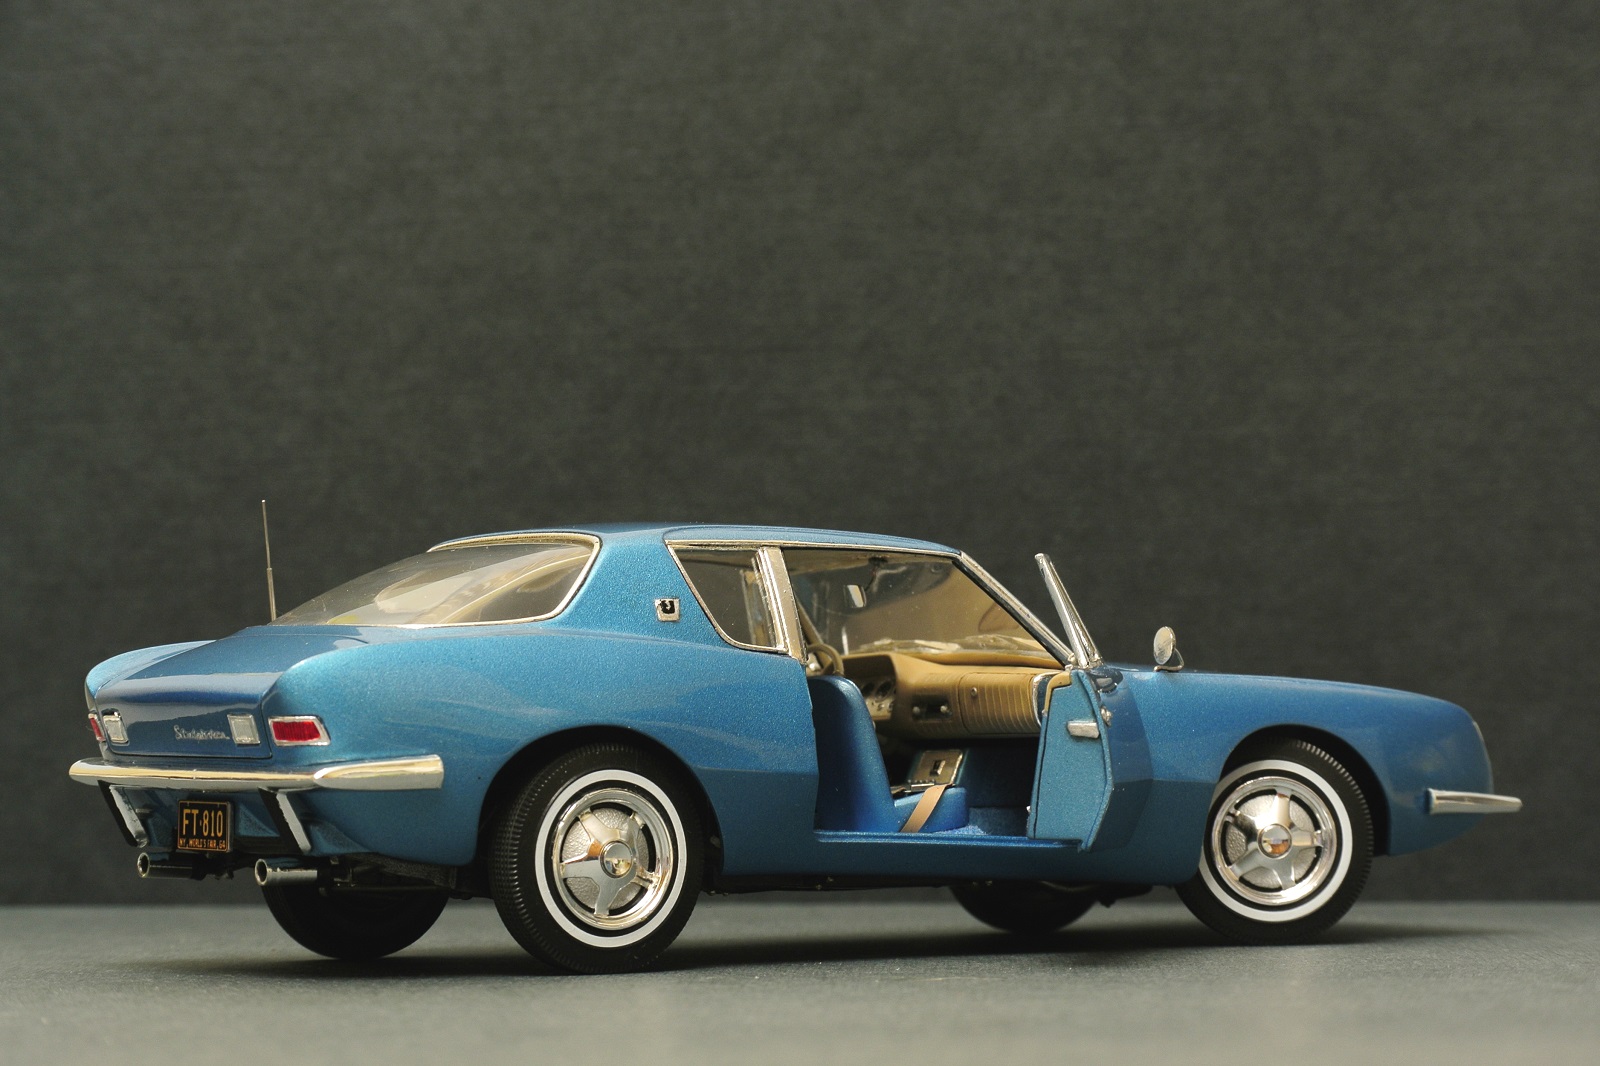
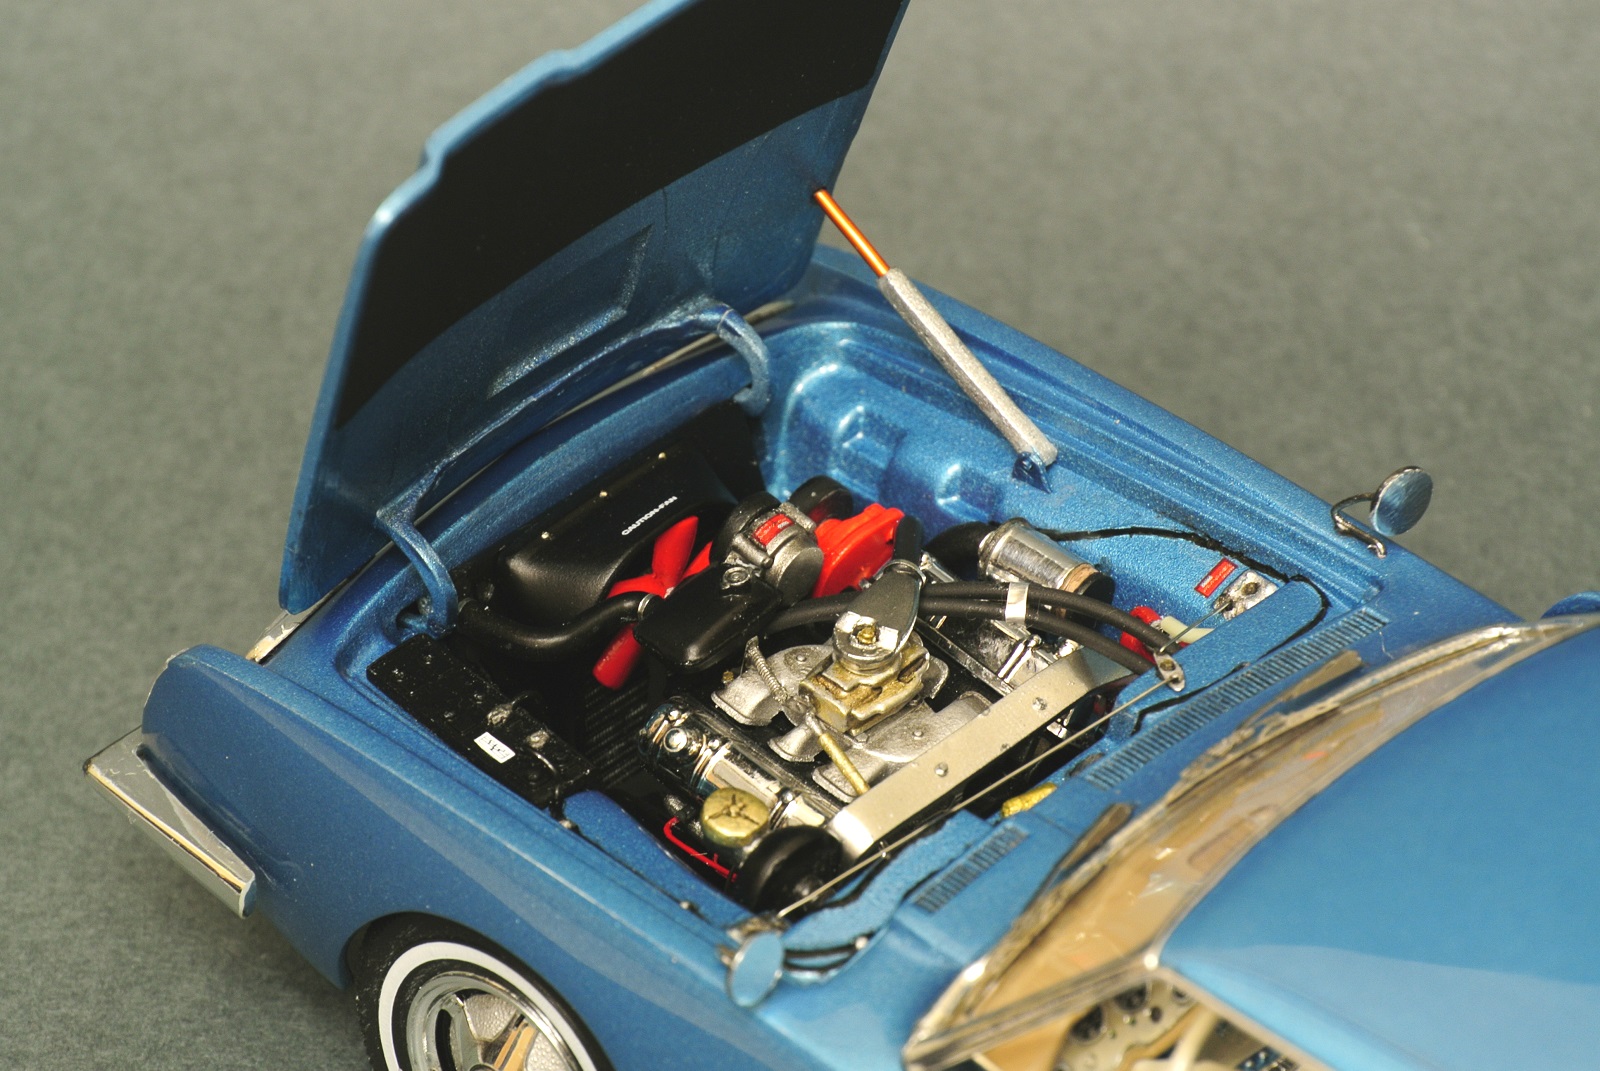
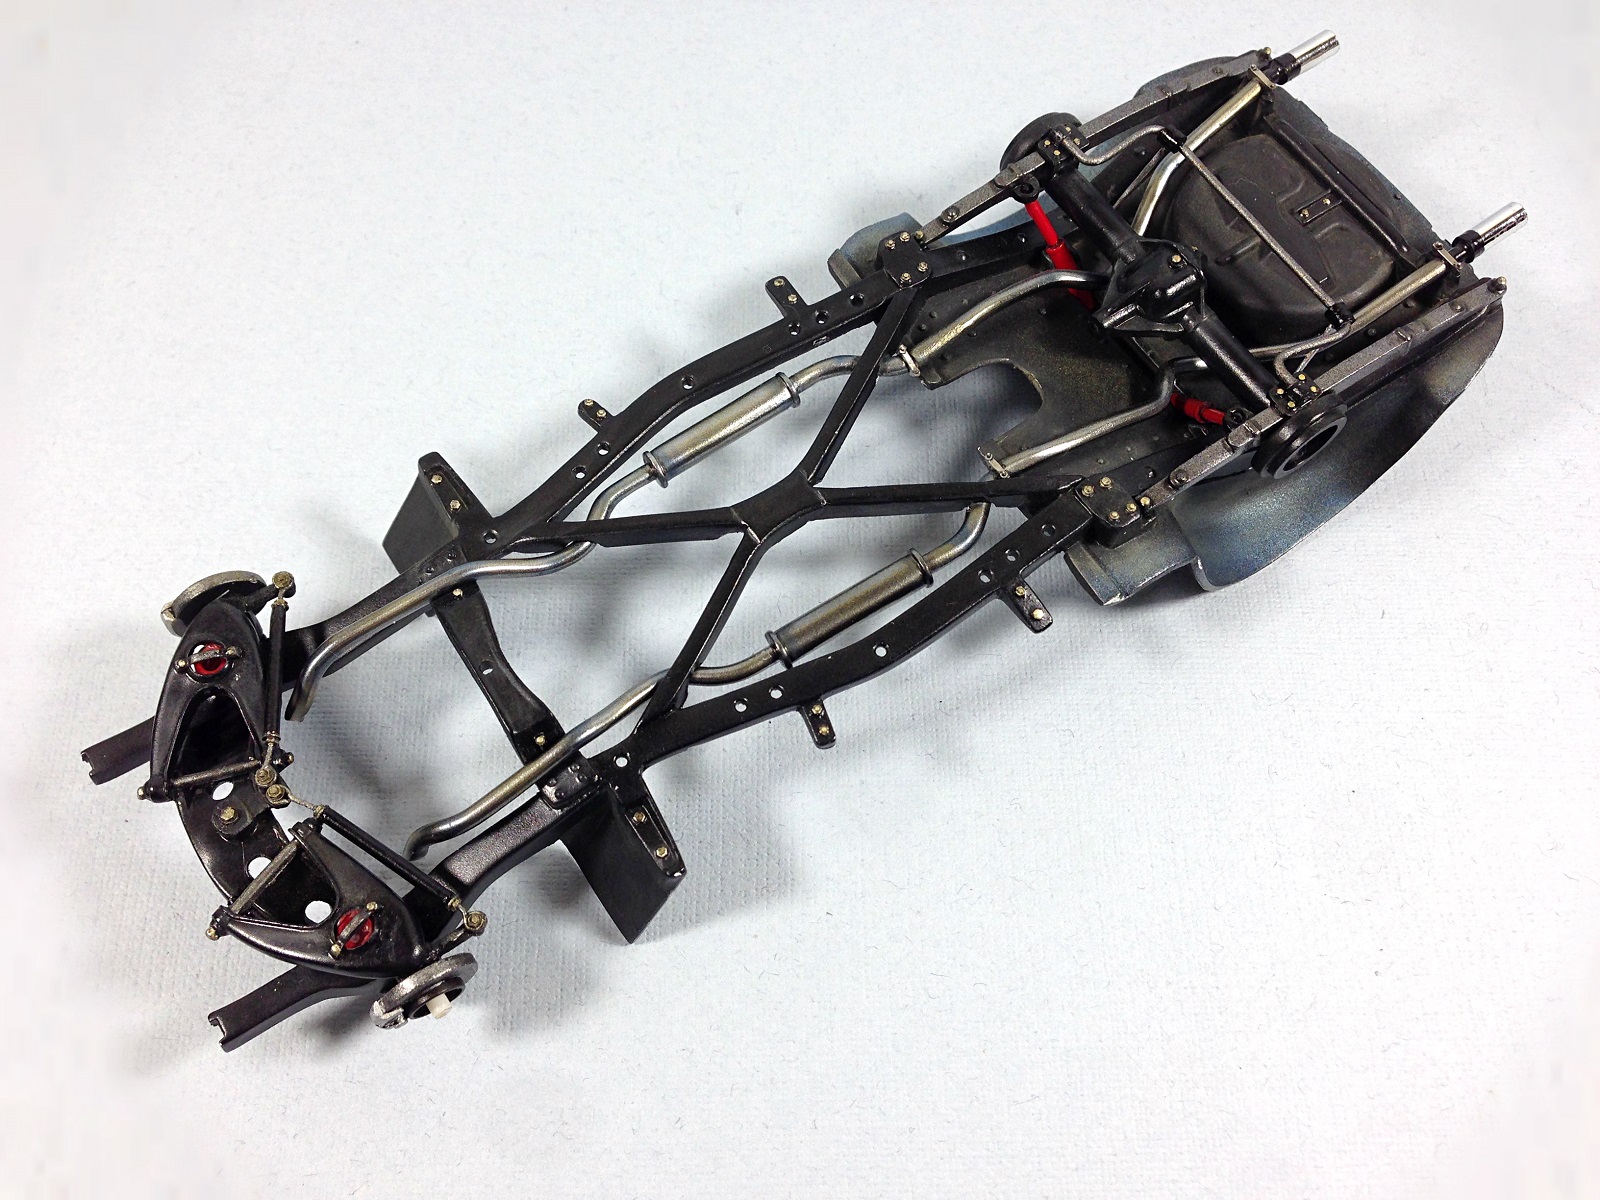
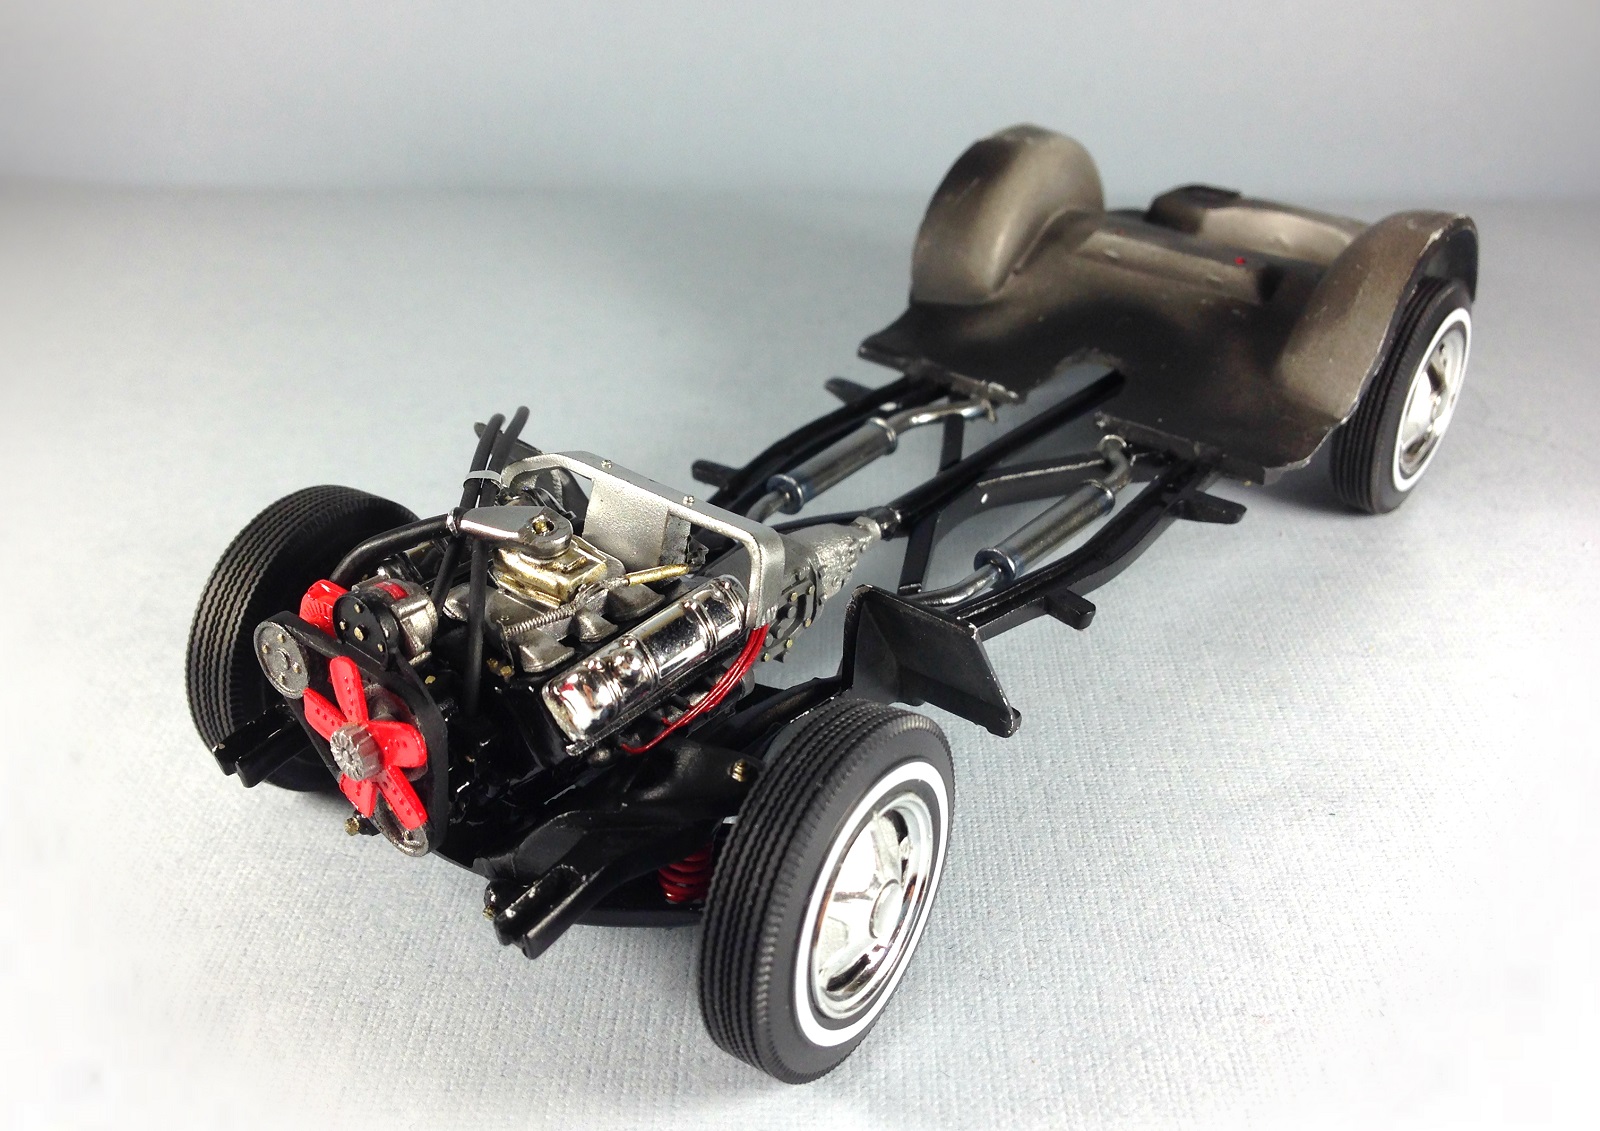
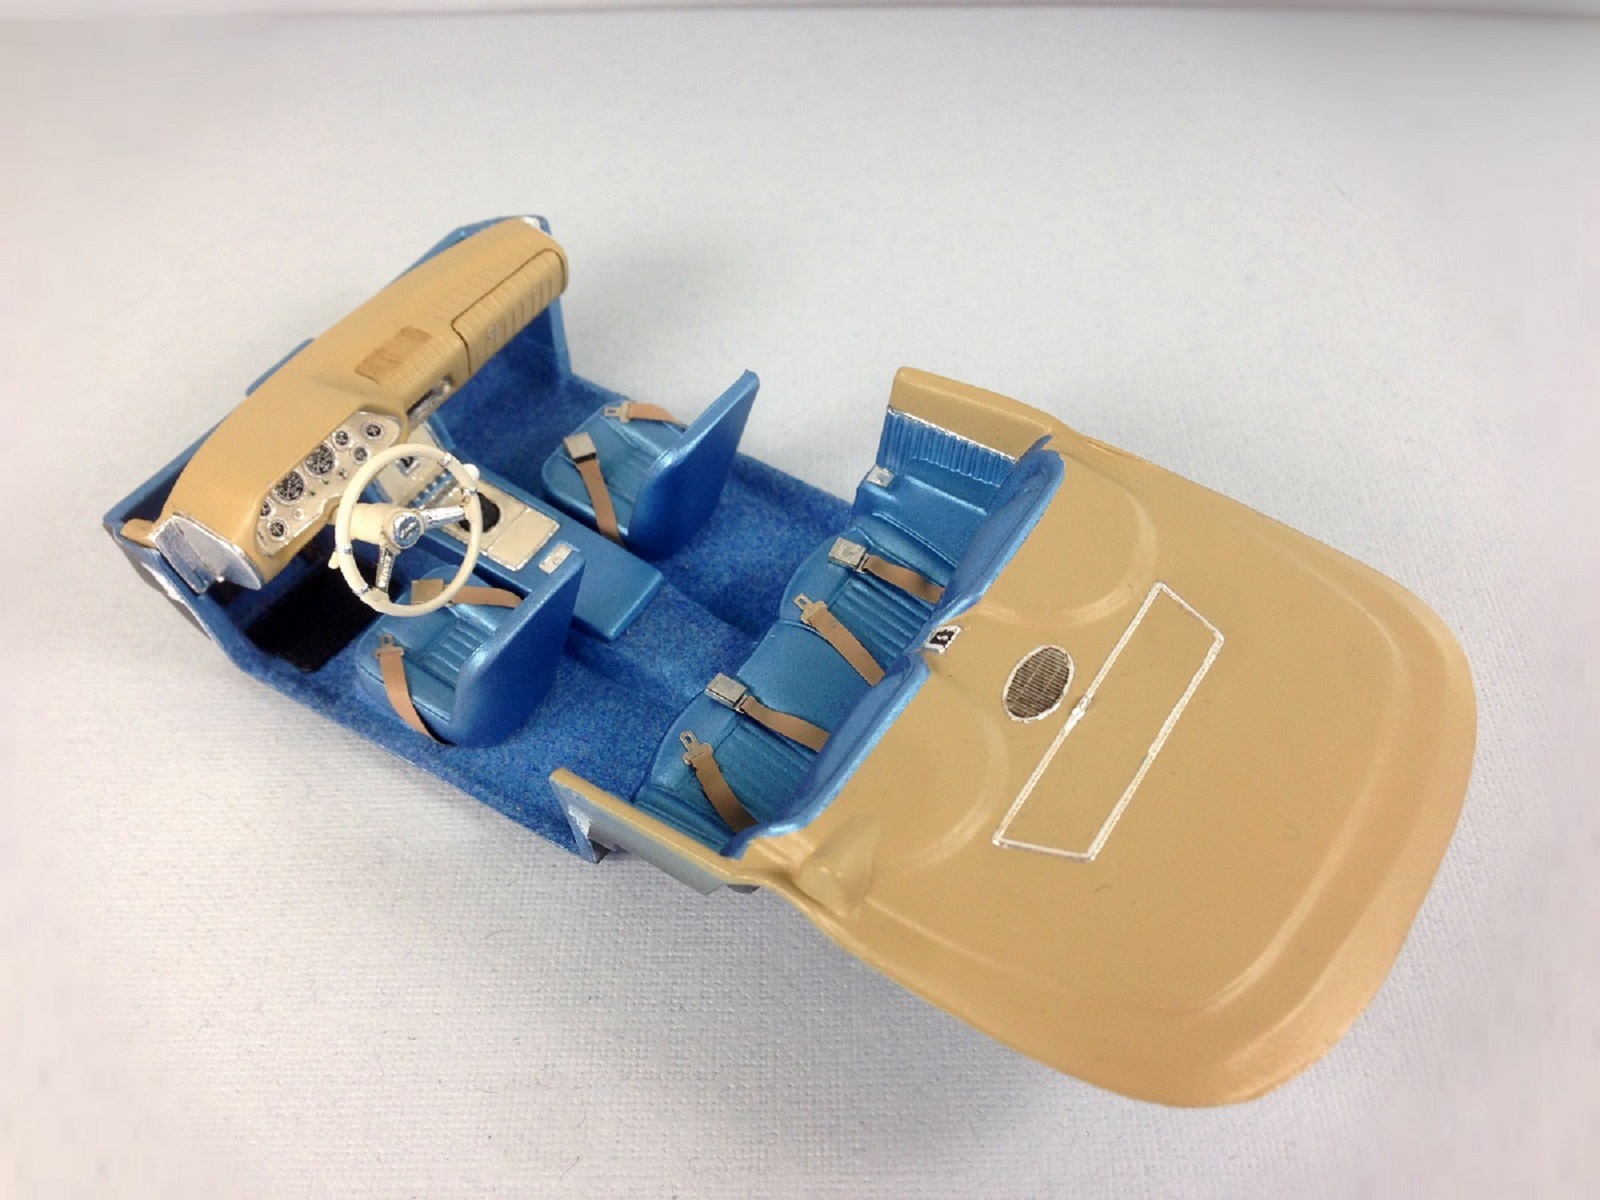
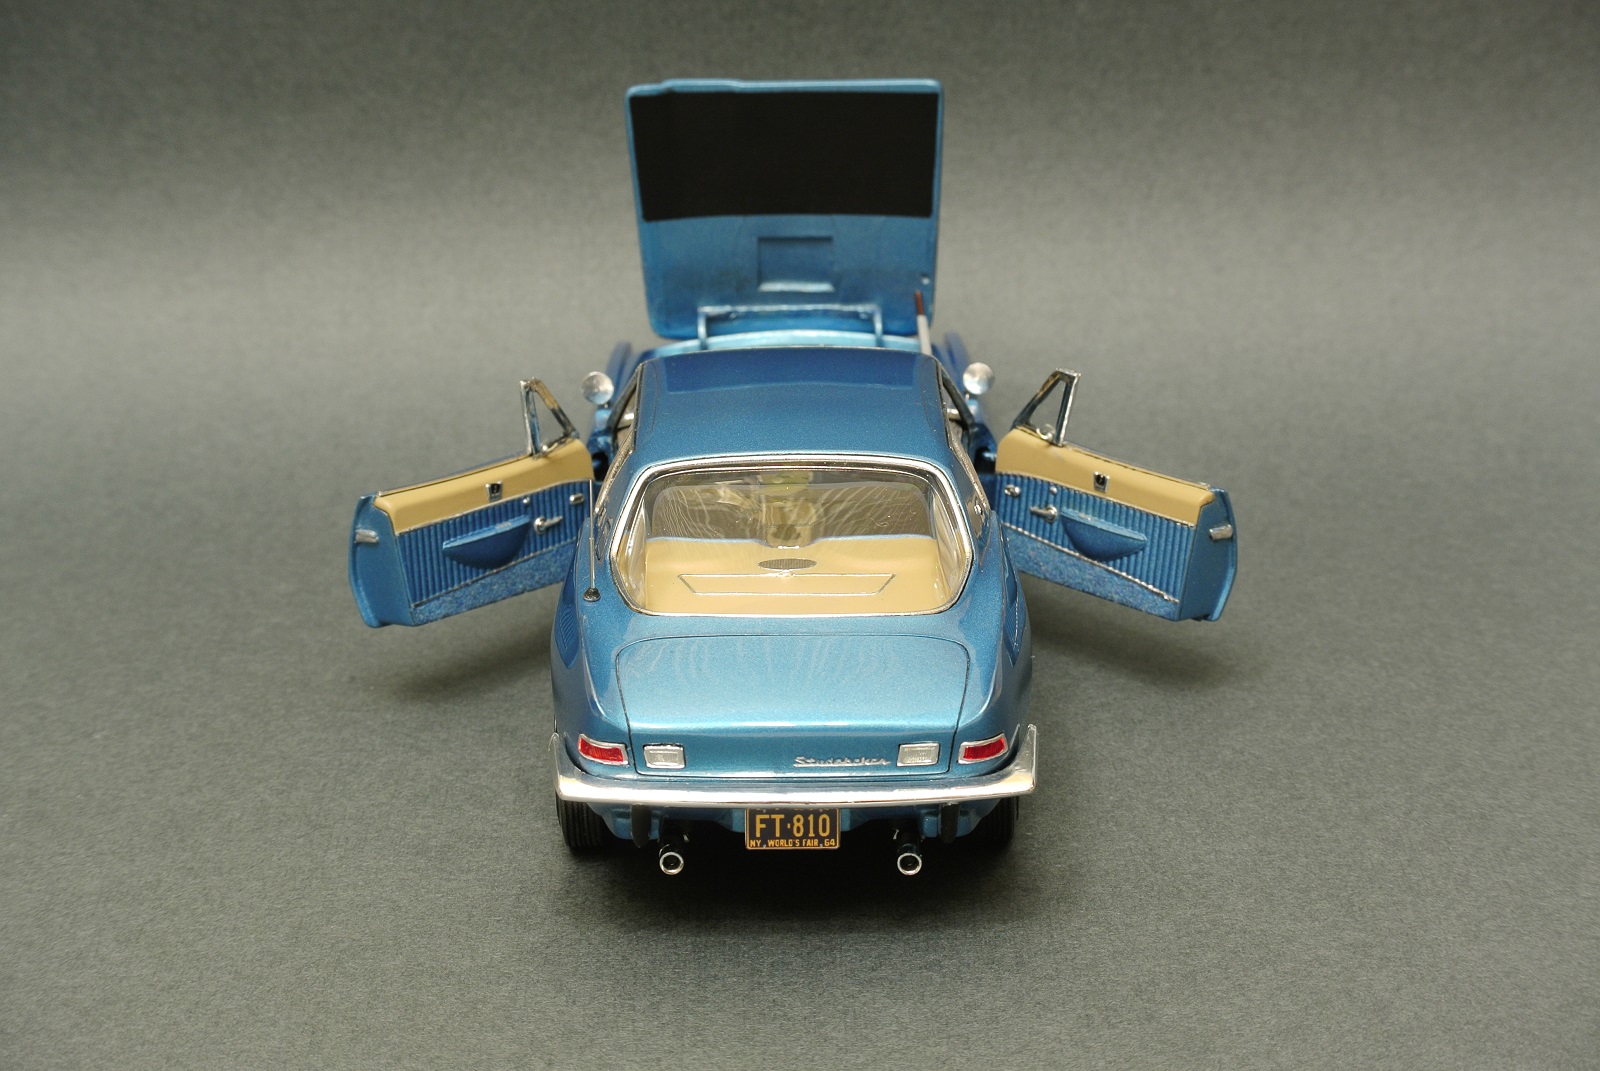
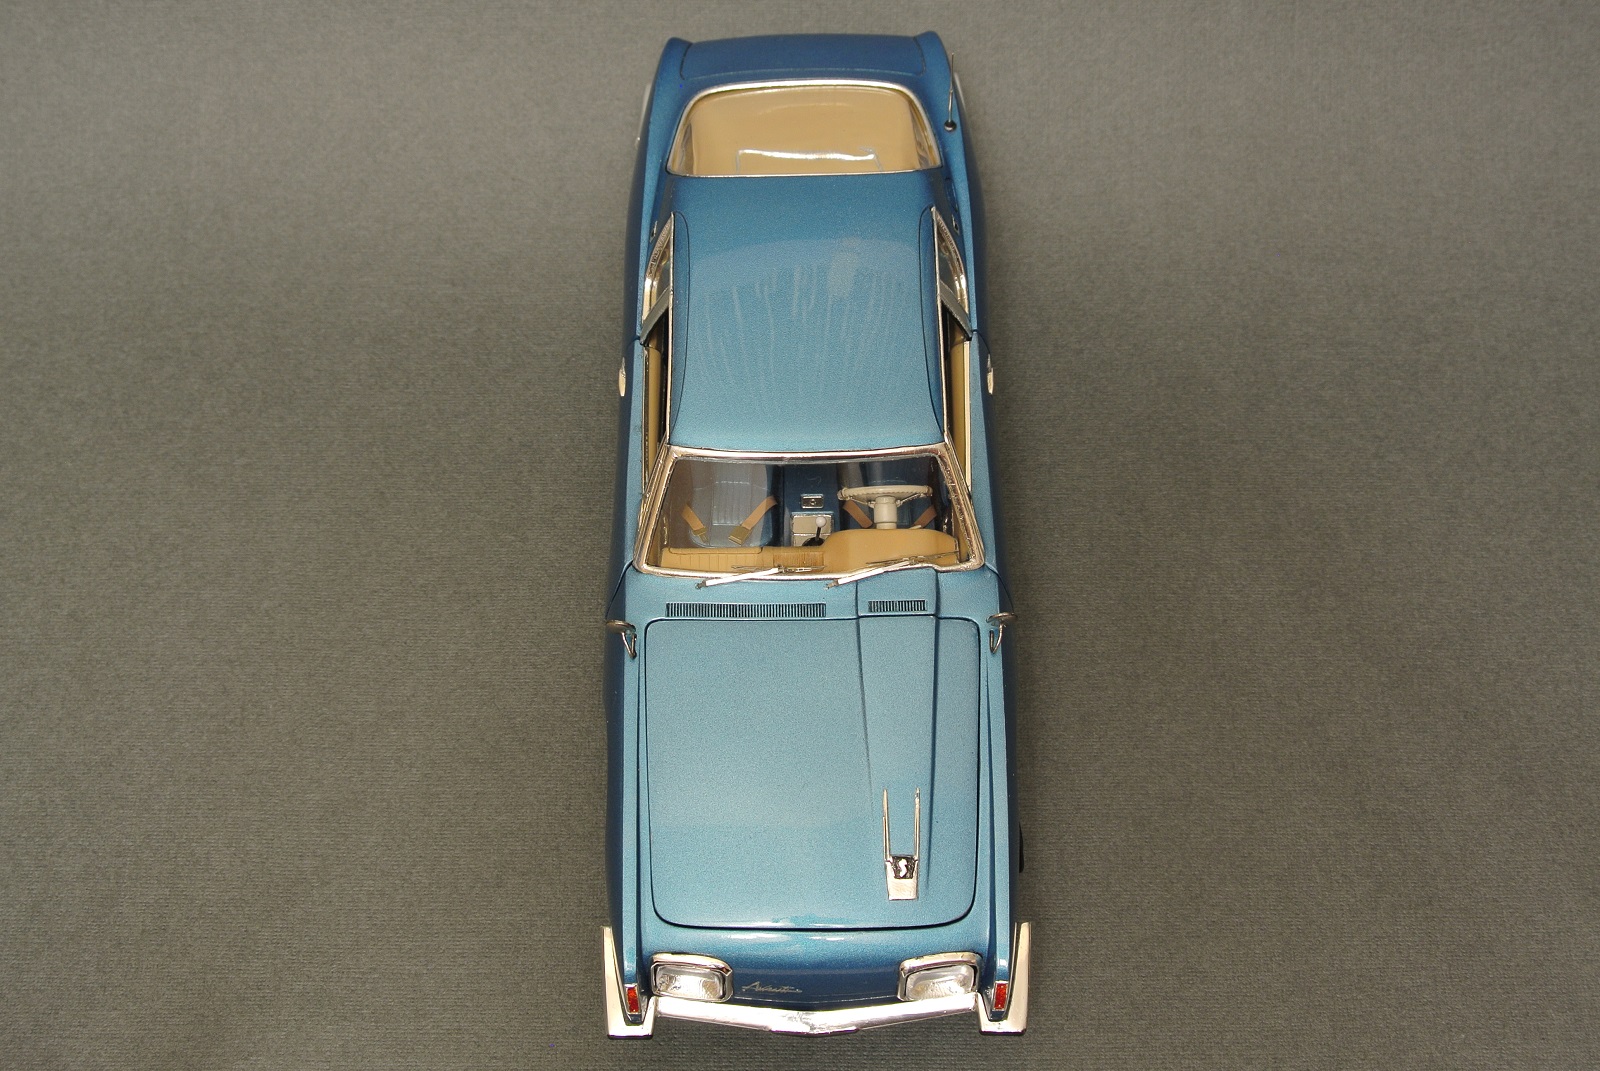
Hi all! This is my first model in this community. Model was build 1,5 year ago and it was my first completely finished build. During the process of assembly, the elements of the suspension, engine, body, interrior were modified. I used some photo etching parts (locks of belts, engine parts, wipers), wire (cables), flock, BMF foil for chromium imitation, Alcad II, Elf headlights, rubber hose cords, string and syringe needle for antenna, 2k putty (mirrors, washer reservoirs). Windows(glass) except for the back are made of transparent plastic 0.5mm. The body is painted with a Model Master Nassau Blue Metallic paint and covered with 2k varnish. The rest of the details are painted with colors from the range of Tamiya and Testors. Interior was build in two-colors. I decided to paint the blue elements of the interior with the same metallic as the body, but due to different varnishes (matte in the interior and glossy on the body), the materials look differently and the interior turned out quite similar to the photos of real cars. Enjoy....
-
Just completed this one recently (it may get some light weathering in future, though. We'll see...). This is a project that was started in 2013, sat in the box for years, and then sat partially assembled for over a year before I decided to make a few changes and finish it up. Some notes: -AMT 29 roadster, AMT '34 Ford flathead with aluminum intake stacks and scratchbuilt wire looms. Headers modified from Revell '32 Tudor kit, AMT '34 Ford wire wheels on Johan Mercedes 500k tires out back, and Revell '31 Woody wire wheels/tires in front. Firewall was modified with extra flanges to look more like the 1:1, and it has a flattened front crossmember and AMT '34 Ford coupe front axle to get the front end down. Cut-down steering wheel, '31 Woody door handles, and the windshield frame was chopped and removed from the stanchions then attached to the chopped-down roadster roof--so they can be removed as a unit for that stripped-down racer appearance. The headlights and taillight/license plate are held on with wire clips and are also removeable. Thanks for looking!
-
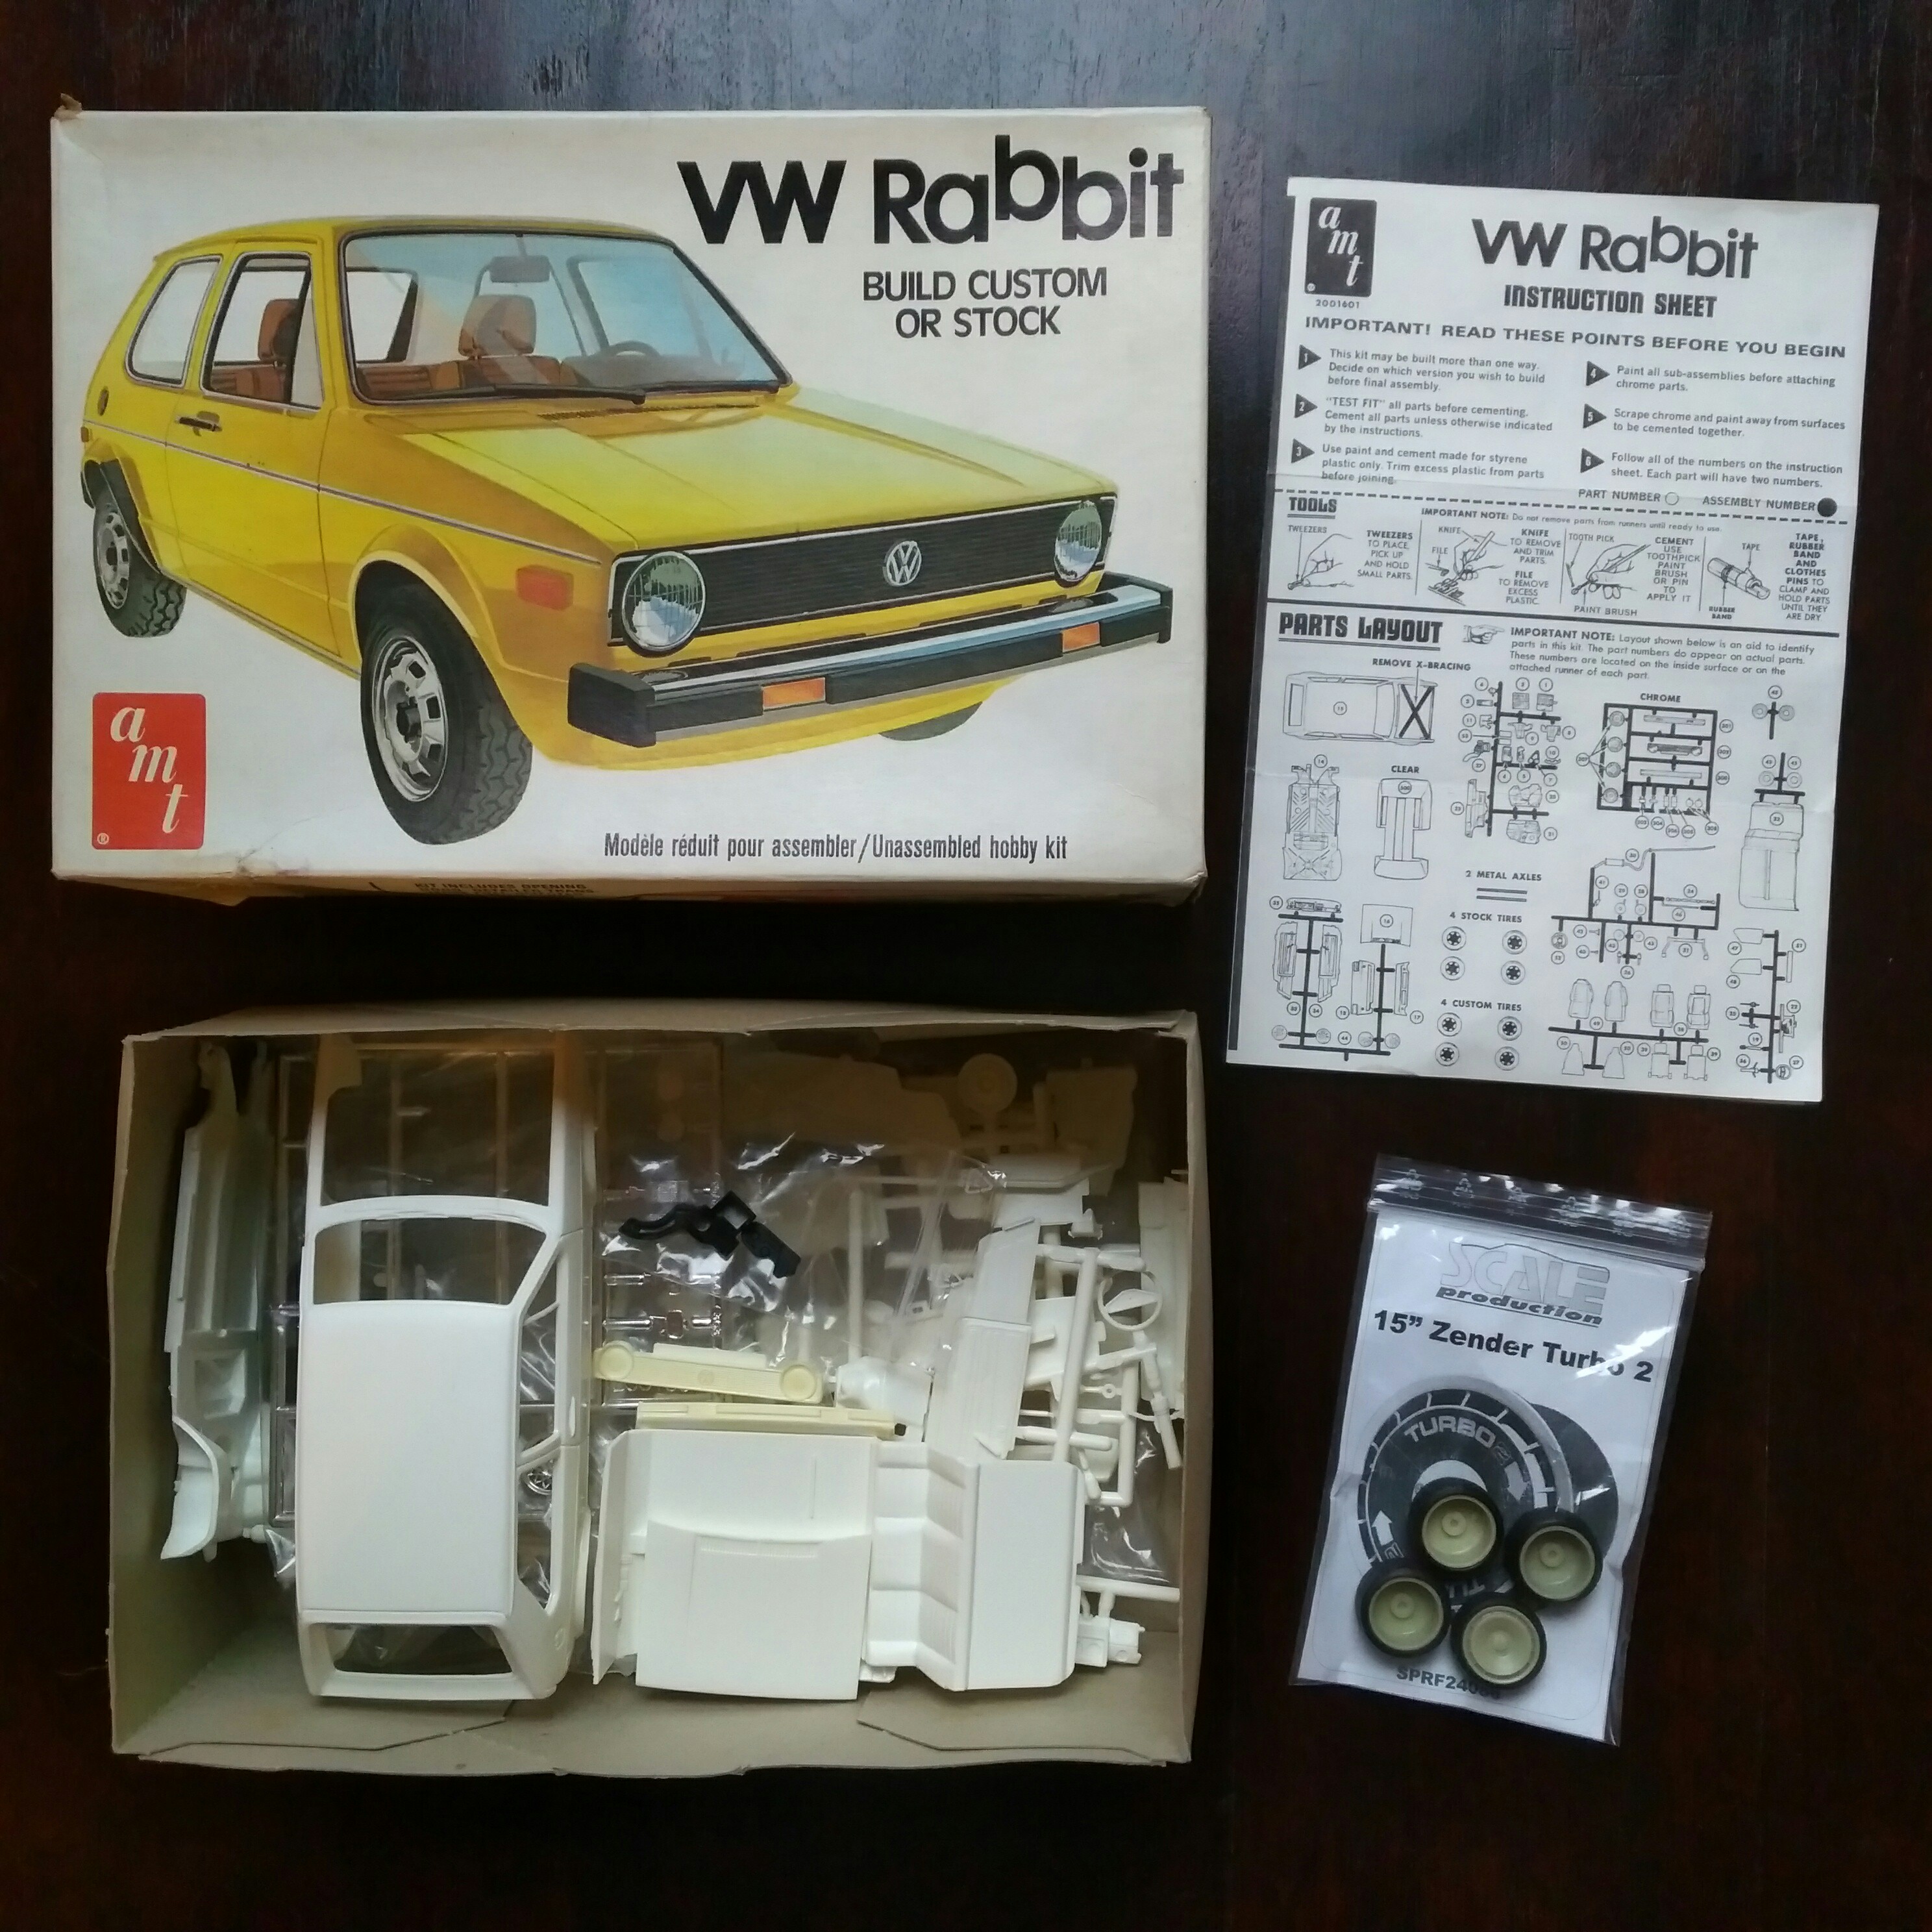
Hey everybody, I started building this vintage VW Rabbit by AMT. It's going to be unrestored with rusty paint but lowered on nice Zender wheels. Here's what the 1.6 litre 4 cylinder engine looks like so far. I took a pic next to a Ford Cobra 5.8 litre V8 so you guys can see how little the VW engine is
-
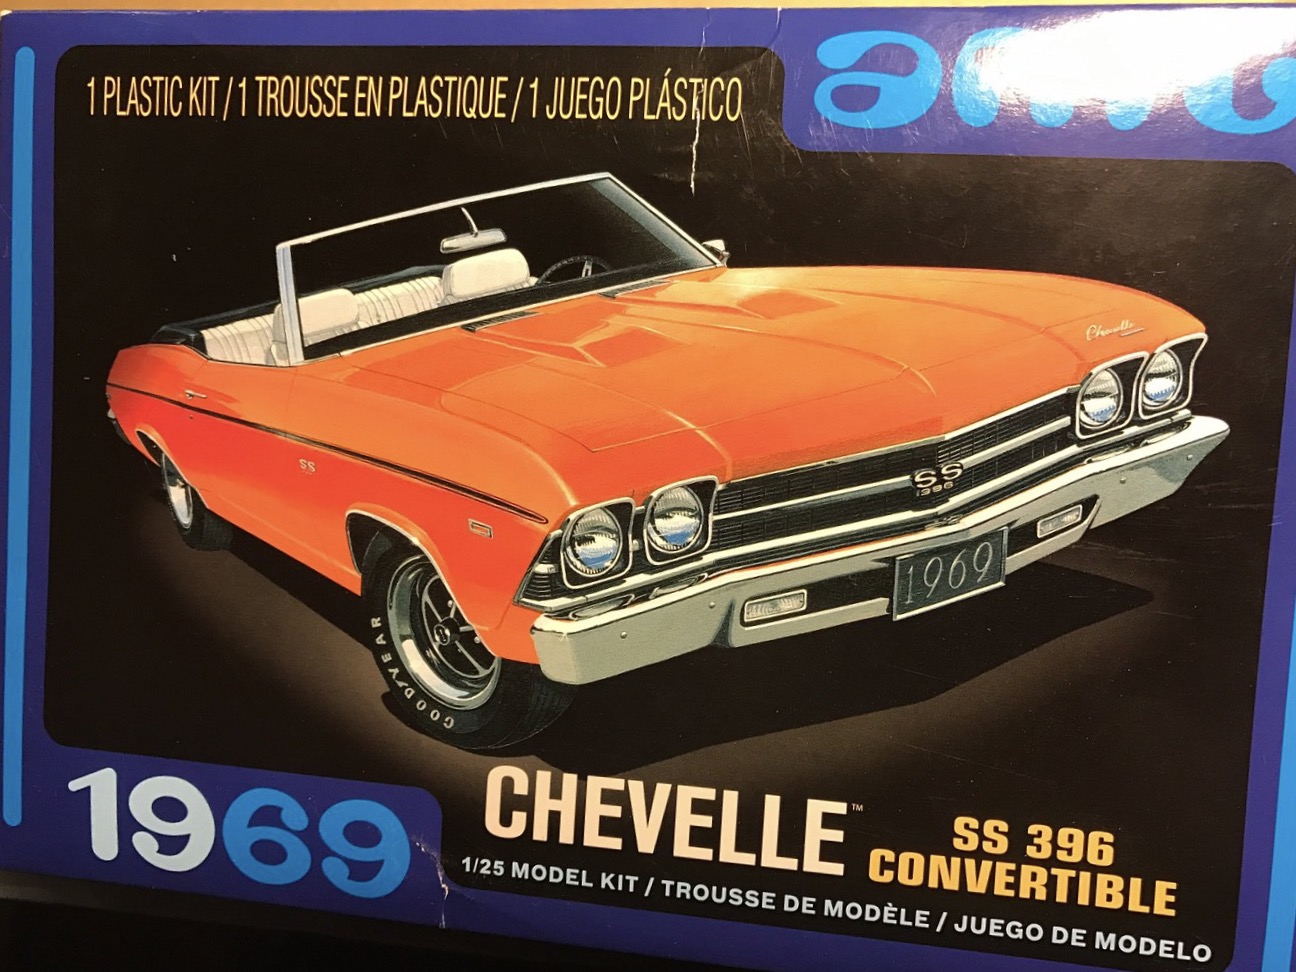
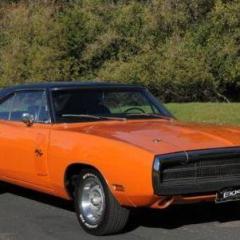
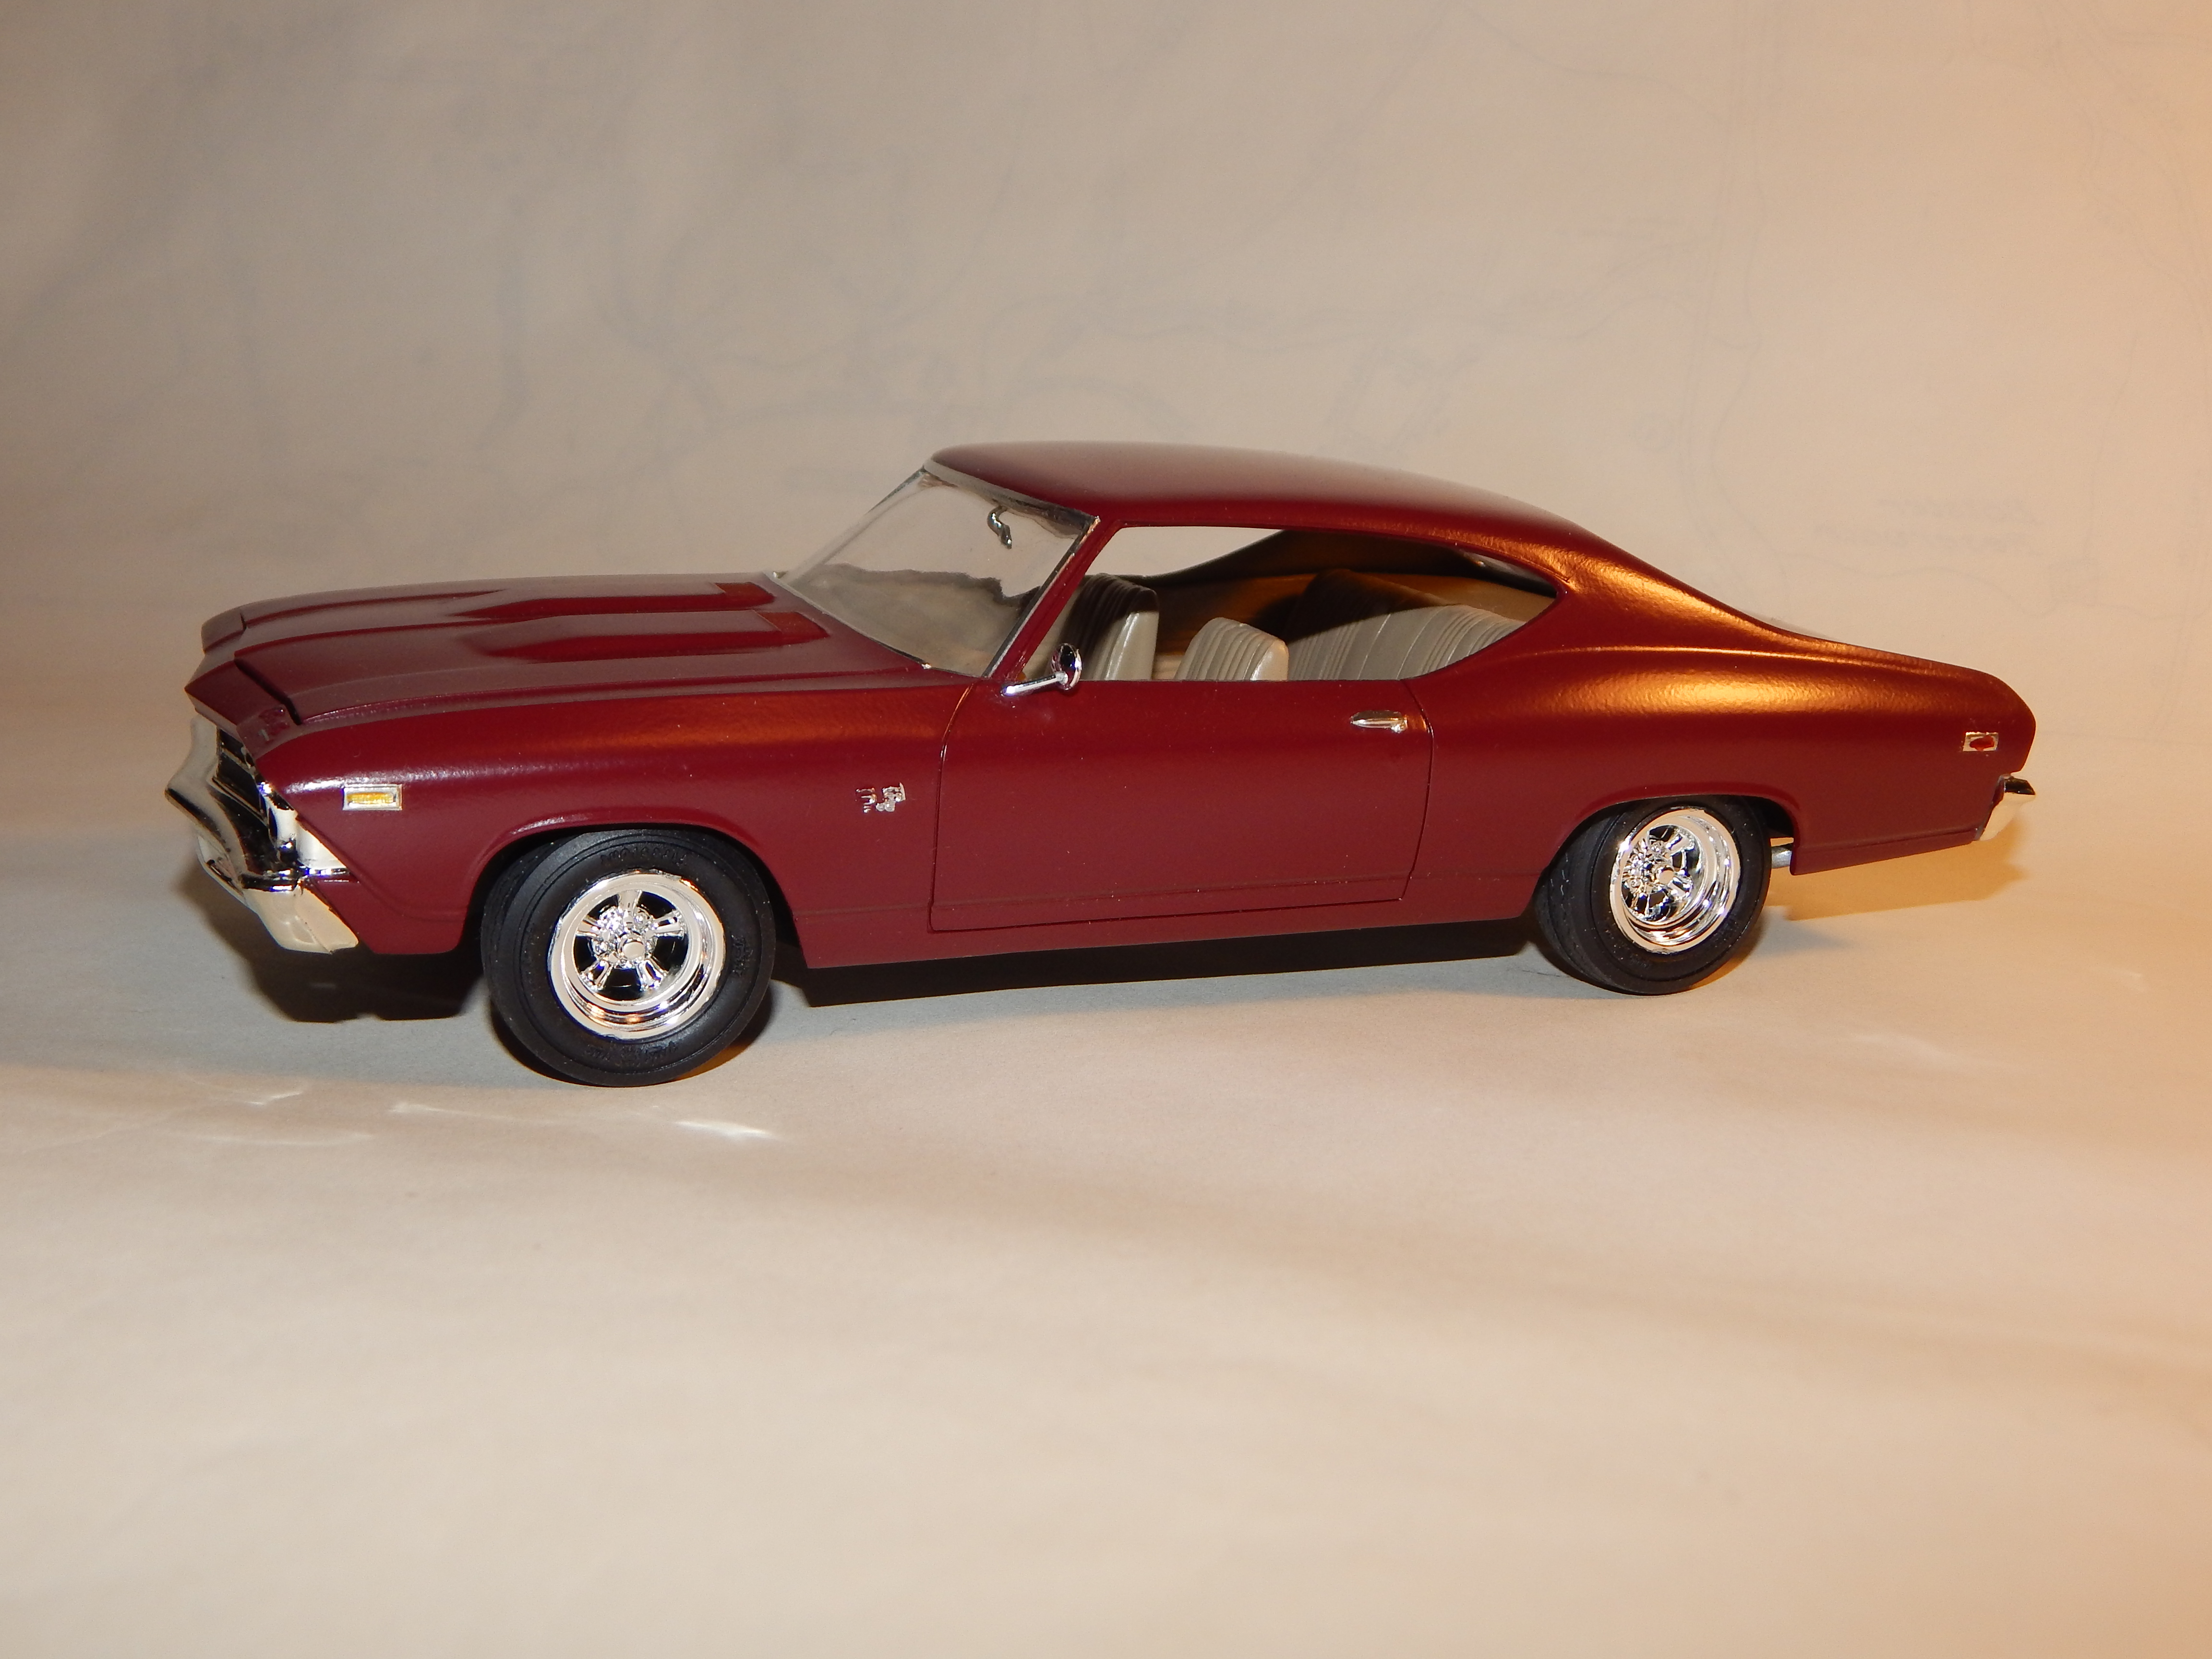
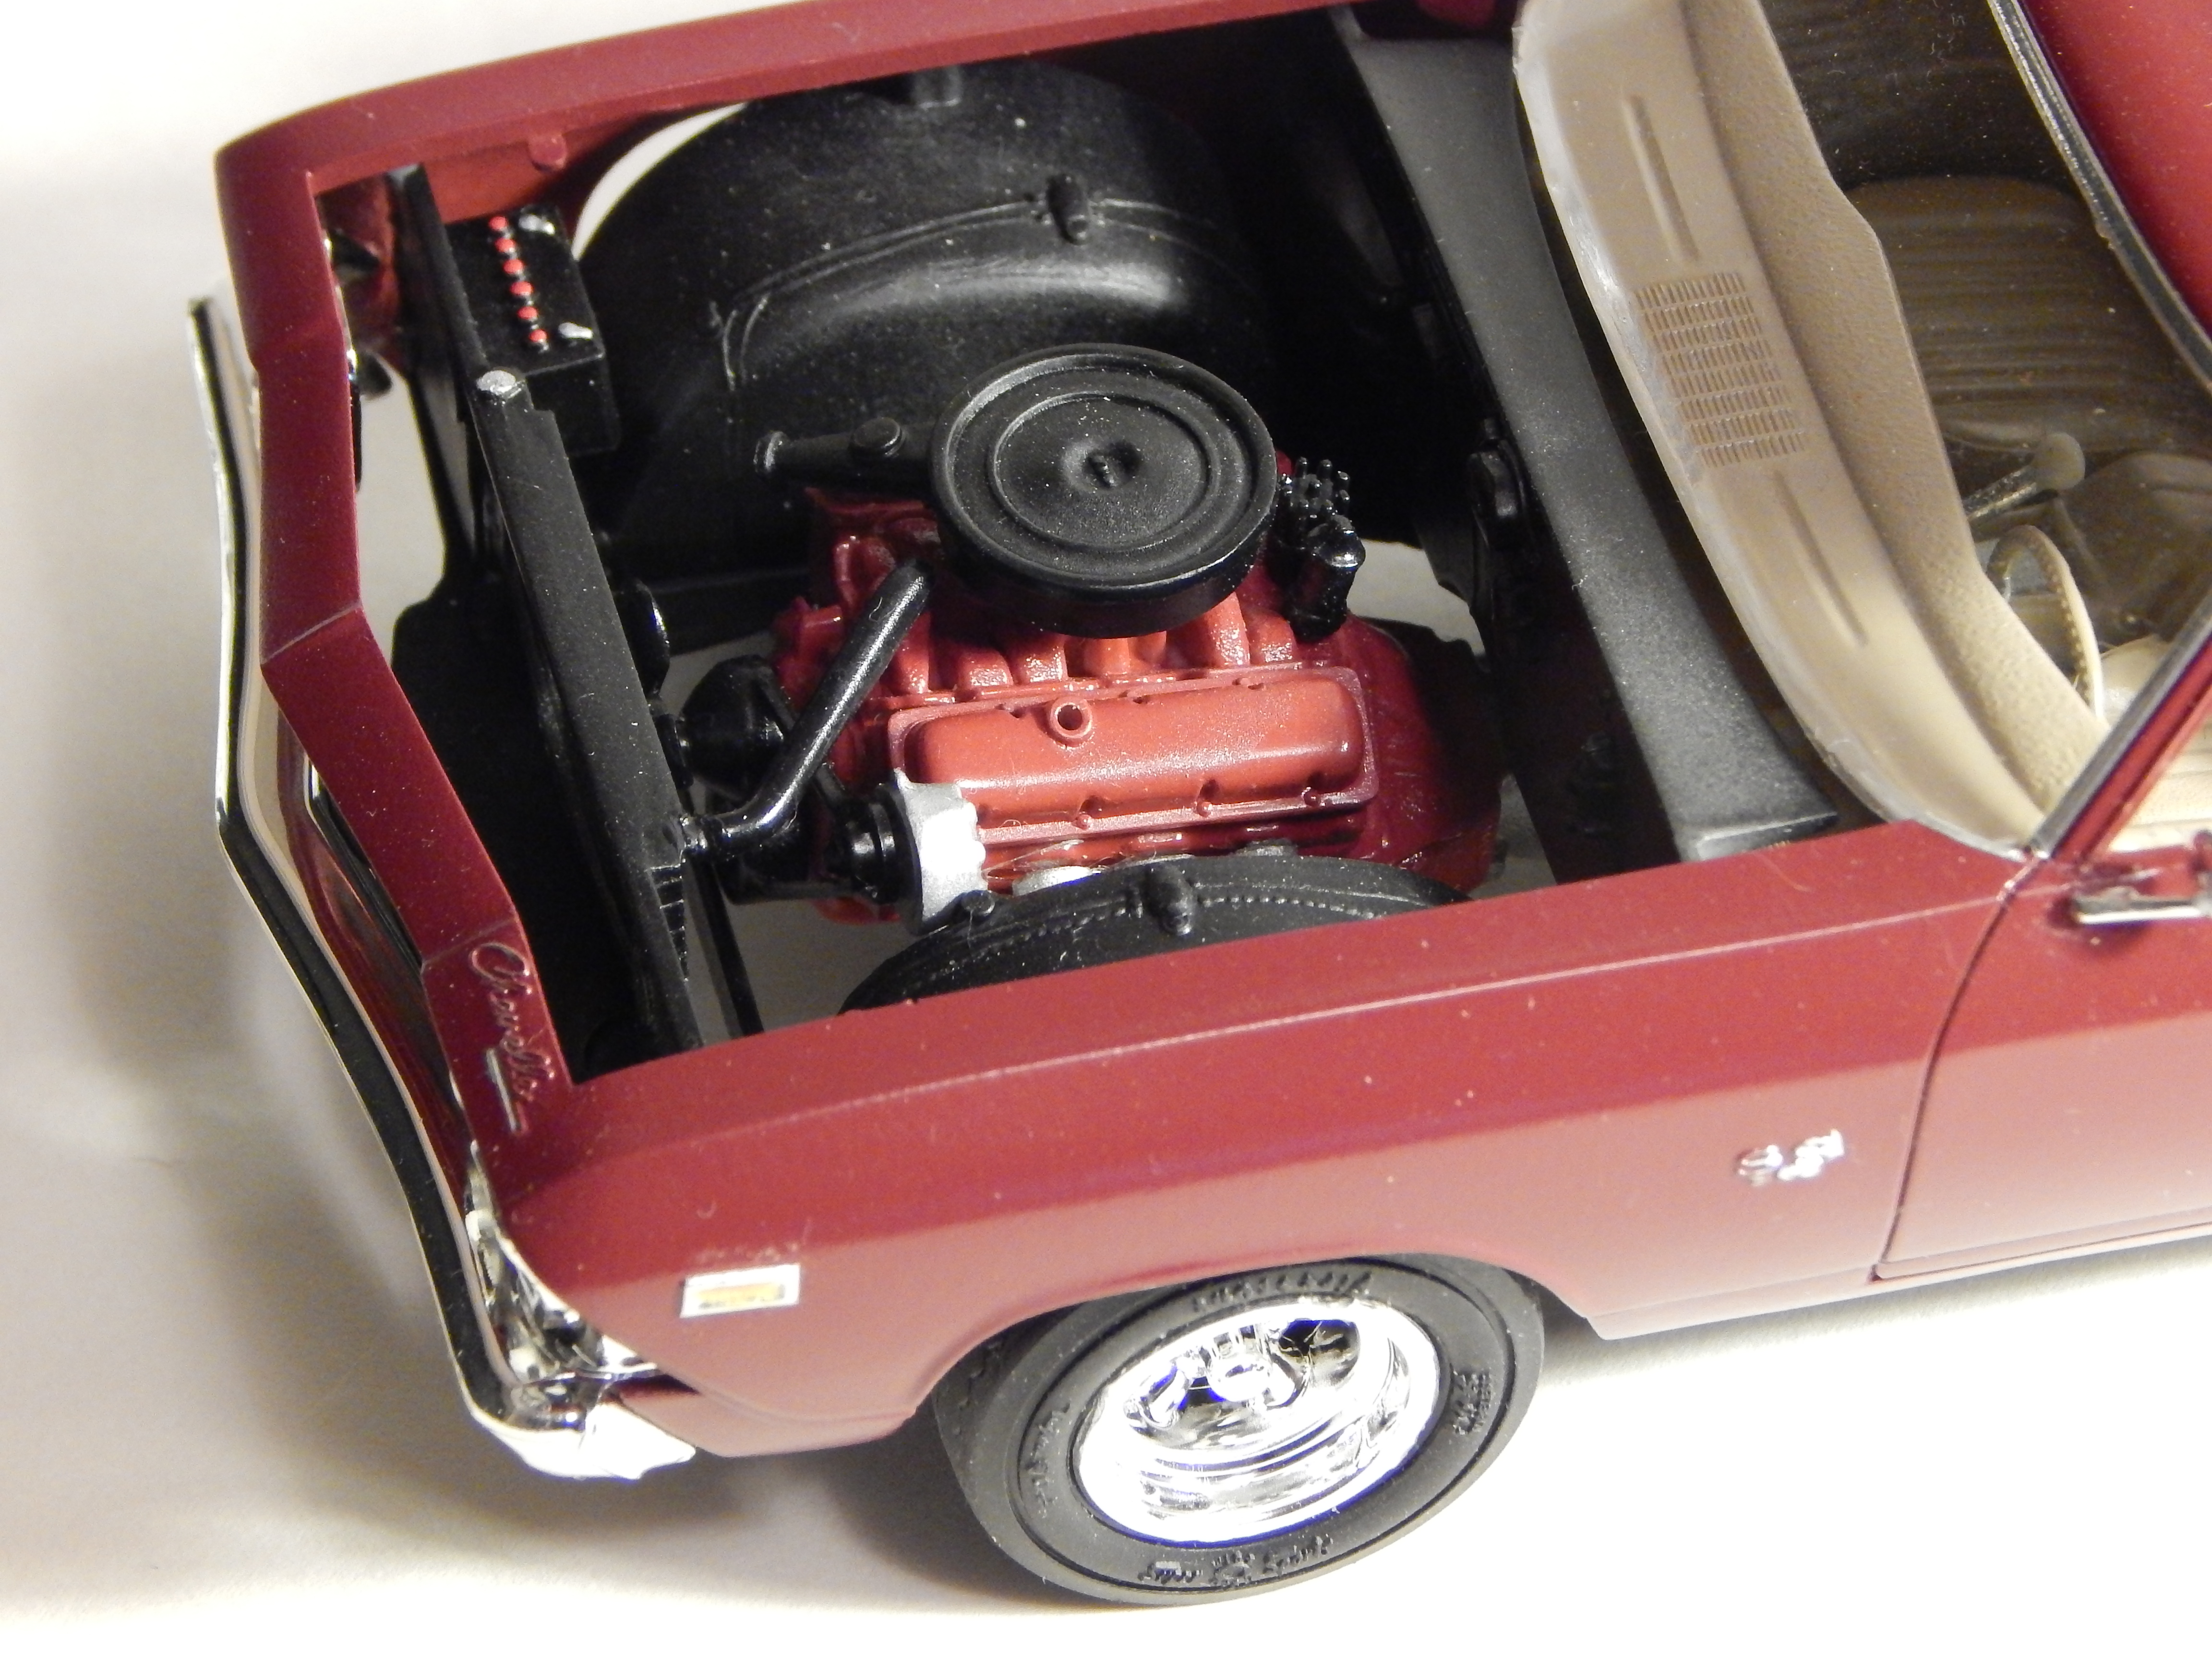
Quickie build. I've always preferred the '68-69 to the '70. Box stock, typical vintage AMT kit had fit issues. Only thing I added from the parts box, a voice in the back of my head kept saying "rearview mirror". Comments welcome, thanks for looking.
-
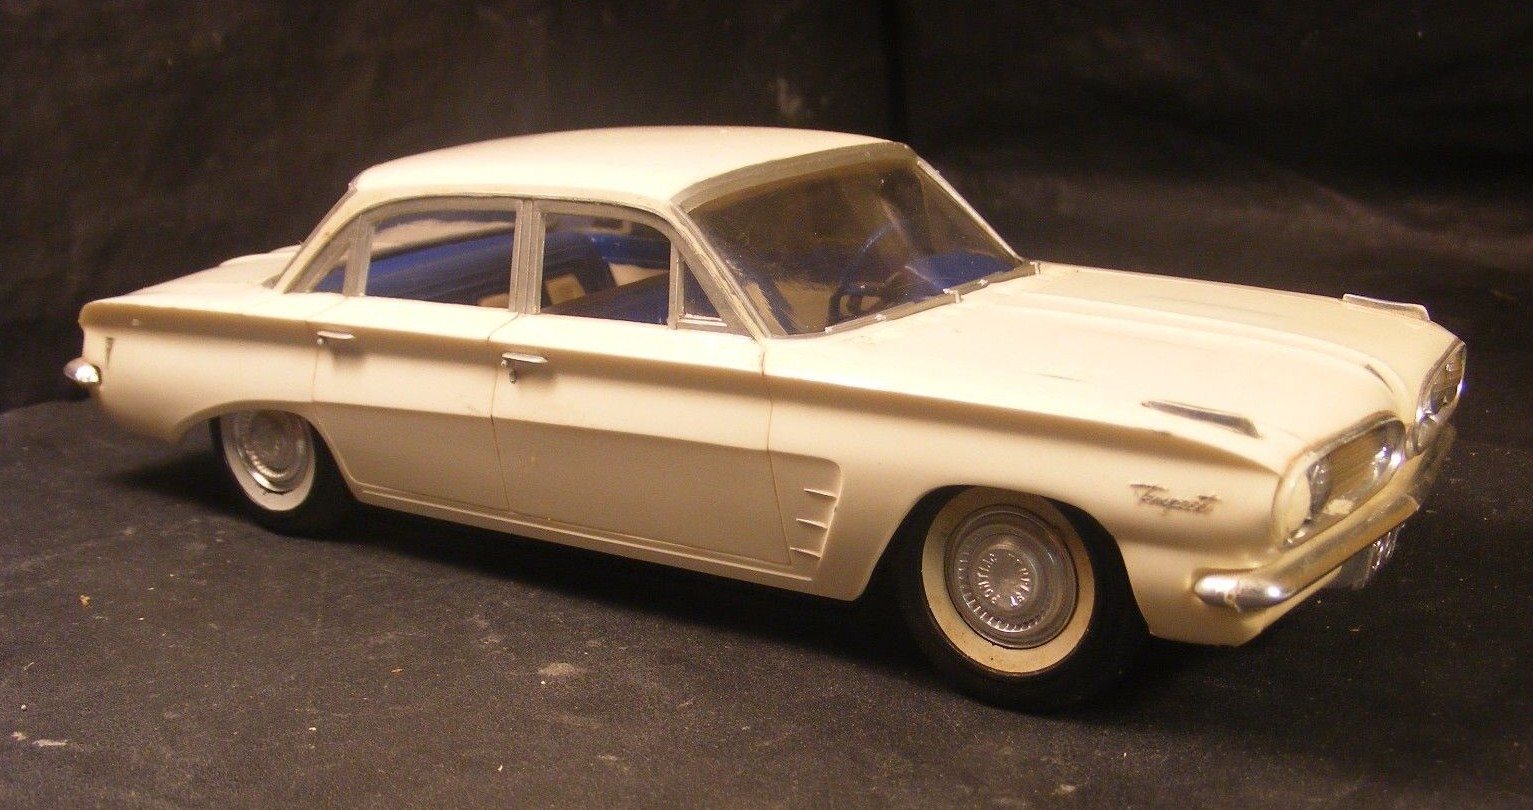
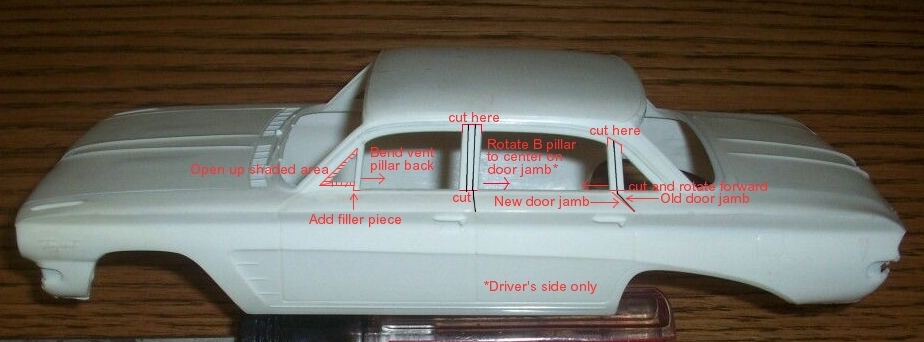
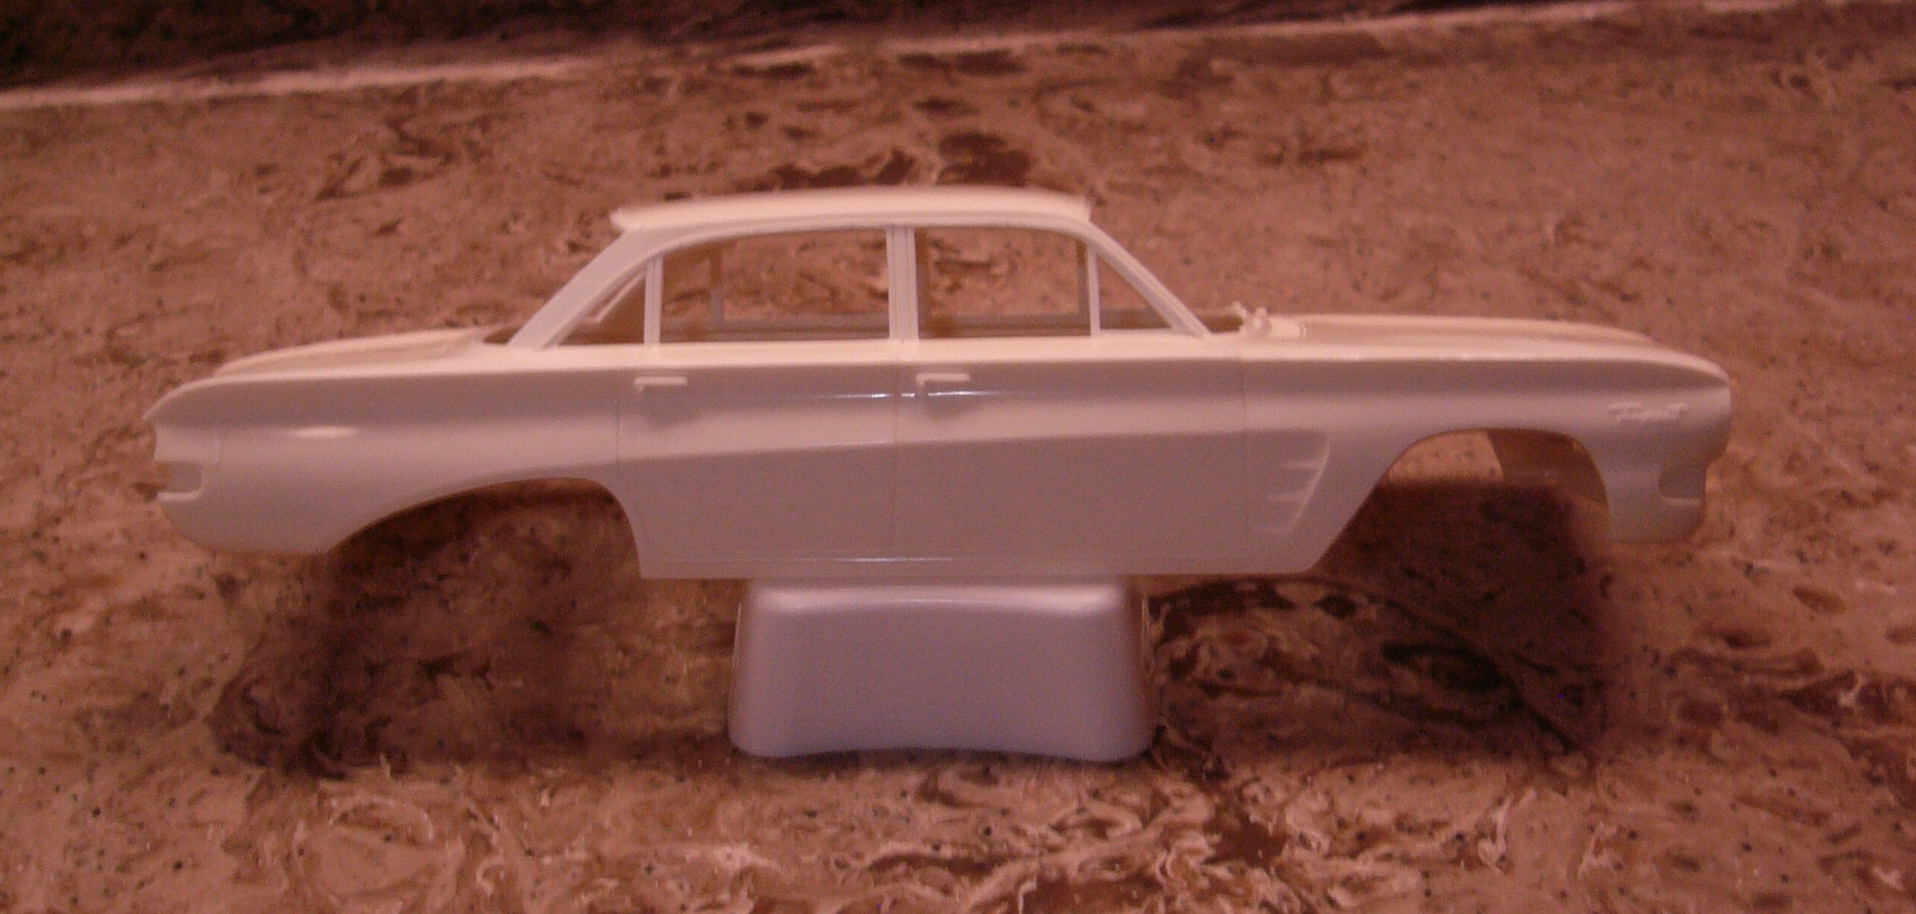
For many years I've wanted to do a '61 Pontiac Tempest; finally I got a reasonably-priced and near-mint builtup on eBay: Managed to get it apart without much trouble - almost no glue was used. To me, the biggest problem with this kit is the overly-thick and crooked window pillars. To wit: (eBay and Hemmings images; real car has baseline trim) So I made the following modifications: I also thinned down the window frames considerably. Note that only on the driver's side the B-pillar is crooked; the one on the passenger side is correct. Here's where I am now: Some more little things have to be finessed, like the windshield and rear window trim, body seams and the wavy areas of the hood (where AMT put cutaway lines for louvers), but I'm getting there. Plans so far are to keep it curbside, and maybe add an underdash A/C unit. Hope this is of some help to anyone else tackling one of these little Ponchos - one idea: NASCAR had a compact class in which a few of these sedans raced alongside Falcons and Corvairs (while the Valiants mopped the floor with them!). Happy modeling!
-
I really enjoyed building this one. Replica stock, I did juice up the flathead with dual carbs and aluminum heads, all stealthily hidden under the hood. No major fit problems. Comments welcome, thanks for looking!
-
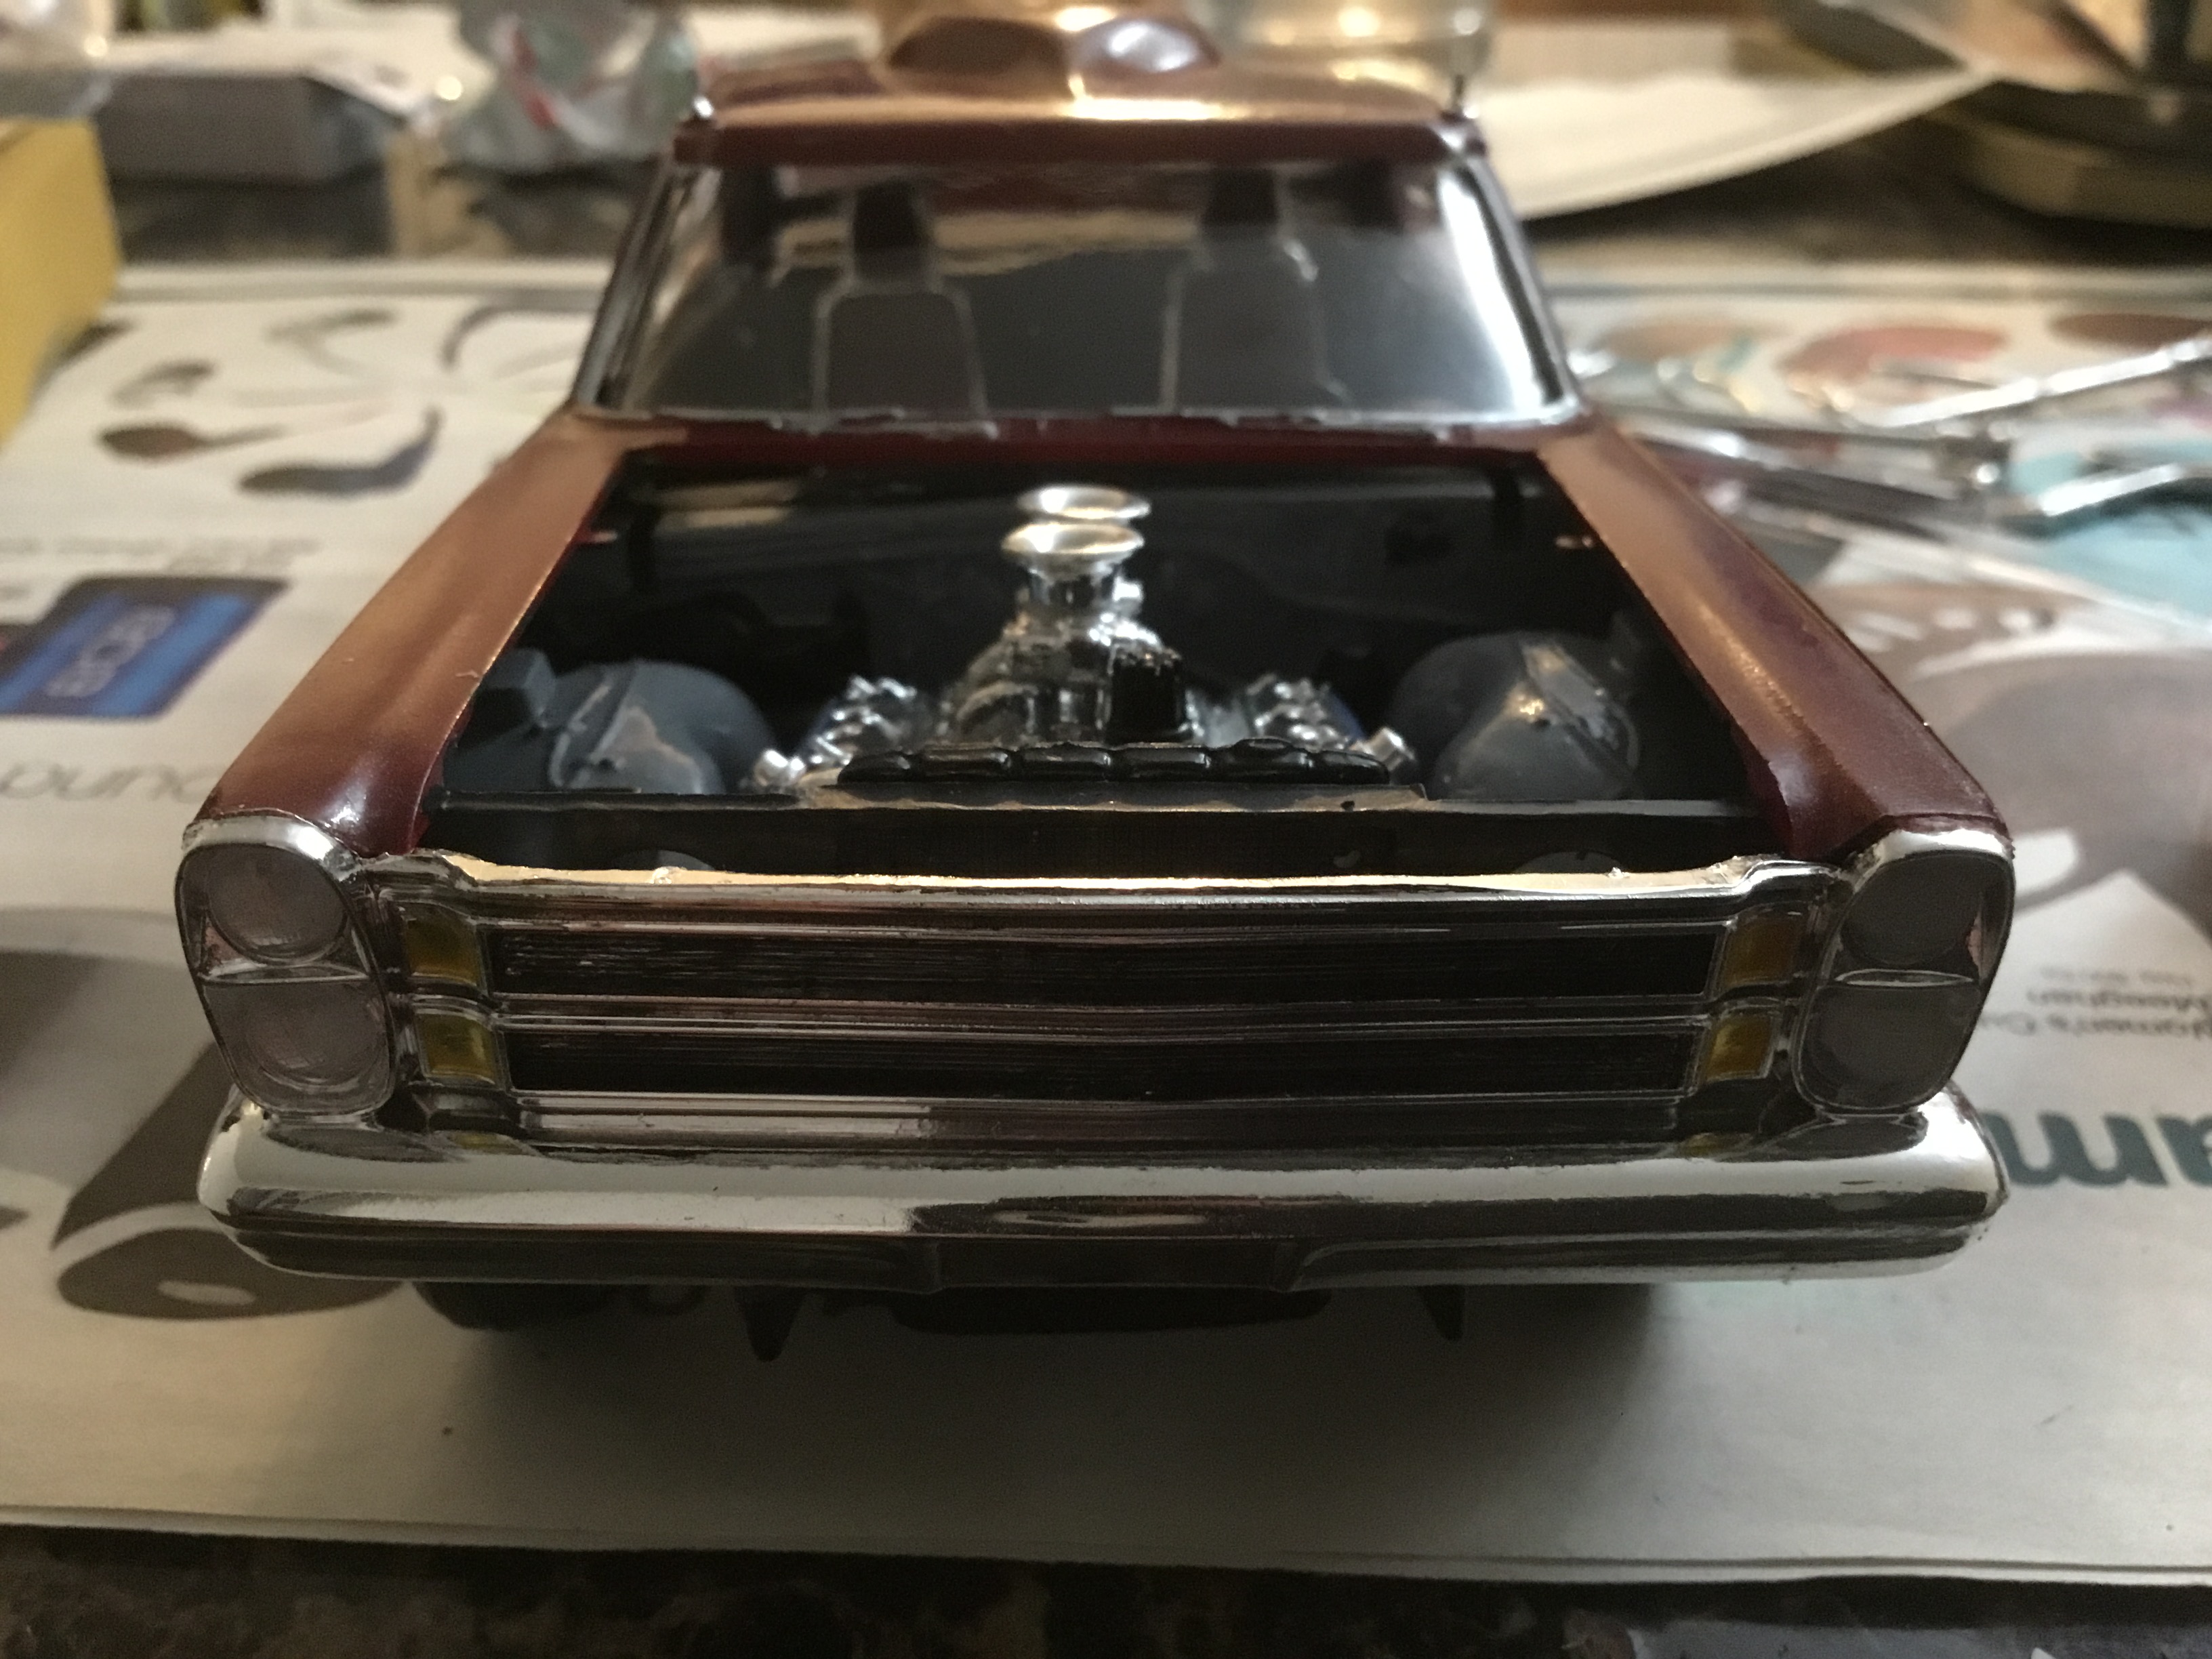
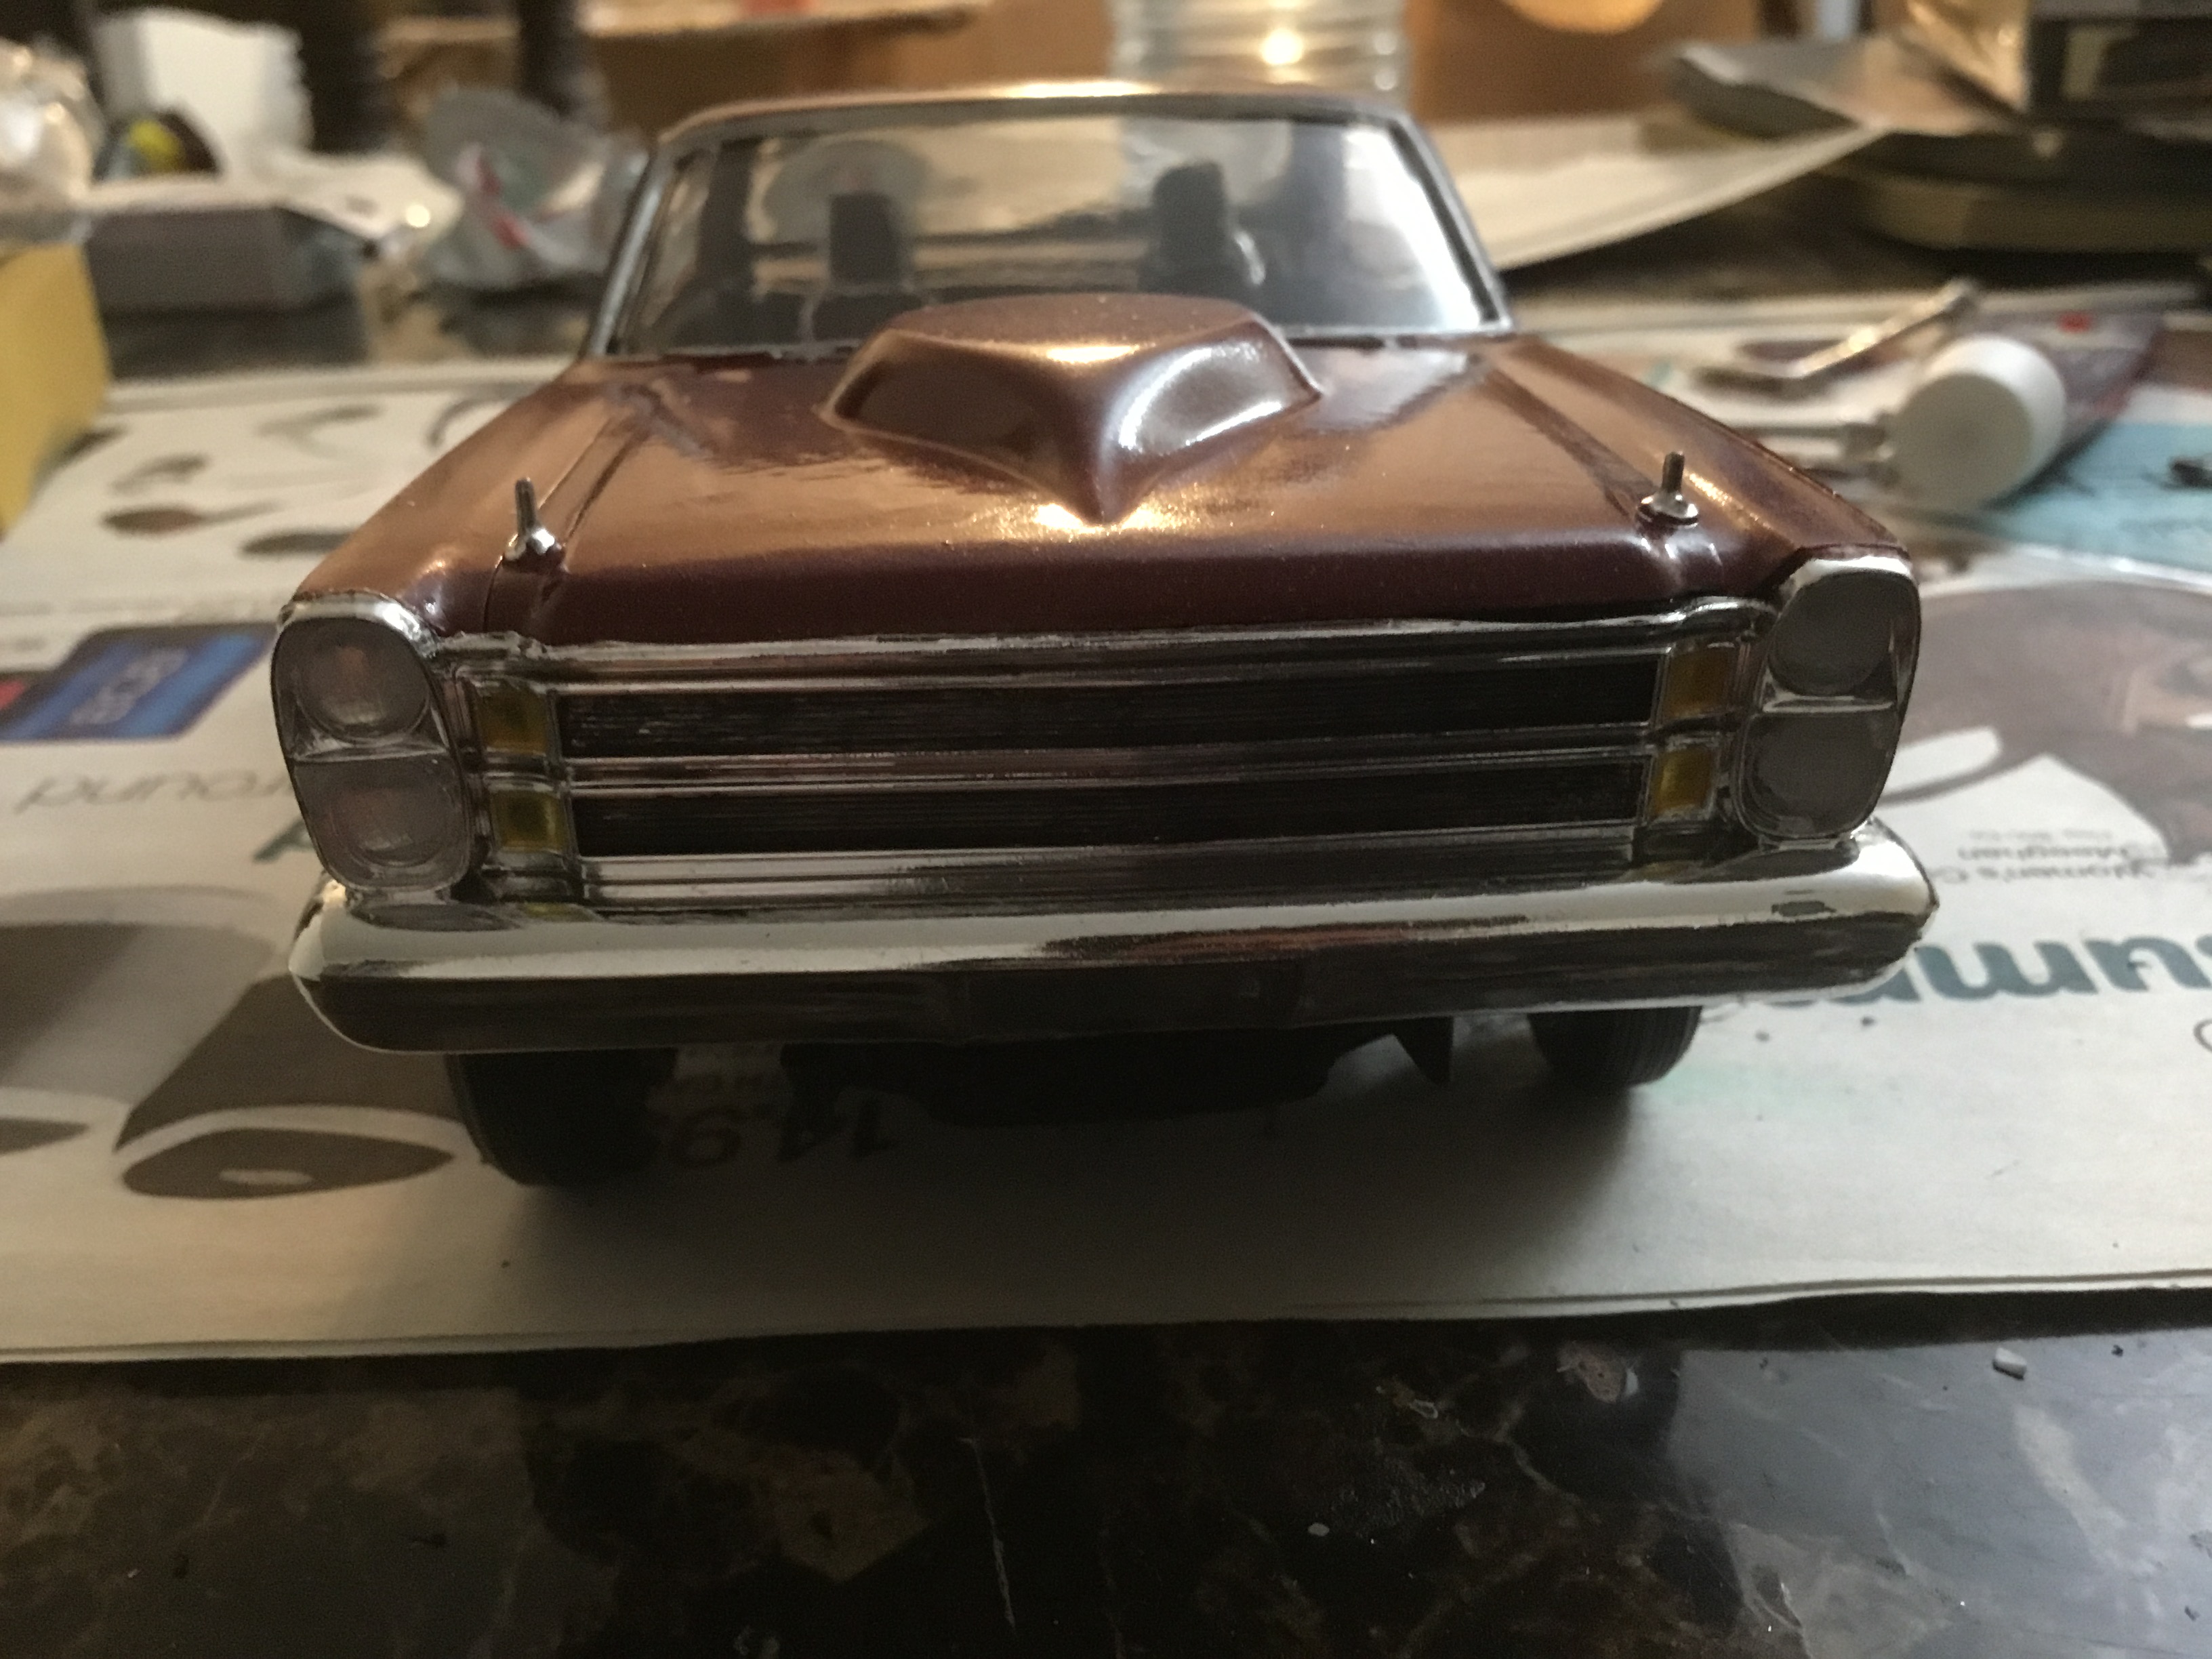
 Greetings and hello to all,,, Built for MODIFIED PRODUCTION class, similar in equipment to a Sox and Martin, Landy, Grotheer style Mopar door slammer from the late 60s early 70s era I suppose. Added some goodies from the parts stash, decals, and a bit of this and that as well.....paint is Testors Inca gold, then Tamiya clear, and finally Tamiya pearlcoat , and finally polished and waxed out. That's about it, and about all this ol' bird here can muster up for now. I welcome comments, or anything that you may want to ask .... all the best,,,,the Ace.....
-
 3n1 re-release with new decals and pad printed tires. This does include the trailer as well. https://www.youtube.com/watch?v=WeNVoyHzsRI
 -
Just finished this one. She started life as a Sedan Delivery a long time ago. I bought her as a built up in need of restoration from a friend. Like I had a Coupe body in my parts box, I decided to actually transform the Sedan delivery into a coupe. A little dig in the parts box found the body, the glass and interior tube from another old build I got already taken apart with a parts lot. Stripped the paint from all parts, repaired some crazing the body had, and started repainting things. Had to add the reinforcement bar to the fenders to stiff things up, as it had to be removed when building the Sedan Delivery. Decided to paint the car black, and used automotive enamel to do so. Did some restoration to the chrome parts by washing them with an old toothbrush and soap. That took off the dust, and brought back almost all the shine. Had to refinish the headlight doors with foil, as the chrome was very thin on that parts. The resulting model is almost box stock AMT, with just the addition of a tailpipe, and vent windows made out of acetate, as the body came without the stock AMT parts. Hope you guys like this little coupe. Thanks for looking. 1940 Ford Business Coupe Deluxe by CCCP Digital Studio, on Flickr 1940 Ford Business Coupe Deluxe by CCCP Digital Studio, on Flickr 1940 Ford Business Coupe Deluxe by CCCP Digital Studio, on Flickr 1940 Ford Business Coupe Deluxe by CCCP Digital Studio, on Flickr 1940 Ford Business Coupe Deluxe by CCCP Digital Studio, on Flickr 1940 Ford Business Coupe Deluxe by CCCP Digital Studio, on Flickr 1940 Ford Business Coupe Deluxe by CCCP Digital Studio, on Flickr 1940 Ford Business Coupe Deluxe by CCCP Digital Studio, on Flickr 1940 Ford Business Coupe Deluxe by CCCP Digital Studio, on Flickr 1940 Ford Business Coupe Deluxe by CCCP Digital Studio, on Flickr 1940 Ford Business Coupe Deluxe by CCCP Digital Studio, on Flickr 1940 Ford Business Coupe Deluxe by CCCP Digital Studio, on Flickr 1940 Ford Business Coupe Deluxe by CCCP Digital Studio, on Flickr 1940 Ford Business Coupe Deluxe by CCCP Digital Studio, on Flickr 1940 Ford Business Coupe Deluxe by CCCP Digital Studio, on Flickr 1940 Ford Business Coupe Deluxe by CCCP Digital Studio, on Flickr
-
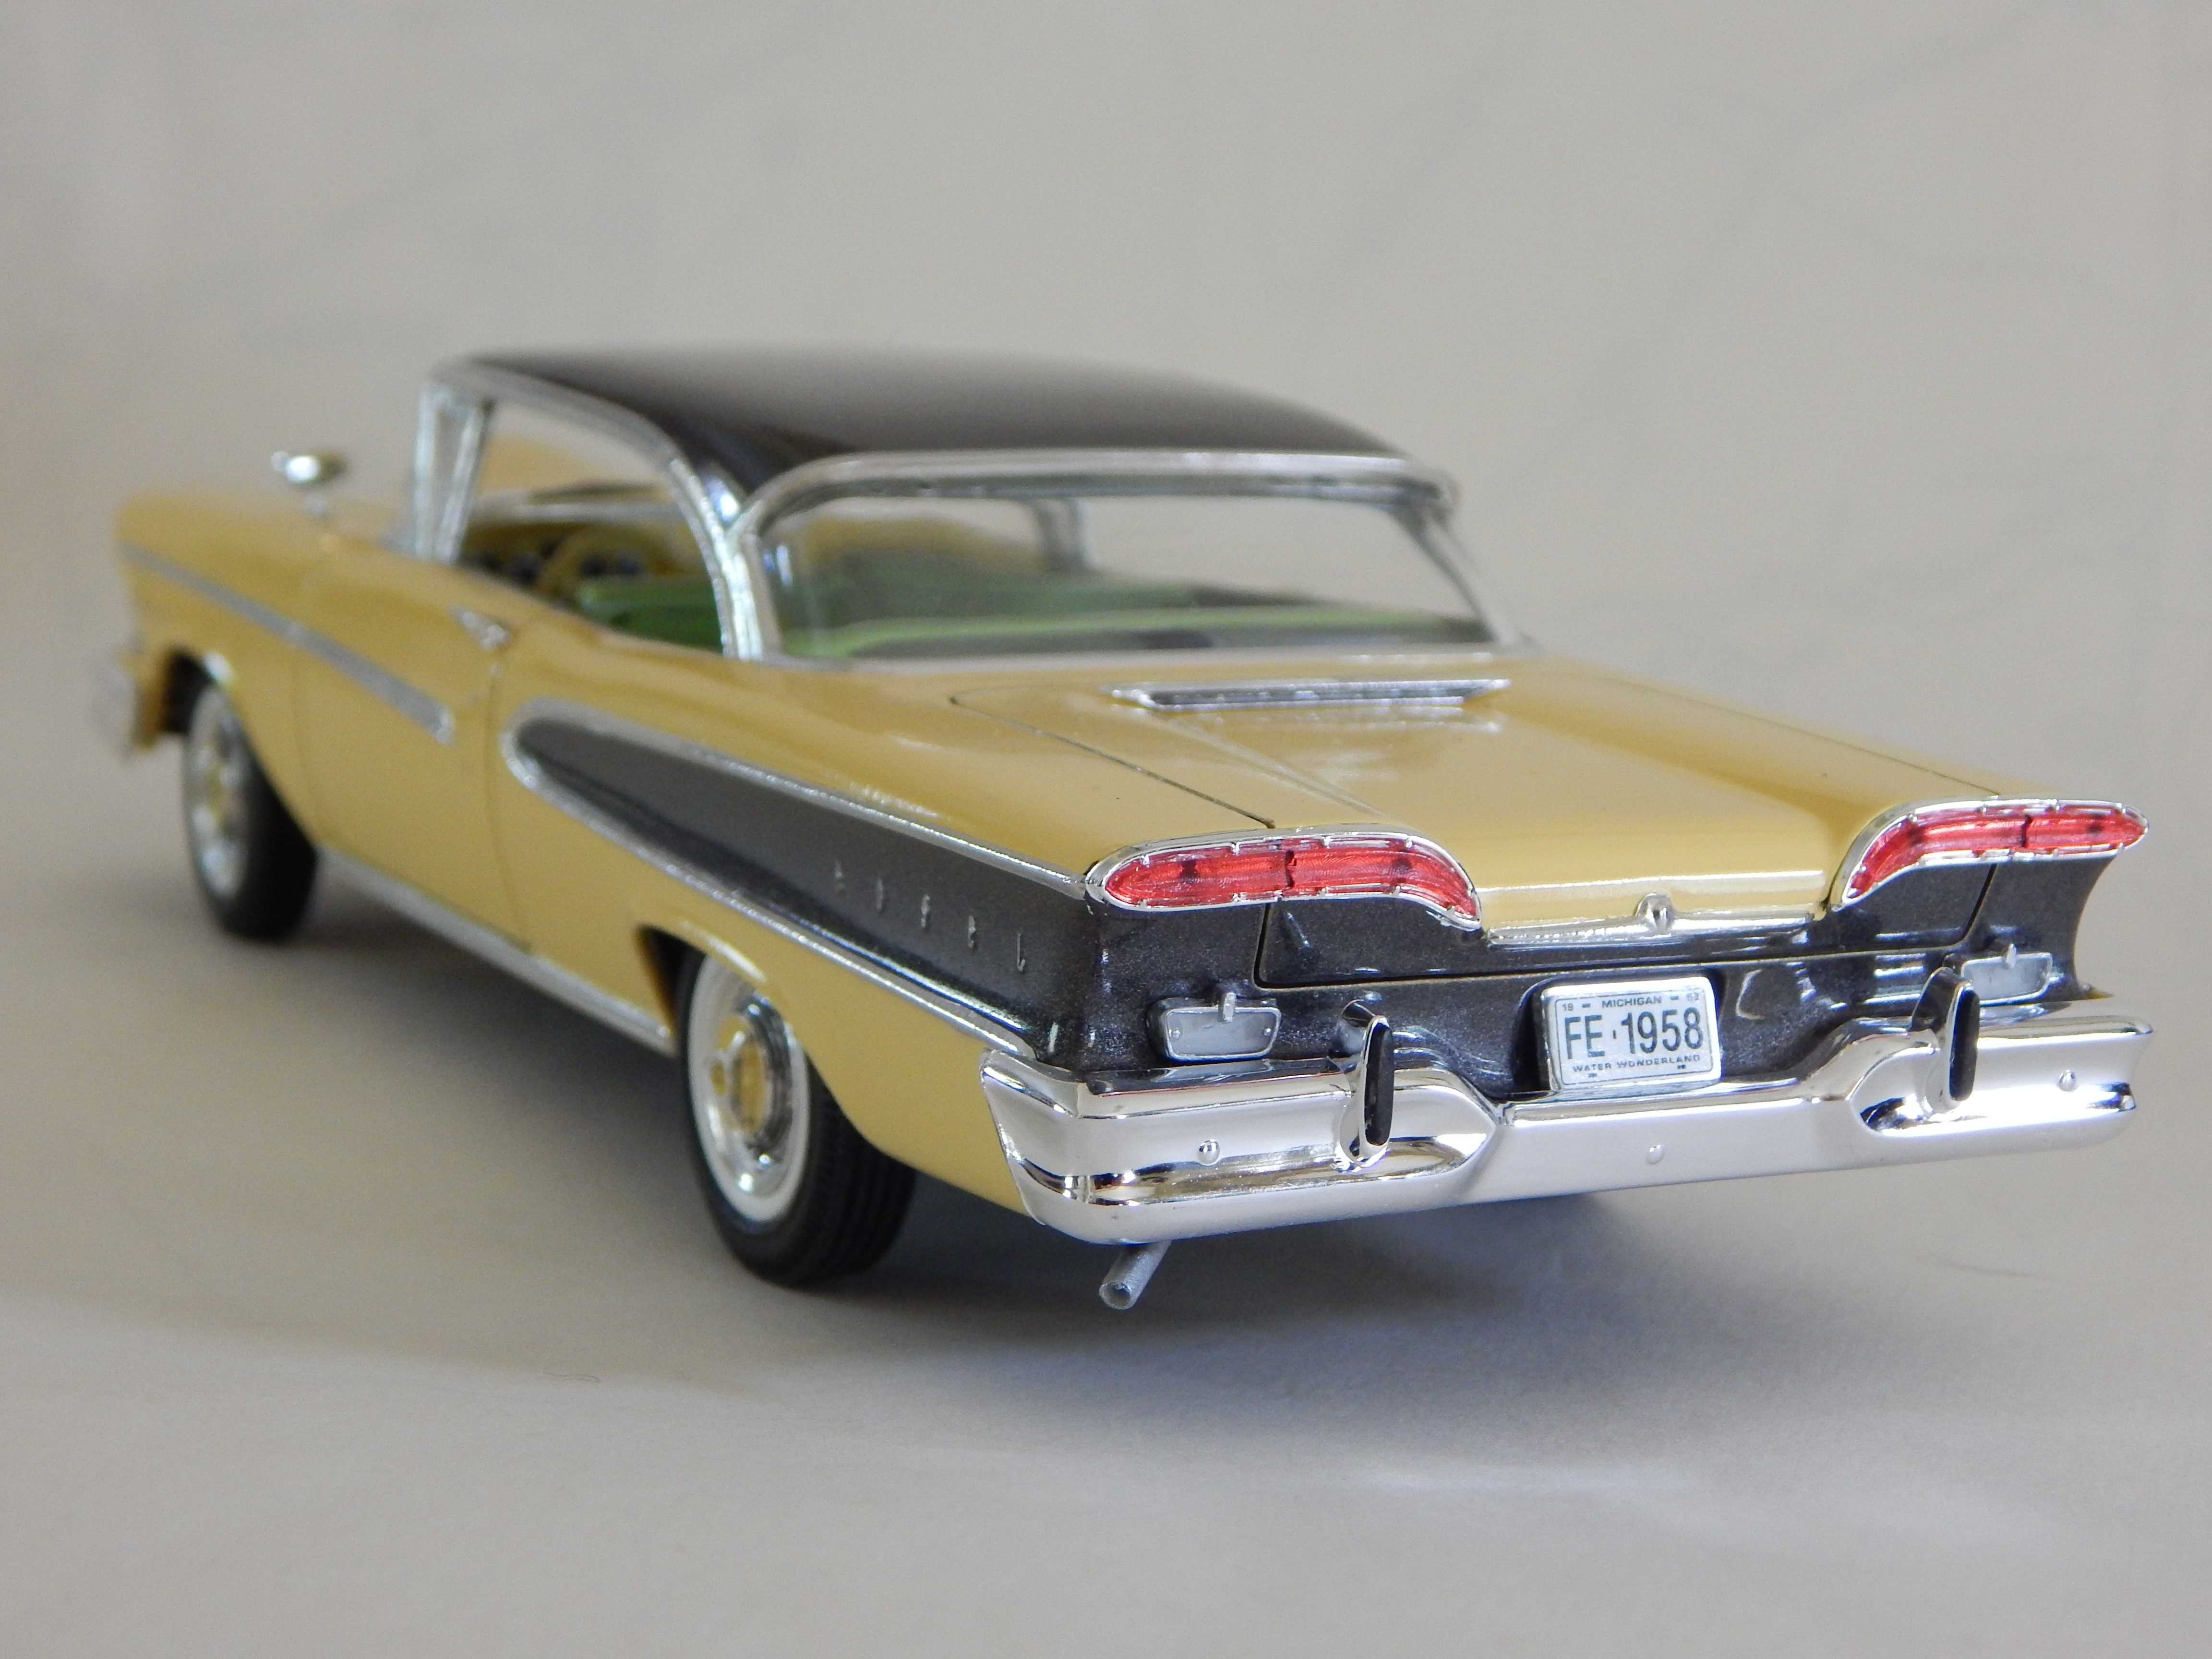
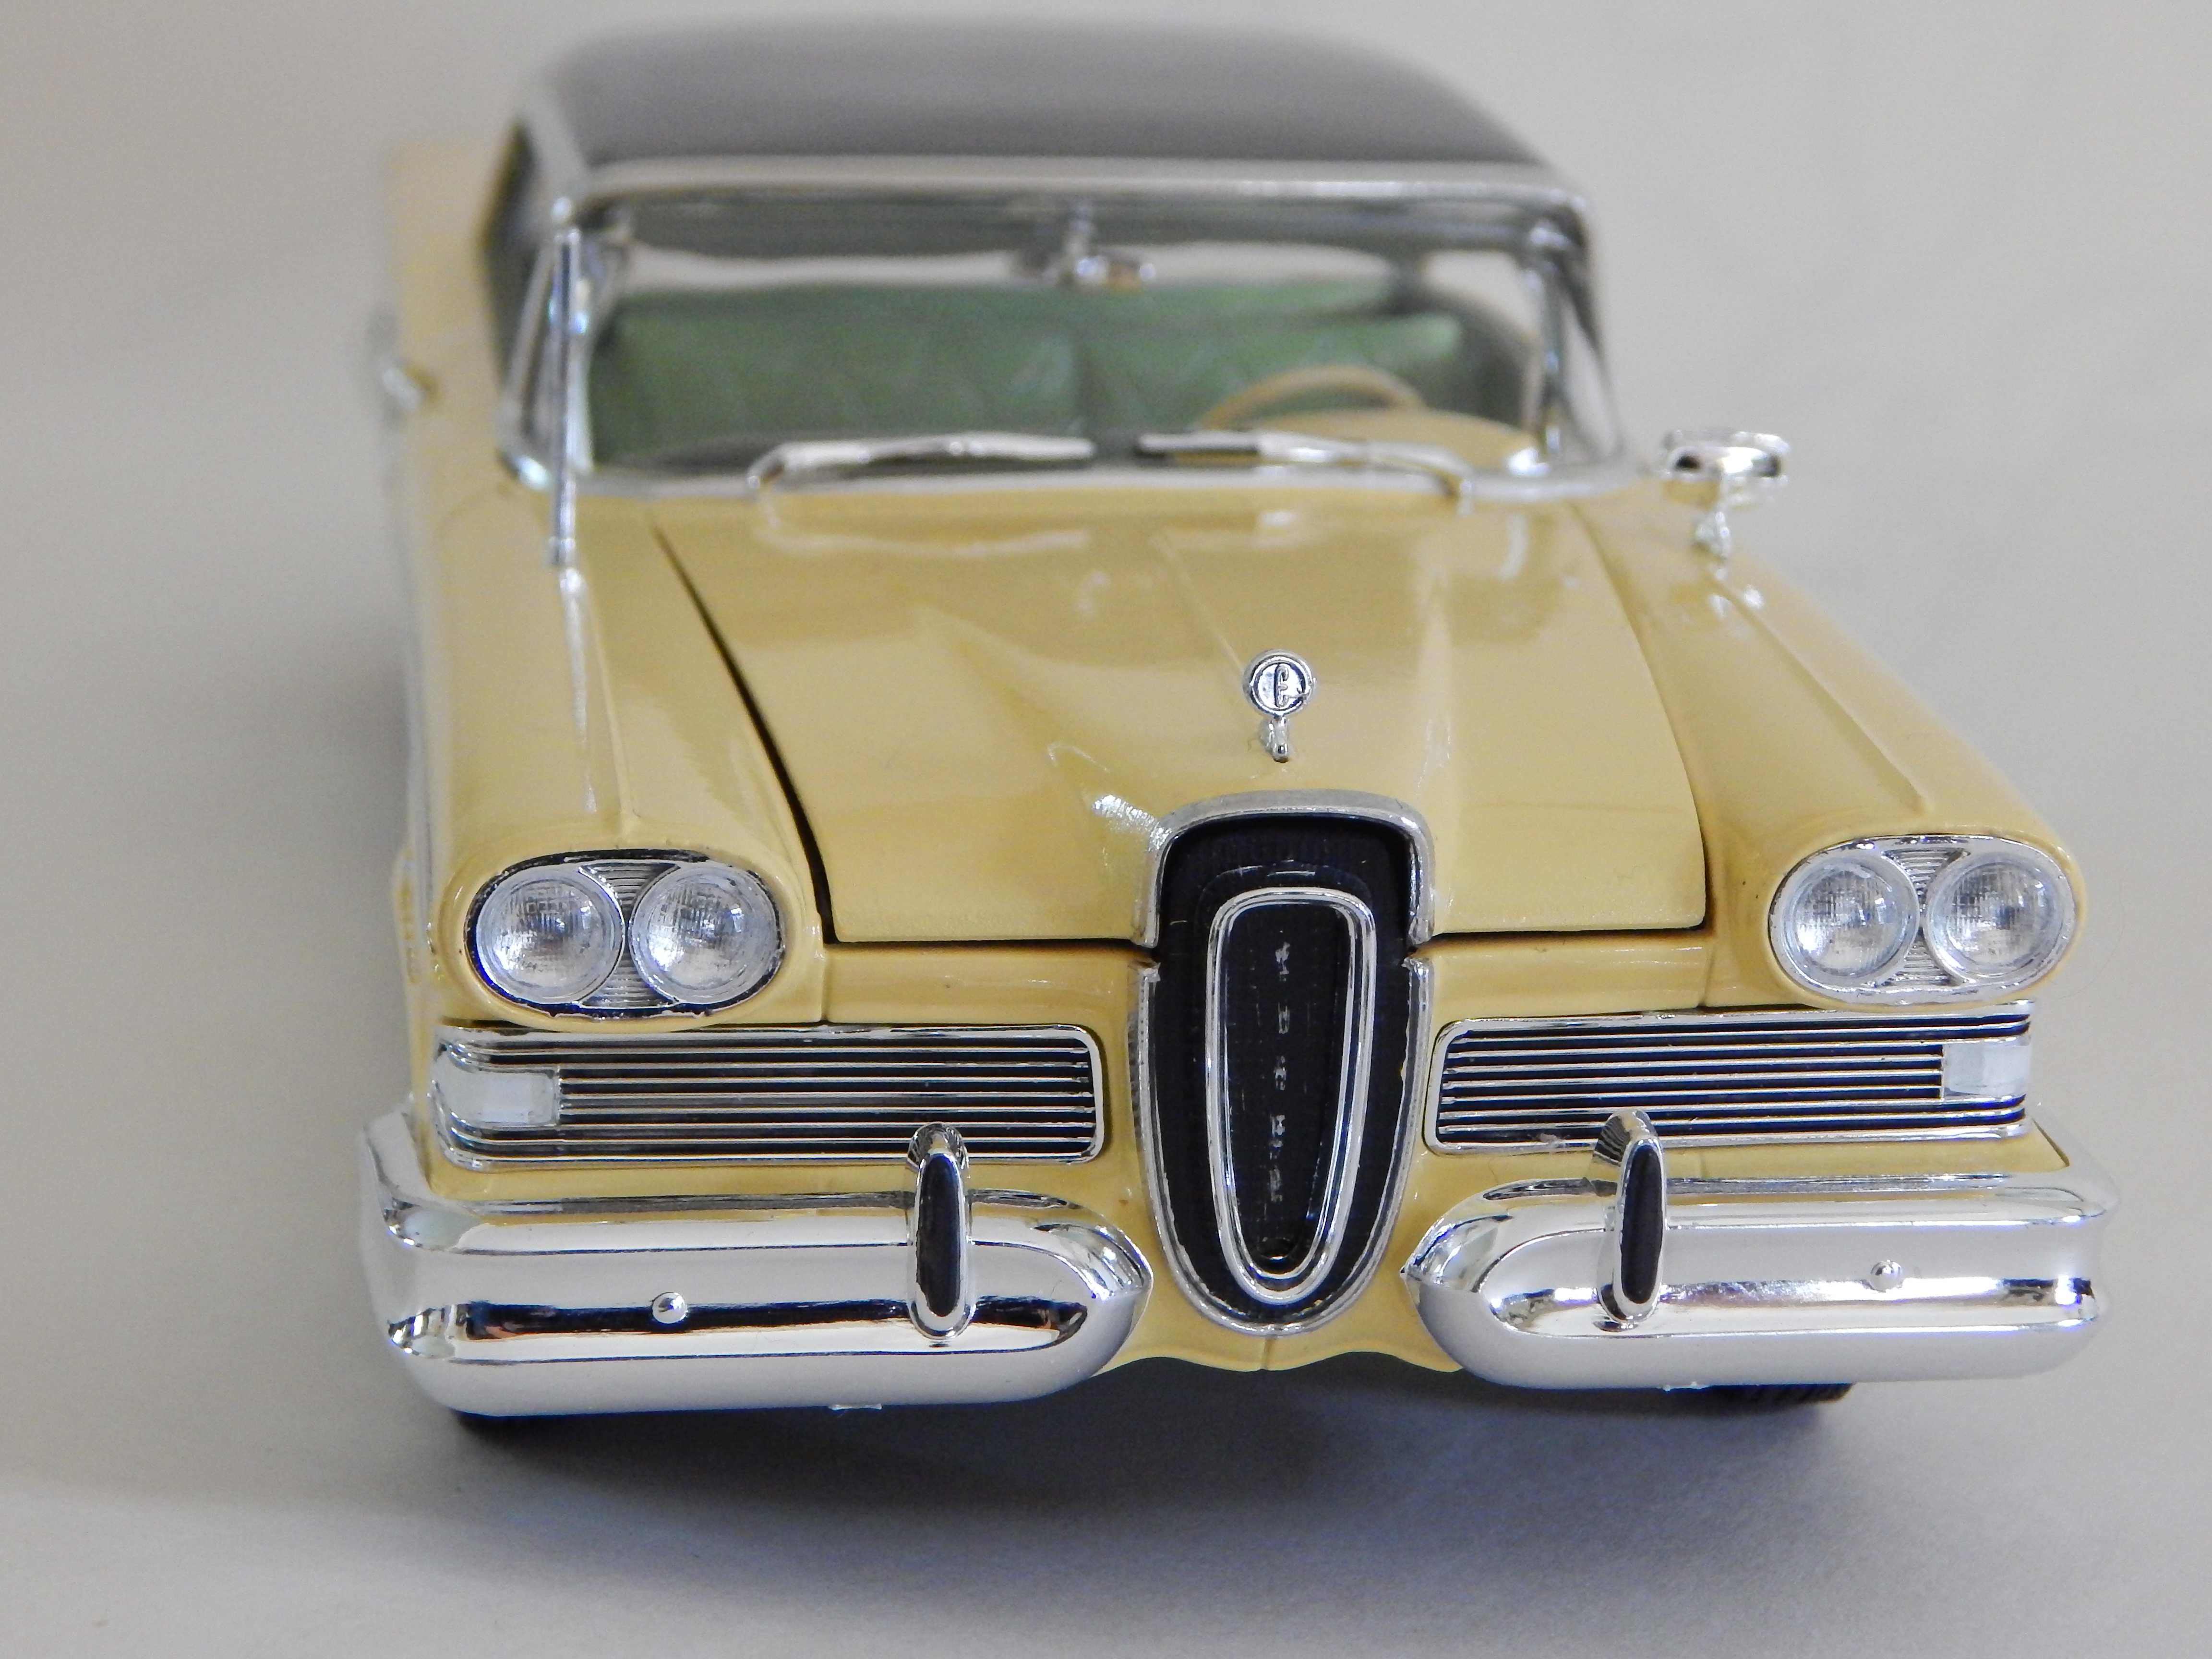
Finished this one today. Really nice, detailed kit, one of the newer AMT tools. I did a Google image search and found one with this unusual color scheme, so 1950's. Comments welcome as always, thanks for looking!
-
Currently working on this model, I heard this isn't a easy build but I got the kit for 10 bucks at Michaels with a 60% coupon. Slowly detailing it and b uilding my the motor. Stay tuned I will be posting more pics as soon as I get my primer (ordered 4 cans of plastikote on eBay for 30 and got a can for free!)
-
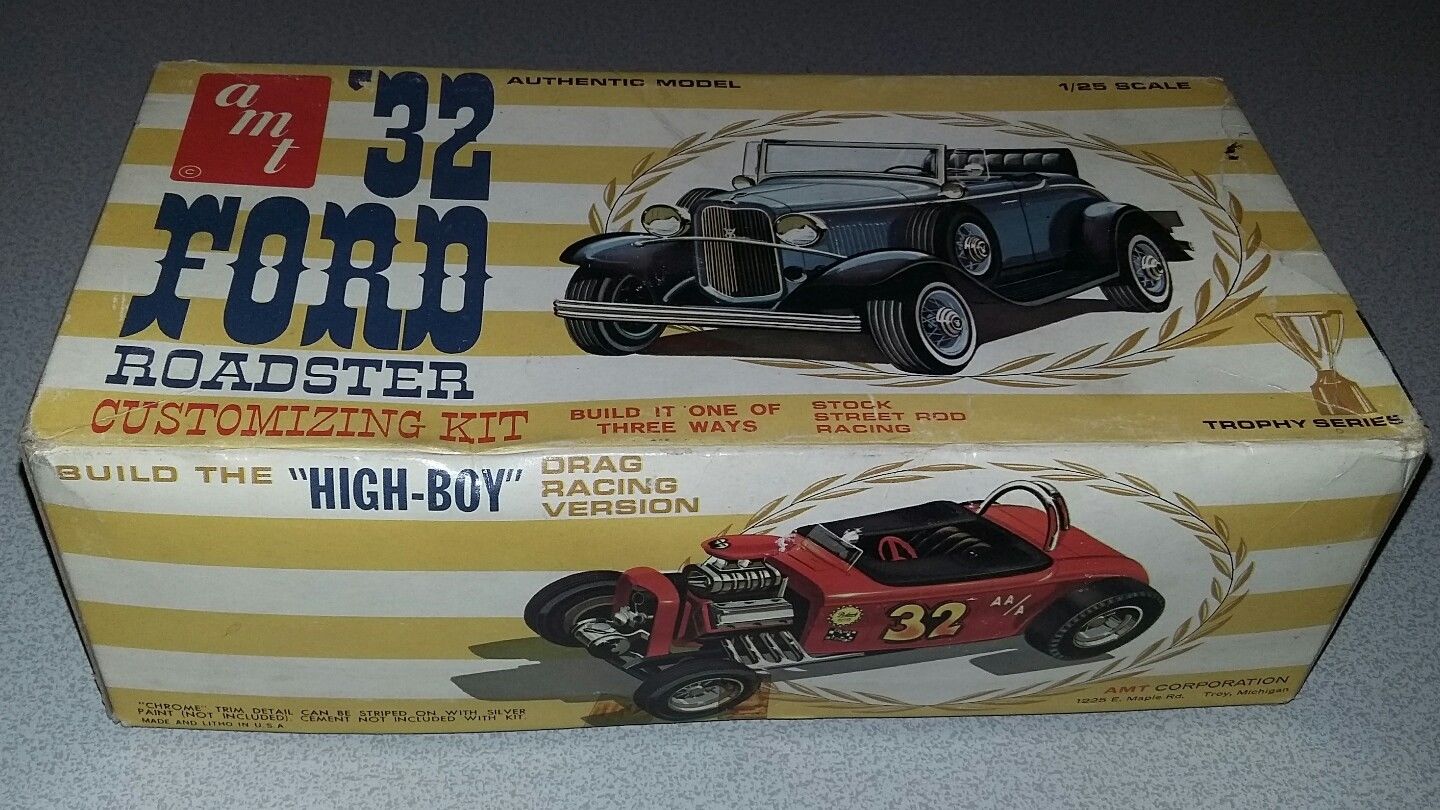
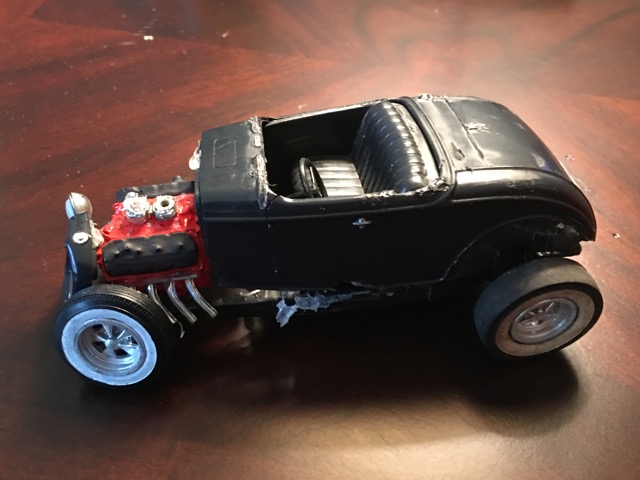
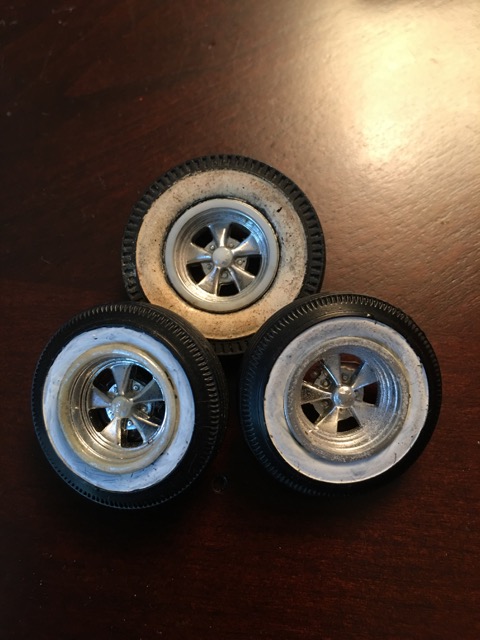
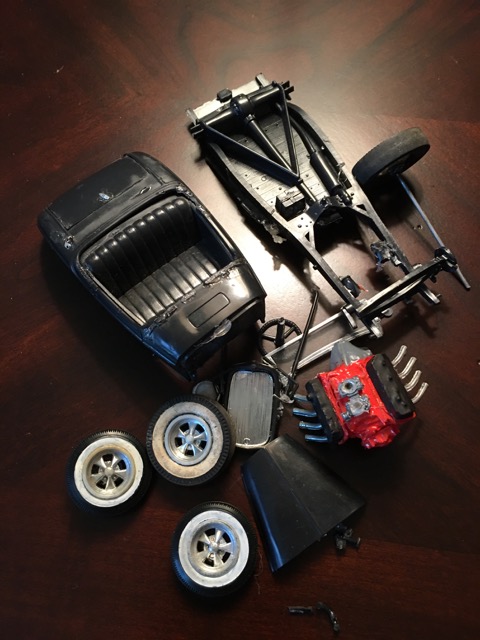
The weather is starting to get warmer in Northern Virginia and I'm getting the fever to build again. I figured I'd start out with a bang by bringing this old AMT Trophy Series 32 Ford Roadster back to life. It's an older kit, and some might gasp at the thought of chopping it up, but that's what they're here for. I paid $11 for the box, which included this stripped down roadster and another, almost pristine stock version. As the seller told me, "The roadster is rough.." and rough it is. It looks like it was put together with a hot glue gun or clear caulking. Certain adhesives interact poorly with styrene, so this has some "dents" in it, which is ok with me. The rumble seat that normally fold ups and down on this kit has been glued shut and a wide gap is left at the bottom (don't you love this?). There is no floorboard beyond the bench seat which has been glued to the body with what could be a liberal dousing of JB Weld. That's ok though, a little balsa wood or a flattened out piece of a Coke can will do the trick. The frame is mostly ok and whatever hot glue or caulking was used on this kit to put it together is mostly forgiving (the areas with Crazy Glue however, are not). The front axle is broken in two places, but the broken part is there, so I could be difficult and not use a replacement from he parts bin. In case you're wondering, the axle is broken because the builder didn't have a second metal rod that came with the AMT kits, so he glued the rims straight to the axle. The engine didn't come from his kit and is the kind that has a short transmission area that matchs up with the molded in transmission similar to some of the older Jo-Han kits. In order to make this engine fit, pieces of sprue were cut and glued onto the frame. The nubs for the radiator shroud are still there, so that won't be an issue. The tires are interesting, I can't tell if the whitewalls were painted or if they came that way. I usually replace the tires on glue bombs like this with the nice AMT whitewall Firestones available recently, but I kinda like these. The Cragar style rims definitely did not come with this kit, and even though I do kind of like how they look, they might be replaced with parts box steelies. Appropriately this guy will be turned into a black primer-ed rat rod, maybe with a little rust thrown in. So there's going to be a lot of work; lots of filing, scraping, sanding. I'm looking forward to it.
-
Here is the rerelease of the Mack R685ST kit. Looks nice, molds have held up. New wheels look great, clear glass, 280+ parts. GREAT decals in this issue! https://www.youtube.com/watch?v=MNQqOlG0c-A
-
...........Just thought I would mention that an ebay seller has just listed the new reissues of the VW superbug gasser and 57 Ford some of us were waiting for.....chance's are more seller's will have their supply in the next day or two as well..........thought I'd just mention for those interested......the Ace......


.thumb.jpg.e0420fe52e683c60d19e843462316523.jpg)


.jpg.b9b5f4aa447df4df18d199d492f2fd37.jpg)
.jpg.b7f2b3bd9318191b6595949de76b4707.jpg)
.jpg.6ec77f6f6a11a5272cc7de260bf8960d.jpg)
.jpg.1431ba8fa40e2646e544fe5e306b4439.jpg)
.jpg.b6a1d27ec891a9c09494c951de8de954.jpg)
.jpg.2f2f1038a13e7761cd9b11ed12053c40.jpg)
.jpg.bfe5634bc4621686fb98558d31541cb4.jpg)