Search the Community
Showing results for tags 'Chopped'.
Found 24 results
-
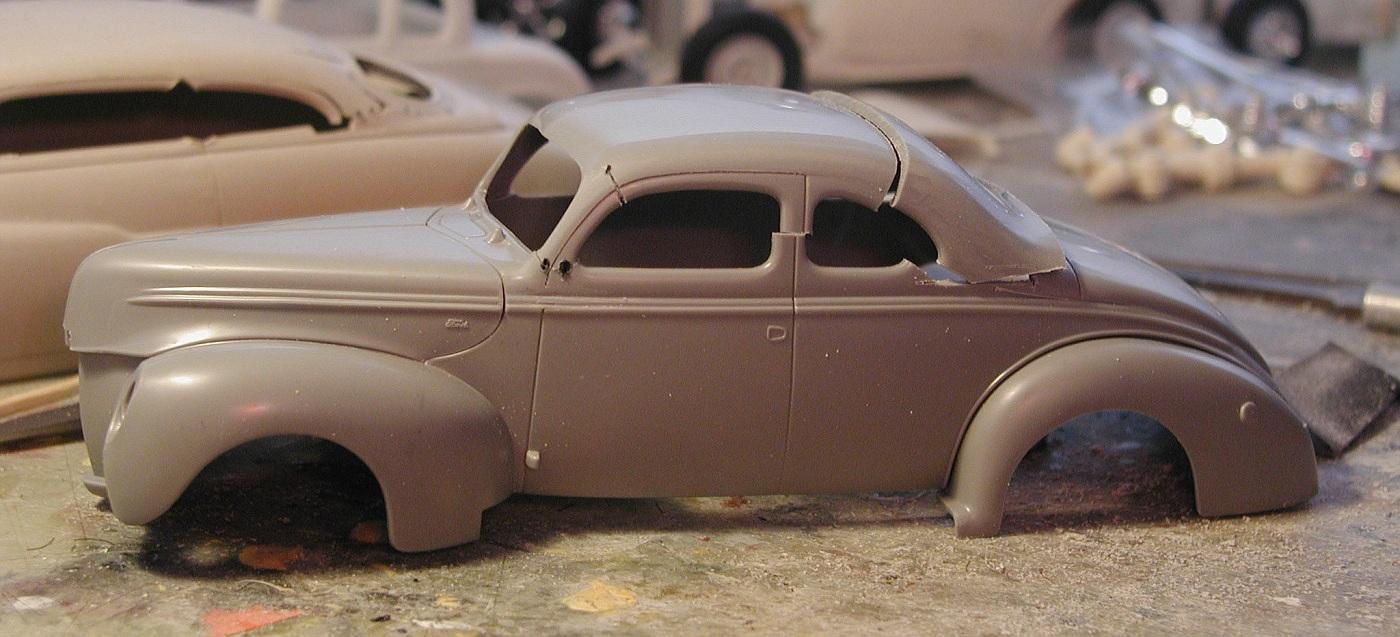
I want to apologize right up front. I found this photo while searching for ideas for my Revell '40 coupe. If it's yours, I'm sorry but I need it to illustrate something. I knew I wanted to chop it a bit but there are many different looks for this car and well, you know.....anyway, I thought it might be interesting to somebody ( you can remain anonymous 🤐 , Michael ) to see the following photos of the steps I took to get a fair chop. It's not finished, it's rough.... but I wanted to get it out there. Maybe I'll finish this one. We'll see. The first picture is one way to do this chop. Not the way I would. I'm not saying my way is right but it worked for me (this time) and, because I am learning as I go, this is in no way a tutorial.

-
A few weeks ago I was flicking through the pages of some old issues of Rod & Custom Magazine and stumbled over this rendering by Steve Stanford in the sketchpad section in the October 1995 issue: I instantly knew this will be my next model car project… I started with the body of a Revell ’30 Model A Coupe, slightly chopped the top and filled the roof. Then I cut off the cowl section and exchanged it with the one from a ’29 Model A Pick Up kit. Redid the body holdings with strip styrene and modified the rear wheel arches to fit the Pick Up’s fenders and mocked it up for a first look: Everything else except for the parts box wheels came from the Pick Up kit… I thought about a flathead or a SBC but decided to just use the Pick Up’s Ansen inline six: The rear plate wears the signature of Steve Stanford. A little tribute to one of my favourite automotive artists. Hope you like it Thanks for looking, as always comments are welcome Greetings from Cologne, Germany
-
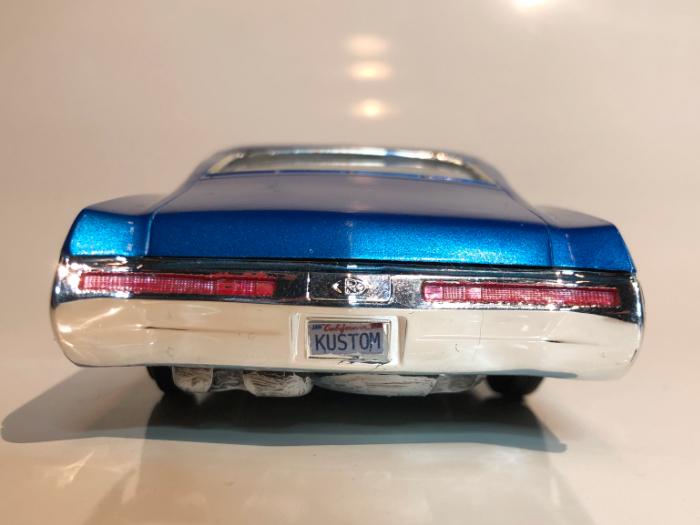
Recently finished: My 1/25 scale version of John D'Agostino's '68 Buick Riviera custom called Pantheon: The original car looks like this: I used amt's '69 Riviera kit to rebuild it in scale. I shaved the body, chopped the top, lowered the suspension, scratch built the wheels and a custom tube grille and wired the engine . Further i tried to replicate some interior details like the tuck'n'roll on the dash, package shelf and door panels, built a center console with cup holders and a TV. Used a parts box steering wheel and amt Parts Pack tires. All what was done to hold kit can be viewed here: Not my best build I must confess. Had a lot of problems with shrinking putty and leaking glue, stance seems not to be low enough and the BMF work could be cleaner... But well, it's done now and I'm happy with my scratch built wheels and glad that I managed the tricky chop. Now, the Pantheon sits in my show case next to John's '61 Oldsmobile The Golden Starfire: Thanks for watching, comments are always welcome! Greetings from Cologne, Germany
-
Some of you may have seen this one on another forum several years ago and there's one shot in the RUST! Thread. This '30 coupe was inspired by the 1:1 I saw in a Coker Tire ad. My rendering is not an exact model but an attempt to capture the general look of the fantastic Hemi coupe pictured below. OKI wanted to cap off the carbs with those little snorkels but never got around to it. I must do that.....
-
Well that was easy…
-
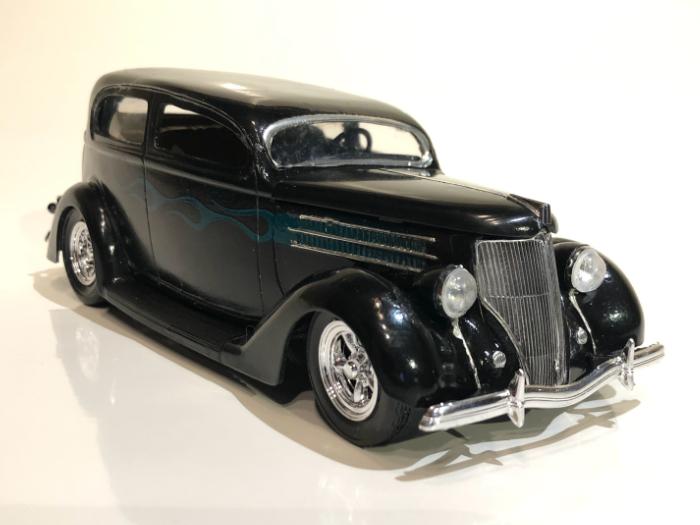
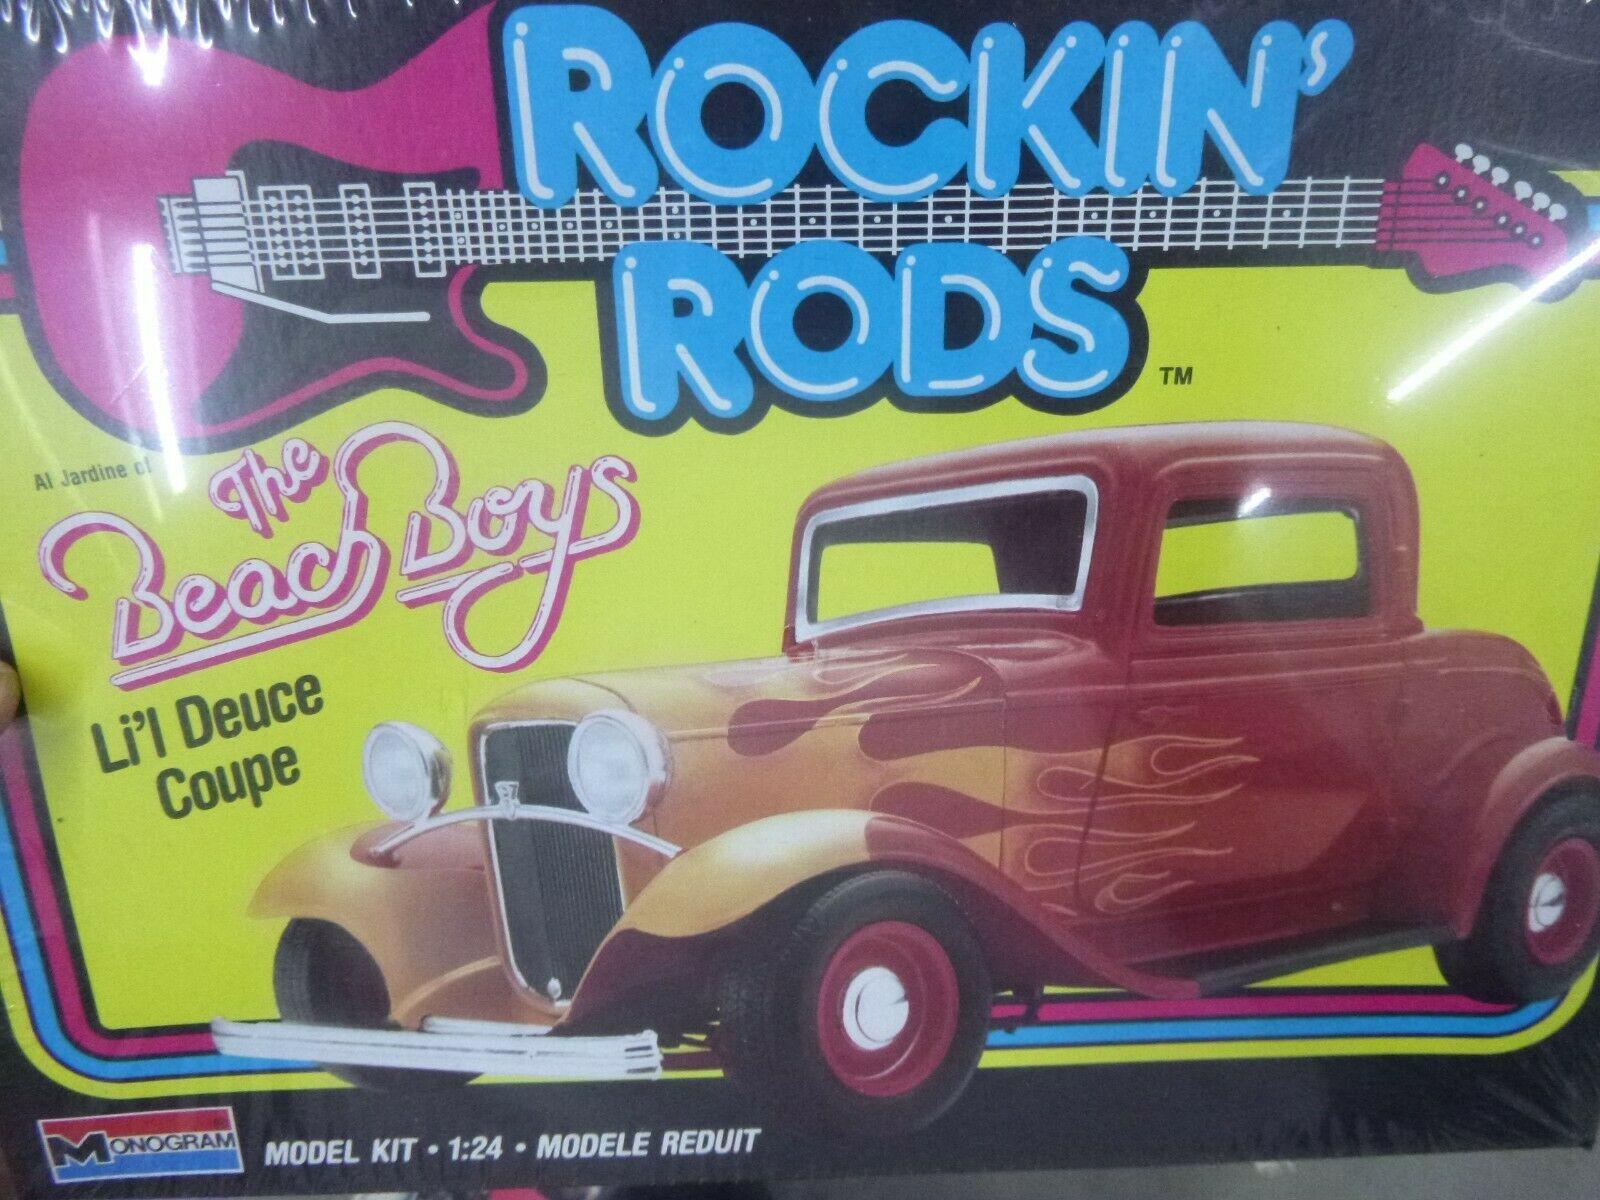
One of these coupes is the Revell kit. The other is a 1:25 Monogram "Rockin' Rods" "Beach Boys Little Deuce Coupe" rendition, an older kit. The Monogram kit is a bit toy-like in that the kit is molded in red. The Revell street rod is a very good kit. This is how I see them. Thanks for looking!
- 19 replies
-
- 2
-

-
- chopped
- channelled
- (and 2 more)
-
Hi guys, I just finished a new build a few days ago. It’s a ´36 Ford Humpback Sedan: Based on Amt´s Dick Tracy kit with a Mill City Replicas resin body and some parts box items I chopped the top a few scale inches, lowered the suspension and added set of Torque Thrusts from Revell´s ´32 Ford coupe Under the hood sits a SBC from Monogram´s Deuce roadster This was my third approach to amt´s ´36 Ford kits. It may not be the best kit but it’s a nice canvas for many different styles: Thanks for looking and as always: comments are welcome
-
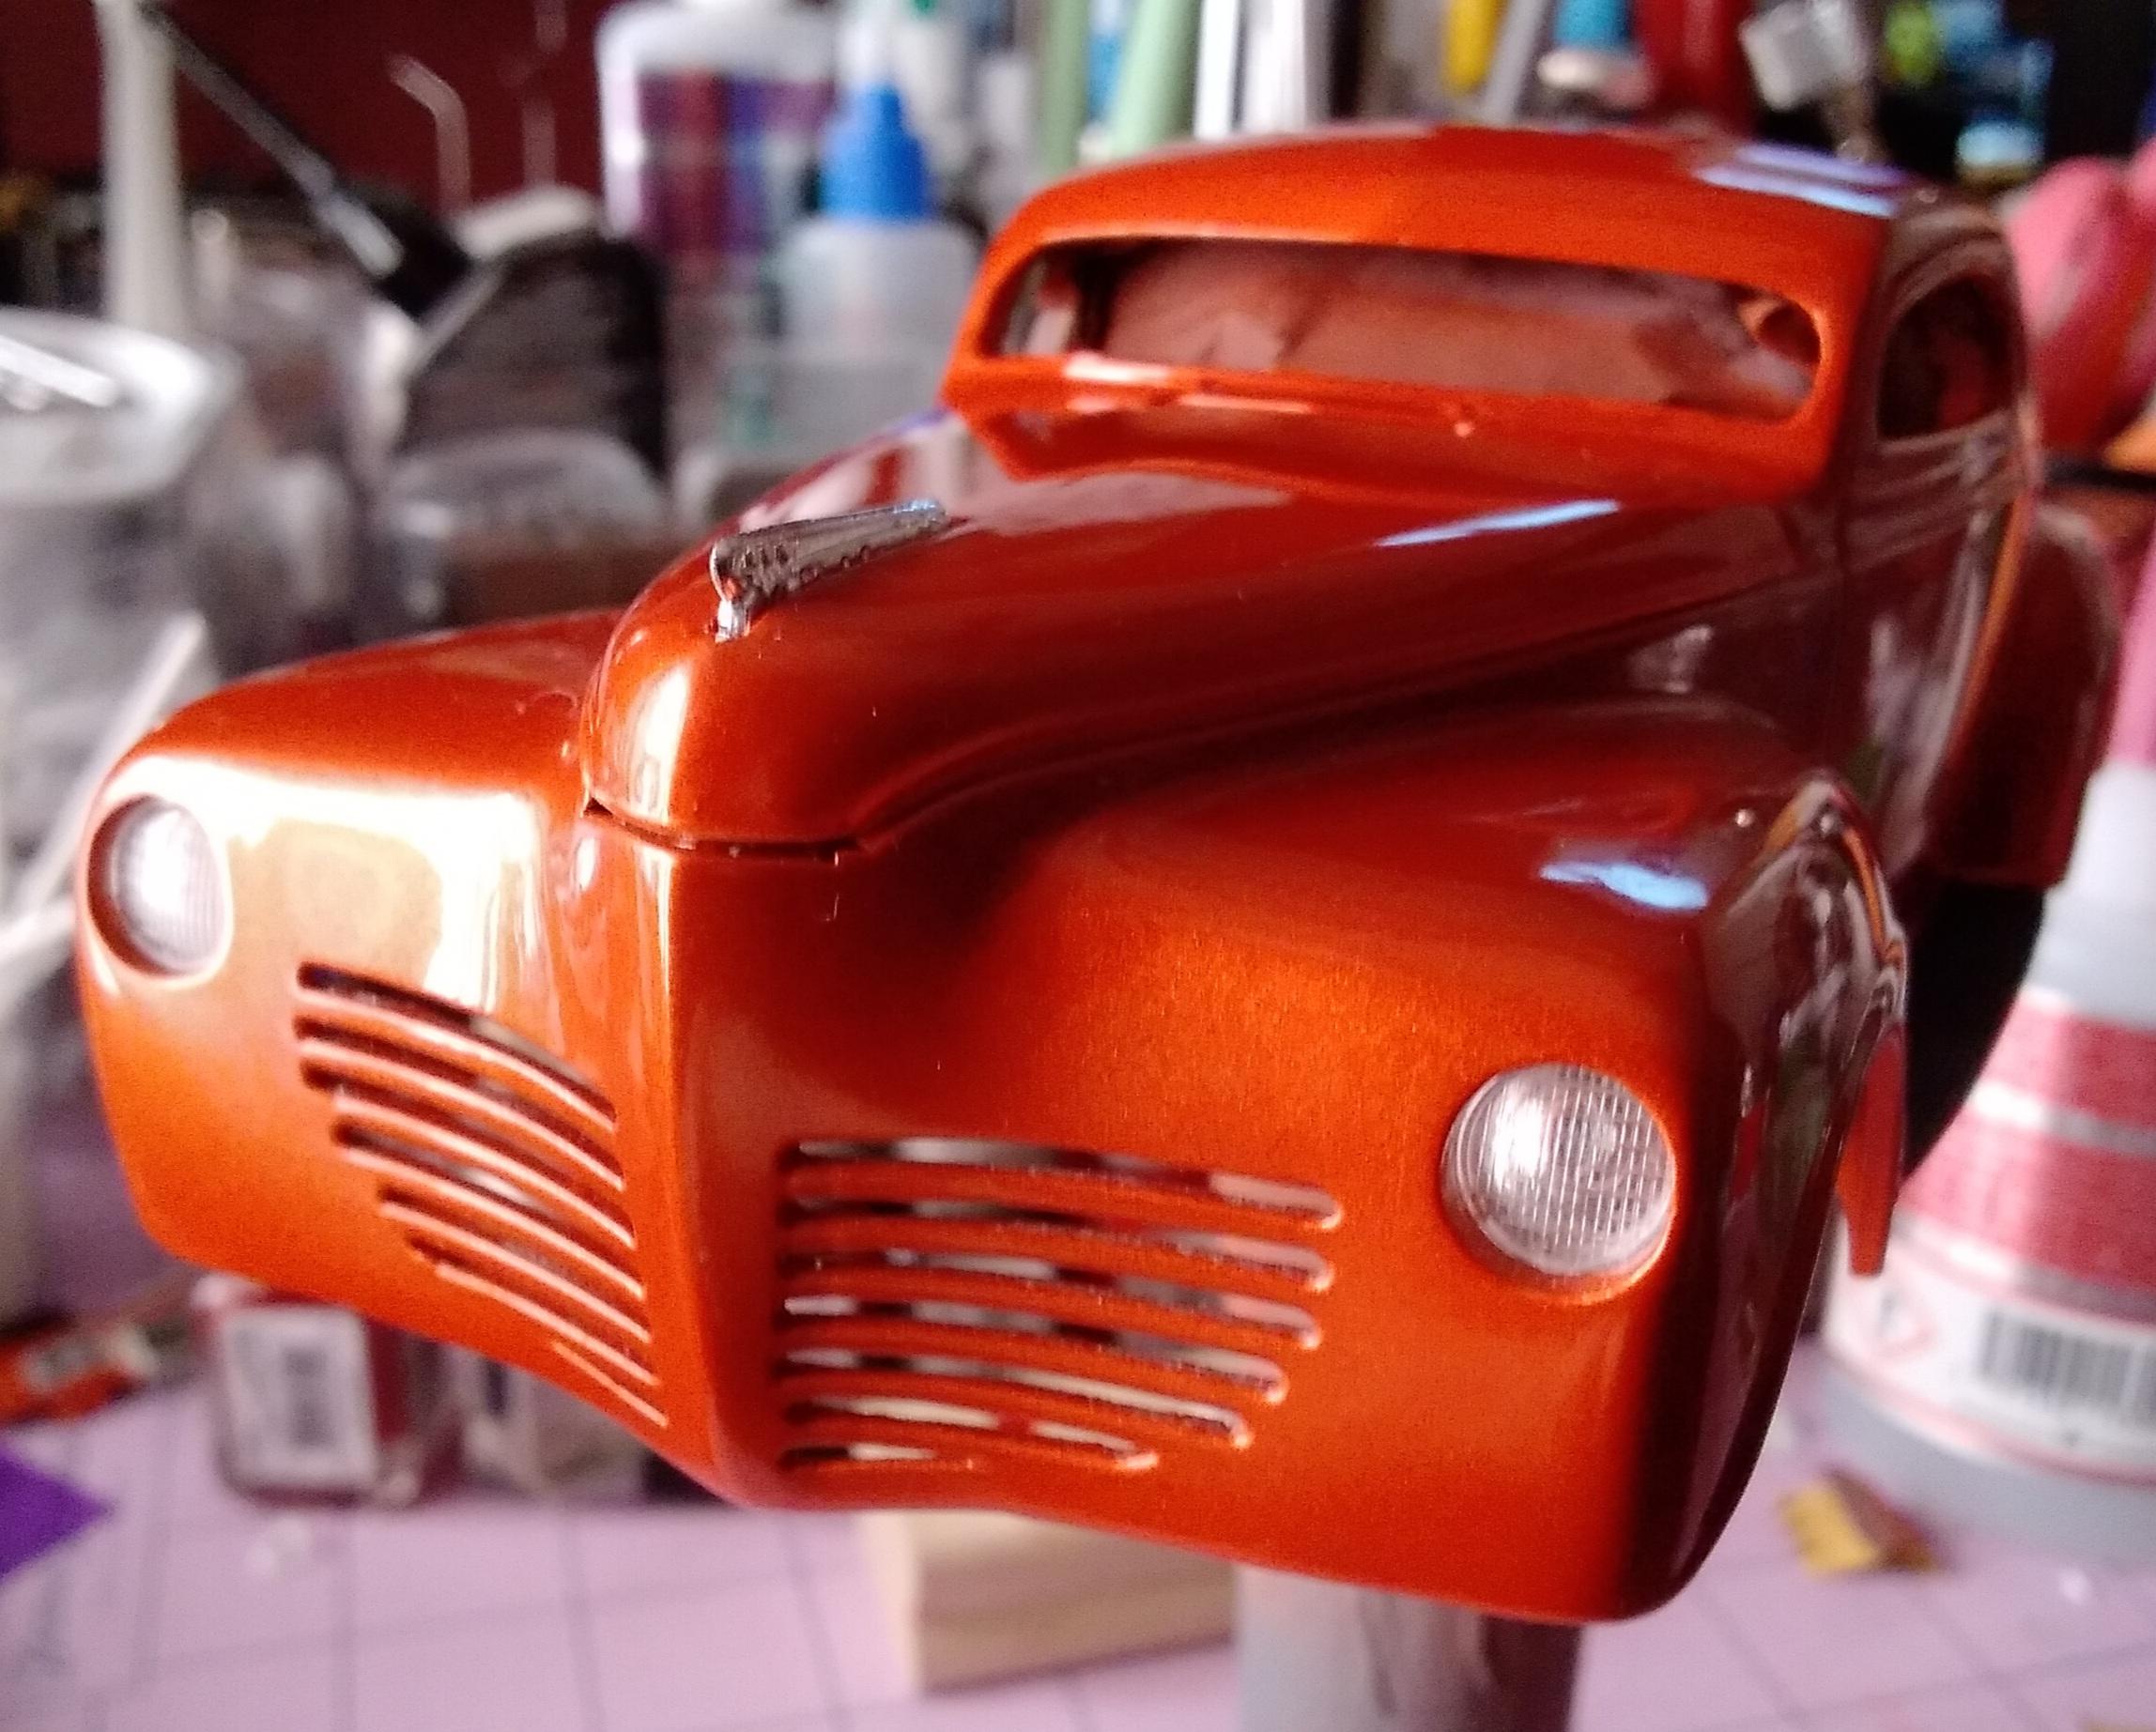
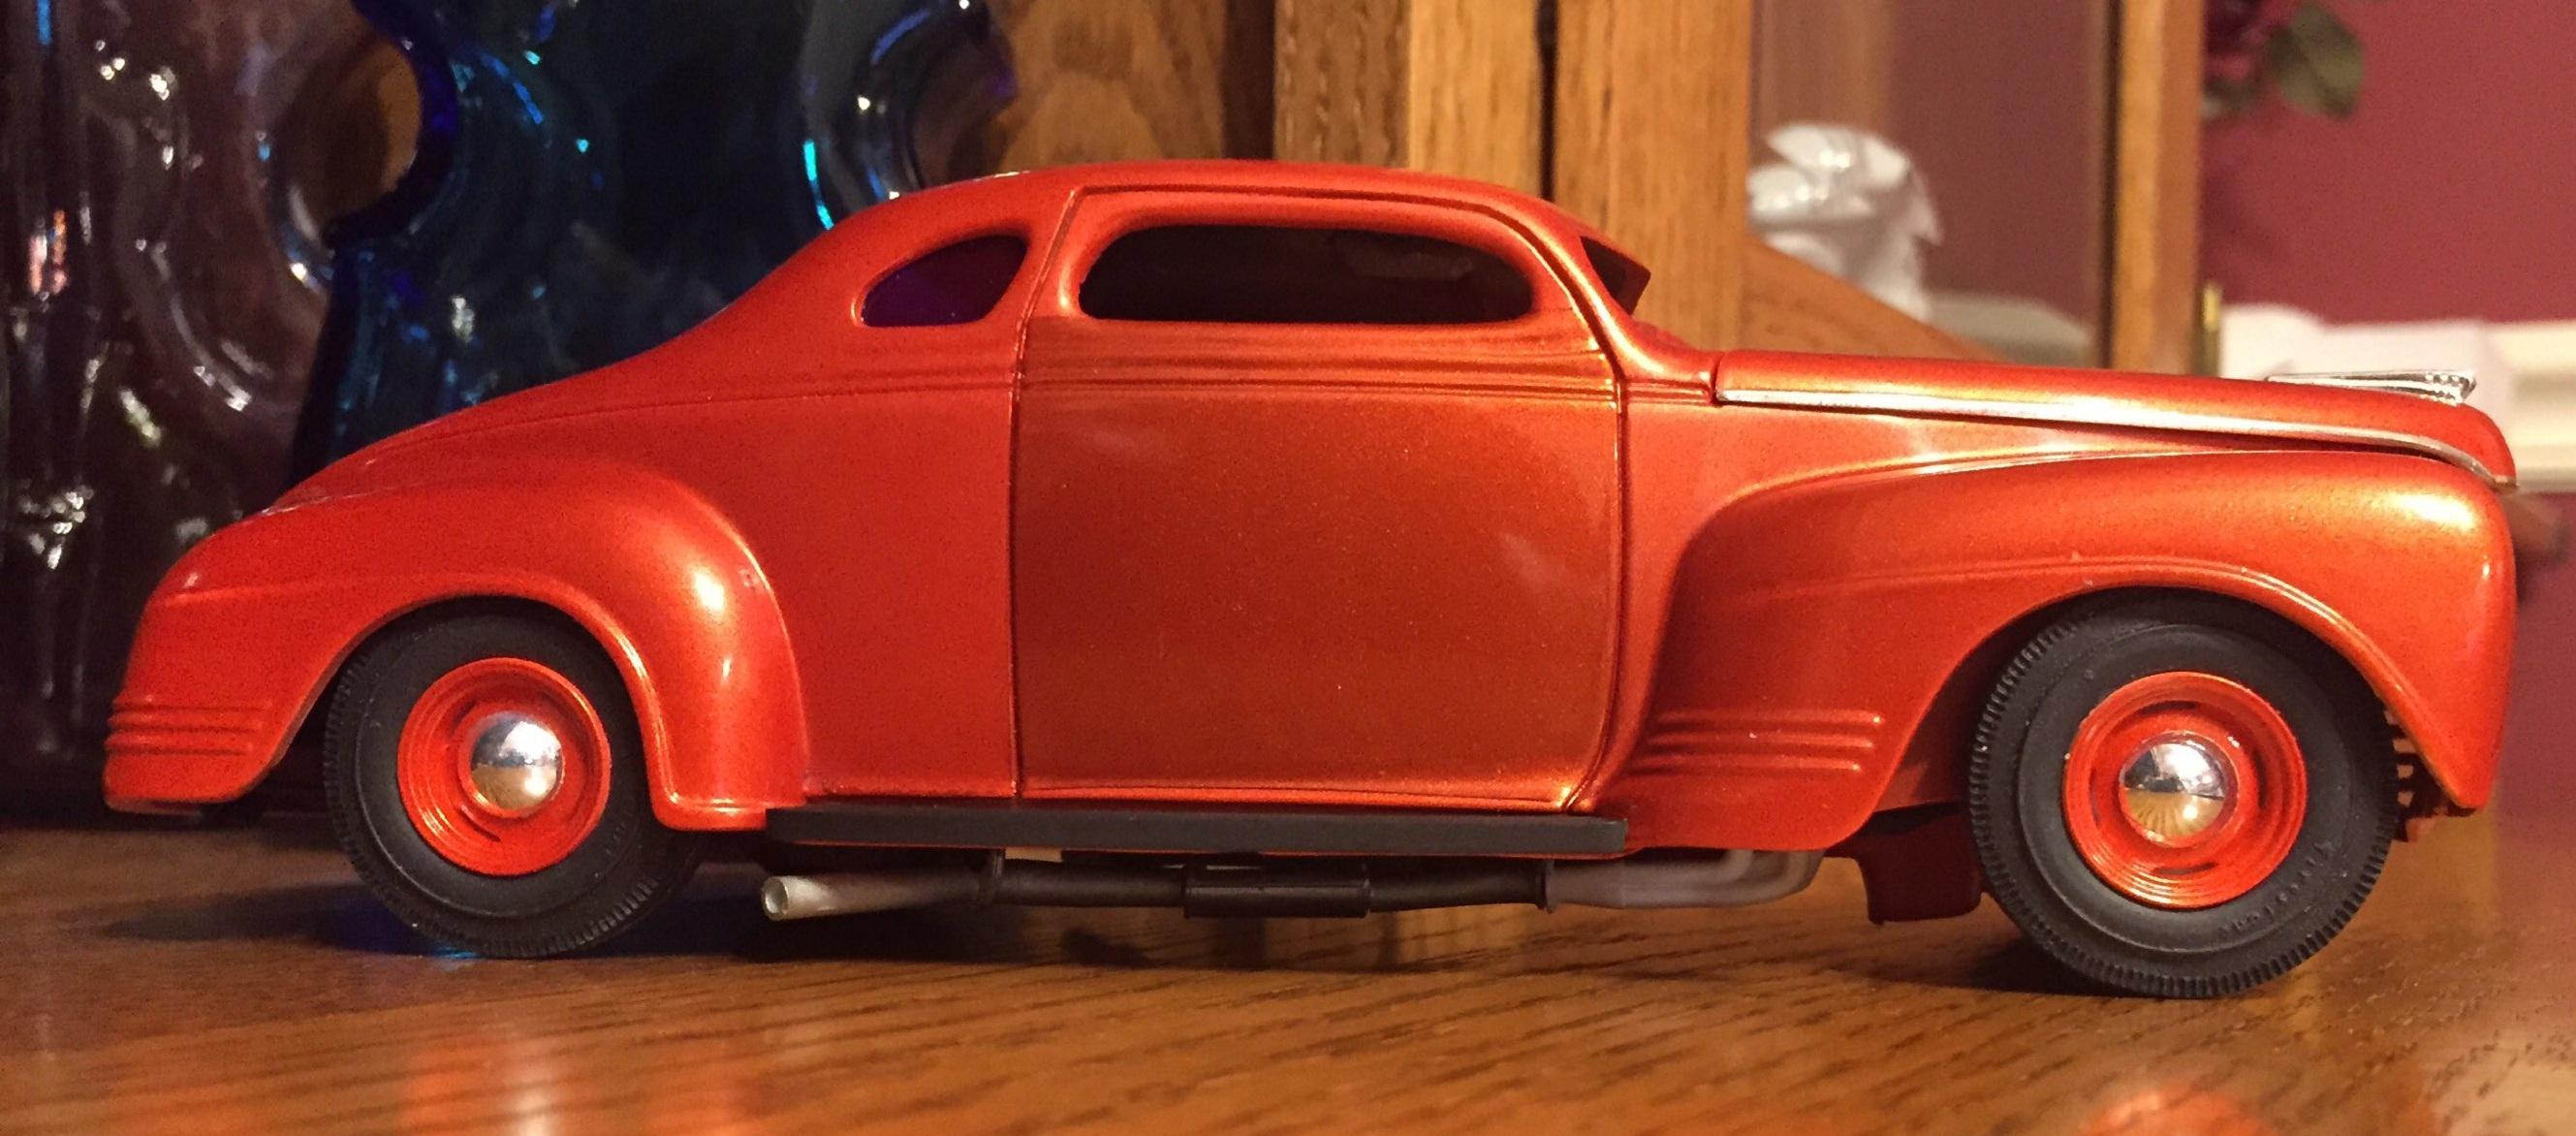
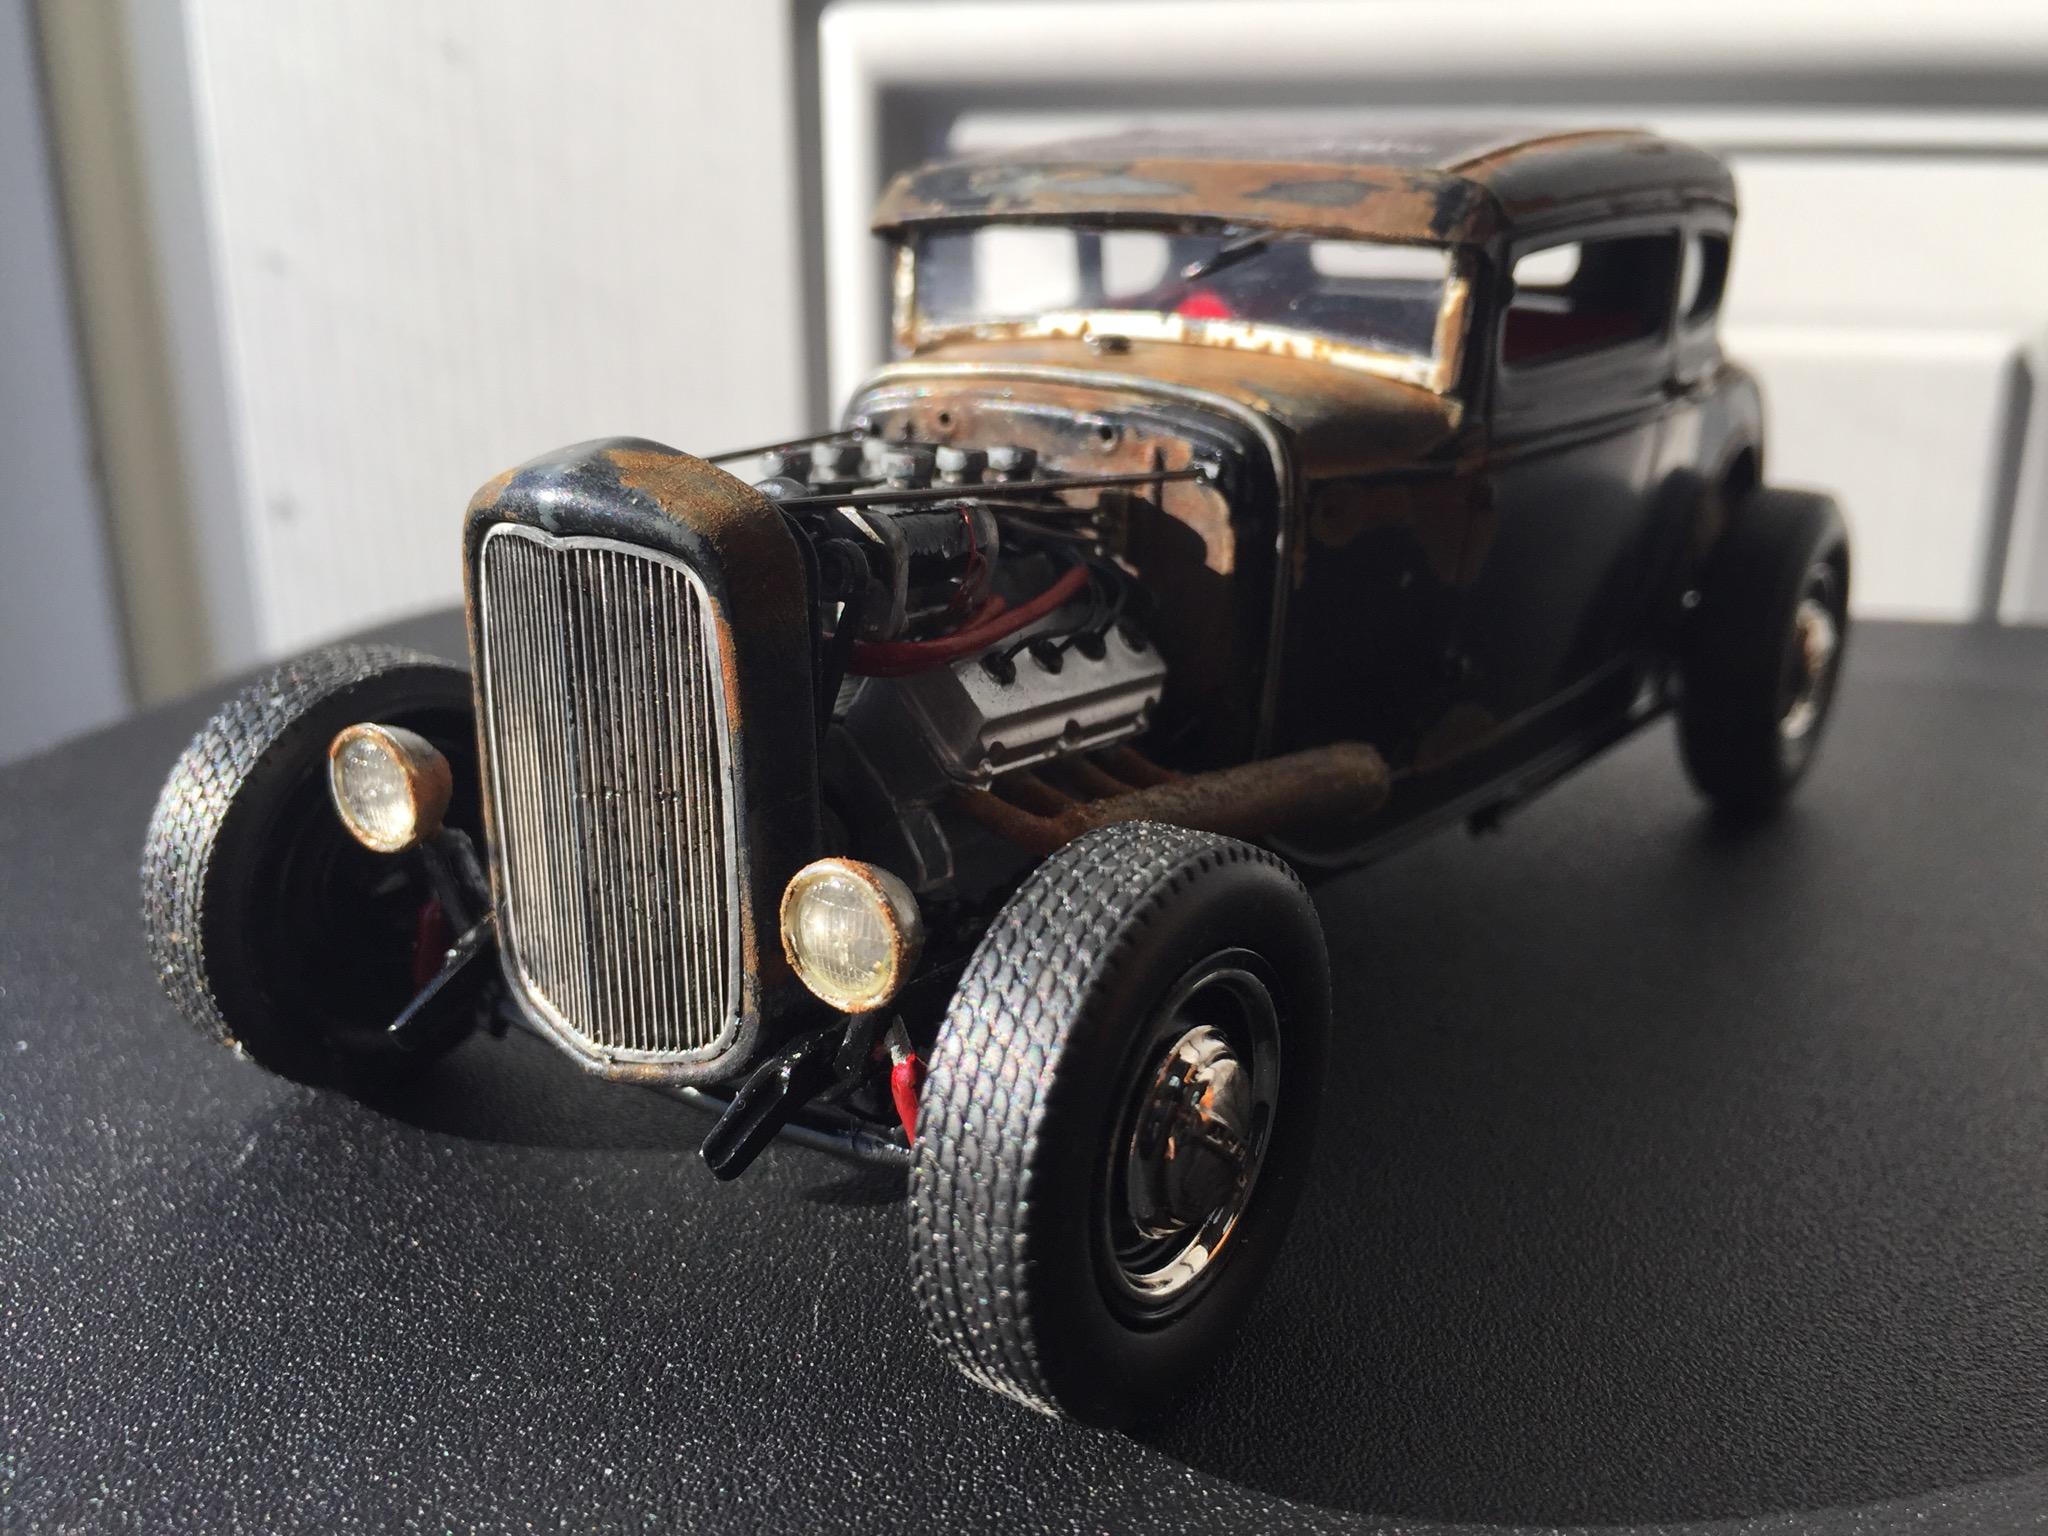
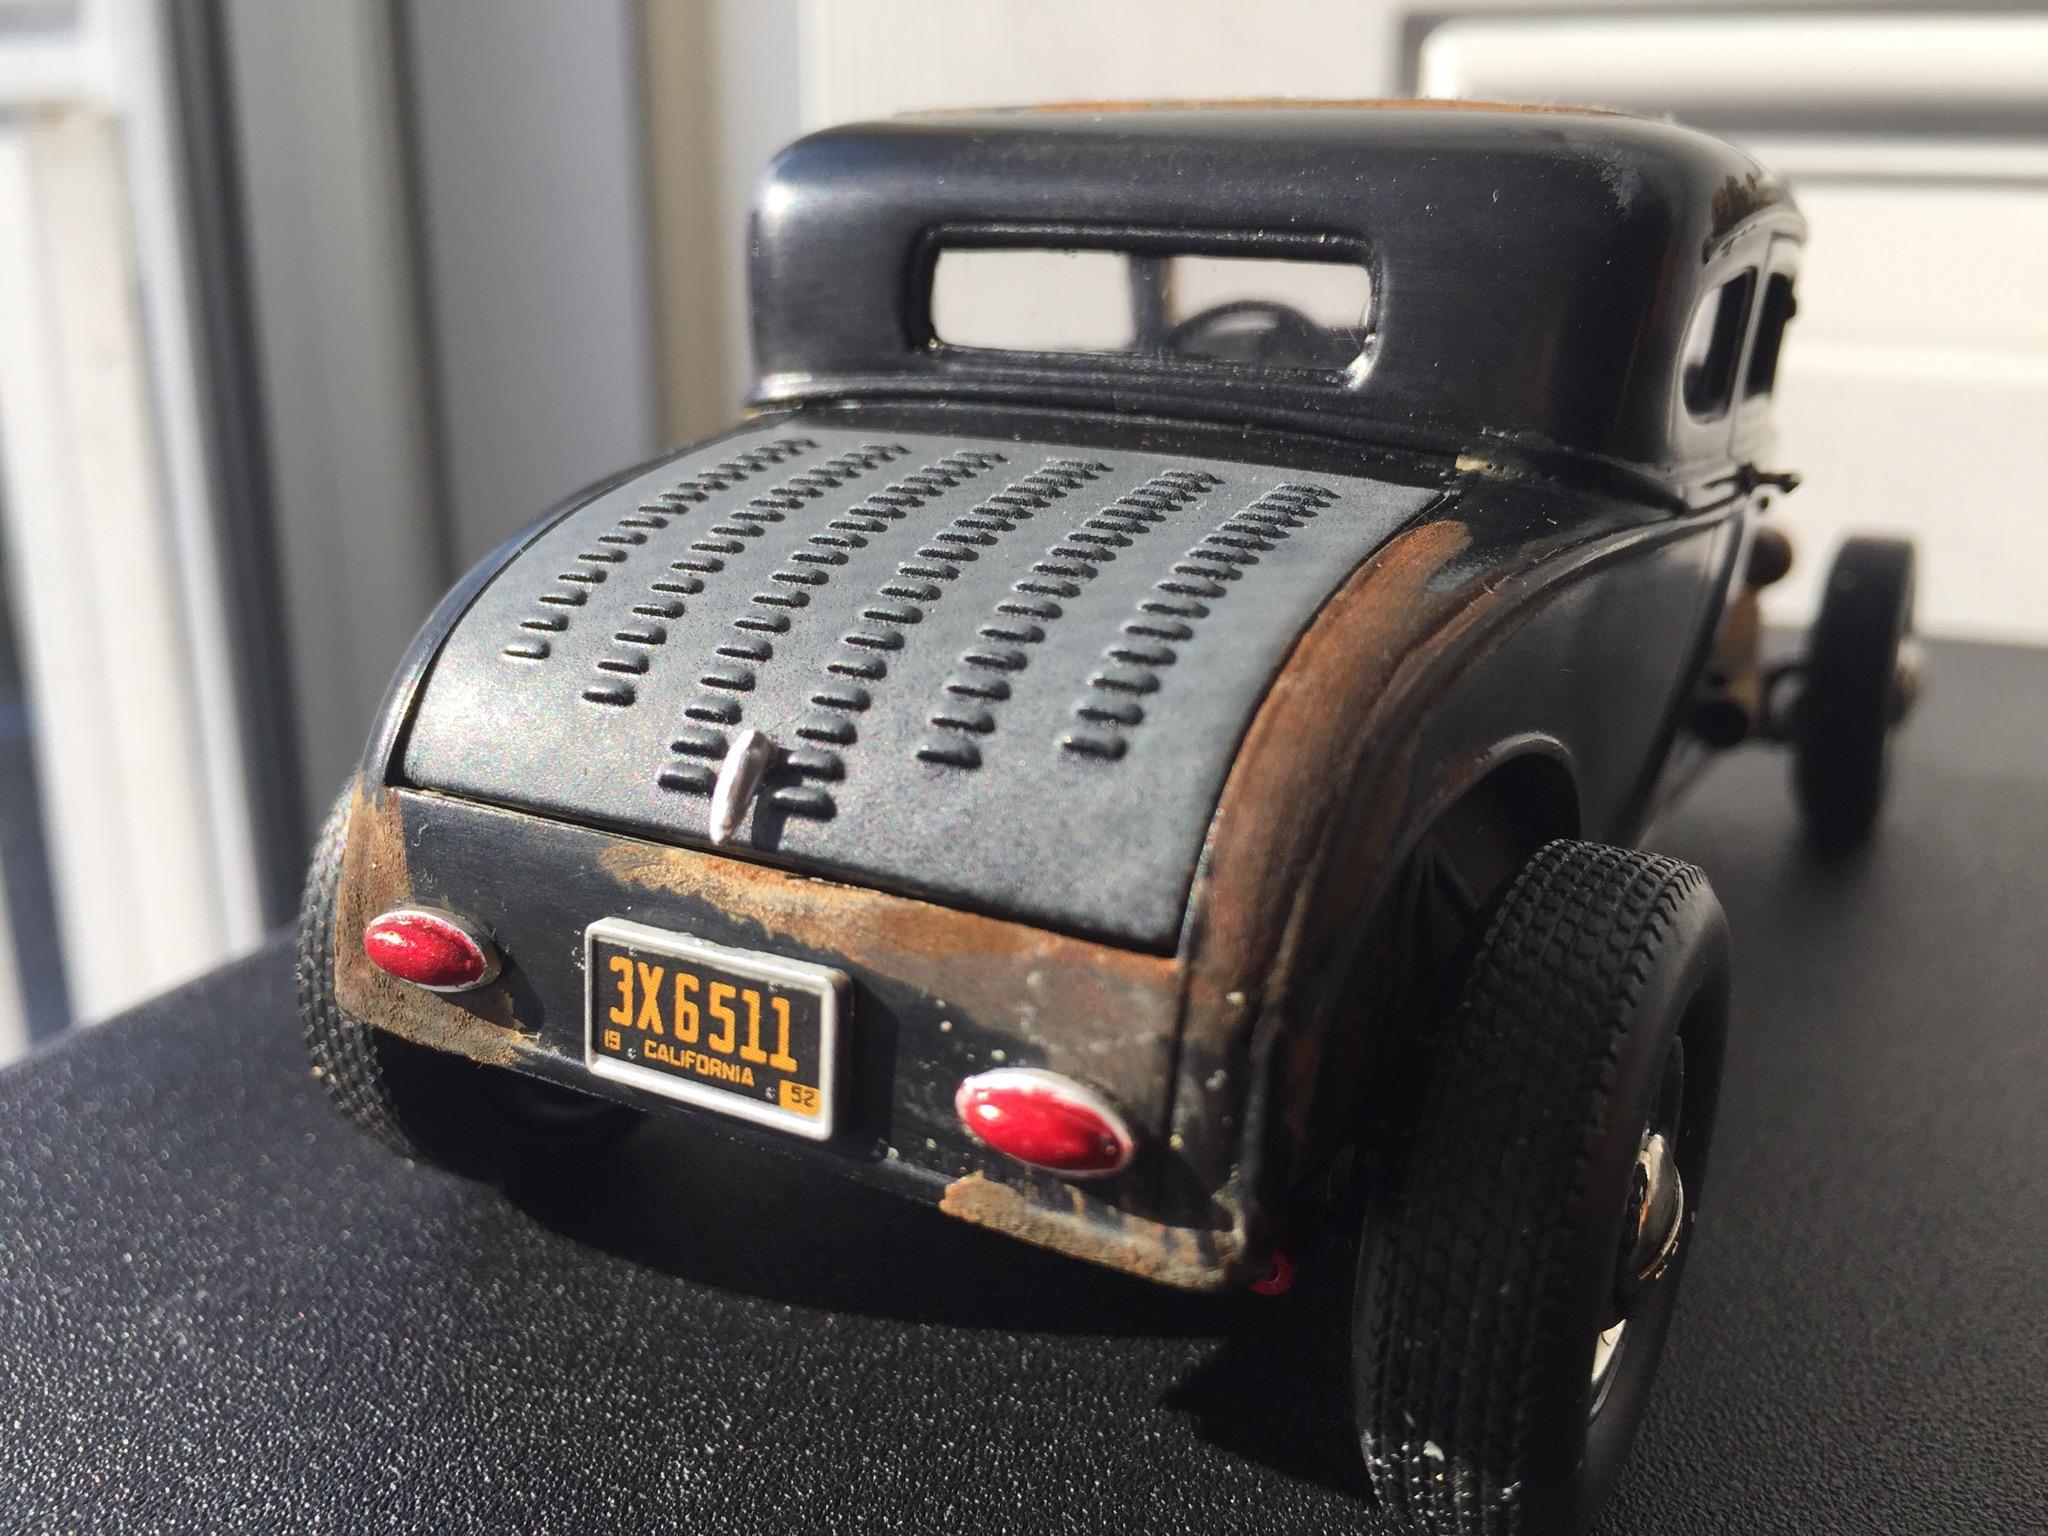
Here's my take on the AMT '41 Plymouth. I have made it my business to chop as many tops as possible 🙂. This one was somewhat of a challenge. This project is close to completion but for a paint issue. I tried to fix a blemish on the right door and it looked great in the sun....then I went inside. Out of the bright sun I saw that the new paint was a few shades darker. AAAAAUGHH!!! Anyway, here's the build from the beginning.
-
 Been a while since I posted anything here, so here is what I have on the bench right now. Revell 41, chopped a little bit, frame is from the AMT 50 Chevy, engine will be a mix off several six bangers. Comments welcome.. Oldschool
-
 Digging thru my old stash of kits, I am horrified by the amount of started models I never finished in my younger days. Now I want to make good use of the time spent and finish some stuff. I found my second top chop project I ever did, an AMT '32 Five Window coupe. Now with the new Revell kit out and seeing how the body is actually sectioned, is it worth finishing or should I just start with a Revell kit and chop away? I am into nostalgia rods and having a sectioned car wouoldn't be bad and I could make an East cast styled rod and use the Revell chassis. Any Thoughts? I think it is about a 3" chop. I used a soldering iron to fuse the plastic at the joins. It has held up well for over 20 years!
 -
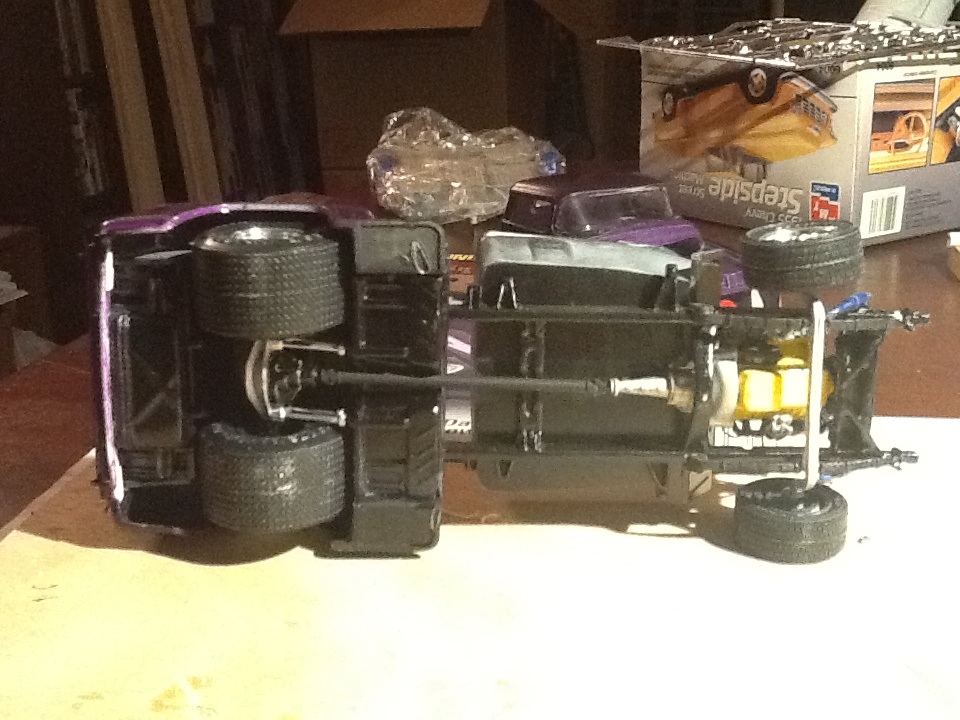
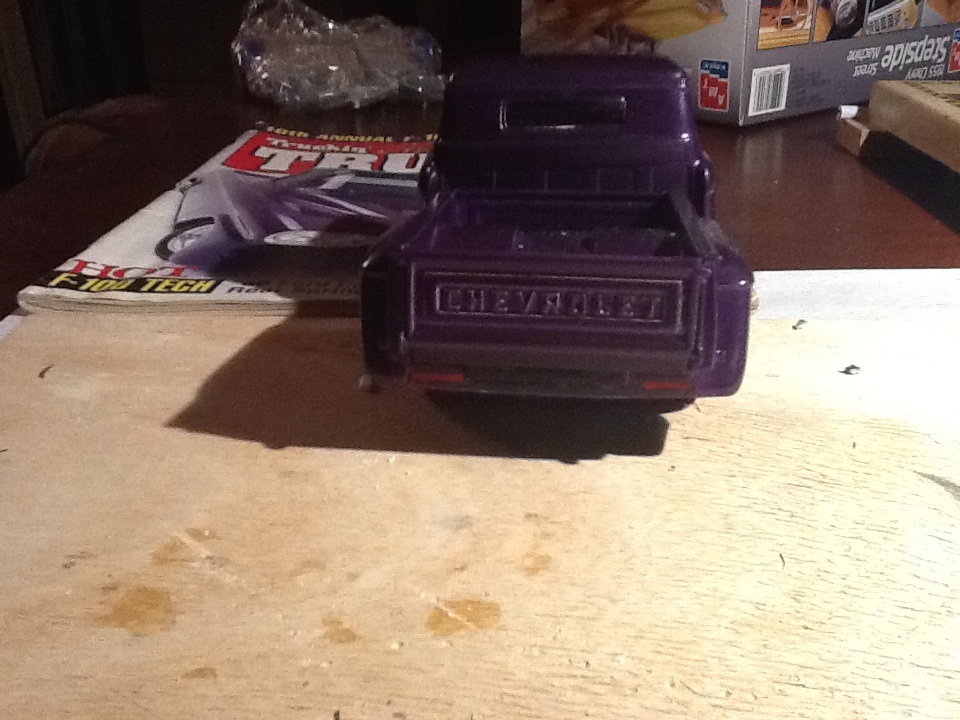
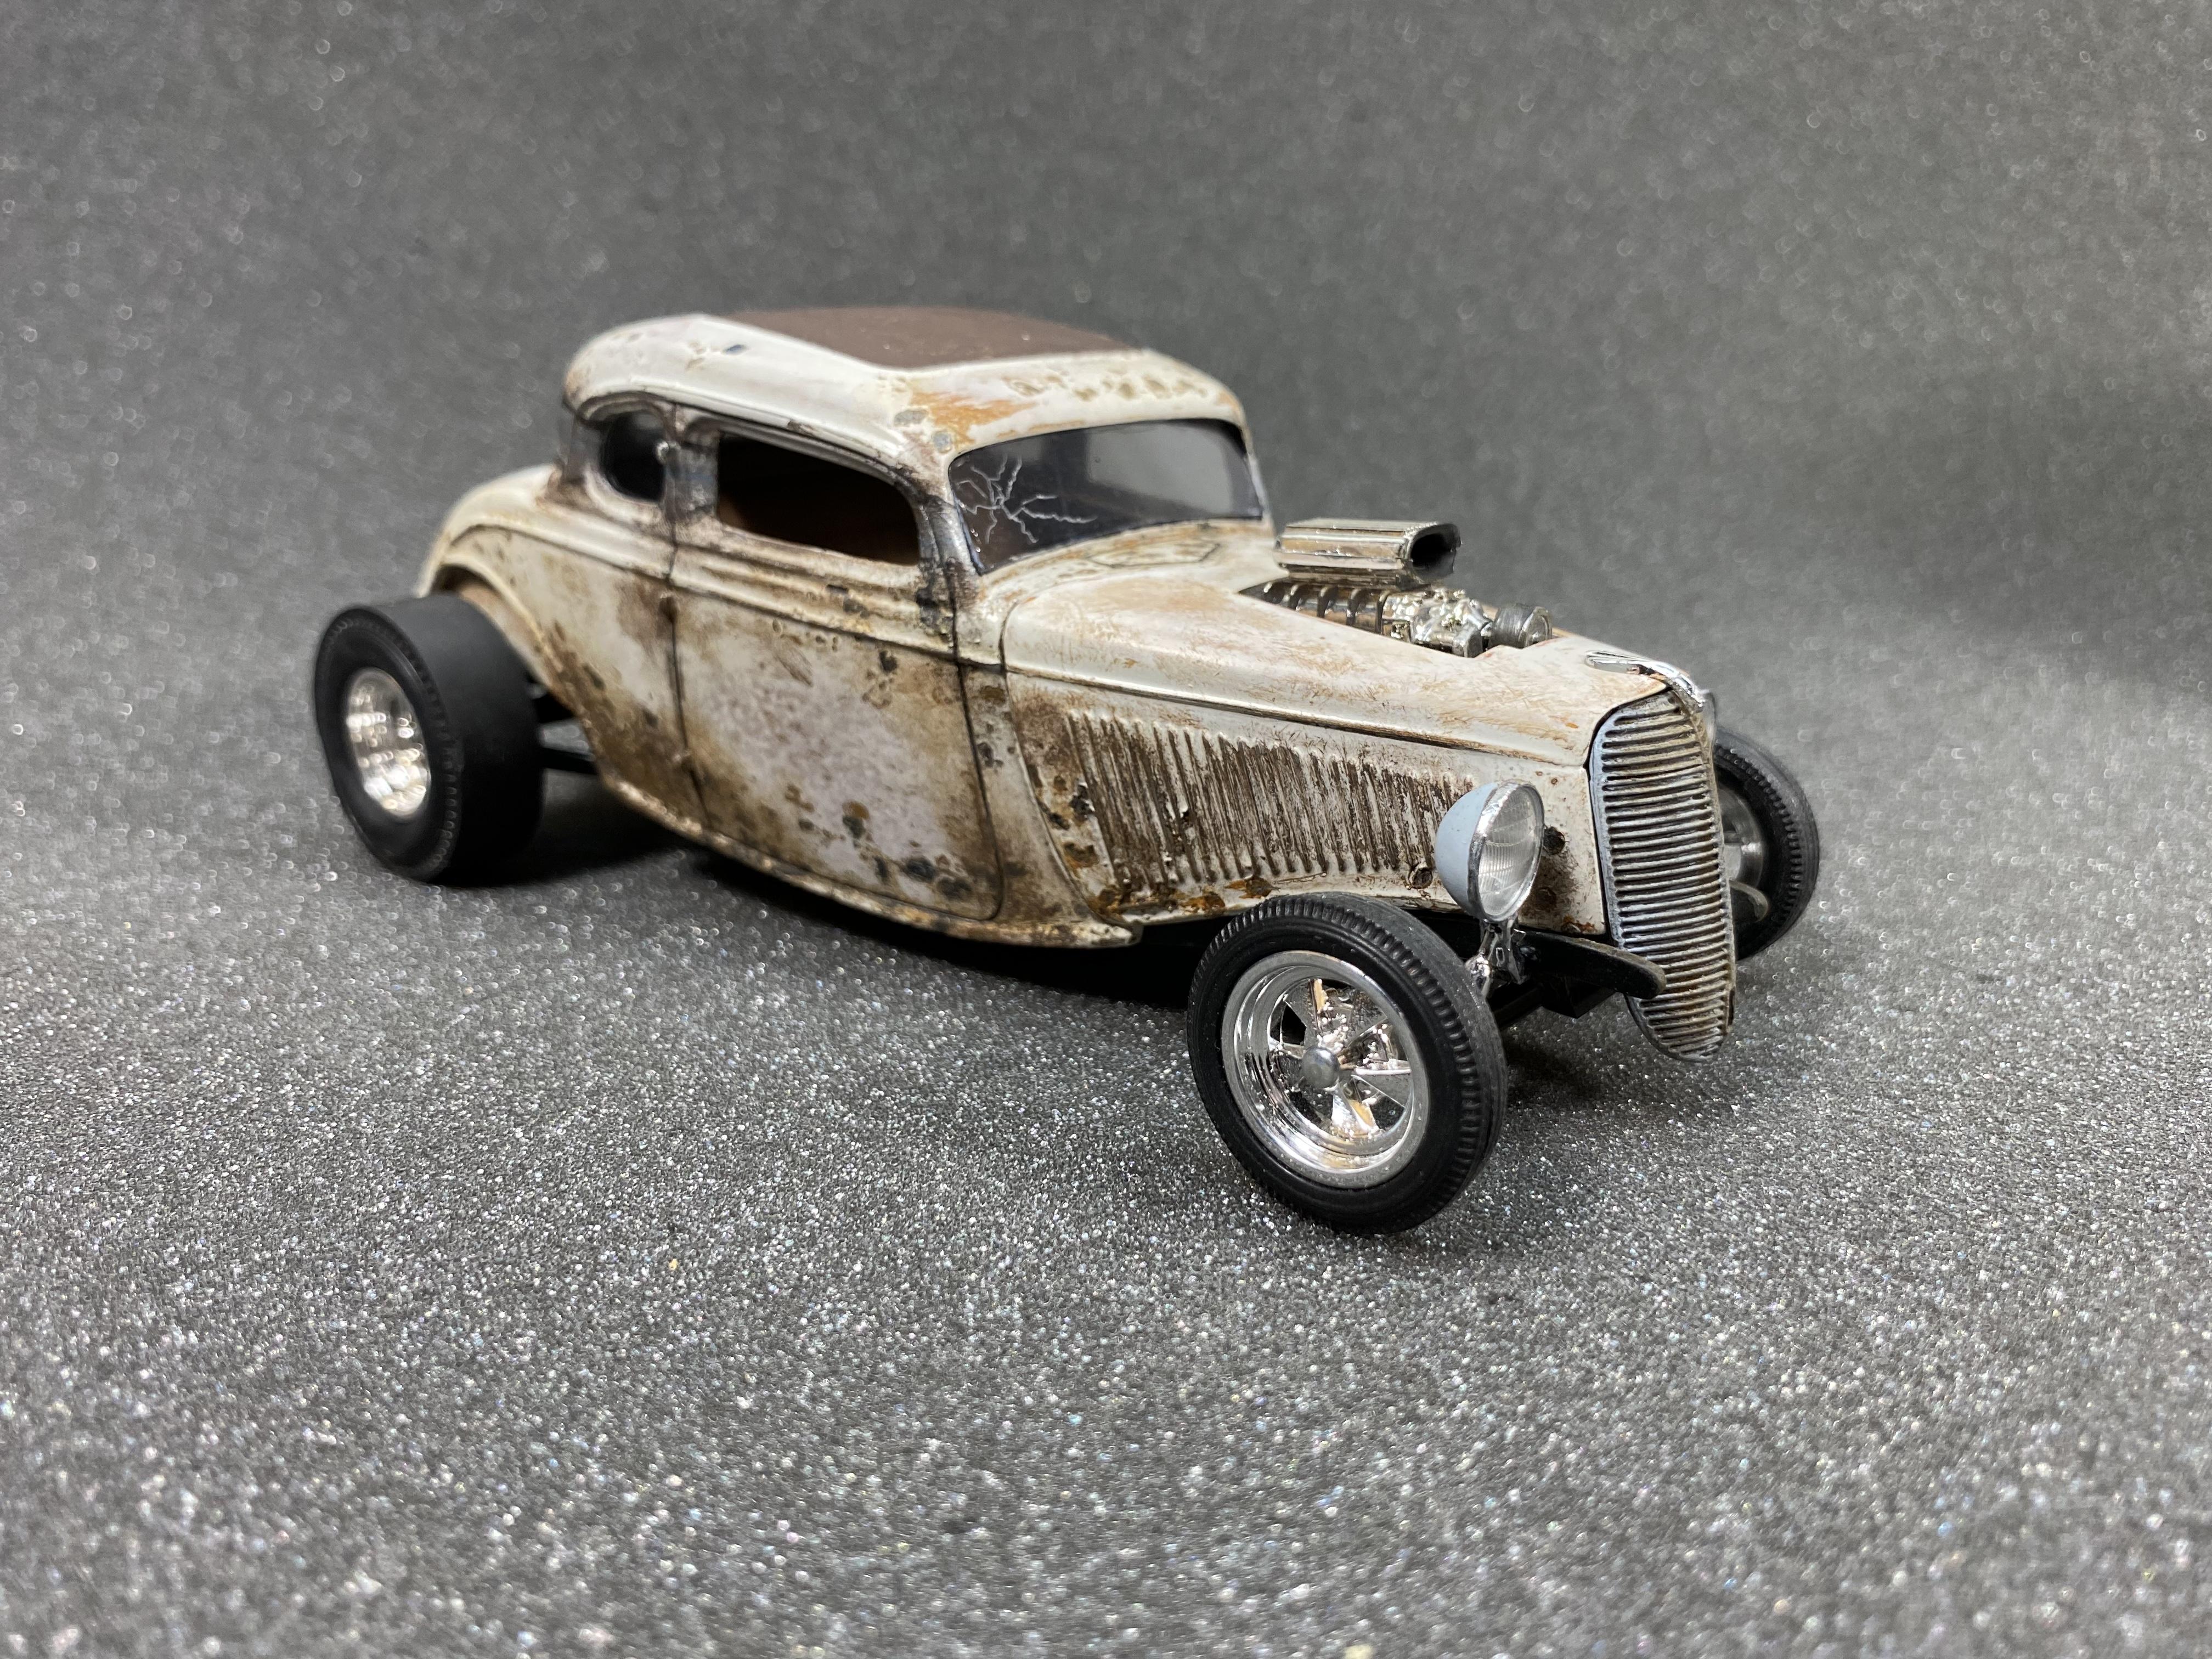
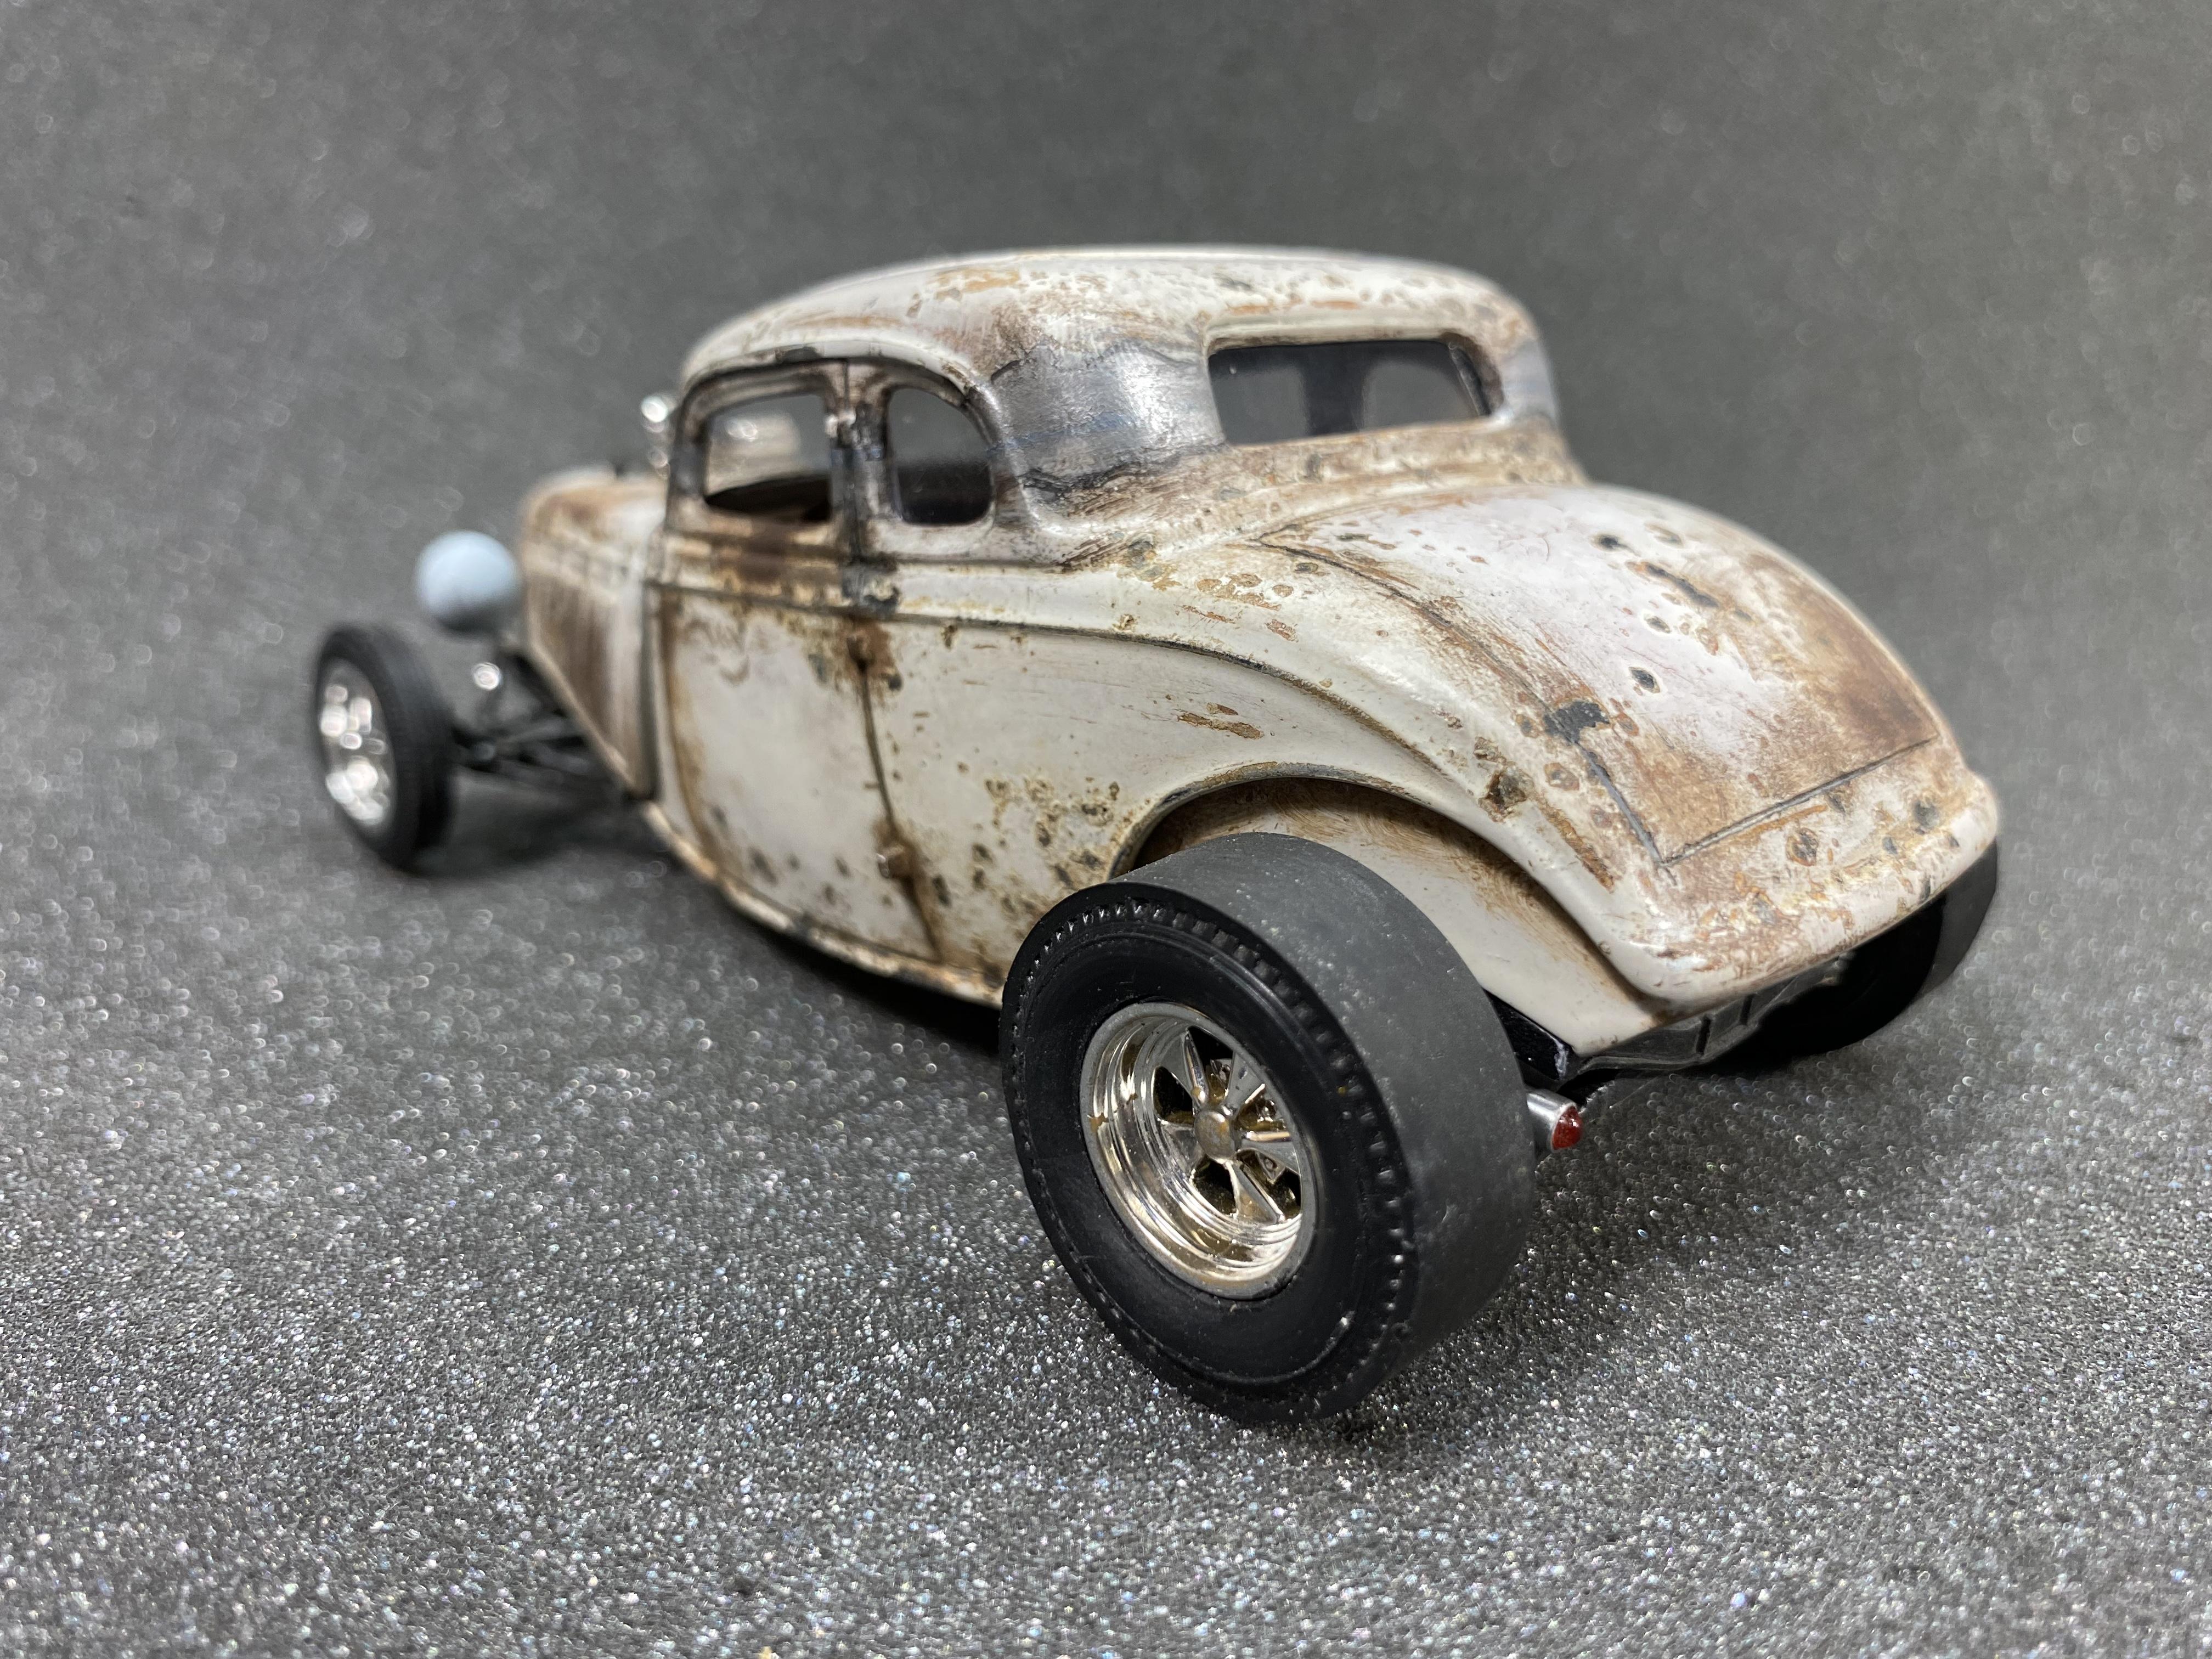
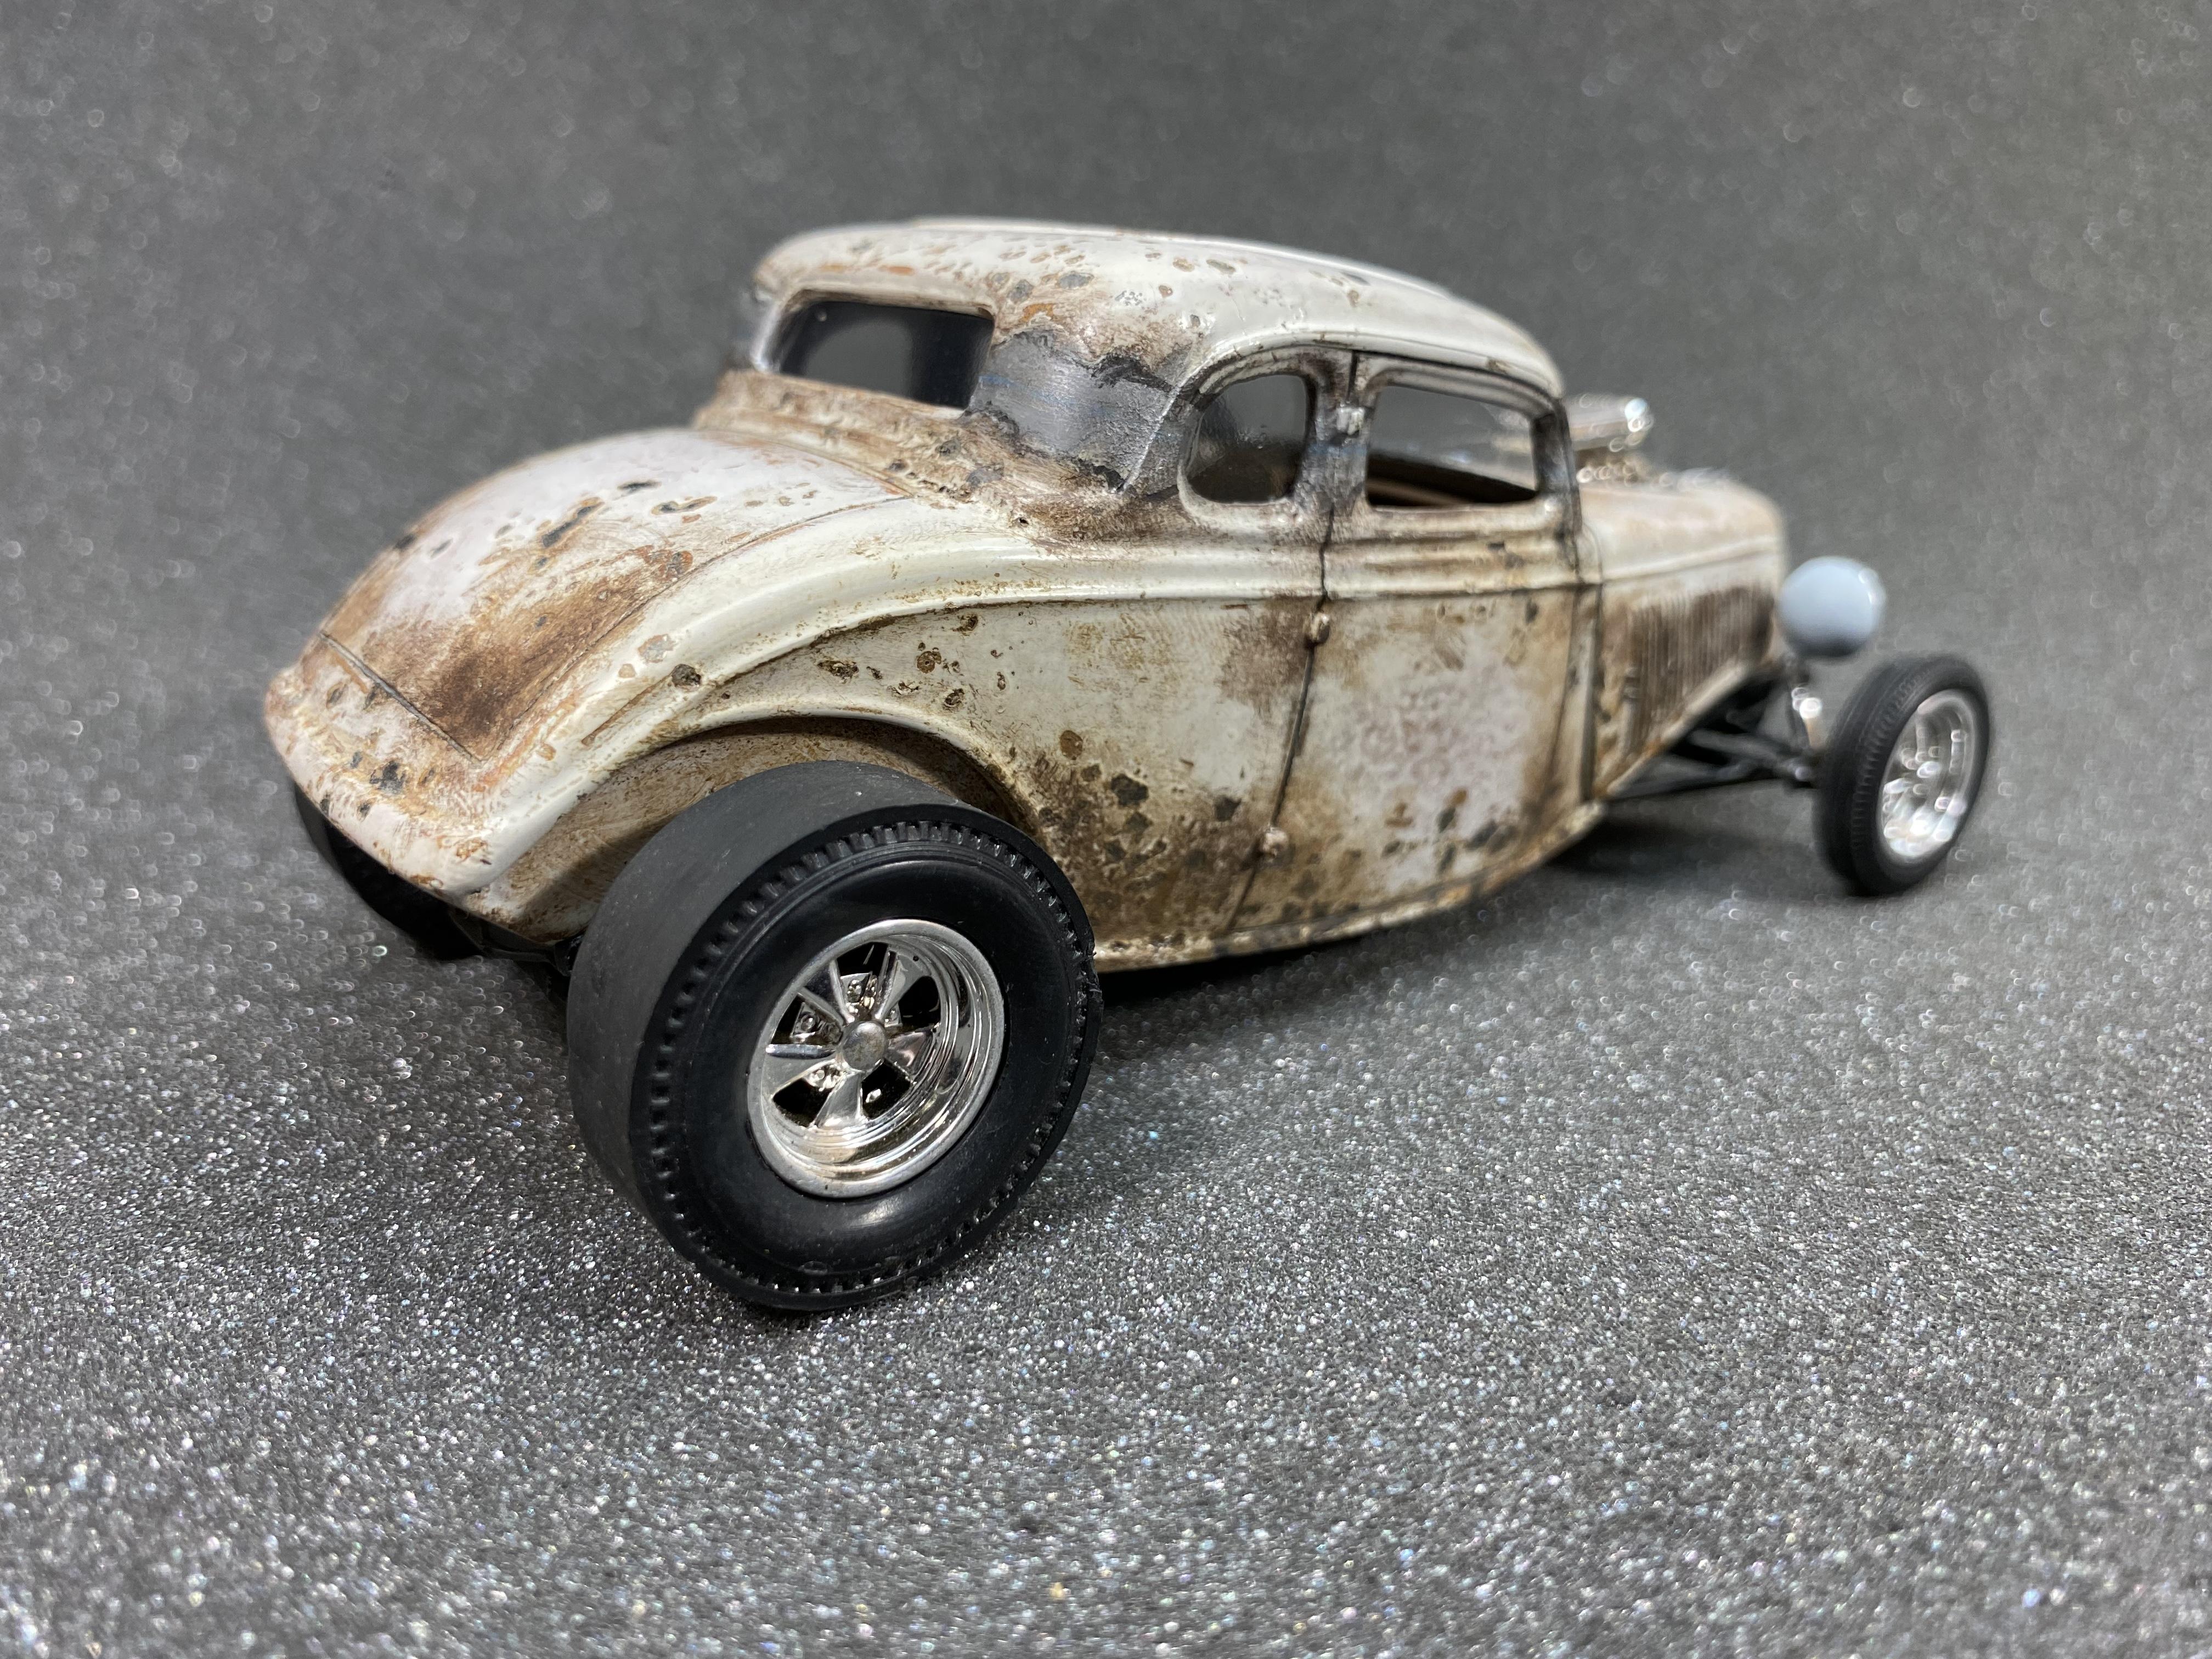
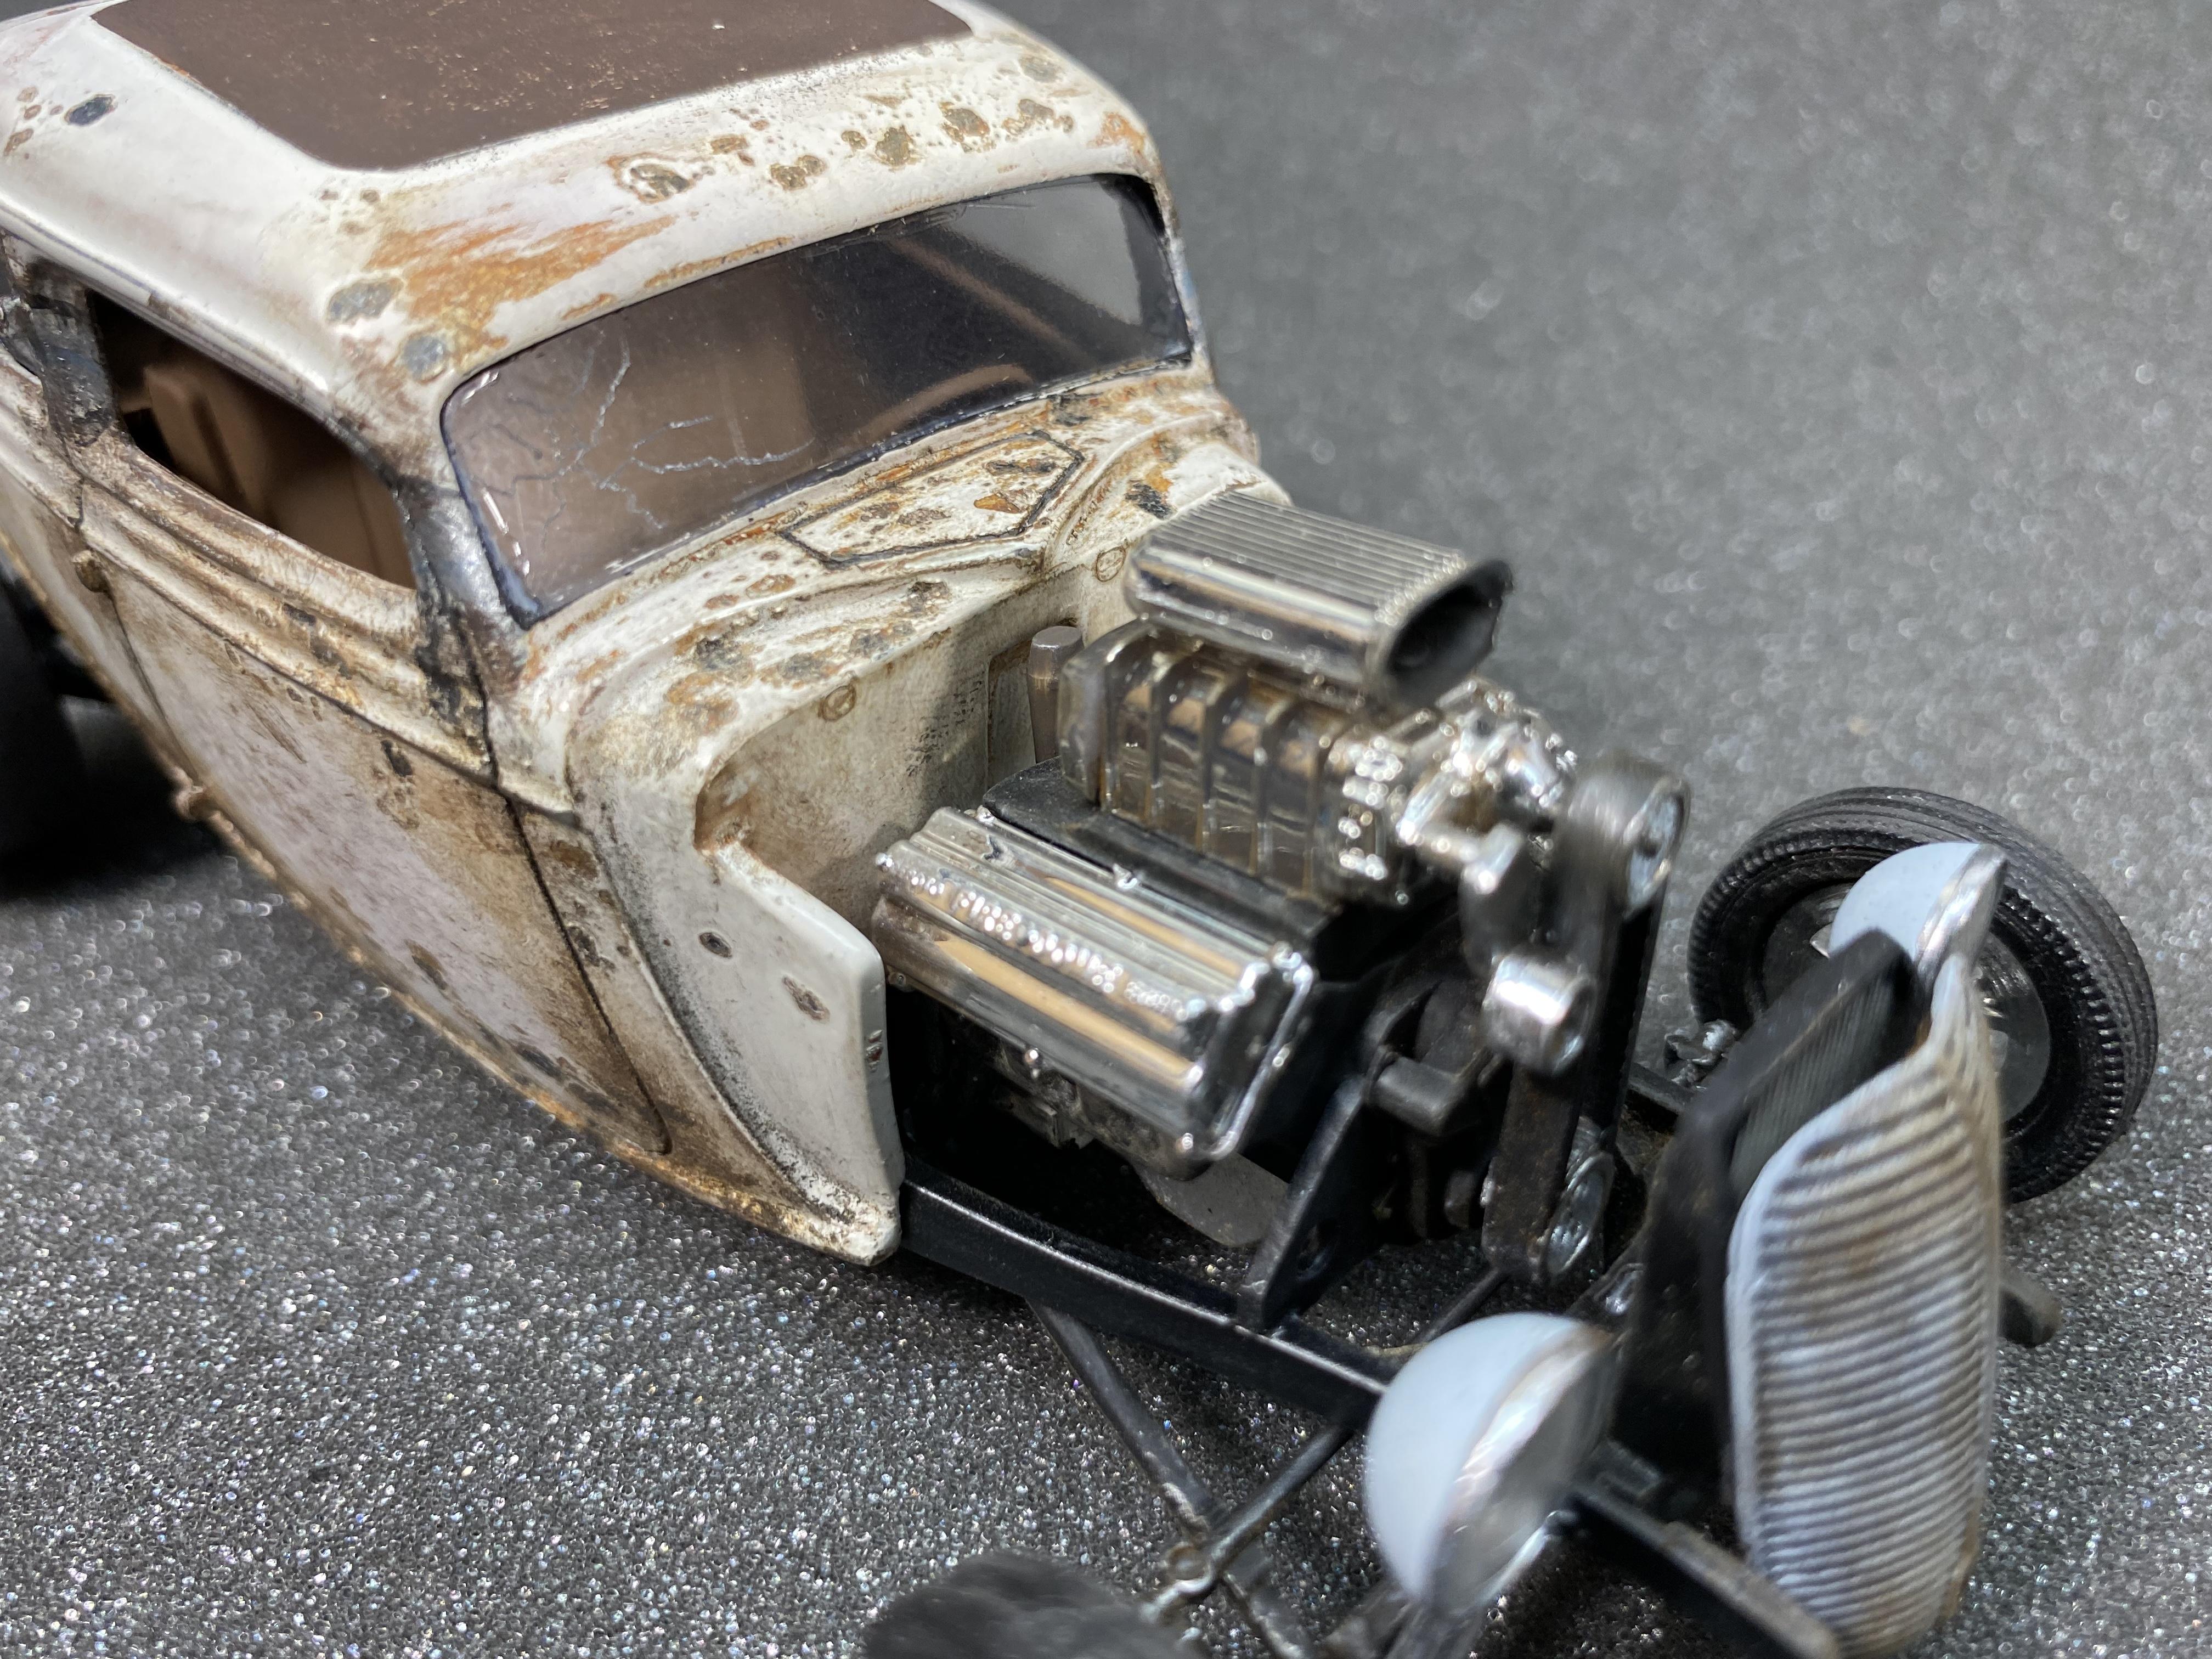
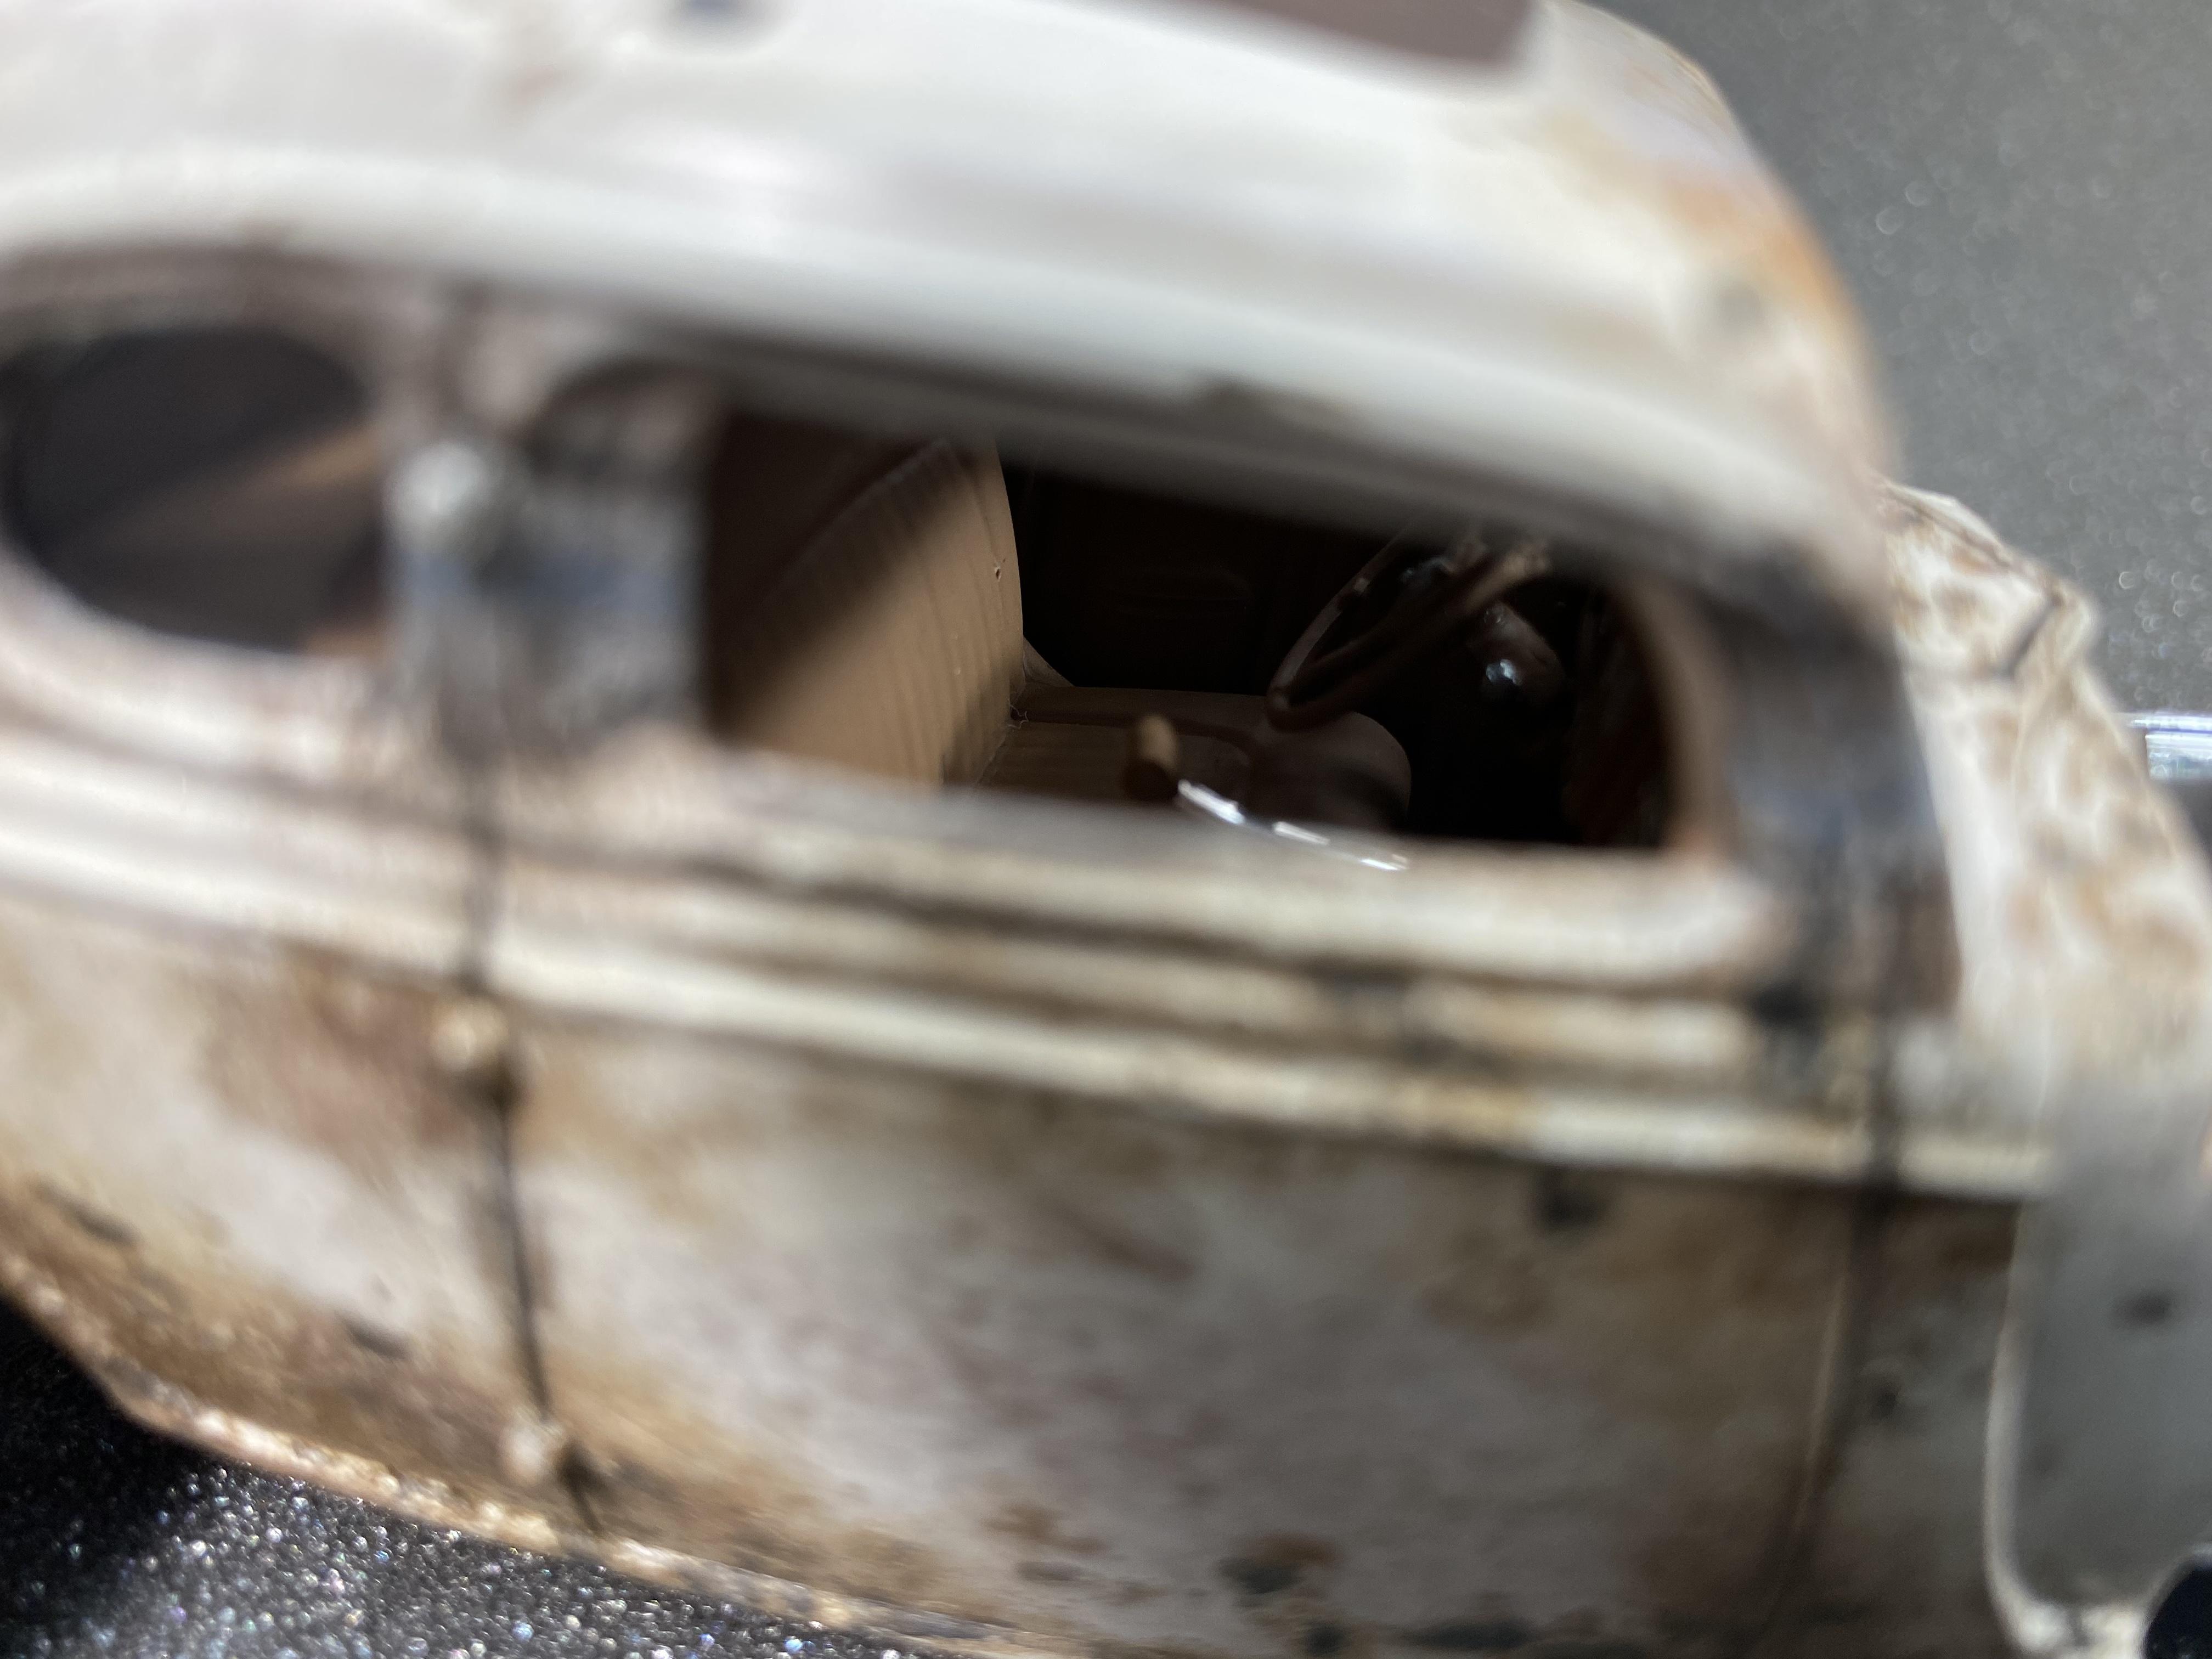
My version of the '32 Deuce Coupe from the Revell 5-Window kit. I decided to trade in the Hemi and stuff a Blown 427 Ford from a "Revell Parts Paks" kit. And I do mean STUFF! It was tight. I tossed out the body for a Jimmy Flintstone chopped version. Wanted it chopped, but I didn't have the cajones to try it! Some things best left to the pros. Got some big fat meats off eBay called "Mickey Thompson Sportsman's" that gave me that little extra badness I wanted and to help the rake since I was not channeling this baby. Went with a bright yellow (Rustoleum Sun Yellow) because I haven't done a yellow car yet and not to replicate Milner's from American Graffitti. No fenders for me! Tried my rookie hand at blacking out the grill. Oh yeah, I almost forgot to mention that I snapped the body down one whole side while trying to massage it into shape. I almost lost my mind! SNAP!!!!!! Arrrrrrgh. Fixed it pretty good though. It snapped on the A and B pillars all the way to the rear fender well on the right side of the car. We can still see it, but I tried my rookie hand had a Tamiya putty job. And here is the interior that no one can see! LOL. I lost the Fuel Gauge decal, but found it stuck to my arm hours after I gave up looking and painted it black! Thanx for looking and once again thanx to ALL of the members of this board that provide guidance and support to everyone. Next up for me, a 53 Jeep Wagon (my dad's).
-
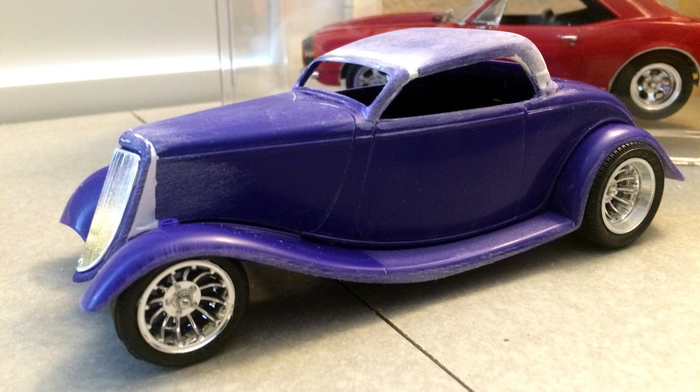
 Started this project last summer with a simple angle chop to a 34 ford coupe body. Reformed the front fenders from the wrap around wheel to the sweep of the 32 fenders I like better. Decided it needed a bit more attitude and angle-sectioned the body for a lowered stance. So far I'm liking the direction its going. This is a snaptite kit, but only using the body, will fabricate a chassis and install a motor with opening doors and trunk. Started with this After
-
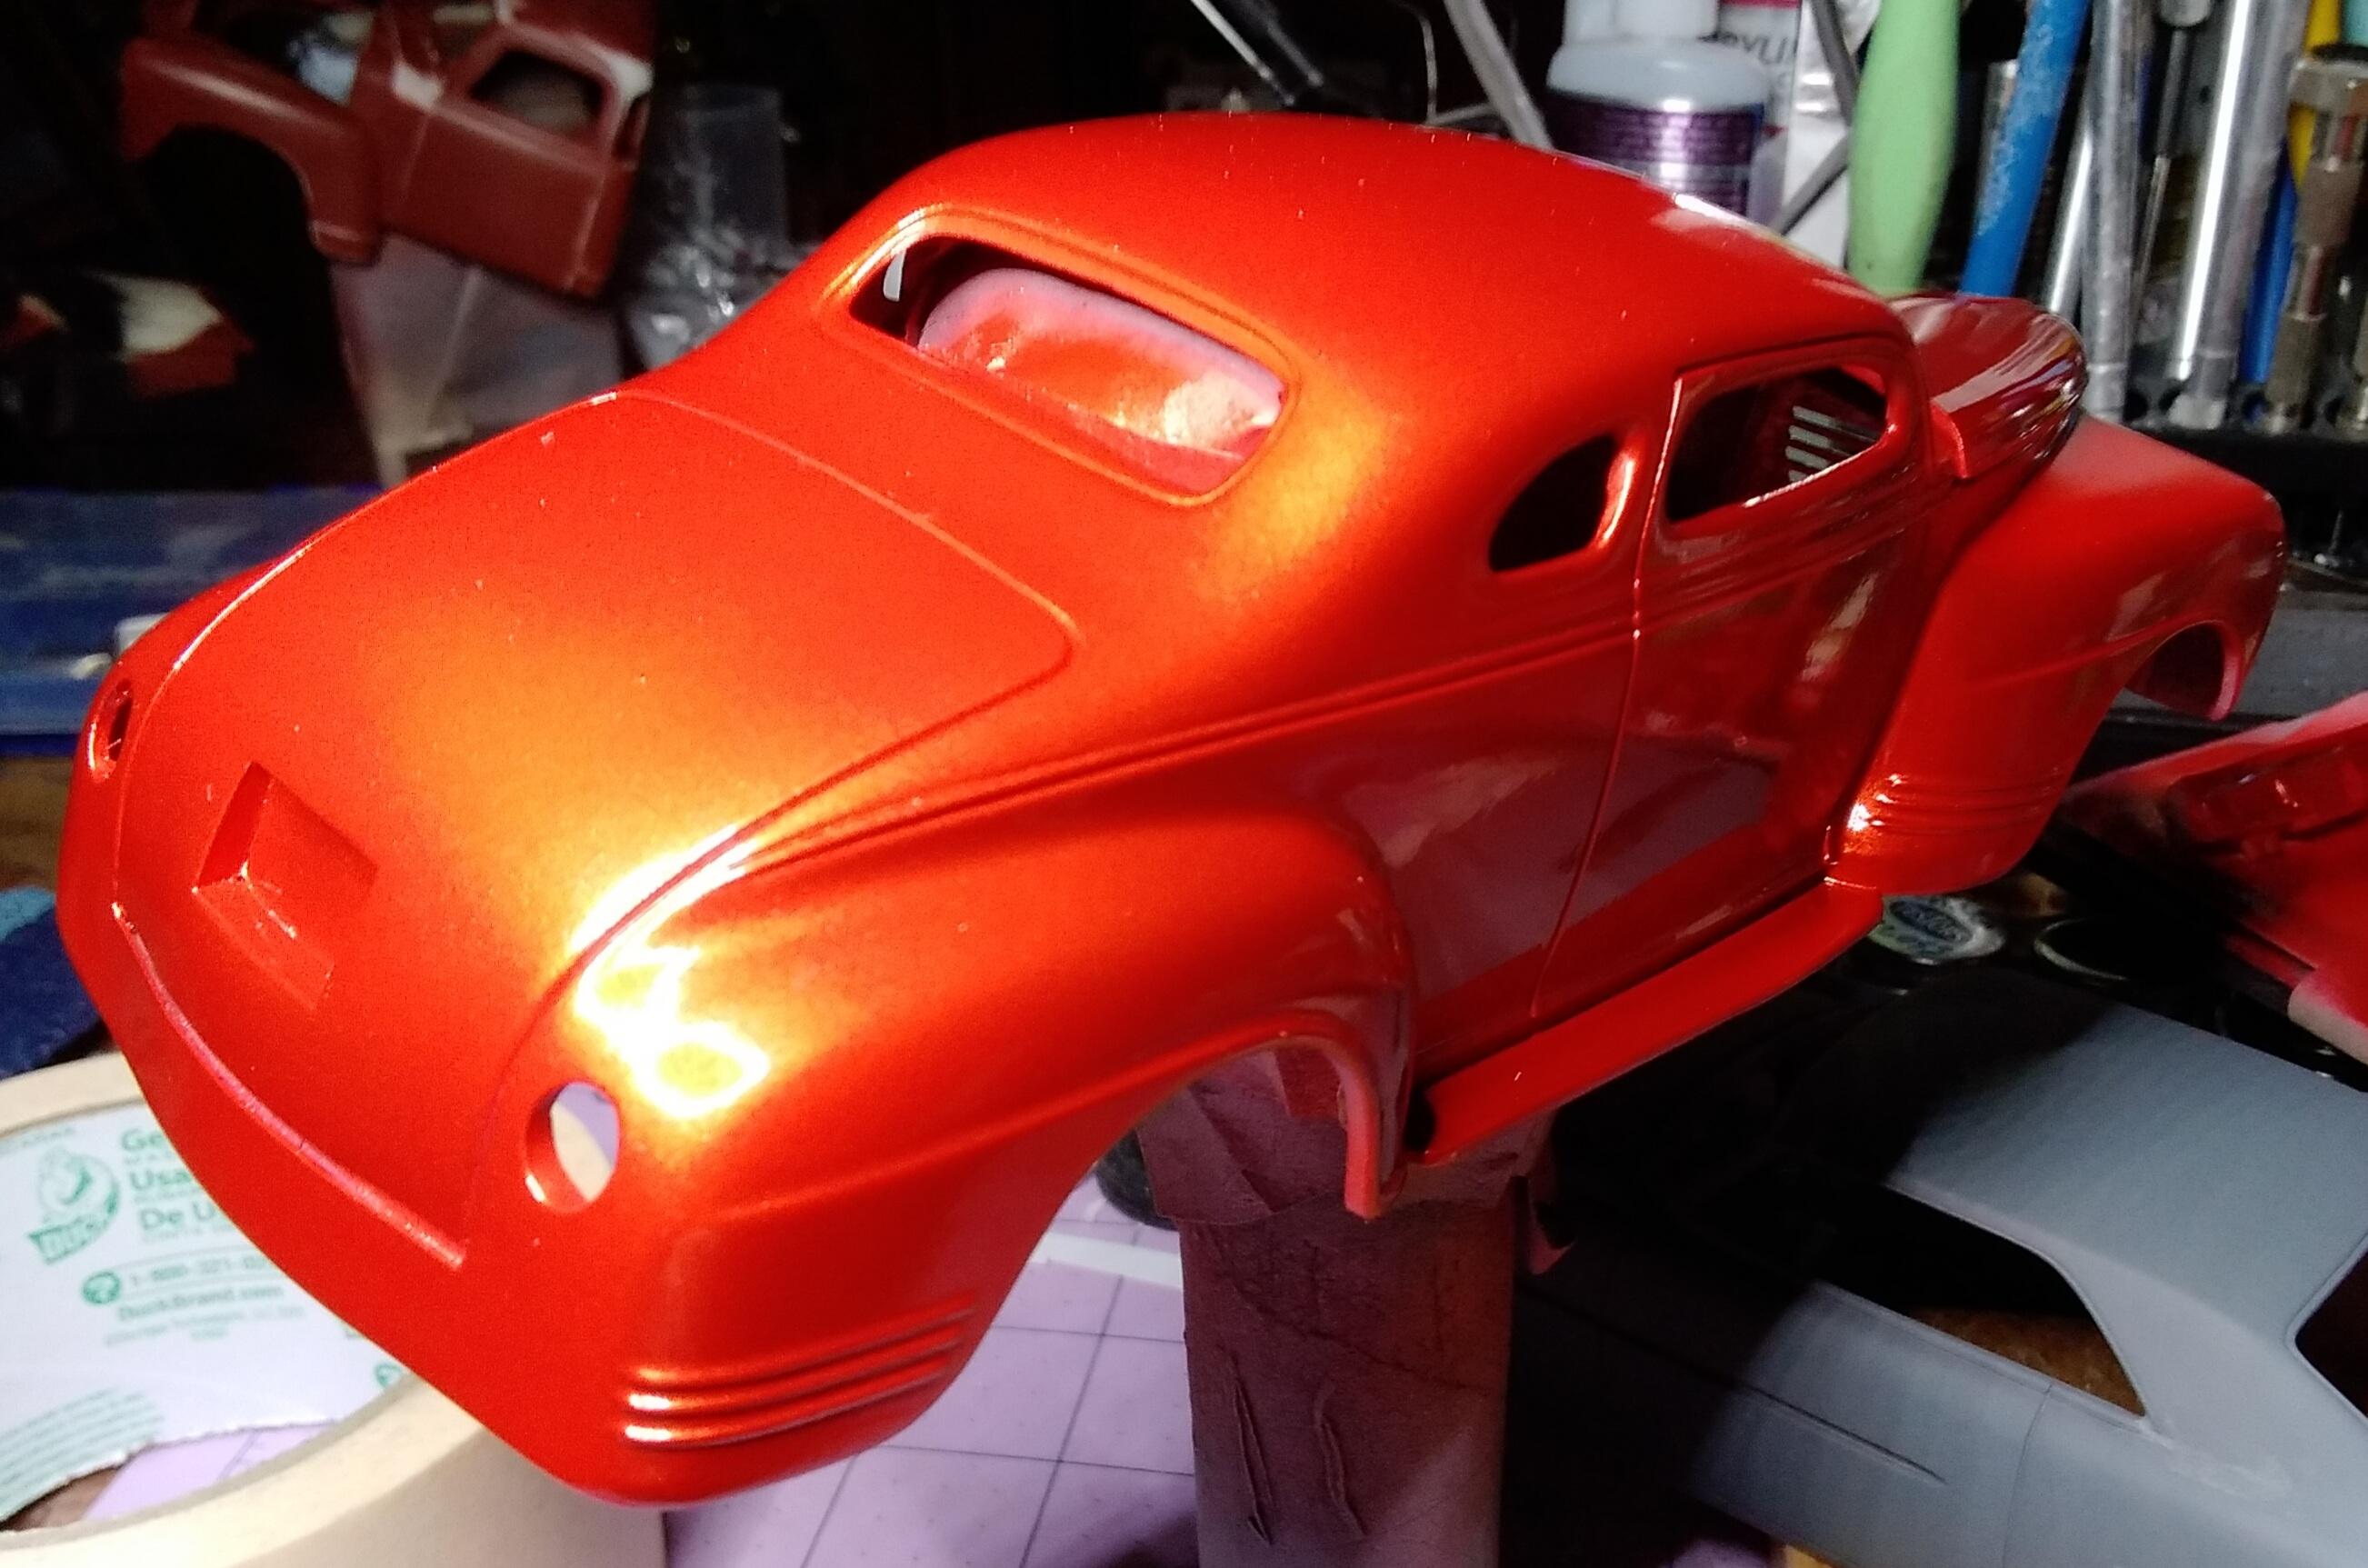
Probably my most ambitious bodywork project, to date. a tribute to the 1:1 I saw at a show Revell kit, with parts box engine, Pegasus wheels. Flocked, wired & foiled. Thanks for looking
-
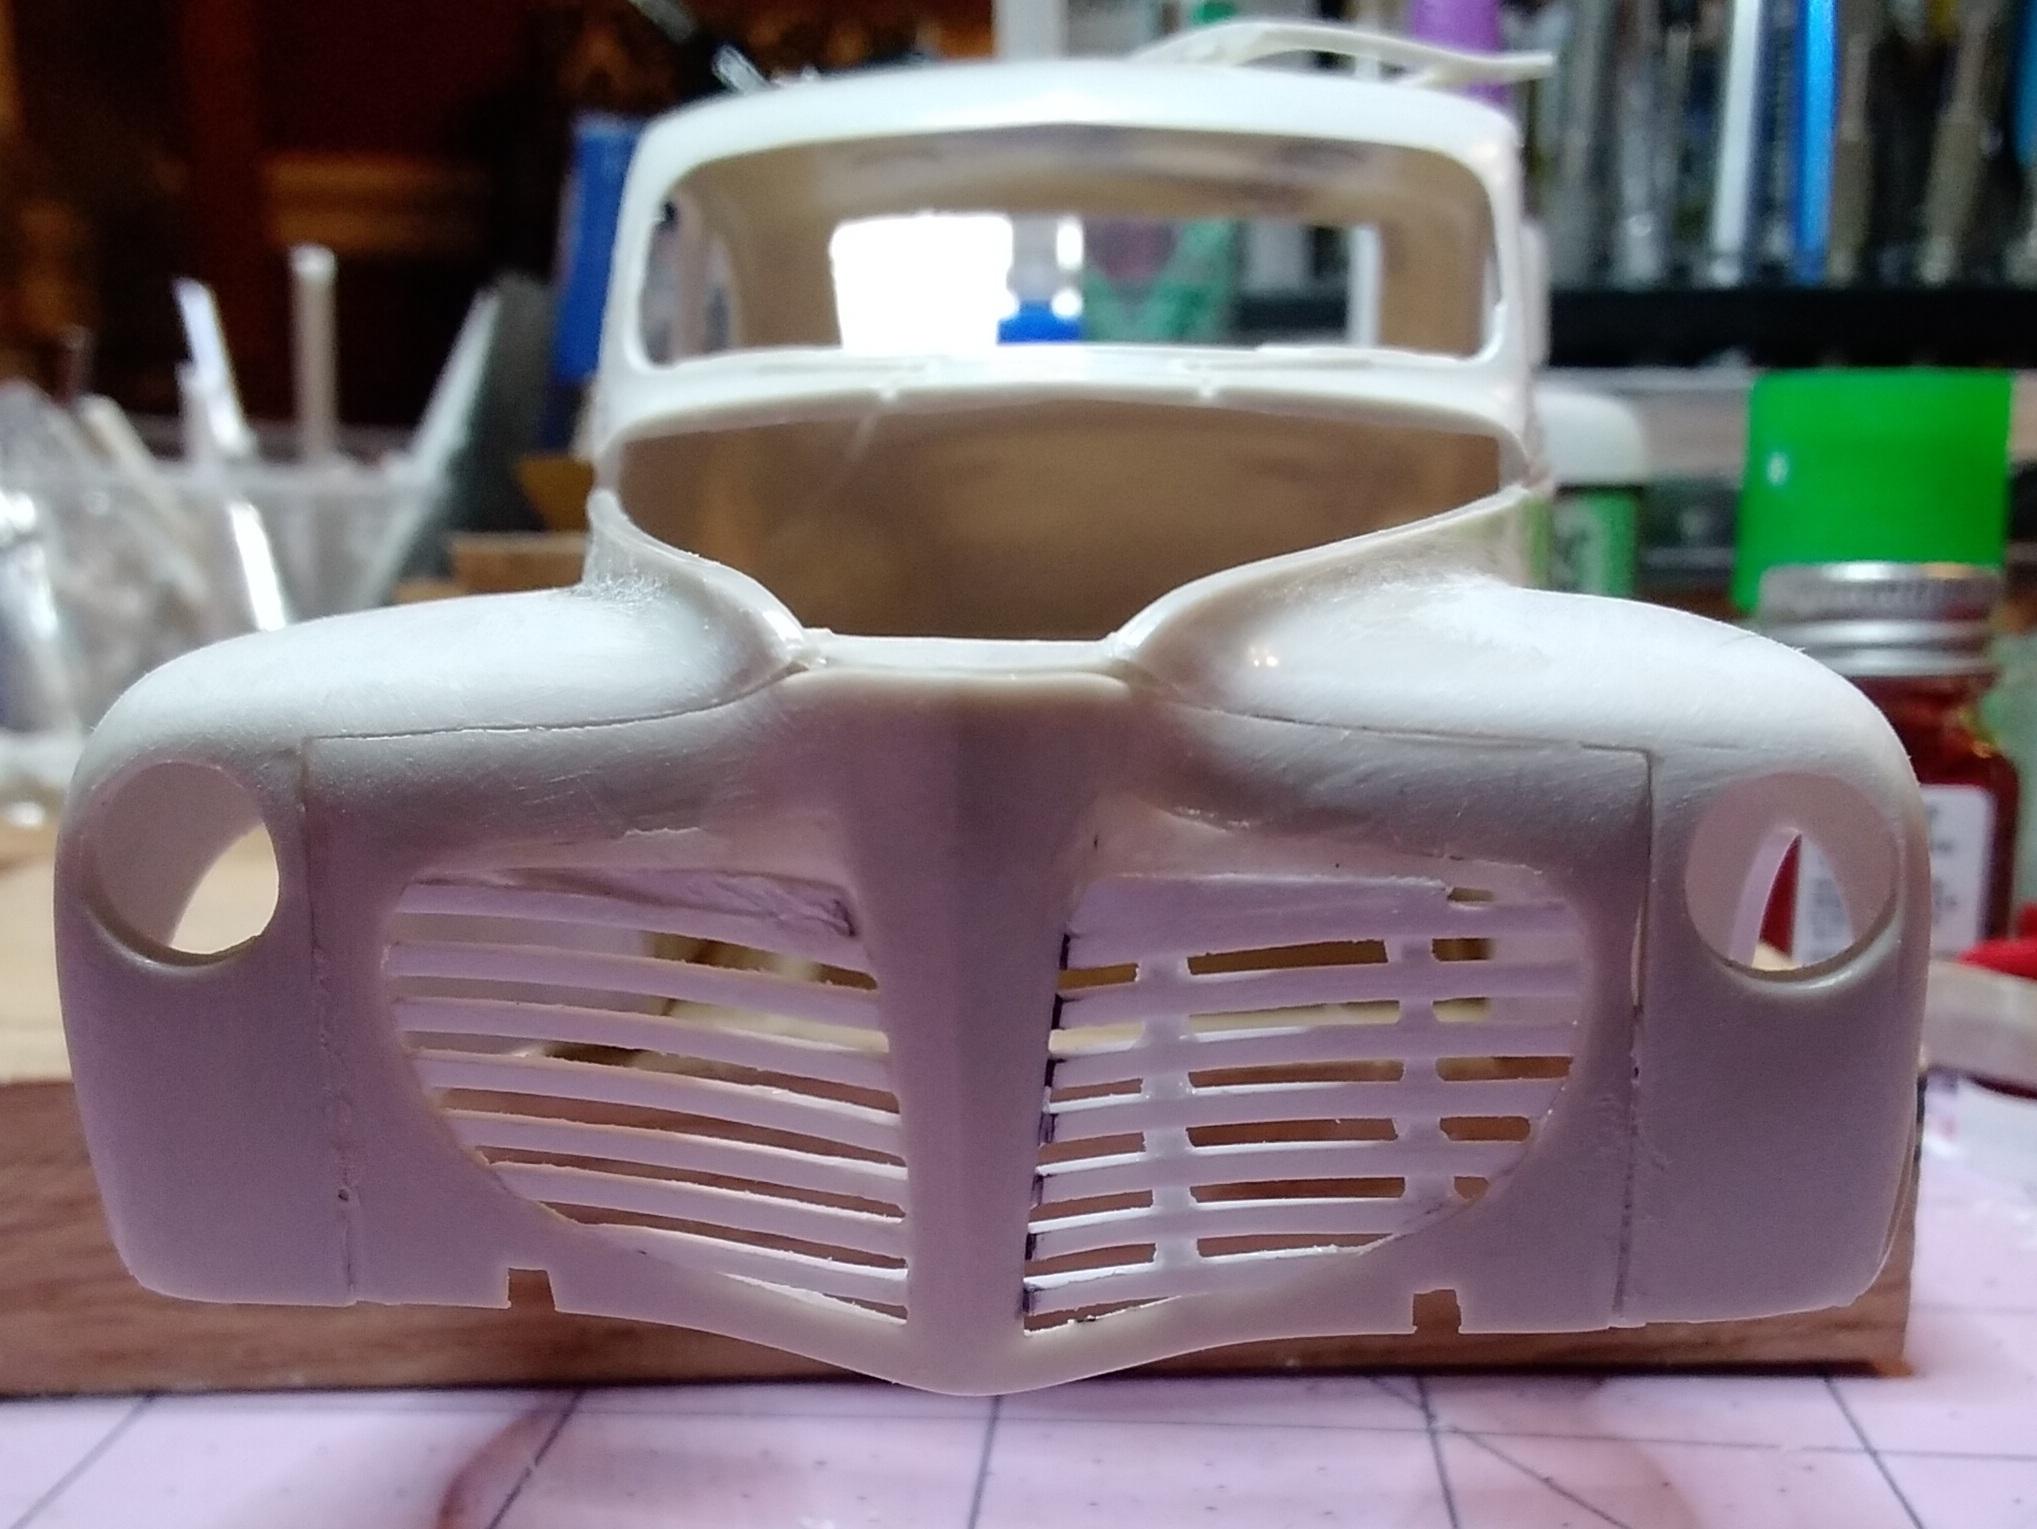
I've been thinking about this for a while, so yesterday I bought a razor saw. %5BURL=http://s173.photobucket.com/user/geetee66/media/795F0EA4-3A13-43B9-A422-1DE7D3F6186B_zpspt6cpq30.jpg.html] I found some headlights in my parts box which I can shape to look a bit more like the original car: %5BURL=http://s173.photobucket.com/user/geetee66/media/06BA8DA5-7491-428C-8268-5DABFDB82F5B_zpsepdyx90w.jpg.html] Starting with a Revell London Taxi kit, I planned my cuts before I started: %5BURL=http://s173.photobucket.com/user/geetee66/media/96690F99-A7E0-43FE-90C4-14105C999D29_zps1zfhszdf.jpg.html] First, I cut away the centre section. As this part has 4 pillars, I'll use it as my reference point for lining up the front and rear sections. %5BURL=http://s173.photobucket.com/user/geetee66/media/572DFB2C-1FC8-4E32-A3A5-90E8B2821C18_zpsvkvujemf.jpg.html] Then epoxy some brass rod onto it as support, strength and to help alignment. The styrene rods are there to help gauge the inside height of the front and rear sections and to rest give support while gluing: %5BURL=http://s173.photobucket.com/user/geetee66/media/815810D3-89DC-4CC3-9882-8C8666486D4F_zpsleg3wapx.jpg.html] I won't remove the front or rear sections until the centre section pillars are glued. That way, I can use the adjacent edges as a guide for horizontal alignment ? I hope more pics soon thanks for looking comments/ advice appreciated
-
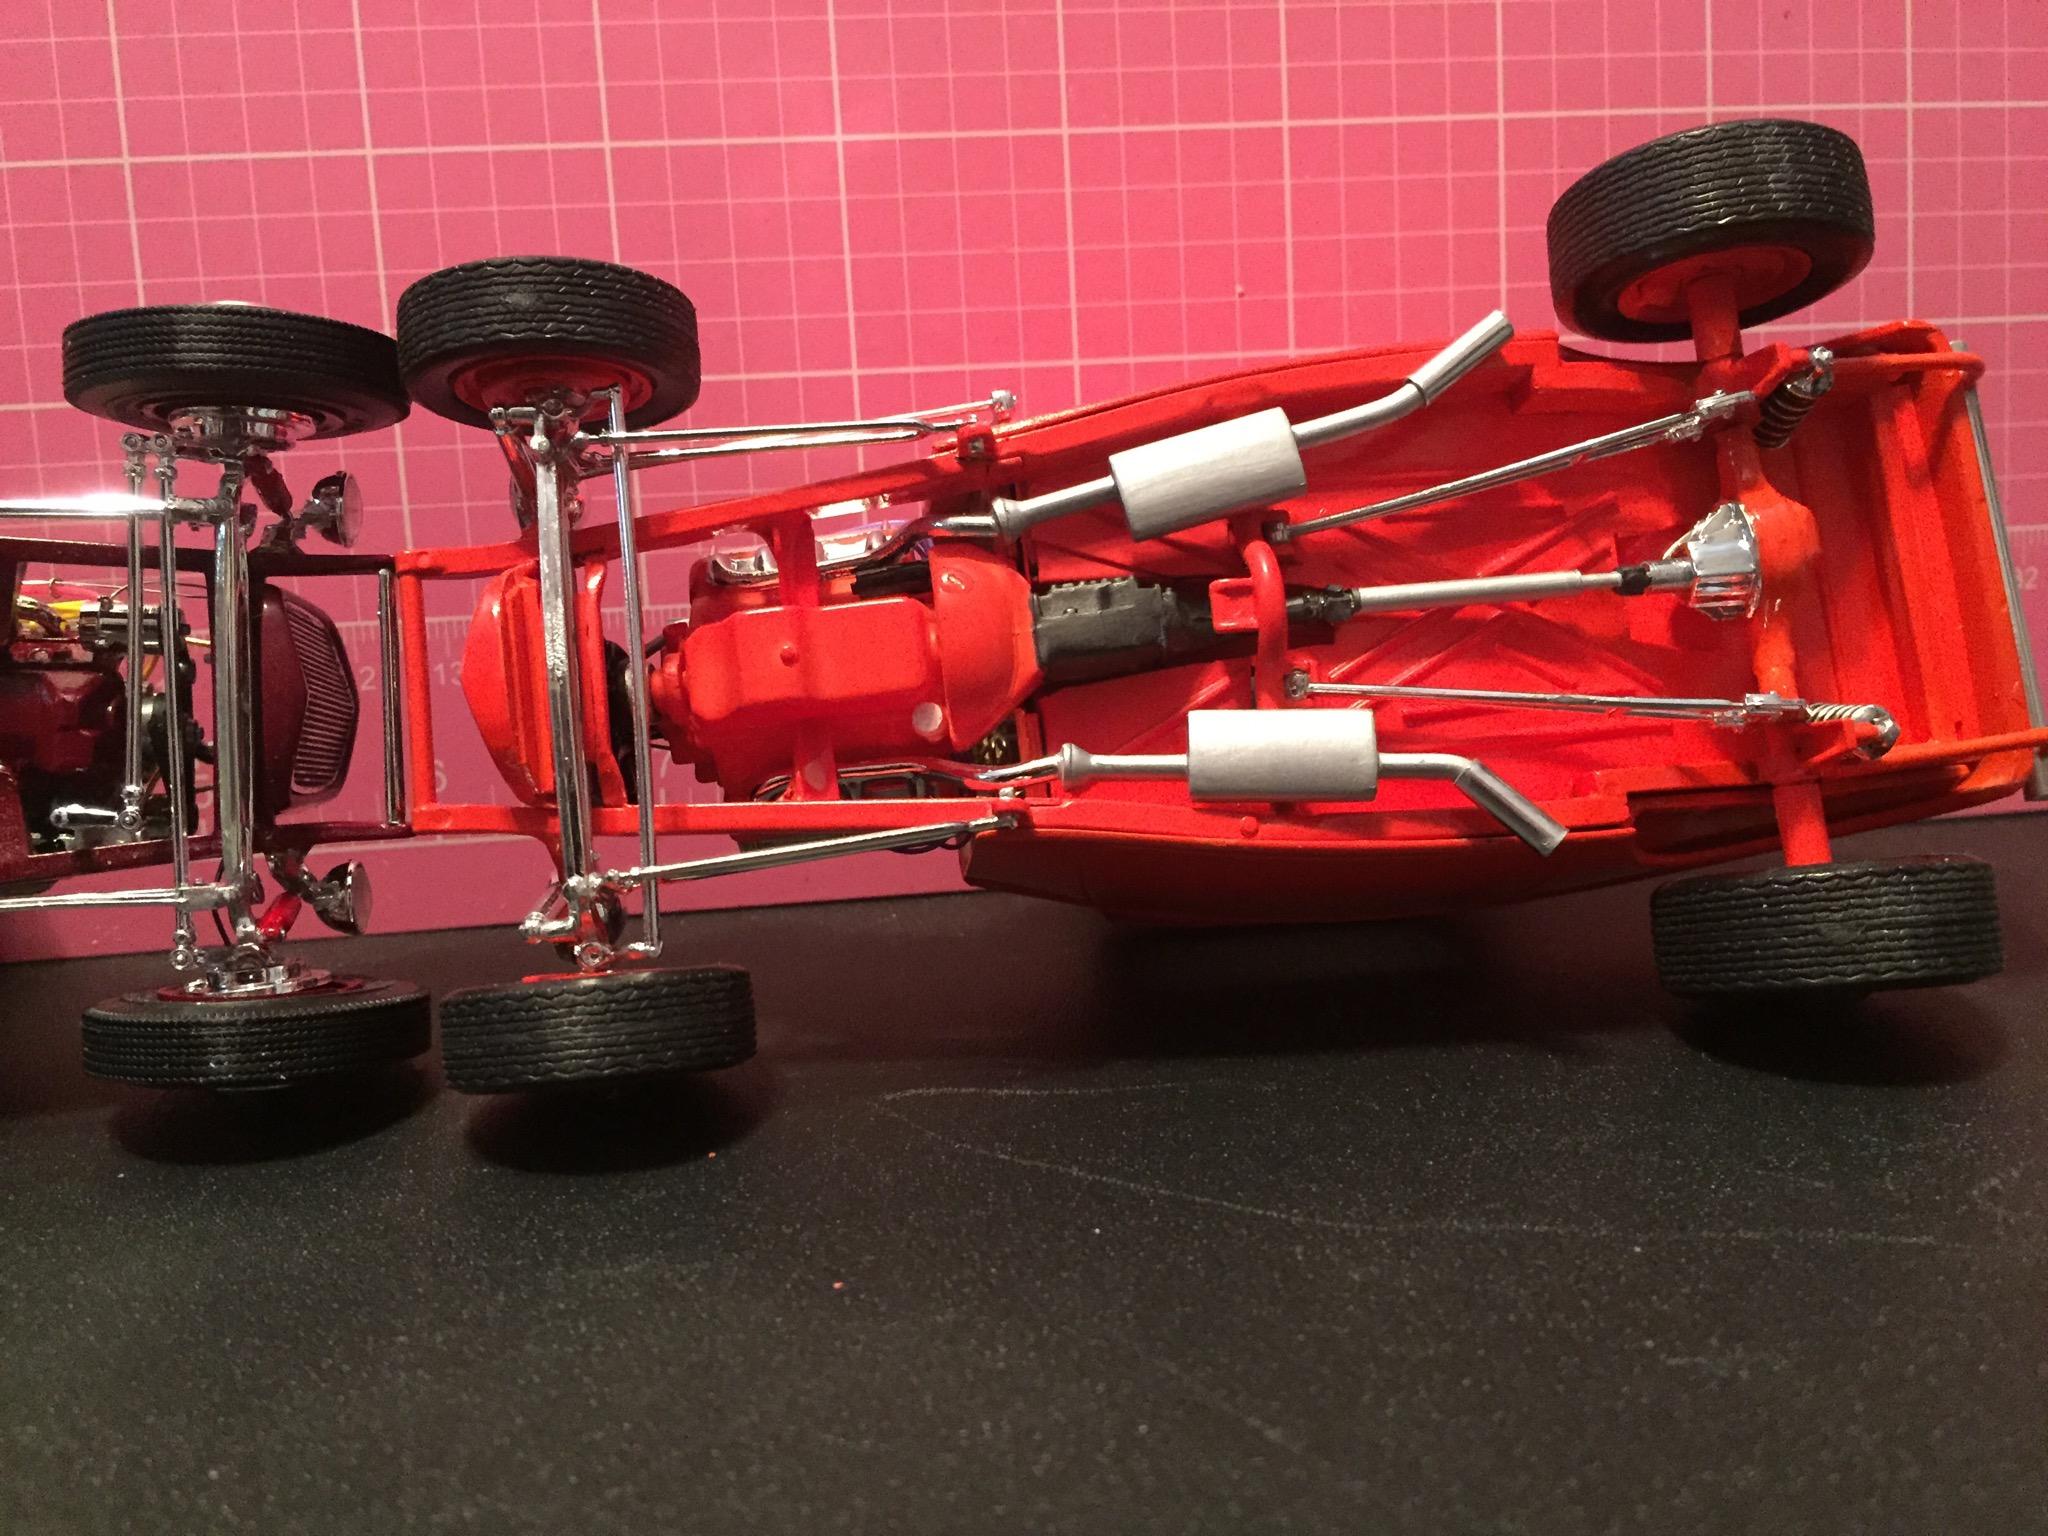
Calling this one done for now (it's missing the radiator support bar in these pics, I'll make another that fits better). Thanks for all the comments on the WIP, it's been a long road (2009-now) so it's great to finally have this one on the shelf. There are about 13 other projects waiting for time on the bench now! A brief summary: -Body and interior: Revell 32 Tudor, interior floorpan partially scratchbuilt. Chopped, channeled. Chopped grille shell. -Scratchbuilt frame (styrene) and gas tank (balsa) -Wheels and front tires: AMT 34 Ford -Rear tires: die cast 56 Thunderbird -Engine: Revell '41 Chevy Pickup. Carbs: resin copies of AMT 34 Ford parts. Air cleaners: Revell '49 Mercury custom. Headers and radiator hoses are solder. -Taillights: indicators from 57 Corvette ( I think) -scratchbuilt chopped windshield frame, acetate windows -front radius rods made from rear wishbones of AMT '31 Ford woody -finned drum brakes made from cut-down toothepaste caps -brake backing plates: resin copies of parts from Monogram '32 roadster -grille insert: metal from an office door nameplate, drilled and polished
-
Here's an old unfinished built that is finally nearing completion. In 2009, I started a Revell '32 Tudor by chopping the top (my 2nd chop ever, and first sedan chop) and dropping it on a scratchbuilt frame with a Revell '41 Chevy PU stovebolt 6 engine. It was only my second build after re-entering the model car hobby in '09. The initial plan was to run straight pipes and have rear airbags and a very low stance, like the rat rods of the day but with nicer paint. I tossed around a number of ideas for paint color, from brown and black to metallic aqua and red. Eventually I settled on a Duplicolor metallic red. In 2009 I didn't know where to get tall rear bias-ply tires, so I spent ages looking for discount toys and was ecstatic to find the 1:24 diecast T-bird tires for the rear. 6 years later, I know how many options are available online, and also which kits have the best traditional-style tires. The build languished half-built for years, and last year I pulled it out to fix some problems with the paint, and chop the grille shell. Then it sat again. Finally this year I pulled it out and am assembling it. Because I didn't plan as well in 2009 as I do now, assembly has been frustrating and there were several minor disasters with glue and fitment. In the end, I've mounted the body higher than originally intended, and changed the exhaust to a set of sweeping dual pipes made from solder. The original setup: Building the frame: Modifying the interior, scratchbuilt windshield frame: How it sat for years: Getting another coat of paint: Updated exhaust made from solder: How it stands today, just needs some radiator hoses and other small details:
-
Finally, I have completed the 1954 Hudson Hornet custom coupe.........to recap the build : 1. I sectioned out about 6 scale inches from the sides, back and front of the car. 2. I chopped about 6 scale inches from the top by cutting a couple of wedges from the upper front and lower back of the A pillar, 6 inches from the B pillar and a 6 inch die-angled cut in the rear pillar, so that the top was "slid back and down" to the new lowered position and then secured with glue. The B pillar has a new top section filled in where the old pillar was moved to. I added a new chrome trim accent strip to the sides in a flowing pattern from the front, just back from the headlight, down to the rear fender back by the rear bumper. 3. The rear fender top line was raised 1 scale inch from the end of the rear quarter panel window to the new tail light fixture to give the fender line a very small fin as a fore-runner of the larger fins to come in the end of the 1950 ear with a sharp "C" look to it. The tail lights are a mix of epoxy and clear red paint dropped into the opening after the opening was painted reflective silver. 4 on the rear deck, I formed a faux- continental kit look into the rear deck to give the rear deck a little height because the nose tends to be a little high on this car. 5. the hood was smoothed out by removing the large flat area that was molded on the real car. 6. The headlights were frenched and filled with liquid mask so that the chrome finish was protected from the painting. 7. a black mesh inner grill was installed to the grill opening which was covered with a "Toothy" grill from my parts box. 8. I replaced the 6 banger stock engine with a Revell chrome Cadillac V8 with 6, 2 barrel carbs. 9. the engine bay firewall and inner fenders were smoothed and covered with bare metal foil, as was the inside top of the hood. 10. The hood was hinged on the left side to open sideways, just to be different. 11. The stock wheels and rear view mirrors were used. 12. Chrome "lake" pipes lifted from the Revell 1949 Mercury kit seemed to fit this car perfectly, so they were added. 13. The stock front and rear bumpers were installed 14. And finally the paint. The car was primed, sanded and re-primed. I mixed up a dark gold paint from Tamiya bottled paint which was sprayed on the hood, top and sides of the front fenders and doors. Once dry, I installed some custom flame masks that my brother designed on the computer and cut out of vinyl ( he is a custom sign maker) ....these were old masked that I used on a Plymouth street rod from about 8 years ago and were just rolled up on a shelf. I installed the masks on the hood and side fenders ( not an easy task I might add). Then the entire car was sprayed light gold. As the paint dried I removed the masks. Once dry, I lightly sanded the area to remove the ridge caused by the paint mask and the thickness of the paint. Once smooth I touched up a few spots and then painted the nose and front side fenders with Tamiya clear red. When just about dry, I painted the entire car Tamiya clear orange, I wanted to give the front end, which has the ghost flames a darker, more red glow, that is why the red is under the orange. Lastly, as the orange as about dry, I mixed a few small scoops of extremely fine gold metalflake into the clear orange so to give the candy blood red/orange a metal sparkle. In the sun, it really poops. And finally, when dry, the car was clear coated with 3 layers of clear, and once dry, it was waxed out and buffed 15. Once the body was dry, the Bare Metal Foil was applied to the side strip and the window trim. 16. OOPS, I forgot, the interior is made up mostly from the door panels, console and seats from an Infiniti G35 coupe with a modified Plymouth dashboard and the steering wheel from the Hornet kit. Thanks it, I hope you like it......I know I am very happy with the result.......I think the original car is chunky and too tall....I think the section and chop bring the car into the proper proportion, and the lowered stance make this into a great 50's lead sled. Here are the finished pictures. Thanks for looking...............
-
going to be a slower build not really in the winter build rythem but already started to ..... the boxart nice supprise inside with surfboards awsome wheels very cool body , the styrene is really thin so still thinking if a top chop is wise , the roof and rear are one piece and the cowl and windscreen post a second part and loose doors . considering the thickness of the styrene i'm not sure if it will be steady enough .. but not saying i wont chop it lol
-
These aren't new, but they had disappeared off my website and haven't been on there for several years. I finally got around to shooting some new photos of them and putting them back on my site. This pair of custom Mercs were orginally Hot Wheels die-cast "Cop Rods" that I tore apart and re-built. More pics and all the details are on my site at the links... The pink one http://www.svensworldofwheels.com/51_custom_mercury_page.html The orange one http://www.svensworldofwheels.com/50_chopped_mercury_orange_page.html
-
Ok, guys, I think I need some help here. 15+ years ago I started this truck with grand ideas of a kit bashed pro street, loosely based on a magazine cover shot. Ron Cash chopped cab, tubs and rear setup from the Super Bee. Scratch built "GMC" hood and grille. I've already shelved it once, and now I'm losing interest again. I cant get it as low as i want in the front, and the years in storage have caused something to warp on the front end. Thoughts? Comments? Thanks for looking
-
Finished this one today, I had no intentions of chopping it at first (i was going to build it like the box art) but after eyeballing it i thought the roof was too high, so i chopped it about 3 or 4 mm and put it back together. I didn't plan on smoothing the roof but after i brush painted the roof tan it looked bad. paint was uneven and i lost the texture of the roof so i block sanded it smooth and repainted it. the body on this was giving me hell, the paint kept going wrong so when i got it sort of good i settled with it so the paints not perfect. Anyway i like the overall look of it and I'm pleased with the final result. I made the mistake of using super glue during the final assembly and i ended up with the white fogging from it. I cleaned it up as best i could but I'm not sure how to remove it easily All comments welcome.
-
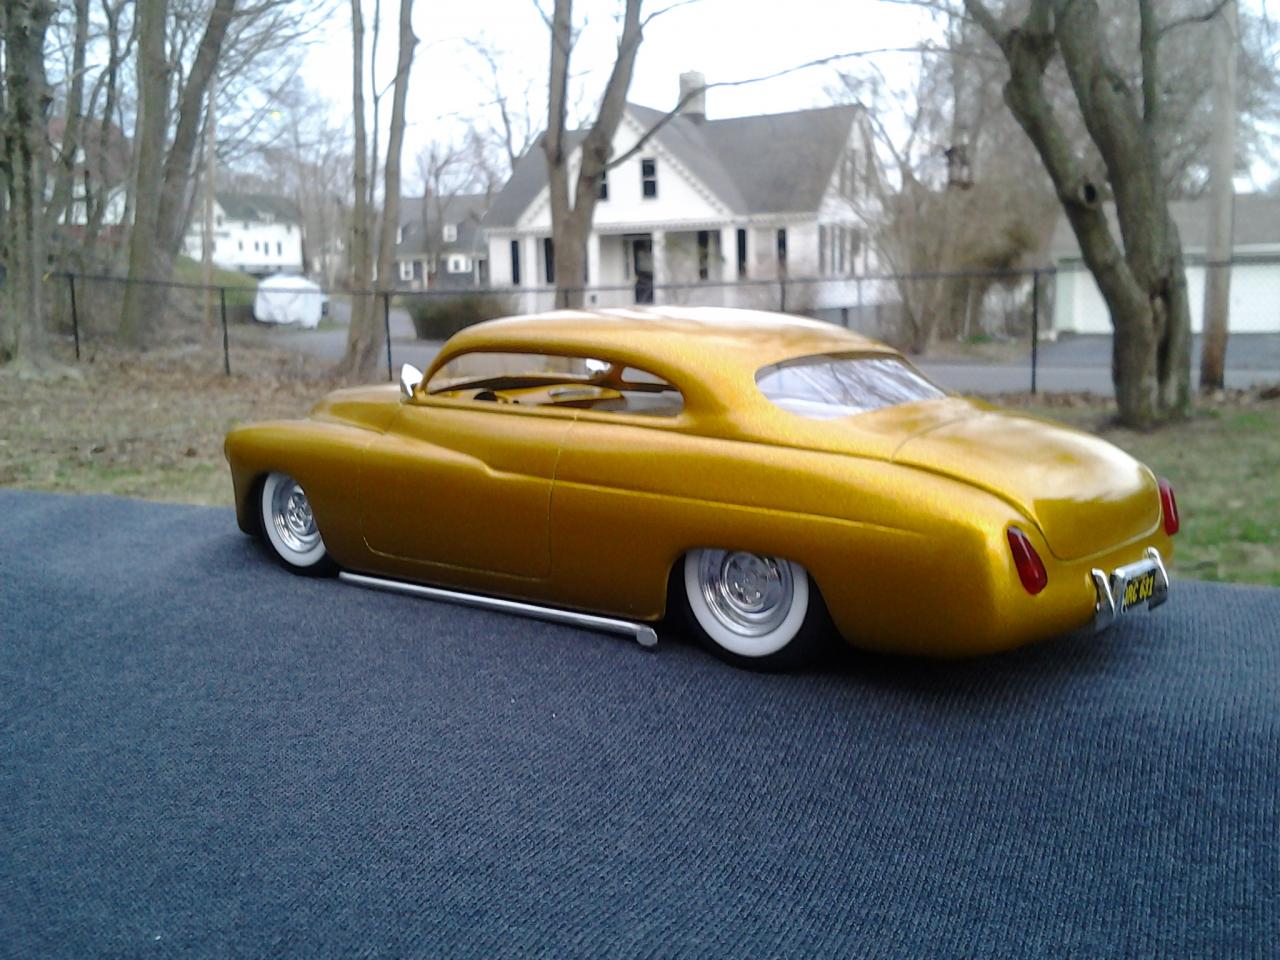
Finally finished my 49 Merc.(The Golden Diamond) This has been a long on going project that started at least 8 years go. It all started with a birthday gift from Alton Spence. (once again, Thanks Alton) and much needed pushing by my brother from another mother Luke Karosi as well as inspiration from his magazine, Kustoms Illustrated. I chopped it and hard -topped it then sectioned the body 4 scale inches, added the canted quad headlights with a kustom fitted grill. The tail lights were from the parts box and were canted as well. All of the interior was kustom made using materials from parts boxes and styrene pieces. The dash is a kustom fit 59-60 Chevy unit with a kustom steering wheel along with hand made Lakes Pipes from Aluminum rod. Glass was also made from templates seeing the original no longer fit. But enough with all the jibberish, on to the pics...
-
I'll have more pictures loaded up tomorrow at my gallery page, along with build pics http://www.modelcars...lery&image=5685 but for now, this one is done! Happy Easter!
-
Hey guys... Gonna do my first chop. We'll see how it goes. Using the 53 lowrider Bel Air kit from Revell, which is 1/24 (ugh) but oh well. After testing the so called "lowrider" suspension I was less than impressed, so out came the Dremel and heres what I got. Going for a Bagged lead sled. Painted some wide whites (terribly) just to see how it would look while i wait for my Modelhaus tires to show up. This was my first step lowering: Here's where she is sitting currently. I'm Pretty content with it, What do you guys think? Also with some less drastic white walls: And with Skirts... Yay or nay? Thats all for now, Ill try to keep up with the build thread. Hopefully the next post will have the roof chopped and trim/handles shaved down. Any advise would be much appreciated. Thanks


.jpg.79a1b981dbcc6325ba027ad9911e4036.jpg)