Search the Community
Showing results for tags 'Revell'.
-
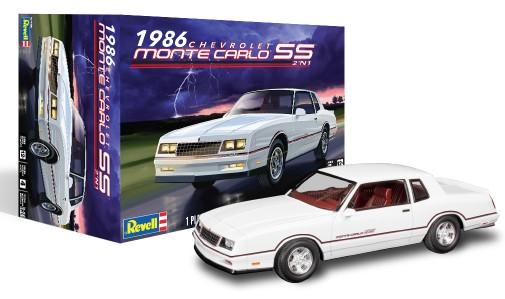
Revell #4496, 1/24 1986 Chevy Monte Carlo SS 2'n1, coming...soon? ?

-
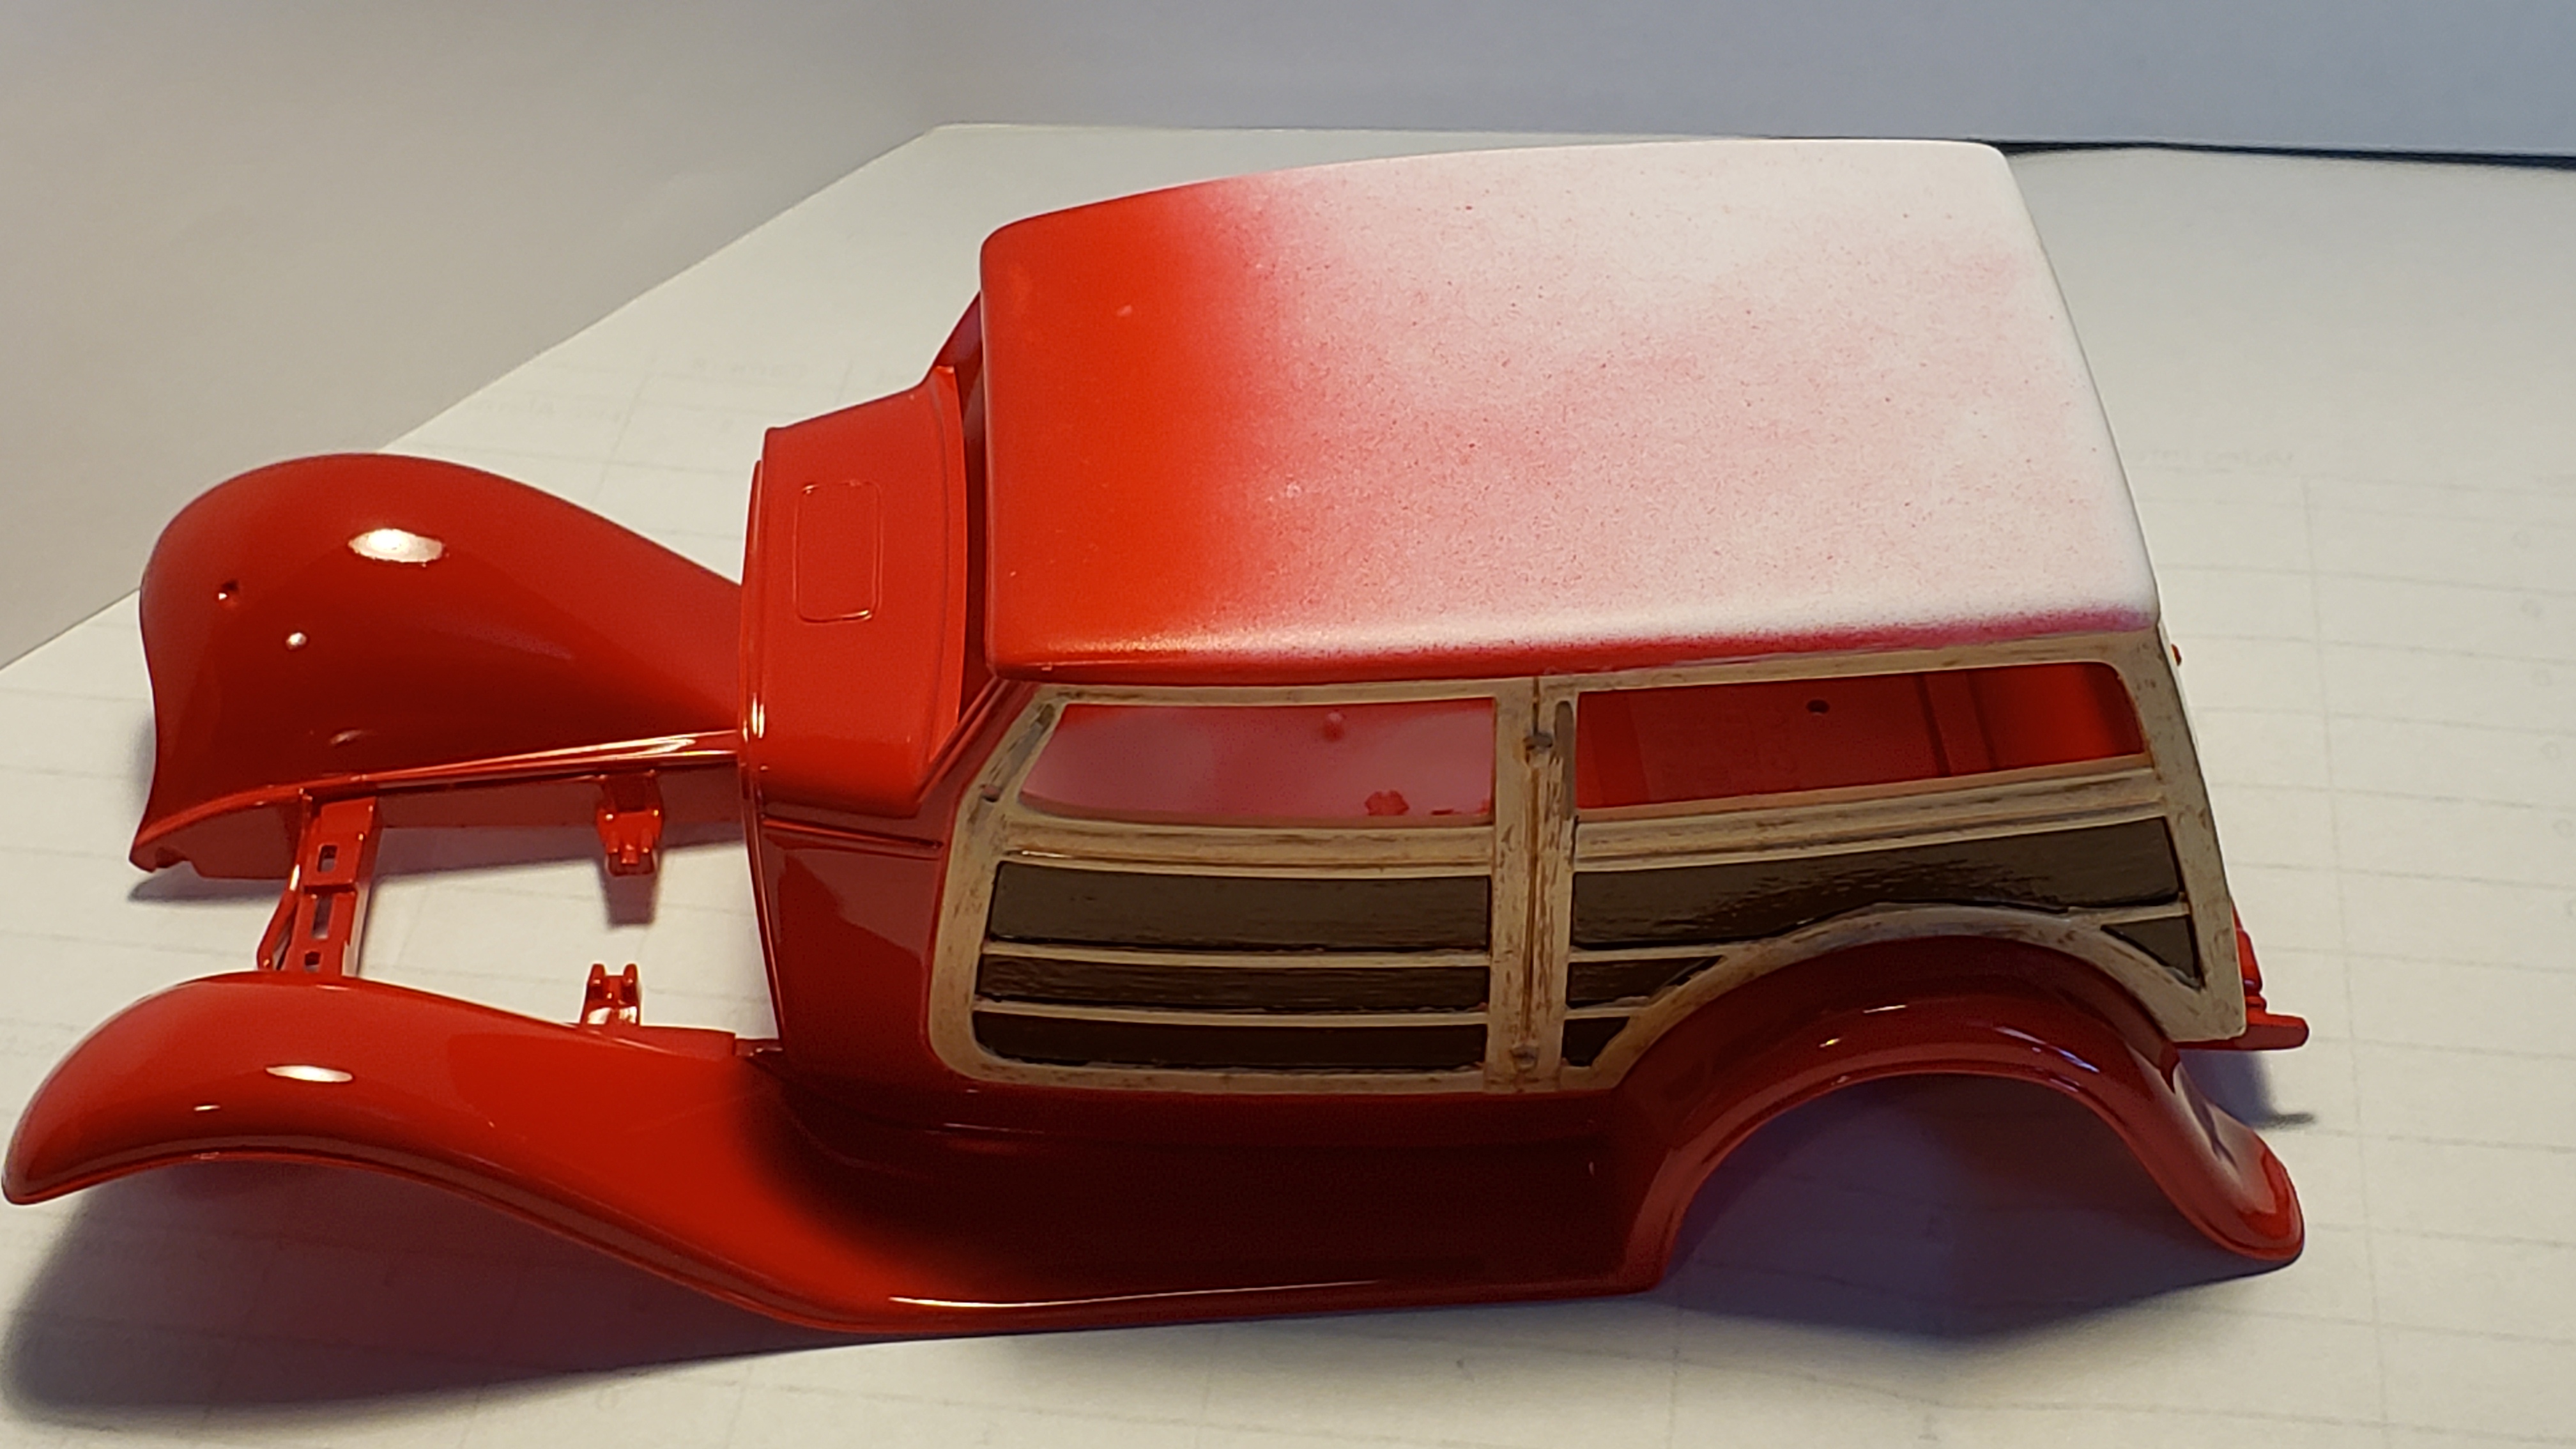
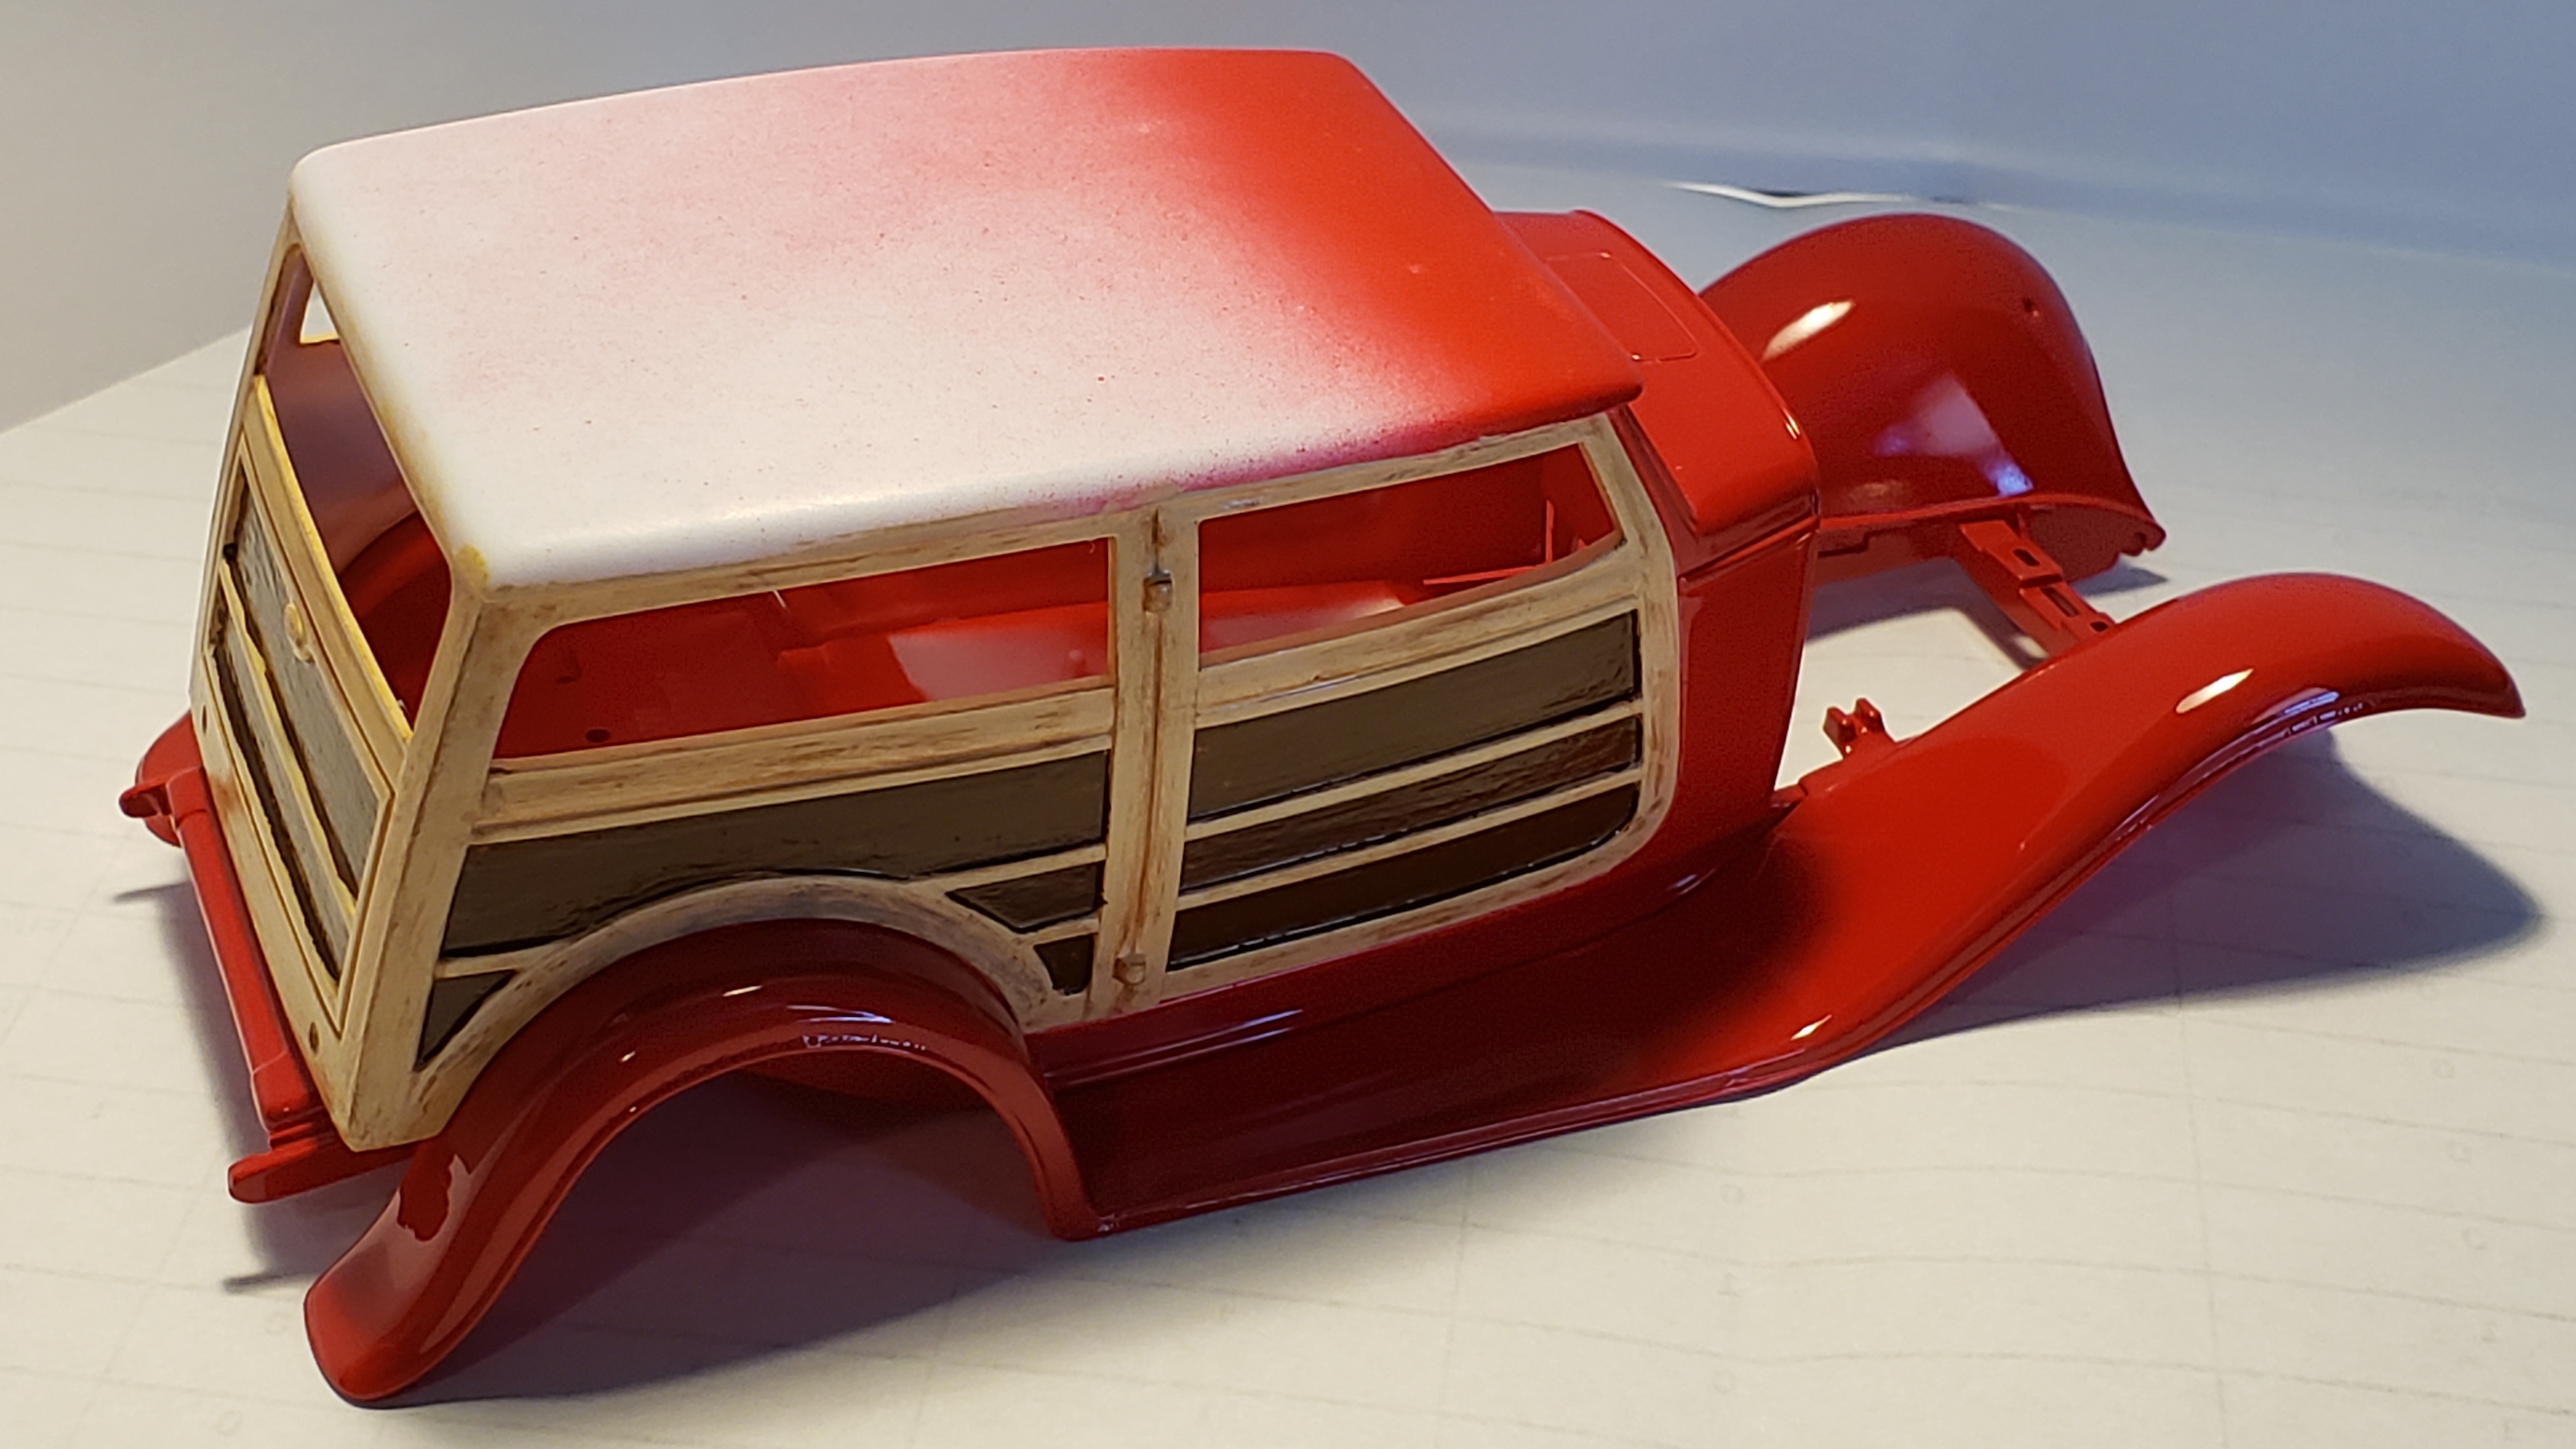
I picked up this sealed kit at the Carlisle Chrysler Nationals this year for $12. Primed and painted Tamiya Italian Red, brushed painted the wood (need to apply decals in the panels yet) with enamels. Used a light Tan and the dry brushed Dark Tan for some wood grain. Used Leather color for panels in case the decals are a little small for the panels. Cleared with Tamiya Clear. Debating on Black or Dark Tan roof. Interior will be Tan of some sorts.
-
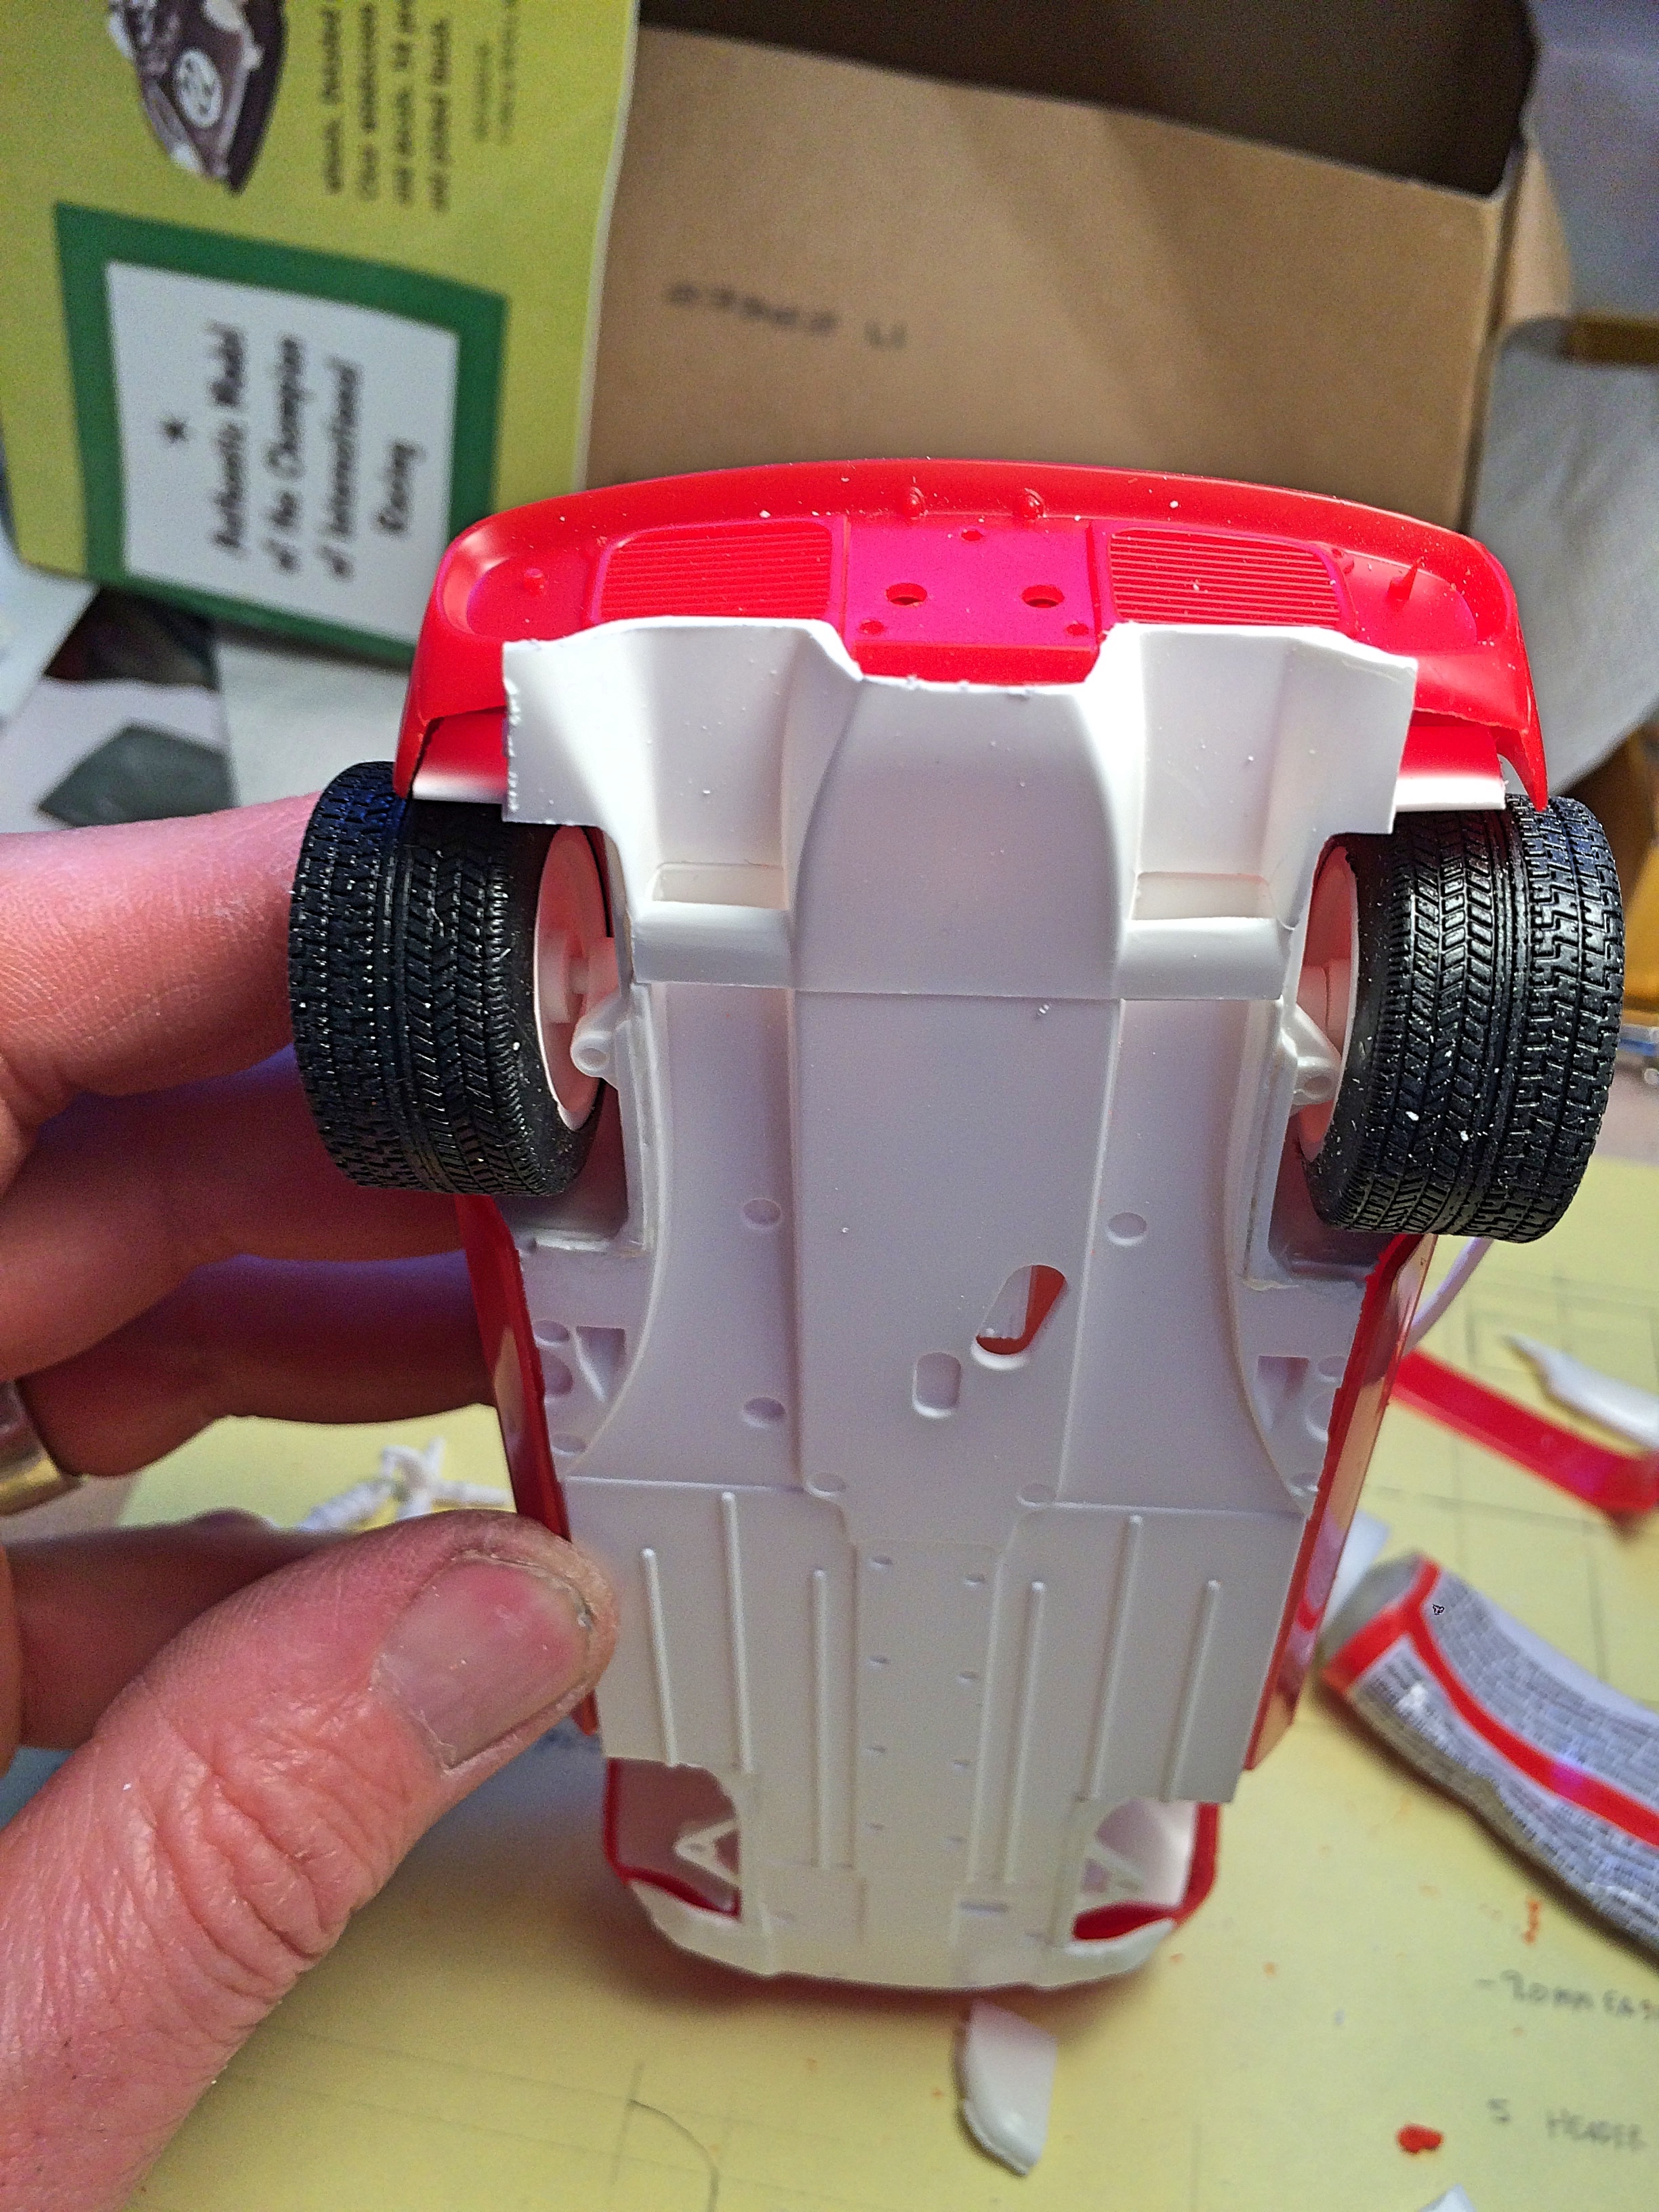
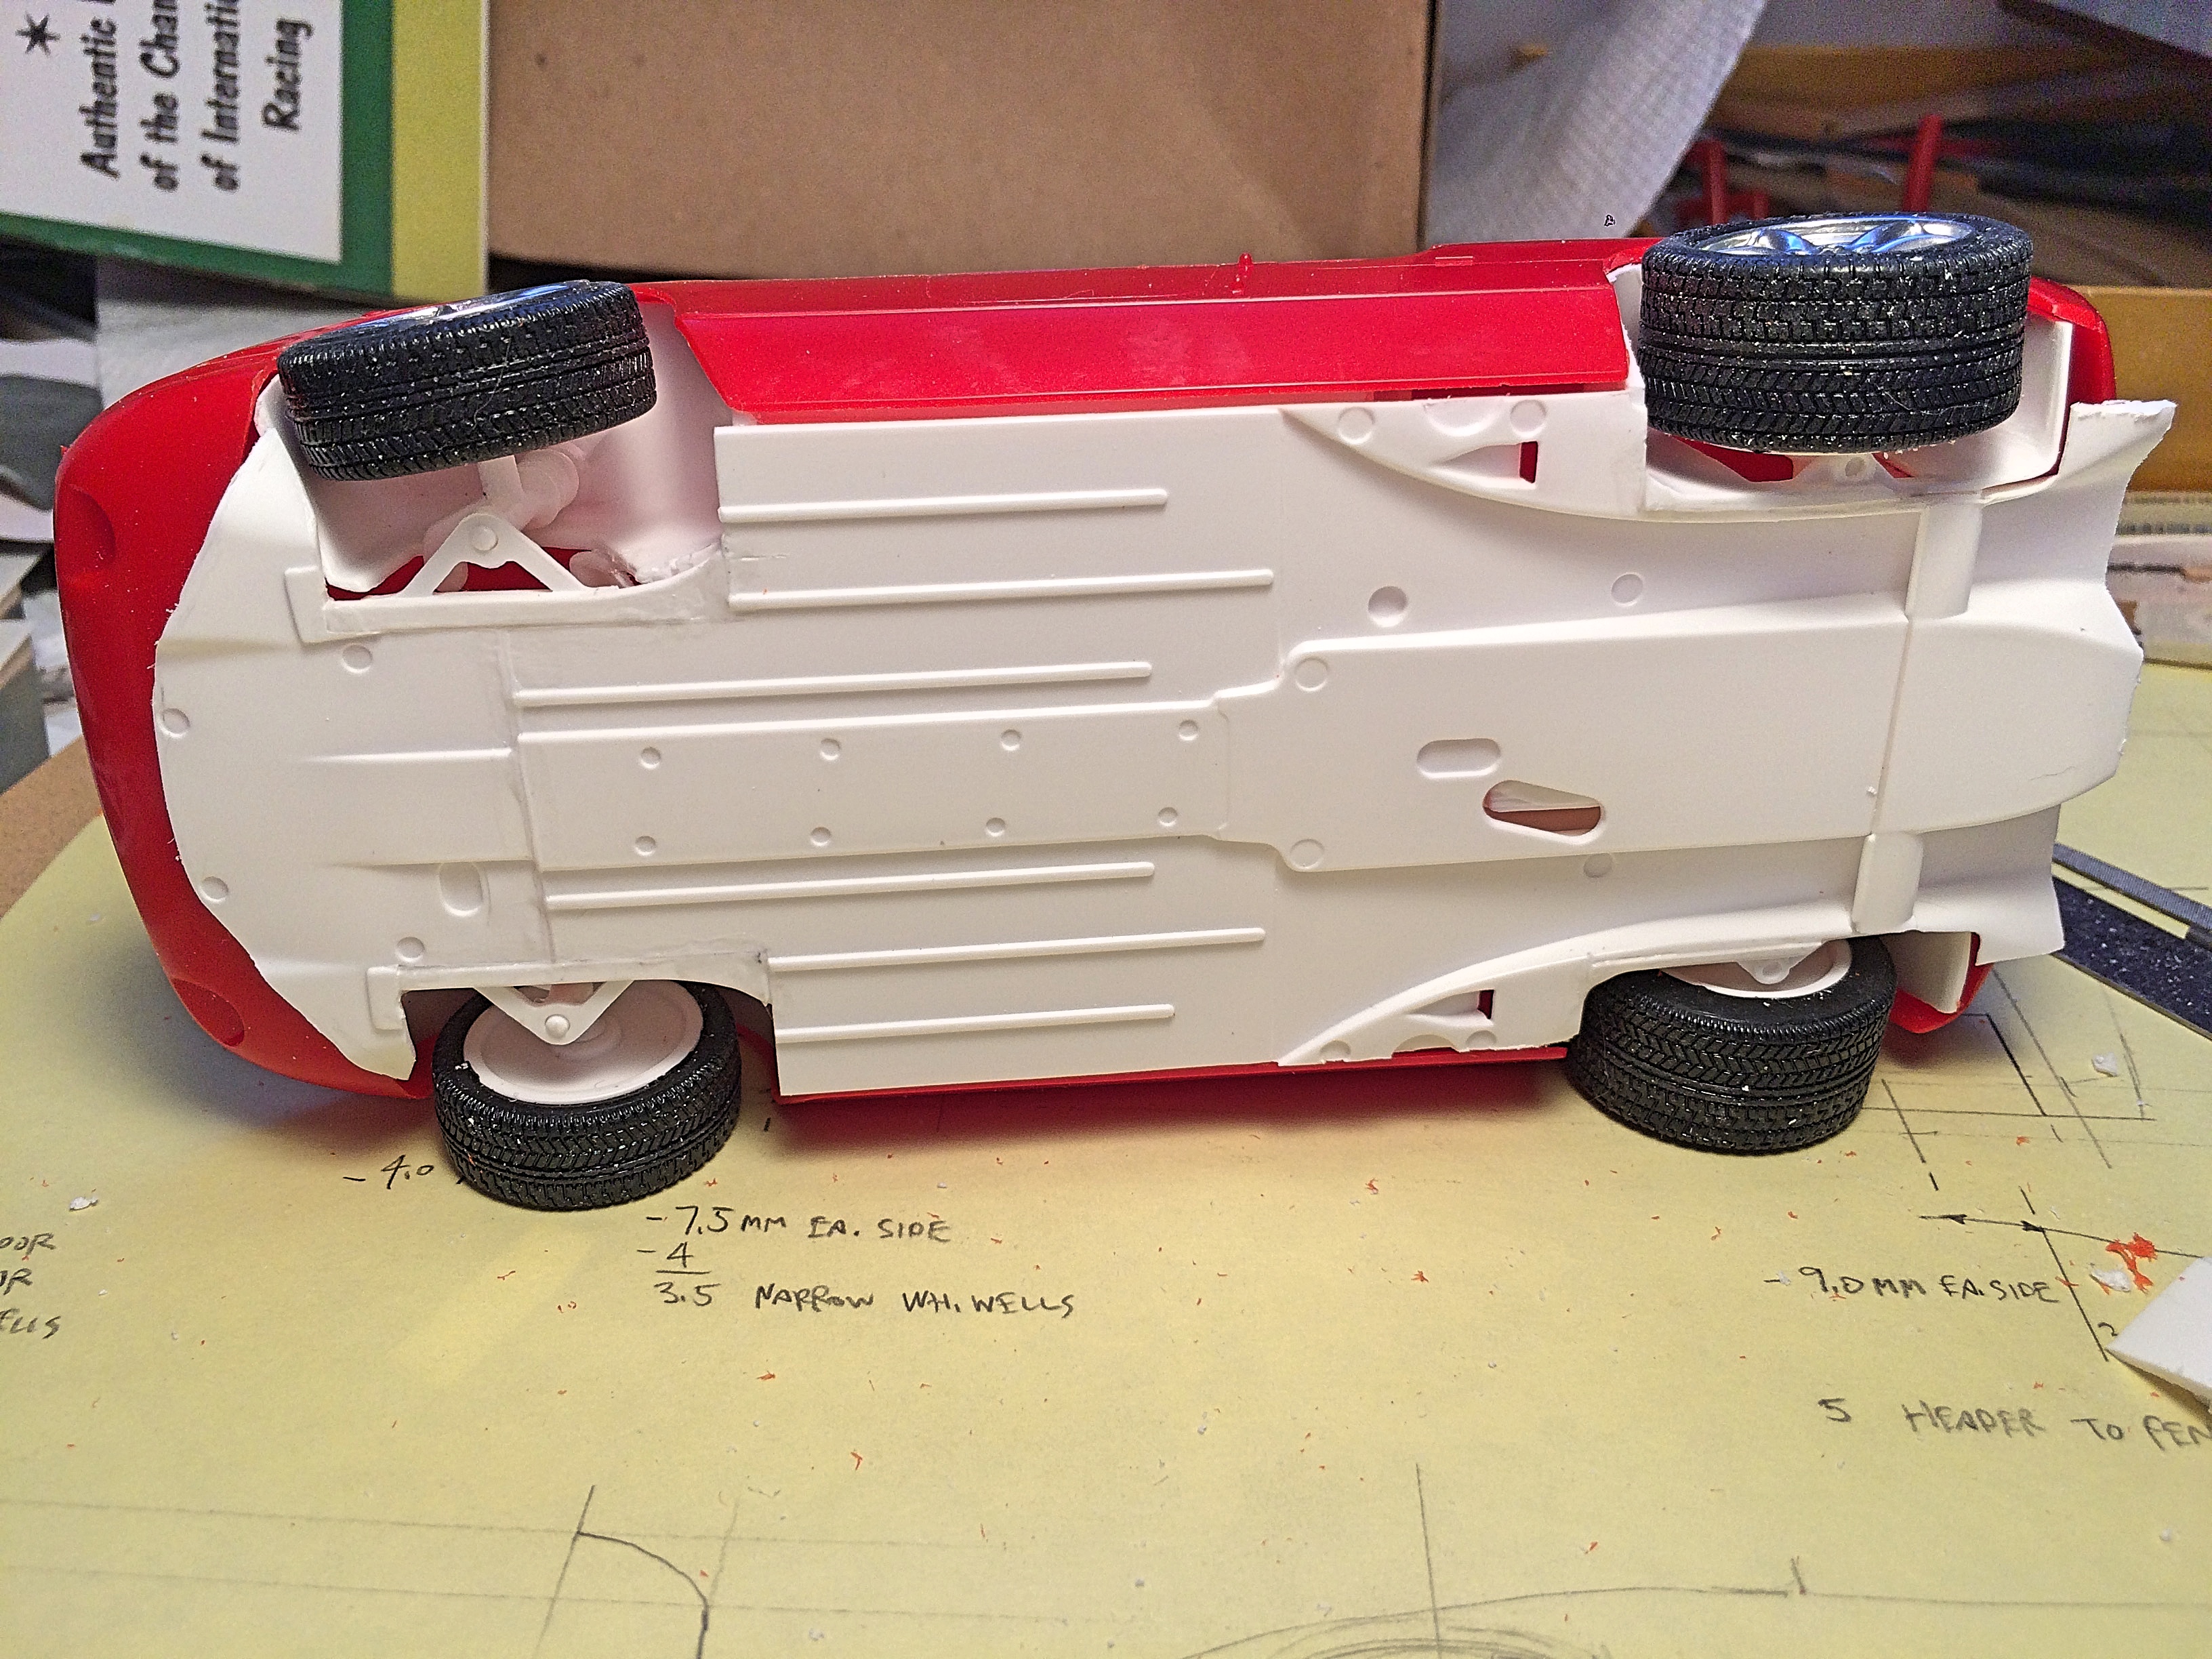
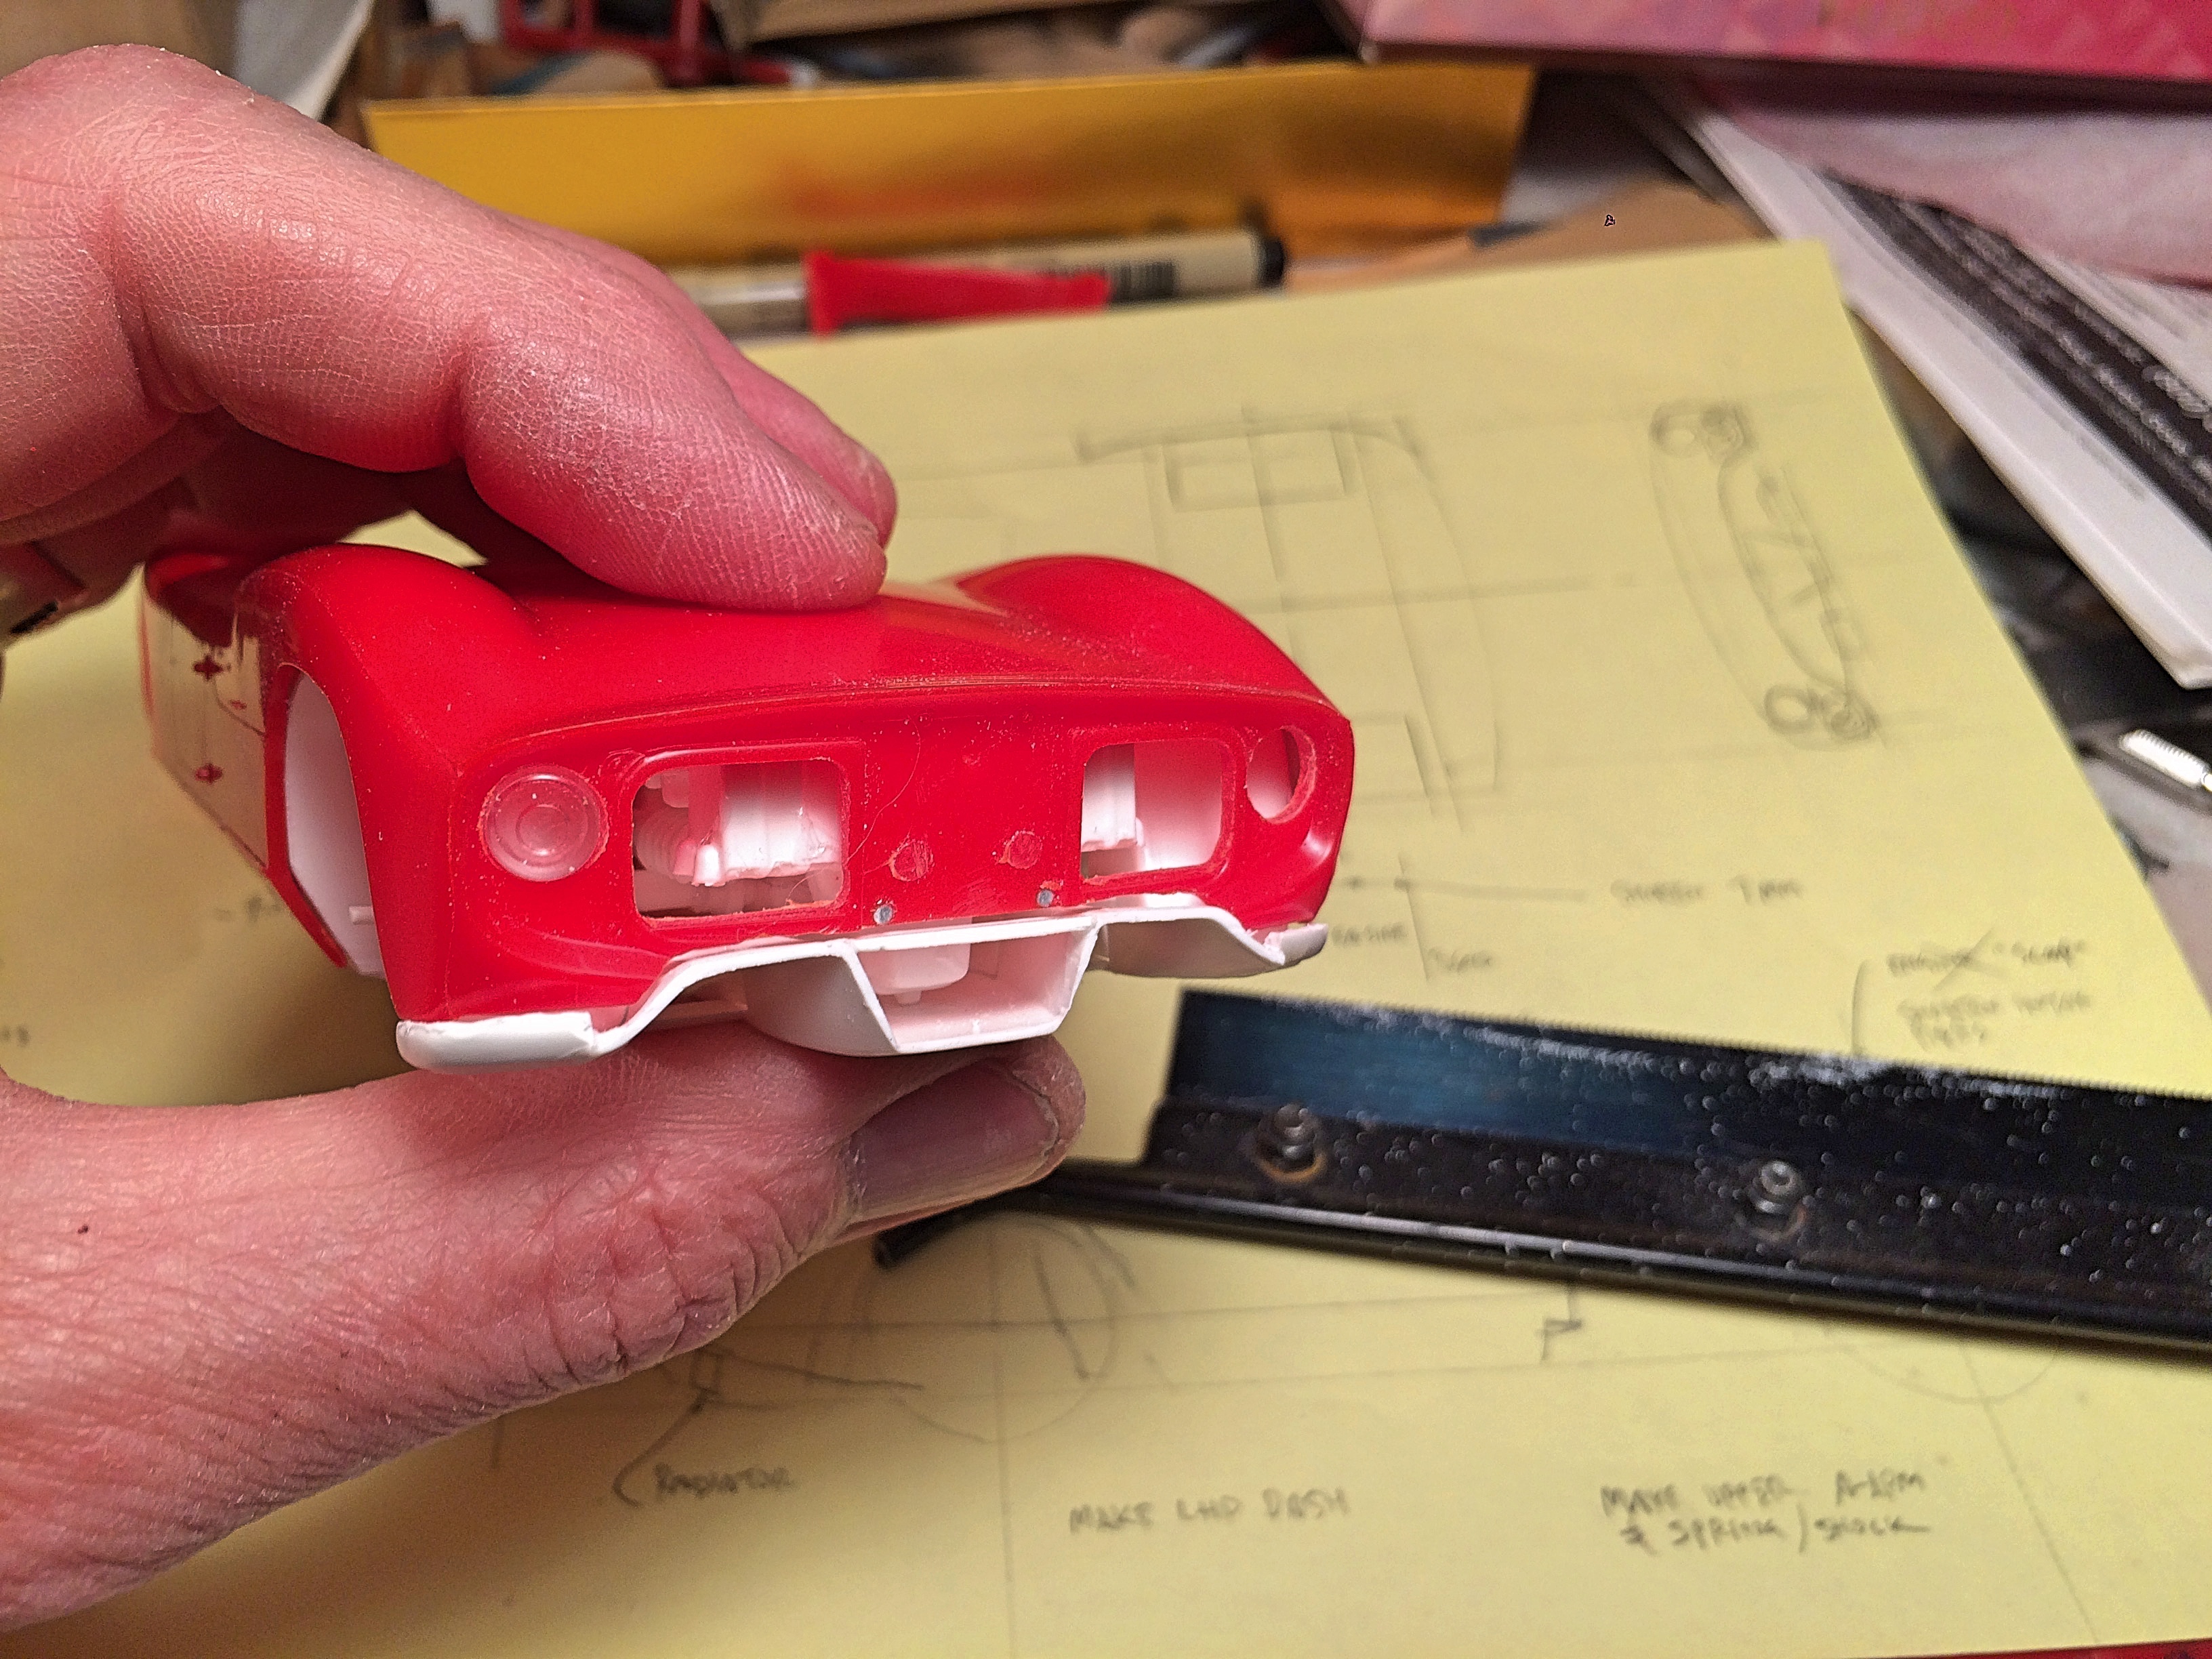
I'd been wanting to build a replica of an early Miata for a while, and I saw the original 1989 Miata showcar on the Mazda display at the New York auto show a couple of months back and took a bunch of pics to make a replica of the first of these cars that the world got to see. I used the Revell kit - from looking at pics online the Tamiya kit of the same model Miata looks a LOT better but is curbside, so I wanted to try one of these to get an idea of how it goes together and to see what I could learn about it for the next time I build one (or bash one from the Revell AND Tamiya kits). The kit goes together ok - you need to remove about 1/16th - 1/8th of an inch from the bottom of the windshield or it won't assemble properly, and I removed about a scale inch from the subframes to get it sitting more like the ride height of a stock Miata too. Even so, it looks a touch high, but then unlowered Miatas often do. The bumpers don't fit on there well...actually, they fit GREAT, they snap right into place but the gaps between them and the body are a little big for my liking, the rear lights would be better off being replaced with some vacuum formed ones in clear plastic (so you can paint them how Mazda intended a little easier) or the Tamiya ones would probably fit pretty well too. My kit also had a BUNCH of short-shotted parts - I had to make some engine parts from scratch, both of the windshield wipers were completely useless (so they're not on there, but that's not too obvious at least with the hood open, which is how I planned to display it anyway) and next time I do one I'd like to sand off those oversized doorhandles and get some more in-scale ones 3d printed. That said, this was a fun build, and I miss my 1:1 Miatas, so it was cool to get to put one on my shelf! I used Createx bright red paint for the body, replaced the Revell gauge decals with a photo-reduced copy from a real Miata, added some missing plumbing and wiring to the engine bay and used a couple of little photo etched pieces where a part was missing or looked a little clunky. I'll definitely be building another, even with the various shortcomings that I didn't enjoy with this kit, and it makes me want to go blast around some winding roads on a warm day with the roof down! Thanks for looking!
-
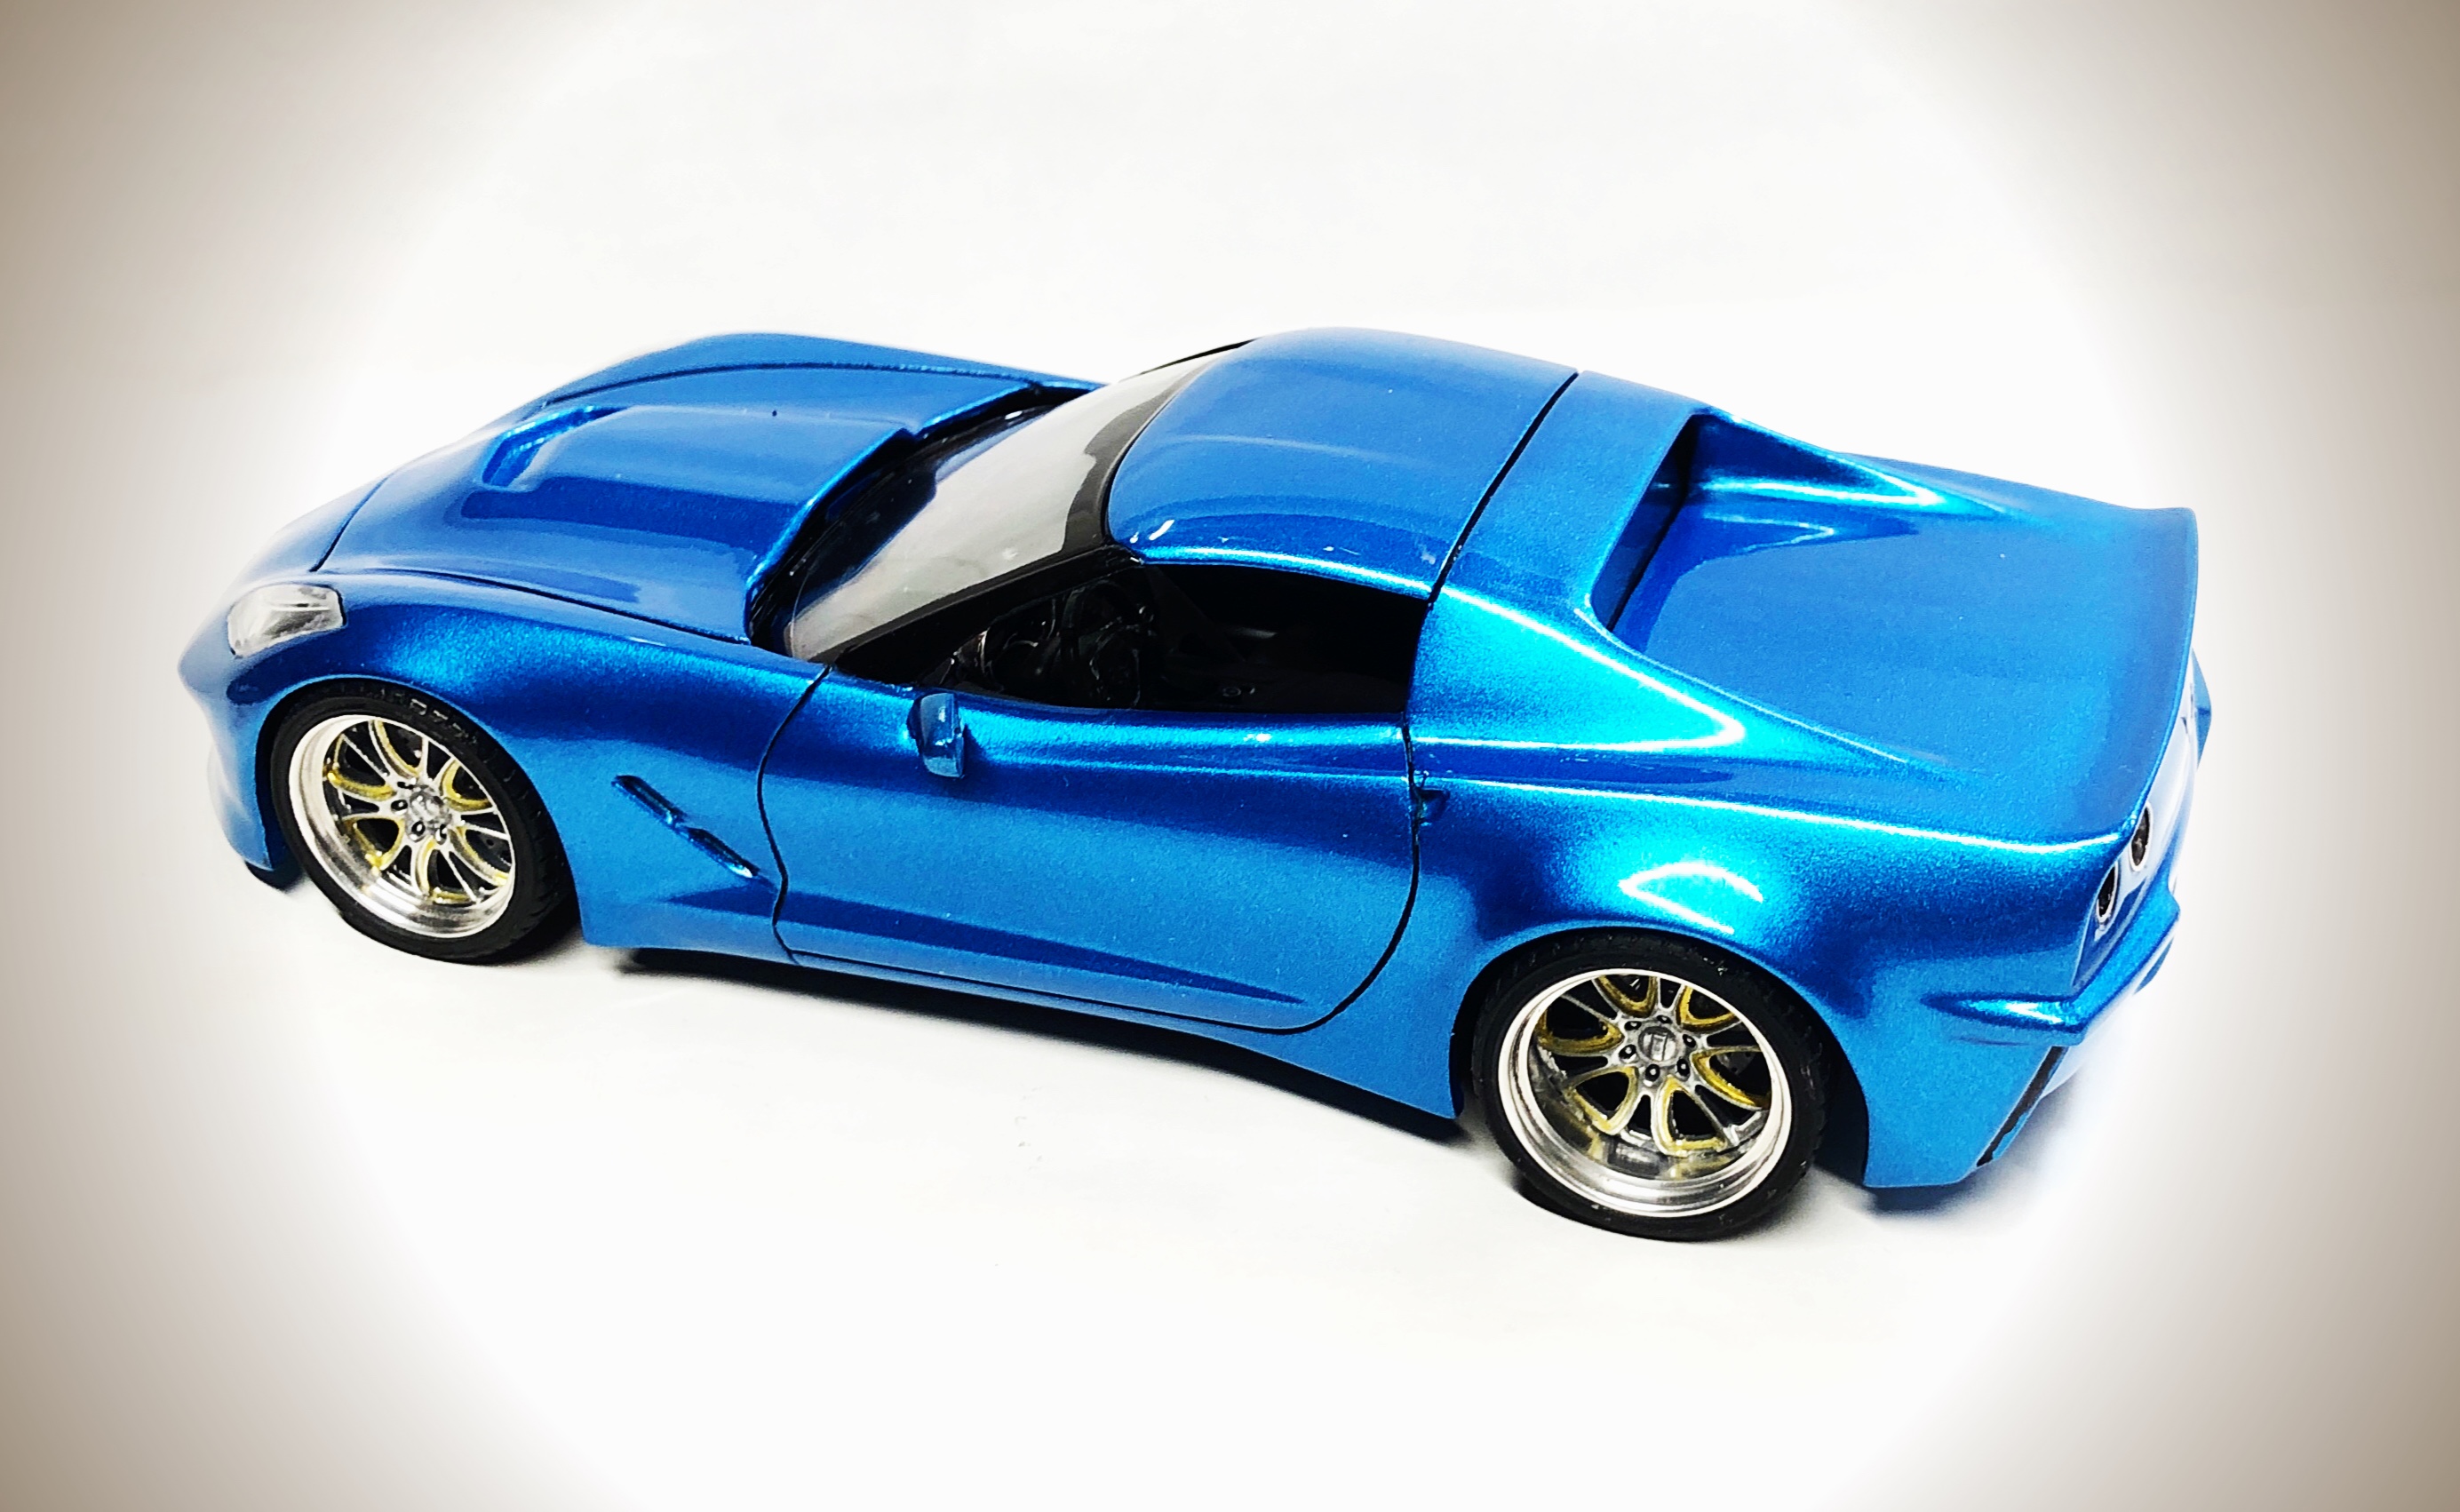
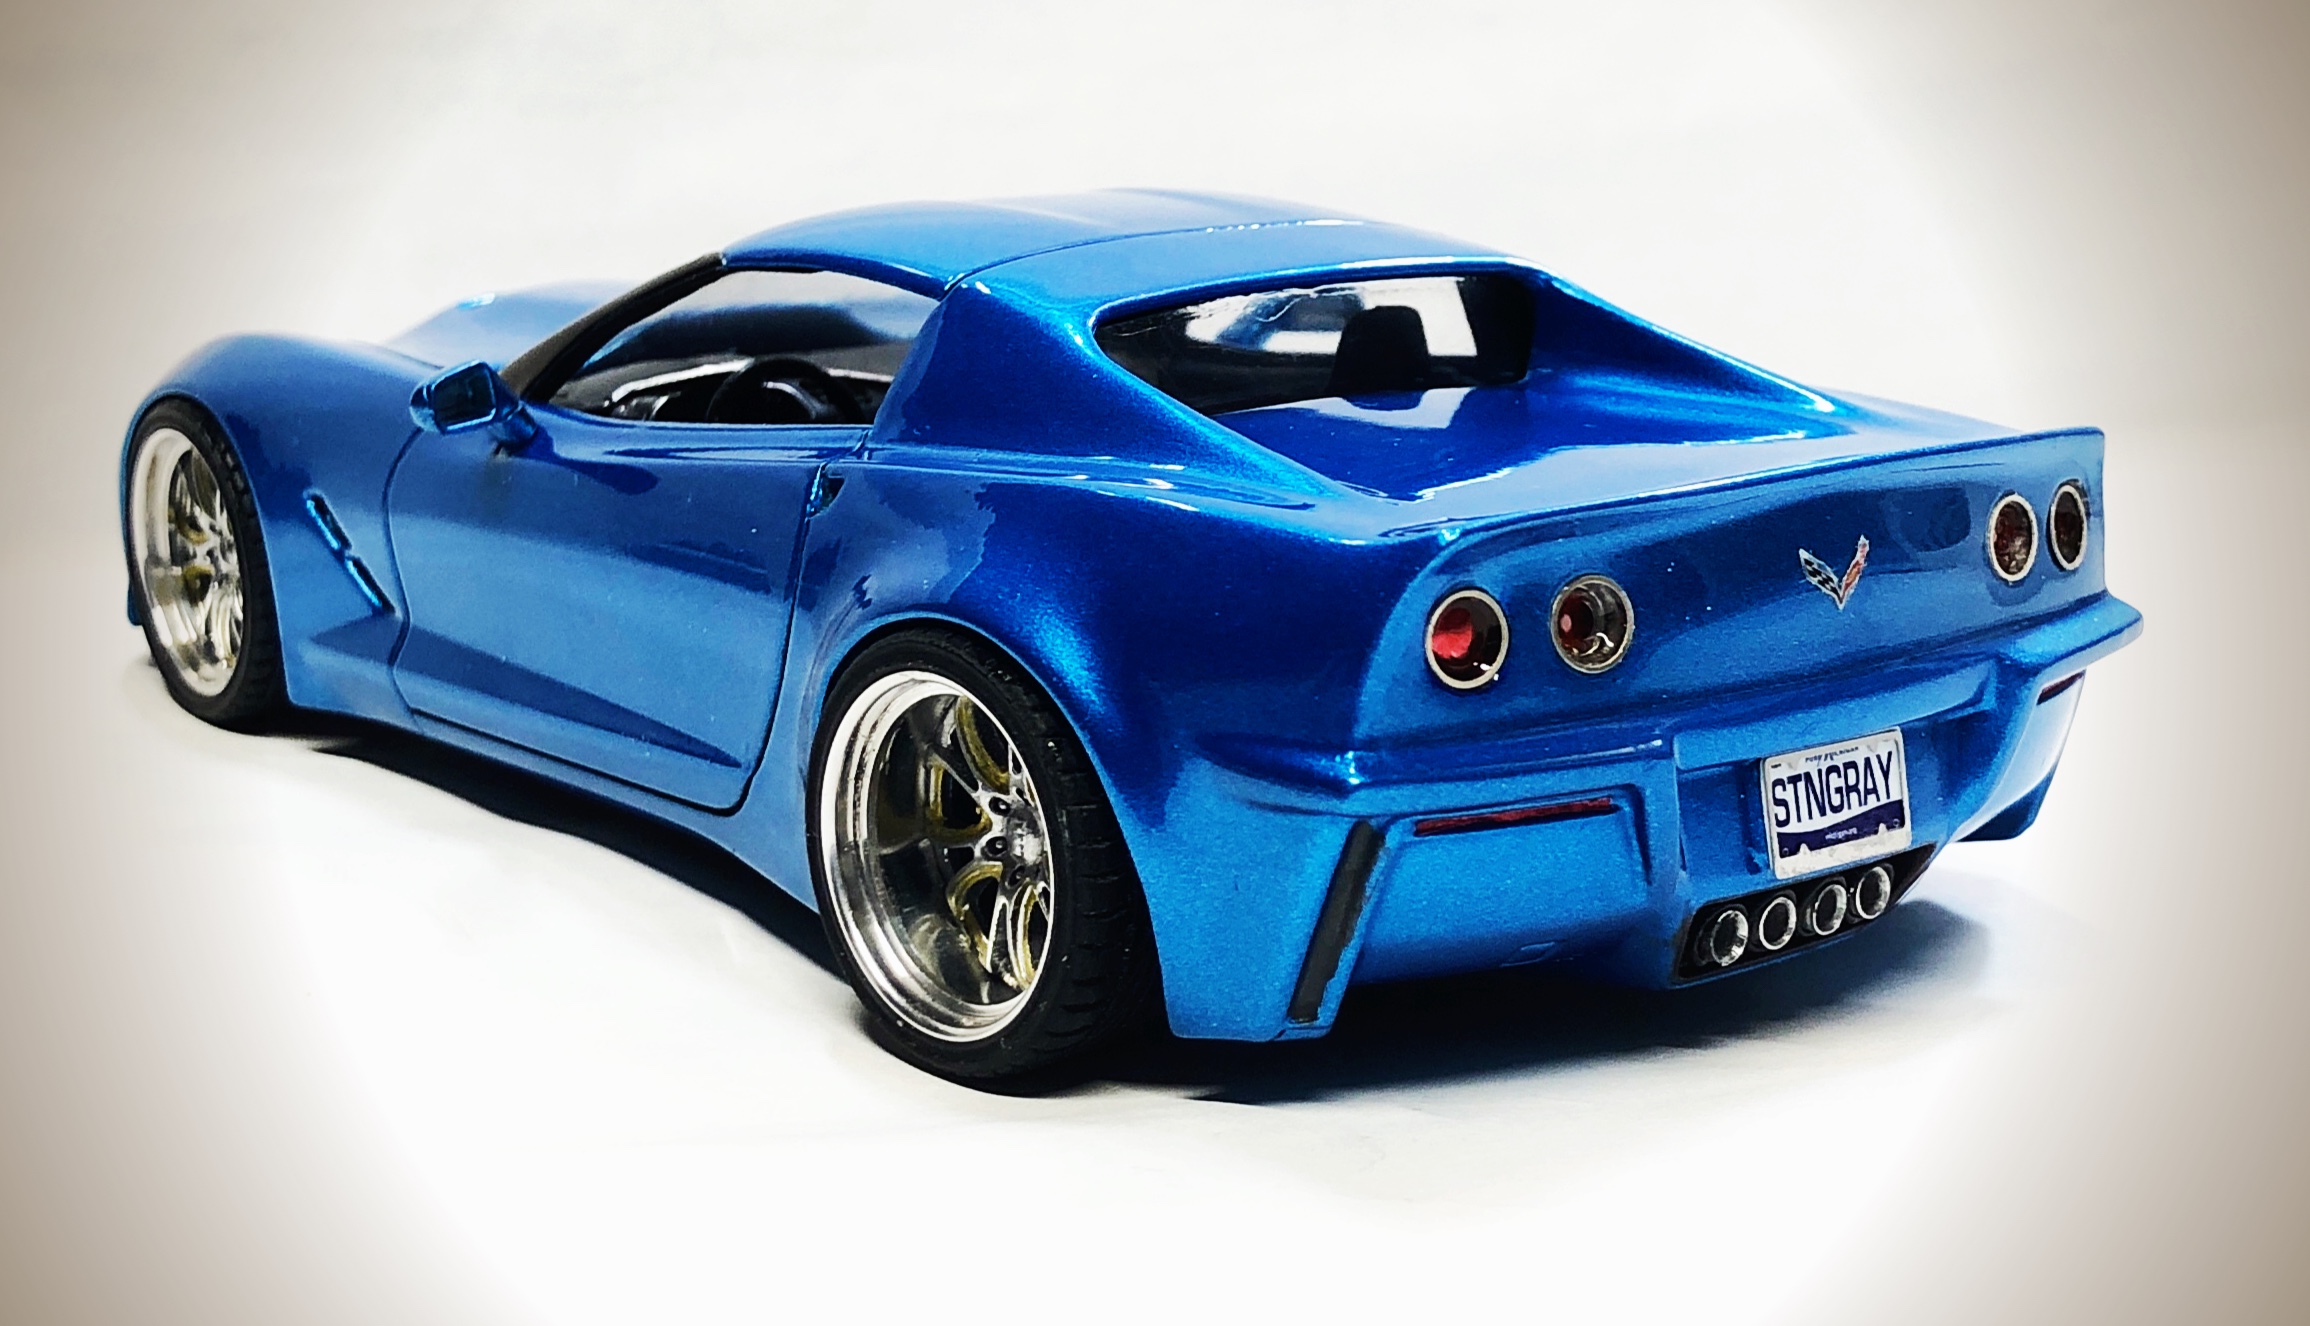
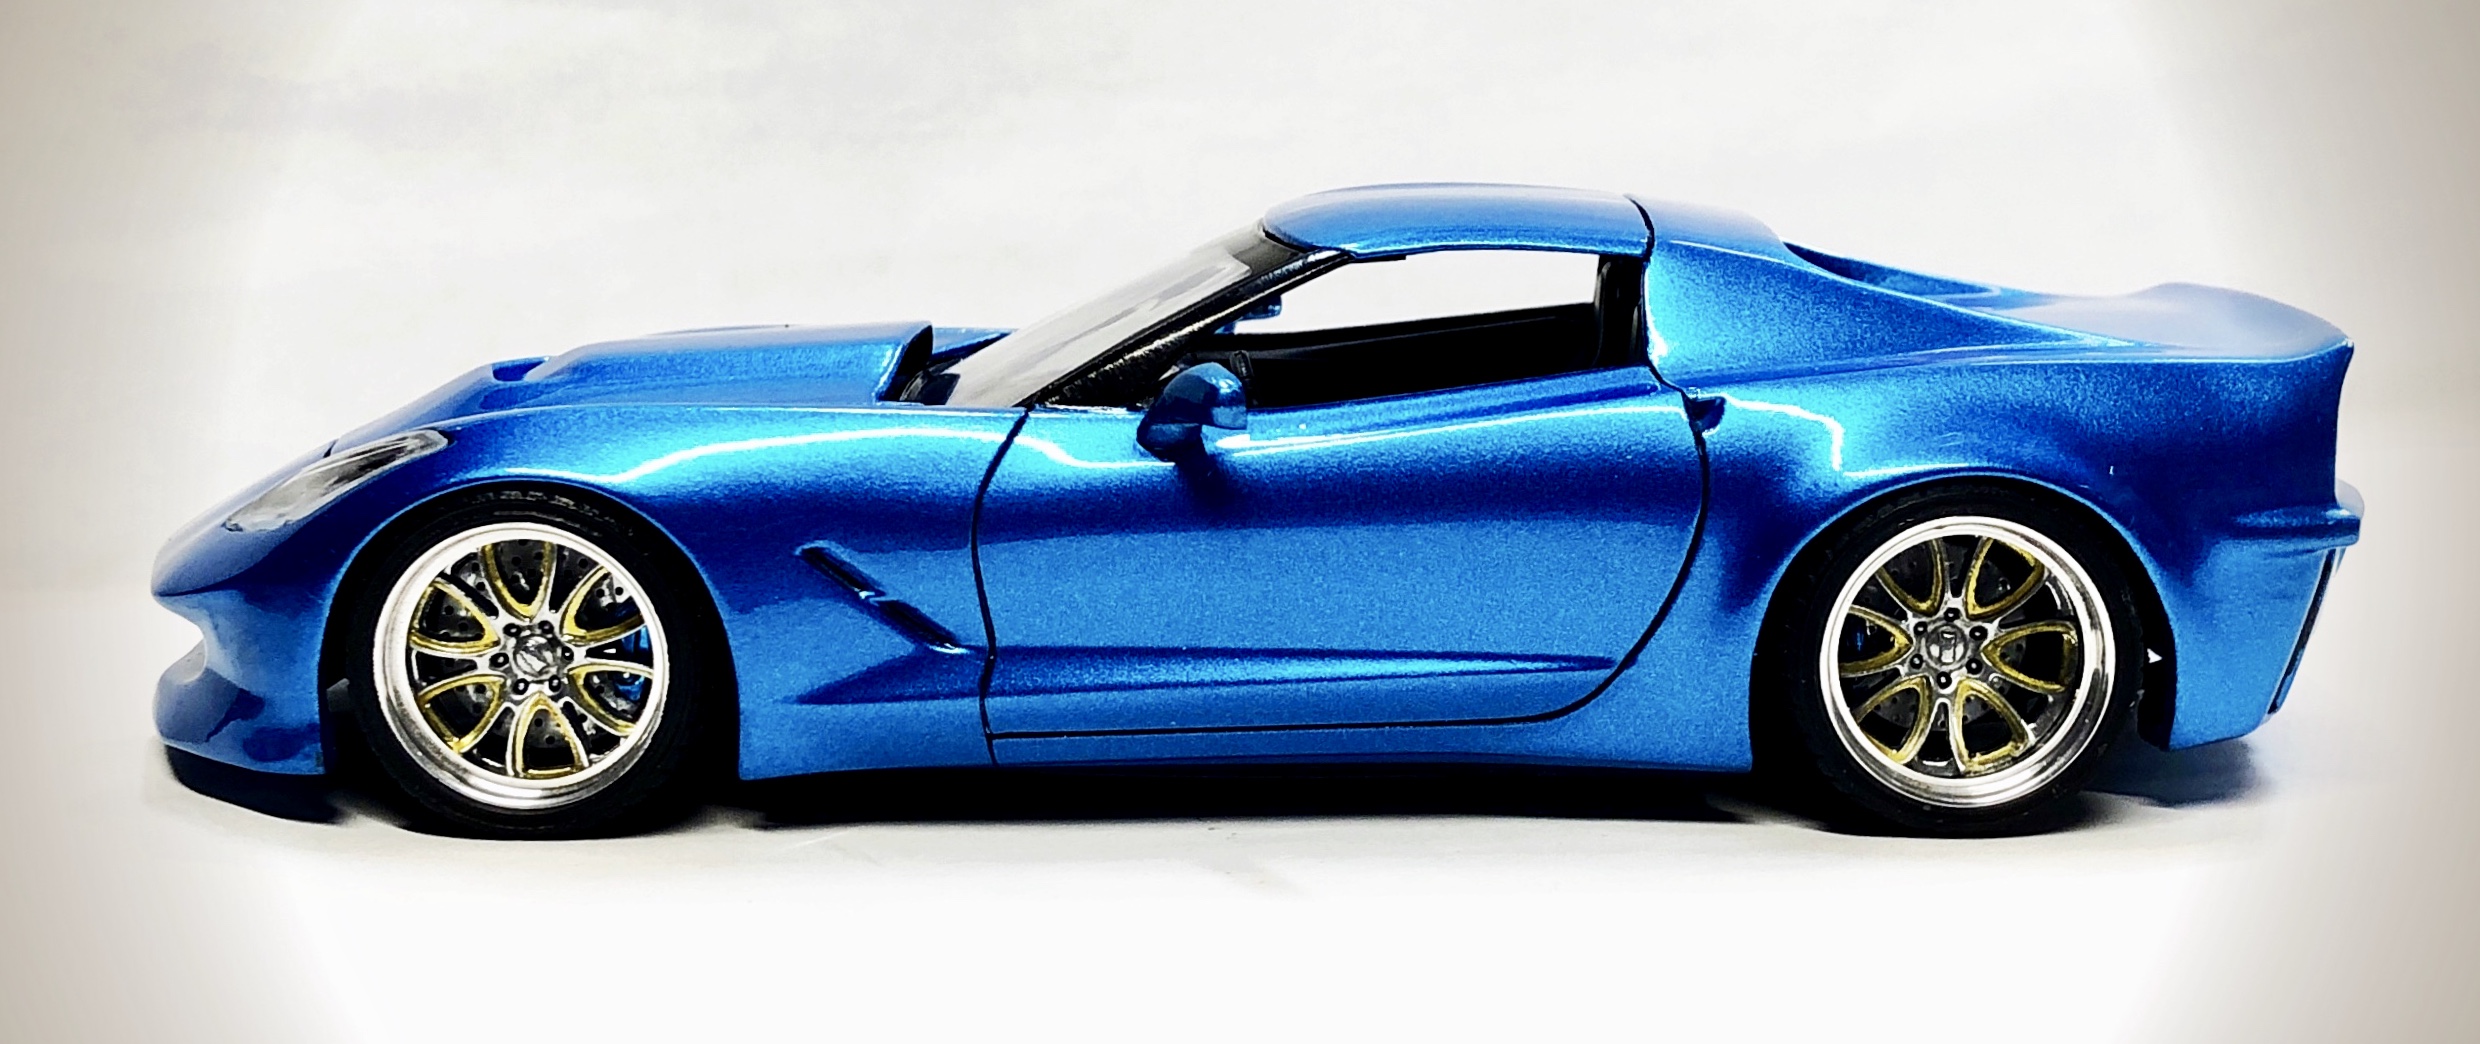
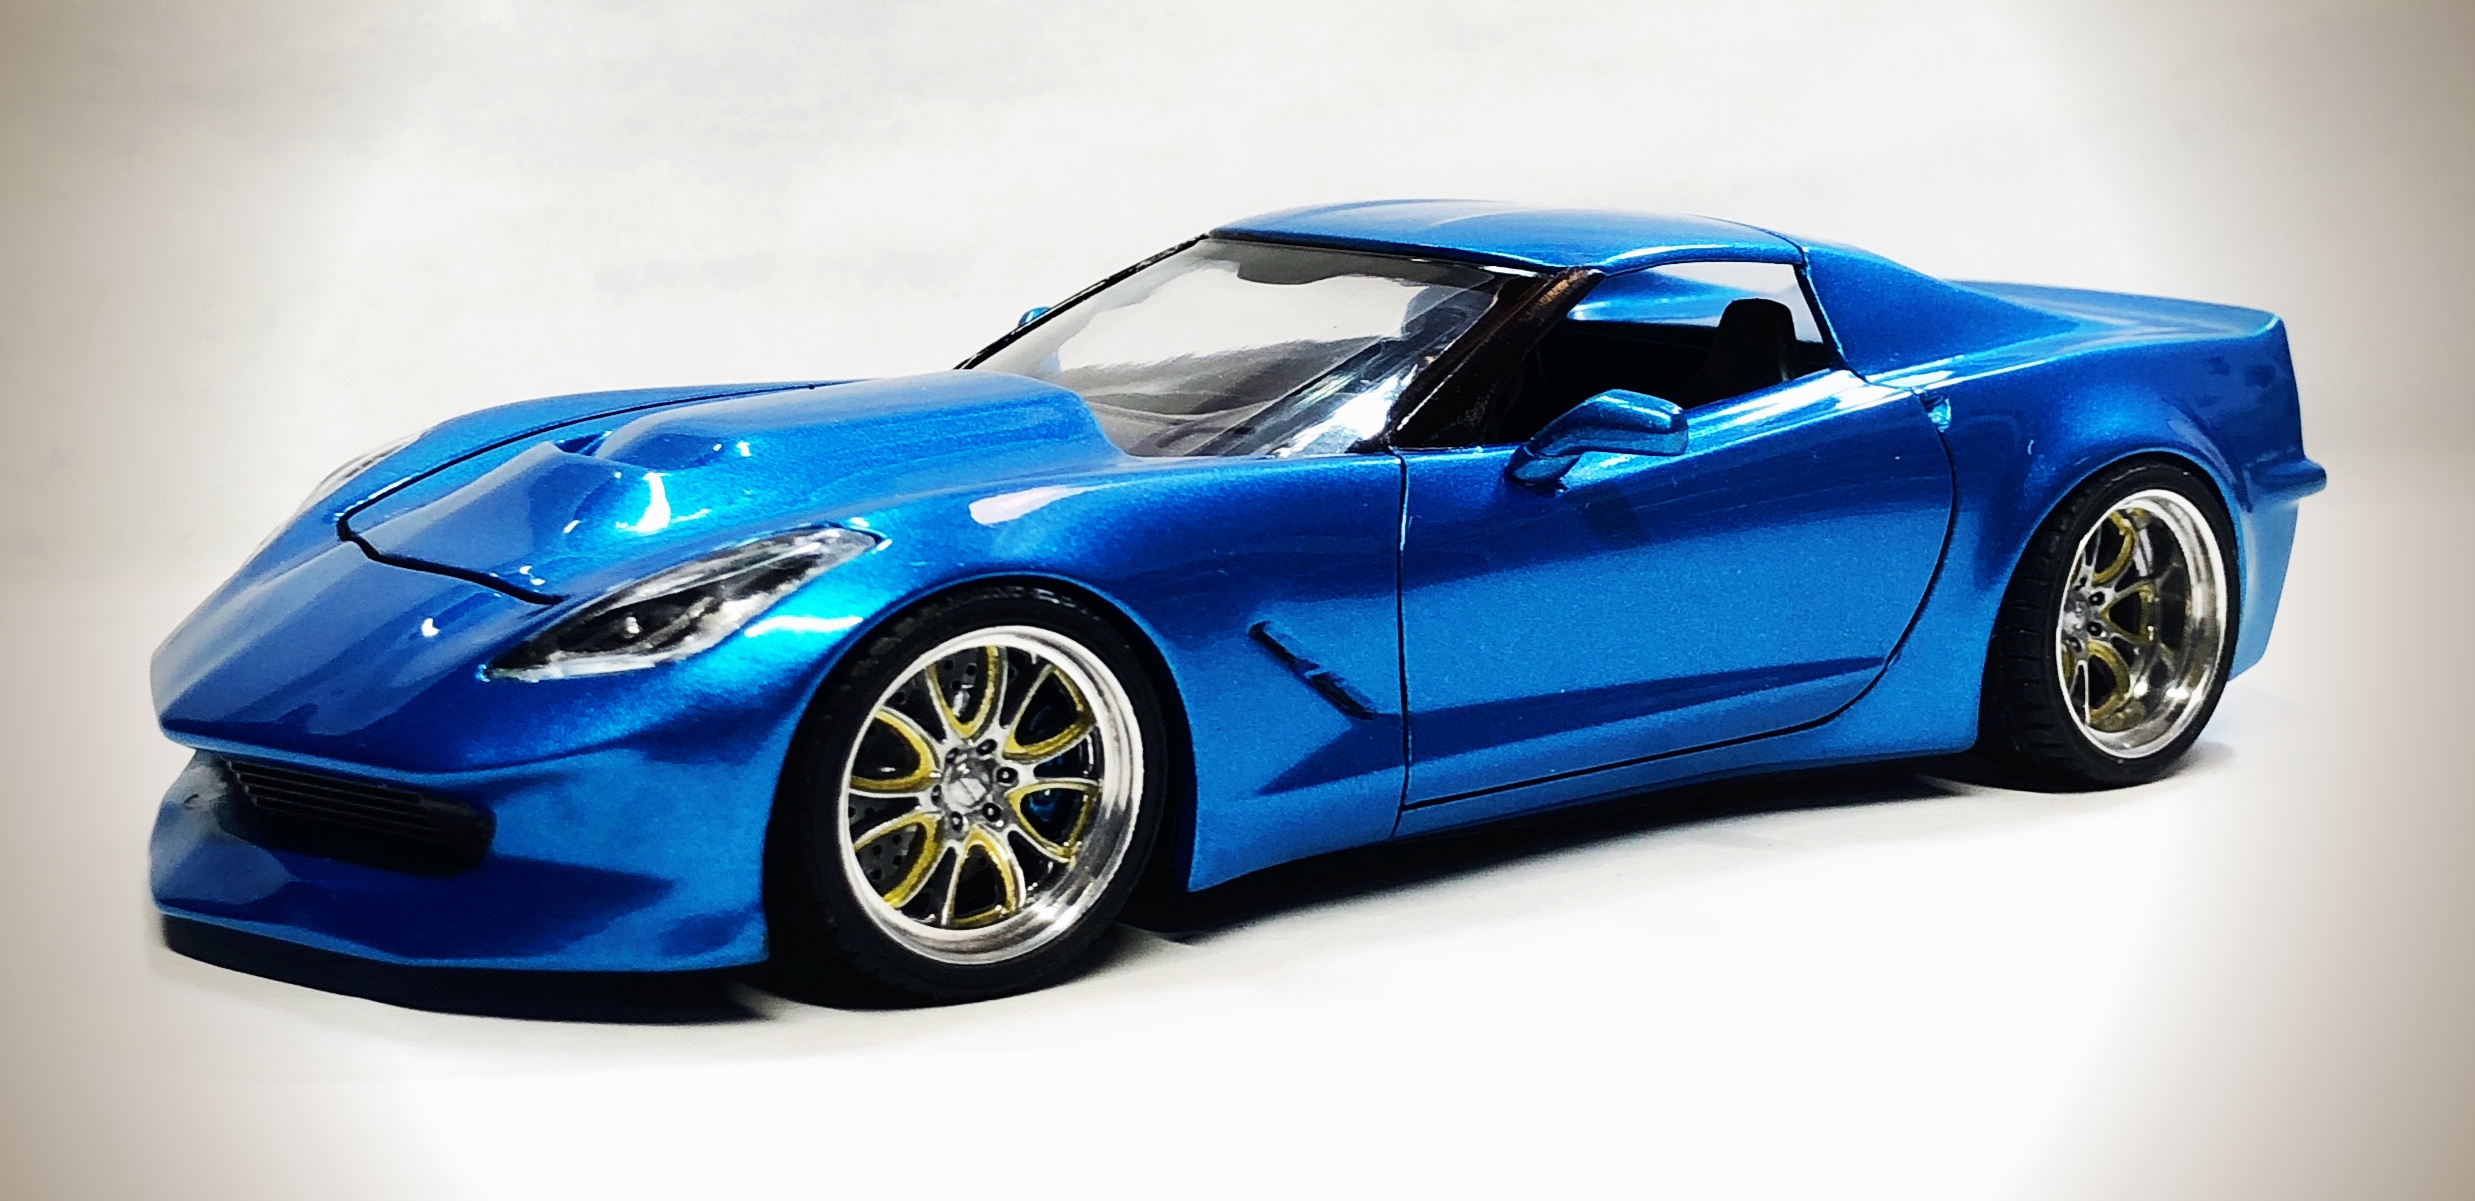
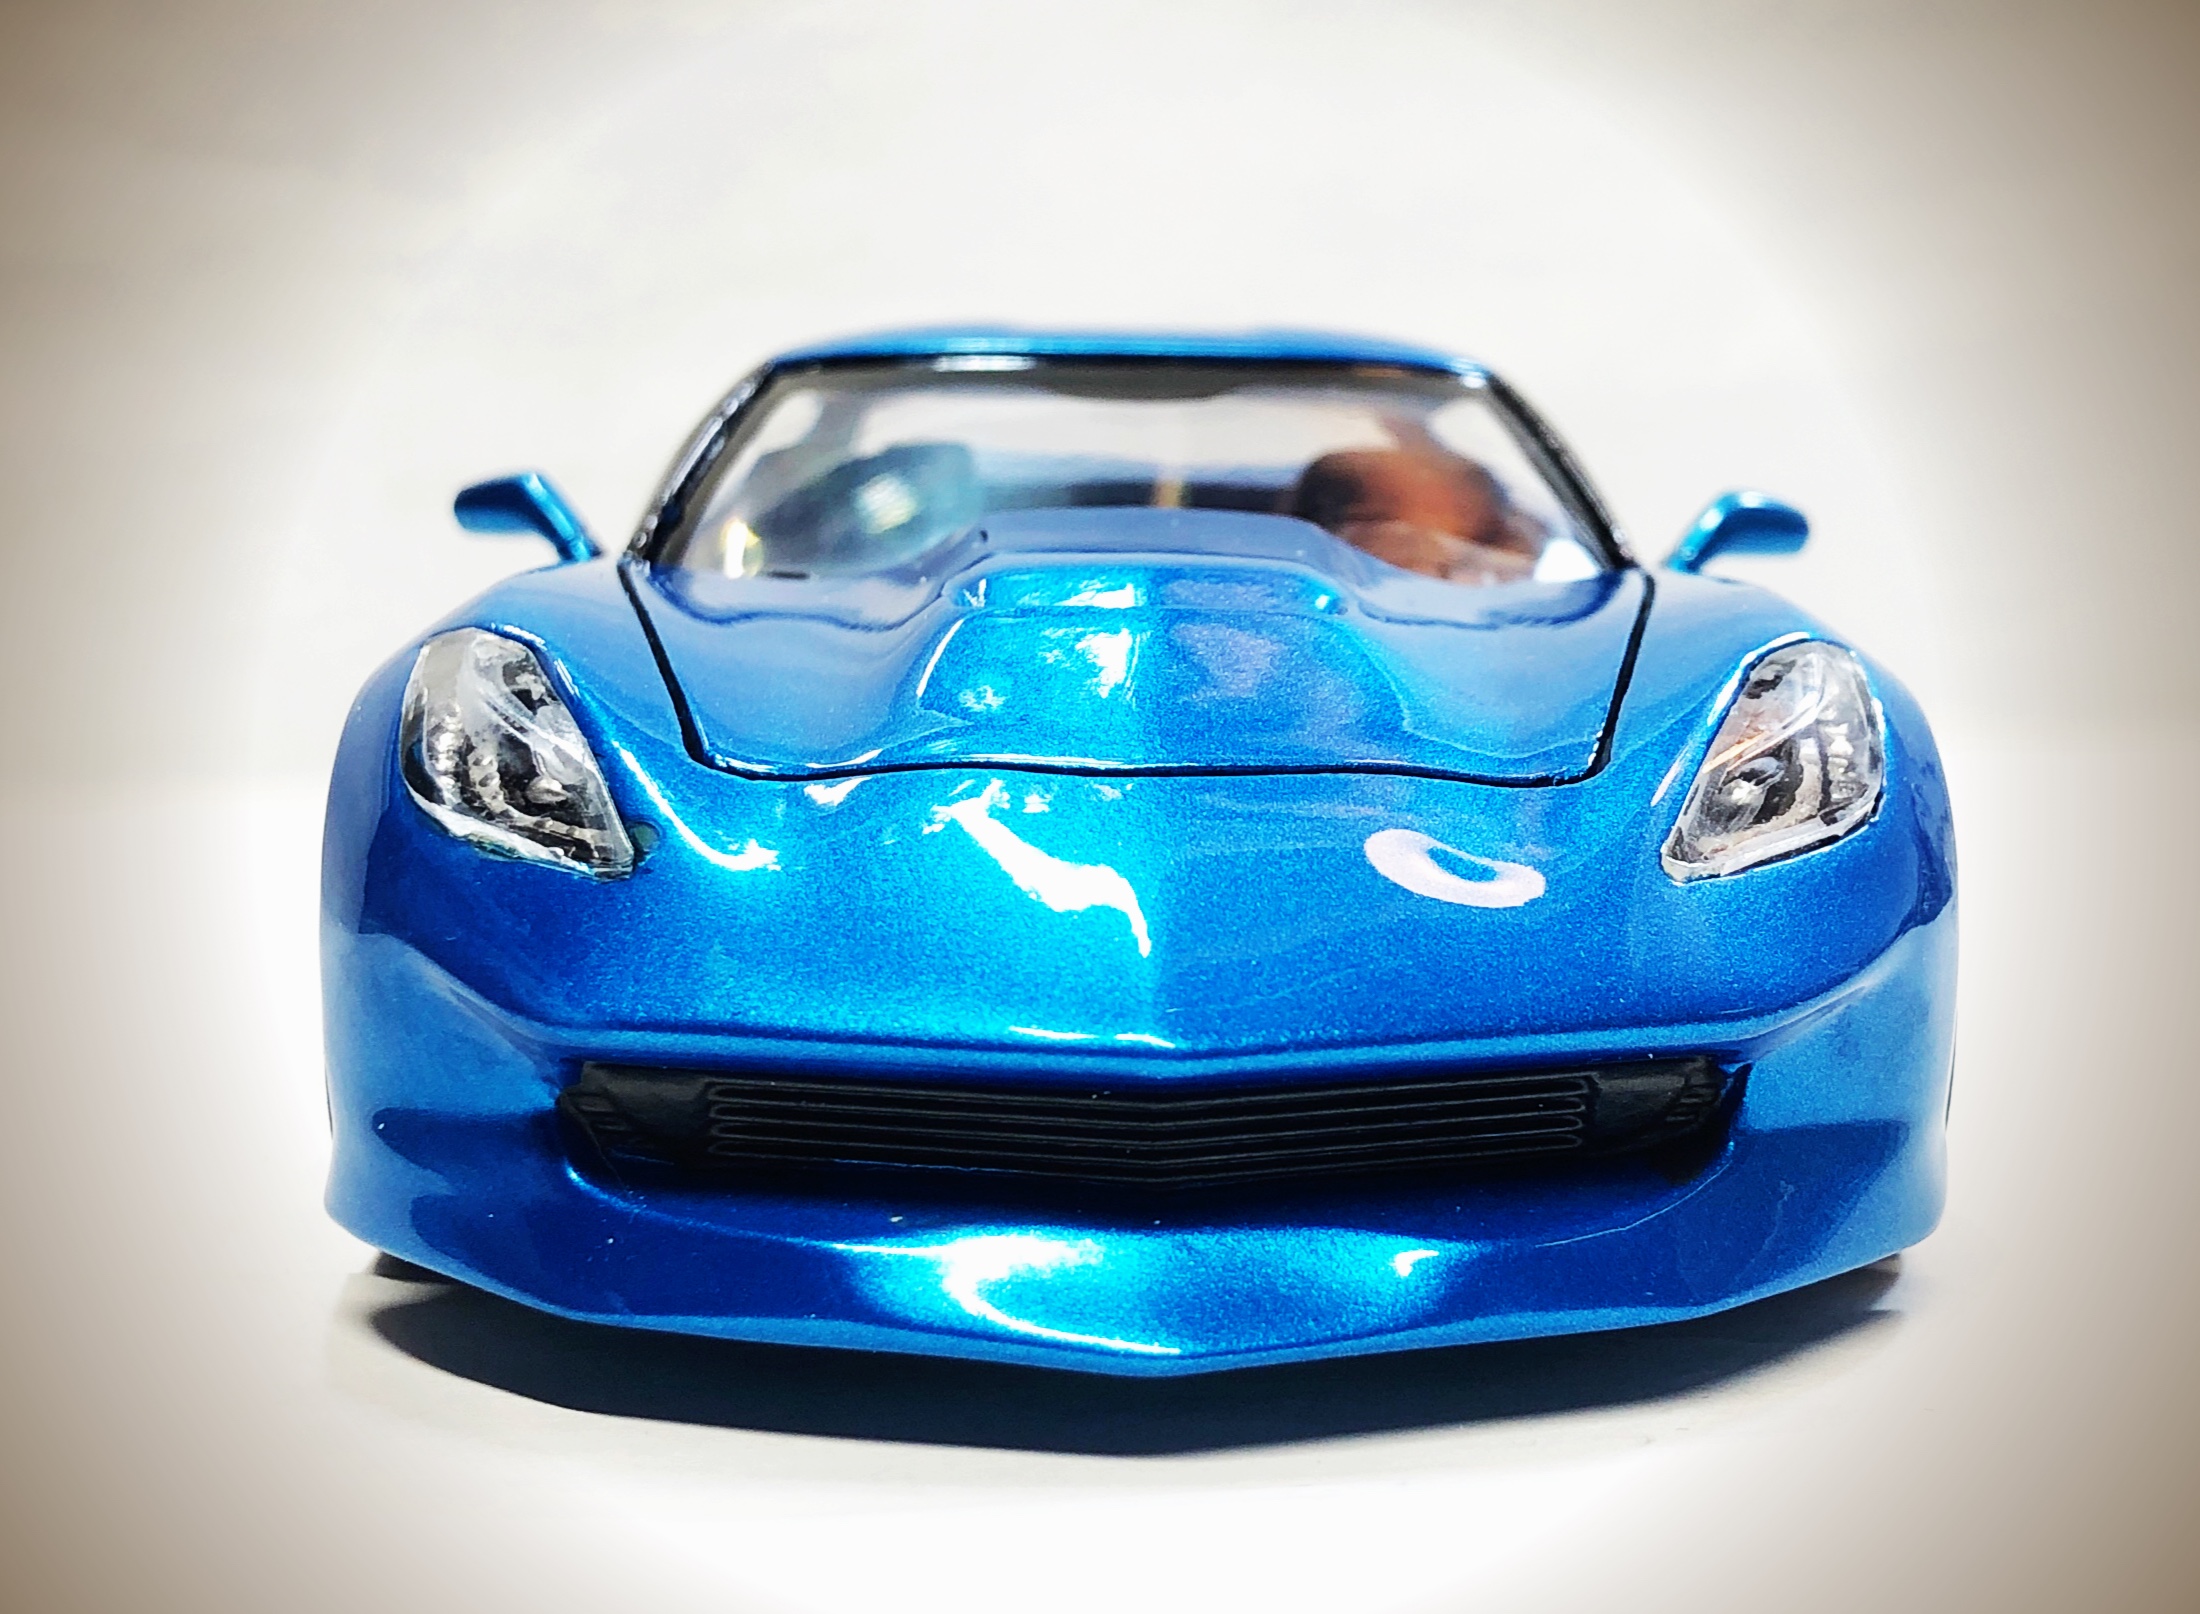
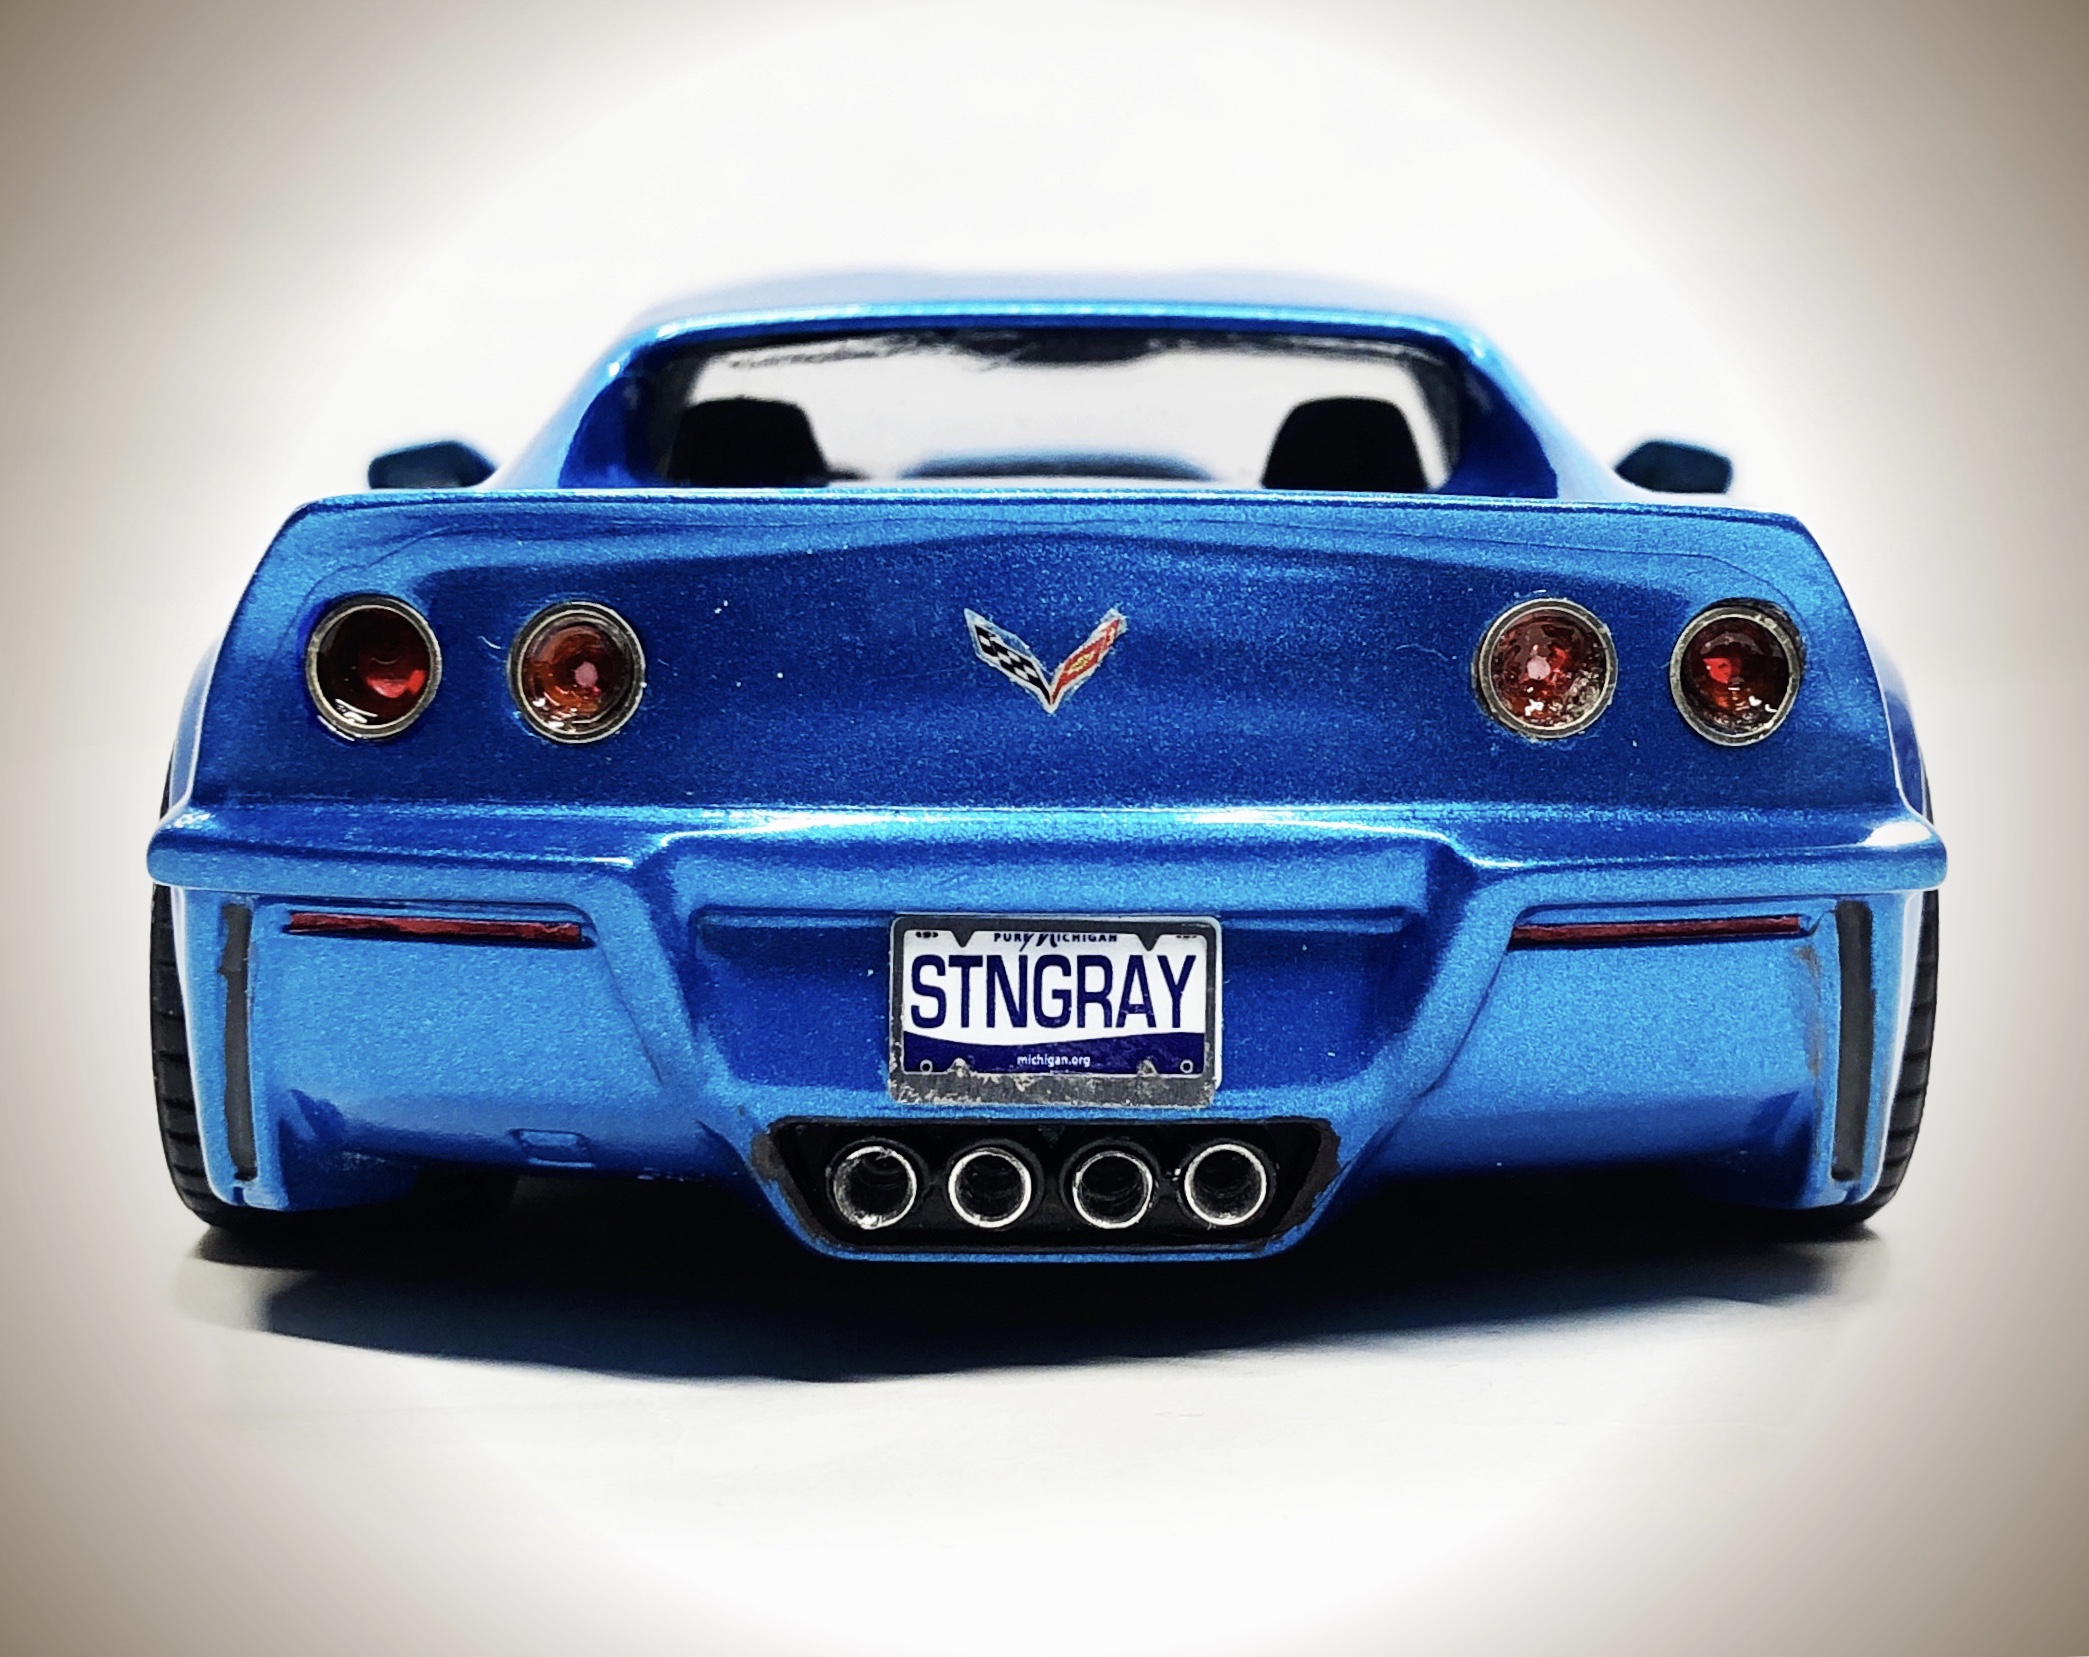
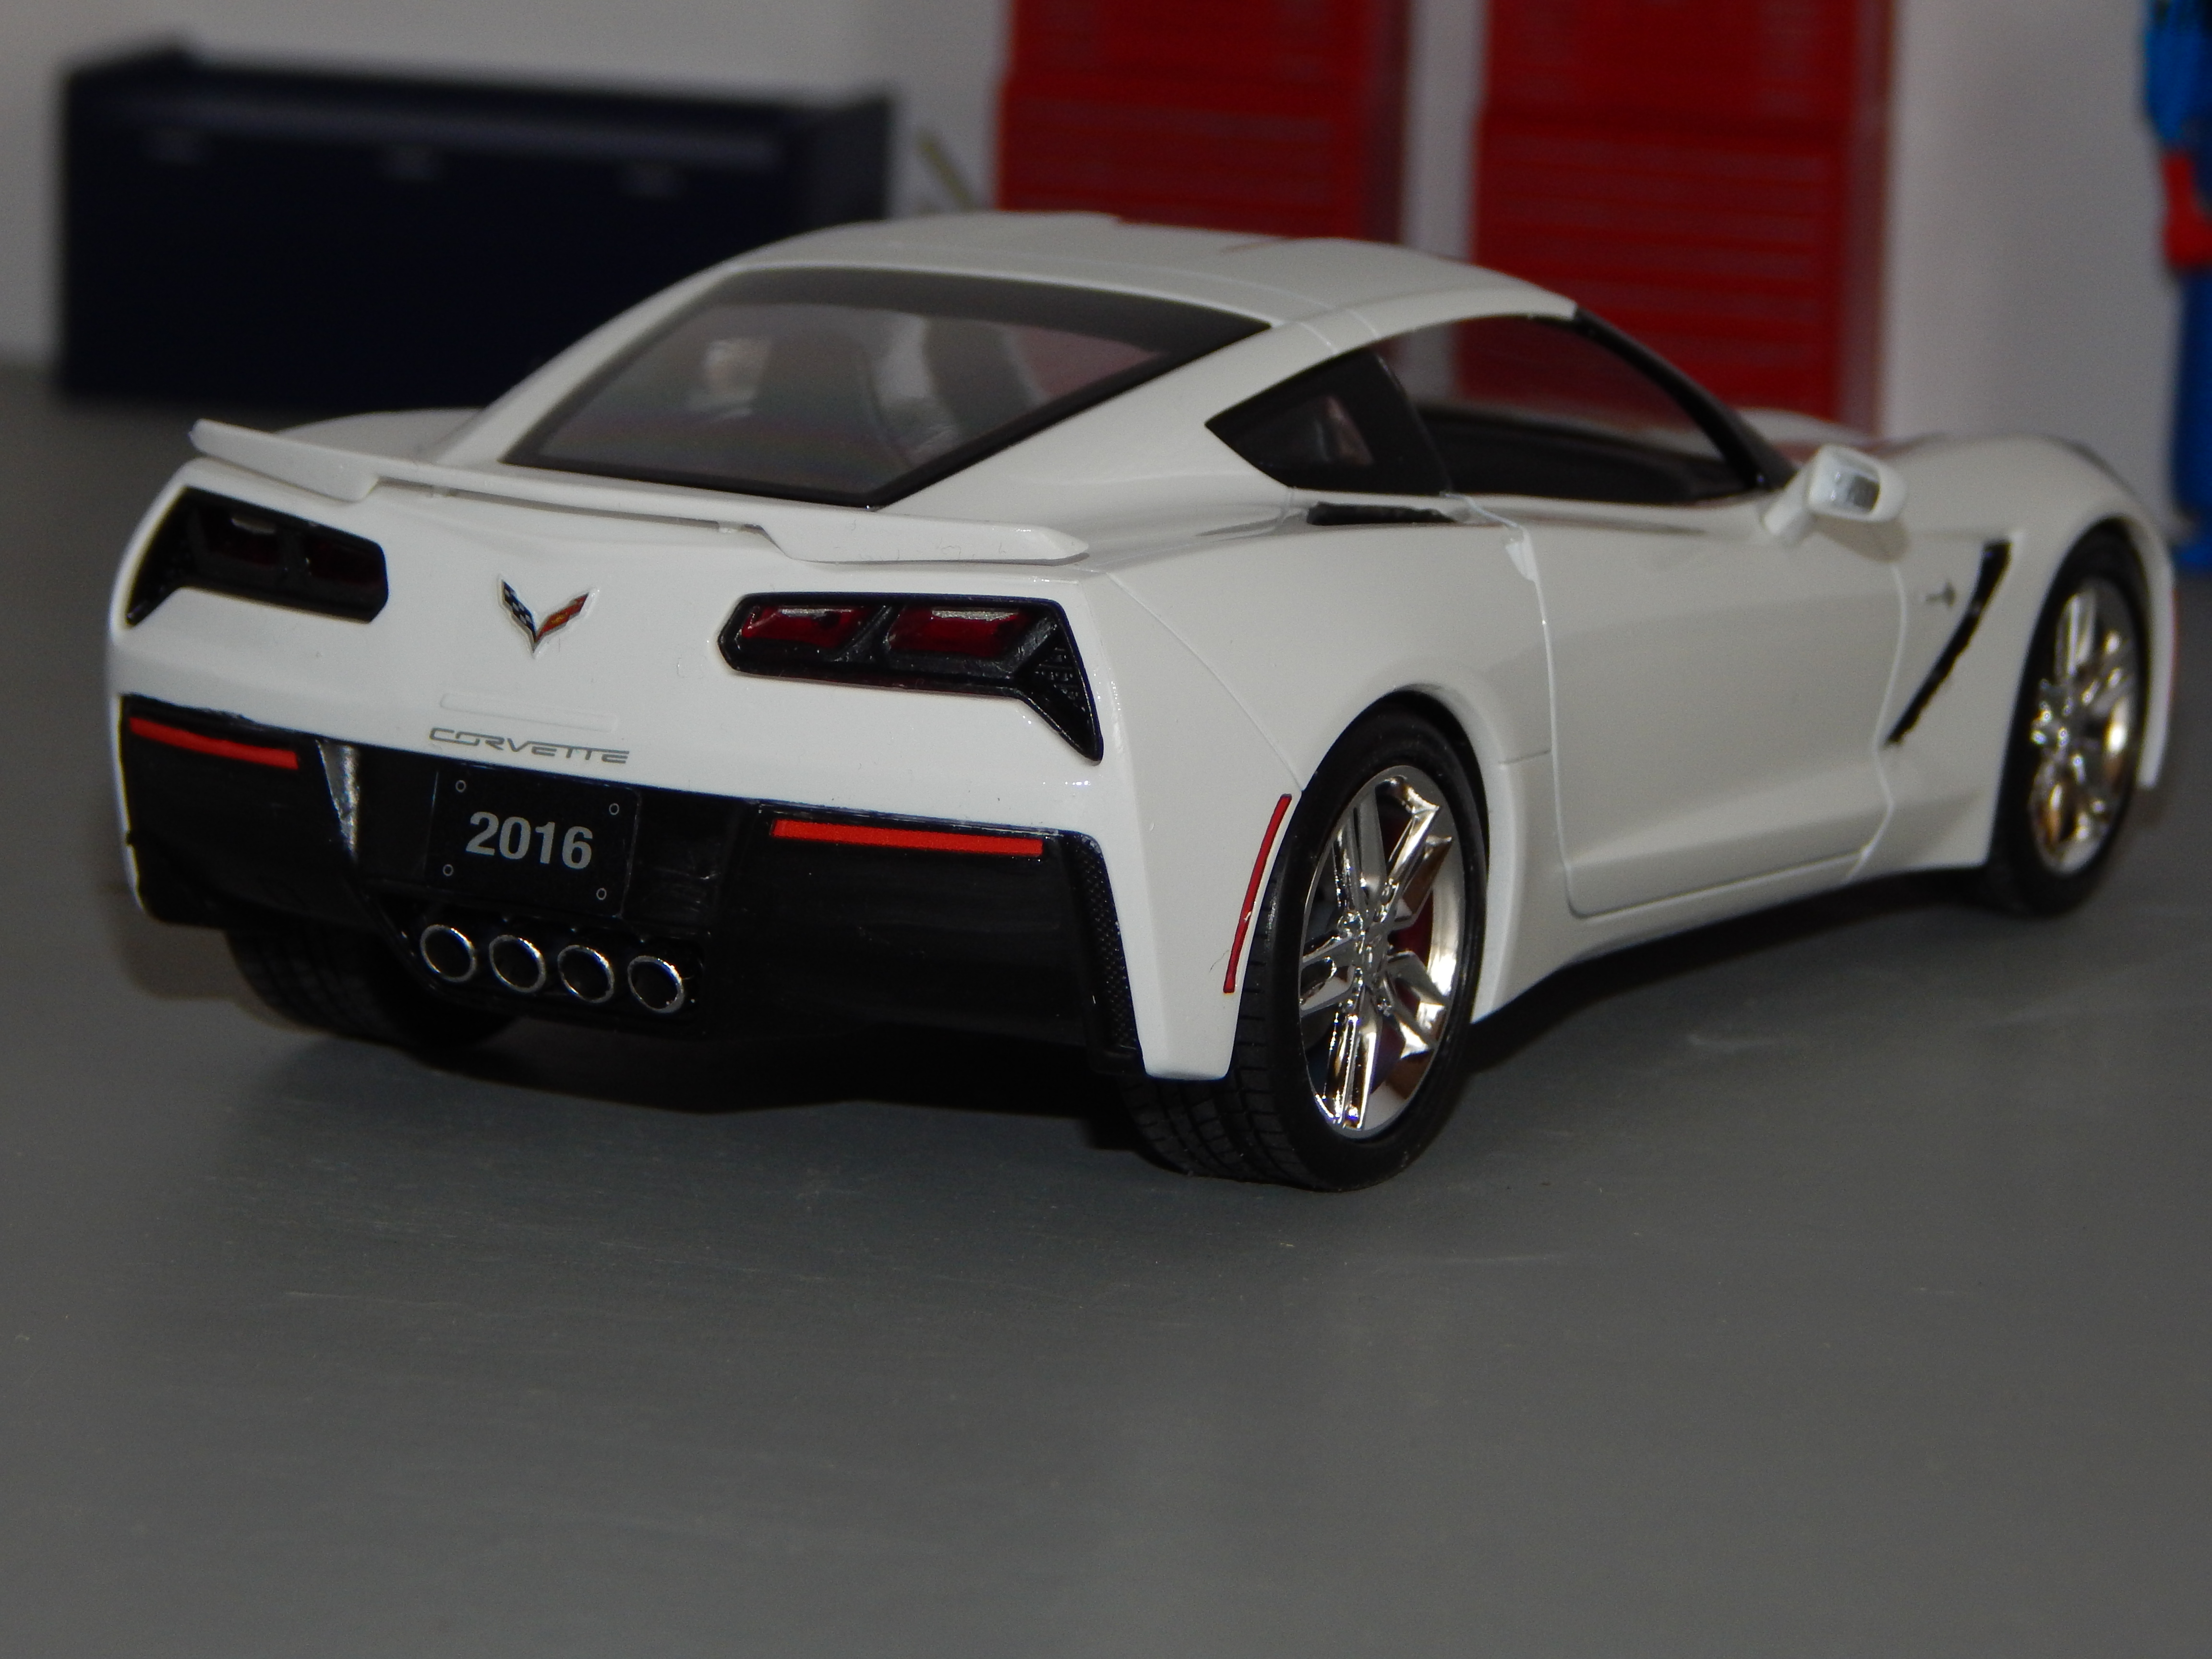
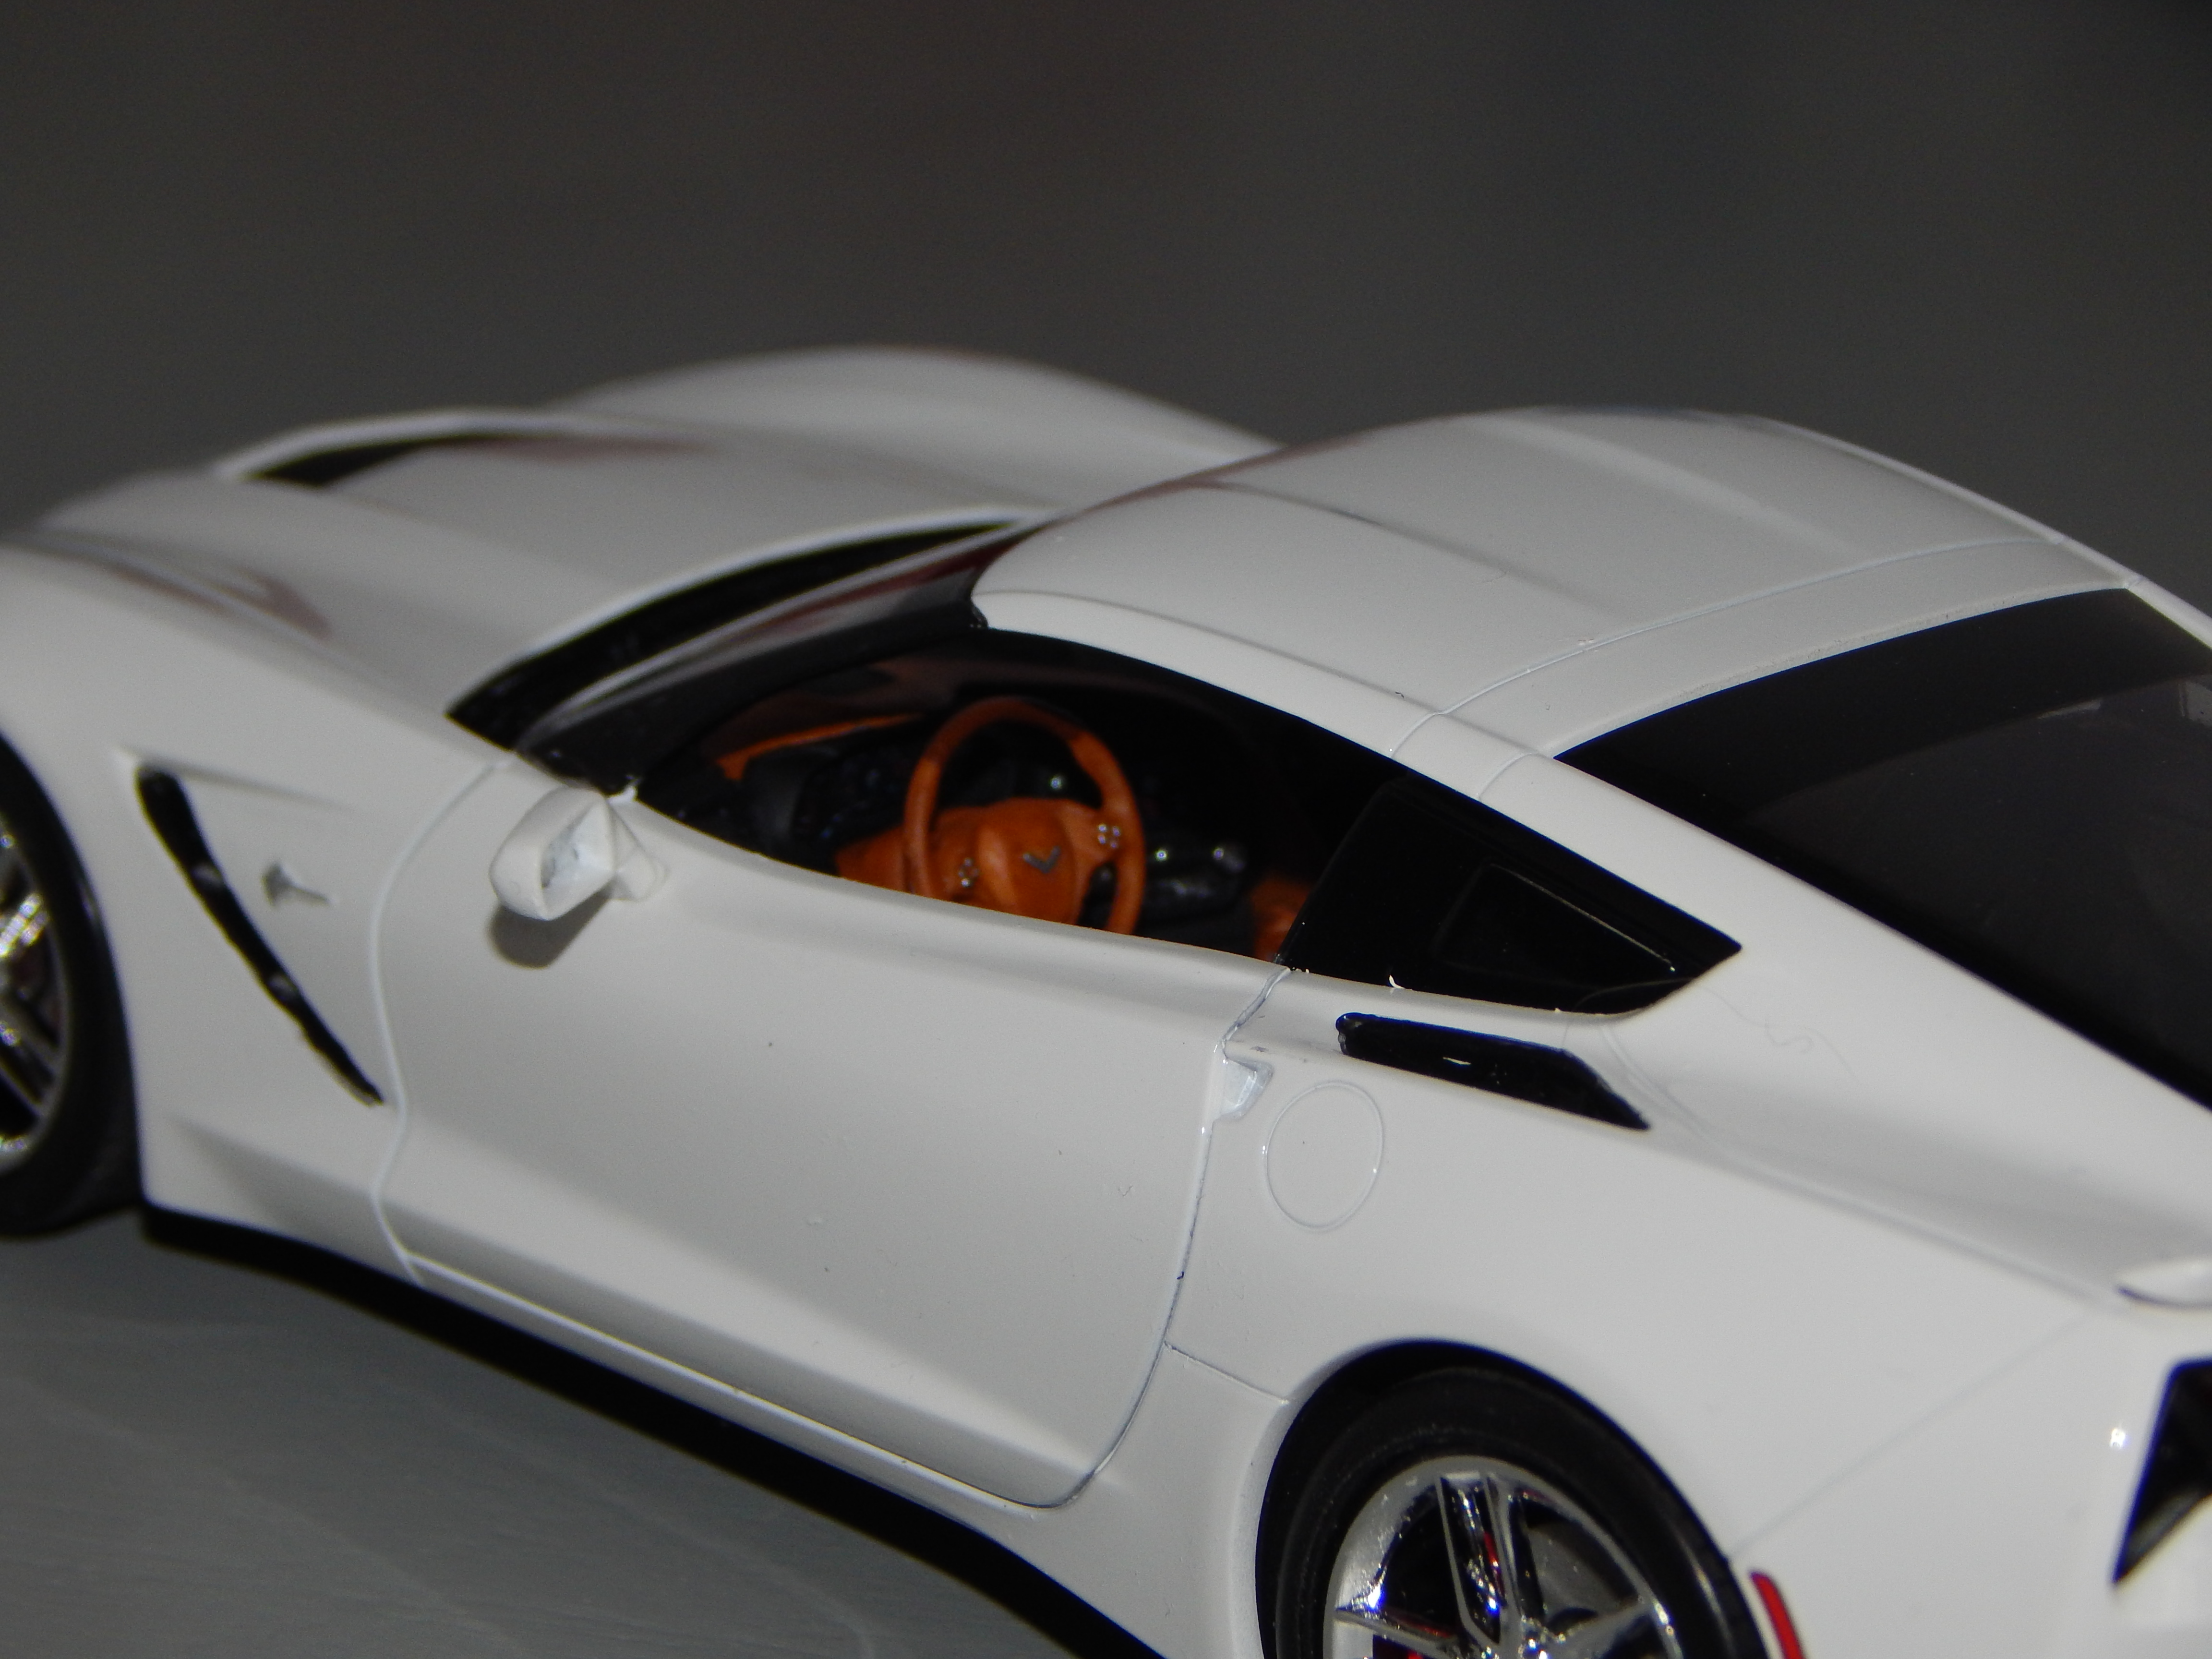
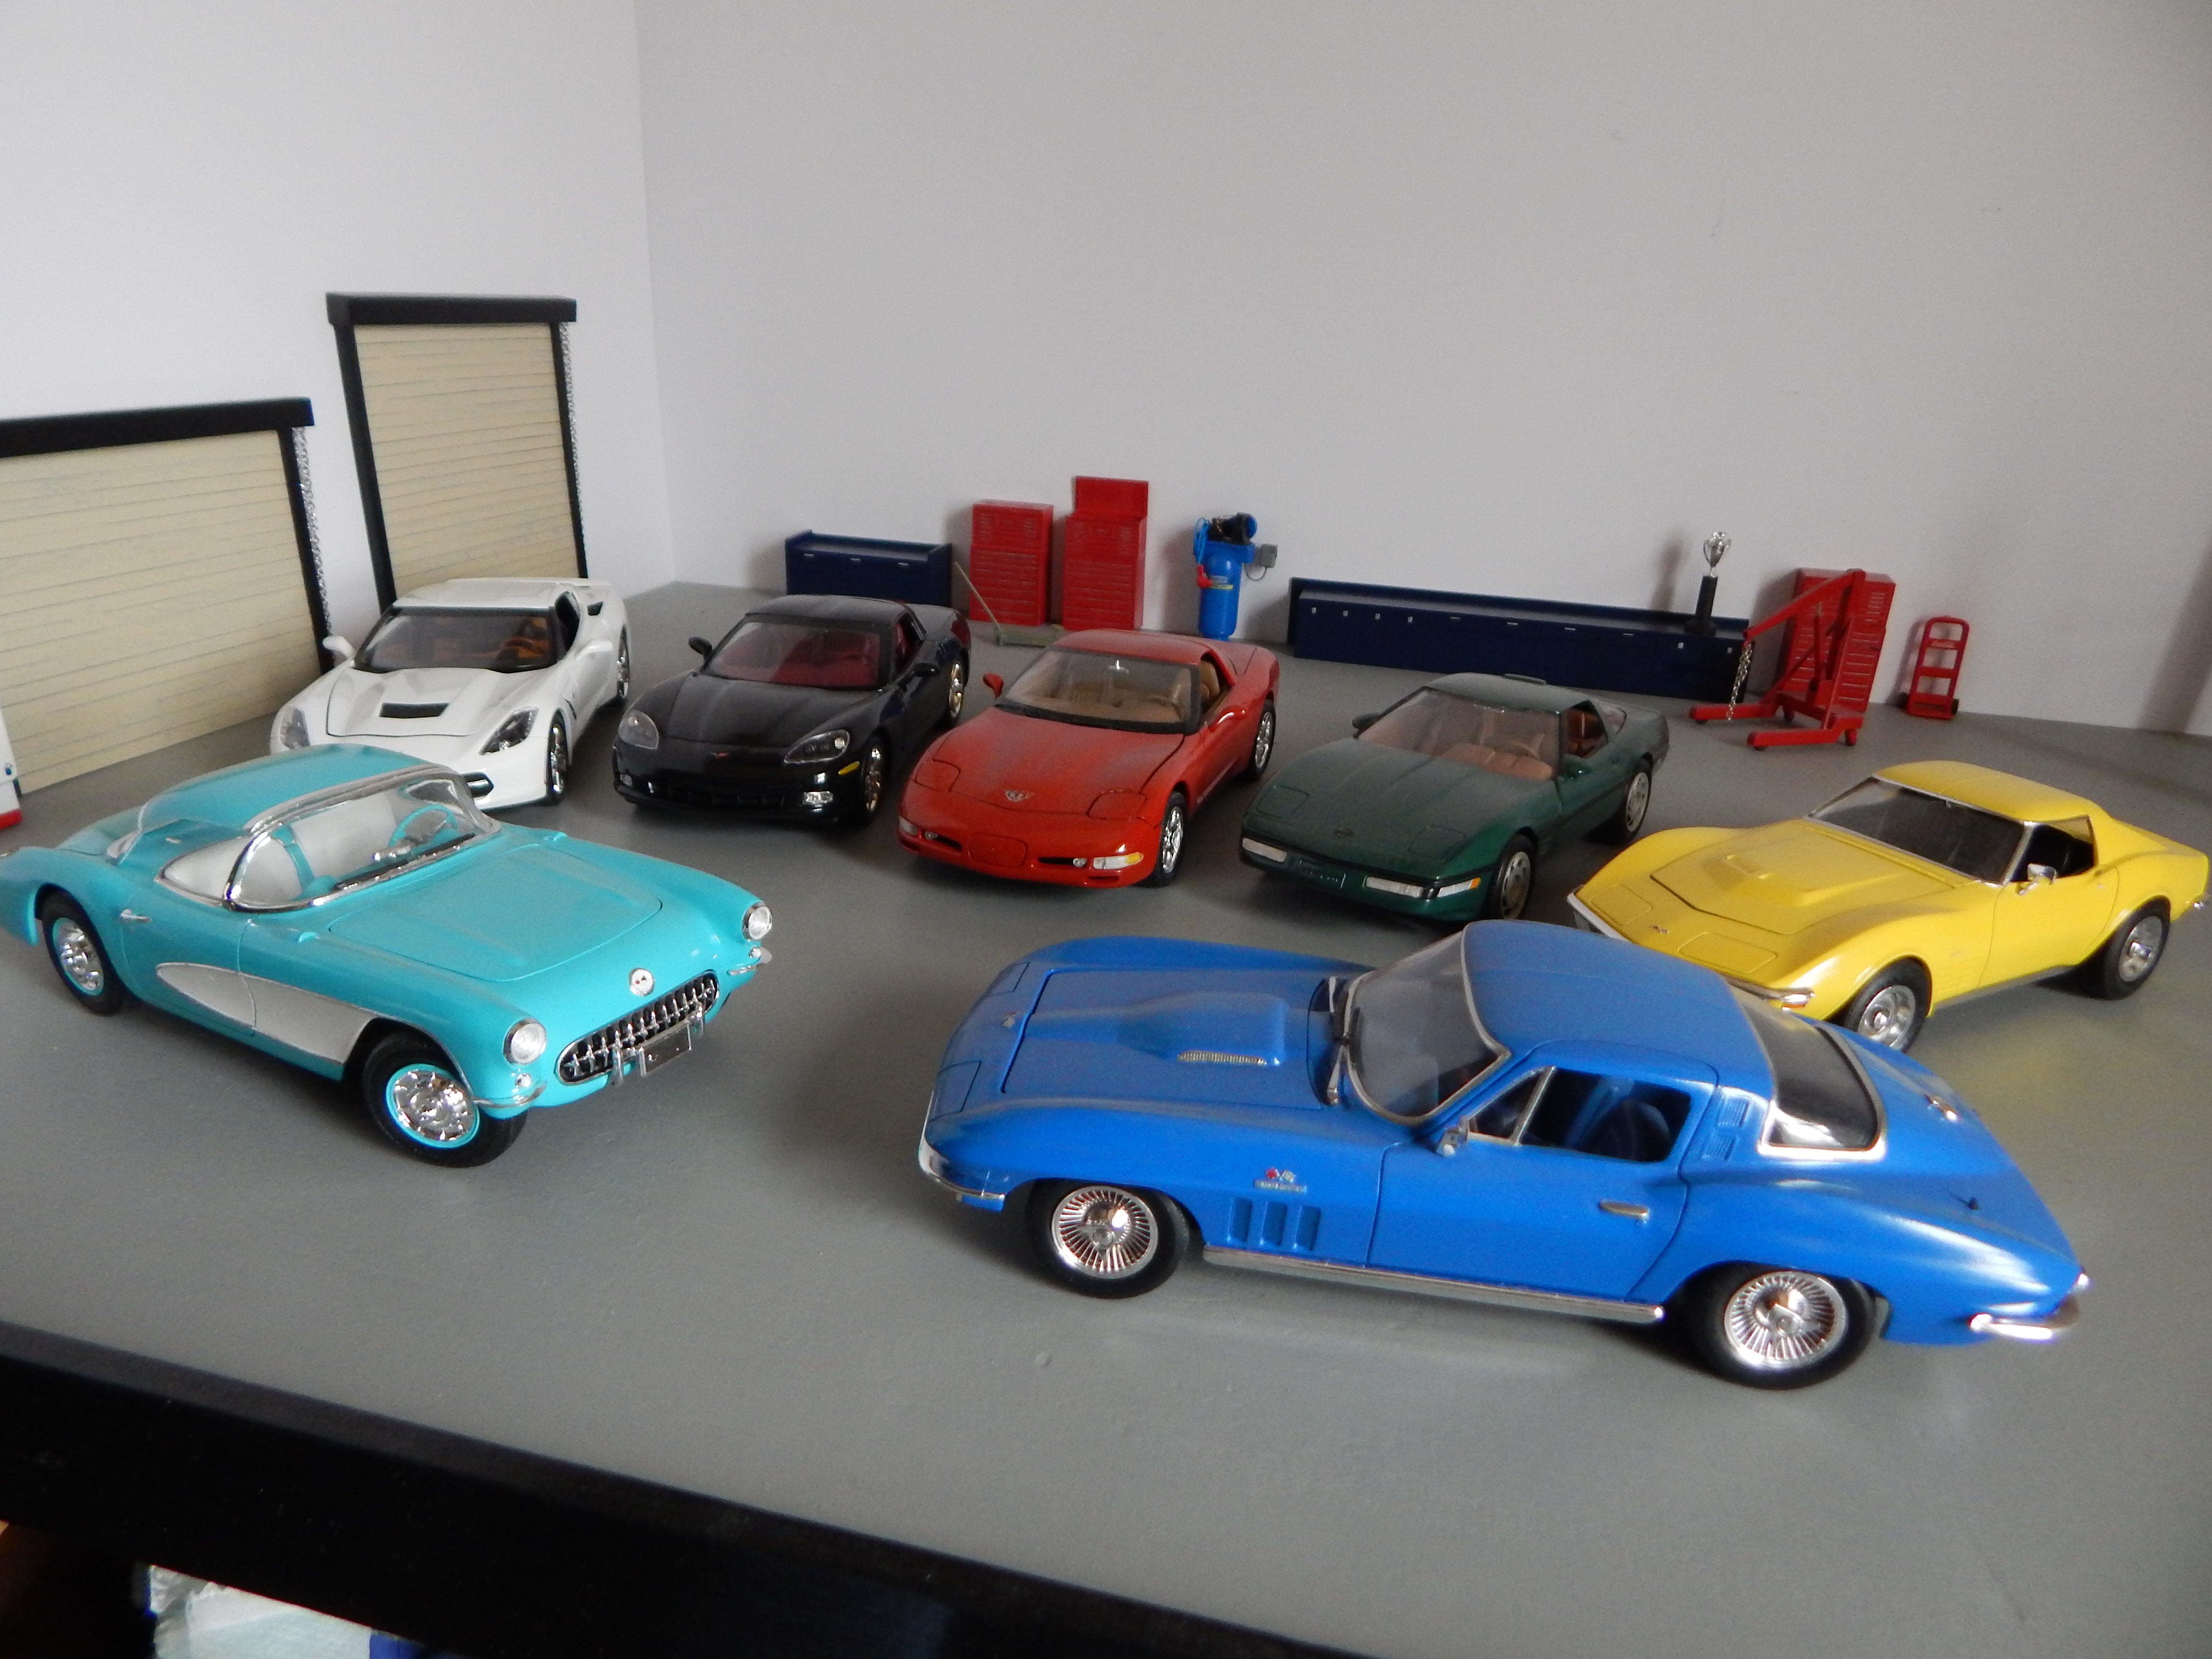
Custom C7/C3 Stingray - What the C7 should have looked like
RestoModGuy posted a topic in Model Cars
I love Corvettes and when the new generation C7 came out in 2014 I liked but not a fan of the taillights. I decided to customize one to have the classic round C3 styling and went as far to change the rear window to the original "sail-panel" rear window. Lots of modifications including a completely new nose and grafted an L88 hood. Also filled in one of the three vents in the fenders, smoothed out the hip line and added rear wheel flares and grafted rear bumperettes like the C3's have. Some build pics show some of the major bodywork I did. Paint is Duplicolor Bahama Blue Metallic. Comparison to a "stock" C7
-
RoG's McLaren 570S all done, finished in Tamiya TS21 Gold, with Semi Gloss Black and Alclad Dark Aluminium details. Interior is my own 'cream' and 'light black' acrylic mixes. The CF decals are from Ka Models of Korea (highly recommended). Not a great kit and fought me all the way to the very end - the final assembly is a proper PitA. I knew to attach the dash onto the lip BEFORE adding the interior because I'd read and seen so many build reviews. Even so, the final fit is truly dreadful... All that said, like the Ferrari 458, the finished car is truly a thing of beauty to my eye. Please feel free to make any comments or ask any questions (yes I know the exhausts aren't on yet). Best from NZ. Ian.
-
Good morning all, I finally was able to get back to the bench after a long absence do to shoulder surgery and I jumped in with the new Boss 302 kit from Revell I did like this kit and thought it went together well I started by adding the basic plug wires and heater hoses but didn't go to extreme on details as I really was using only 1 arm then at the advise of my Brother inlaw I went with a Calypso Coral paint scheme i am happy with the way it turned out please enjoy and any comments or critiques are always welcome Thank you
-
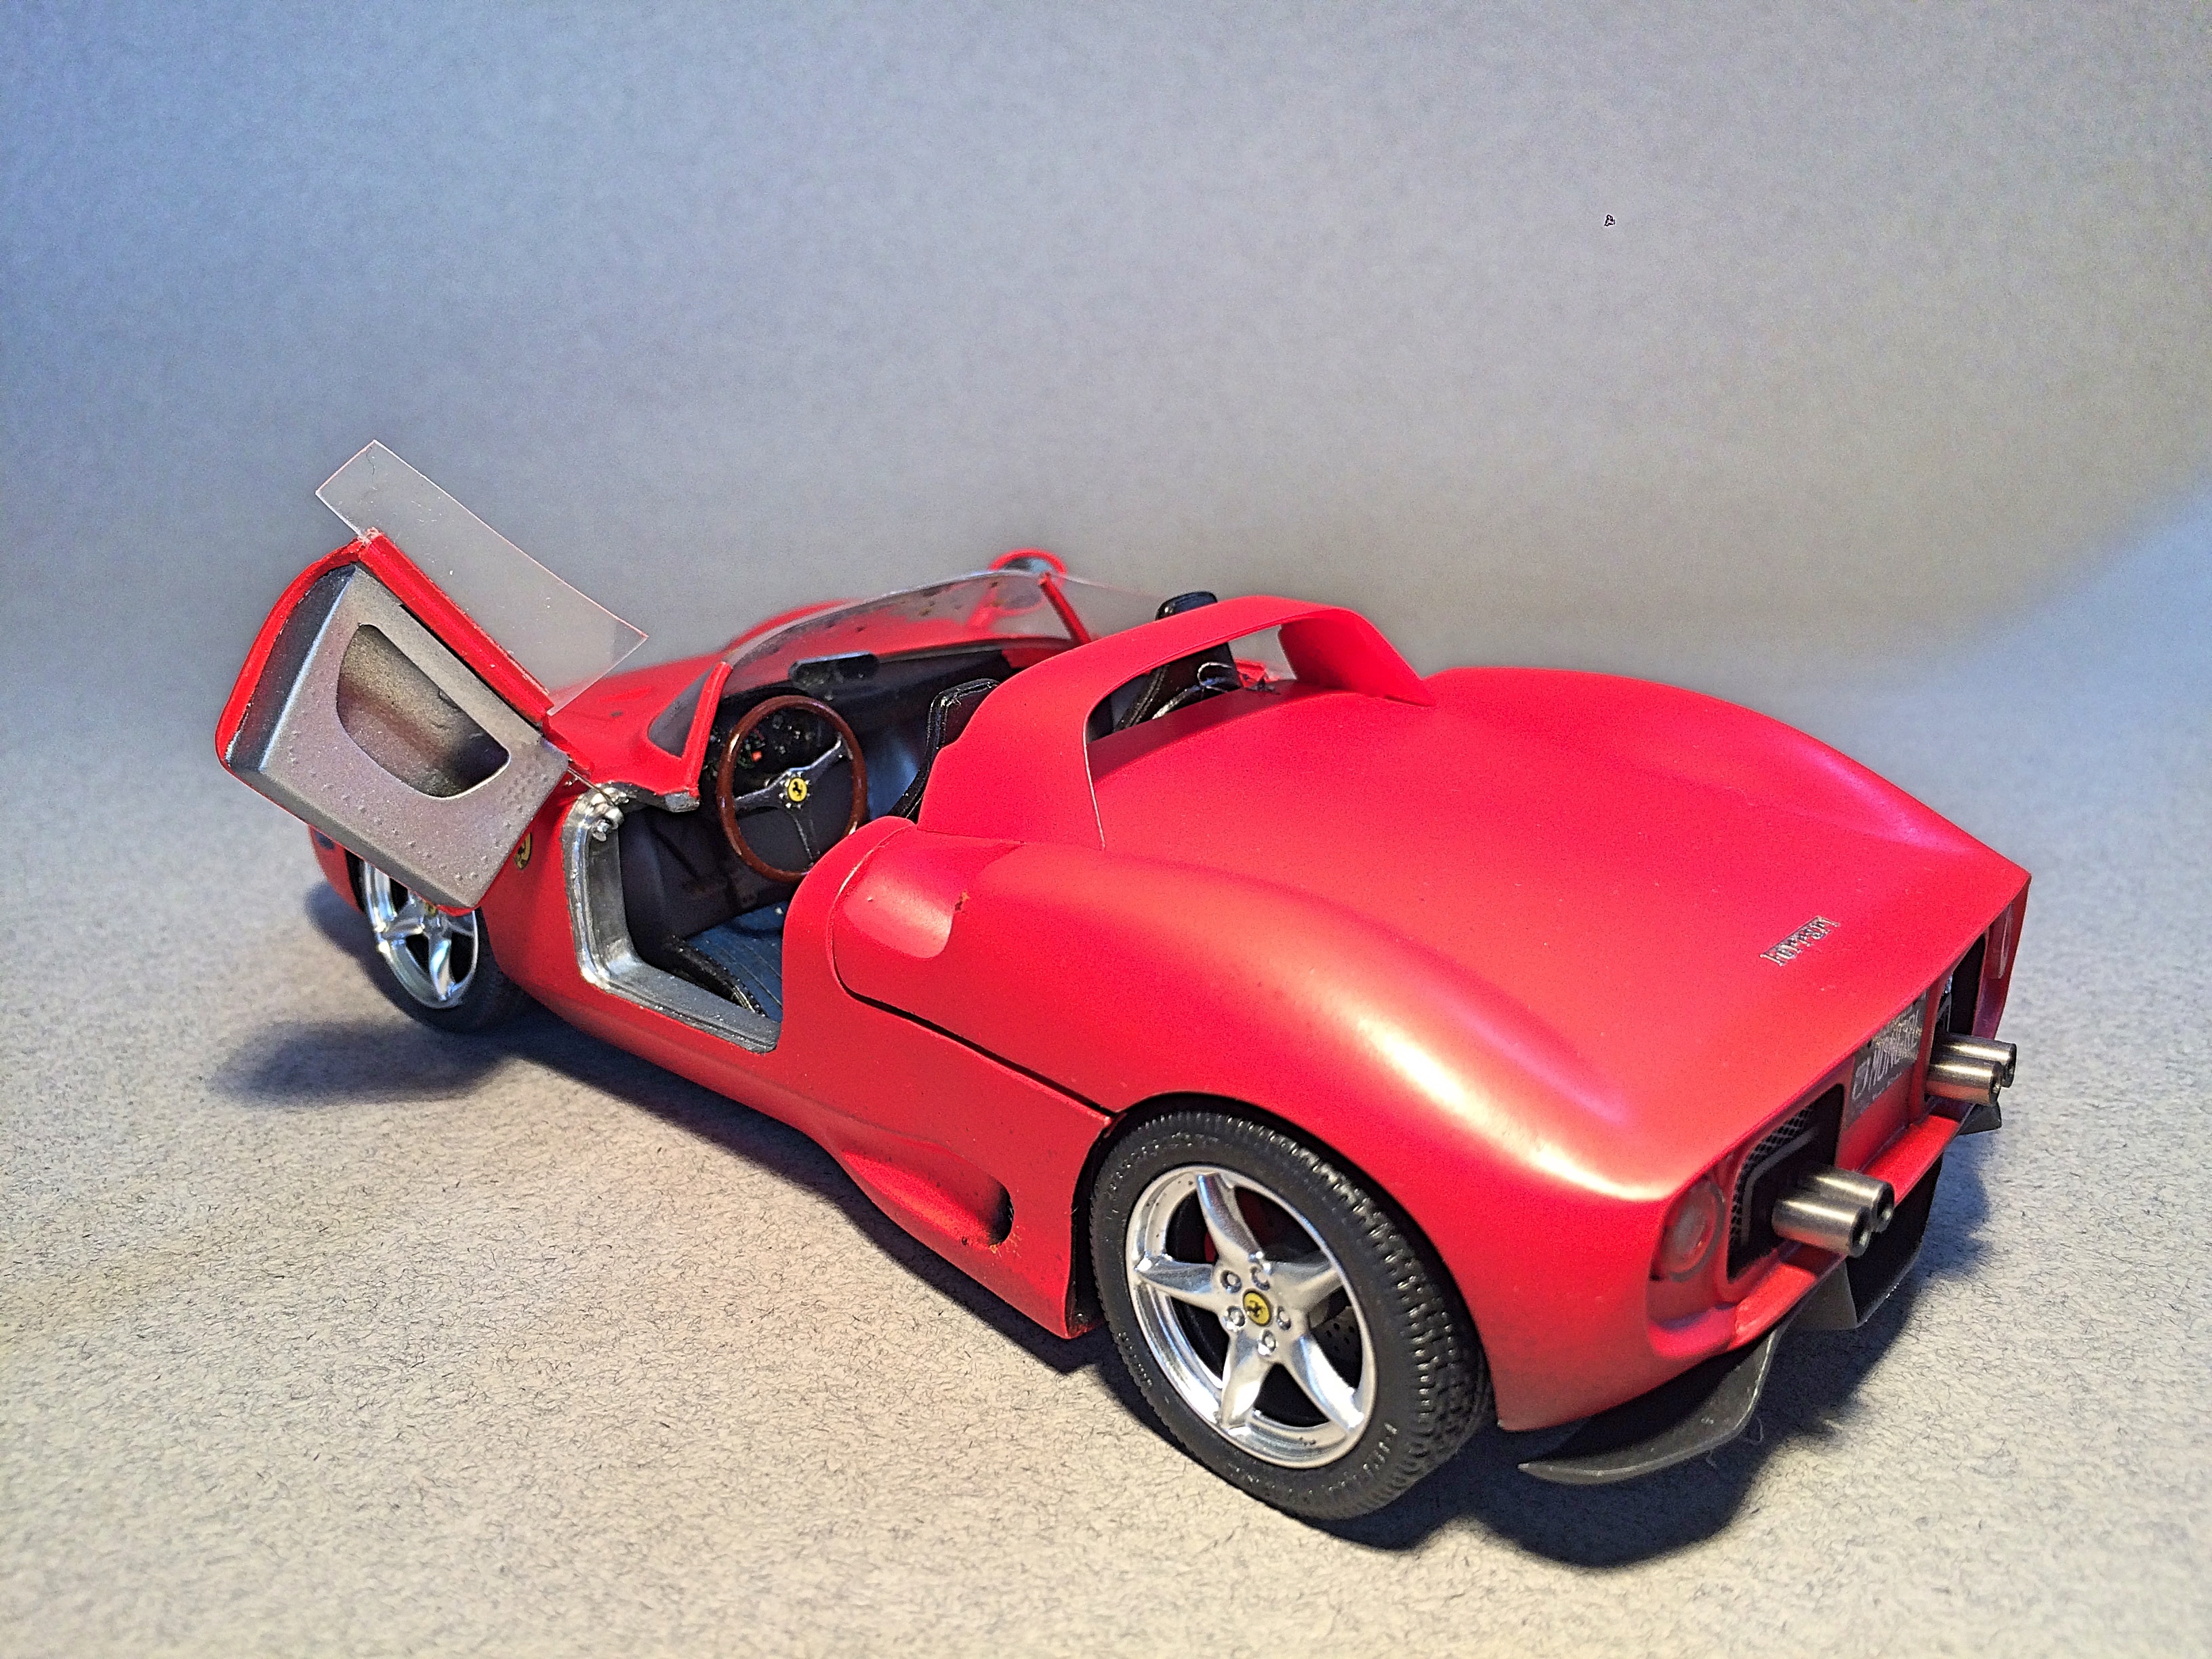
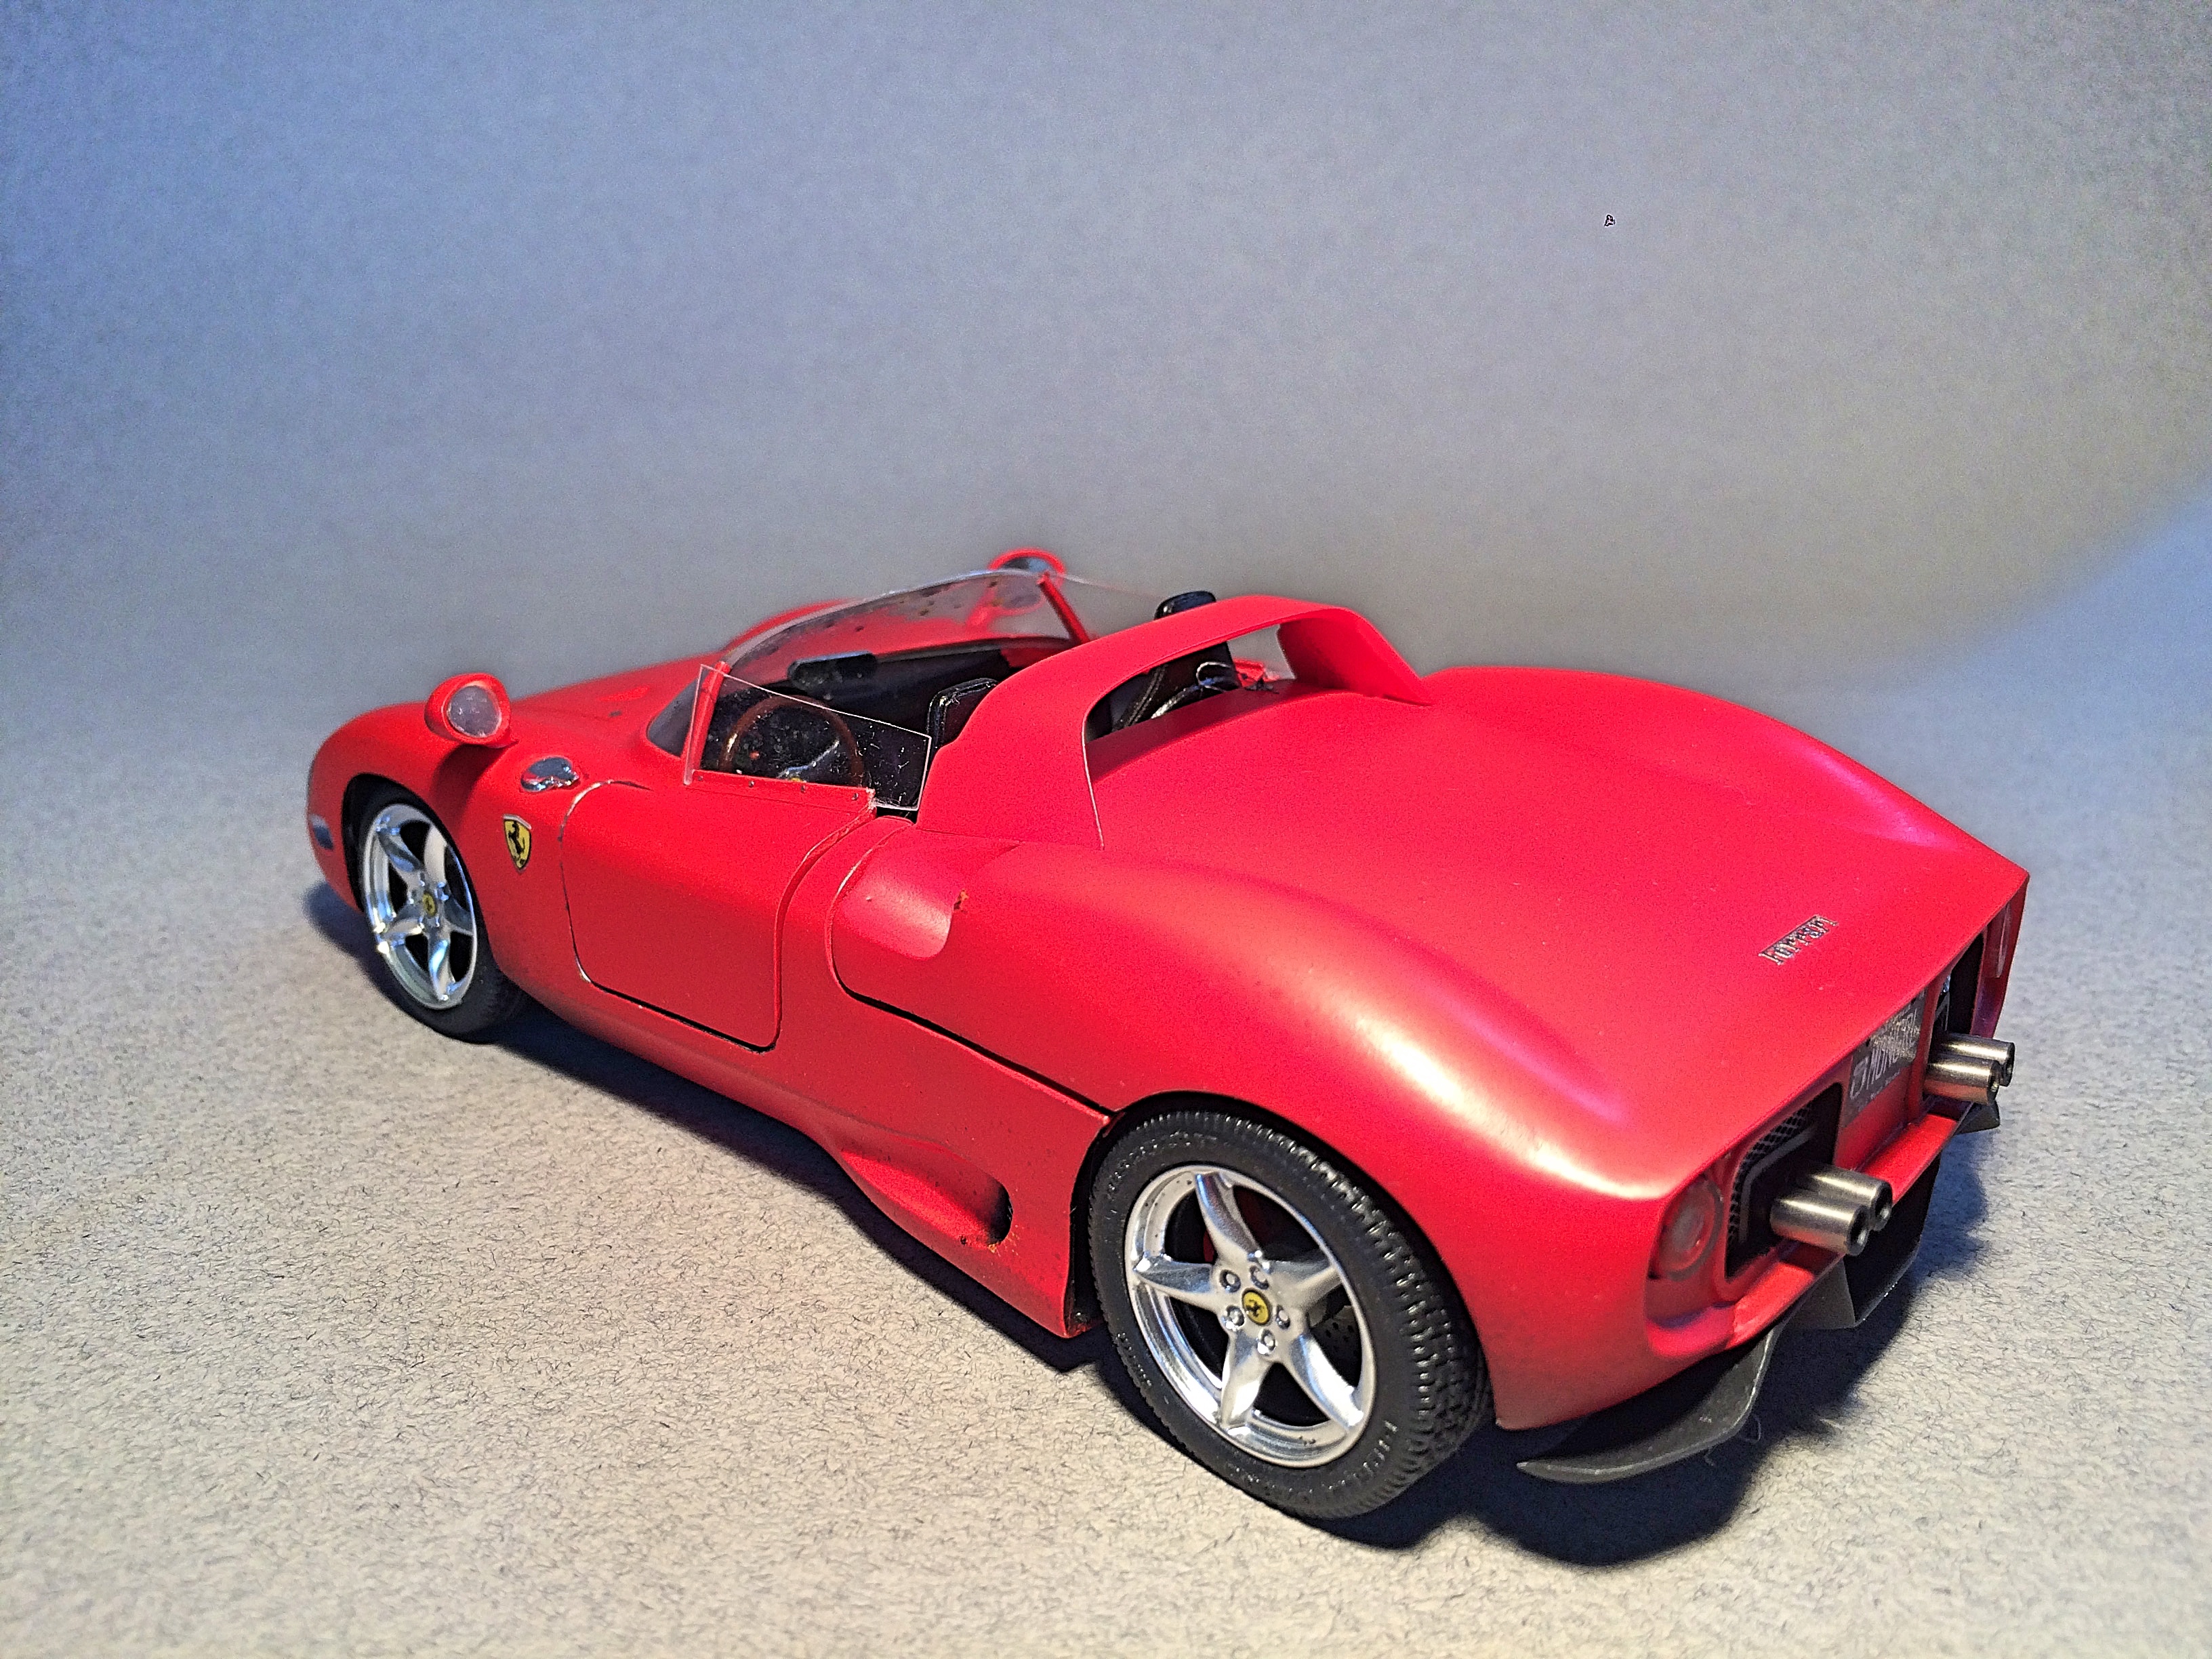
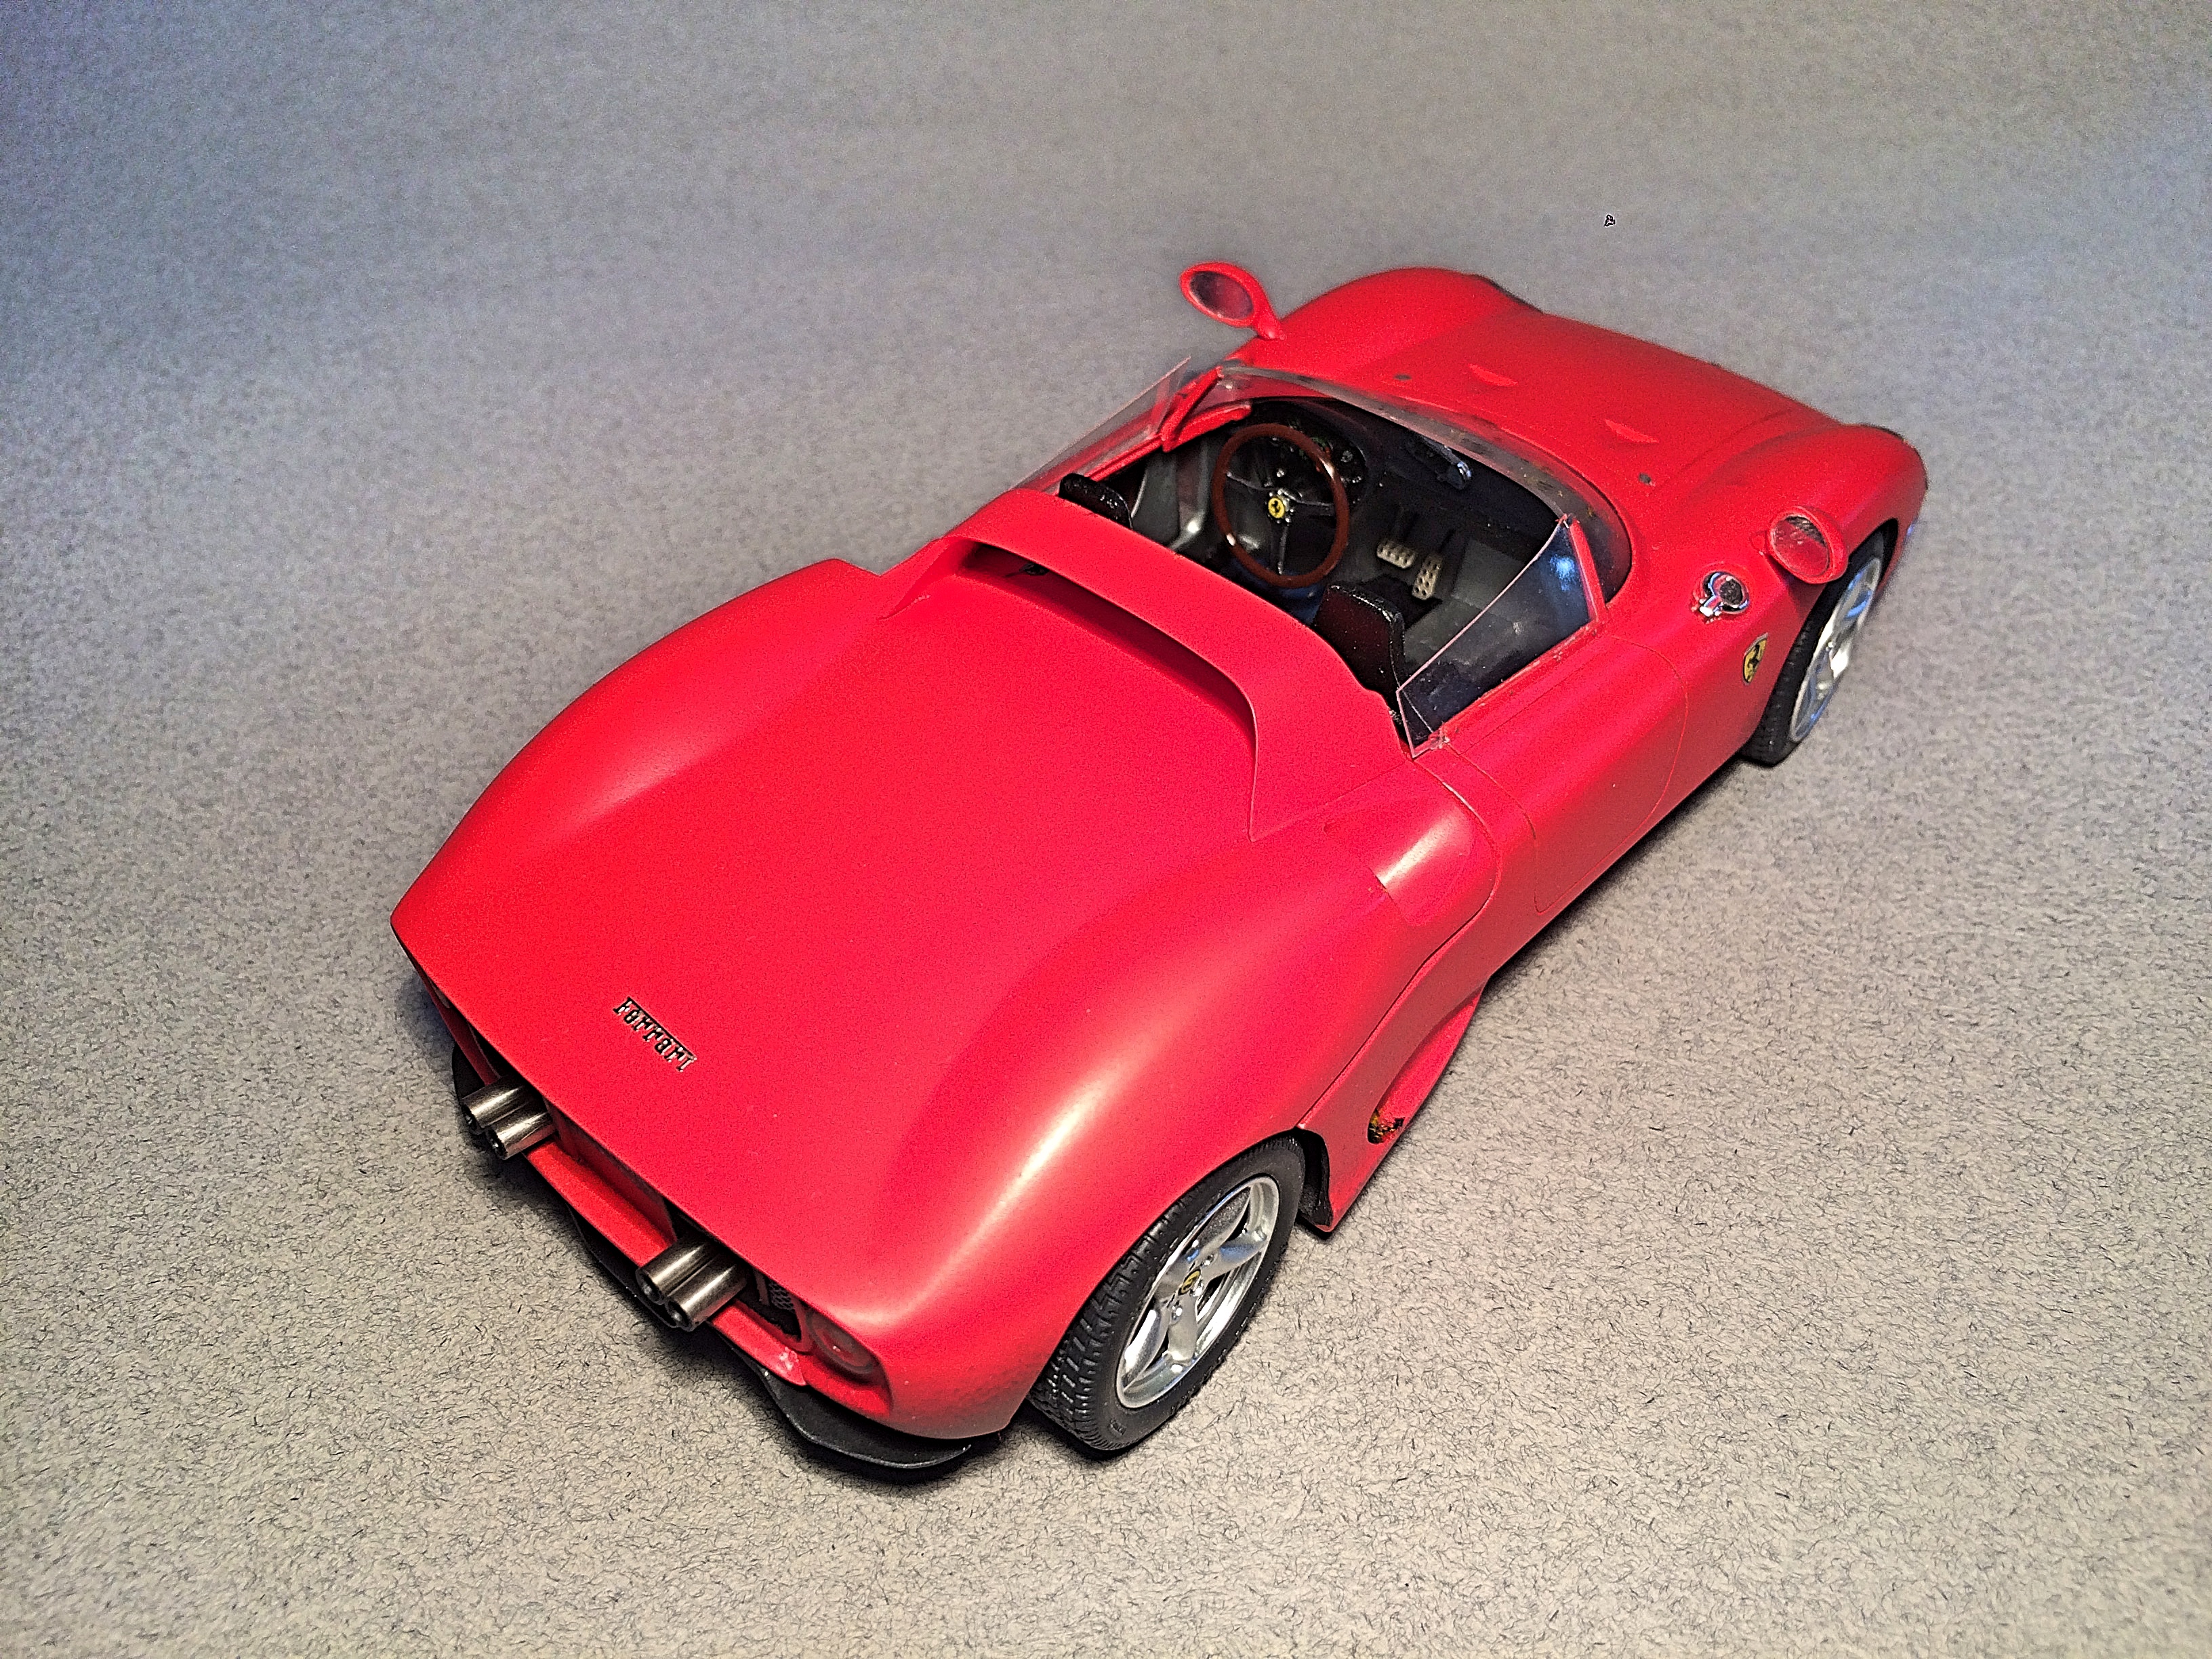
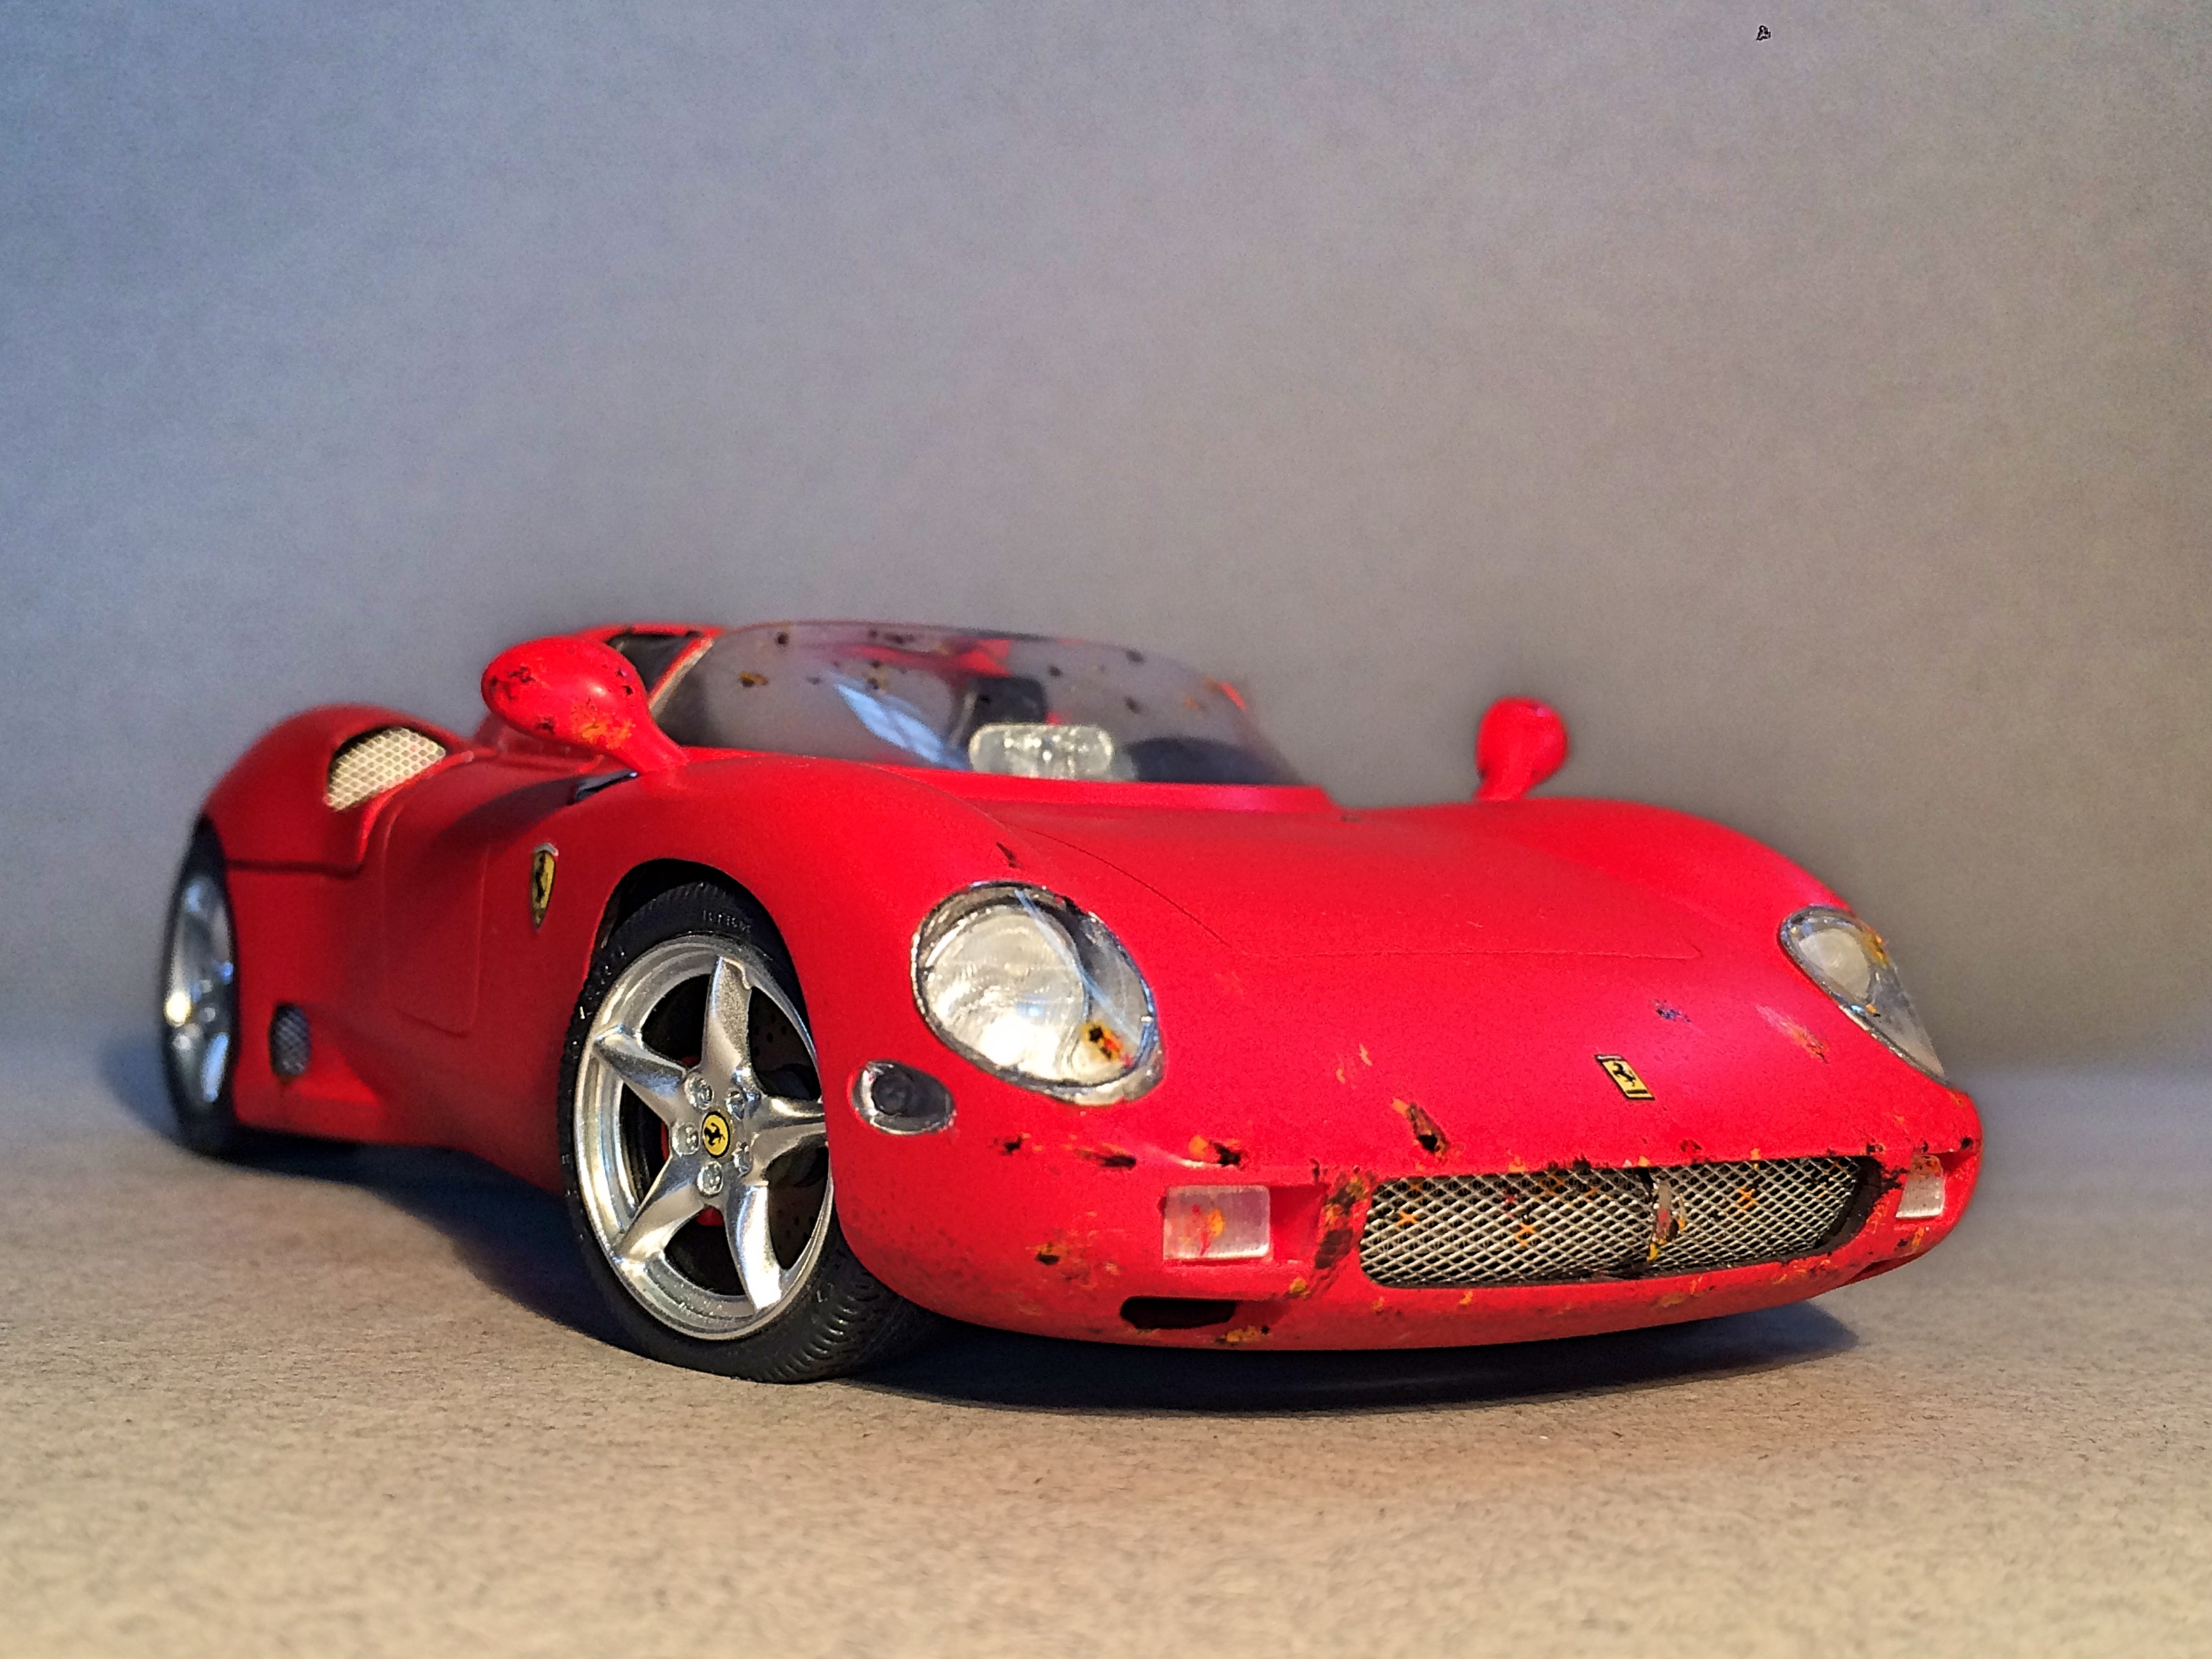
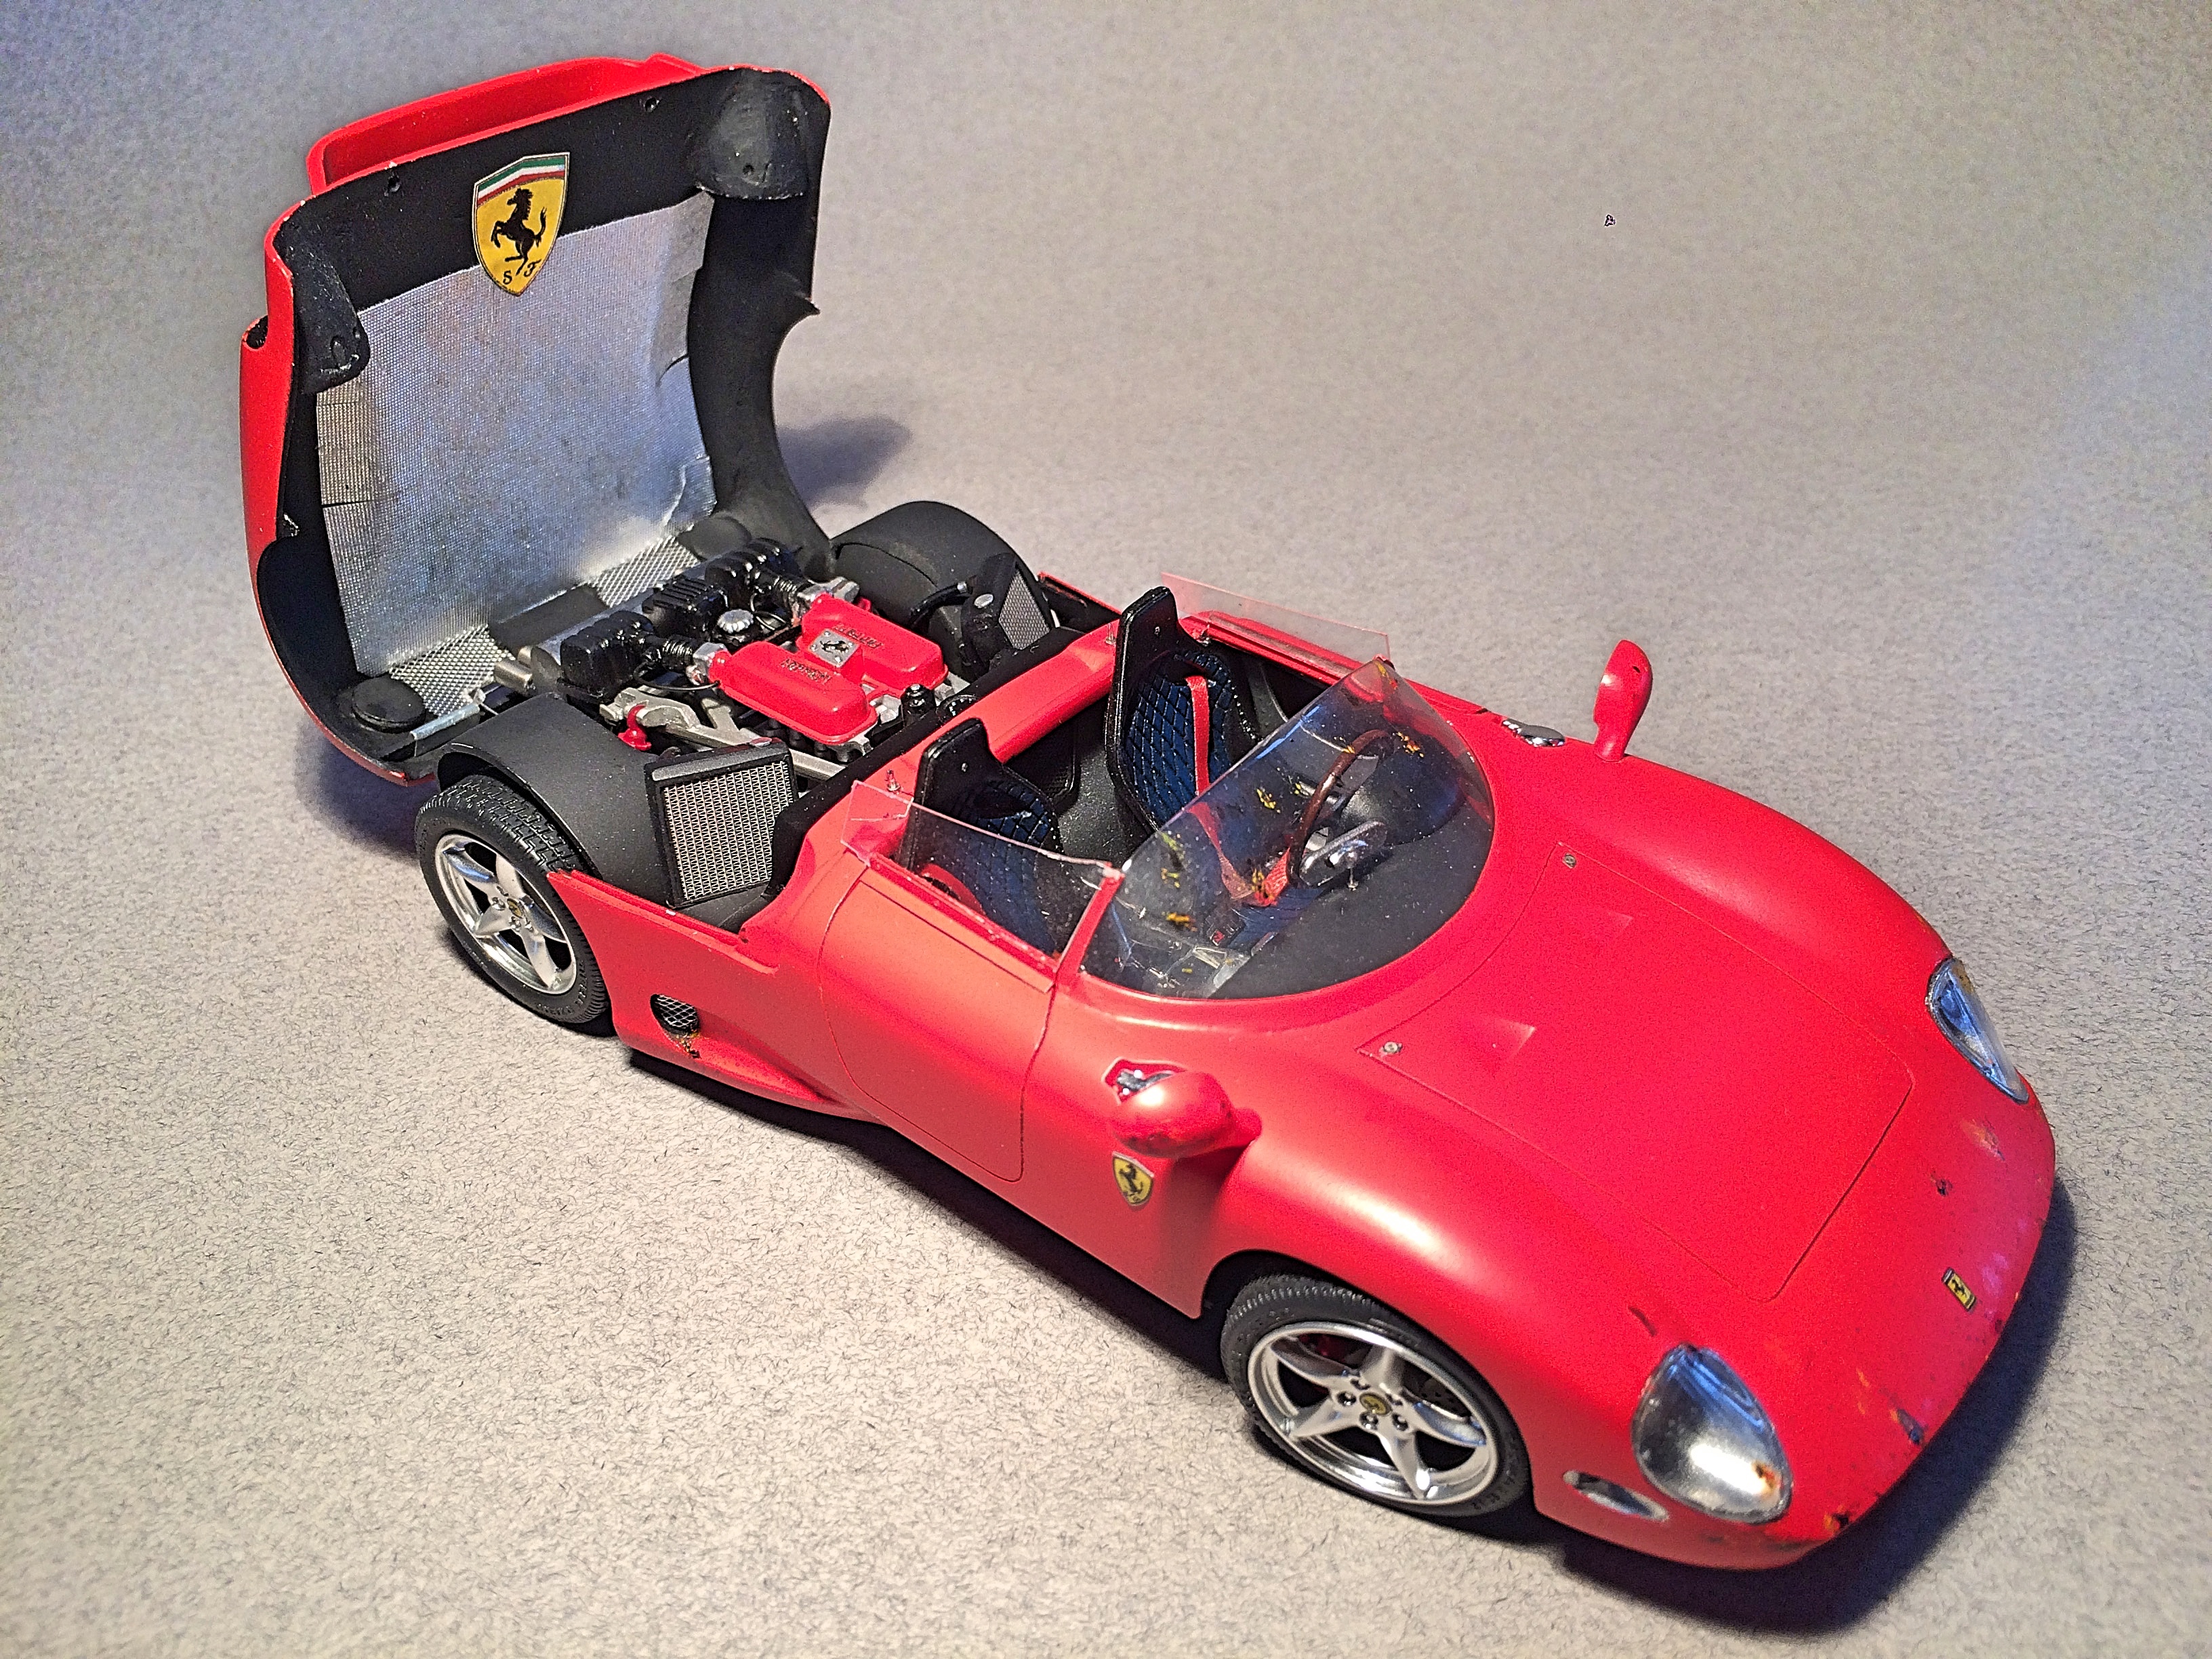
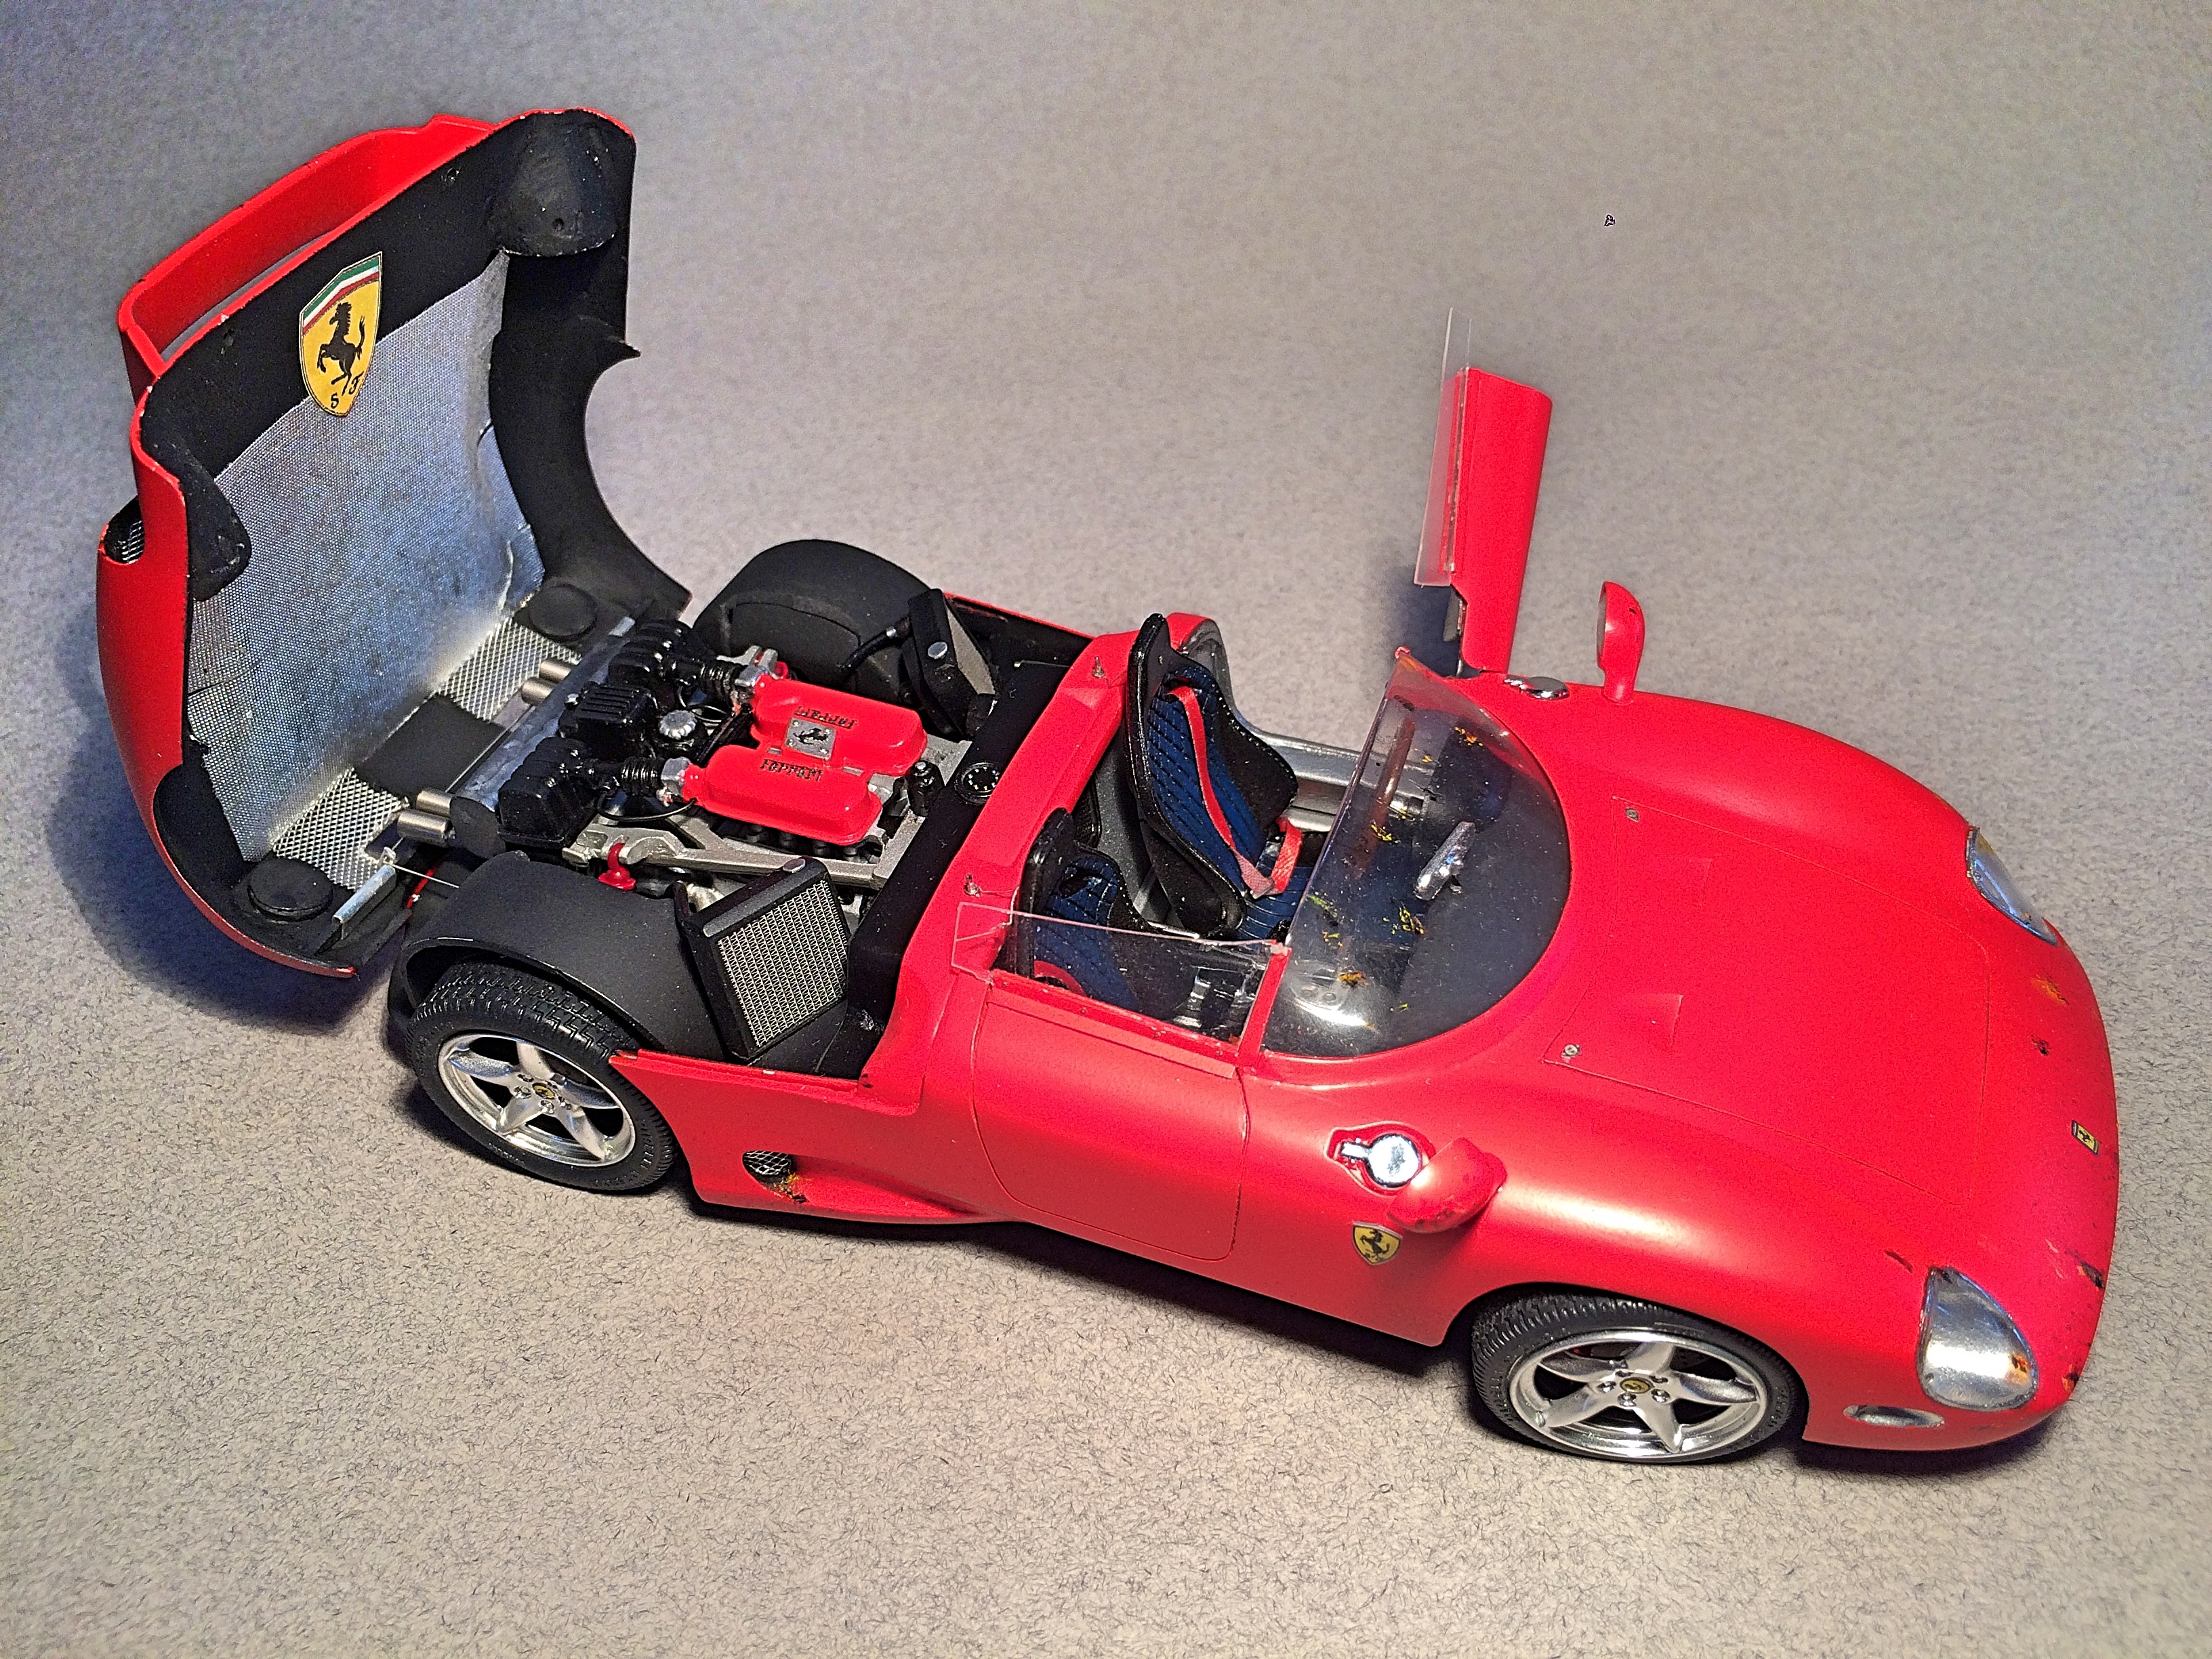
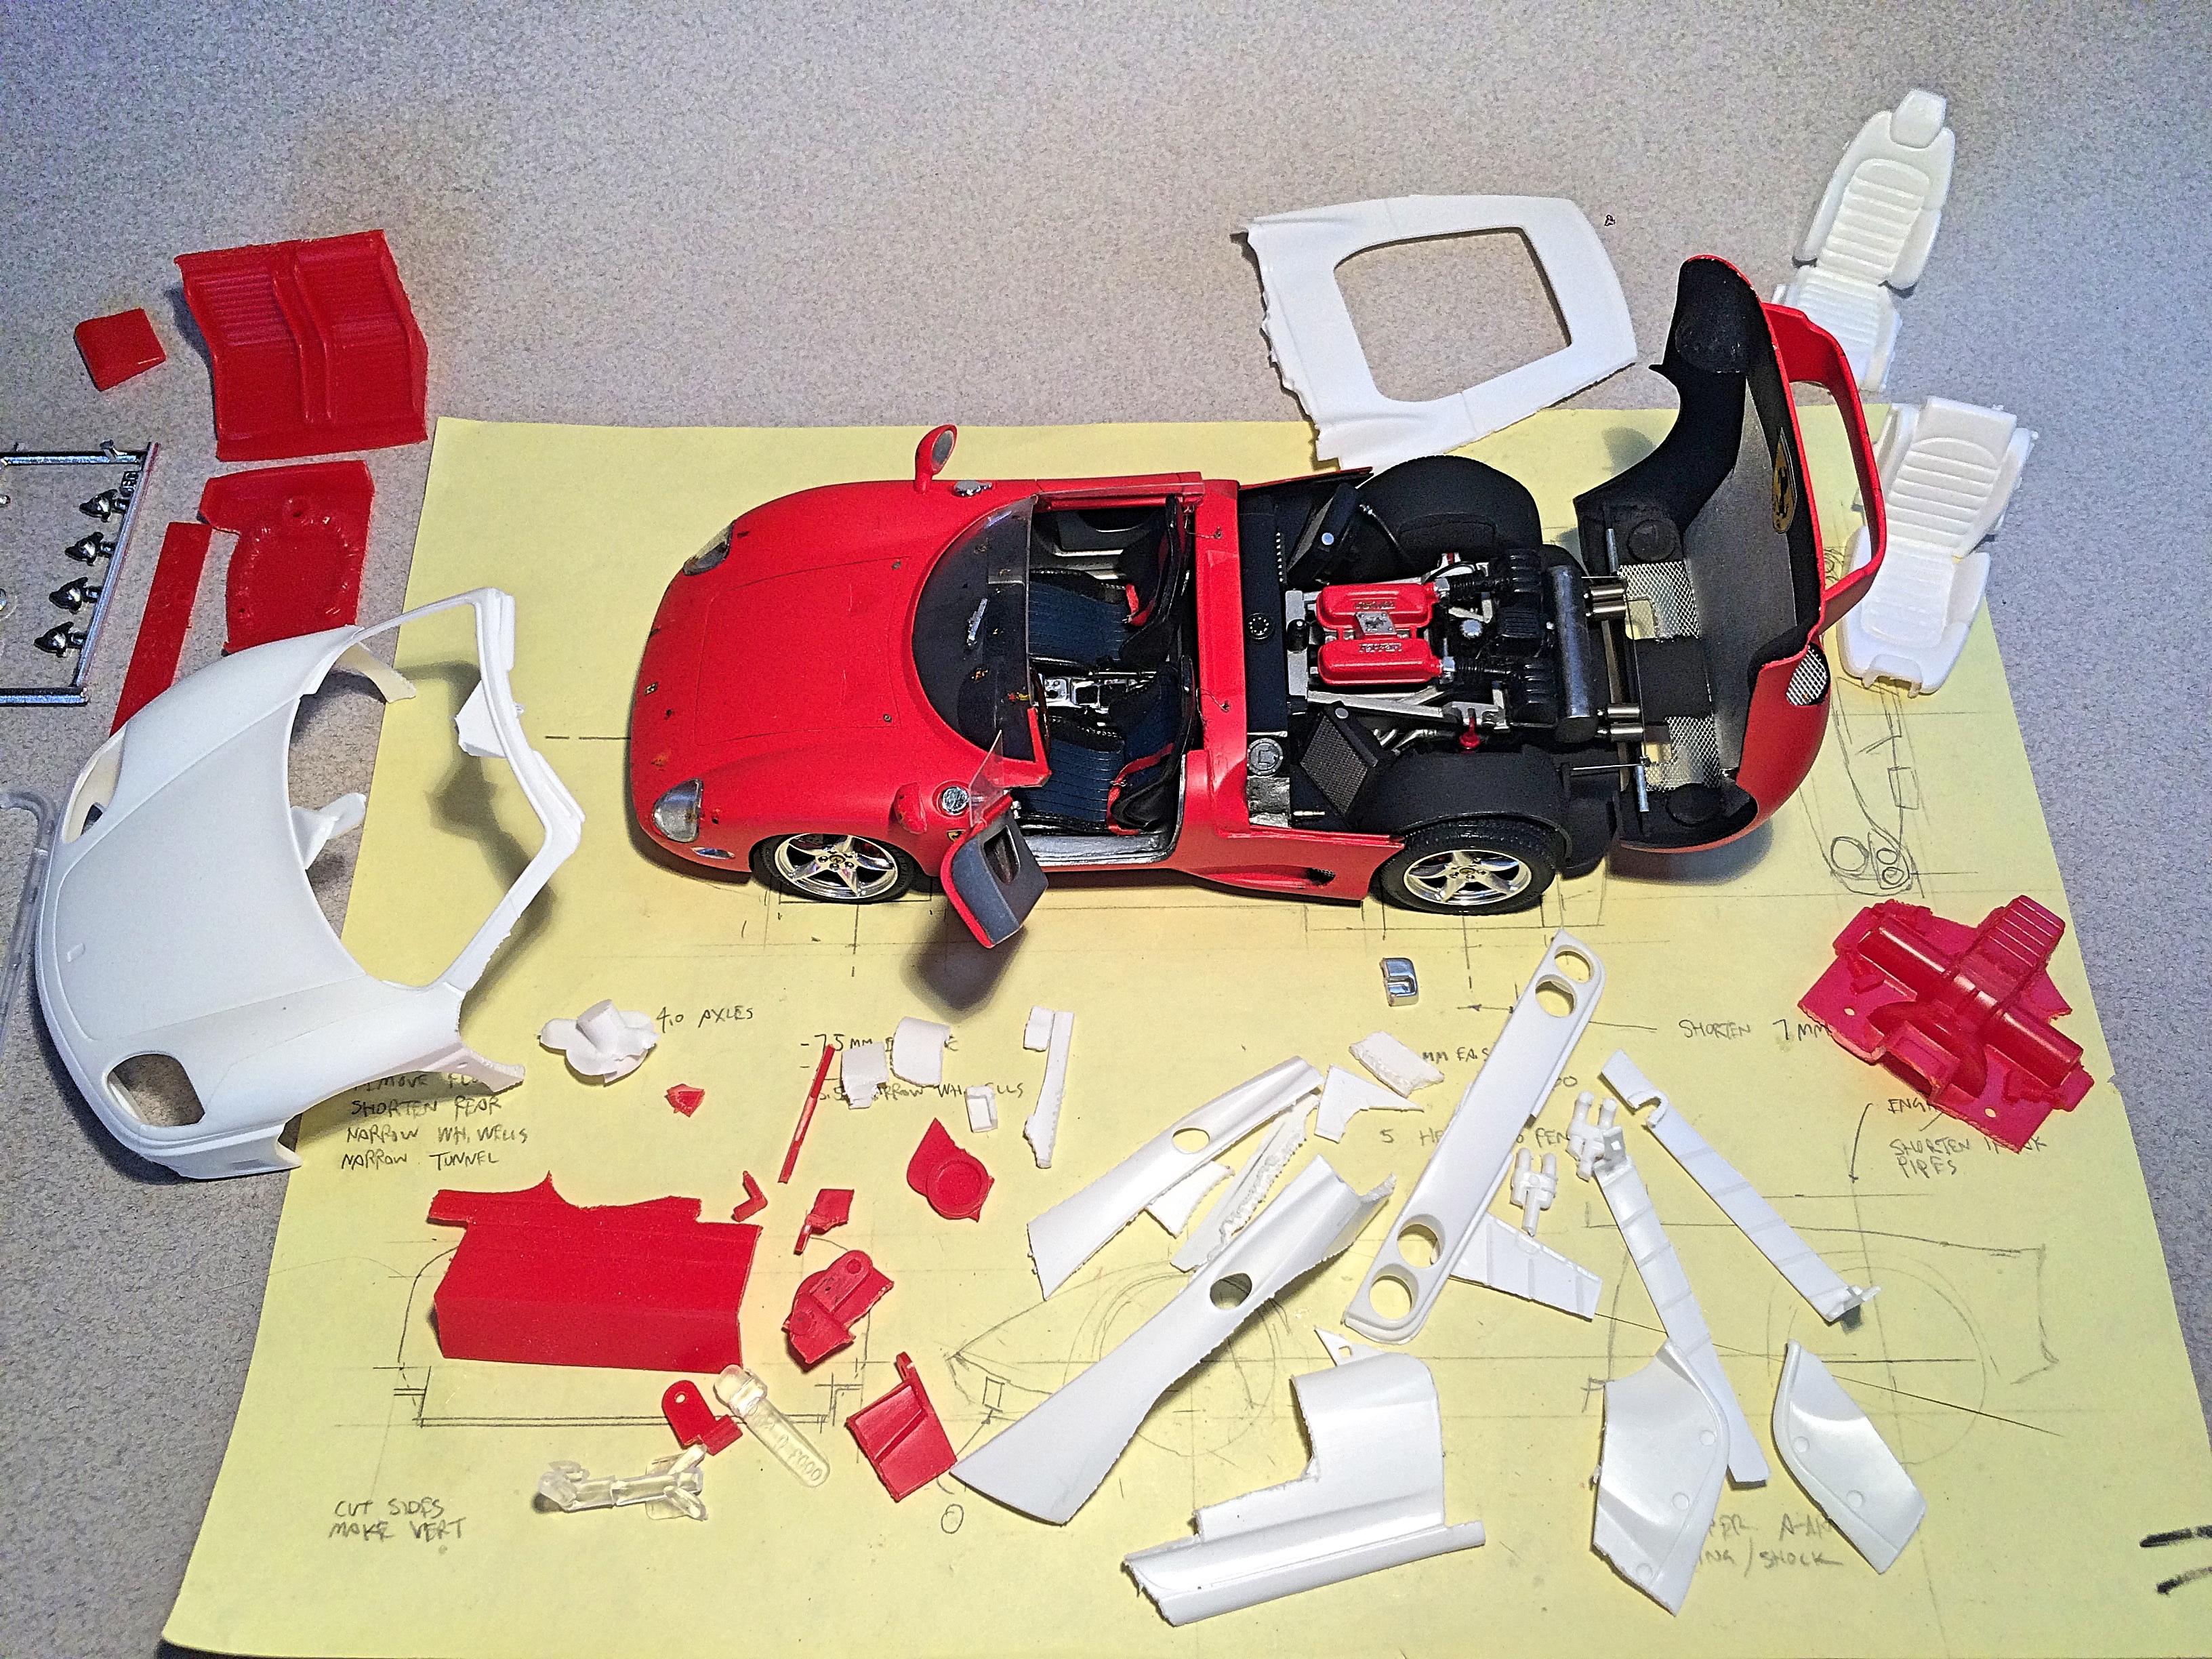
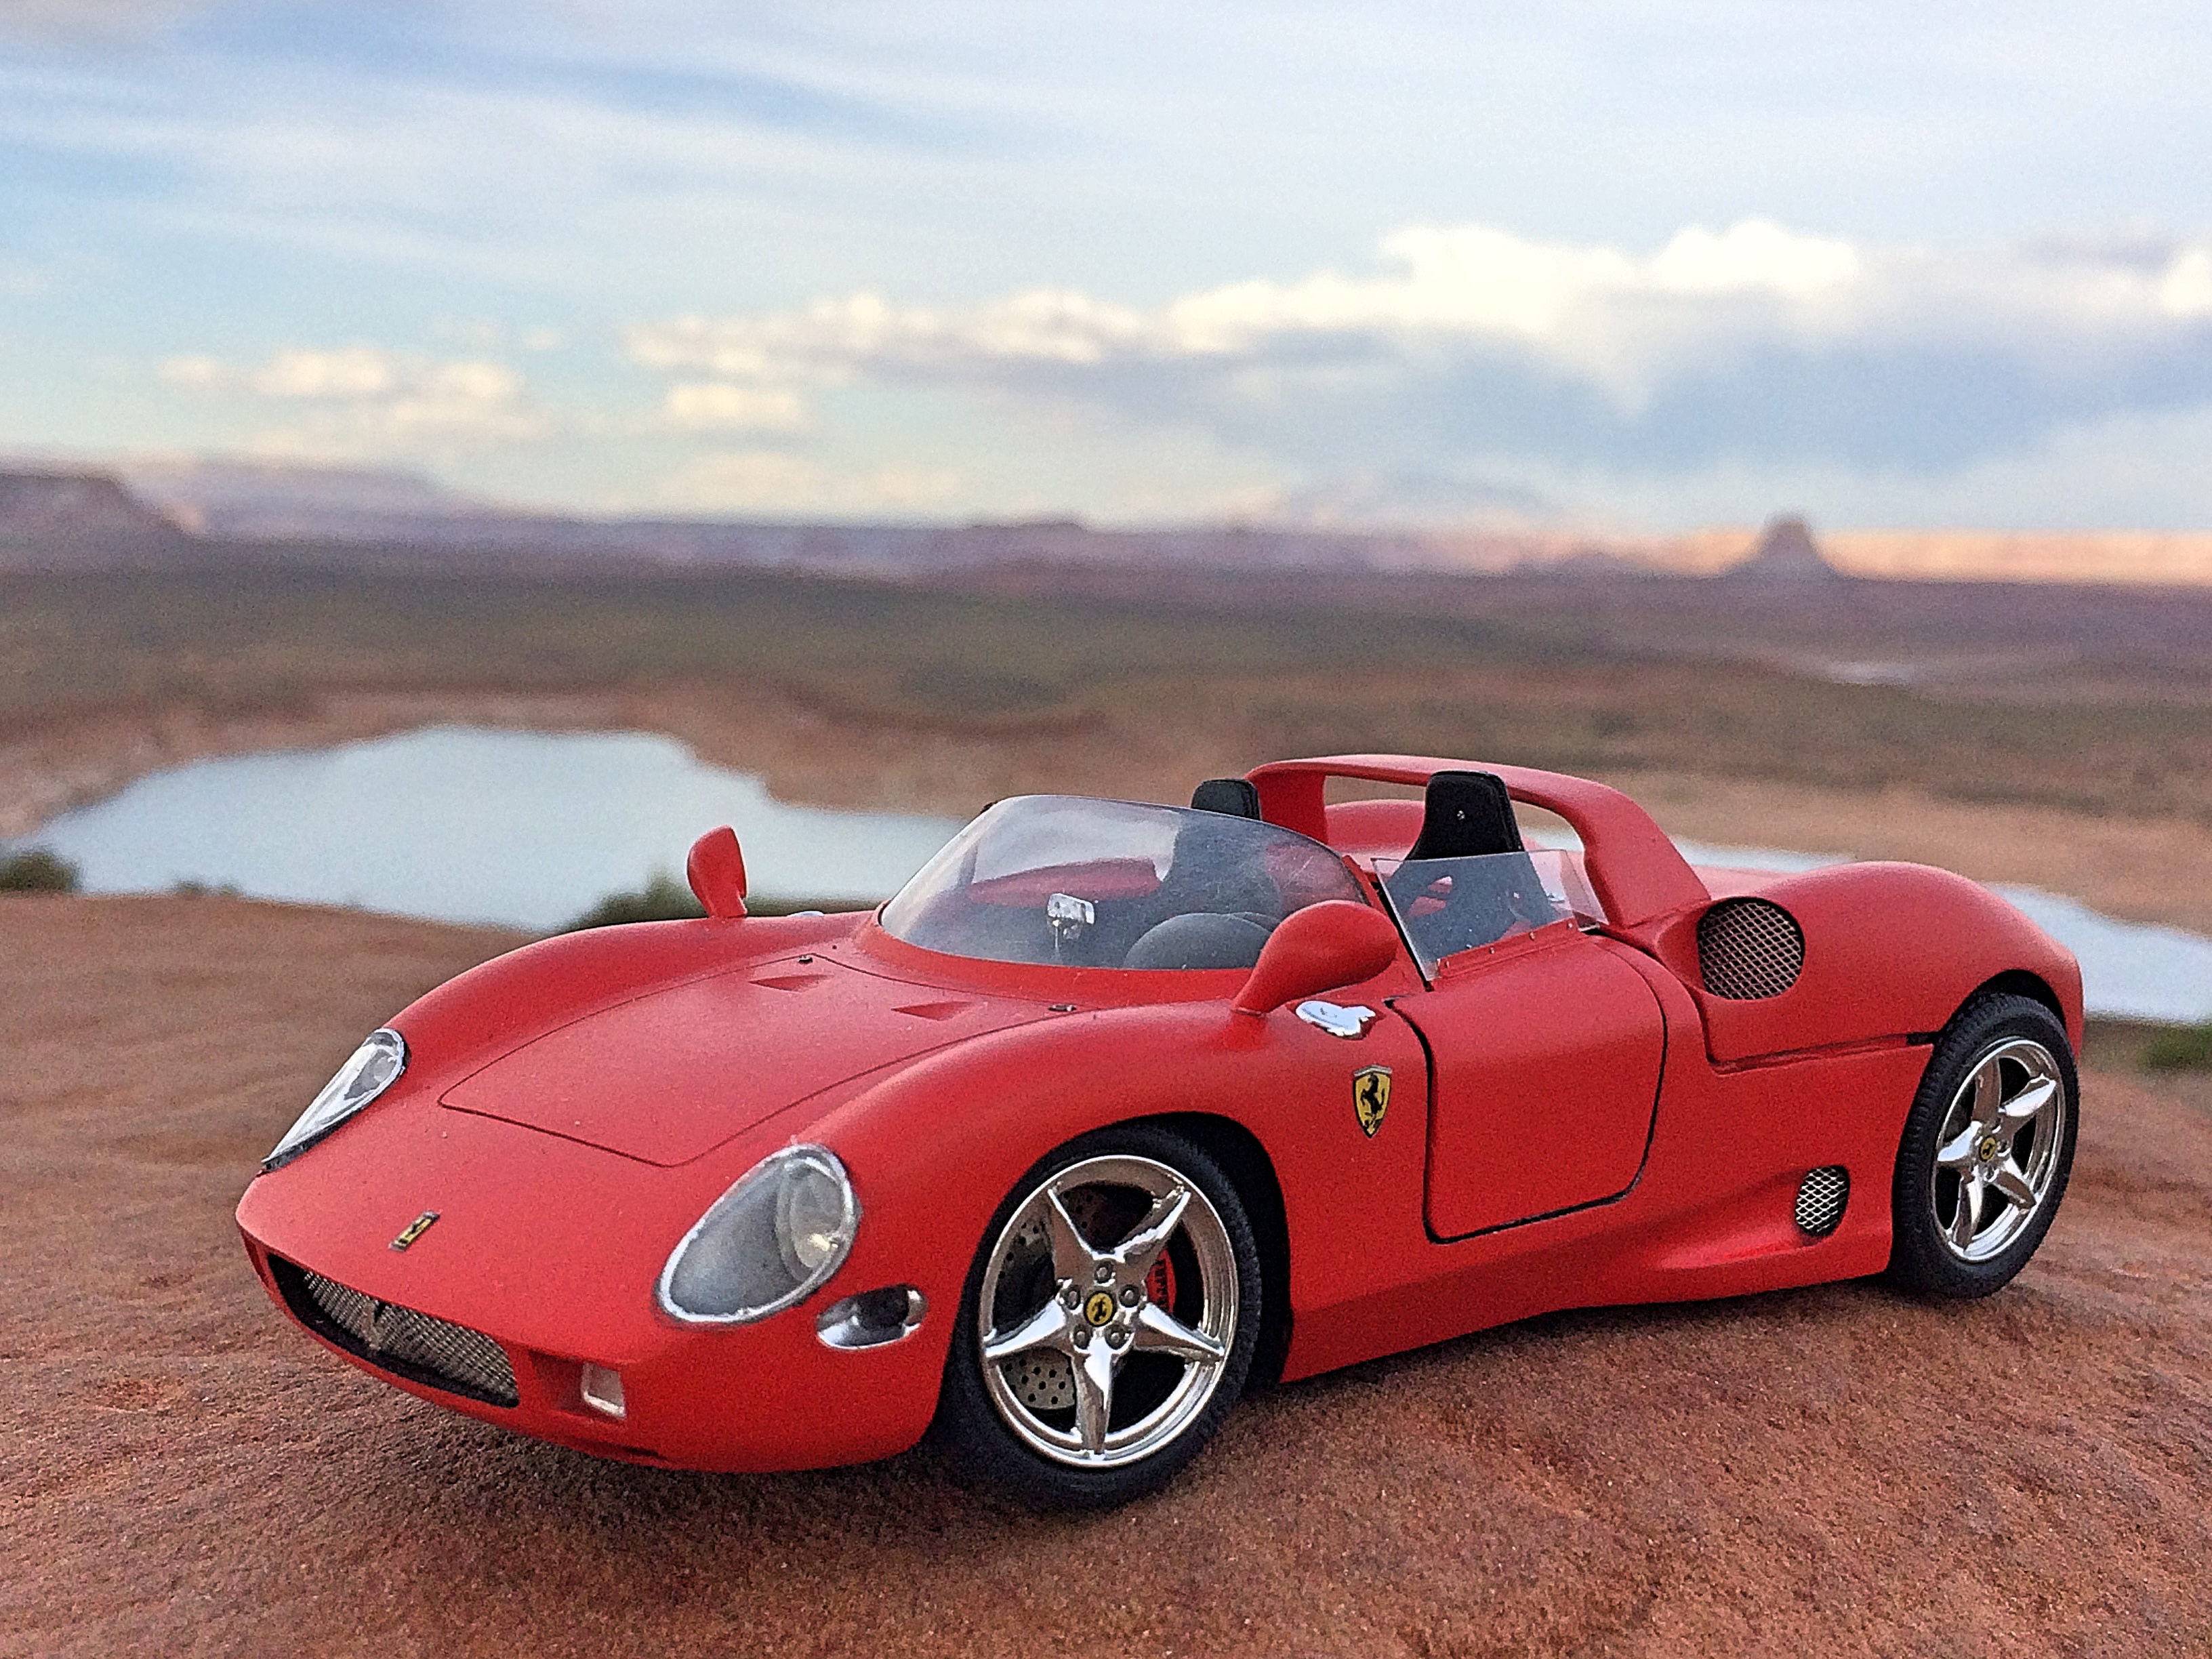
Kitbash of the classic Monogram Ferrari 275P curbside/slot-car, a 1990 reissue of the 1964 kit, and the Revell 360 Modena Spyder that is sort of a curbside since the hood did not open, but had a window over the engine. Work In Progress I found the 275P at a Phoenix model swap last month, then saw the Modena and it was crazy time. Started Tax Day with a mock up, started butchering on the 18th, worked like a dog until the 3rd at Noon, just before heading up to GSL, 132 hours. I did rush it, could have spent a couple of weeks sanding and polishing, and it would probably would have ended up in the box like a few other projects. I just wanted something different than the typical super dooper shiny muscle car on the table. I didn't have time to write a build document, but had this for the description: Blasphemous and sacrilegious kitbash of a historic Ferrari race car that won Le Mans two years in a row, and another Ferrari that only has a 3586 cc 395 HP V8. Story is, this car was found in a chicken coop somewhere in Venezuela, missing the 3285cc 320 HP V12 engine and transmission, the aluminum tub was badly corroded from chicken poop. The Modena was bought at a tax auction, it was rolled by the drug dealer during a police chase. Built by a shop wanting to do a reality TV show, but never got funding because it’s just a Ferrari and not an American muscle car. Some of these pictures were taken at Page on the way home.
- 18 replies
-
- 1
-

-
- ferrari 275p
- monogram
- (and 2 more)
-
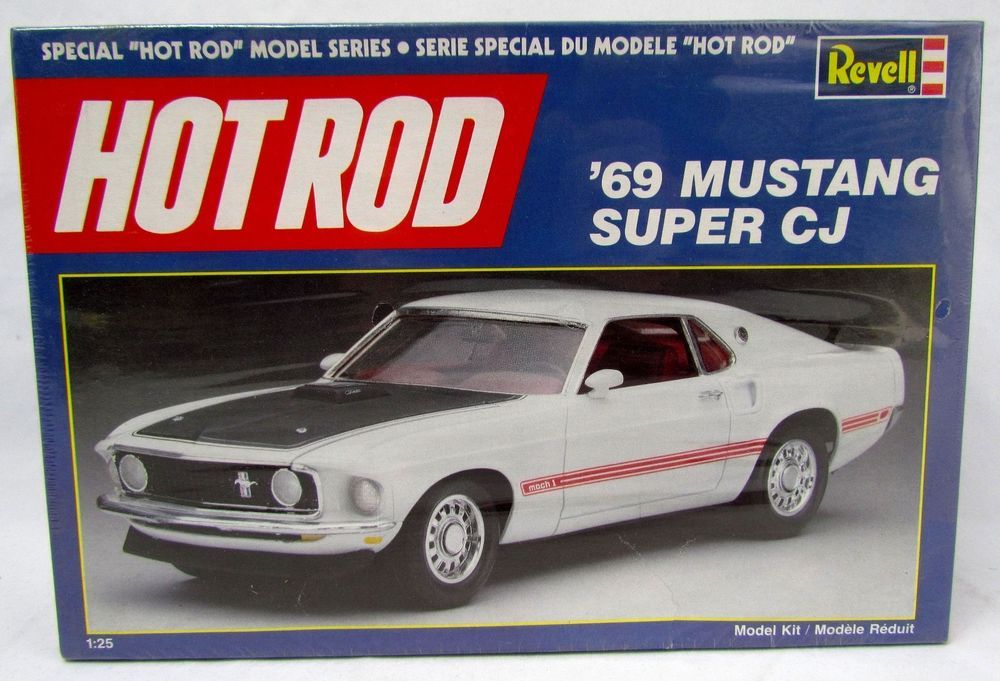
 I’m looking at options for the 50 Years of Mach 1 CBP, and I was wondering - is there a difference between these kits? If so, what is different? Thanks in advance!
-
Does anyone make this hood in resin or 3d printed. Also looking for the decals as well in white or gold. GOD Bless, Thanks for Any Help ....
-
Finished the last in the series. I like this kit, although its fairly simplified it went together well. The tough part was painting the black out ducts on the body. Comments welcome, thanks for looking.
-
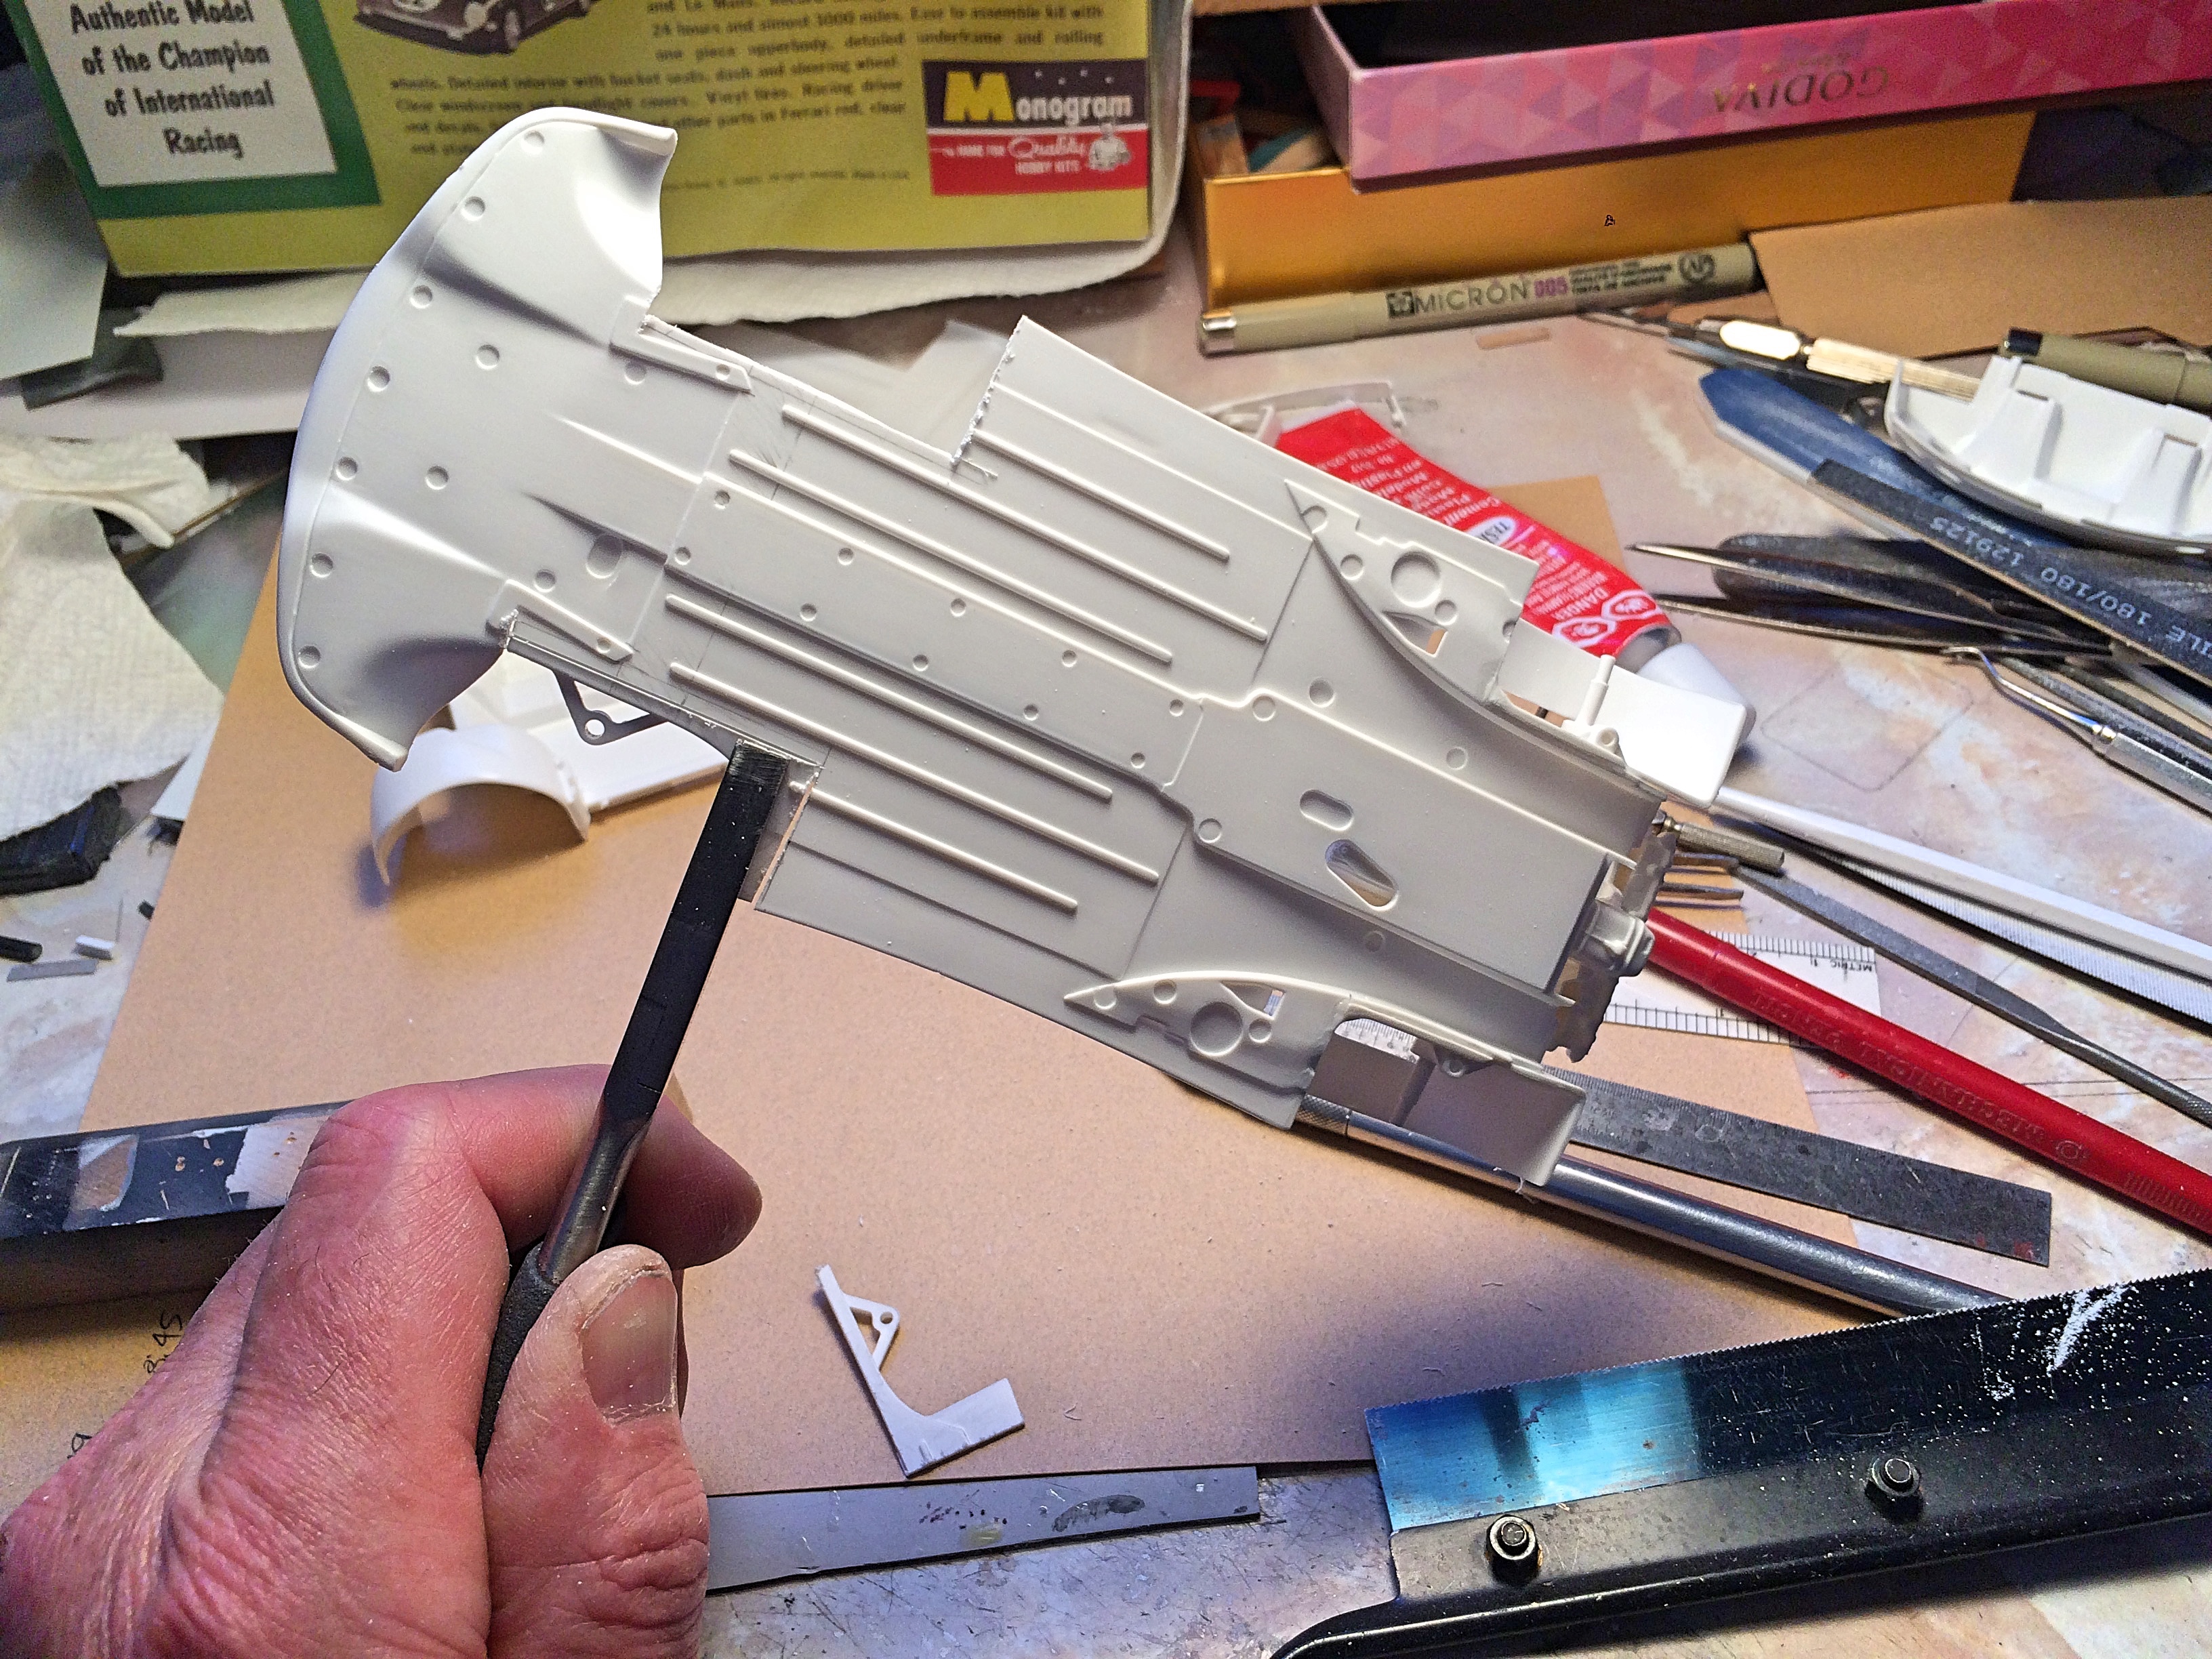
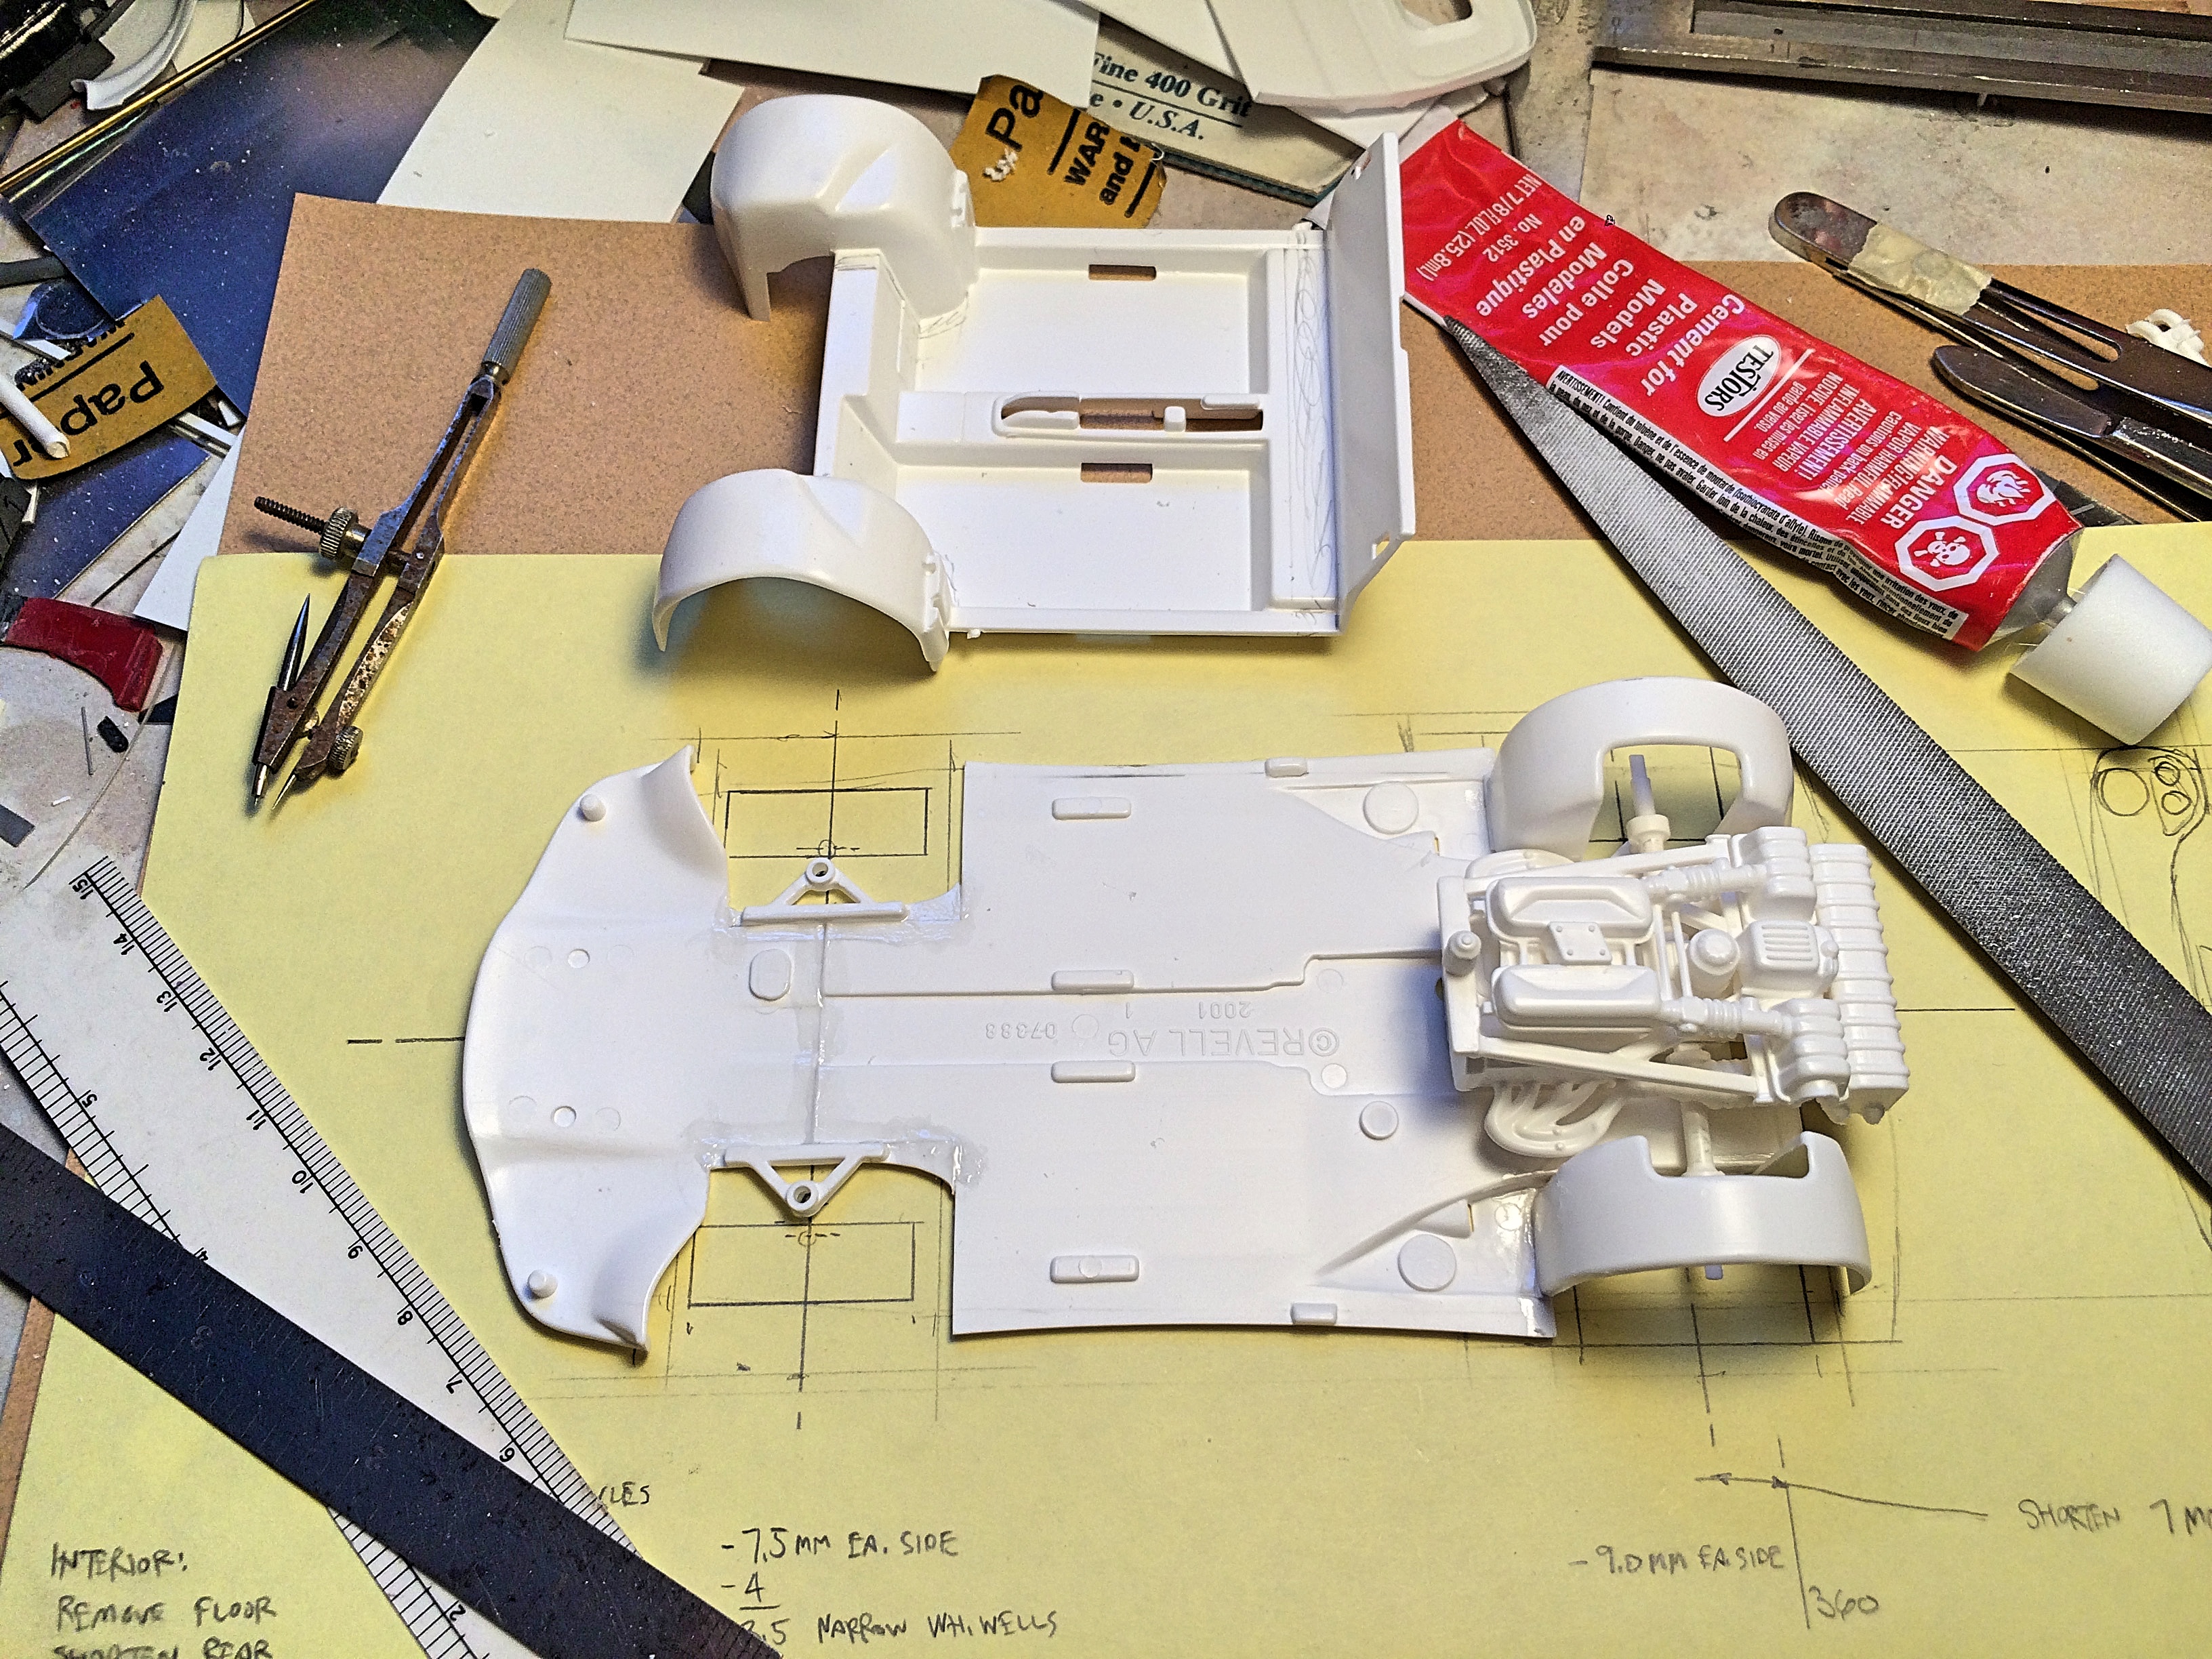
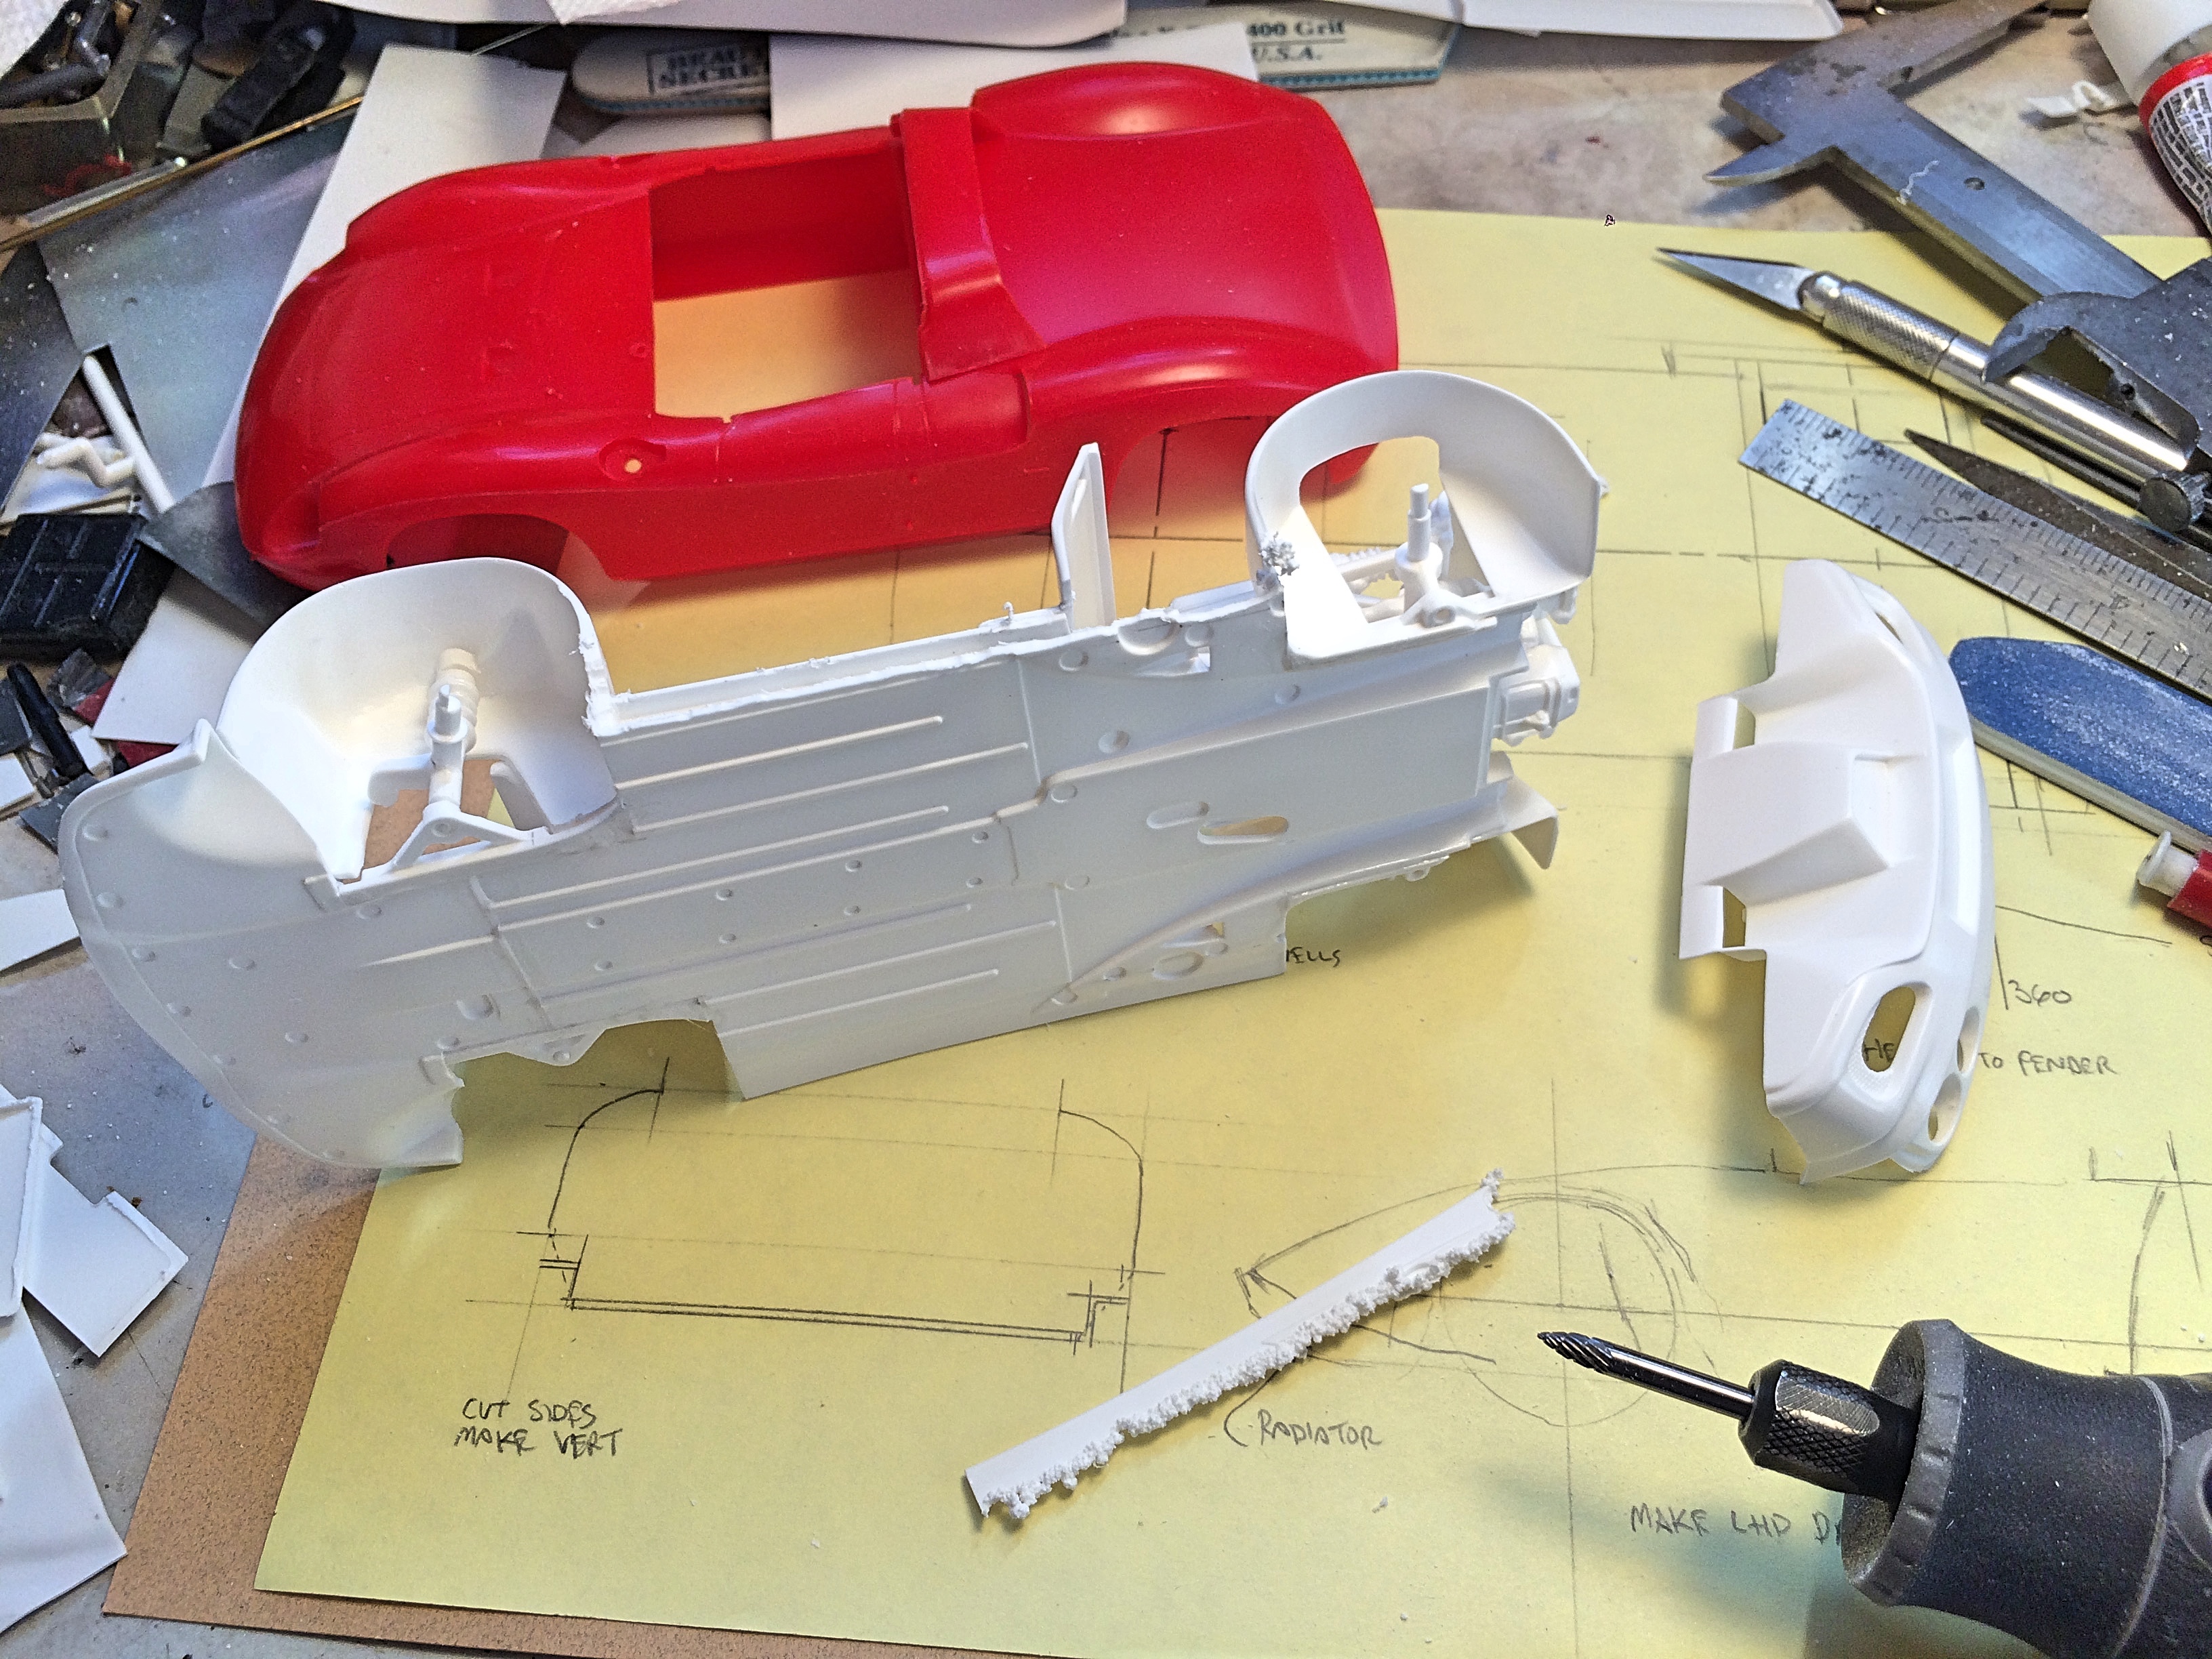
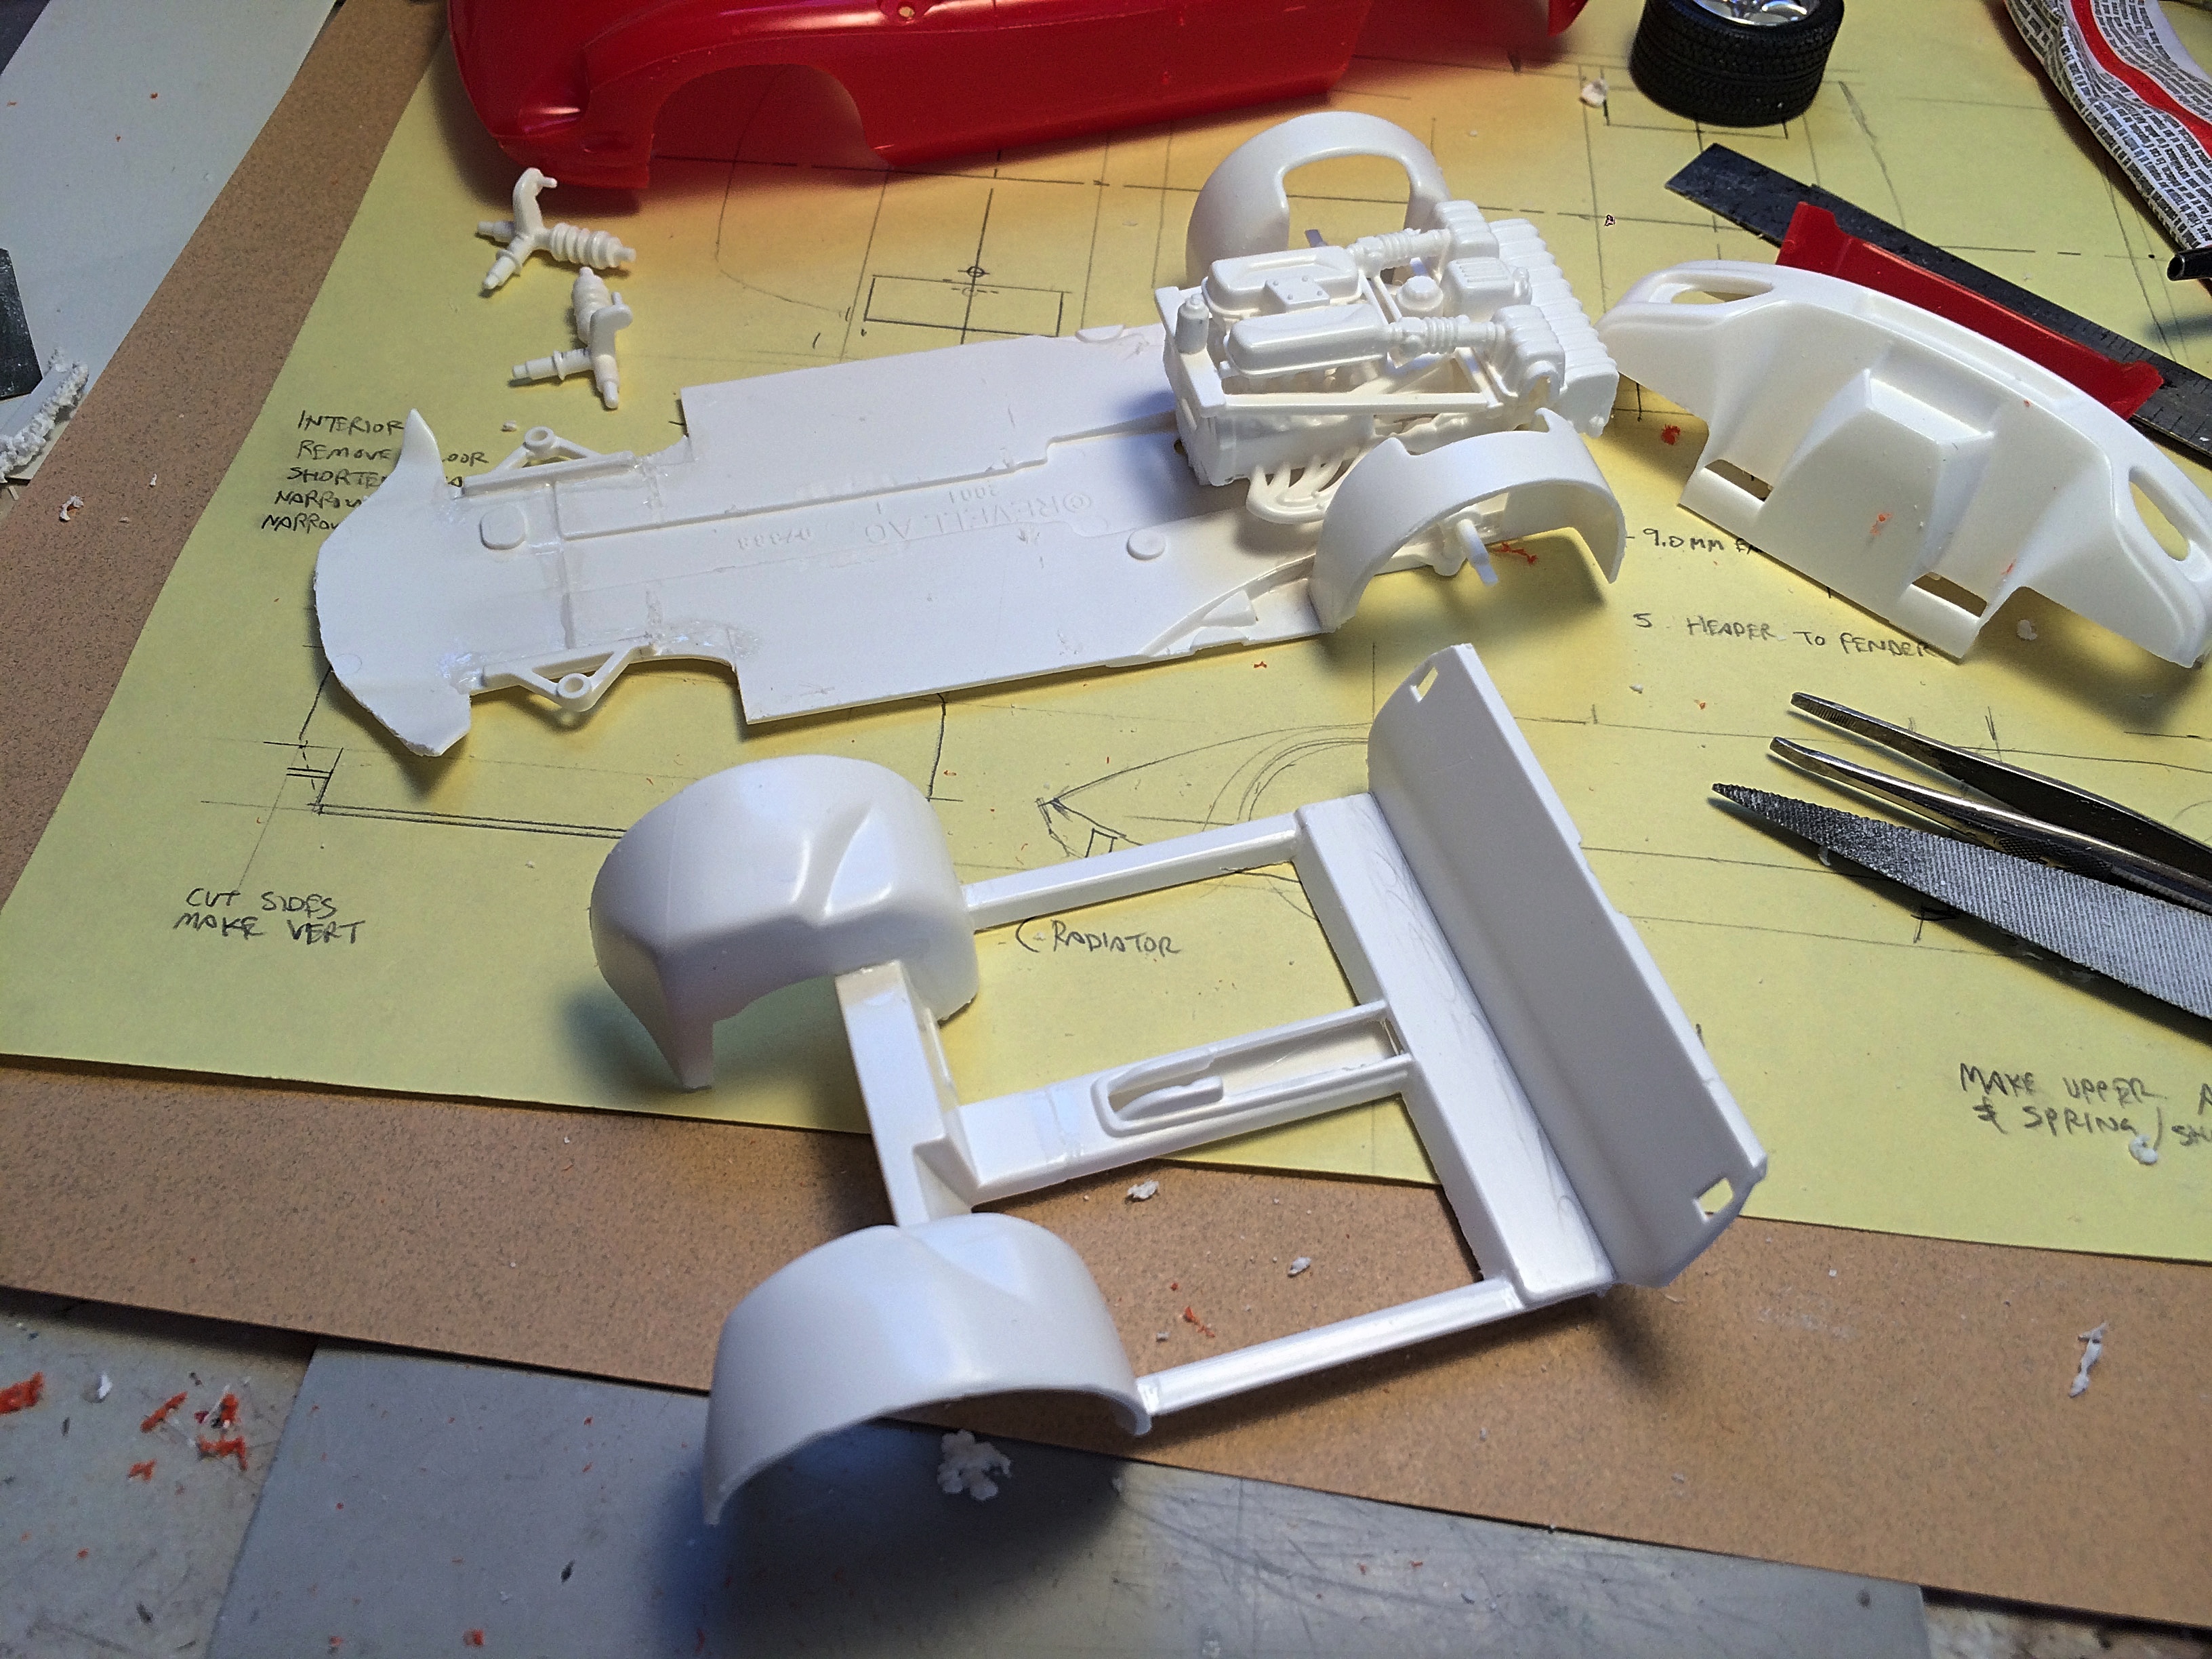
Gestation happened in my Monogram Ferrari 275P vintage kit review thread. I started by barely tacking the engine together and onto the chassis pan. Measured and drew plans to figure out where to chop and modify. I thought cutting down the engine components would help, and considering the way Revell engineered it, nobody would notice. Each surface was filed down before reassembling with just a little more glue, but still can separate to paint. Cut apart the plenum, air filter and canister part. Sawed off the engine bay sides. I sawed, and in some cases scribed and broke apart the chassis pan. The suspension is really non-existent, lower A-arms were easy to relocate. The back has been narrowed. Shortened the pan behind the front axle line. I glued all this with regular toxic Testors glue, and Flex-i-file liquid cement, much like welding. That way if I needed to adjust, could pull apart, and I could squirm it around for adjustment (supergluing does not allow this). I used the Dremel with this bit for everything, here I just removed the edge of the pan. I really cut apart the interior tub, with a saw, and filed down and straightened the cuts. I needed to keep this as a separate piece, for being able to get the struts in later. I tacked parts onto the pan, but welded all together as I went. I adjusted my plan as needed, kept the tunnel which will need some modification to the chrome trim part. I really like the tunnels, so cut off the rear body part, made several saw cuts. Front of the pan was sawed off, some Dremel grinding to shape, real rough at this time. But it all fits in great, and don't need an engine hump! Thinking of how to add fender flares, simple round bumps most likely. Still need to shorten front axles. Modified the rear, decided to keep the original grills, but going to be modified at the bottom, and will be mesh. Drilled holes for the Mondial taillights, have also done for the headlights. The valance edge will be refined later. I was going to have the exhausts exit through holes similar to the Mondial, but it will be easier (I hope) to direct down from the mufflers into the tunnels, and then back. Now I need to leave it alone, so the cement will cure. I discovered the body is twisted, so need to consider how to straighten with strategic body mounts using screws. The fender flares will be fun. Interior should have simple door panels, and dashboard. Need to figure out the radiator in front, thinking laid almost flat, with channels exiting before the wheels. Then when all that is done, cut off the engine lid, and then will need to fabricate chassis box thingies and framework continued from the engine part. Two more radiators in back, modify the body ducts. Then exhaust pipes. Then seats, I got some cool aftermarket units at the DSC show. Color, Ferrari red with a pearl overcoat. Dann will hate that.
-
Rolled her off the assembly line this morning, not to happy with the final paint finish, or the ill fitting hood, but it's done and I can go on to the other Chargers I have. Painted with Testors' Sub Lime green and wet look clear, roof is Tamiya semi gloss black white the interior is Testors' lacquer primer white and Tamiya semi gloss black door panels and dash. The Hemi came from the Revell 68 Charger kit and I had to modify the exhaust system to work with the headers. Rear Frame supports (black things in front of the rear sprigs) came from a Revell 70 Charger kit. Thank you and all comments welcomed! Now, on with the show! Thanks again!
-
 Hey, everyone!, I just wanted to show you the shifter I made for a friend. It was a fun project - in itself...a model all its own...Hope you like, thanks for looking!!
-
Finished this one up yesterday! Not a bad kit at all and easy to convert to a street machine. Painted Testors' Go Mango with Tamiya TS-65 Pearl clear. Interior seats were taken from a Revell 68 Charger along with the exhaust pipes which were cut down to fit onto the kit supplied headers. I had an extra 68 so I used the tail light panel from it to make a hybrid 68/70 Charger. Thanks for looking and all comments welcomed.
-
I got all the rear stripes put on the Chargers now. Check them out. 68 Flame Red 69 Sublime green 70 F&F Go Mango 70 Sun Yellow 70 Panther Pink Thanks for looking, comments welcomed.
-
Completed this morning. Not perfect but it is done. Painted in Tamiya Park Green with a black interior. The Hemi is from a Revell 67 Dodge Coronet kit. I wanted to use an AMT Hemi from the 68 Road Runner kit but the placement of the exhaust manifolds on the AMT heads did not line up properly with the exhaust pipes so I had to use one from a spare Coronet kit I had. "Hemi" door decals are from a spare Revell 68 Dodge Charger kit. Not much more to say, everything else came from the Daytona kit itself. Thanks for looking.
-
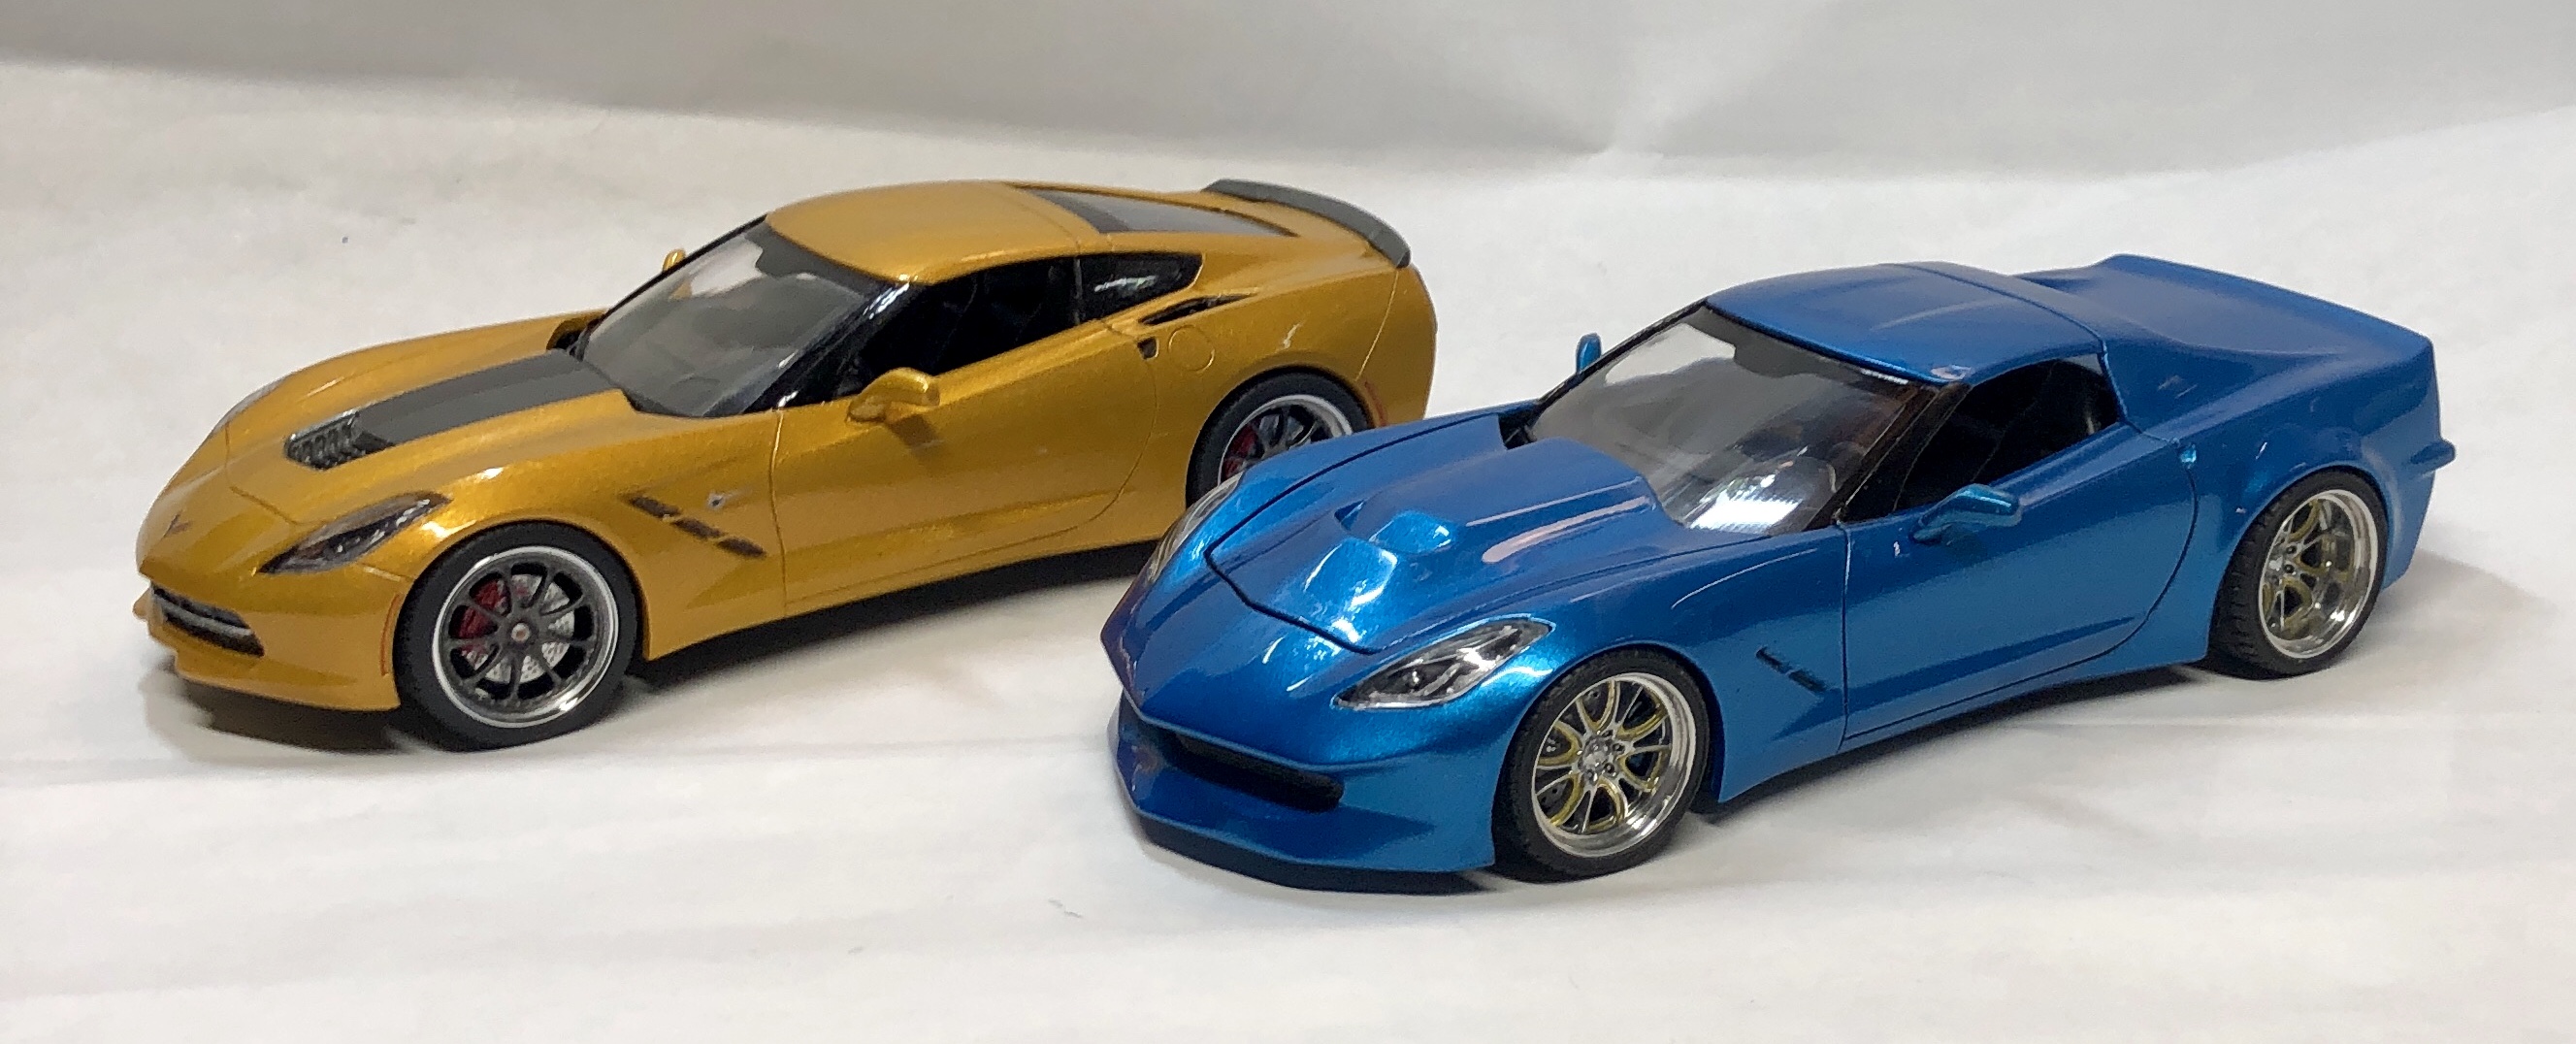
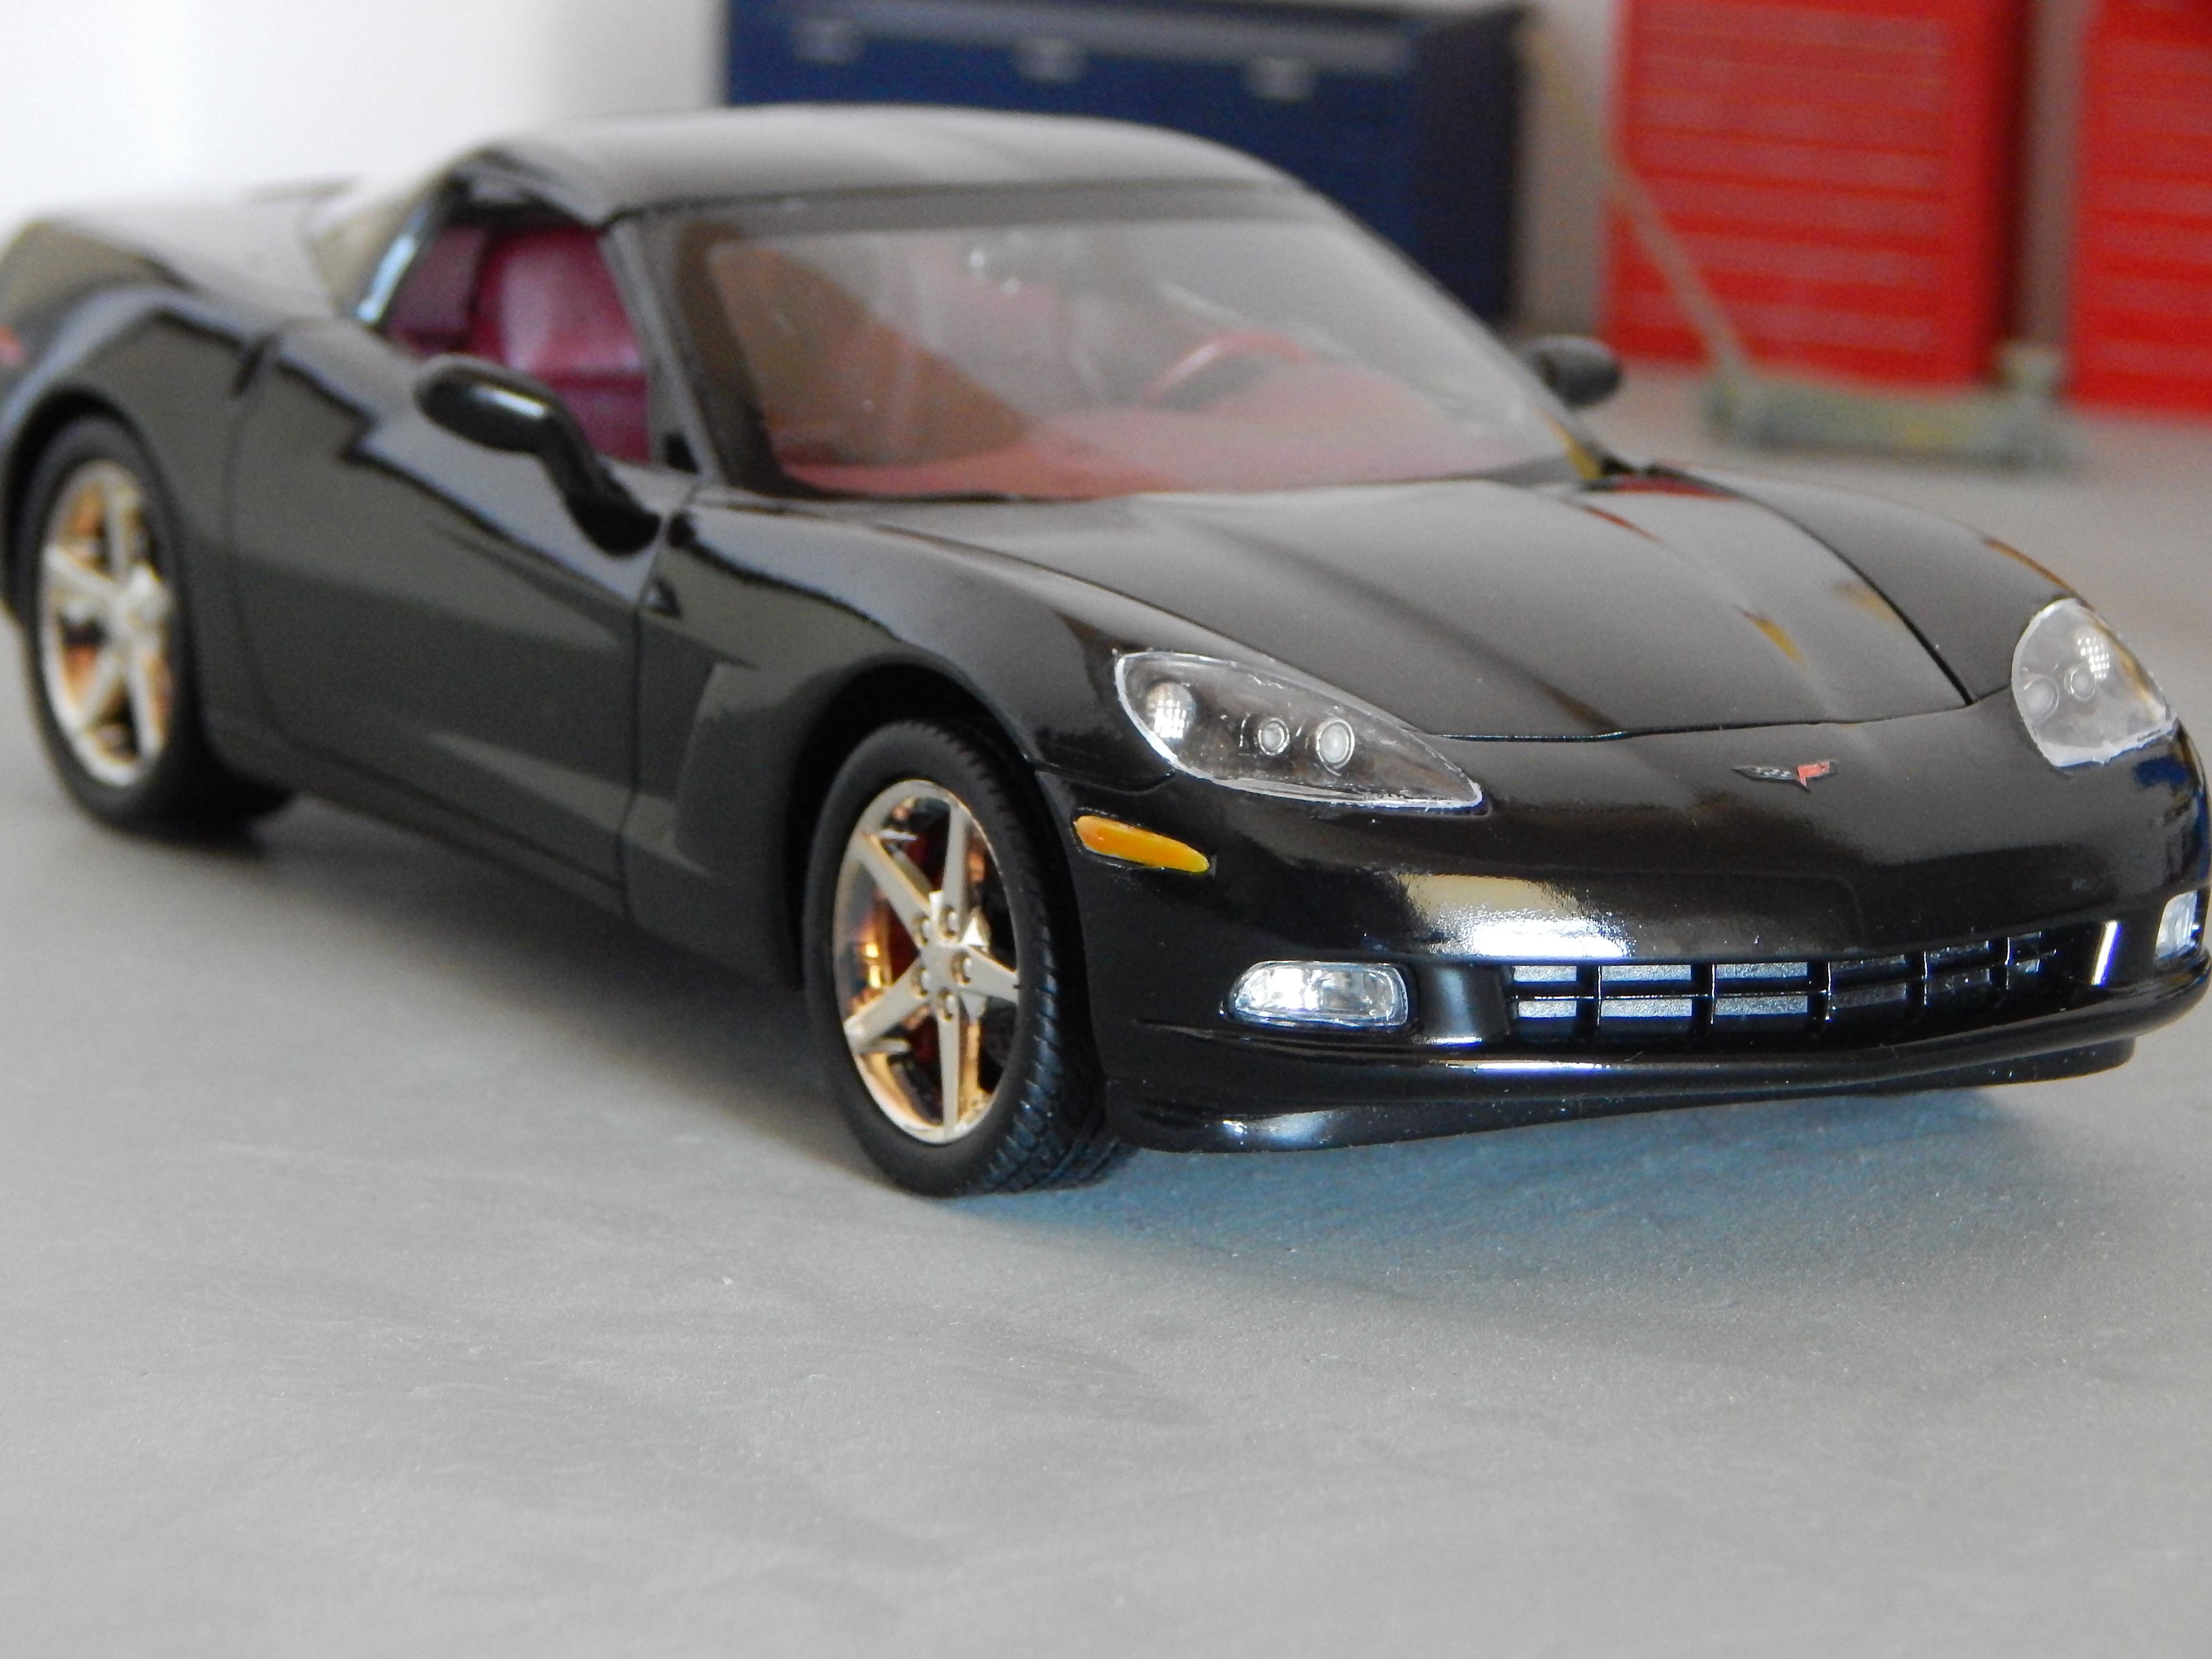
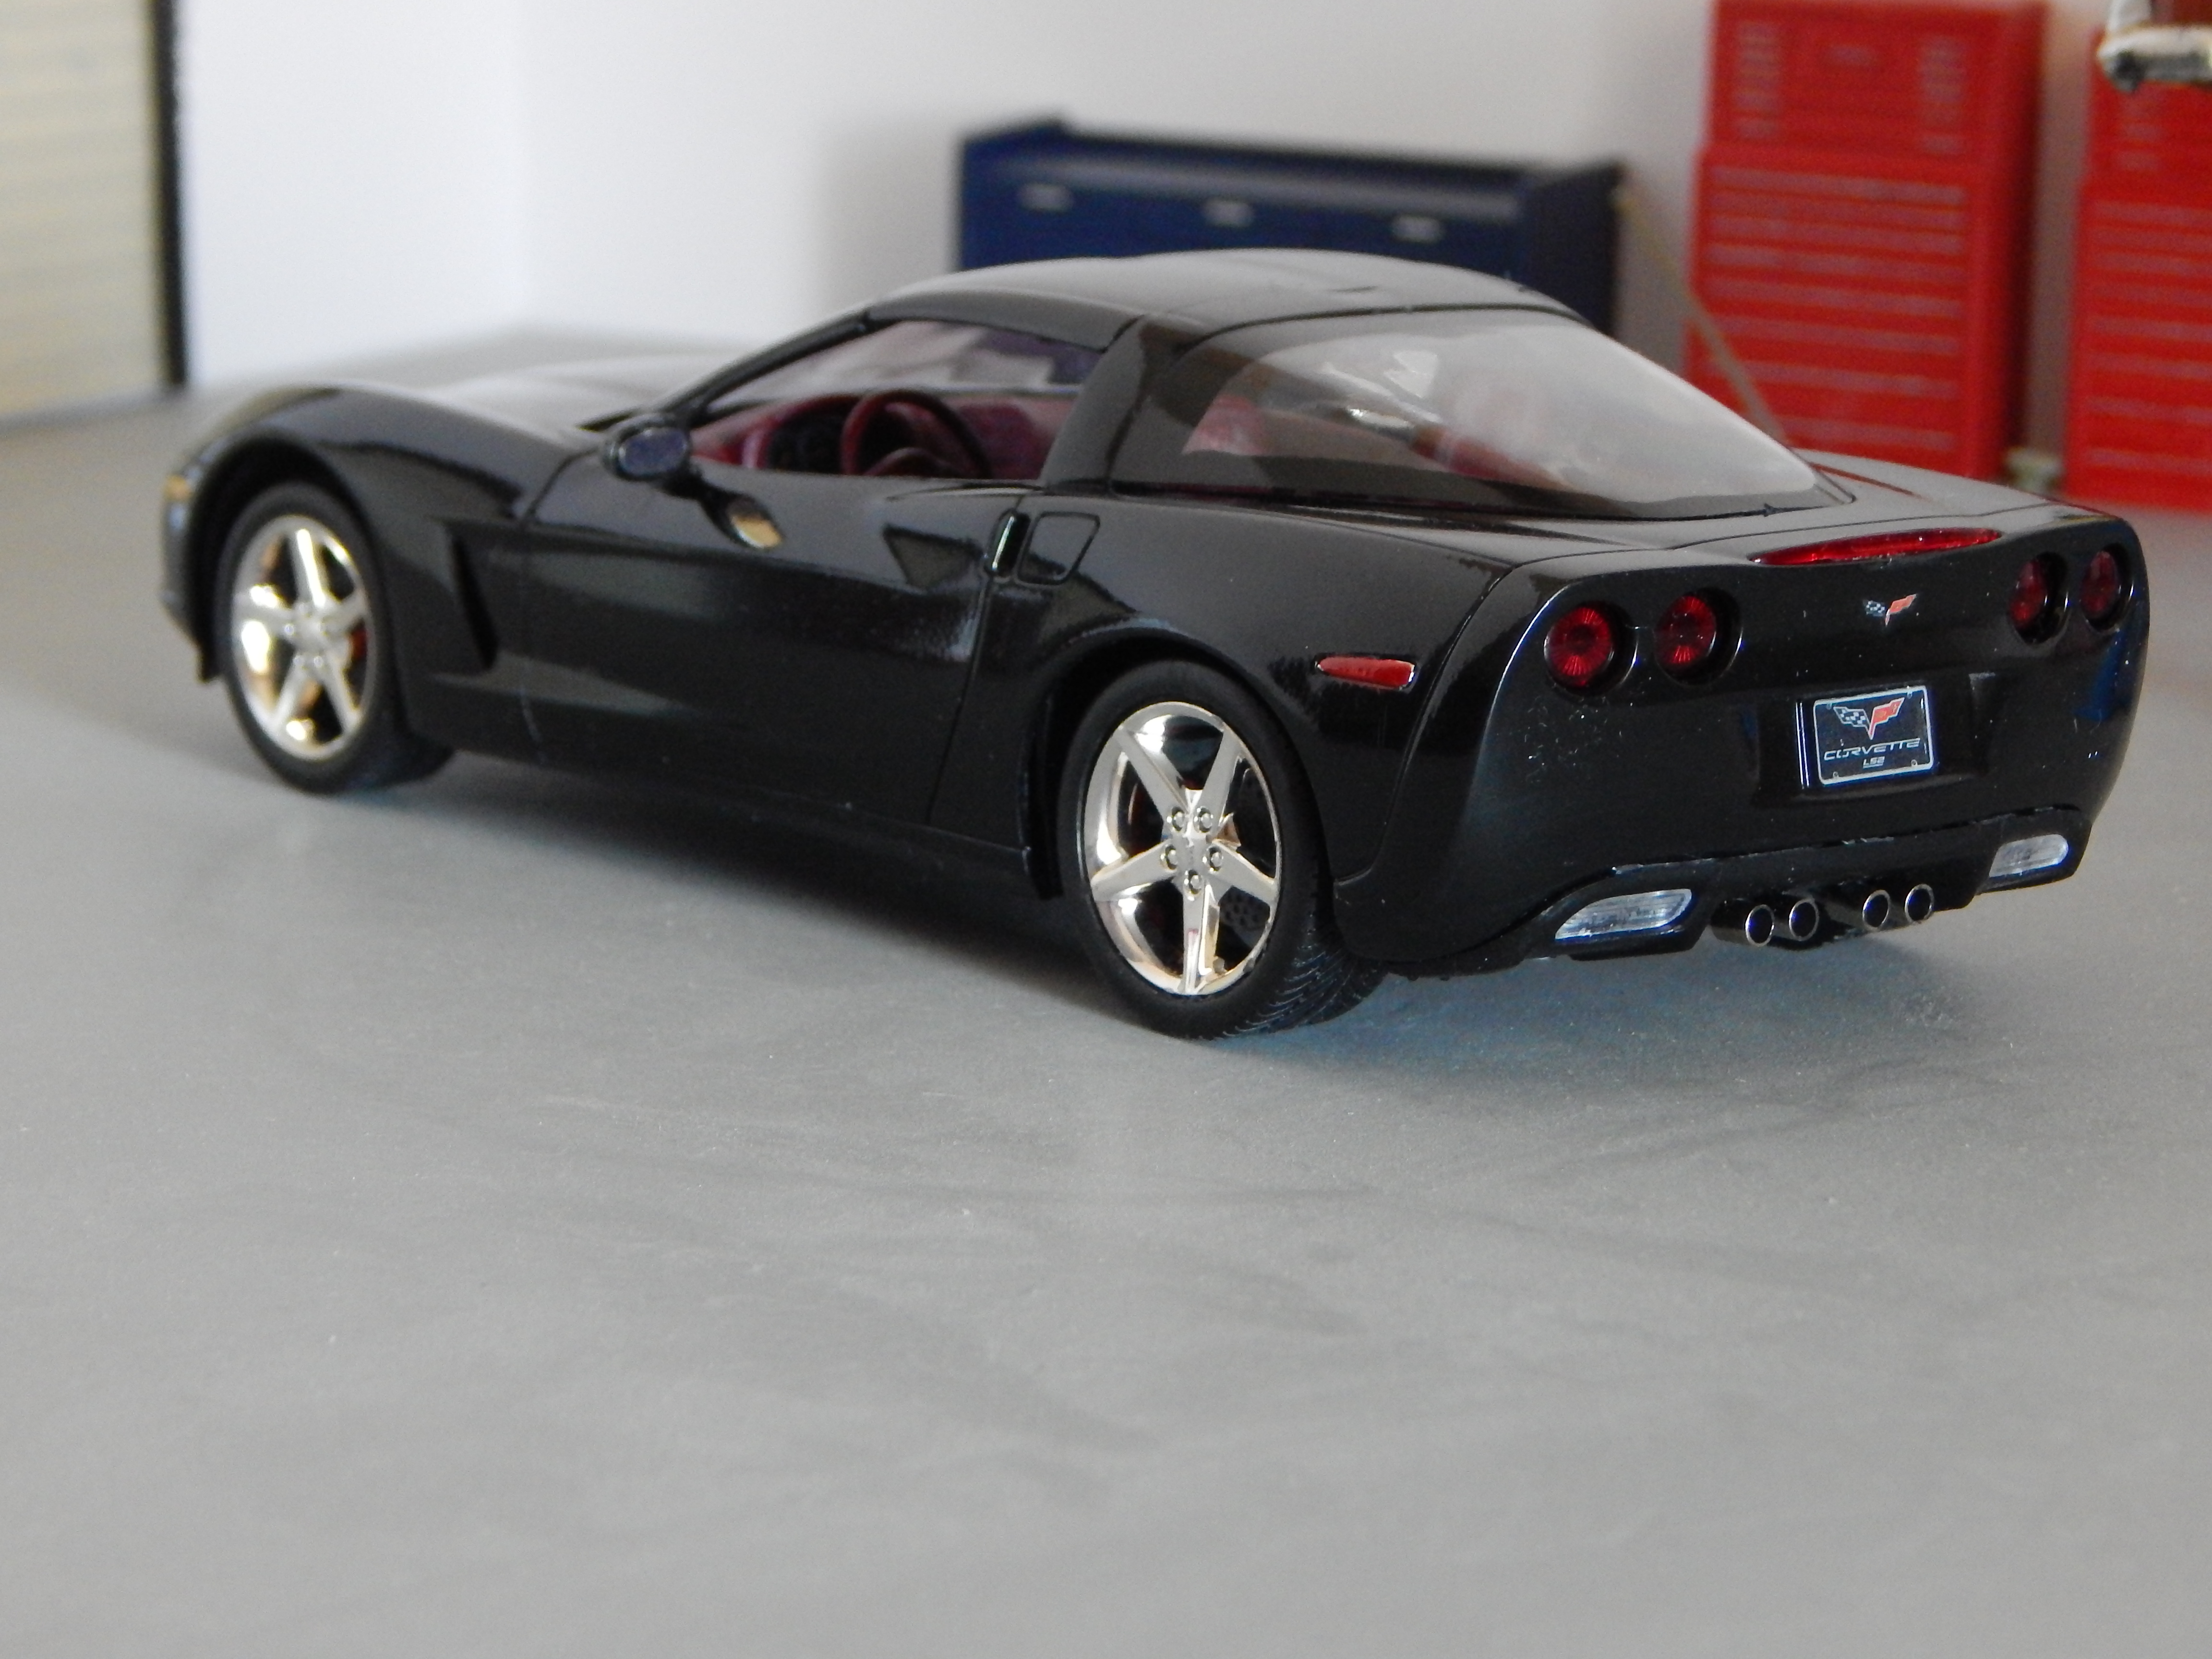
The latest in my series to build all generations of Corvettes, the C6. Fairly simplified kit, but it goes together well. Only 1 left to go! Comments welcome, thanks for looking.
-
I got my Fireball Model works six pack intakes in the other day. Unfortunately they are just a little big to fit on the AMT & Revell 1/25 440 engines. That's okay though because I have a couple of Monogram 1/24 scale MOPARS that those intakes will fit. I went through some boxes and found some six pack intakes that would fit the engines though, so all is still good. Here is the one for the AMT 71 Charger, I forget where I got this intake from, but it is molded in yellow. The tires/wheels for this build I also picked up another 71 Charger, this one is the street machine version with the Hemi. Here is the set of tires/wheels I finally decided for this one. The wheels are some MPC units from something while the tires are those Goodyear Raised White Letter 15s.
-
My latest addition to my Charger stable is this Fast & Furious version. I found a set of really wide treaded tires that would fit the kit wheels. I only had to use some #14 spacers from an MRC tire pack between the rear axle and brake plates to get them to fit without rubbing the springs. I'm actually going to have some fun with this one, as I have a 68 tail light panel and interior to put in it. So it will be a 68 Charger with a 70 nose. I will paint this one Go Mango with a black interior, like the 74 Road Runner I just rebuilt. It will have full exhaust so it will be a street car instead of a drag car. Below is just a mock up of how it's going to sit.
-
I finally got a finish on this body that I can live with! Interior is almost done as well. This will have a 440 six pack with the carb setup from Fireball Model works. Thanks for looking! Comments welcomed.
-
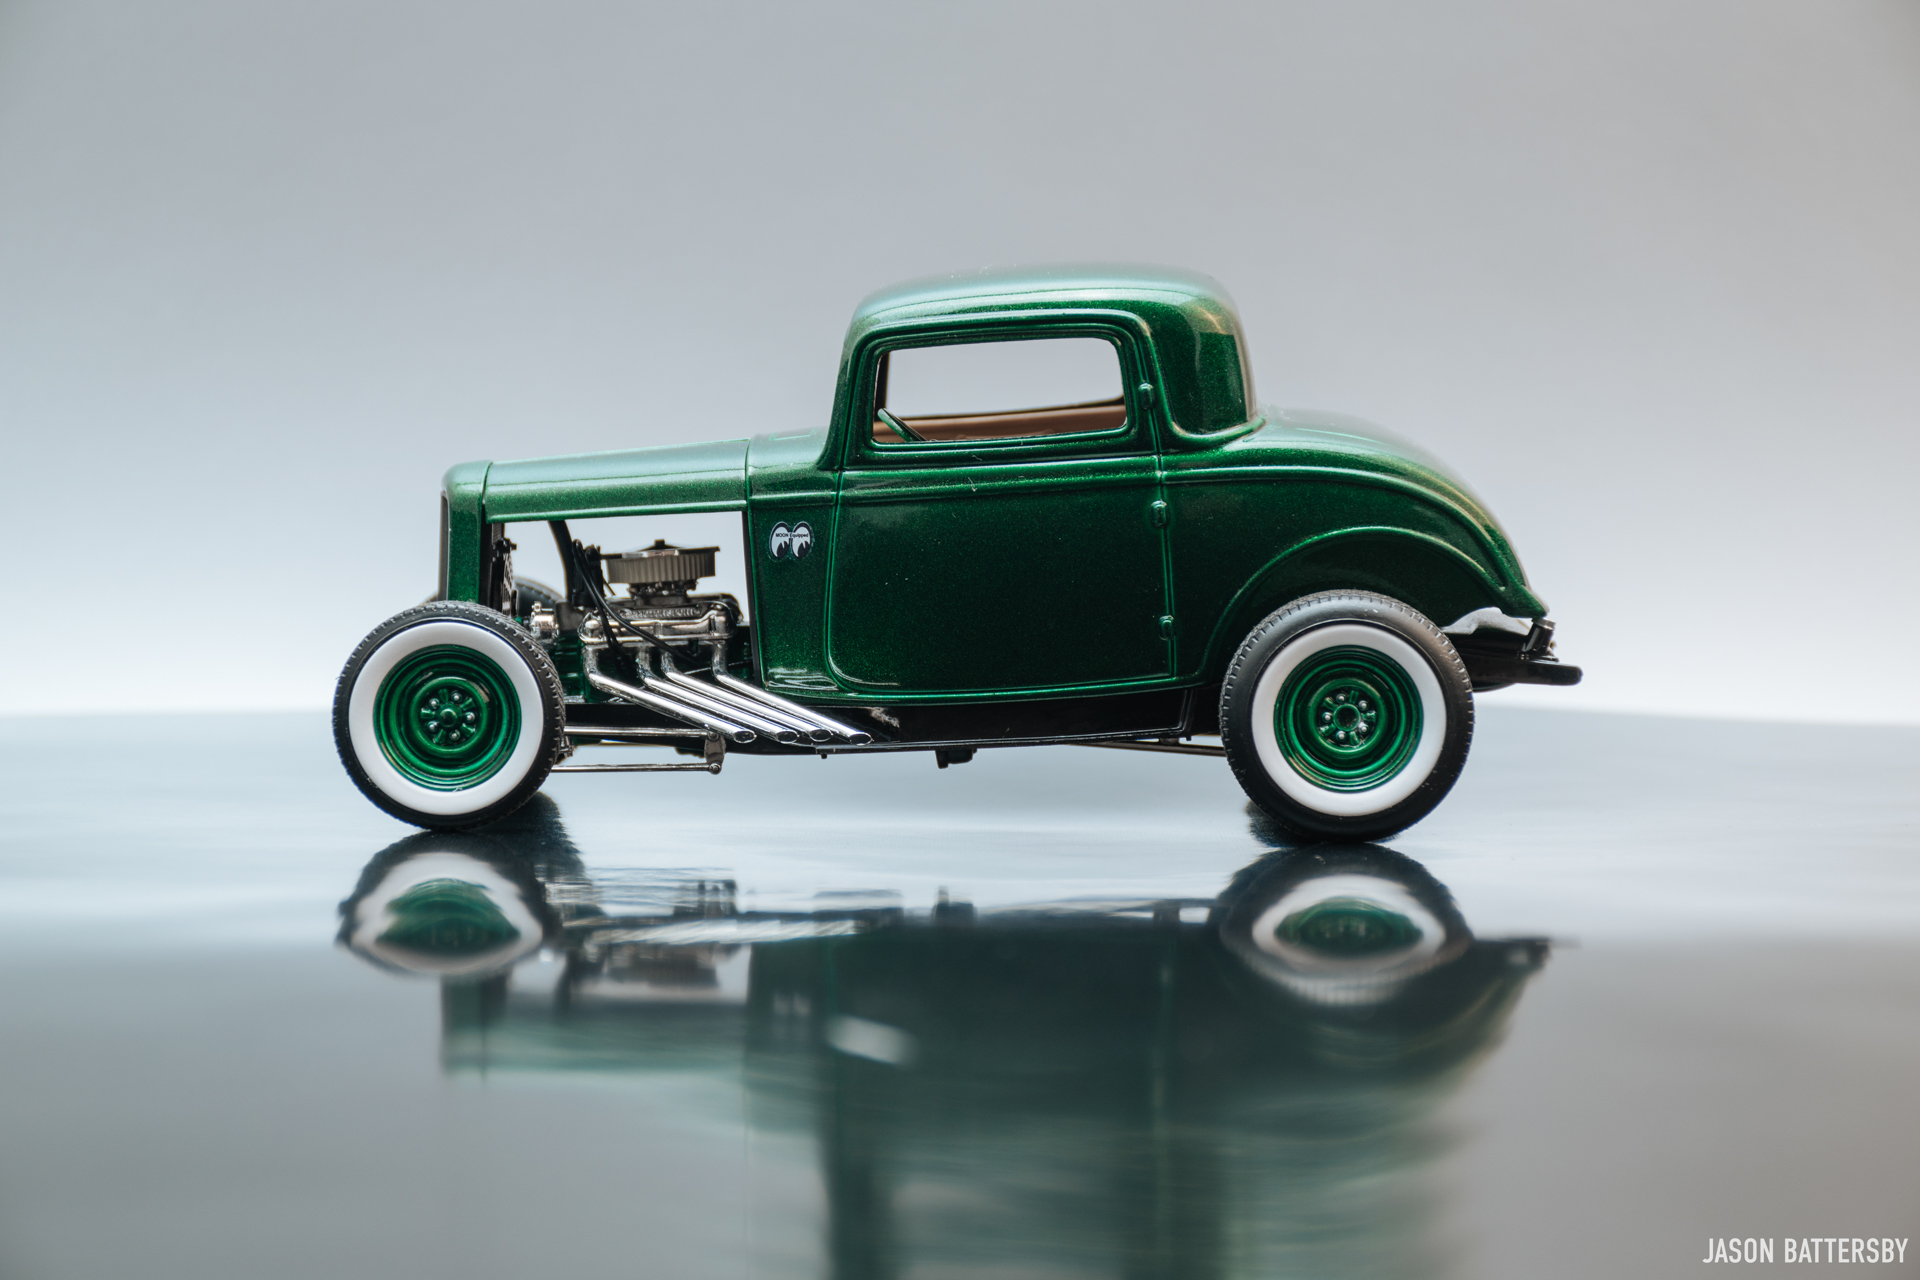
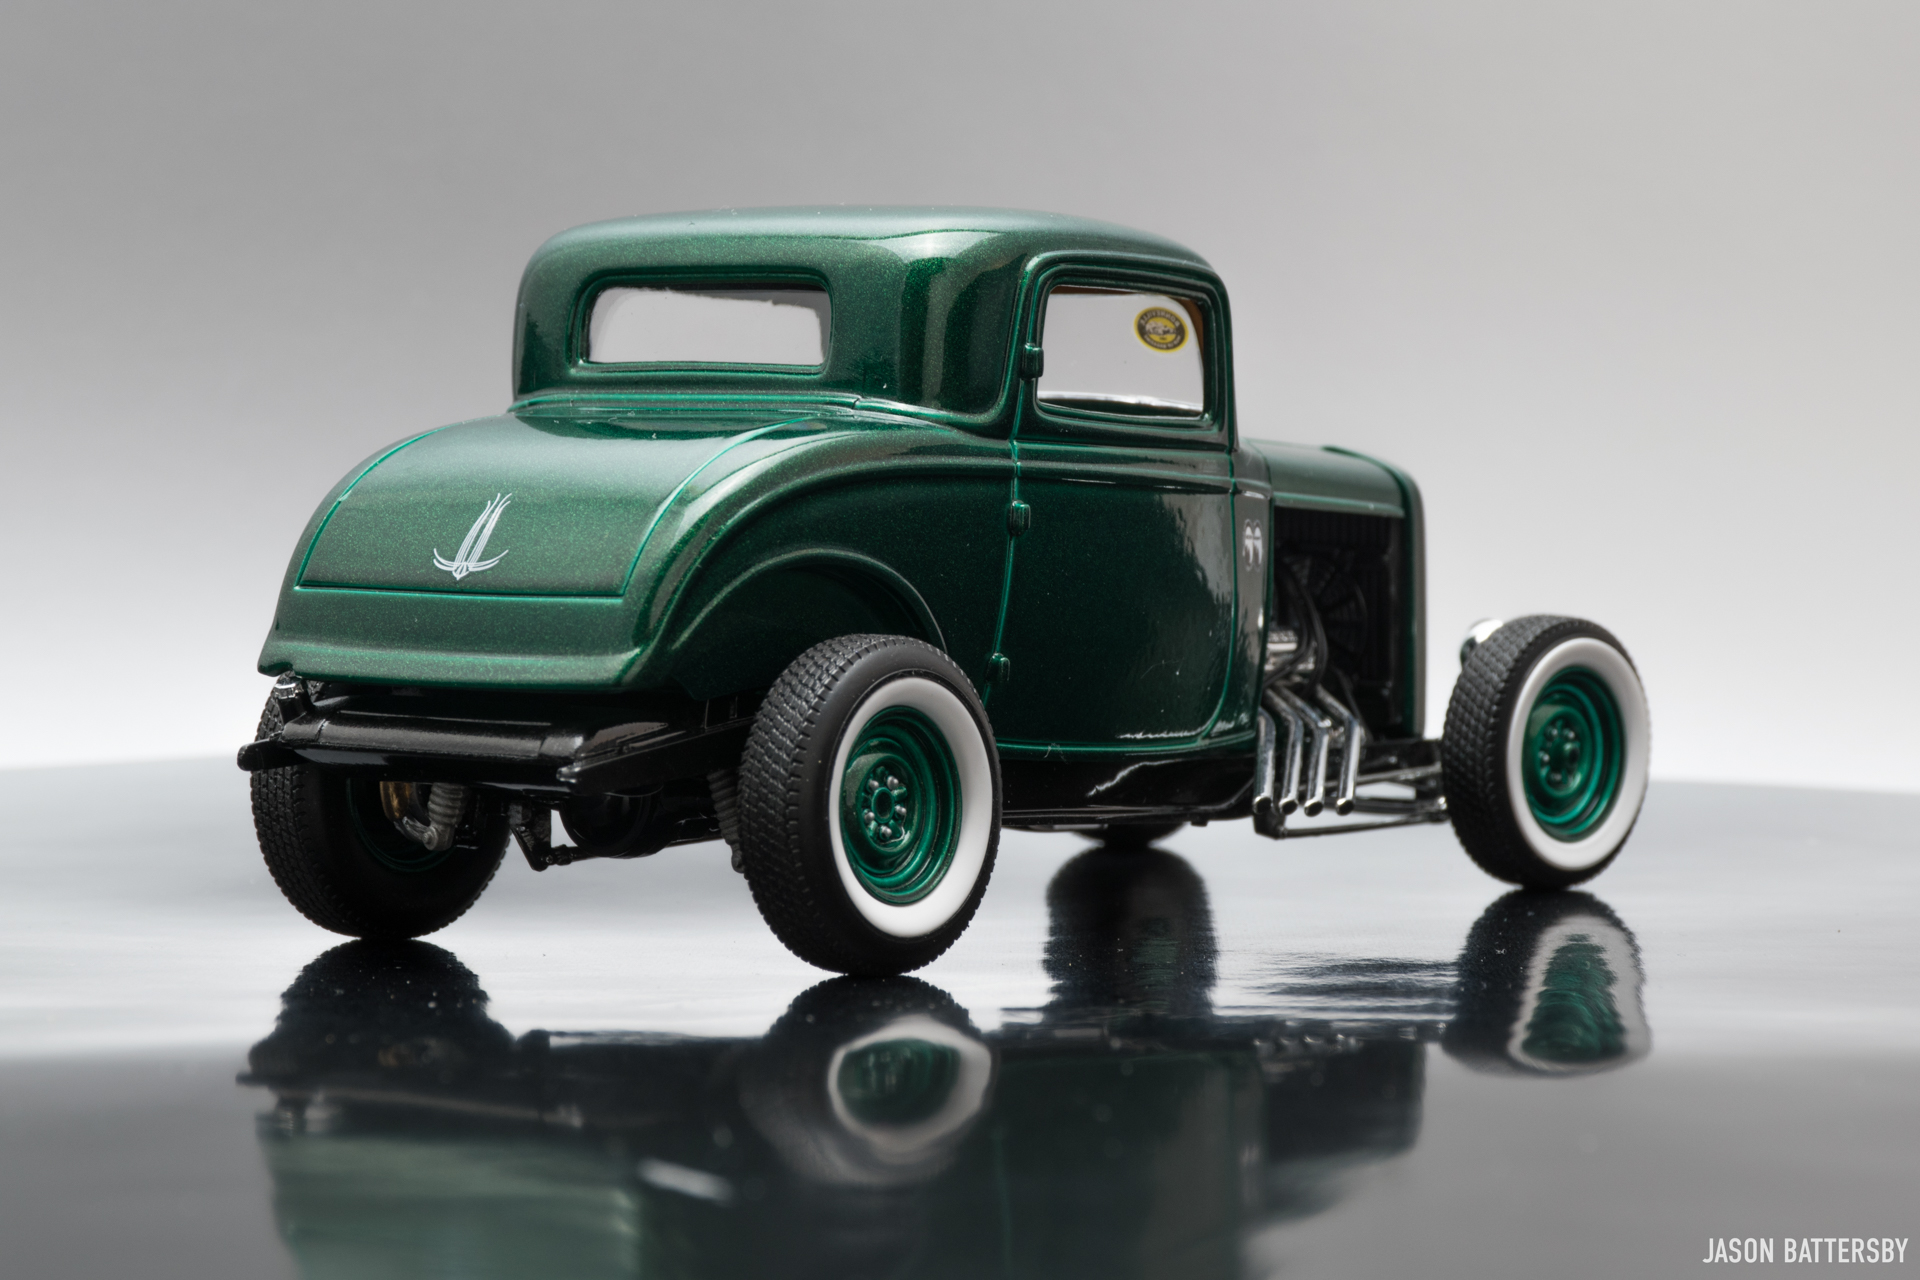
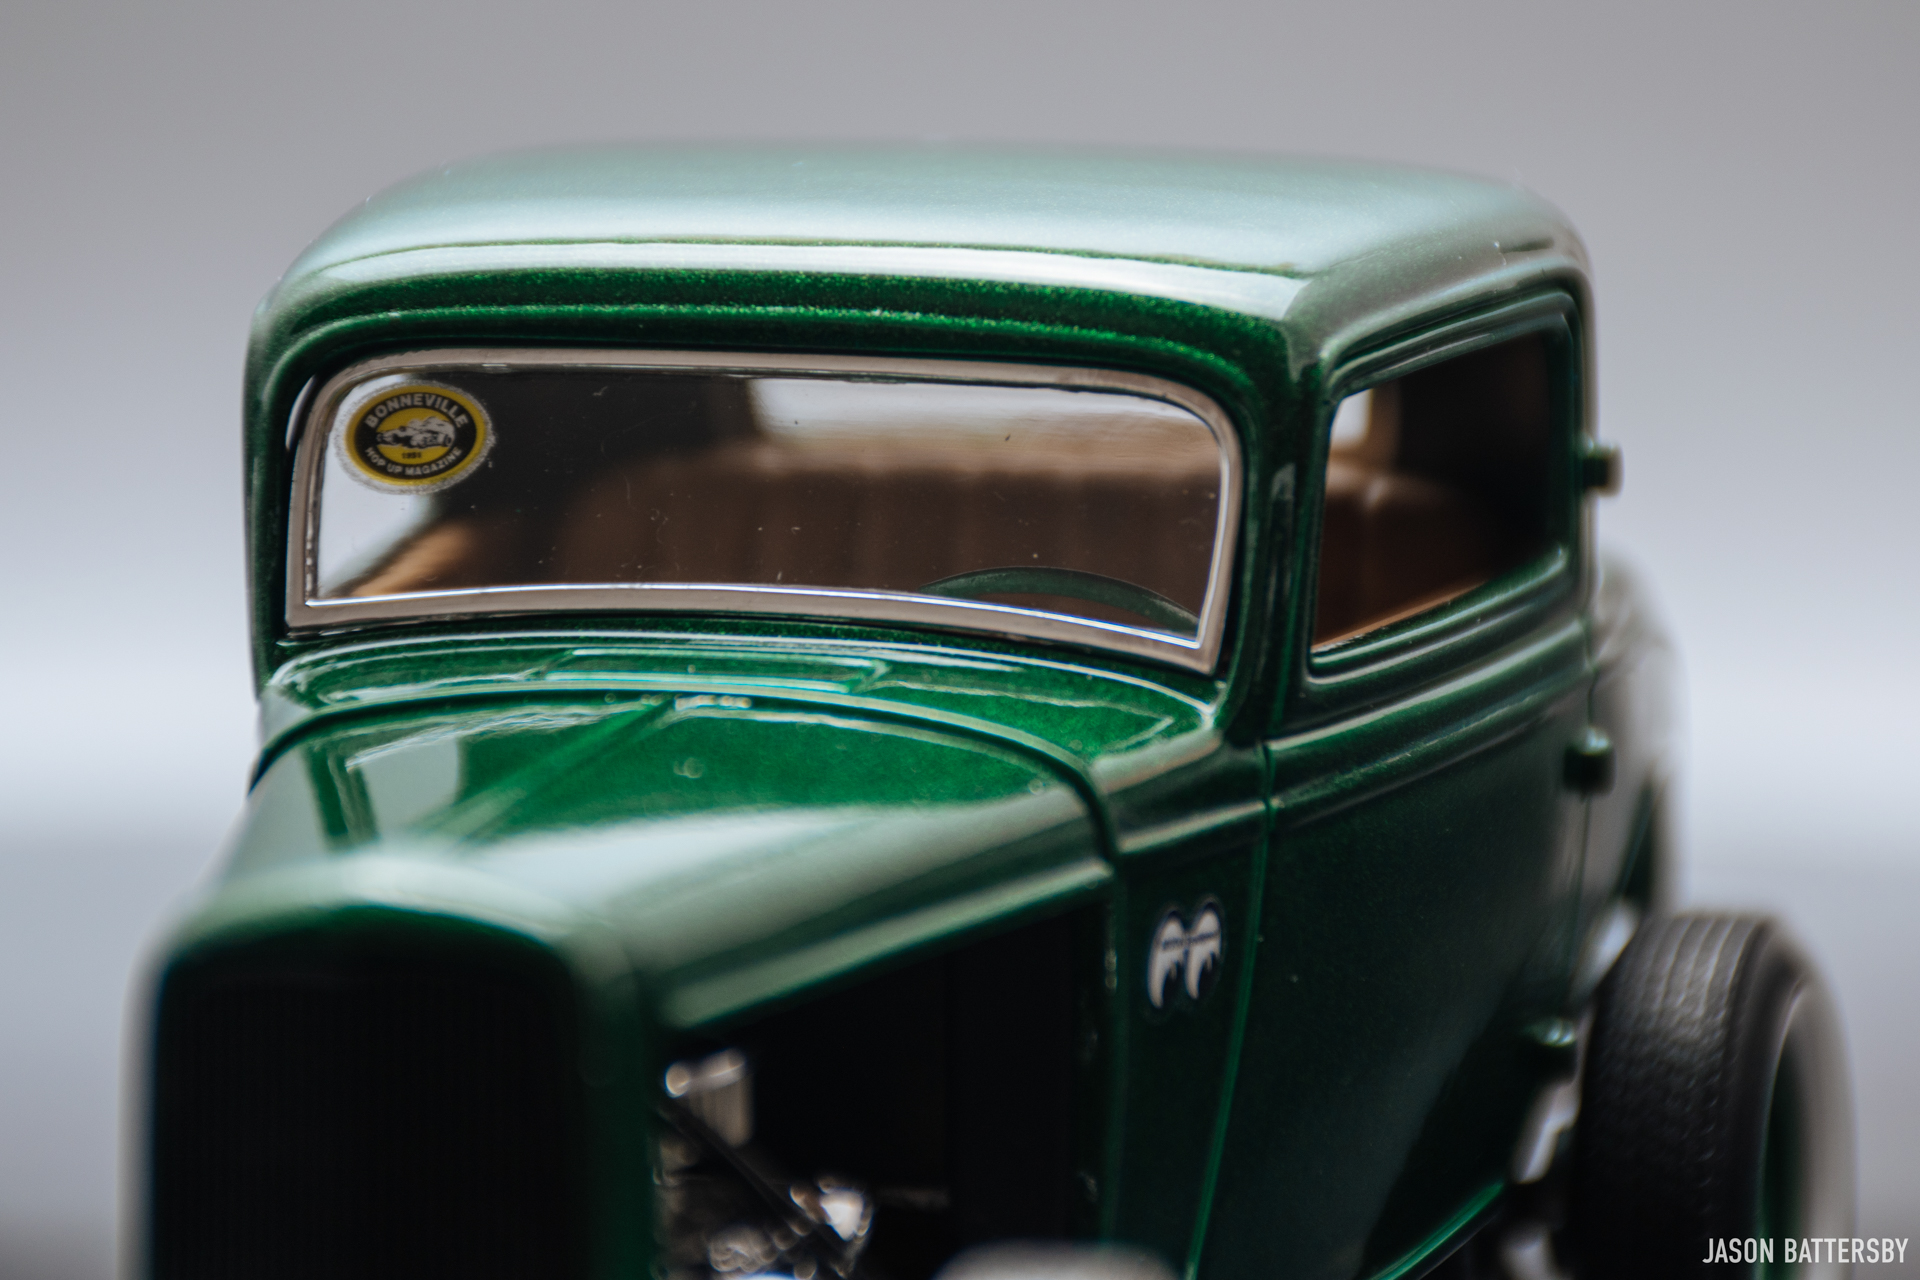
Hi all, it's been a long time since I posted a finished build here on the forum, but finally I found the time to upload some images. The Bonneville Coupe as I call it is basically a box stock 1932 Ford 3-Window Coupe without the fenders. Modifications are the wheel and tire combo, and the straight pipe headers. The paint is Testors Green Metal Flake(1630) from a can, no clear overtop. For more updates on my builds, please follow me on Instagram @scaled_models as I update there regularly. Cheers!
-
So this kit has been in my built kit cabinet for a few years, and then I noticed this goo pouring out of the wheels. it looks like the rubber is attacking the plastic, and the plastic pours out. I didn't pay it any attention, but it just gets worst and worse. So I took the wheel off & stripped them with brake fluid
-

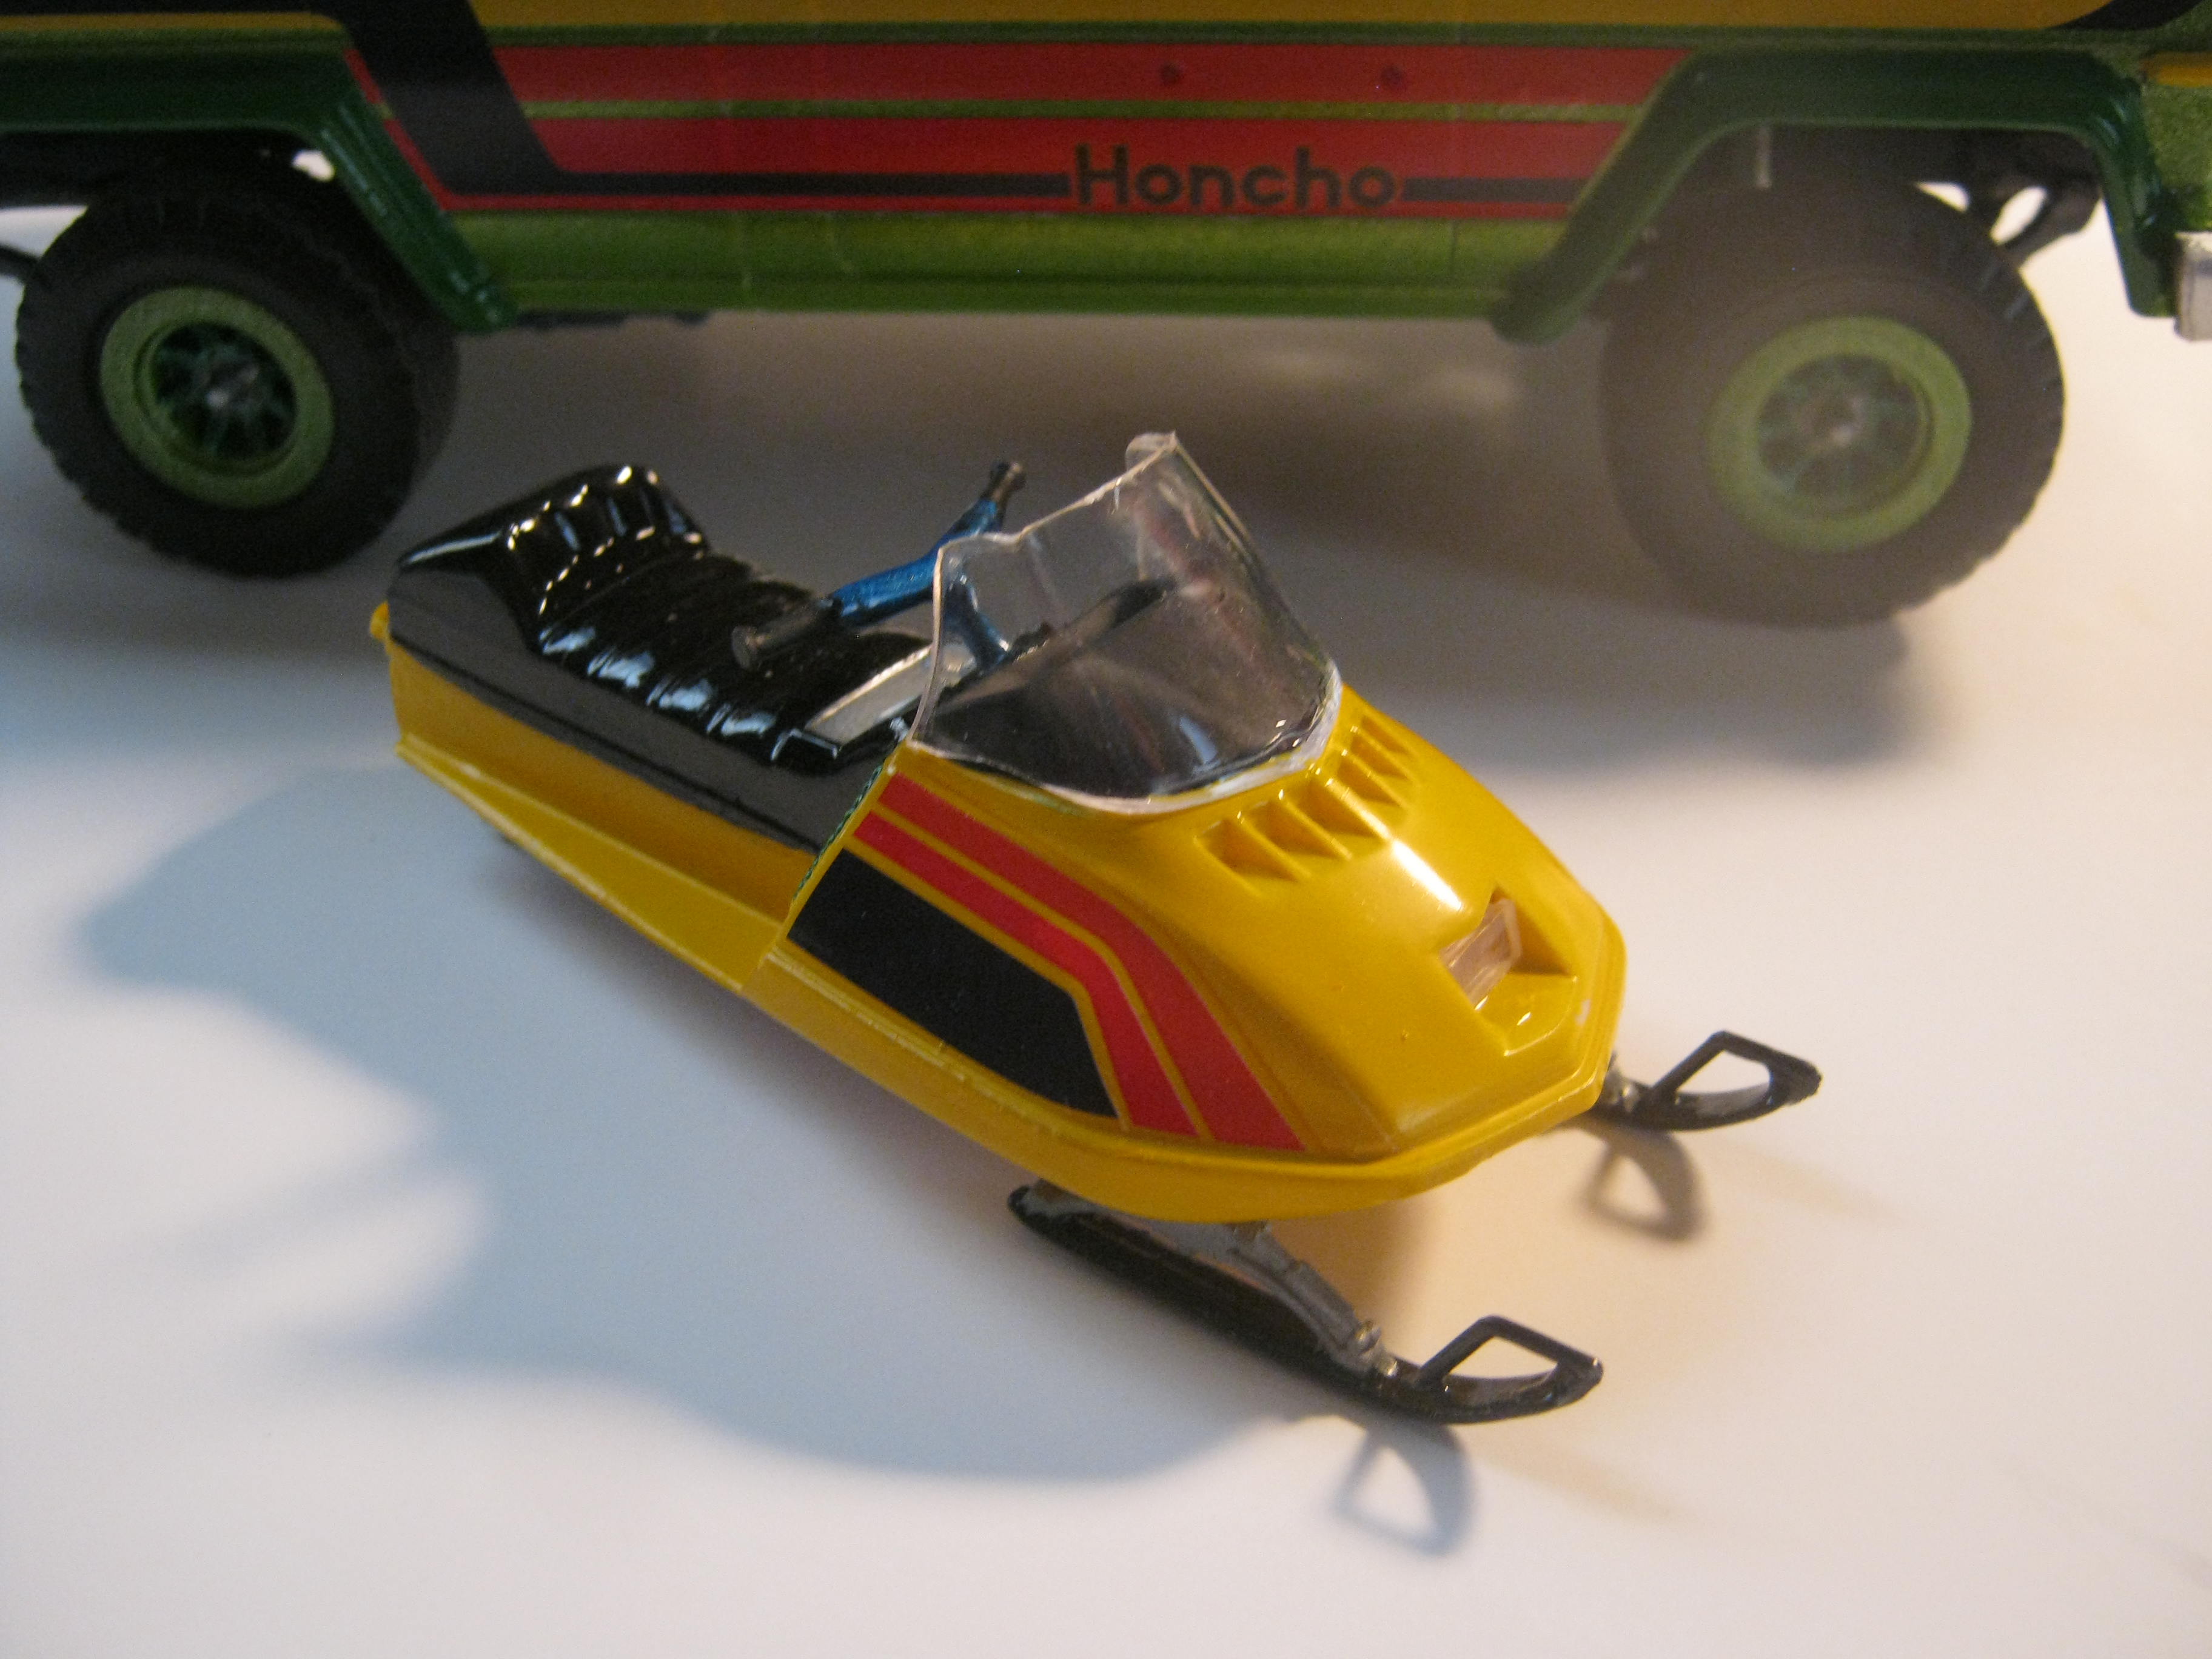
Little Green Honcho
skymnky721 posted a topic in Model Trucks: Pickups, Vans, SUVs, Light Commercial
Hi all,hope alls well for ya,,I just finished this Revell "Ice Patrol" kit. Fun kit to do,,sprayed w/Testors "Lime Ice" quickdry enamel,,and some basic wiring and such. Always enjoyed the early 70's AMC products,,my grandpa had a Blue + white interior Jeep Wagoneer ,,had many a fun trip in that one. Enjoy the builds here,,Build on!
-
The maroon 68 has morphed into a flame red one! I had so much problems with the maroon that I chucked it into the pond and bought another kit. This is the paint job after a dip in the pond as well. The 68 turned out to be a problem child. I have some hood clearance problems with the air cleaner that I will fix. Thanks for looking, all comments welcomed!
-
I broke down and got a new one the other day along with some Testor's Revving red. I was quite surprised when I saw instrument decals on the sheet along with a neat set of red line tires and some nifty Crager mags! Red lines and Cragers, hum. So sixties! Backing plates are painted with Mr. Color #3 red. Here it is with the paint finished, Testor's Revving Red with clear coat. The chrome air cleaner base is from the Revell 68 Charger kit. I am using the chrome round air cleaner from the 67 on the 68 to give it the look of a stock 426 Hemi equipped car. Thanks for looking, all comments welcomed.
.thumb.jpg.e0420fe52e683c60d19e843462316523.jpg)