Search the Community
Showing results for tags 'Seat belts'.
Found 5 results
-
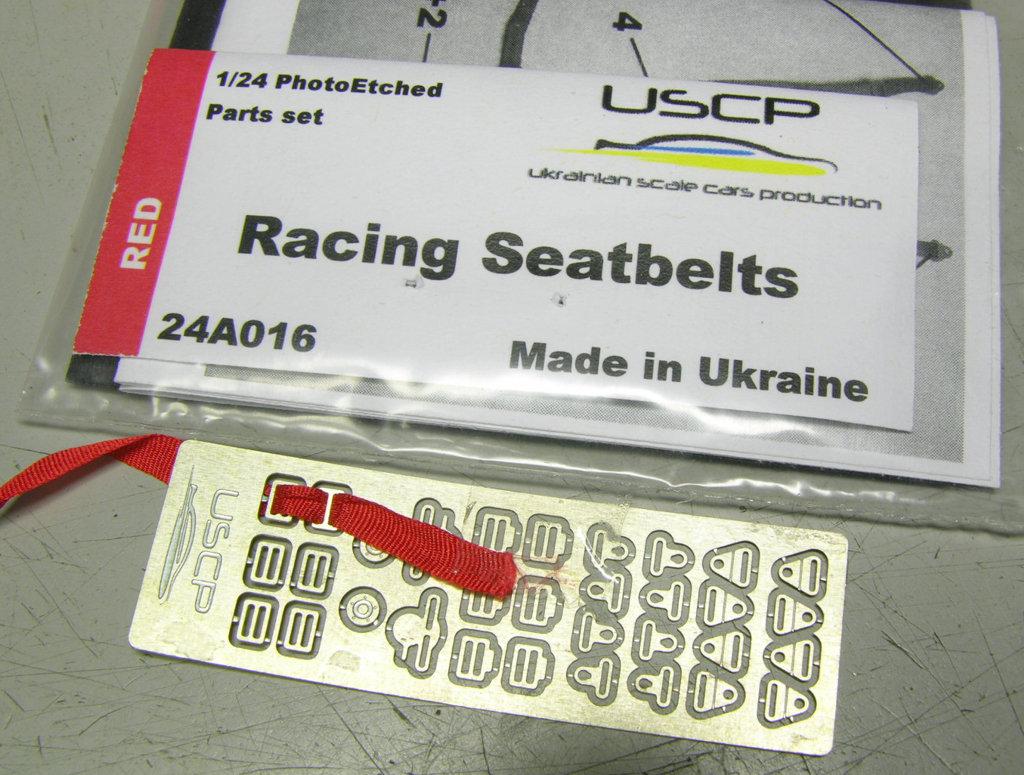
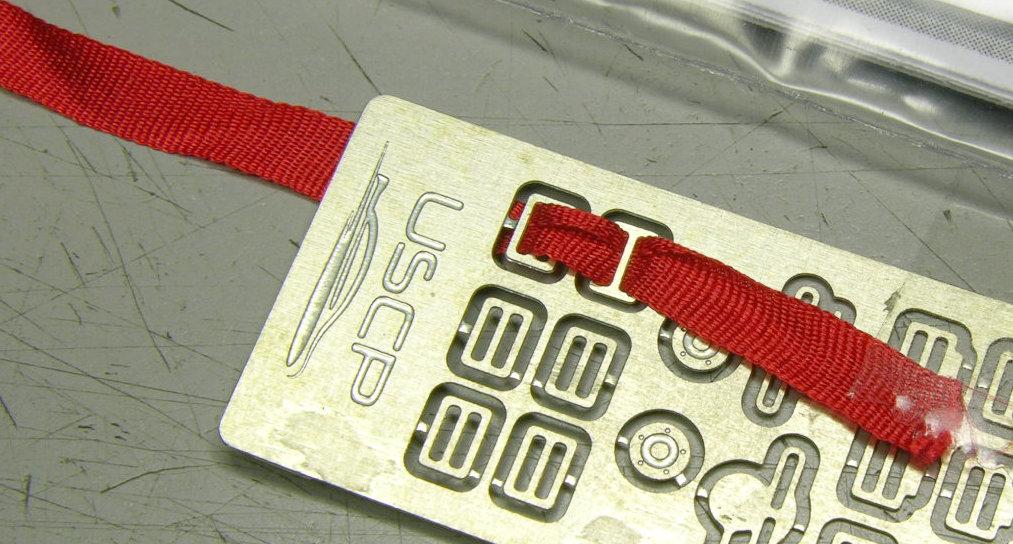
 I placed an order with USCP for several items including these seat belts. Smooth and easy ordering on their website, PayPal transaction, items all well packaged. It took some time, but that is not unexpected, coming from Ukraine to USA. The seat belt material is the best I have seen. The weave is as close to scale as I have seen, and the material is very soft (not stiff like some other brands). But there is a problem. The belt slots in the photoetched hardware (like buckles) are too small. The belt material ends up folding over. It doesn't look good. I took measurements and the belt is 0.149" (3.78mm) wide. In 1:24 scale that scales out to the 1:1 belt being 3.58" wide. The slots in the hardware are 0.103" (2.62mm) wide. Scales out to 2.47" in 1:1 scale. I'm not familiar with 1:1 scale belt dimensions, so I don't know which (if any) of those are in-scale. Still, what is painfully clear is that the photoetched hardware cannot be used with the belt material. The belt cannot be trimmed to be narrower - it will unravel and fall apart. All the other products I have purchased from USCP (this is not my first order) were very well designed and flawless. I'm really puzzled as to why USCP did not make the photoetched hardware match the width of their belt material. I'll have to see if photoetched belt hardware from other companies might have wider belt slots in them. I would hate not to use that great looking belt!
-
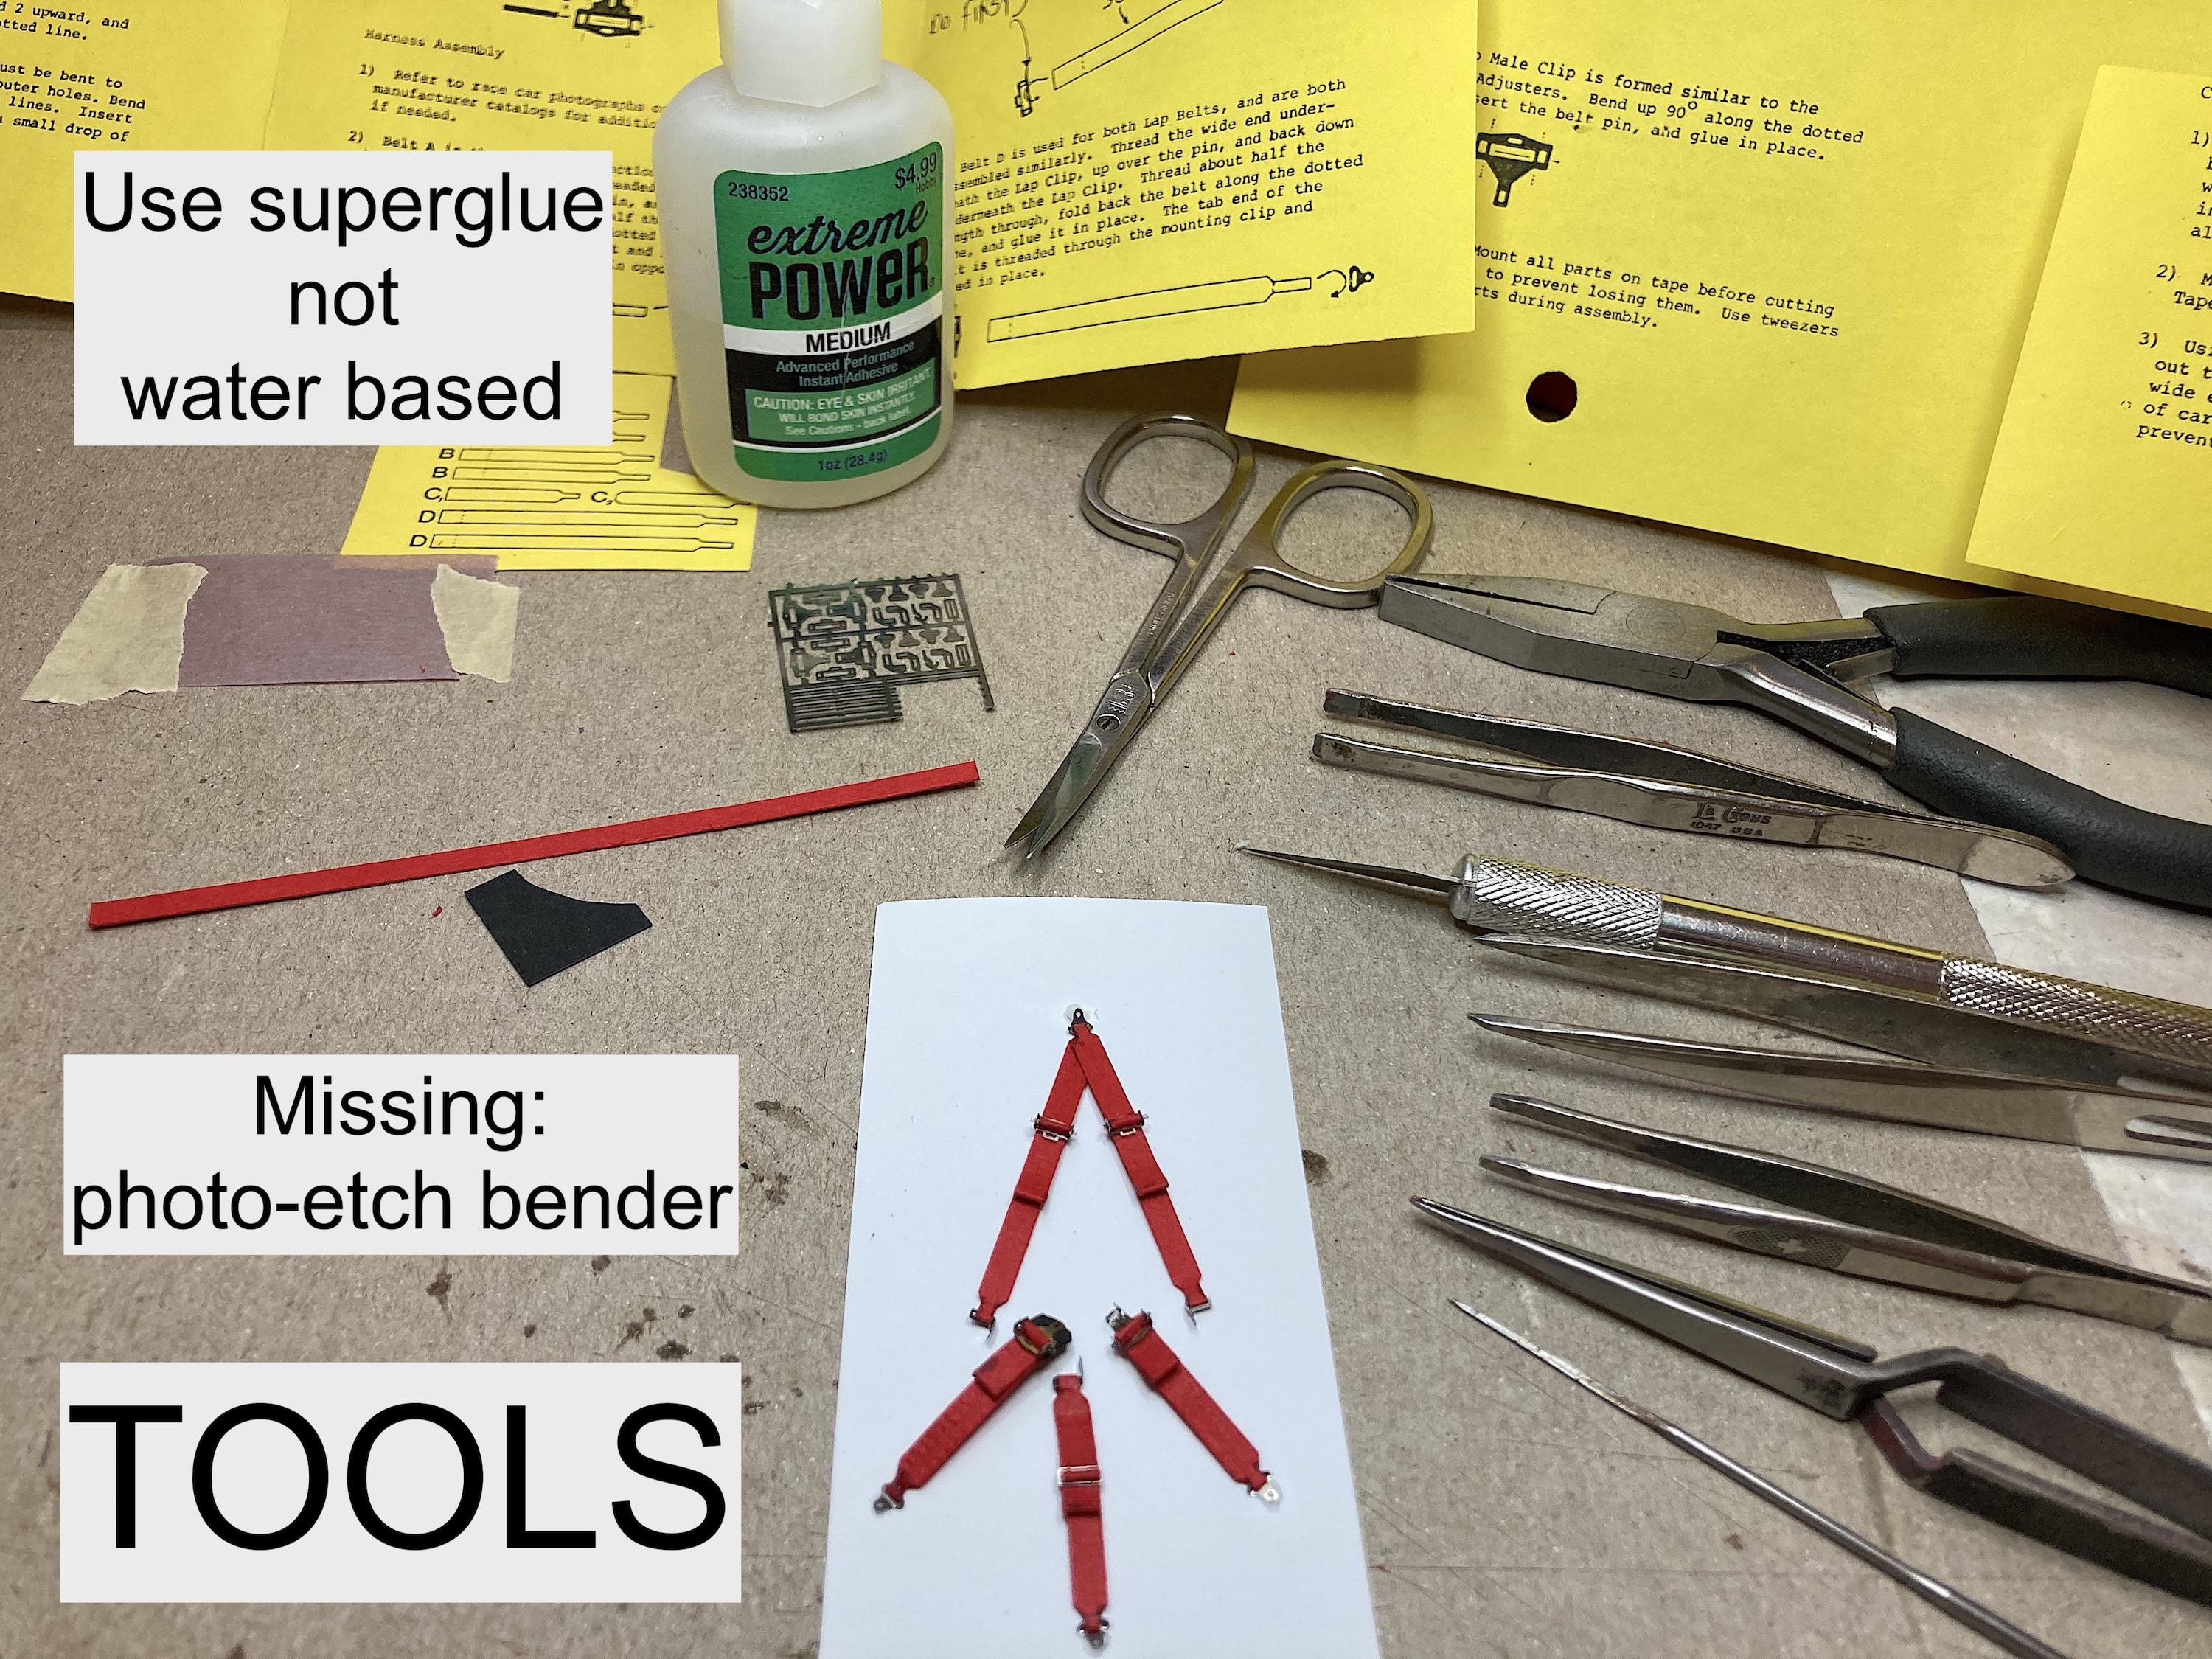
 I tried to find a tutorial on this forum for doing the Detail Master racing harness (seatbelts), and other places, but no luck. This was an early set, had thin tissue paper that was supposed to be painted. I see the current offering has the sewing ribbon, which IMHO would be impossible to use with this. I also don't like the fuzzy look after it gets crammed through photo-etch. I also don't like the belt material in Studio 27 seatbelts, the back side is not the same color, and it gets fuzzy. I now prefer using color paper from the craft section (Hobby Lobby, Michaels, etc.) My first pass was using regular black paper, with no texture it's tricky to keep track of which side is up. The later sets use textured red paper, not exactly to scale, but other colors have a finer and more consistent linen texture, and it's slightly thicker than plain paper. I had trouble with the sequence of assembly using the instructions, had to modify to work, and not having pictures but tiny one dimensional images was a challenge. This is my method of assembly that was good enough for government work. As with anything, having the right tools is key. I used superglue because the last stage uses water, and it's faster. Having tiny scissors is better than trashing the knife blade. Need to have clamping tweezers. Whatever glue applicator tip that works for you is fine. The first set, I cut the belts as shown in the pattern, don't do that! Each one had a slight variation in width. Just cut an 8 1/2 inch (width of the paper) strip, you might use it up. On some steps, you can cut the end after screwing up a couple of times with the photo-etch. In fact, I cut all belts longer, and trimmed after the photo-etch was done. This is optional. You could sand with 1000+ grit first, then polish too. Scale Motorsport photo-etch is awesome shiny to begin with. I found that using my finger worked best, wash really good before proceeding. Instructions say to use tape, I prefer using the tweezers. Just a suggestion: Just like cleaning plastic parts when removed from the sprue, I think this step is essential. I didn't know that I needed this tool until recently. I don't know what all the notches are for, the two screws work to hold the part in place, that's all I care about. I position into place with a toothpick, lessens scratches. It's hard to get the razor blade under a short part sticking out, you need a minimum of this dimension (IMO). Like this... Sure beats using pliers. One of the clips has 3 bends, tool worked great. For this part, putting the slot under the bender kept it flat. This is where I modified from the instructions. Look at the real thing before taking my word for it. I bent all the photo-etch before adding the belts. The most confusing step in the instructions was dealing with the adjuster, looked like there are four, but there are only two. There is no way to push two belts through that slot, so I did only the top belt. Again, first pass with cutting the belts per instructions, waste of paper. Take a break, do breathing exercises while doing stretches, use eye drops if necessary. 👀
-
 ProTech 5-point racing harness hardware requires seatbelt material that is 2 mm wide. What to use? I have heard vinyl can be used. Any pointers? Thanks
 -
Probably somebody has used these. I've heard that vinyl material can be used. Also what do you use for brand name labels or decals on something this narrow? 'Preciate it.
-
 I bought a piece of photo-etched seat belts from Hobby Design, I was scared to start with these for months because I never used them before This afternoon I started and to my surprise nothing fits..... the belts are to wide to fit the clips and the clips are in two pieces and these also don't fit into each other because the holes are to tiny. My smallest drill is 0.5mm but that still way to big... I tried sanding the belts but its very difficult to hold them while busy. Suggestions, ideas and tips are very welcome because I still would like to use them