Search the Community
Showing results for tags 'el camino'.
-
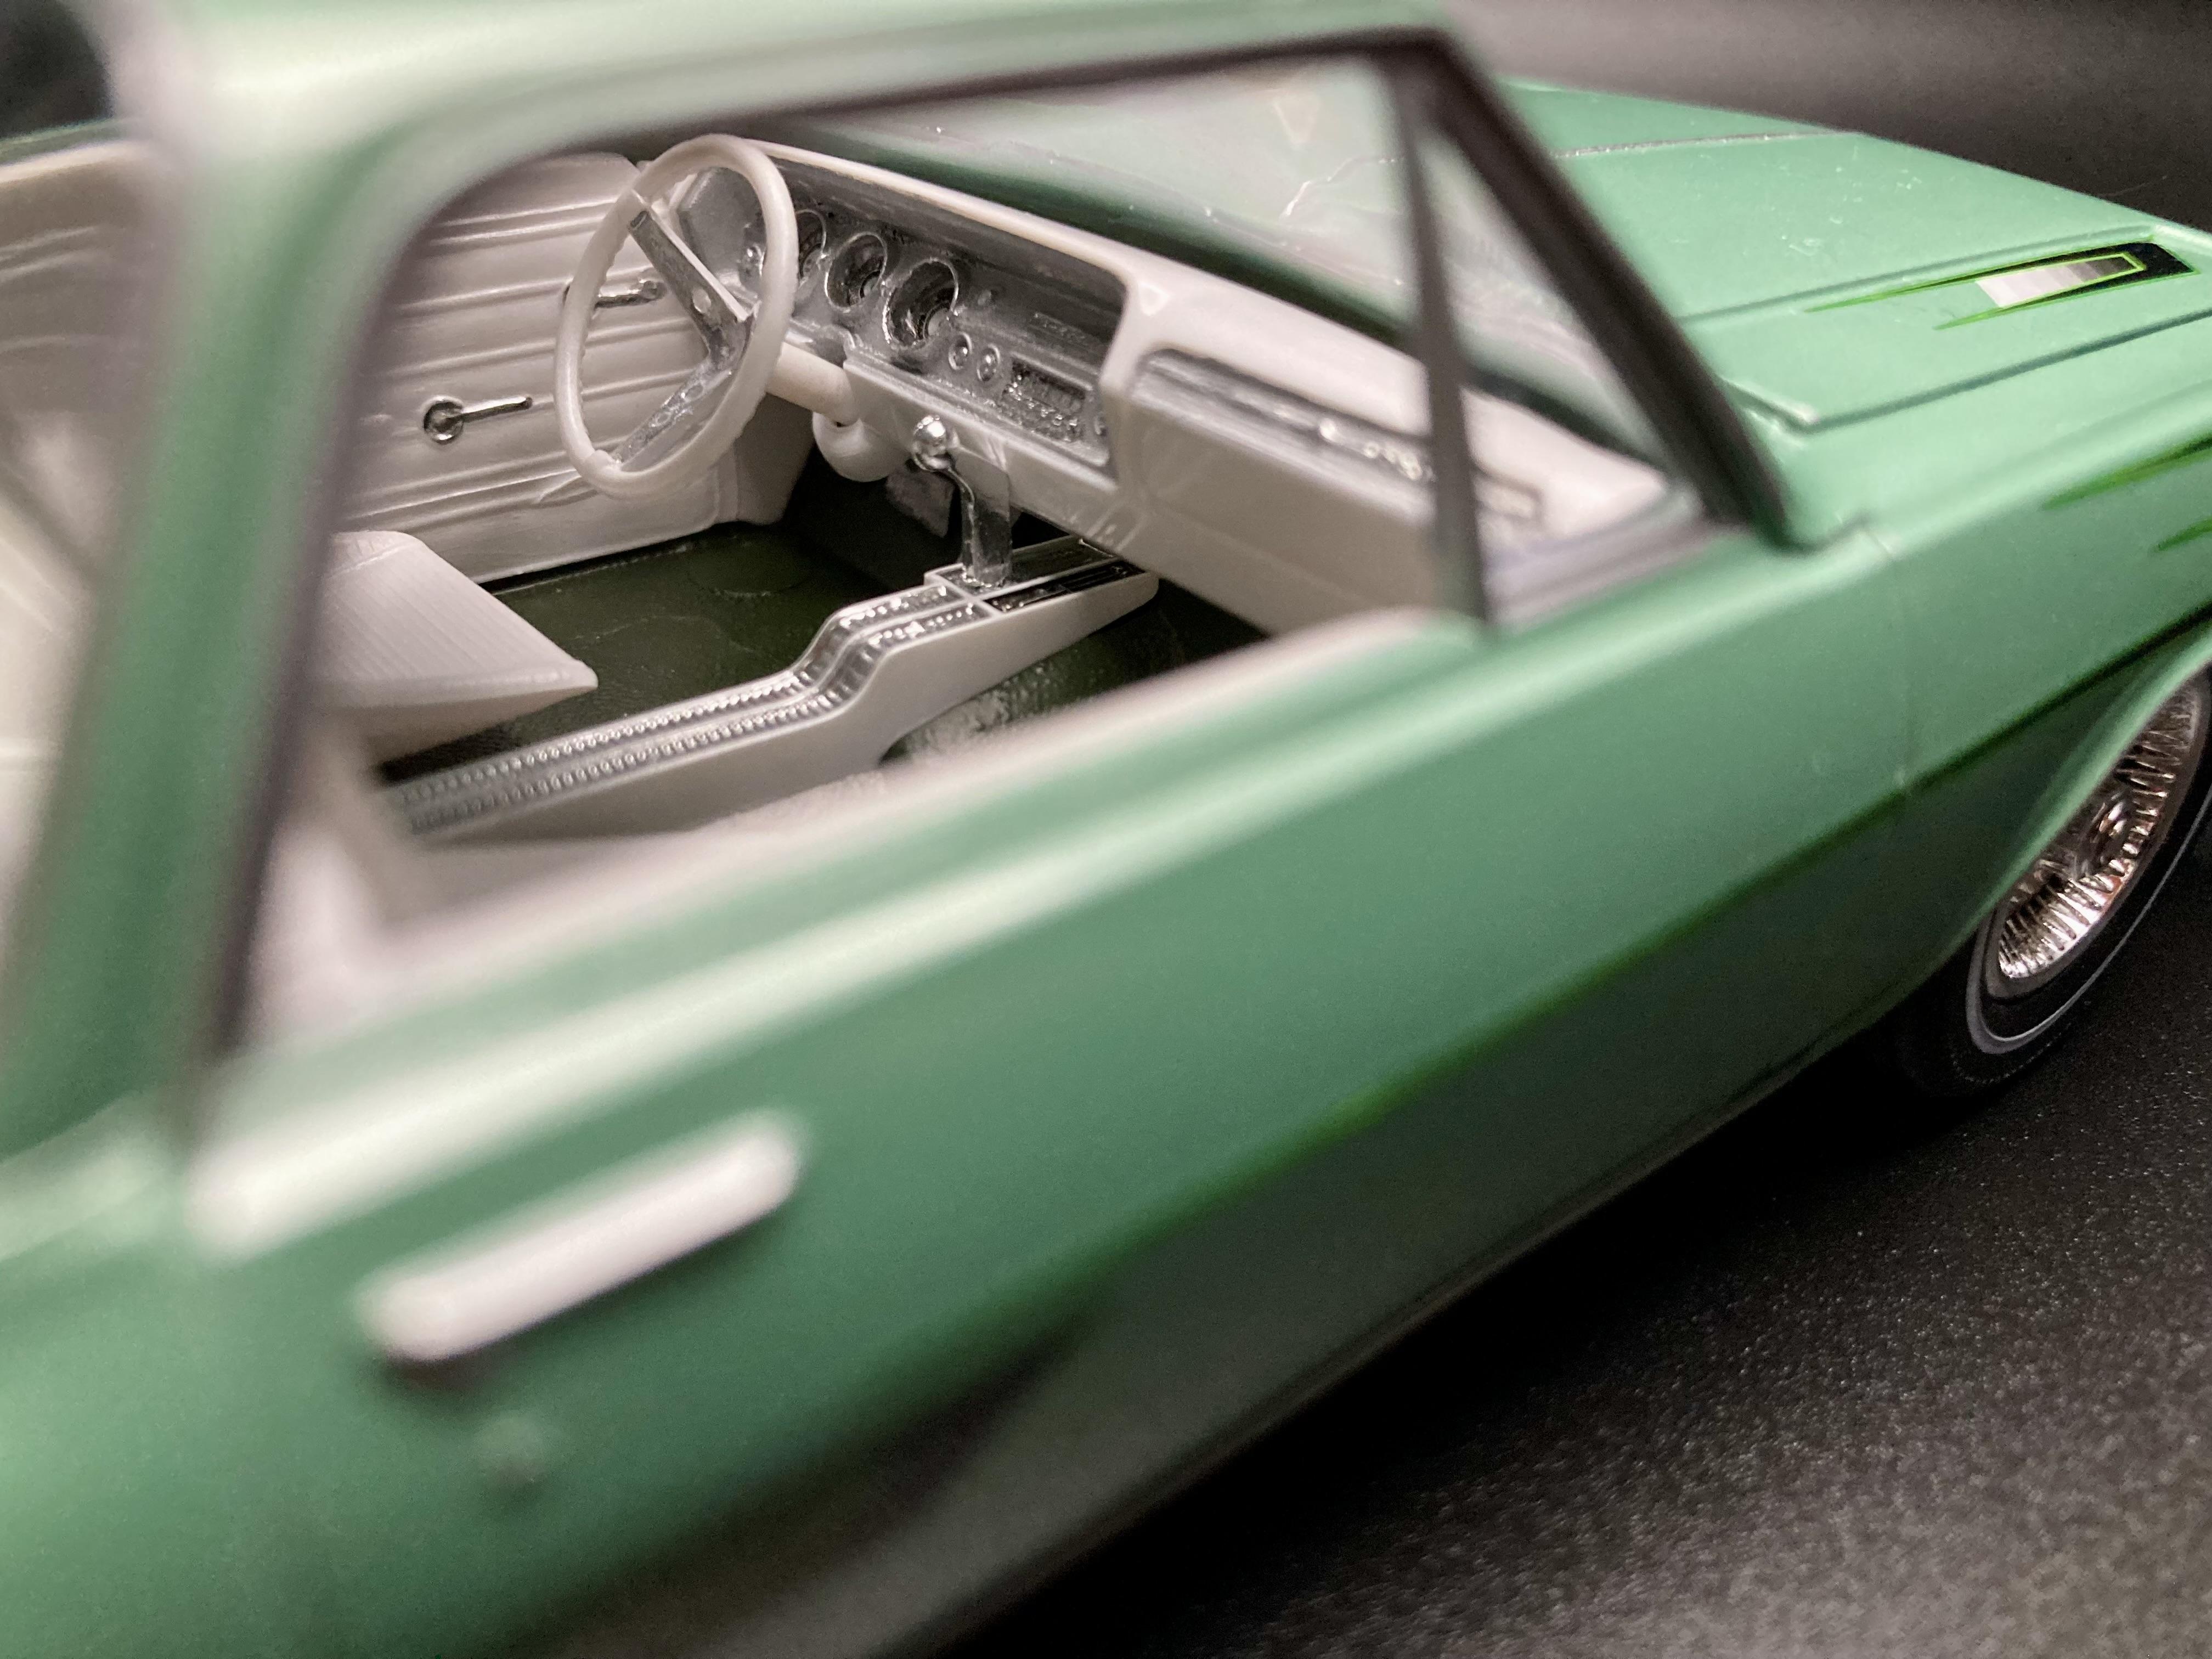
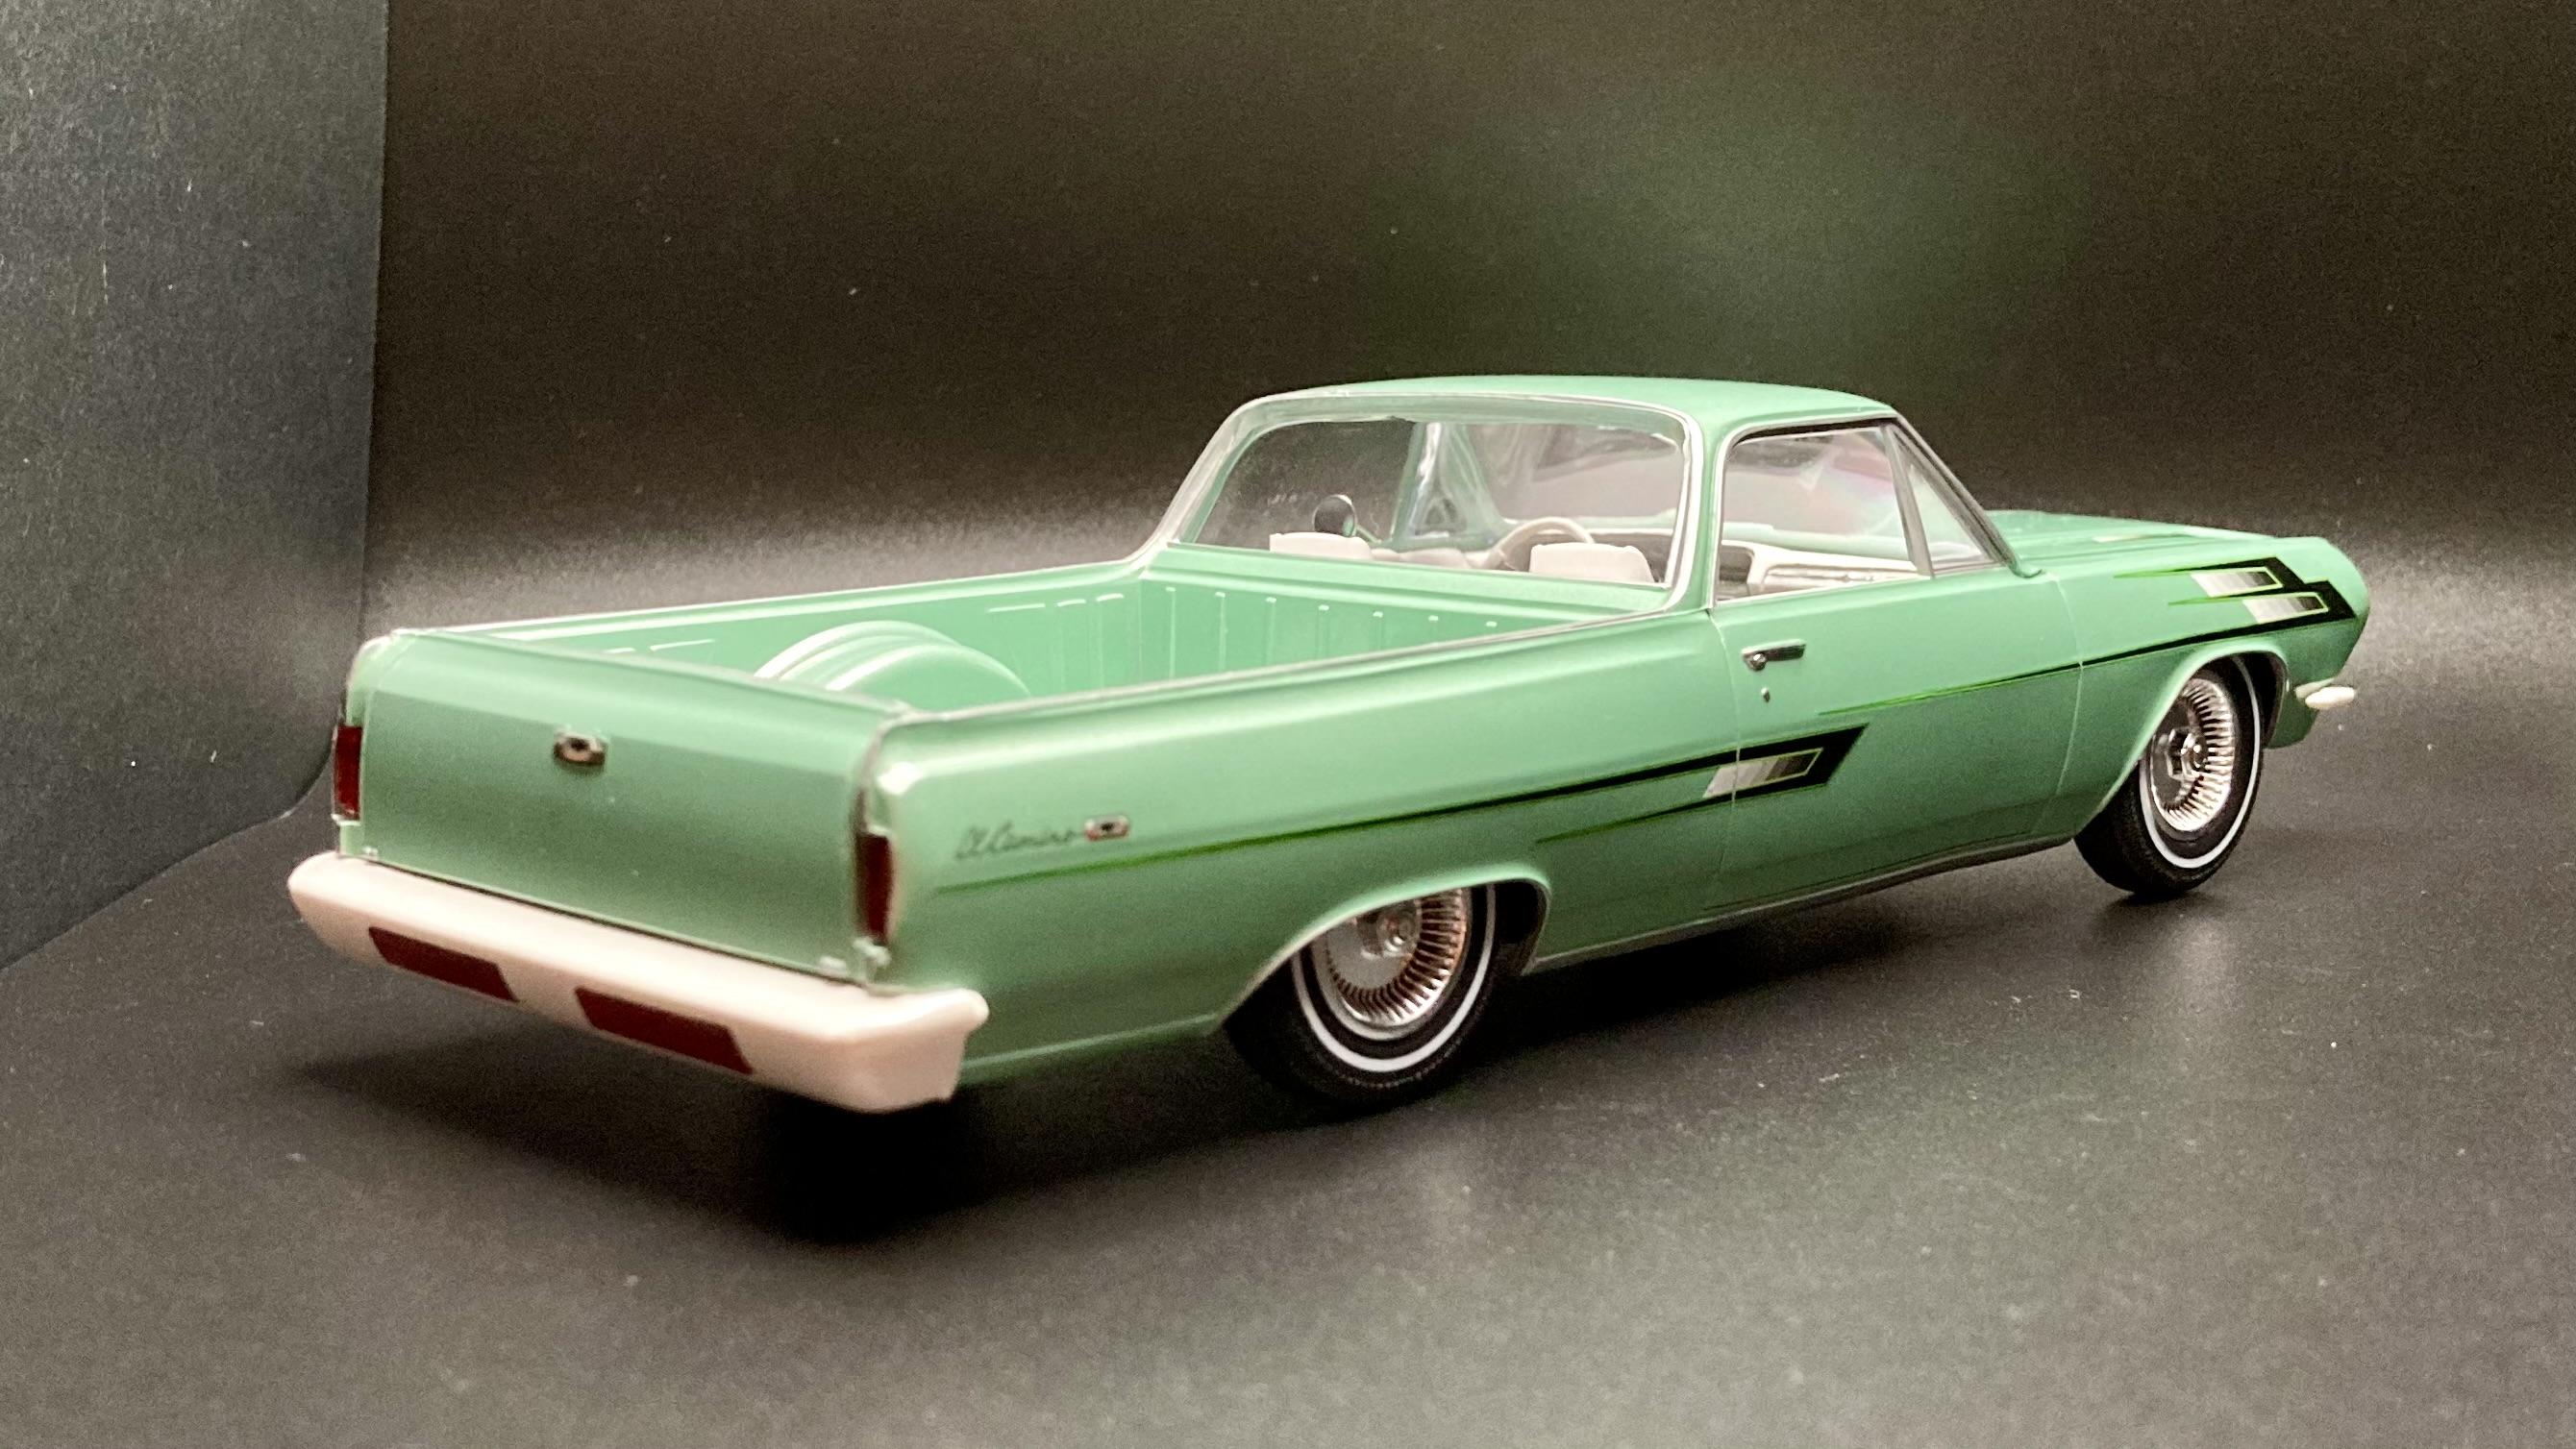
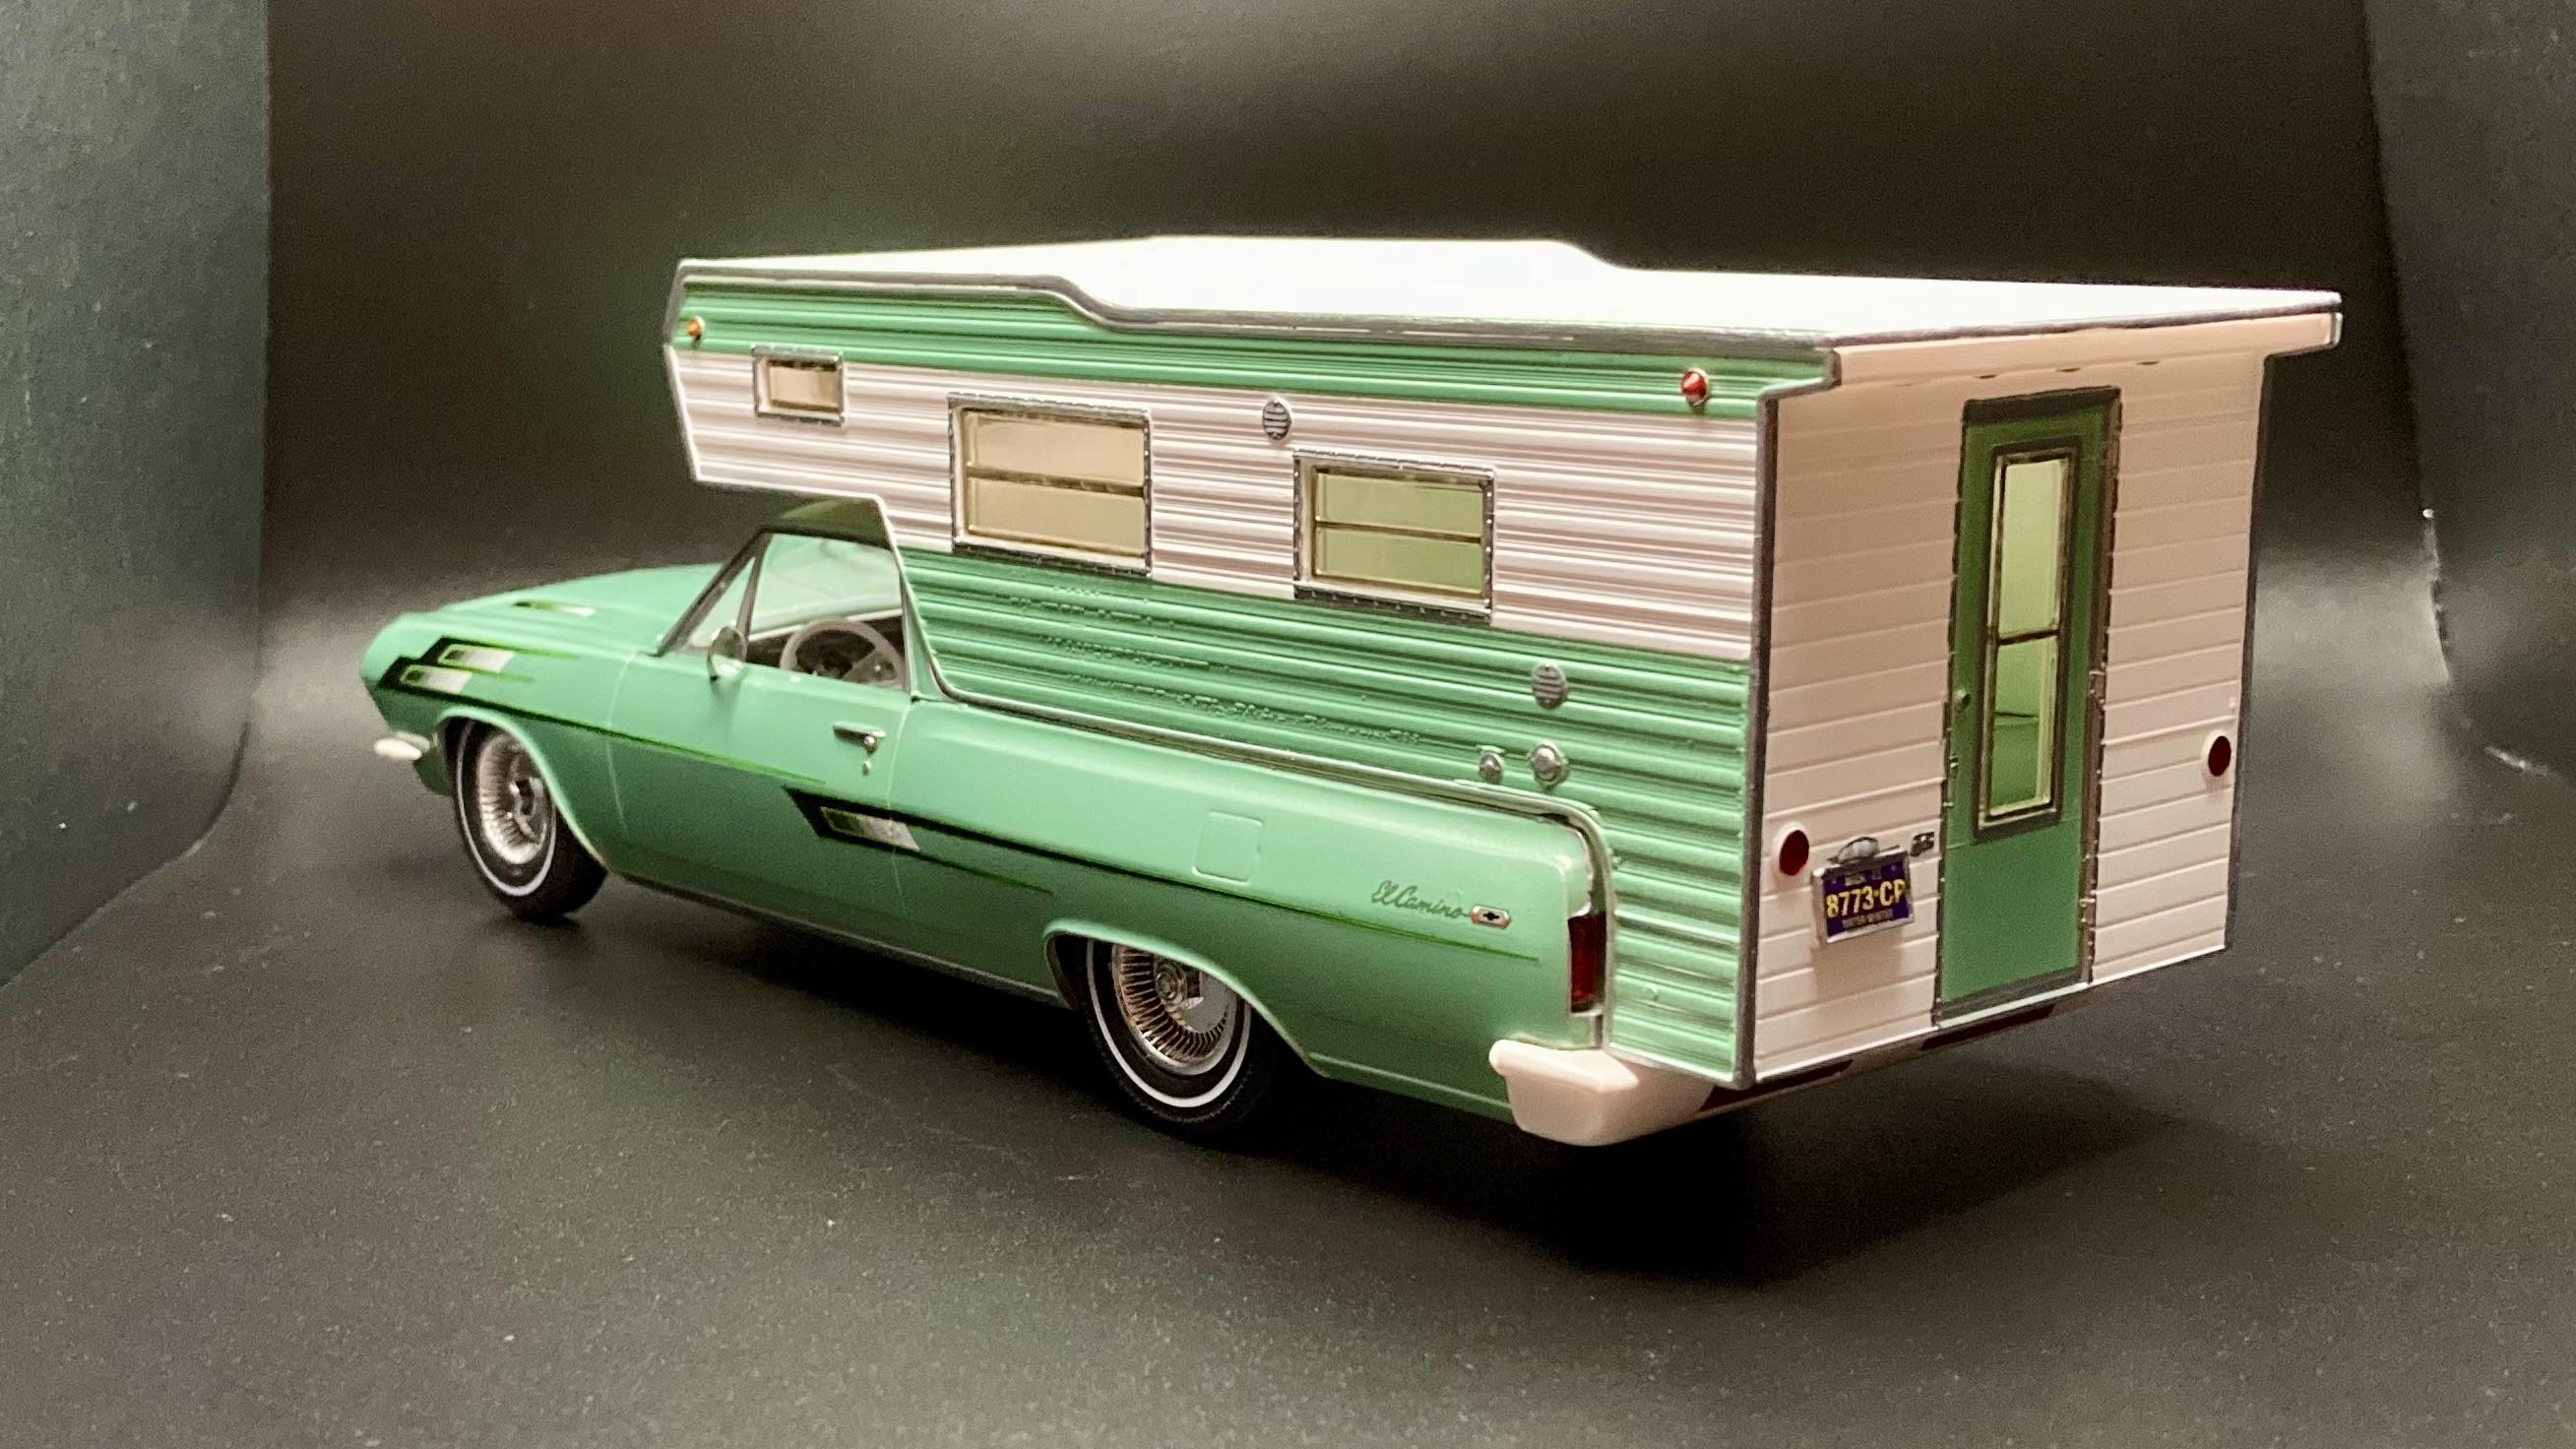
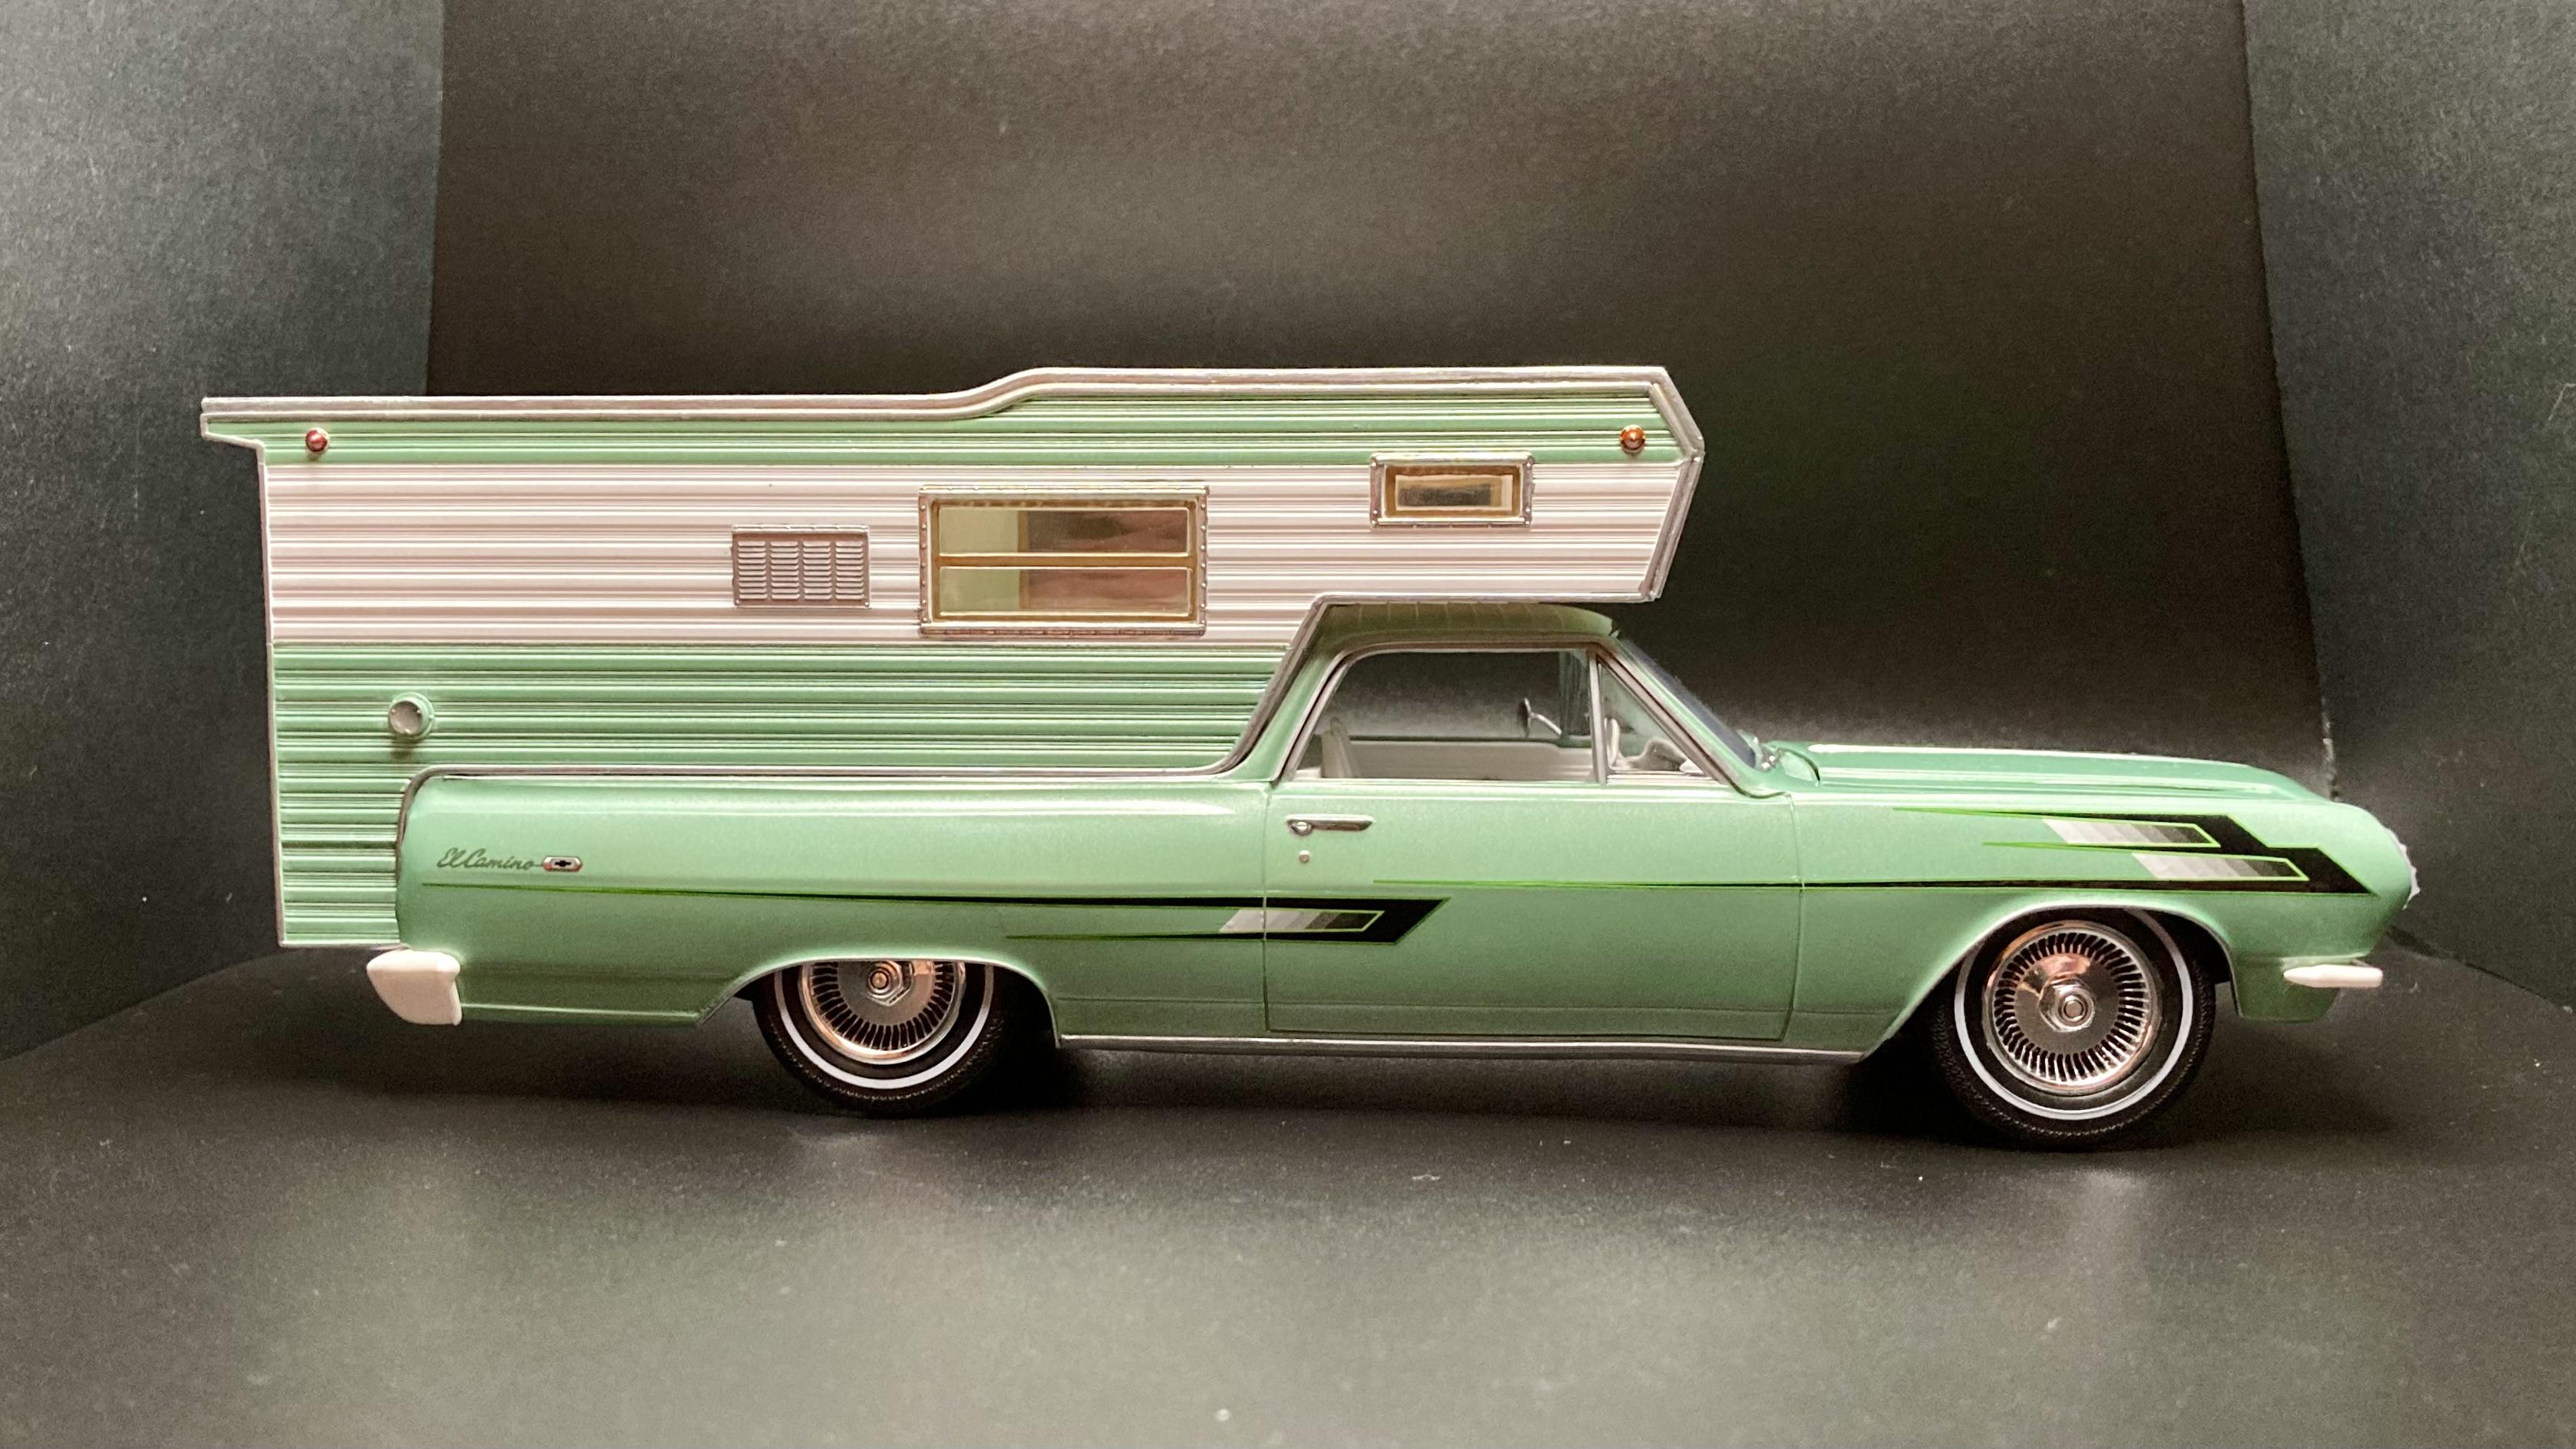
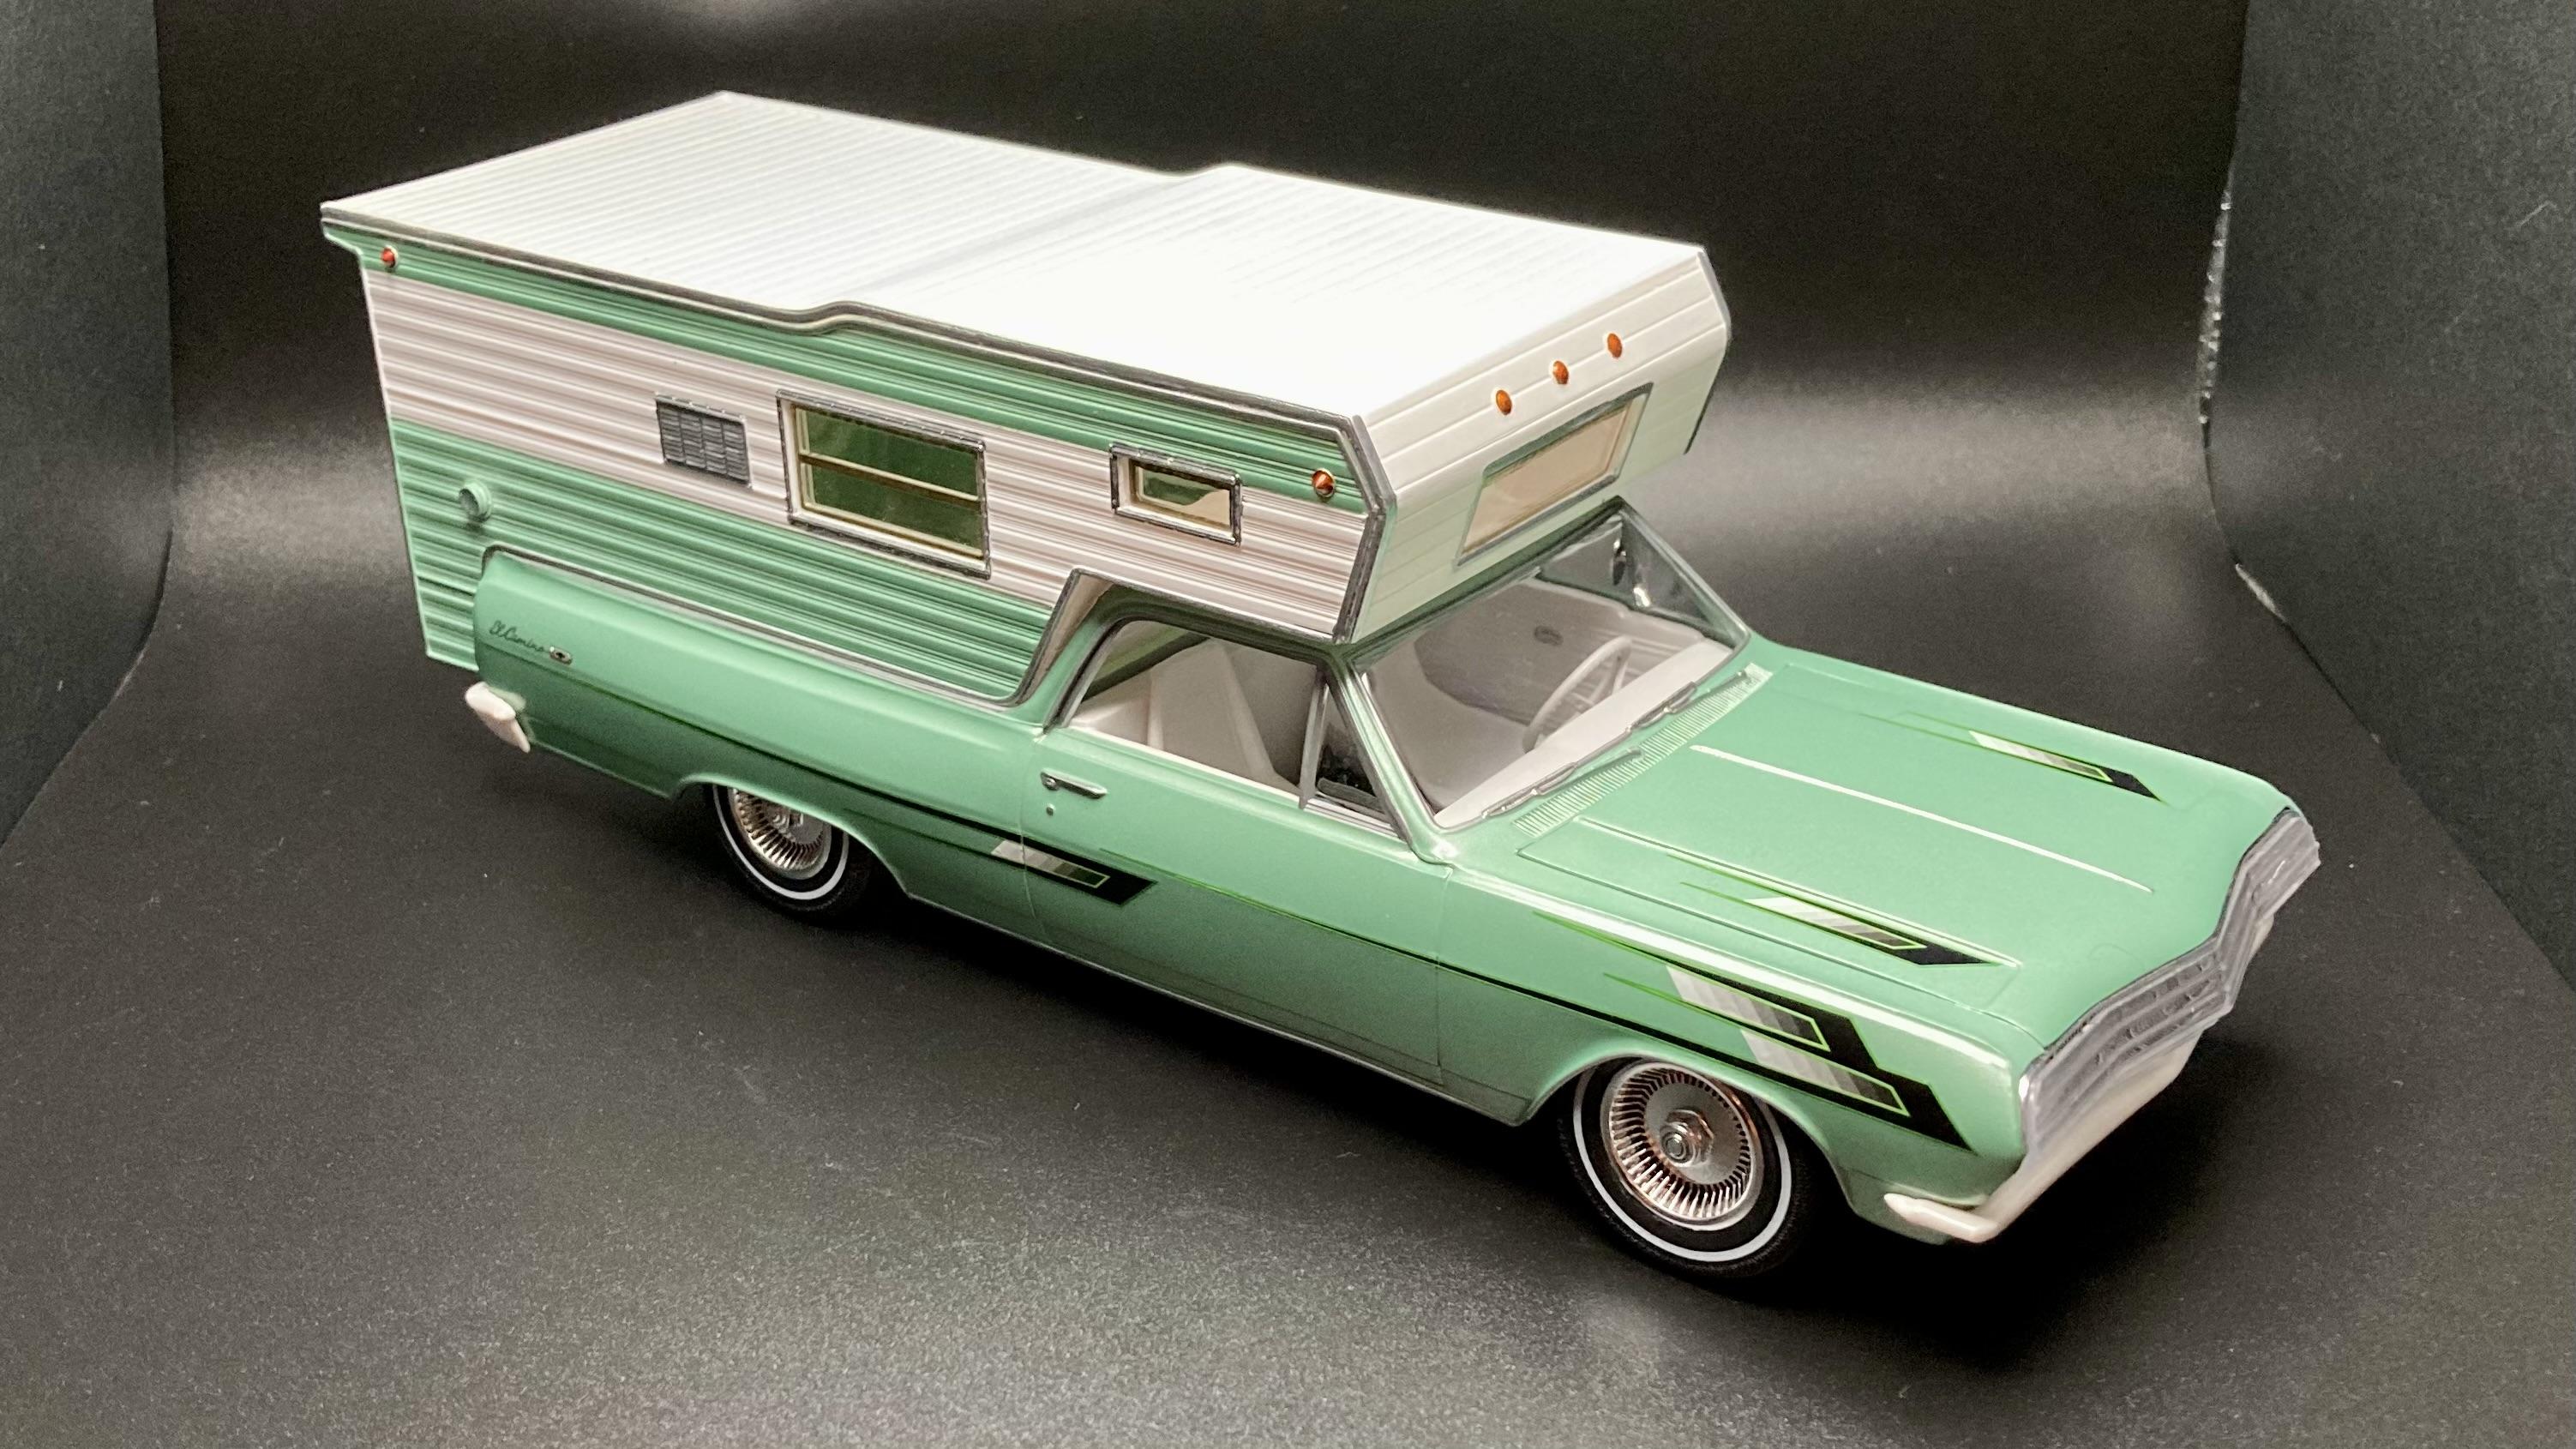
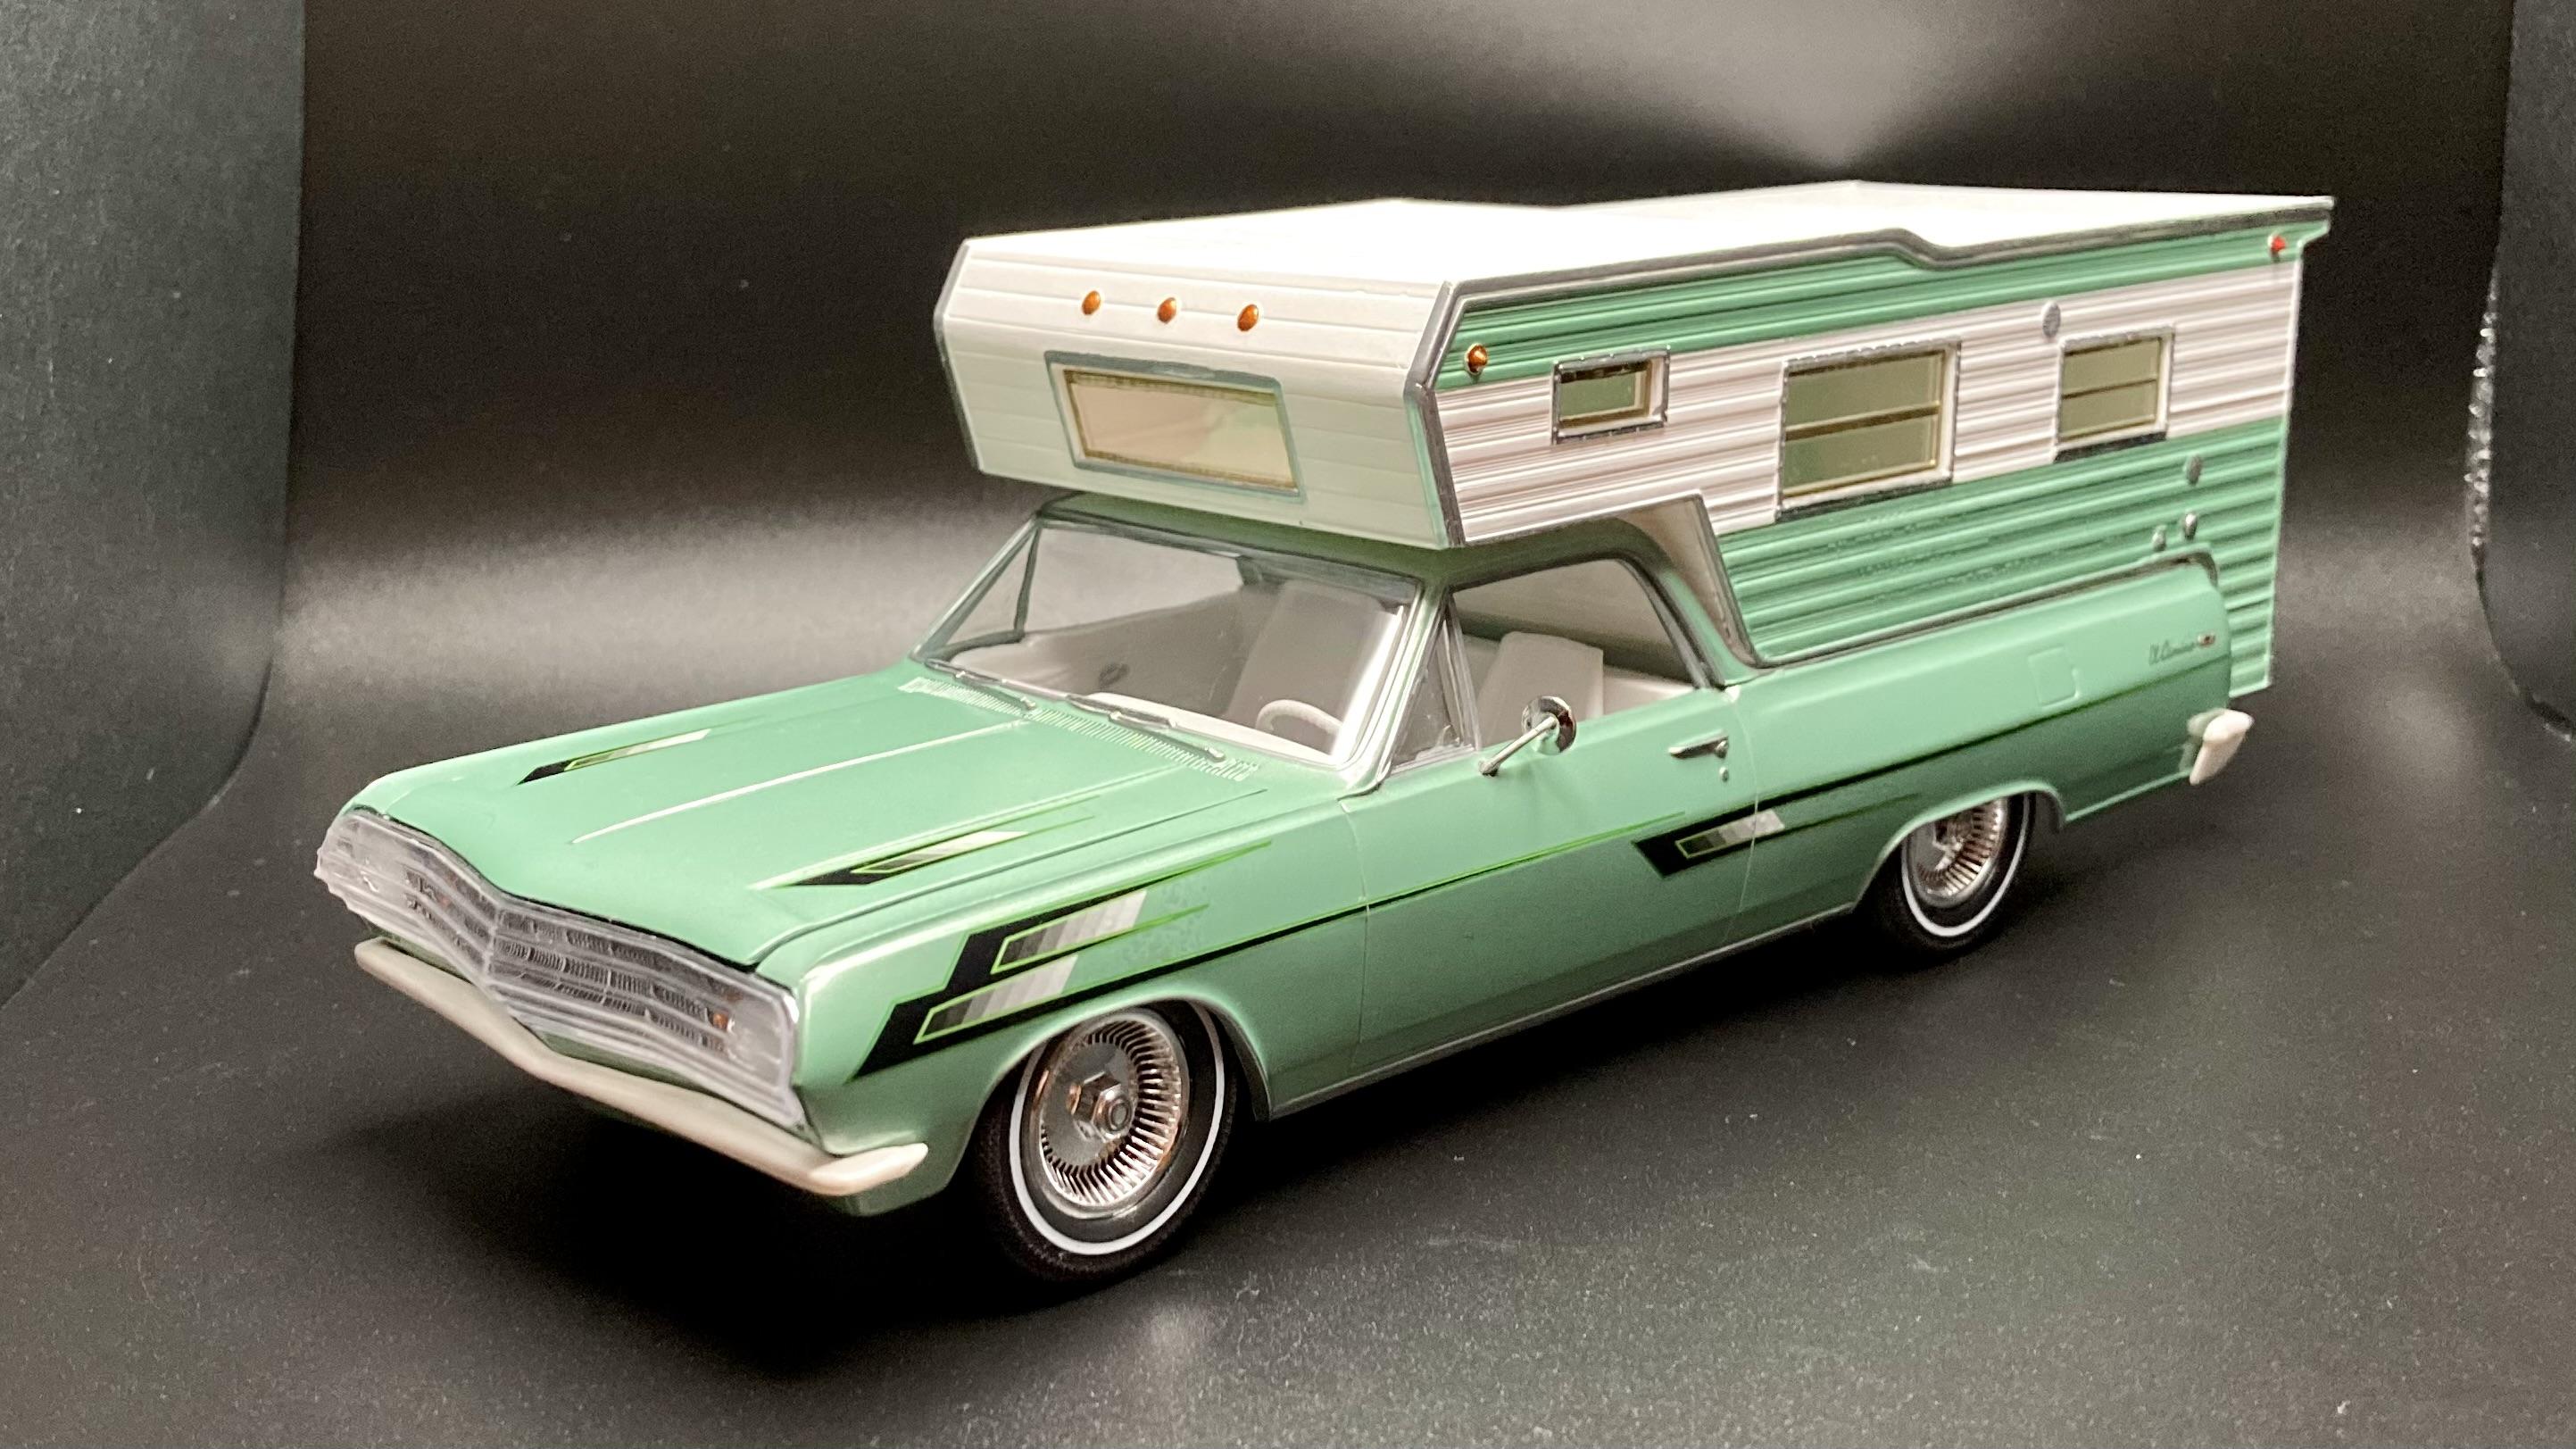
 Here’s my build of the recent release of AMT’s ‘65 El Camino Camper! I liked the custom fluted glass-looking grill/headlight cover so I decided to go custom with this one. In my mind, the camper manufacturer built this custom show truck to promote their new El Camino Campers! It’s painted Tamiya Light Green with Tamiya Pearl White for the bumpers and interior. The cab carpet is Tamiya Dark Green, and the white paint on the camper shell is Tamiya white primer. The decals came from the recent release AMT ‘65 Bonneville, and the wheels are from the parts box (I believe from the MPC “Bad Company” Dodge Van). I drilled new axle holes in the chassis to lower the stance. This is a very basic promo style kit but it has some cool custom parts, and 10 pad printed tires. I had a lot of fun with this build!
-
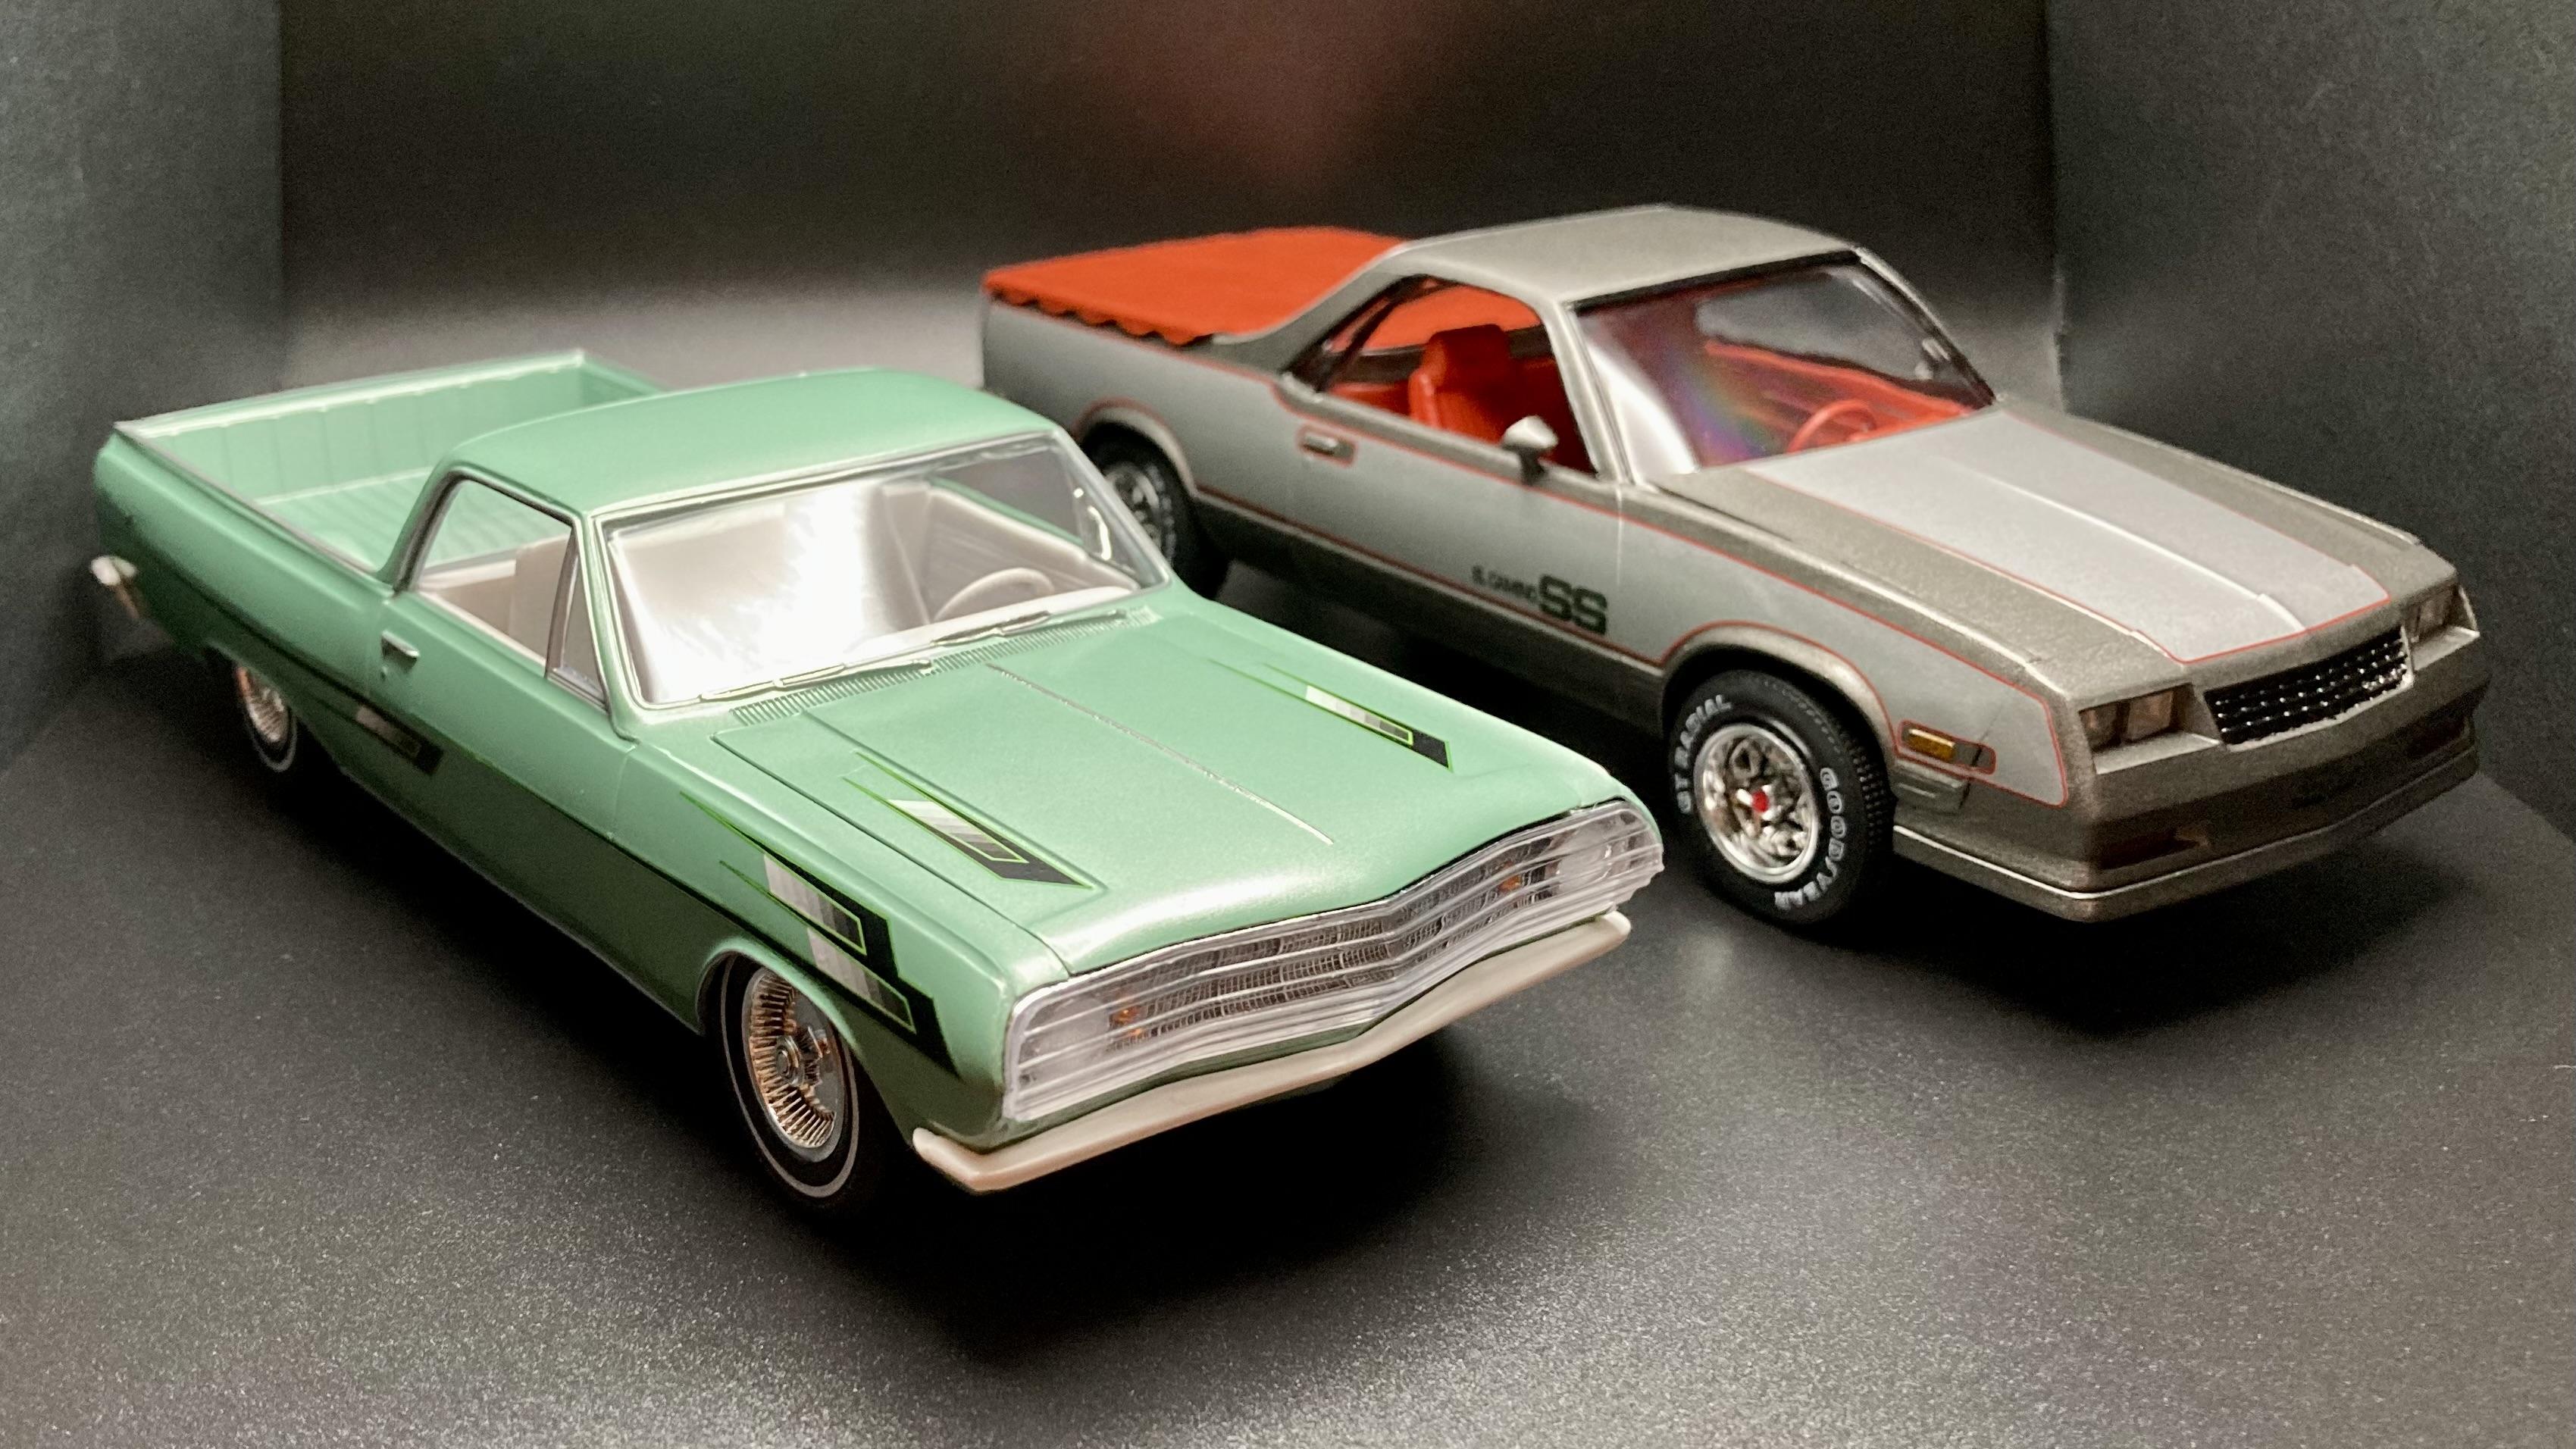
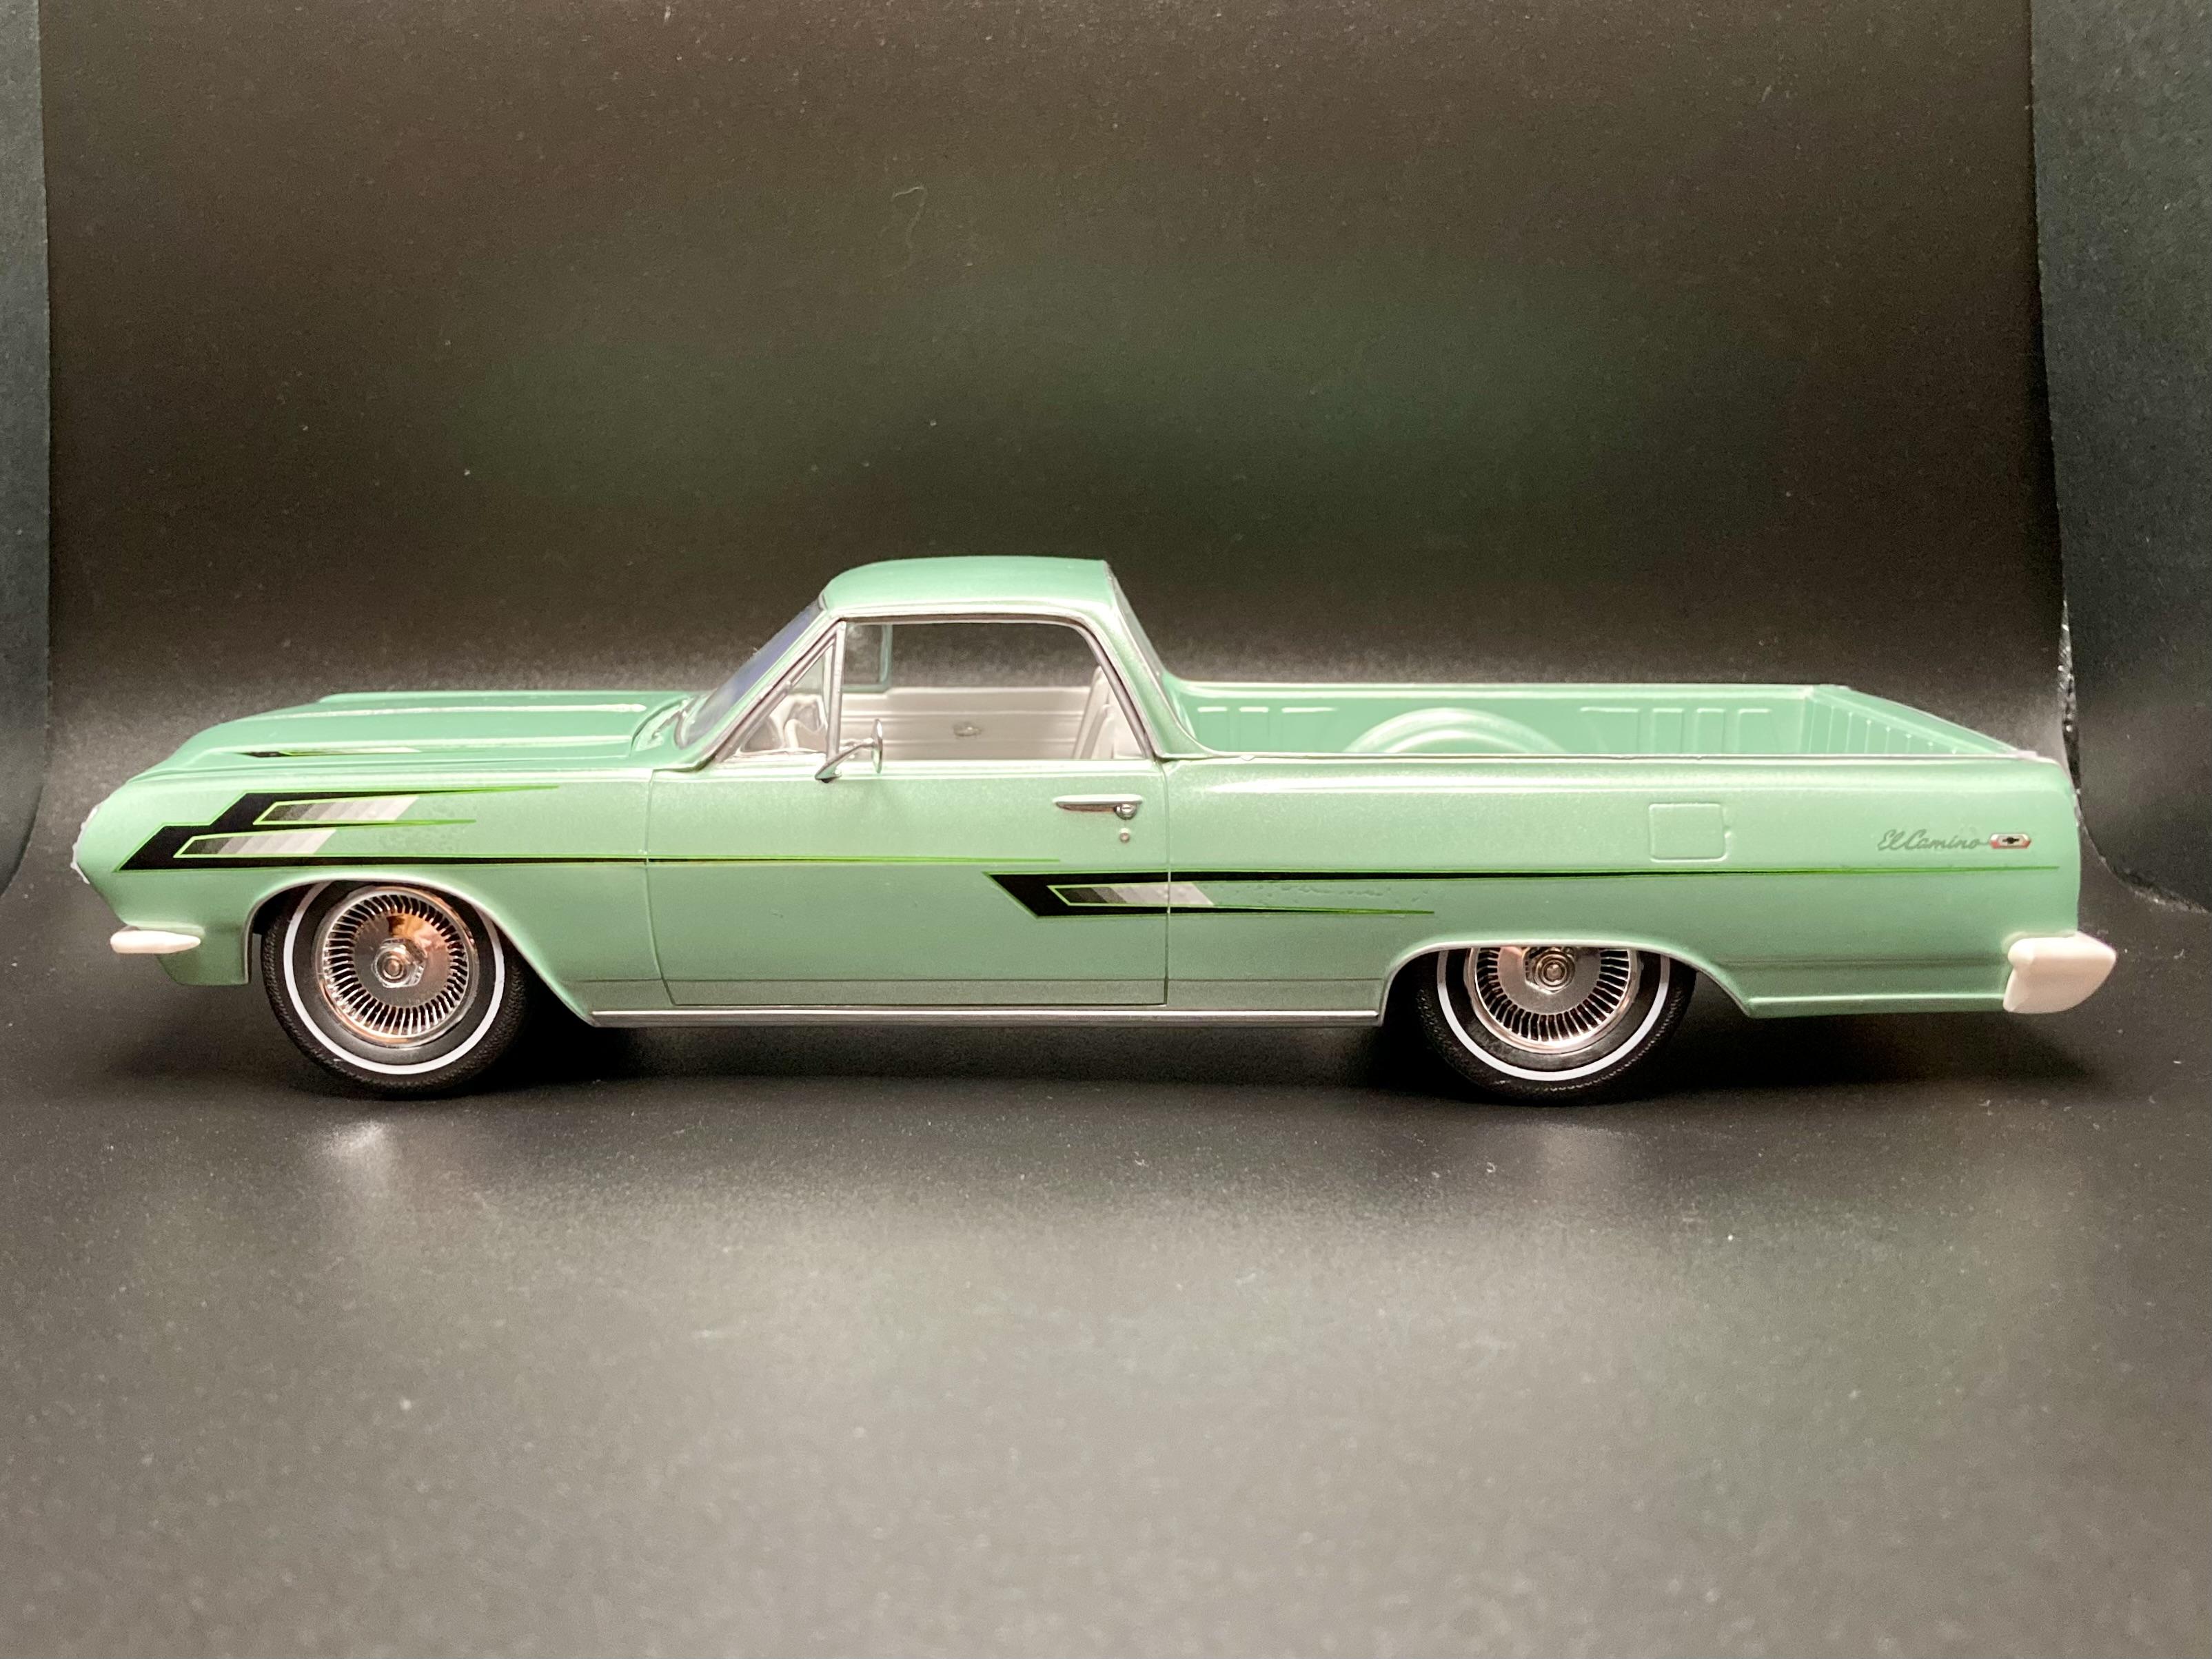
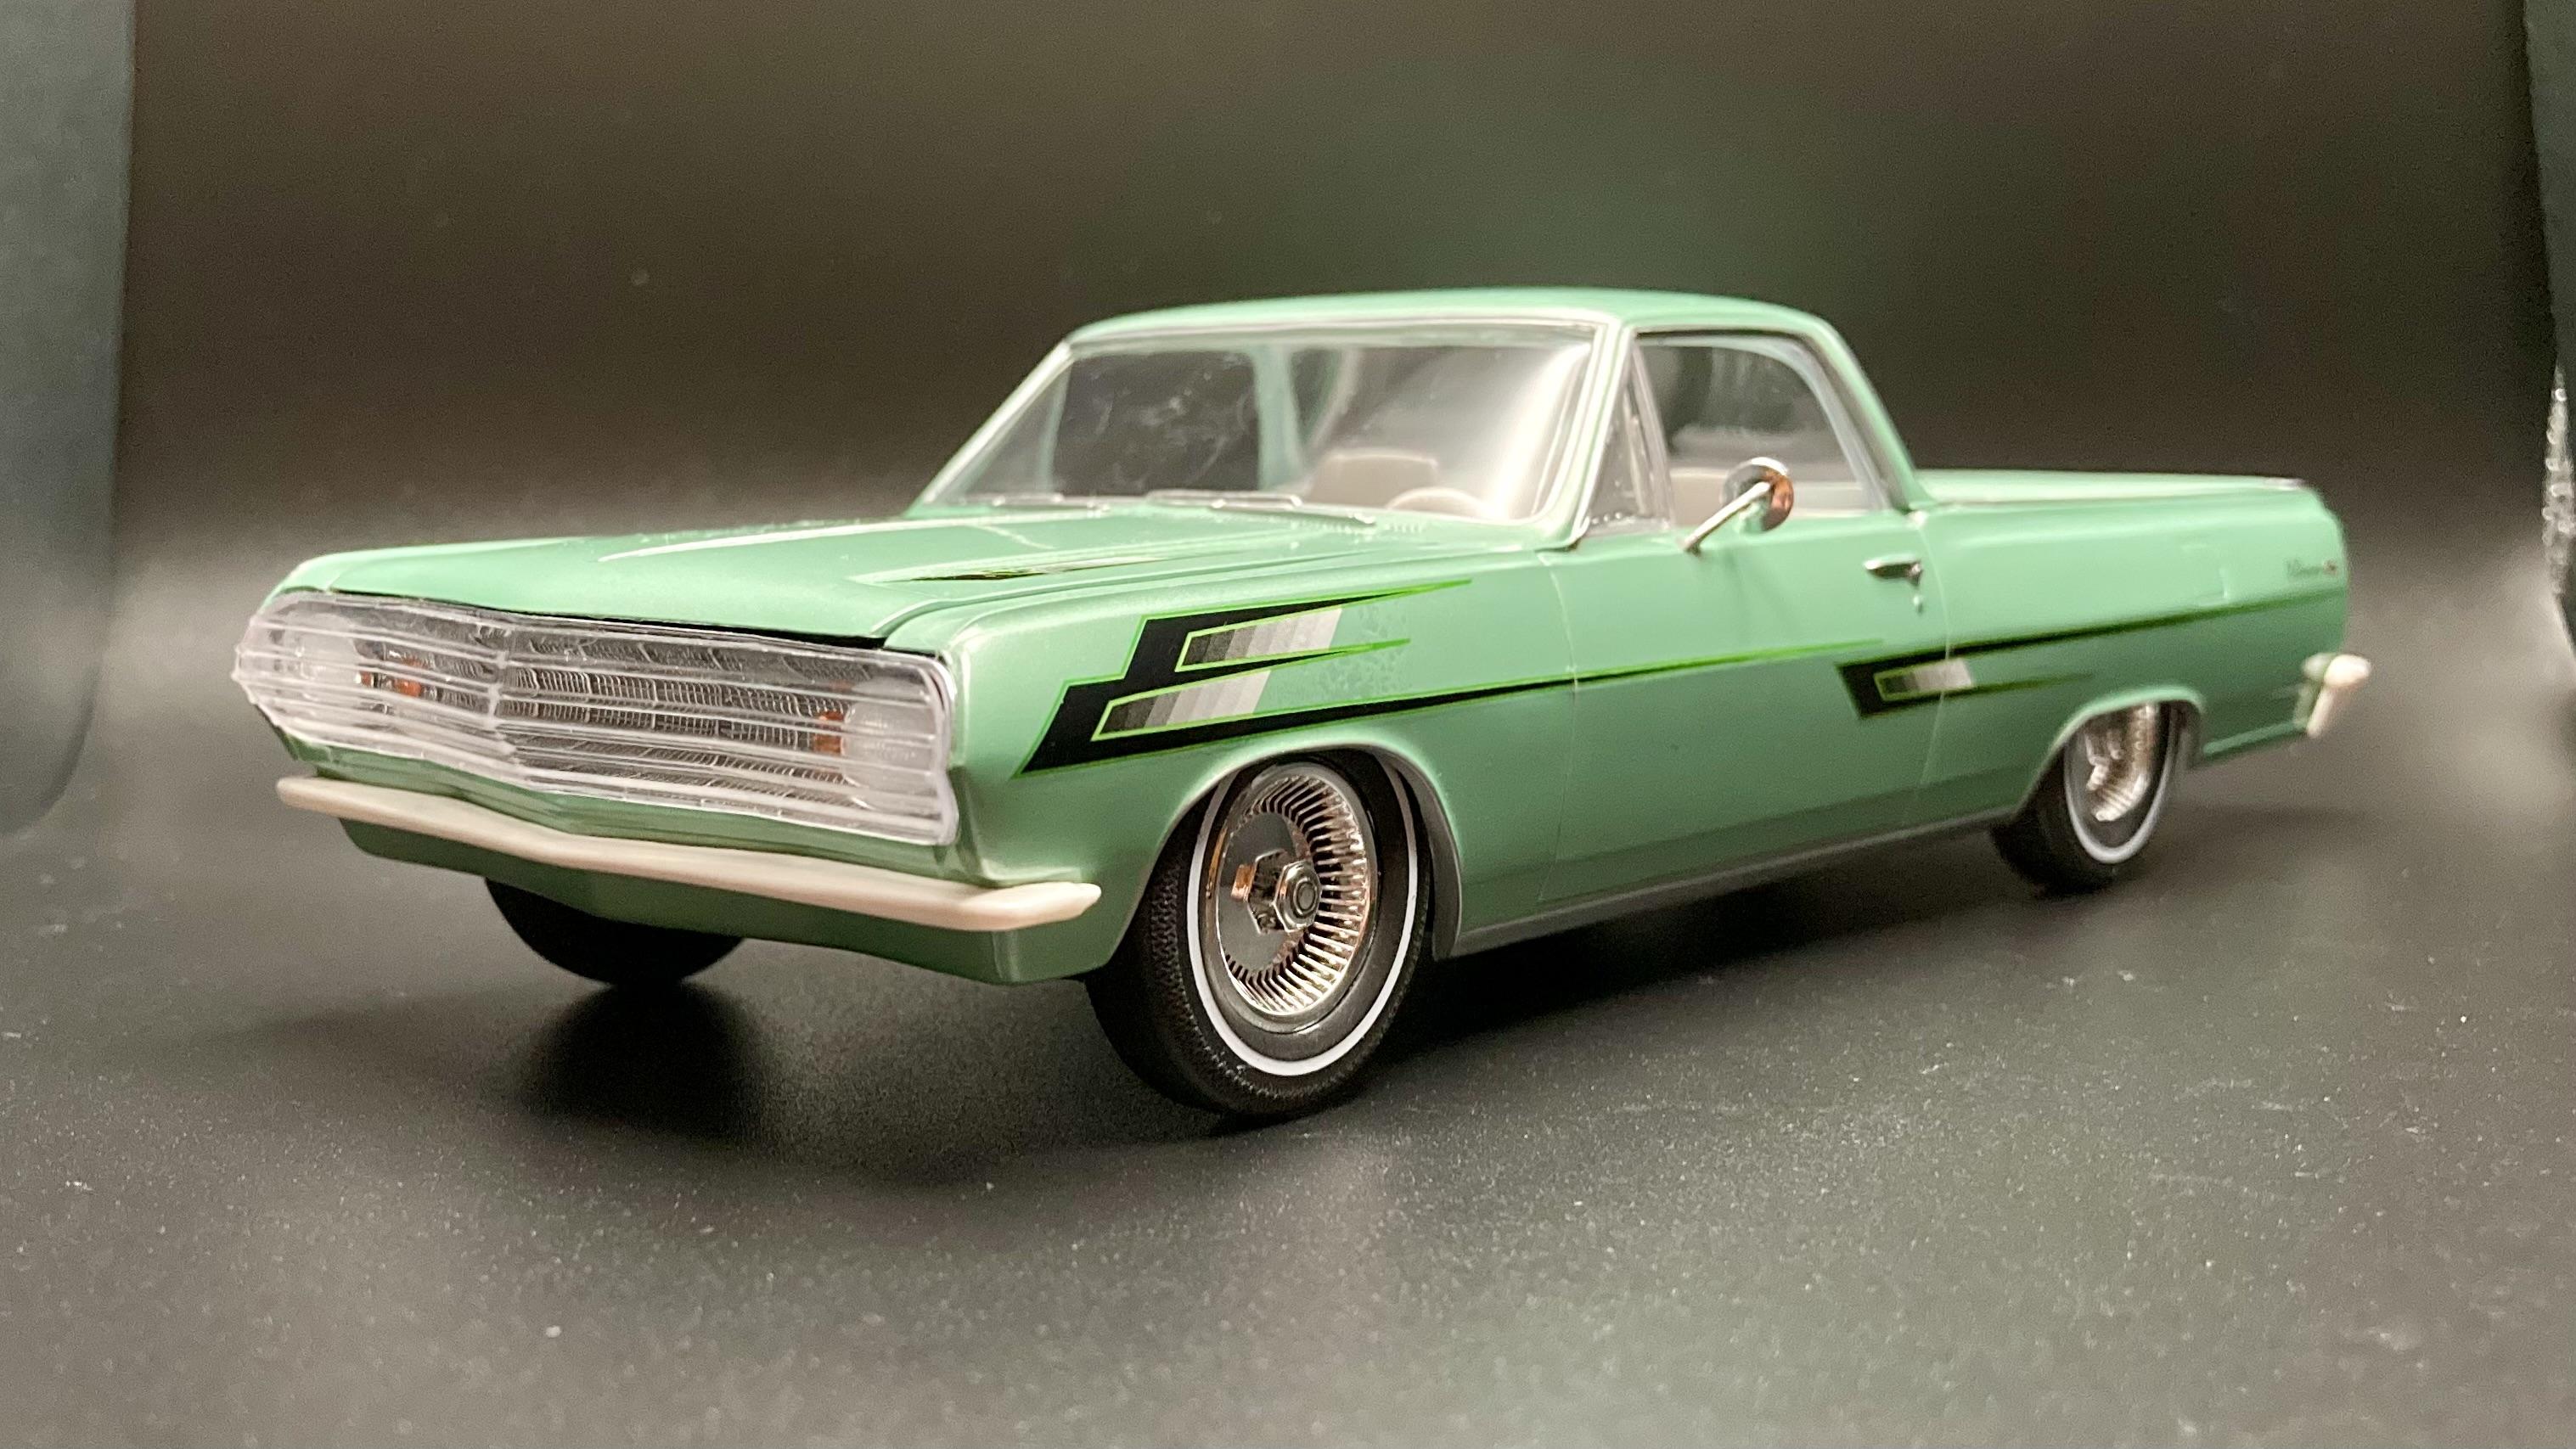
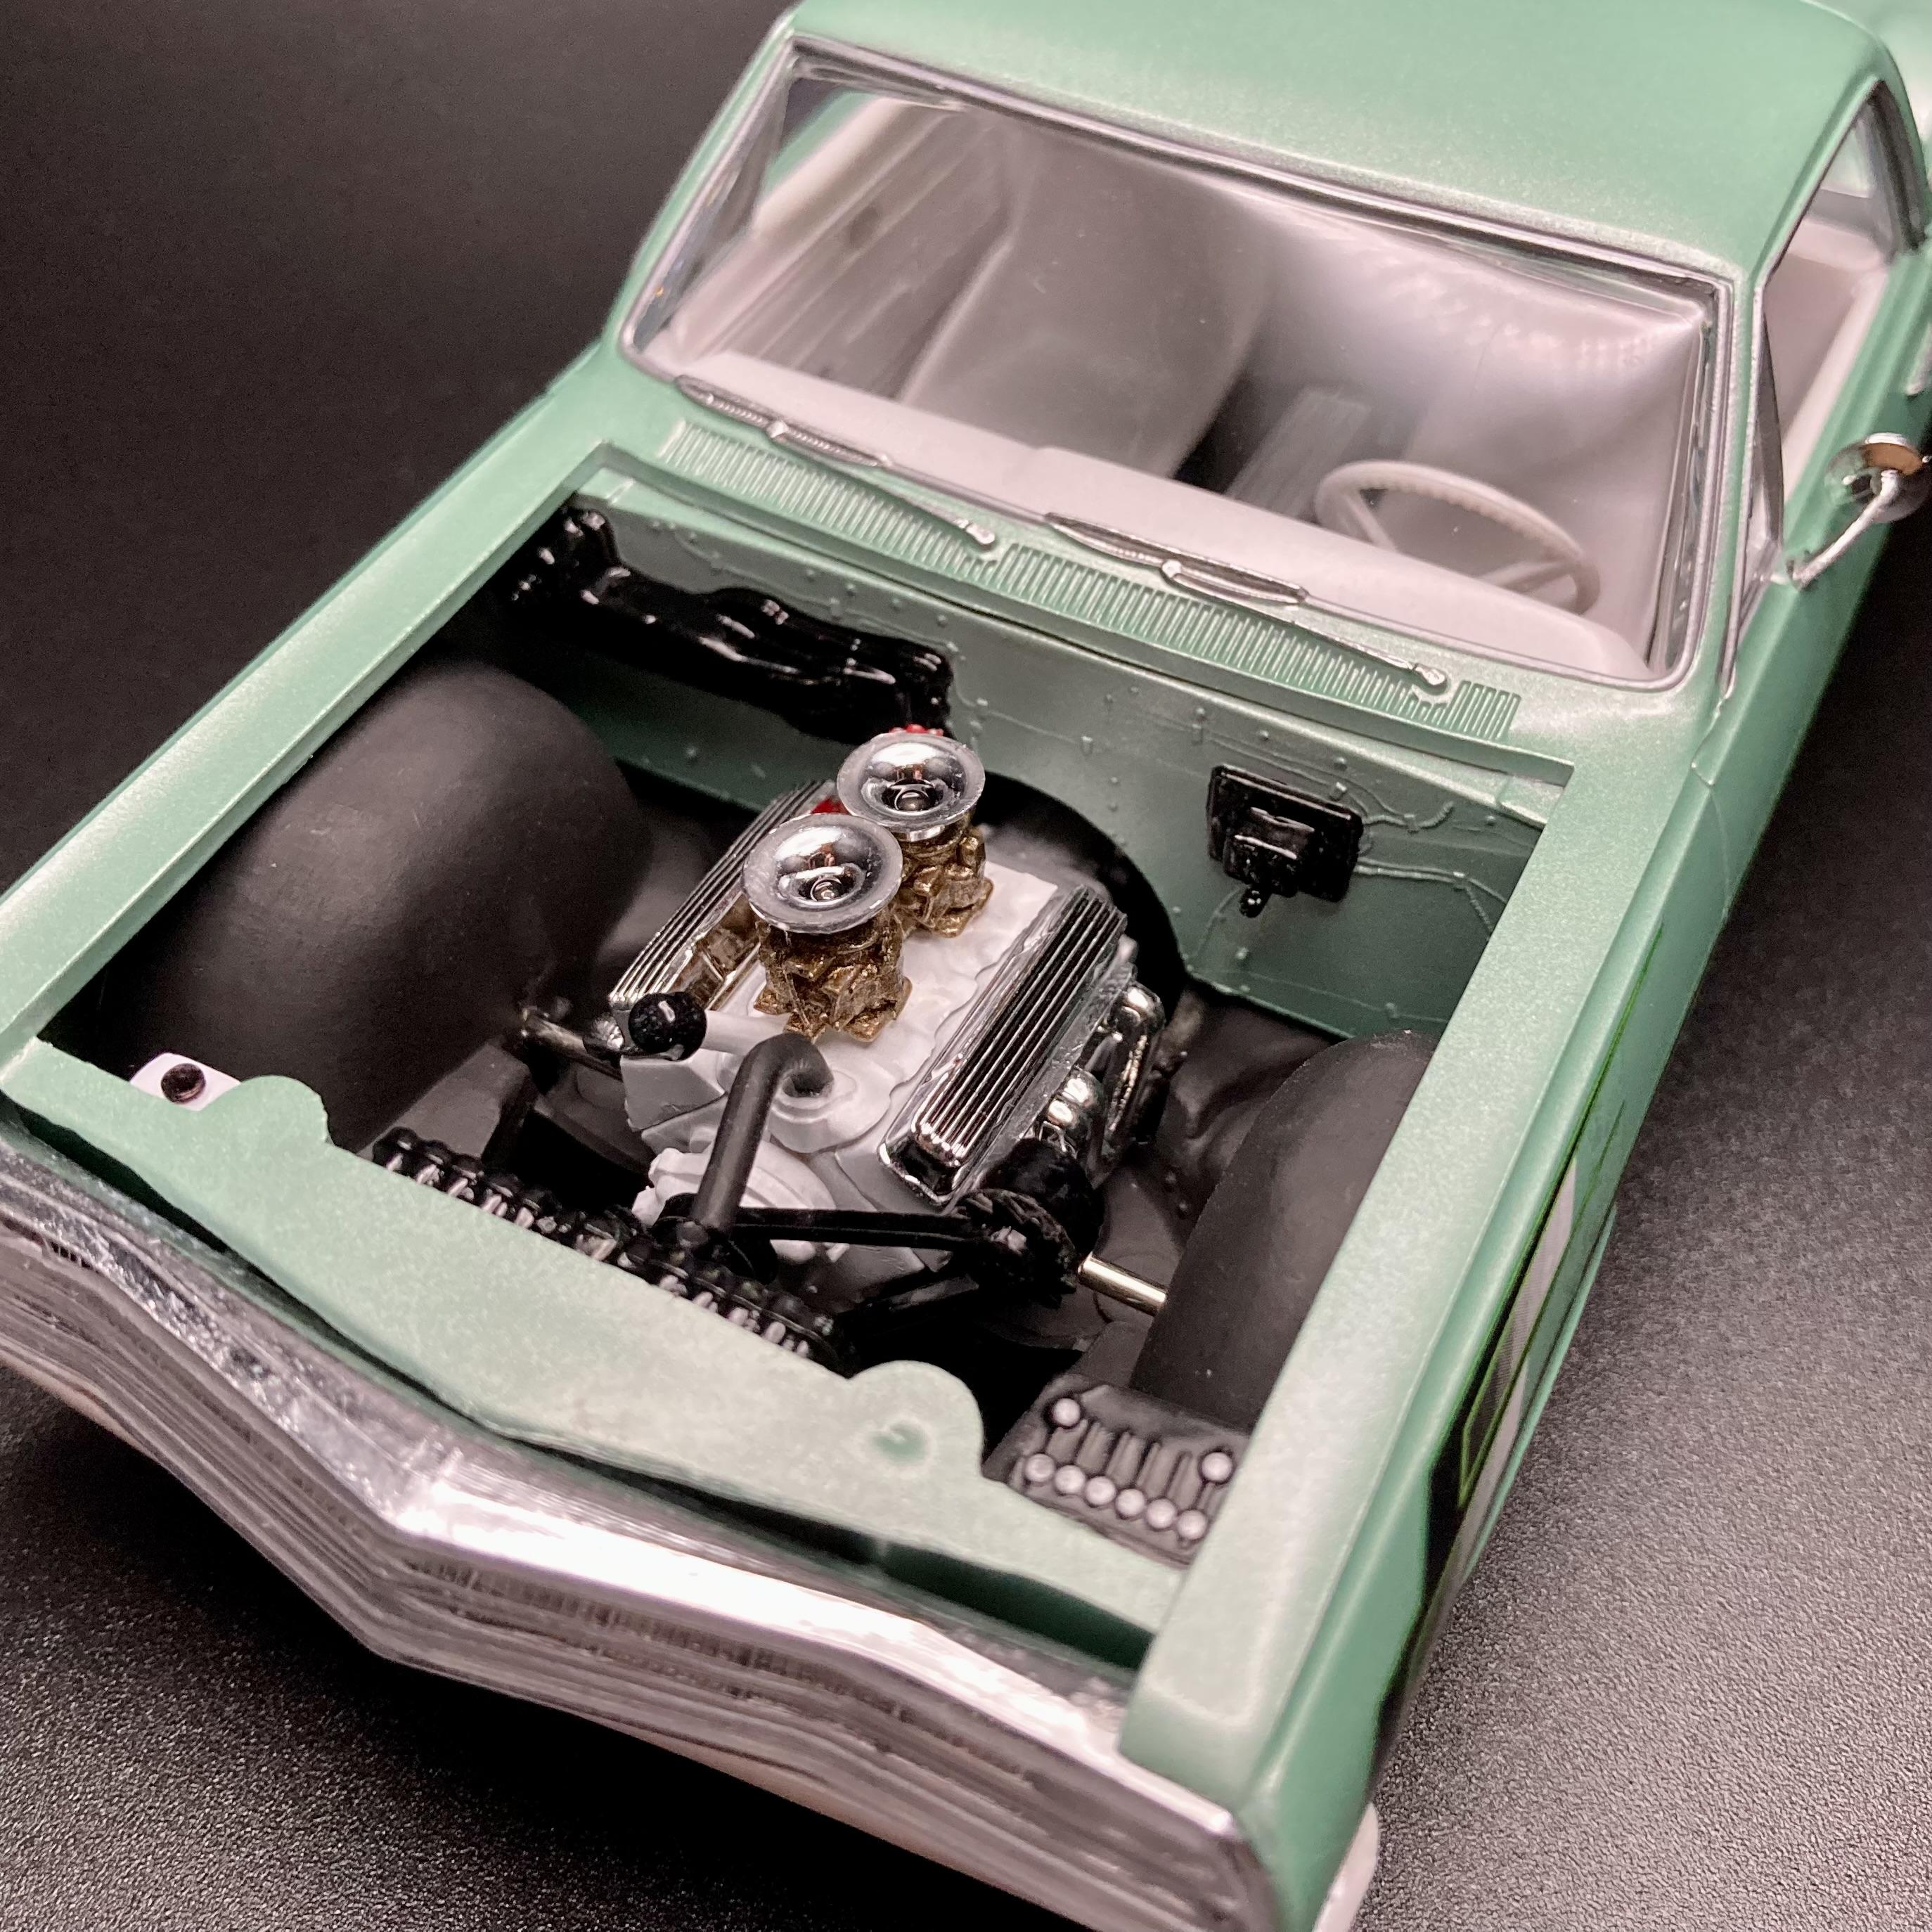
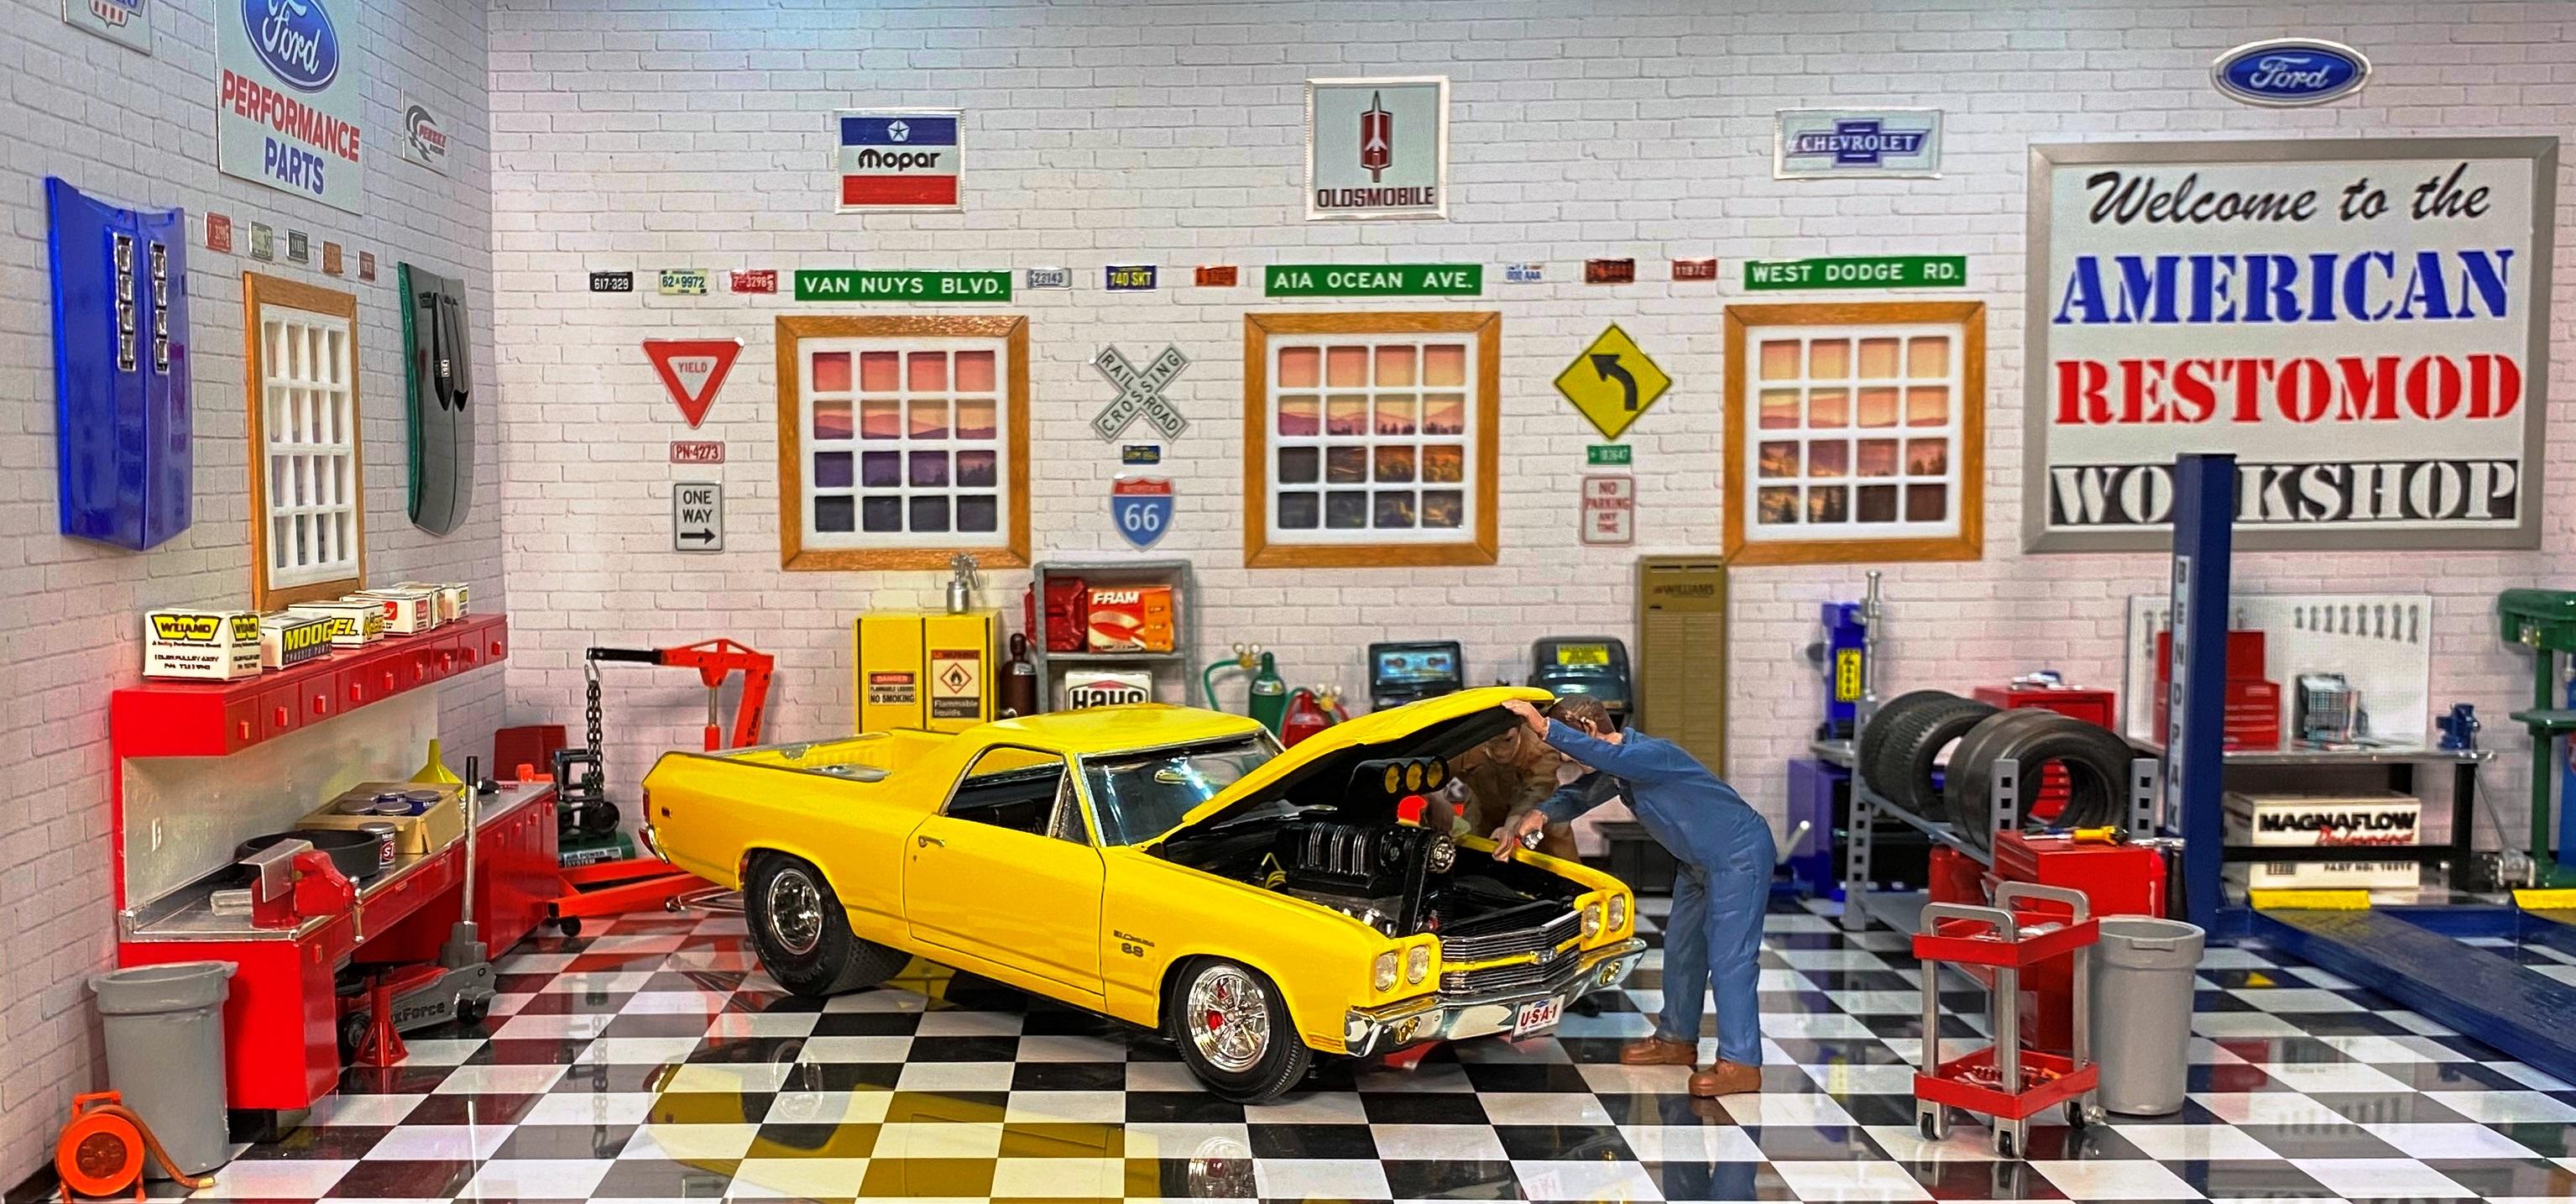
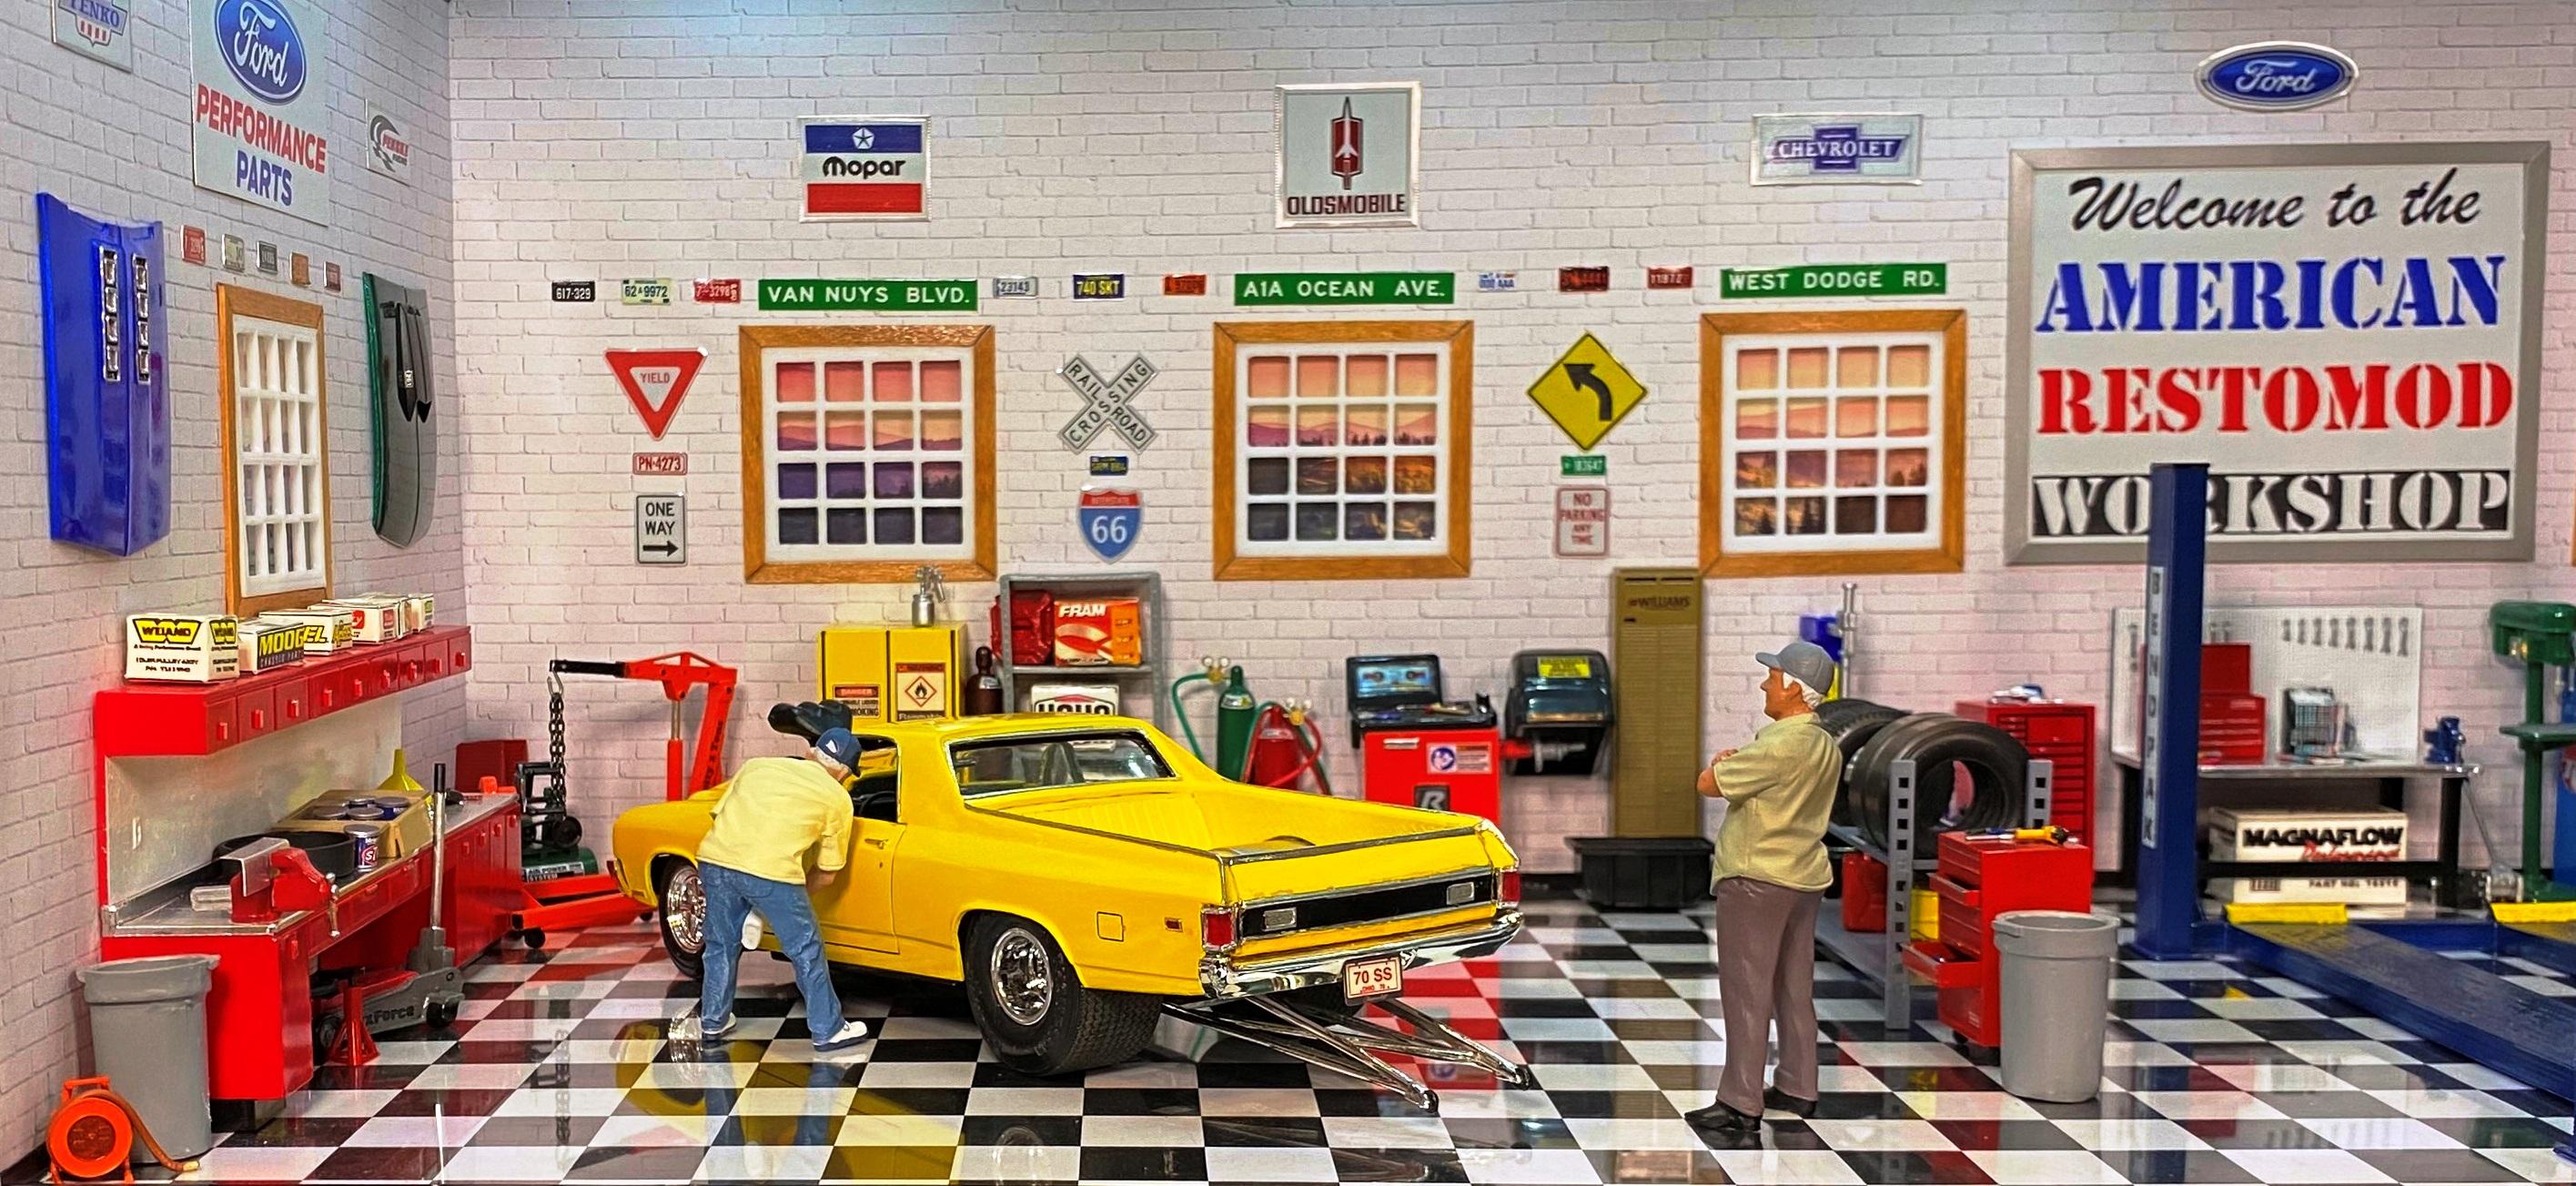
 This build was originally part of my Chevelle batch build in 2019. Due to all the test fitting and fabrication required this one was quite the challenge. However, I had a vision, and have now finally seen it through. The quality is not up to par because I had to handle it so much but it is "good enough". I am not sure I will ever take it to a show but at least I have one holy grail under my belt. Comments welcome. P.S. Does anyone have a spare set of AMT black 70 Chevelle hood stripes to help me give it the final touch?
-
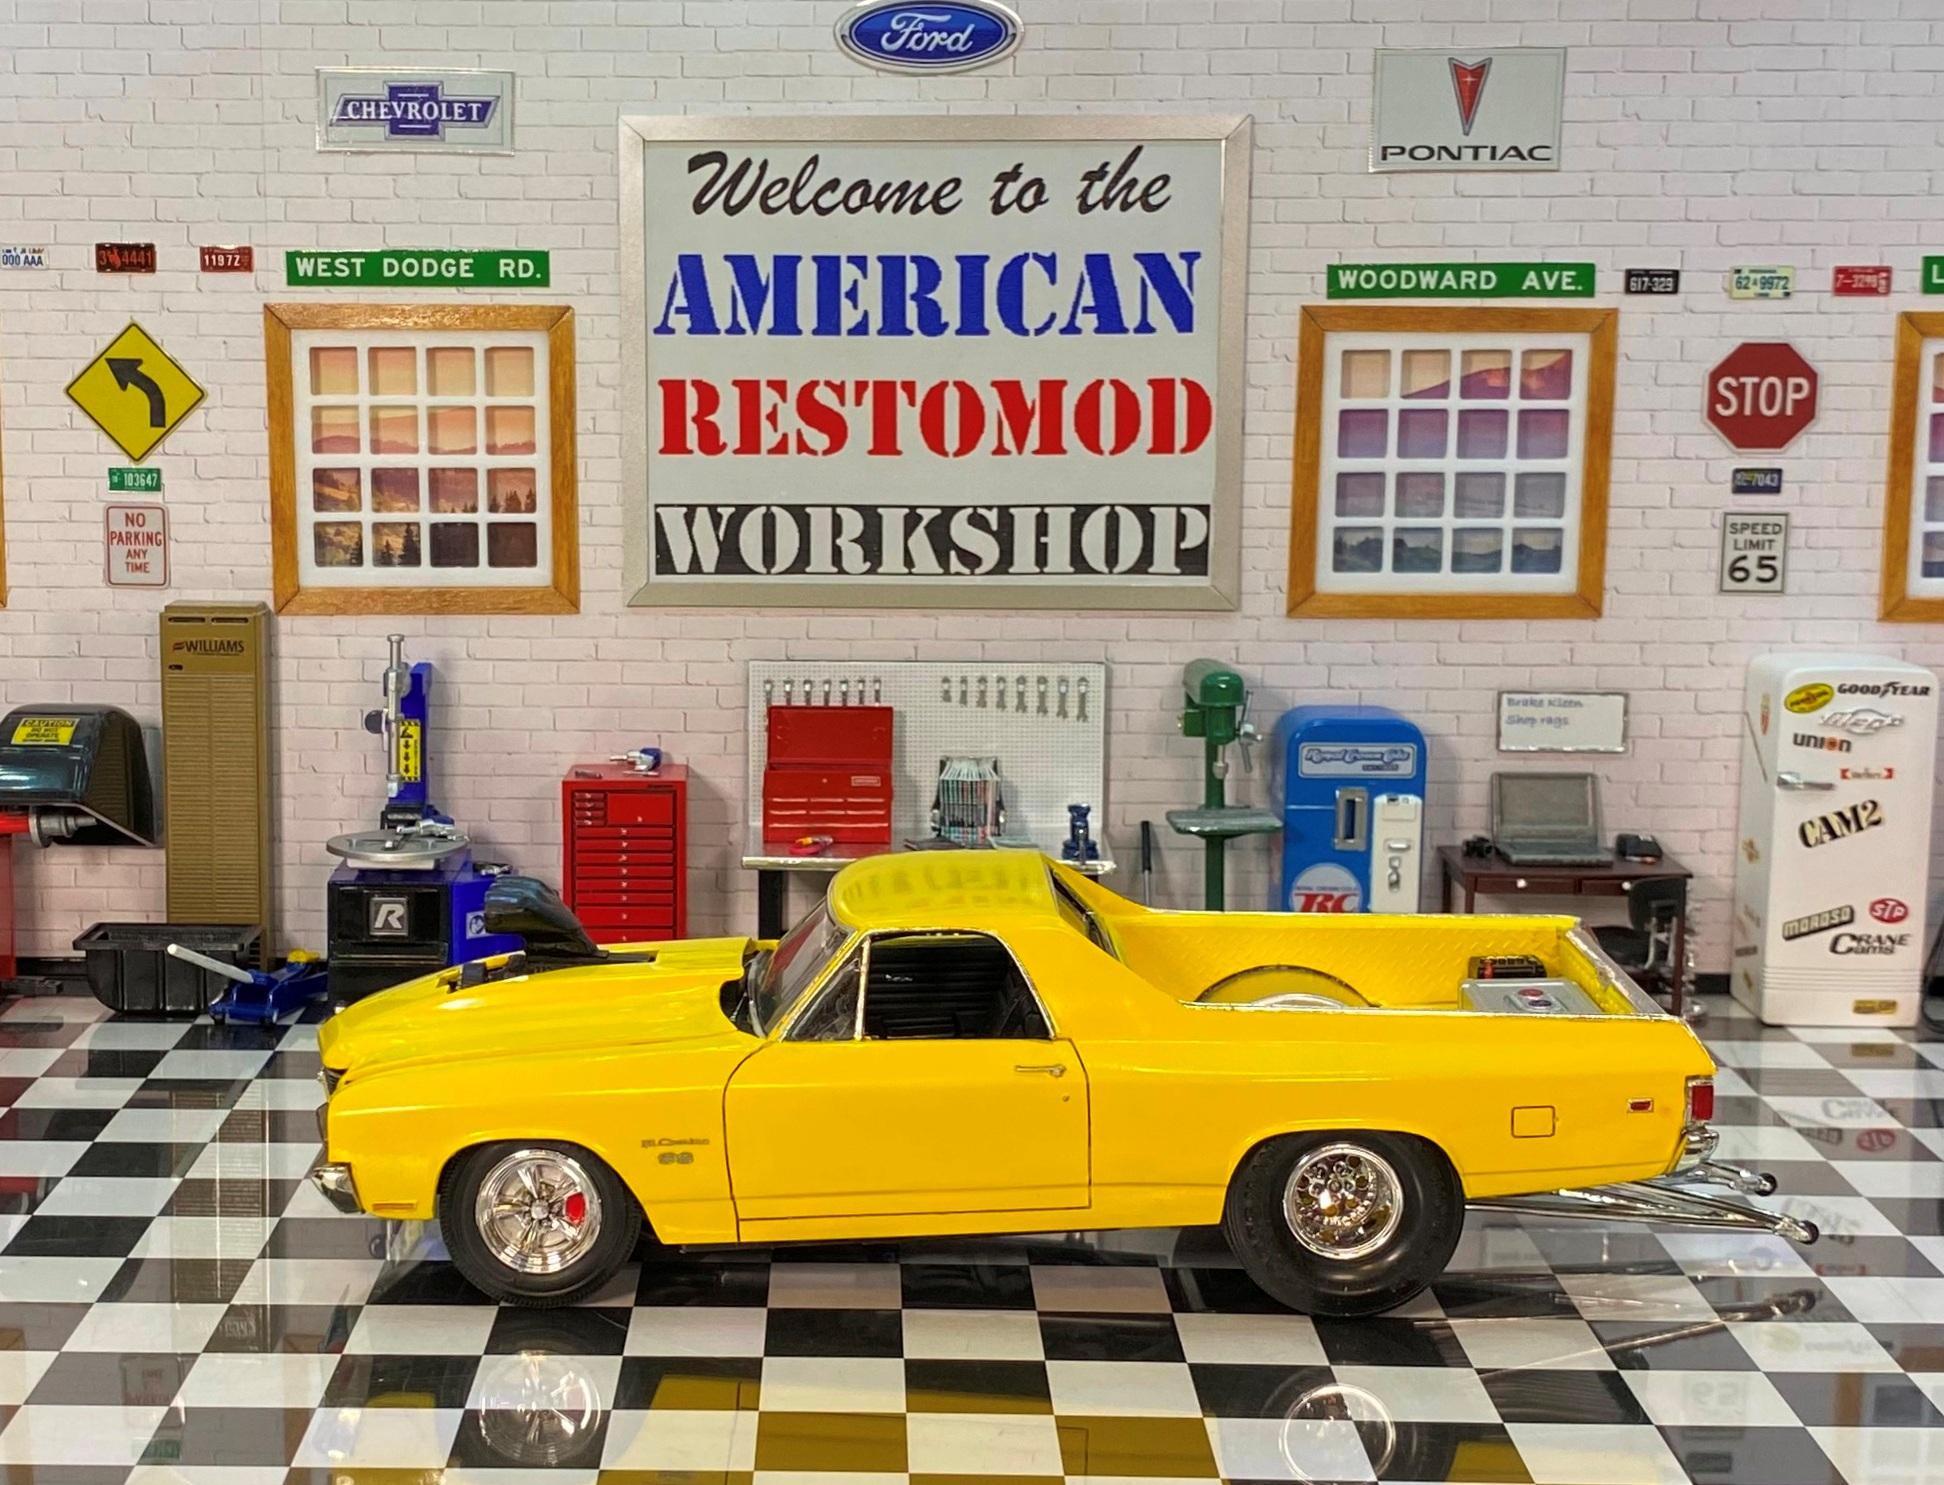
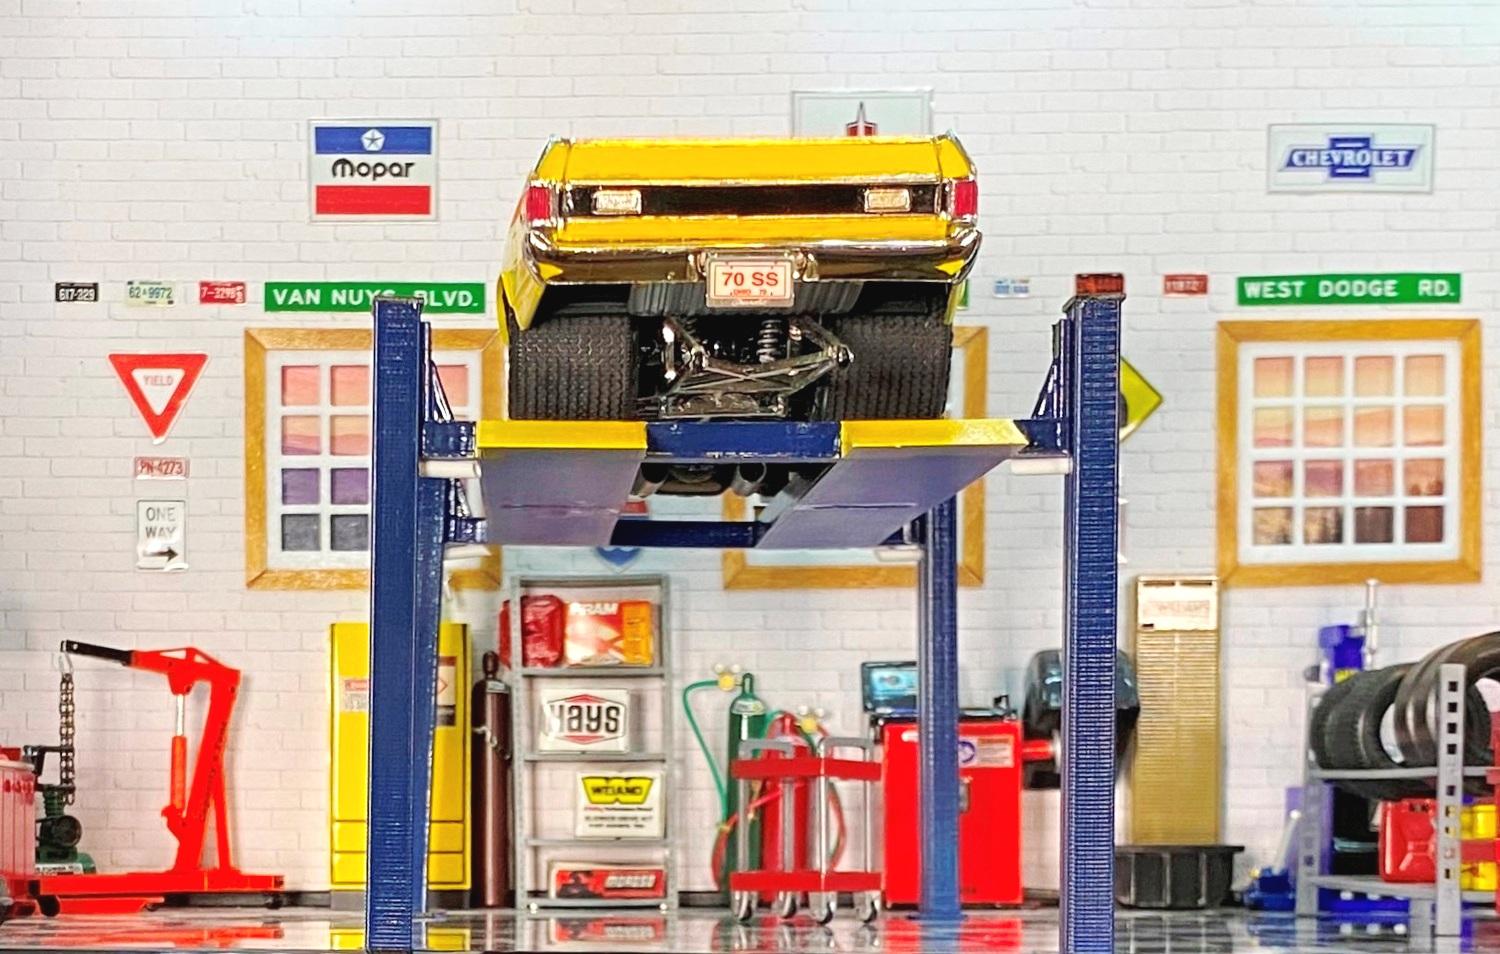
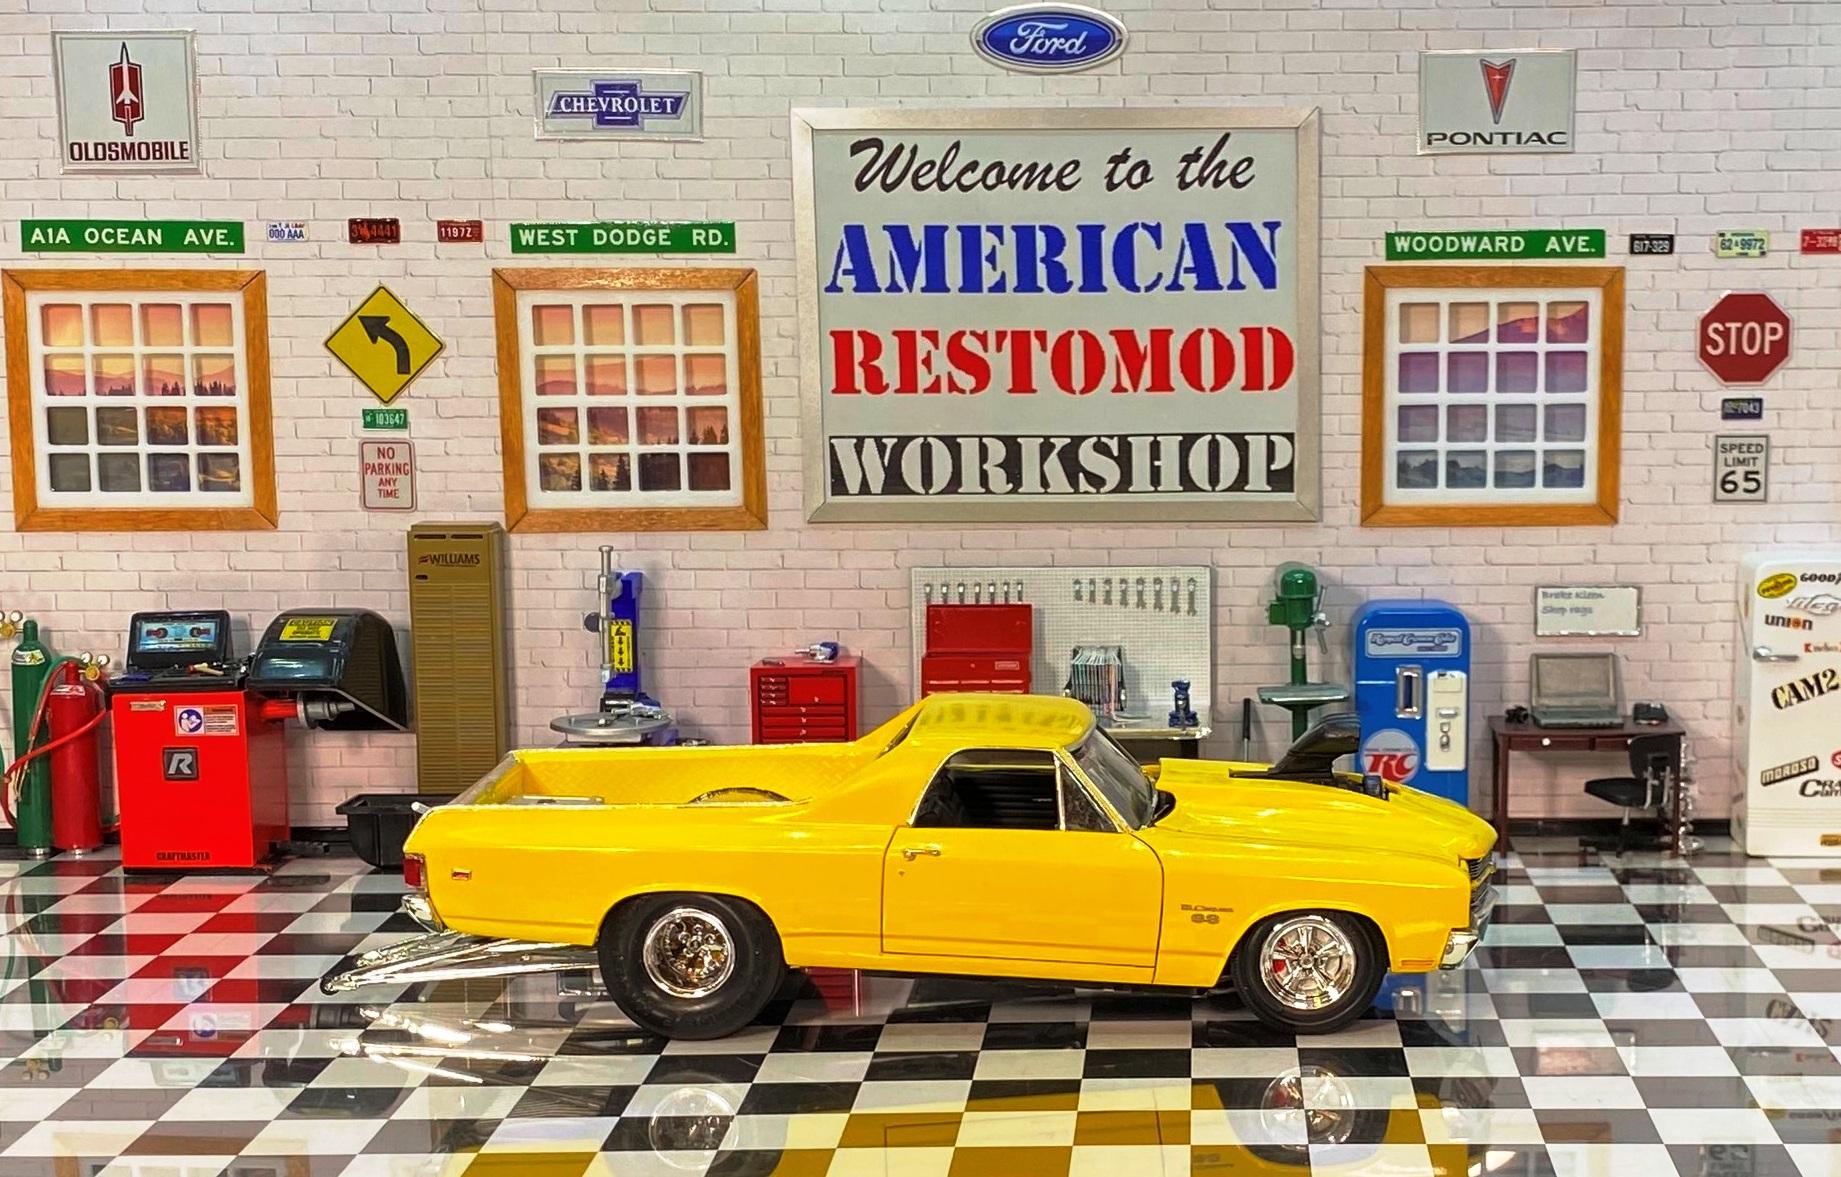
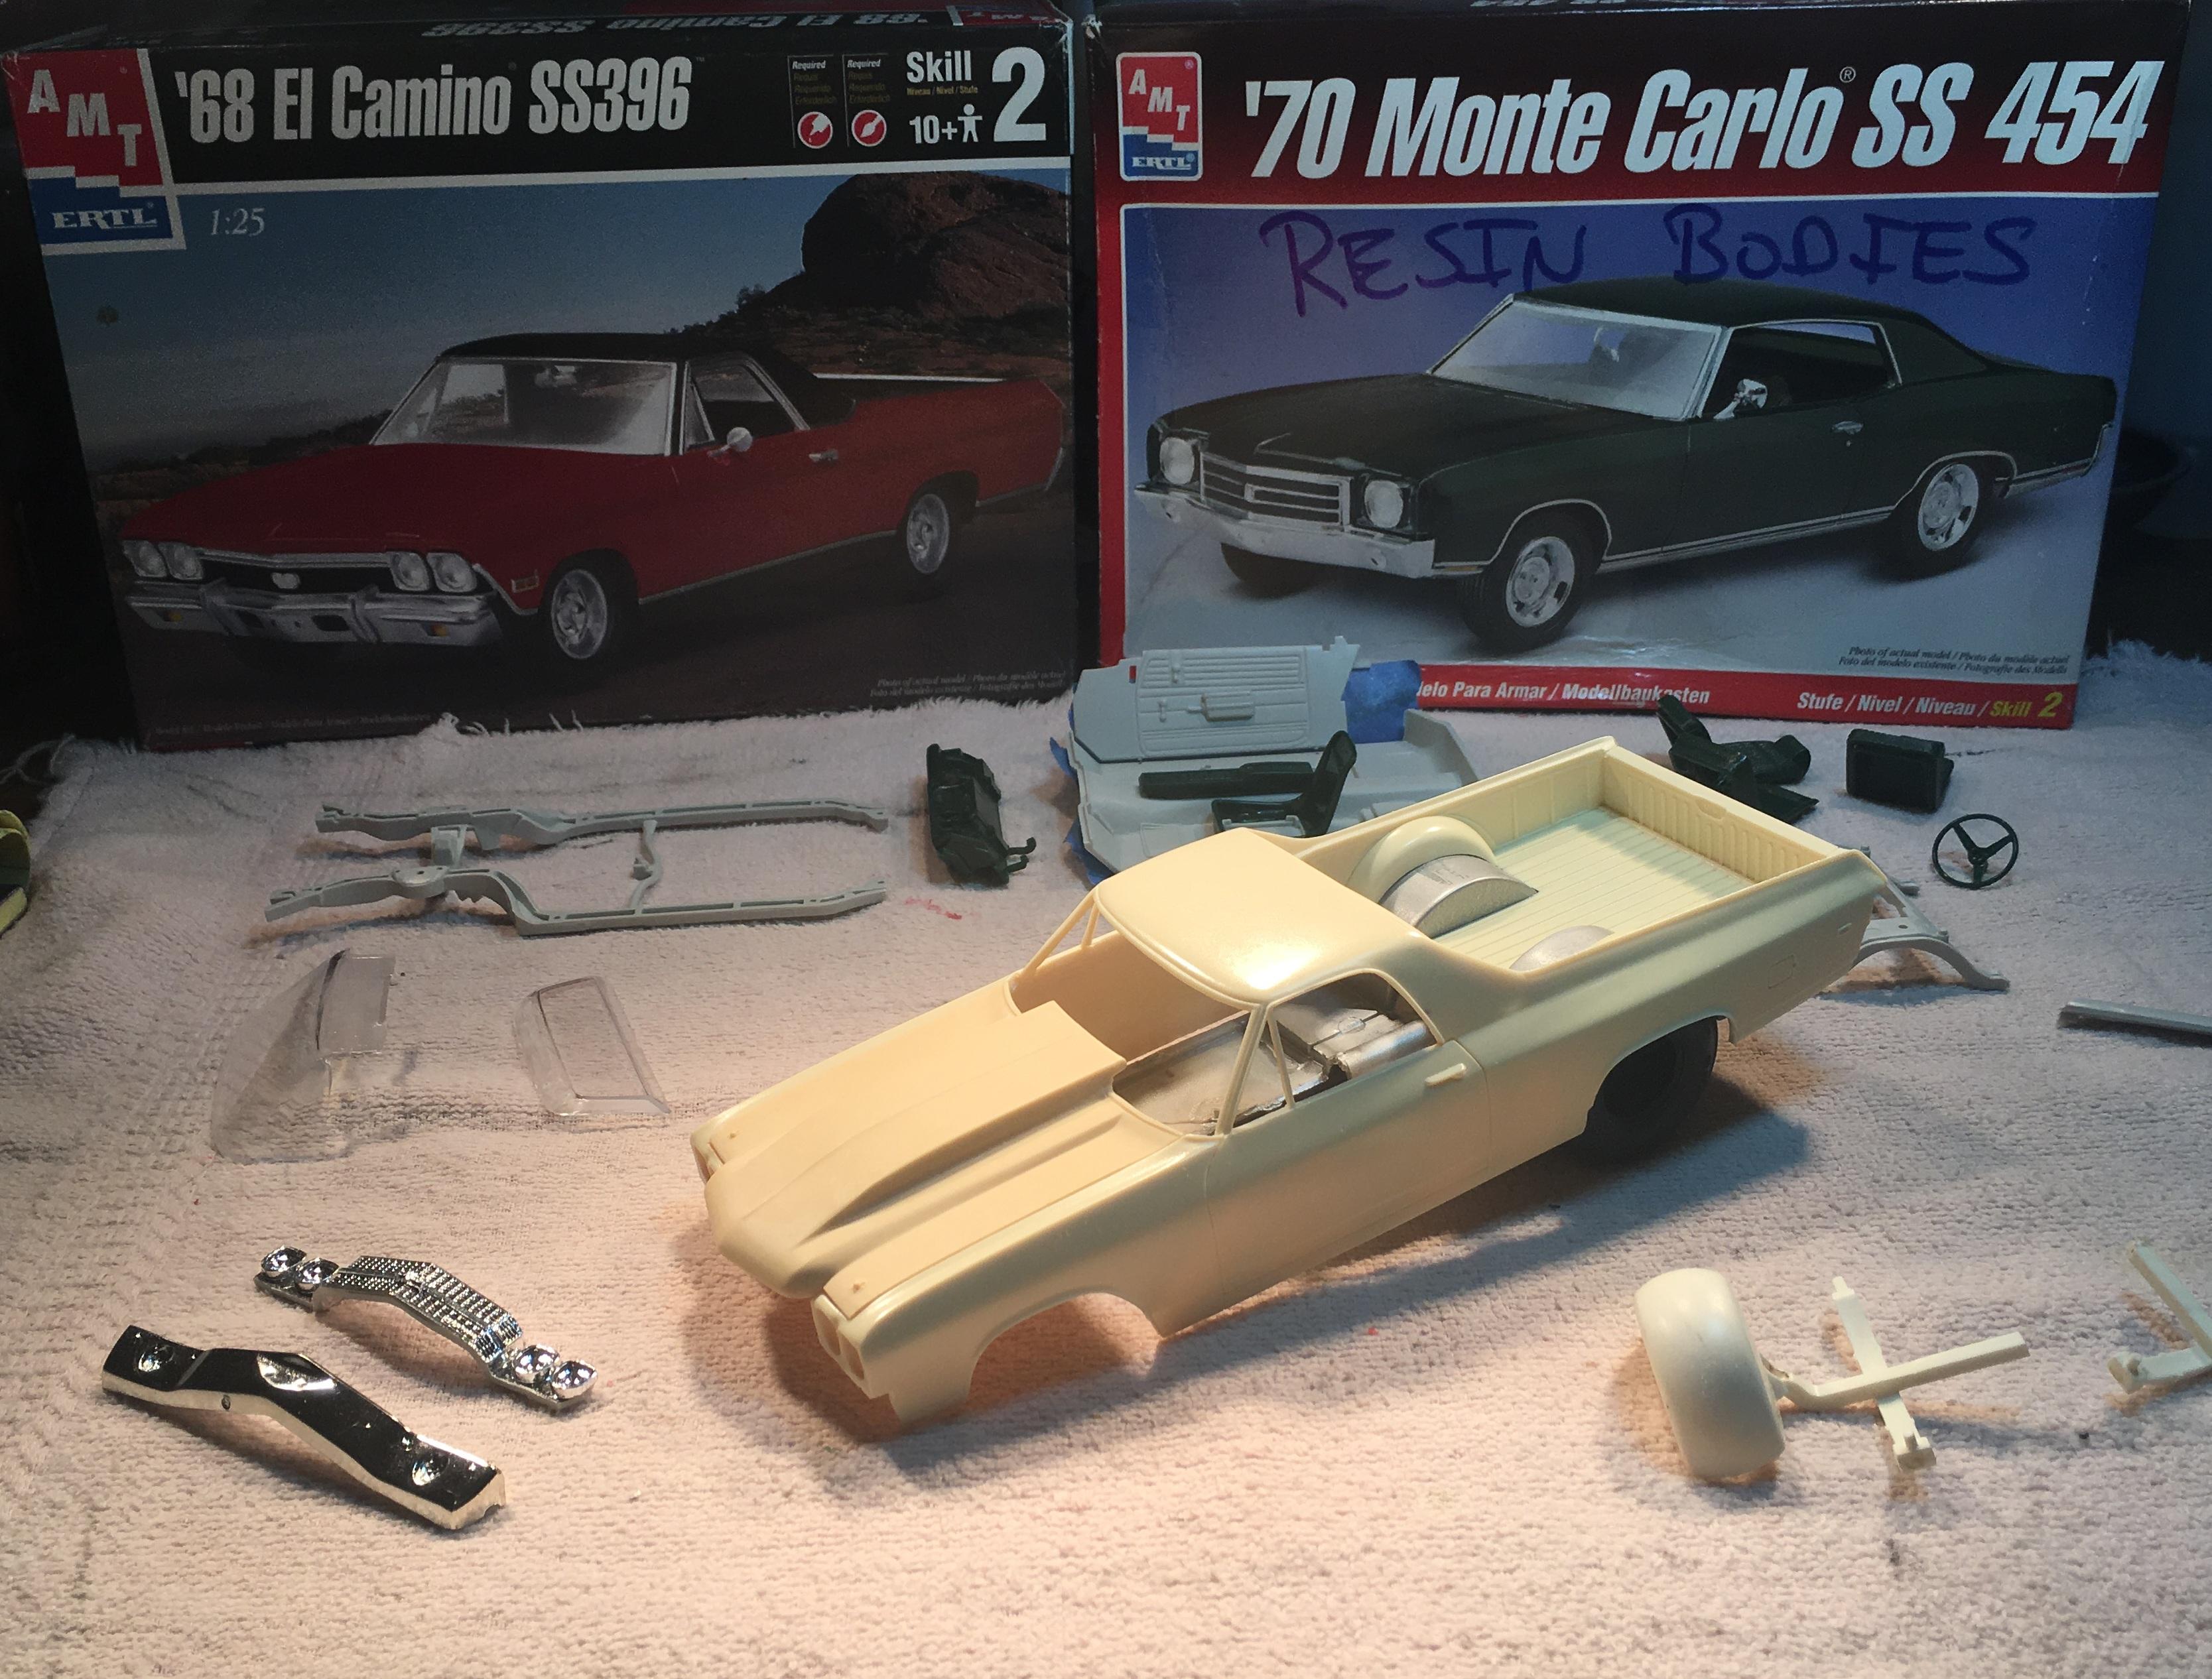
I am just now posting this mid build. 1970 El Camino body Jimmy Flintstone (resin). 1968 El Camino chassis, interior tub, windows, rear bumper and tail lights. 1970 Monte Carlo front bumper(correct for El Camino) engine, seats and dashboard. 1967 Pro Street Chevelle wheel tubs and Pro Street tires. 1970 Chevelle grille, head lights and SS stripes. Tandem trailer fenders used as inner fenders. The '68 El Camino interior floor pan has been trimmed and joined to the '67 wheel tubs. (1)After 2-3 days of fabricating (which isn't my strong suit), I have made the front of the bed from 5 pieces including chunks from a Laborghini Countach dashboard. (2)I also made the rear panel for the interior. The Jimmy Flinstone resin body comes with neither. The rest of the interior is going to be a mix of '68 El Camino and '70 Monte Carlo parts. I spent the 2 days trimming and fitting the interior such that it will be happy with the windows. I still have to make a filler panel between the cowl and the base of the windshield. Painted and mocked up the interior. Added touches with chrome Molotow pen. Selected the deep dish rims. I have a whole box of wheels but not very many for tires this wide. I drilled out all 32 holes in the rims to make them more realistic. I plan on dressing up the plain, smooth centers with some spinners from my parts box. Converted spare car trailer fenders into front inner fenders. Fabbed up some gap filler plates for the wheel tubs to the inside of the bed. I was almost done with the 2nd one when I broke it in half. GRRRRRR! I ran into a snag. It seems I no longer possess the two front '68 El Camino spindles for the suspension. No spindles = no front tires. I sent a PM to one member and he is going to send me a pair. WOO! HOO!
-
AMT's 1/25 '65 Chevy El Camino kit, this time in retro "Gear Hustler" packaging from the Construction Series:
-
Here I have my Monogram 1/24 78 El Camino. This kit goes together nicely except for the tailgate. Lots of options in this kit and was fun to build. Paint is Tamiya ts24 purple with ts46 light sand for the interior. All feedback is welcomed and encouraged. Cheers, David. 😎👍
-
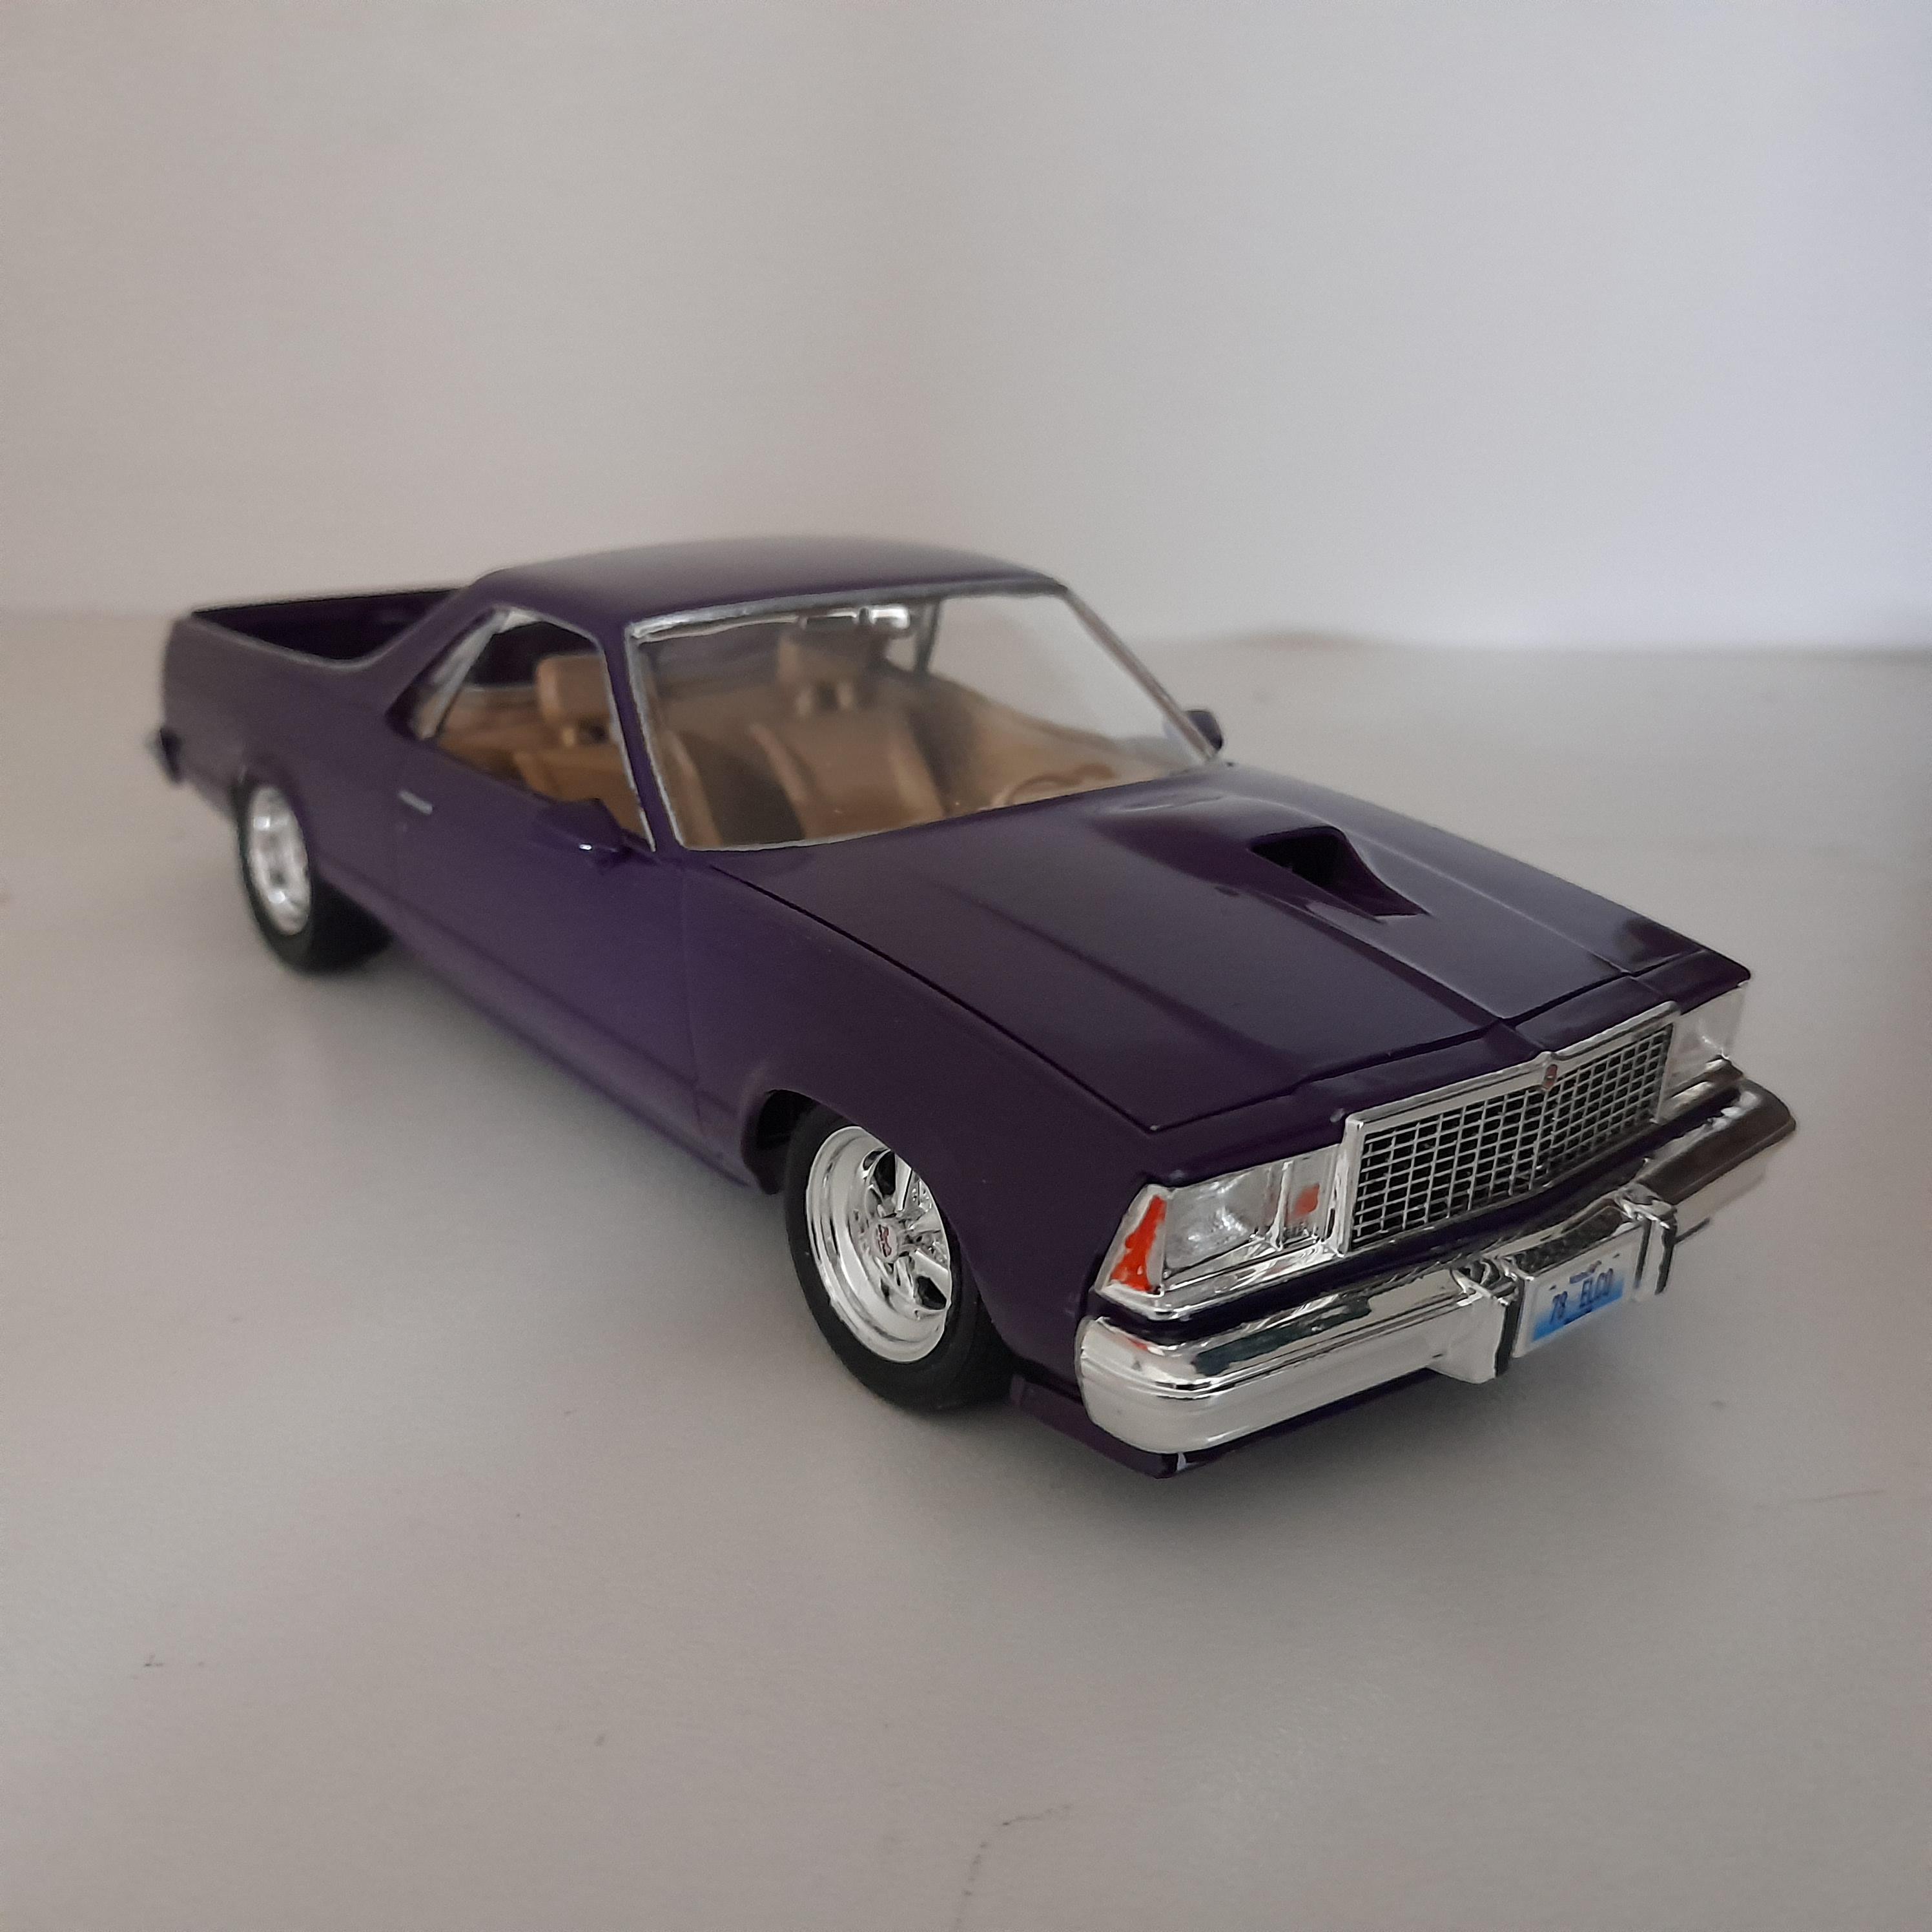
This is a model of an El Camino I once owned . It was actually a '74 that I put a '76 front clip on , so to avoid any confusion I'm calling it a '76 . I started about four months ago by modifying a Chevelle stock car body , including lengthening the wheelbase . The bed is from the AMT '68 El Camino with a few modifications done to it . I modified the front bumper by adding the parking lights , and made my own grille and rear bumper . I used the headlights and interior from a Revell '77 Monte Carlo . The chassis is from the '68 El Camino and the engine was built from my parts box . The wheels and tires are from Fireball Modelworks . The paint is Duplicolor Honda Starlight Silver Metallic , the stripes are my own decals , and it is cleared with TS - 13 . I'm planning to build another one of these so I'd like some honest critiques and opinions . There a few things I'm going to fix or do differently on the next one but I only have two eyes and would appreciate your feedback . Thanks for looking !
-
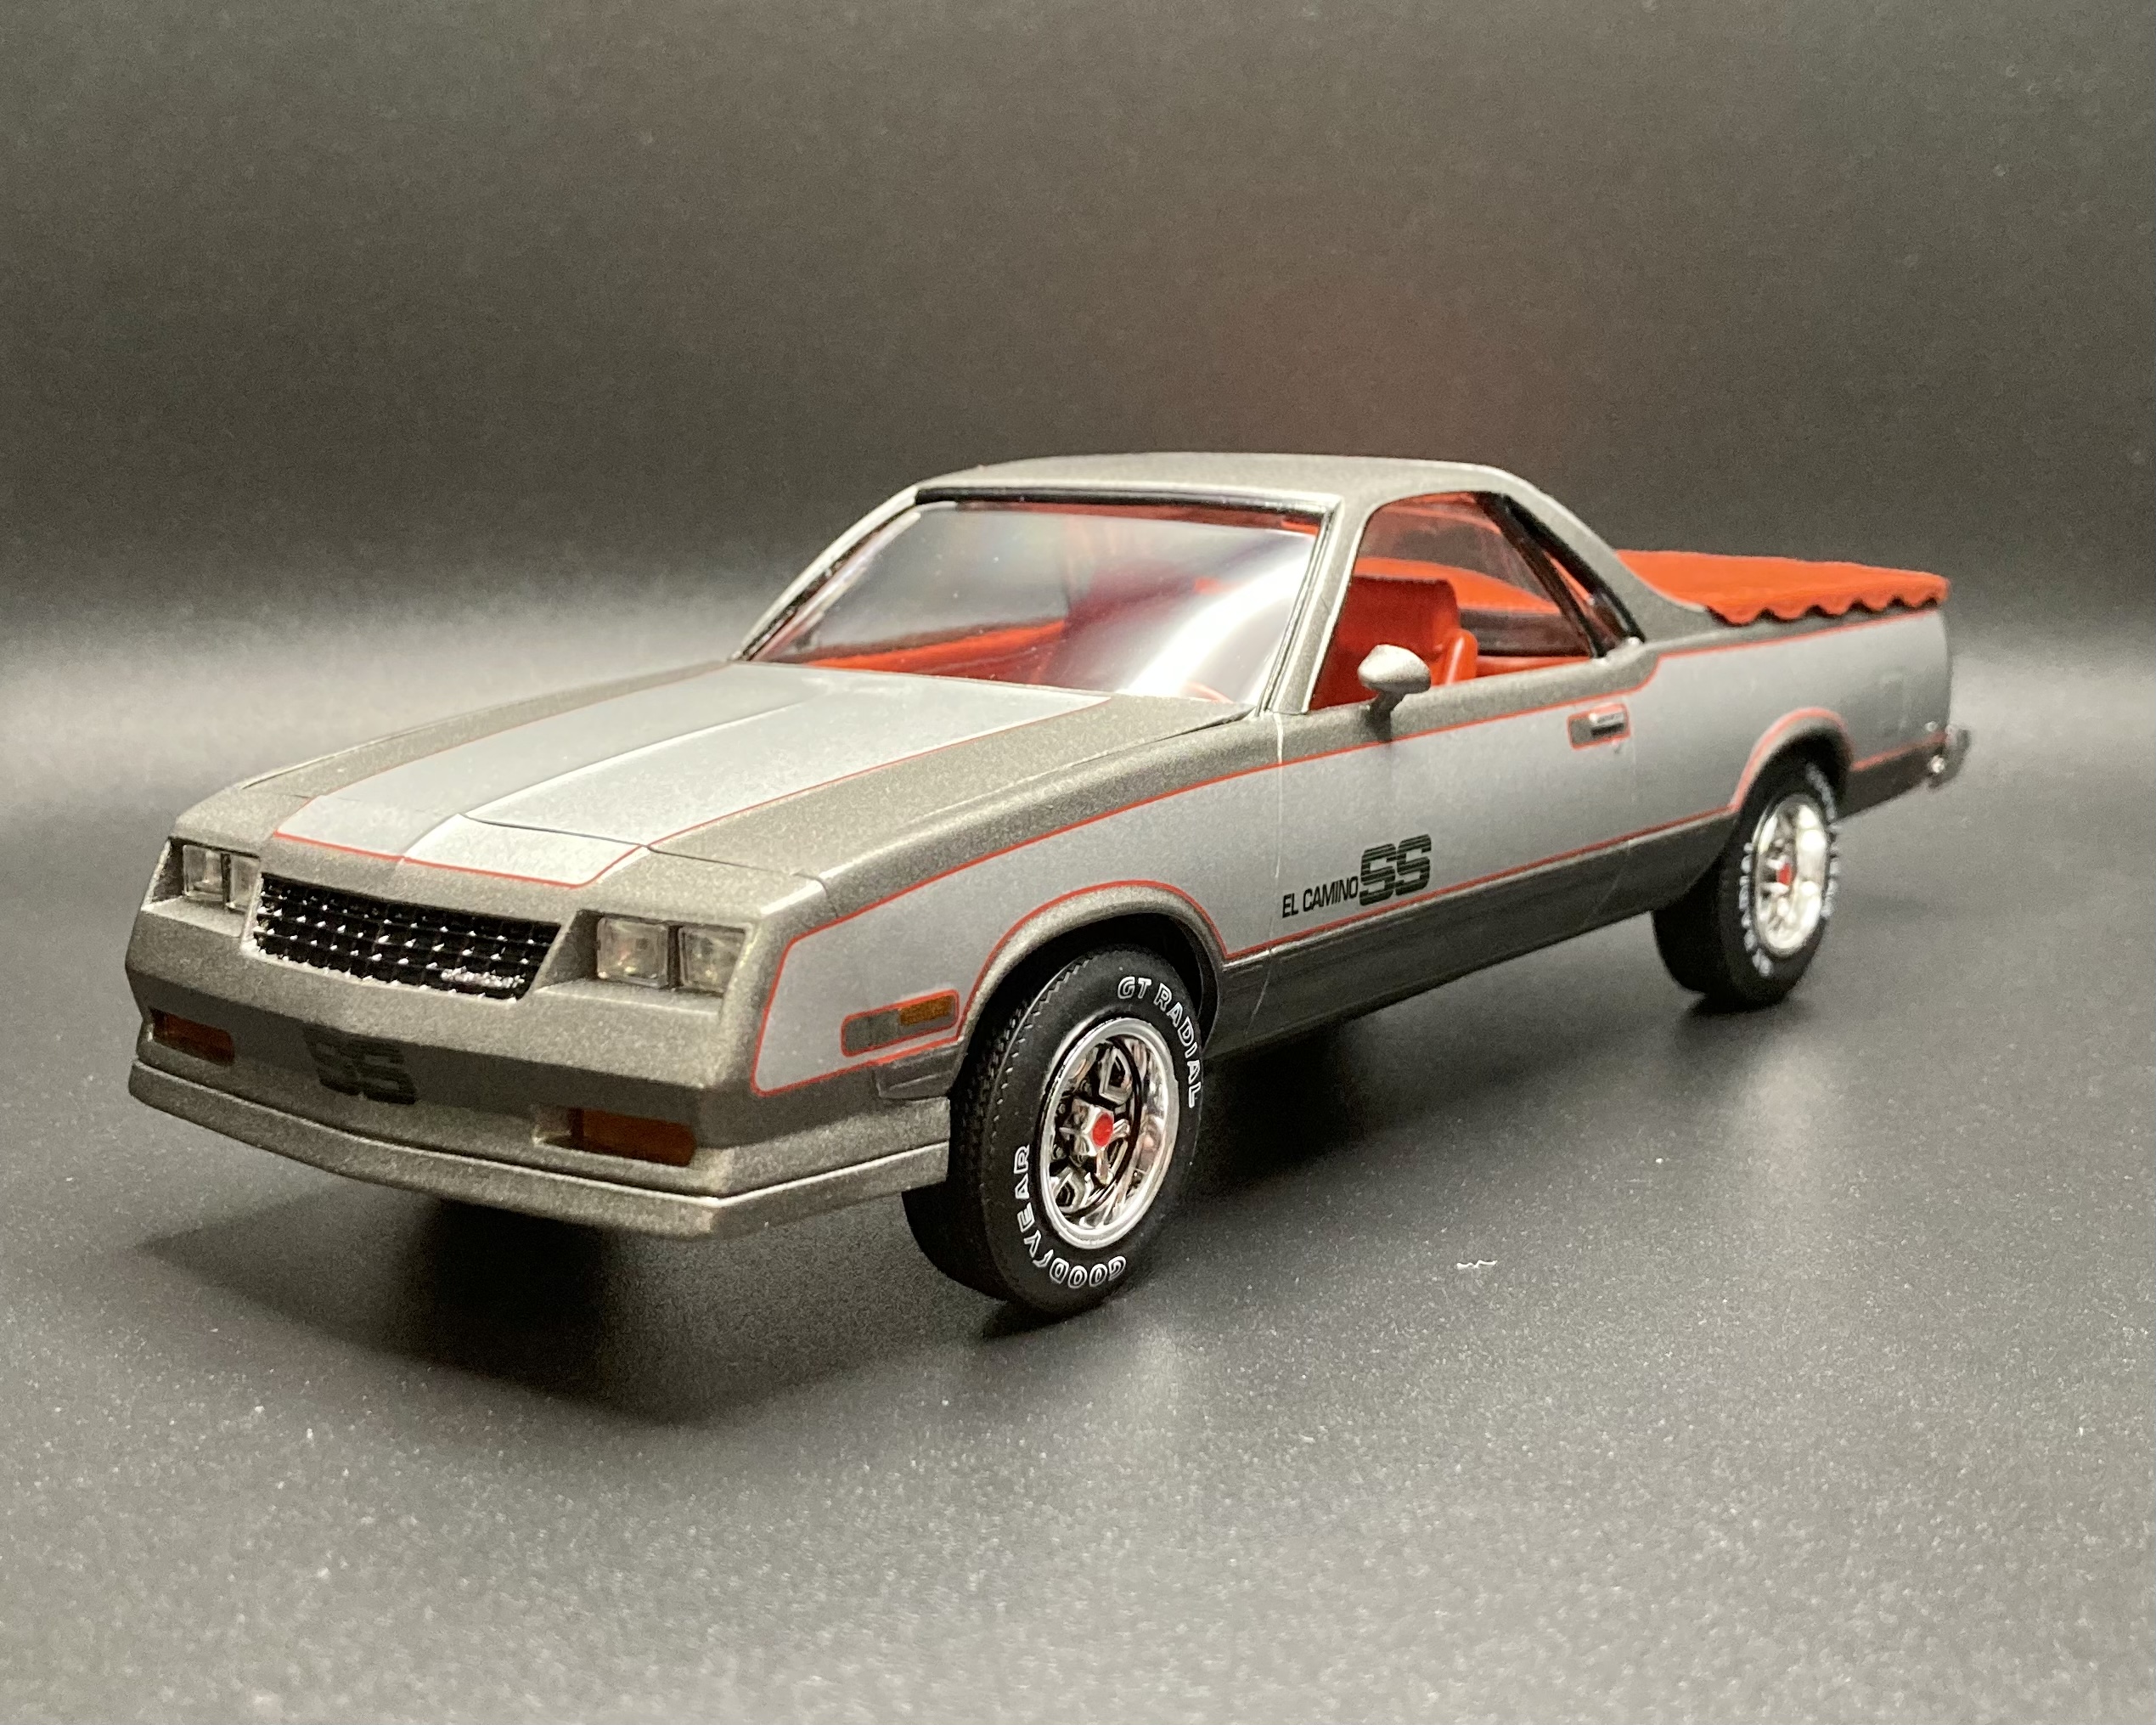
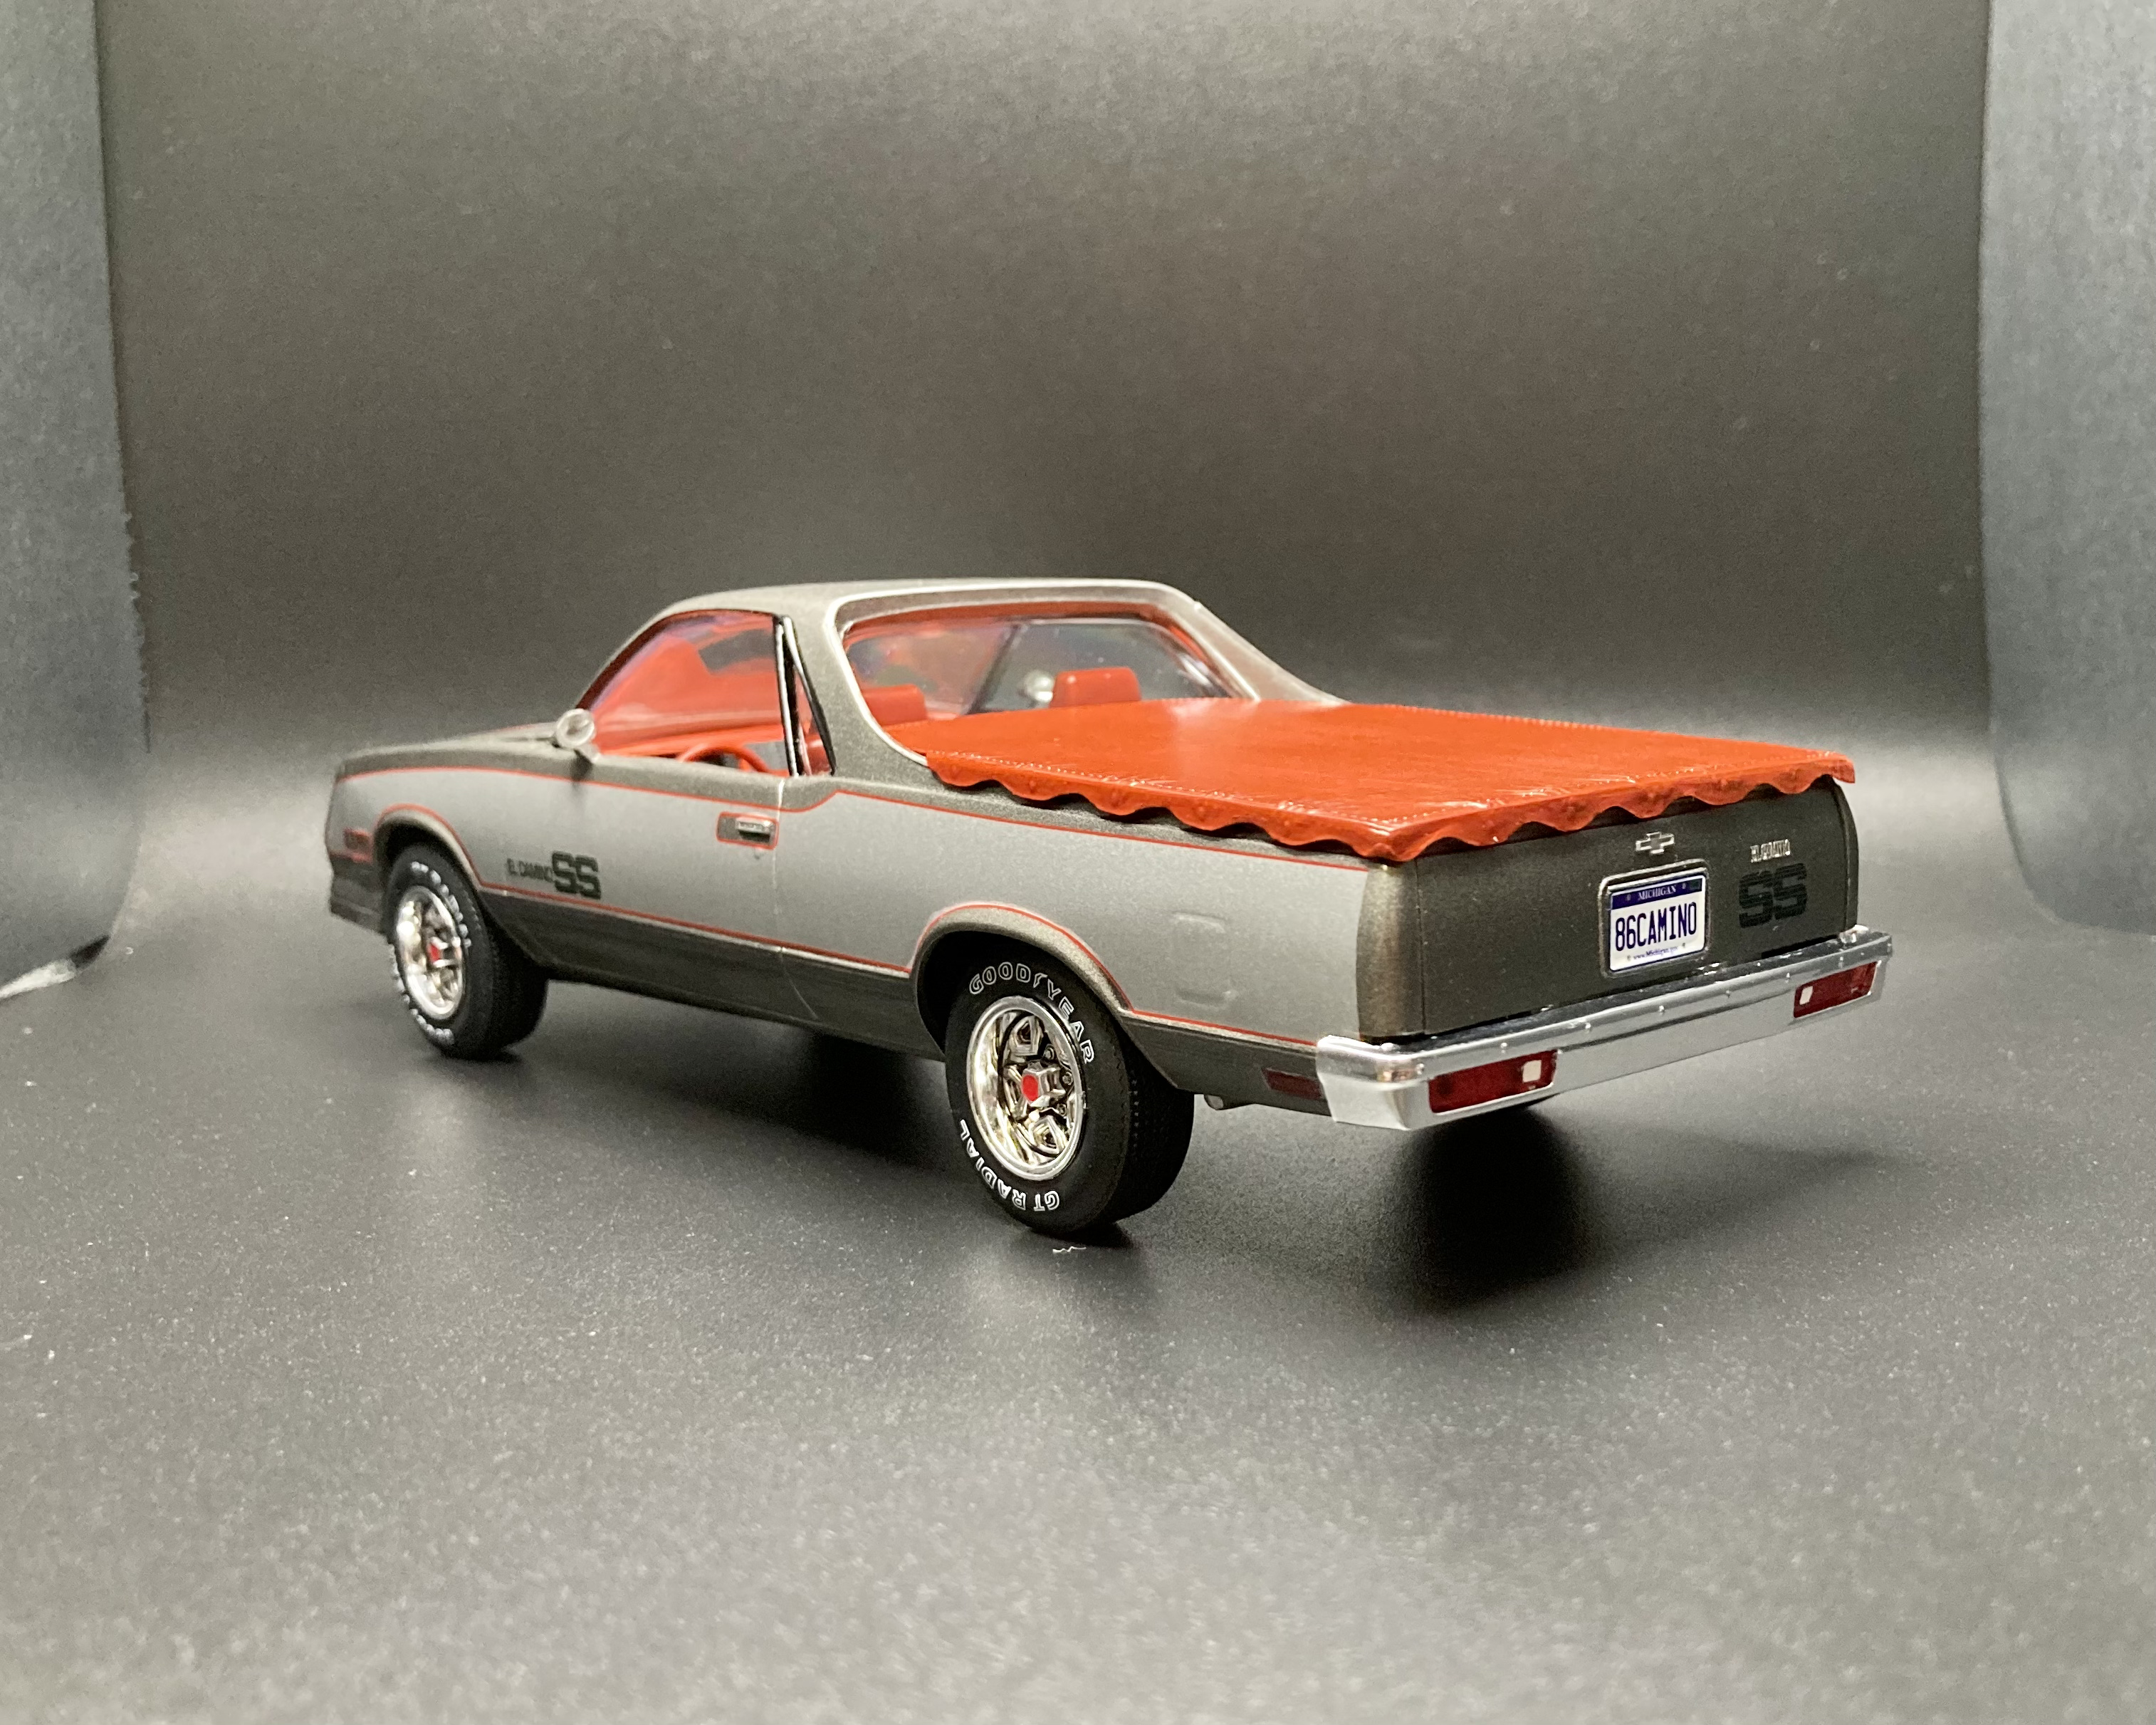
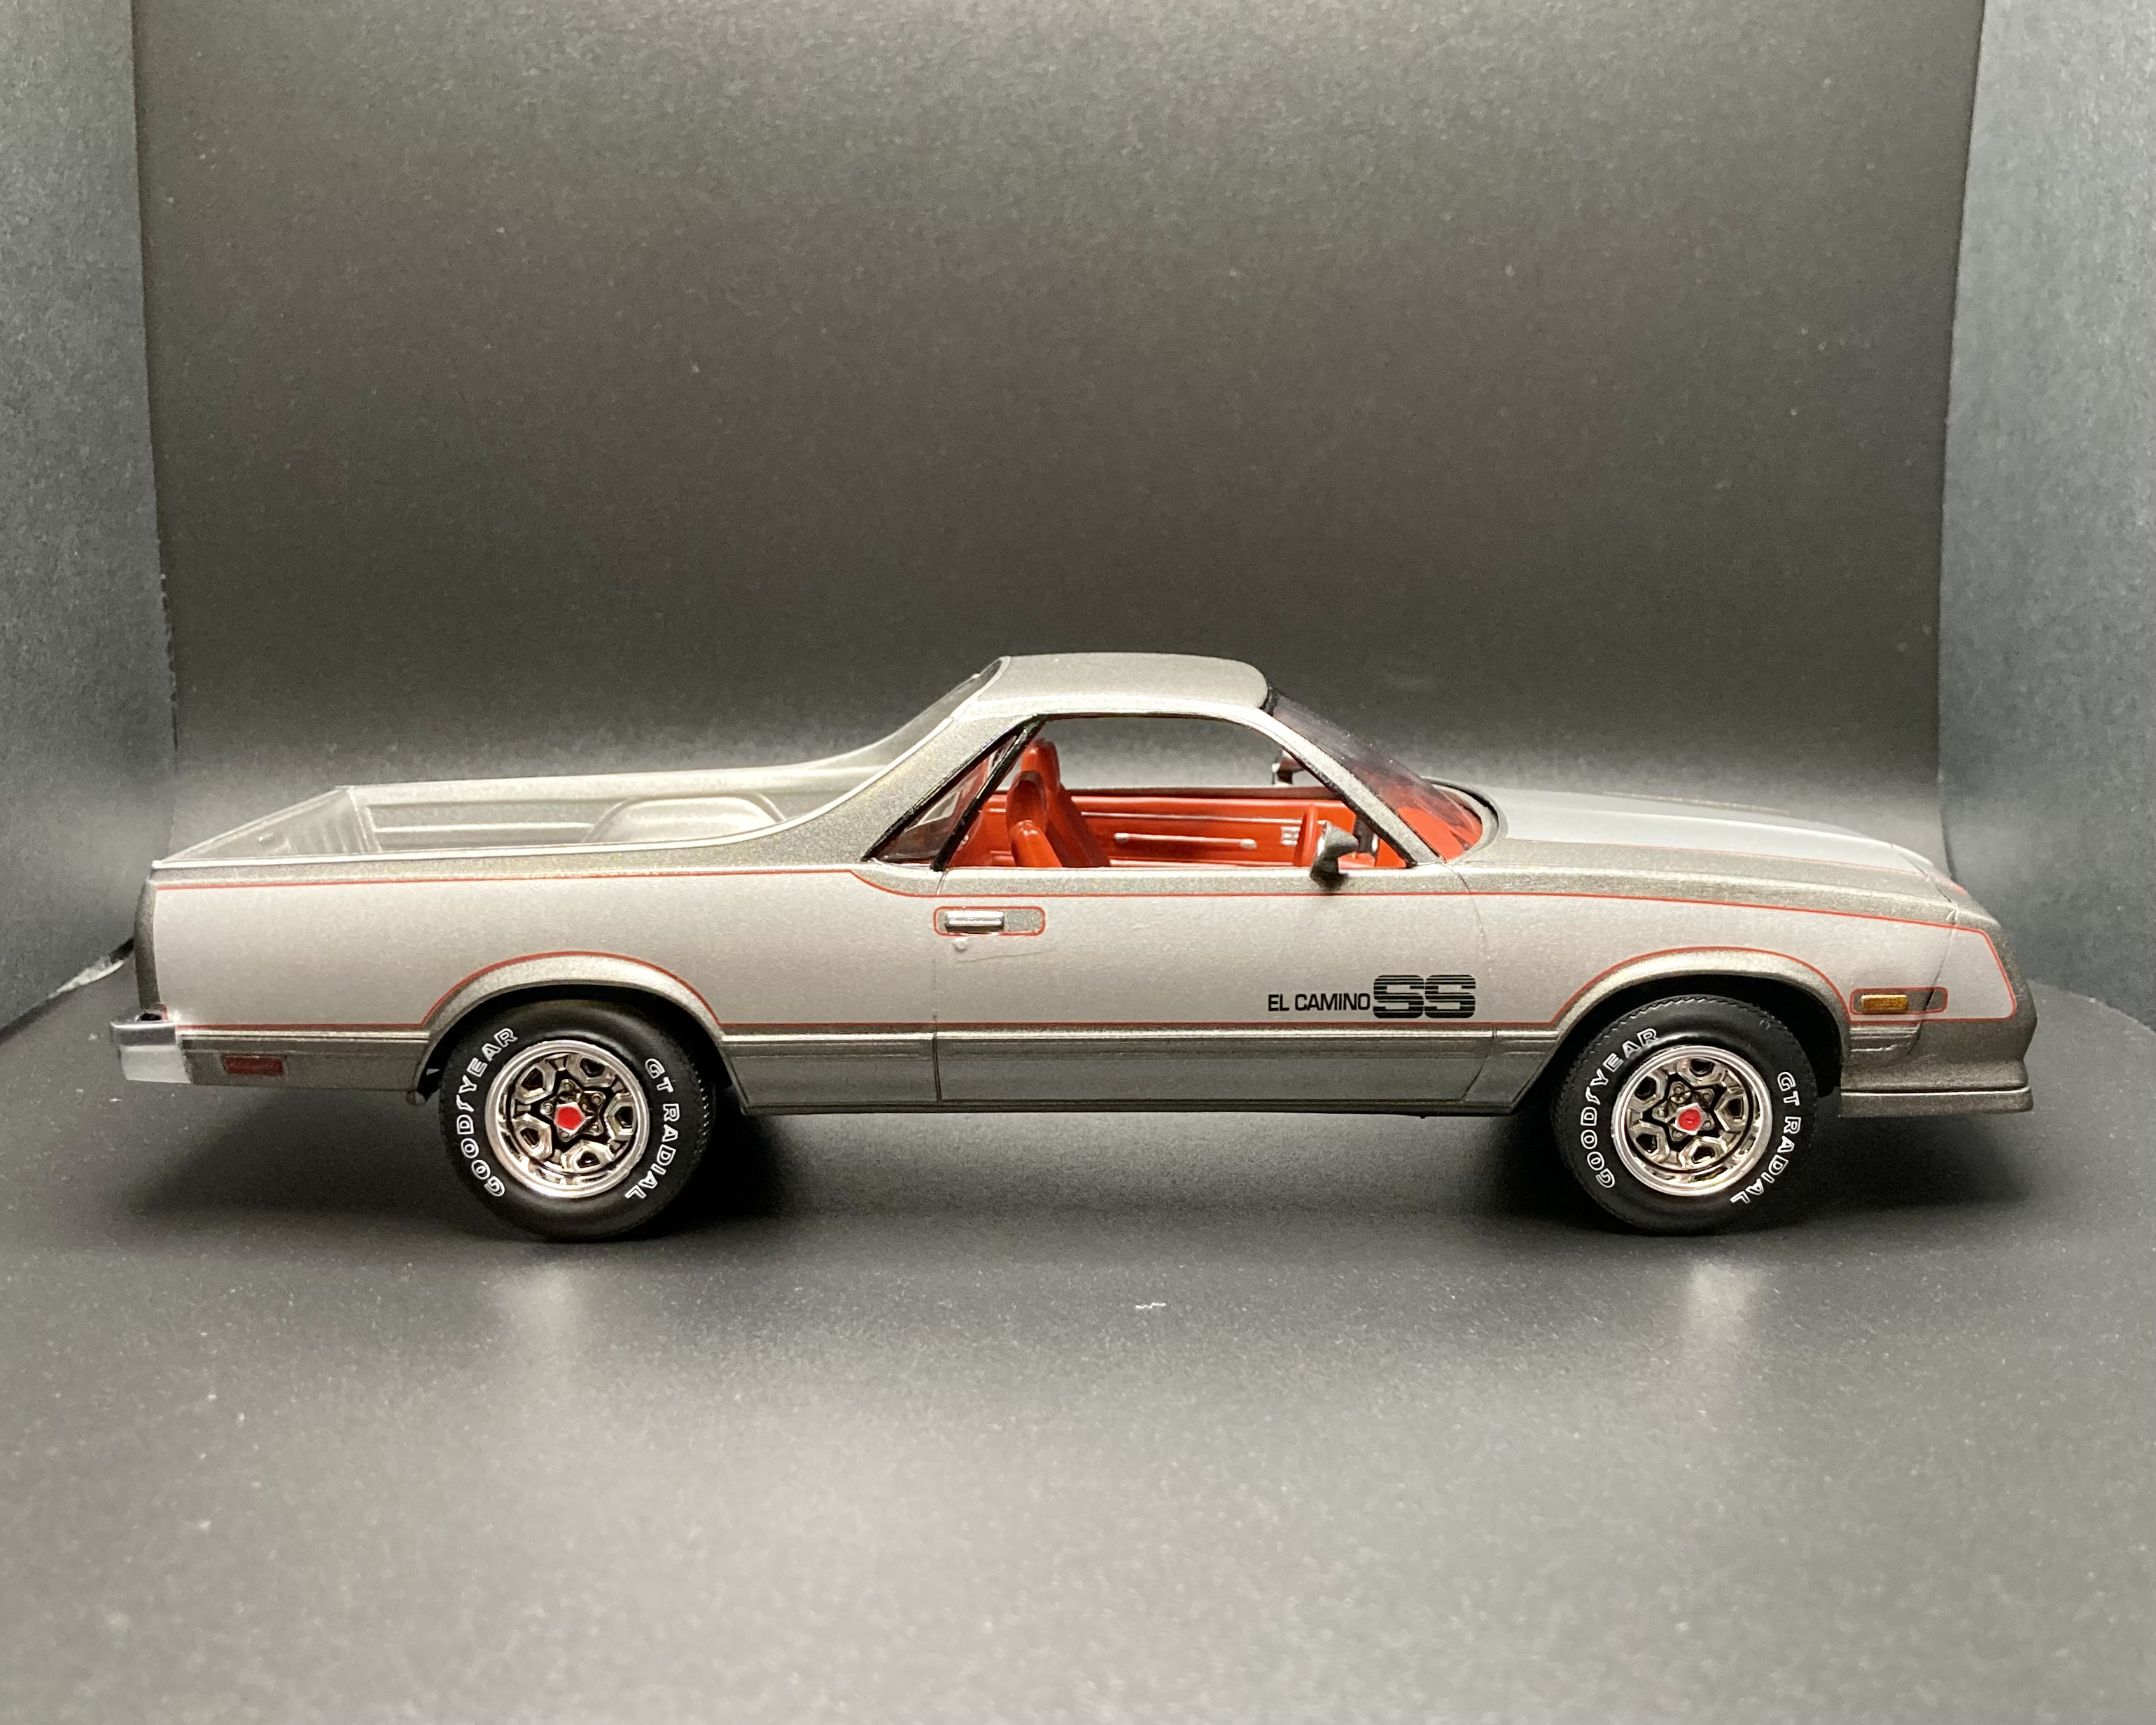
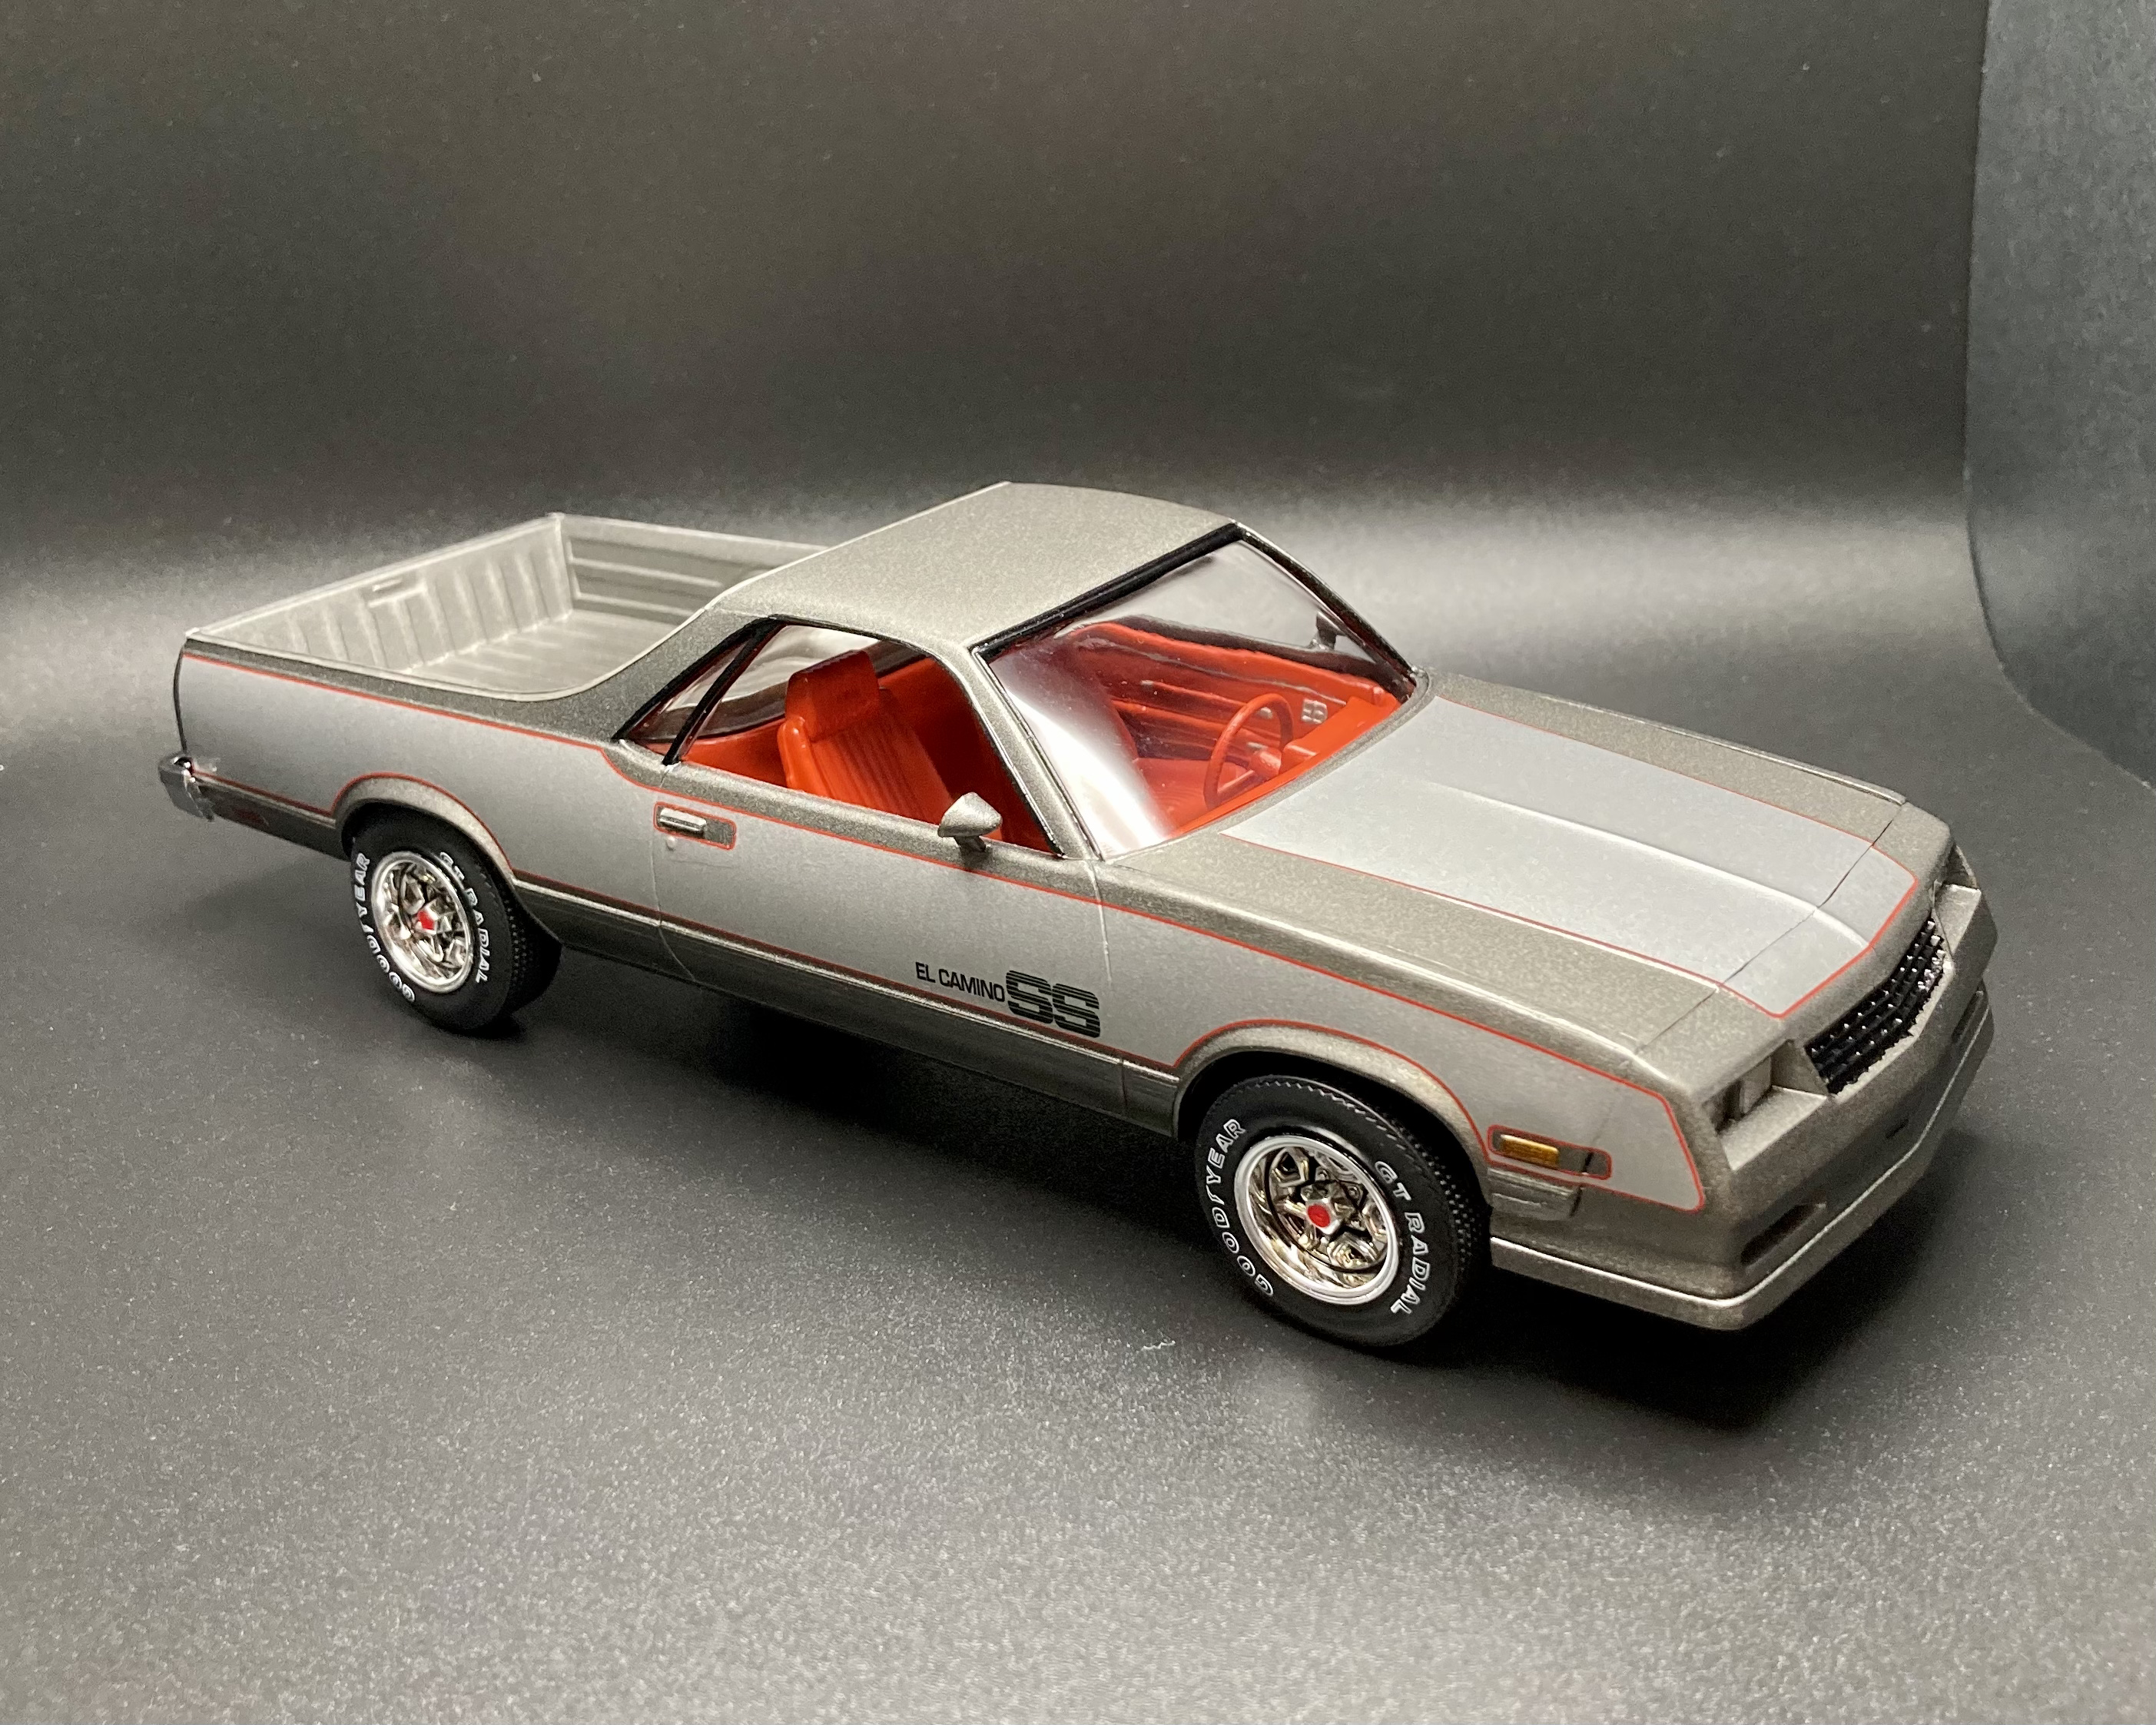
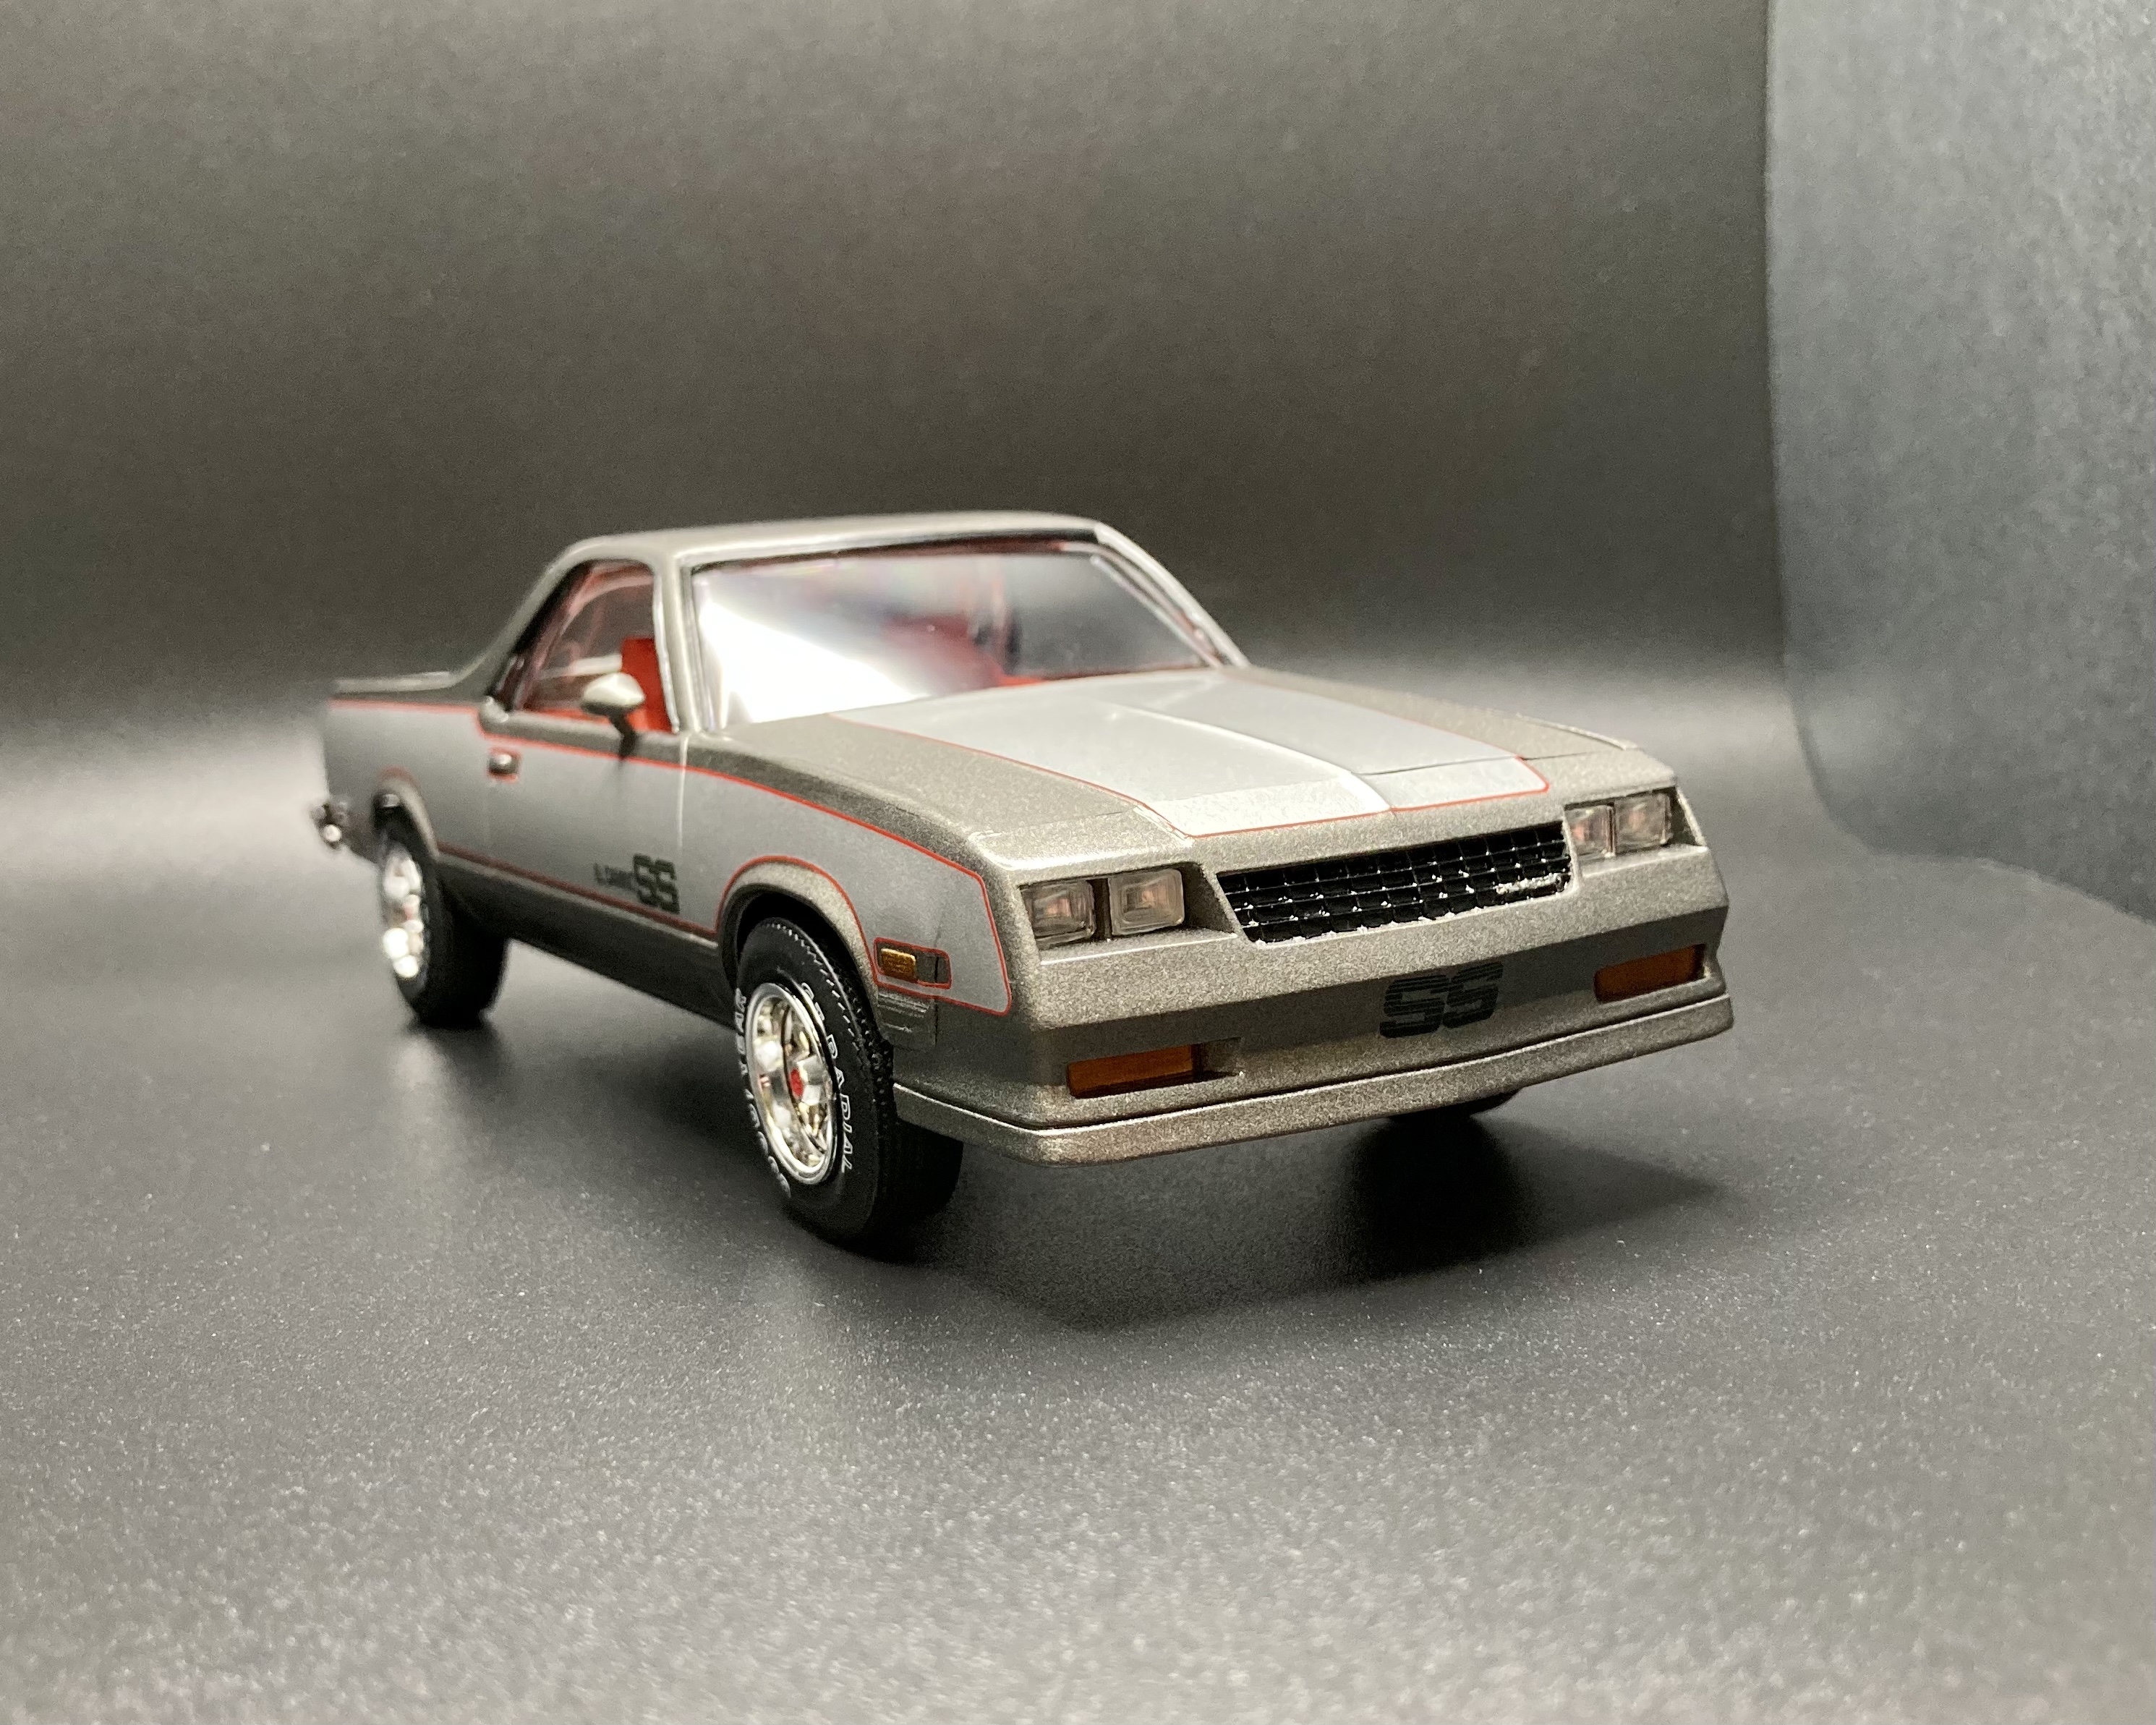
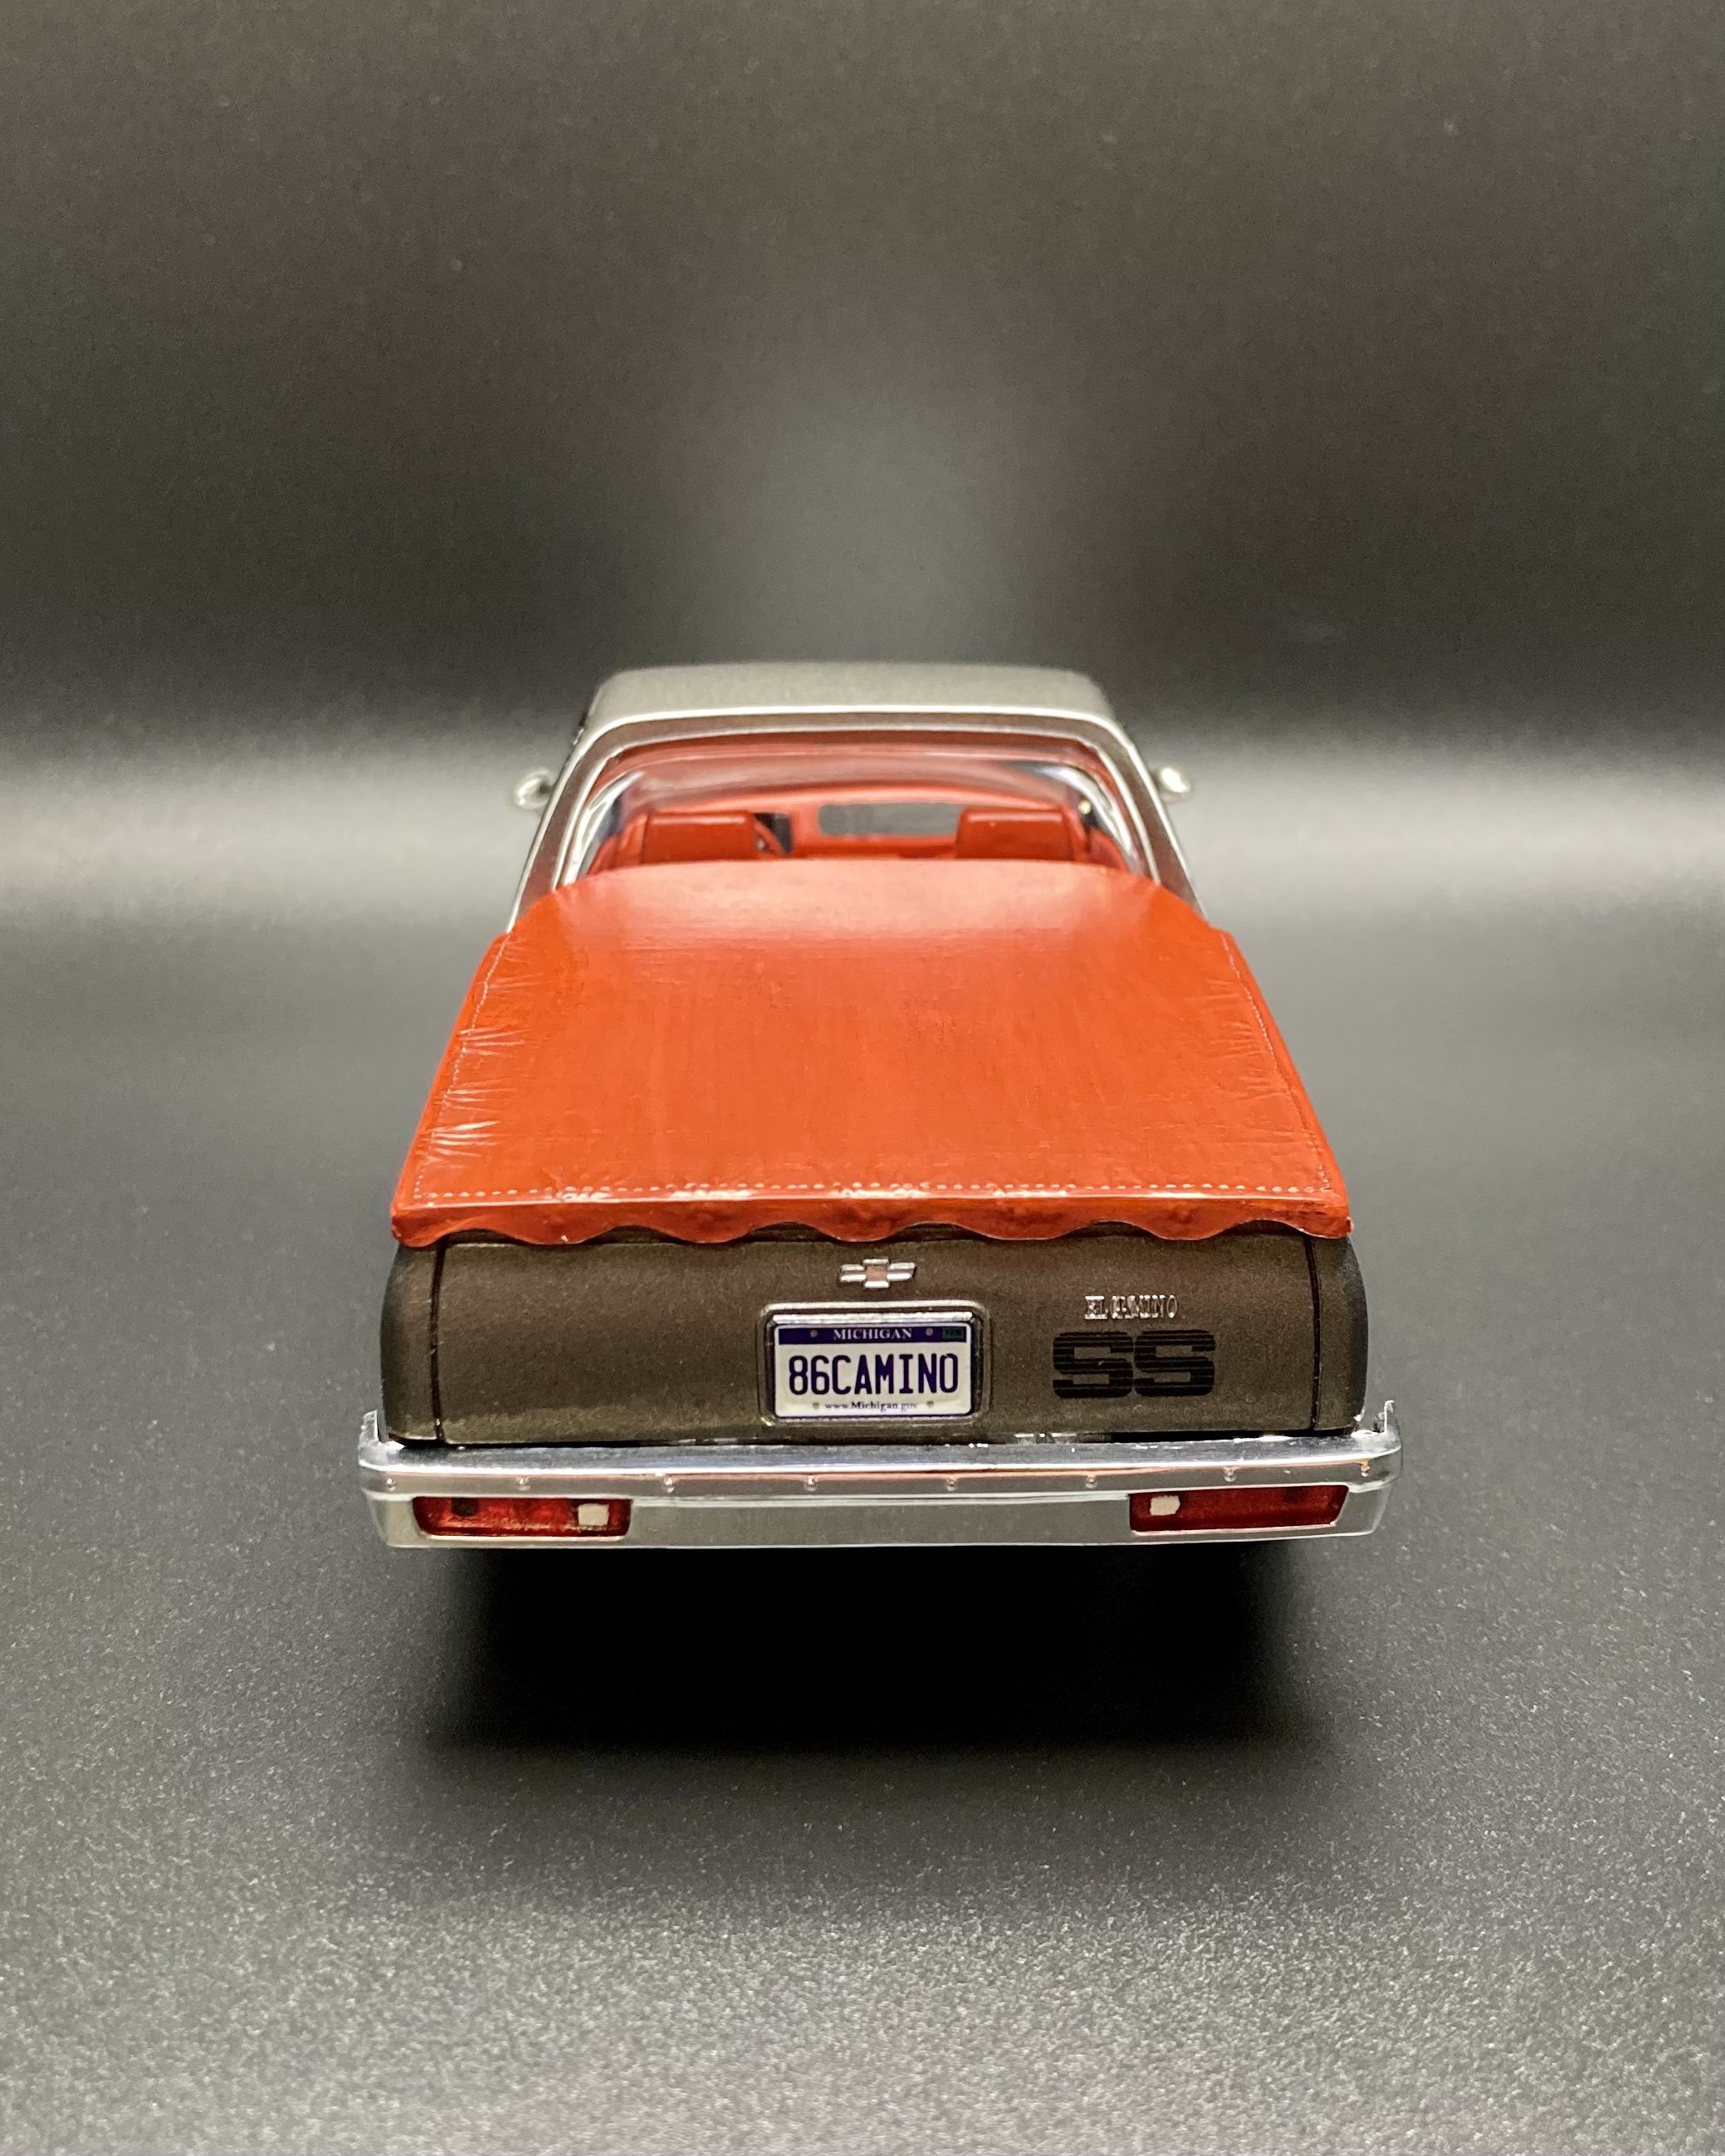
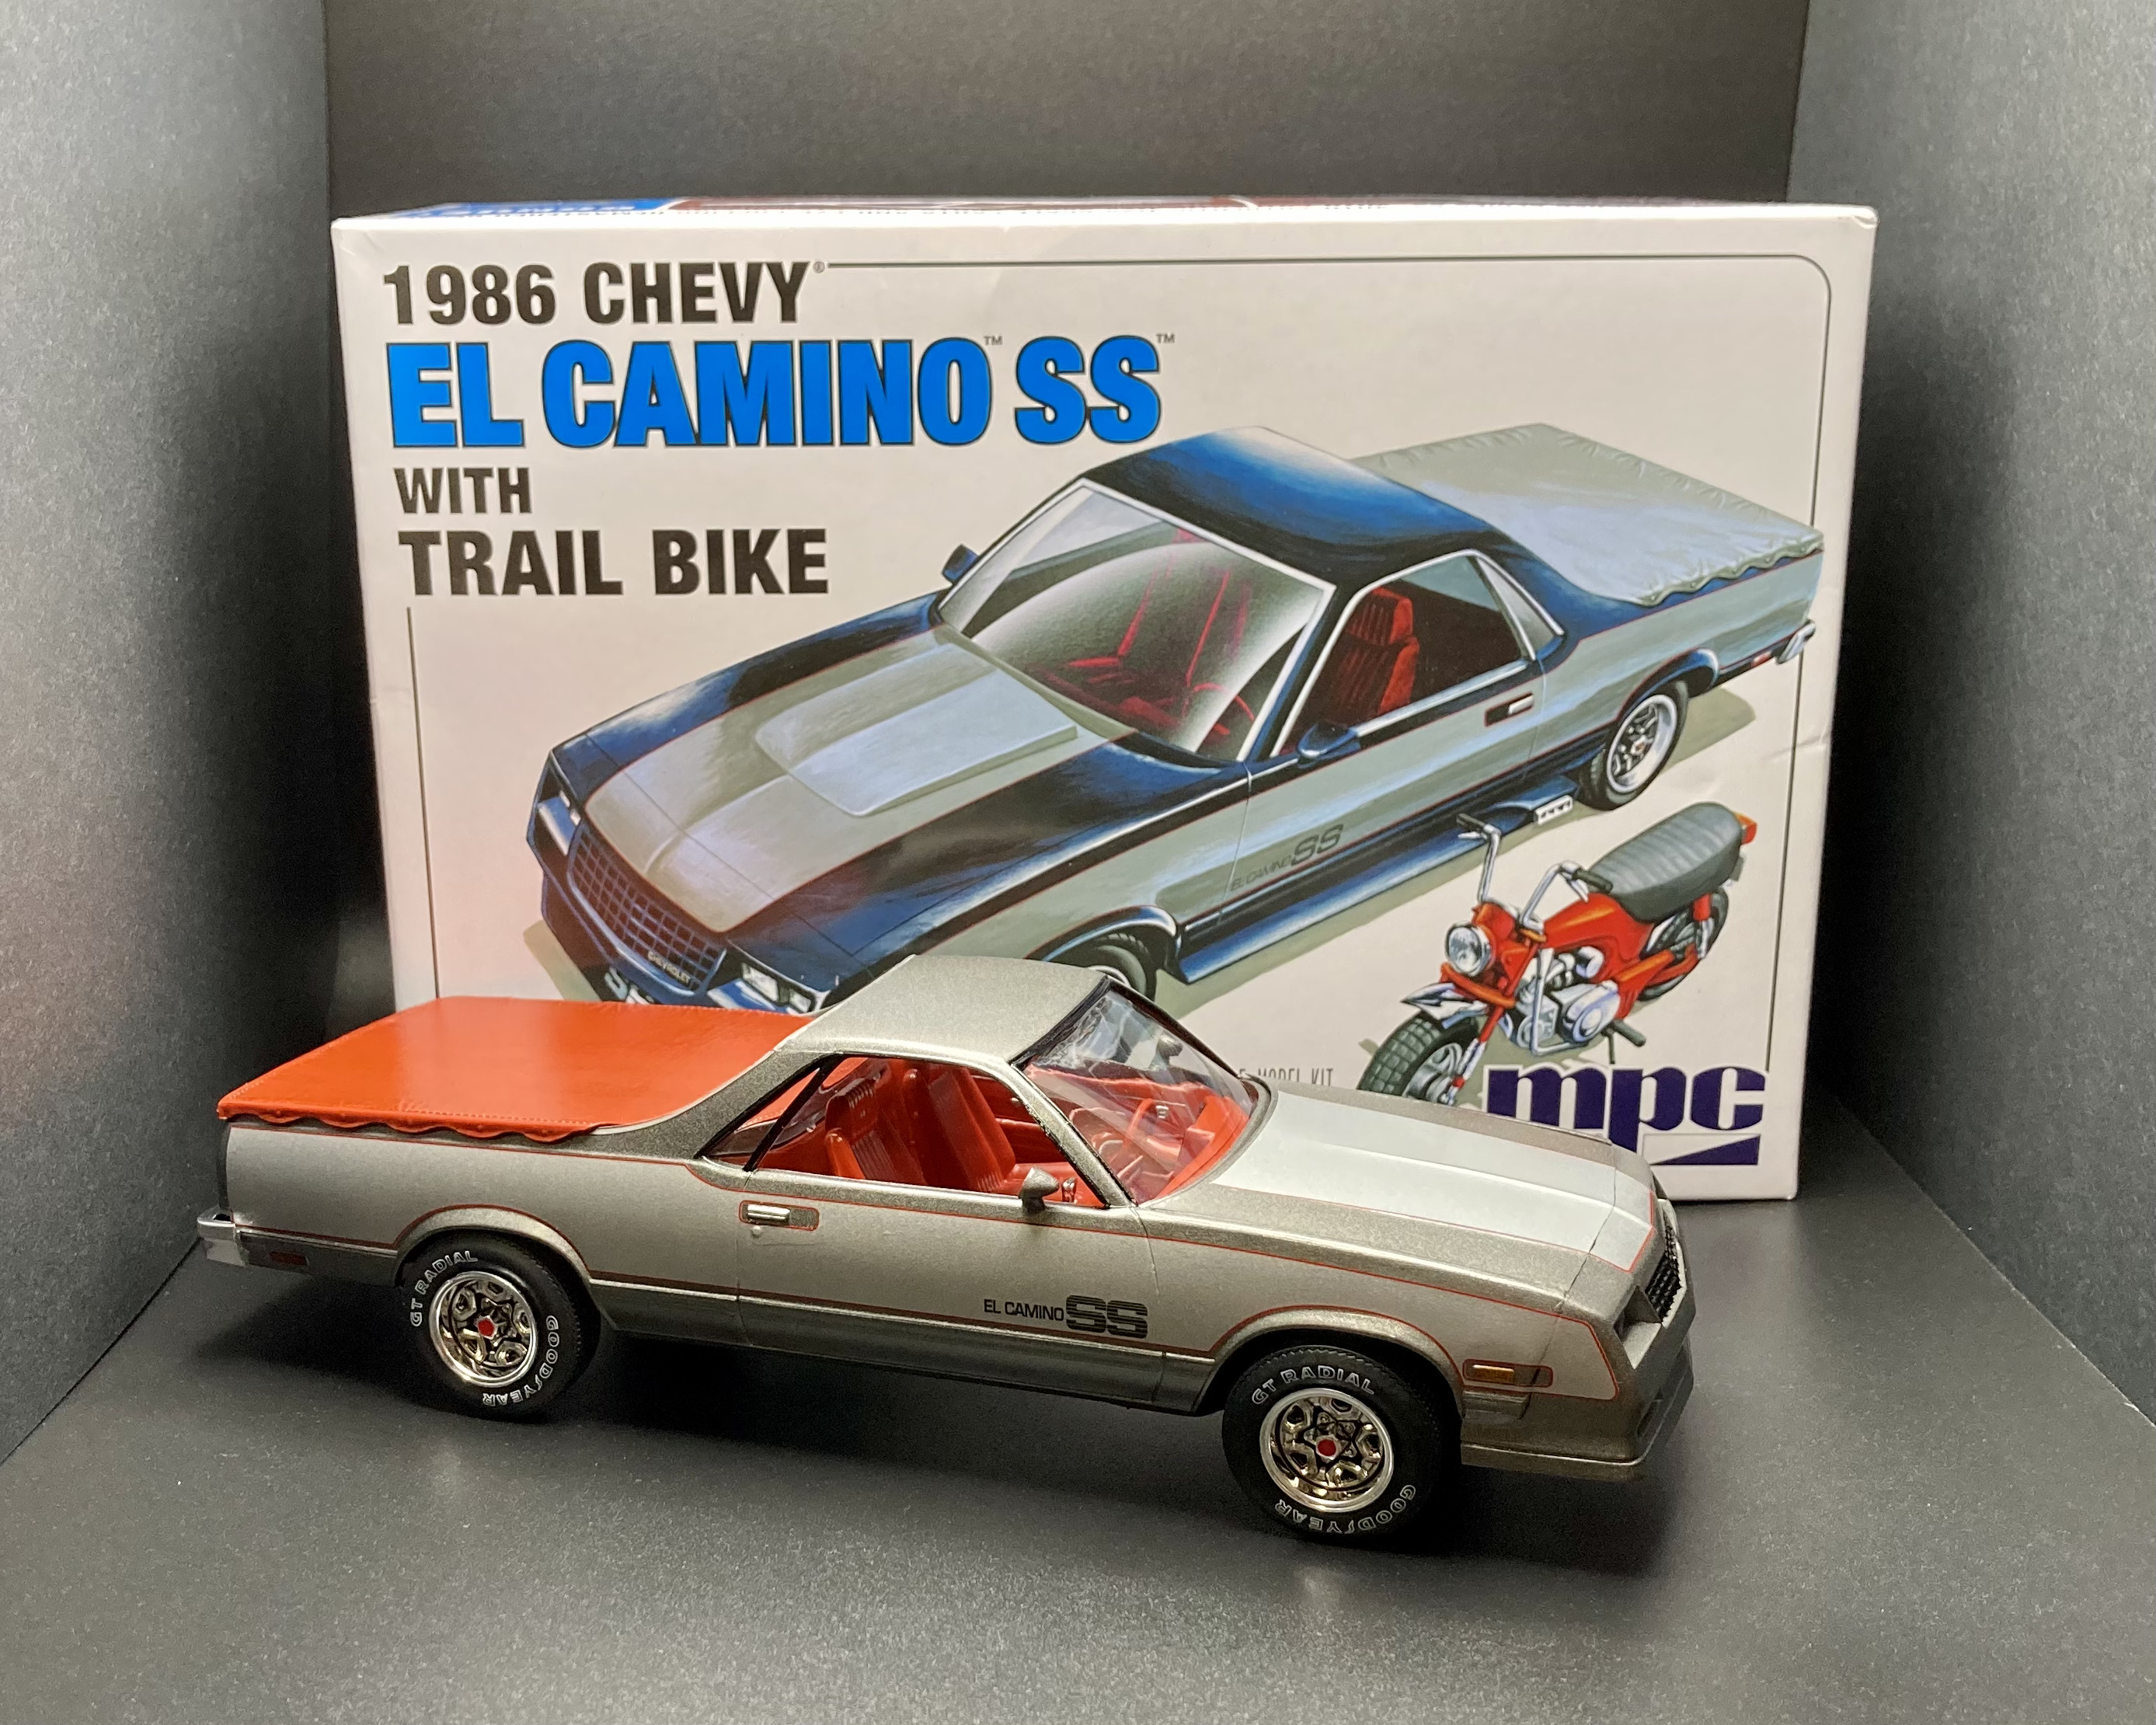
Here’s my build of the MPC ‘86 El Camino. It’s a box stock build of the recent release with the mini trail bike. Despite being the reason I sought this particular kit, I ended up not building the mini bike because it’s fitment was terrible and I got frustrated with it. I might try it again later but into the parts box it went. The actual car itself builds up decently well for the age of the tooling, and the decals settled down very nicely. I painted the interior Krylon Pimento and the exterior Tamiya XF-56 Metallic Gray with three coats of Pledge floor gloss (one coat under the decals, two over). I gave the bed cover a wash of Tamiya black panel line accent to give it some dimension. The red-orange interior definitely isn’t a factory color but it really sets off the red-orange decal stripe so I’m pleased with the look!
-
Started on these today. Got the frames down and will wait for good weather to paint them. Thanks for looking!
-
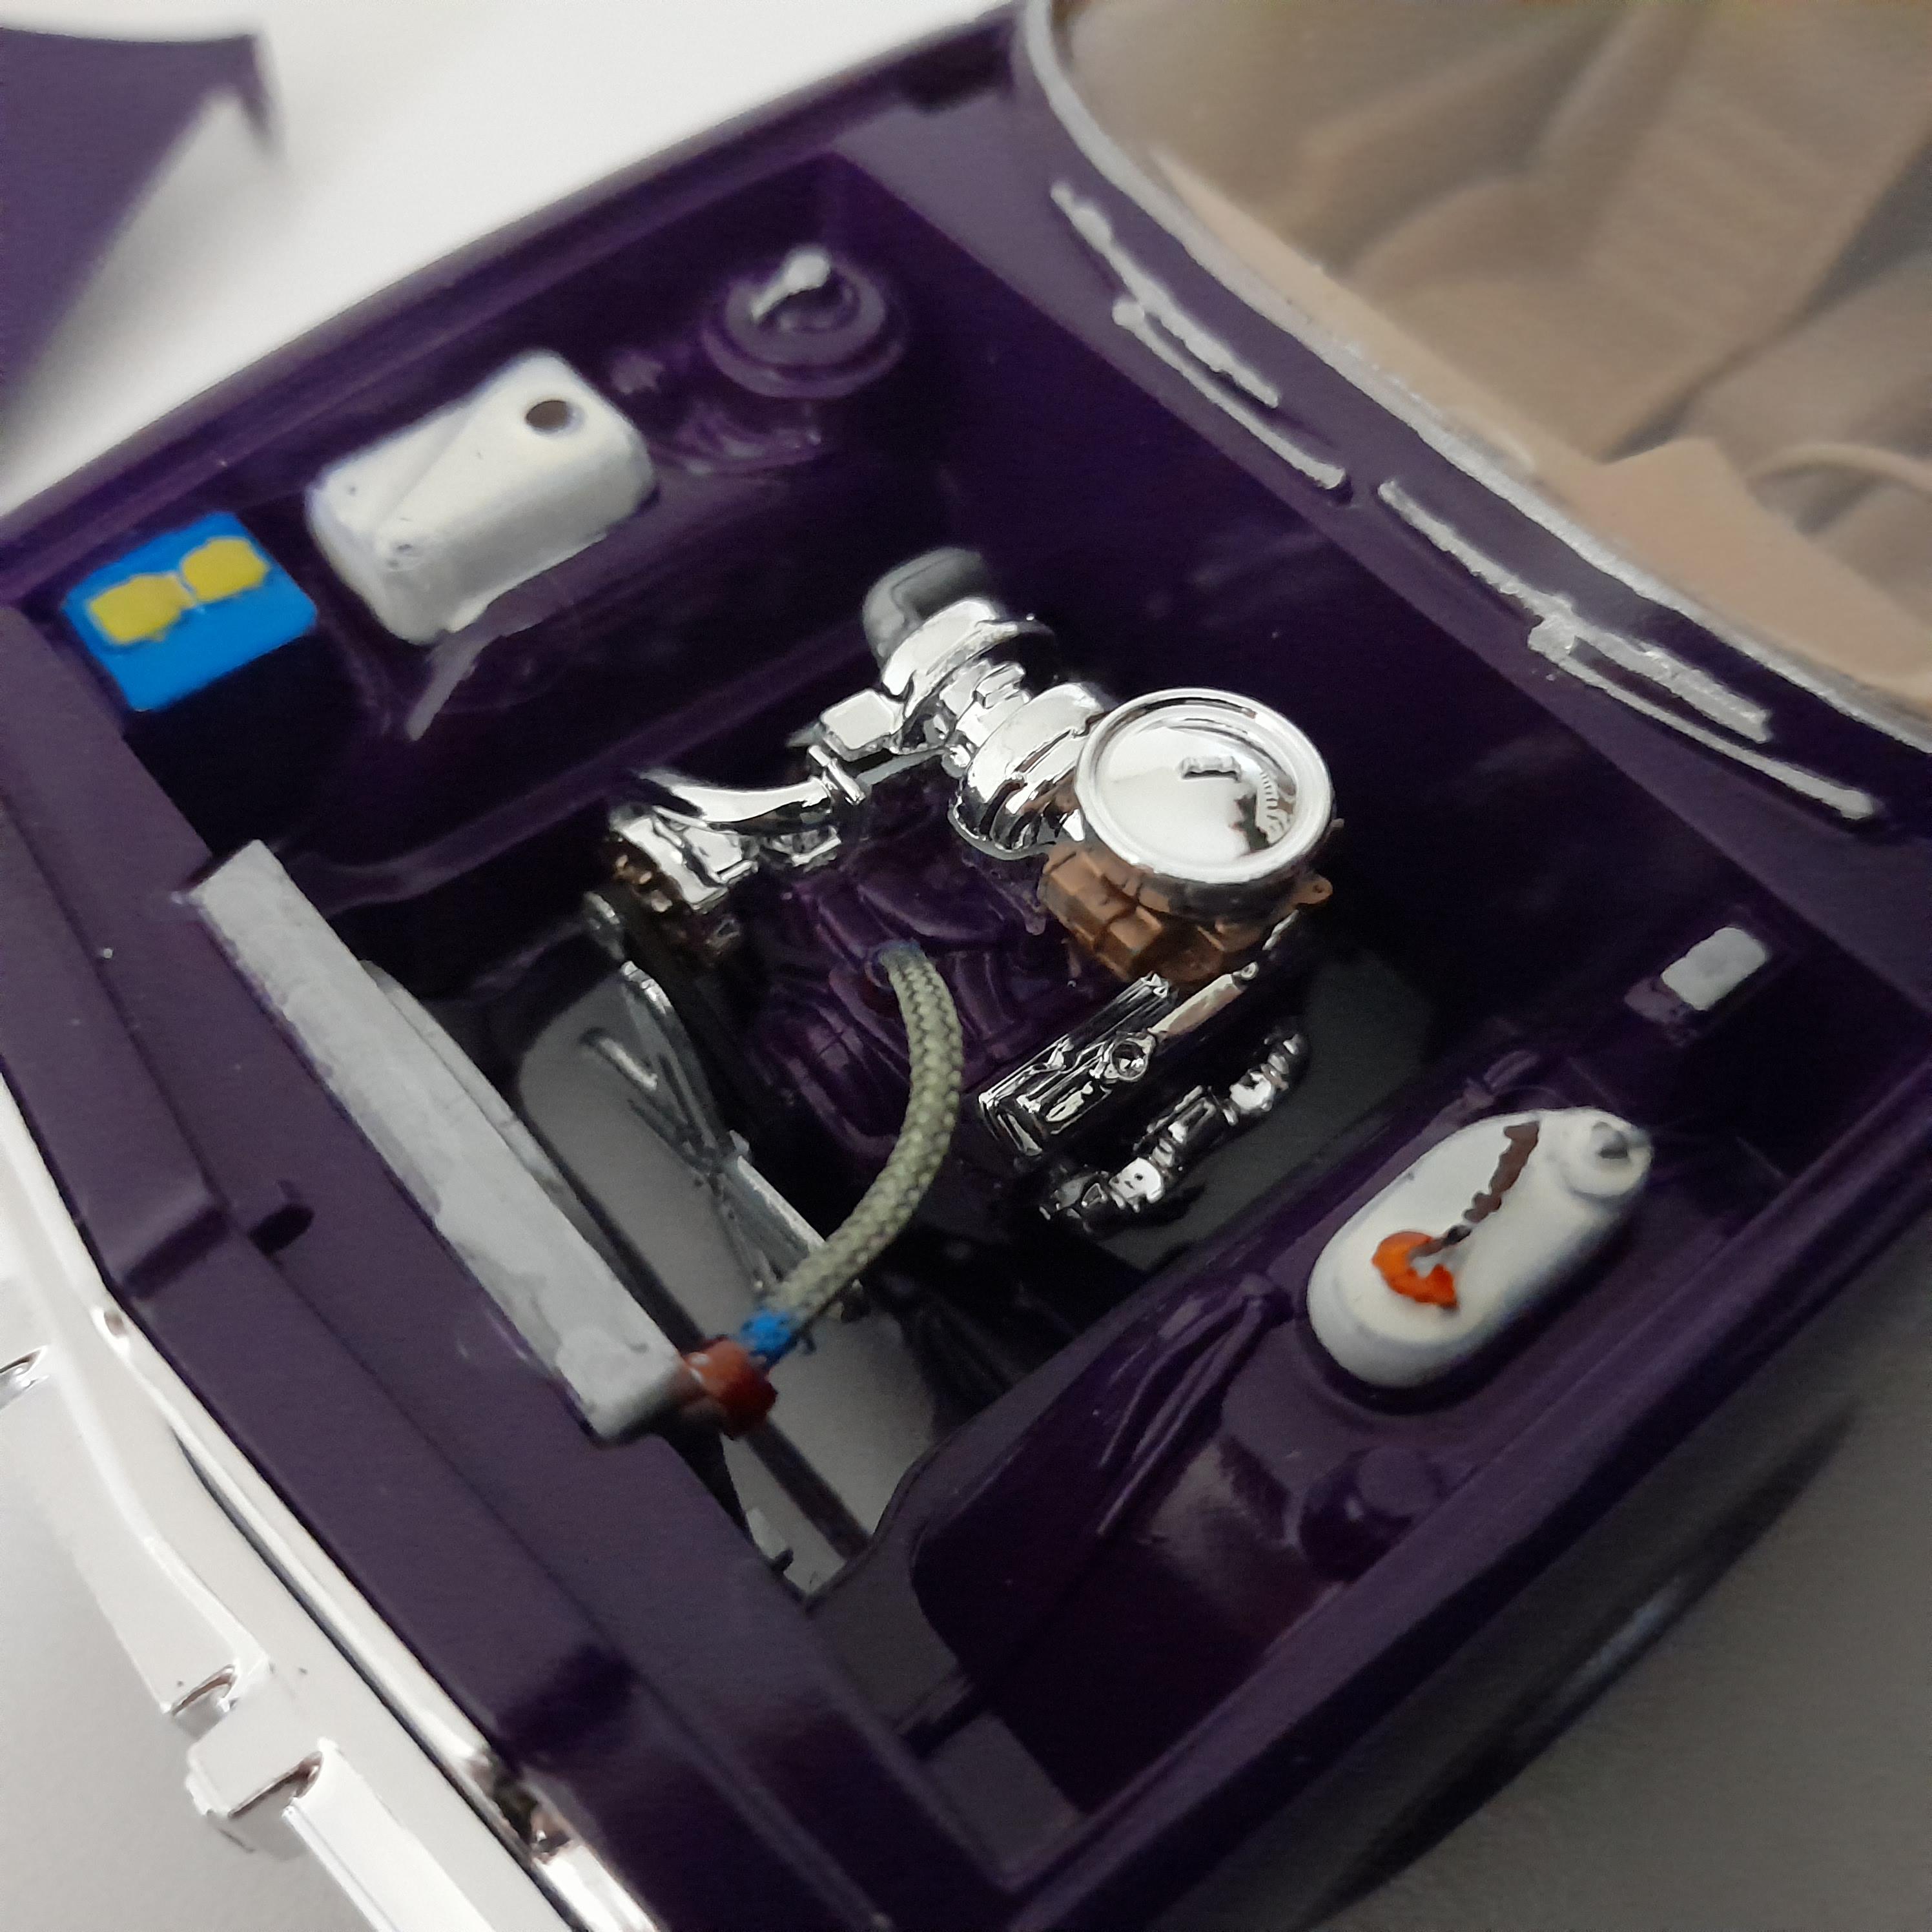
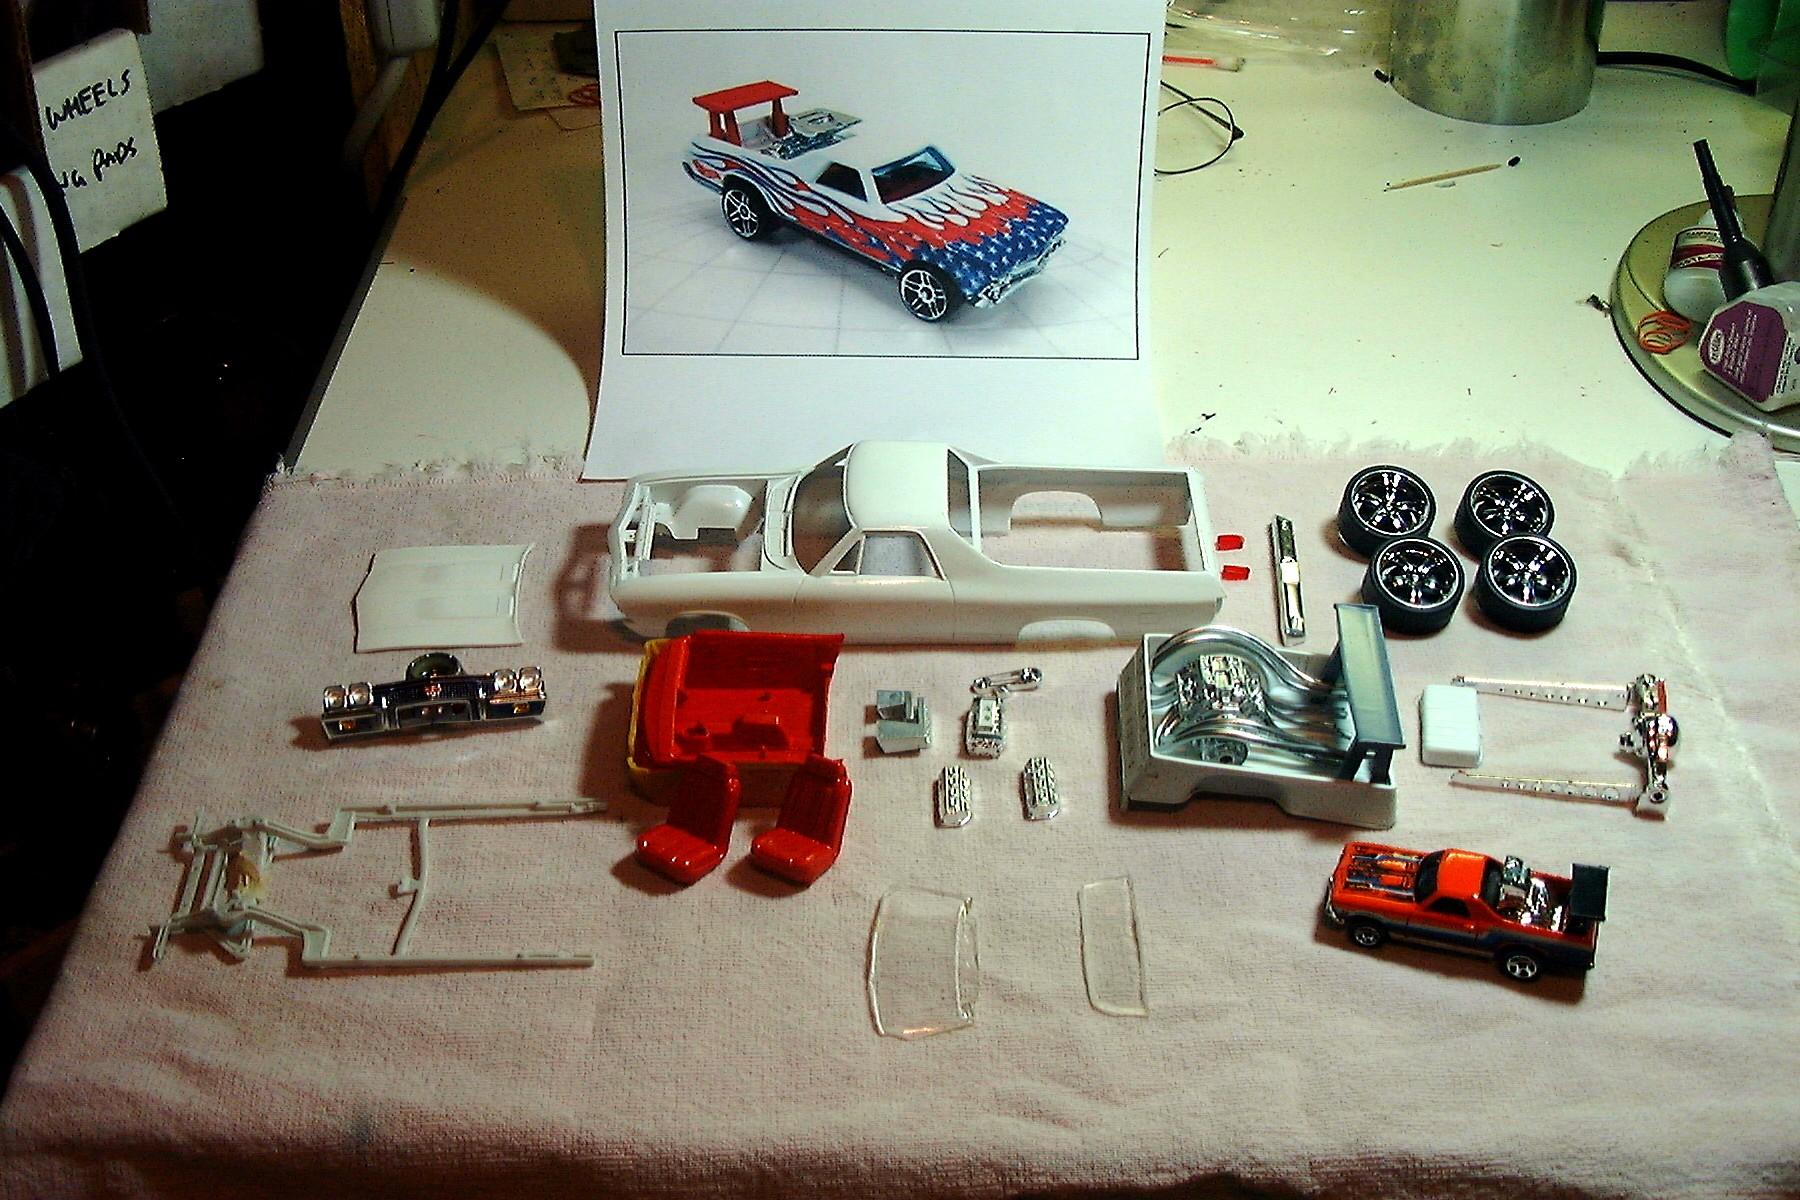
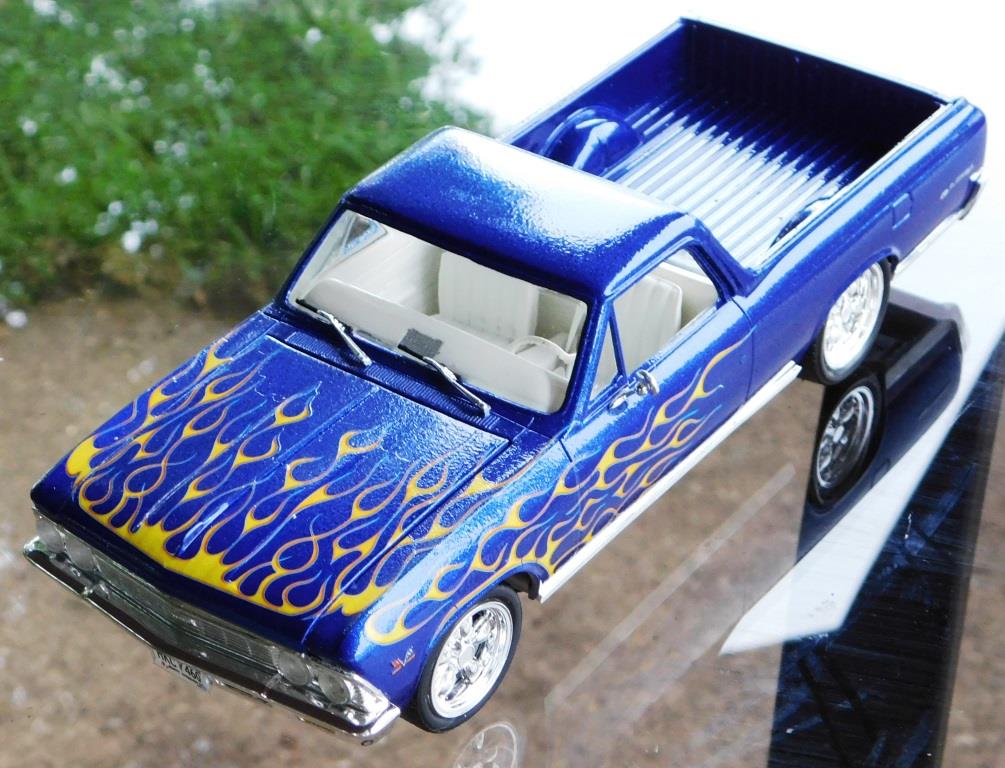
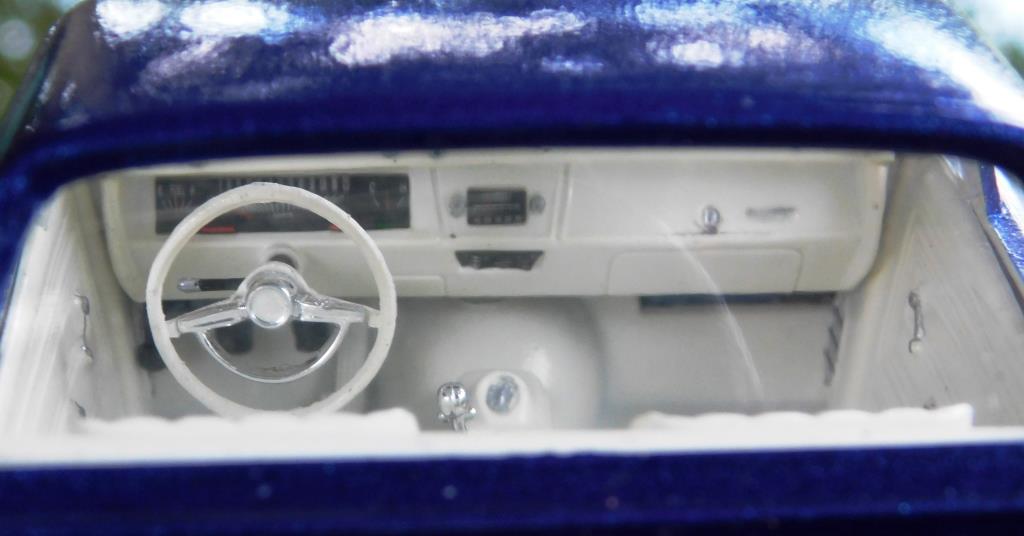
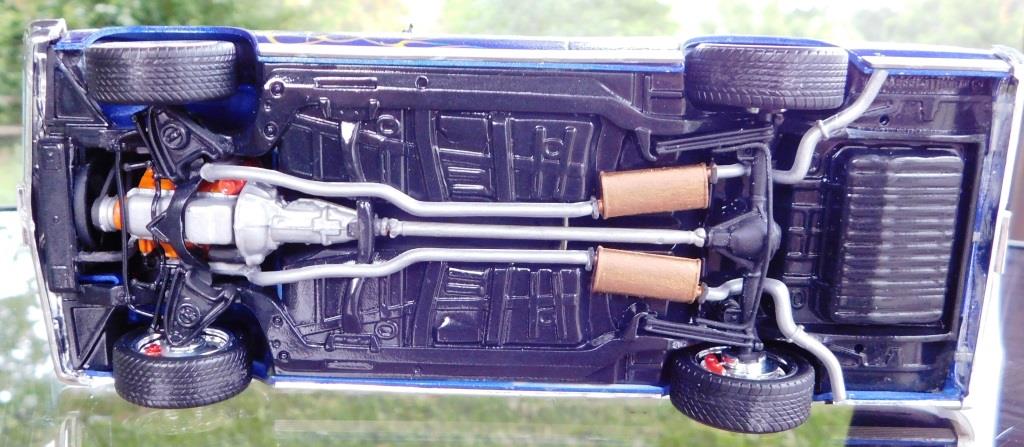
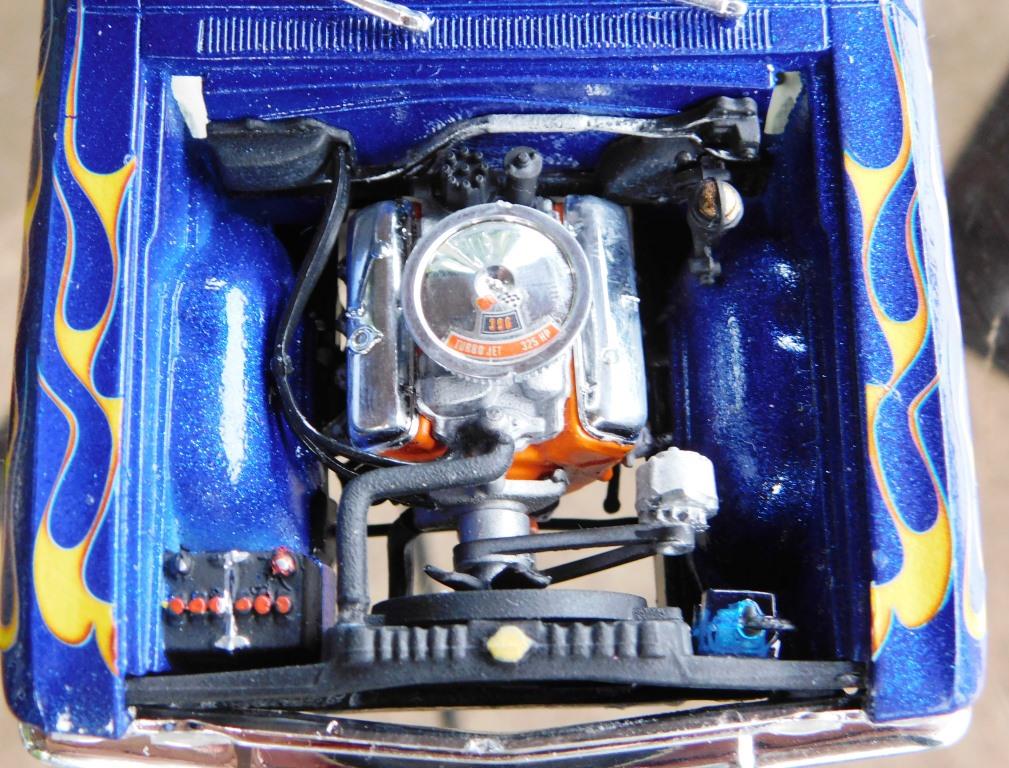
To start with, this was a TOTAL parts-box build. I do not have much of a parts box to begin with. All of the spare parts I own (except for wheels and tires) would fit into two model boxes. Any way, I was trying to imagine a build that would be more than a Hot Wheels paint scheme on a box stock kit. On the other hand I do not have the talent to fabricate one of the wild creations Hot Wheels has produced over the years. I needed something that would look cool AND, be within my skills as a builder. One day, I went to sit on the couch and my youngest son Keenan had left one of his Hot Wheels on the seat. I picked it up, looked at it and the proverbial light bulb went on in my head. It was a customized 68 El Camino with a wing and engine in the bed. I then remembered that I had an orphaned 68 El Camino body left over from a plan of using its kit to build a resin 70 El Camino. I now had a starting point. My little boy's toy car had an ugly orange, blue and black paint scheme that I did not wish to duplicate. So… I searched the internet for other versions of the car and found one I liked. The patriotic red white and blue, tickled my fancy. I found a chrome, blown, Top Fuel engine that came as a toss-in to a 'lot' of wheels I had bought on ebay. The parts I actually needed to fabricate were the unique hood scoop and the “bundle of snakes” exhaust headers. I made the scoop from part of a VTEC engine, two pieces of rectangular evergreen and cut-down tail-light buckets from a Lamborghini Countach. I tried making the headers from lead solder but the scale was not right. So, I then tried 12 ga. wire and while stiff, it worked out OK. I painted all but the actual chrome pieces with “chrome” paint. The wing is also from the deceased Countach kit but has the center point sanded away. The struts are rectangular evergreen which matched the scale of the Hot Wheel car struts perfectly. The interior was next. I couldn’t use the El Camino interior or windows as those parts are spoken for in the previously mentioned 70 El Camino build. I had an old junker 72 GTO that came with built model 'lot' I purchased on ebay. As it turns out, once the rear seats were cut out, it mated perfectly with the body. The windows were from the same GTO and were surprisingly scratch-free. I took a tip to tint windows by using food coloring and Future floor wax. I found you have to get it really dark in the cup to get light blue on the glass. The amazing thing was, with a little effort they actually came out evenly tinted. The front bumper wasn’t need by the 70 Elky so I was OK there. The 68 rear bumper I wanted for the 70, but it is actually a bit too wide for my resin body so I used it here instead. The wheels are some “bling” low profile 23s that I was planning on selling on ebay. They are five spoke with ridges down the center of each spoke. I meticulously hand painted the ridges to simulate the 10 spoke wheels in the picture. I reversed the disc brakes and painted them black to act as background. The suspension was the next challenge. I needed to really raise the body without looking hokey but, I had no actual chassis to start with. I also wanted to go with as much chrome as I could as that is what many Hot Wheels have. The rear axle and ladder bars are from the Li’l Gasser kit which I parted out long ago. All I needed to add was a cross member to attach the front of the ladder bars to. I used a section of chrome driveshaft which is connected to semi-truck transfer case to assist in the drivetrain’s believability. The front suspension consists of the front subframe from a 62 Catalina, the extended springs/shocks from a 70 Monte Carlo lowrider, and the dropped buggy axle and wishbones from an unknown source. I did need to add a second cross member for the 3-link wishbones. To attach them, I used leaf spring extension shackles turned sideways from a 70 GTX. They had the holes I needed to locate the pins of the wishbones. That pretty much covers the build. The biggest challenge of all, was how to do the graphics. Obviously, they cannot be purchased, as no one has made anything even remotely close to these. Some people have the skill to mask and paint on the stars and flames but I am not one of them. So, I decided on water slide decals, but how to do it? Well, I took the body and covered the hood and sides with wide masking tape. I then drew the flames freehand using Ultra fine point markers. They were pretty shaky as the tape is kinda bumpy to draw on. I then peeled the tape and stuck it to some paper then scanned it into my computer. I then spent HOURS AND HOURS manipulating the scanned jpeg to change it to ONE red and ONE blue. After that was done, I didn’t like how misshapen the curves of the flames were. So then I had to go back and redraw all the edges in MS Paint with the line tool and then fill in all the spaces pixel by (tedious) pixel. Fortunately one of my other programs has a flip/invert tool so I only needed to do one side and half of the hood. OK, so now it is in the computer but does it fit? Decal paper is spendy enough such that I would not want to waste it. So, I printed it on plain paper first. I then did Scotch tape mock ups until I felt the fit of the body curves was close enough. One of the hardest parts was the fact that the hood flames flow continuously onto the sides of the fenders. That made for a heck of a precision alignment. The graphics run continuously from the center of the hood, over the hood bulges, over the fender crease and down to the wheel wells and rocker trim. All this, while also needing to line up the front edges of the headlight-brows to the flame-licks just above the sides of the tail lights. The Hot Wheels logos were simply snagged from their website and pasted onto the finished graphics. To obtain maximum flexibility, I only clear coated the sheet once. I hoped that would seal them well enough to not allow the ink to run when wet. I got lucky. The amazing thing was they laid down without any tears or fold overs. I am quite pleased with the result.
-
First up, started back in 2003 or so, painted in short cuts "Iris," I'm trying out the red window glass from the new release in it. What do you think? Next, remember when this was a new release? Well, that is when I started this one! I lowered the rear suspension by trimming the mounting tabs and then cutting a hole in the floor above the rear axle so the pumpkin could set lower. It is still not as low as the front but it will work for me. Tires are from the new issue 55 Cameo while it's sporting a set of AMT 64 Chevrolet SS hubcaps. It's truly a period piece because I am using the 63 Mercury grill in it as well. Last, but not least, the "retro rod" build. Engine is from the Revell 57 150 kit with the standard shift. Thanks for looking, all comments welcomed.
-
Looks like the minibike from the MPC '77 Dodge (Monaco), no?:
-
My father-in-law has a collection of some classic cars that he takes to car shows, and one of his friends who goes to car shows with him, Jim Bailey, has an excellent example of a 1971 El Camino. Jim's wife asked me if I would build a replica of his car as a gift for him, so that's what this build is all about. The build won't be full-detail, but even so, will have a few challenges. This first issue is that no model companies have ever made a '71 El Camino. The closest I found is a Jimmy Flintstone '72 El Camino resin body that uses the AMT '72 Chevelle as a donor kit. While this cominations is close, there will still be some alterations that will be necessary to represent a '71, and then some more work to make it look like Jim's Elco. Here are some pics of the original.
-
Re-release of the AMT '59 El Camino kit, this time with the original box art, poster, decal inside. 8, yeah, EIGHT pad printed tires in the box (whitewall and polyglas), both 348 and supercharged V8 as well and a nice sheet of waterslides for stock, work truck and custom. Steelies, hub caps and centerline style wheels included. https://www.youtube.com/watch?v=Oc3gdnd4iFs
-
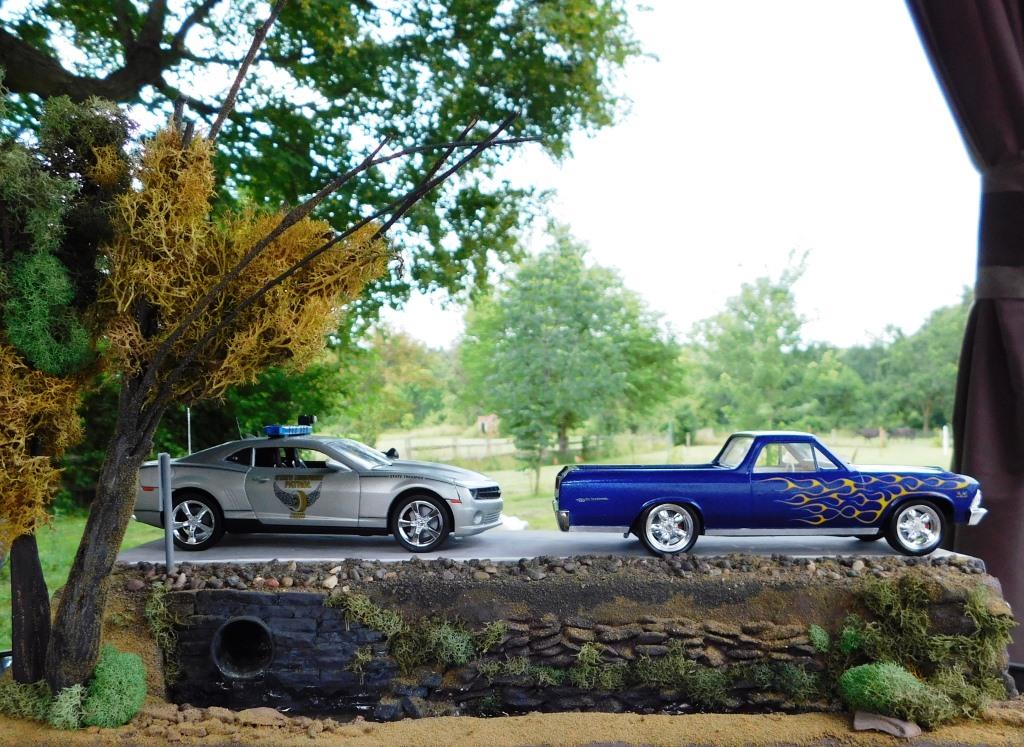
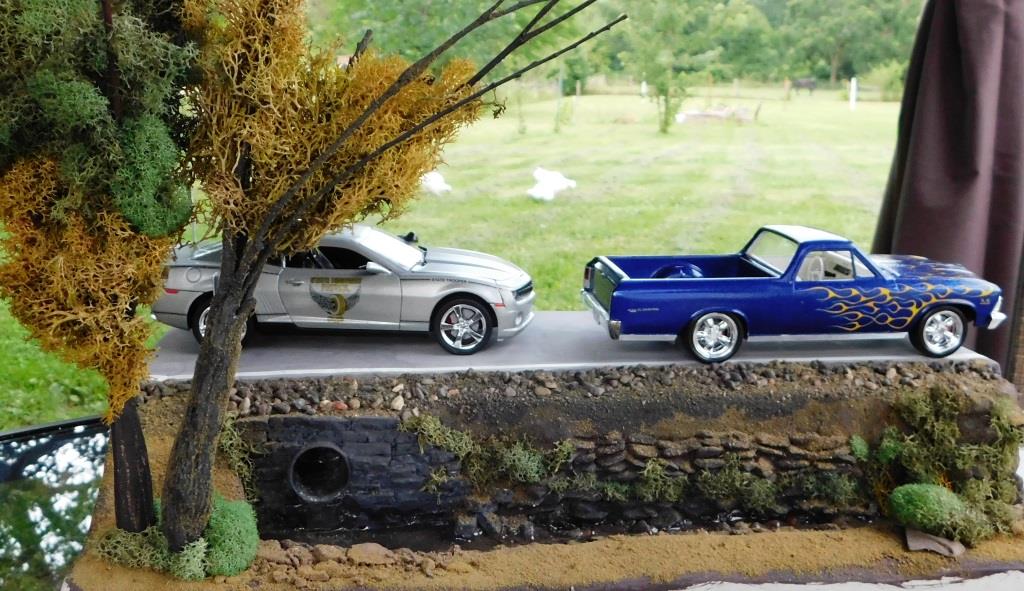
I saw this kit on sale at my local drug store. Right away I knew what I was going to do before I even made it to the check out. The body is painted with Testors star spangled blue and the interior is a simple white. The kit is pretty much stock except lowered the suspension a bit, but once I got done you can not tell much. Took the car out for a drive on the road and apparently enjoyed the 396 too much and was caught. Thanks for looking.
-
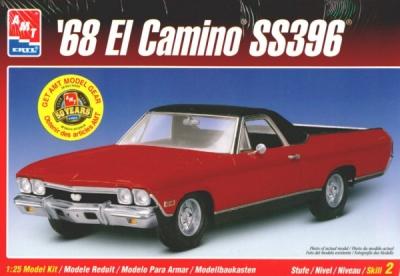
Any one know if theres a download for the instructions for this 68 EL Camino ?? Ive looked around but havent found any yet Thanks
-
Hey, all. I found a decent old never-painted built-up 59 El Camino on ebay, and rebuilt it as a mild custom. Wheels are from a Revell 49 Merc with painted whitewalls. I used the custom grille and bumpers from a Revell 59 Impala convertible kit. Krylon apple red paint with some wet look clear. Pretty simple build. Comments welcome!
-
The El Camaro you see here is a project I started during Winter 2014, and just recently completed a couple of days ago. The Model is a mix of an unfinished Revell 1978 El Camino Model I had laying around, and Monogram's Frank Iaconio's Pro Stock Camaro. I have always wanted to see what an IROC style El Camino would have looked like, so this was a great chance to try something and have a bit of fun with the surgery. The final bodywork is not my best but I just wanted to wrap up the project and move on to something new. The Interior is basically the stock El Camino interior except for the seats which are from another IROC donor model. I hope you guys enjoy the pics!
-
 I've owned six El Caminos over the years and one of them was a '74 that I picked up as a wreck . After putting a '77 front clip on it and a fresh 350 it became my work truck for eight years . I always thought it was kind of ugly but it's size reminded me of my 1960 El Camino and it ended up being one of my favorites ! This is the best photo I have . It was still not painted when I sold it ! I've been thinking about doing this for a while , so last week I started chopping up bodies and putting something together . Here's where it's at so far !
 -
Well I finally finished this one. Started it around 1999 or so. It's got a few flaws that got me discouraged. Right now I can't find the tailgate or the tailights bezels but it's as done as it ever will be otherwise.
-
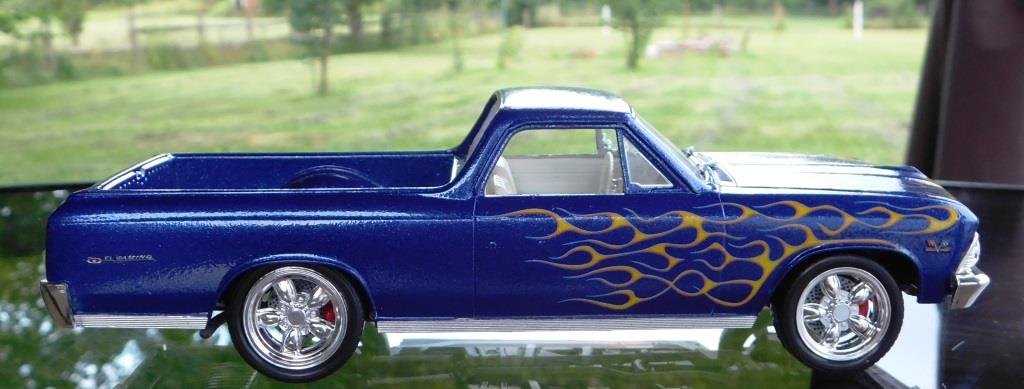
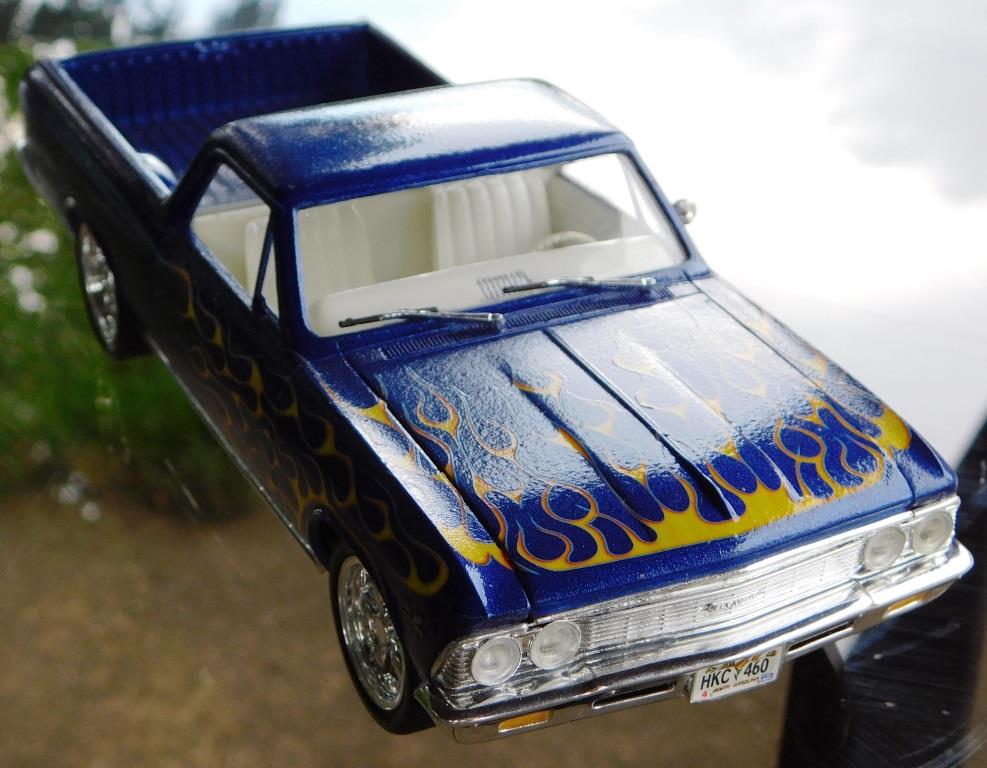
 Just completed! SS badging from the Monte Carlo SS kit... (hard to see) Trim - Gloss Black, Body - Inca Gold, Top - Black Vinyl... Hood stripes - '69 Camaro... "CHEVROLET" lettering - Chevy Pickup kit....
 -
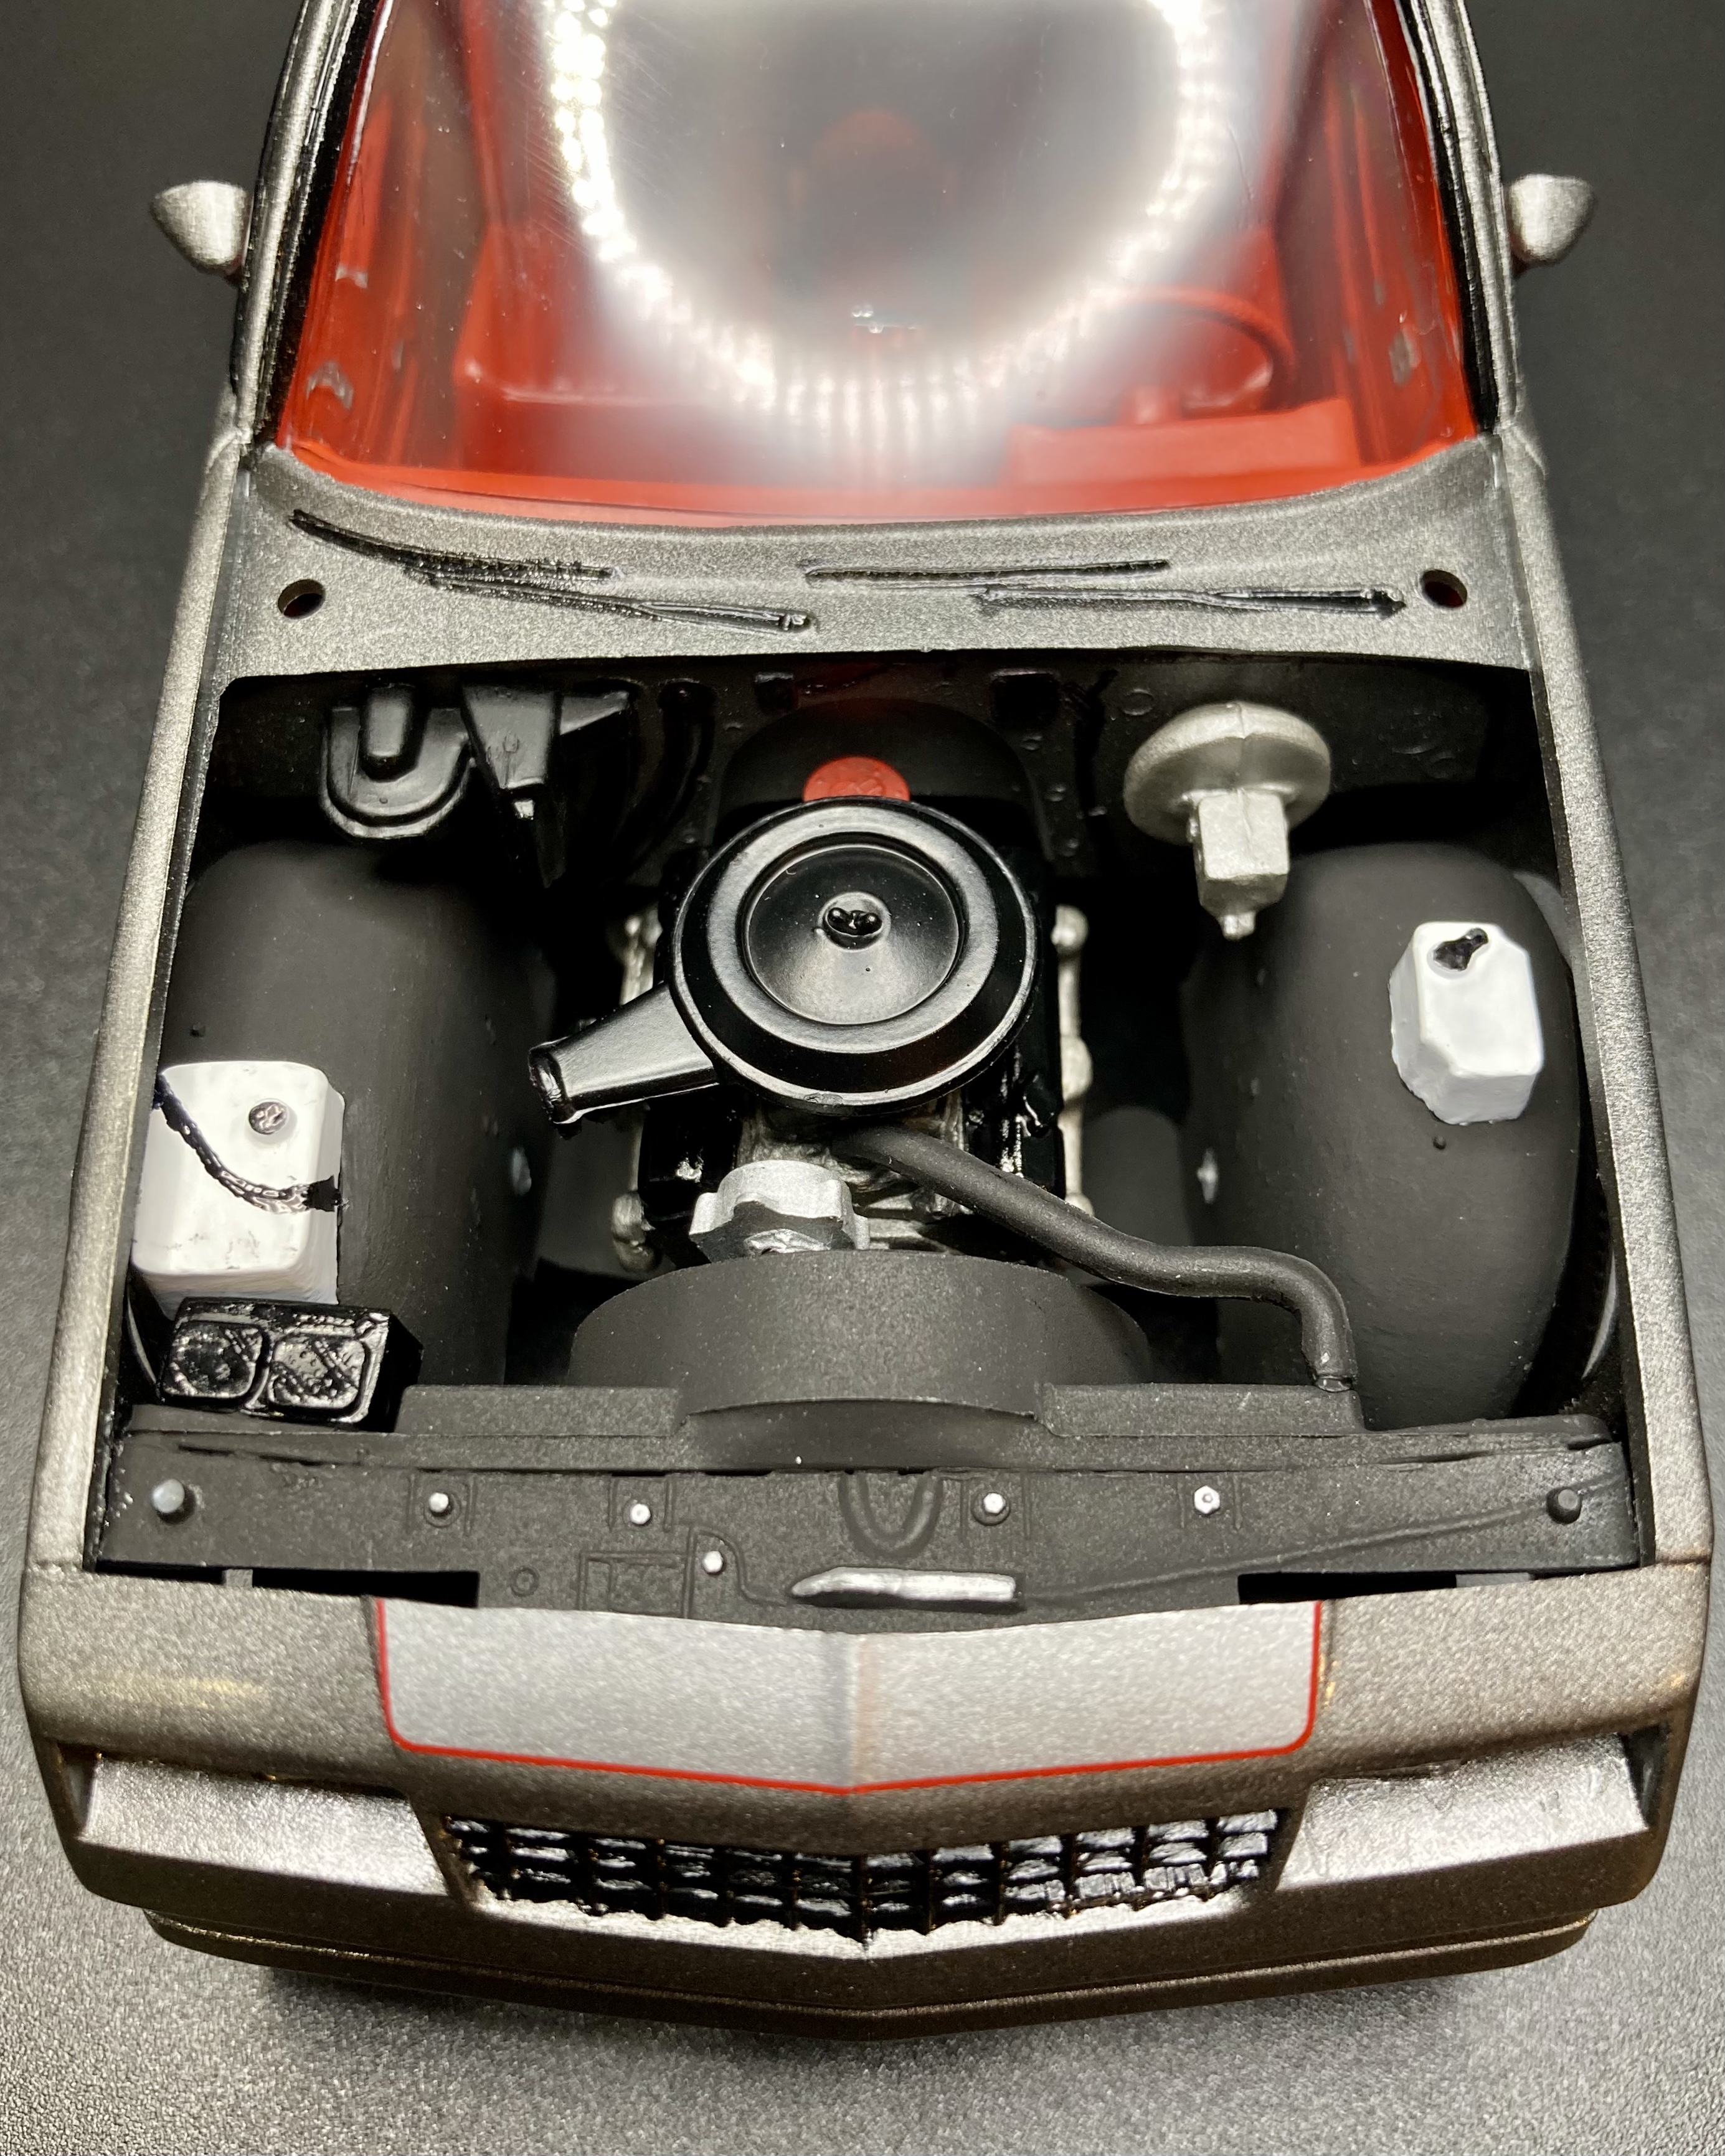
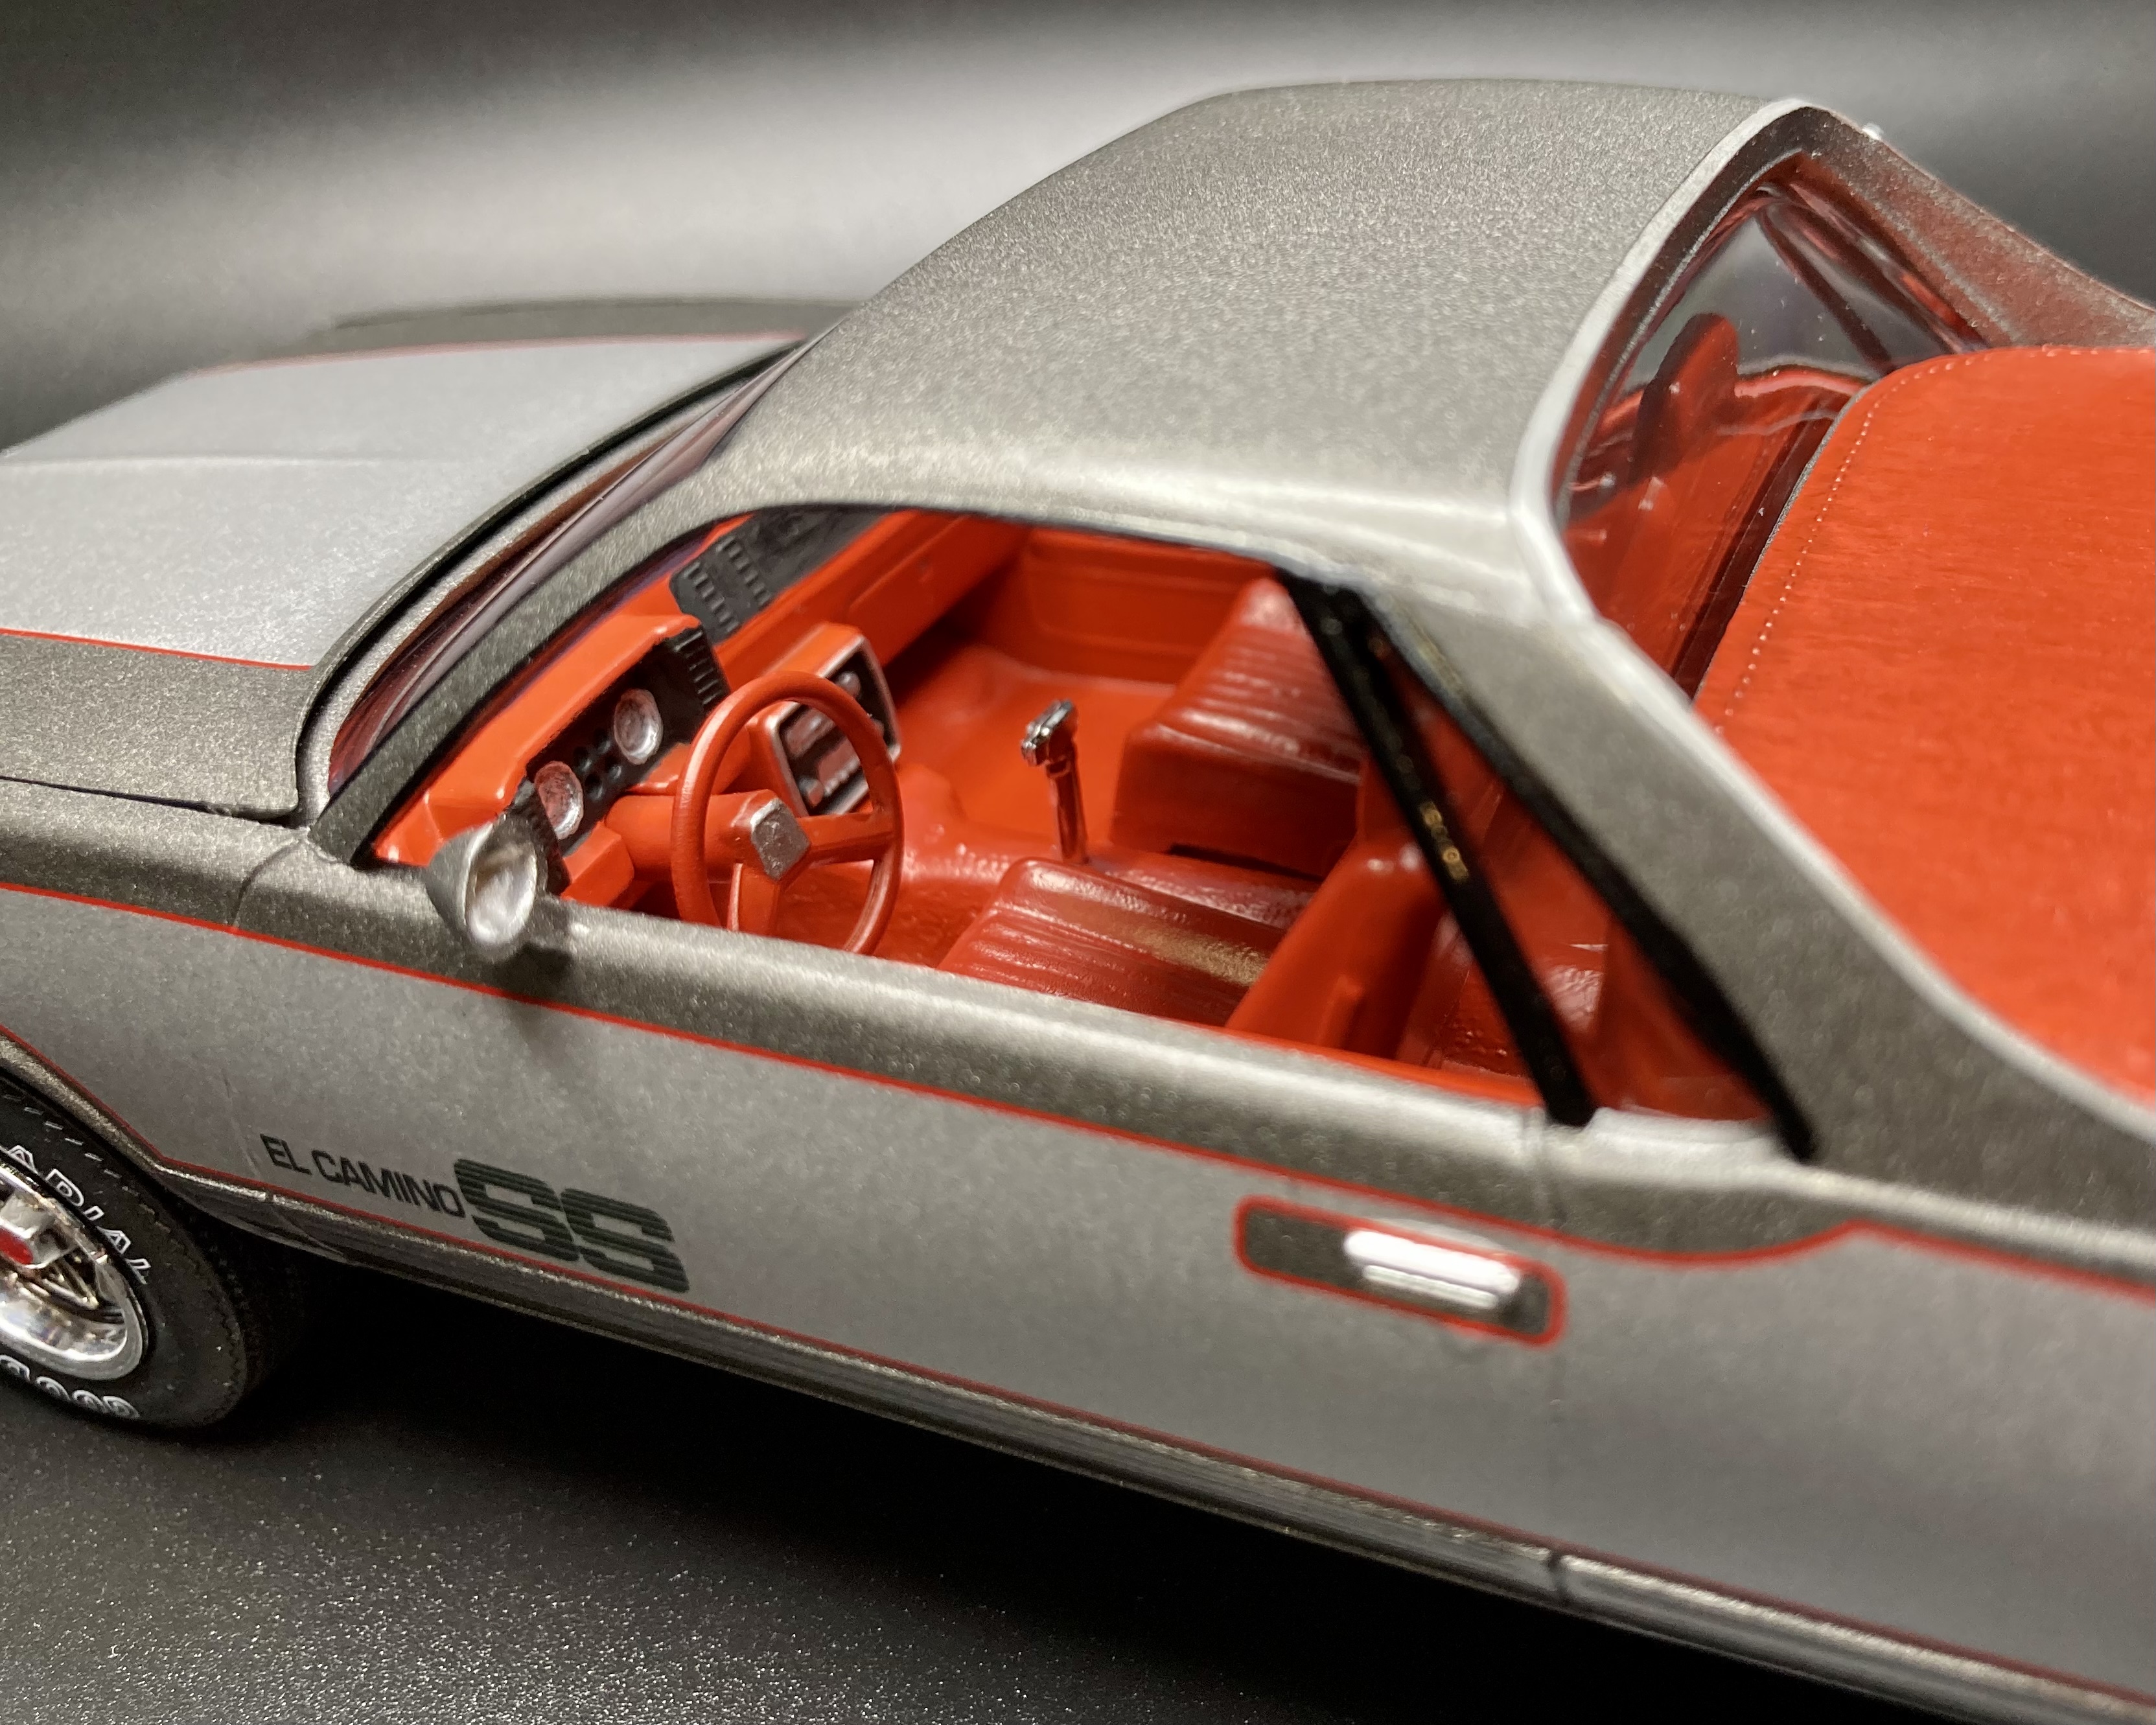
I'm back on cars after a number of truck builds.... this is the AMT kit. I actually like the Supercharger in this kit.... Typical musclecar black interior with silver highlights.... Tamiya Gloss Black basecoat and One-Coat Inca Gold... And Black Vinyl Top to be finished today, followed by silver trim....
-
This is a model of an El Camino I owned many years ago . It had a 283 / 4 speed and was painted Roman Red with the Impala trim . The model is a Revell '60 Impala with the roof and bed from the AMT '59 El Camino grafted on . I had to lengthen the bed about 1/4 " to line everything up , and modified the tailgate and rear bumper . I used the Revell chassis and modified it to show the bed floor and a new gas tank . The headers and exhaust were made from aluminum rod . The engine and tranny are from the revel '63 Impala . The tires are from Fireball Modelworks and I don't know where the Cragars came from , they were in my parts box . I tried to replicate everything just like it was , right down to the 1987 license plate !
-
I thought I'd share a few pics of what's on my bench right now . It's still a bit rough but I mocked it up to get a feel for what it will look like . Hope you like it !
-
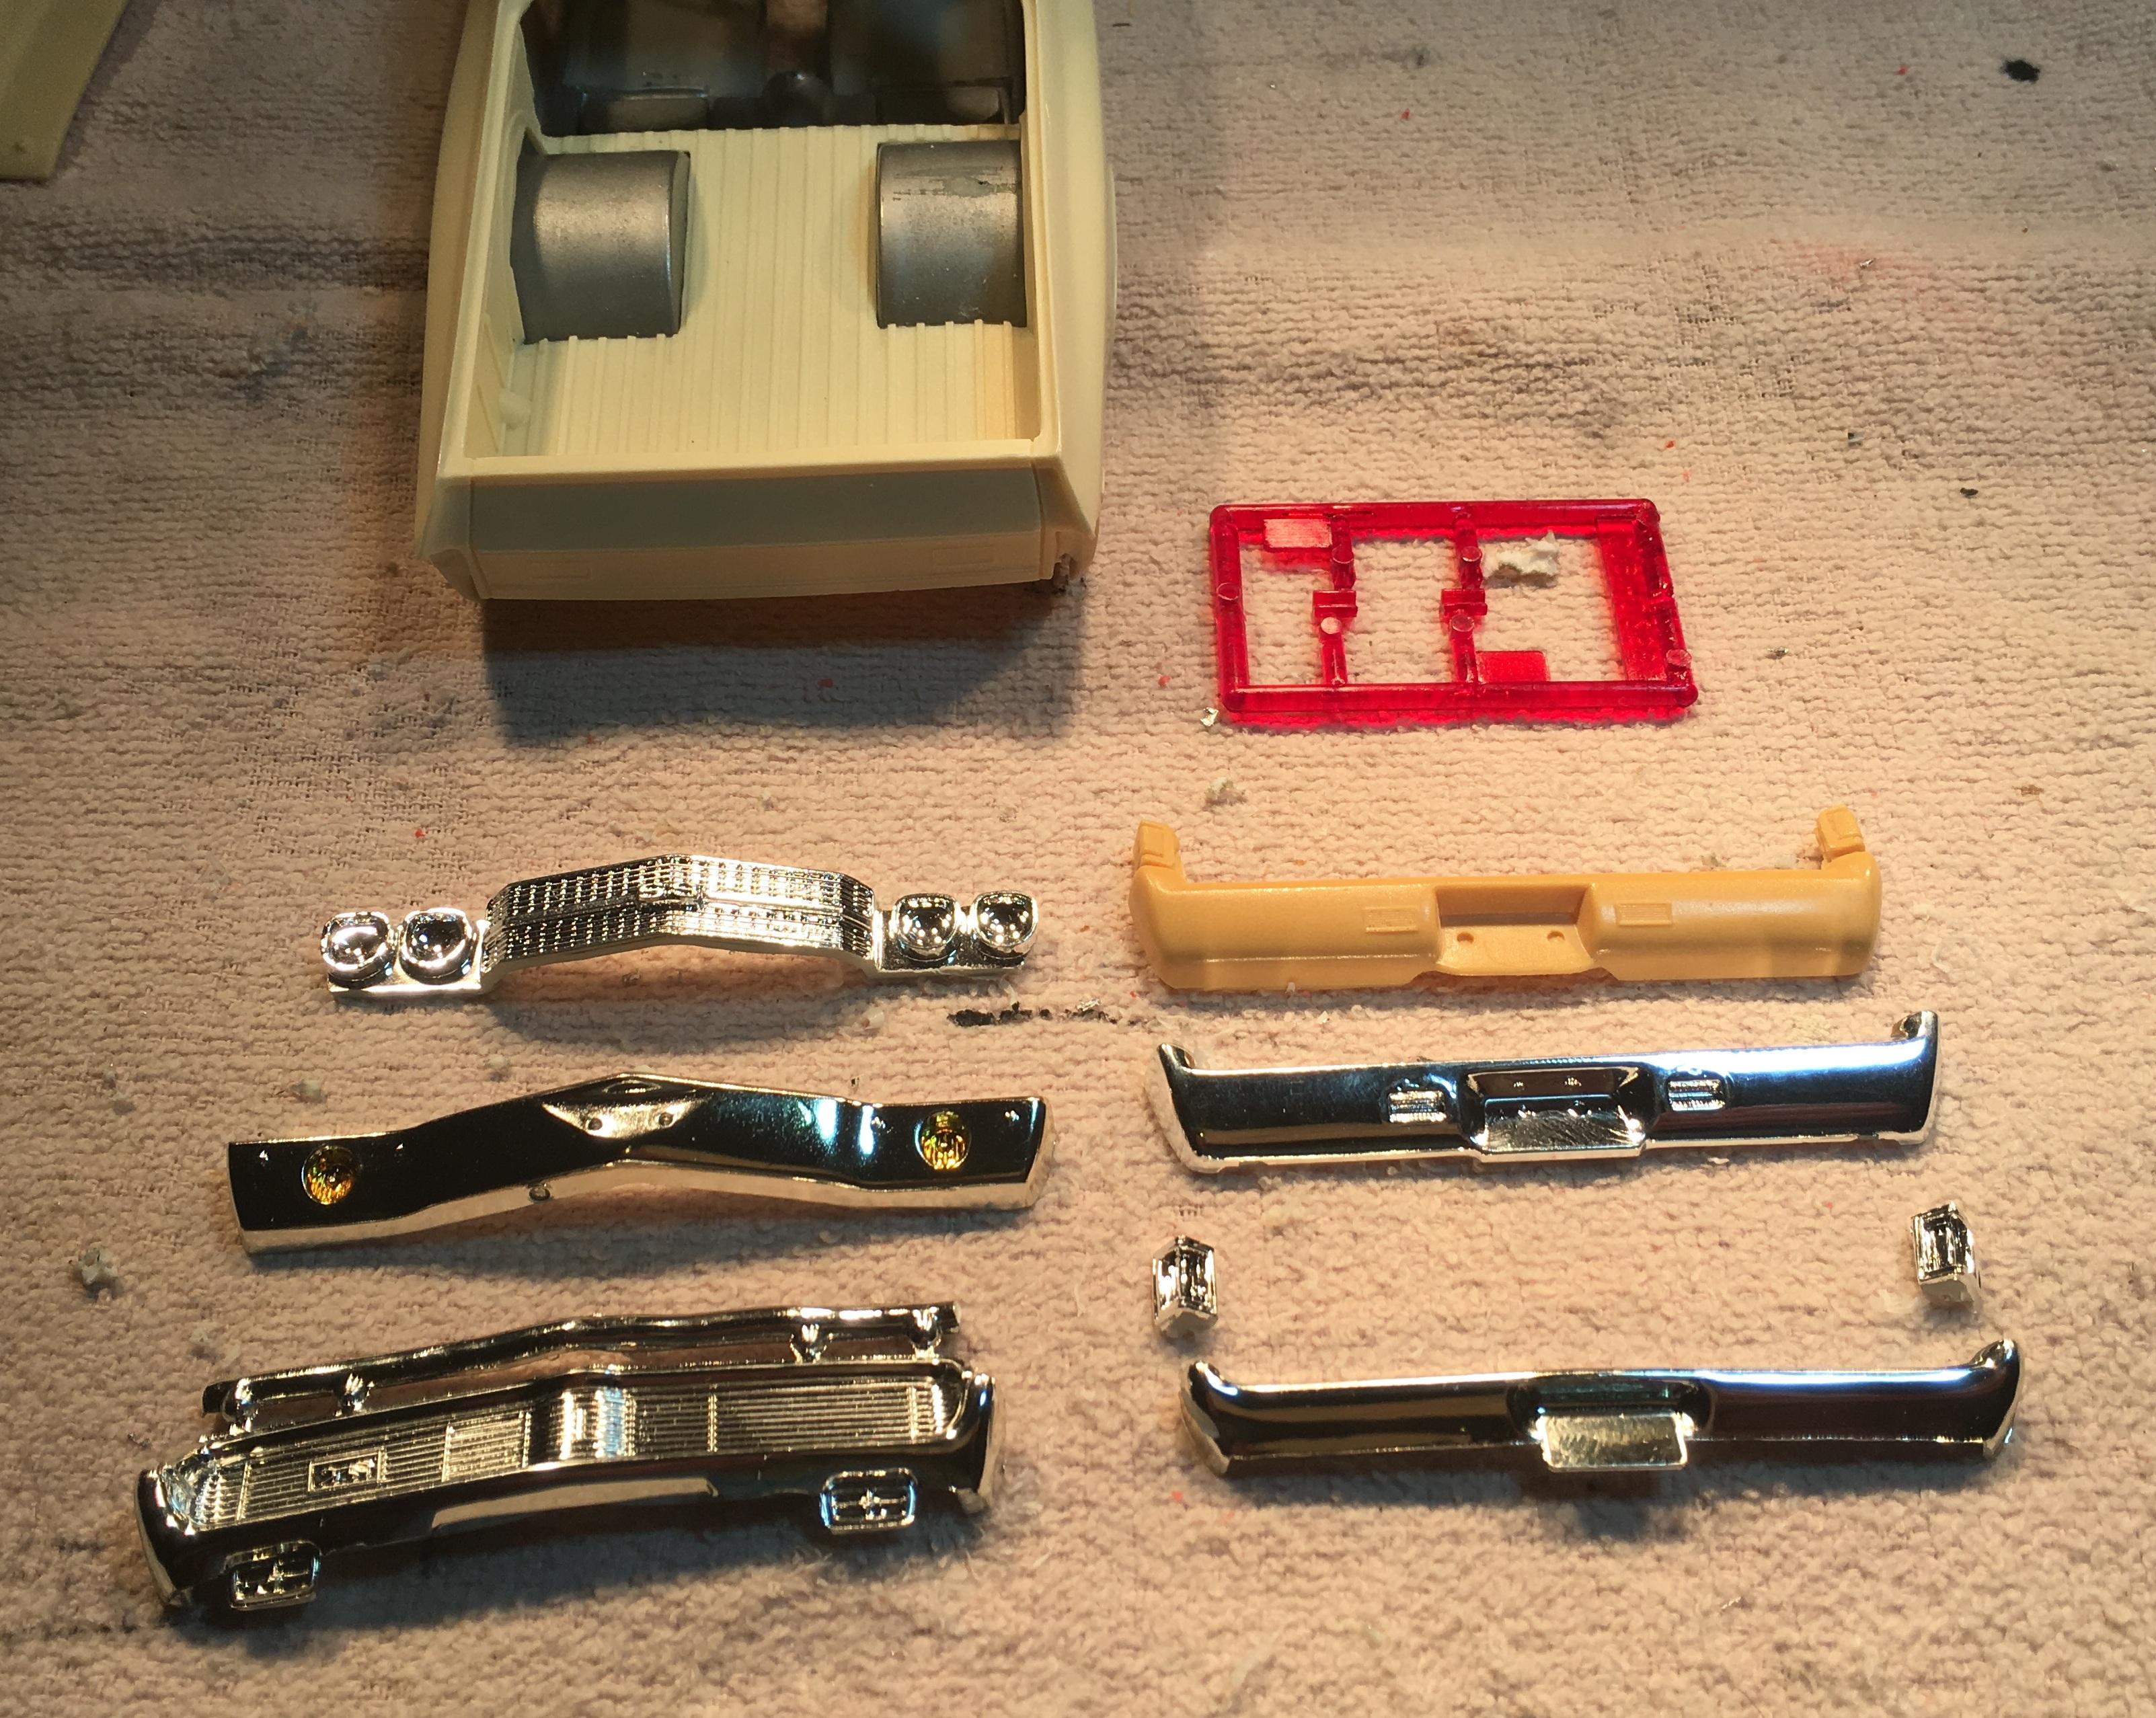
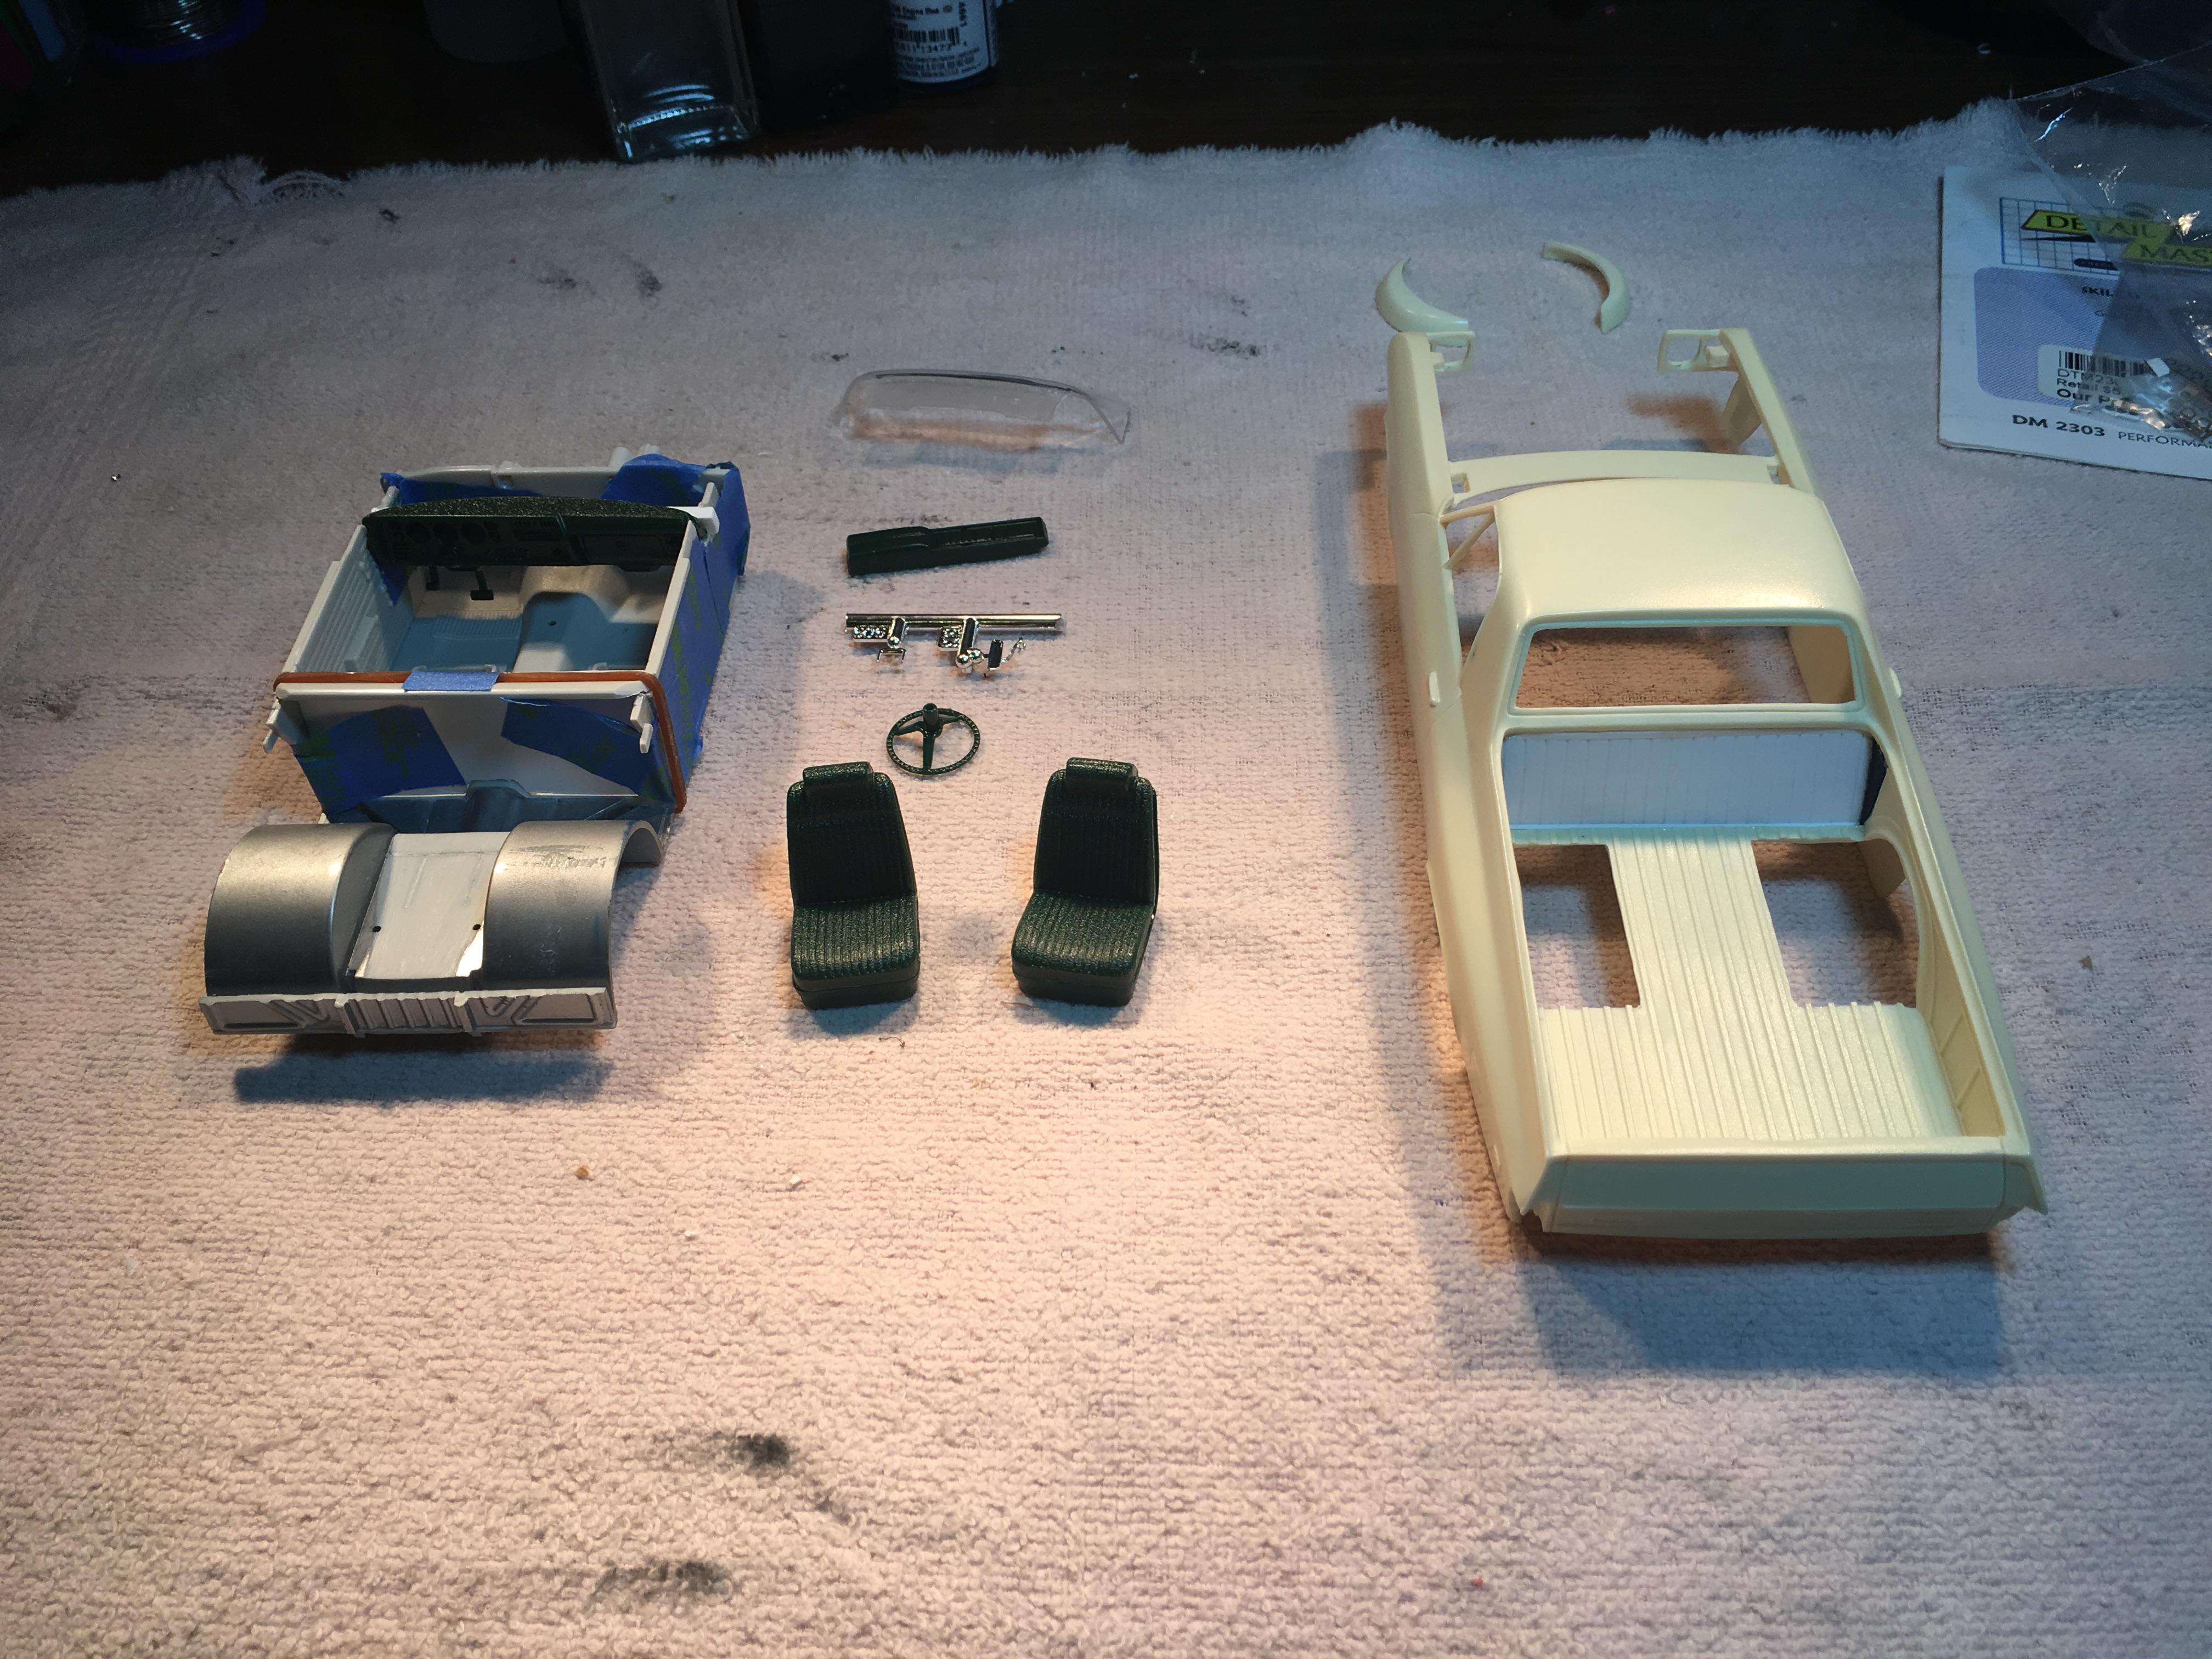
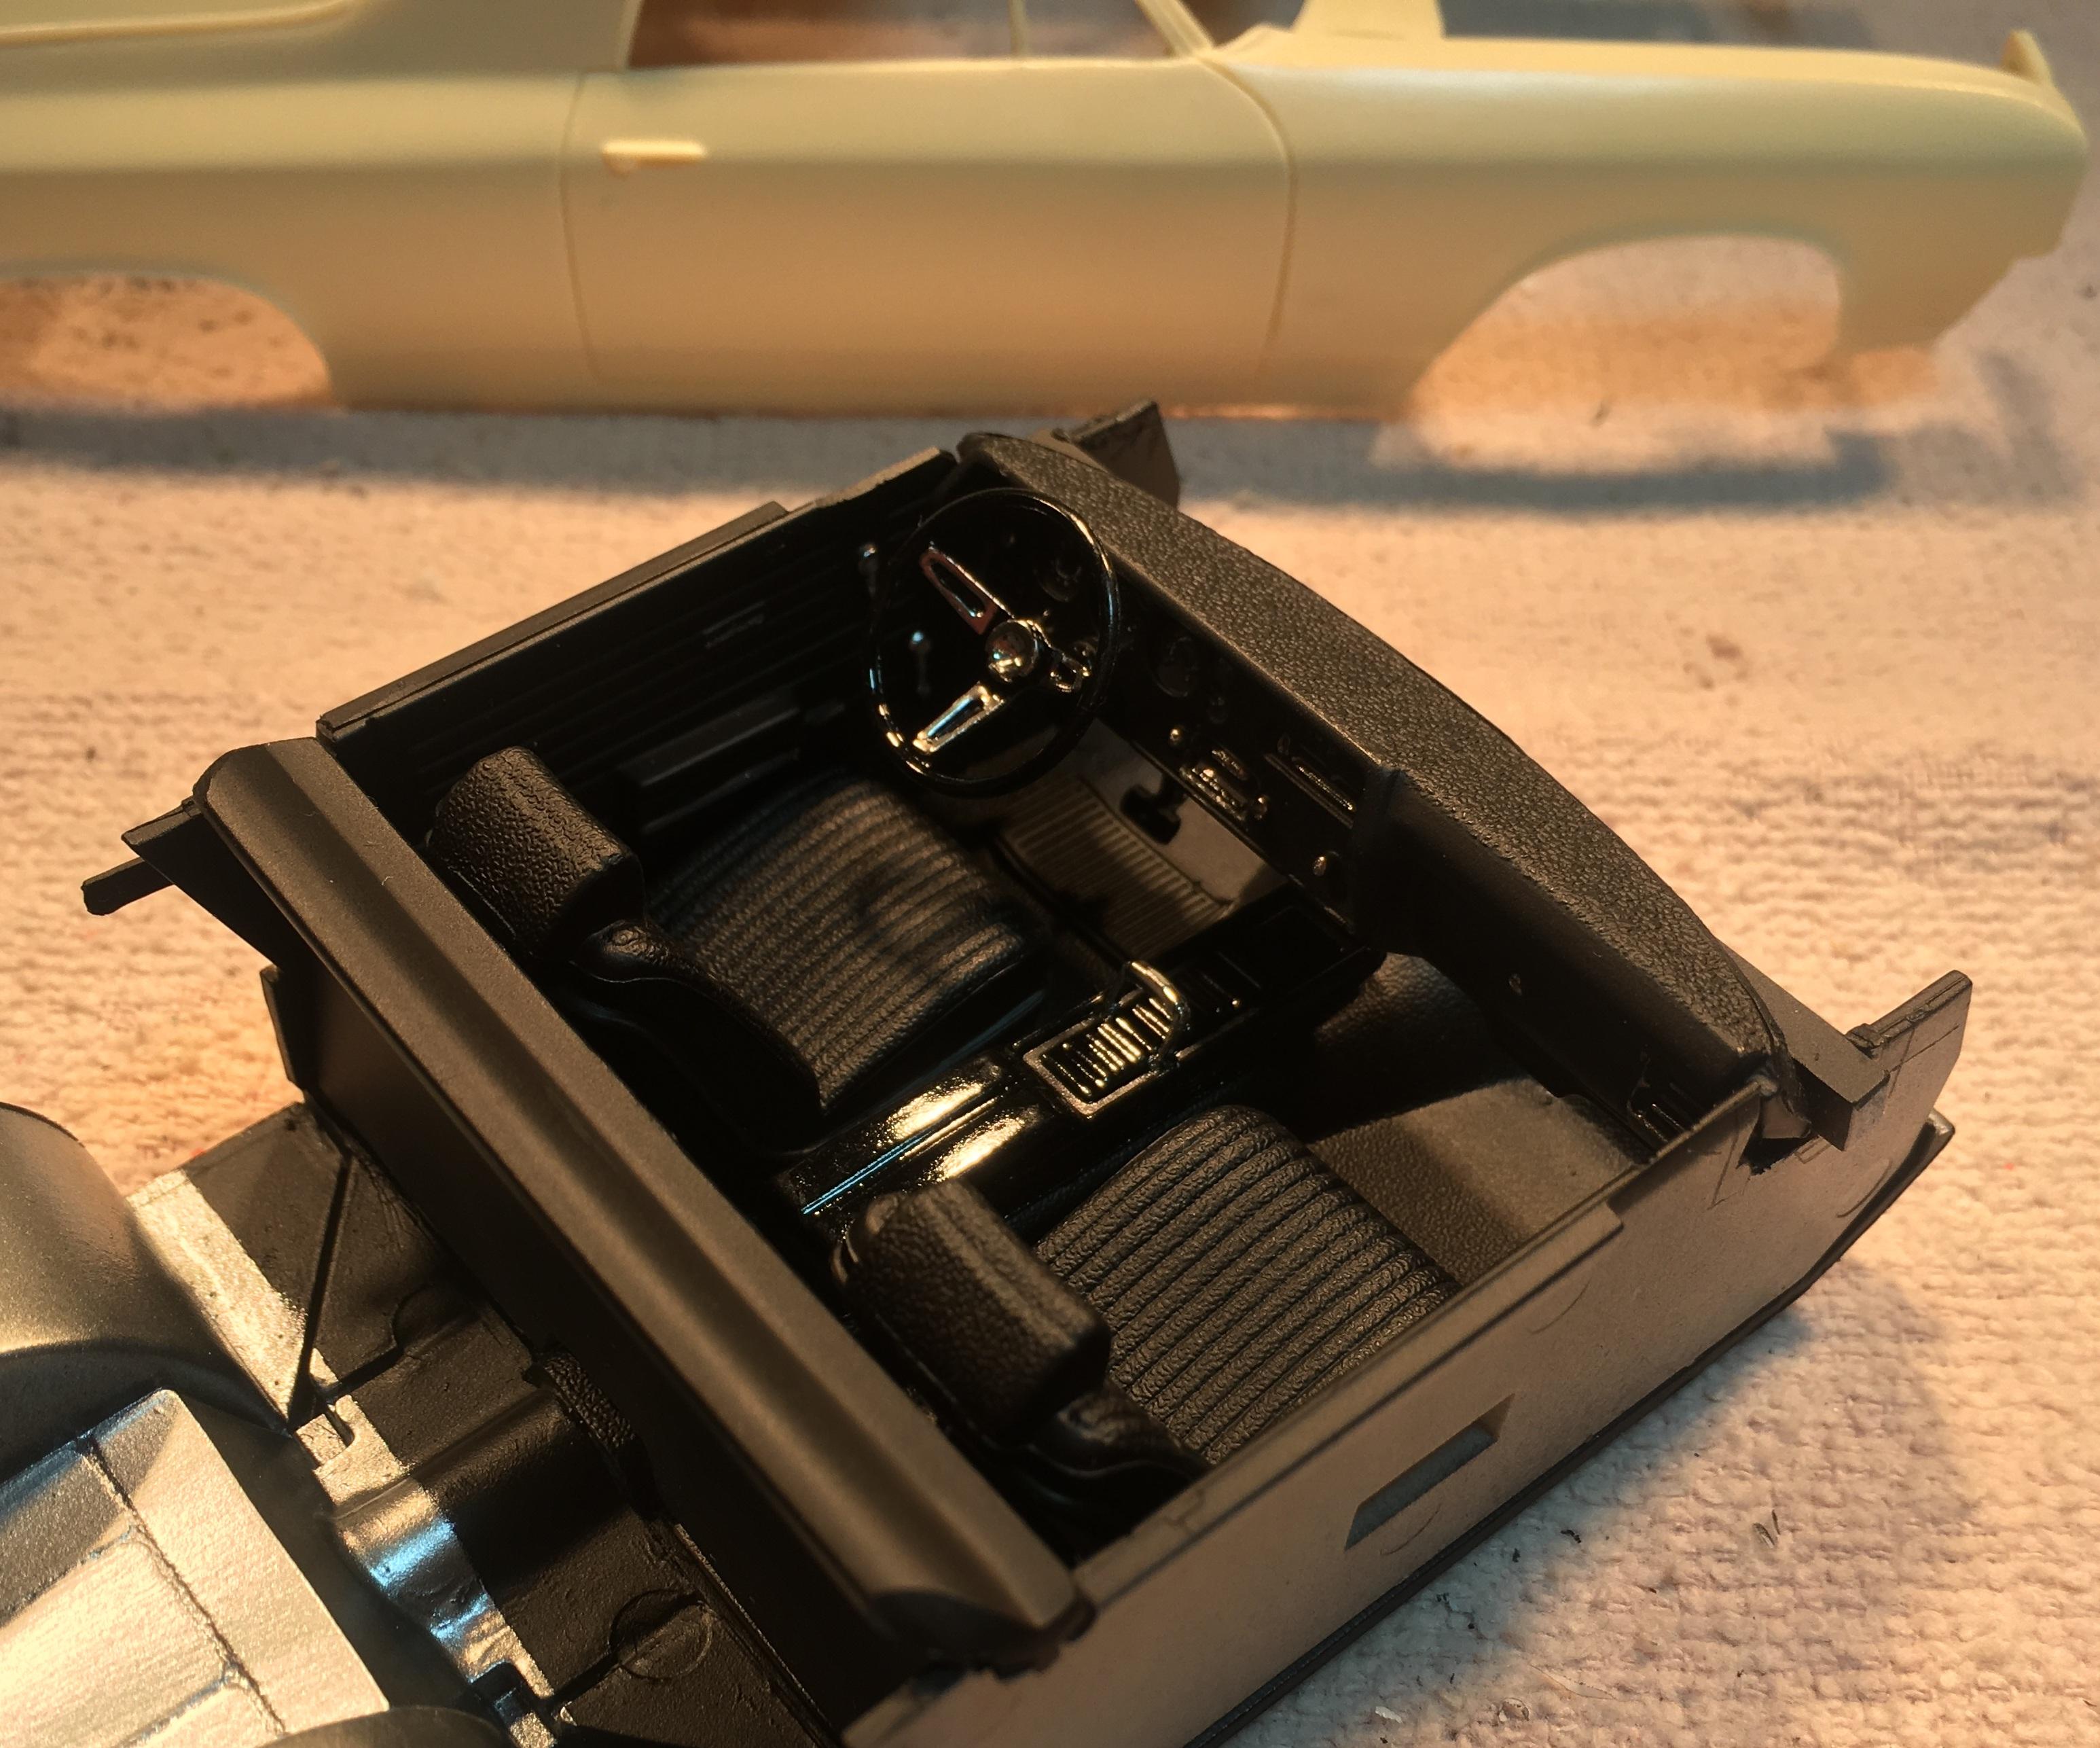
Another Ebay find, this one is in very nice condition. The chassis and tub appear to have not seen paint and the body is partially cleaned up, some badges have been removed and it needs some gentle work done. while my other Camino will be a custom this one will be mostly stock in appearance. Modelhaus bumpers just need slight tweaking to fit better. Fresh from the box... Disassembled...
-
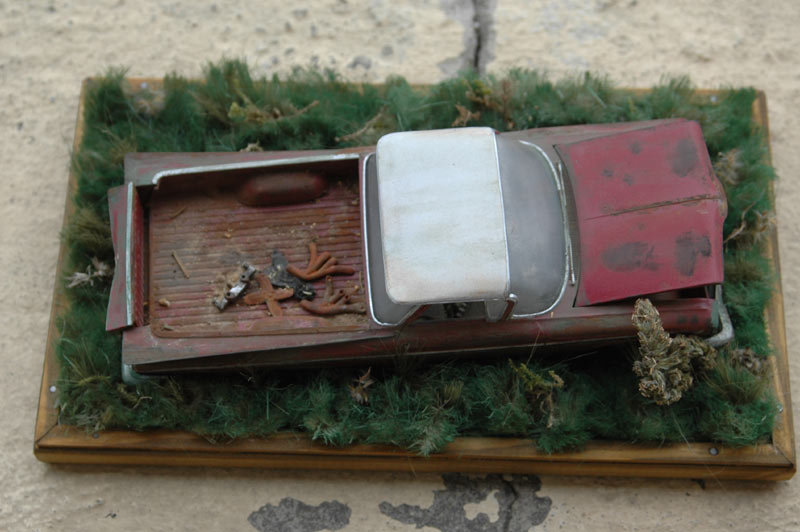
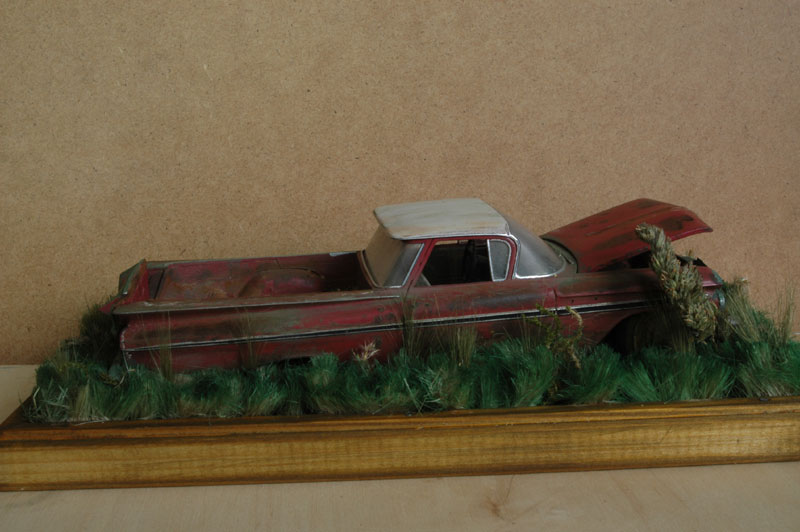
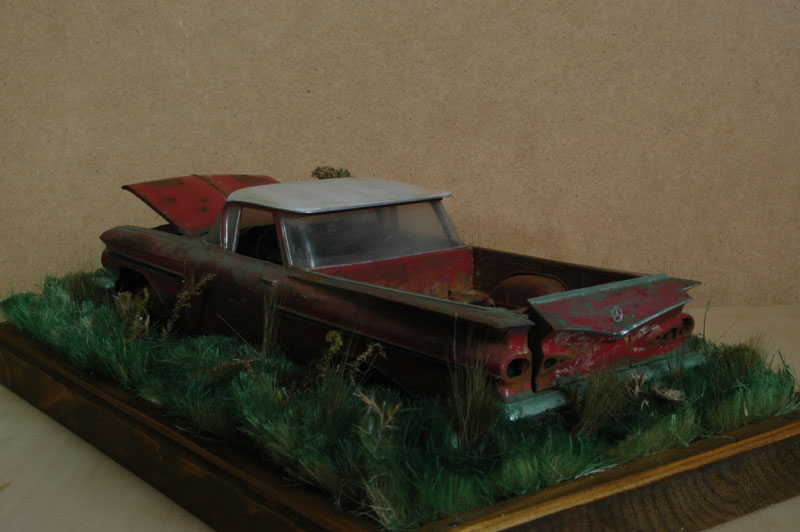
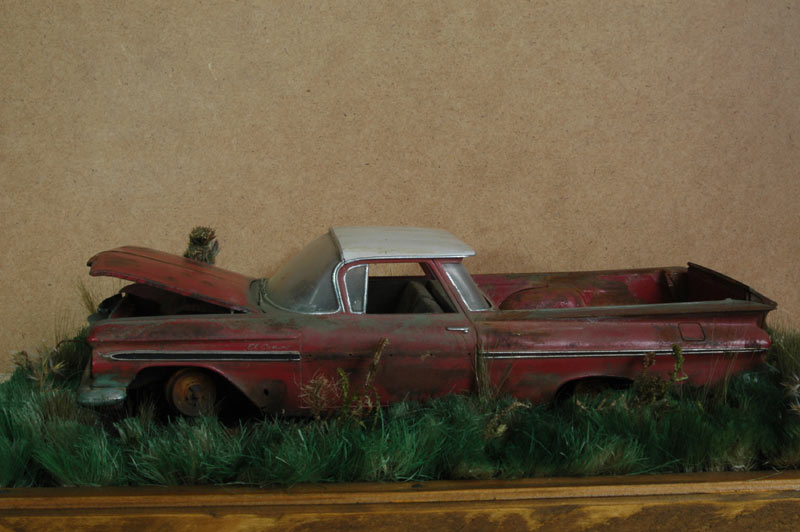
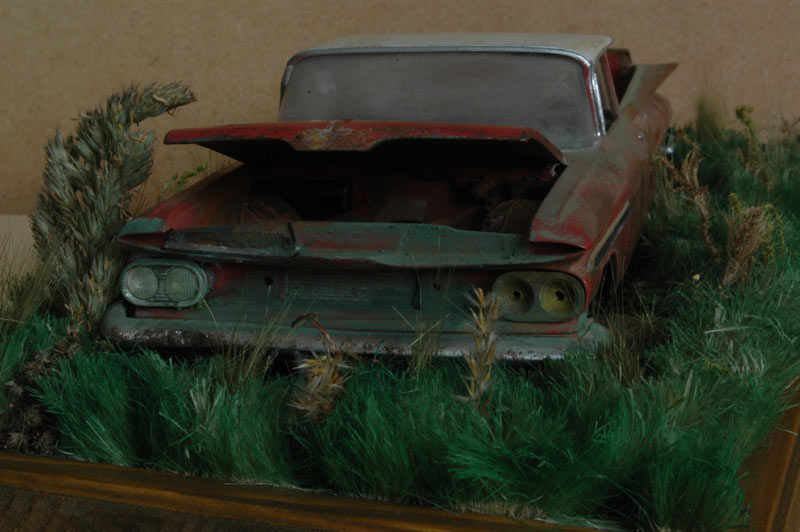
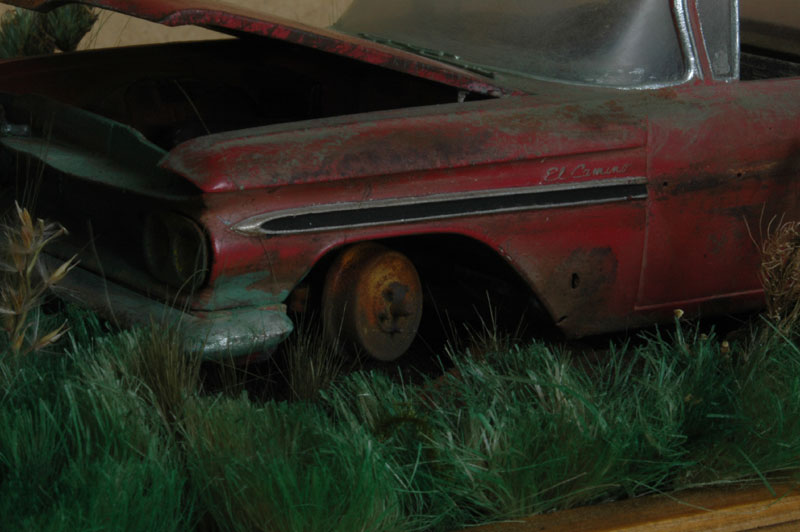
 hello friends of plastic here is my last build a 59 el camino parked a few years ago on a meadow... have fun greetings maik


.thumb.jpg.e0420fe52e683c60d19e843462316523.jpg)