Search the Community
Showing results for tags 'lowrider'.
-
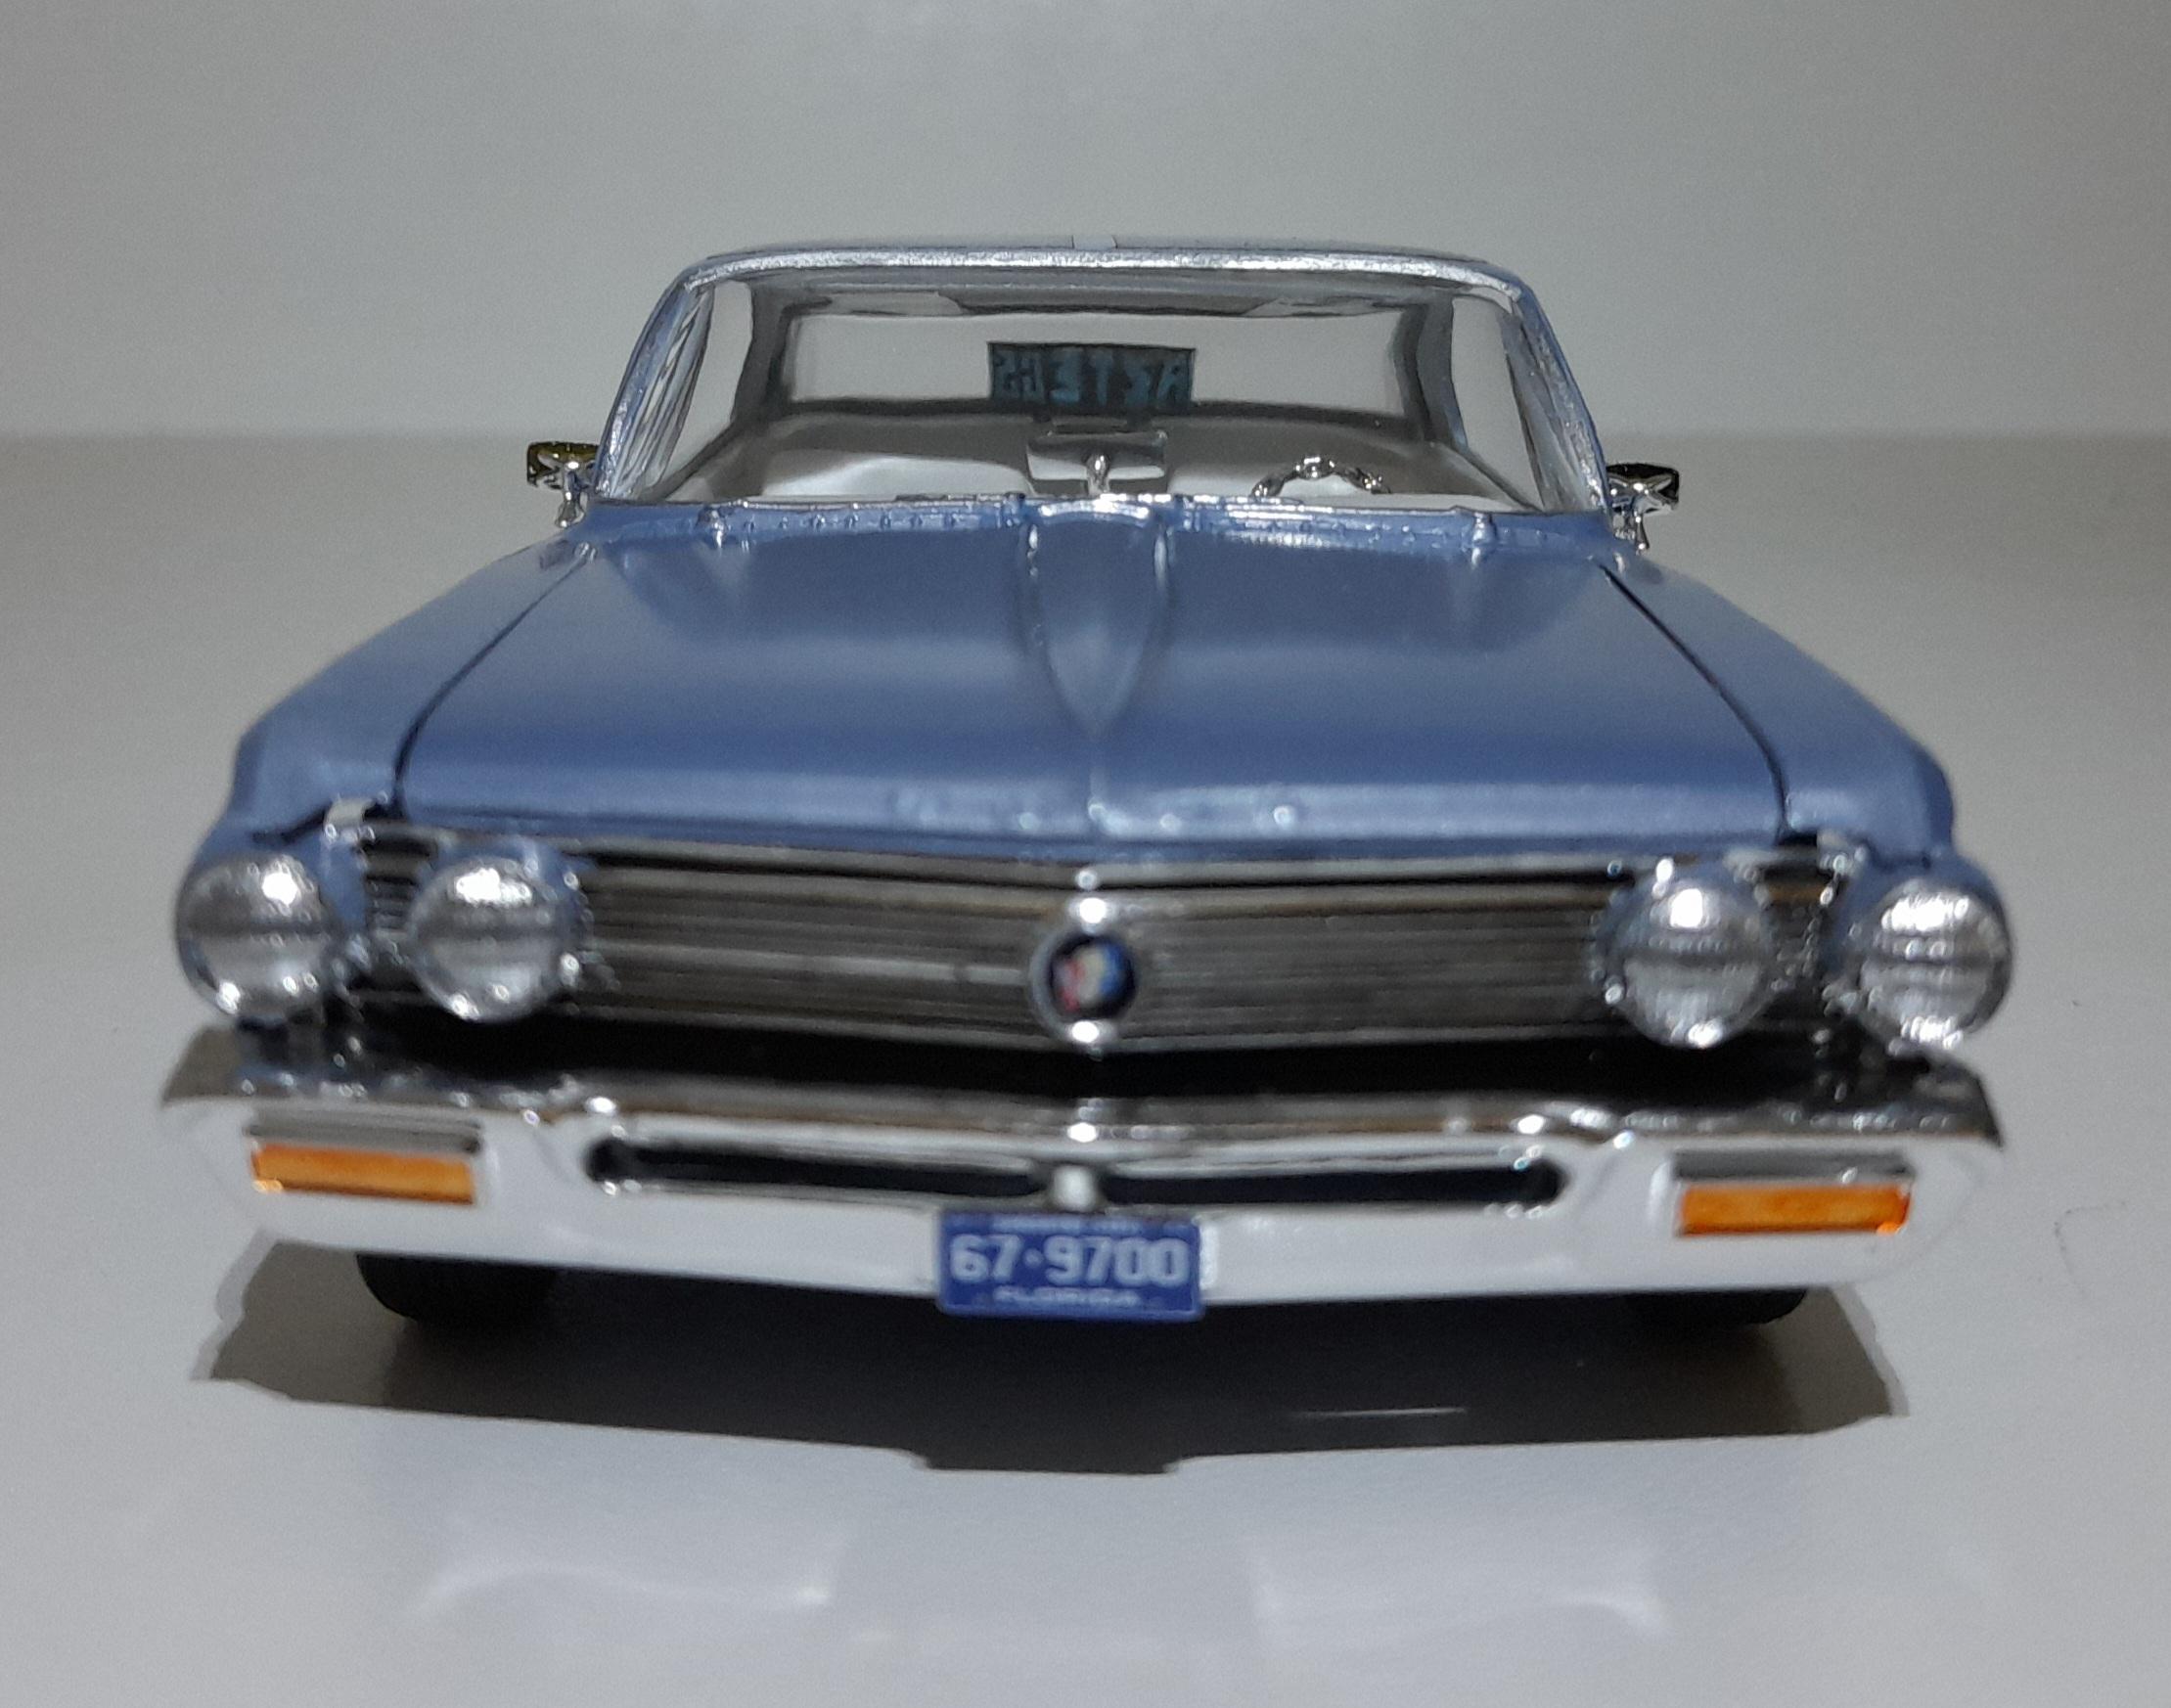
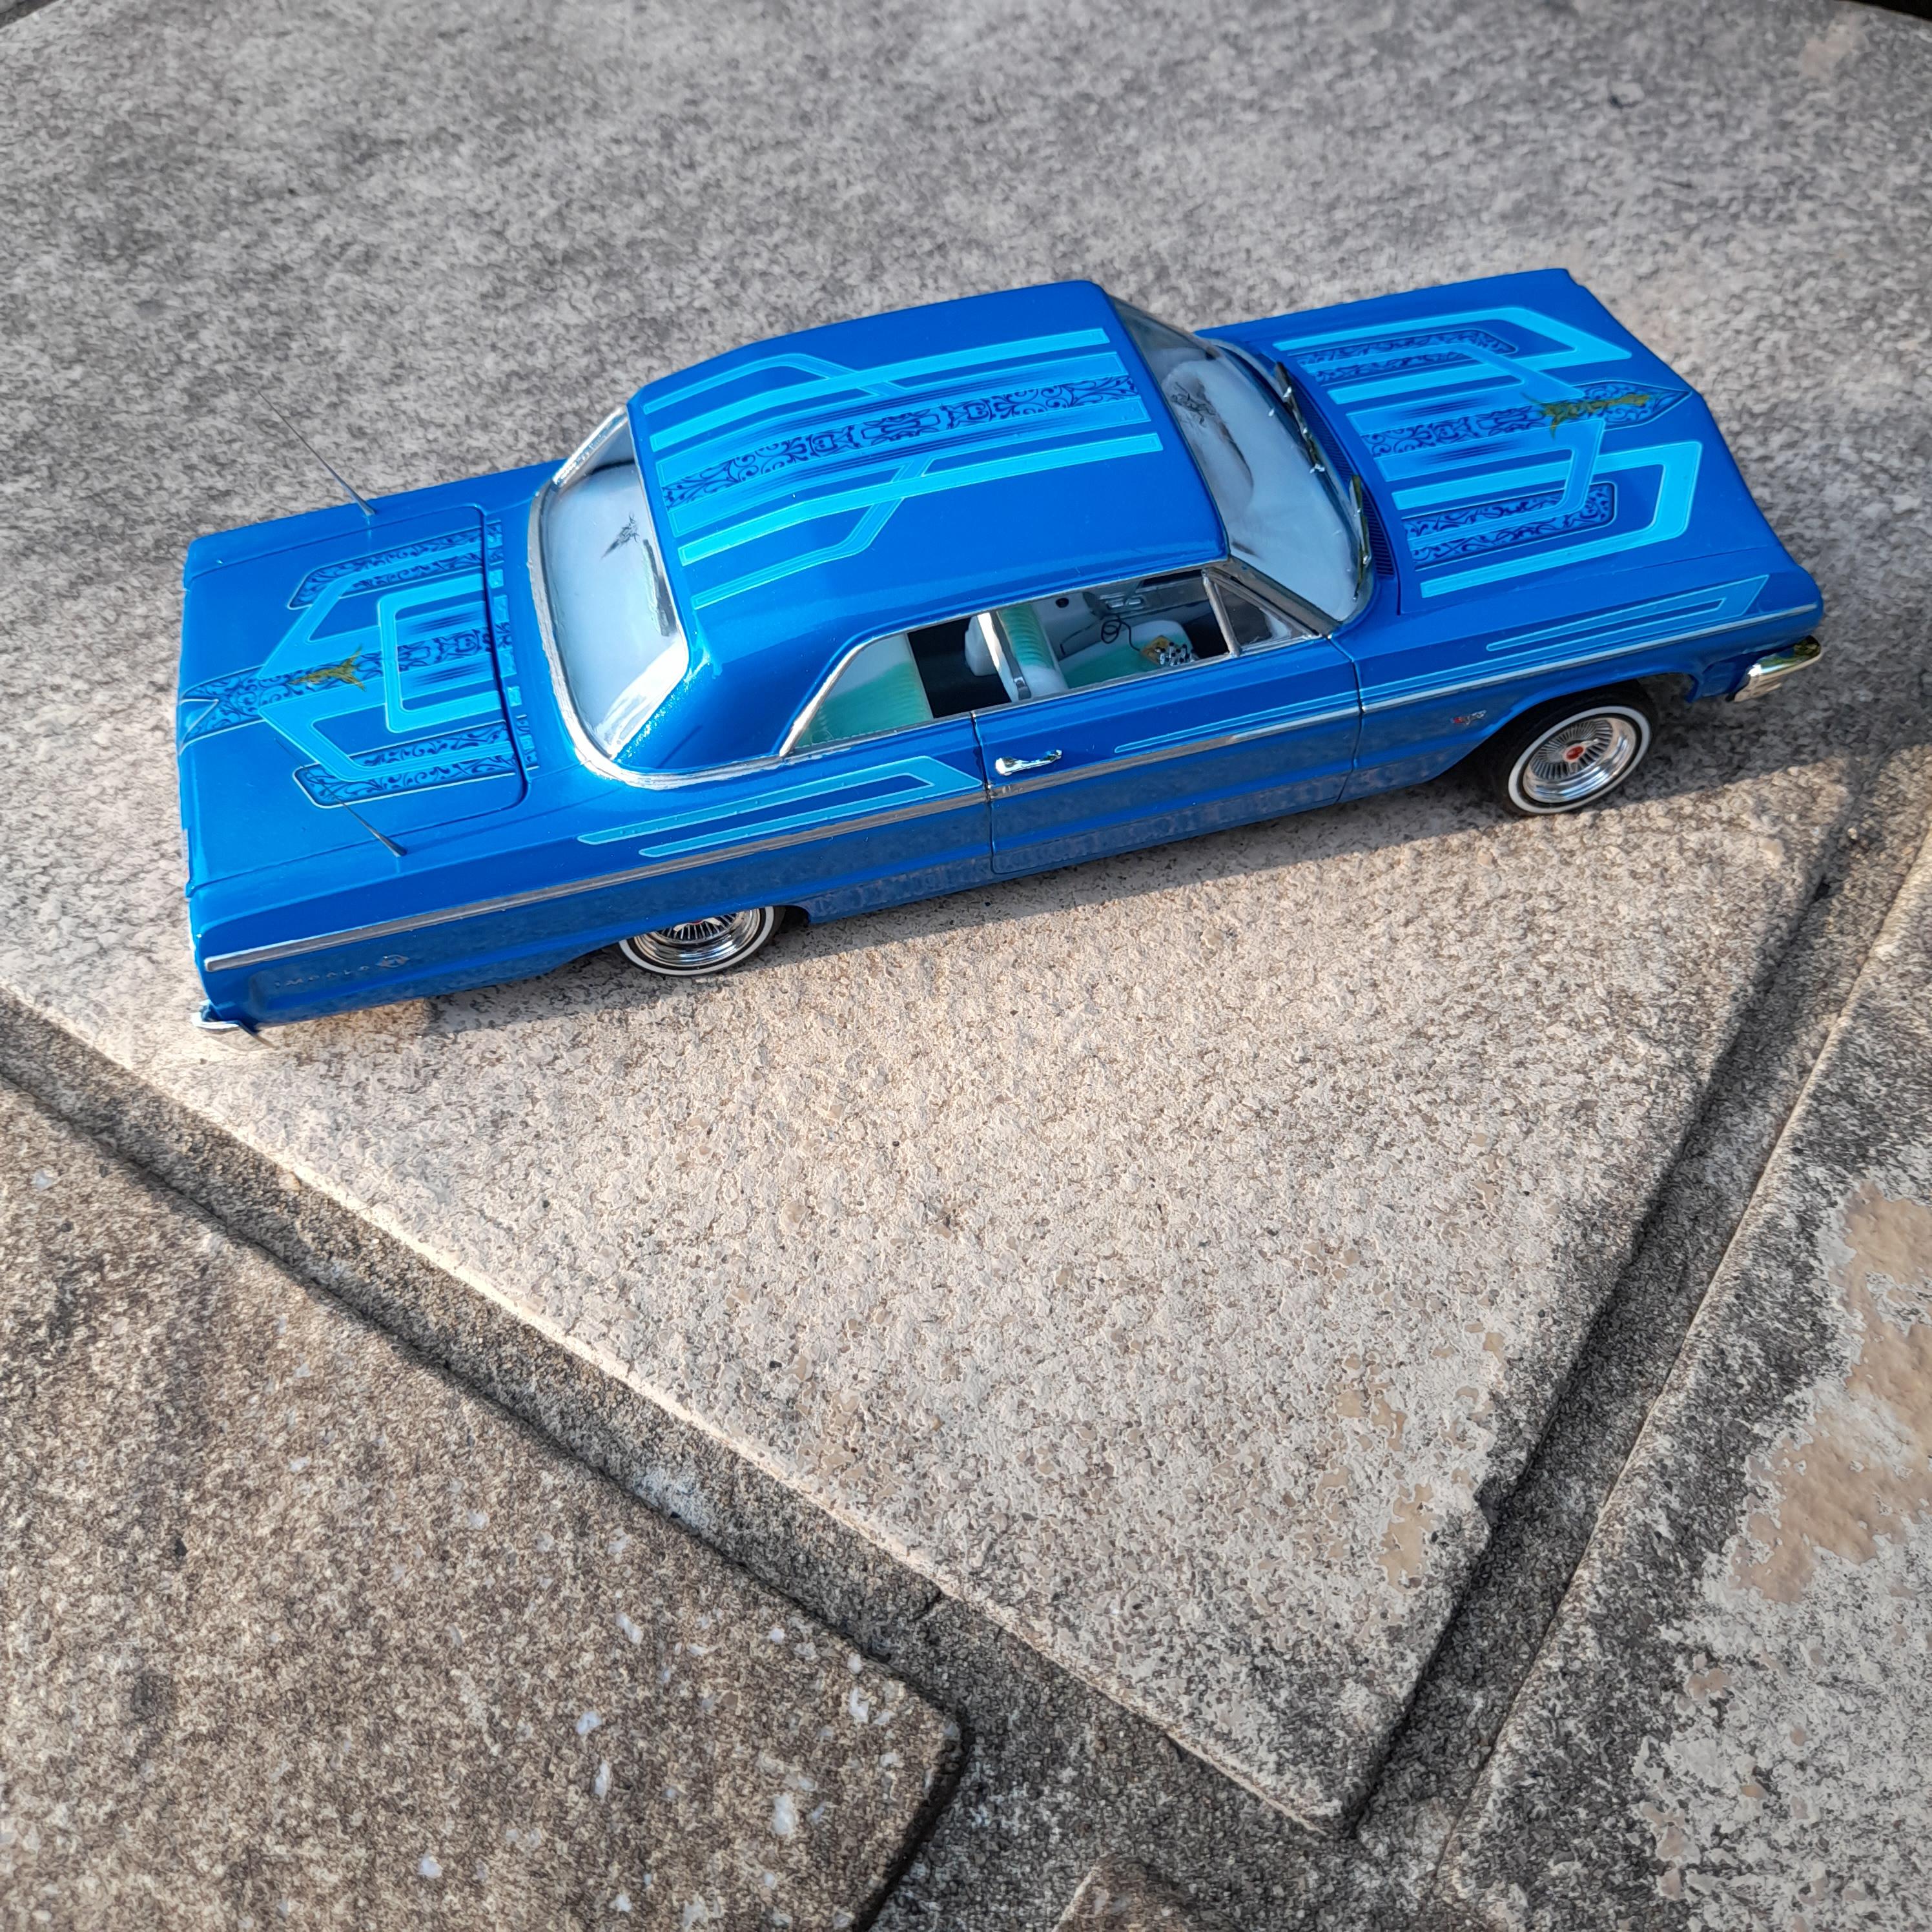
G'day folks, here is my version of AMT's 62 Buick electra. I decided to make it a lowrider to display with my 64 chevy impala. Colour is Tamiya ts58 pearl light blue. The graphics were done by masking up over the light blue then a base coat of ts30 silver leaf, then free handed the pattern with a black fine tip sharpie then finished off with a coat of ts72 clear blue. Interior was left in the white plastic with some chrome details. Thanks for looking and all feedback is welcome and appreciated. Cheers, David. 😎👍

-
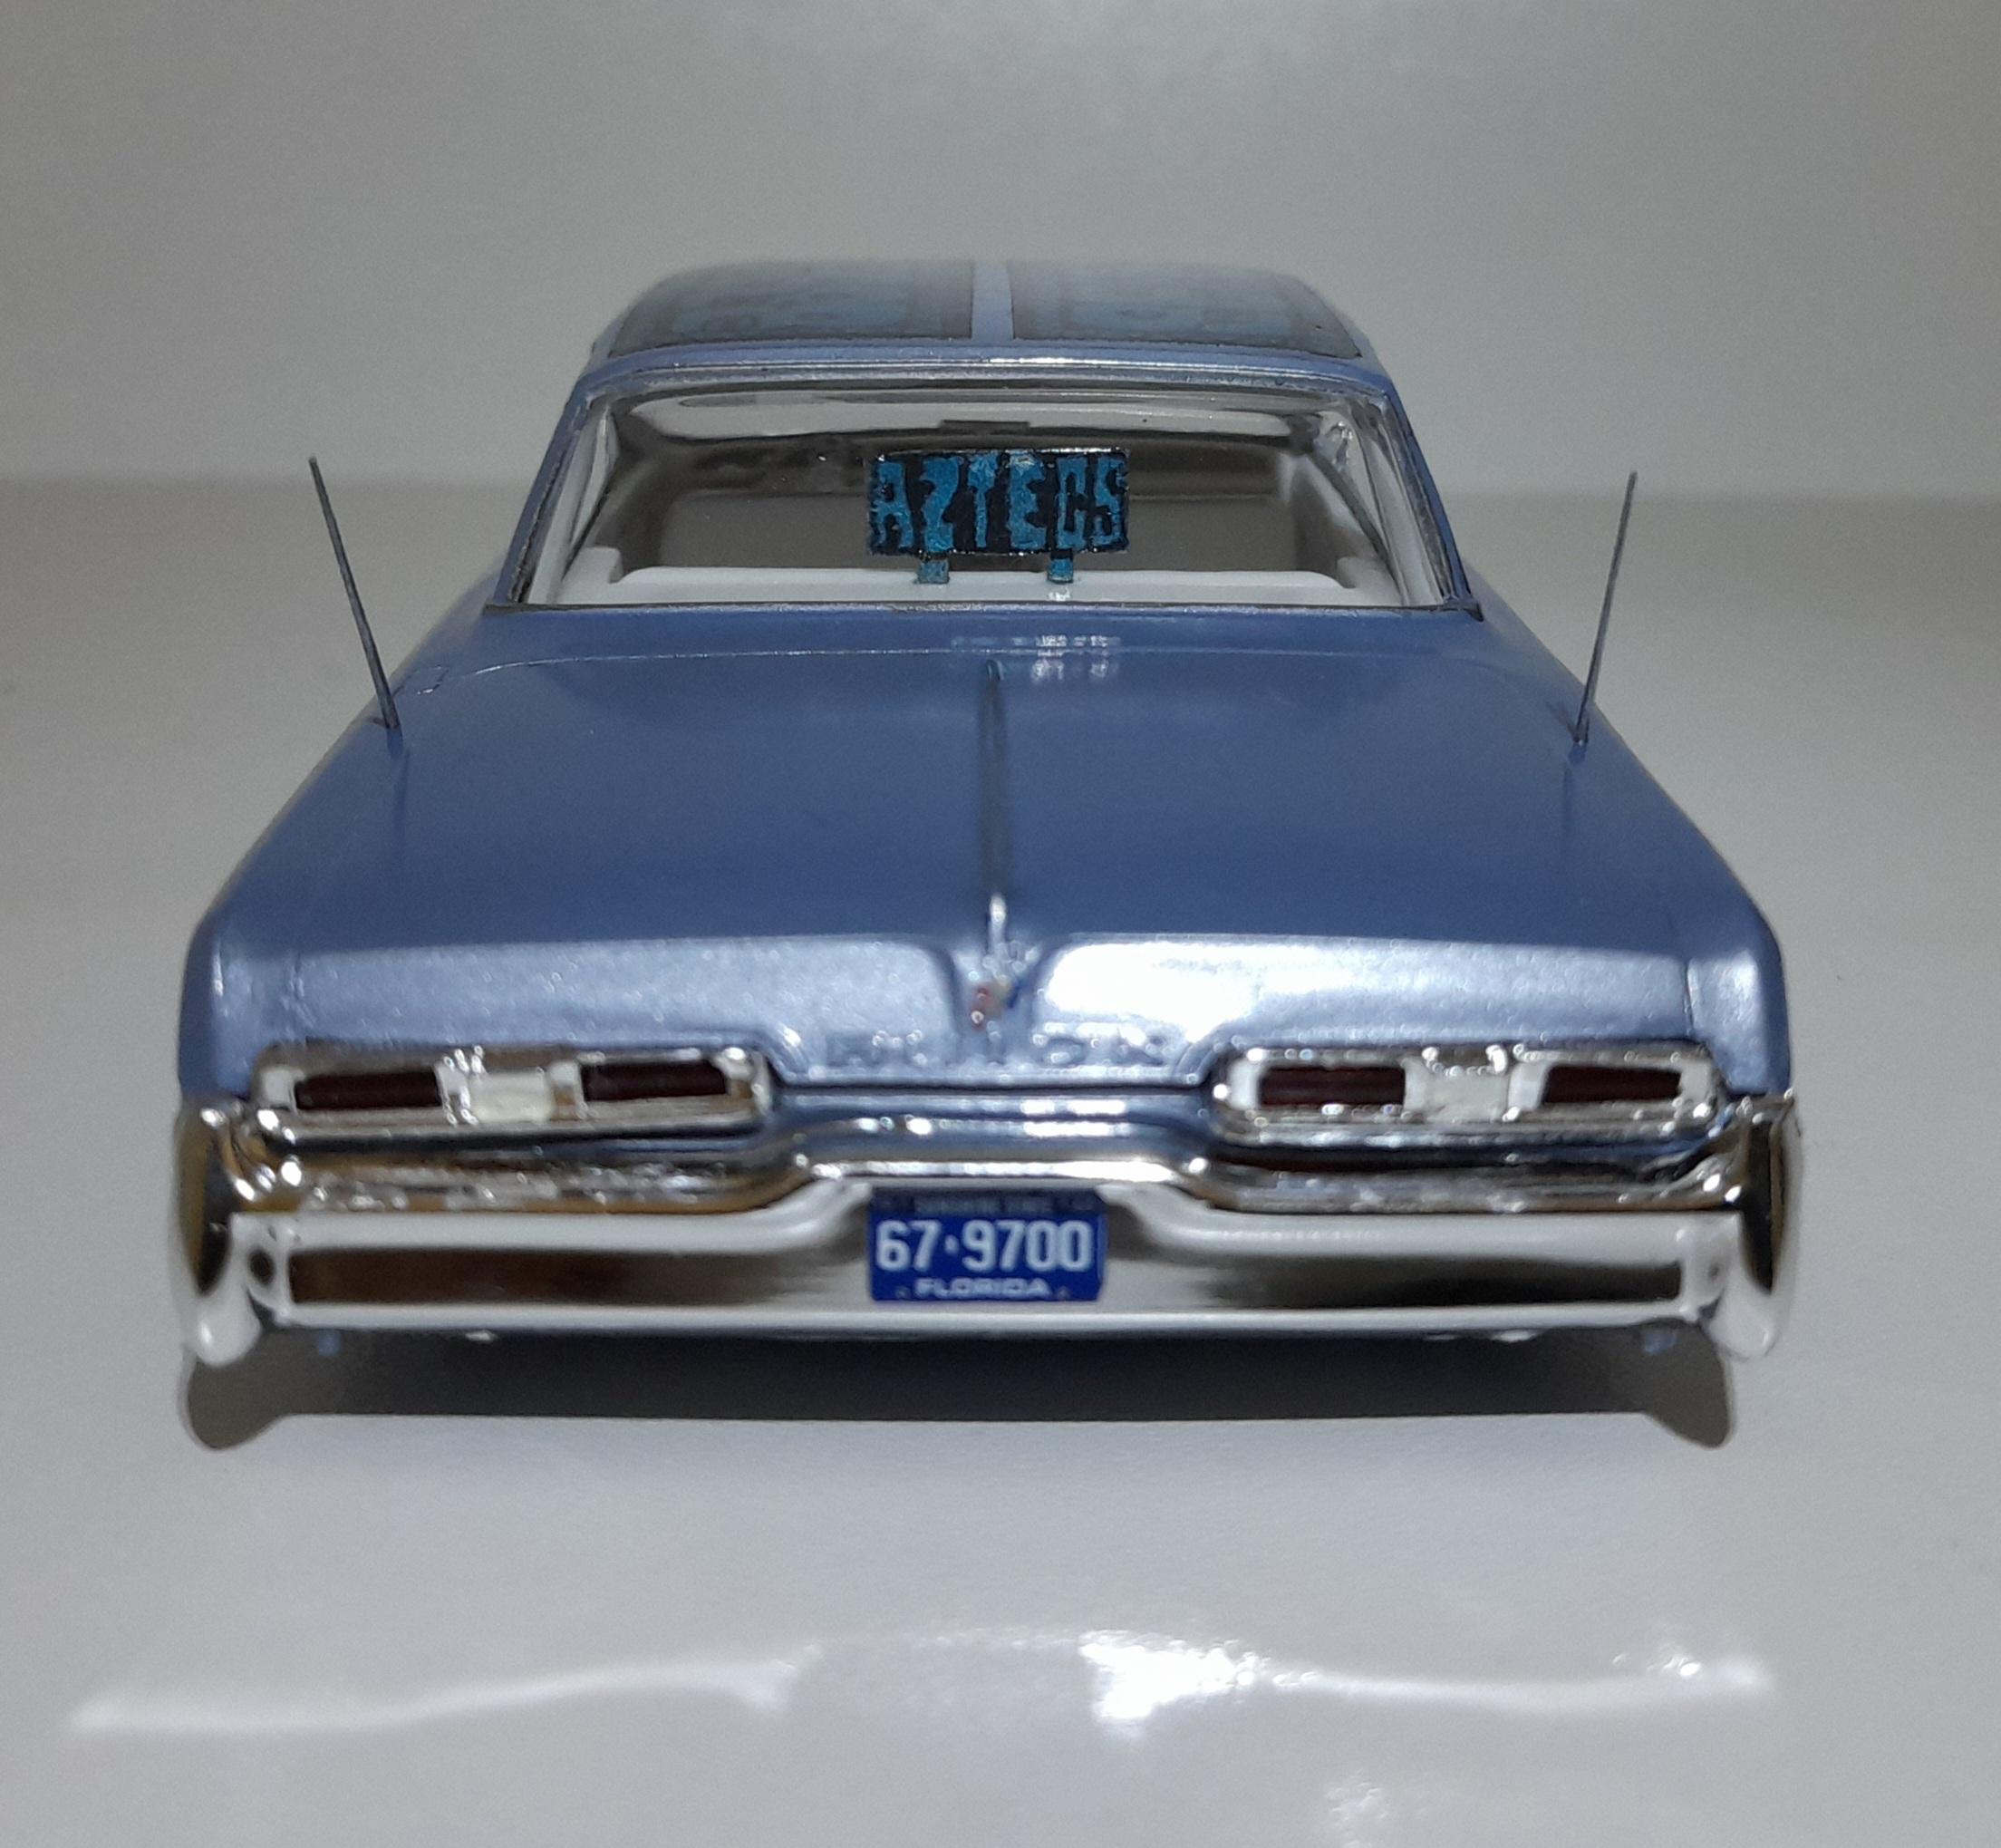
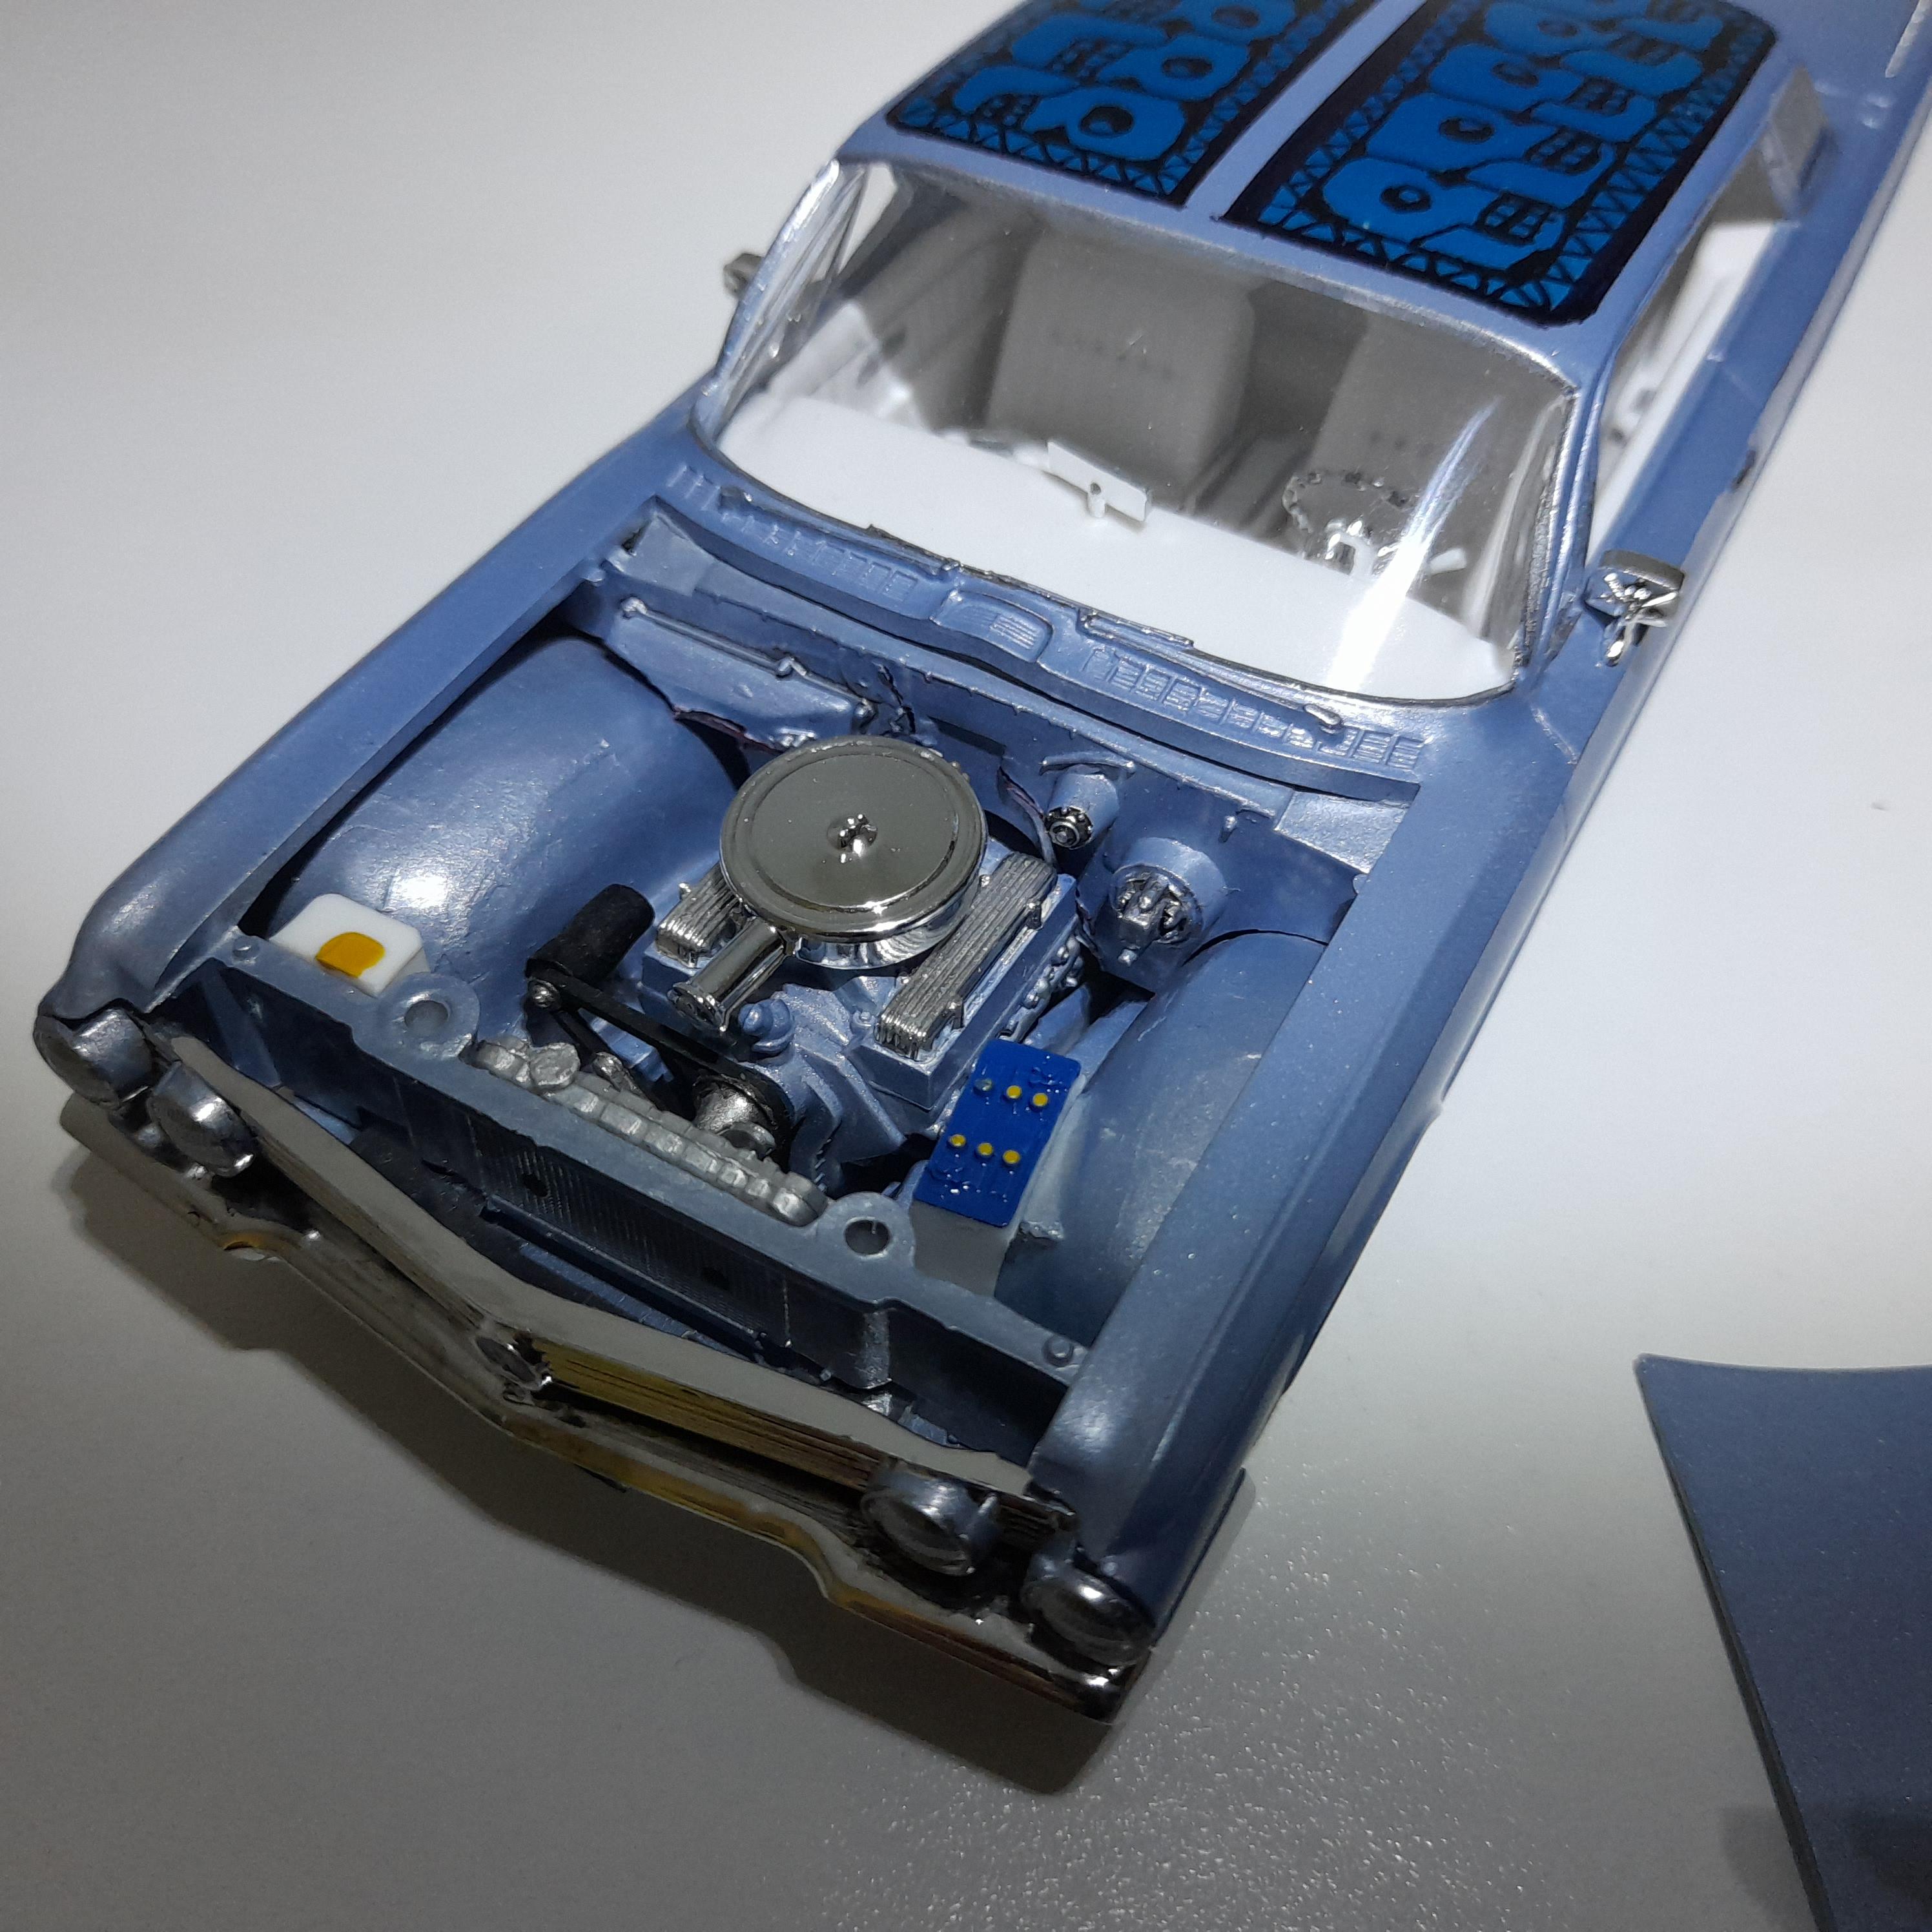
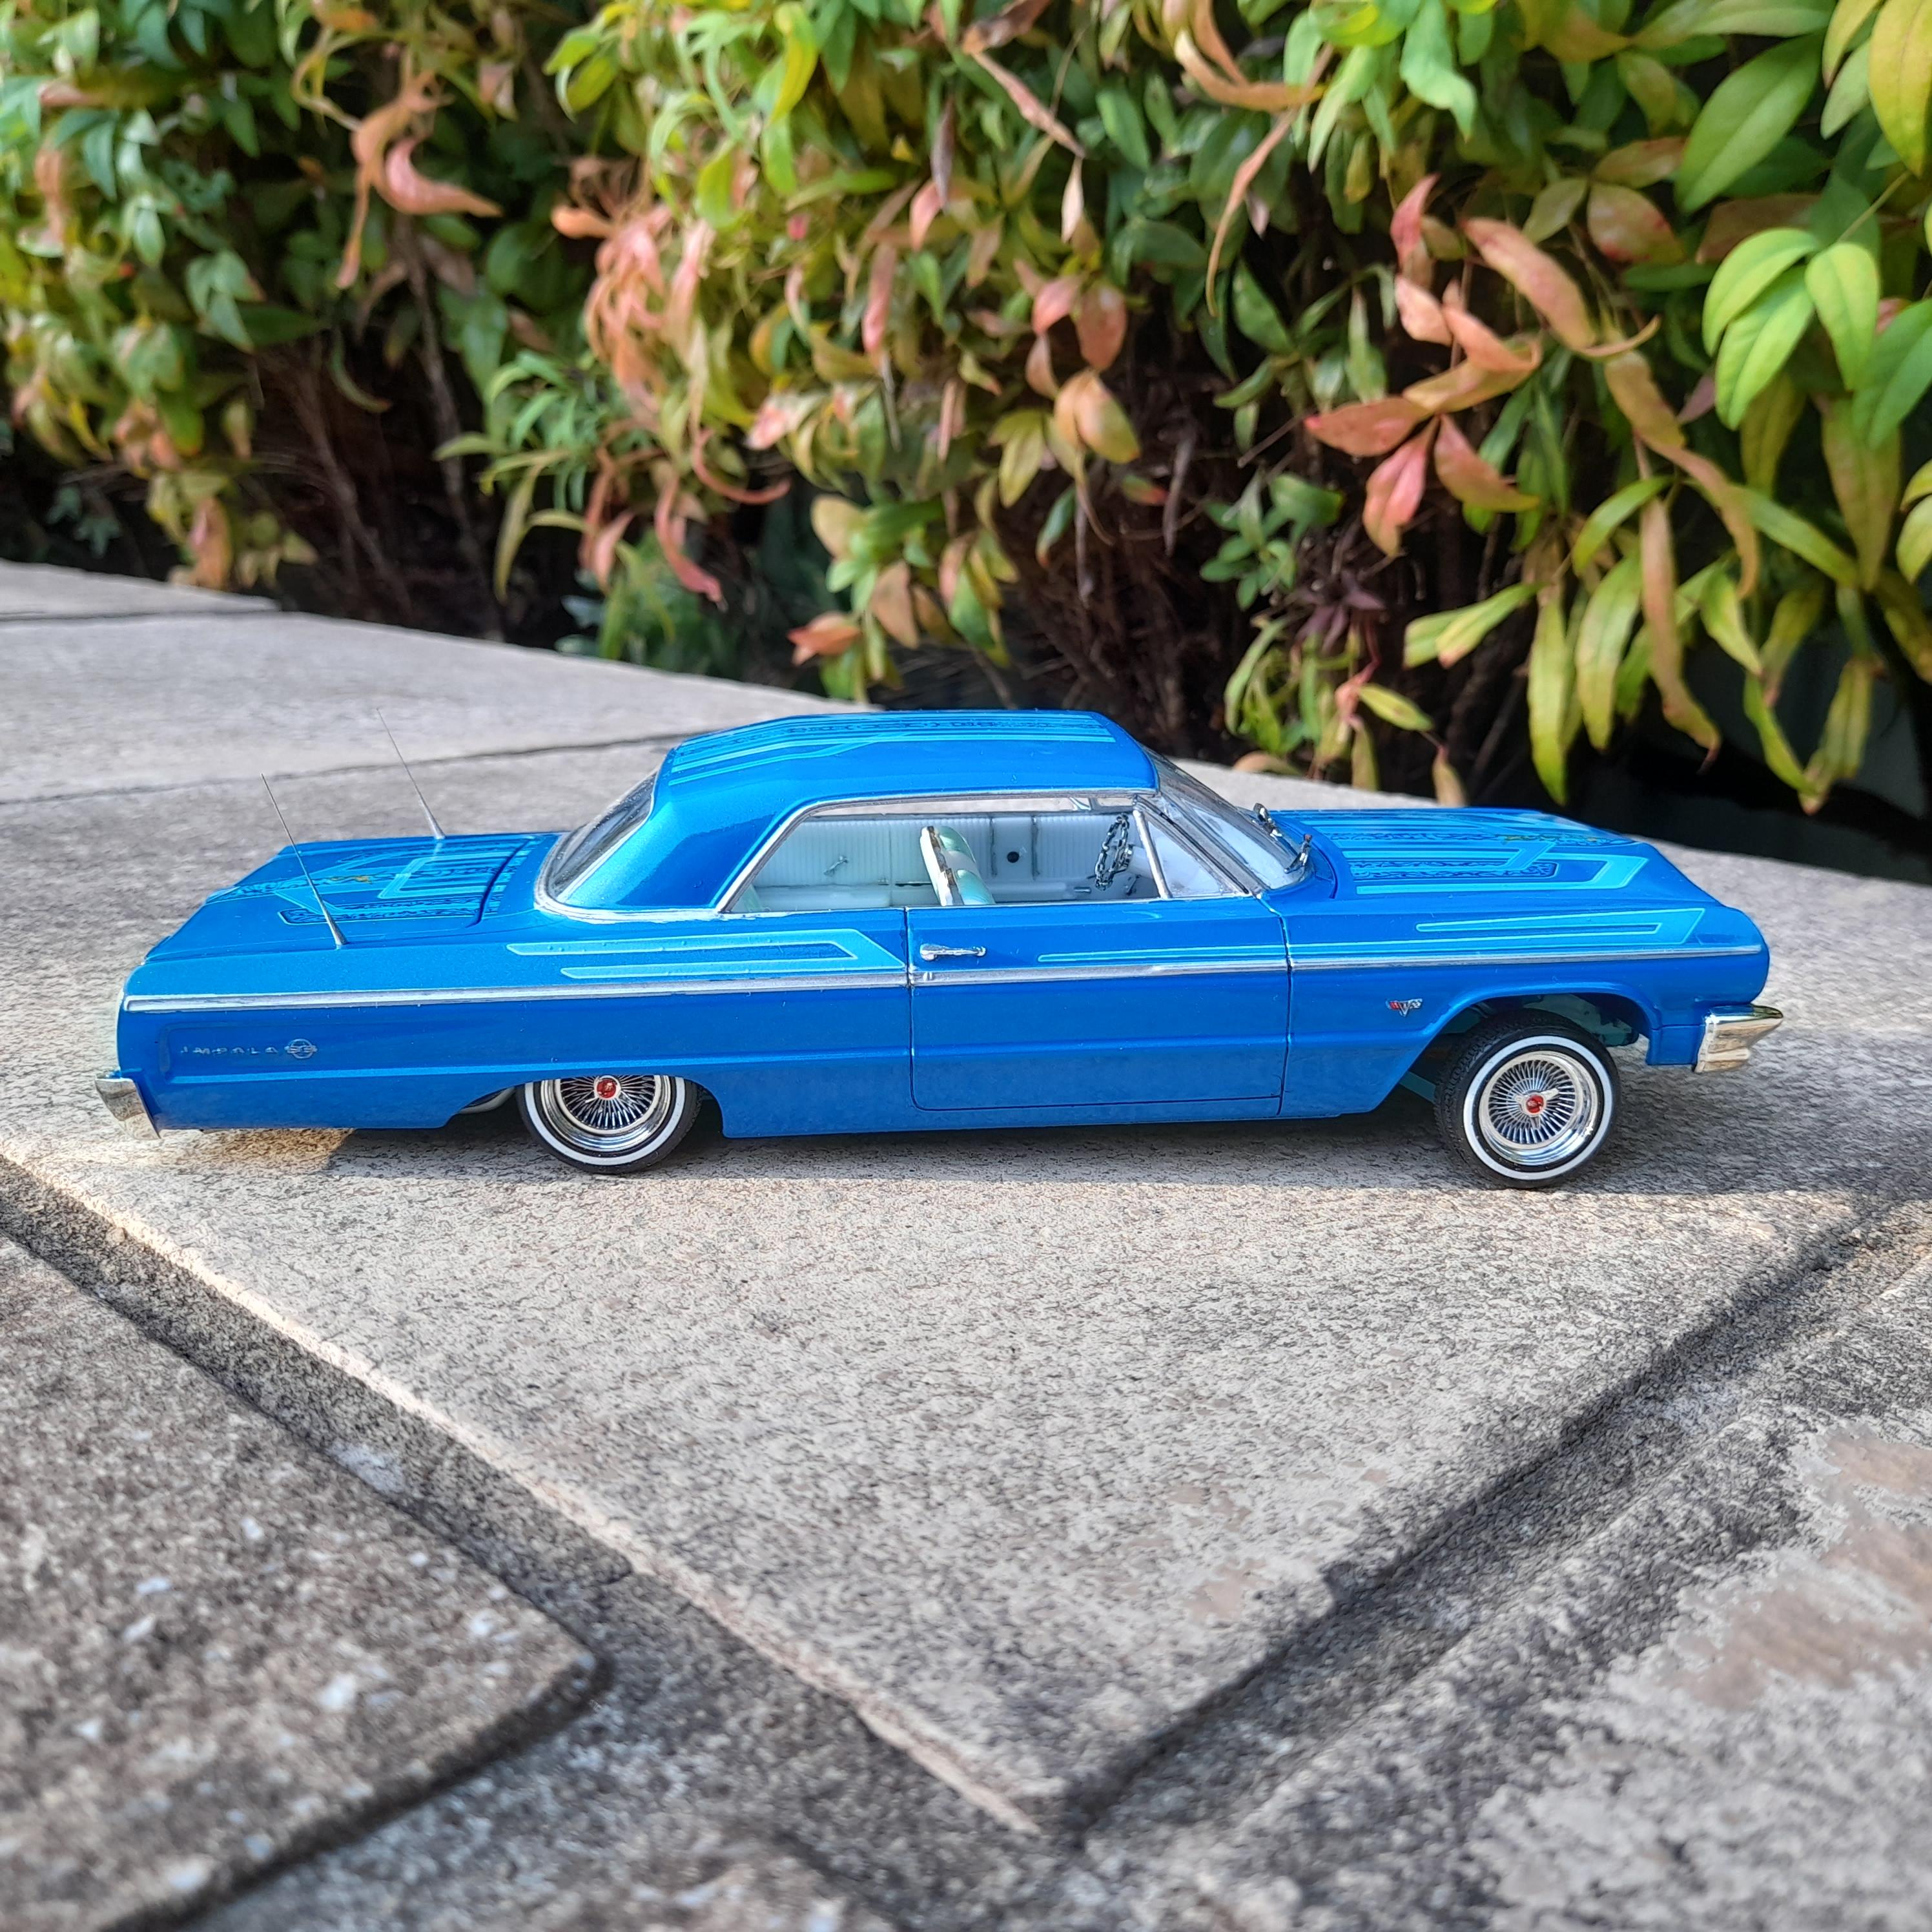
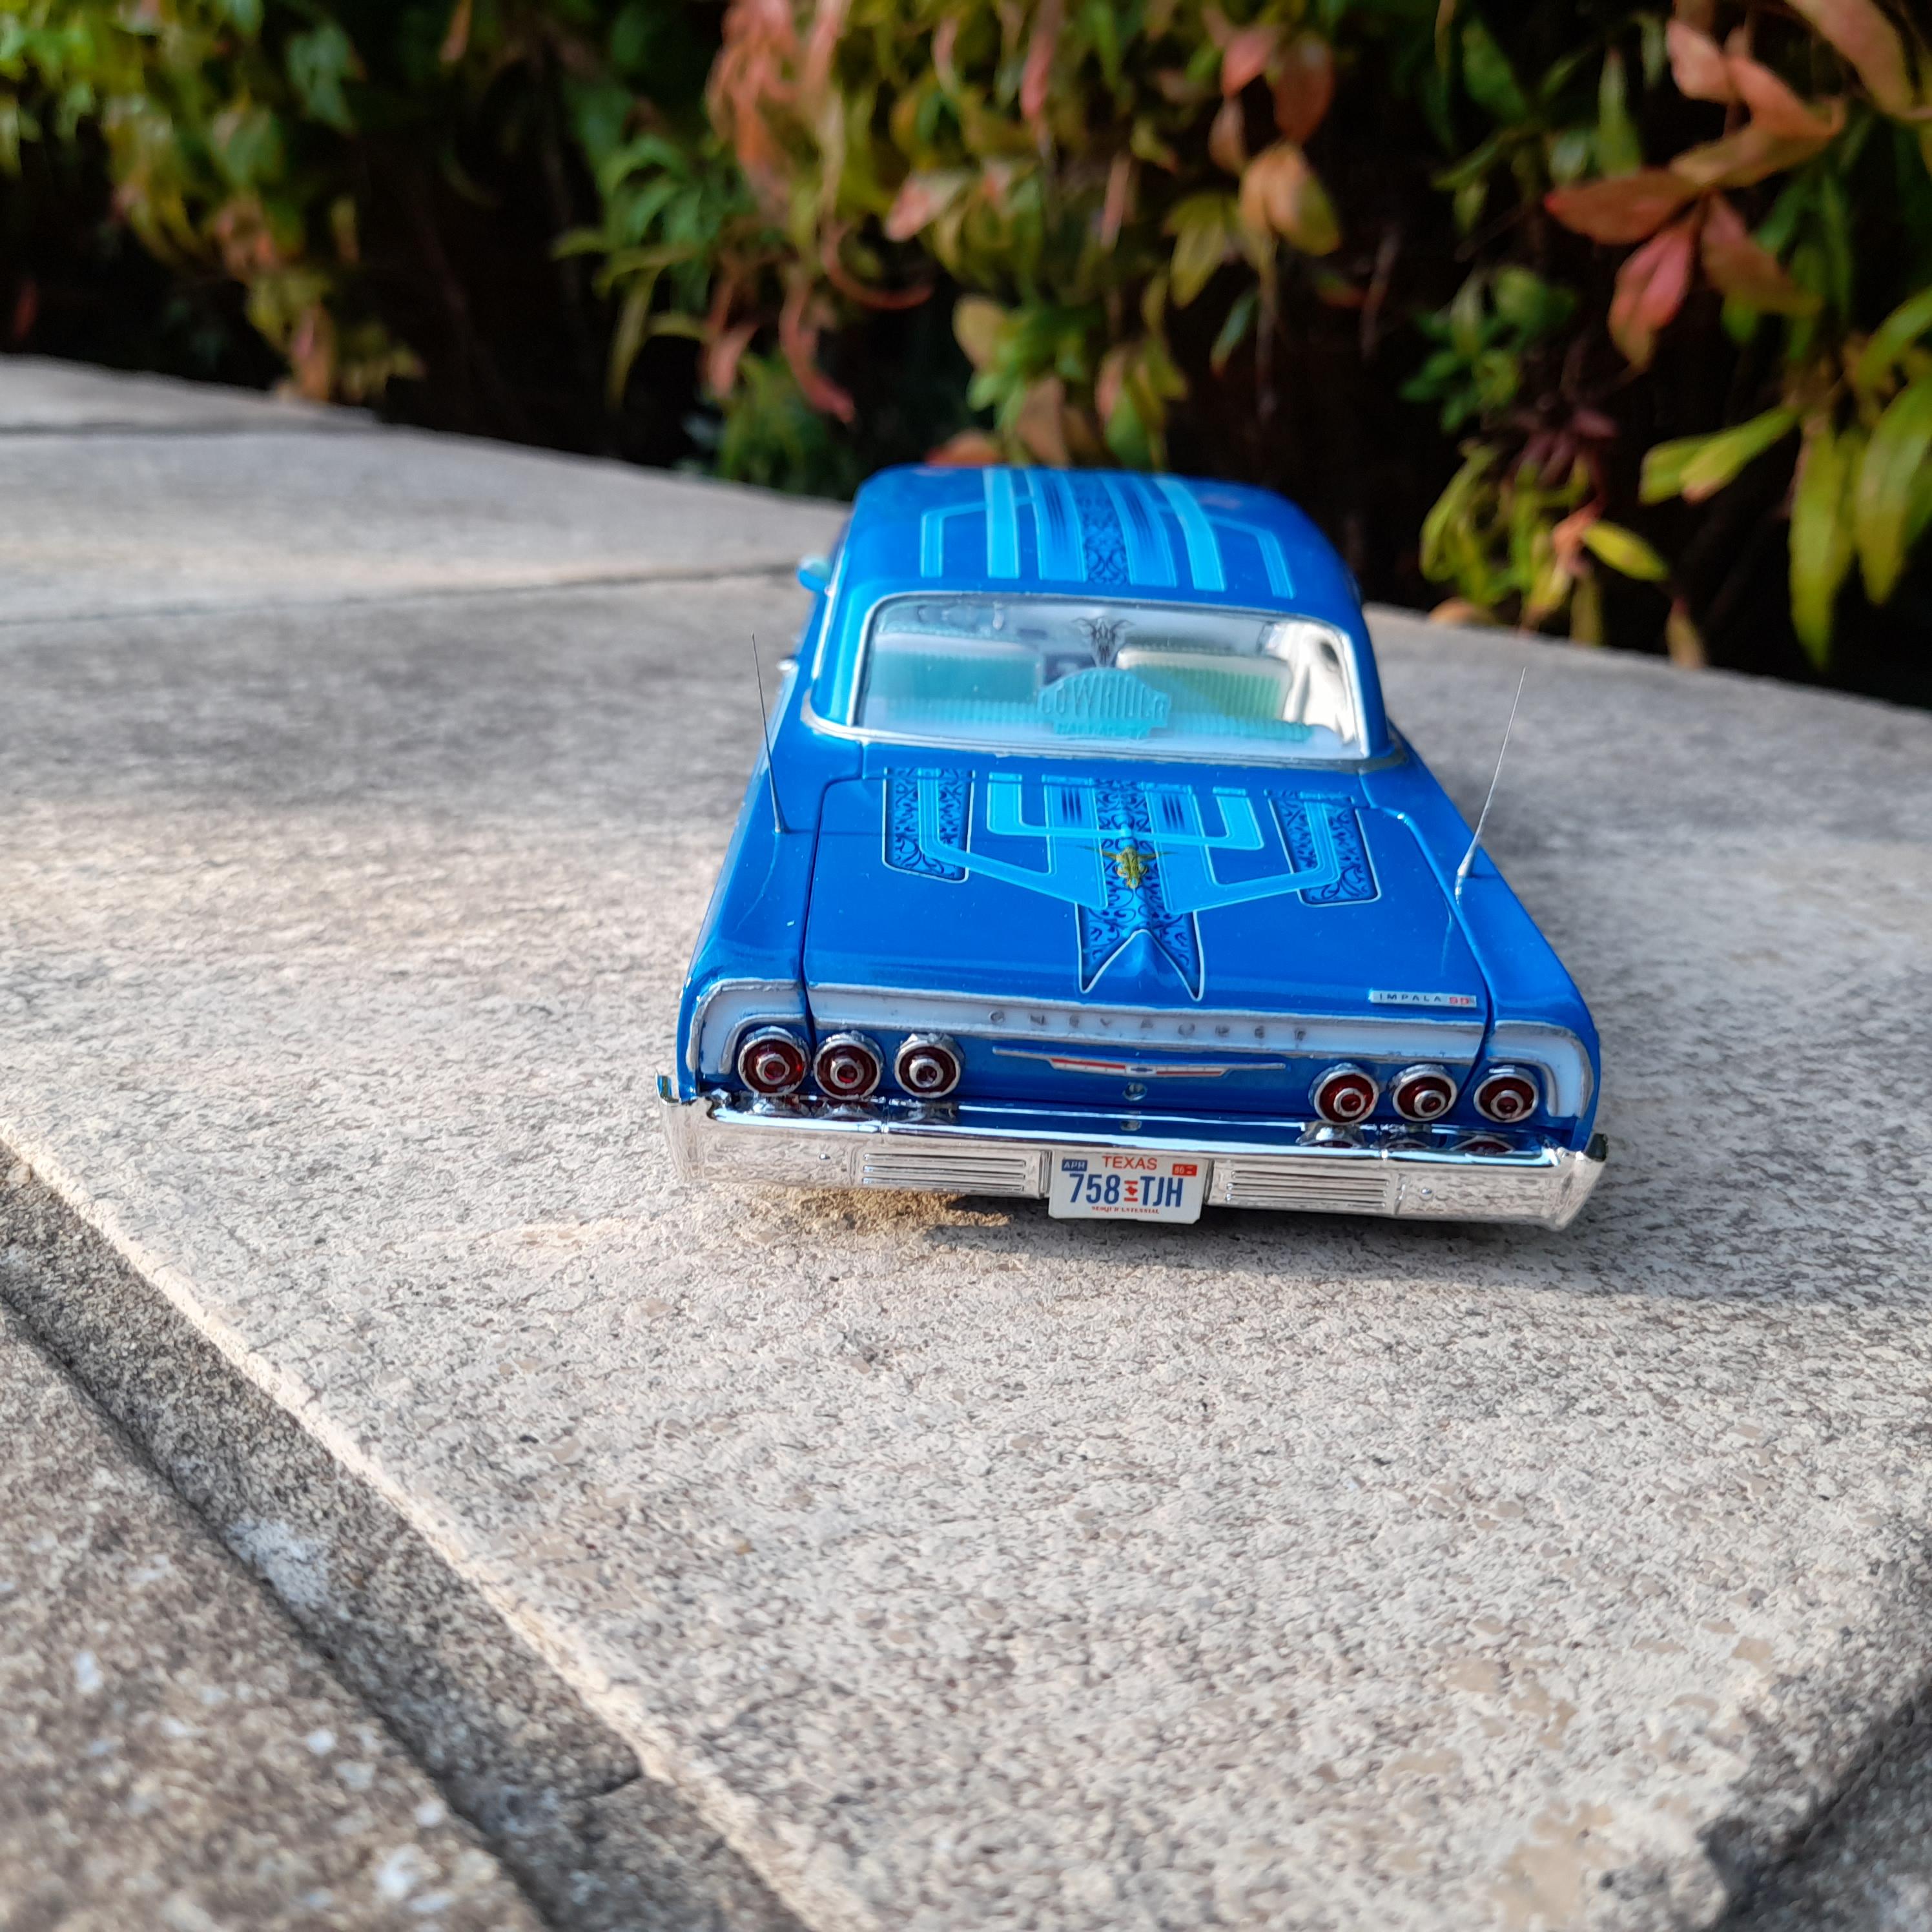
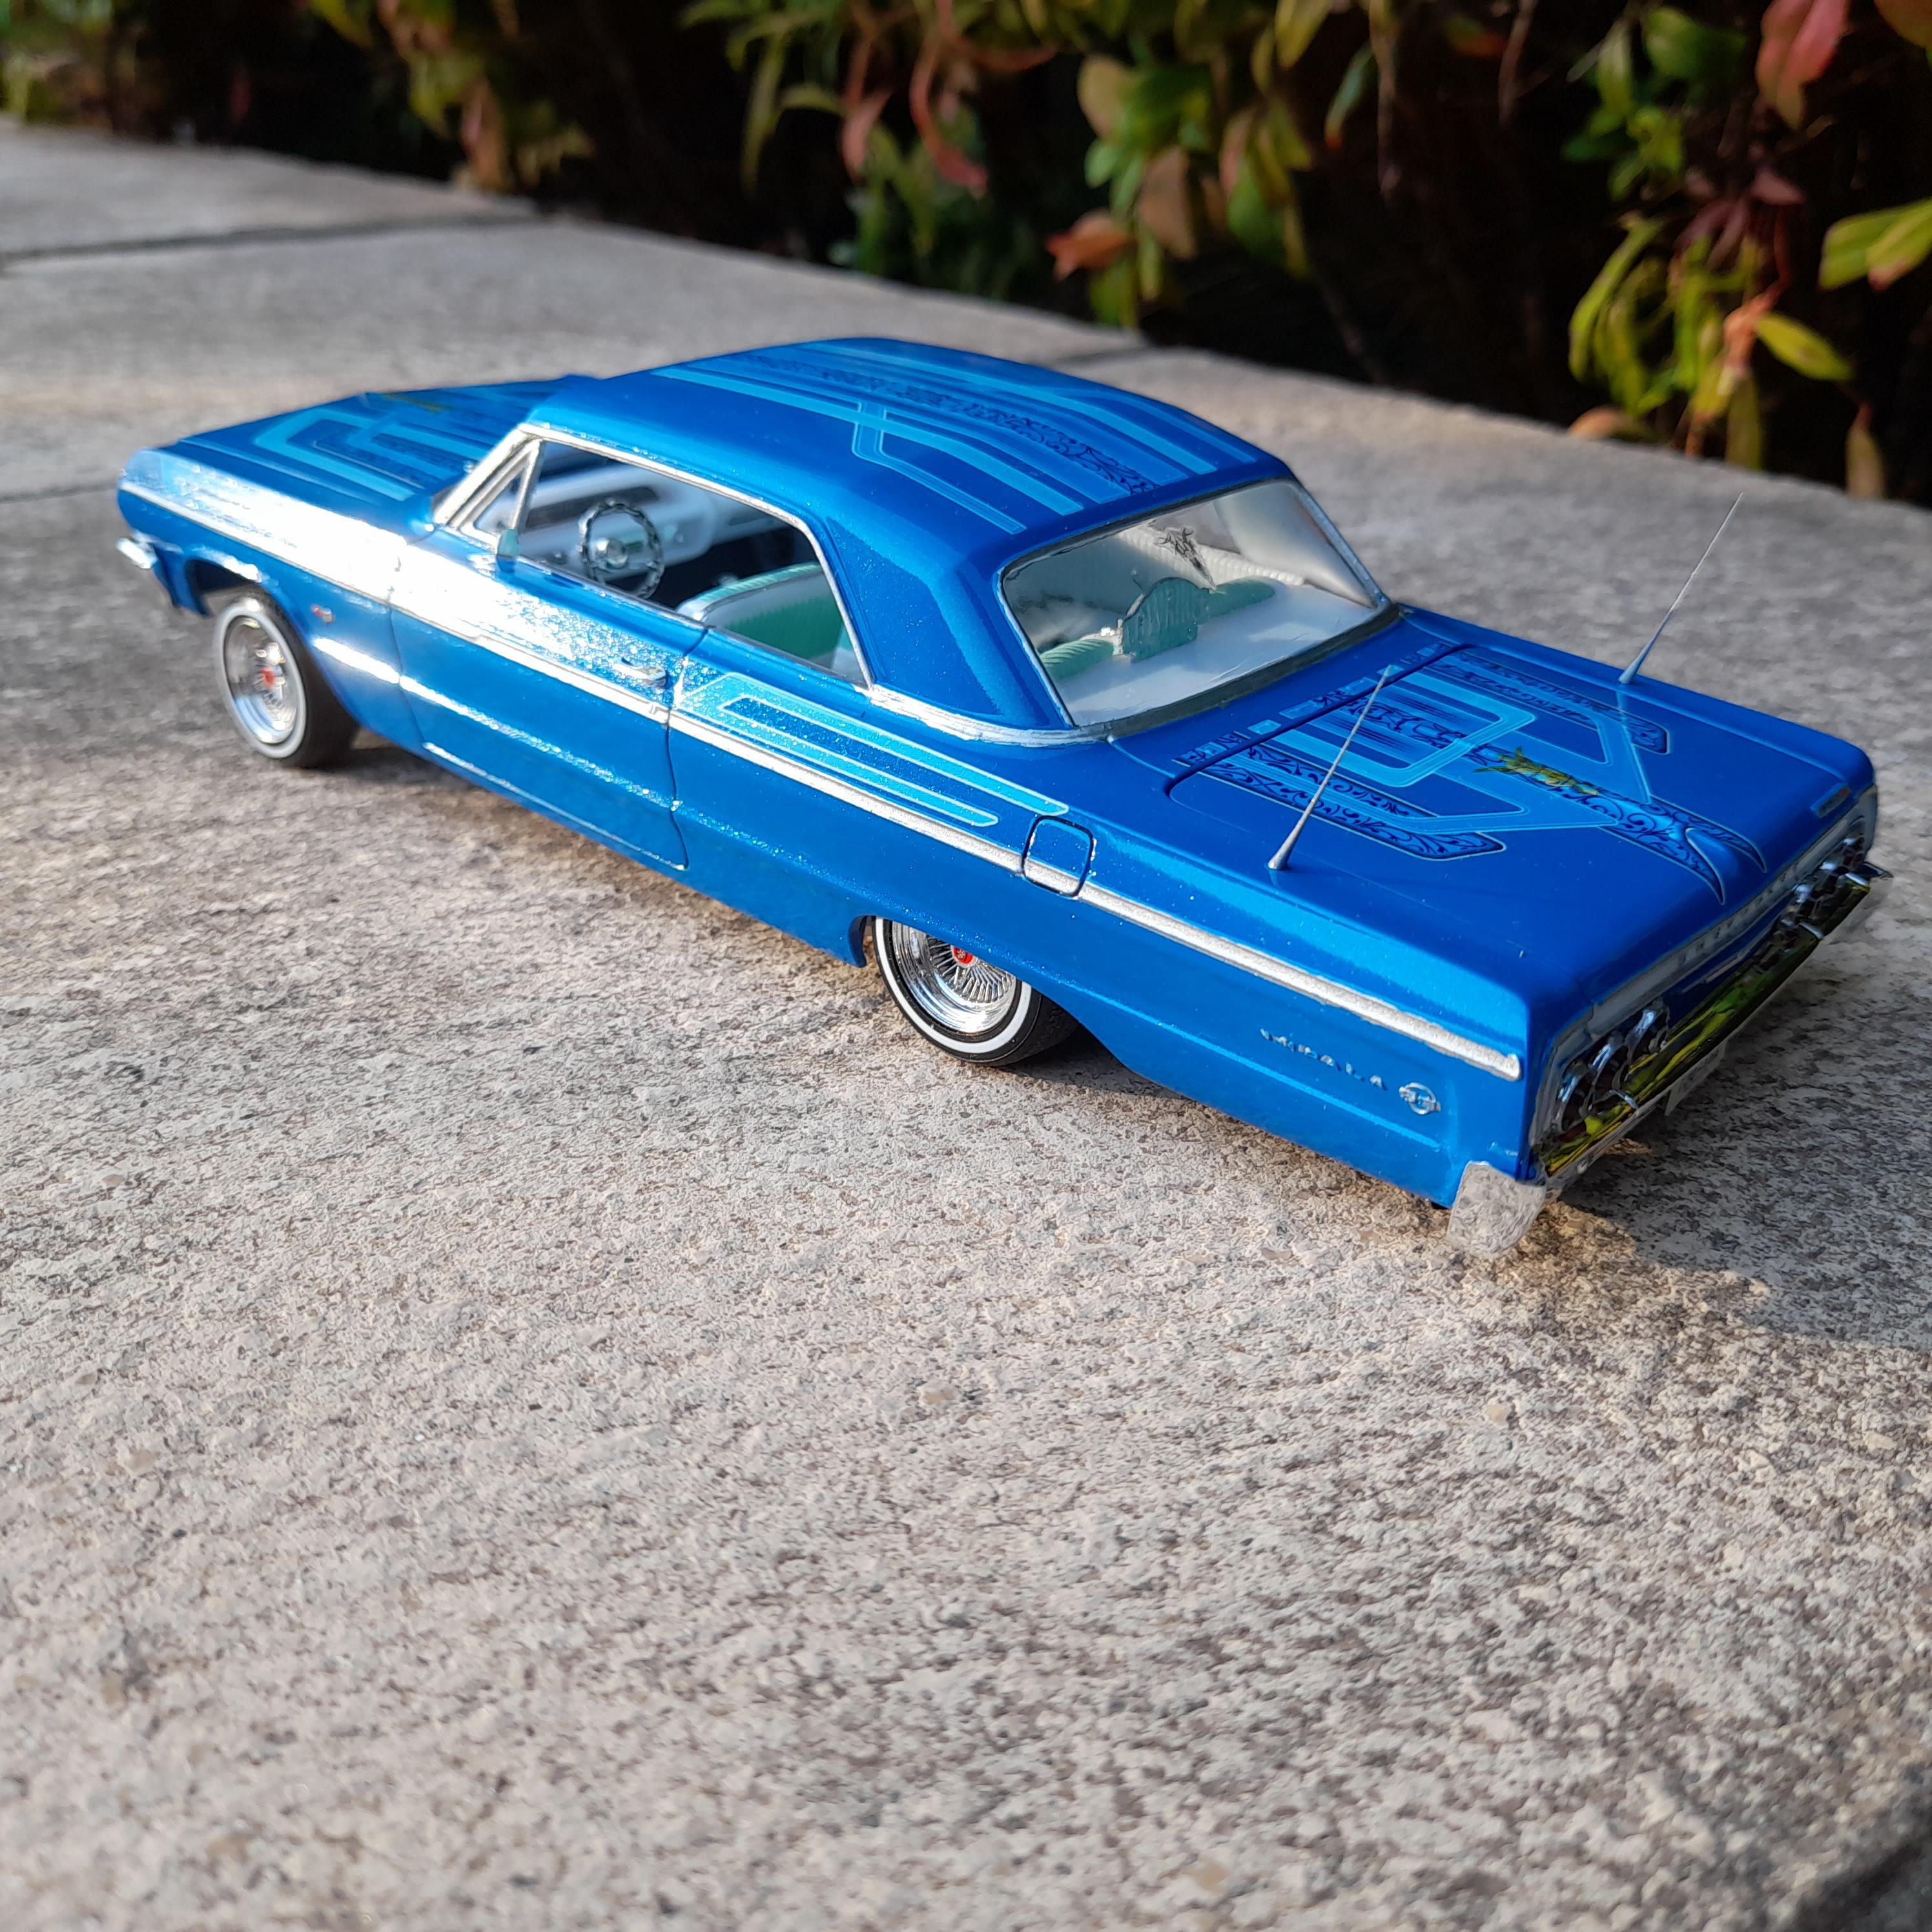
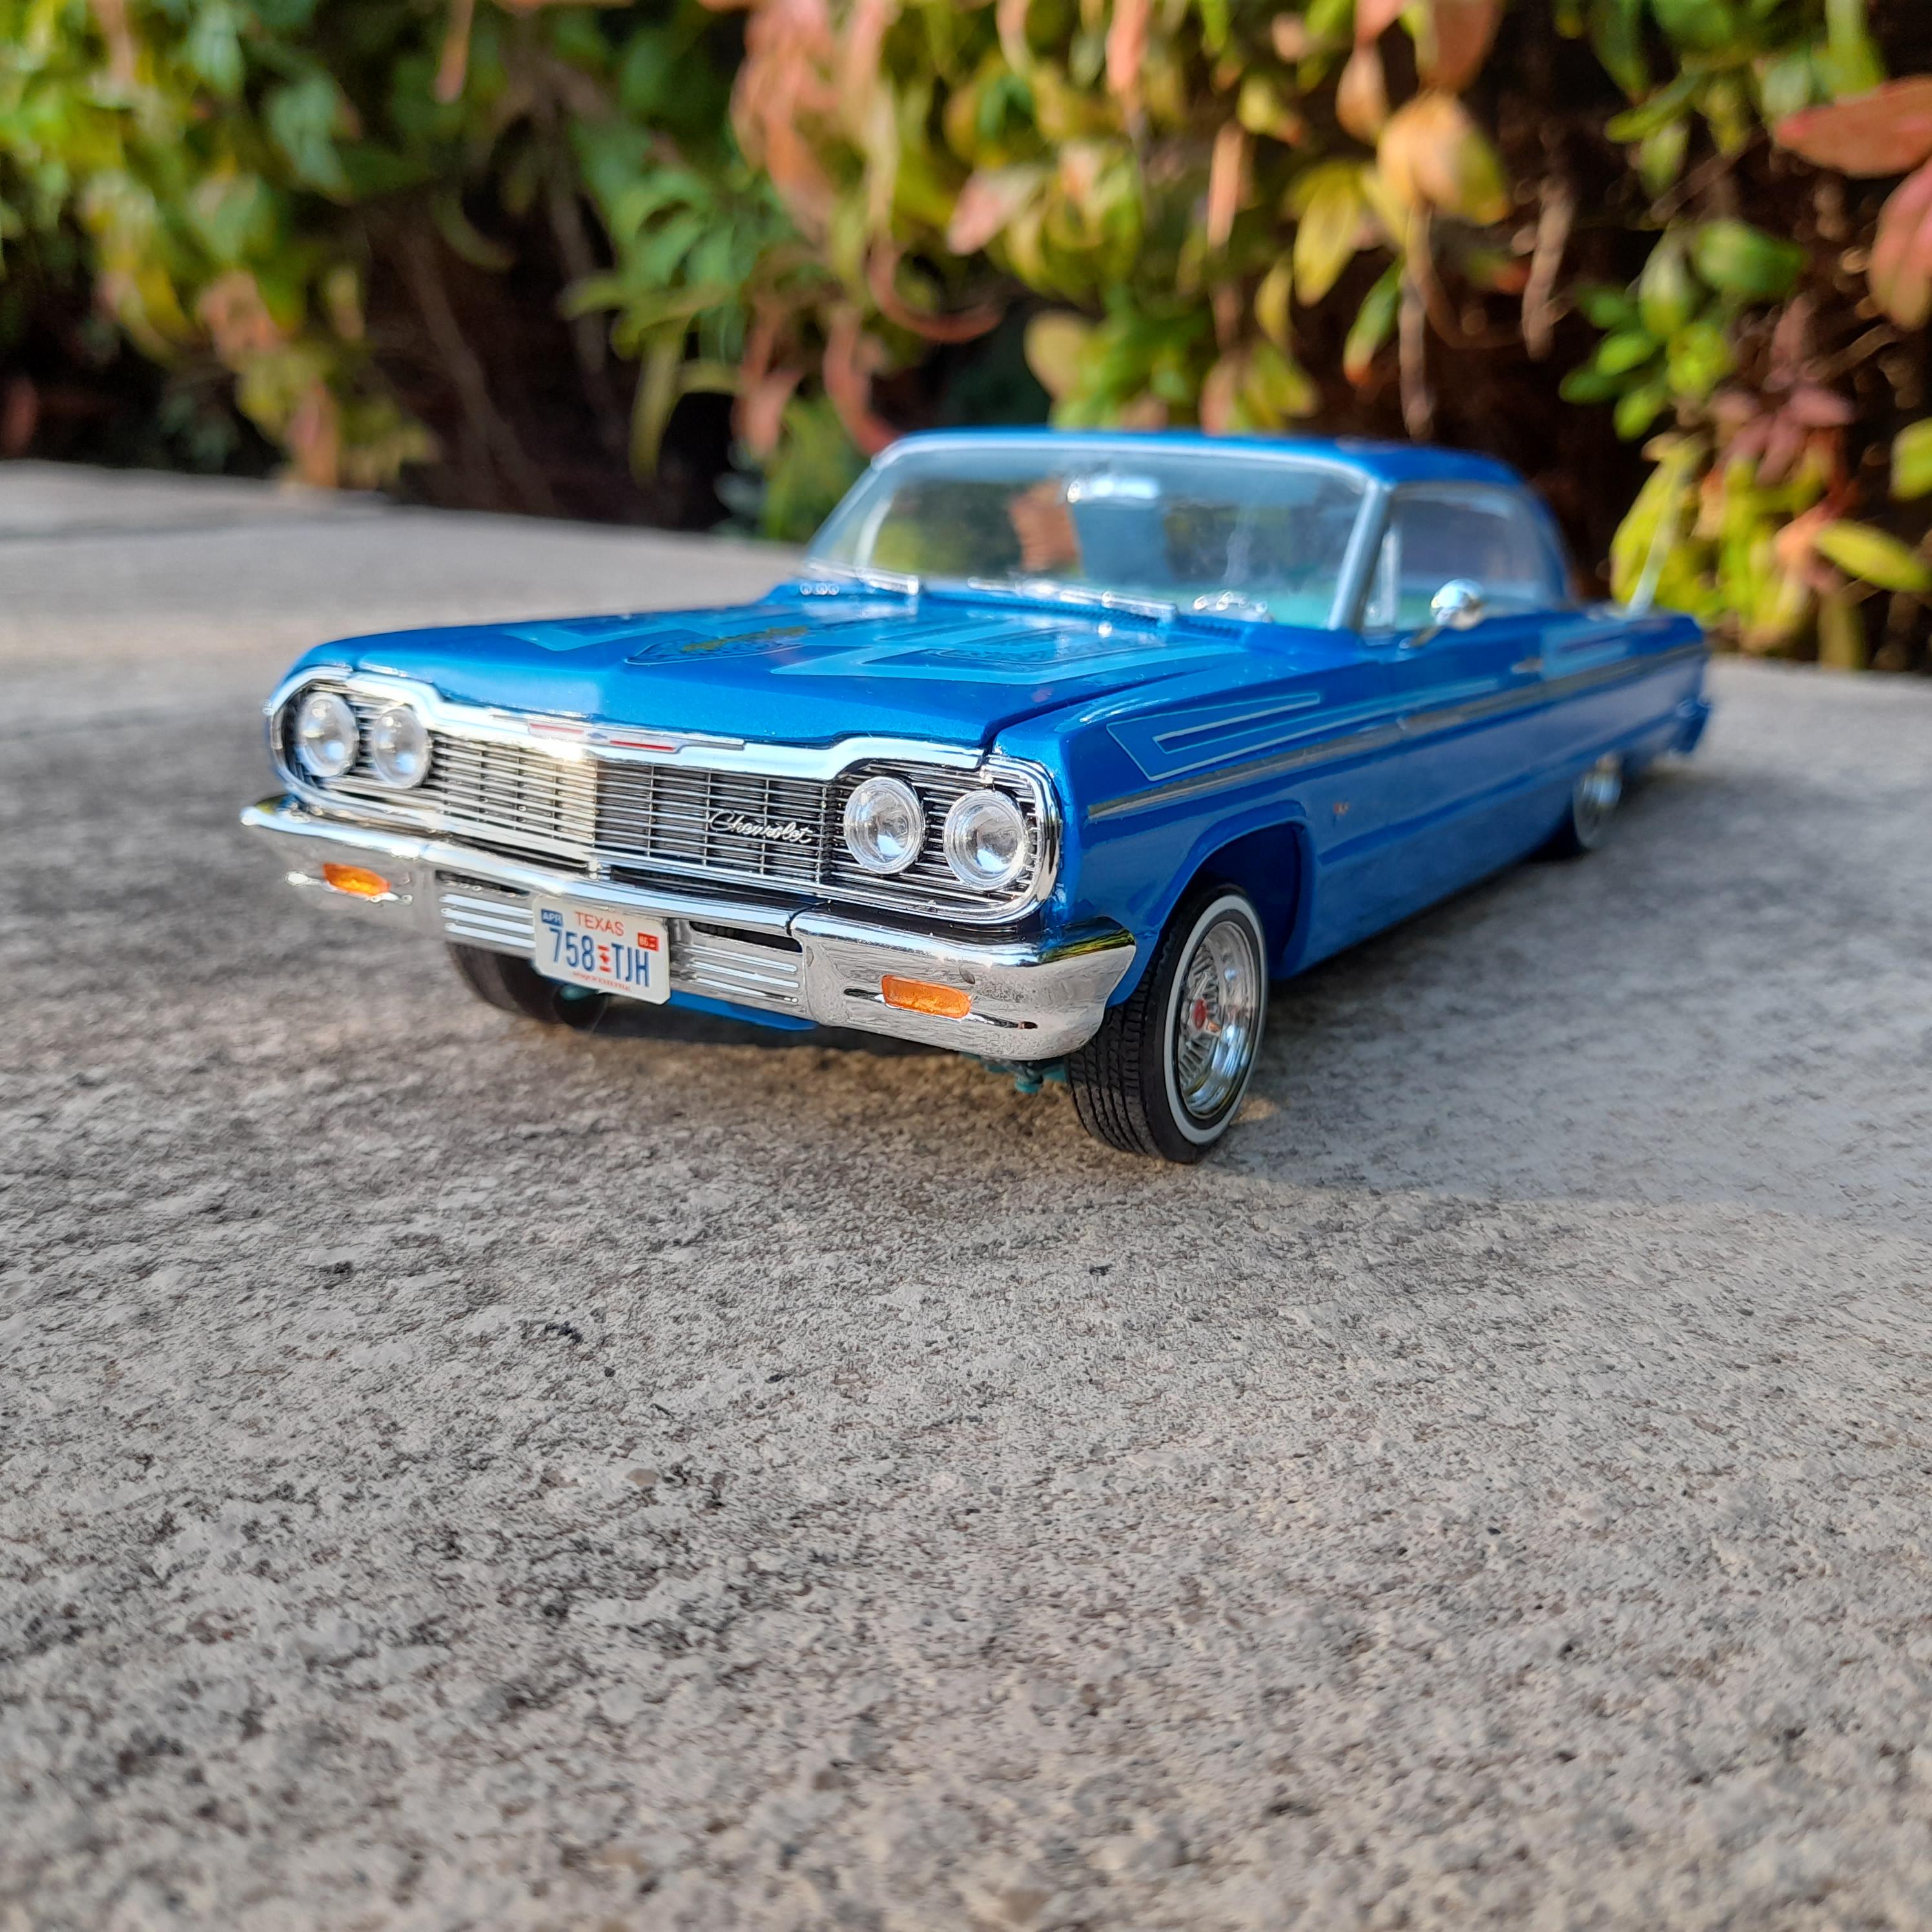
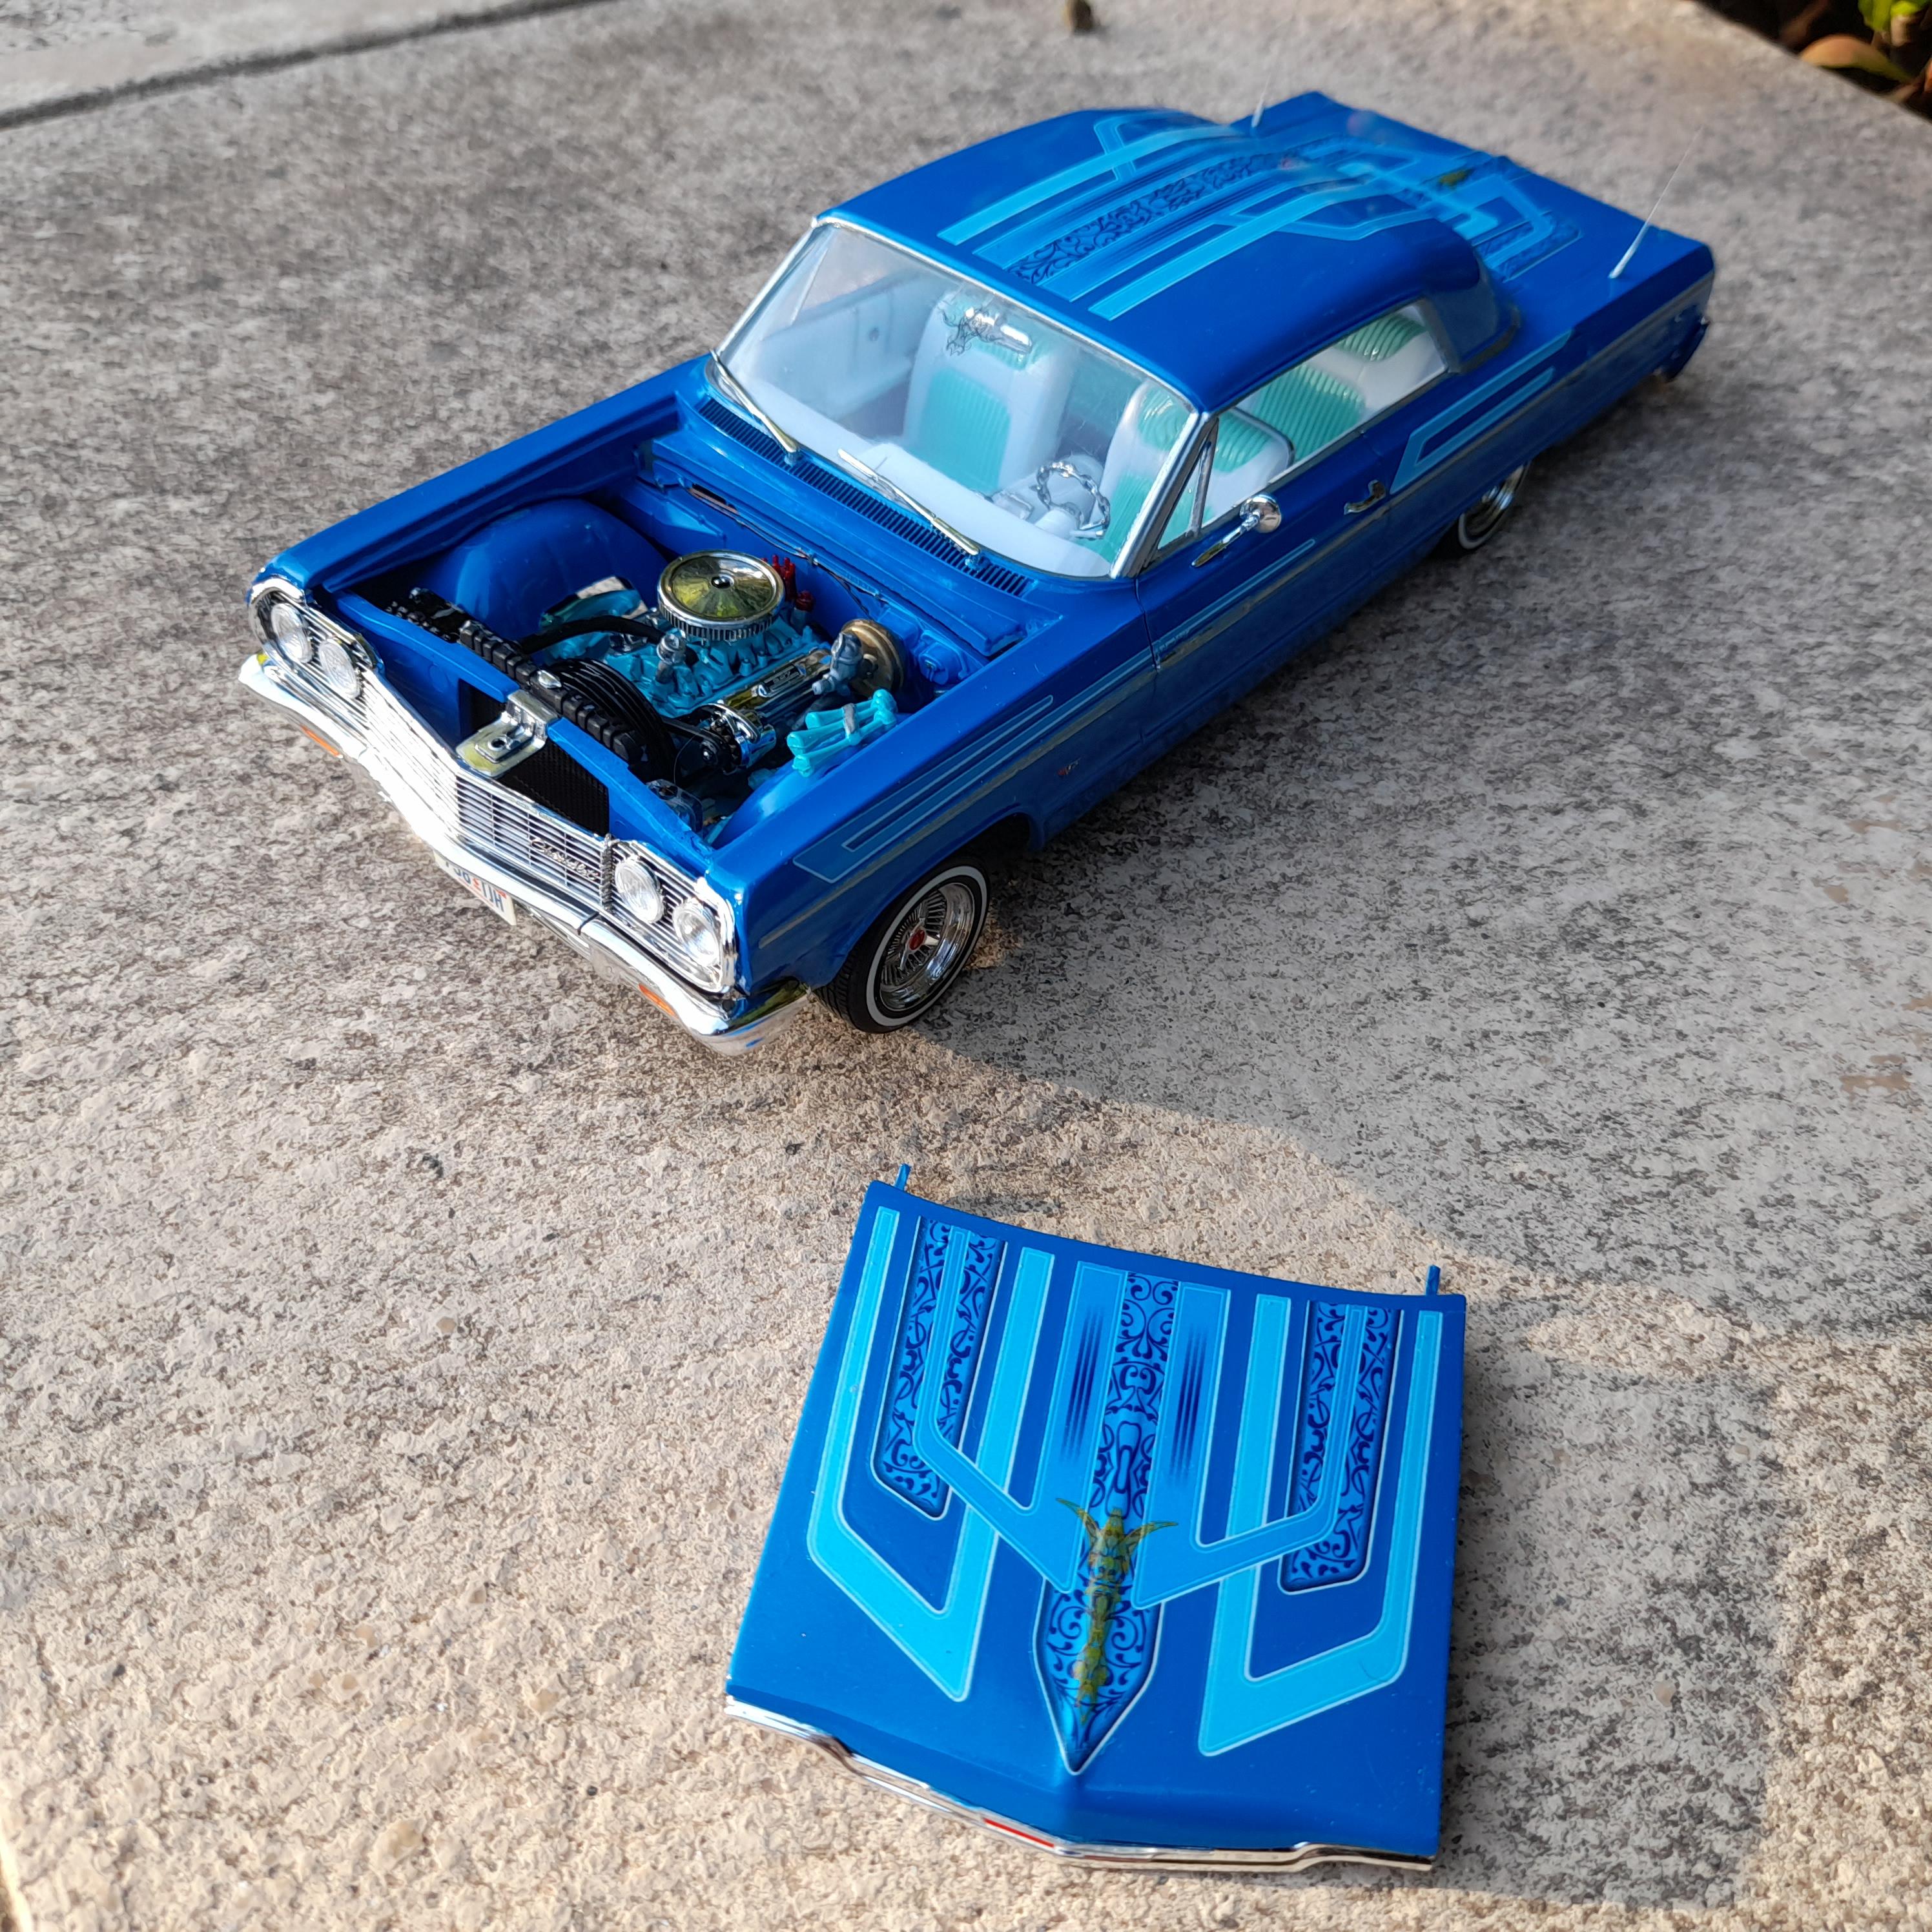
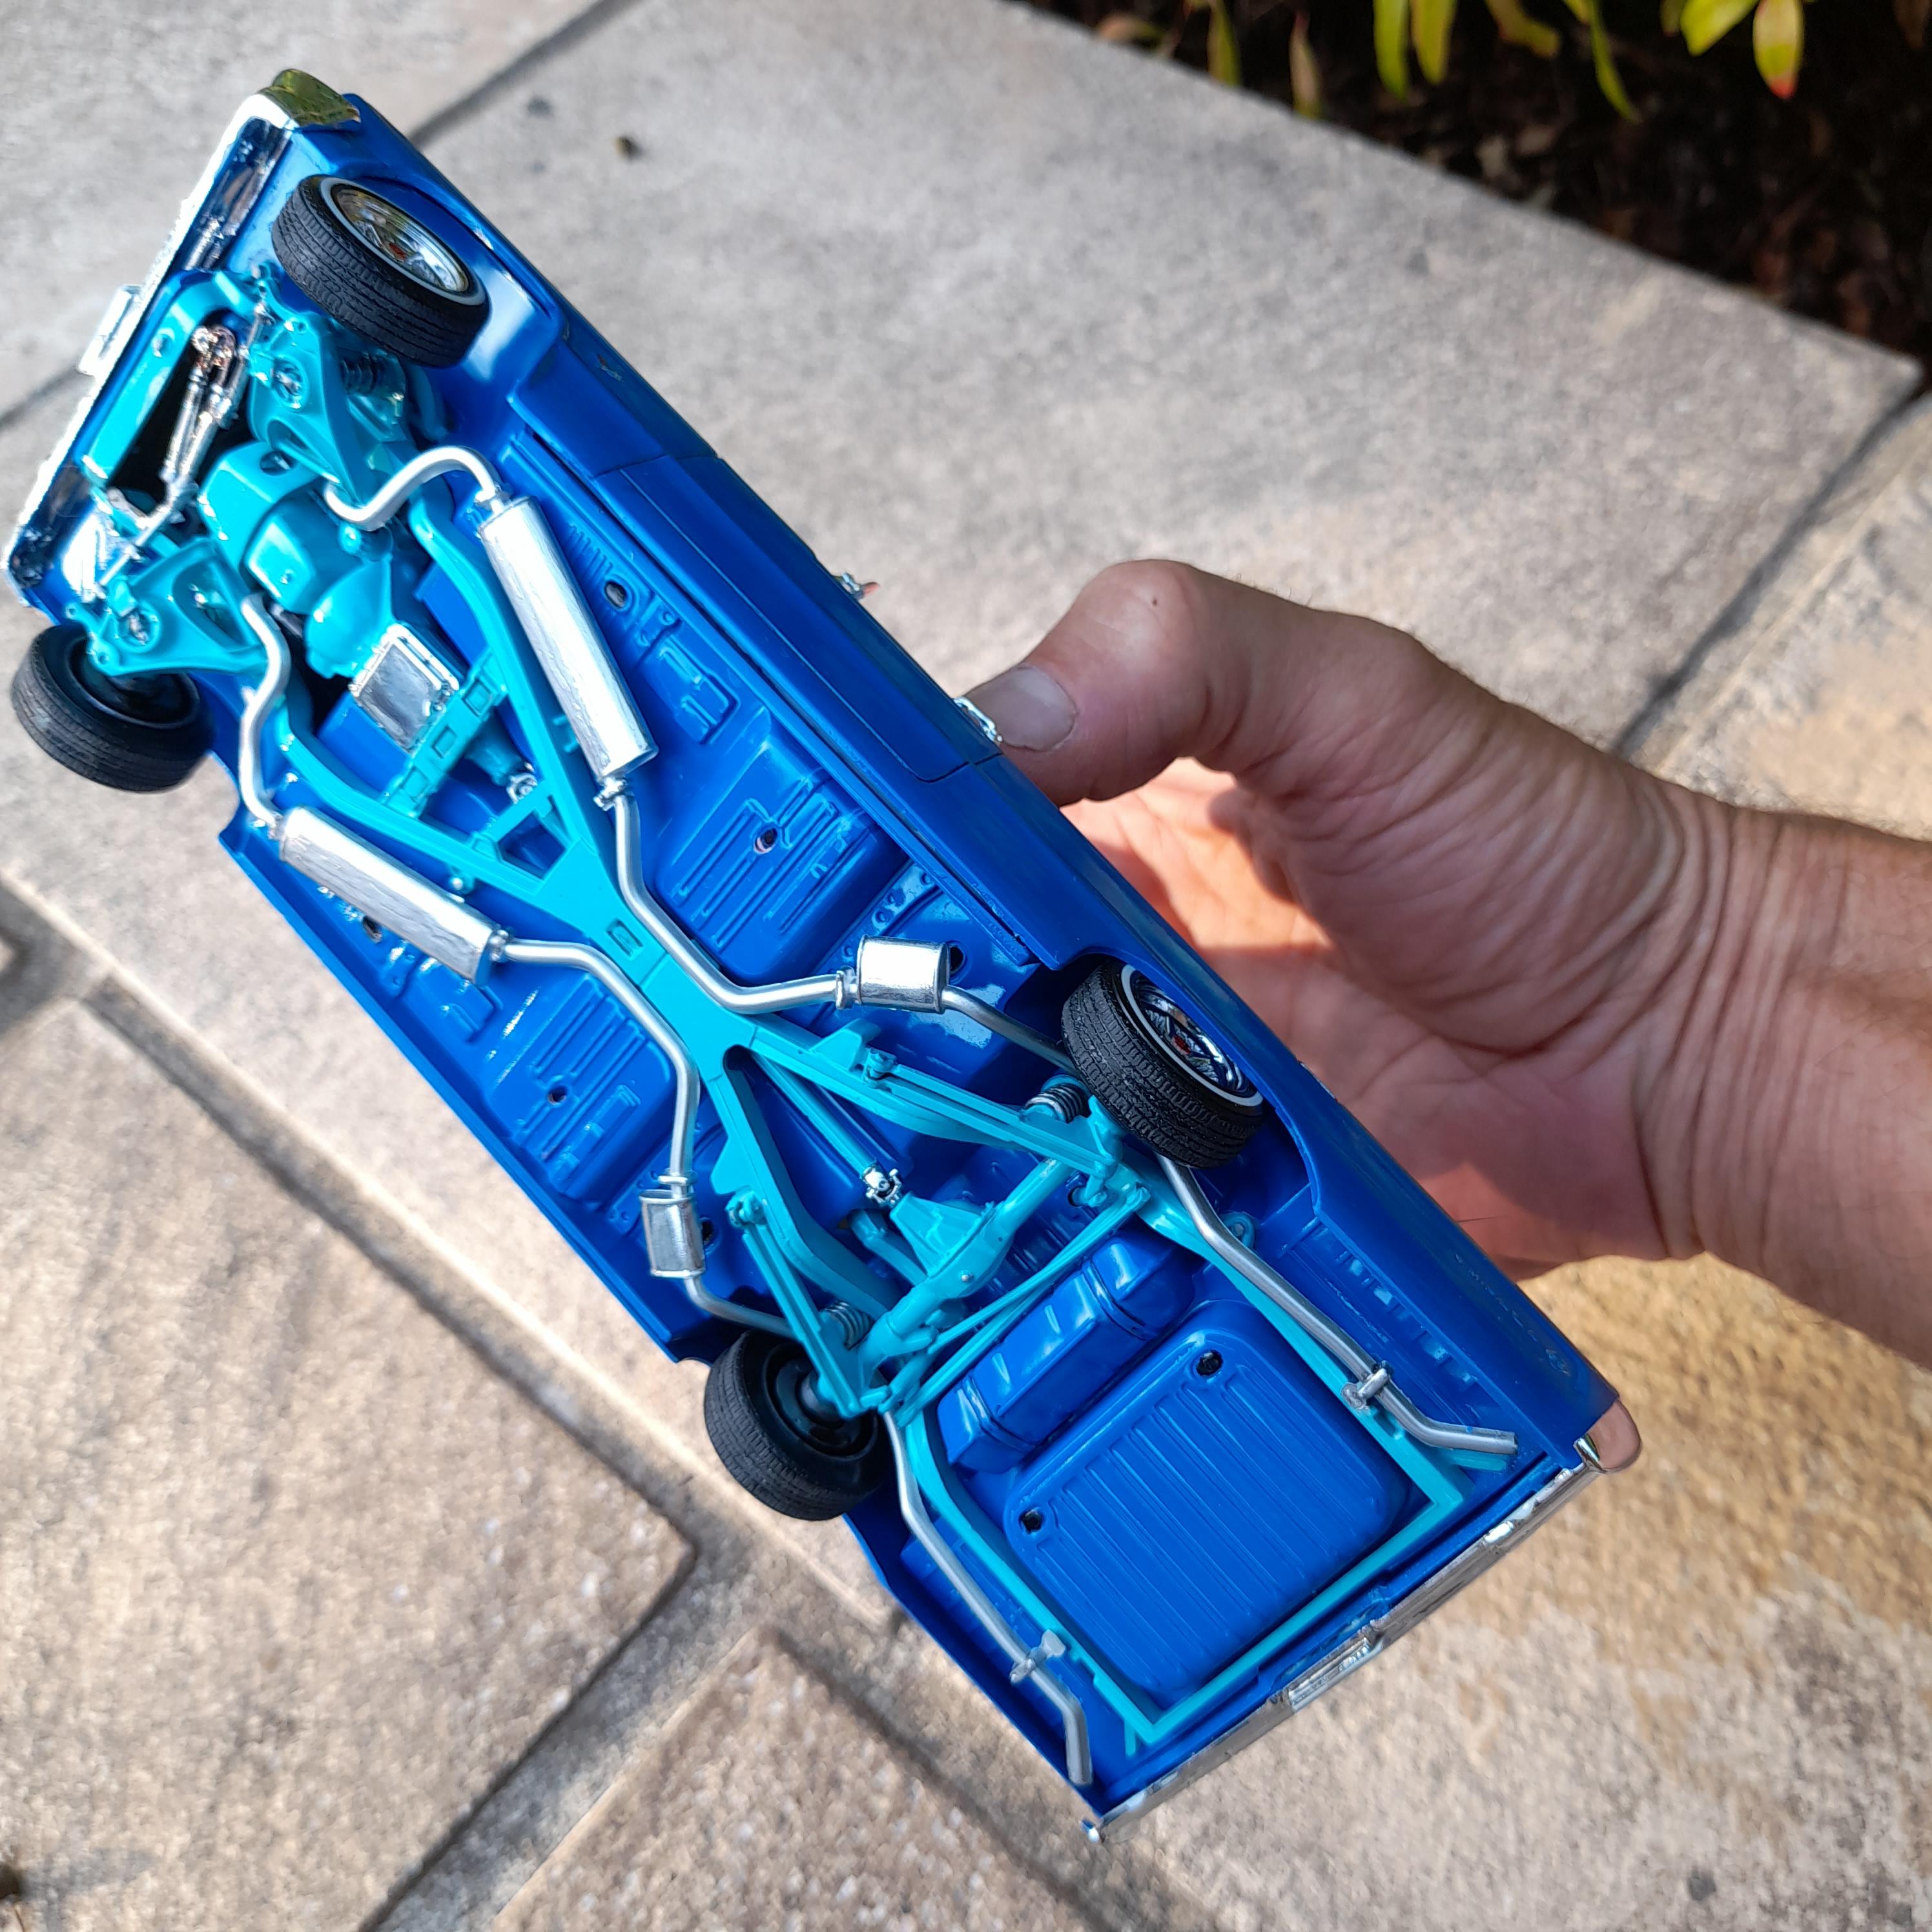
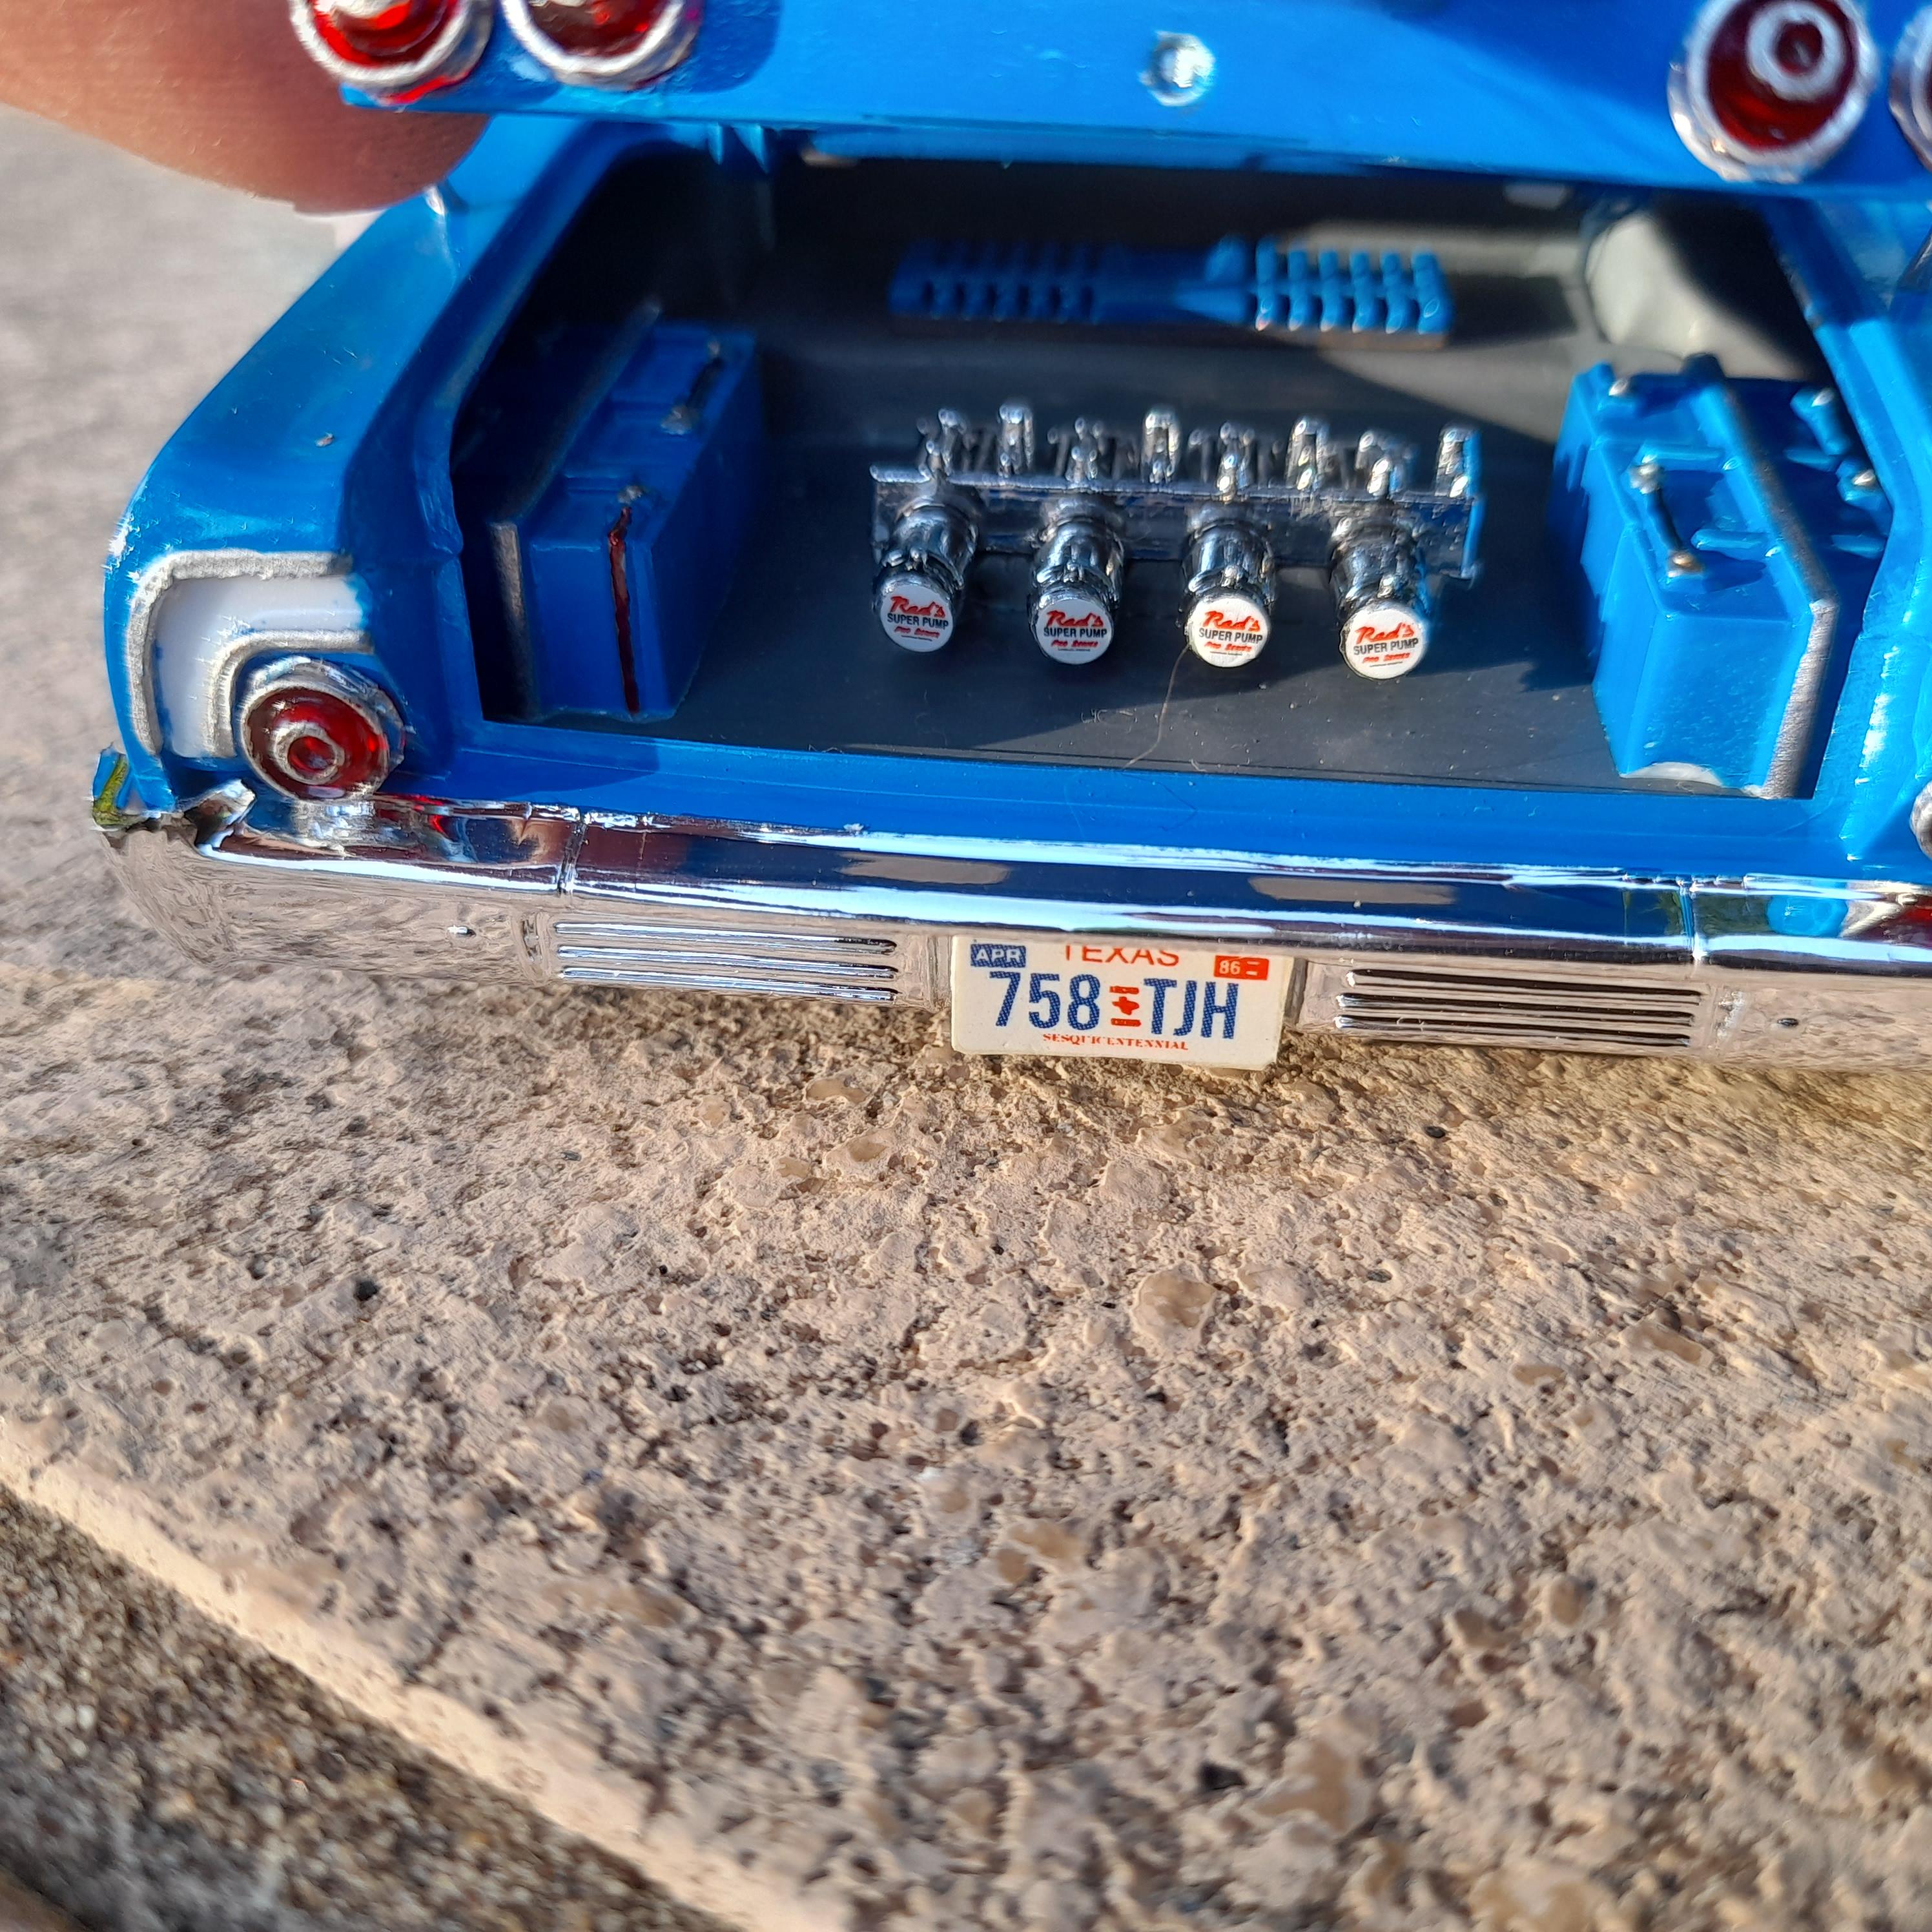
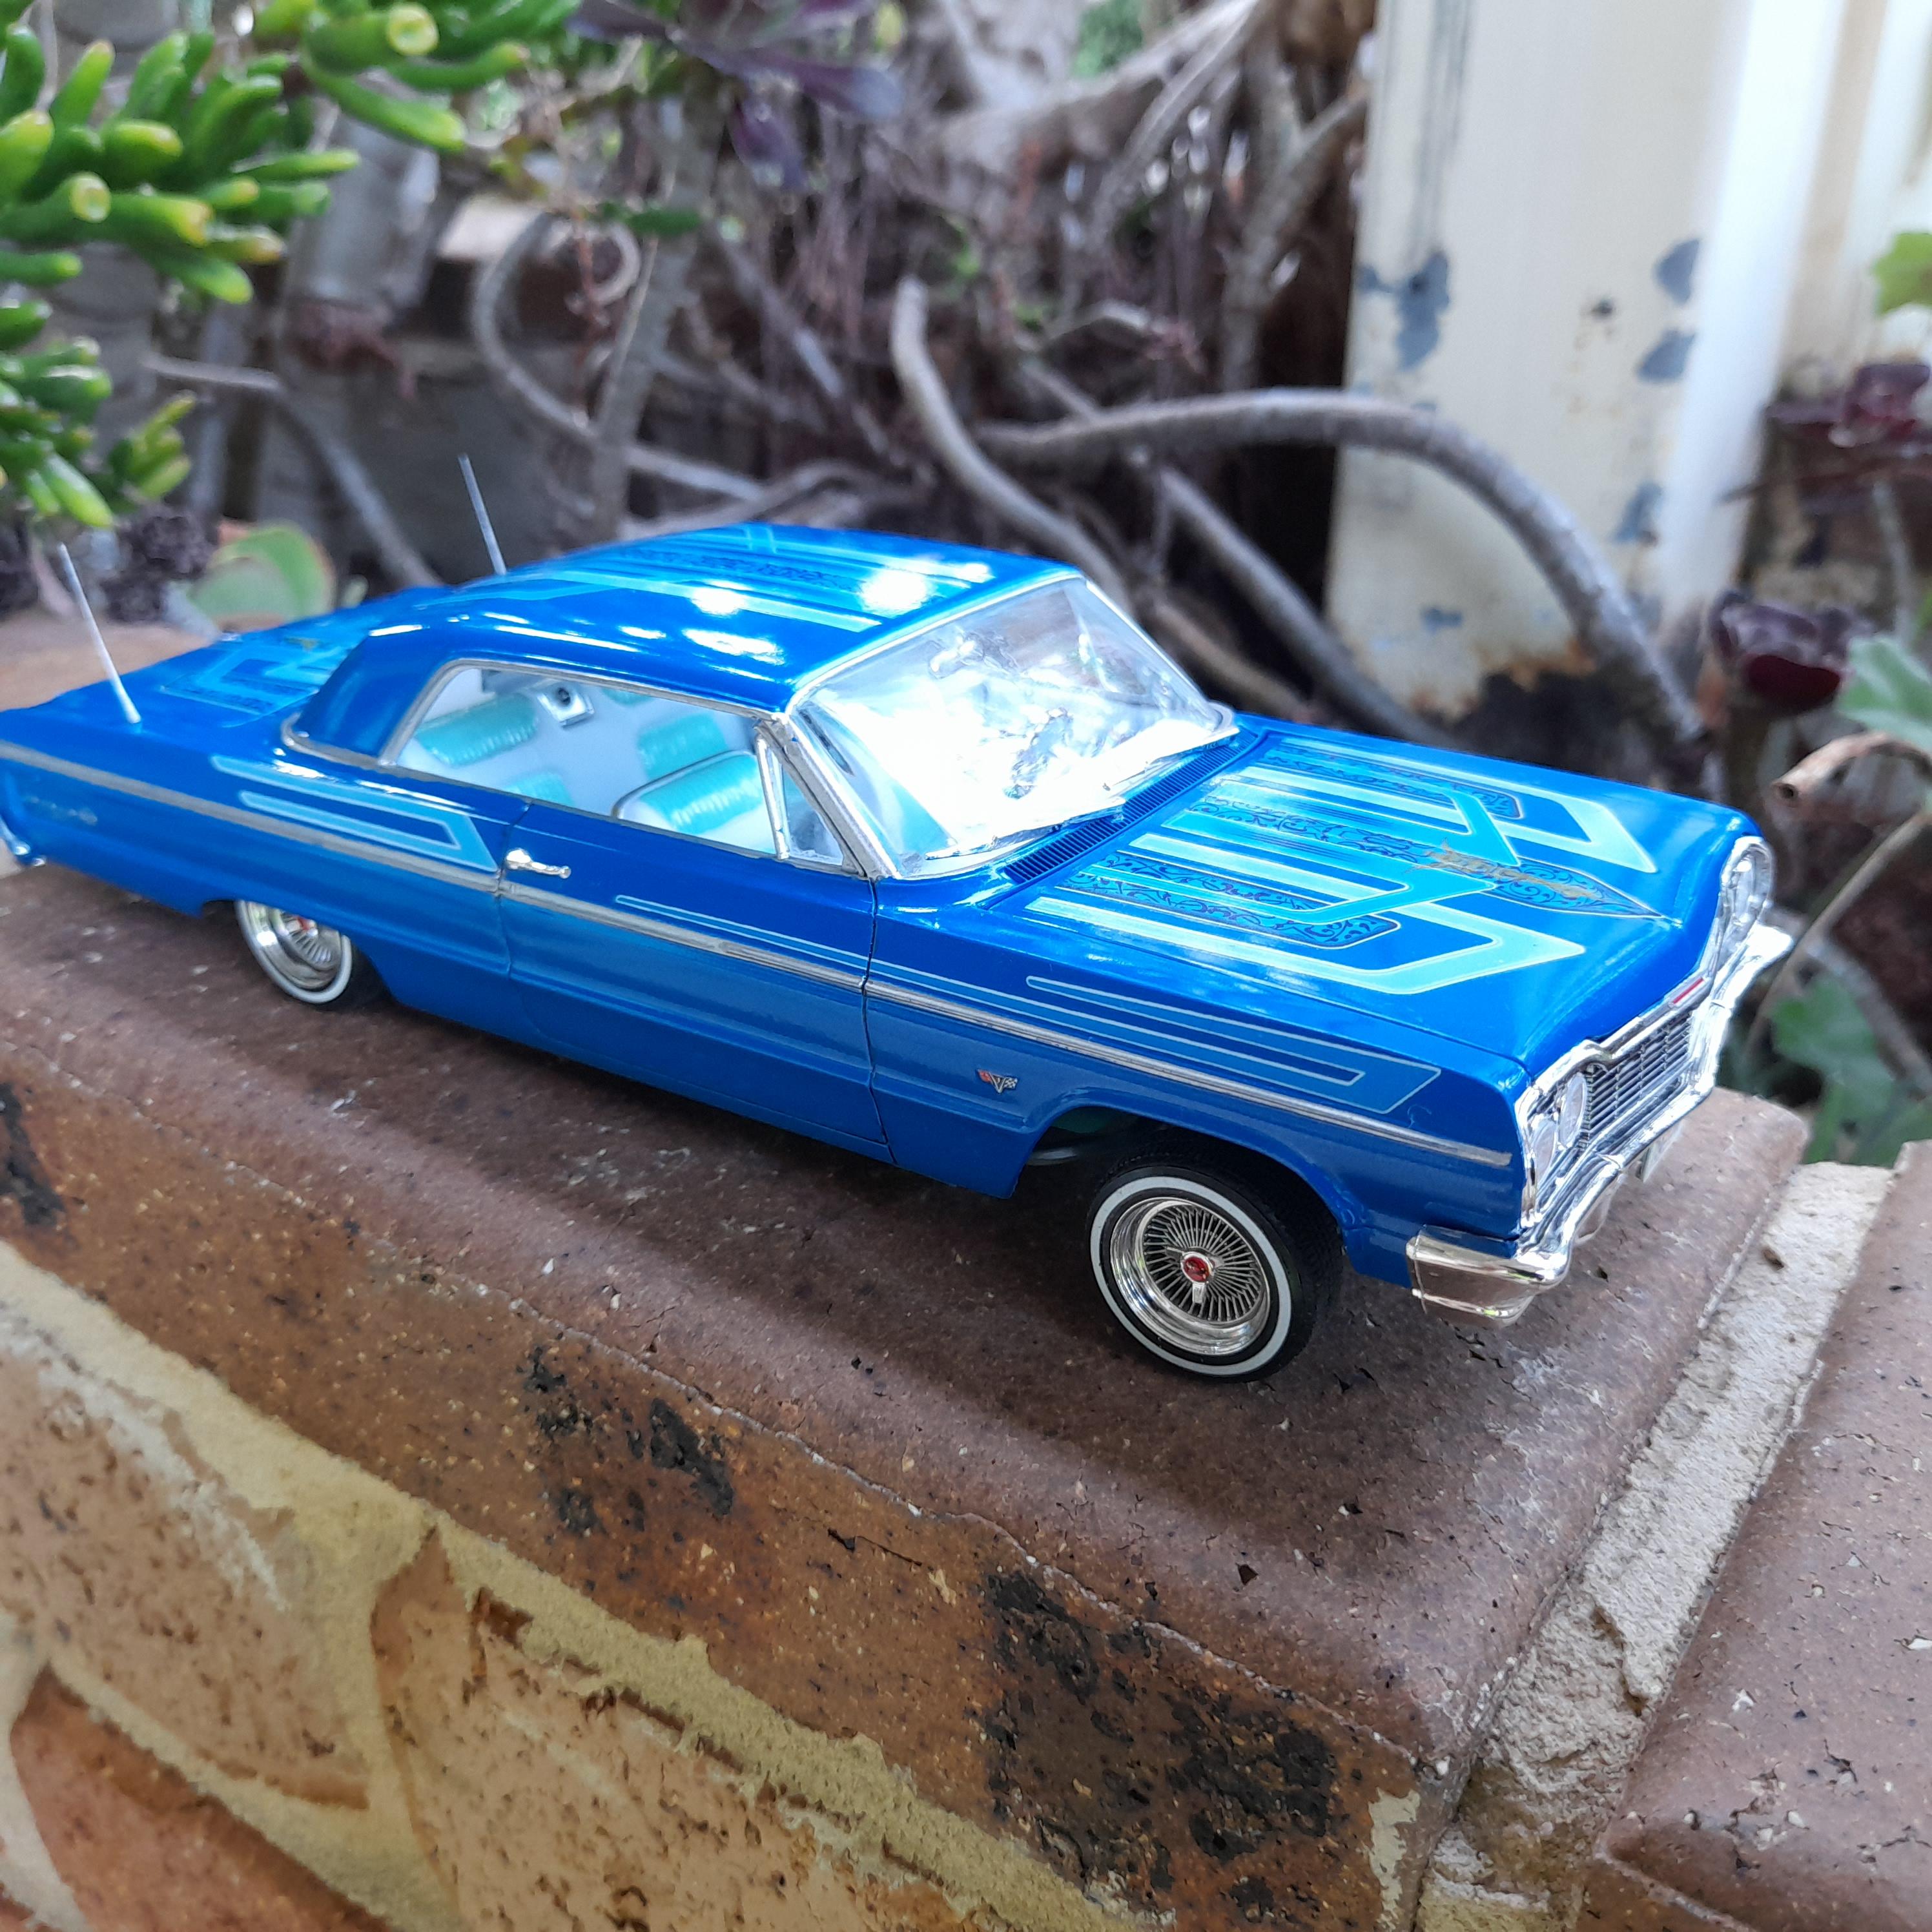
G'day folks, today I finished my version of the Revell 64 Impala. I'm quite happy with the result. I only have one issue with this kit and that's the tail lights. To me they look a little out of scale, i.e. too big and different sizes. Overall this kit goes together well. My only regret was when I got glue from my thumb on the front windshield and cracked it when I was buffing it out. Graphics are the decals from the AMT 63 Galaxie kit. Everything else is oob except for the twin antenna. Thanks for looking and as always all feedback is welcome. Cheers, David. 😎👍
-
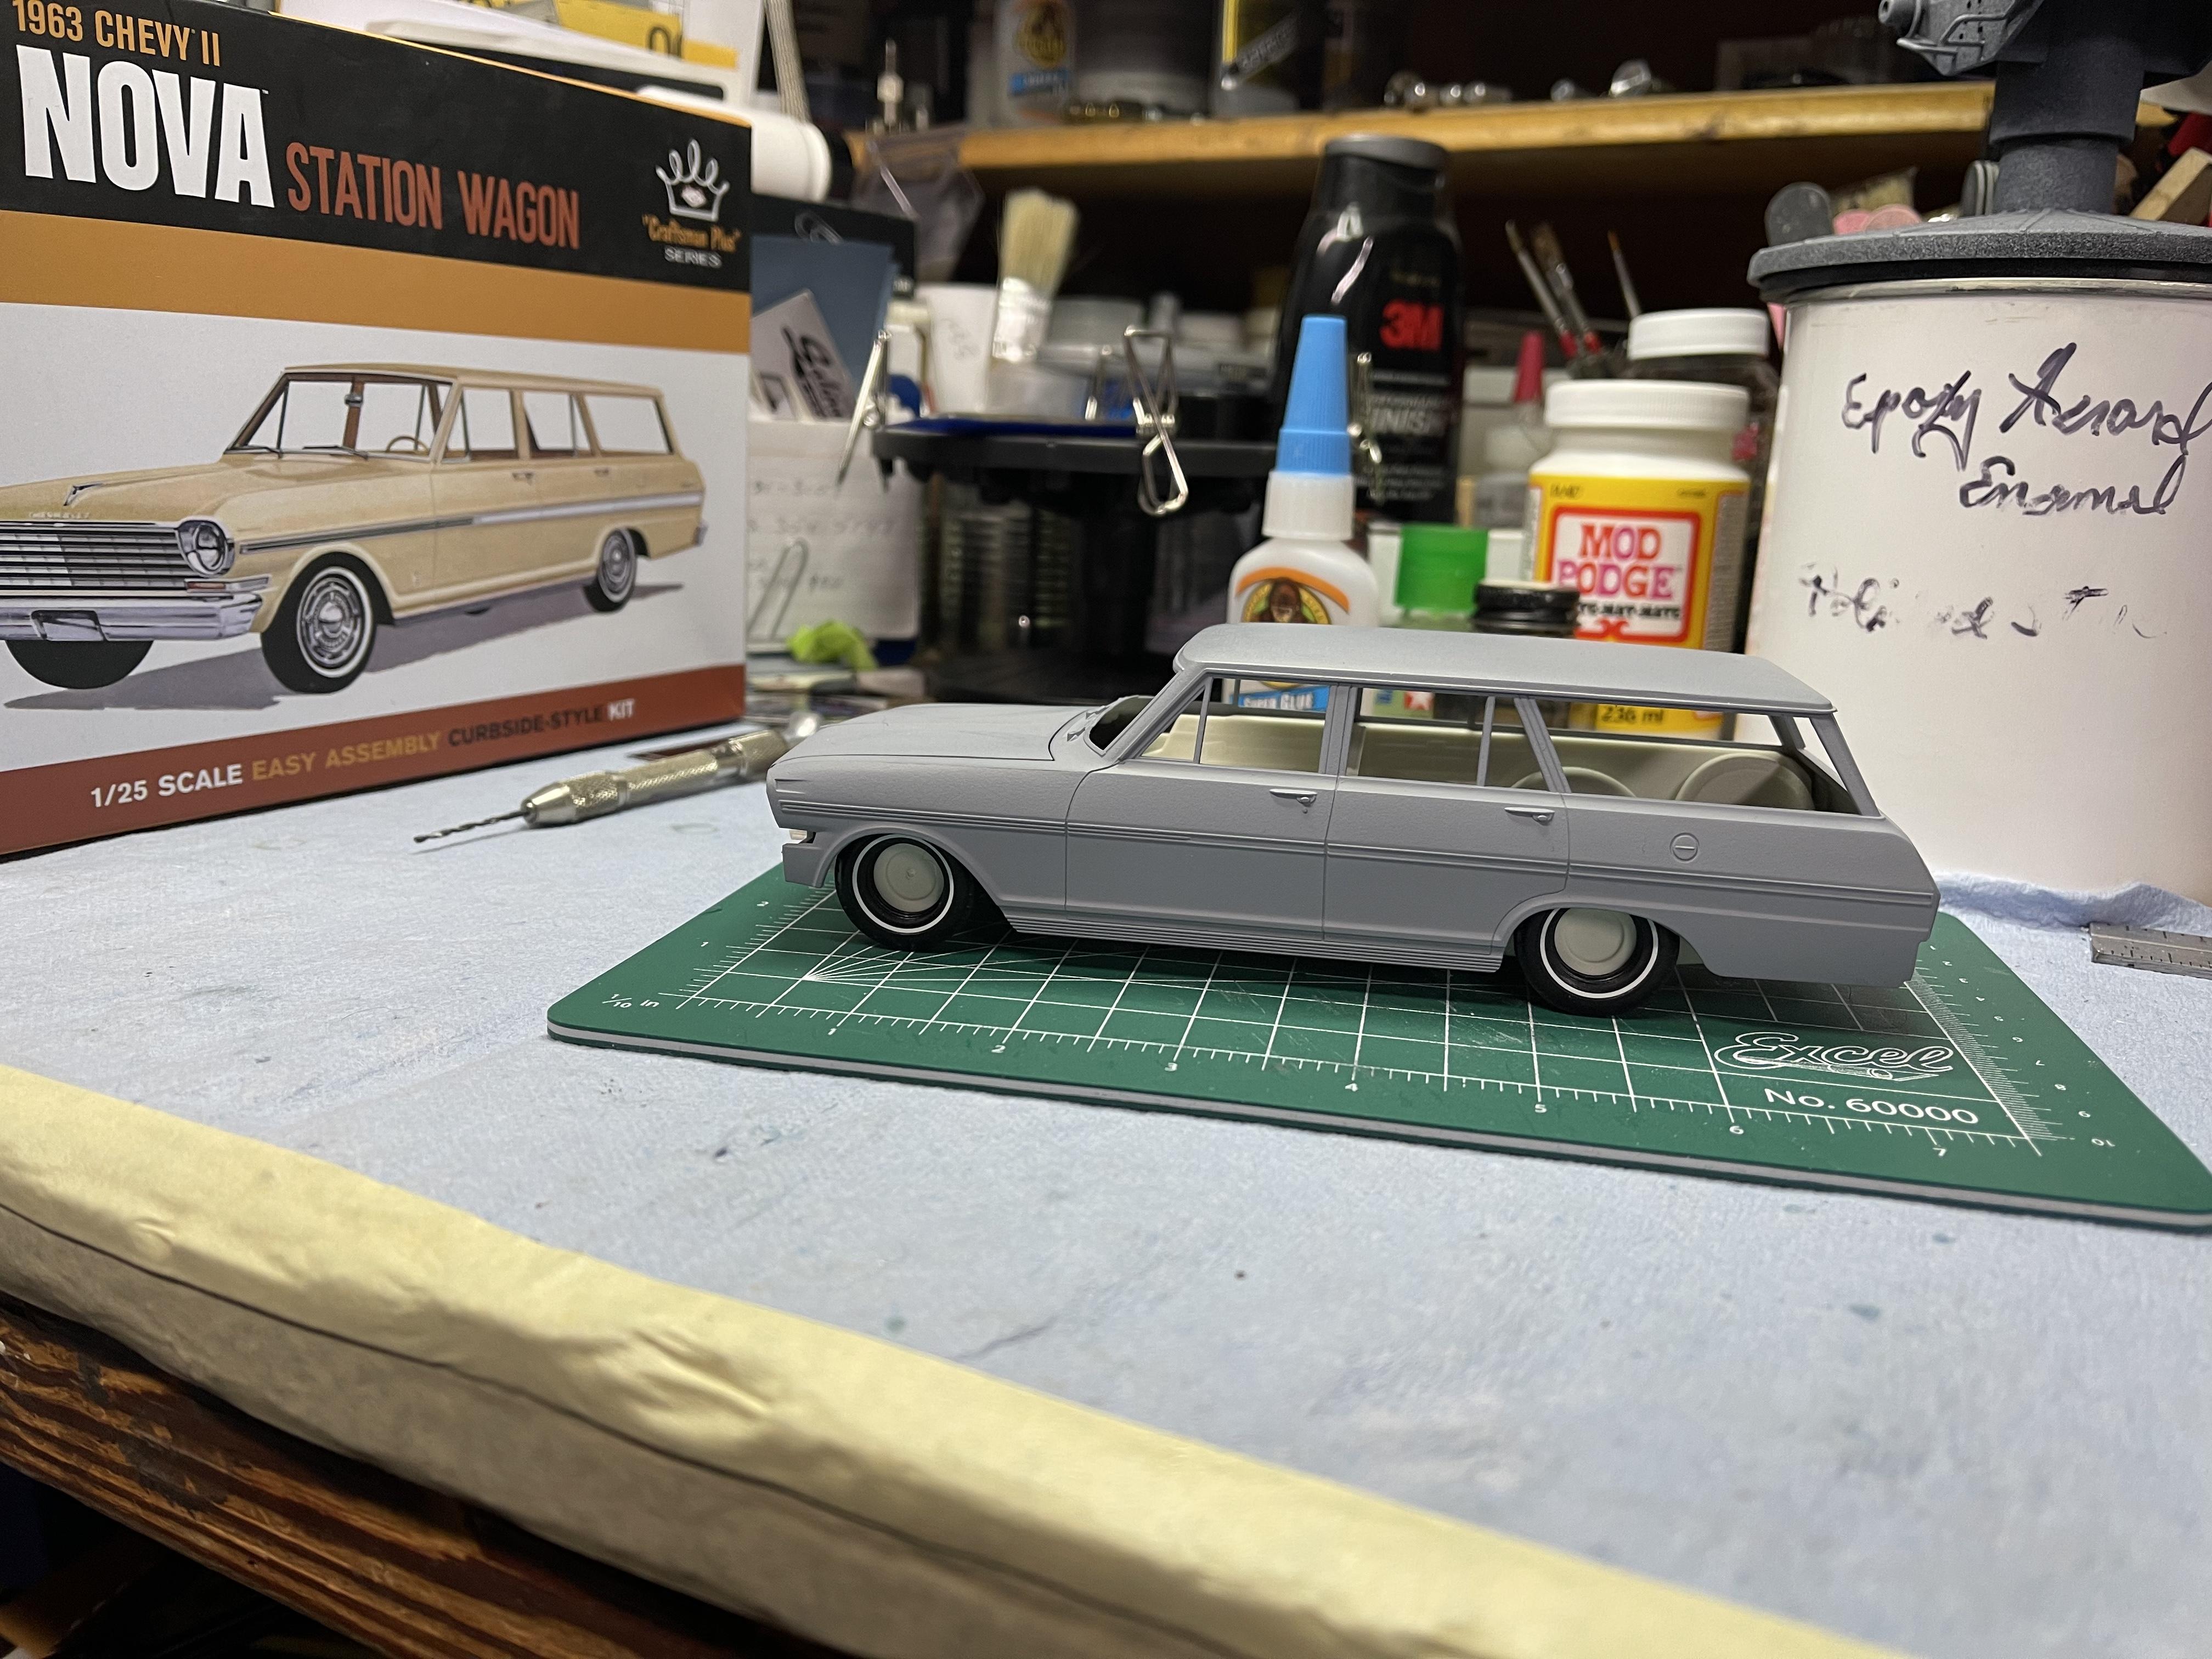
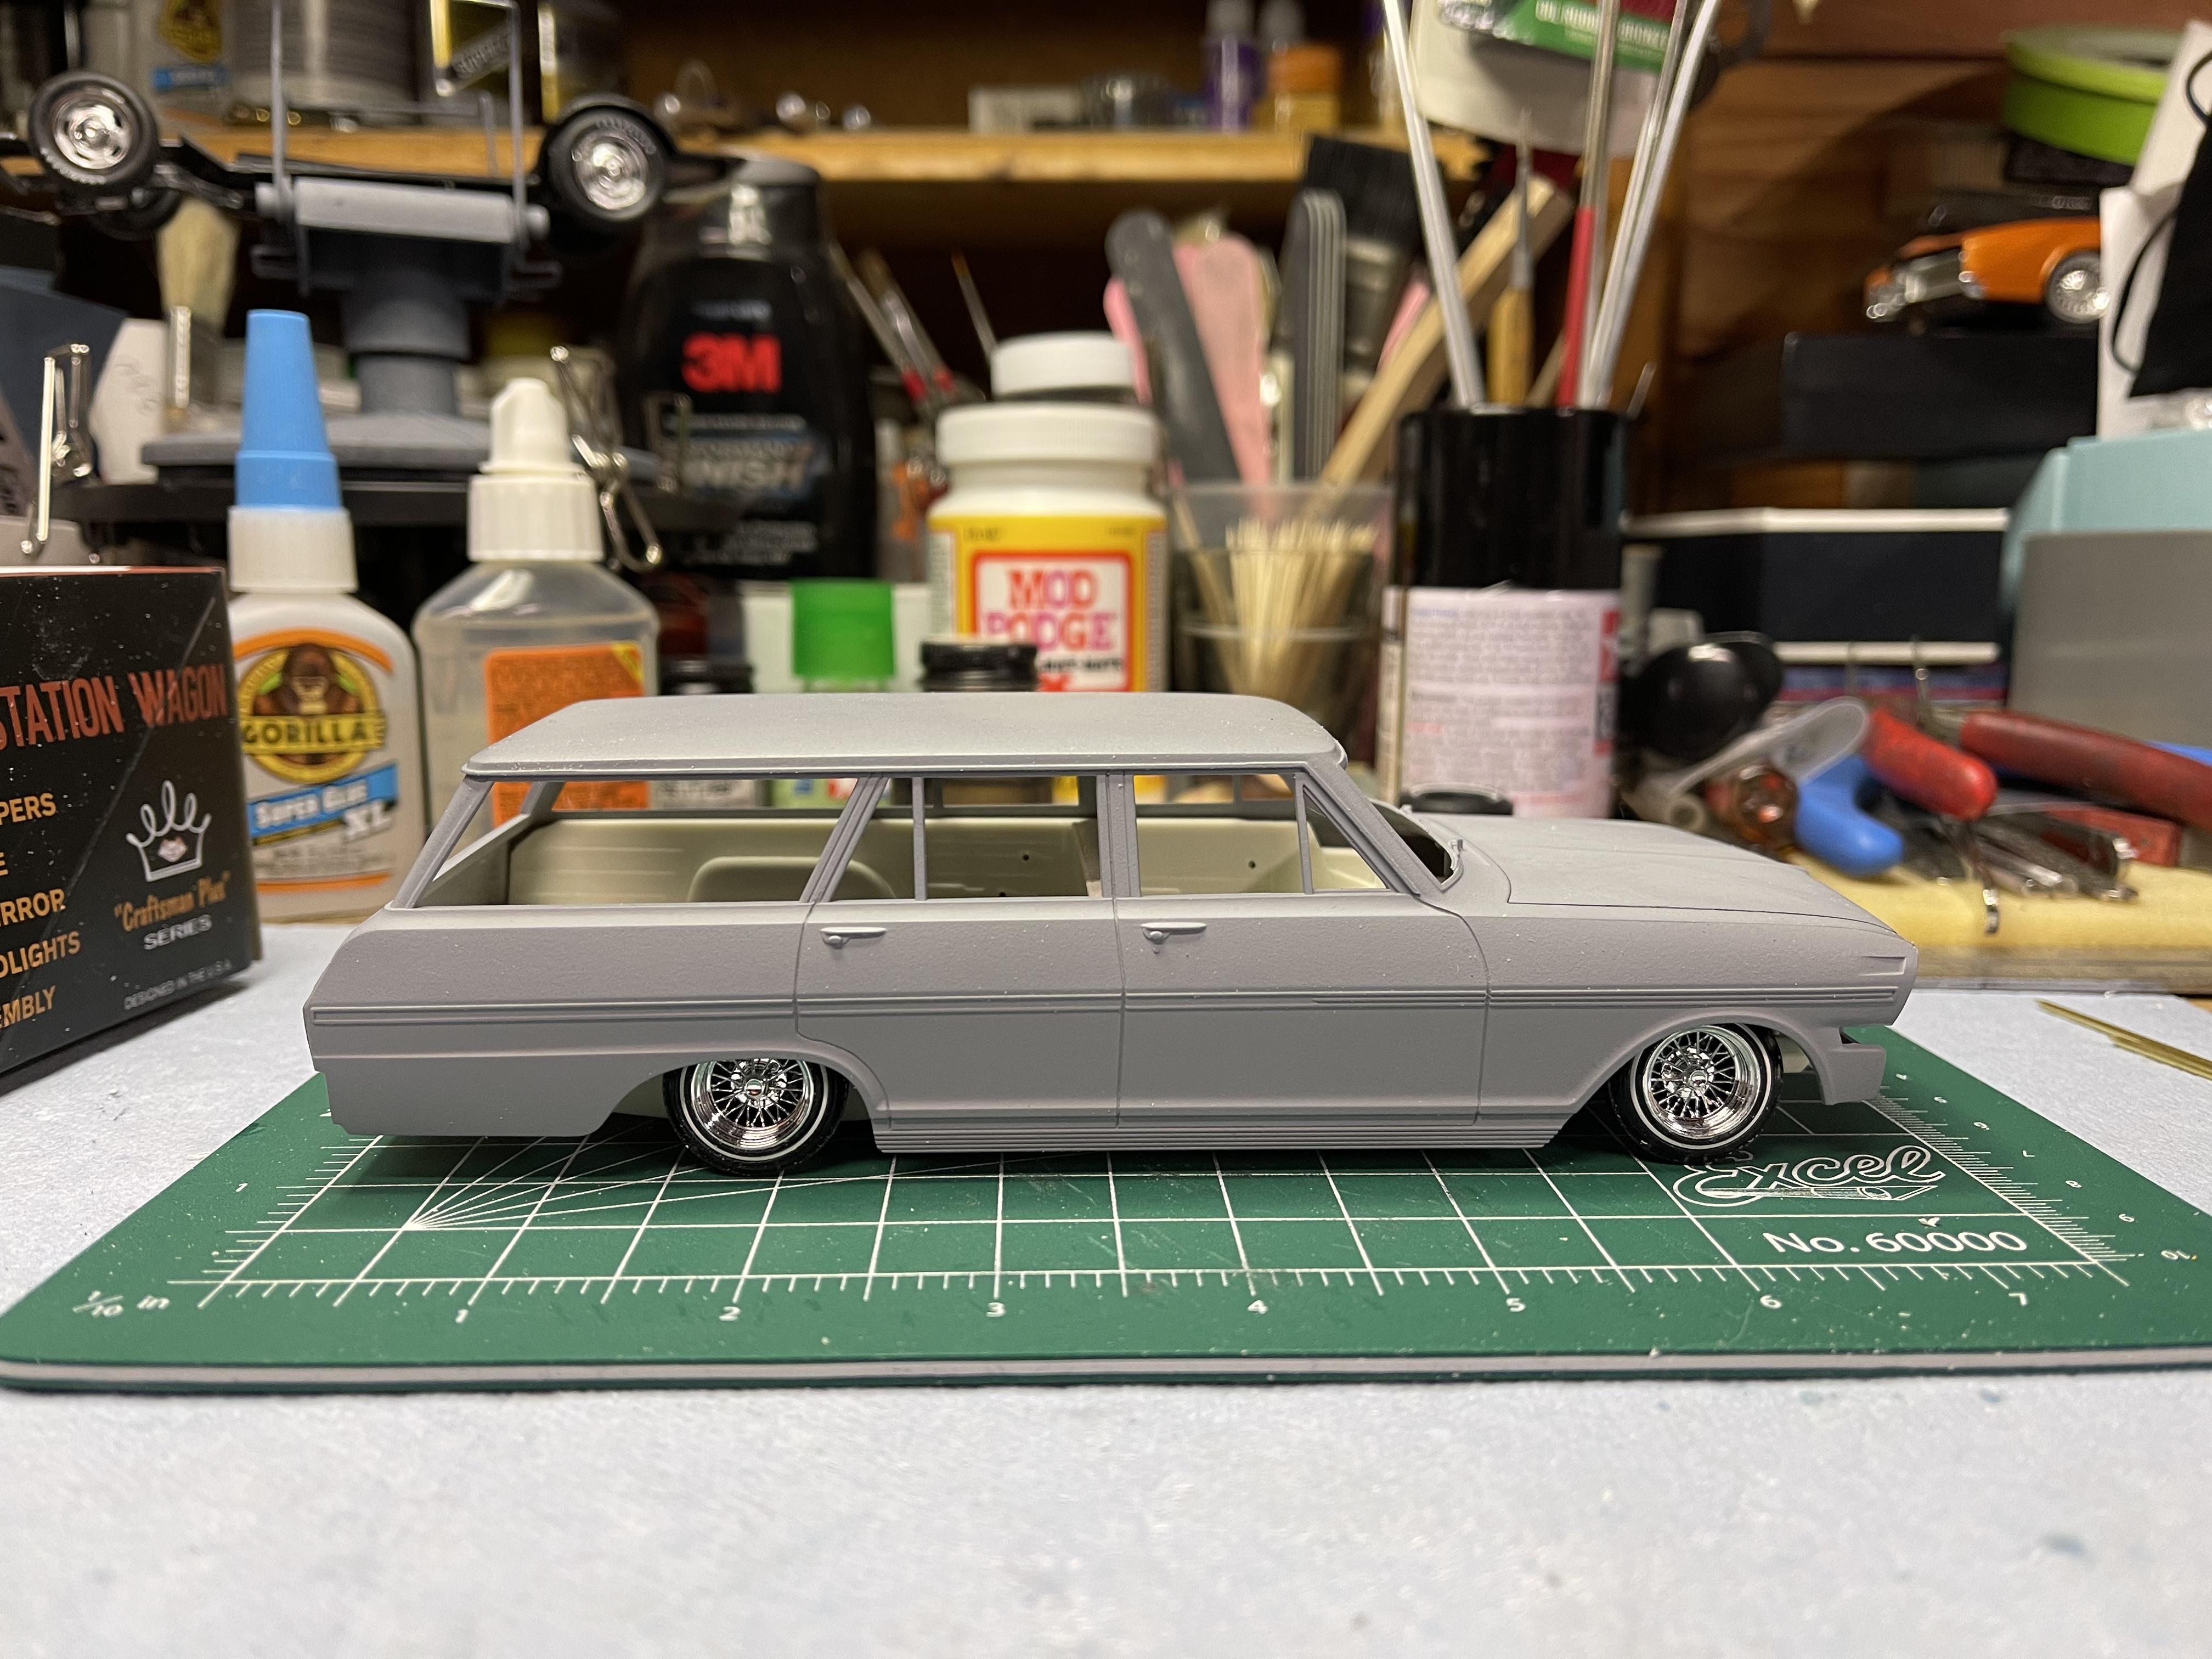
Started on this for an Instagram Buildoff, been a slow start but luckily this is going to be a curbside build. So far I’ve spent the most time in cleaning up the body, scribing, removing some mold lines, blocking out some flash lines. I think I’ve got the height where I want it, adapted some loweridermodelcarparts 13inch wires set in. Have some ideas for the interior and paint scheme, see how it all goes!
-
Kei C10 Lowrider
Lownslow posted a topic in WIP: Model Trucks: Pickups, Vans, SUVs, Light Commercial
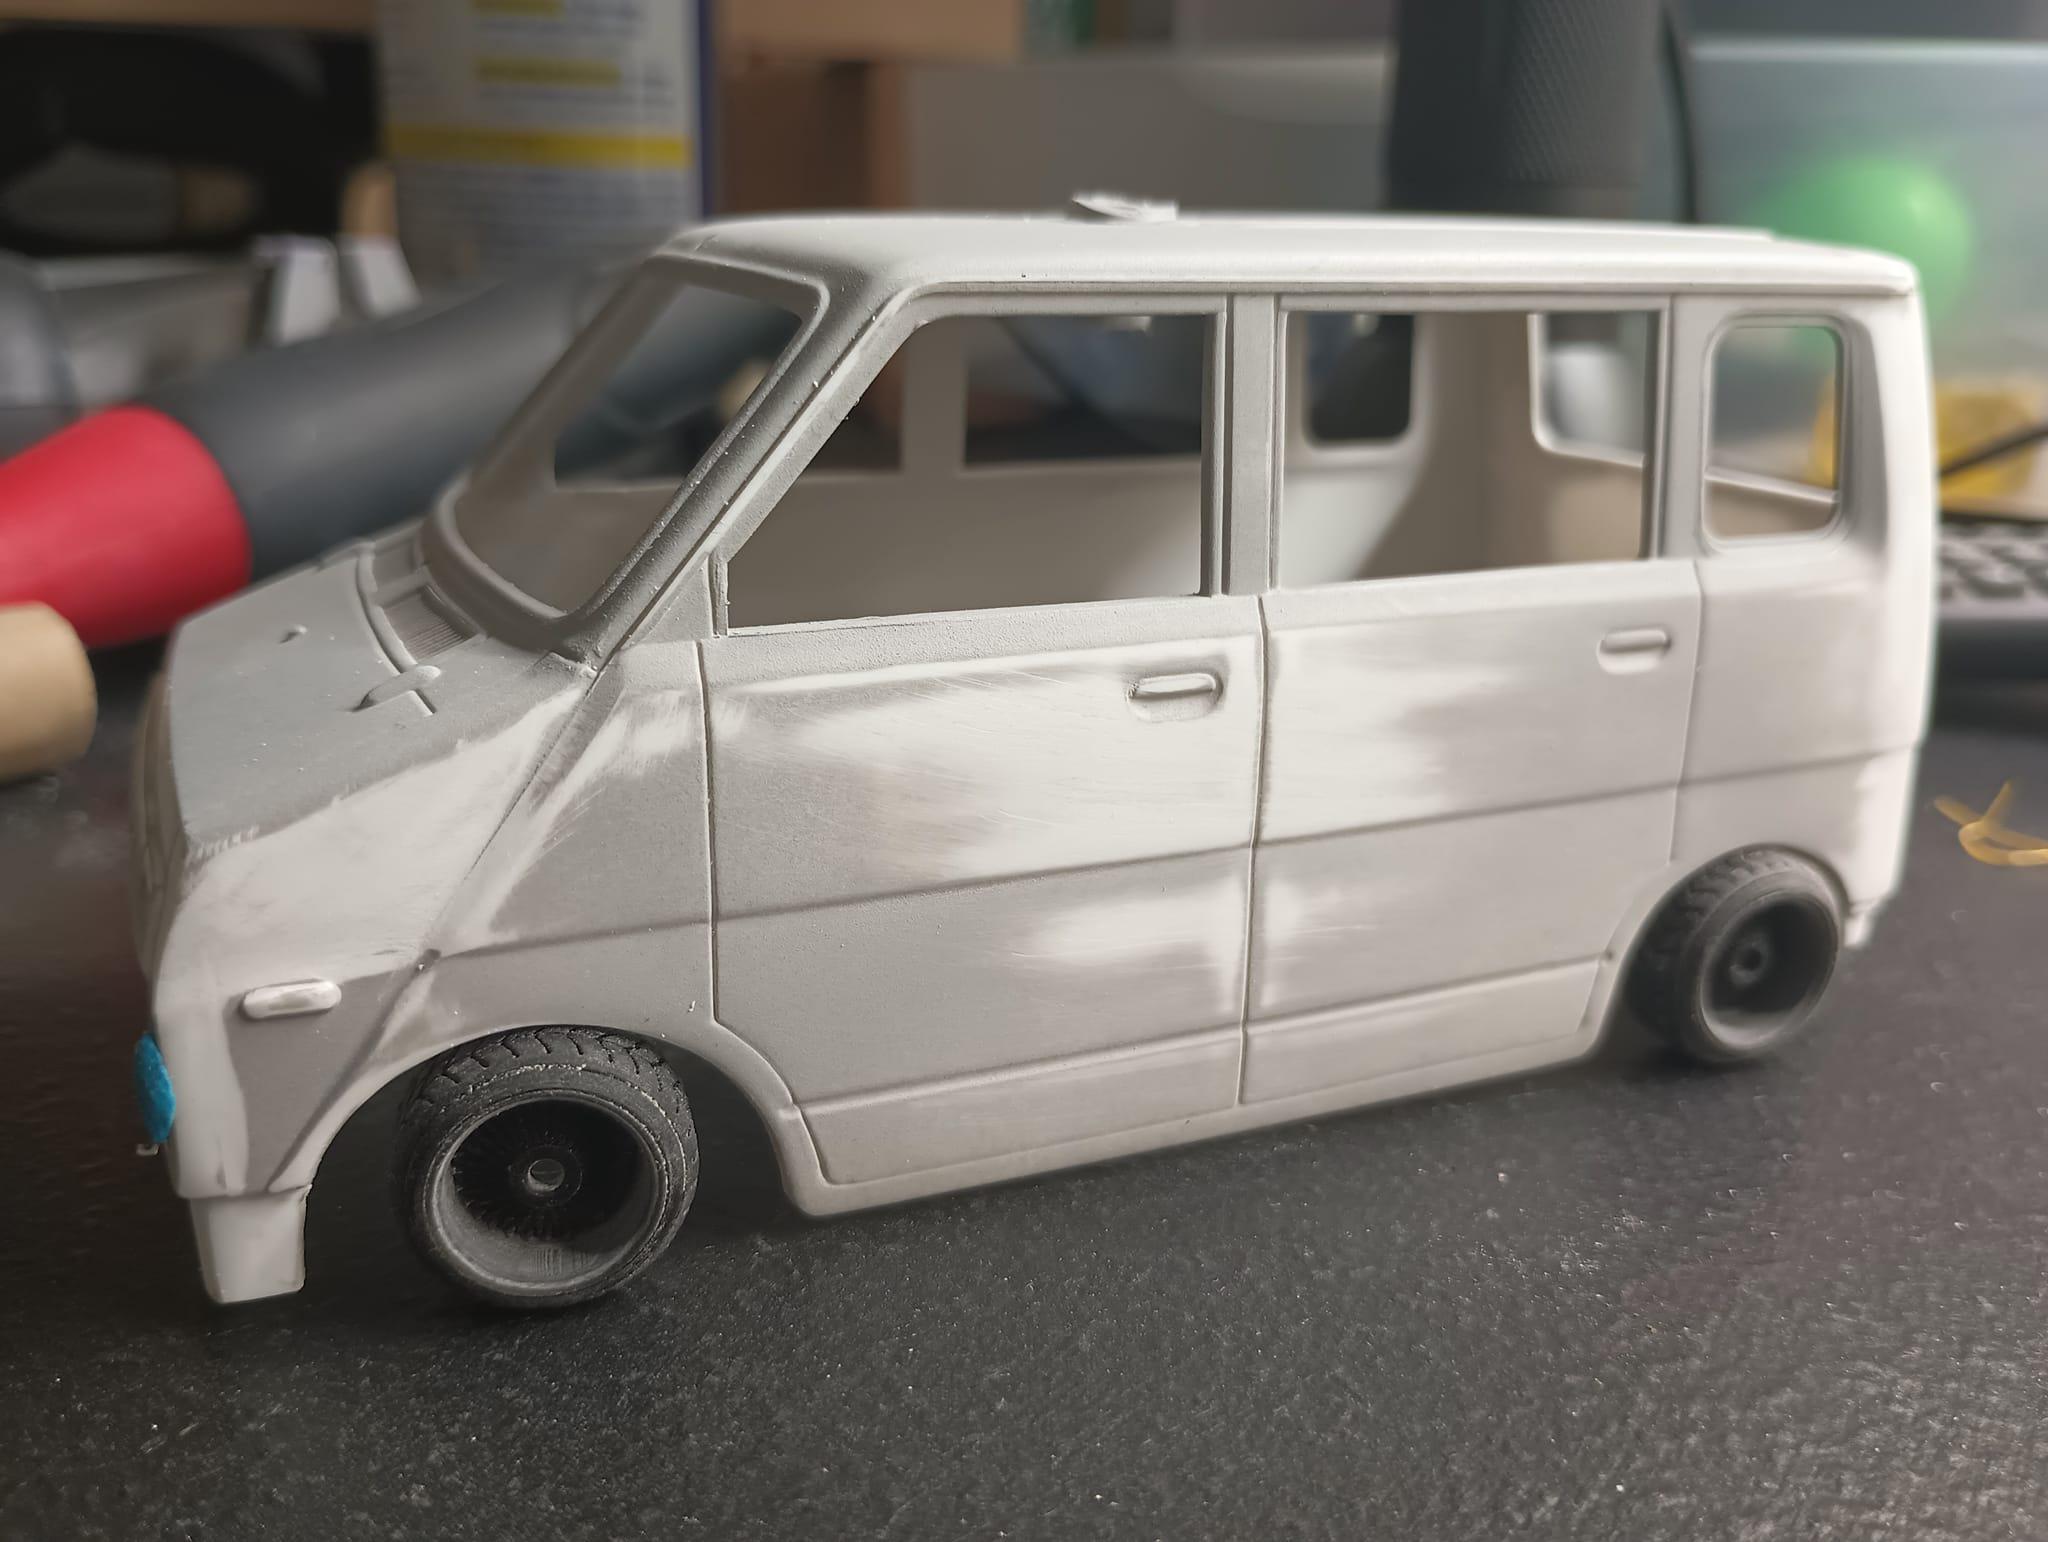
Was actually the first body i successfully scanned and at the time didnt know what to do with it ive since learned the scanner and now pretty much putting every kit i build through the process before any work is done. This one Got a C10 Grille, bunny window fillers, and wanted a more first gen camaro style bumper to match up the grill, other accessories are being printed as the build progresses. the van is 1/20 so i had to scale some lowrider wheels to stock 10" and made some custom tires for it. the Honda letters will be shaved at some point only give away it was a honda will be on the trunk handle.
-
Purchased this kit with the intention for it to be built in my favorite style I have done on many builds. Over the years many people have questioned how I achieve my black paint jobs, so in this thread I will do my best to explain the process I use. This is the paint that is always used. But first things first with this type of build, the wheels. After that its usually get the body out of the box and mock up trying to figure out where I want the ride height. Might not be practical or even possible in the real world but Im okay with that, as I like my builds low as possible and hope it wont involve too much work achieving a super low stance. Now on to the start of preparing the body. Wash the body. I place about 1/2 a teaspoon of dishwashing liquid into my ultra sonic cleaner and put the body in for a 5 minute cycle. Could soak and wash in a container or sink with a toothbrush or small scrubbing brush. Either way give it a good clean and rinse with water after. I use a chamois cloth to wipe away excess water and airbrush to blow dry the body. Then set it aside while preparing the surfacer. Check coat using Surfacer. Instead of using spray can primer, I prefer to use this. And here is a quick video I found to show the ratio and technique for pre thinning. Using an Iwata HP-TH .5, with the trigger set at 2 turns and the psi @18-20, I apply 1 wet but light coat. Preferably a .3 to .5 needle size is best for applying primers and surfacers. This is what I call the check coat, I find using black helps to see all the mould lines and others areas and spots that usually need to be sorted and fixed. And once you start sanding and scribing you can see what areas you have worked on. I learnt this technique from Japanese and Korean model car and Gundam builders. Another purpose for airbrushing a check coat of the 1500 surfacer is so it can be easily removed with the MLT which will be shown further along in the prep process. Set aside overnight to dry. How can I not resist another wheel mock. Back to tomorrow with the next part of the prep work.
-
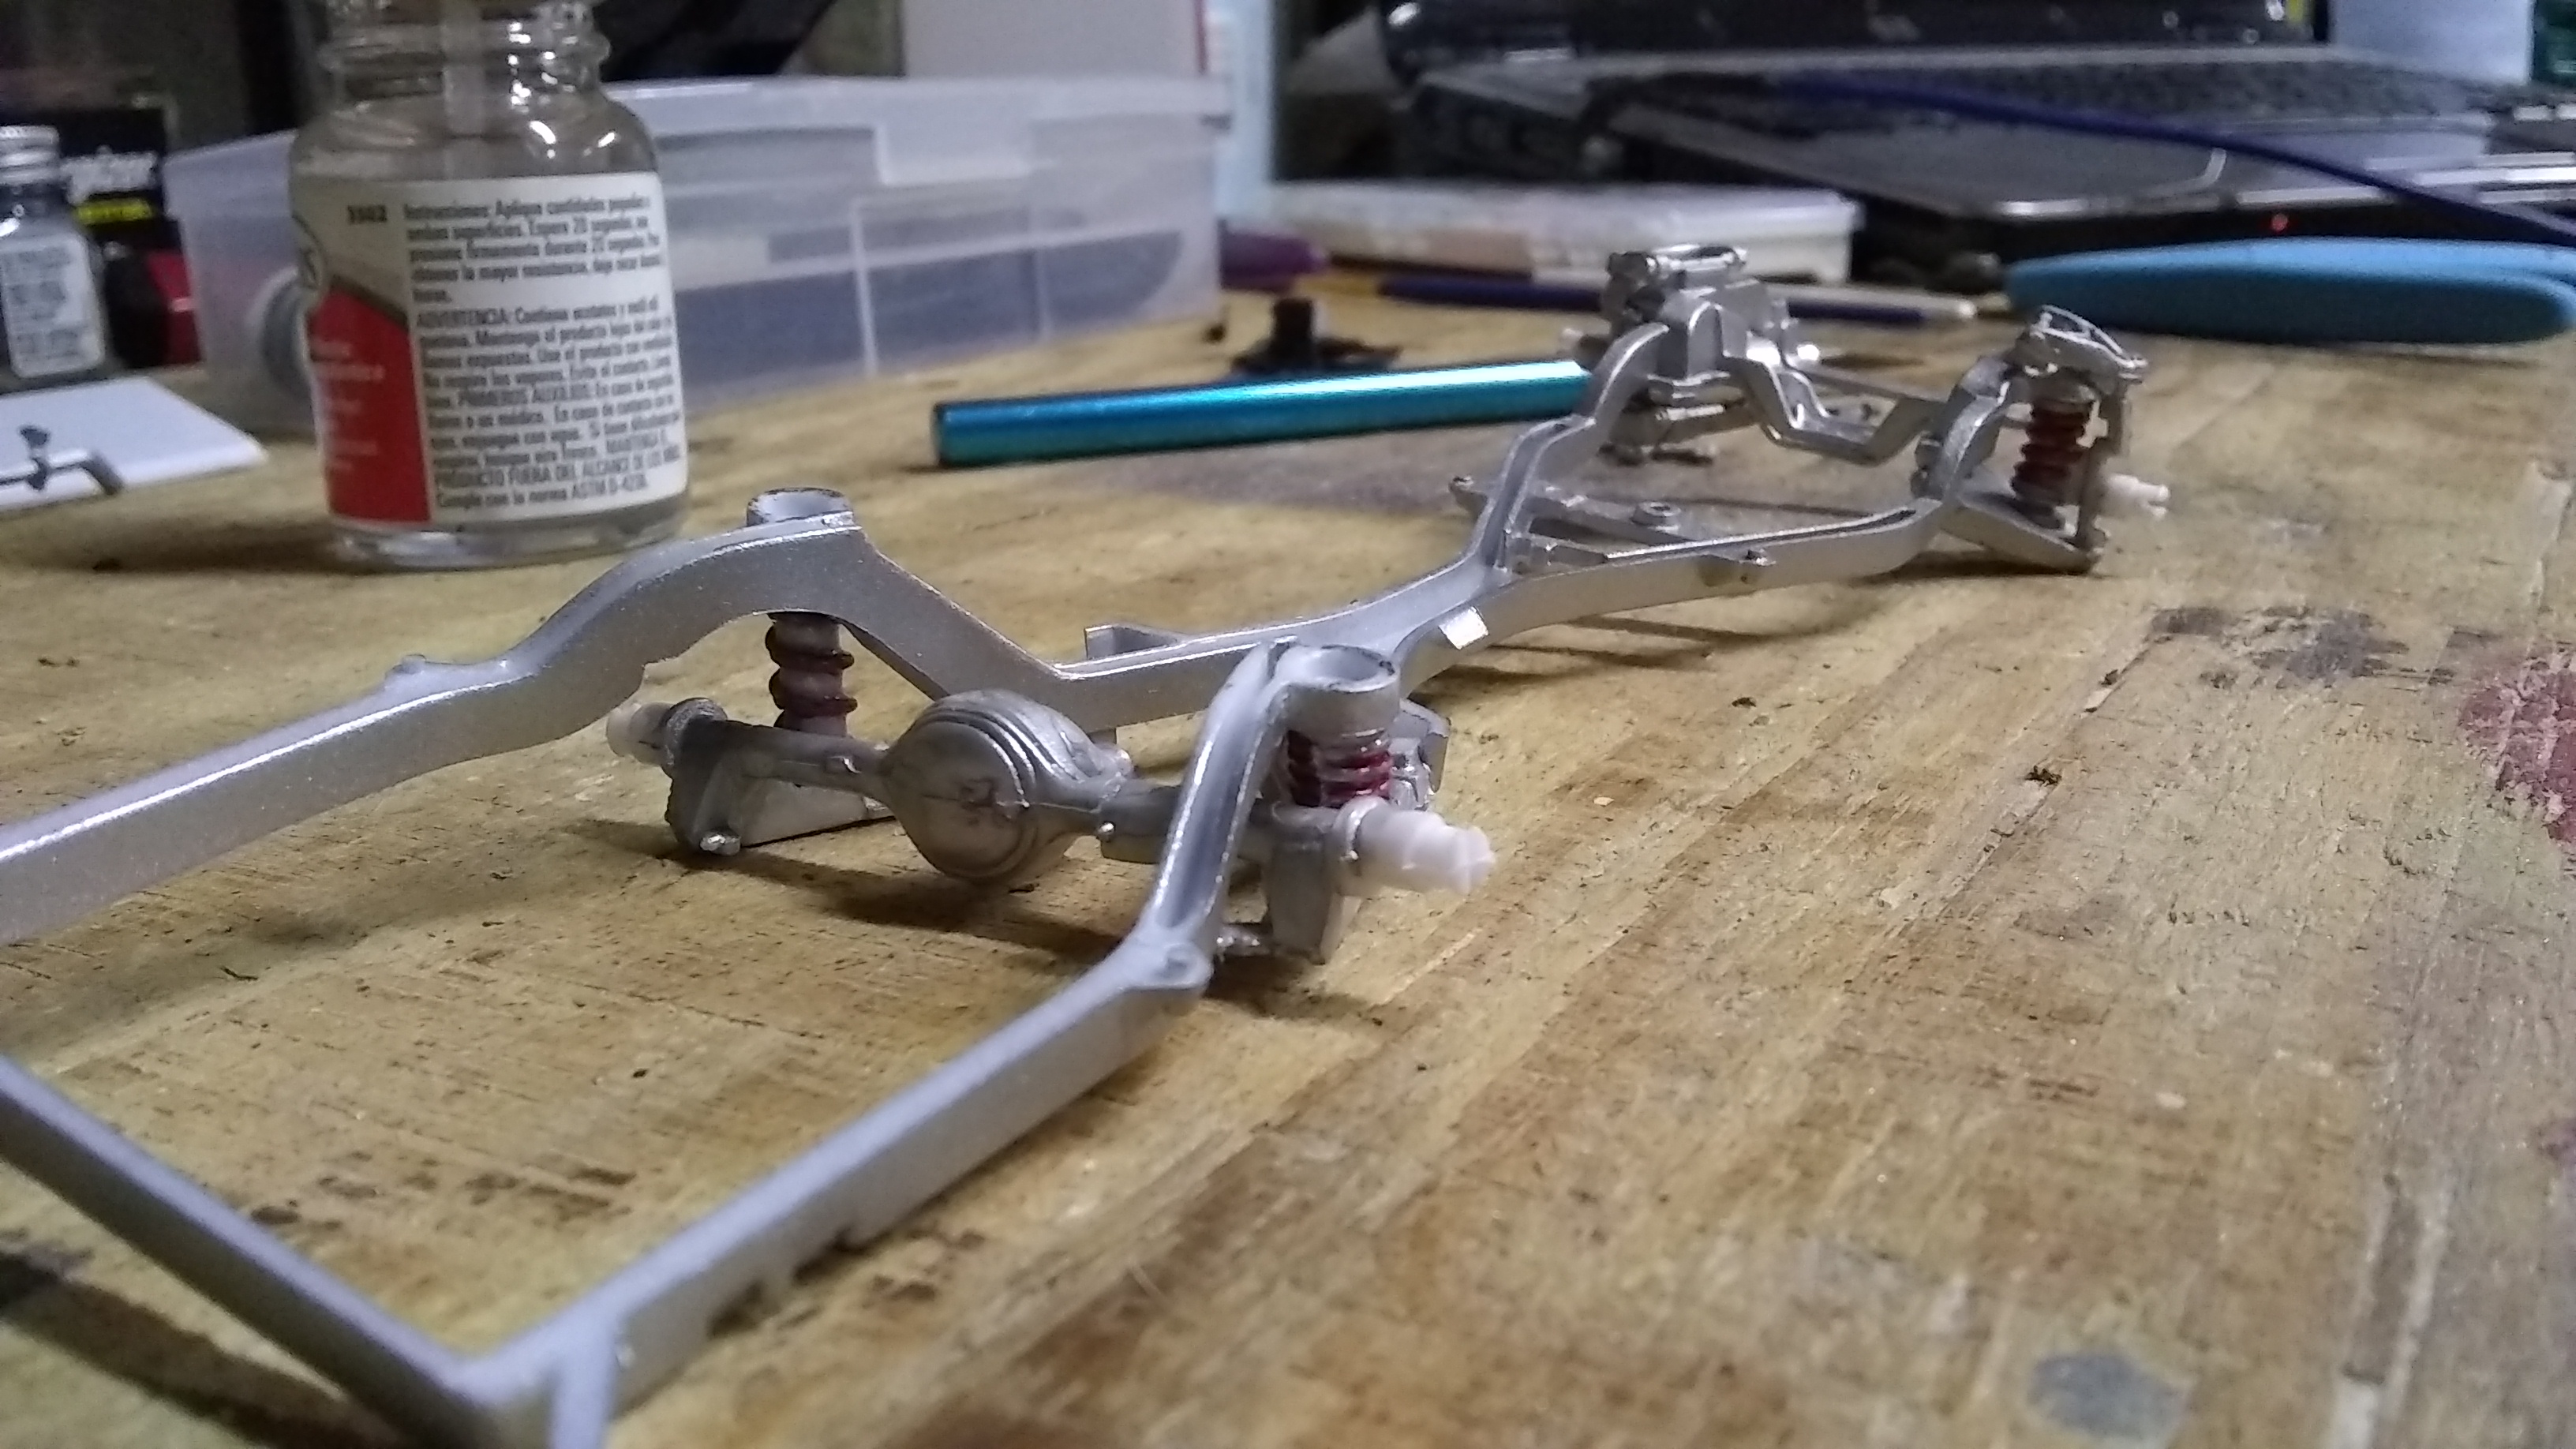
Time to get this back on the bench. Started the kit in 2016, but like some of my others it stalled. Wheels. Current state of the parts. These pics are from when I set up the stance in 2016. Engine is already complete. Work that was previously done 2016. Modified the oob kit suspension to look like it has the hydraulic cylinders.
-
 Well ive got to be honest and say im not a 100% happy with this build. But I guess you lose track of a build when you started it 10 years ago and try to pick up where you stalled out. Had a lot of fit issues and trouble when doing final assembly. Glad I made it through to have another stalled build completed and on the shelf so I can move on to something else. Those of you who are observant will see some of the issues and things im not happy with. I've learnt expectations can not always be satisfied with every build. So im not going to whinge or complain in detail, just move on and accept it is what it is. A decent clean build that looks good on the shelf. Okay now we got that disclaimer out the way onto the pics. LOL! The kit I started with. First mocked it up and set the stance back in 2012. Other details in the WIP As per usual the same colours I always use. TS-14 black and TS-49 bright red. Wheels are Pegasus #1109's. Removed the mold lines on the bumpers and redone with Alclad chrome. Nothing fancy here, could say its a curbside plus an engine. Have held onto this number plate for years saving it for just the right build. Had clearance issue's with the oob air cleaner, so had to use one from my spare parts and painted Alclad chrome. No idea what it is from. Coil from spare parts also. Made a hard lid for the bed out 1mm sheet styrene and scribed around the edge to create the trim.
 -
Finished up another one of my stalled WIP builds. Decided to go triple black with this one. Not quite as good as the 62 I built years back. But im really happy how this one looks.. Usual Tamiya TS-14 Black, but this one is polished and waxed. Interior is Mr Hobby Finishing Surfacer 1500 black and Tamiya XF-1 flat black. Pegasus #1109 wheels, painted Tamiya X-1 black Got a bit slack and couldnt be bothered doing much paint work on the undercarriage, if it had a separate X-frame would have chromed that and all the suspension and running gear components. So went the easy way and left all 1500 surfacer black.
-
It's been years since I've attempted a lowrider or any type of custom. This one didn't start out that way, but took on a life of its own.
- 18 replies
-
- 1
-

-
- 1958 plymouth
- lowrider
- (and 2 more)
-
Got this one finished. An enjoyable simple build. Kit was alot better than I thought it would be. WIP thread is here My usual Tamiya TS-14 black, this time I did polish with Tamiya coarse, fine, finish compounds. And waxed with Meguiars NXT Tech wax 2.0 Interior TS-49 bright red over coated with Alclad Klear Kote flat ALC 314. Pegasus Chrome DZ's wheels, scratch built air tank and solenoids, 3D printed compressors and Lead City plaque.
-
Yeah the a.d.d is a problem. Well im in the lowrider mood lately so im going about sussing some idea's out and possibly do some paint work while the summer weather lasts. Another kit I bought from ole mate Ray. A very lucky score as it was my holy grail kit. My liking for the 68 Impala came about from the movie The Principal. Then I became a fan of Lowriders. The kit is in the wrong box, no instructions and missing some parts. But that didnt matter. Over view of what parts came in the box. Set it up on the oob chassis. I really like the tail lights in the bumper of the 68's Also like the rear quarter and roof shape.
-
Well im building the 82, so may as well build this one along side it. This is another kit I got from ole mate Ray. He was lucky to find and get it from a private estate sale in Adelaide. Then I got lucky when he offered it for sale to me when he walked away from the hobby. They certainly dont make kits like this anymore. Would be fun and different to do a custom version as some of those parts have cool features. But il stick with a some what stock look. Such a trip to experience a kit of this era. Got a rough idea of the direction im going with the build pretty much oob. I will use these parts and build the 6cyl as a side piece. And once again il use my favourite wheels. So far ive just cut some 2mm brass rod for axles, and set it in the low holes for a oob mock. But it still needs to be lowered more.
-
My ole mate Ray got this kit for me back when he was building, unfortunately he gave the hobby away couple years back. So I figured it was long over due to build it and remember the times we shared on forums building model cars. I remember when he shared a pic of the box art. I just laughed, got to love those 80's kits. Supercharged engine got me interested For it's age and from that era, seems like not too bad of kit, bit simple but the detail is there with the few parts there are. Overview of all the kit parts Parts i'l use for the build. As much as I like the supercharged engine, not sure about that. But I am kinda thinking of transplanting a big block from the AMT 69 Chevelle to fill out the engine compartment. Definitely going to use the 69 Chevelle seats and centre console. Have to use my favourite wheels of course. Applied a check of surfacer and done a wheel mock. Got it set up to where I think id like the ride height to be. So the fun begins.
-
Knowing how poor quality kits of this era are, it was bought to be built it in my favourite style. These would have to be my favourite wheels, pity that they arent available anymore. After a bit of messing around re drilling axle holes, got the ride height where I like it. Thankfully no modifications to the front wheel wells, rear tubs or the interior tub were required. Will build as a curbside plus, so it will still have an engine. Had to raise the engine up a couple mm so the sump wasnt sitting on the ground.
-
Thought id introduce you to a bit of a long term build, my 64 Impala ! So there was a catorgory at Lowrider shows for Radical builds, its all a bit more subtle now, but i used to love those cars, so I thought id build one ! So whats going on ? I never did like standard, so heres the ideas... So far ! the whole back half of the car will tilt up on hydraulics split front bonnet / wings joined, and tilting upwards split rear boot/rear panel joined,, probably opening up the same as the front ! opened rear section by the bottom of the rear window chassis needs boxing ! will have suicide doors, scratchbuilt fur/mirrored interior, and a detailed chassis with complete hydraulic install... maybe a new front and rear end style, roof chopped and a split targa roof, tilting up ! Can only do a bit at a time, theres nothing left to glue together otherwise.. ! The floorpan is an old one i'd already added a smooth firewall too, and later broke ! So this is repaired and going in the mix, with smooth floors underneath ! Hopefully i can get this back to being one piece again, wish me luck eh ! !
-
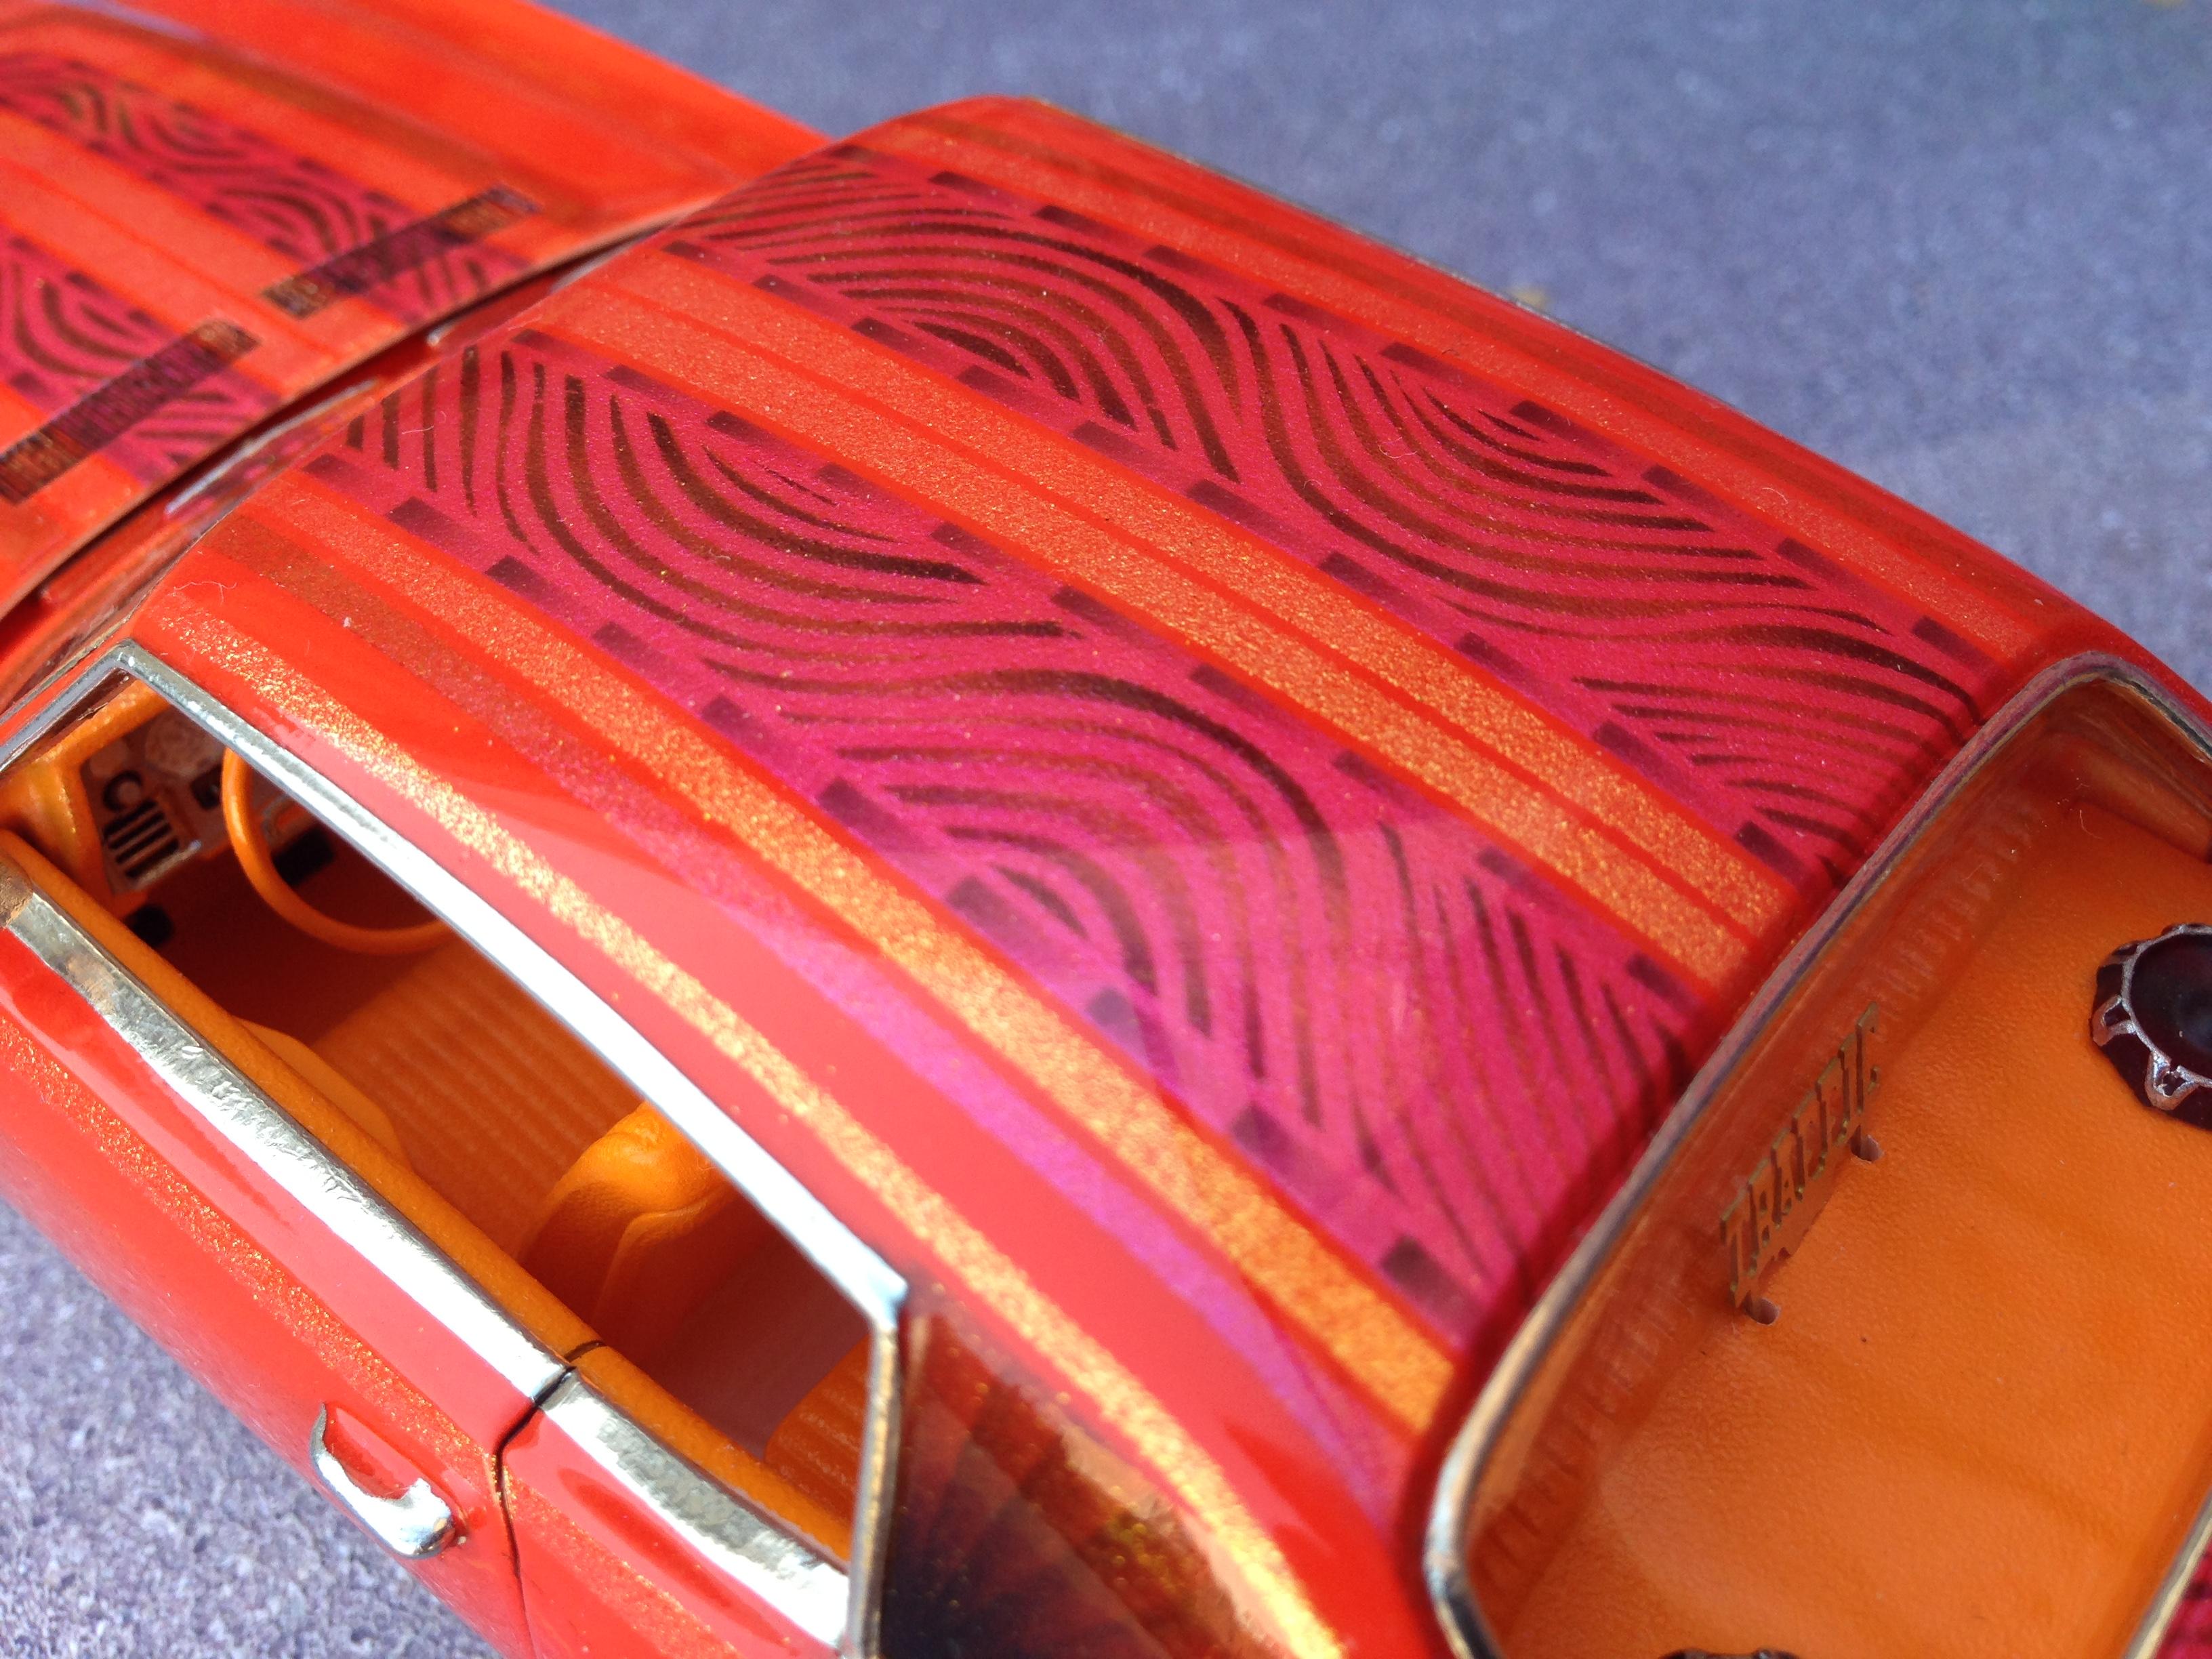
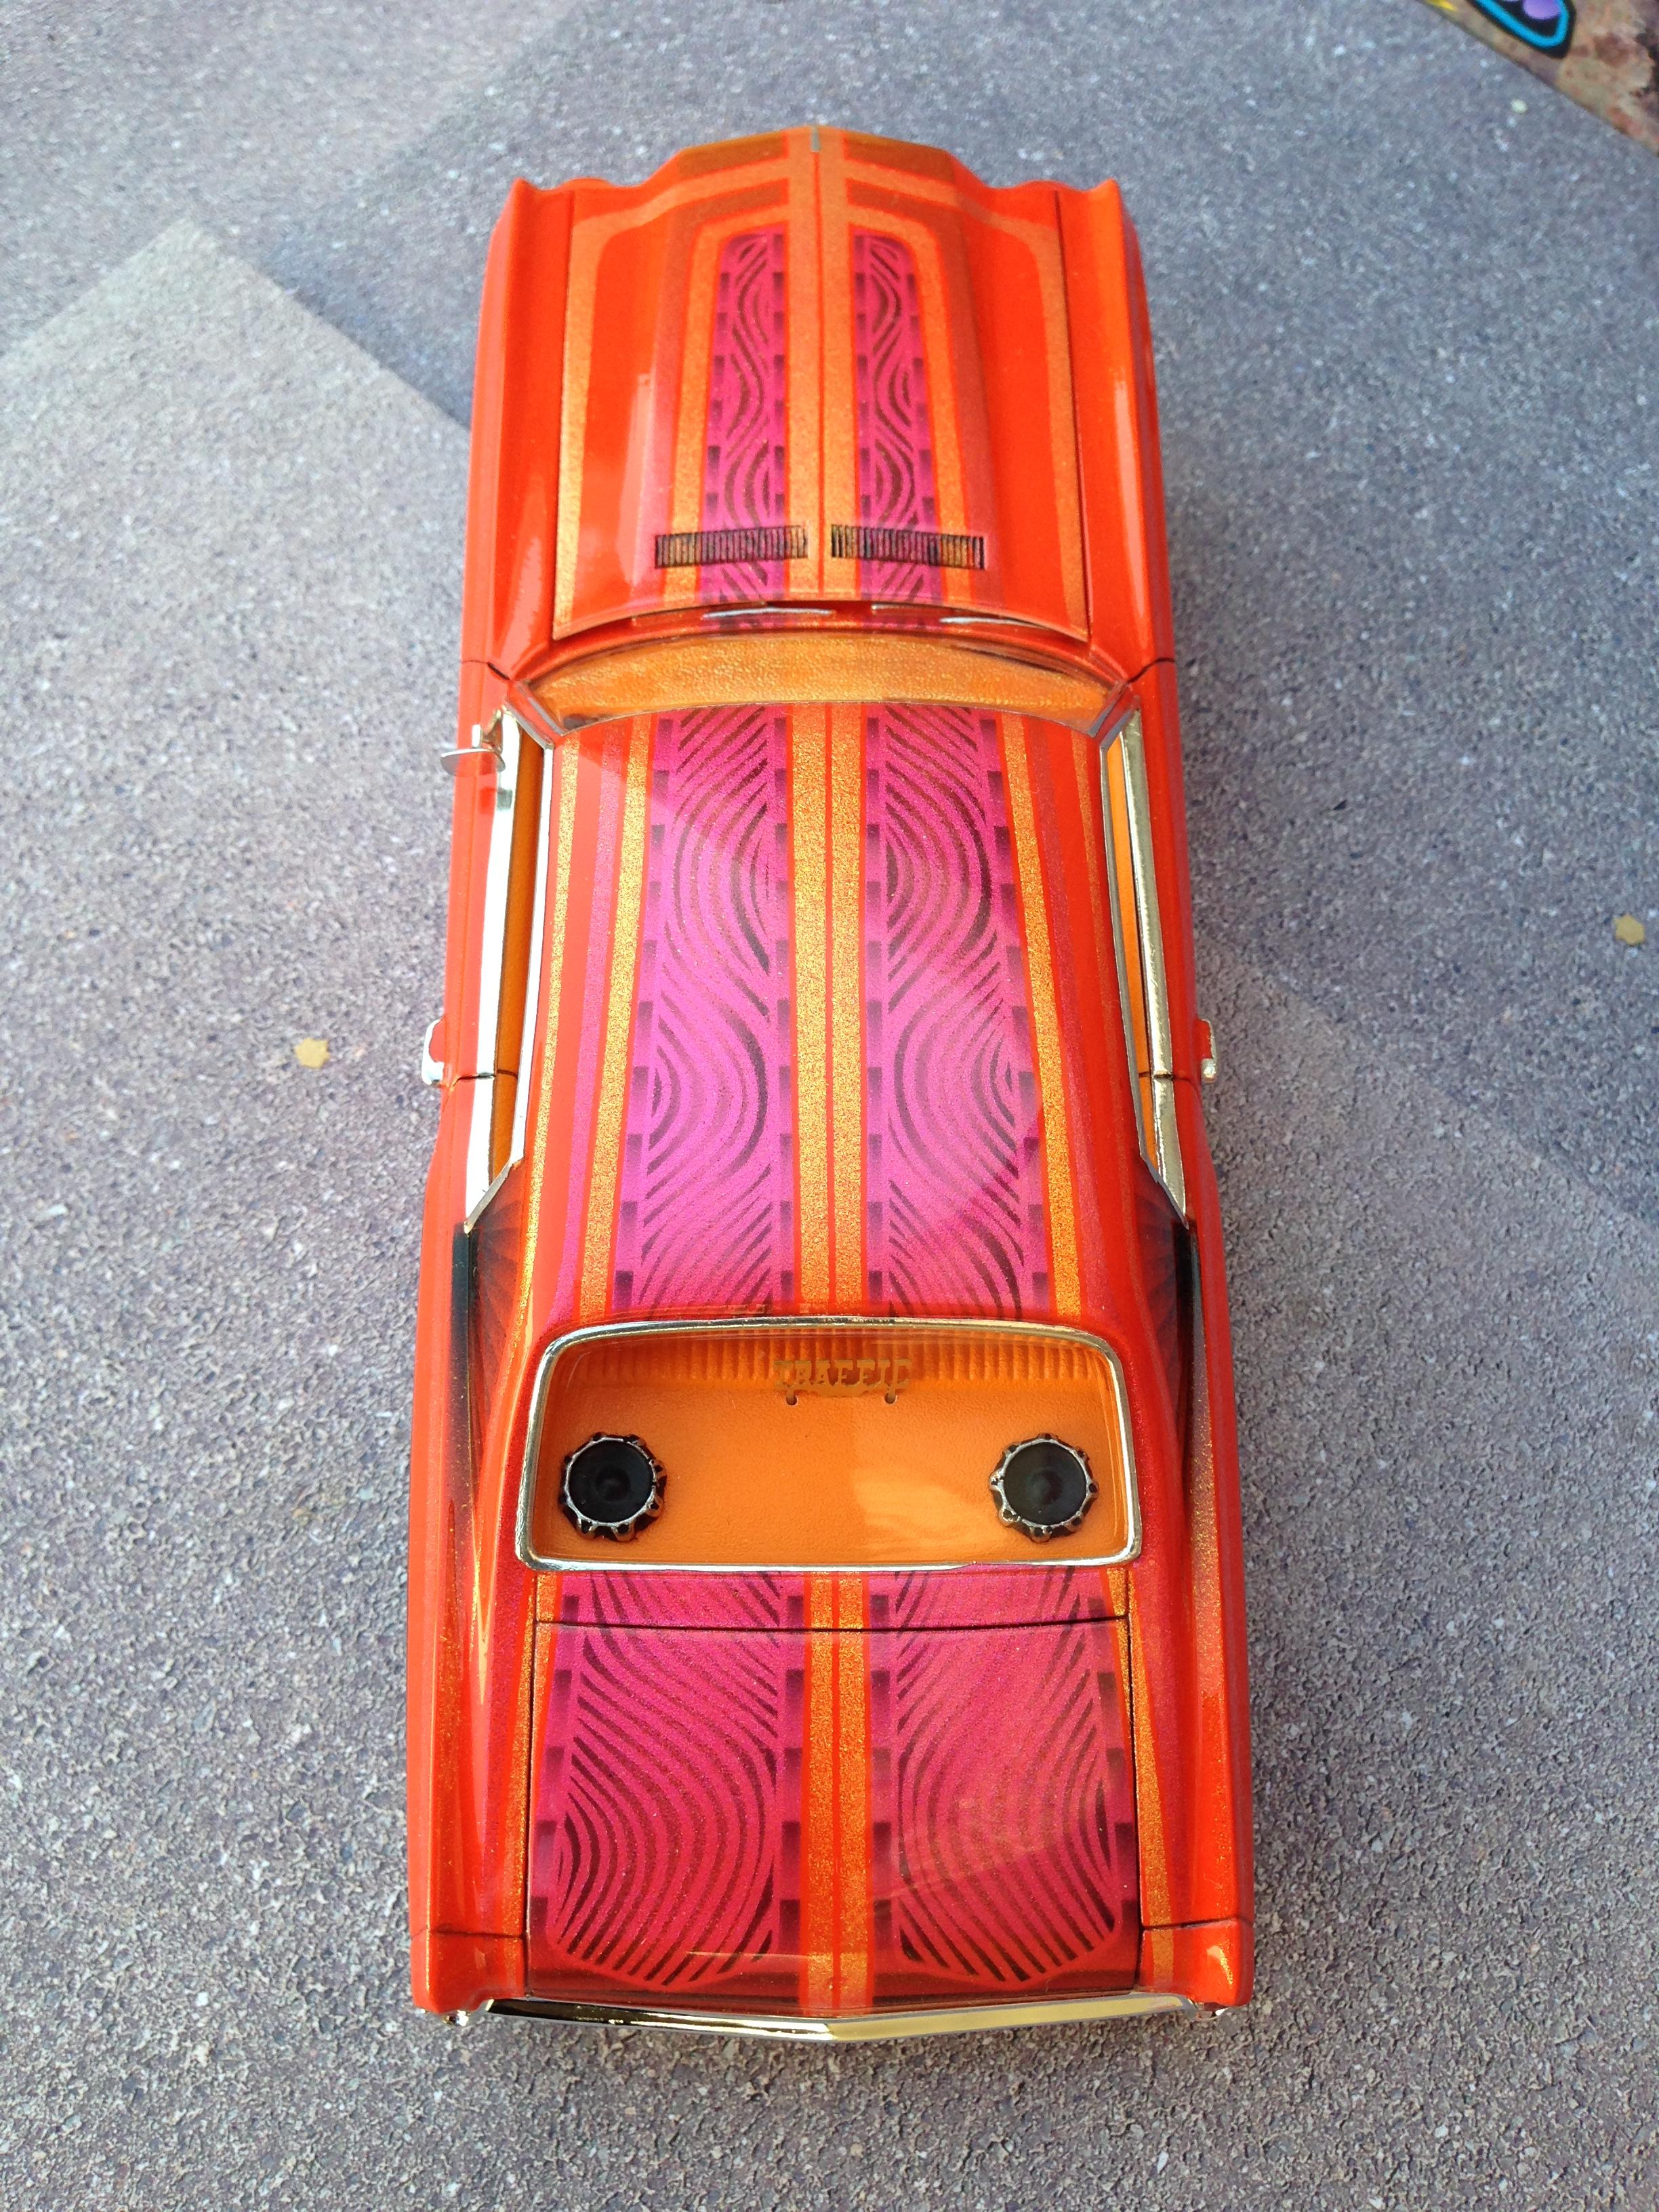
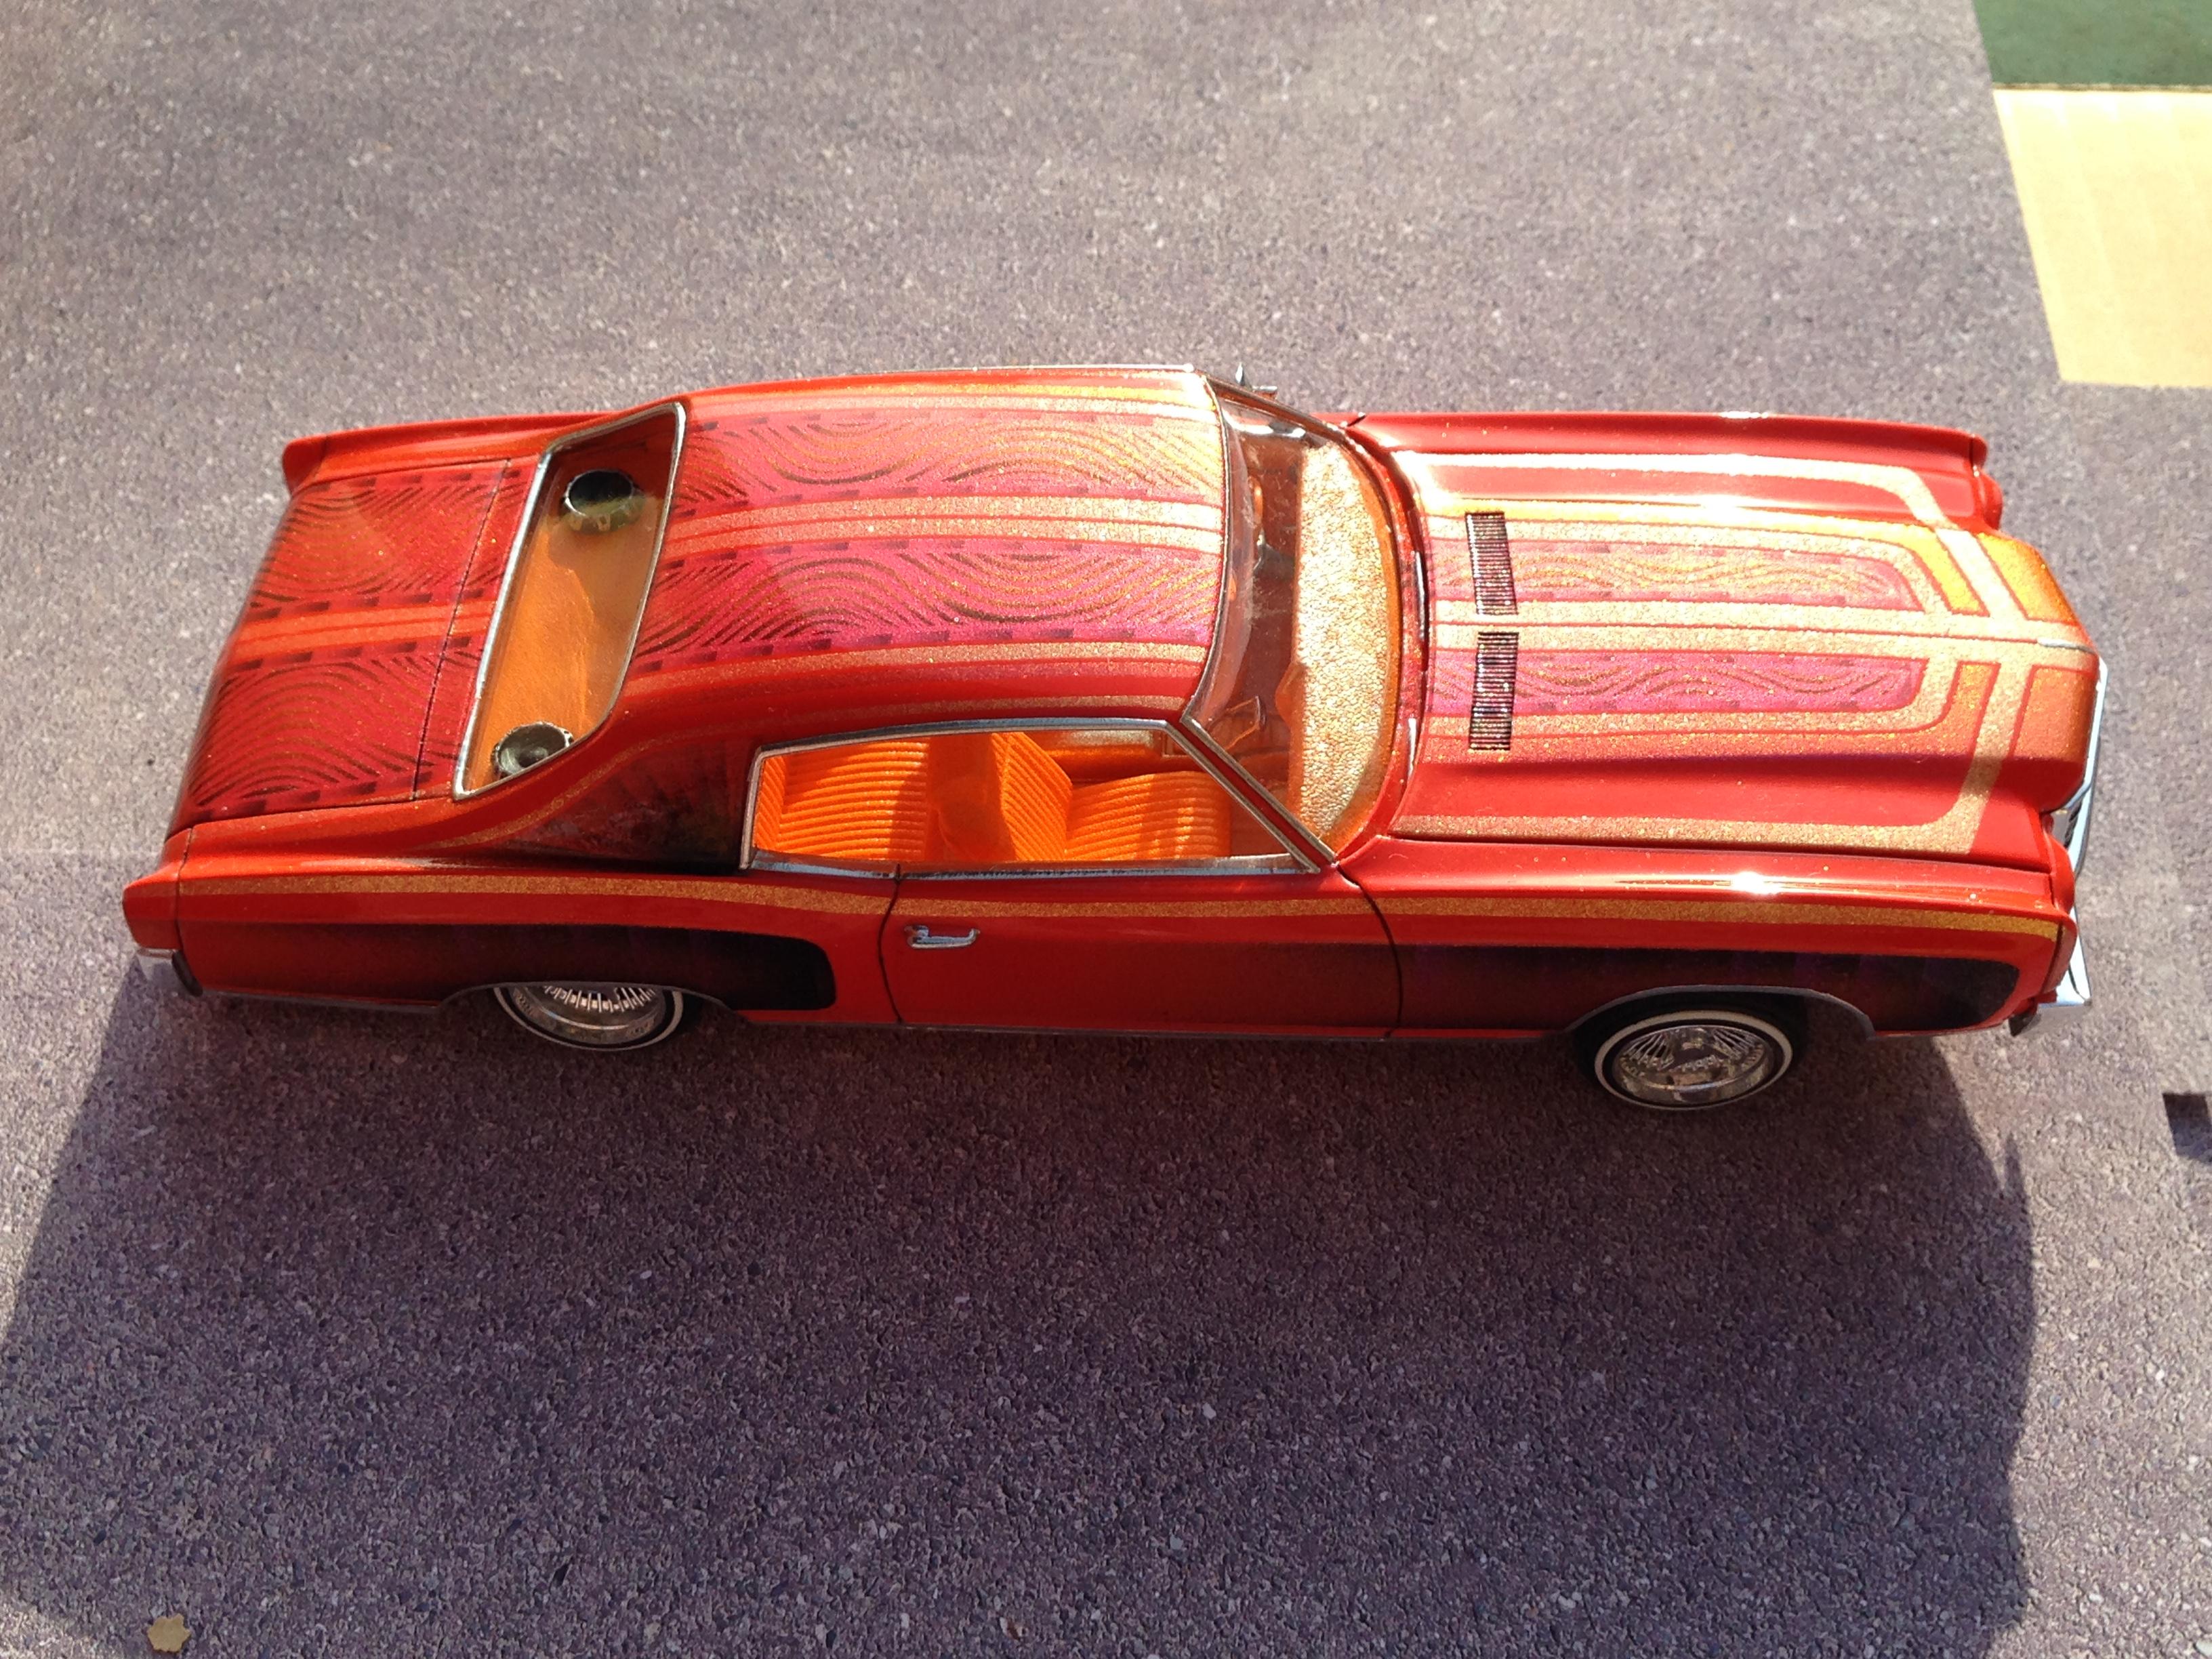
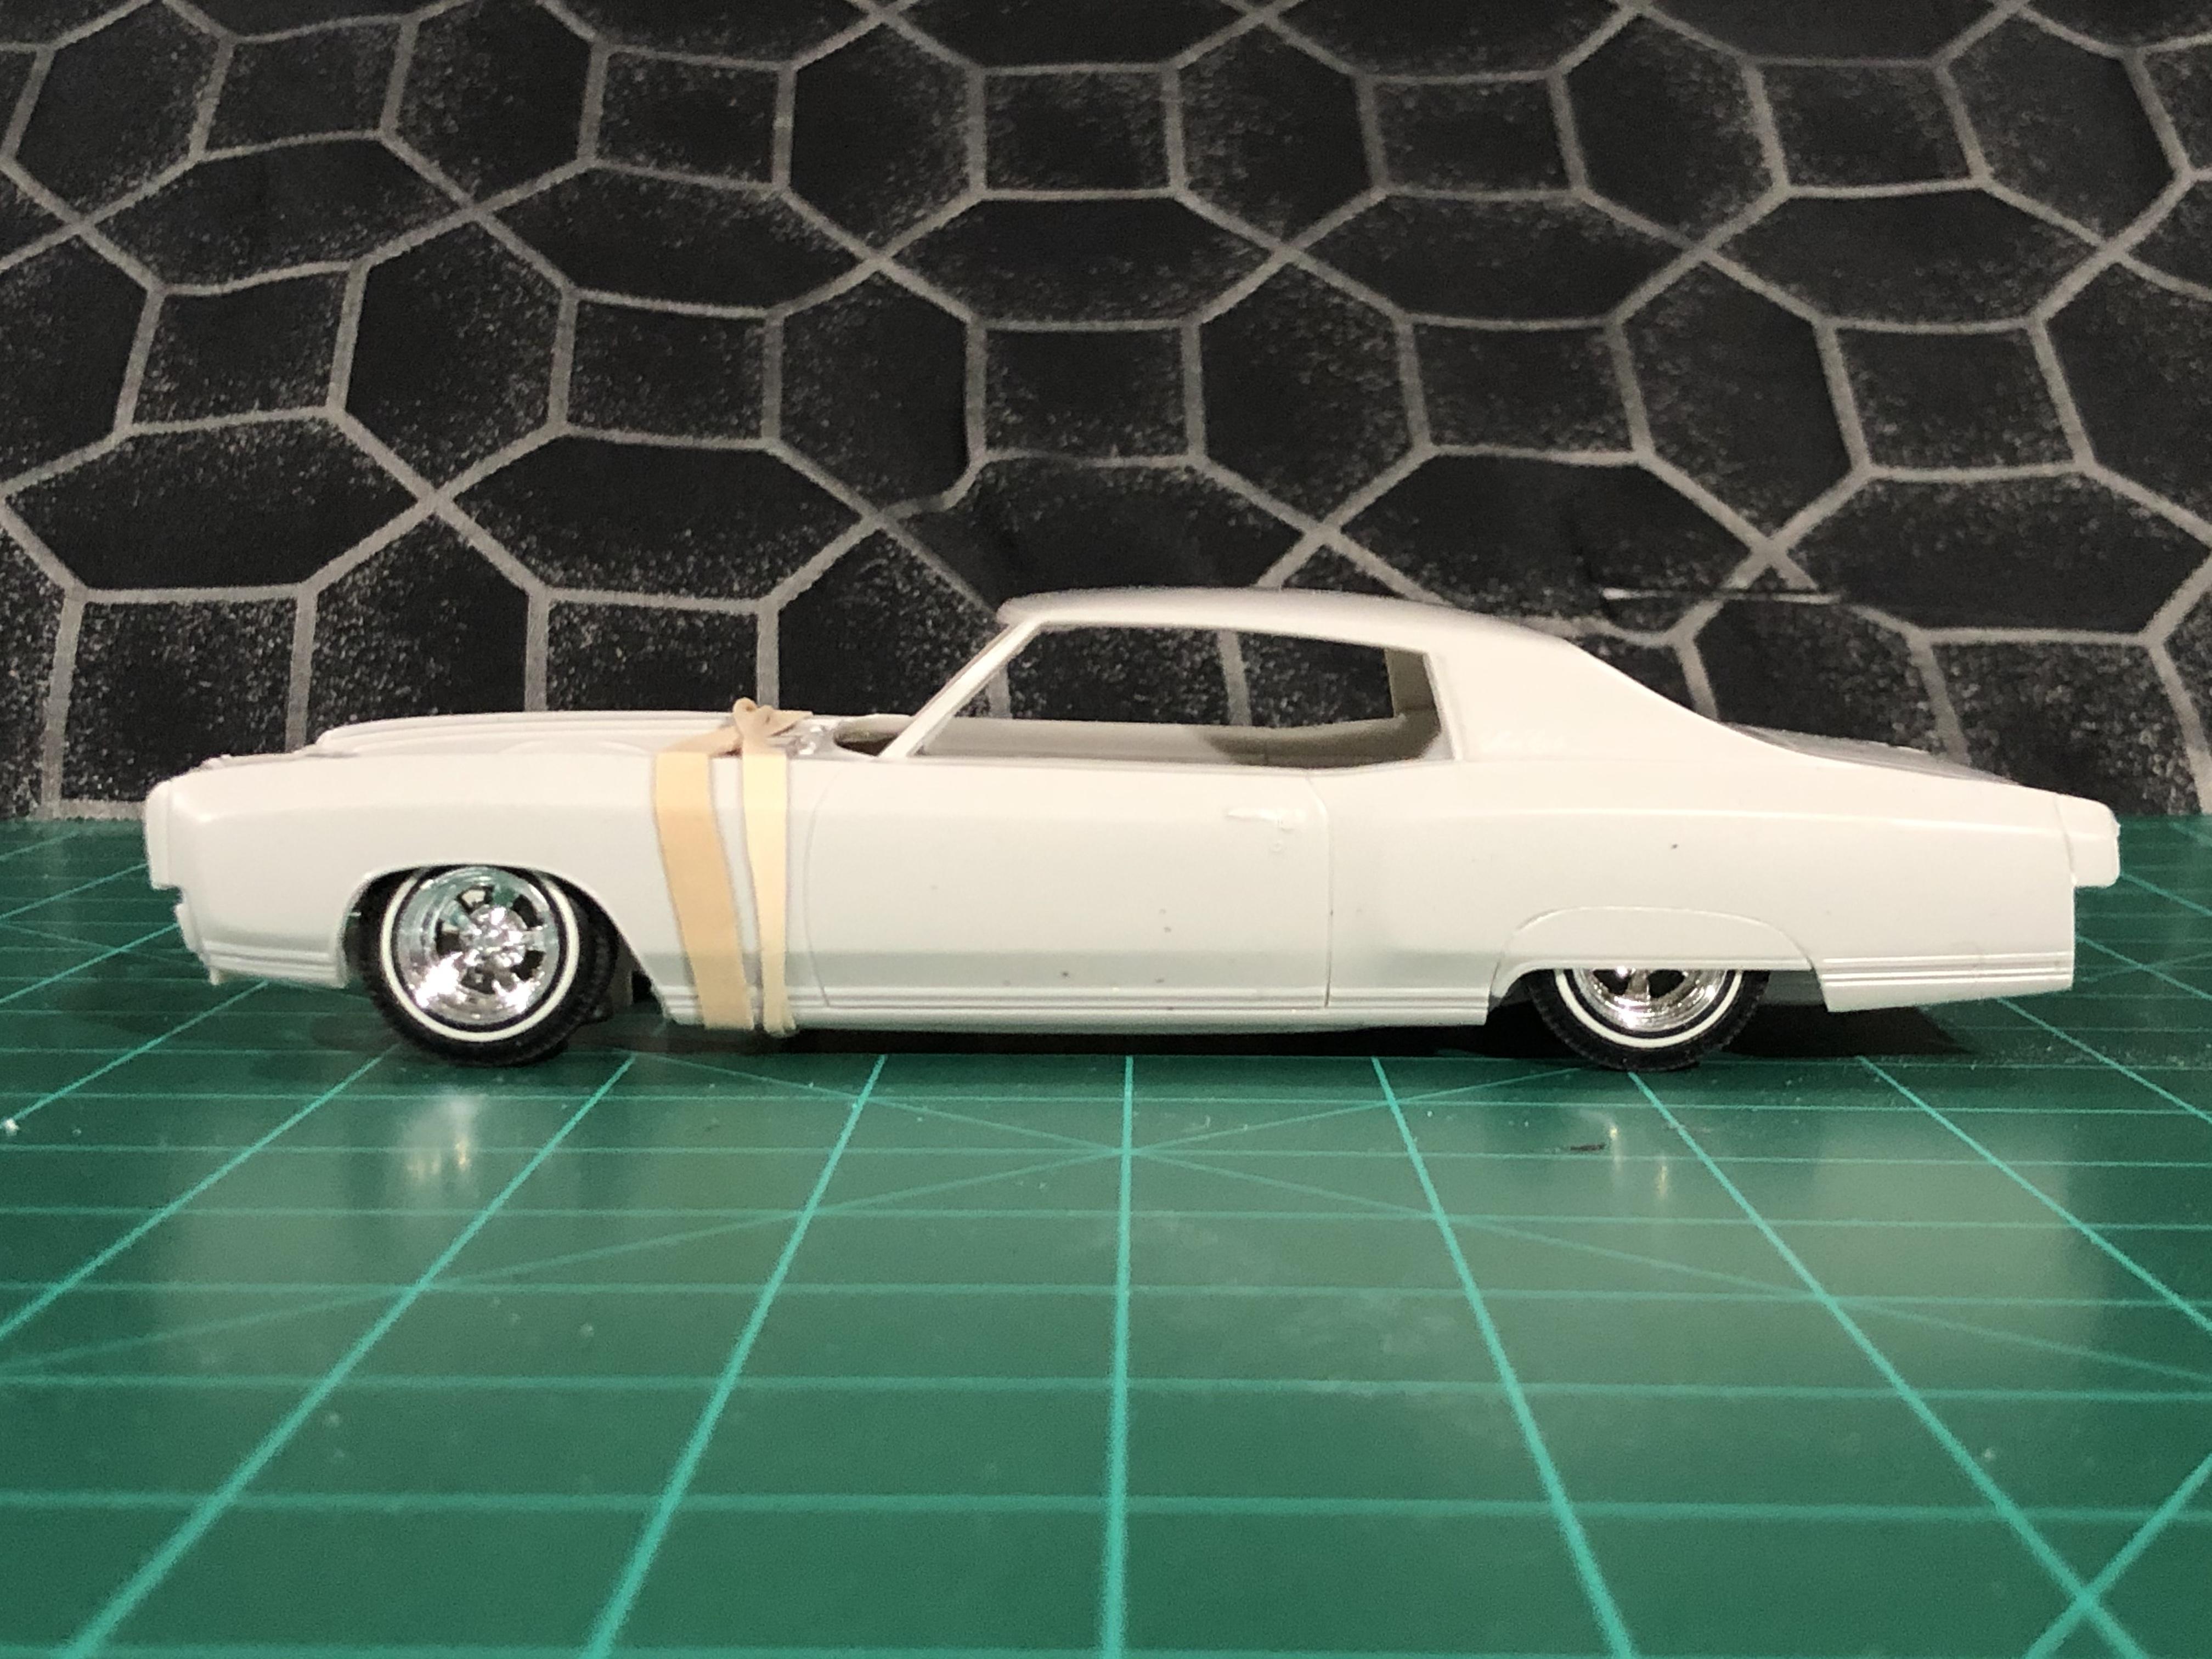
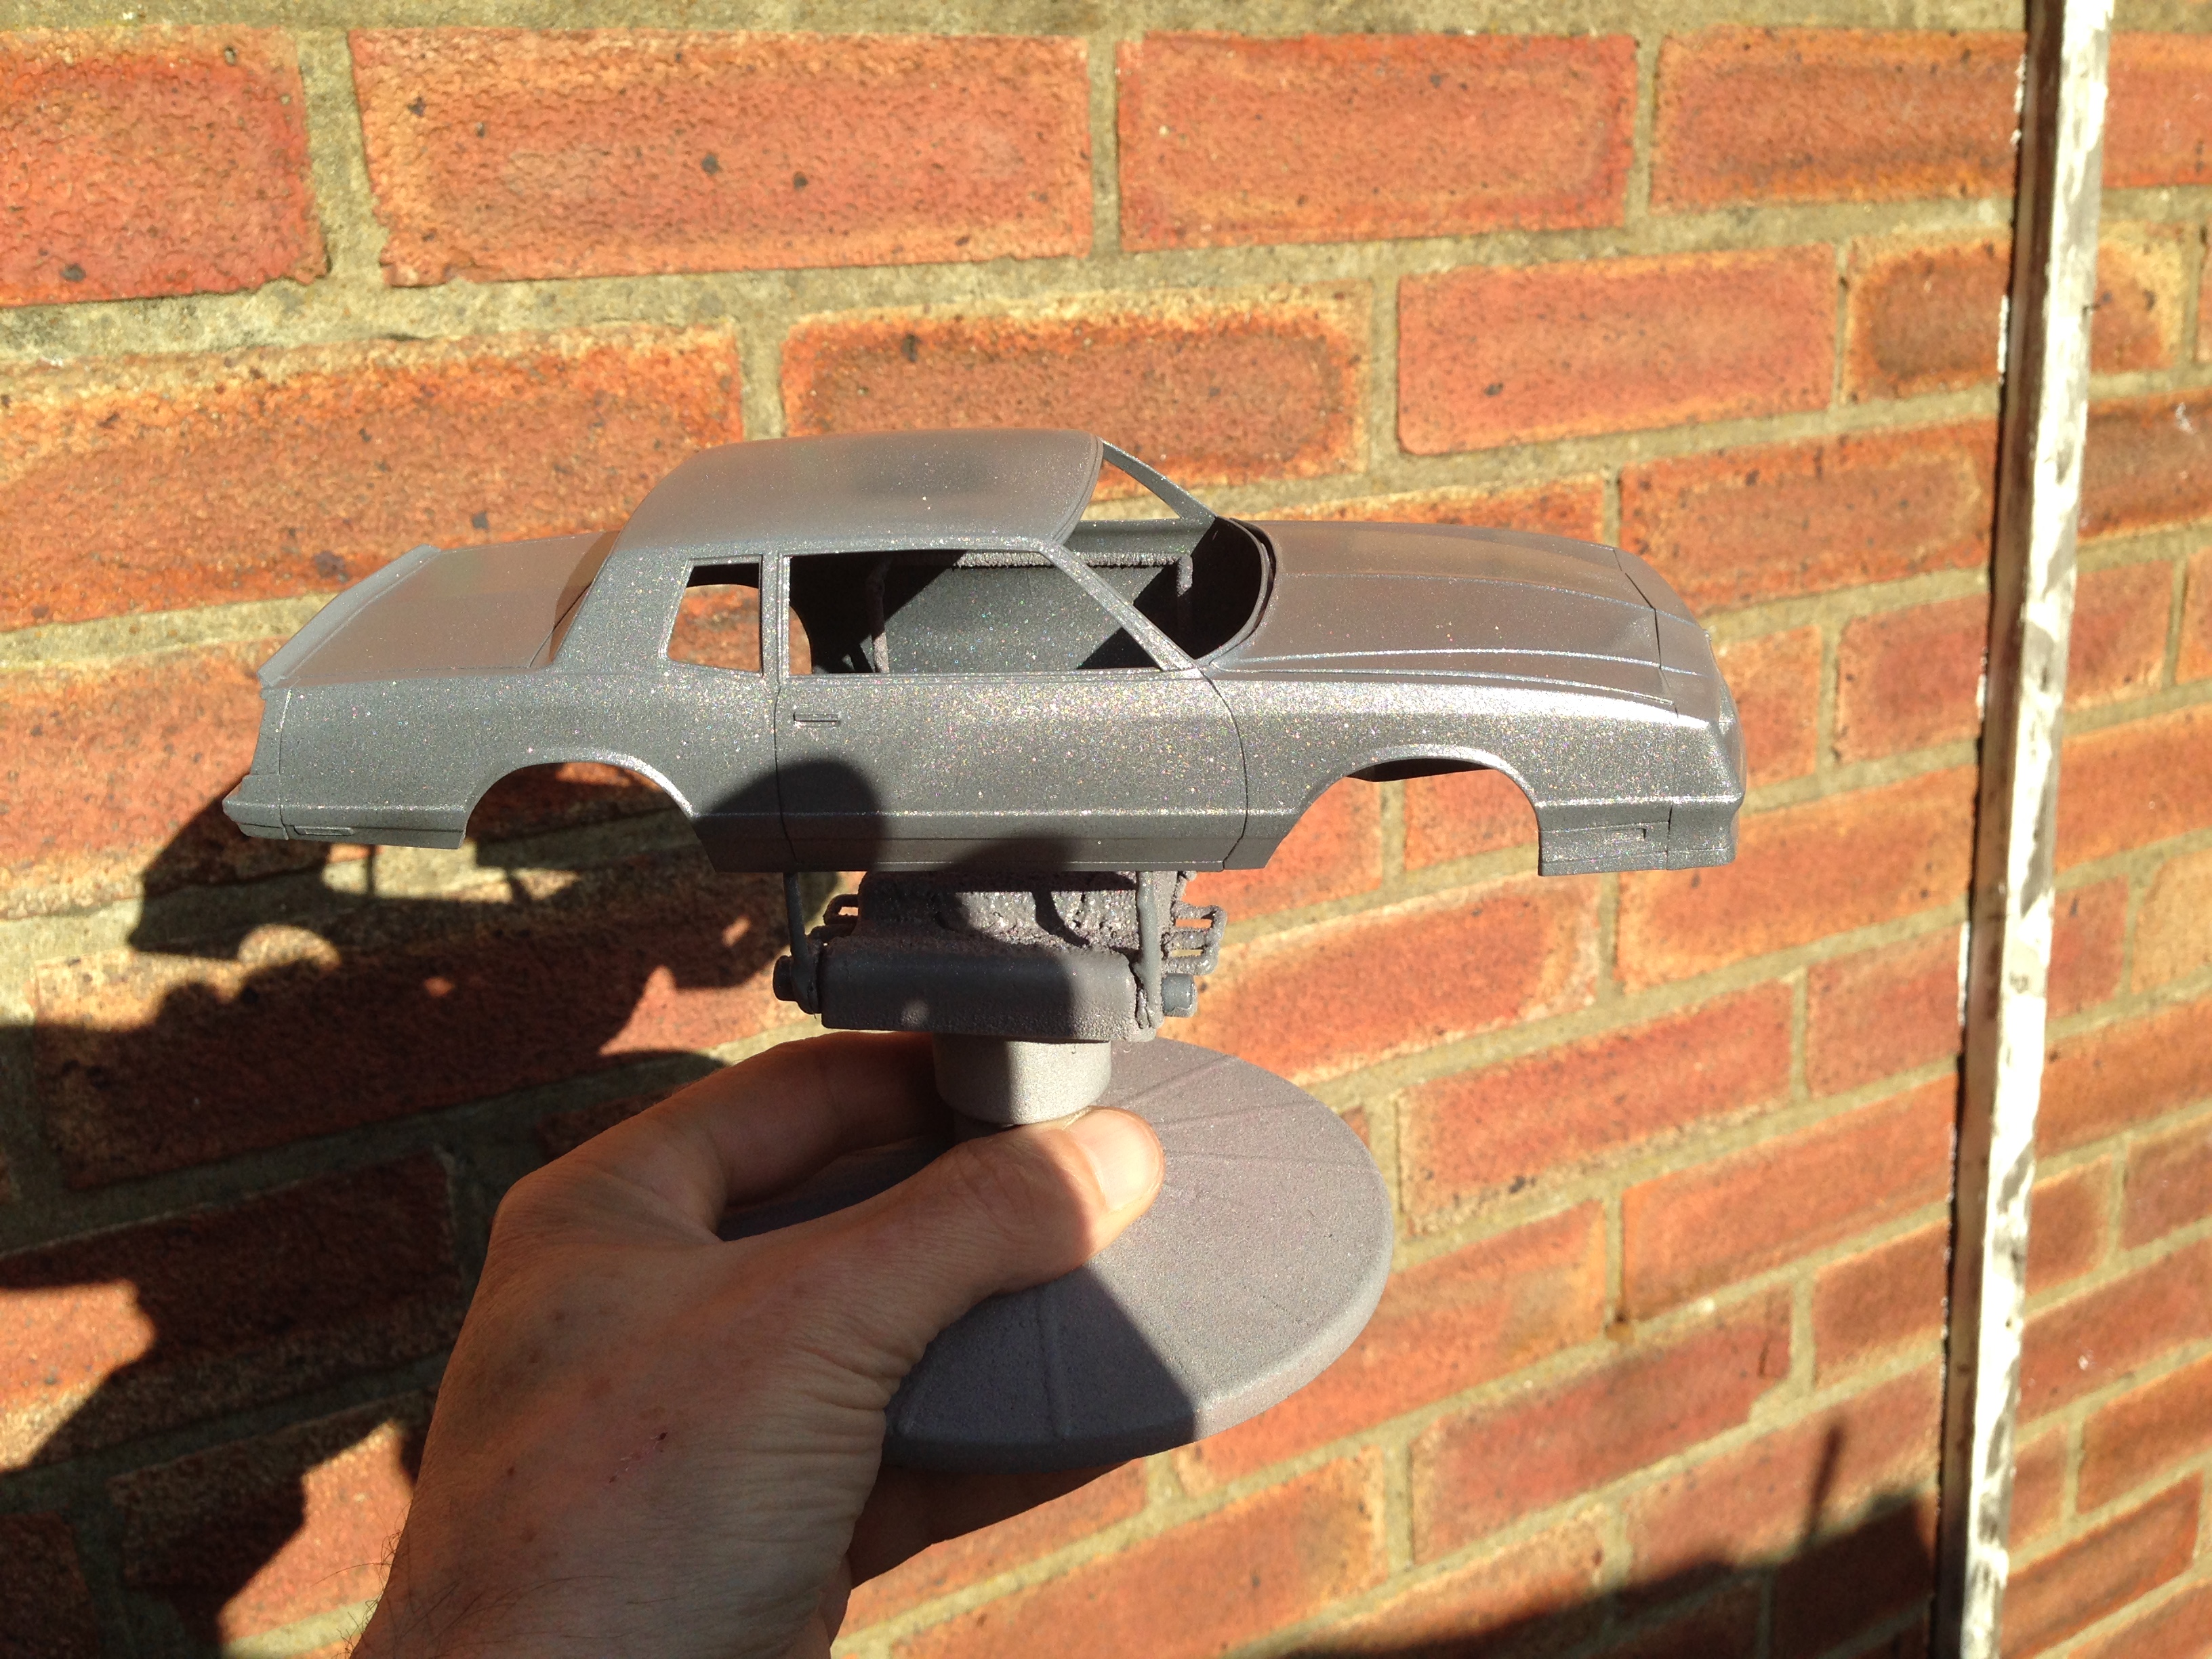
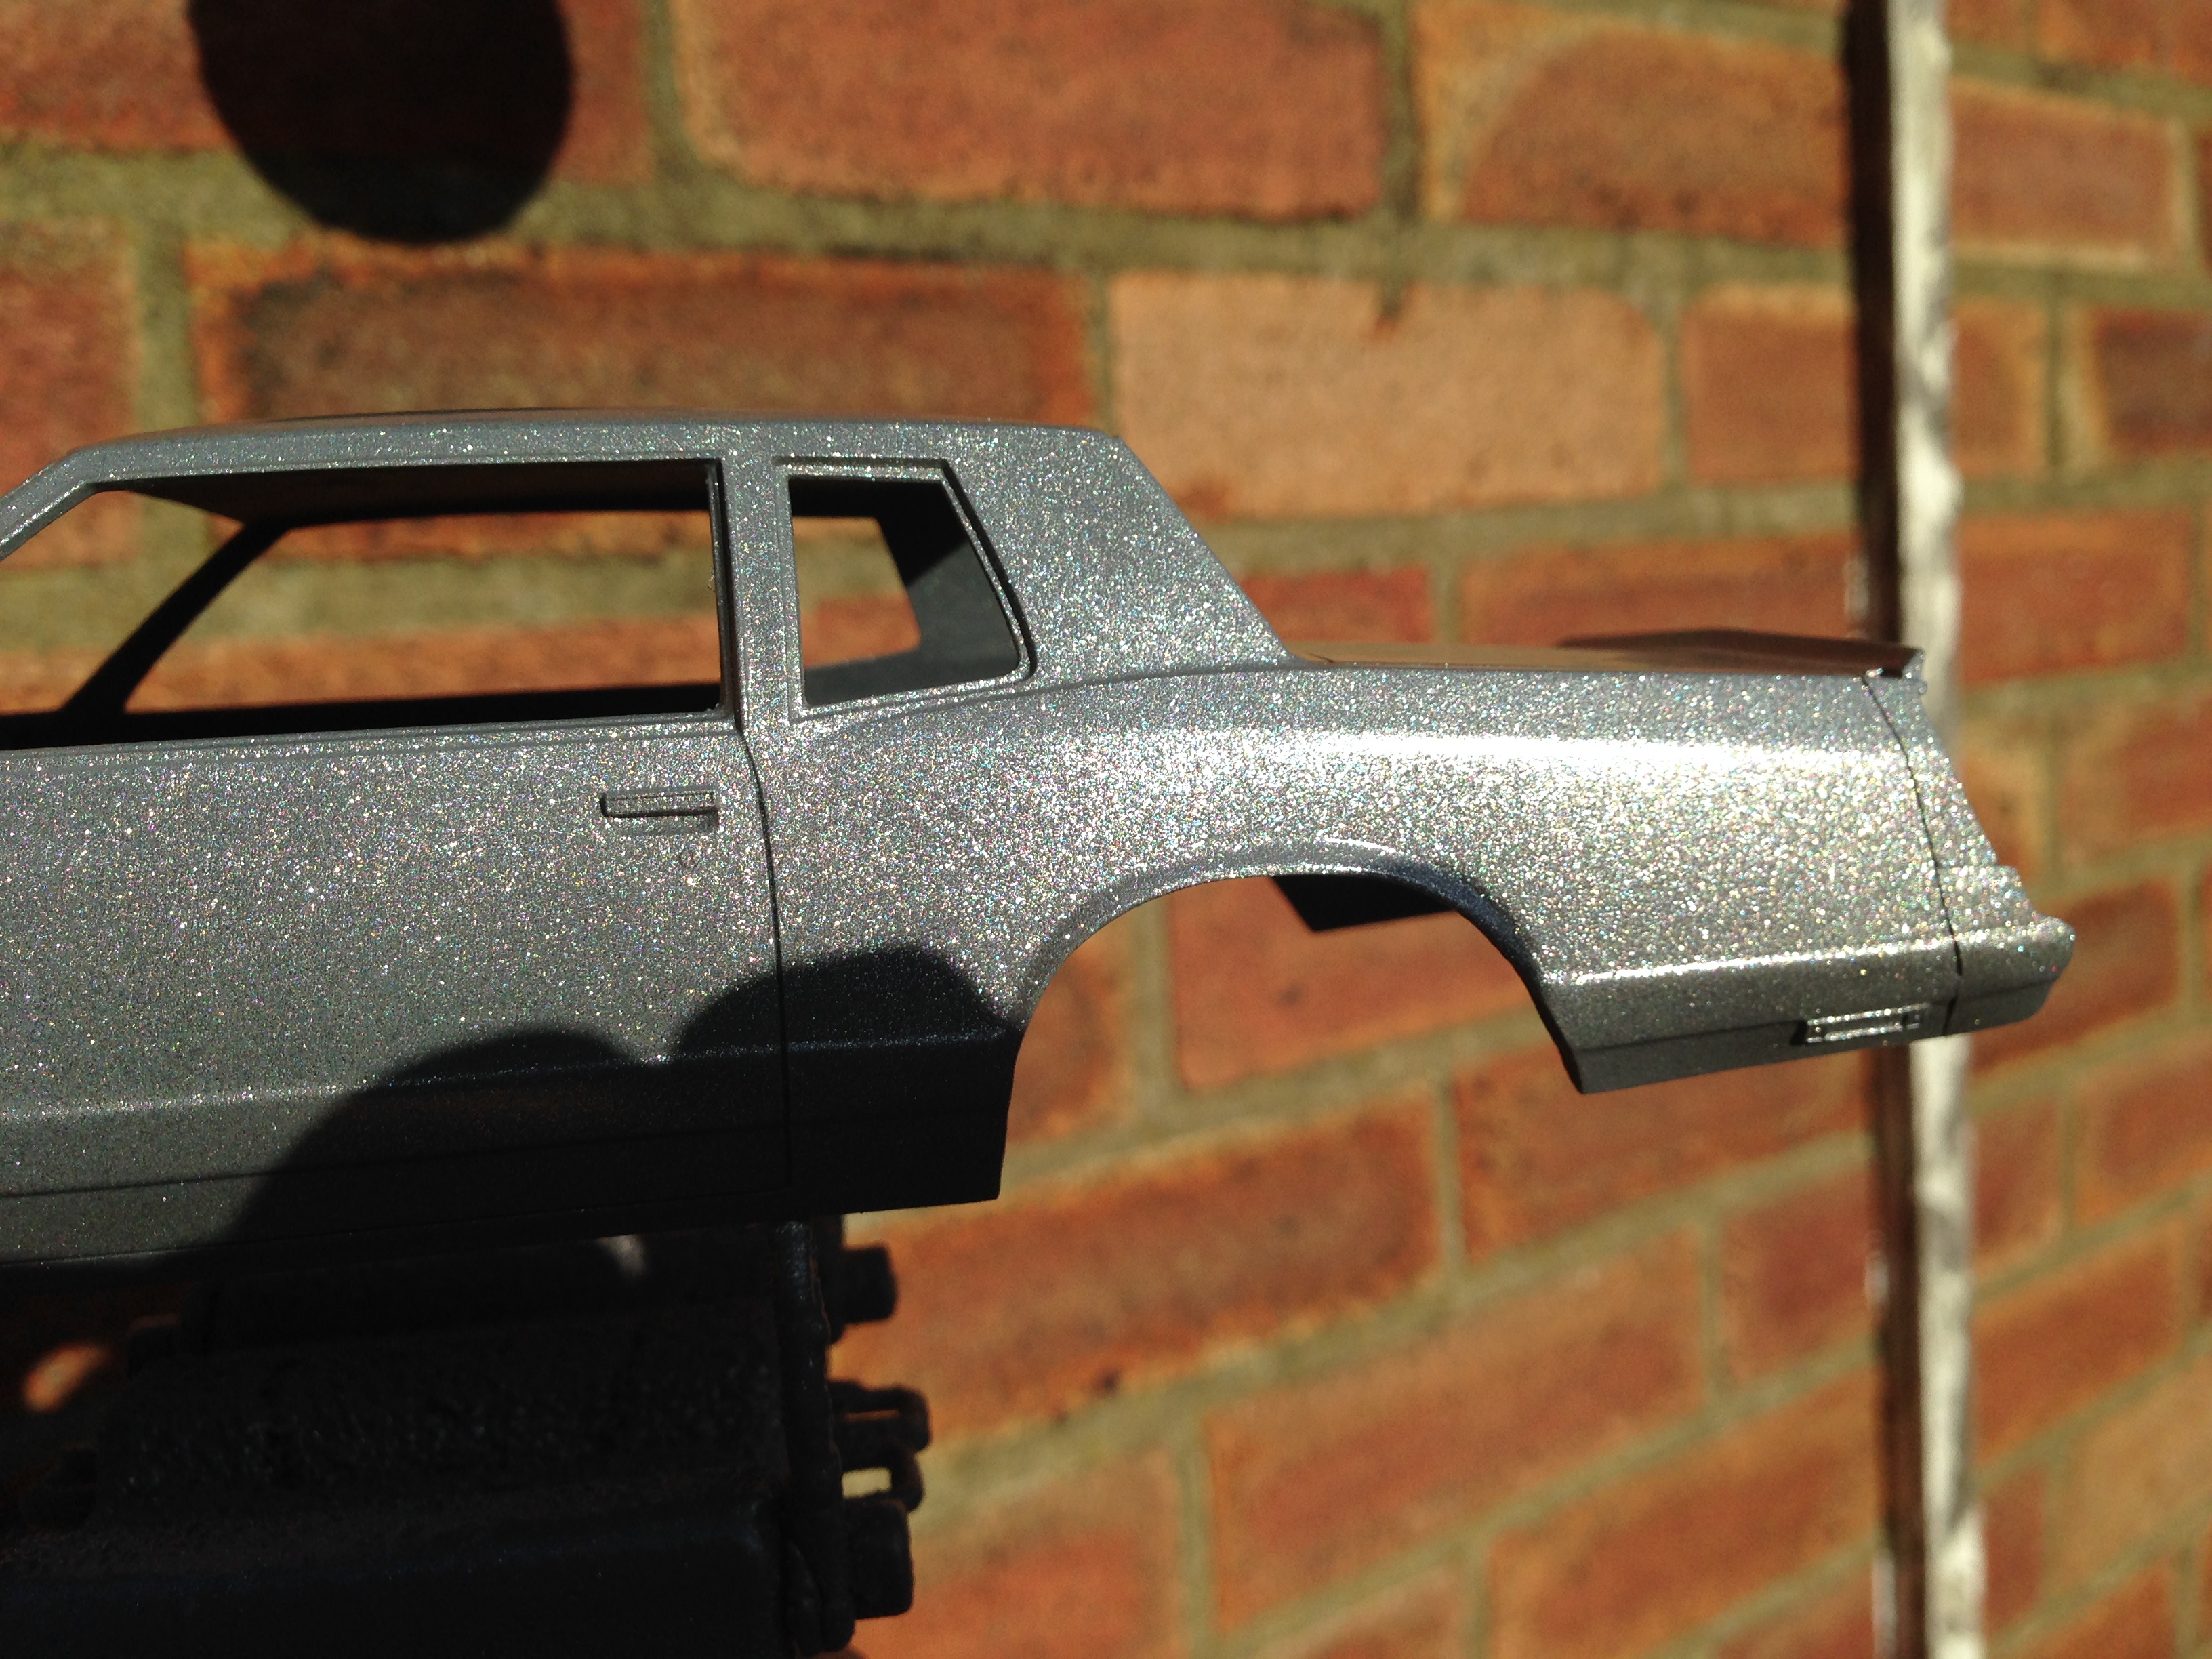
I can't seem to stop making lowriders at the moment. I'm obsessed or something. anyway, here's my go at a 1970 Chevy Monte Carlo. I reworked the rear suspension to drop it as far as the chassis would allow and converted it to a 4-link setup. Paint is all nail polish, with rattle can clear. It's base colour is orange, in case your screen makes it look red. The interior is Tamiya orange with some gold flake highlights. Any comments or questions are welcome. thanks for looking
-
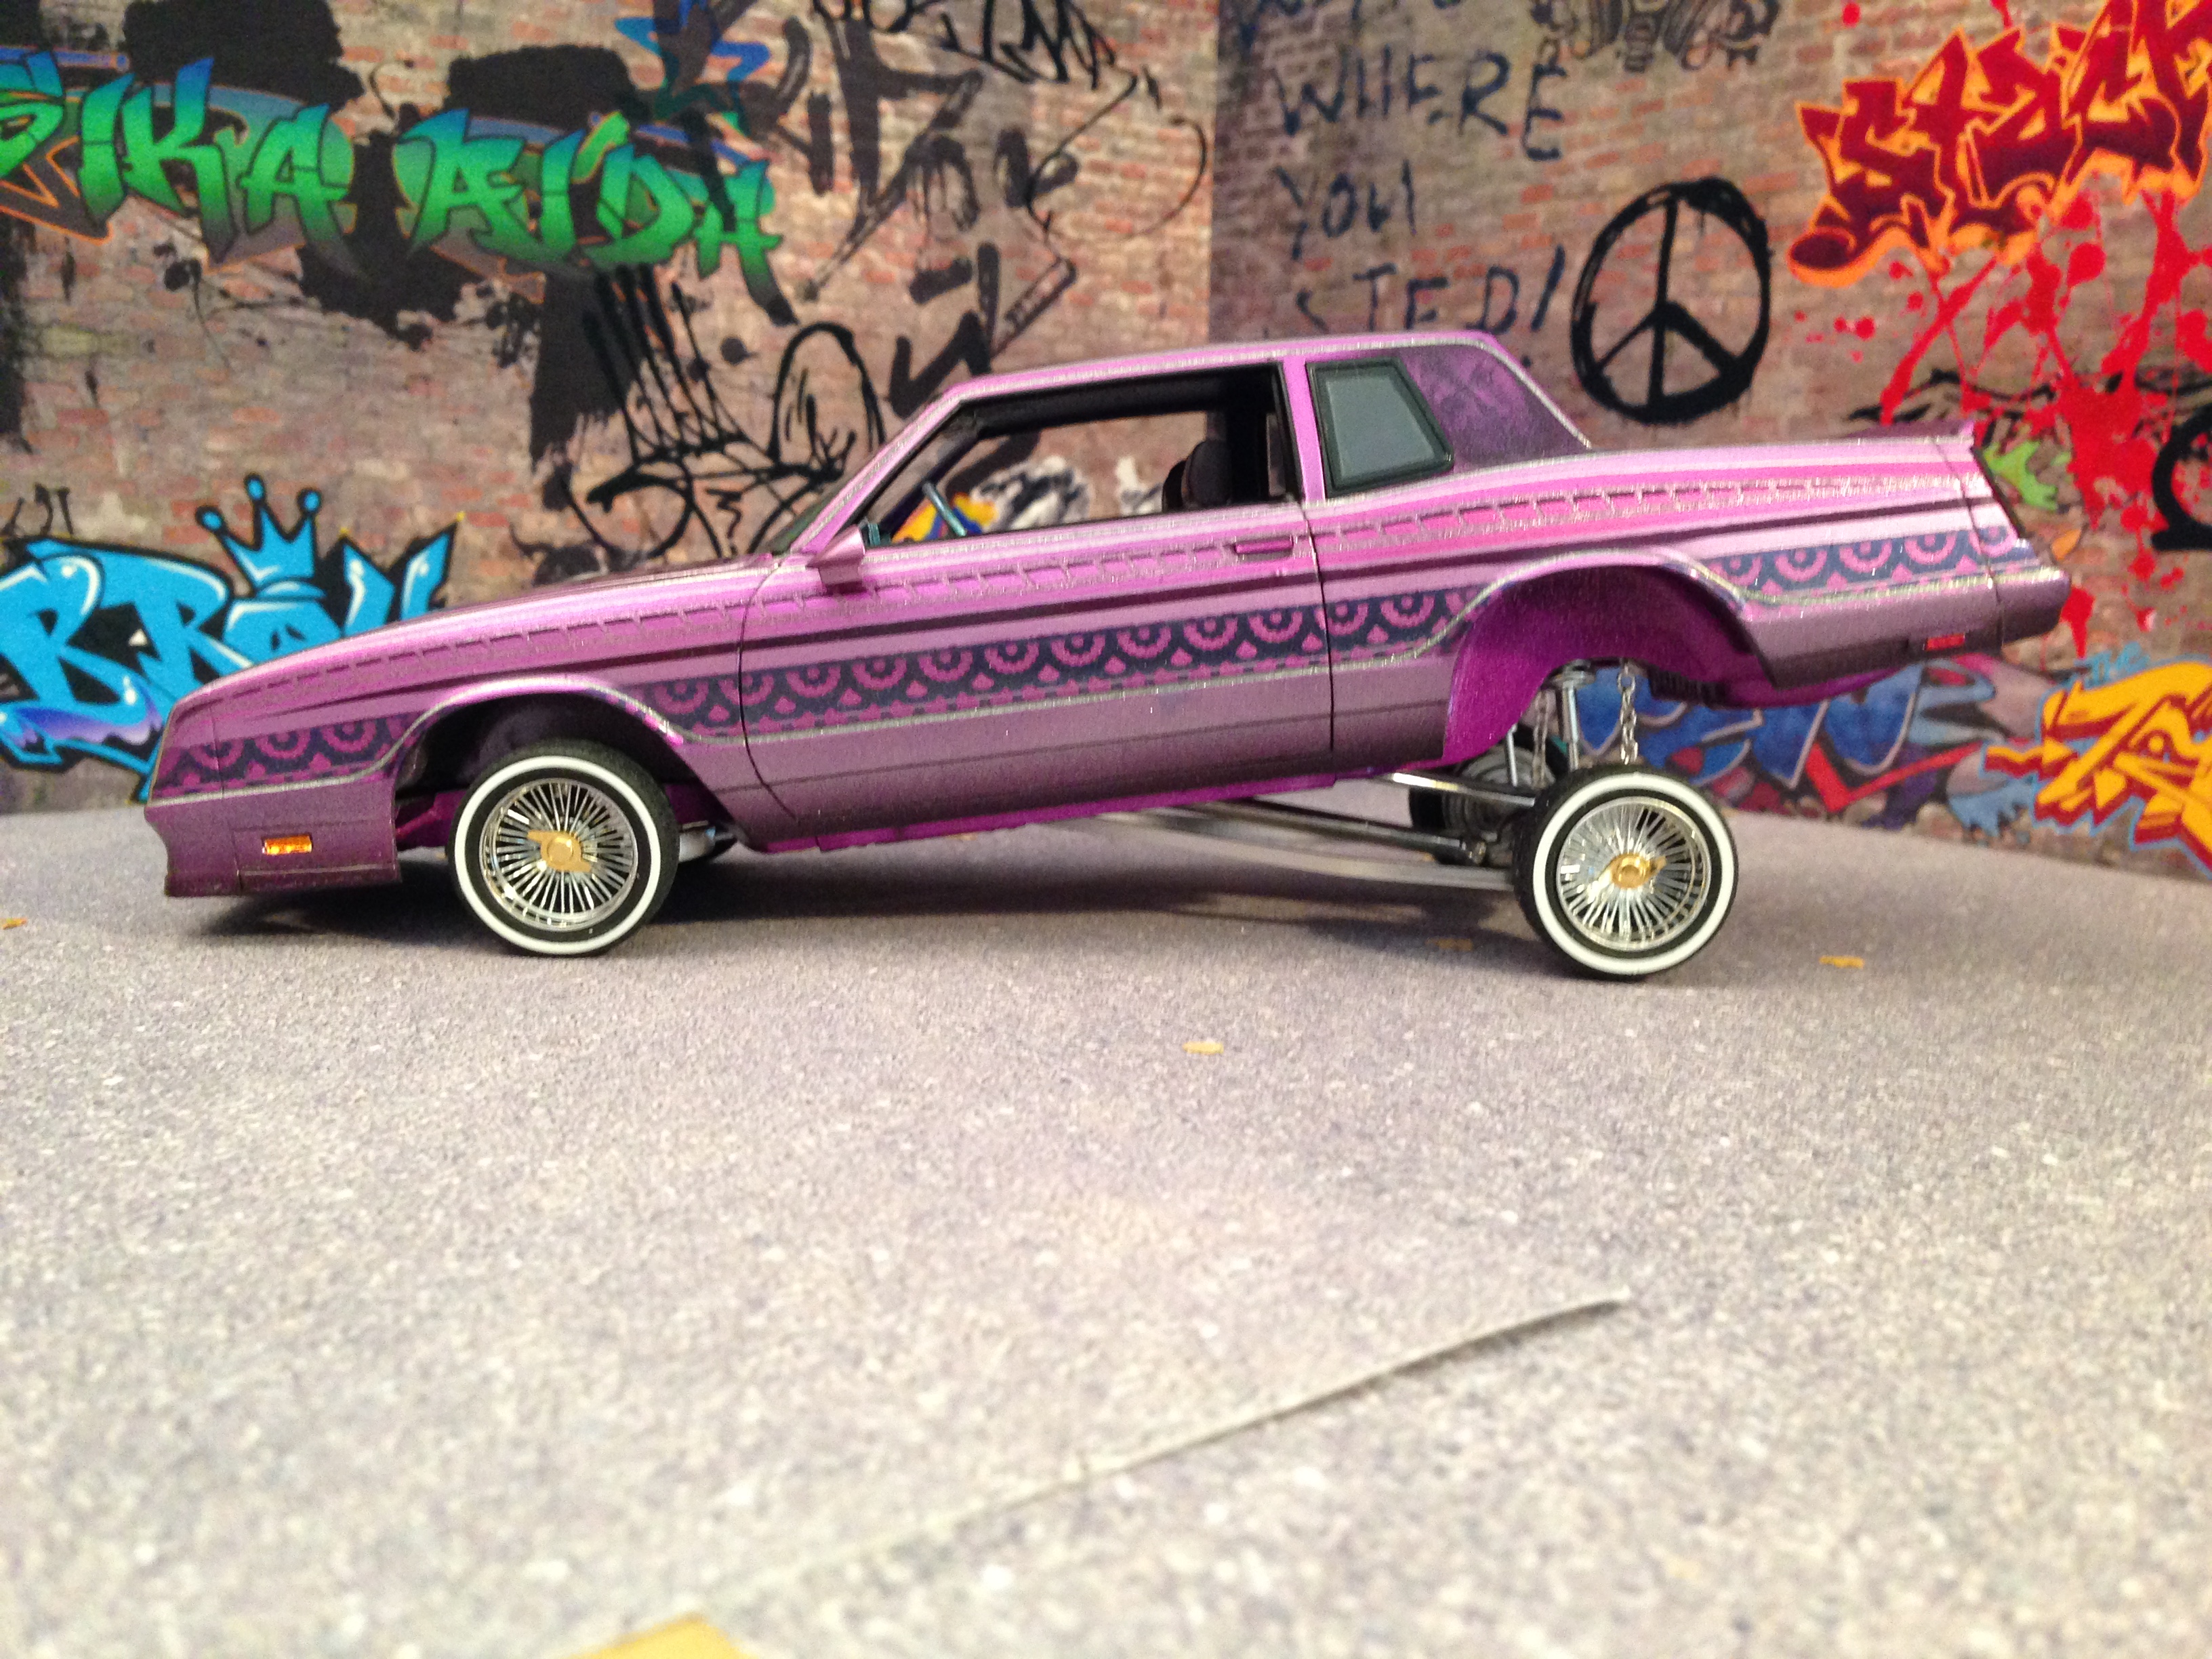
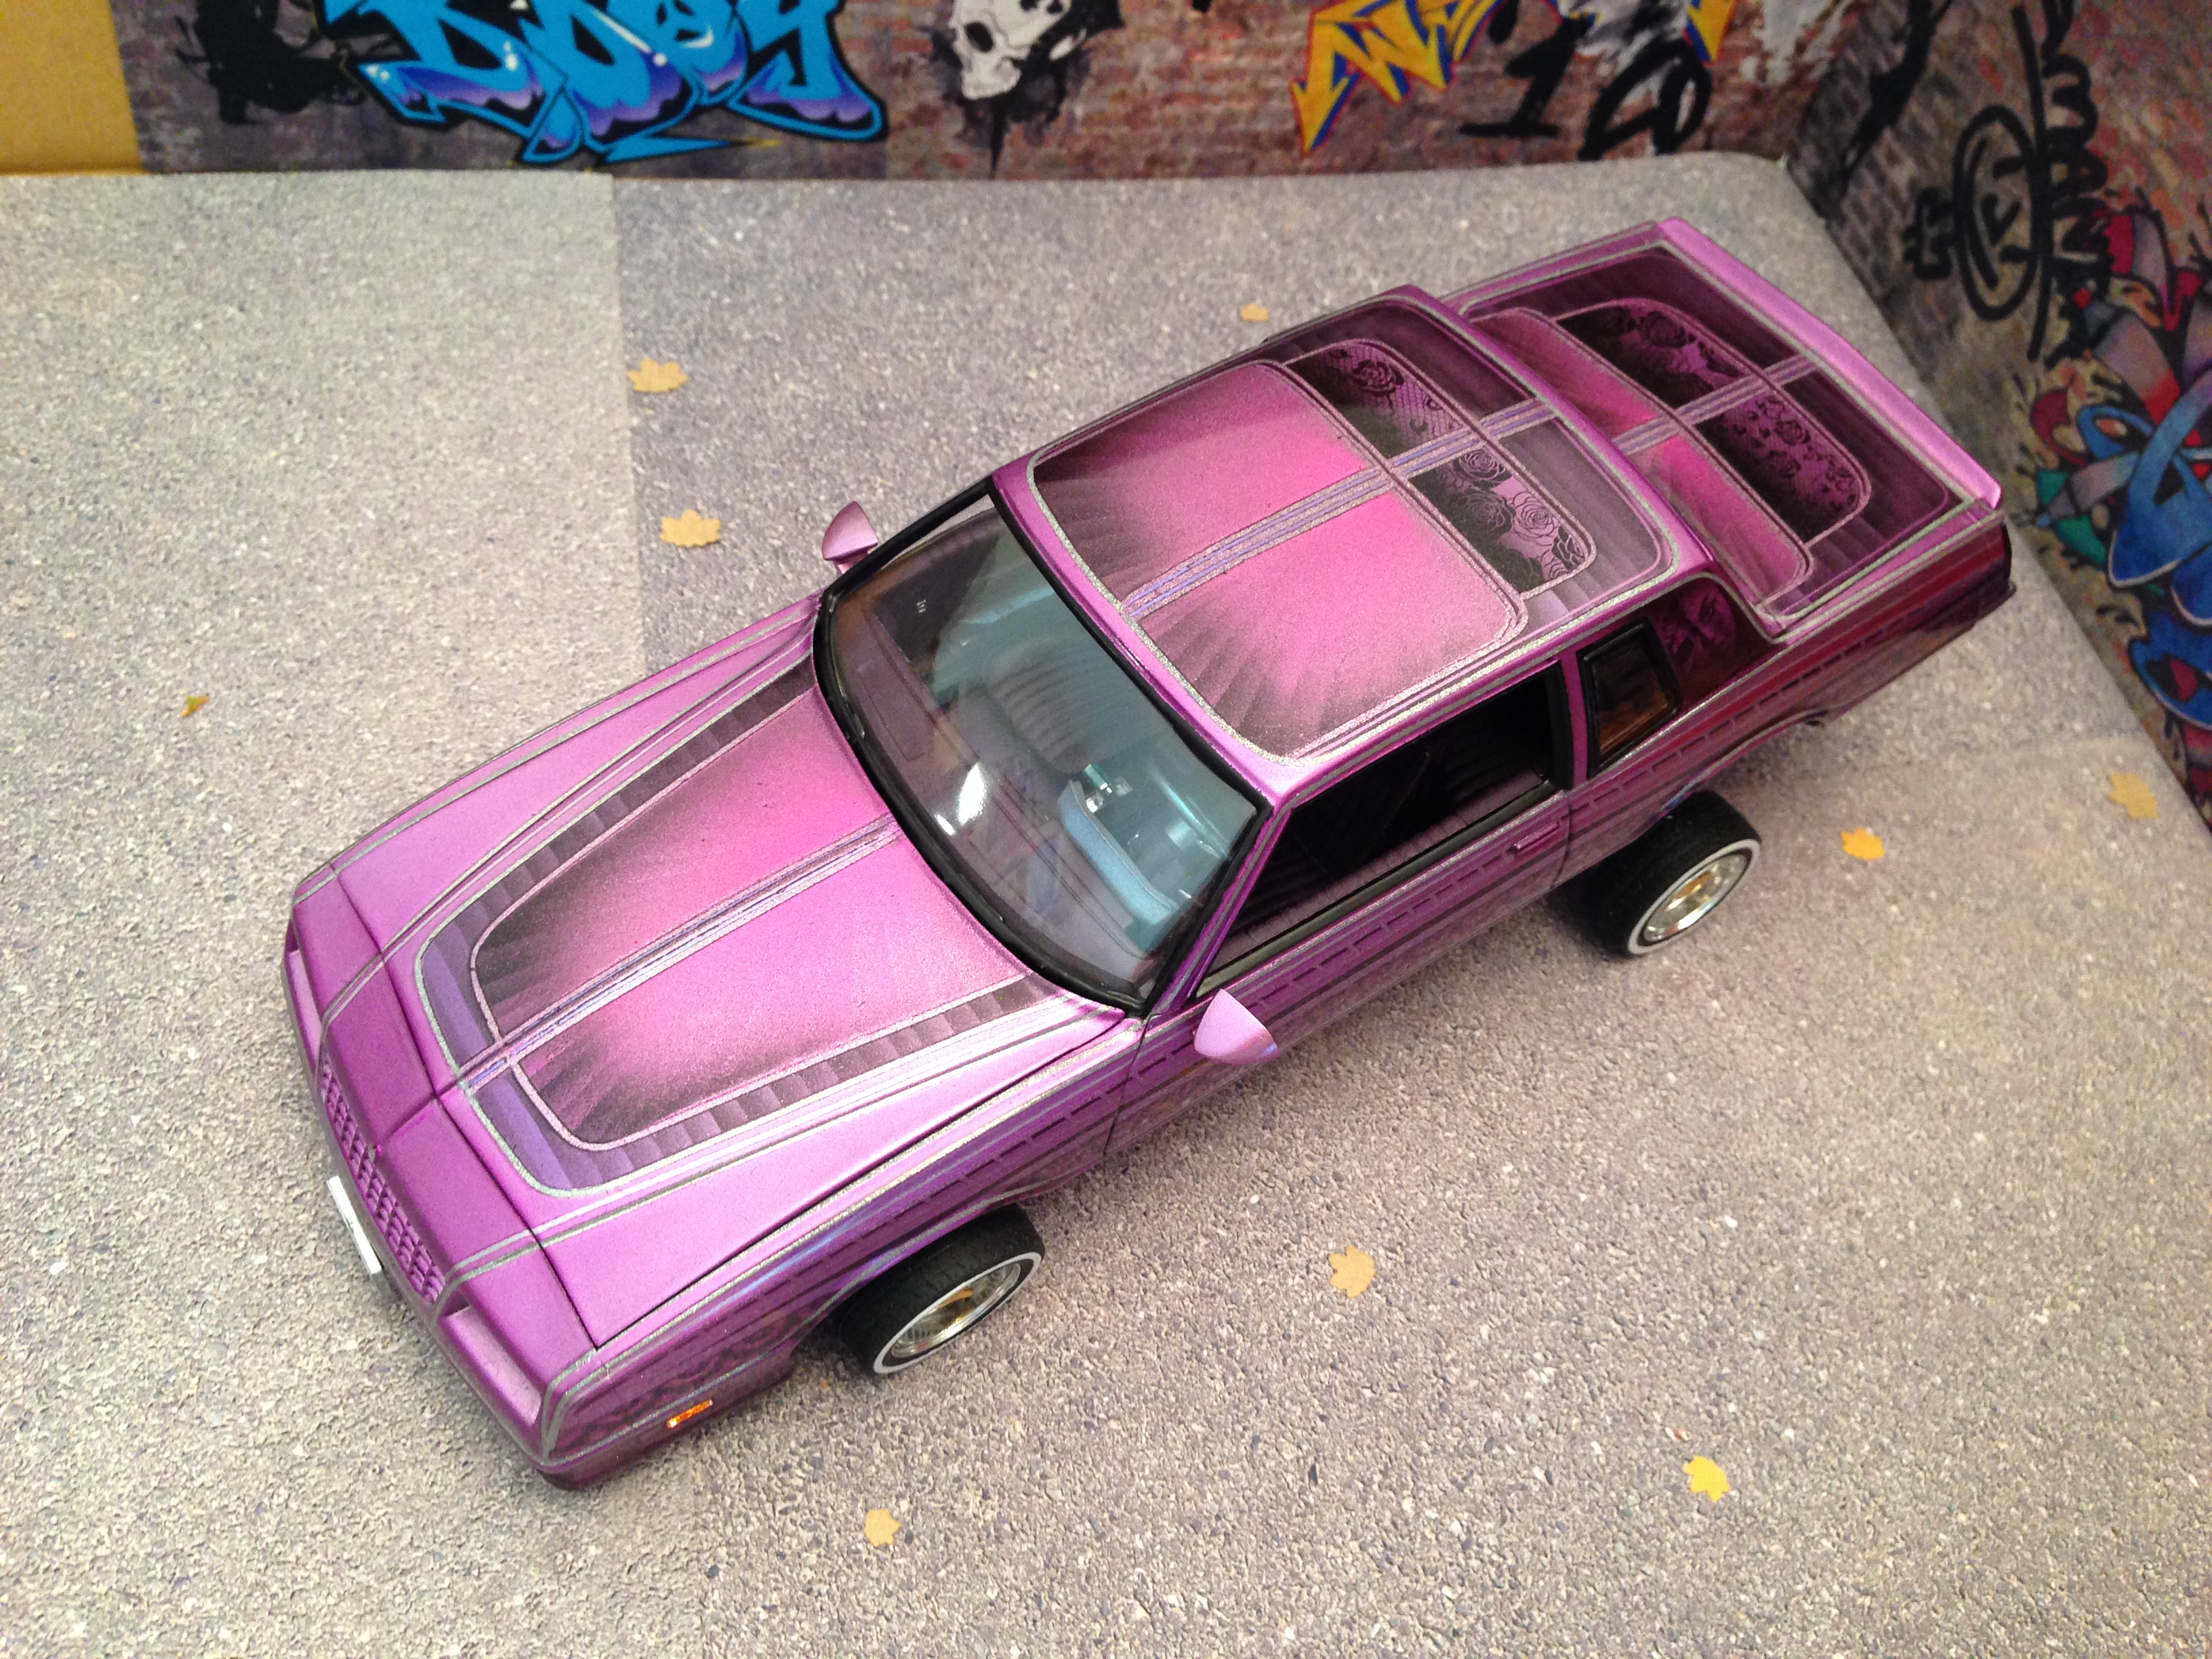
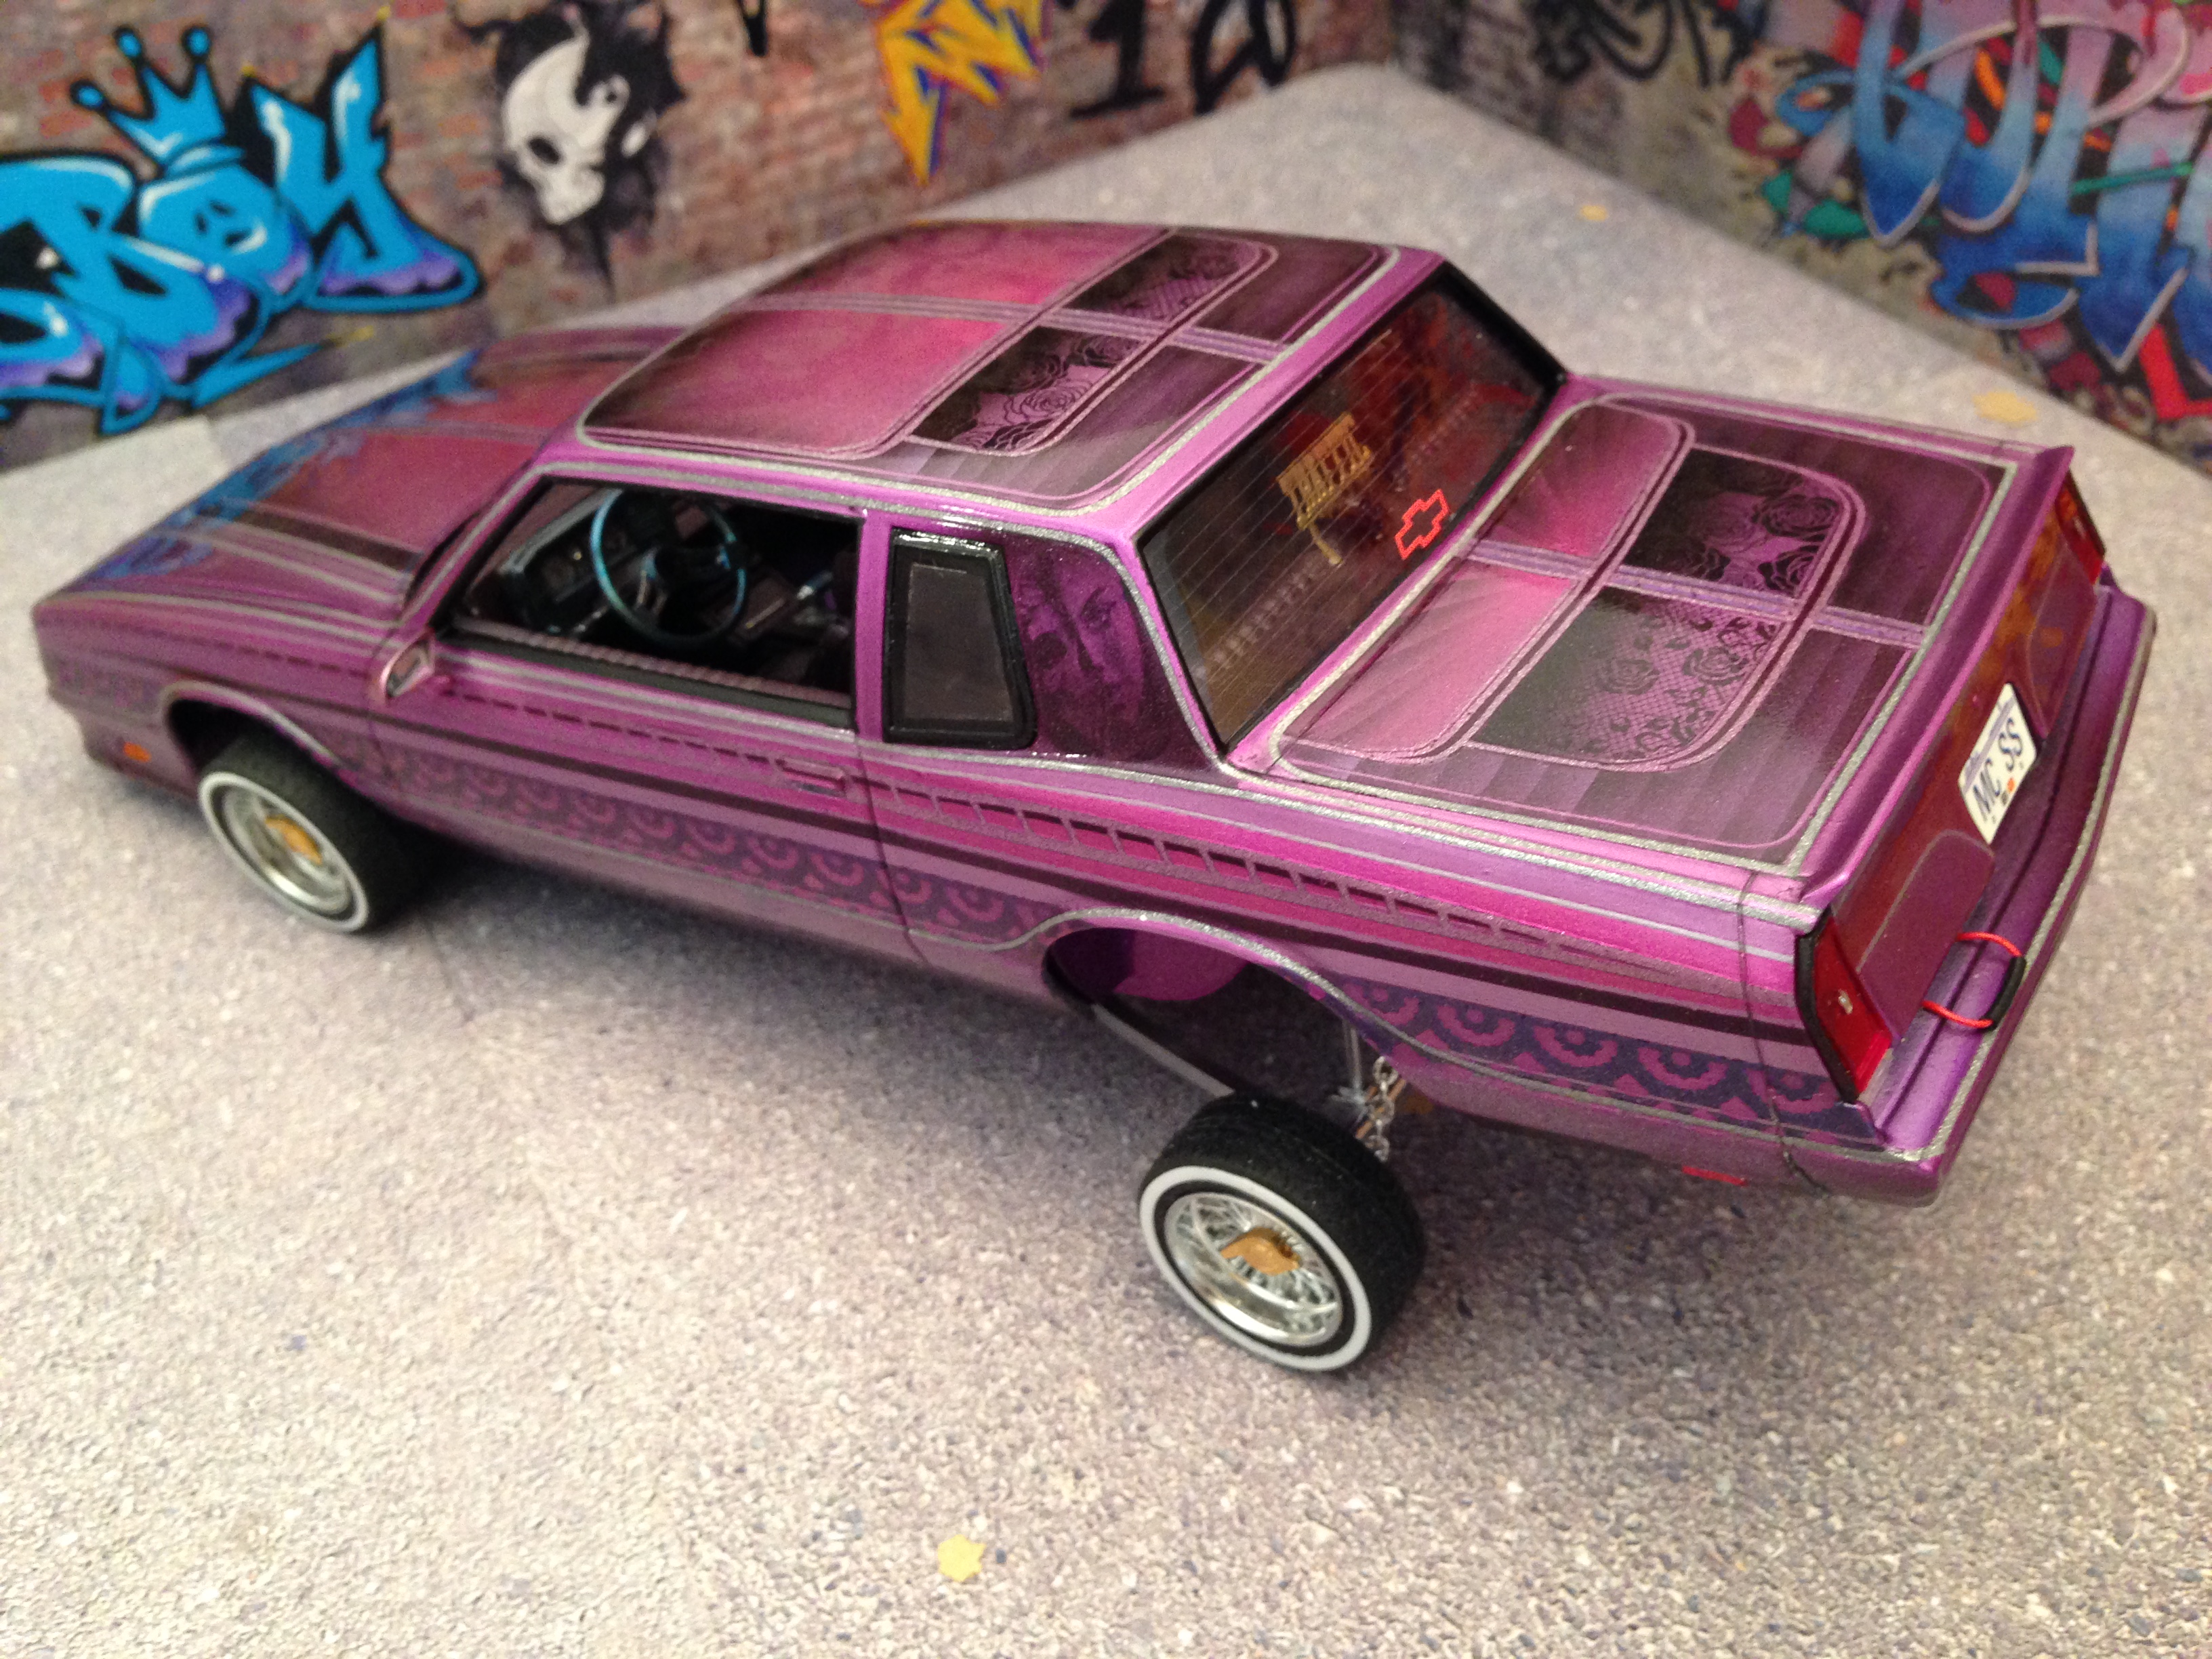
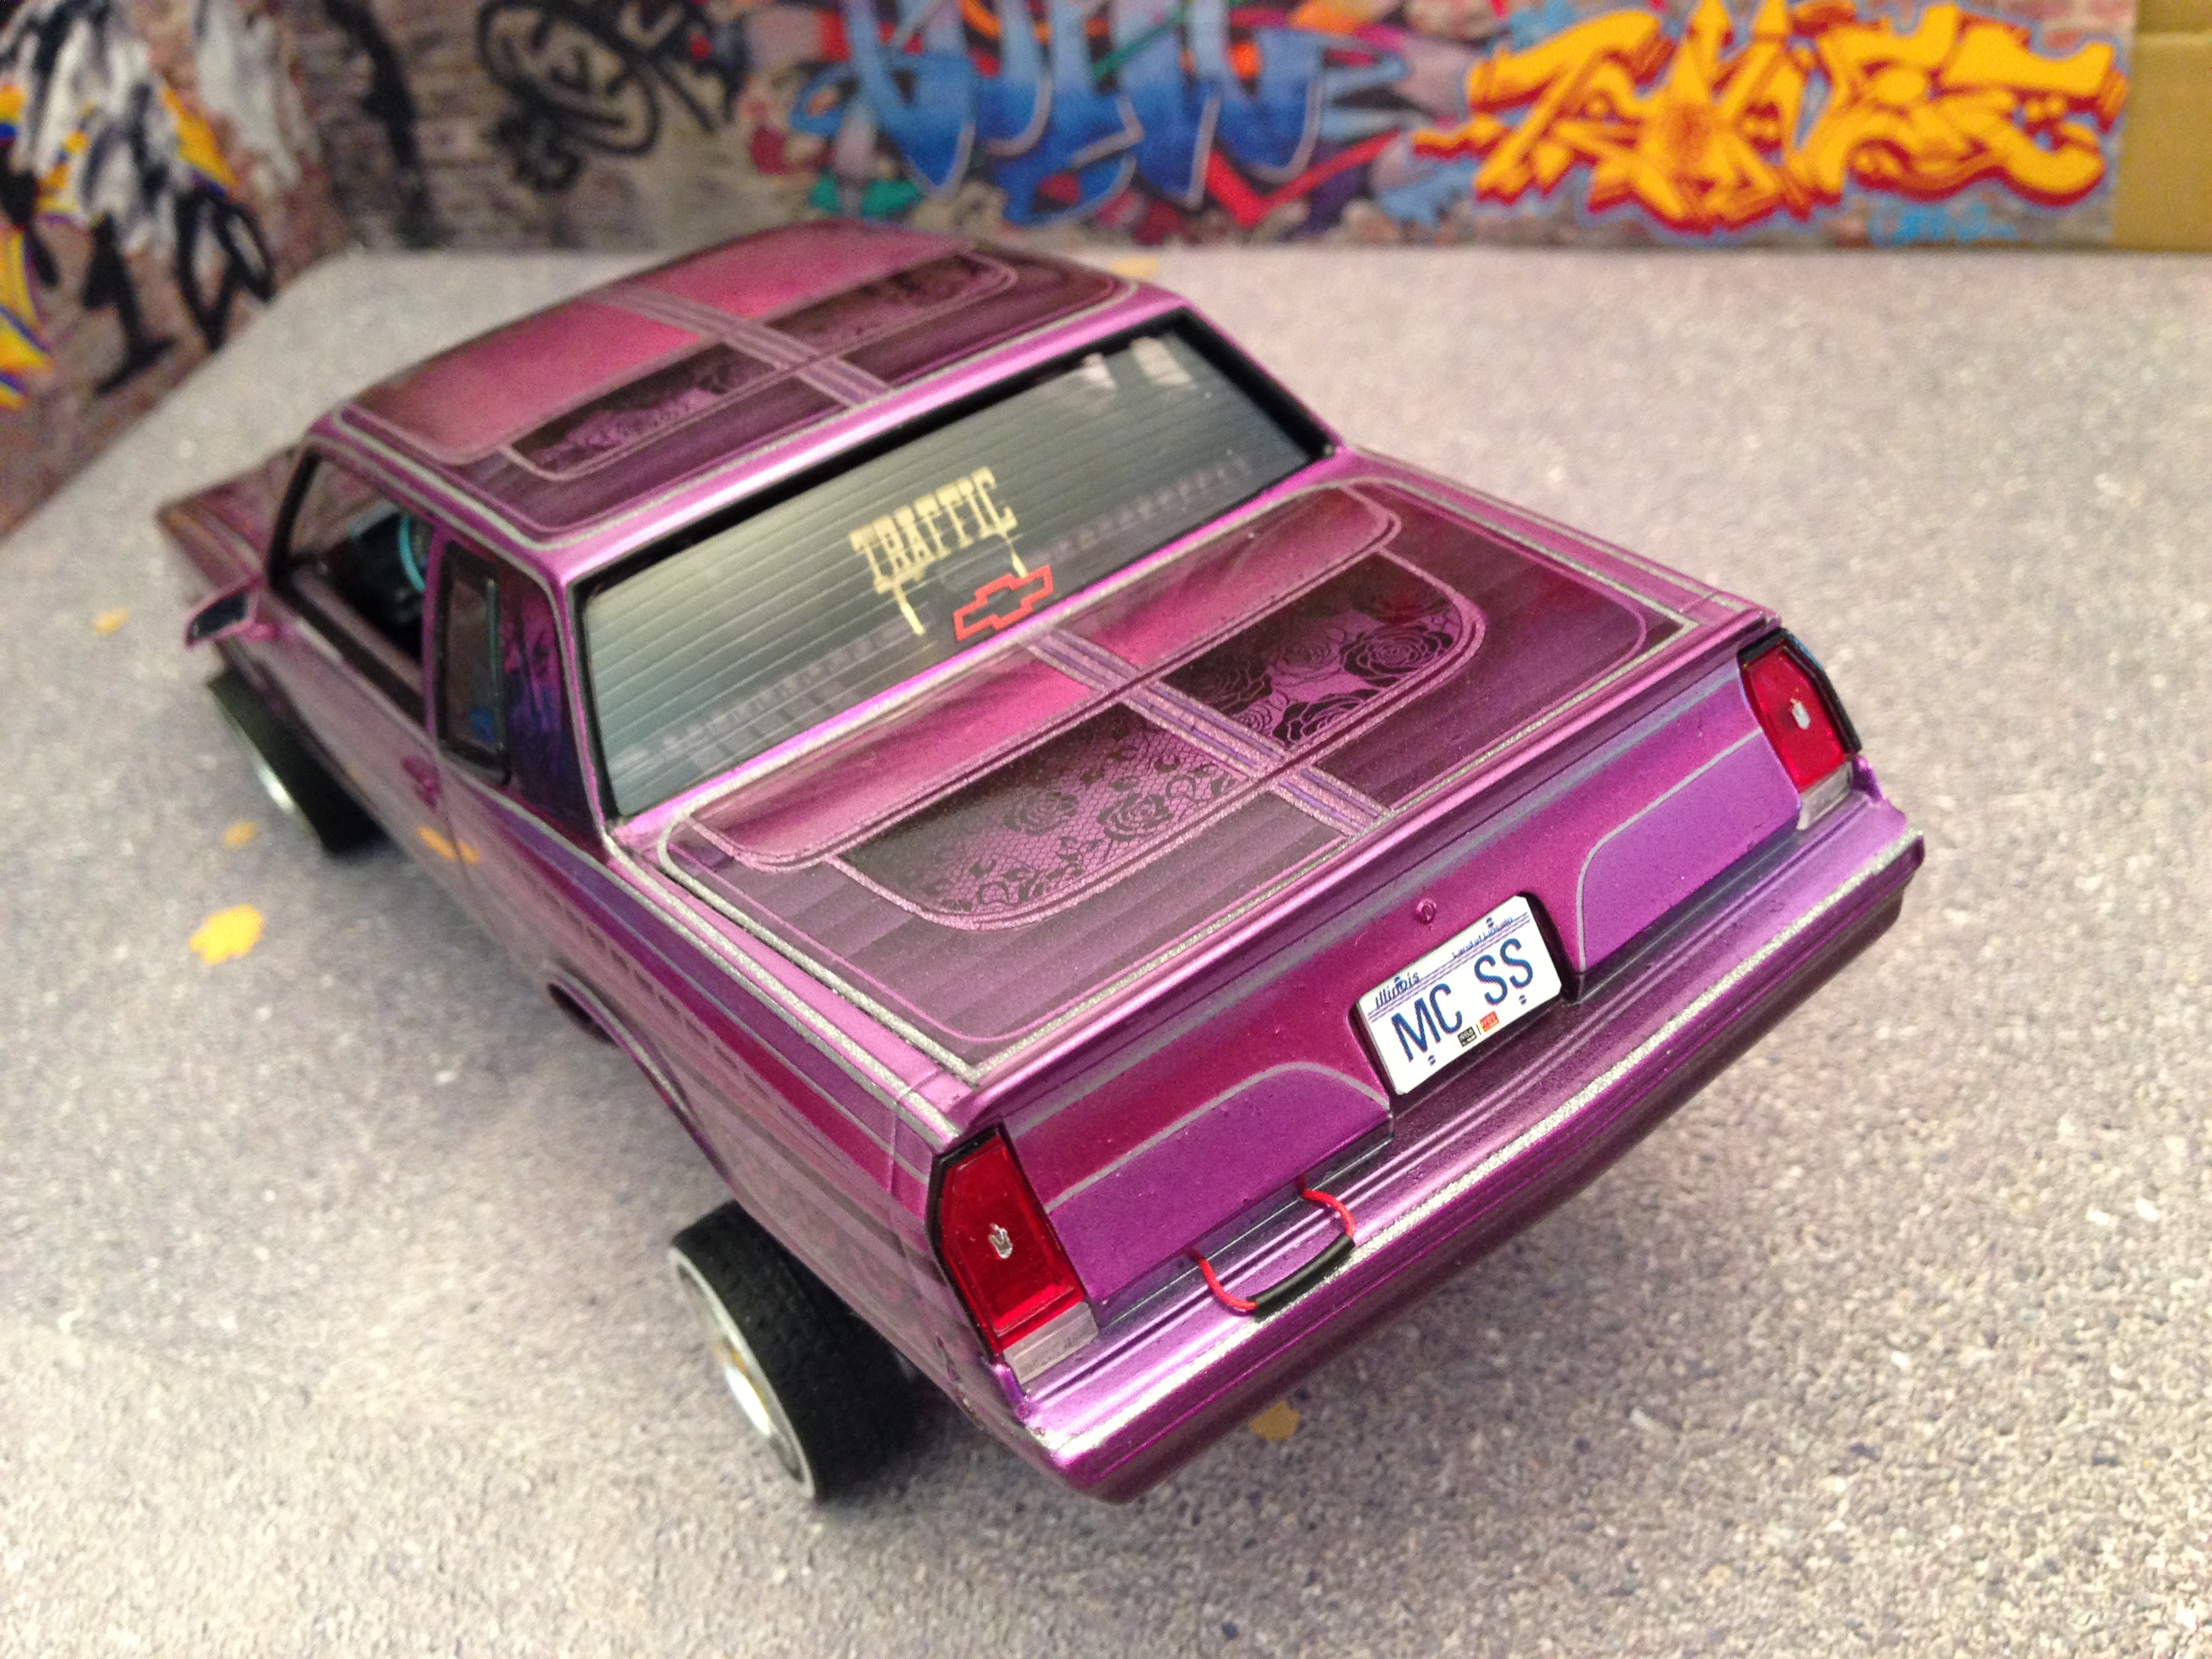
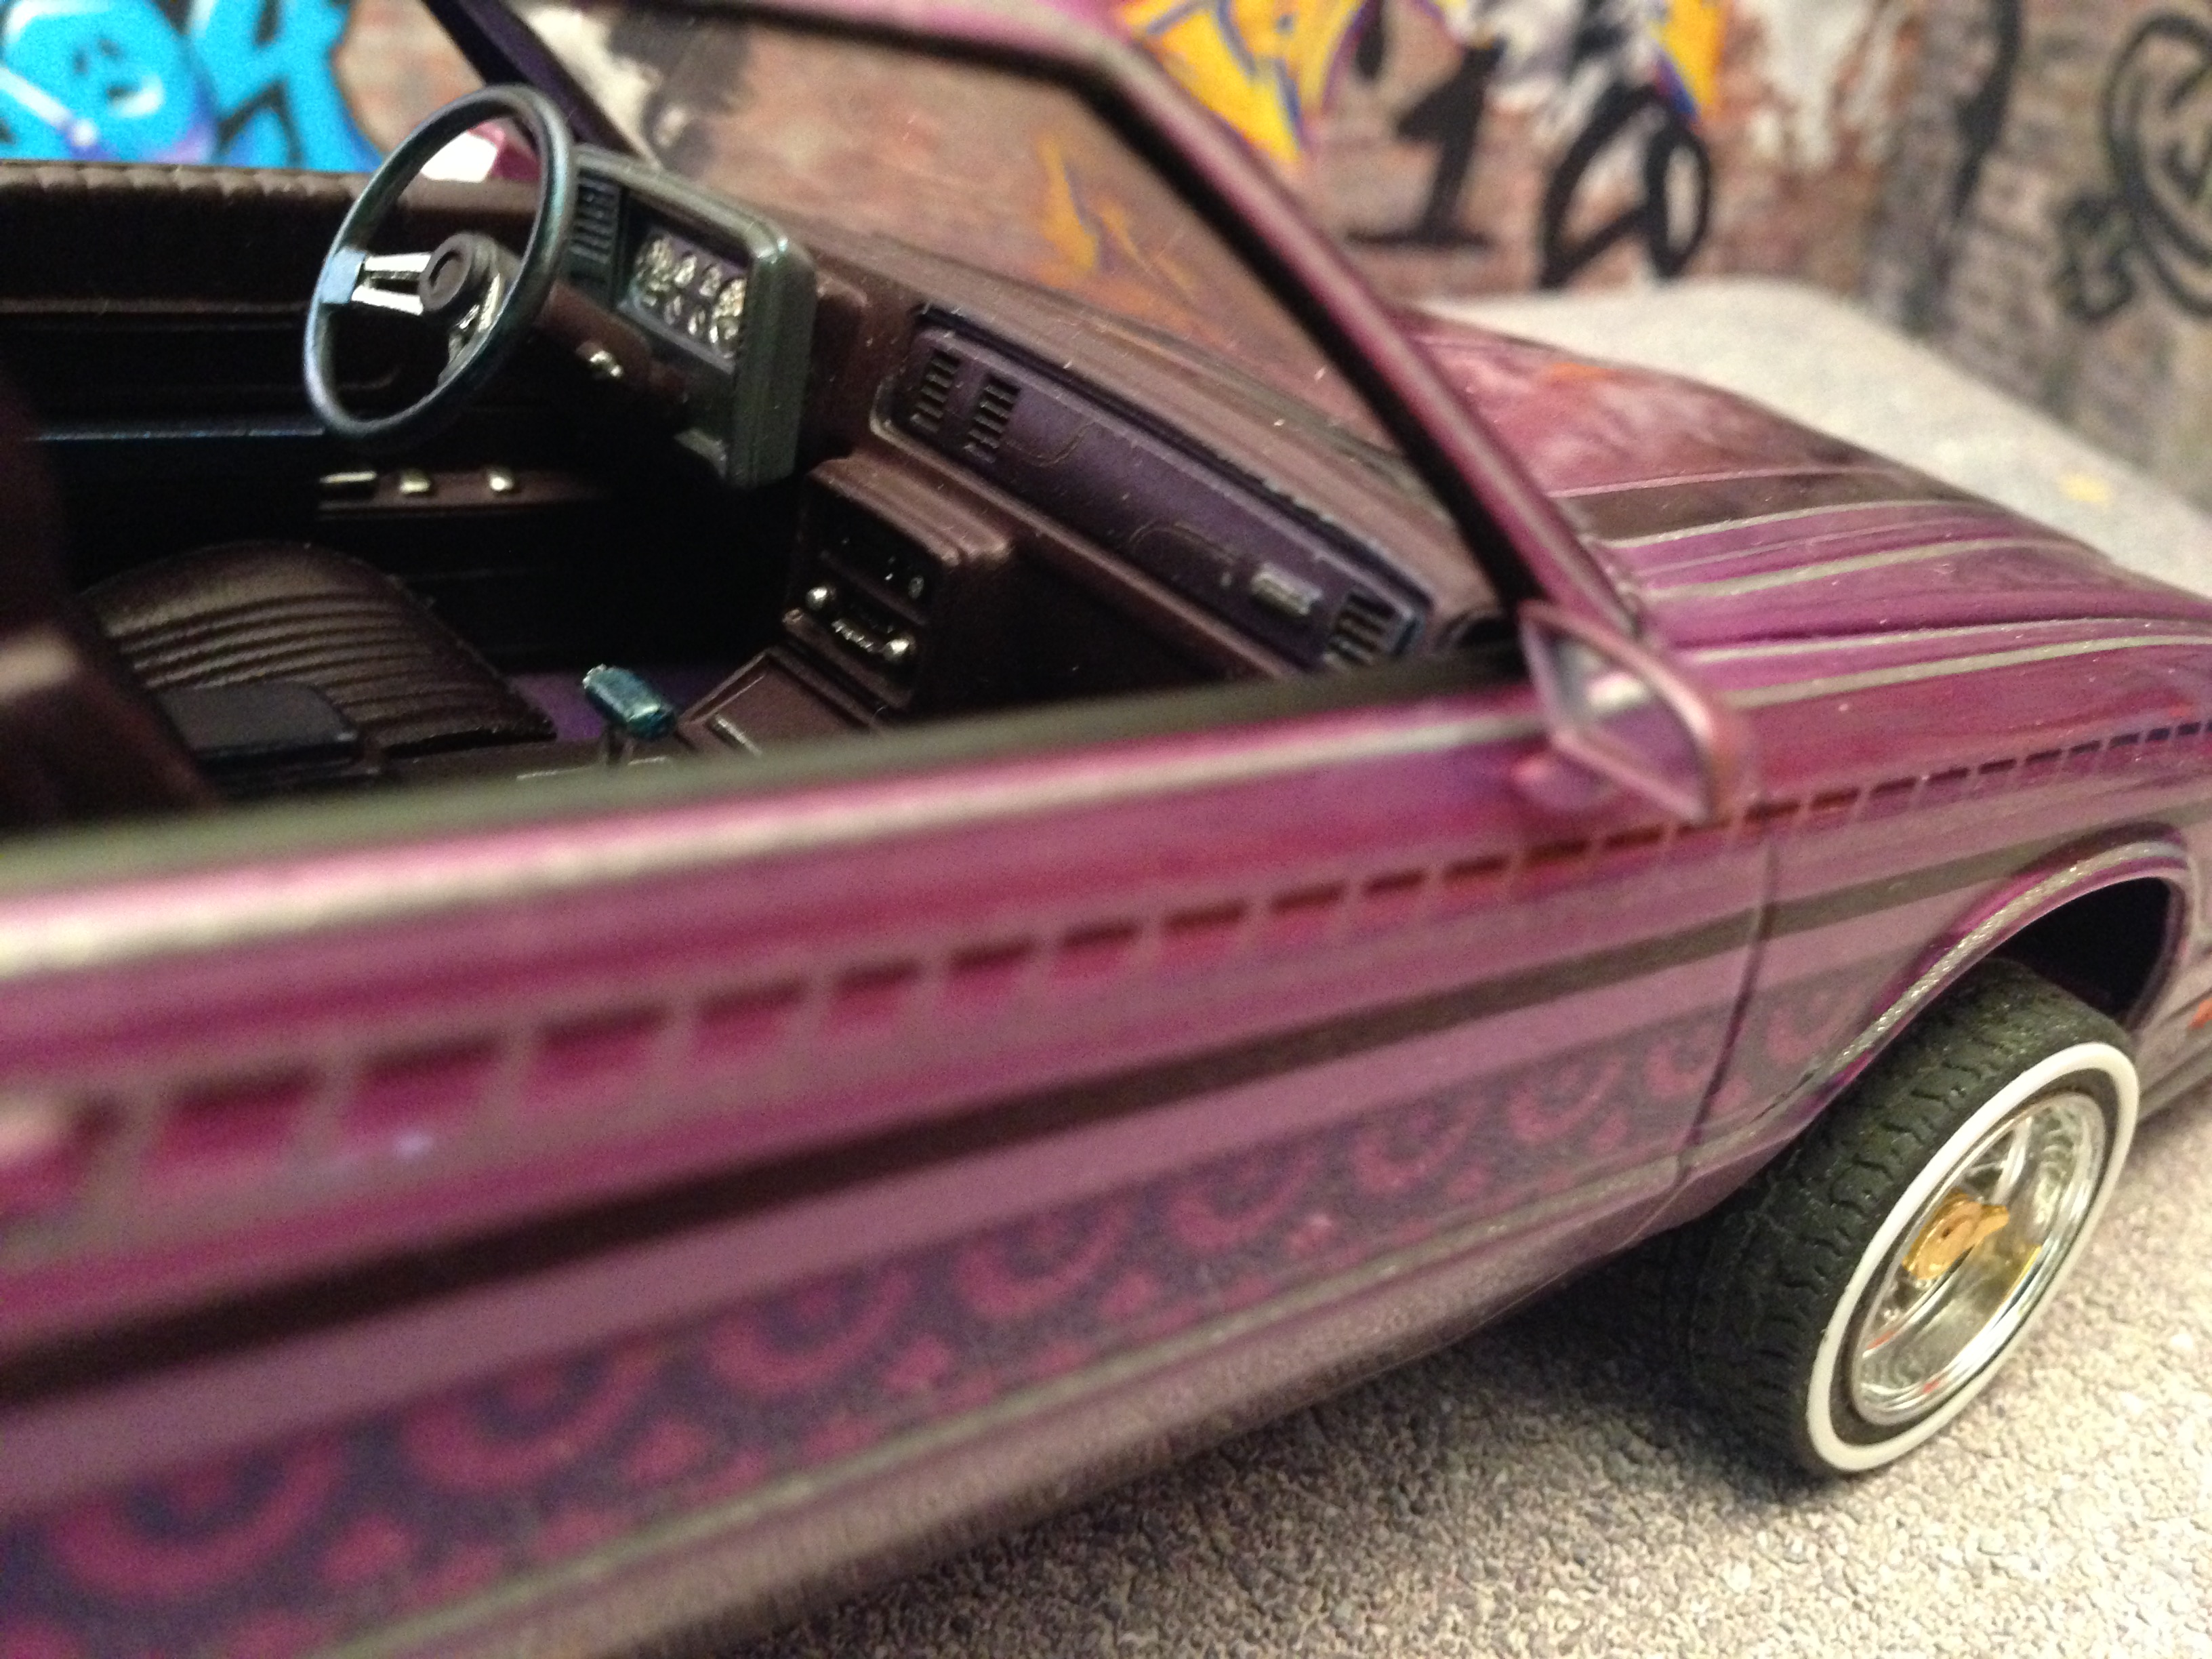
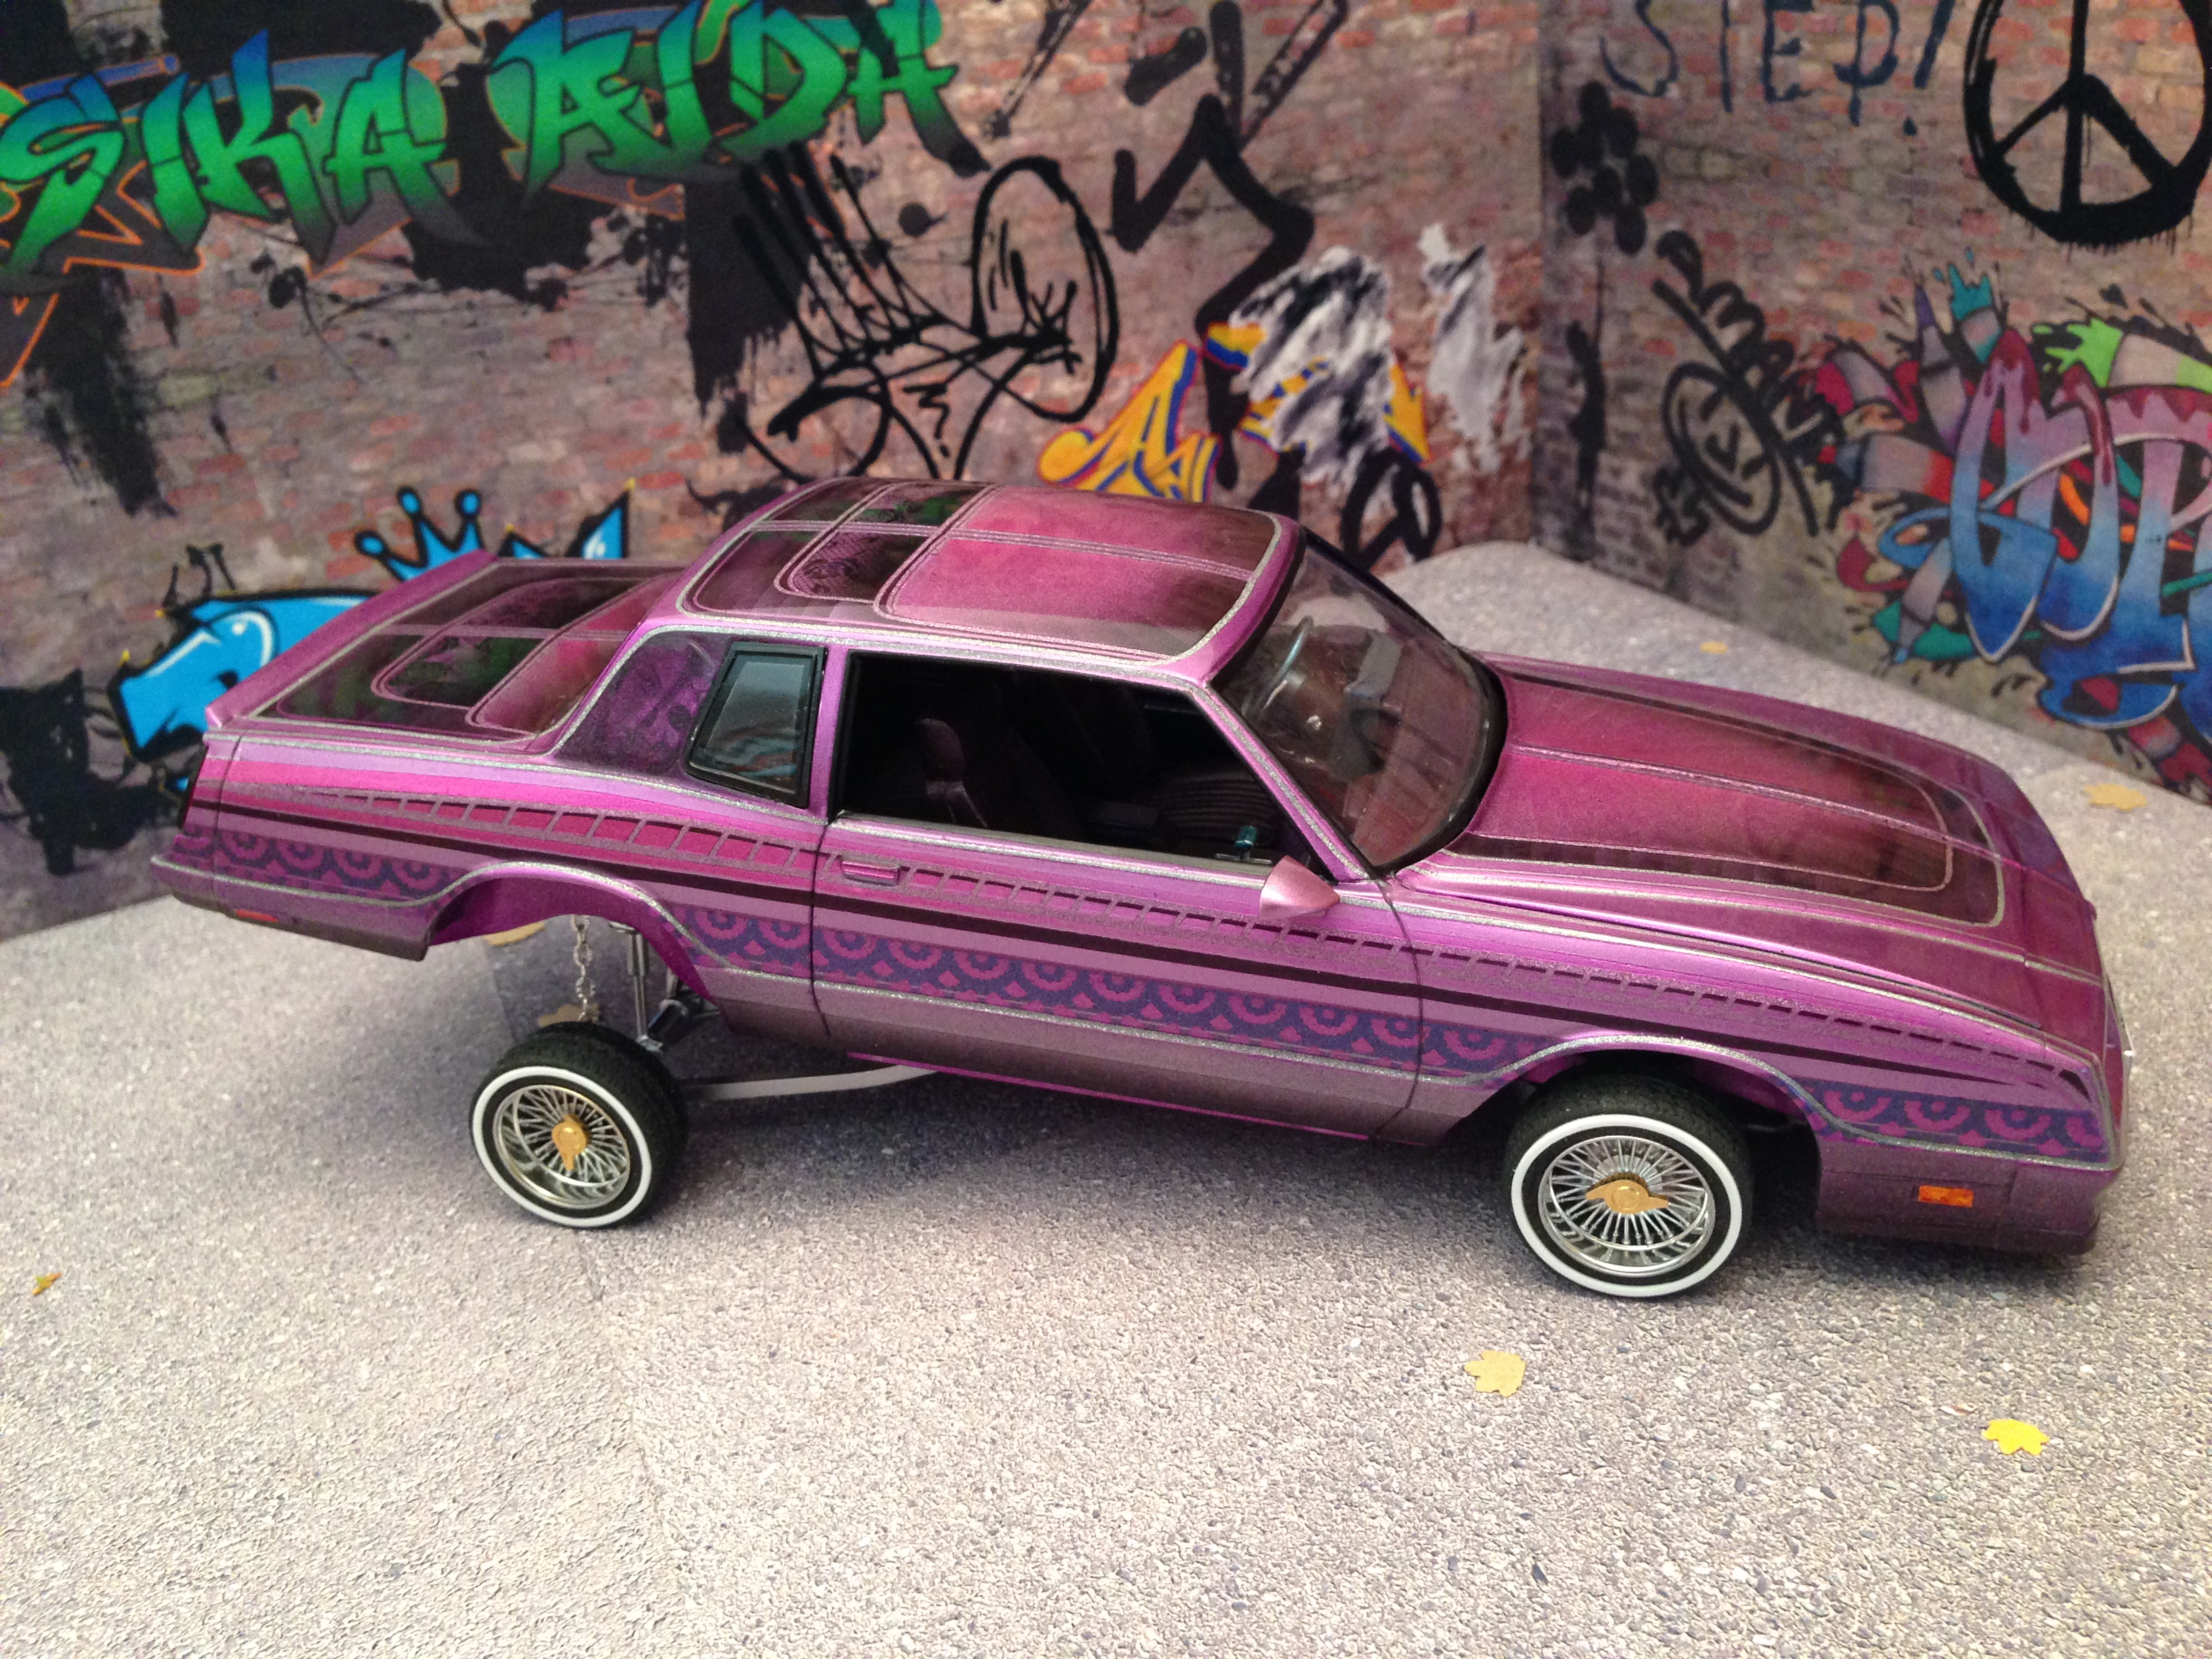
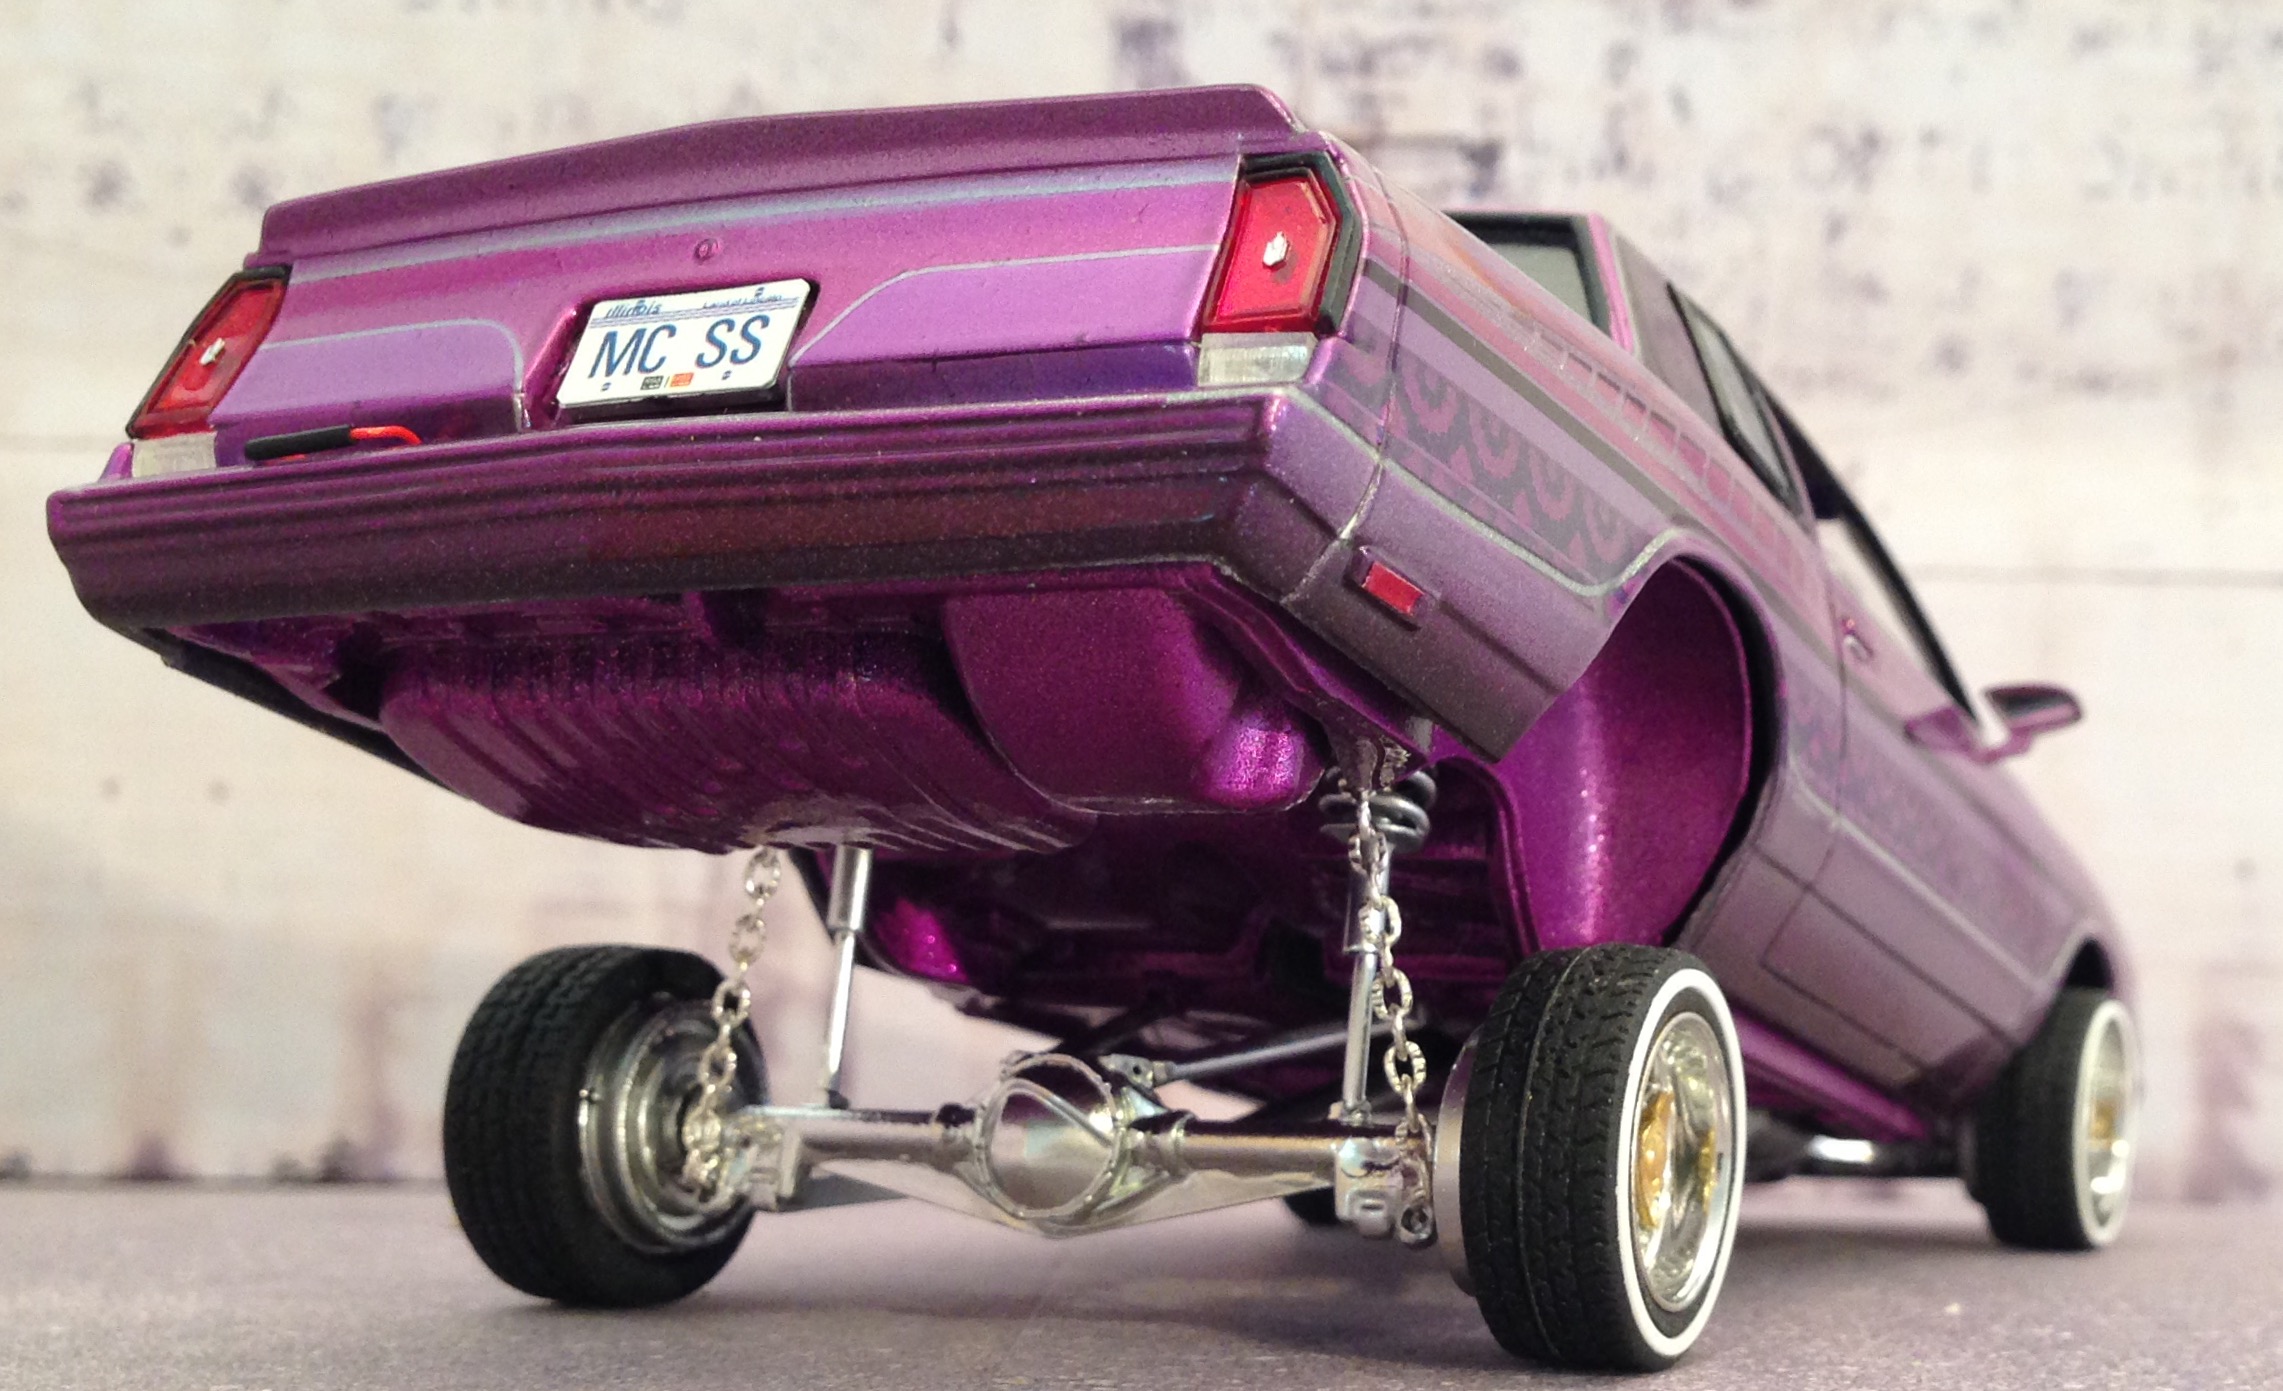
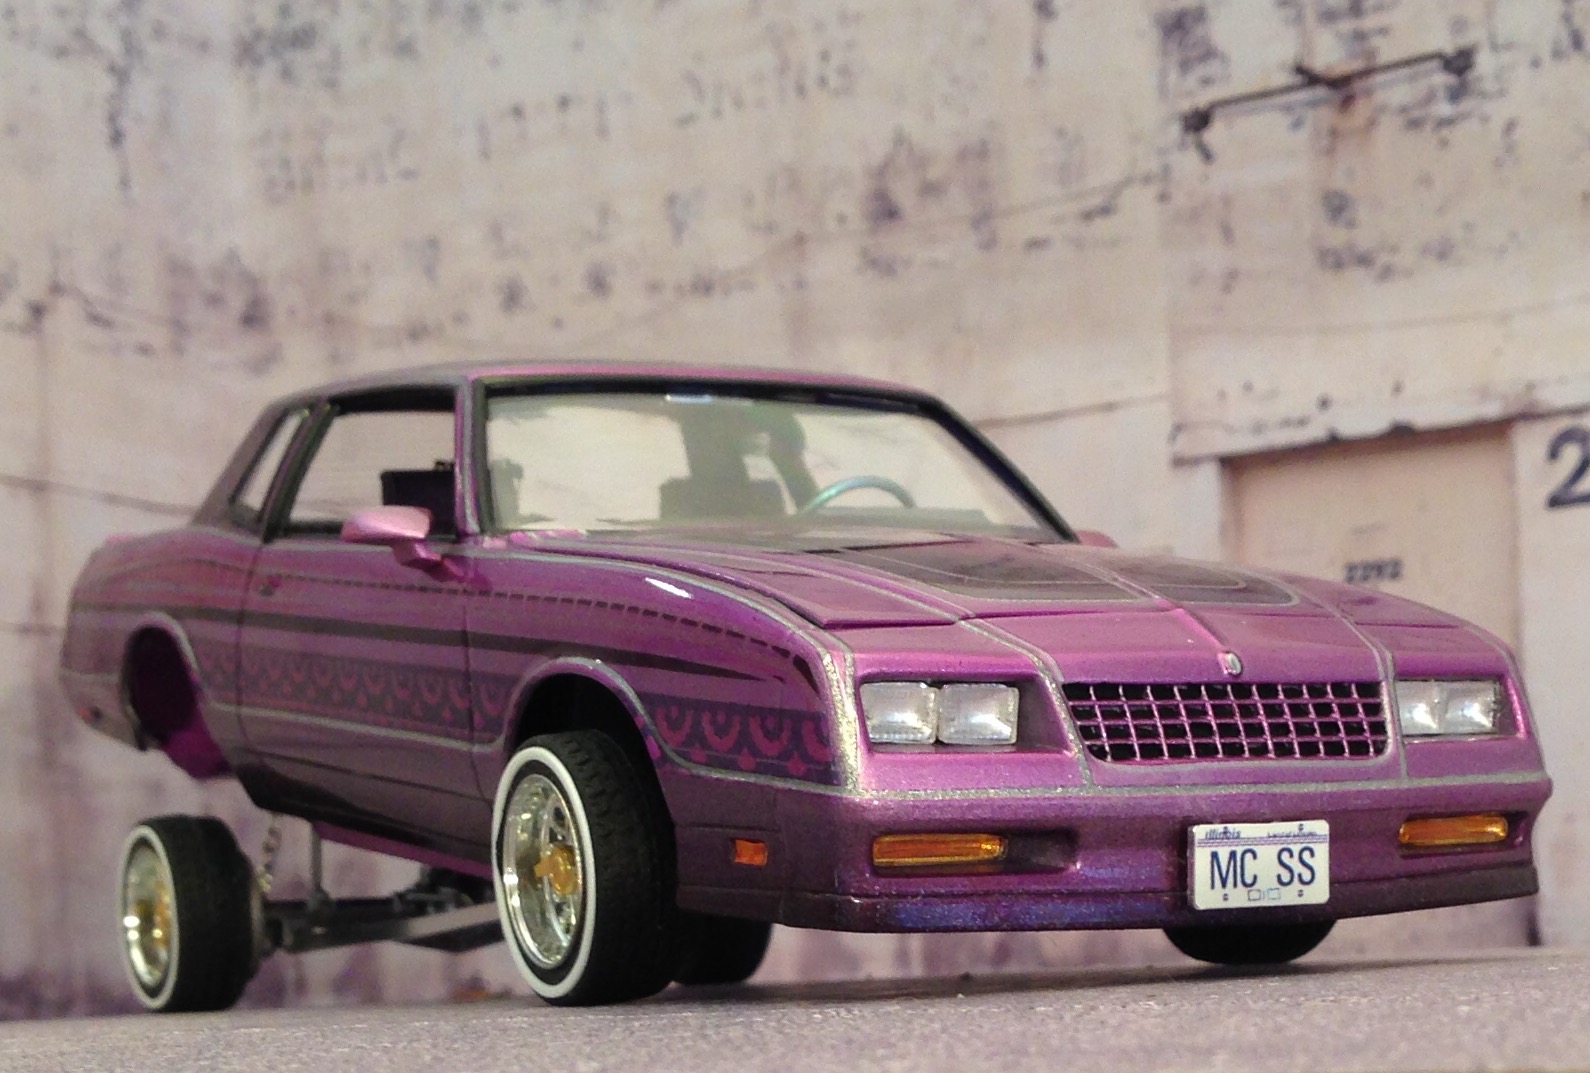
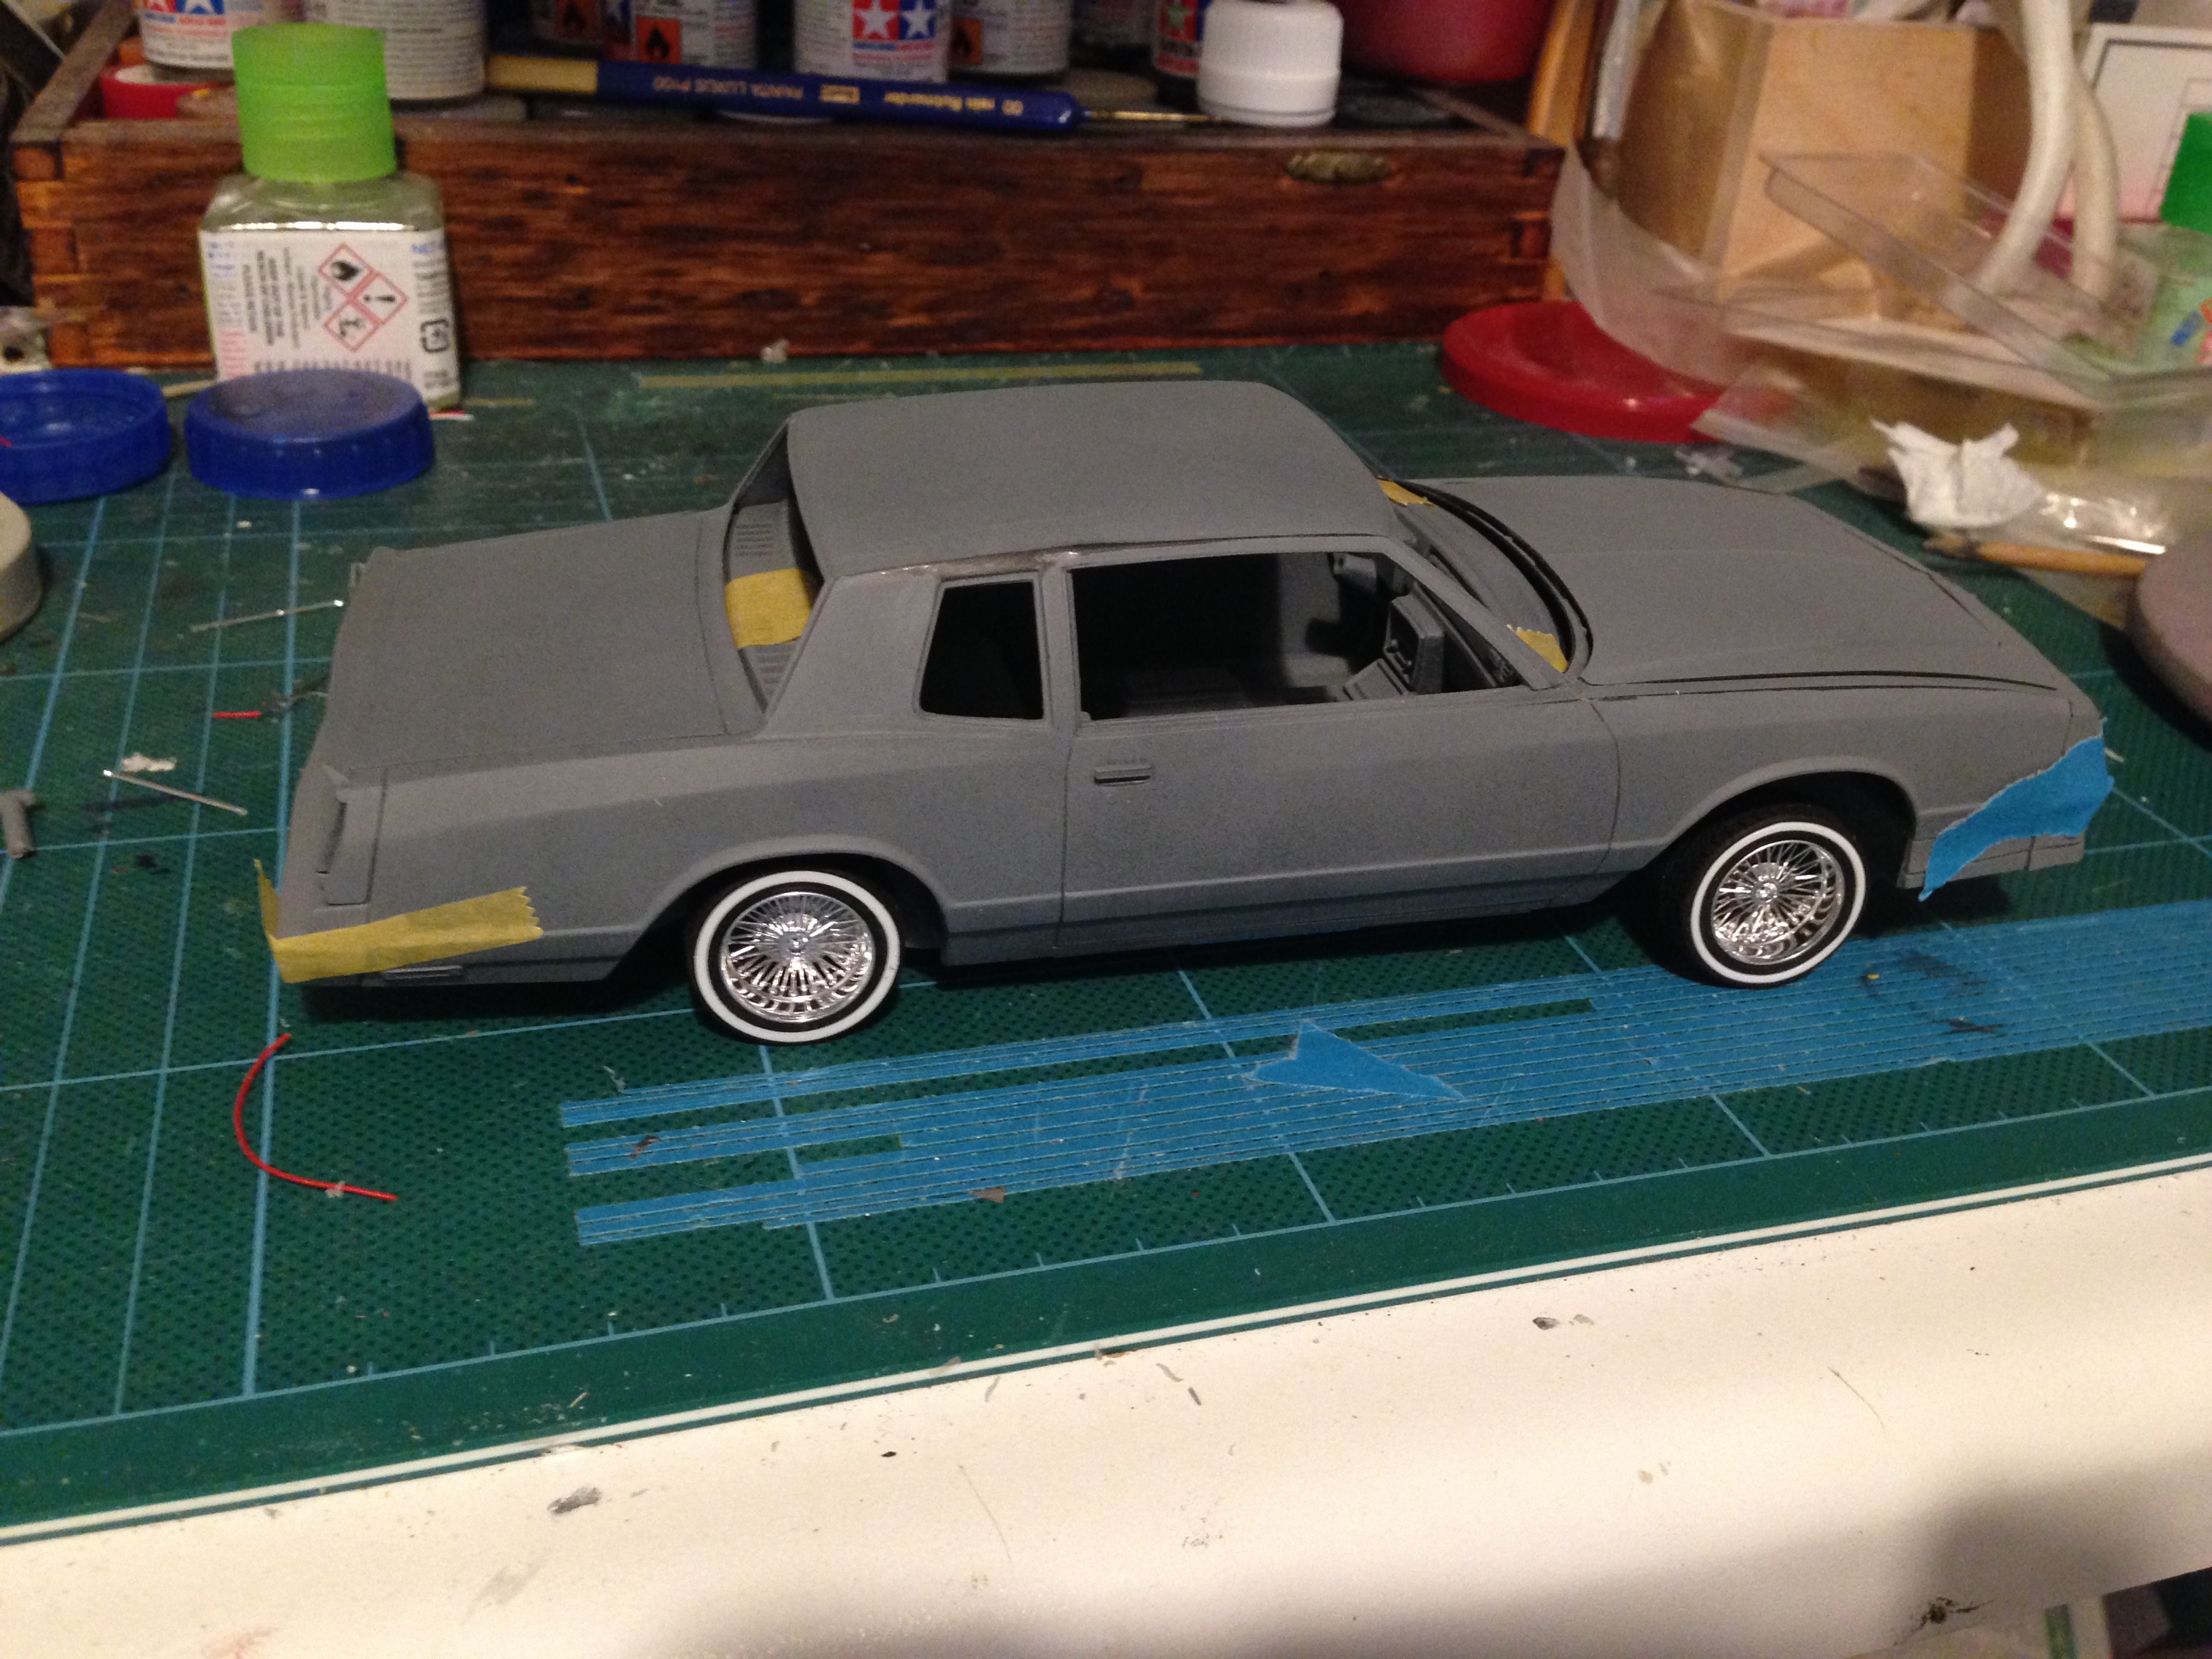
 I’ve always admired the workmanship that goes into low riders. Especially the multi layered paint jobs. There’s a guy that shows his models at our local LIARS show and the NNL East. His work is fantastic and always inspires me. After seeing his work a couple weeks ago I’ve decided to dip my toe into the water and give it a try. I’ll be converting the 70 Monte Carlo into a 1971. I don’t know if I’m going to do a multi color paint job or maybe a two-tone. But I worked tonight on the ride height. I wanted it Looooooooow!
-
Just a very mild custom lowrider in the works ... Complete with a 70's vibe paint scheme ...
-
I love the shape of these cars and this Galaxie Ltd. kit is lovely to work with. got a swamp cooler 3D printed by Shapeways in the Netherlands, artillery wheels from The Parts Box, in Australia. Roof n fenders will be candy red and the hood and sides will be white gold.
-
Just finished this Monte. I swapped out the rear axle for something with better detail, scratch built coils and hydraulic struts and made a 4-link suspension setup. Rides on Pegasus wheels and painted with automotive paint and nail polish. Flocked carpet with matching headlining.
-
I'm going to build this as a hopper, because while I was watching YouTube for lowrider research, I became amazed at the pounding these cars get, especially the hoppers. I really like it when the car 'statues' and balances on its rear bumper. I'll paint this with nail polish and rattle cans and also use a few decals.
-
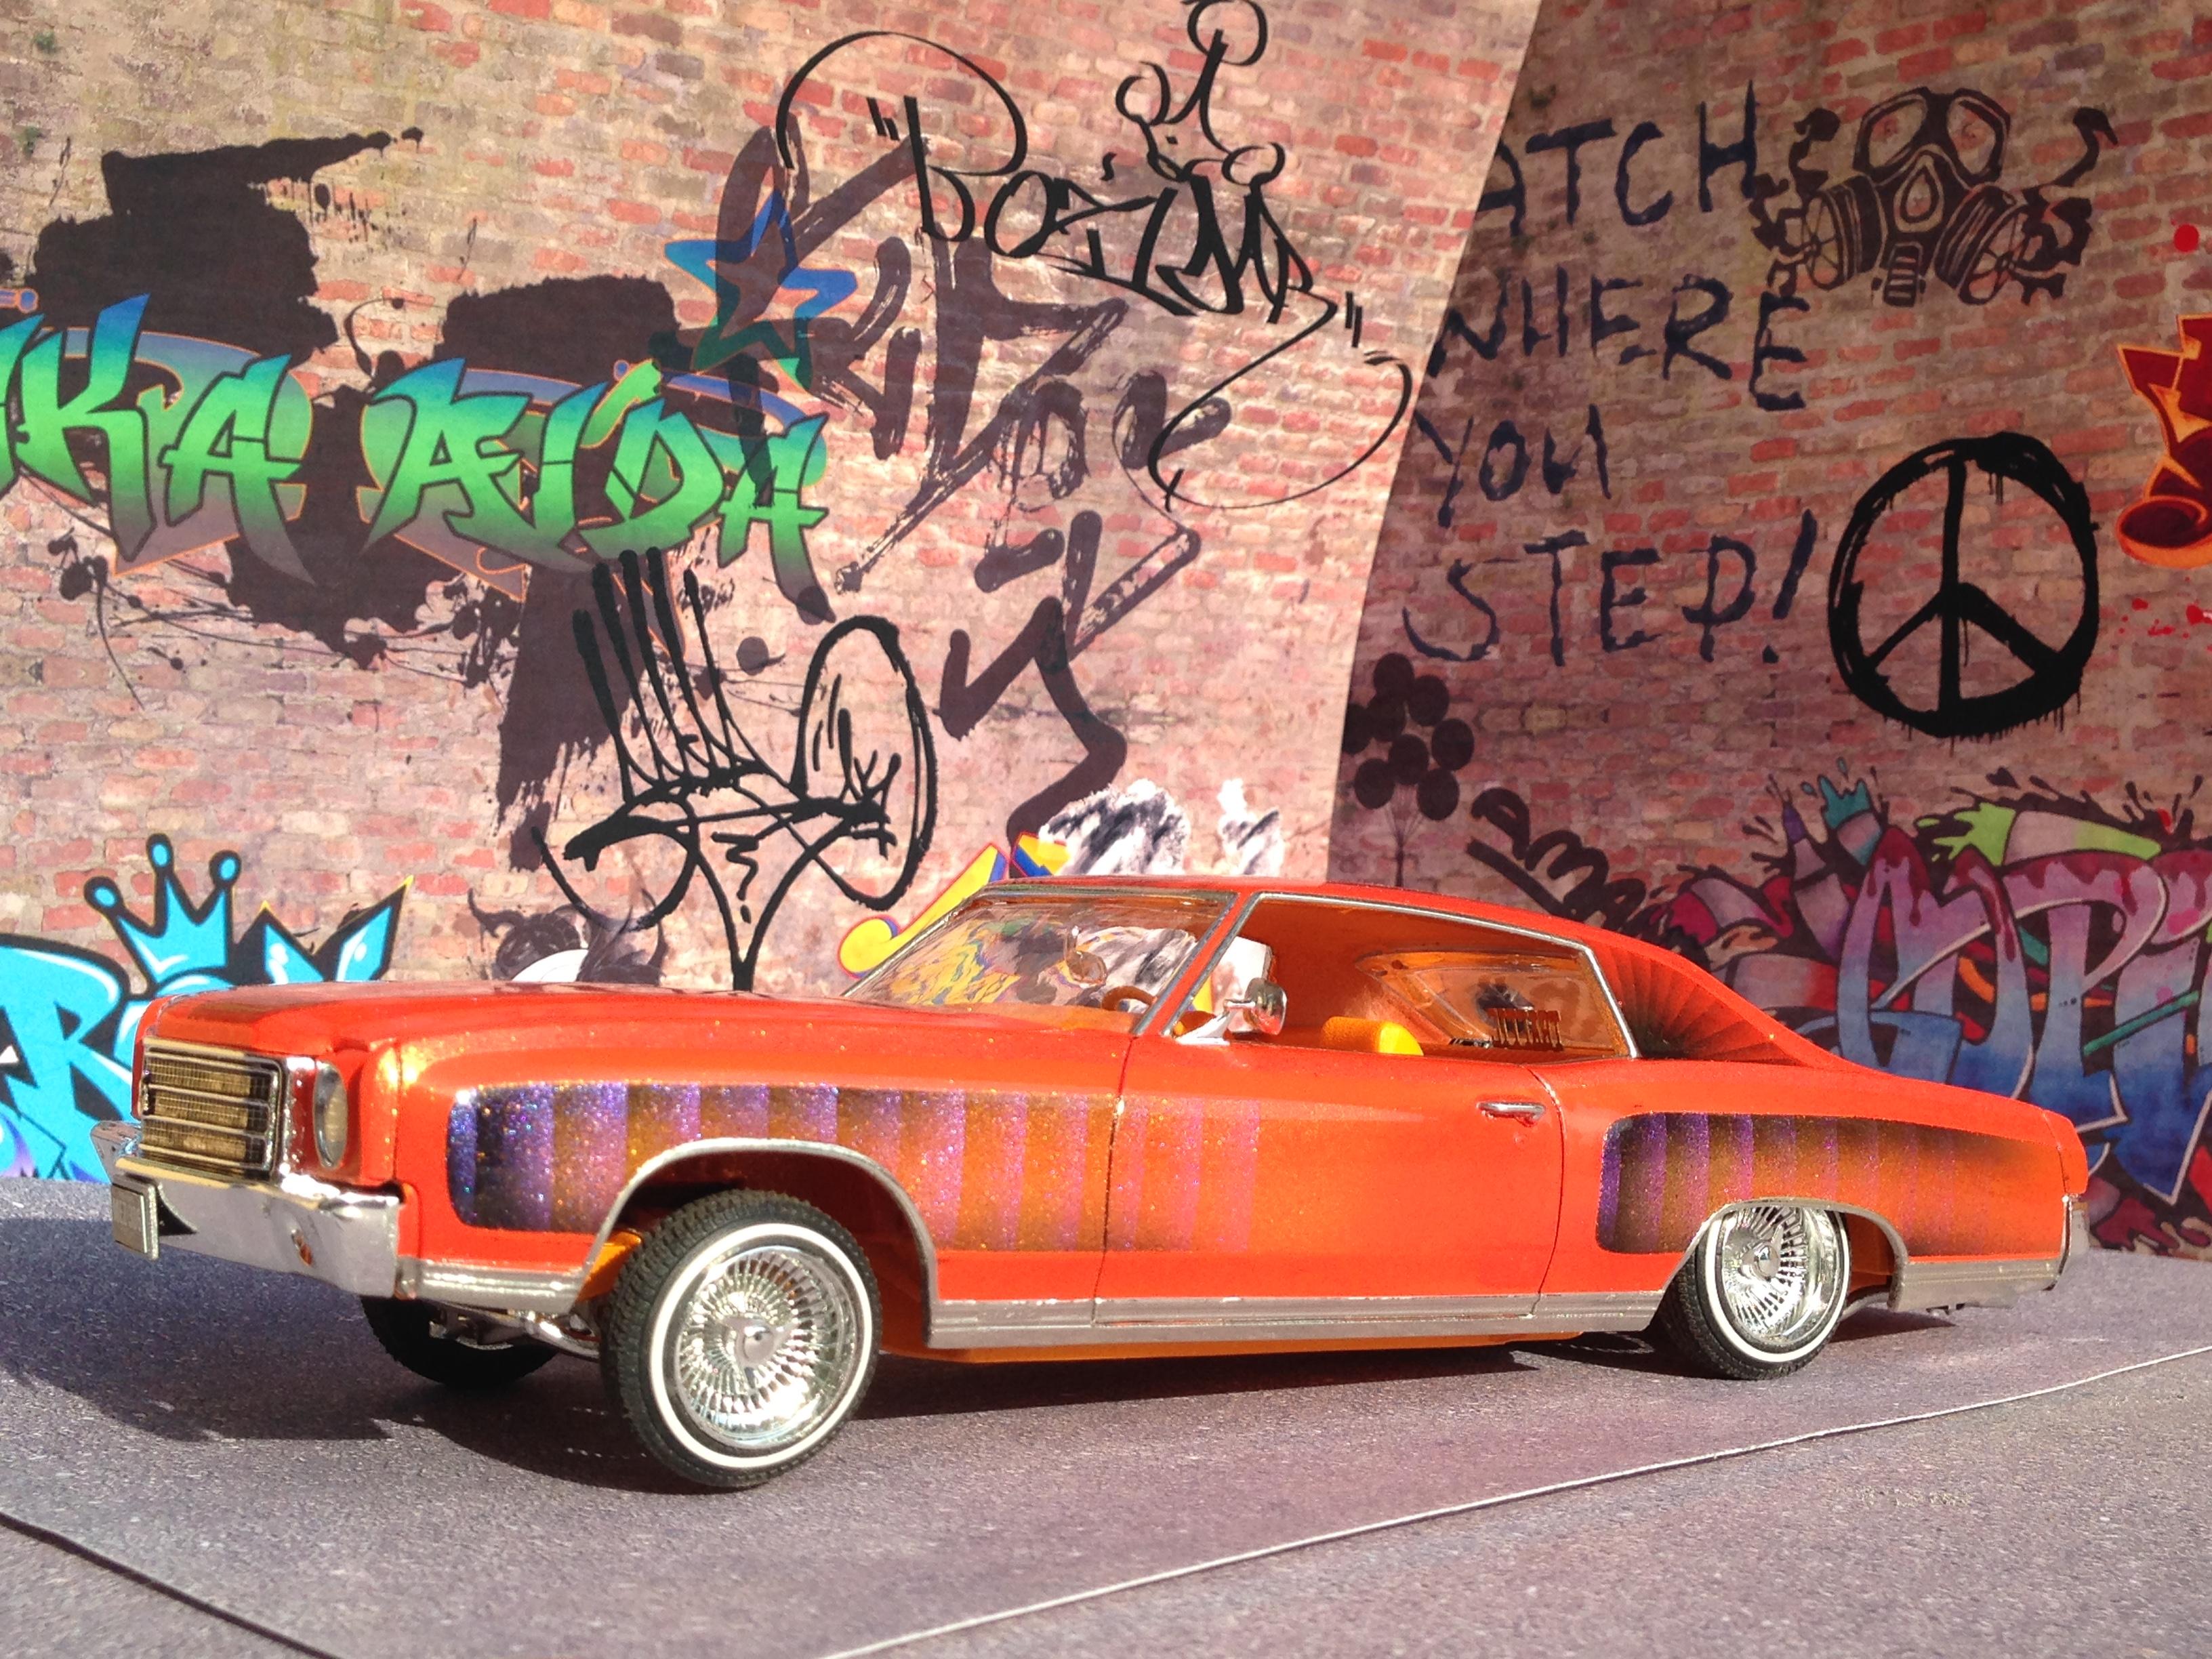
I love all aspects of car culture, but I really do admire the artistry and devotion that goes into lowriders. I can safely say my next few builds will be either bombs or lowriders. I love playing with colours and tape.! I added subwoofers and a switch box and dropped the rear end as far as it would go. I hope you like it, even if it isn't your bag
-
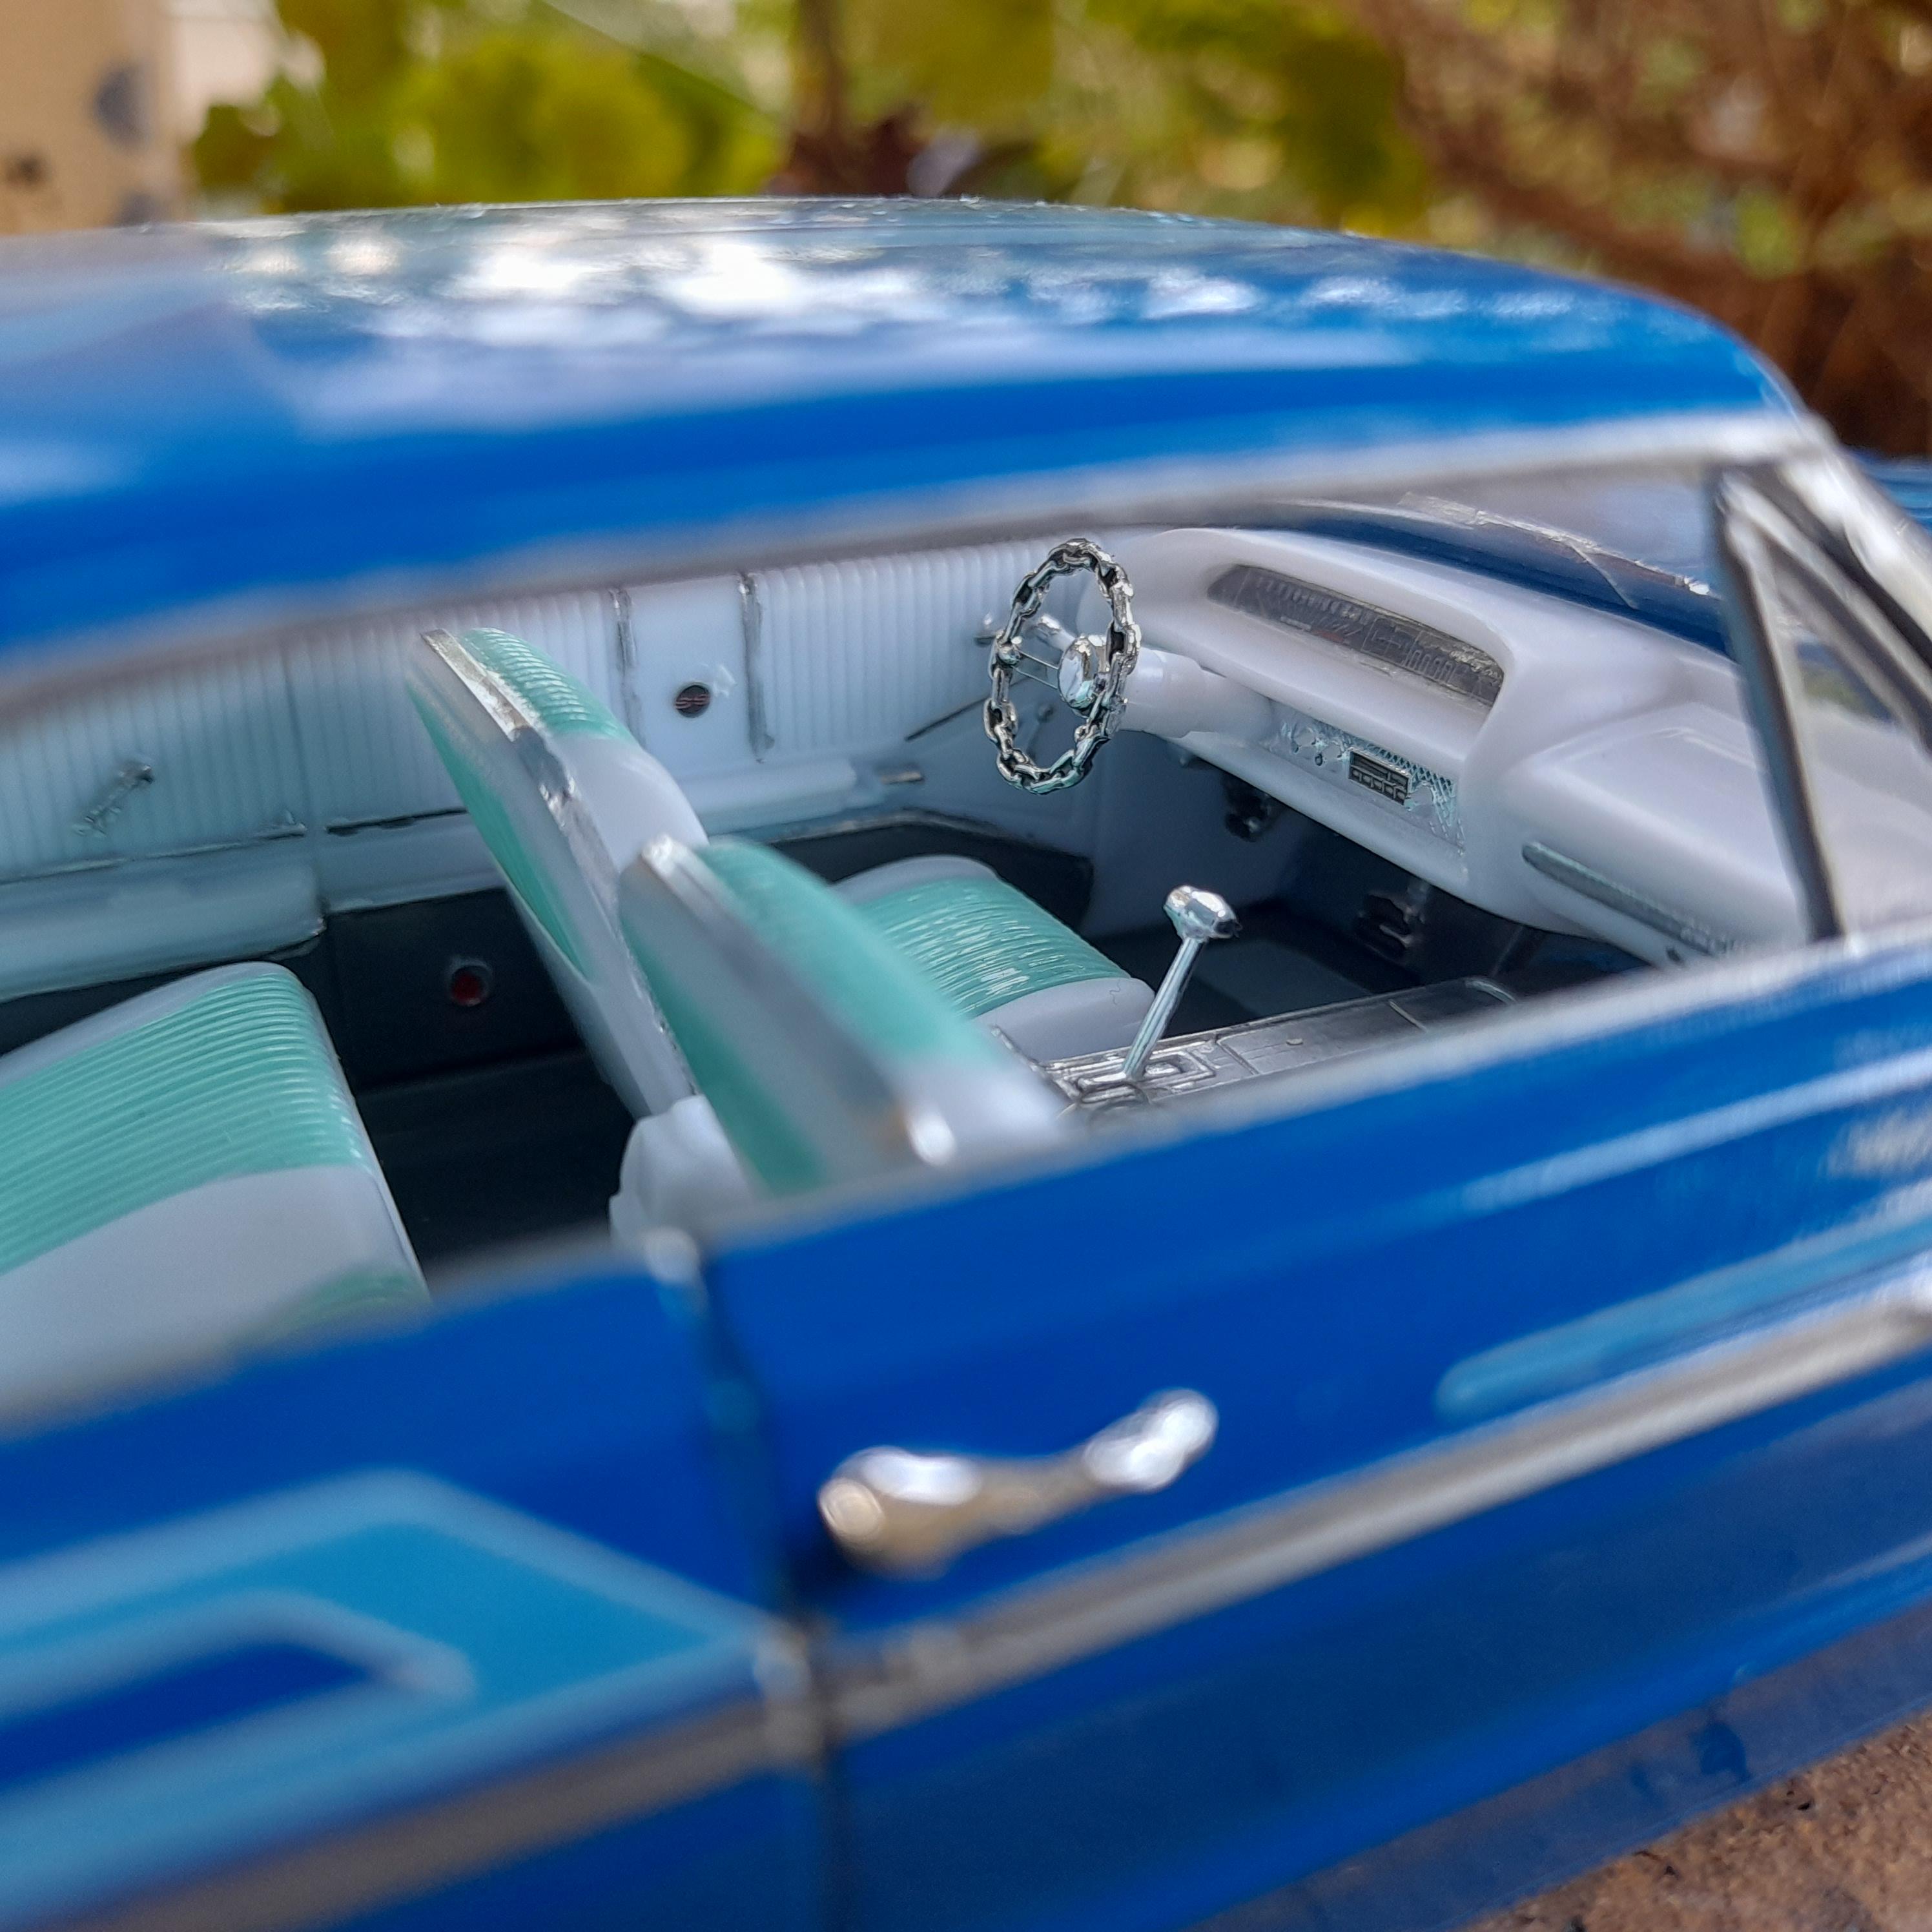
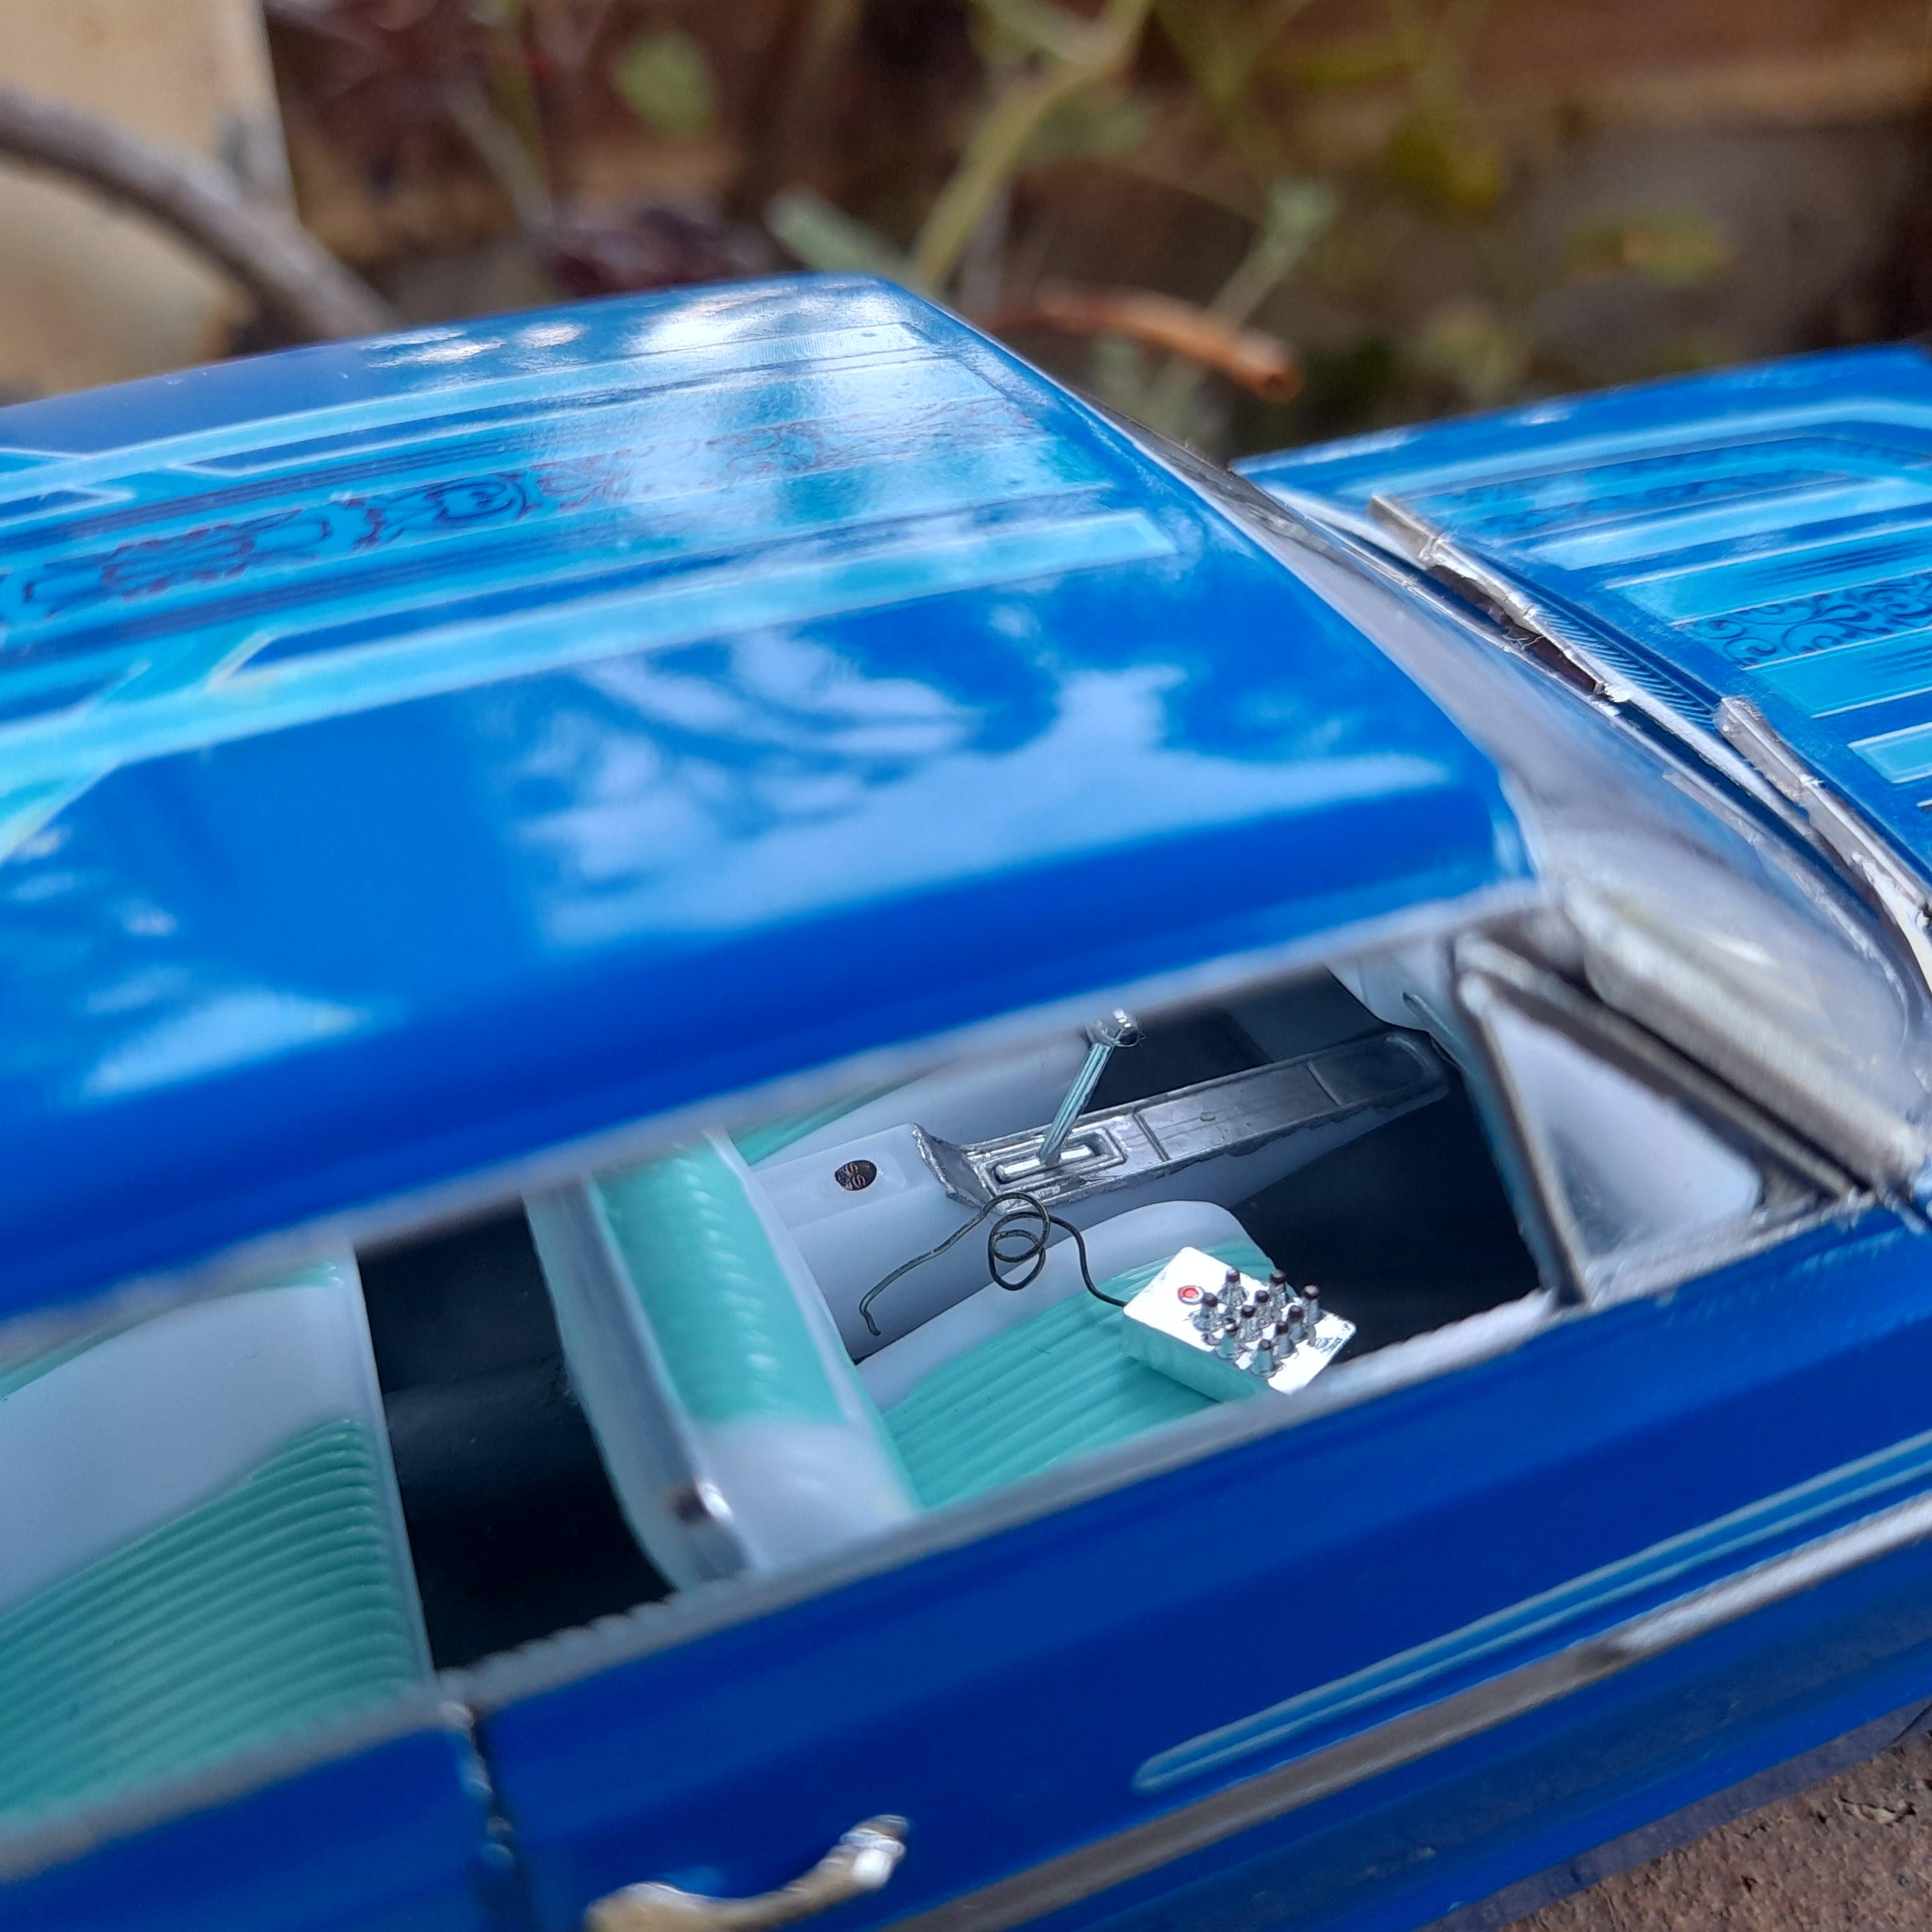
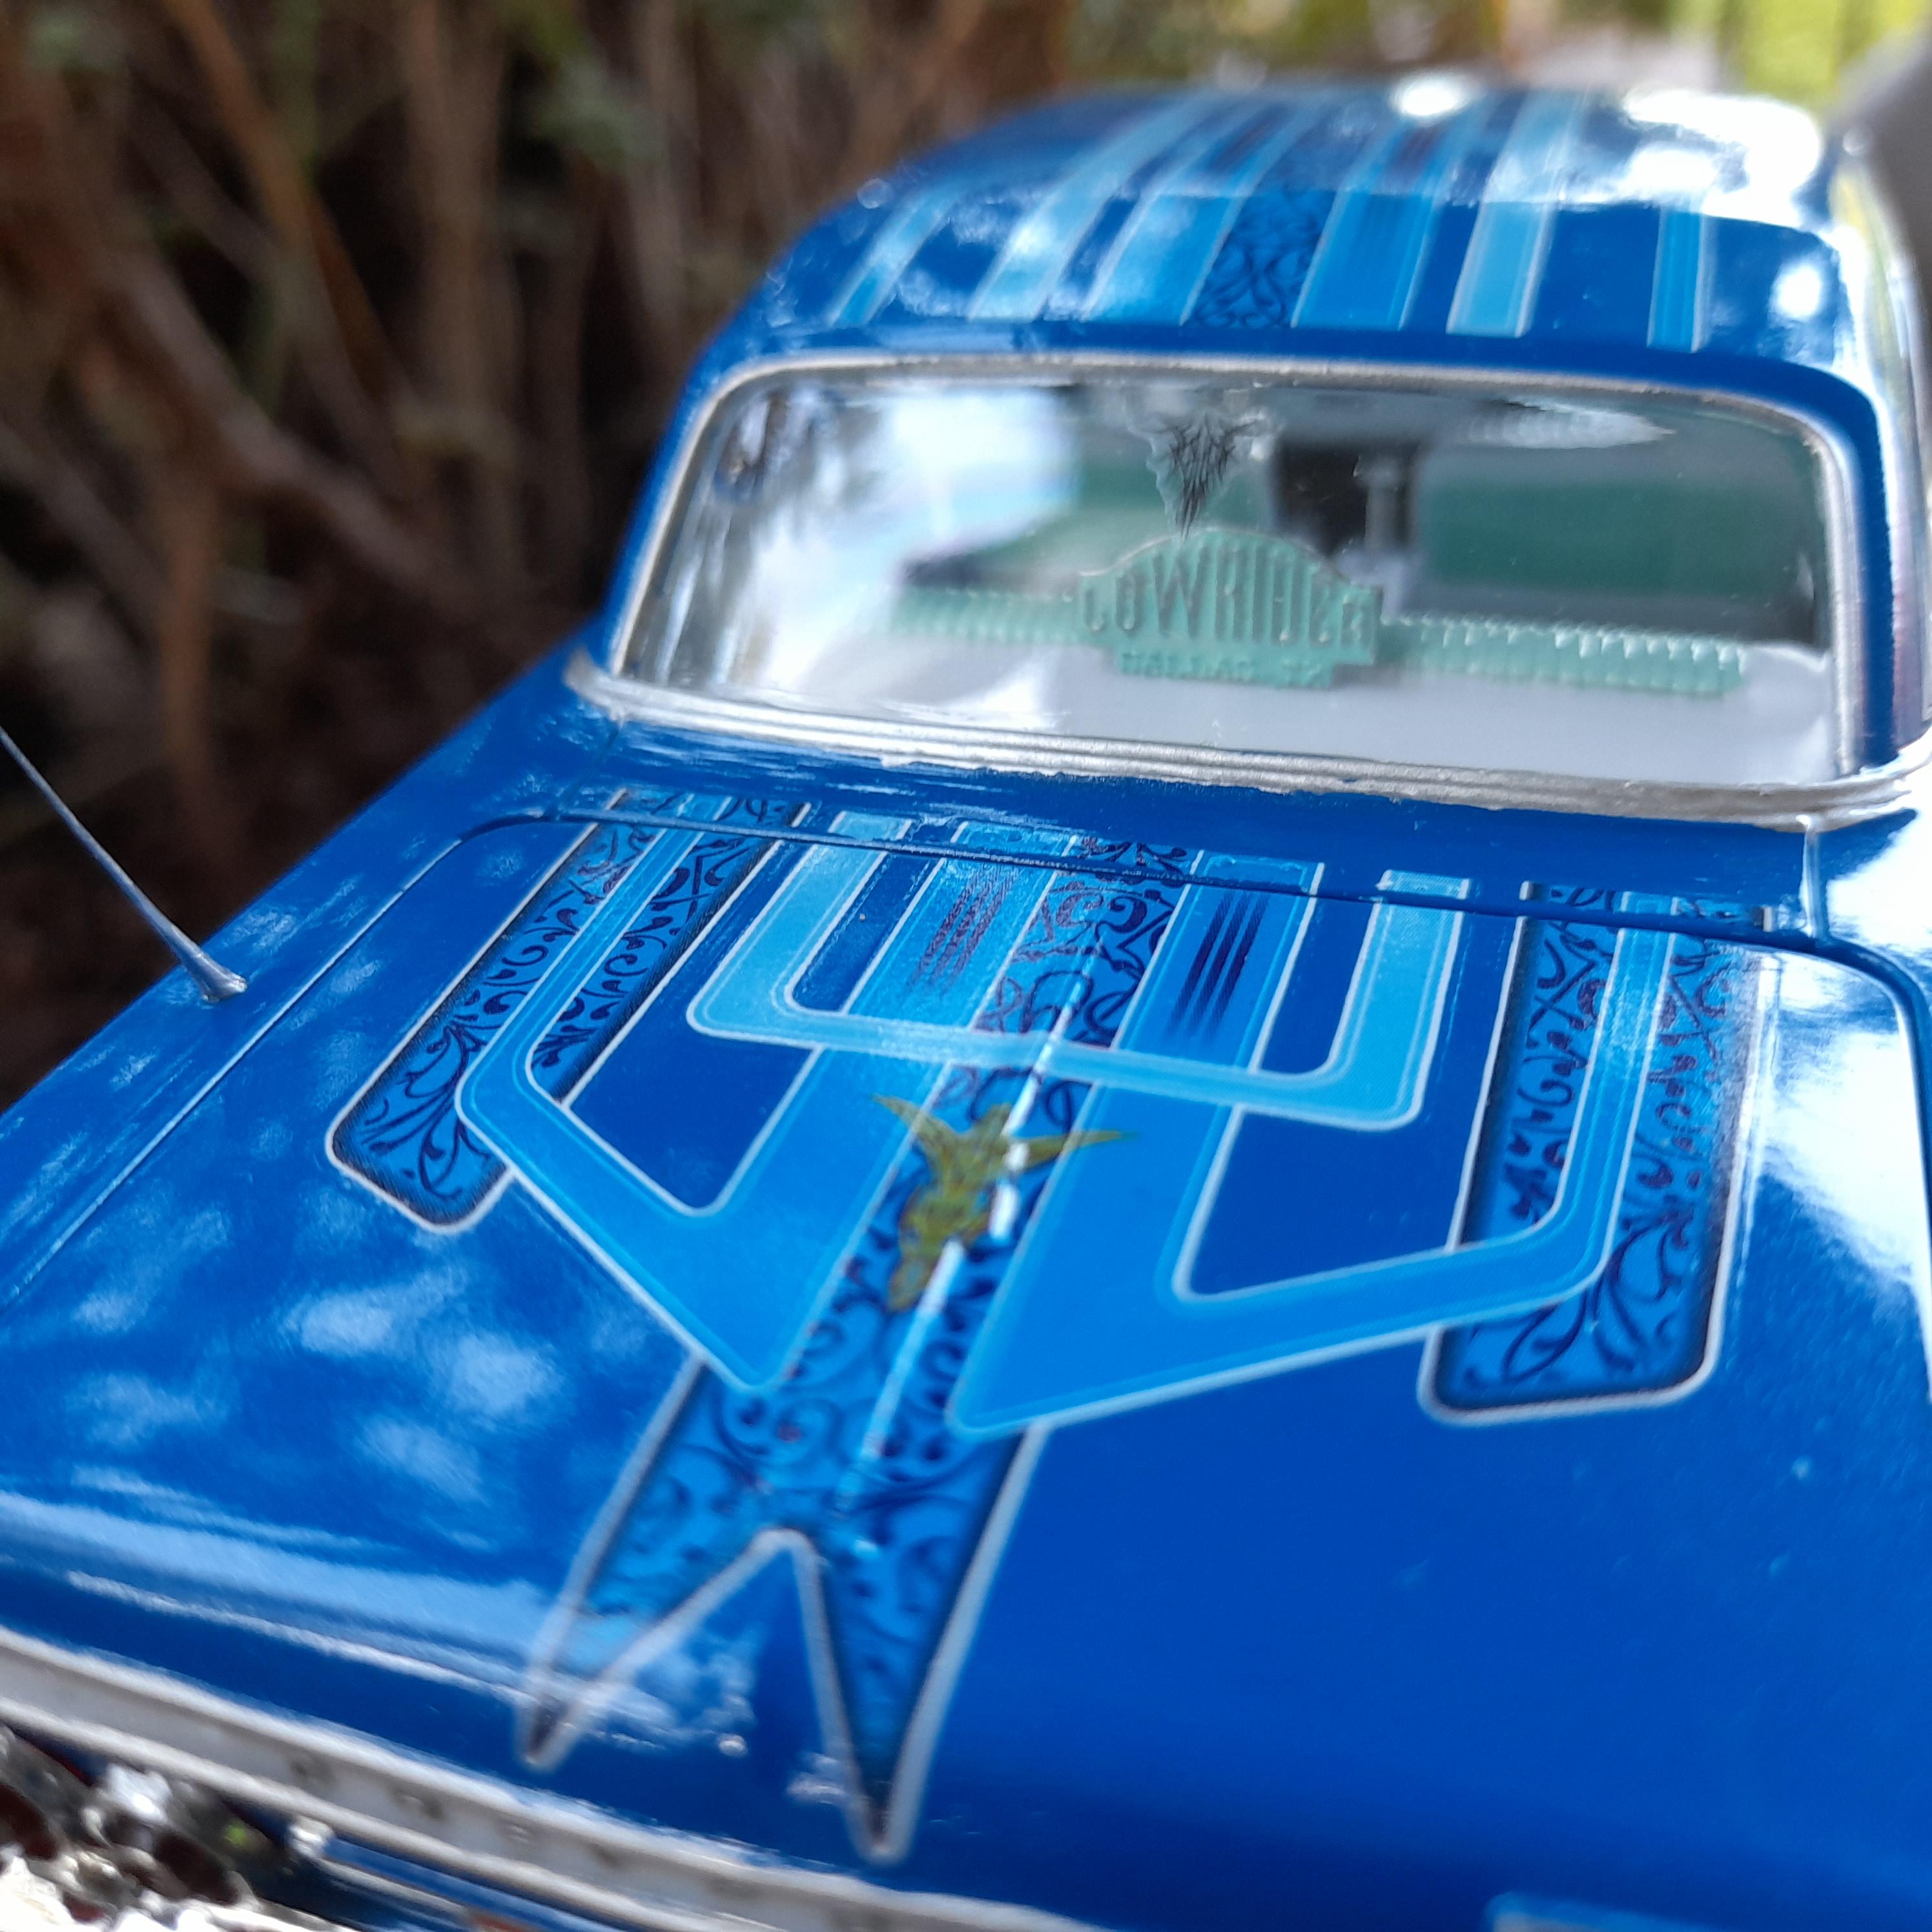
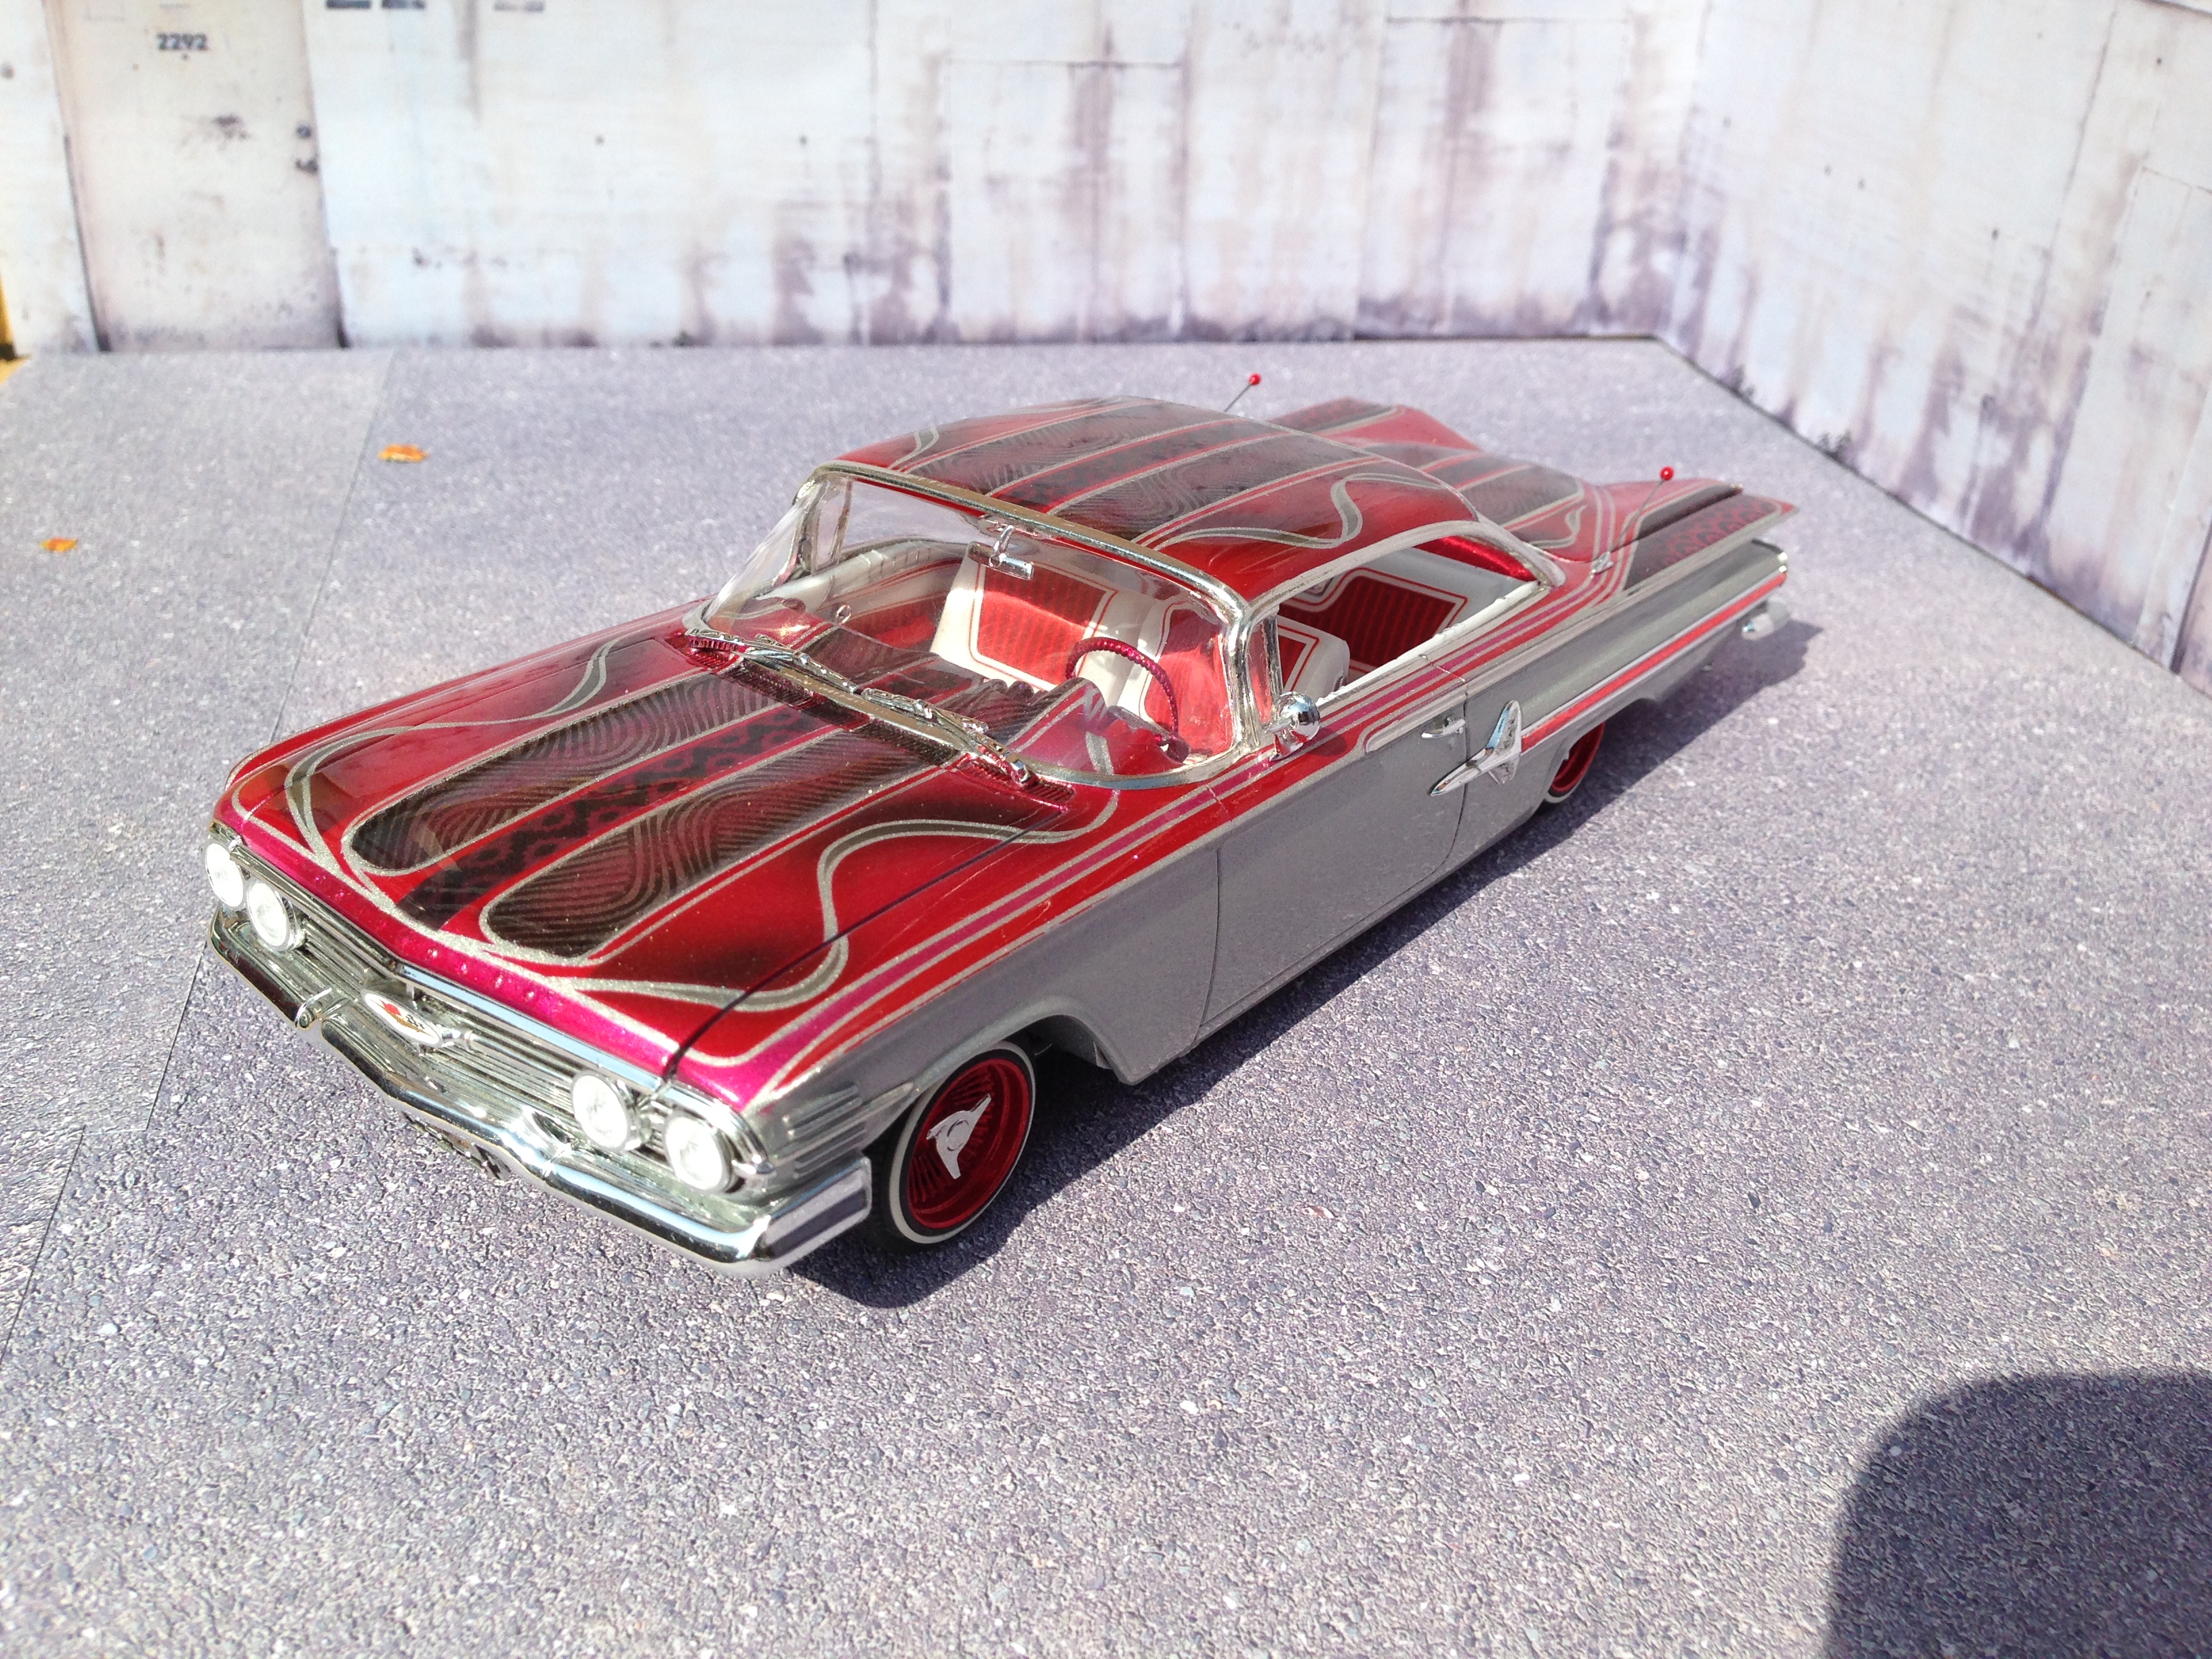
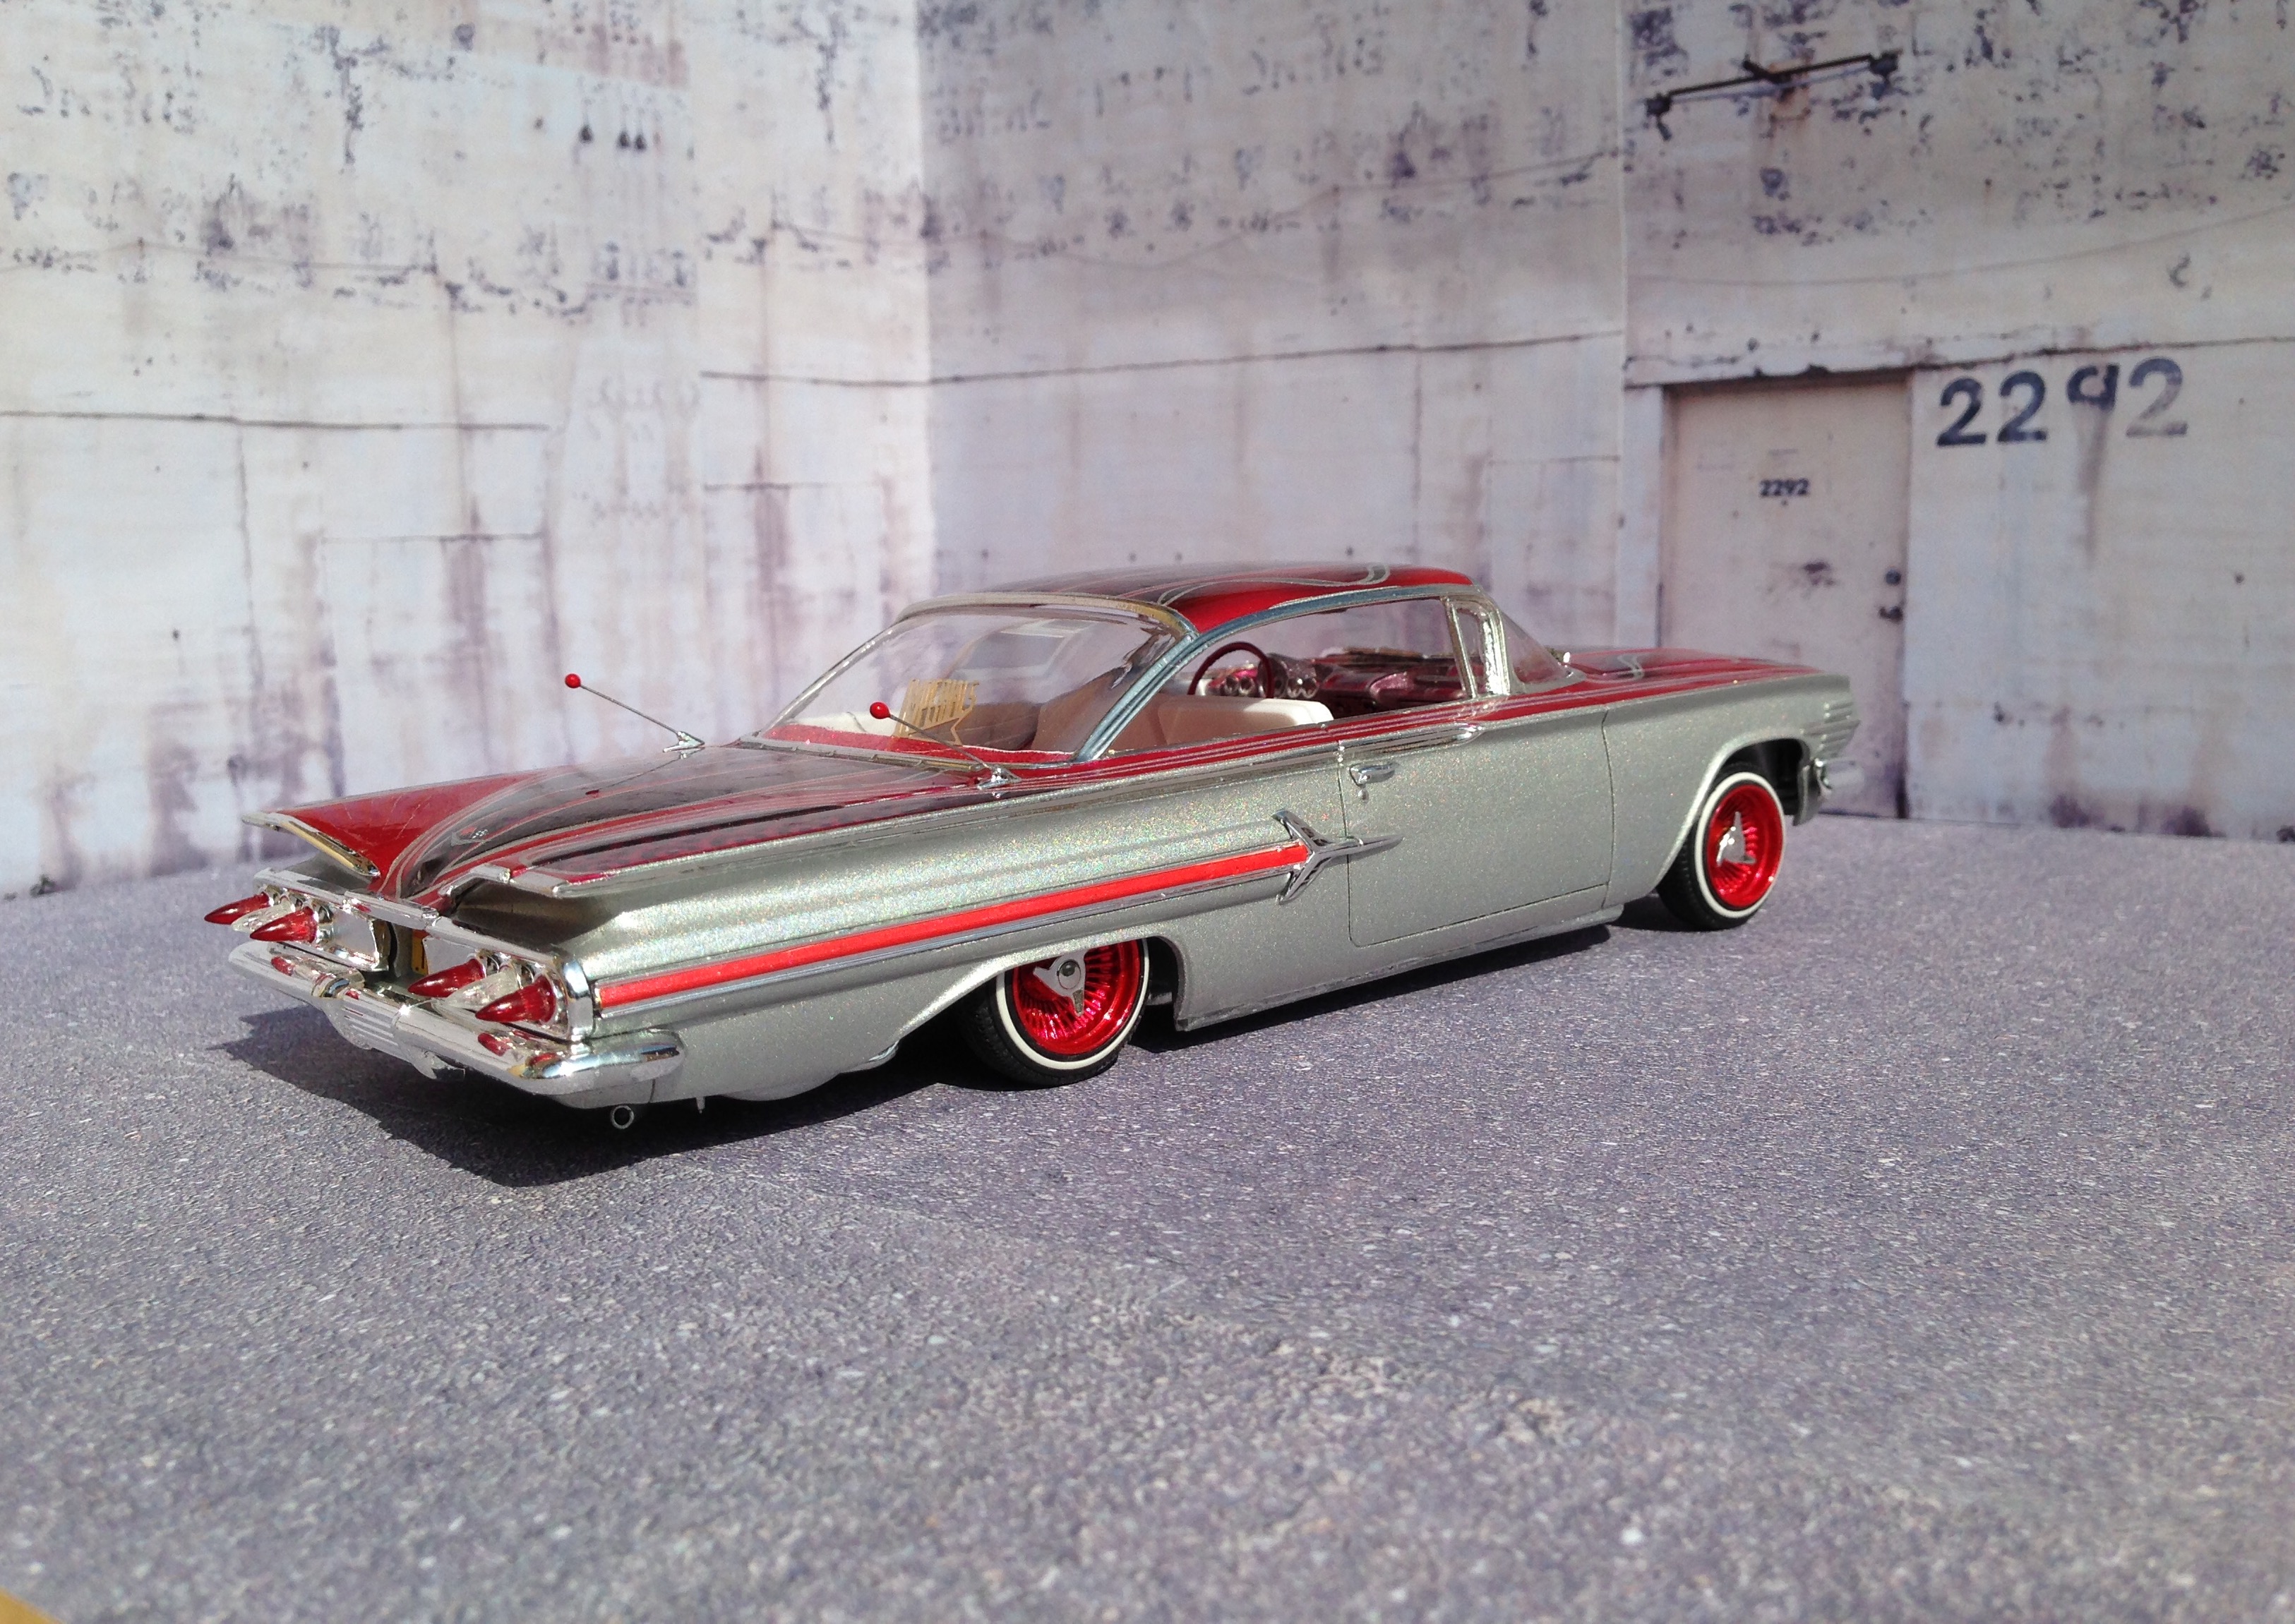
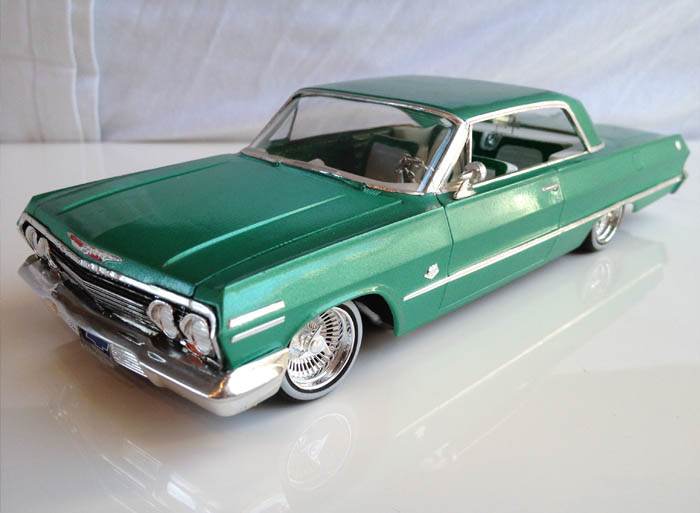
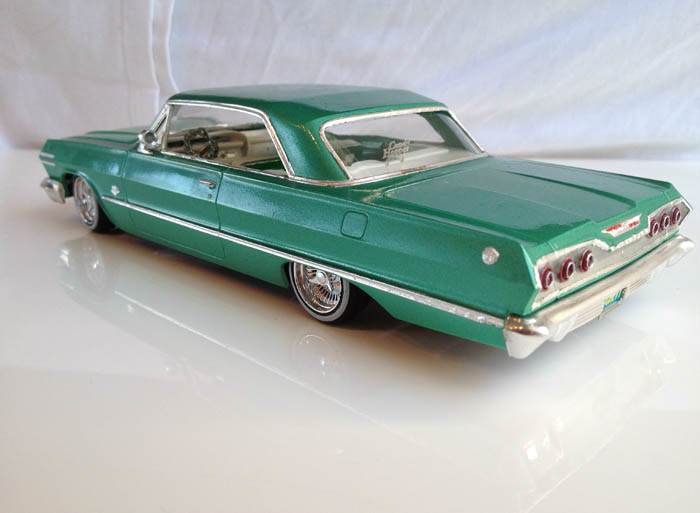
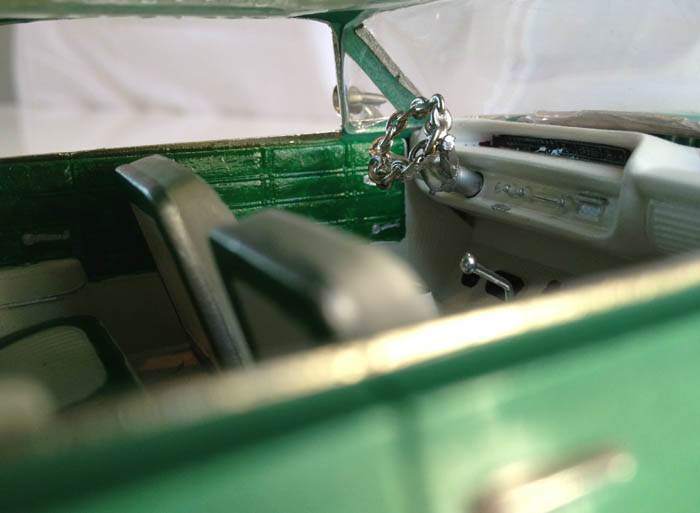
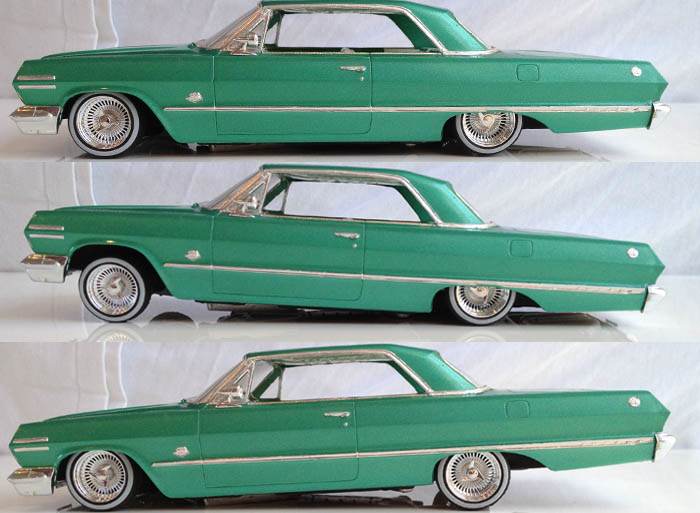
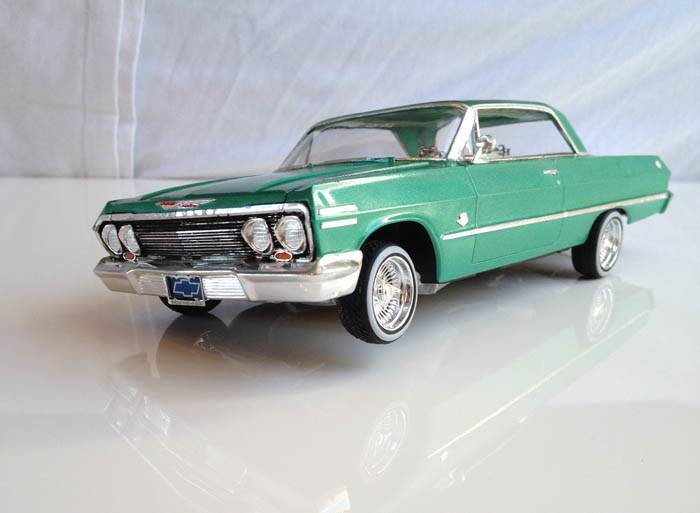
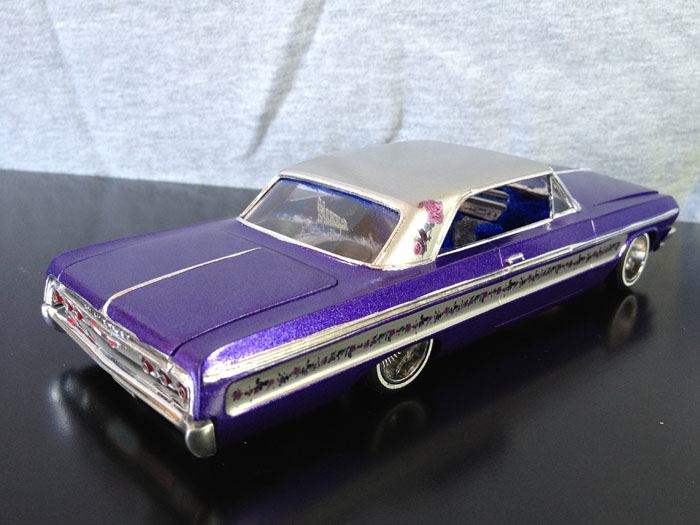
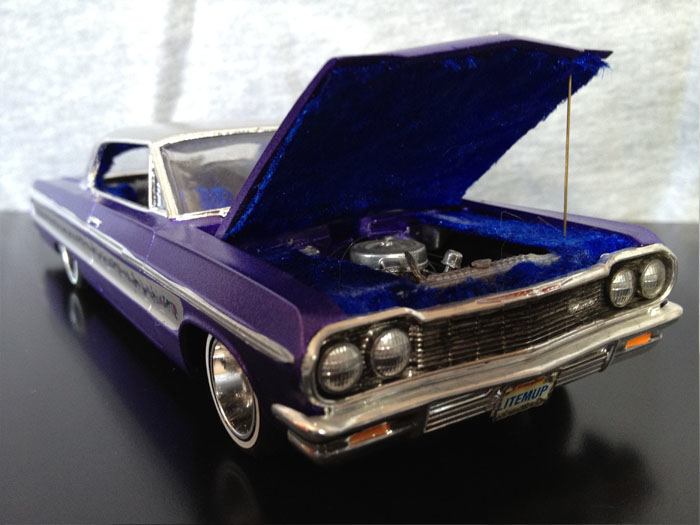
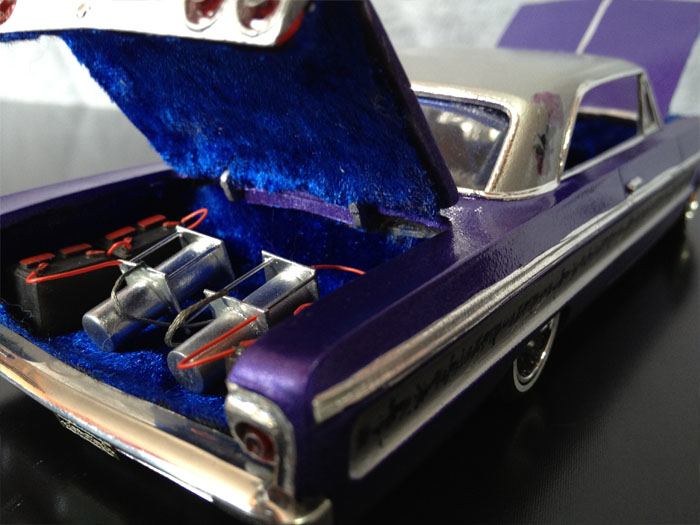
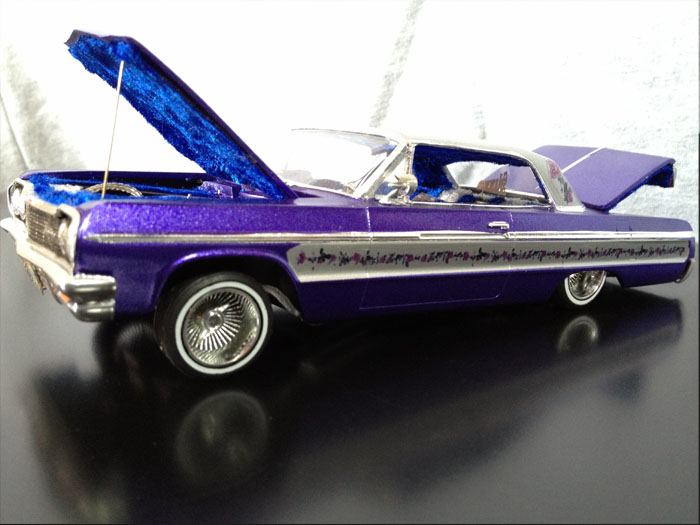
I recognized a renaissance of Lowrider models here on the board in the last few months. Many very fine executed builds and WIPs could be seen recently, which reminded me of some of my own old projects ,though they do not have the standard of the builds that were shown here (which is not surprising, I built the following models about 20 years ago when I was still a teenager in the early and mid 90s). The green ´63 was actually my second model kit ever and was built in 1993 with a scratch built chain steering wheel and Pegasus wheels and tires: The purple ´64 (built in ´95) has Hoppin´Hydros rims and scratch built hydraulics in the opened trunk: Both are old AMT kits with stick-through-metal-axles which allowed me to simulate working hydraulic suspensions. I think I will definitely have to improve my pant and detailing skills before I start a new Lowrider project... Thanks for looking!
-
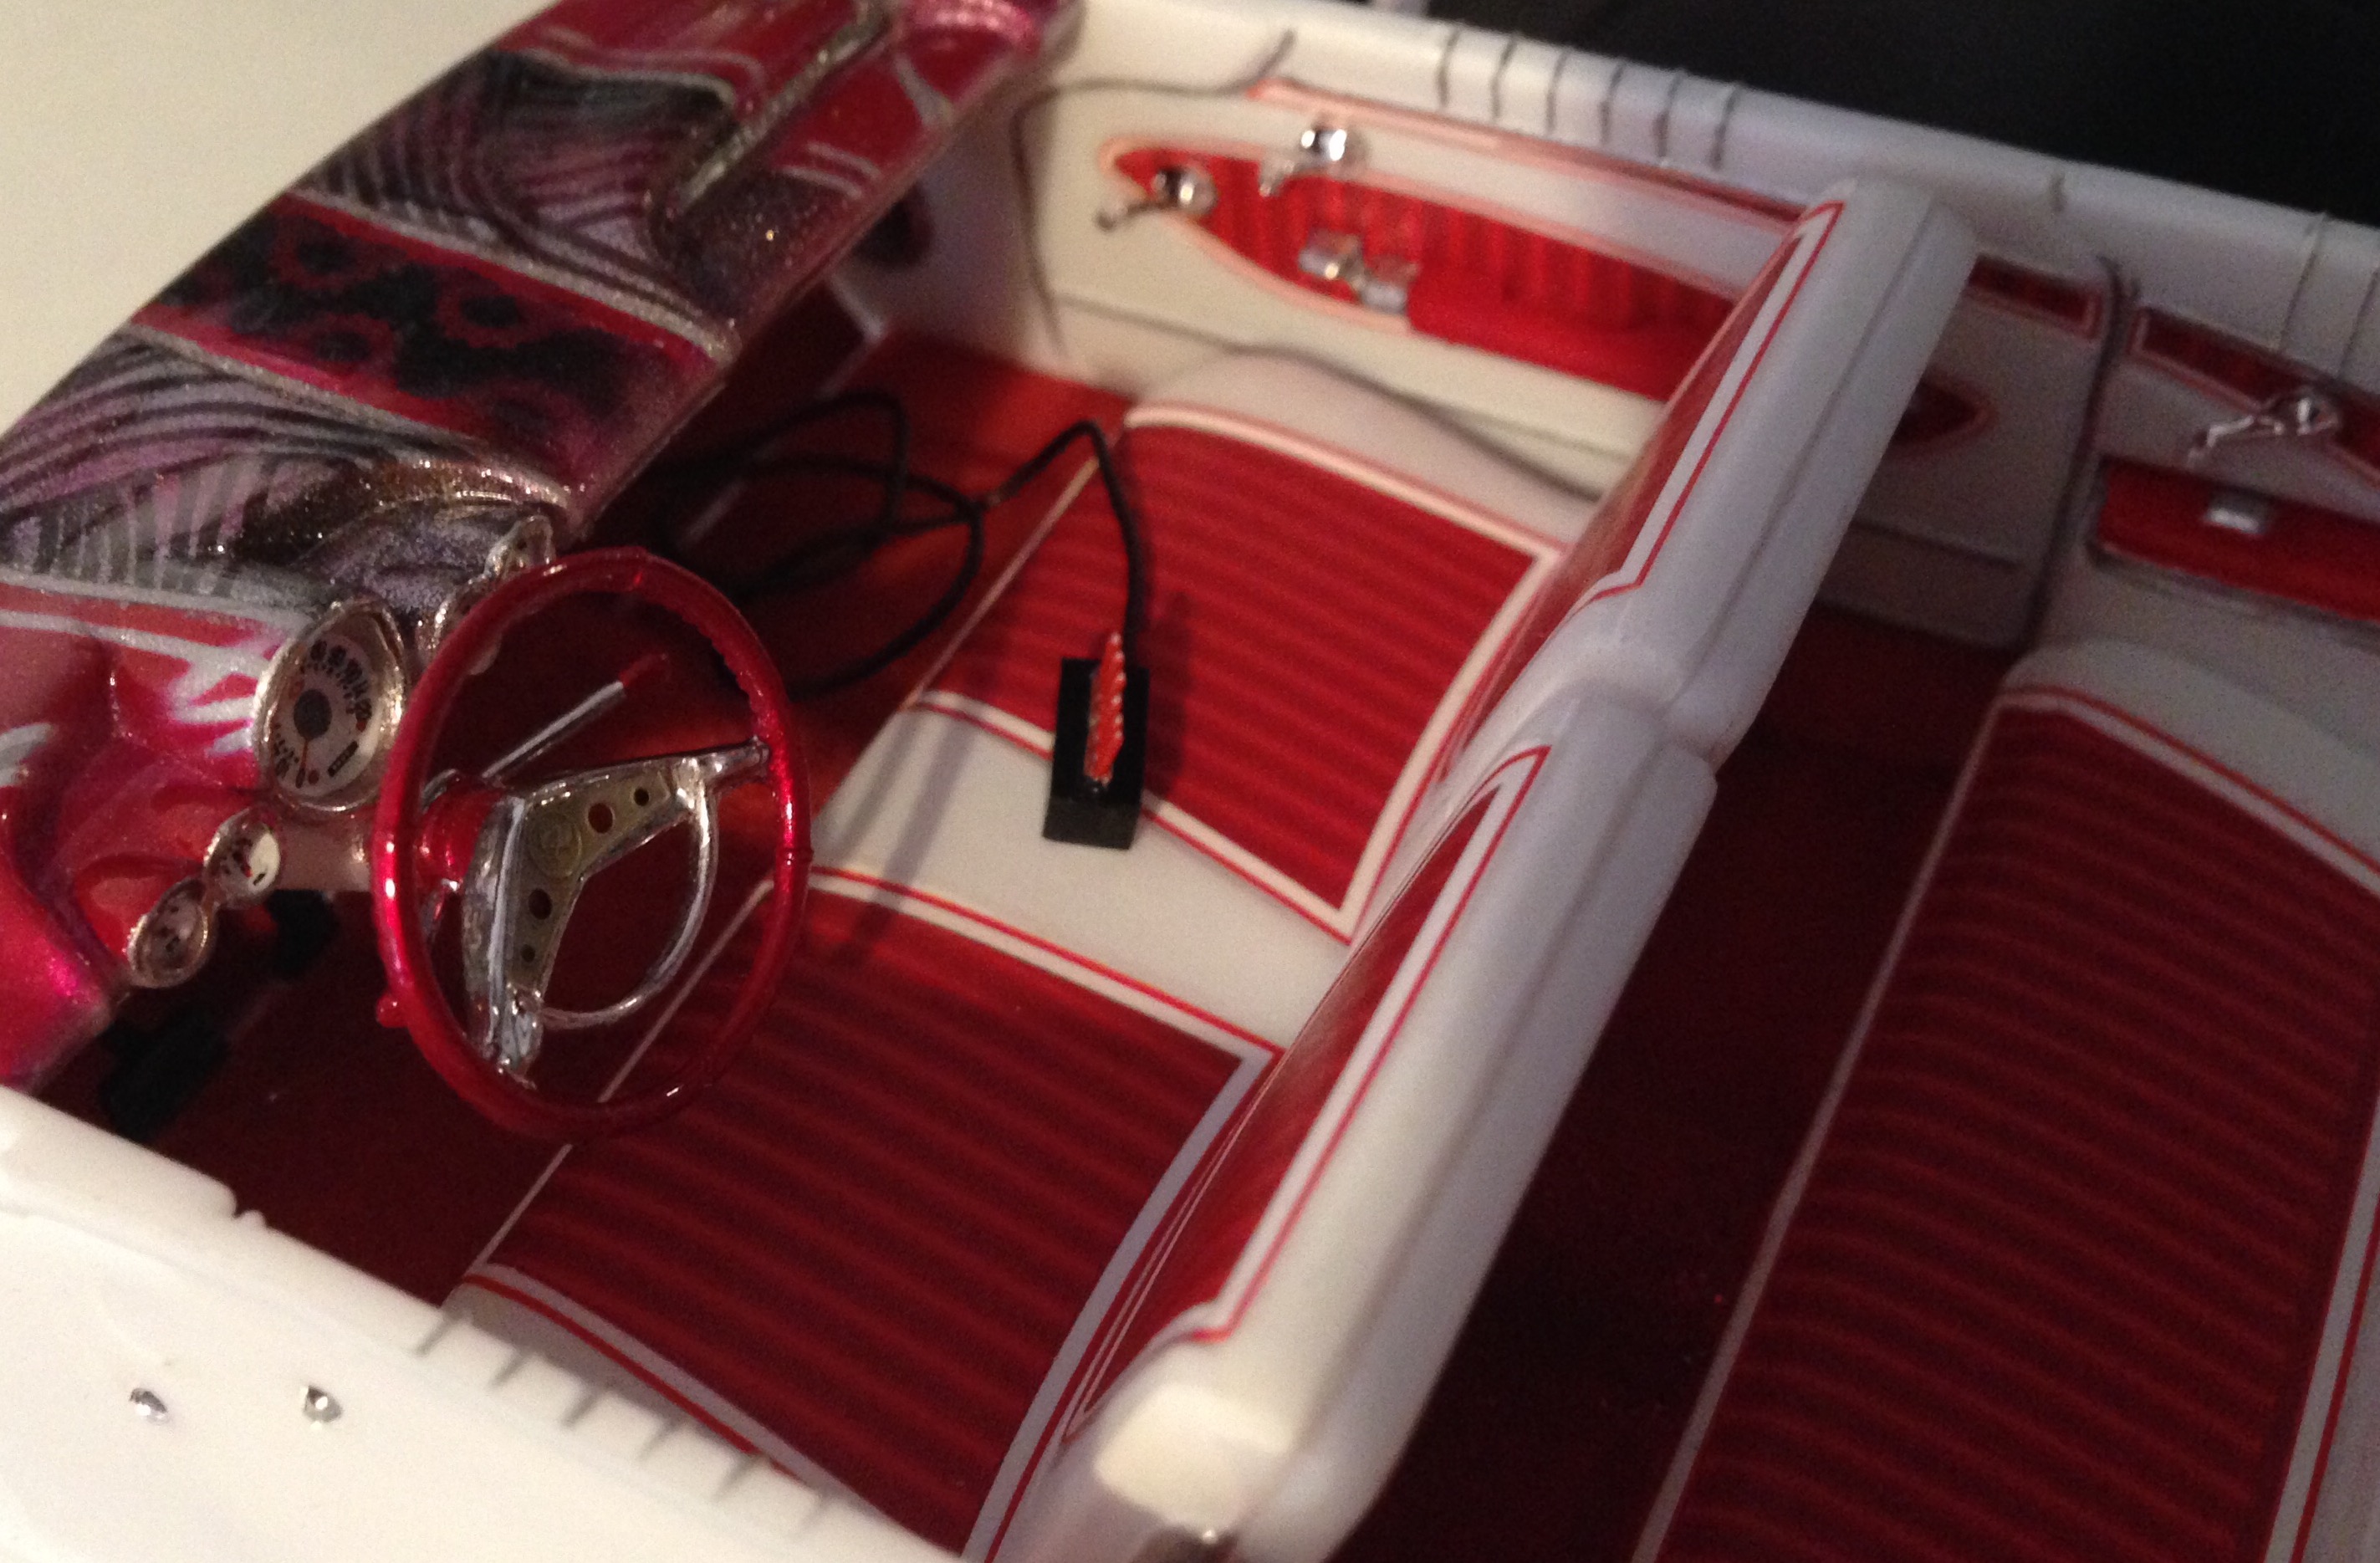
Hi!. This is my version of a well - known Tamiya kit. Local ( Finnish ) plates, pegasus wheels and tyres and some minor modifications. Tamiya spray paint layers in following order: - pink primer - gun metal - clear red - clear - clear green - clear - pearl - clear x 2 As usual, all comment and questions are more than welcomed. Into the pics we go:
-
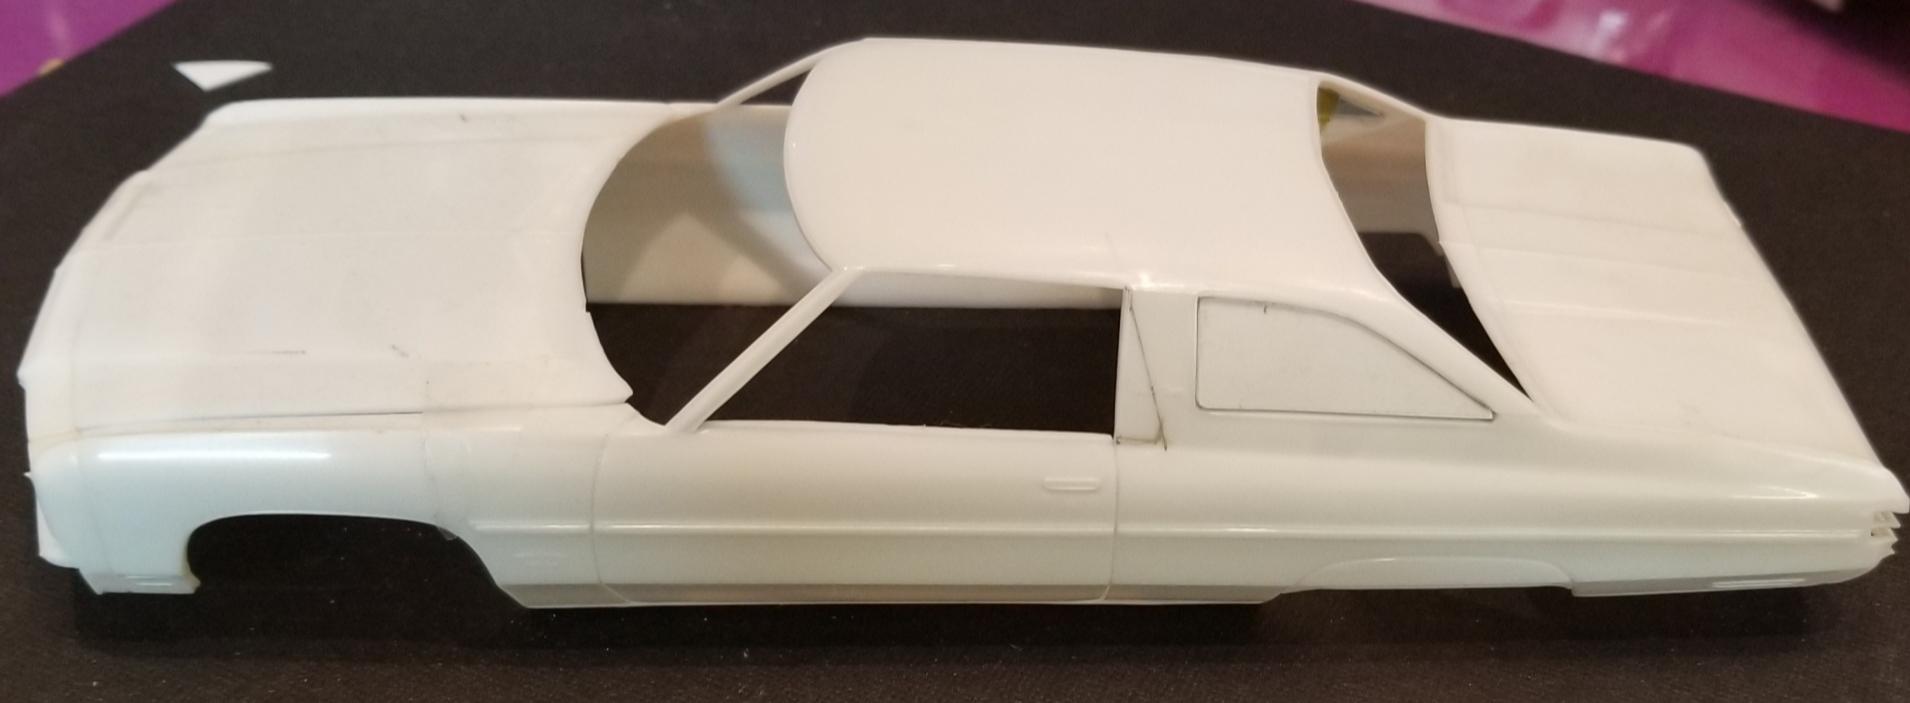
Here is some pics of my Impala on the bench. Started it couple years ago and just got back to it after major life events. This is a practice model to since it's been so long. Trying out the wash technique that I've never done. Thanks for looking in.


.jpg.5e915a54e73529143d19644b3fbf6638.jpg)
.jpg.f9d16473f83b59a80590c388a6d67ed0.jpg)
.jpg.4fe4579bfc90b241e18bfe888f247c5e.jpg)
.jpg.5179a7c5fe40dccdbe922b7f1072c024.jpg)


.jpg.a458017f485ace769603a8b44dfceabe.jpg)
.jpg.79a312567fba250a2cd67d9405b52e42.jpg)
.jpg.c7b7b4b5b513841d9dfb7e02db1b2963.jpg)
.jpg.084a955576e5f5cd5b4f8238ab8d0504.jpg)
.jpg.c1e71b63b721d43c1c56d8071a9bab49.jpg)
.jpg.4bcfa1950f3253b4f63594e52449cca1.jpg)
.jpg.c67d69a9f74be3561a15fcd1eae9fb56.jpg)
.jpg.796588ceb30e63e174b9dc1682696882.jpg)
.jpg.33b1cb8d977e8d4953fea42238899209.jpg)
.jpg.43671b1f49691d5c4ec25fae63f8e9cd.jpg)
.jpg.d072b1892a656c93565c0e85068bec24.jpg)
.jpg.f45a4410d7ece57d2e76af8ea6b43714.jpg)
.jpg.39699d0efe73e533372cbf1e362df7af.jpg)
.jpg.6a453f2bd39c7307283d63e713698513.jpg)