Search the Community
Showing results for tags 'revell'.
-
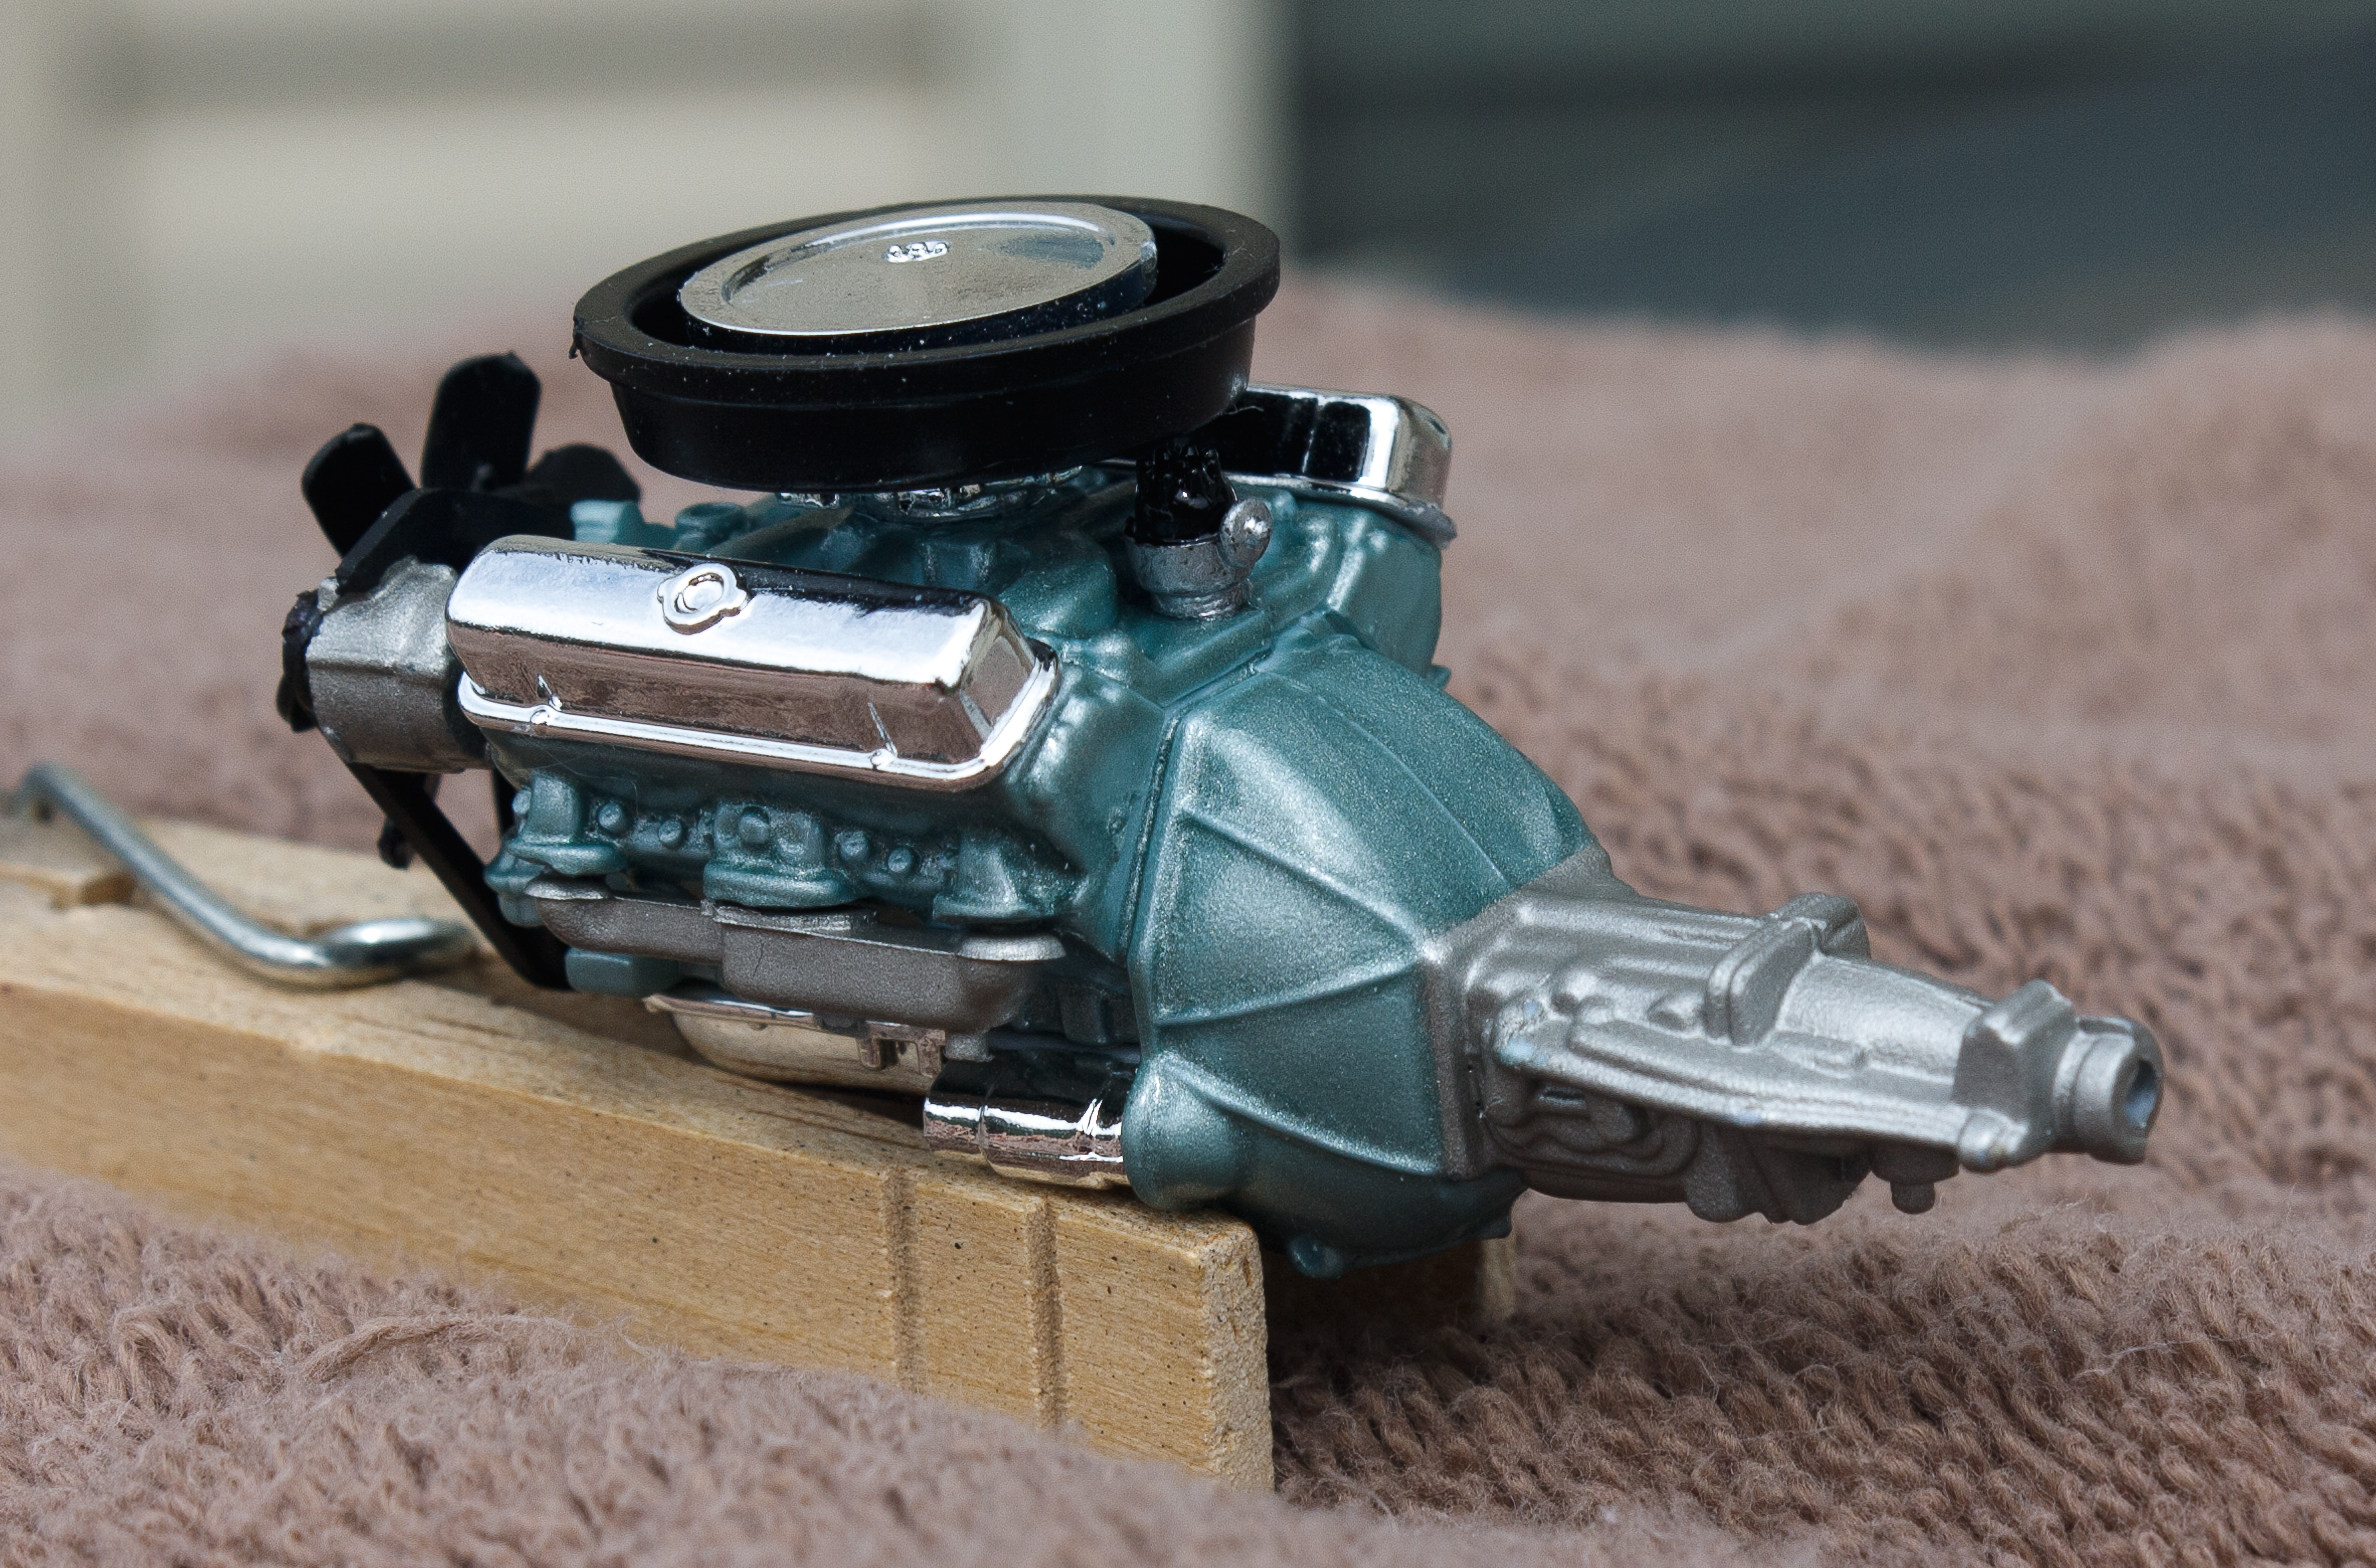
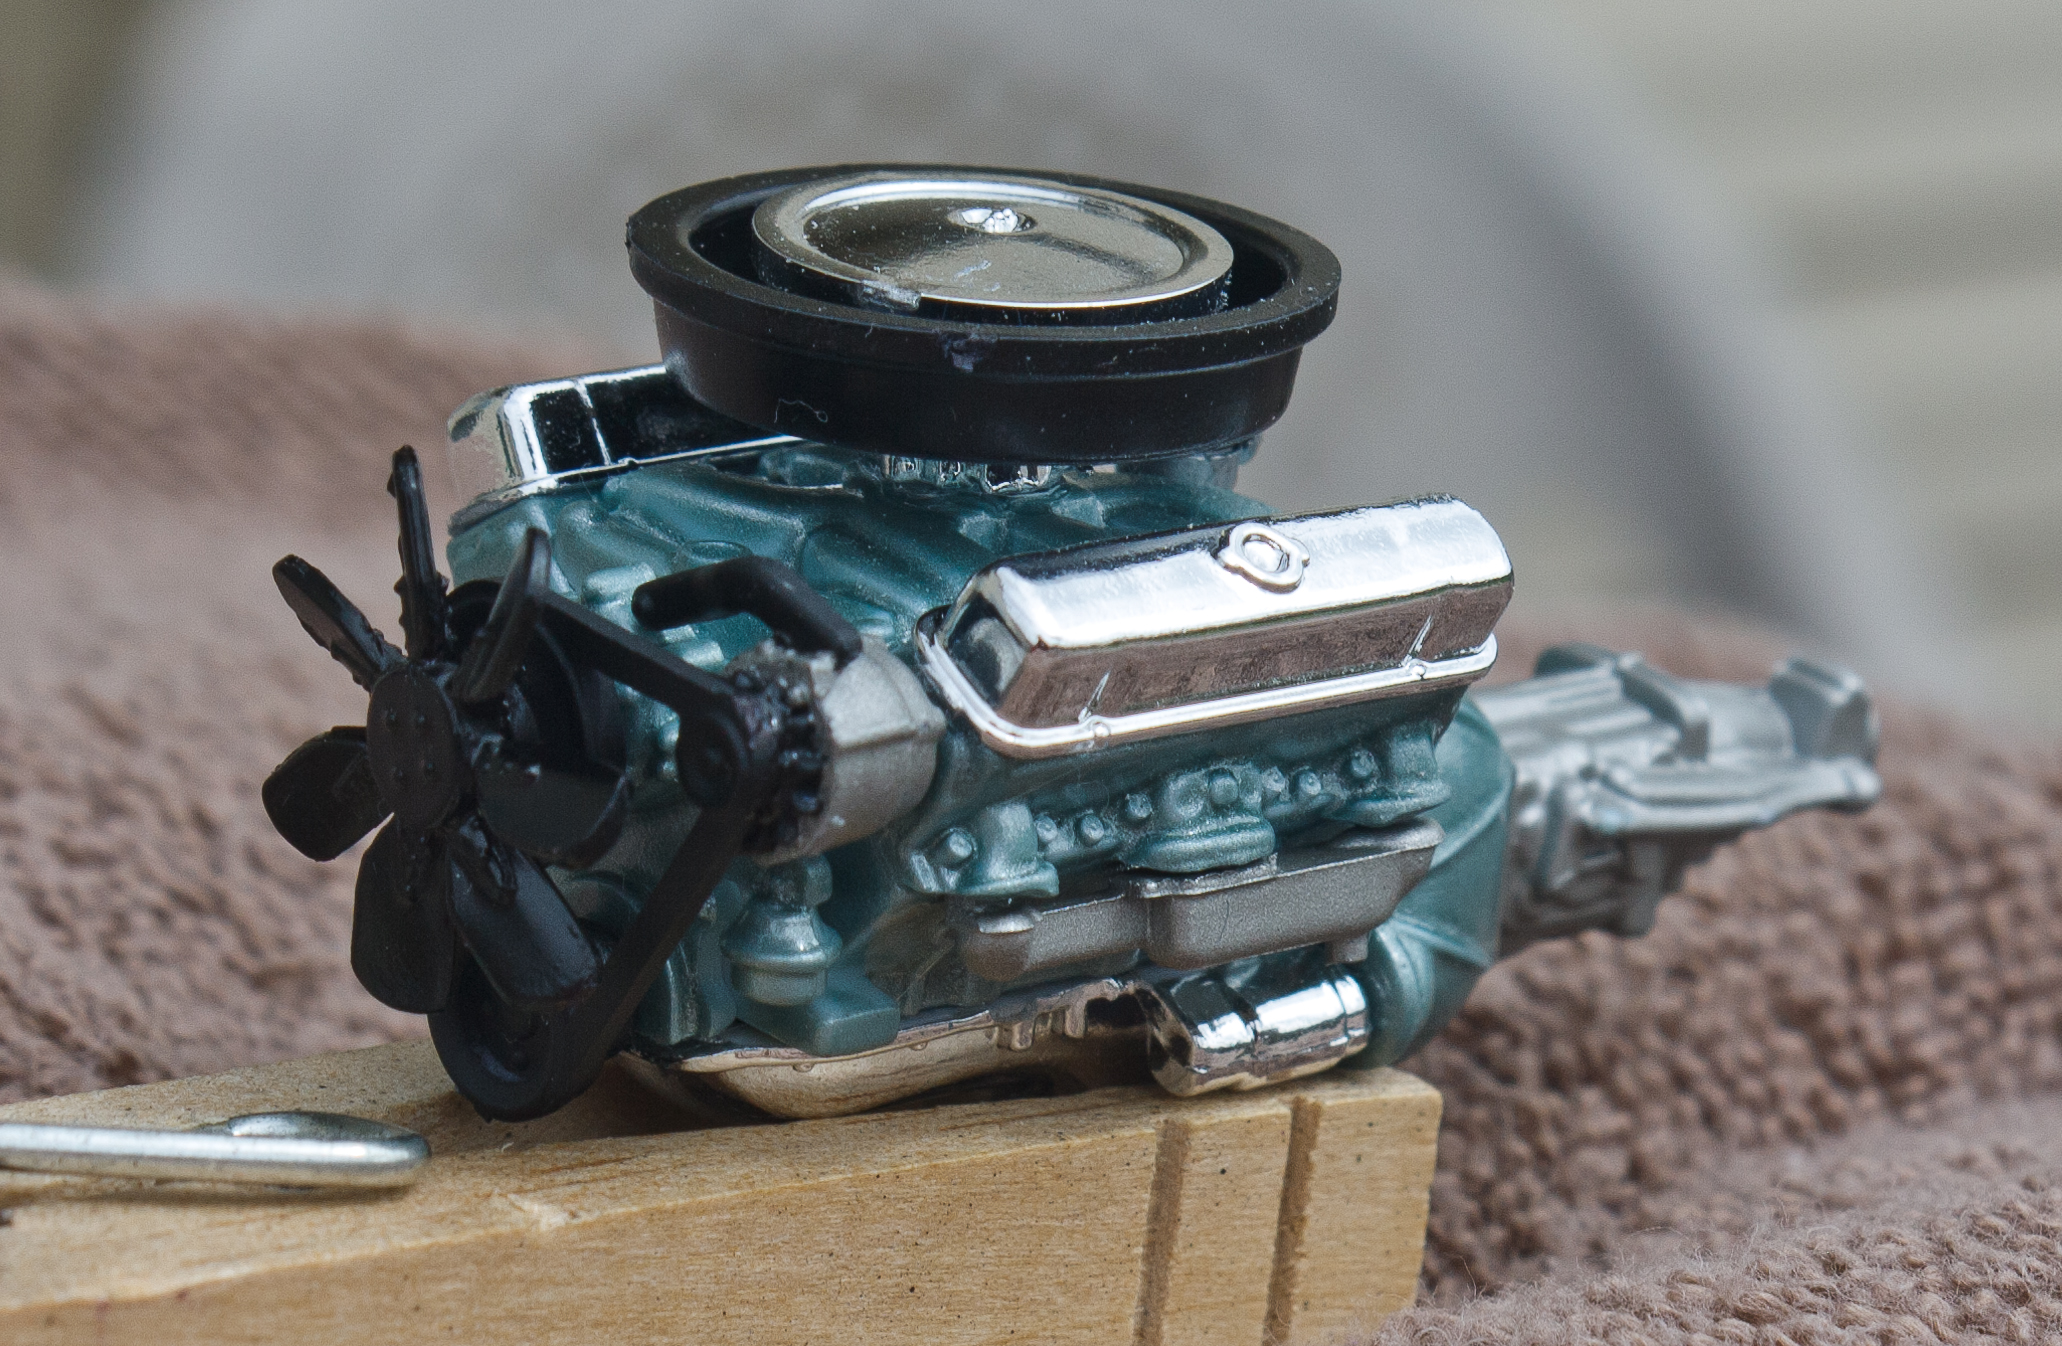
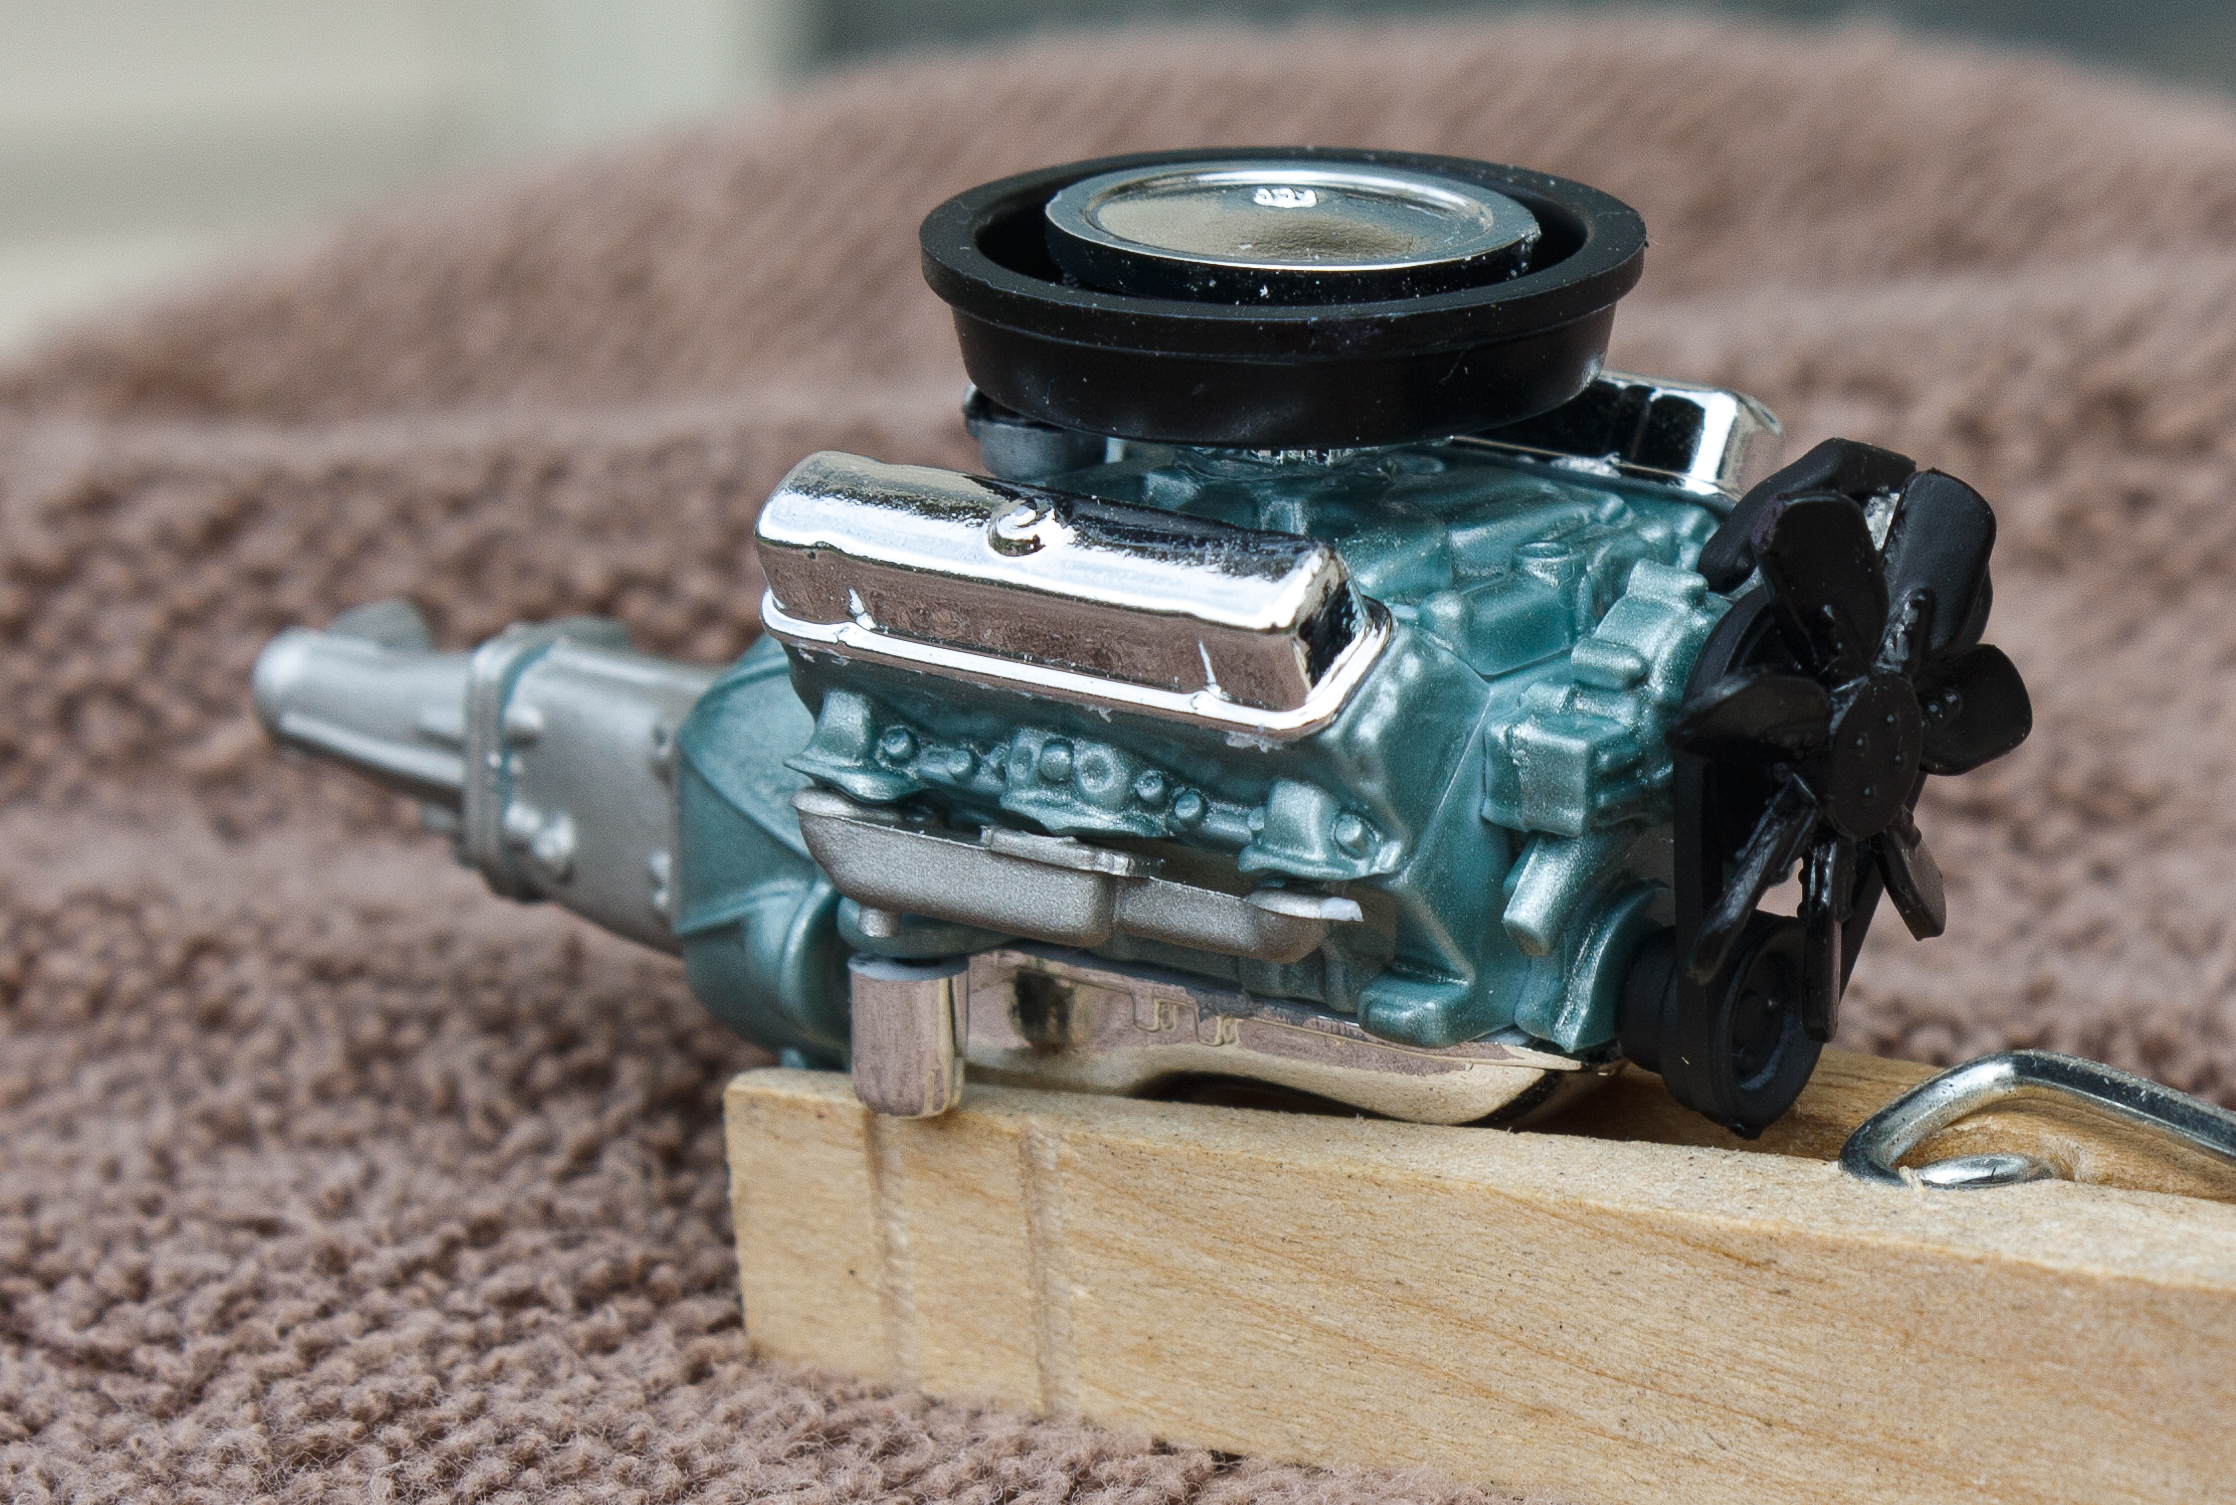
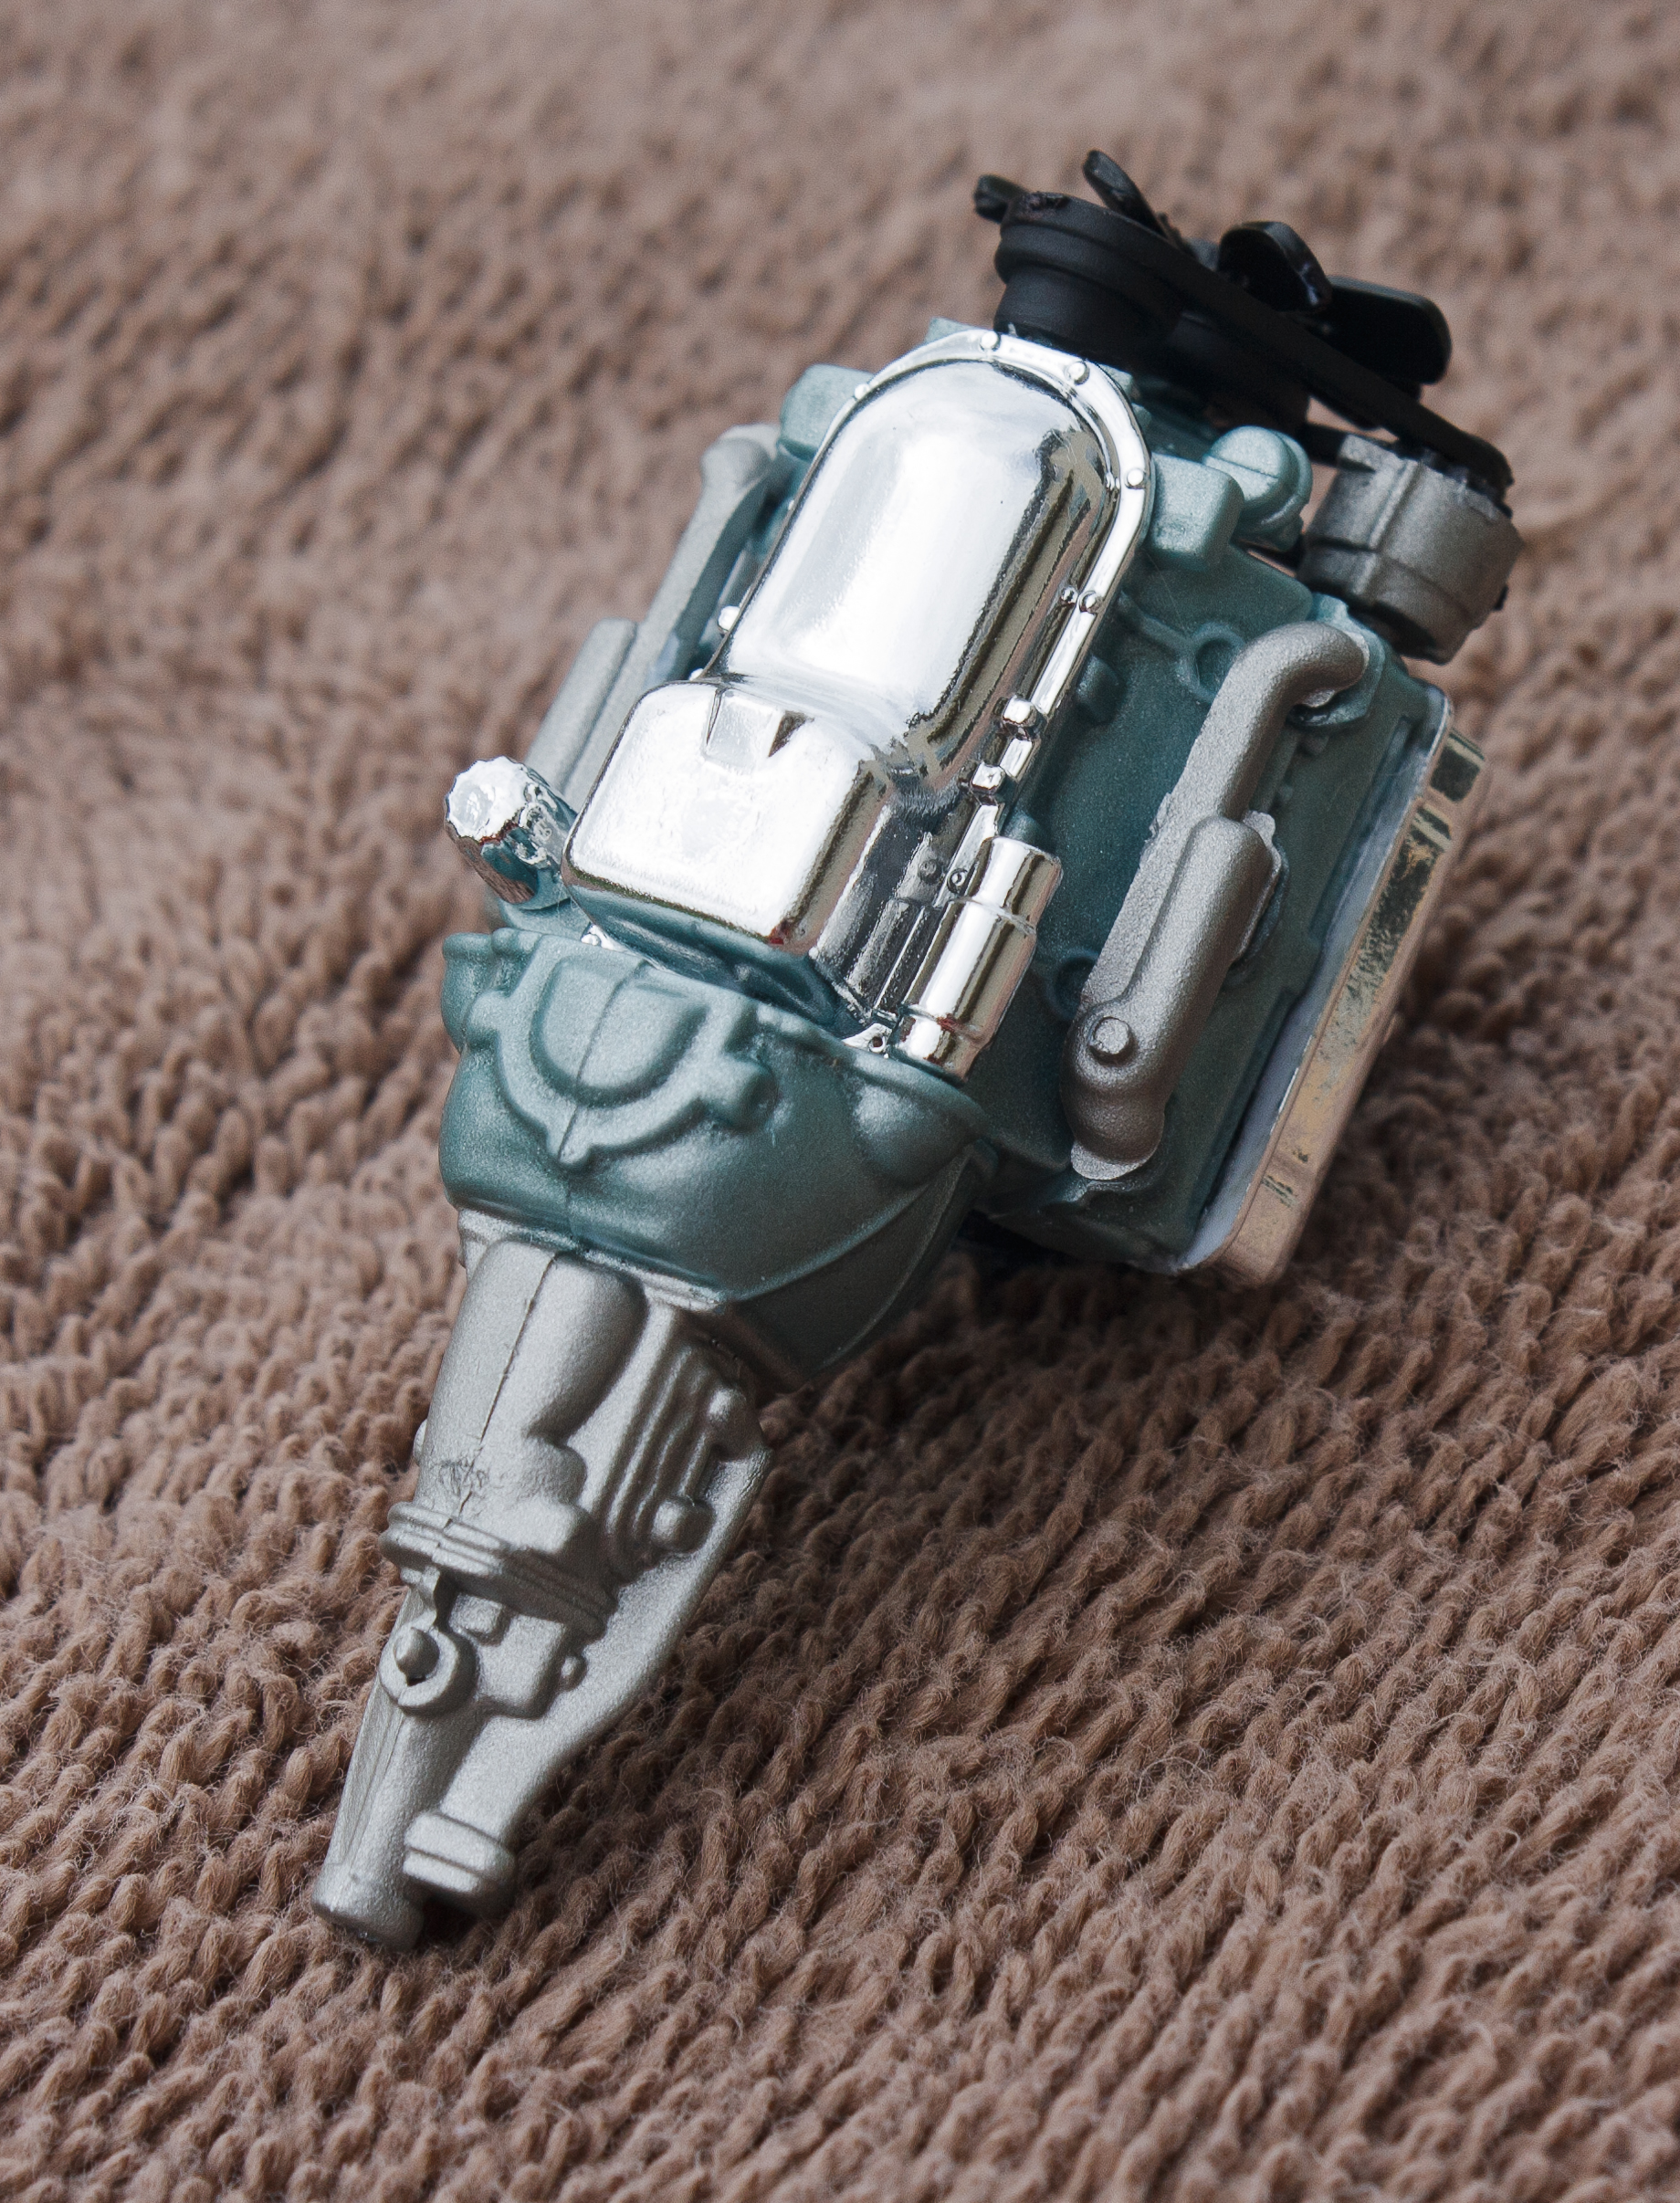
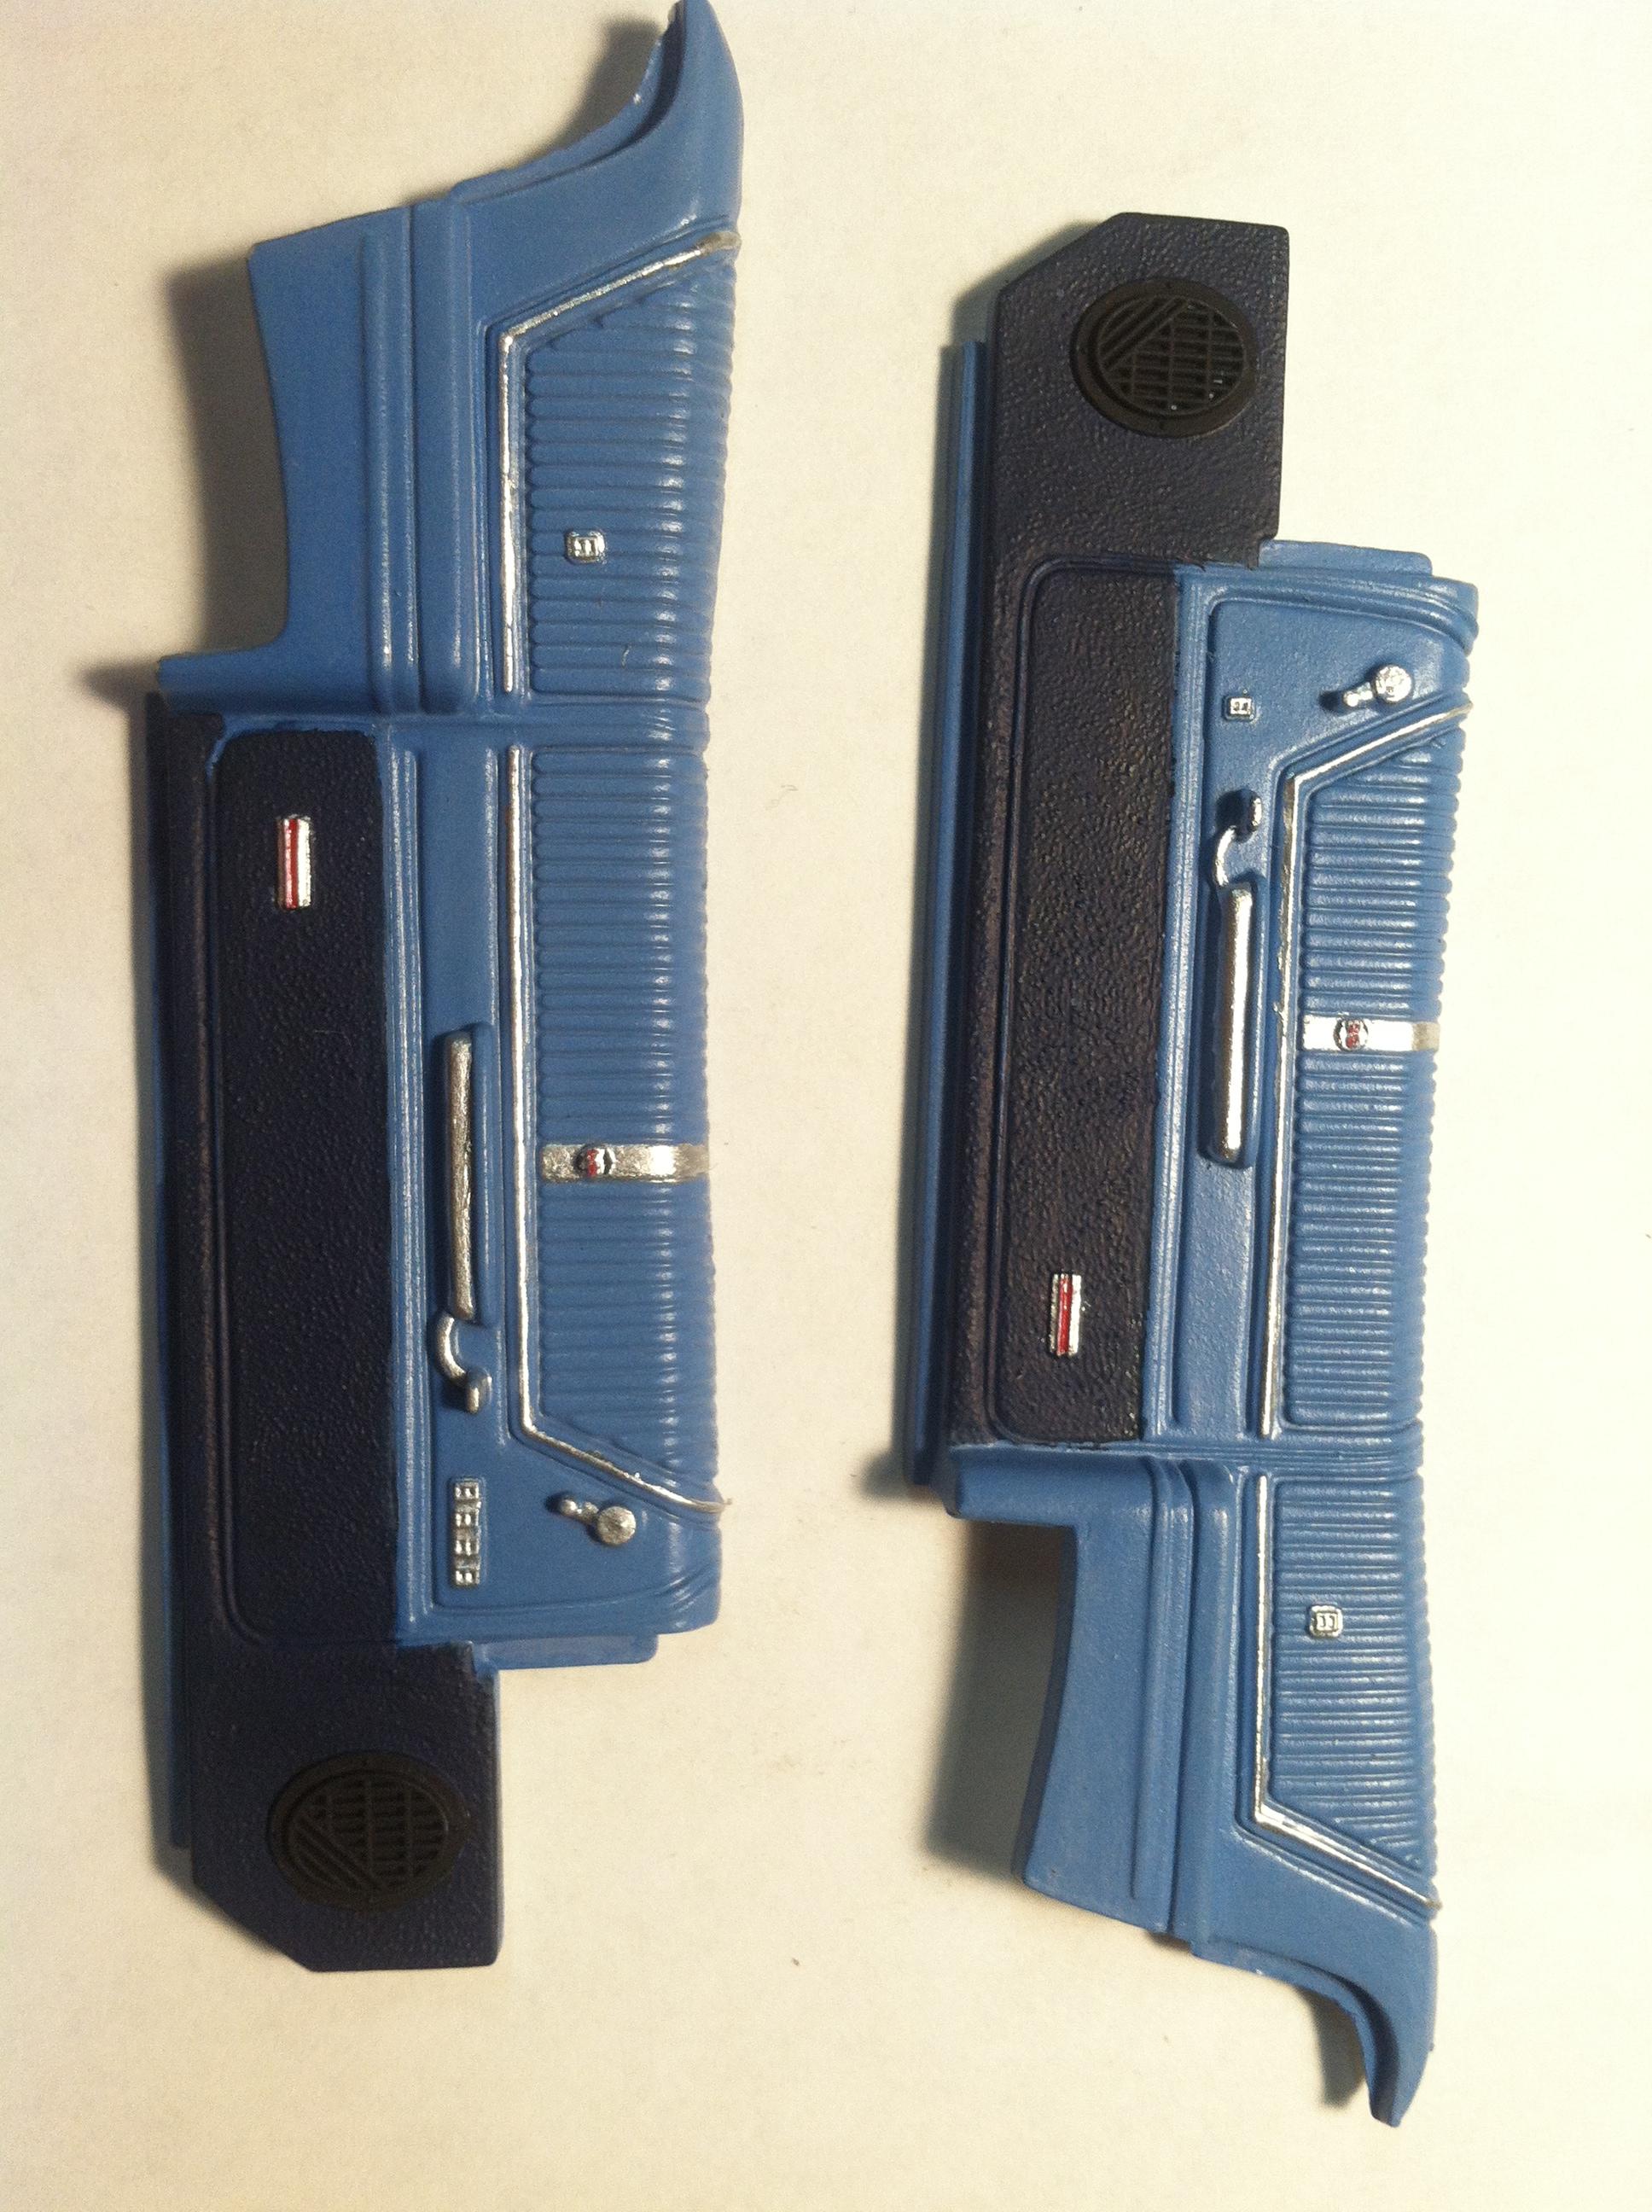
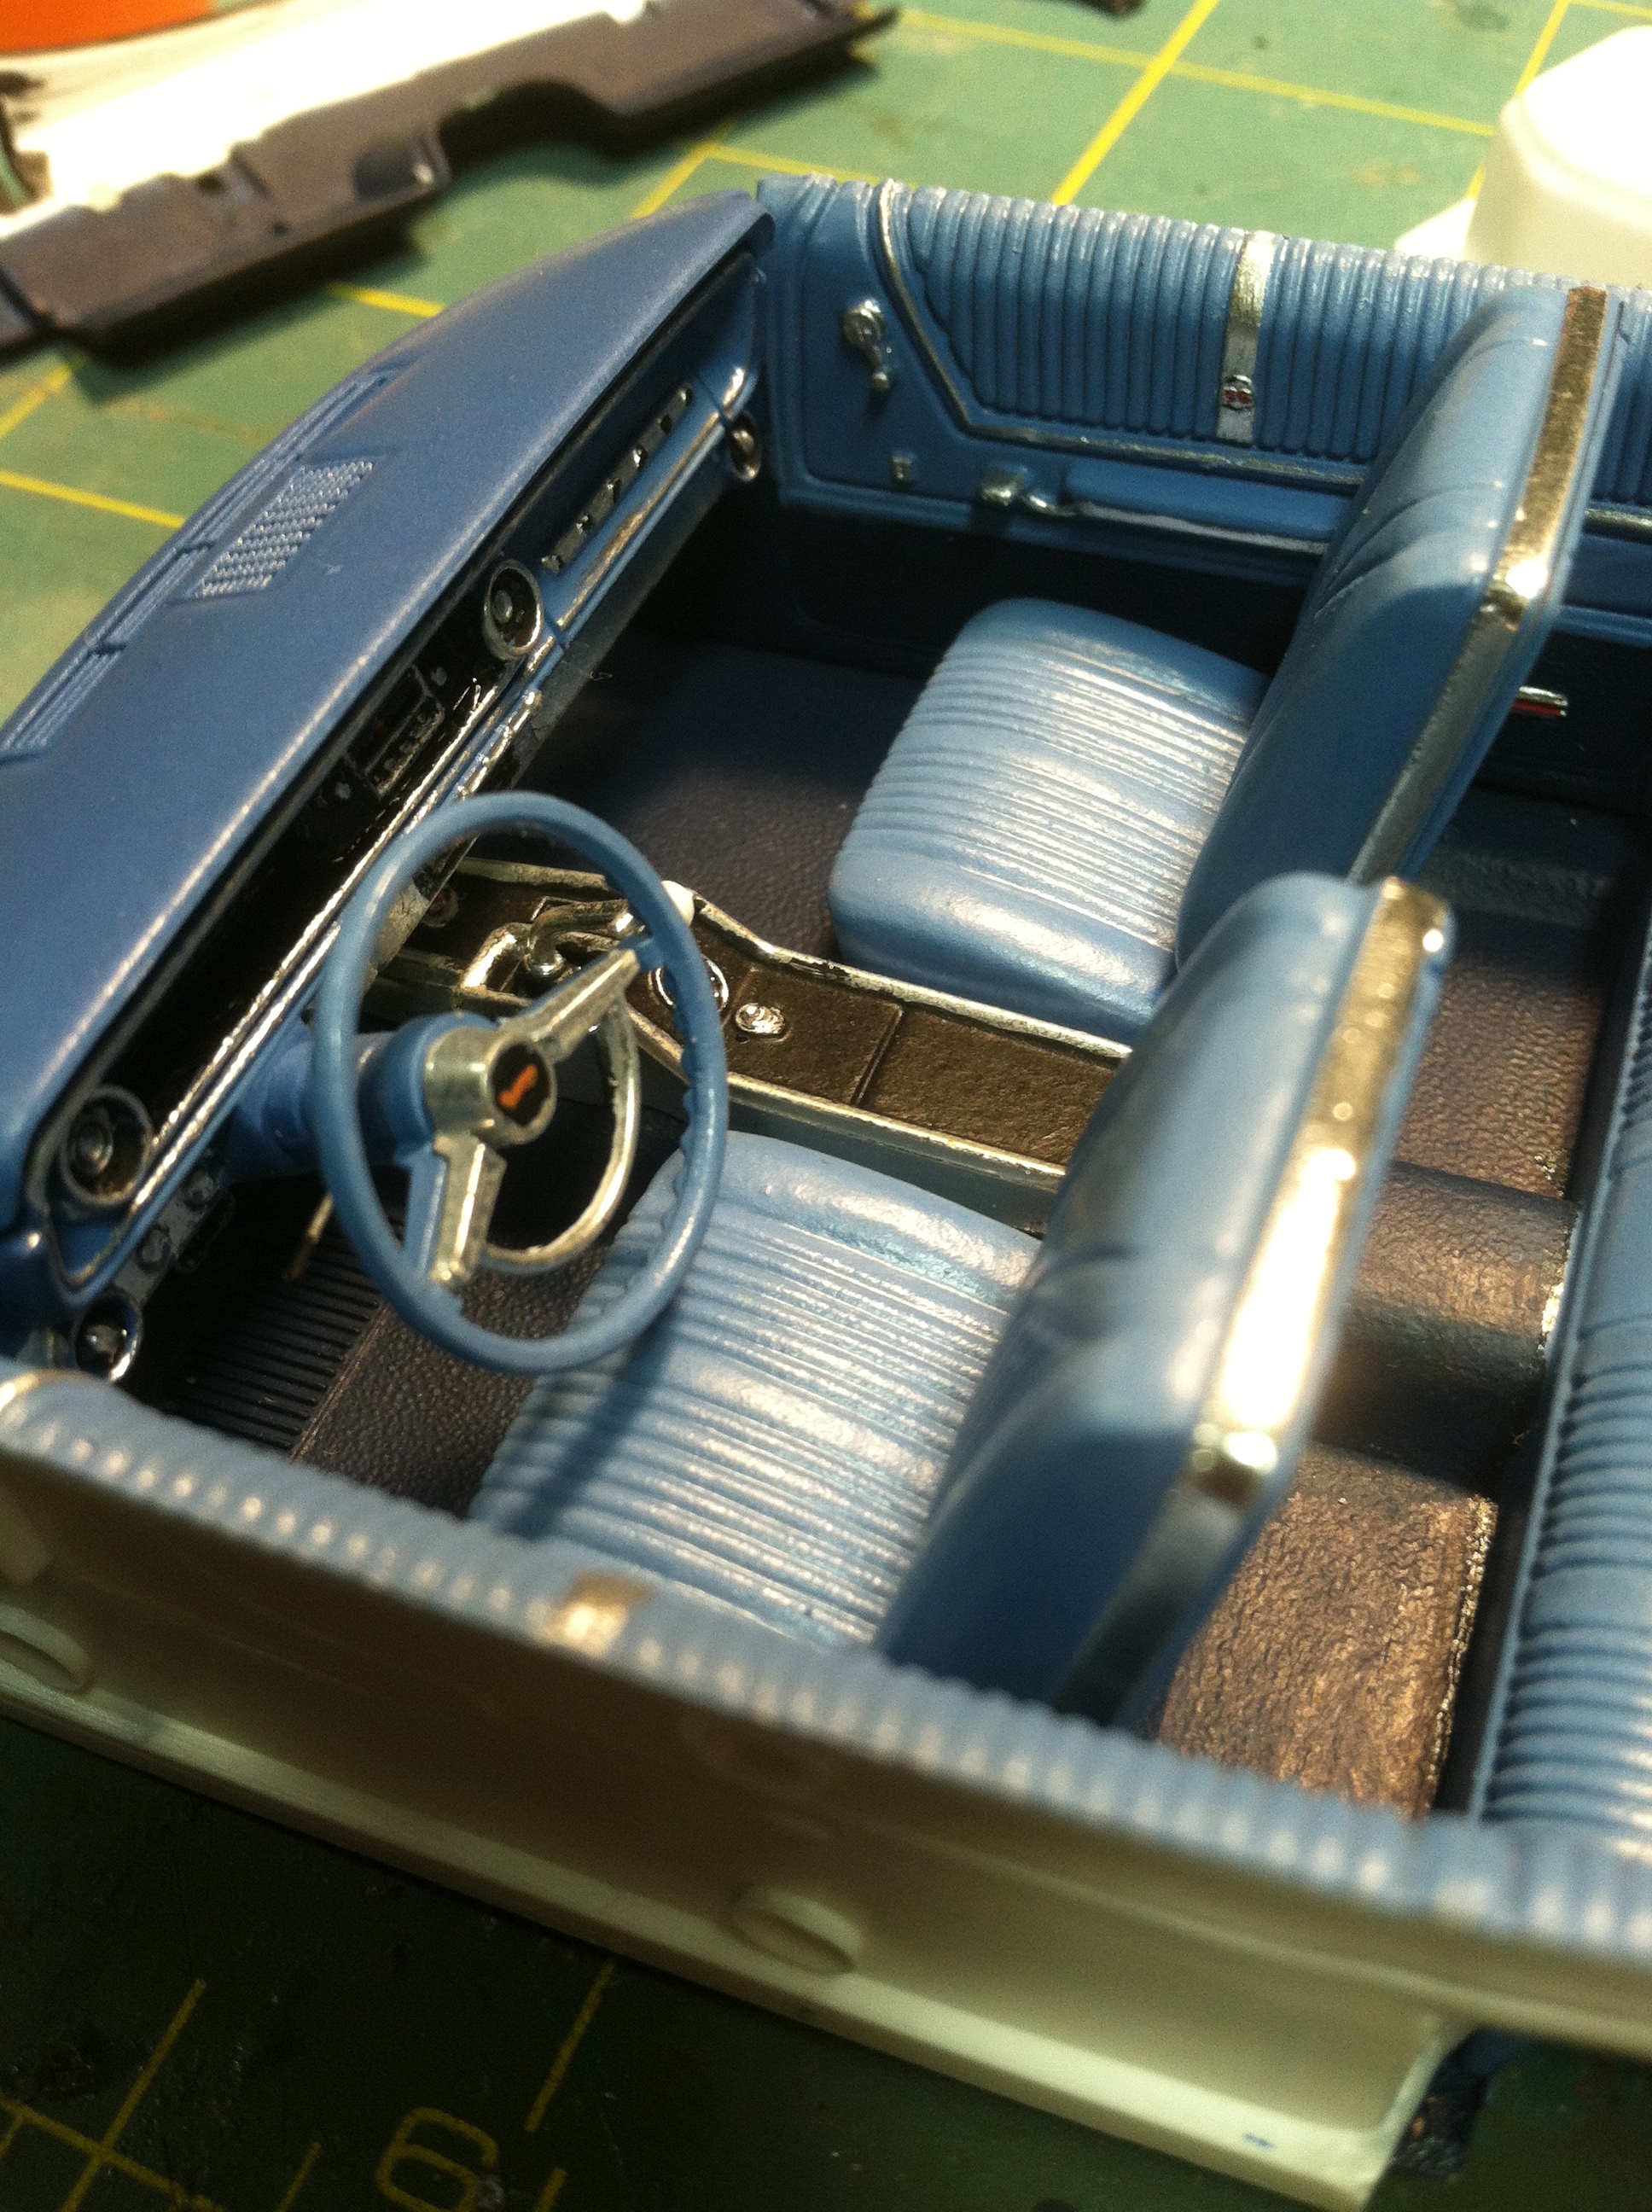
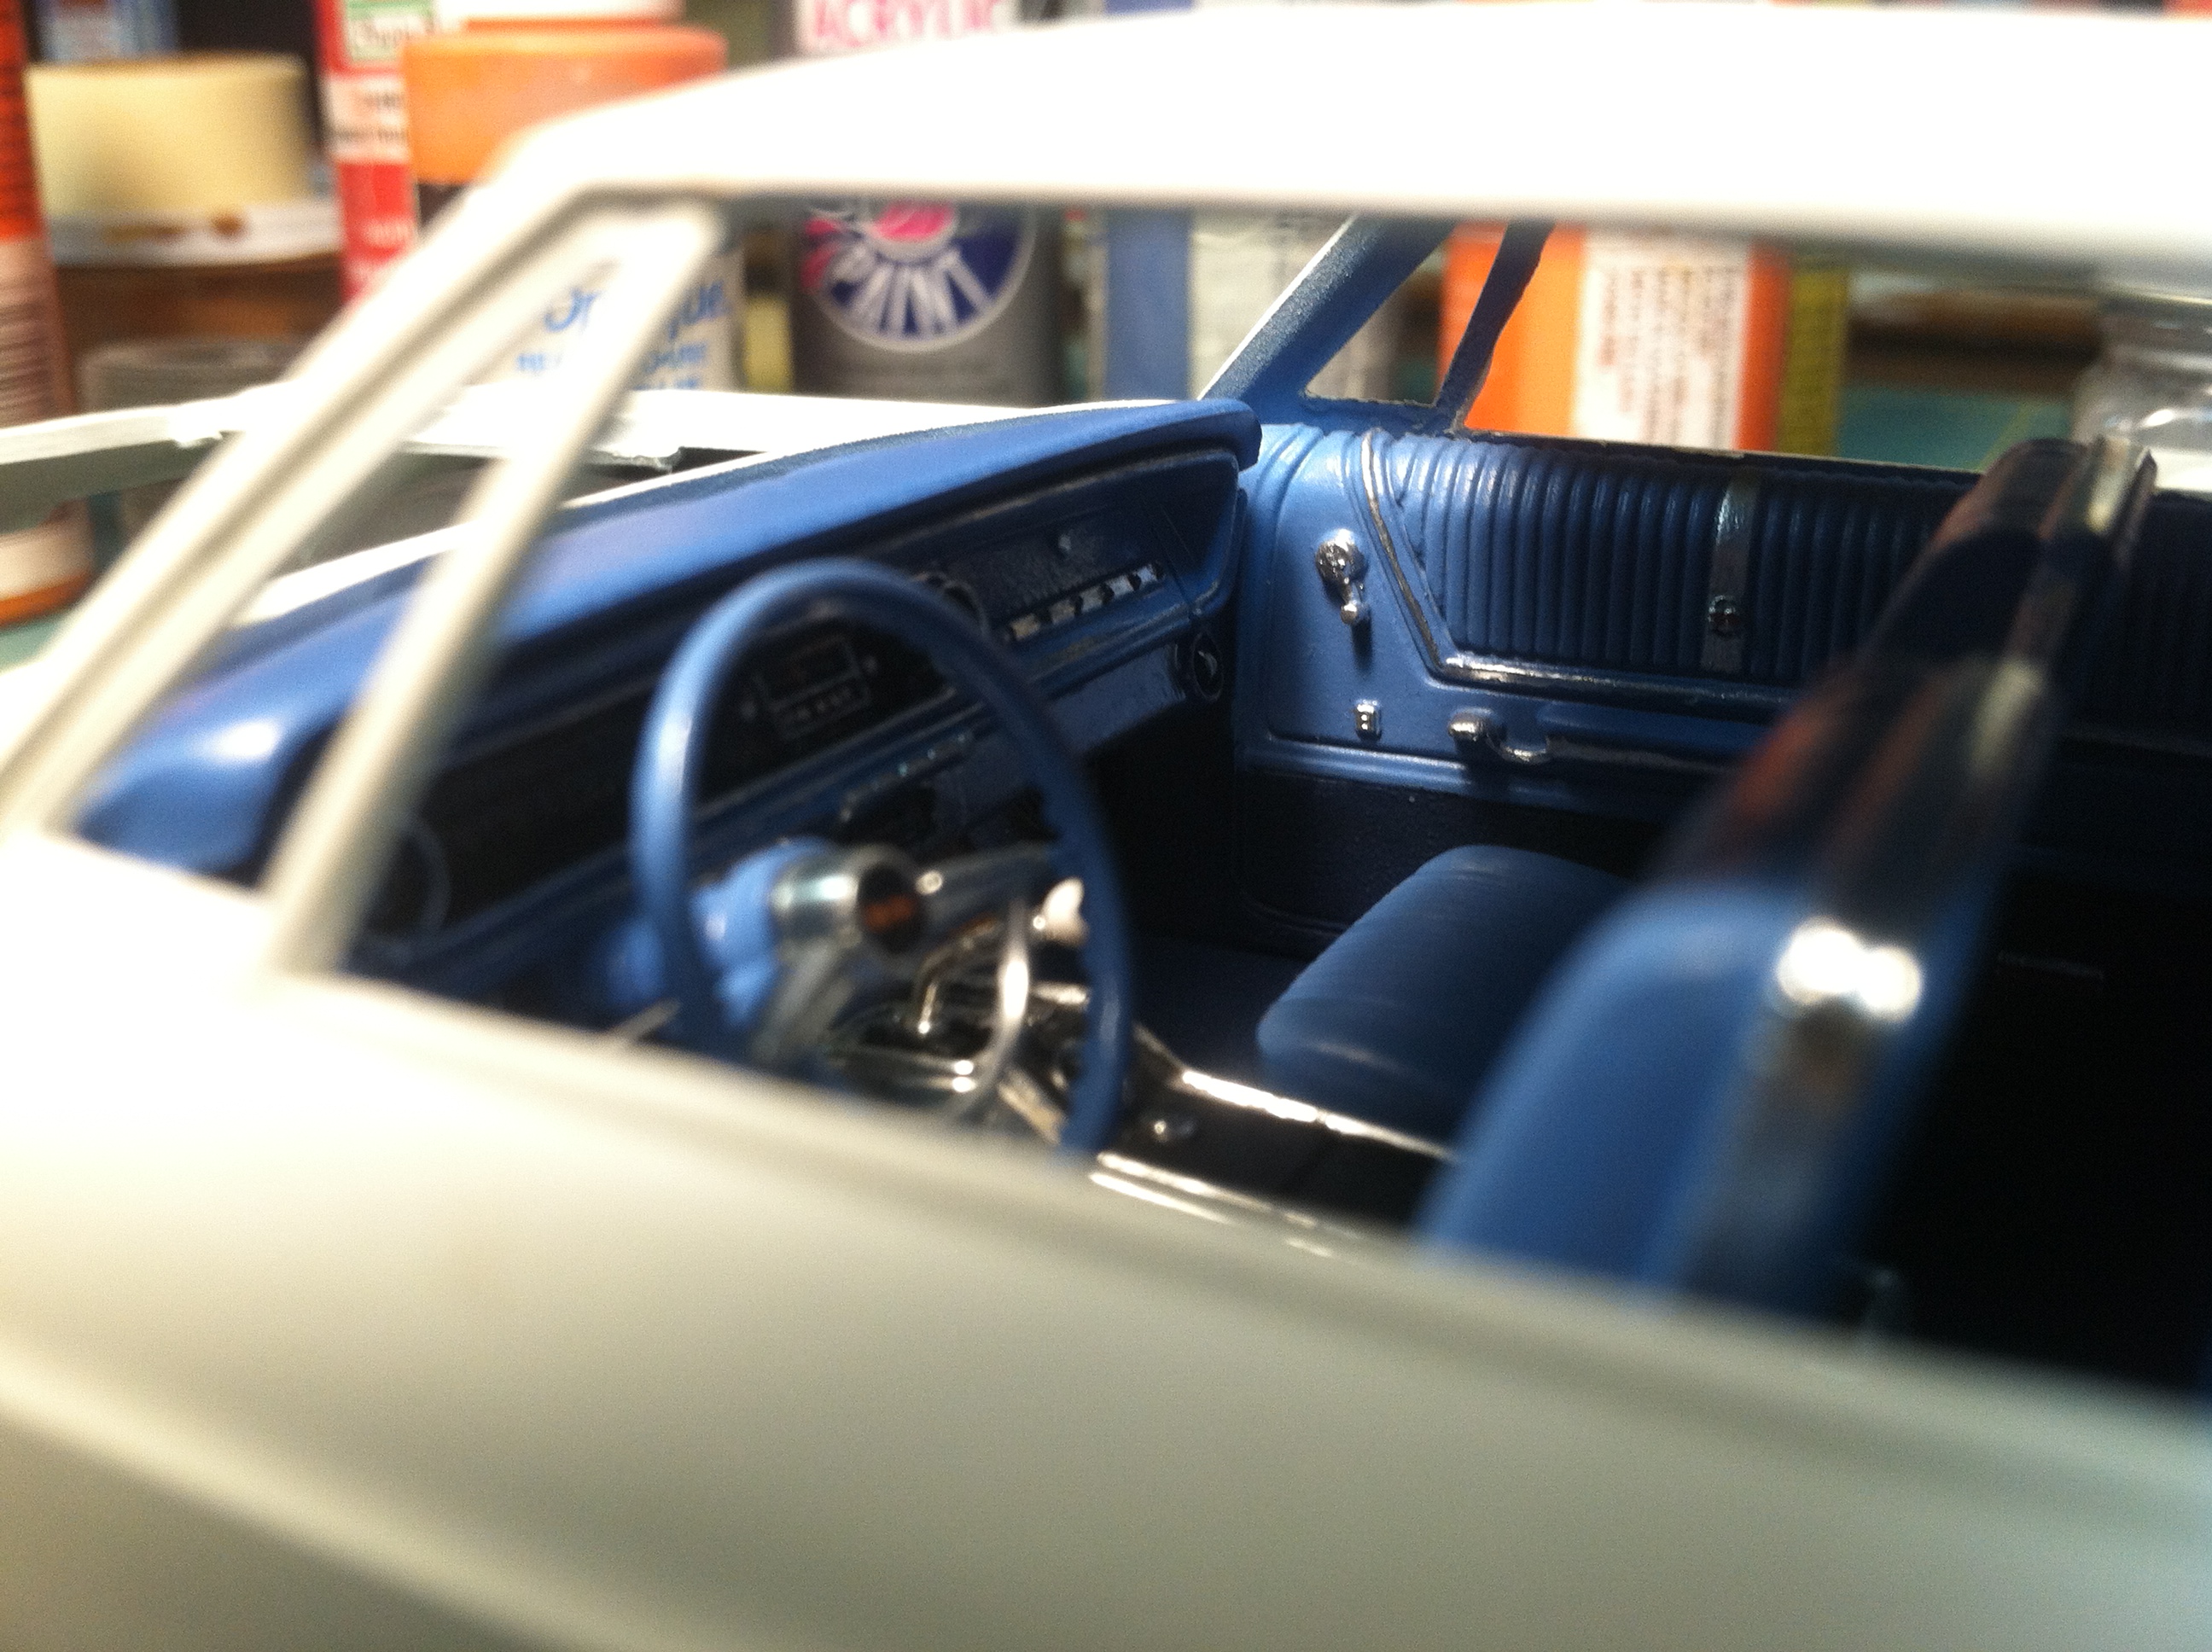
The '68 Firebird 400 by Revell is the latest model I've been working on. This kit allows you to build a stock or drag version. I'm going with the stock. I've finished all the airbrushing and I've started on the detailing. I've also finished assembling the engine. The body color is Model Master metallic blue 2768, which was hard to find. It's based on a real body color for this car. The interior is going to be Model Master light ivory to simulate a real interior color for this car called parchment.

-
.thumb.jpg.e0420fe52e683c60d19e843462316523.jpg) We've seen images of the old '50s and '60s era molds Revell had stored in their Illinois warehouse, some (many?) of which Atlantis Models acquired. They have begun to share publicly exactly what they acquired, starting with this mold for the Revell Douglas D558-2 Skyrocket: Let the automotive model related speculation and hopes begin.
We've seen images of the old '50s and '60s era molds Revell had stored in their Illinois warehouse, some (many?) of which Atlantis Models acquired. They have begun to share publicly exactly what they acquired, starting with this mold for the Revell Douglas D558-2 Skyrocket: Let the automotive model related speculation and hopes begin. -
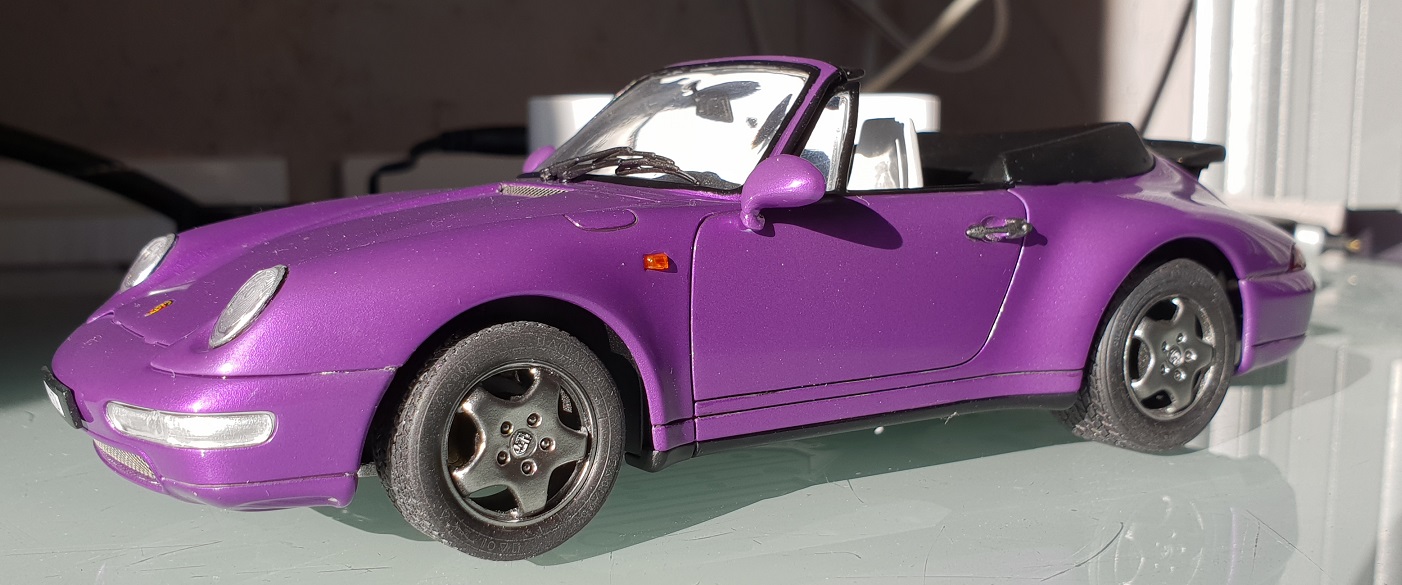
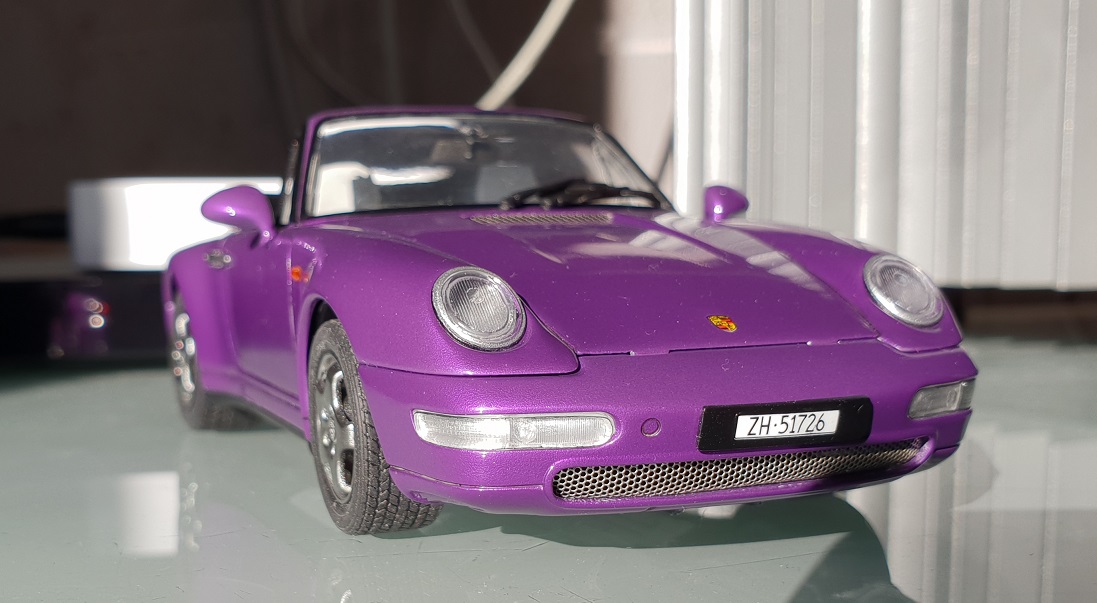
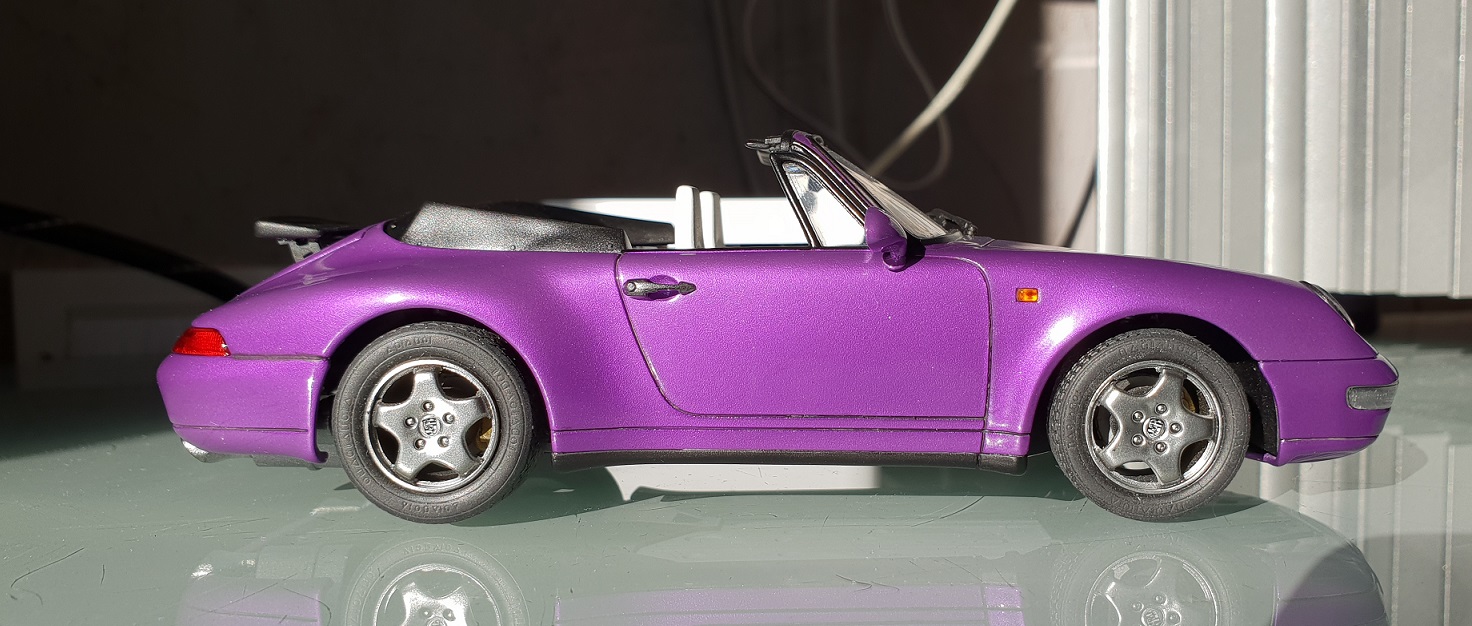
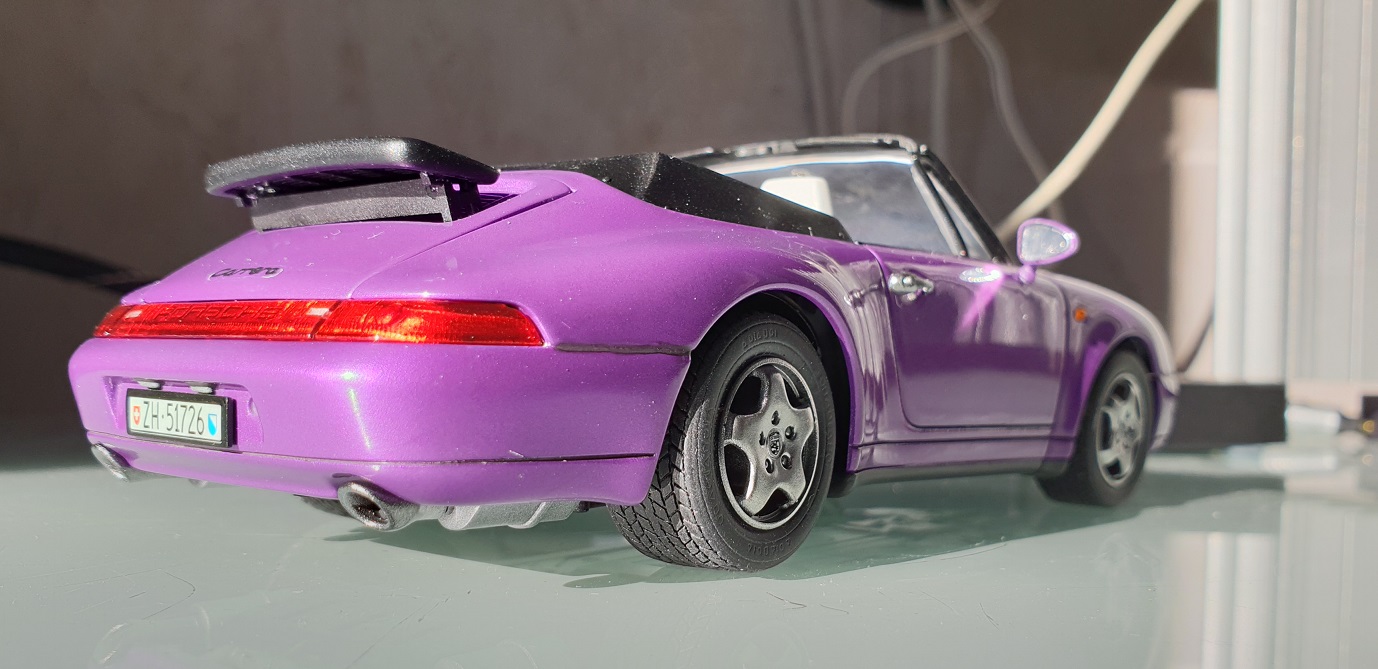
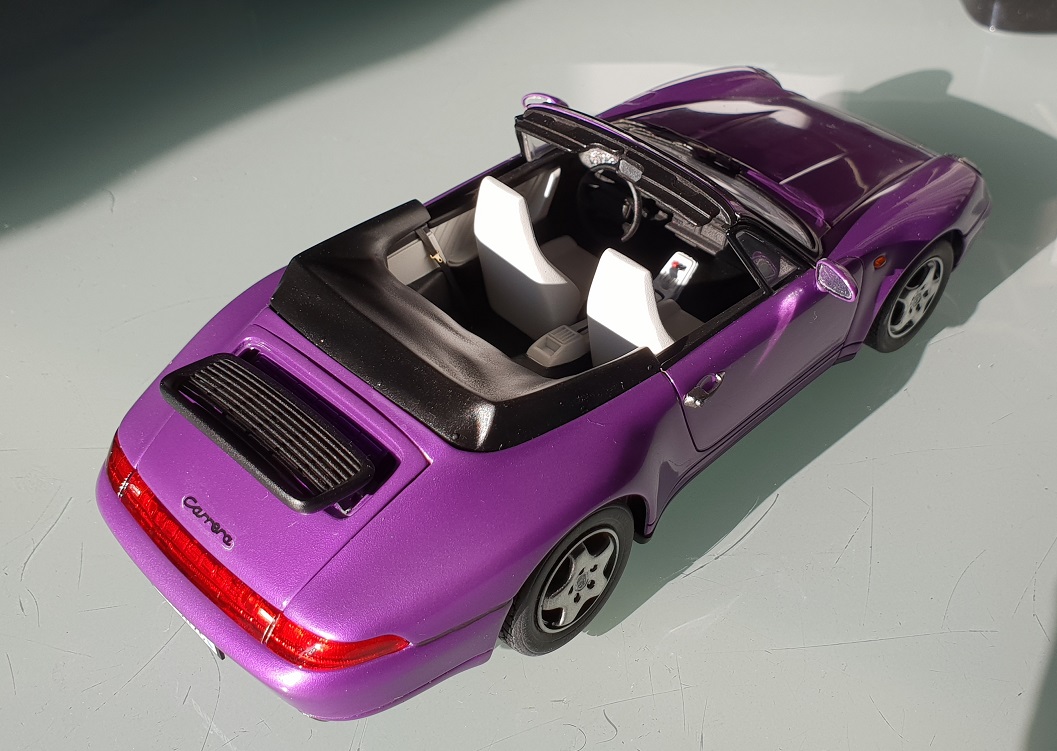
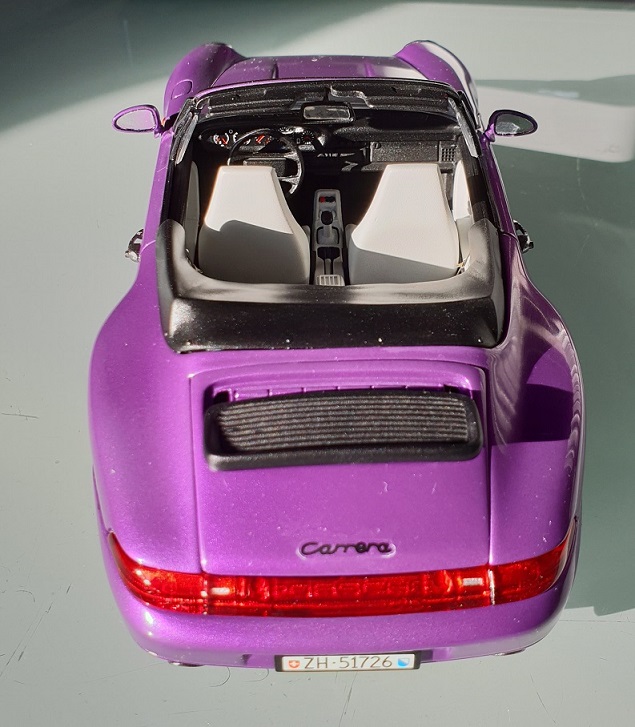
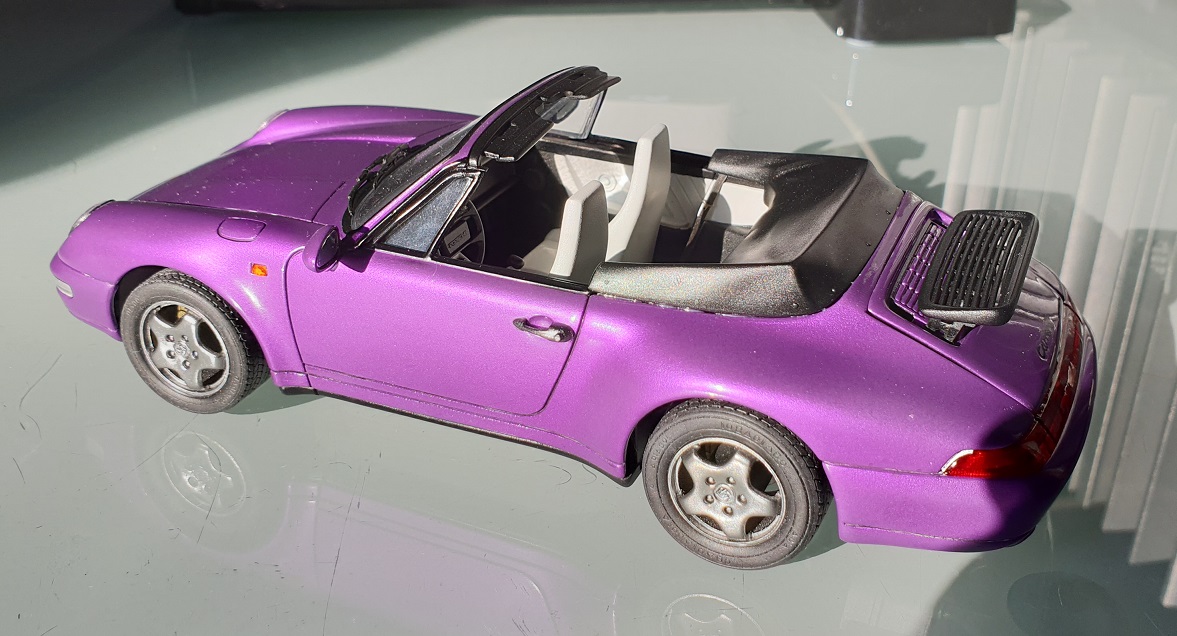
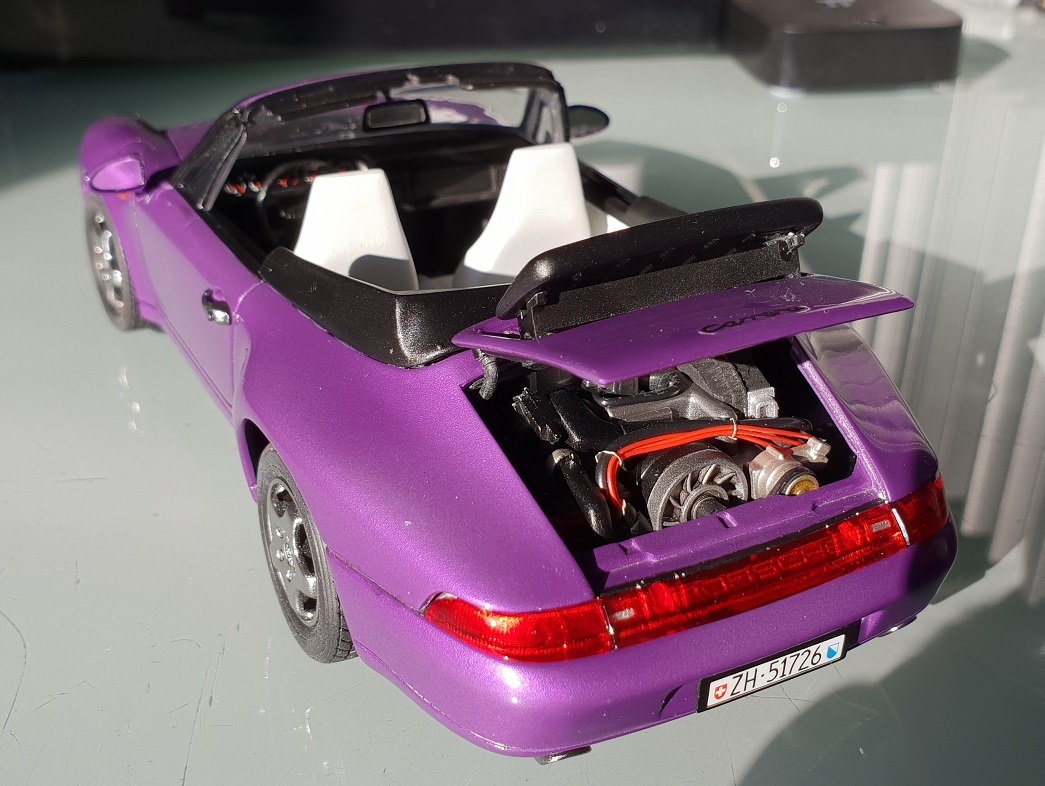
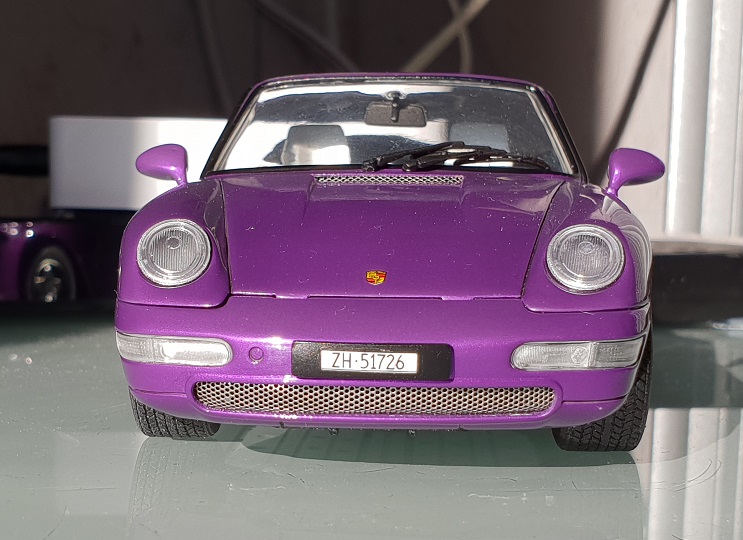
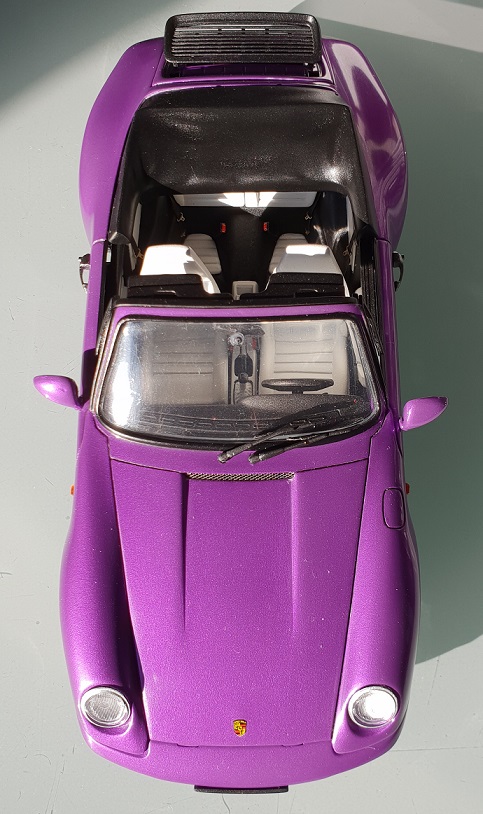
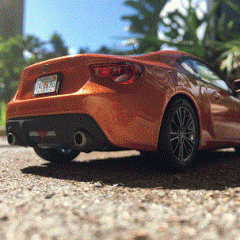
This build was mostly finished in 2016, there is a build thread on this forum. I just had to finish the license plates - which I did this year... It is a dog of a kit, quality is low, general fit is poor and the way it is supposed to be assembled makes it difficult to get right. It was sprayed with some old nail polish, one of may favourite colours on one of my favourite cars, shame it looks a bit strange... hopefully my '85 Fujimi 911 will turn out better! Comments welcome!
-
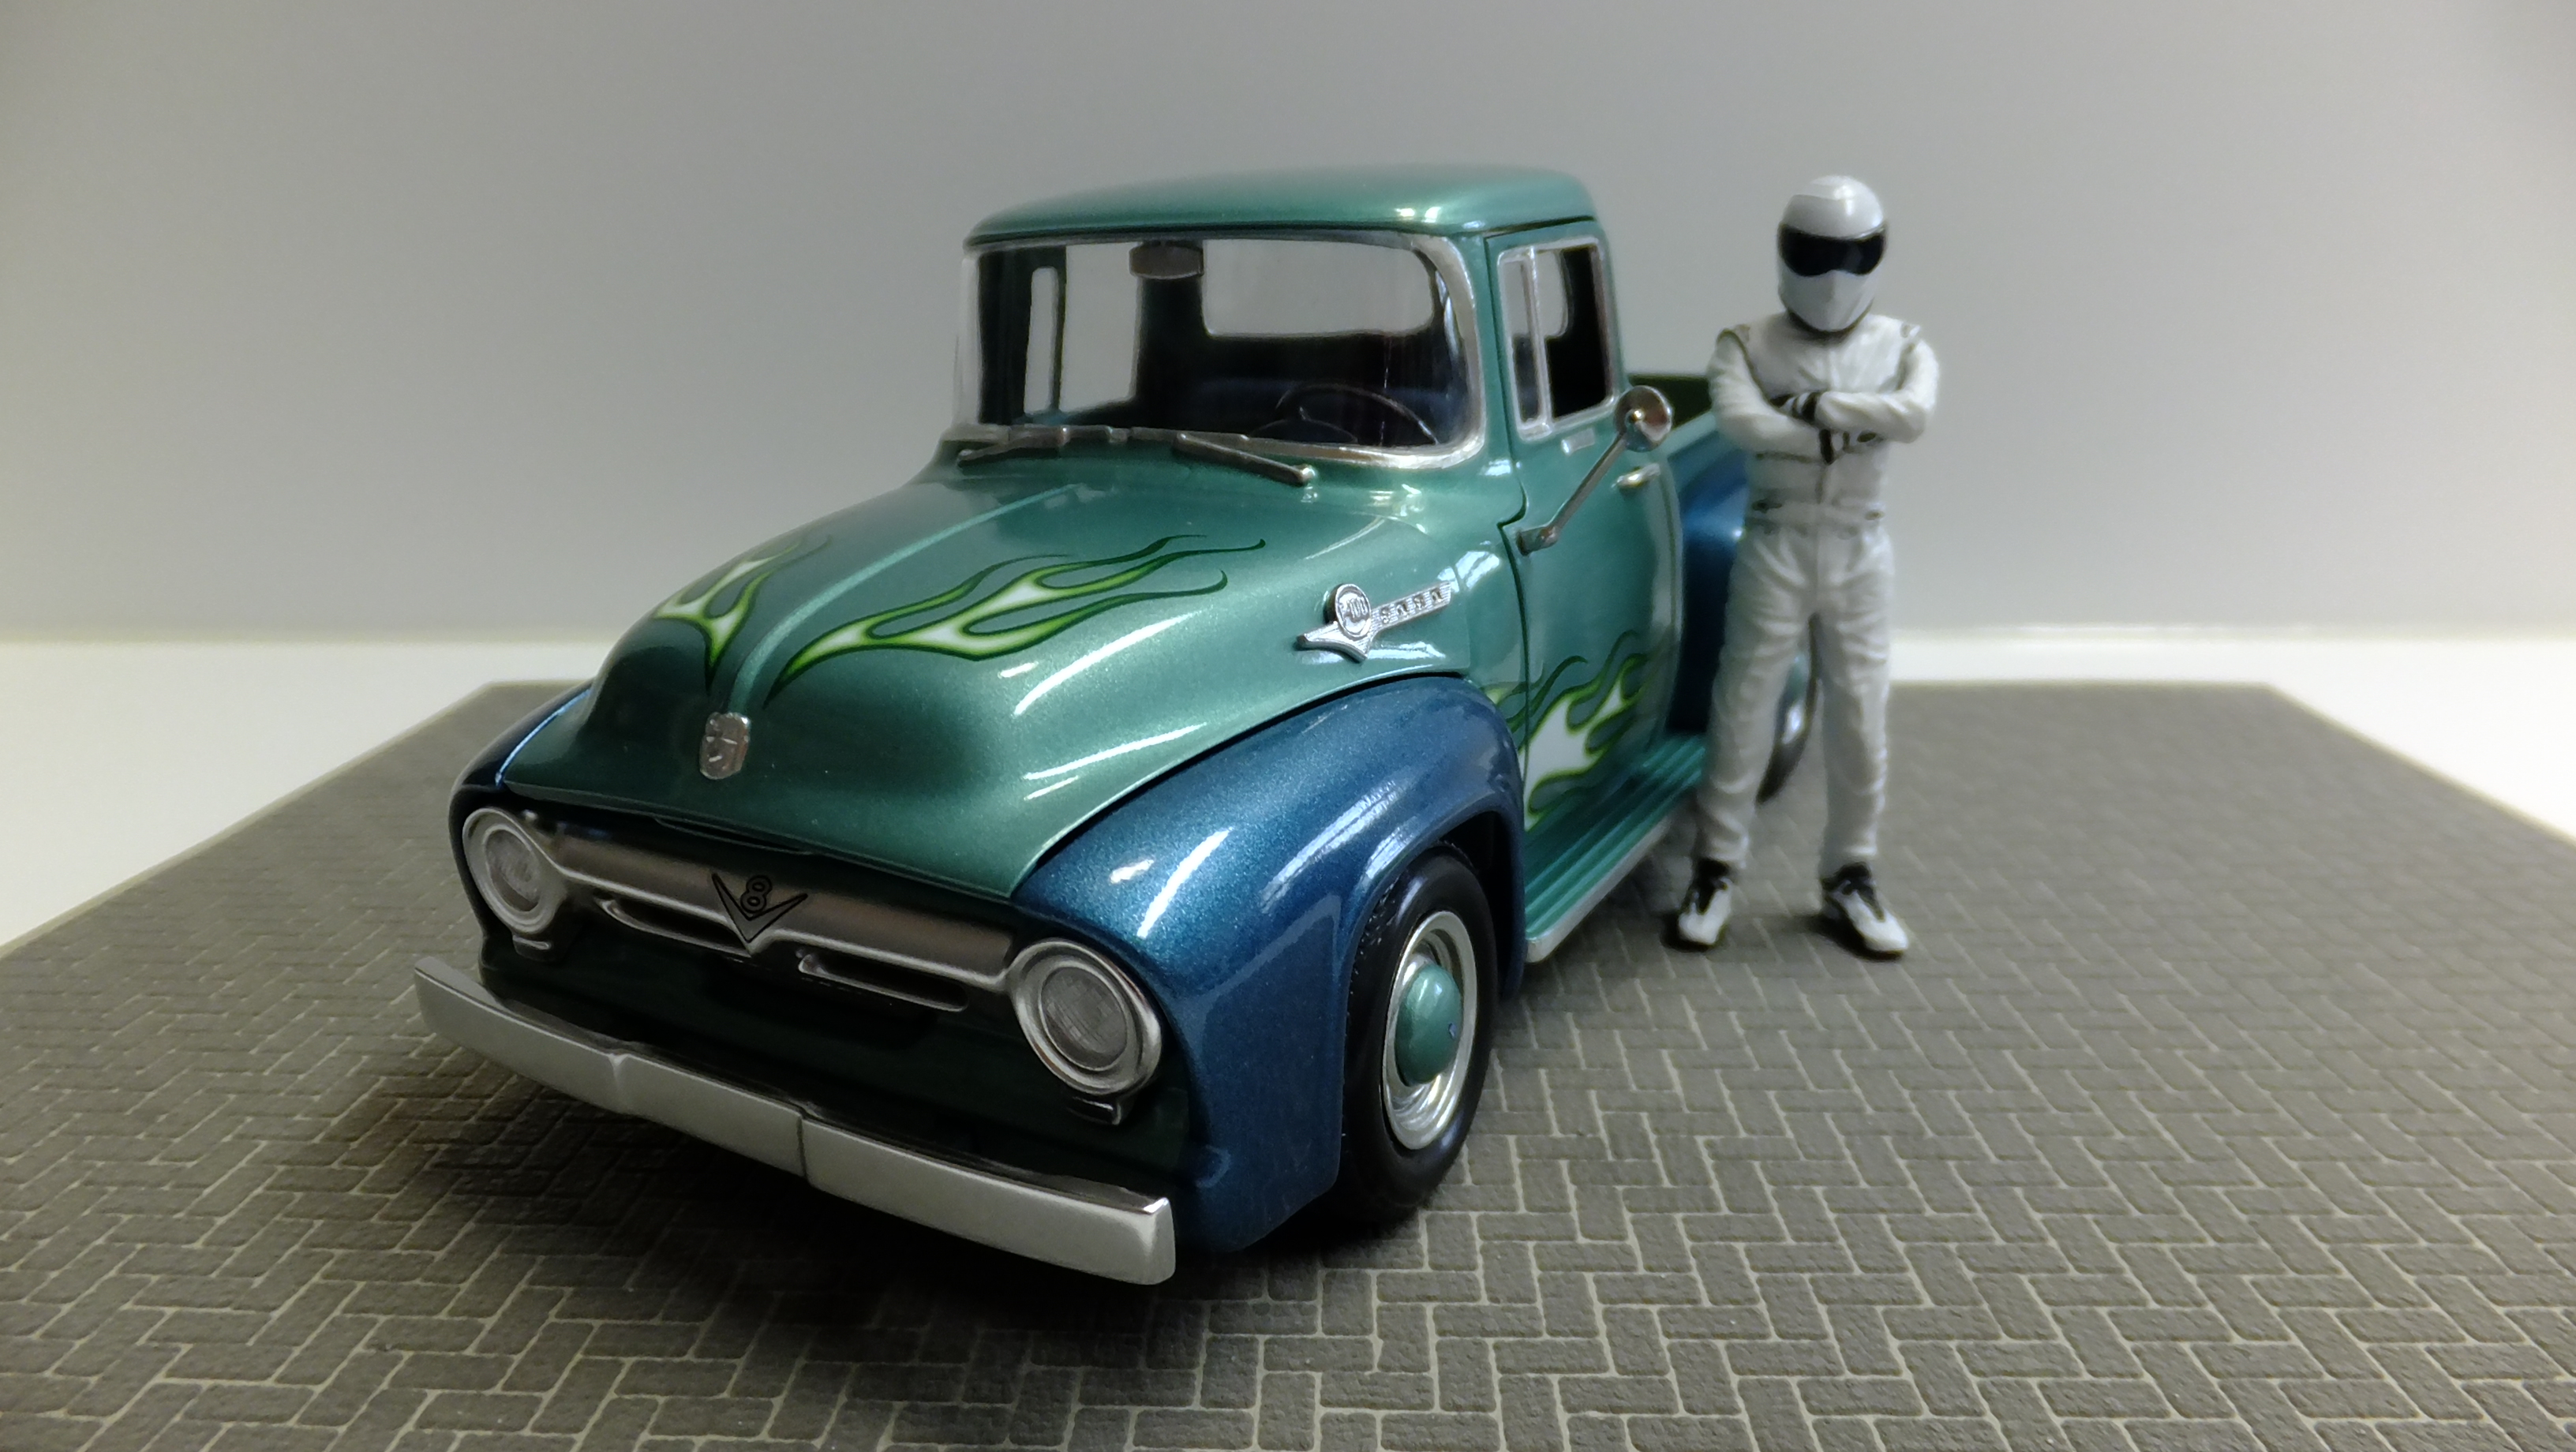
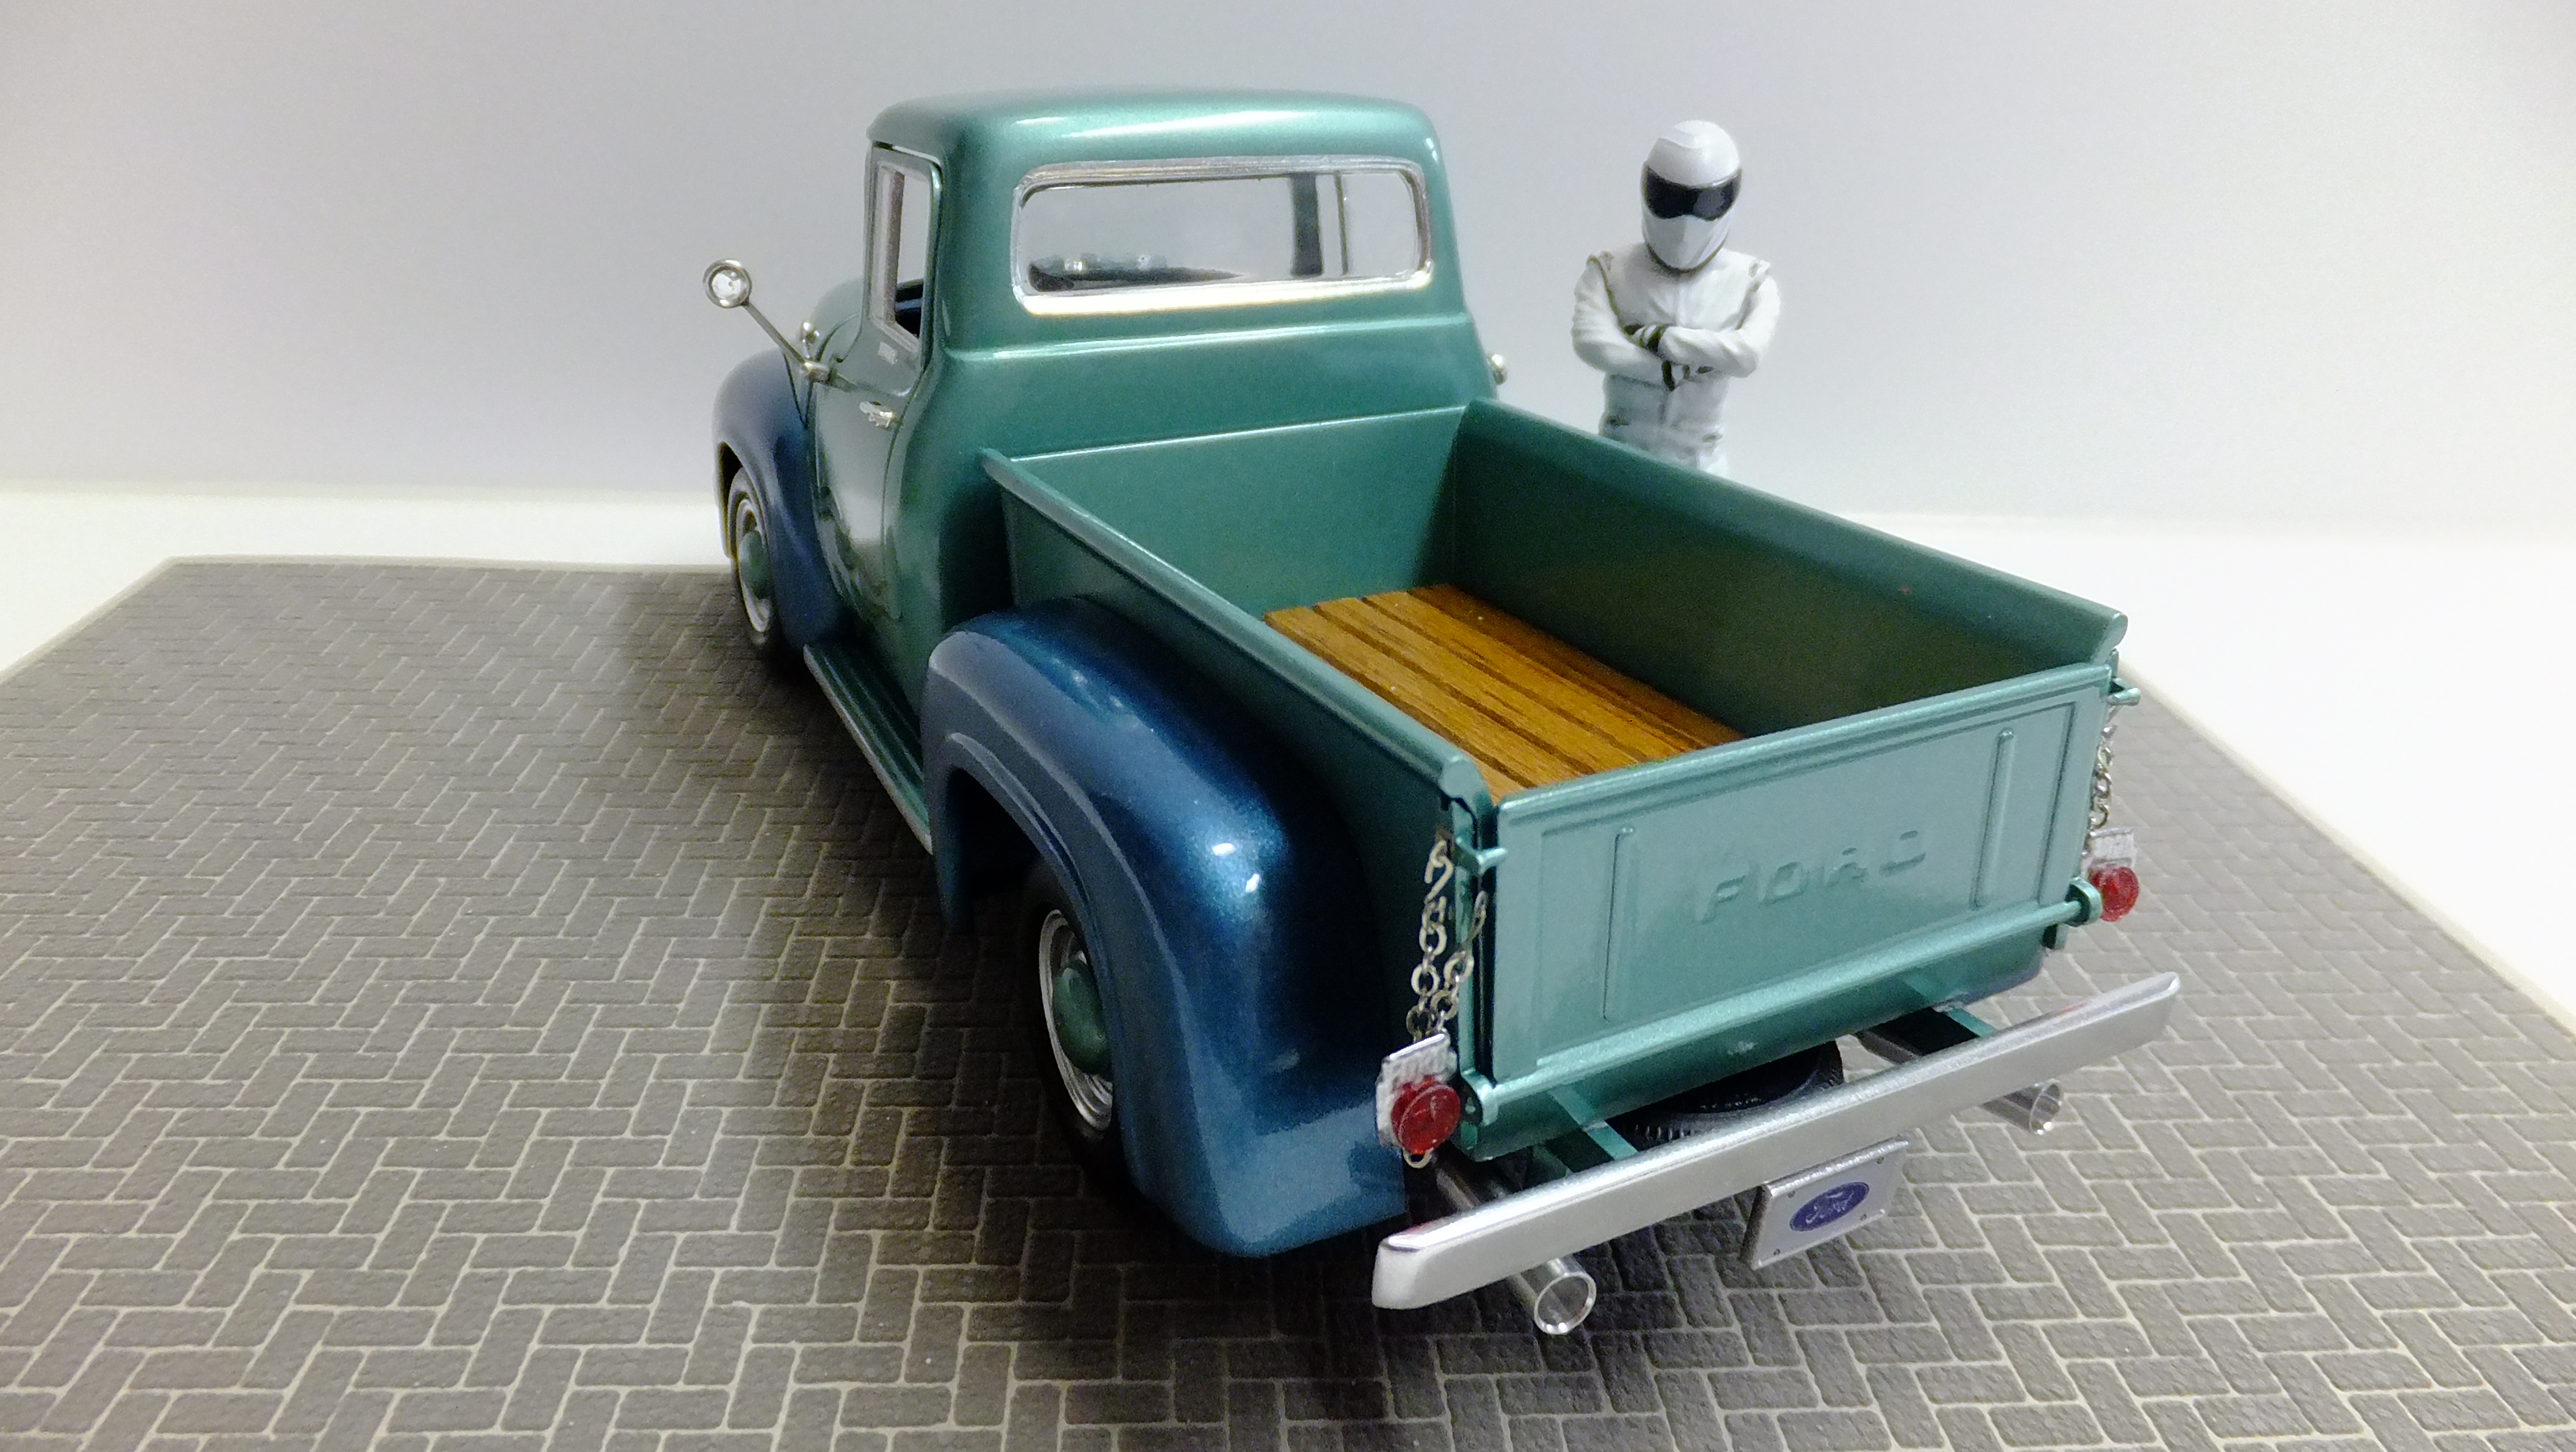
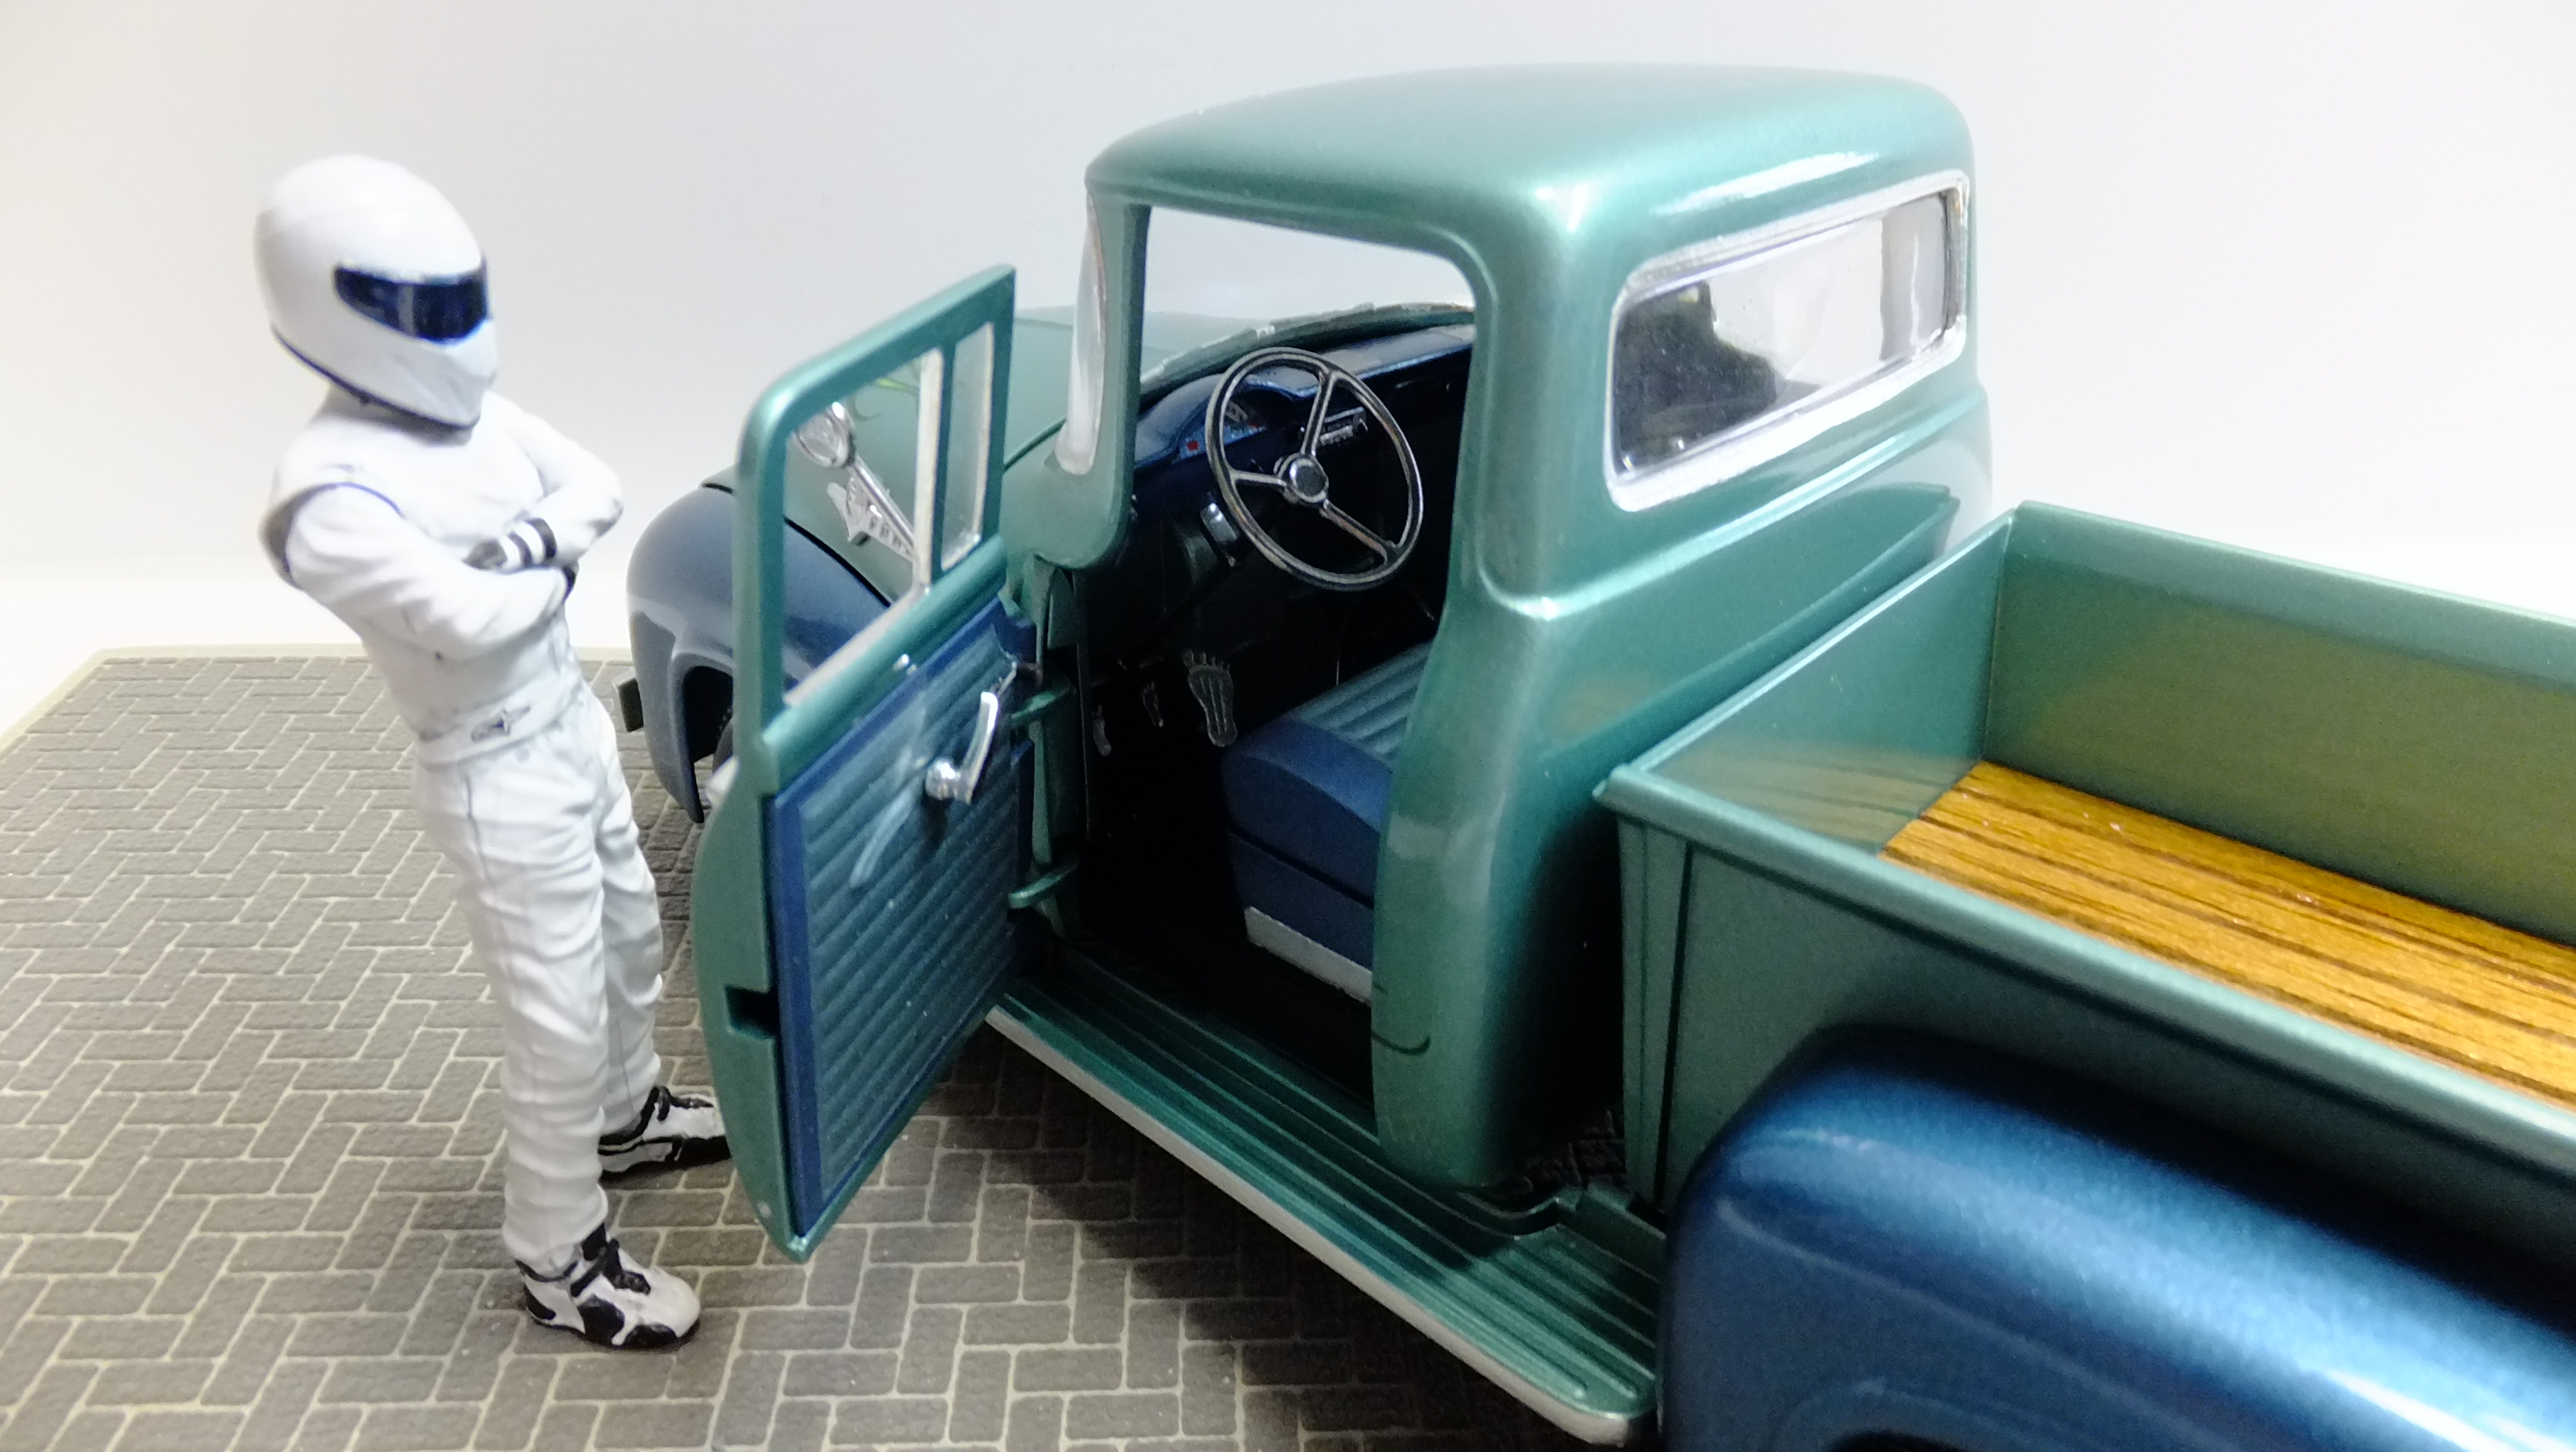
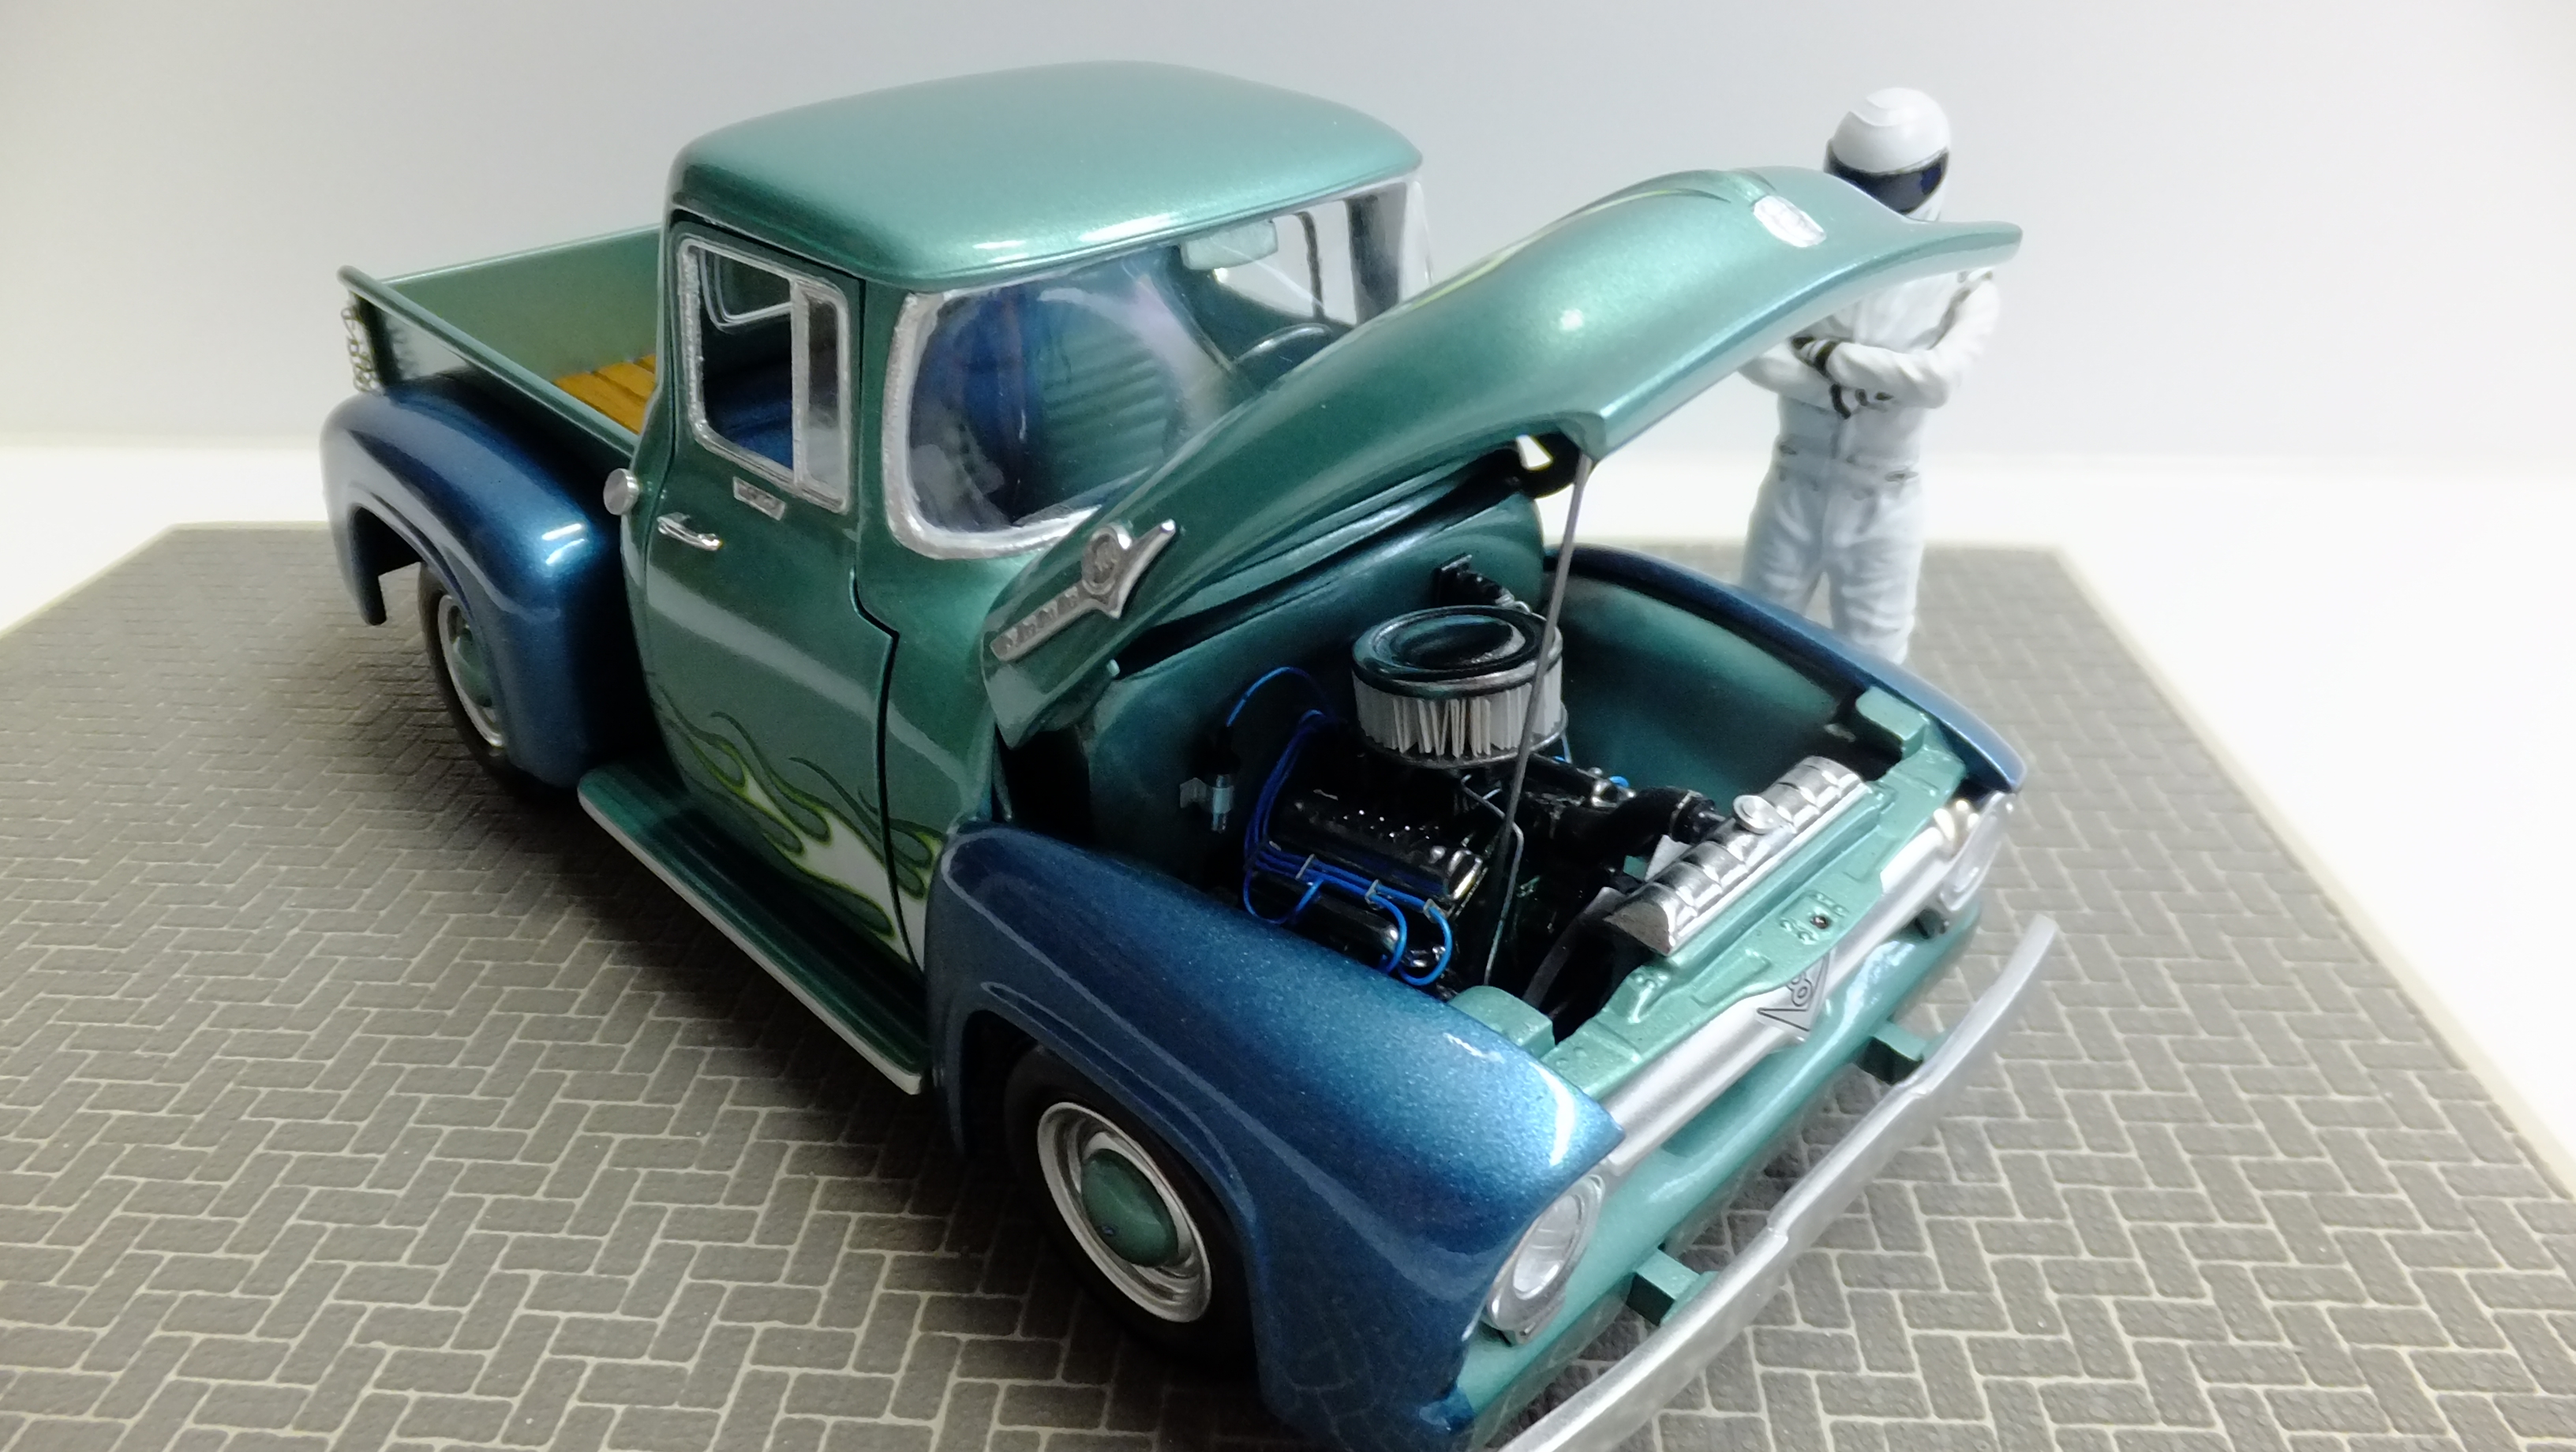
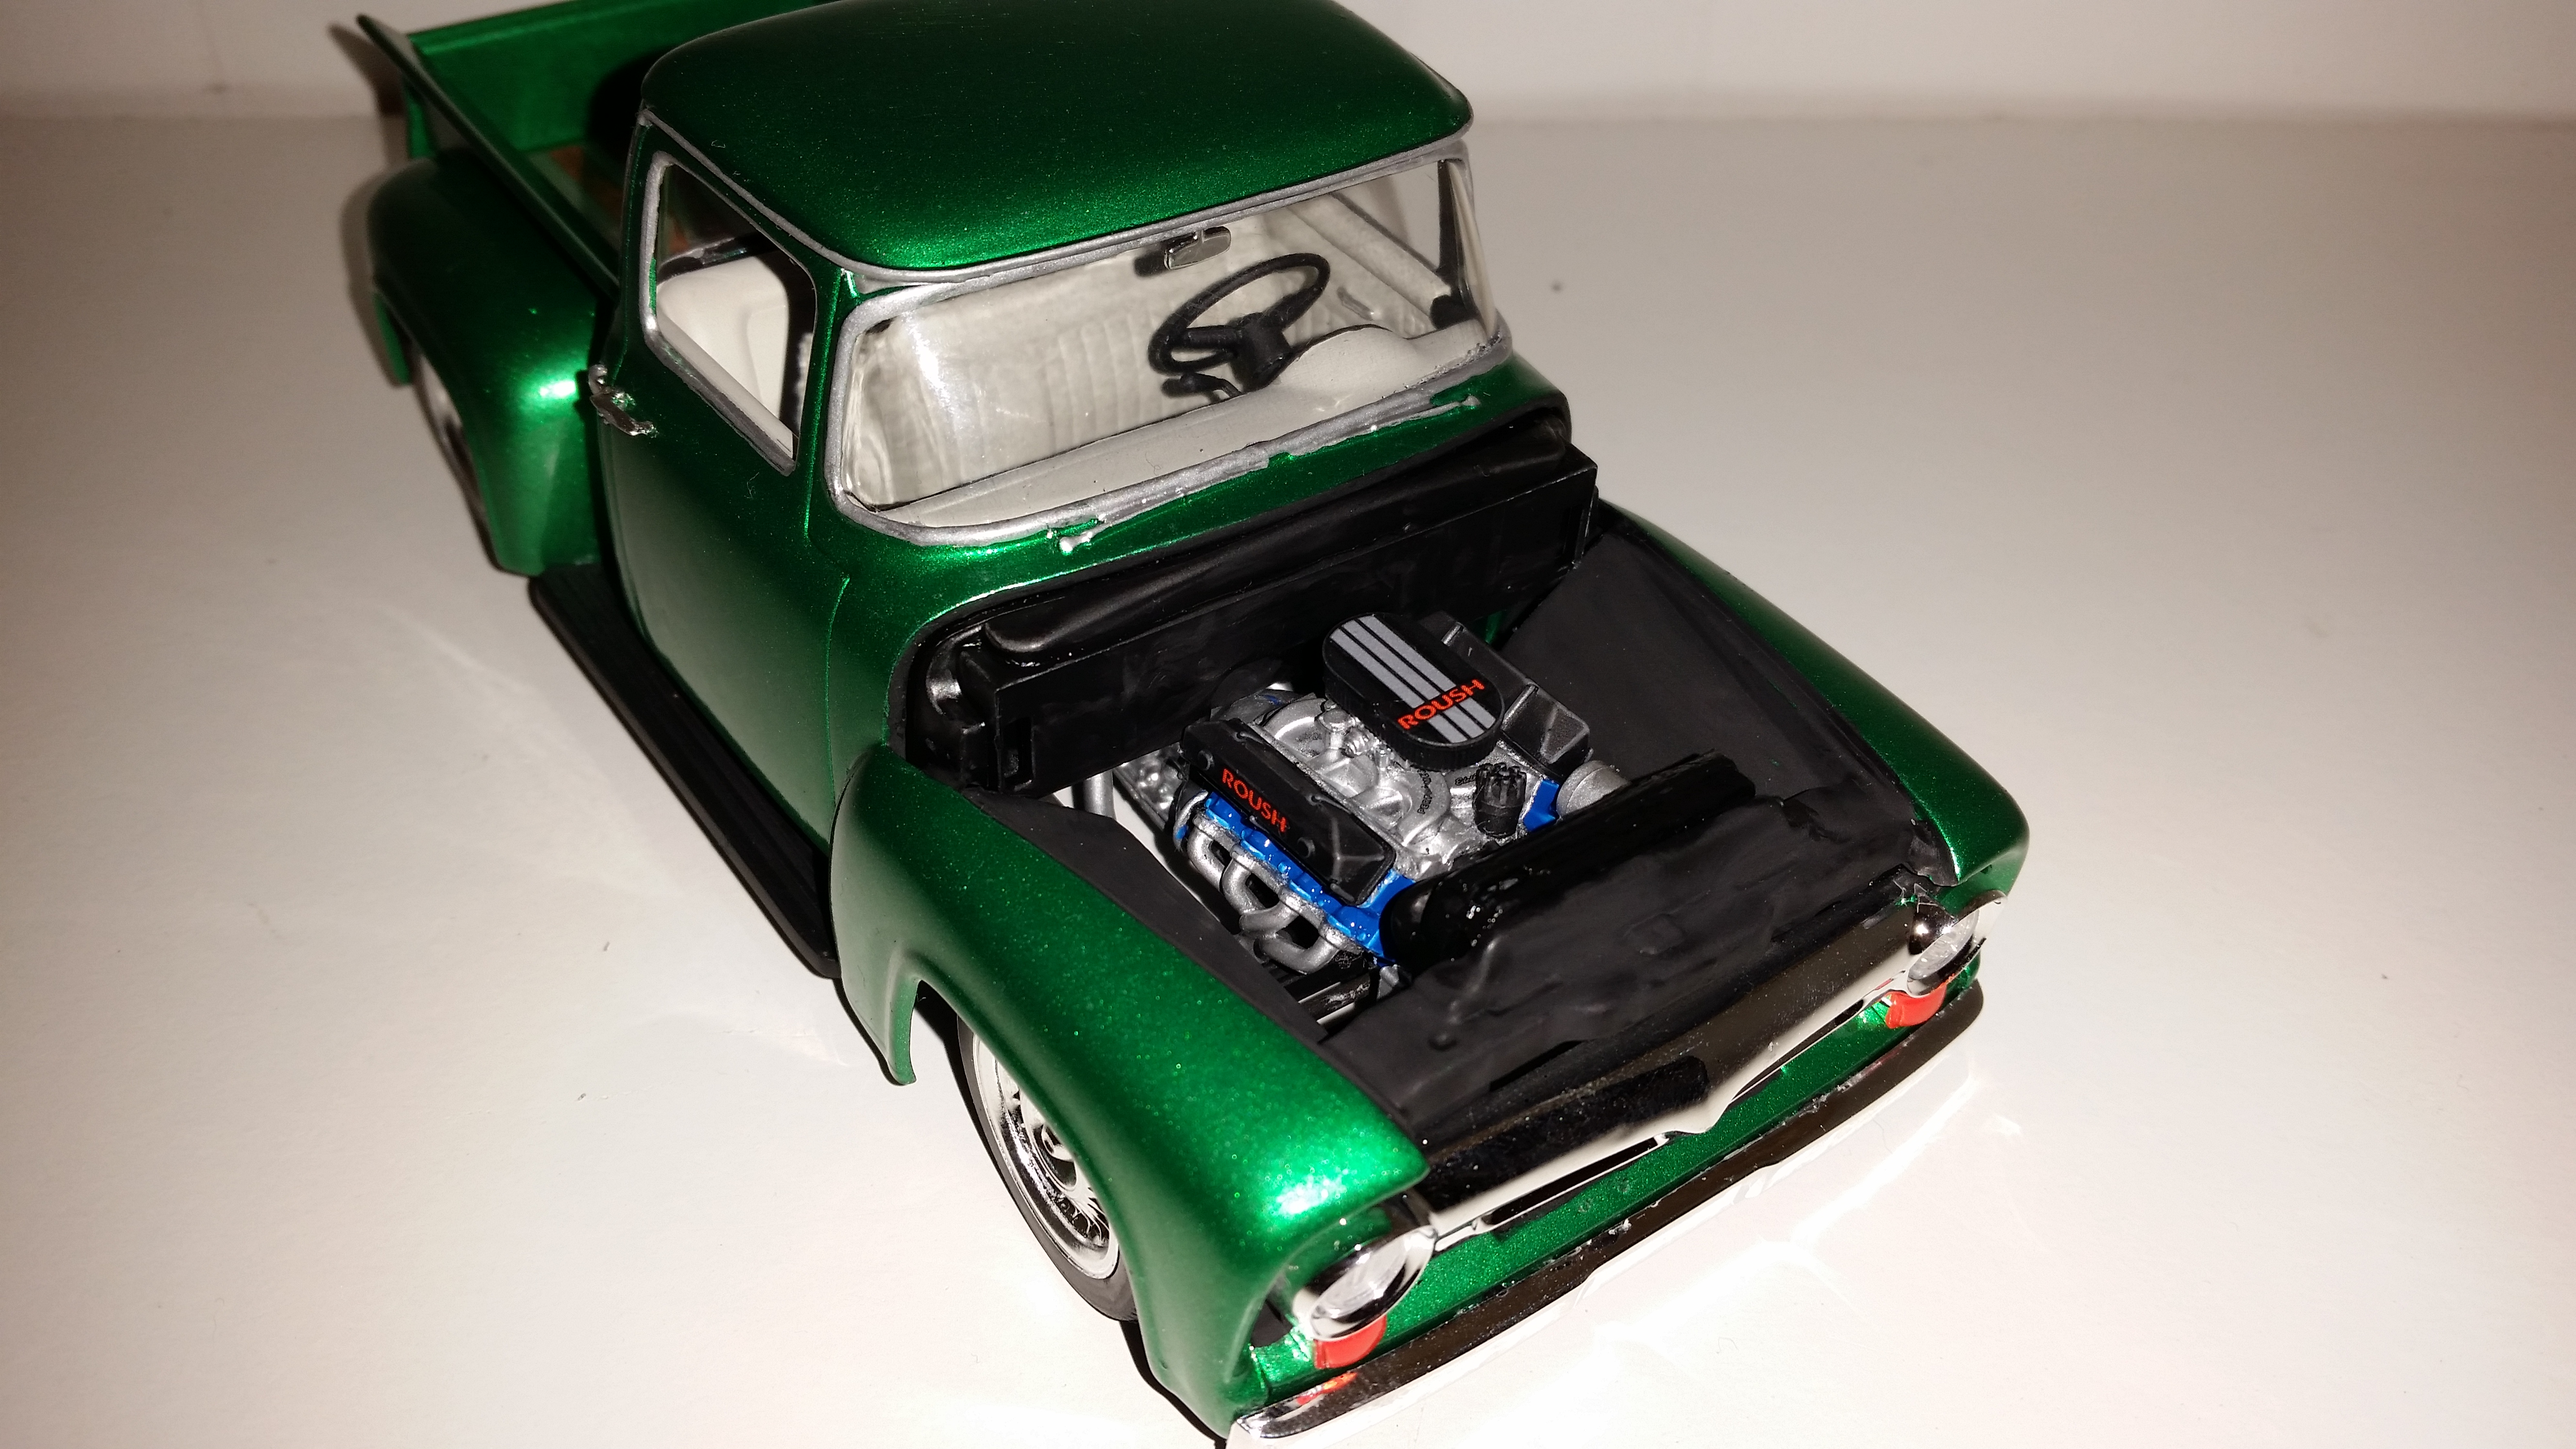
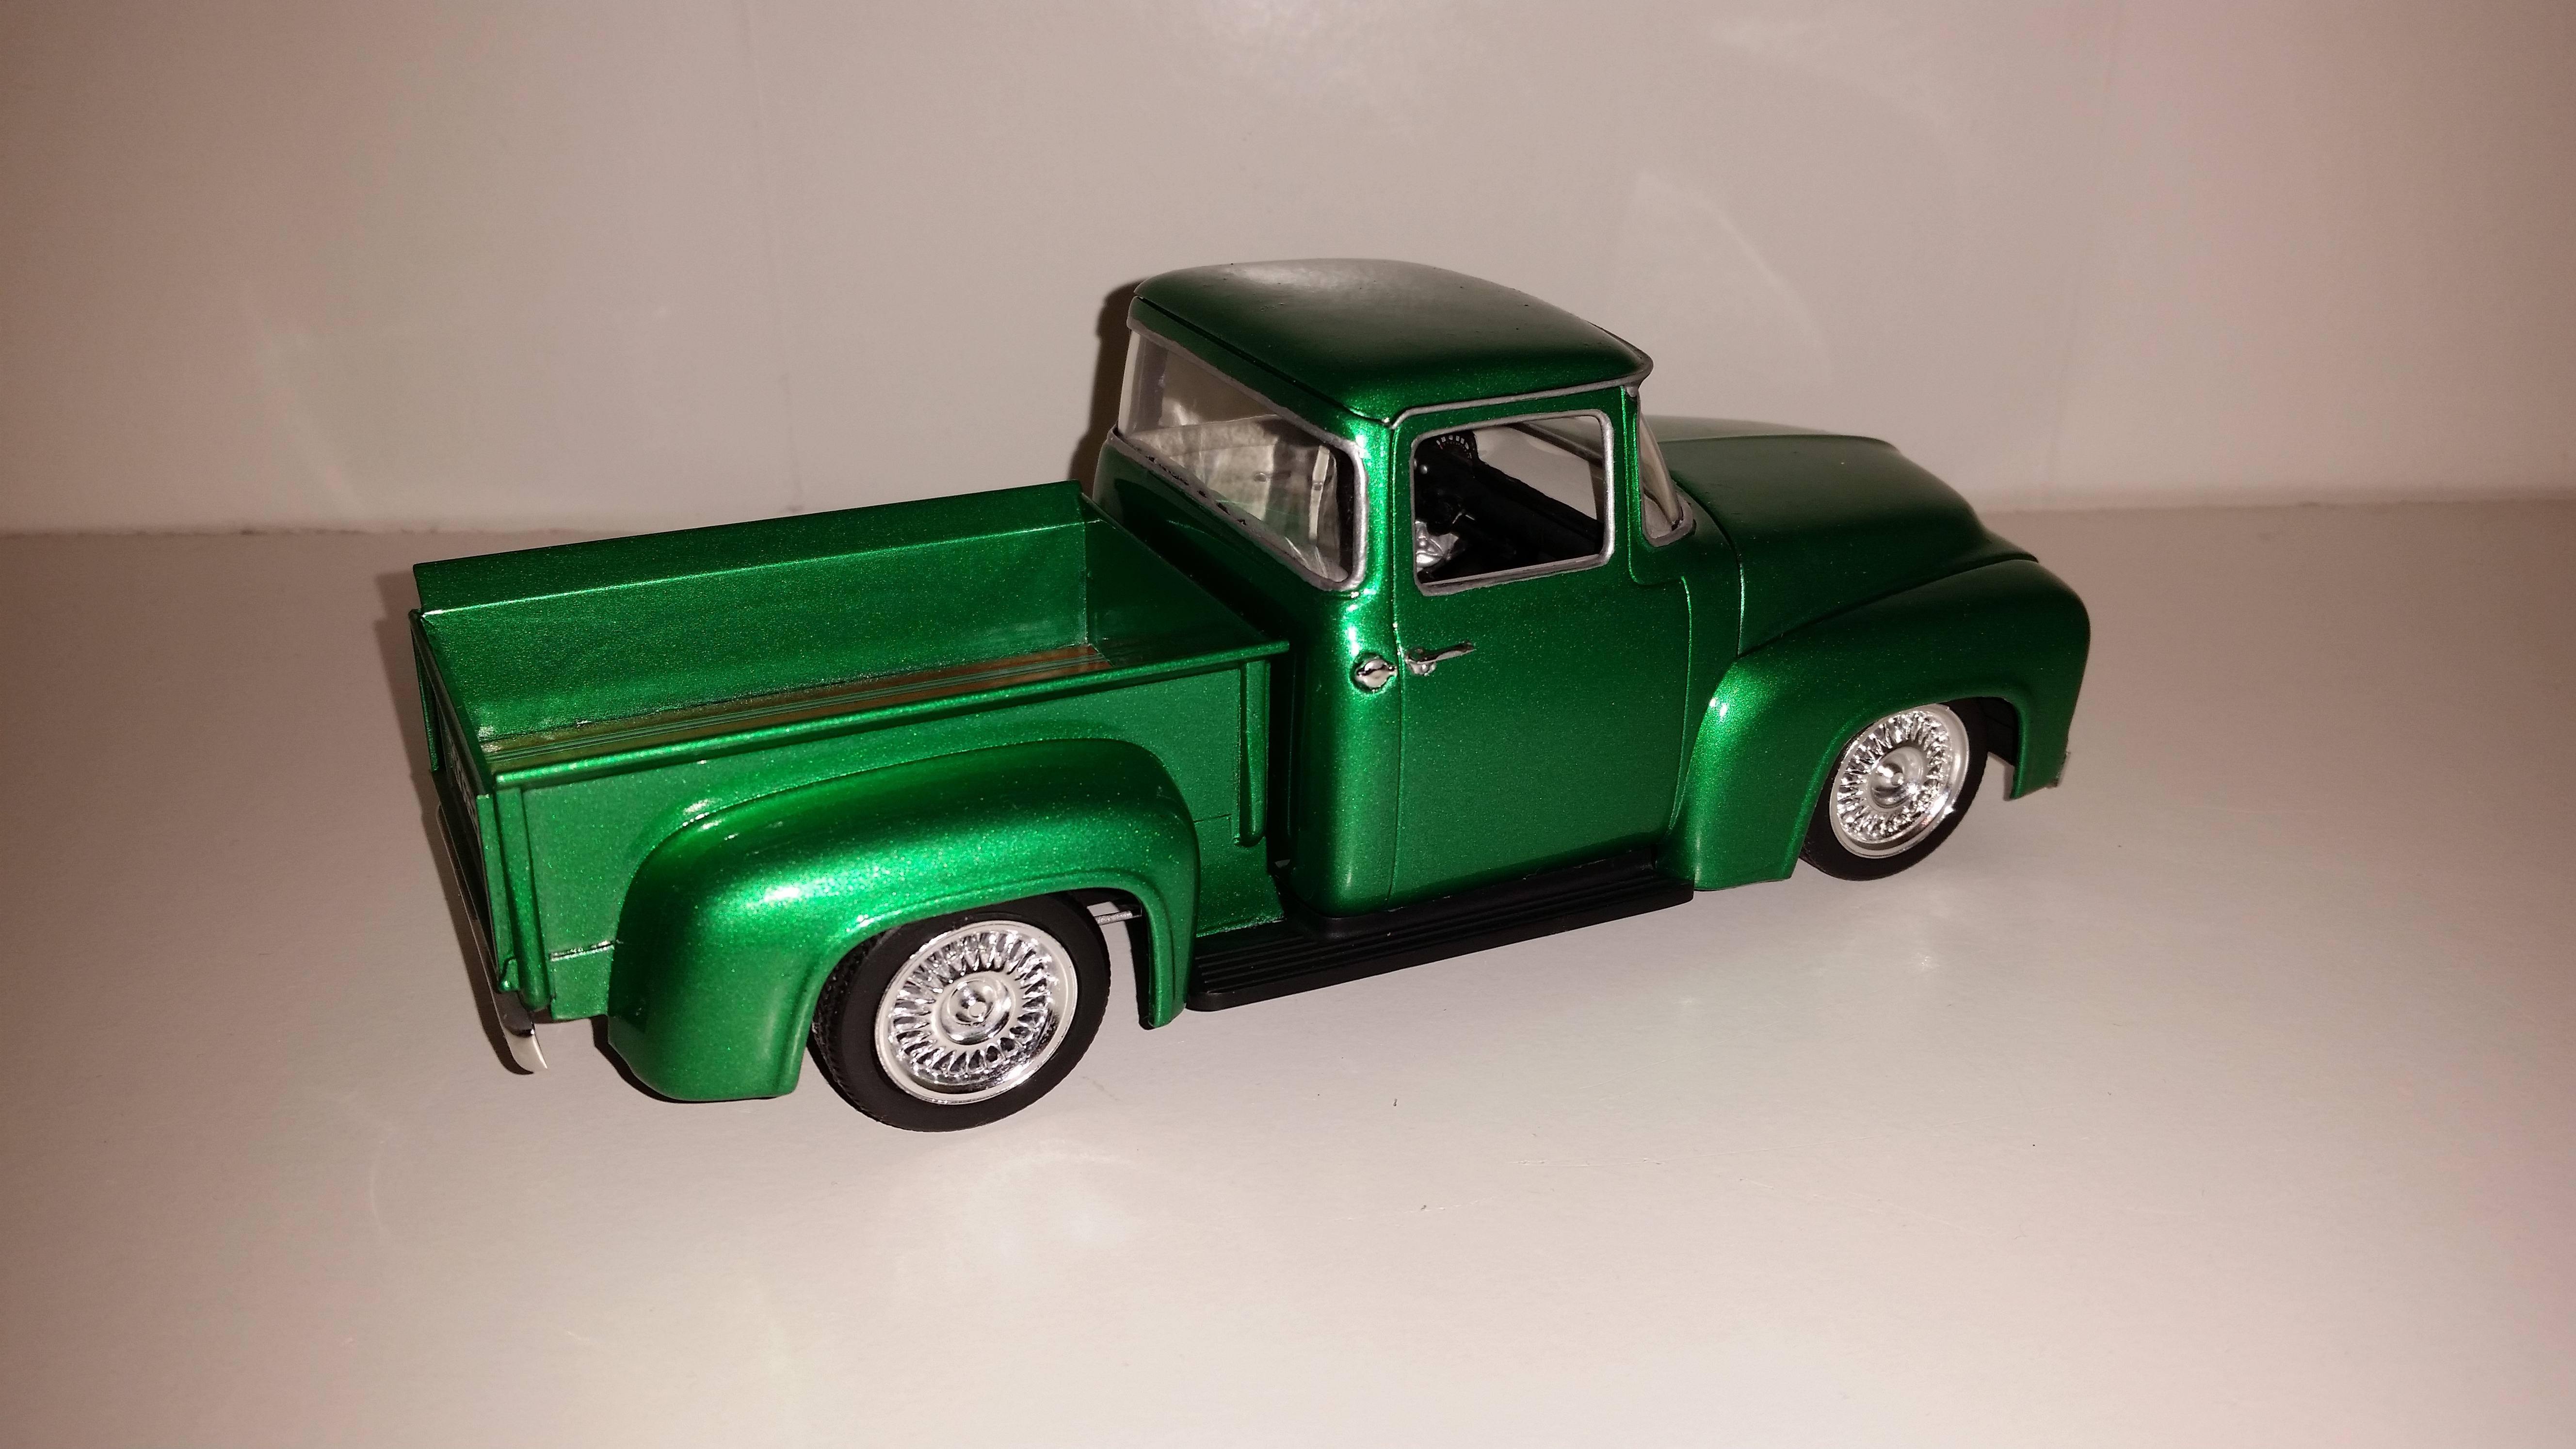
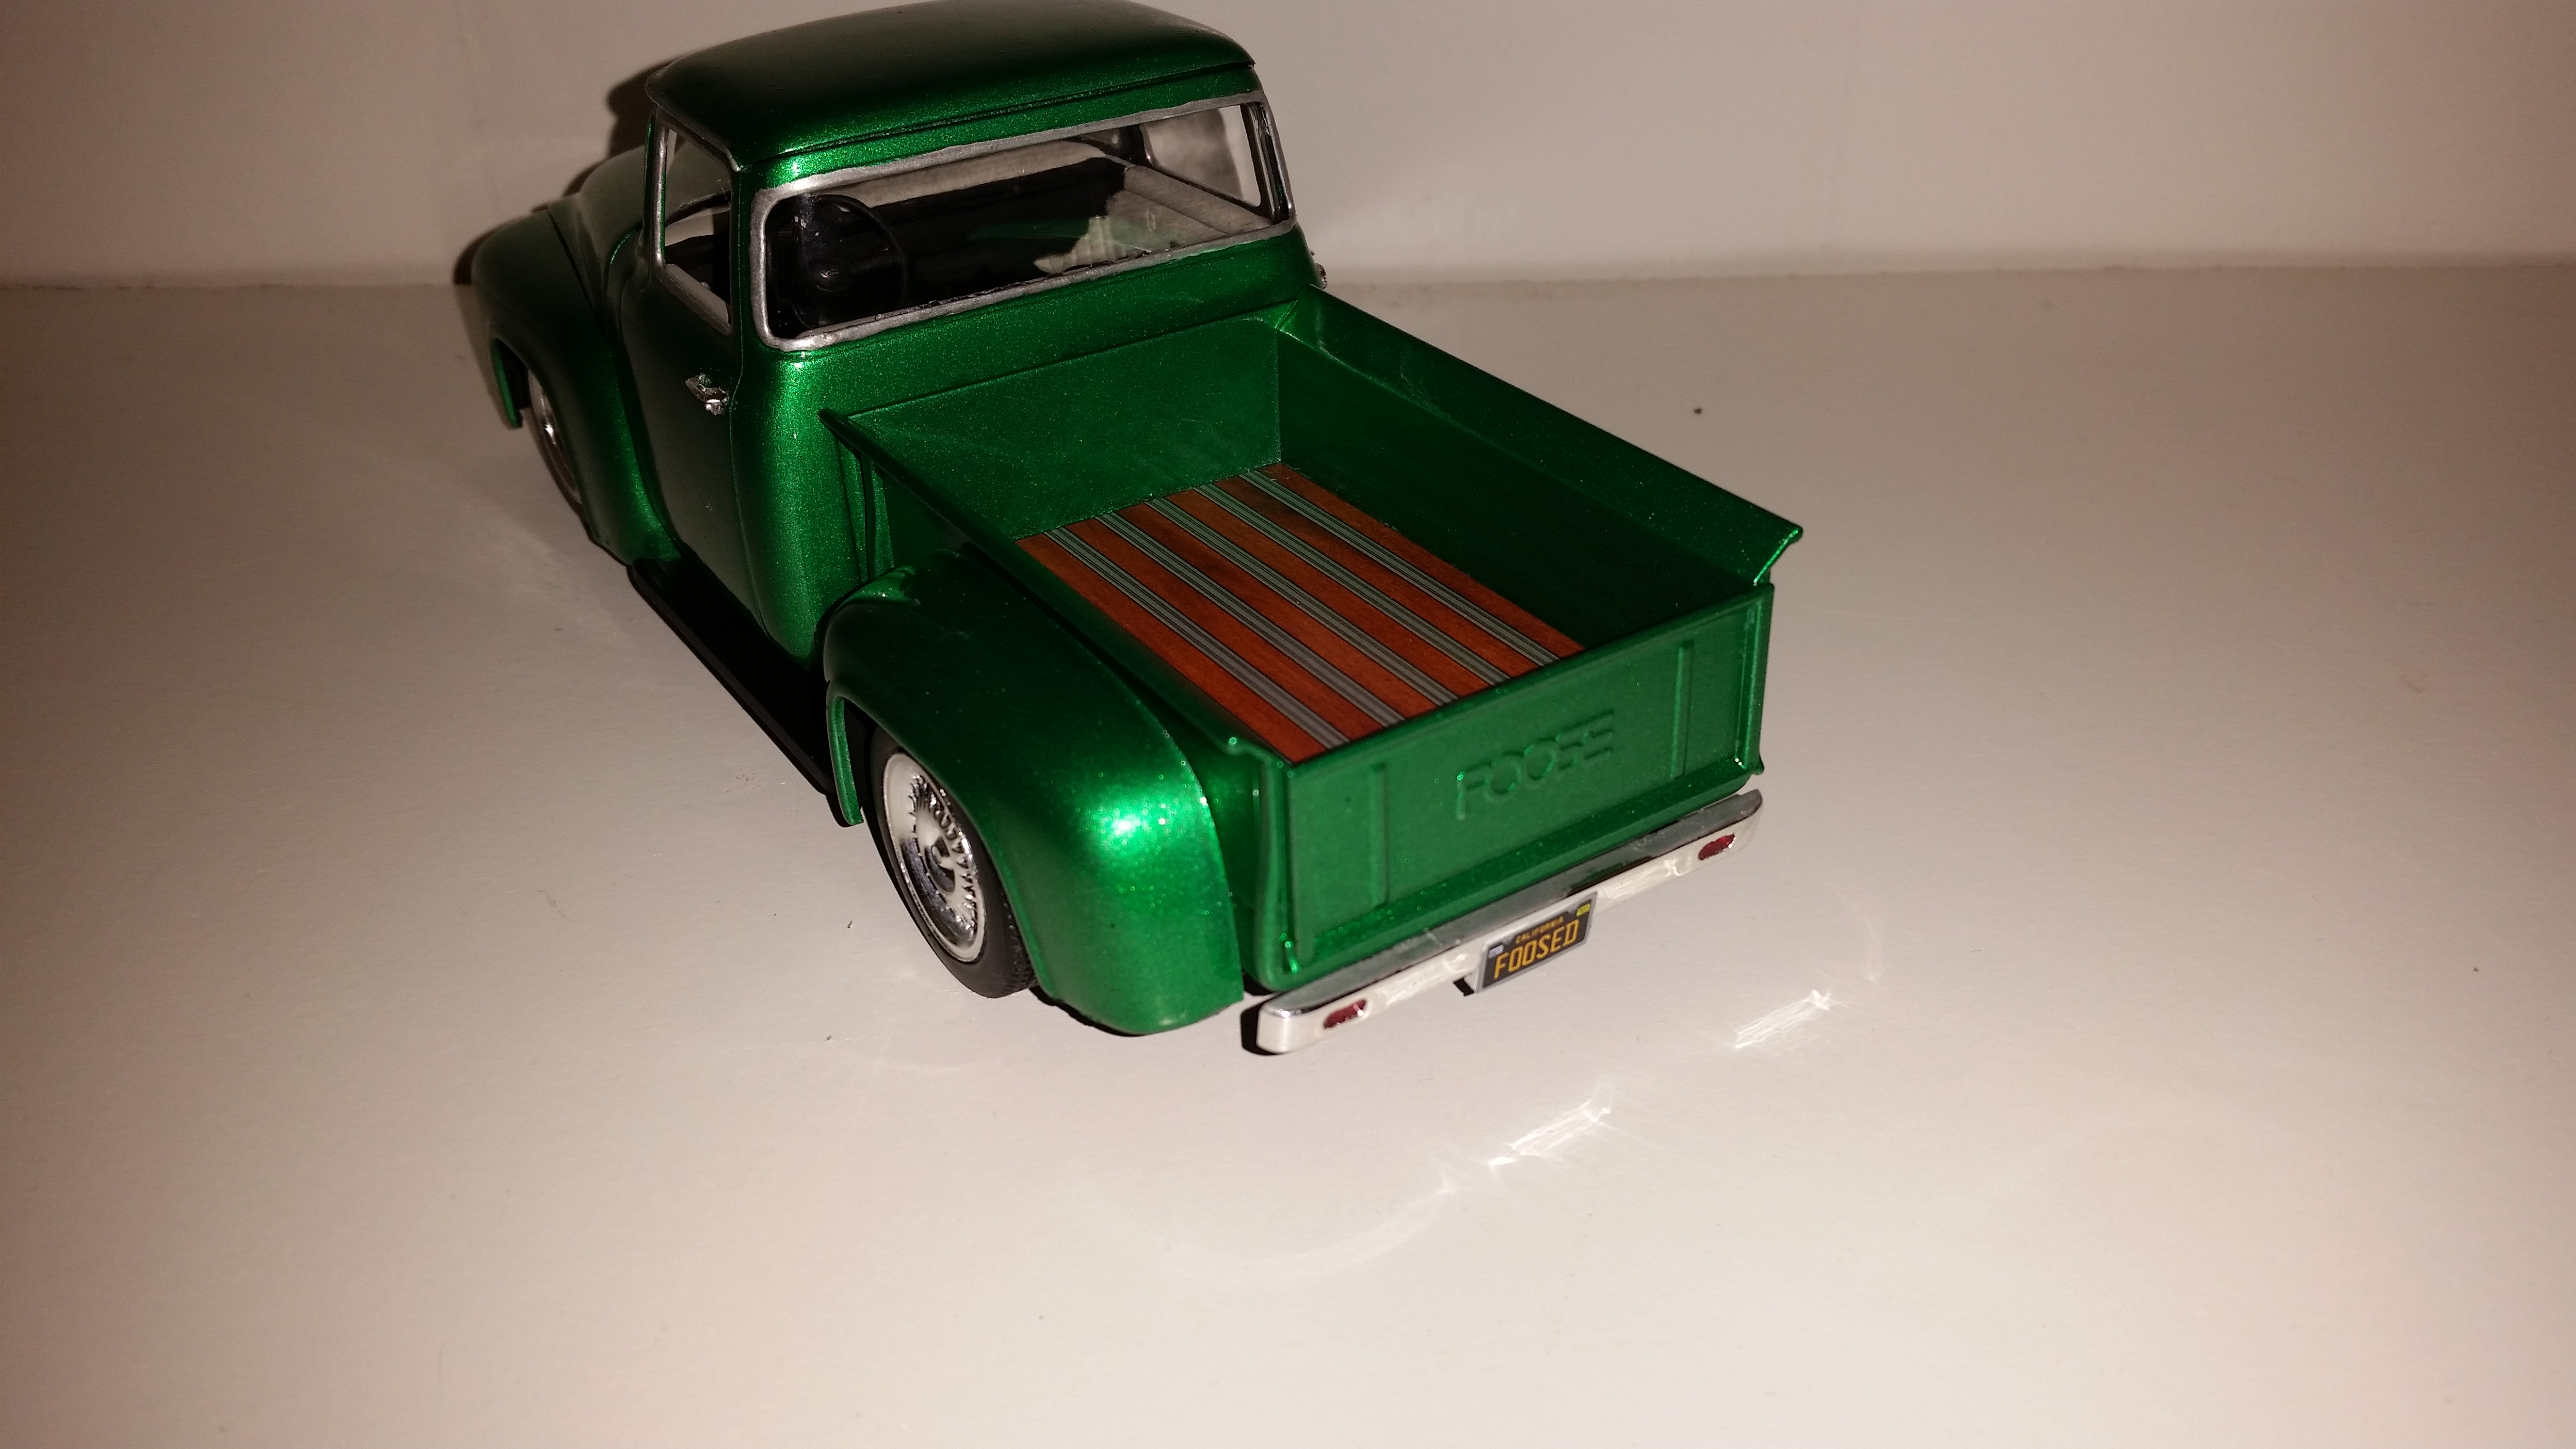
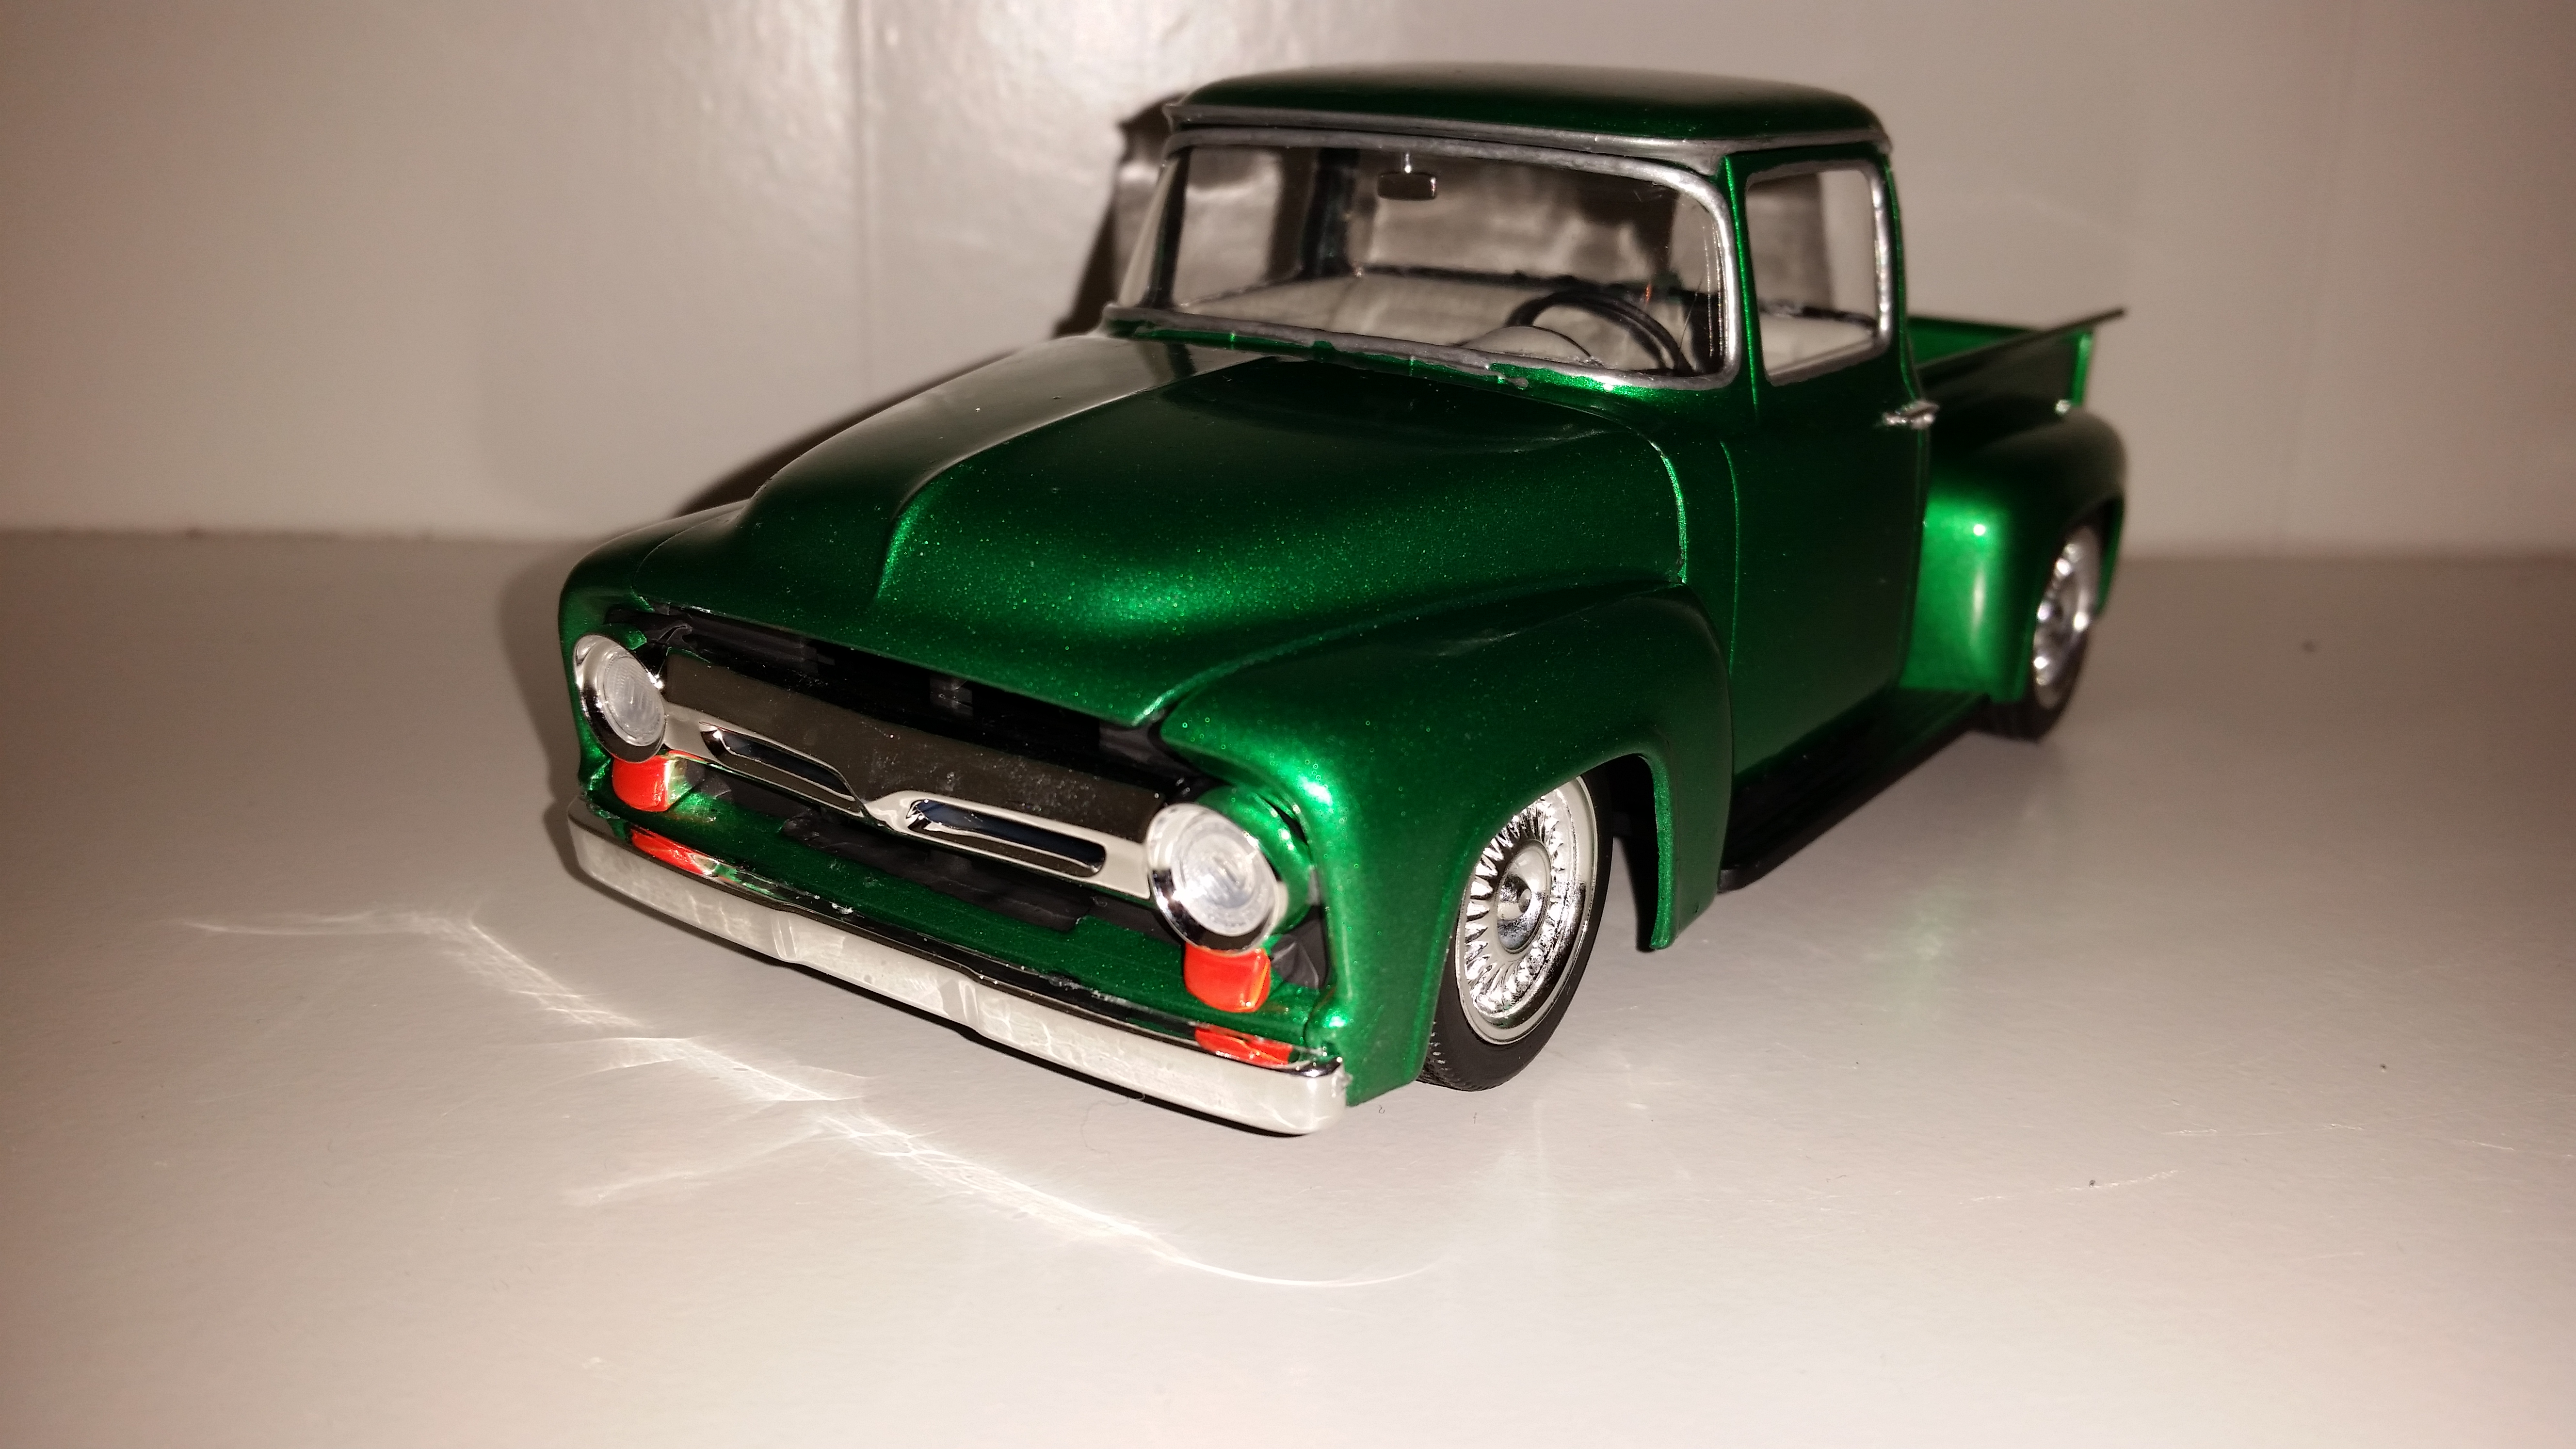
Hey everyone!, My wife, Tina built this Revell 56 Ford Pickup. It was her second model ever, and its totally detailed. This ISNT the Foose version, but the rather HORRIBLE original version. Nothing fit good, but she stuck to it, and did I great job!!!......Stig thinks so too!!!
-
Ok so I work for a hobby shop in Massachusetts and I just got a fax copy of an email that was sent to 1 of my distributors from Revell. They are back with a new company here in the US. There new warehouse is located outside of Chicago. & there is product on the water on its way to the new warehouse & they are trying to have stuff available by September - October time frame & quantities will be limited. So be patient.
-
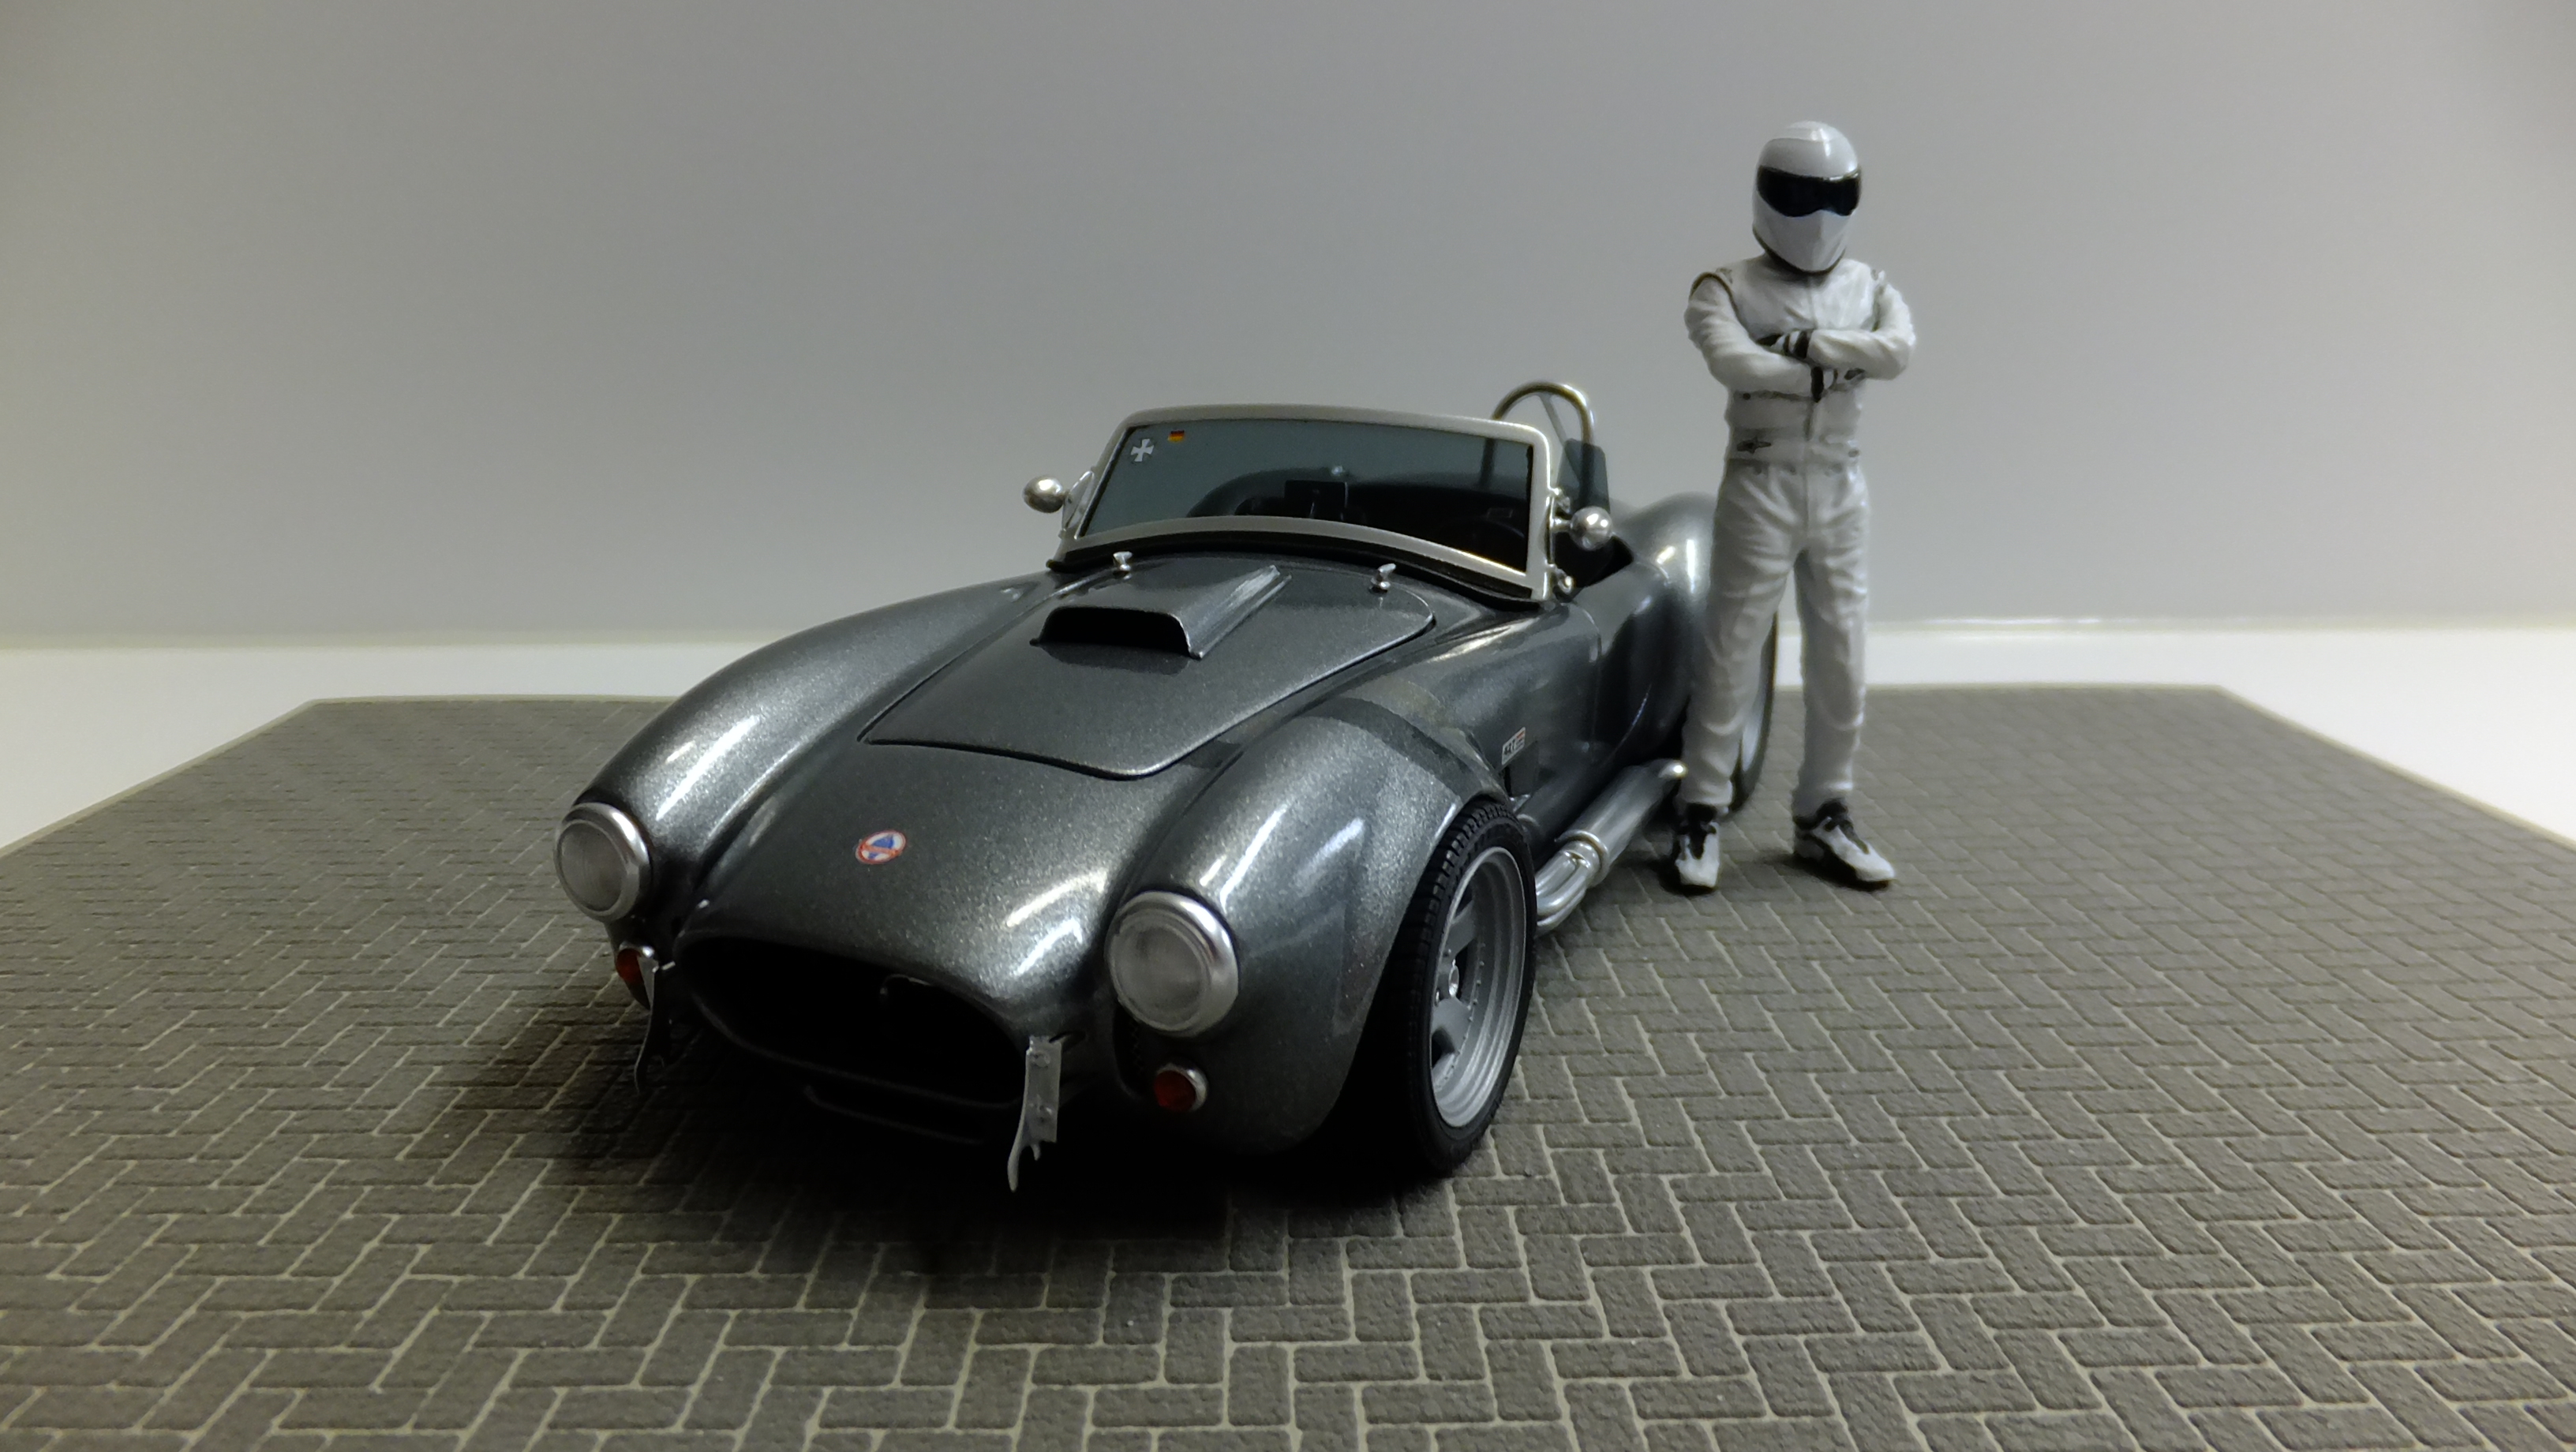
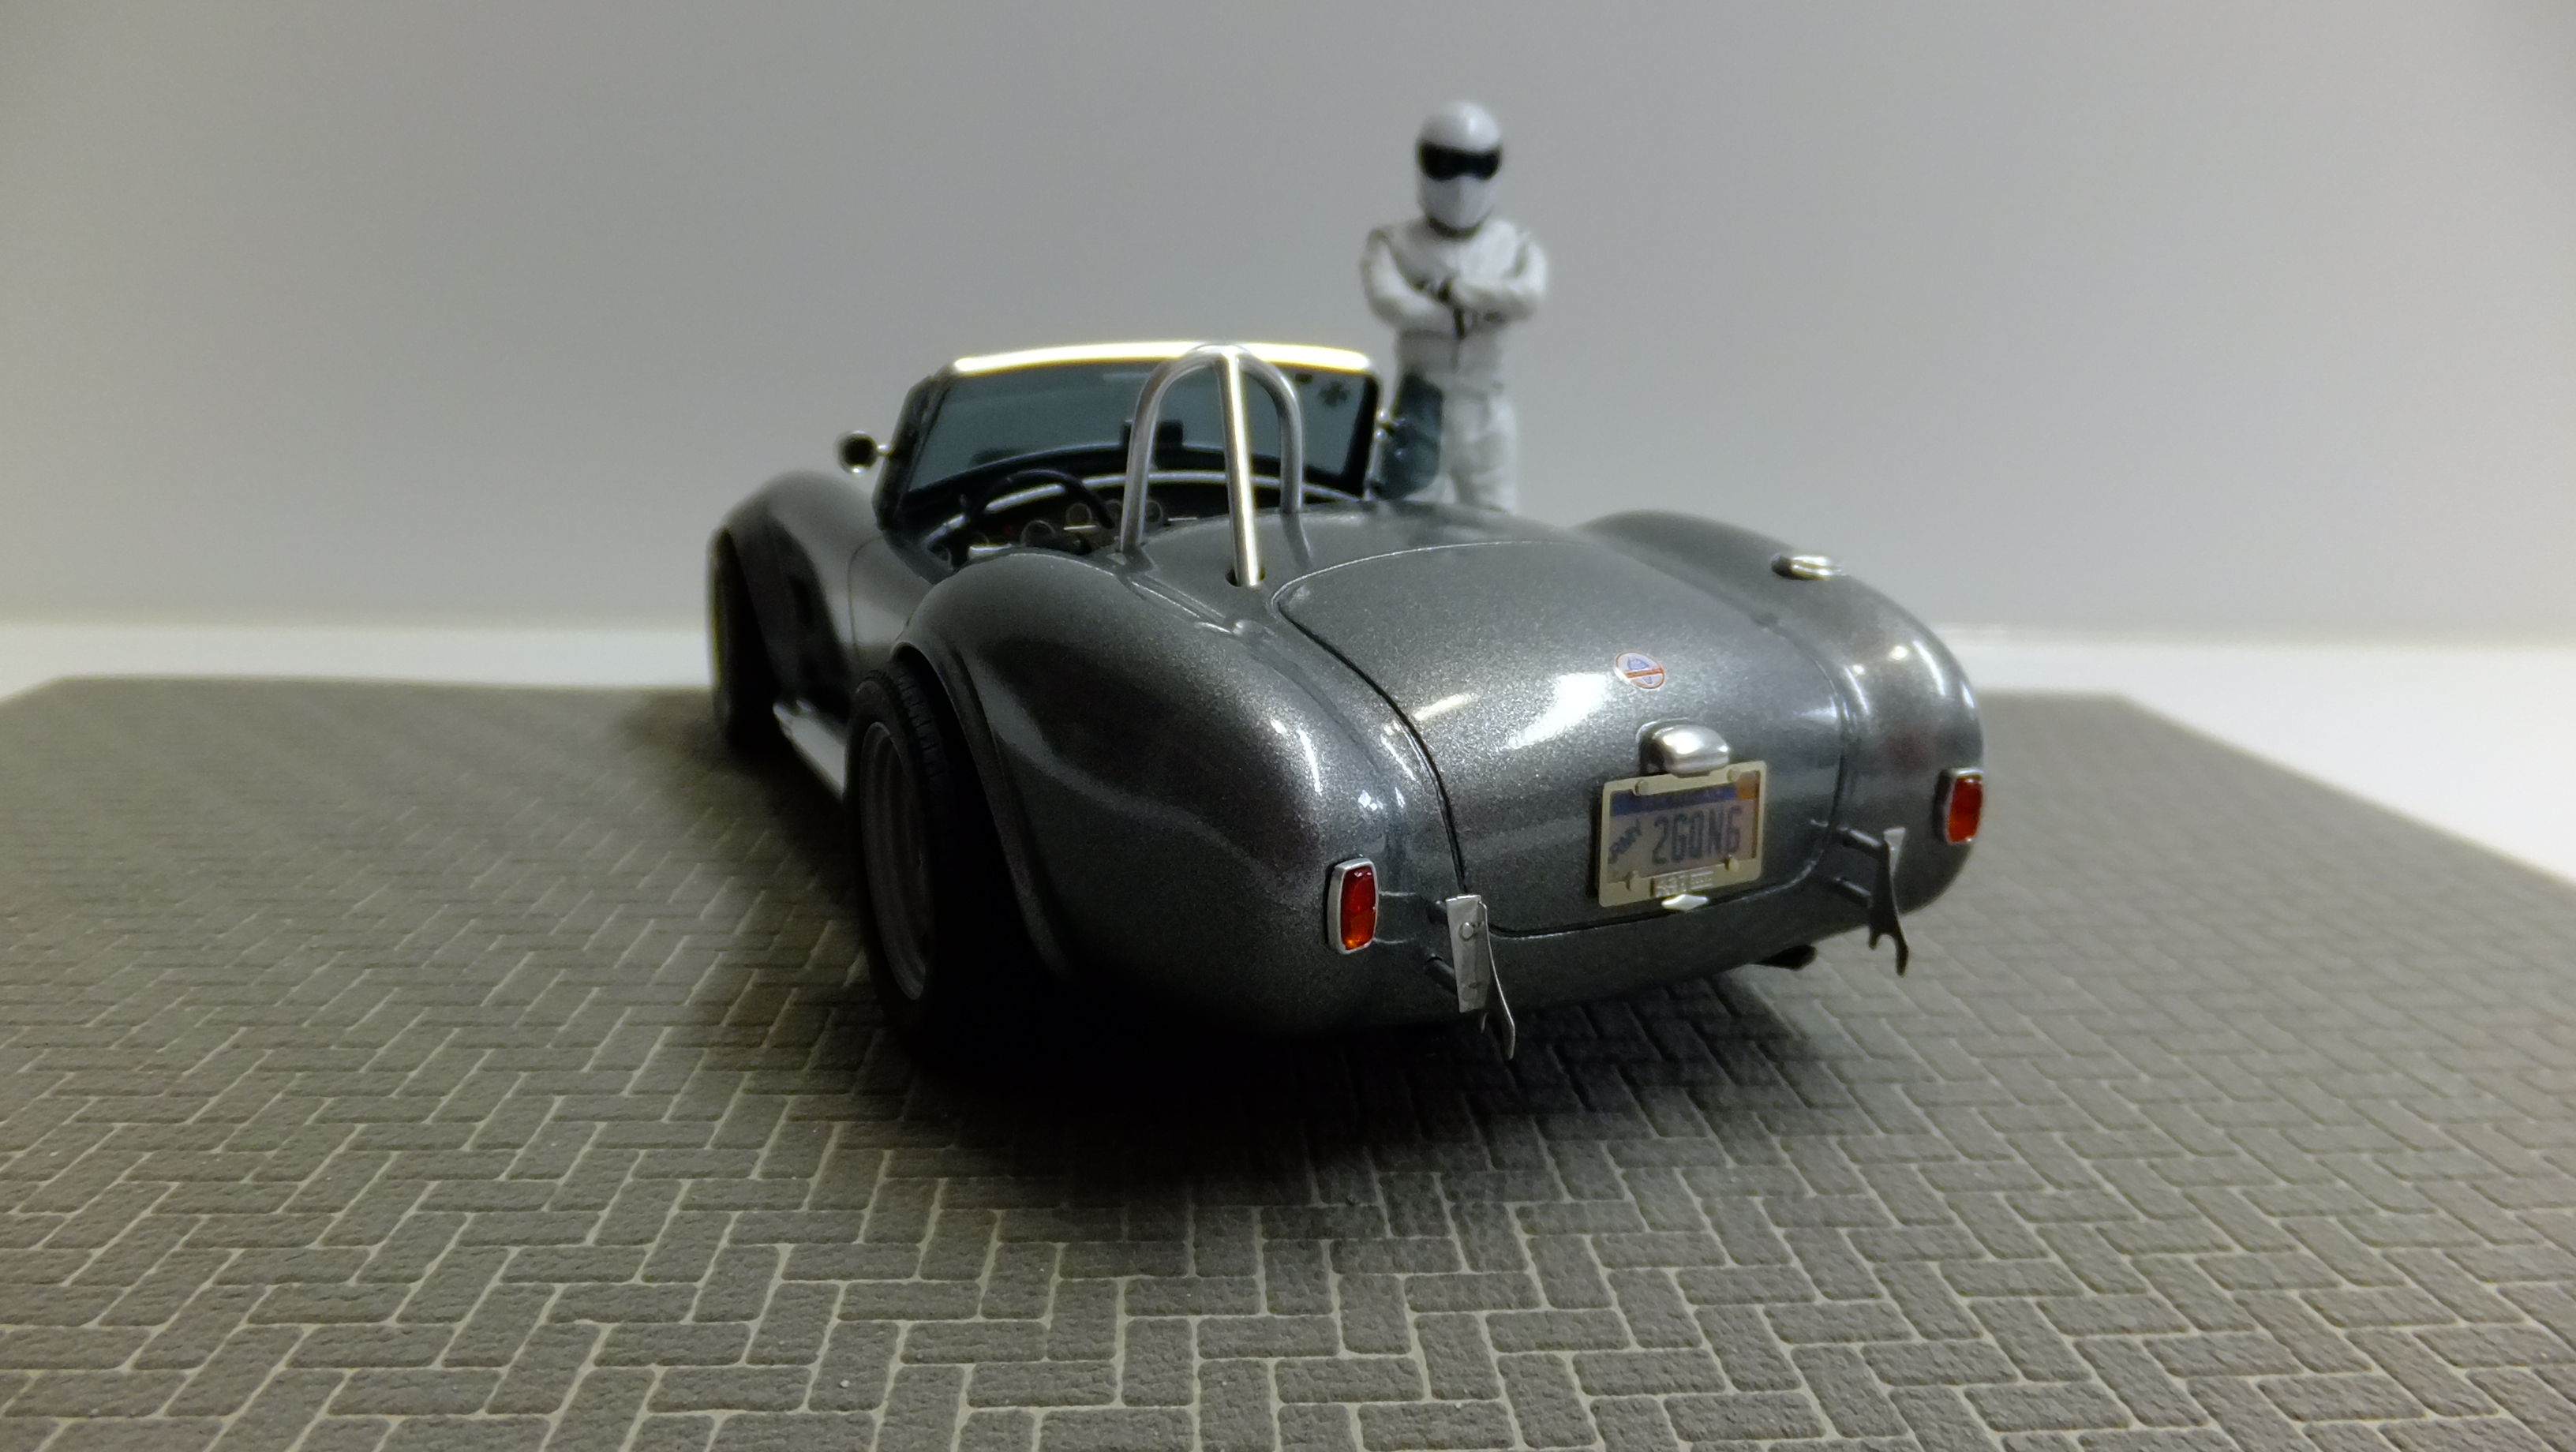
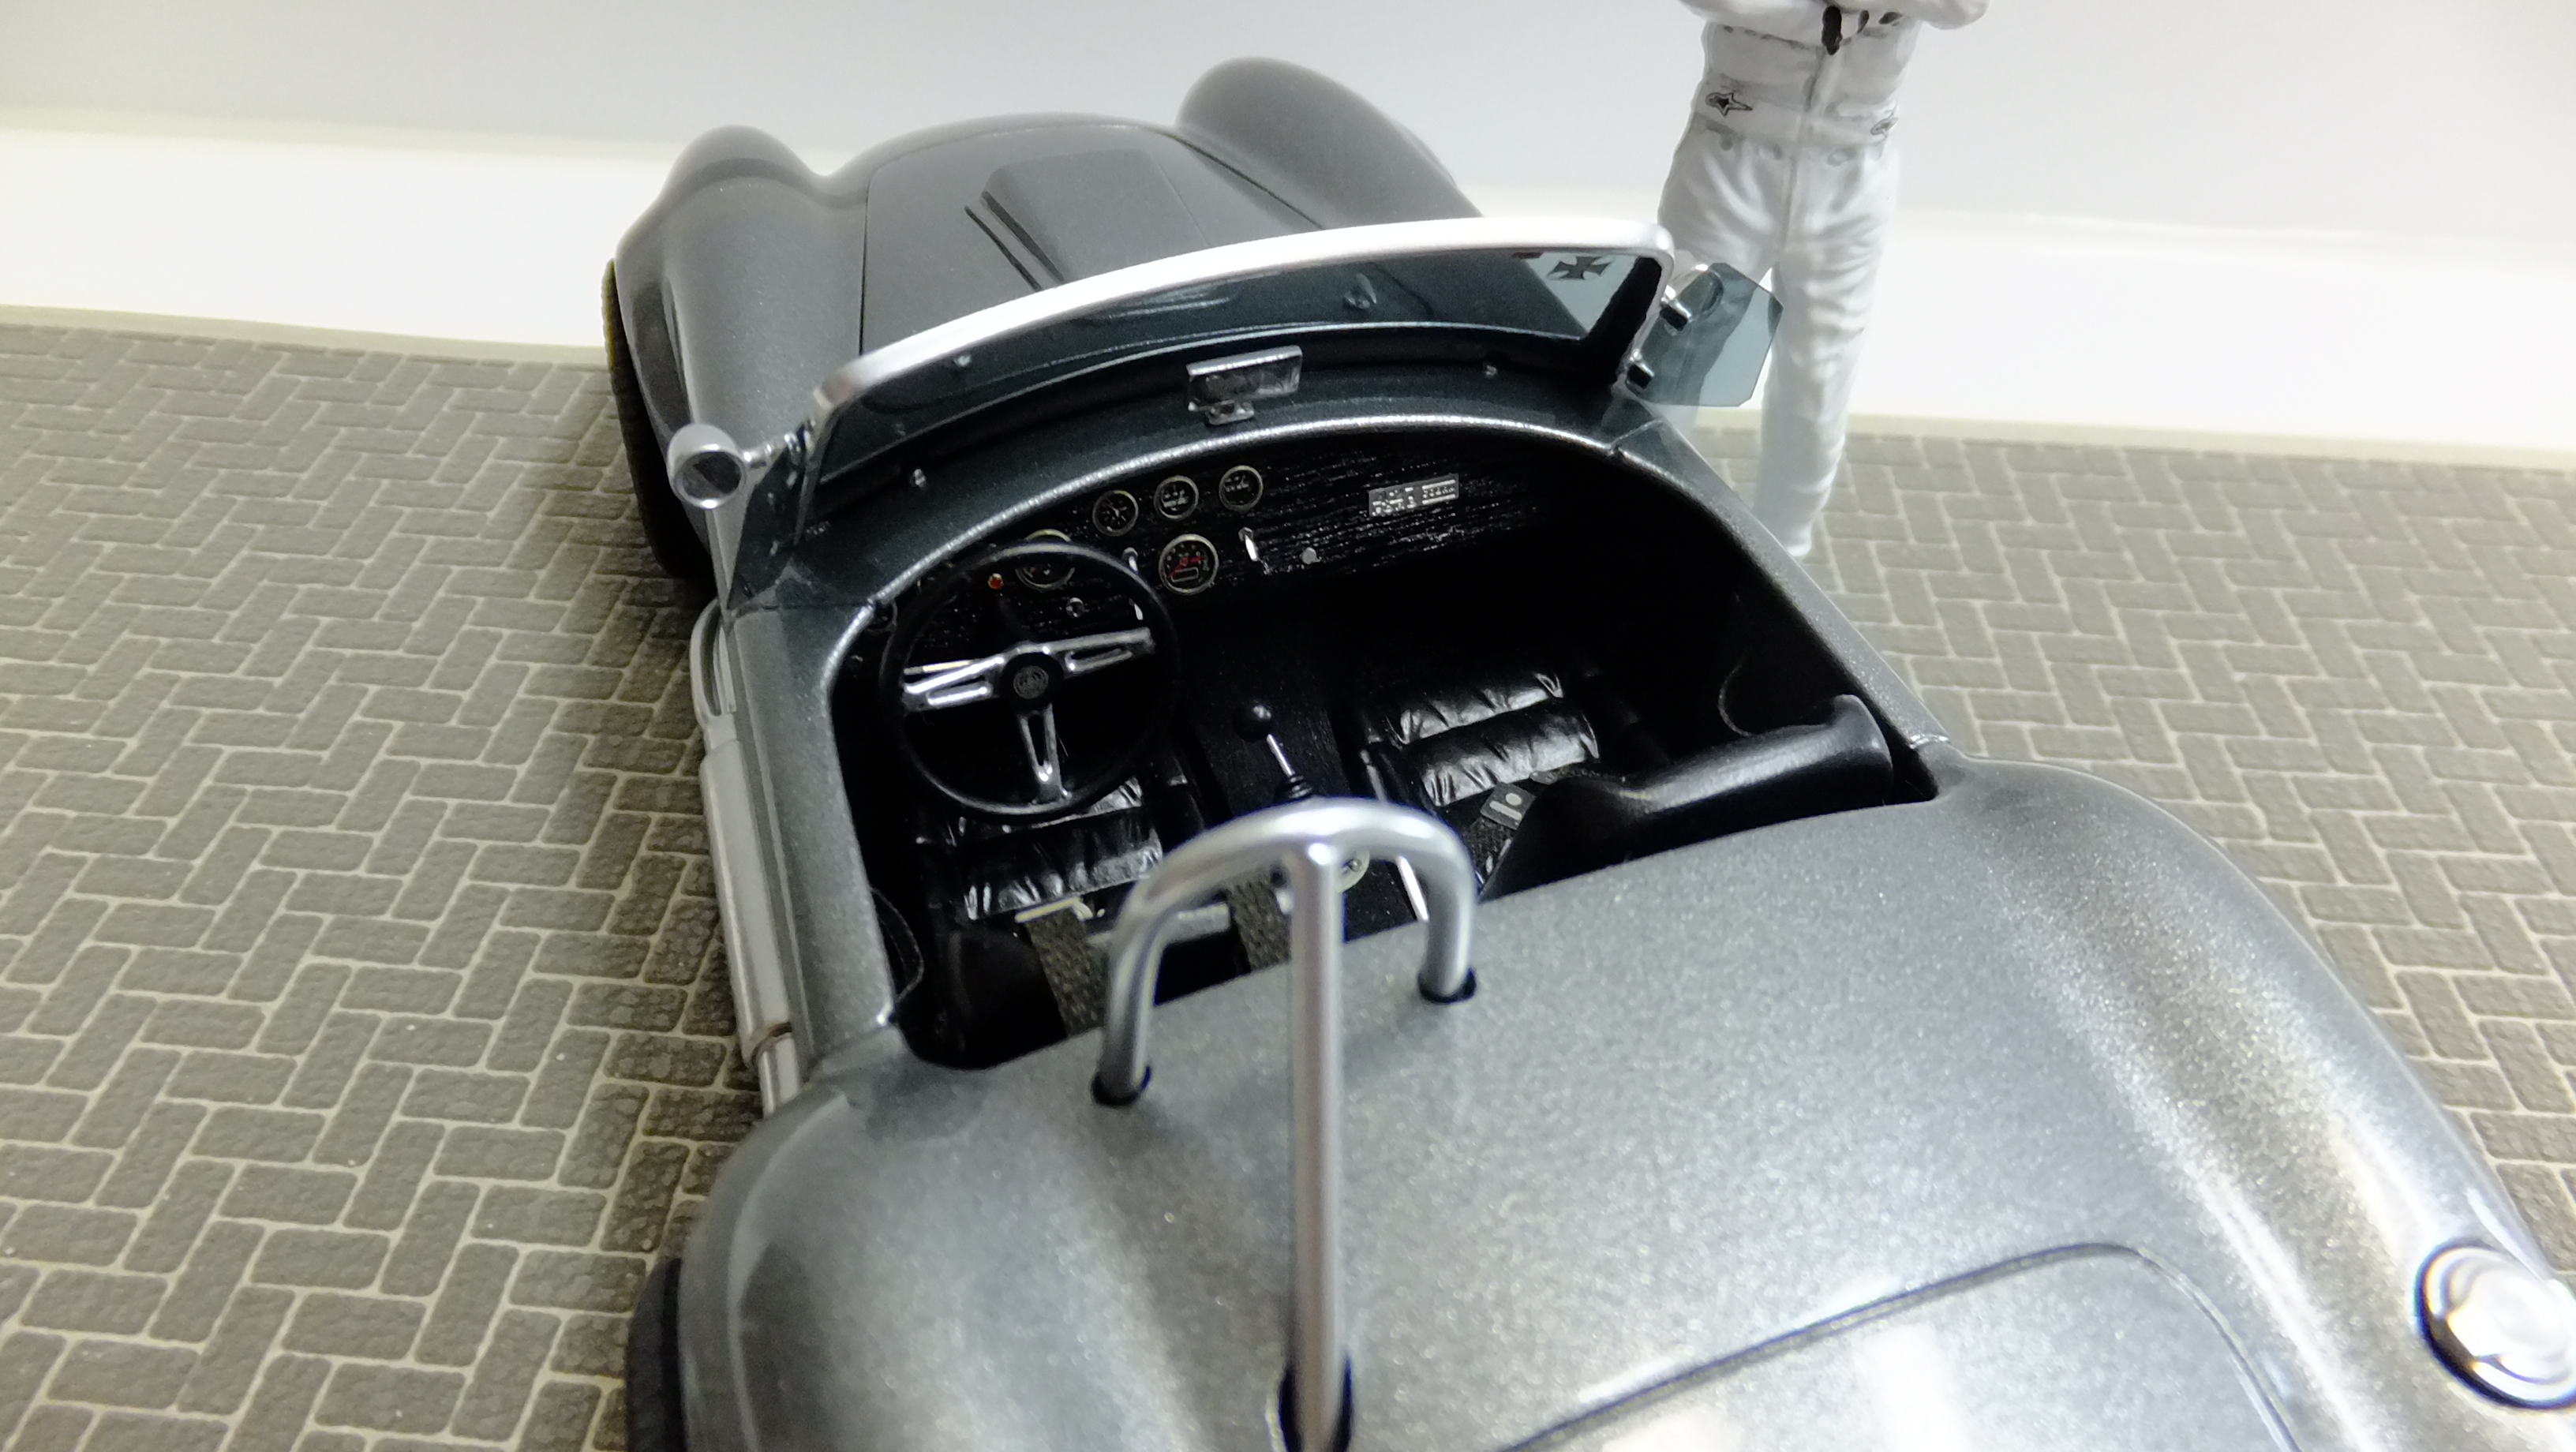
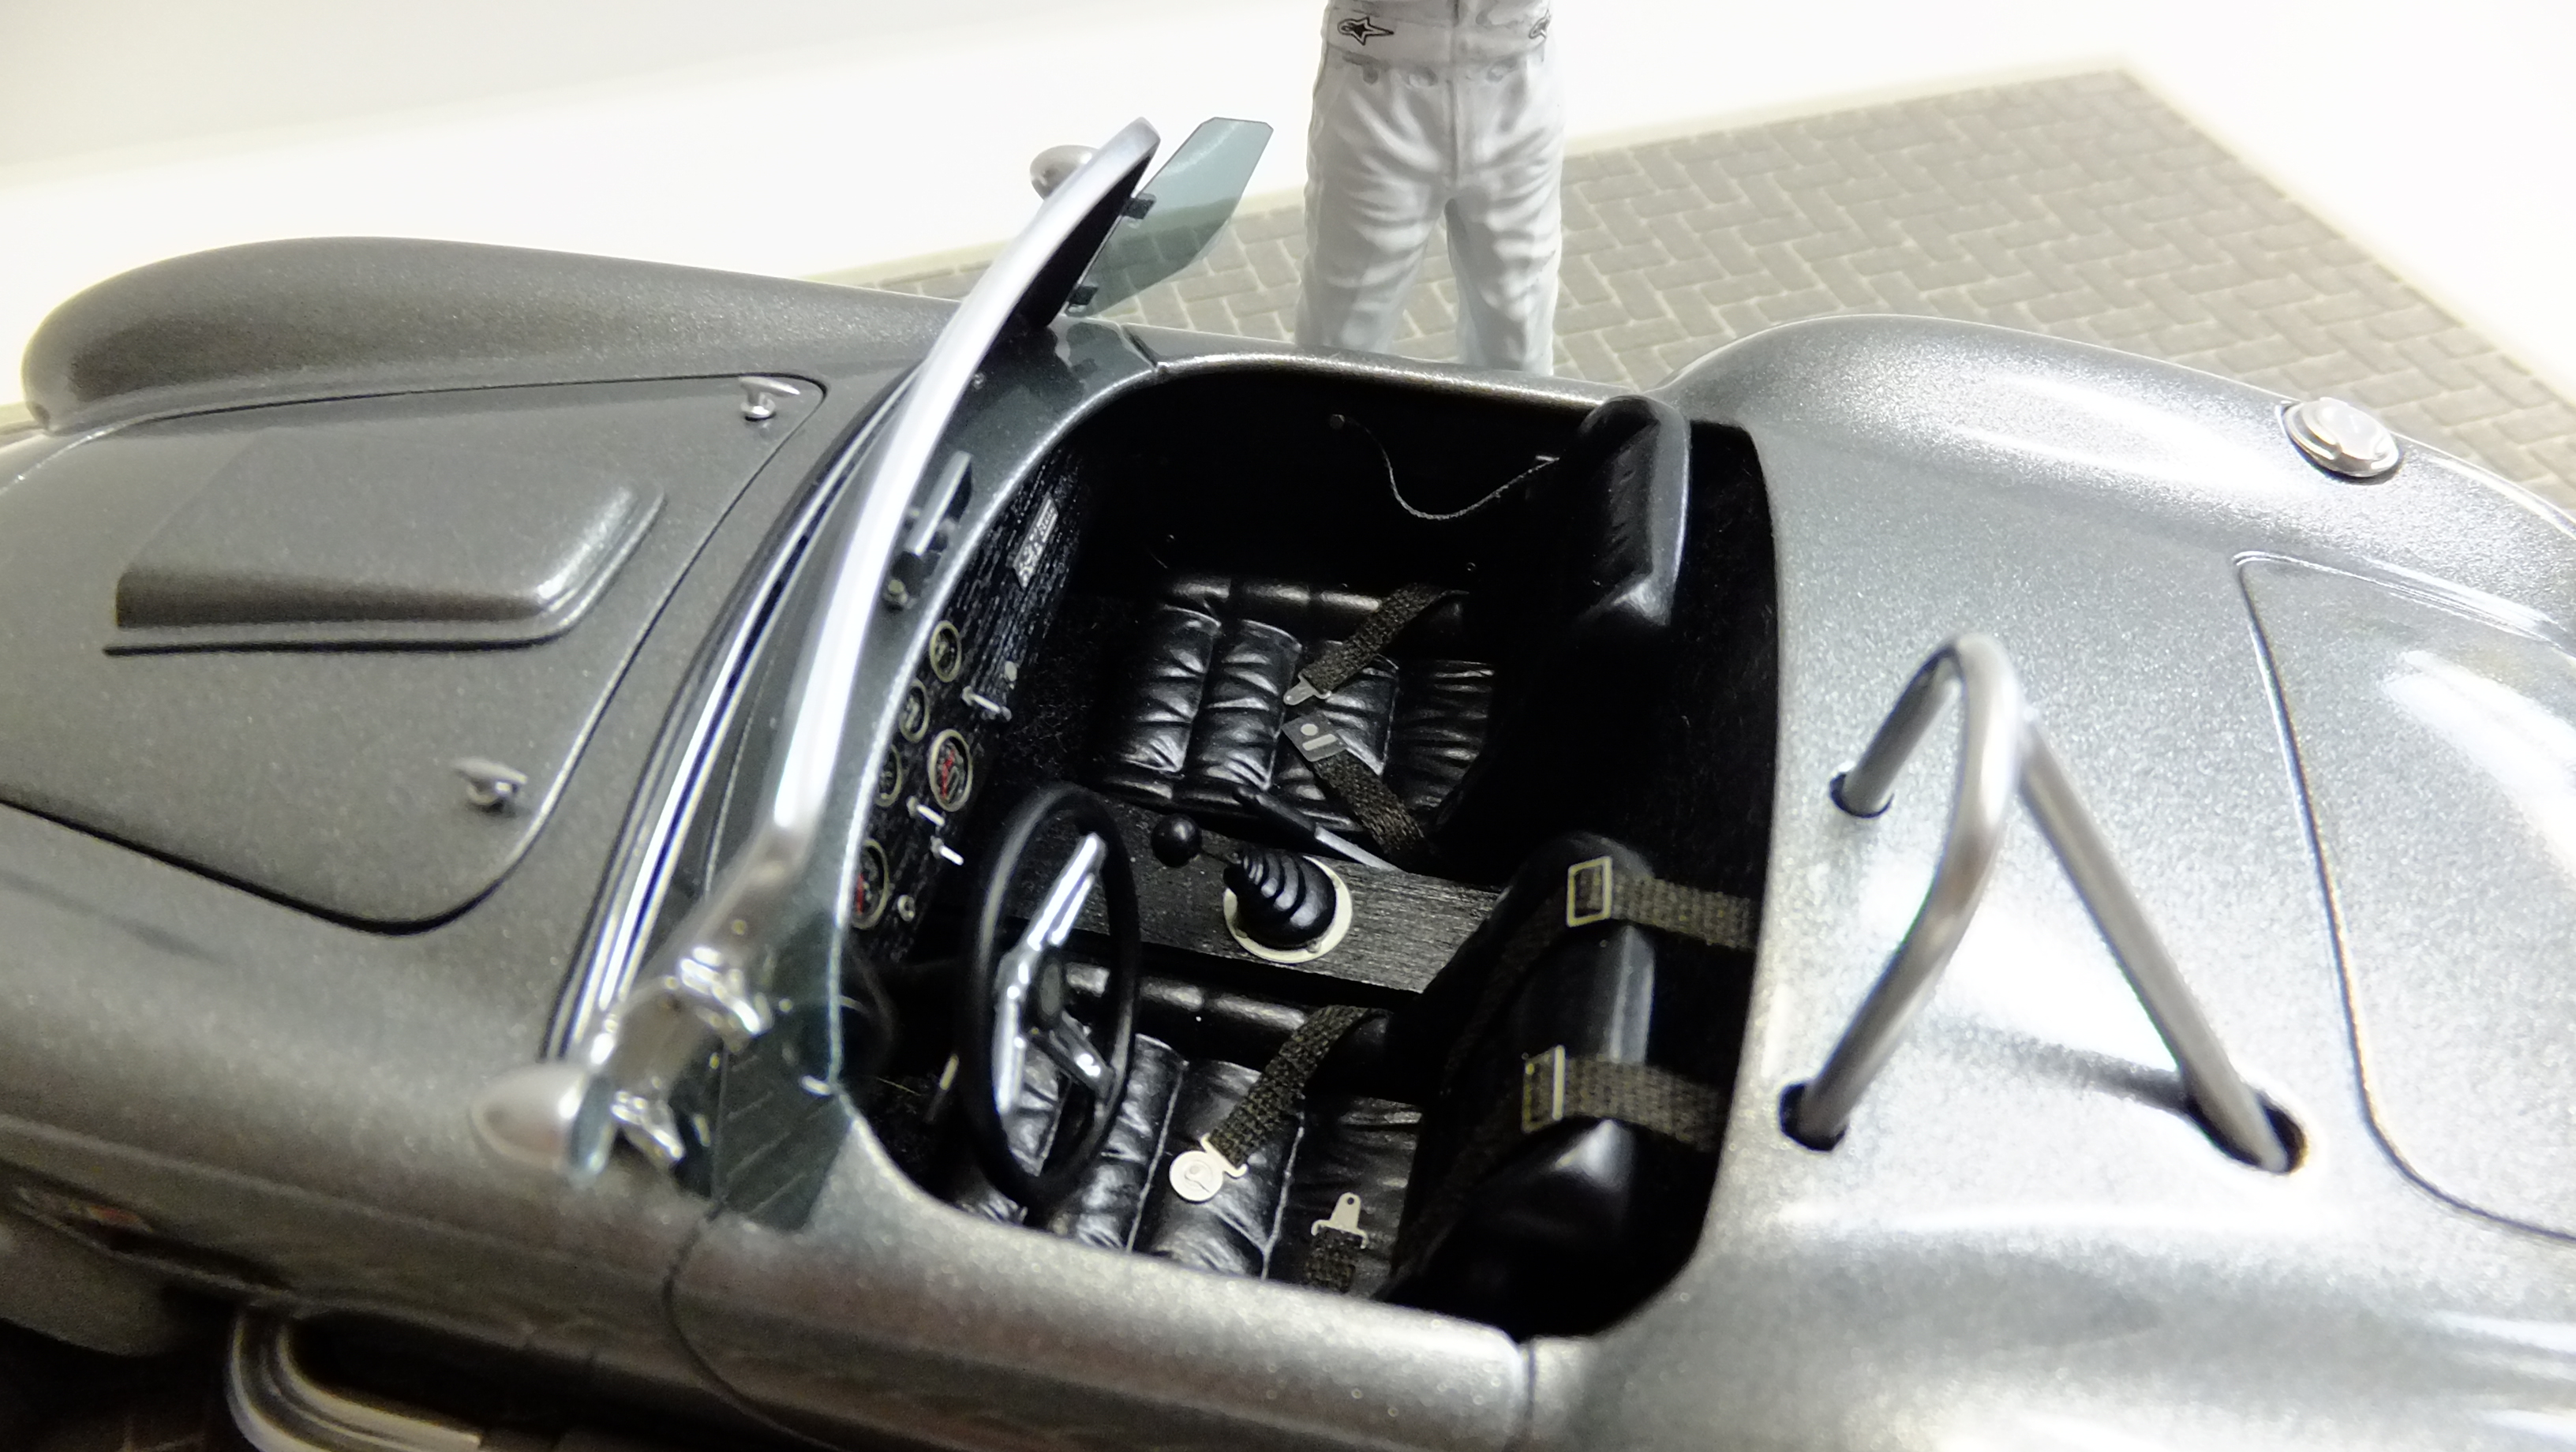
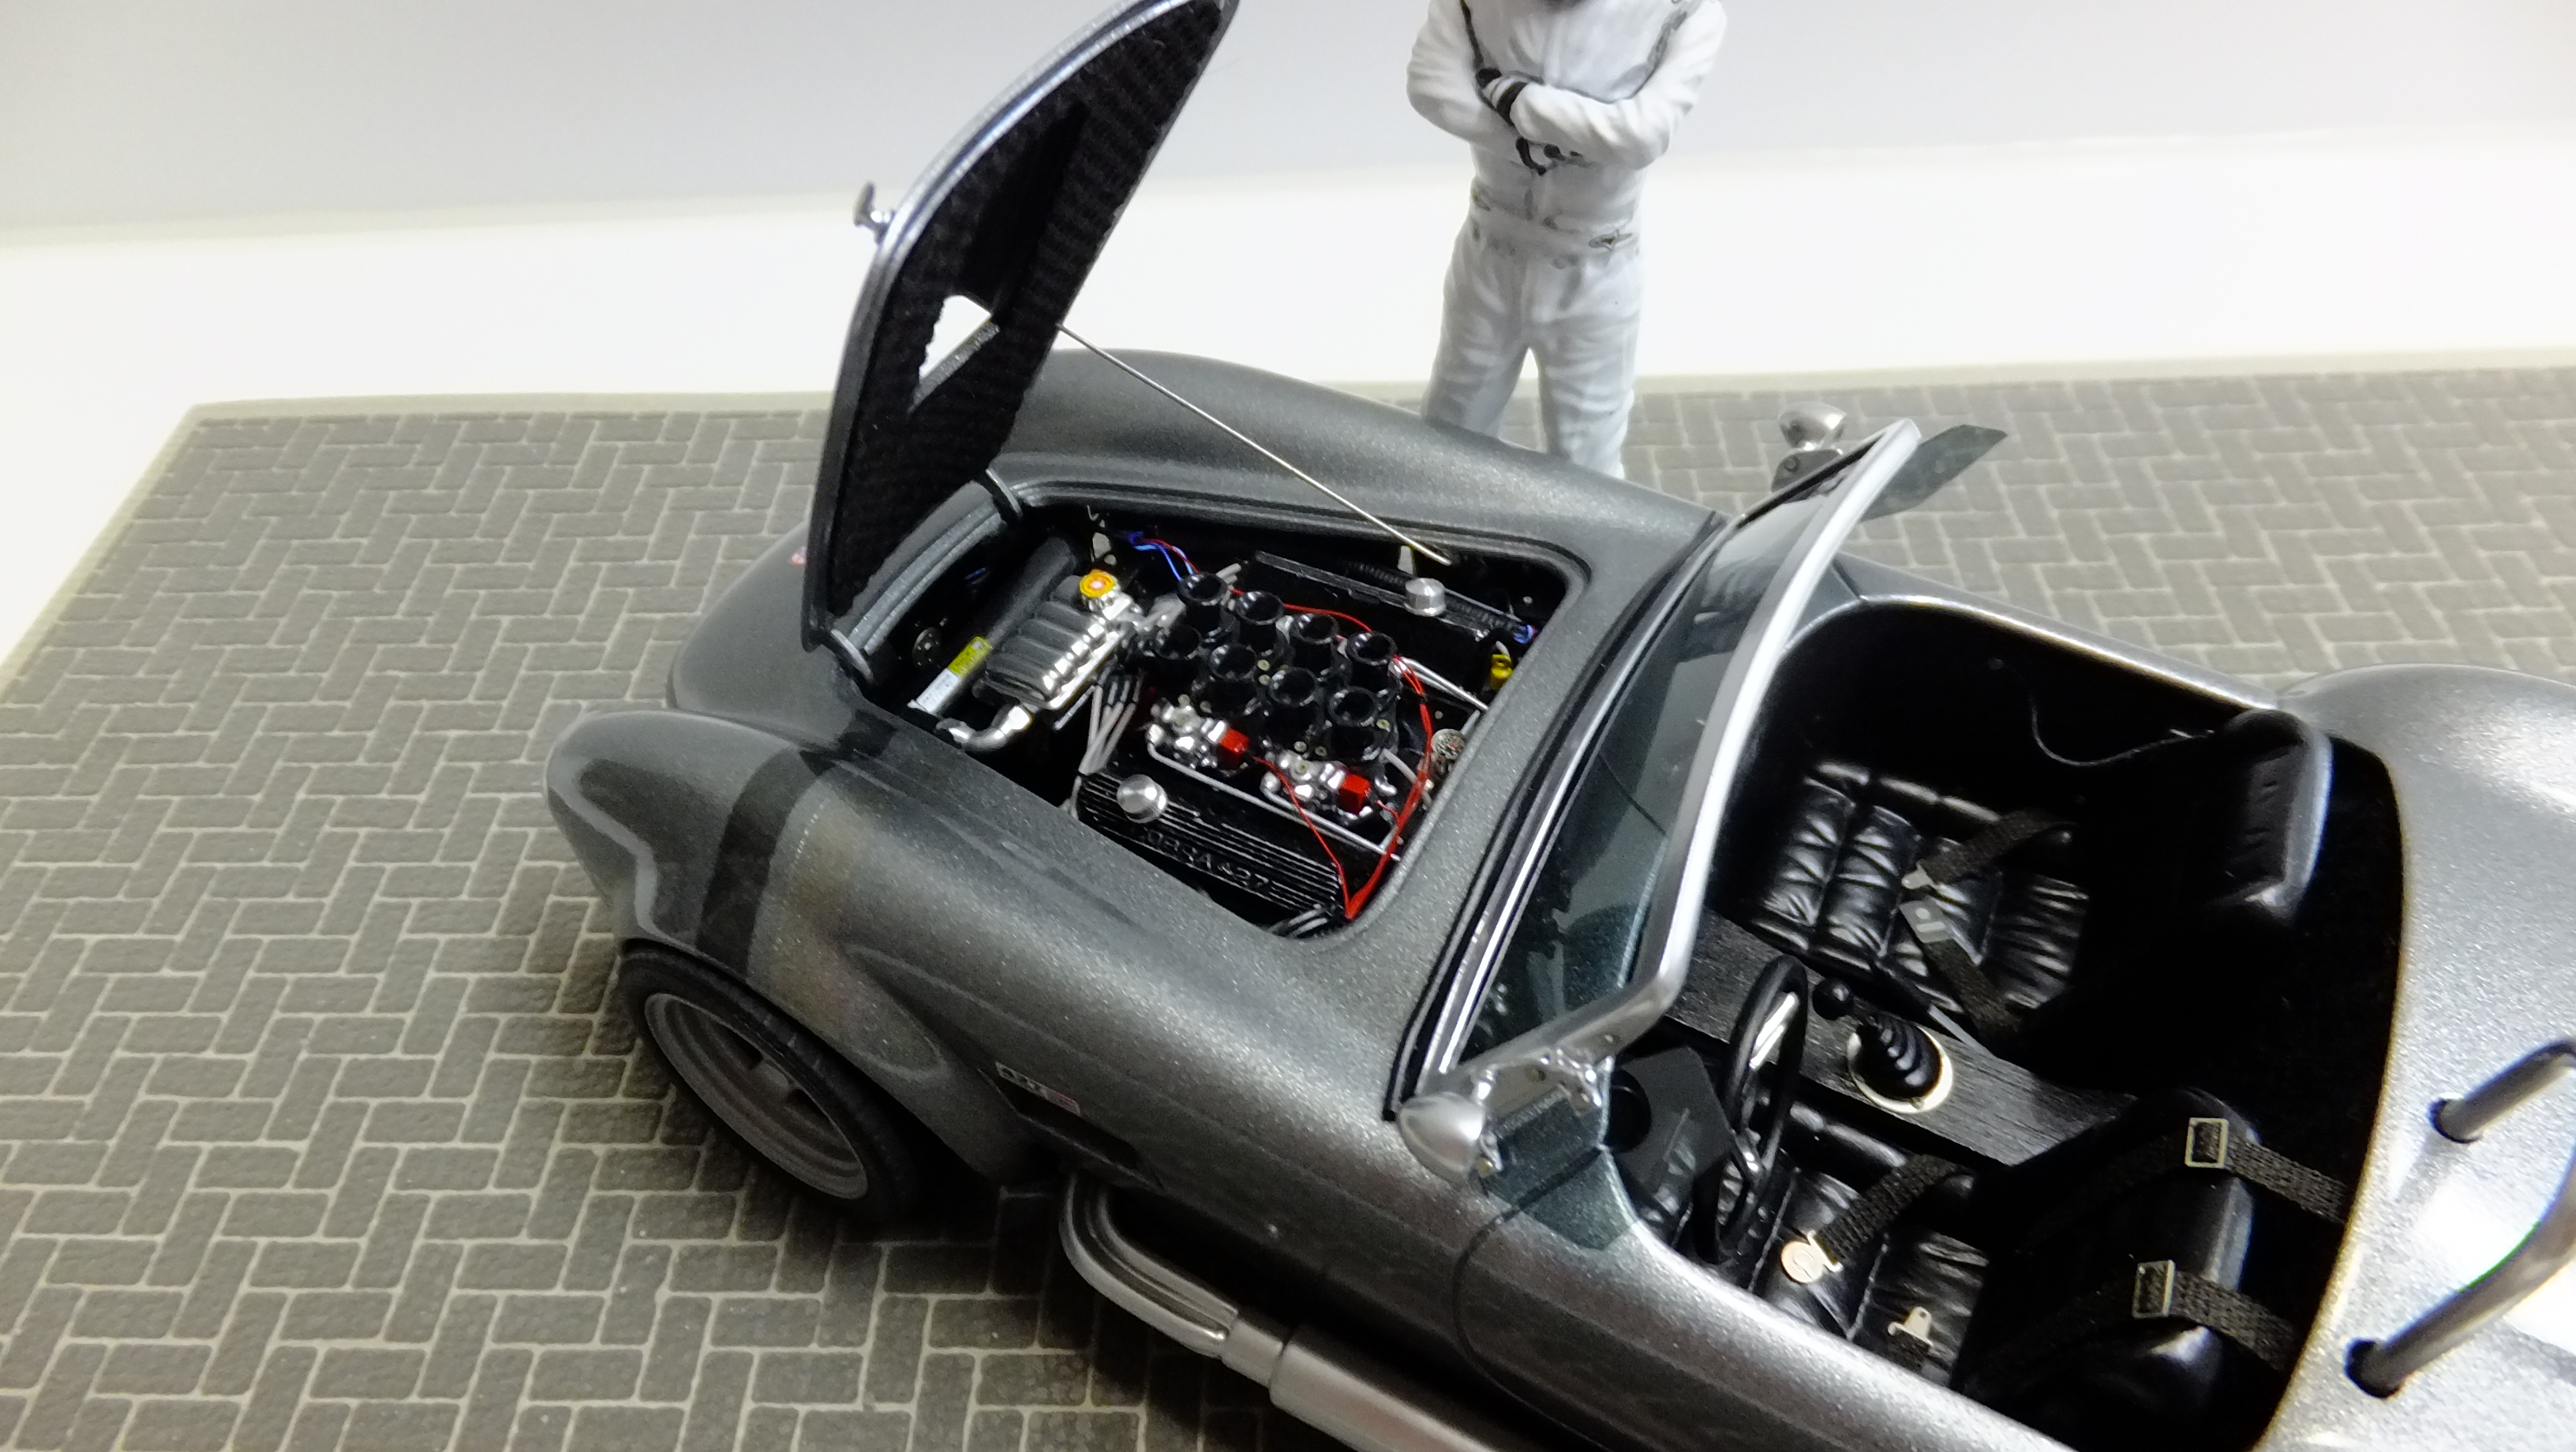
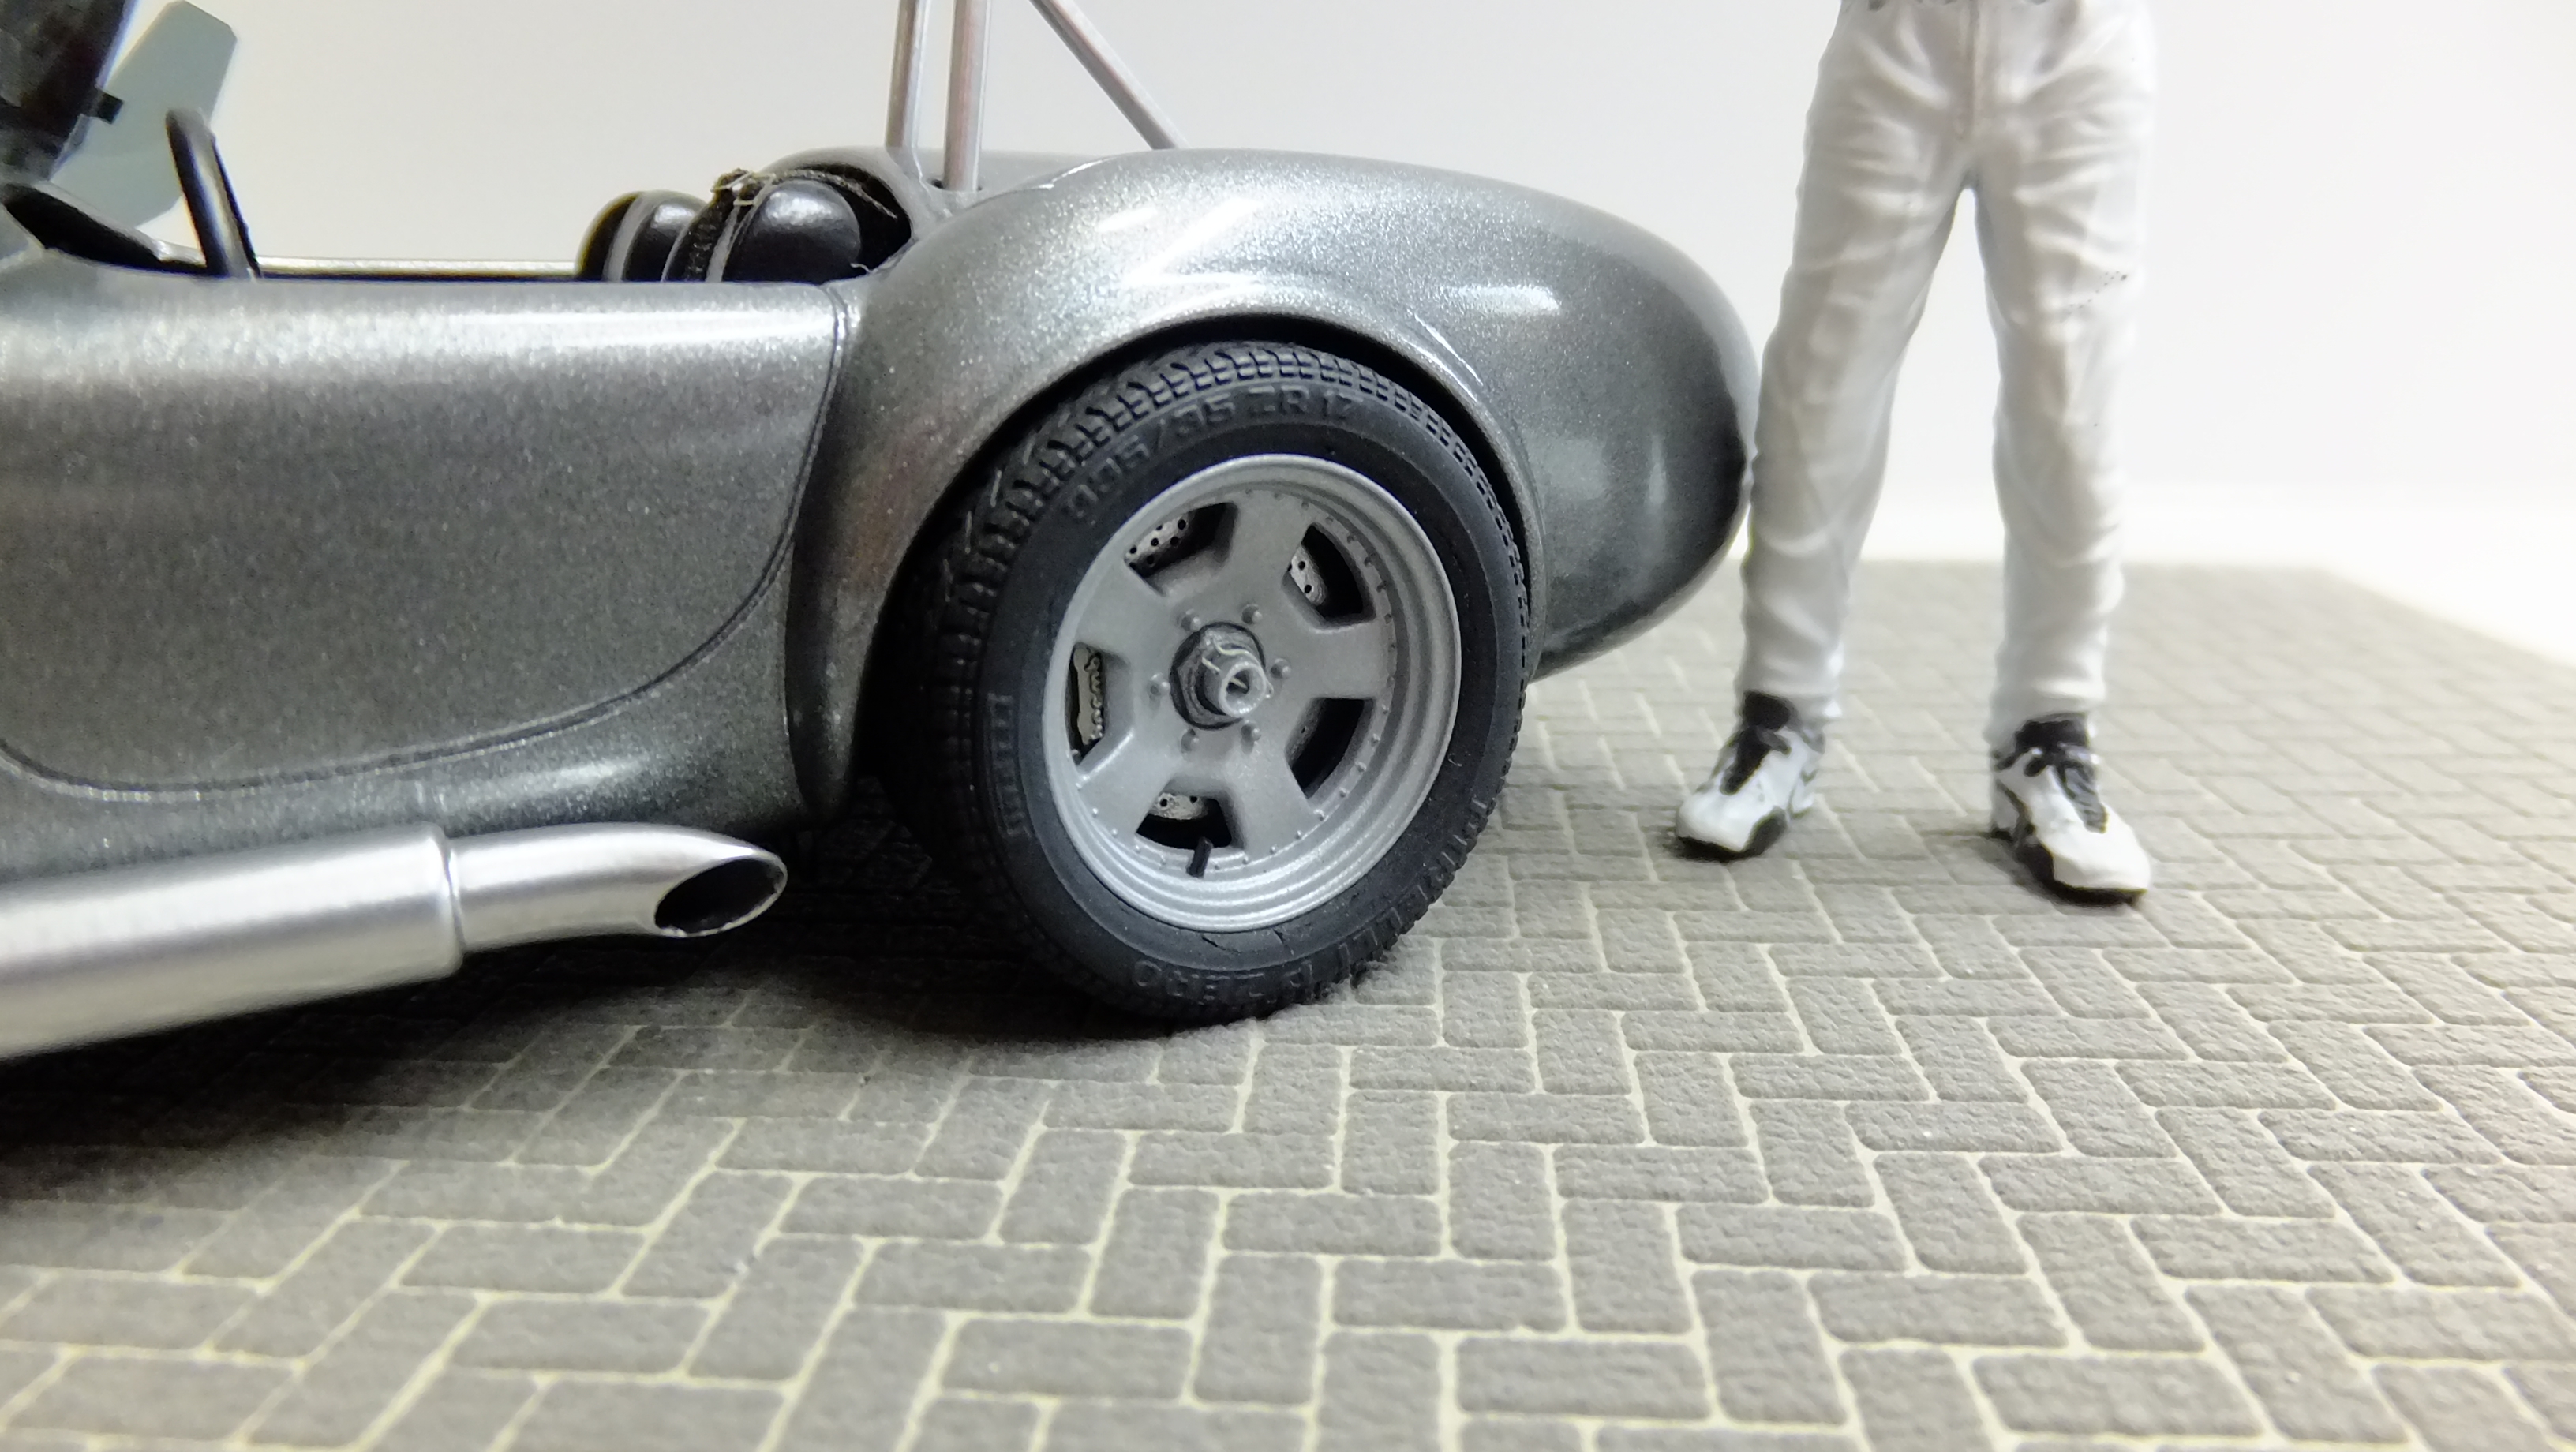
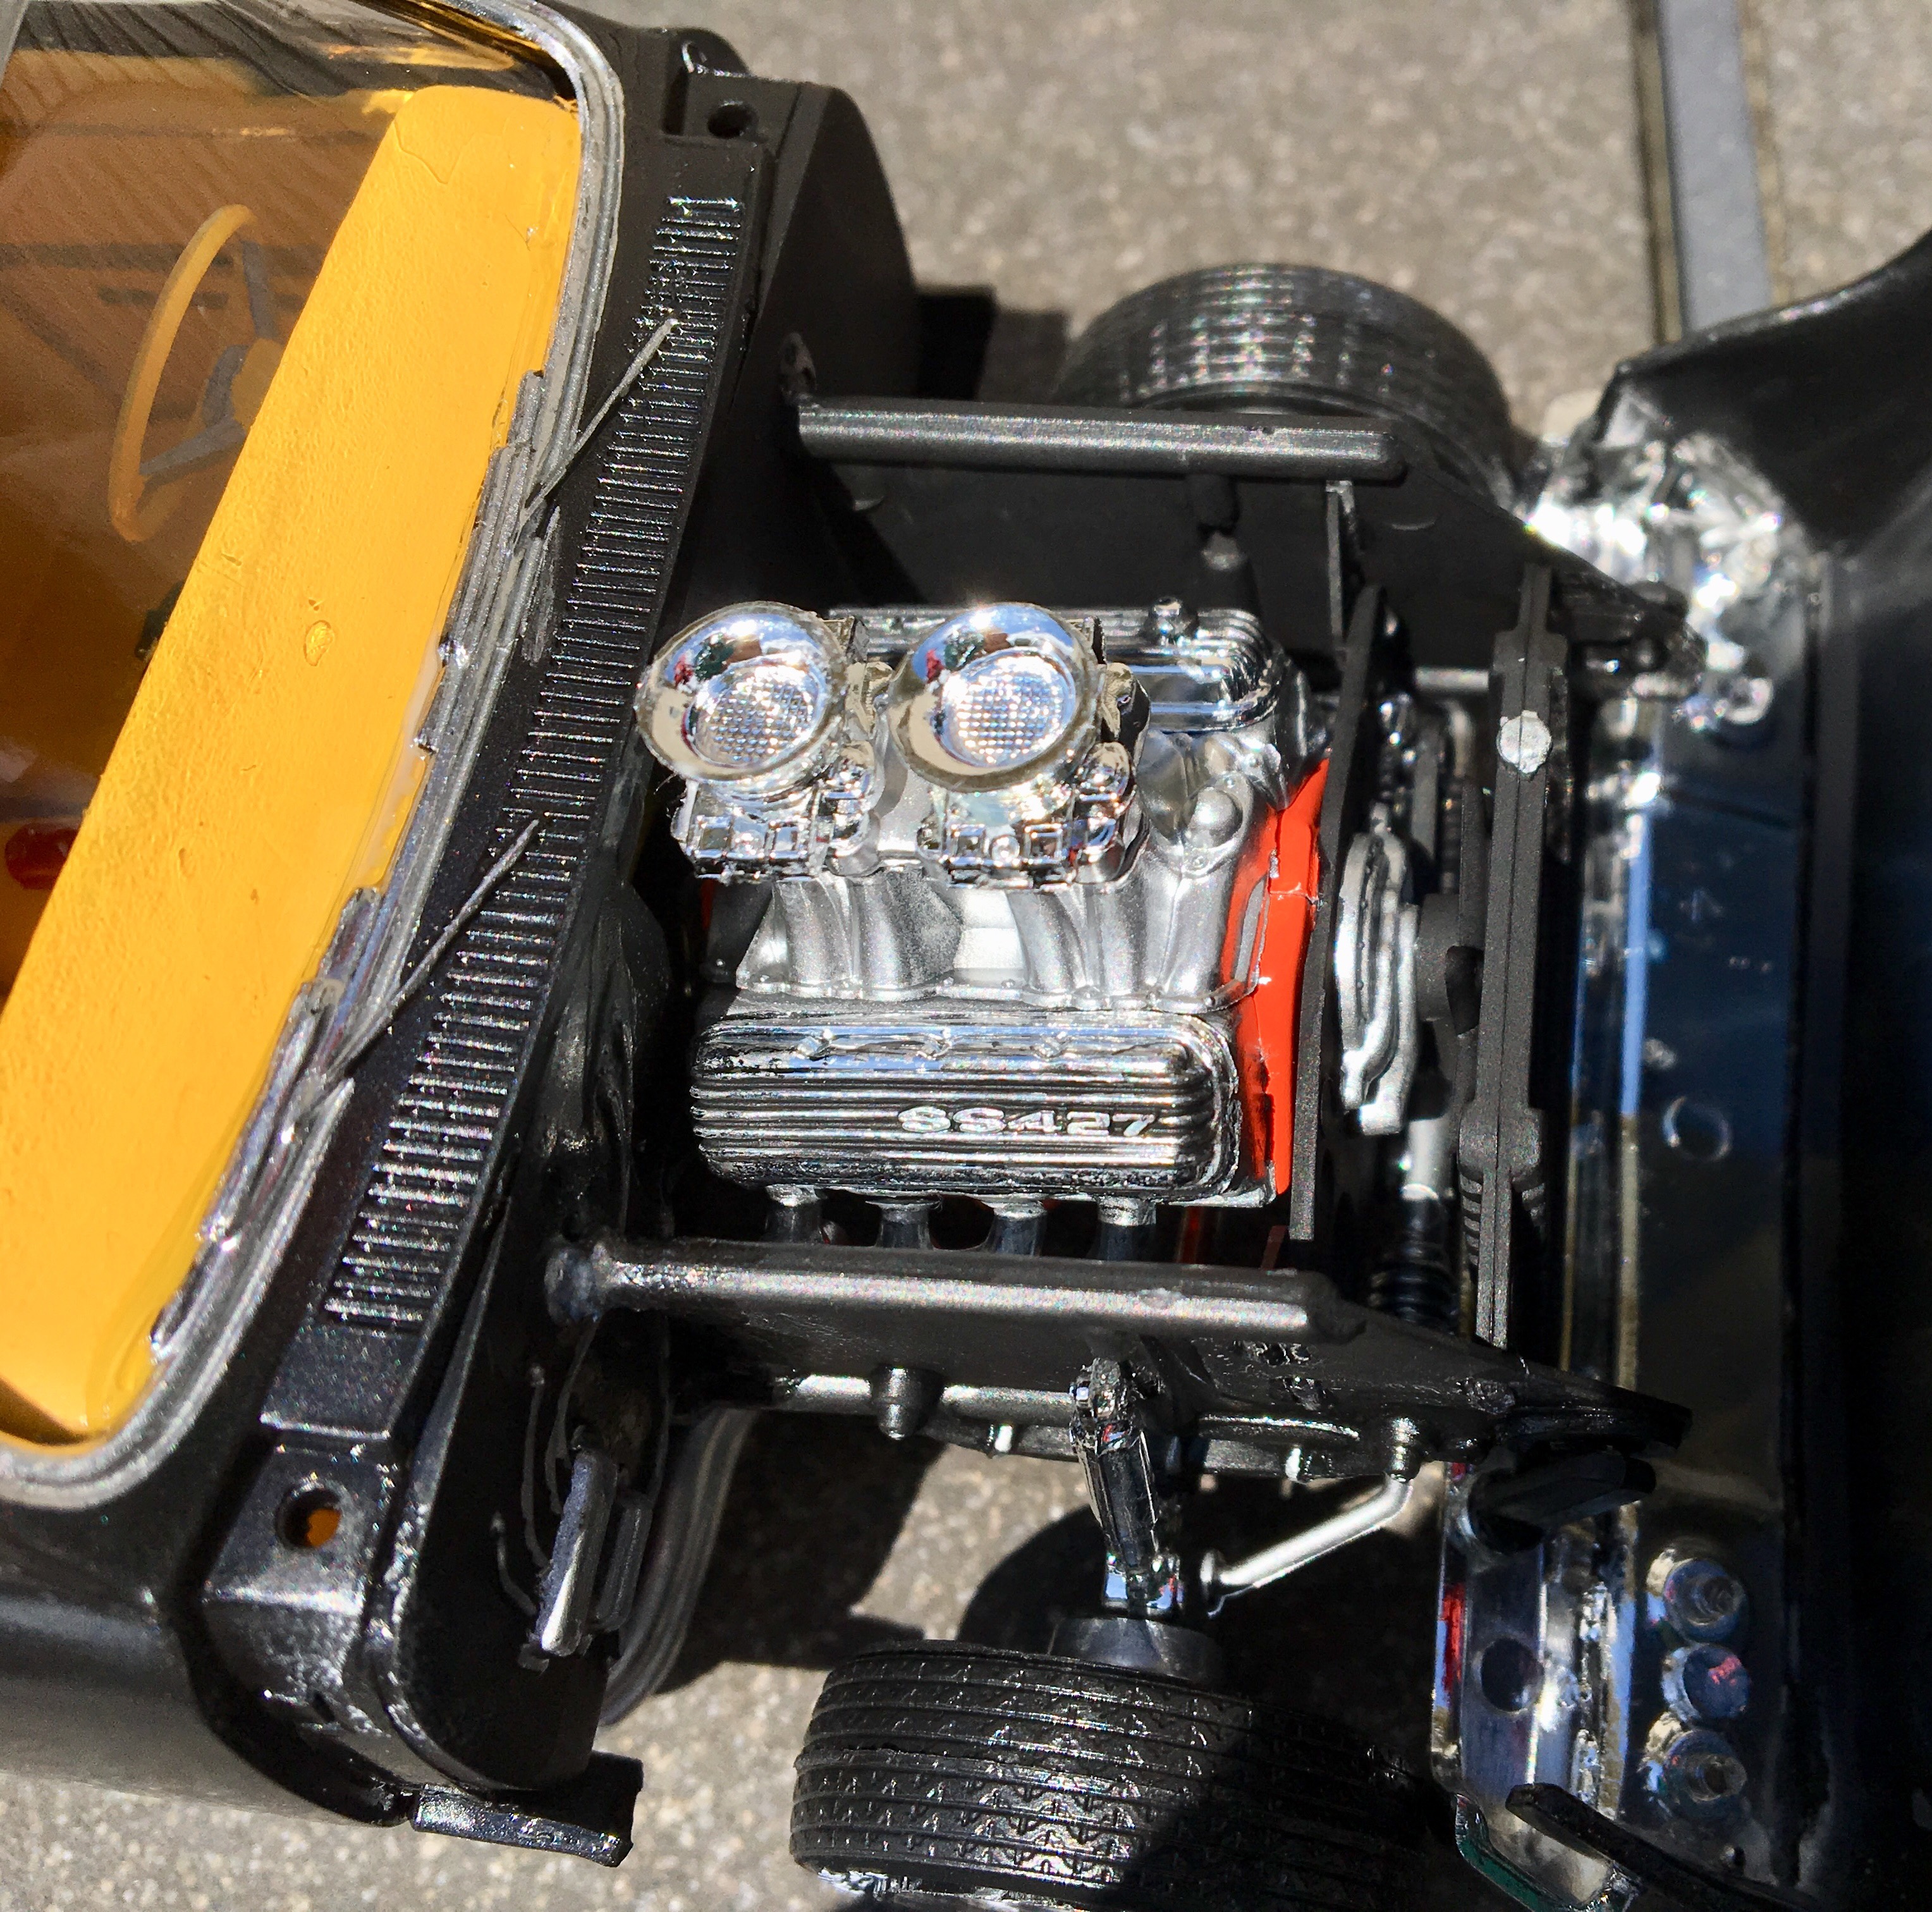
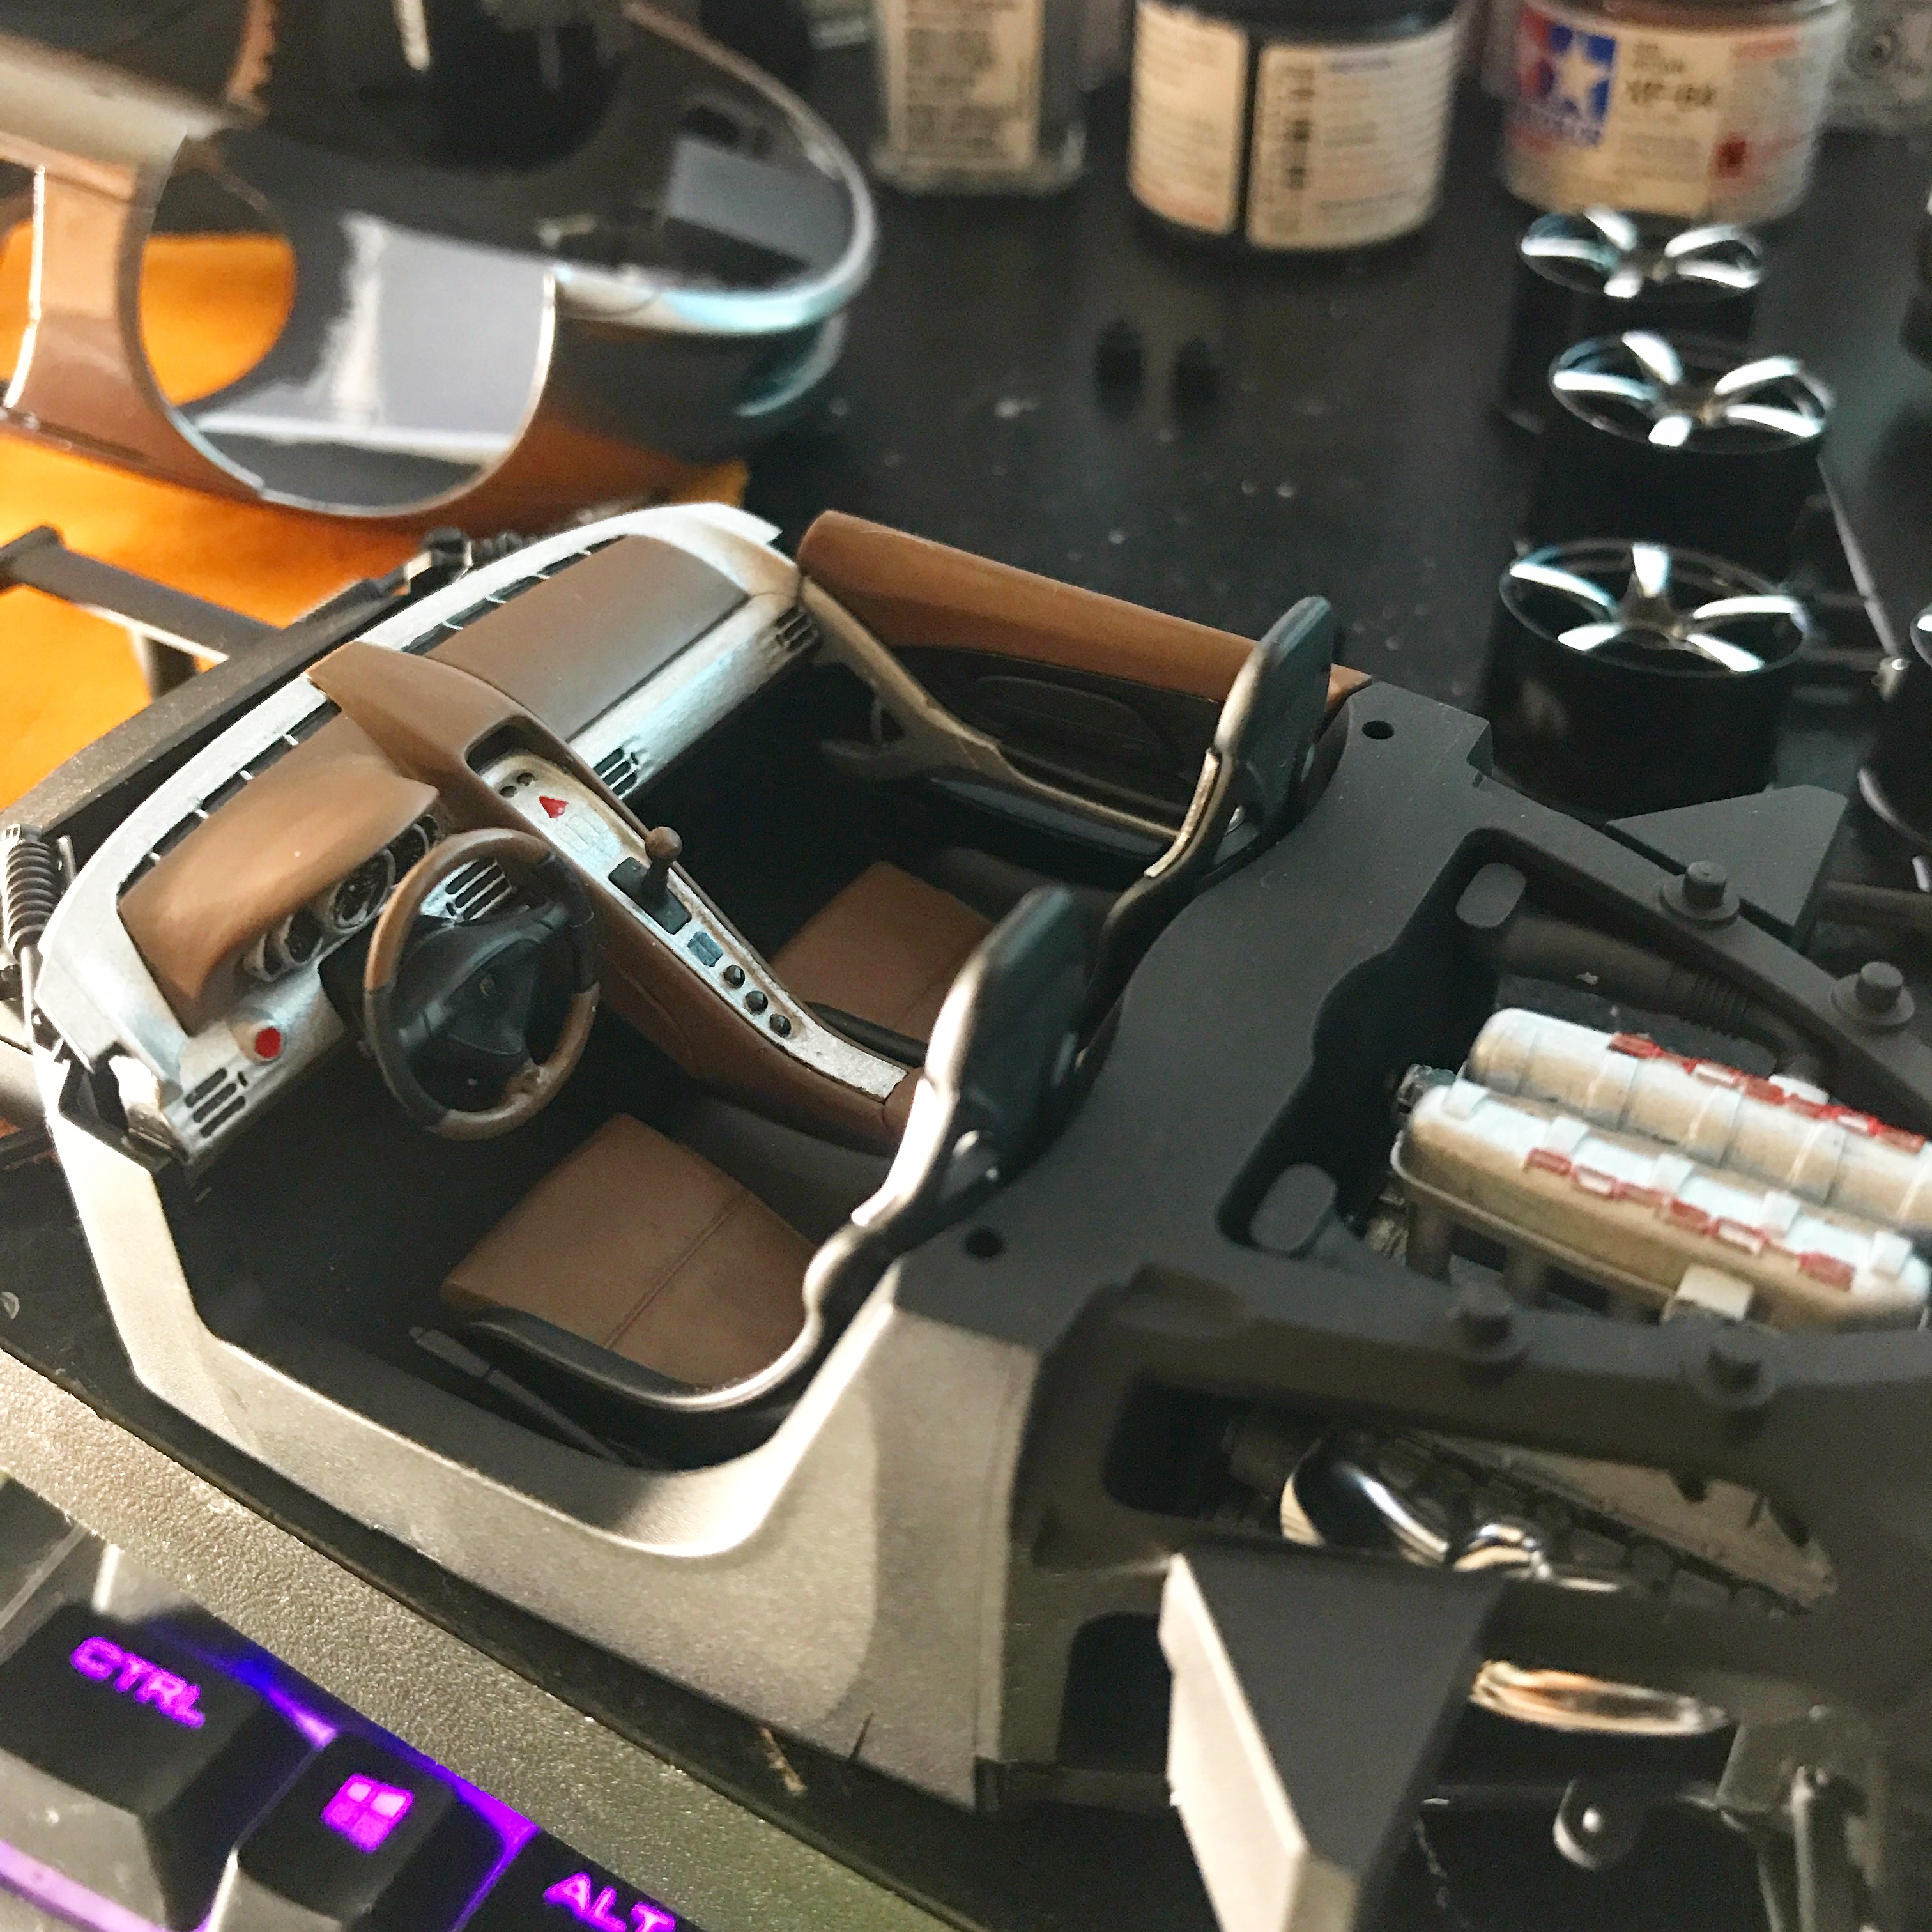
This is my fully detailed, customized Revell Cobra 427. There is so much that I did to this, so heres a few things; I replaced the hood scoop for a Fujimi one, I made the windscreen frame from aluminum, and SB the mirror Brackets. The side pipes are made from aluminum tubing, and the jack-points are photo-etch. The interior has real black lacquered wood, and the seats are modified Lotus Esprit seats. I put Pirrelli PZero tyres from a Tamiya Ferrari F40 kit, and the wheel centers have real cotter-pins in the spindles.
-
 Posted this in the CB 2018 thread, but not why post it here as well. What I started with: Quick mock up What's done so far 7/22: Did quite a bit of scratch building, trimming, and parts scrounging for the 2JZ and the engine compartment. Quite a tight squeeze in there (won't be able to see the 2nd turbo once the cowl in in) and considering it's 1/24 vs the AMT's 1/25th I used on a eariler 2JZ swapped F-body, that made some things a bit more difficult but was still possible. Used spare turbos from Olds Areo on shortened and trimmed Ferrari Enzo V12 headers and made intake tubes from spare chrome parts trees. The idea for the intake was it to be ram air style for functionality, so I found a old painted radiator from a 80s Turbo FWD of some sort and used that. Exhaust is the old LT1 style from a 93 Pace Car as it's on the same side as the 2JZ's header and easier to intergrate going by experience on a 2JZ'd '93 I built long ago. The 98 strangely had a single exhaust tip setup so a dual tip f-body muffler was scrounged up but was missing the tips. So, on went spare aluminum stacks from the Opel GT as new tips. Also had to modify the radiator so the fan shrouds don't hit the motor as much. Also opened up the vents and expanded the snorkel scoops on the hood for better air flow with that tight motor and the turbos. Still have some small things and a bit of clean up to do motorwise as I plan to add in intercooler to slightly show where the lower front lights were, then it'll be setting the ride height/wheels and it's off to paint. Had Walmart Color-place Fire Red in mind to complement my older 2JZ T/A build. Will try to keep posted here and the CB thread.
-
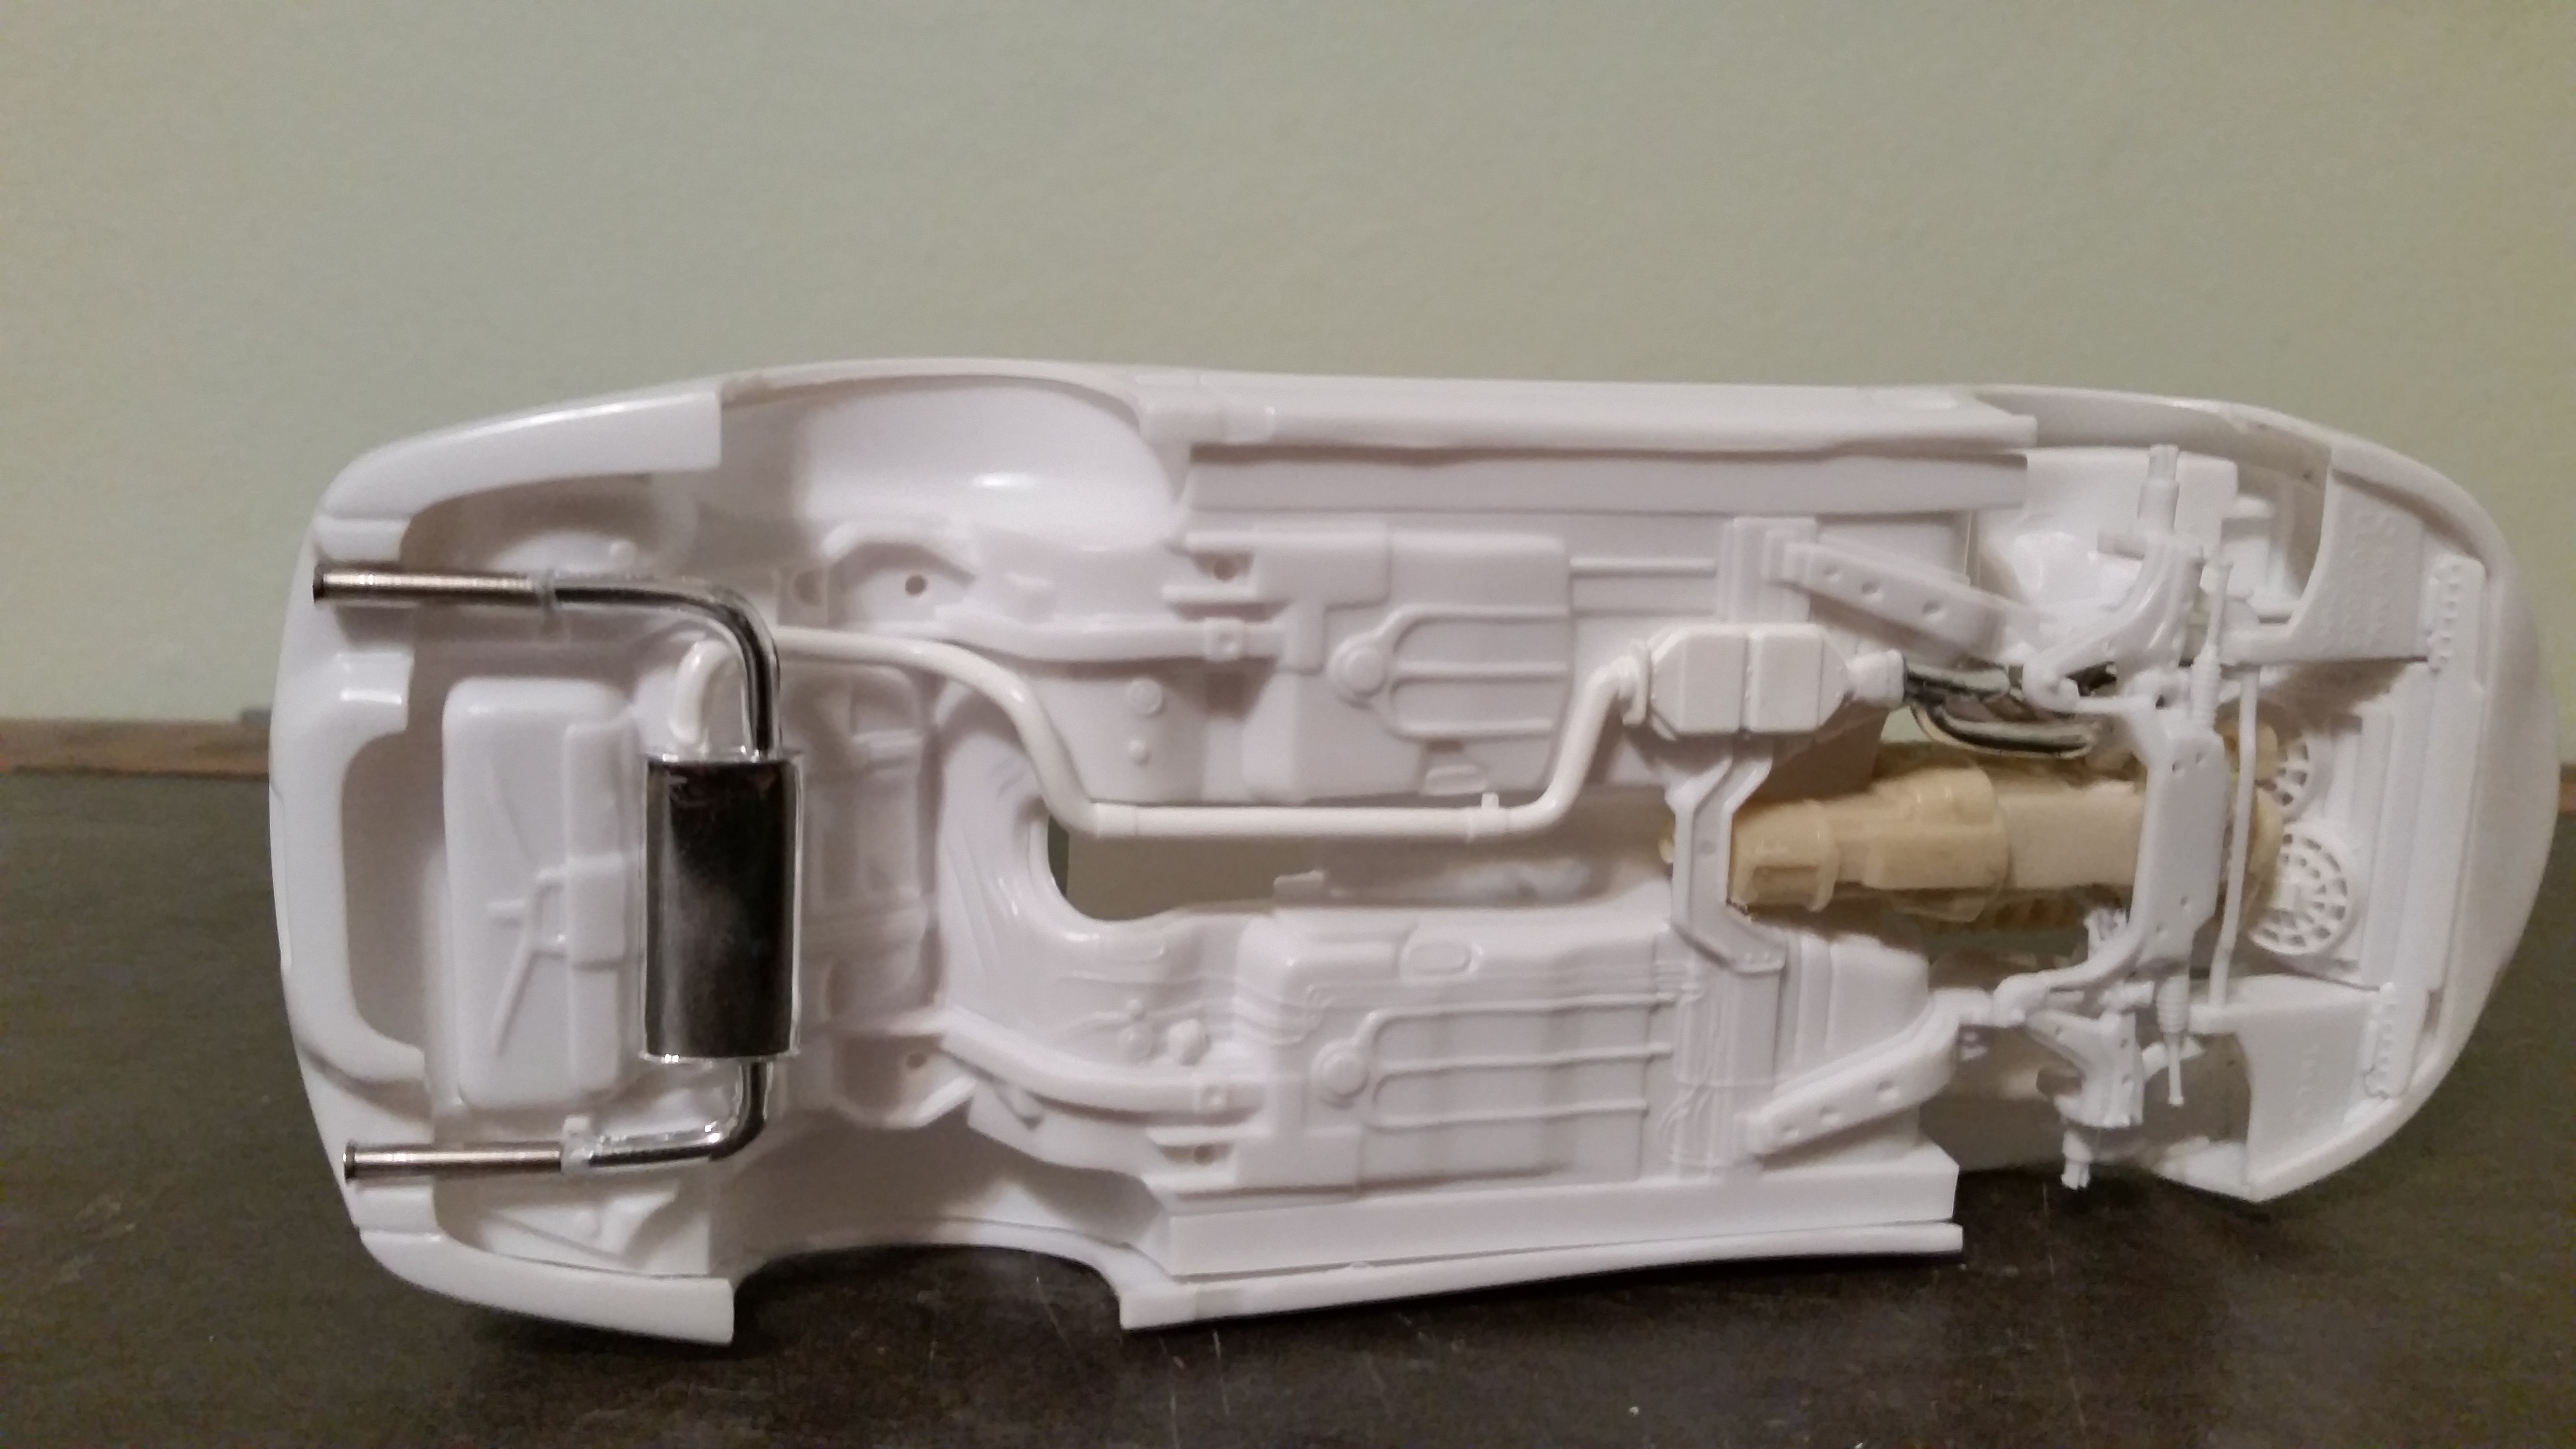
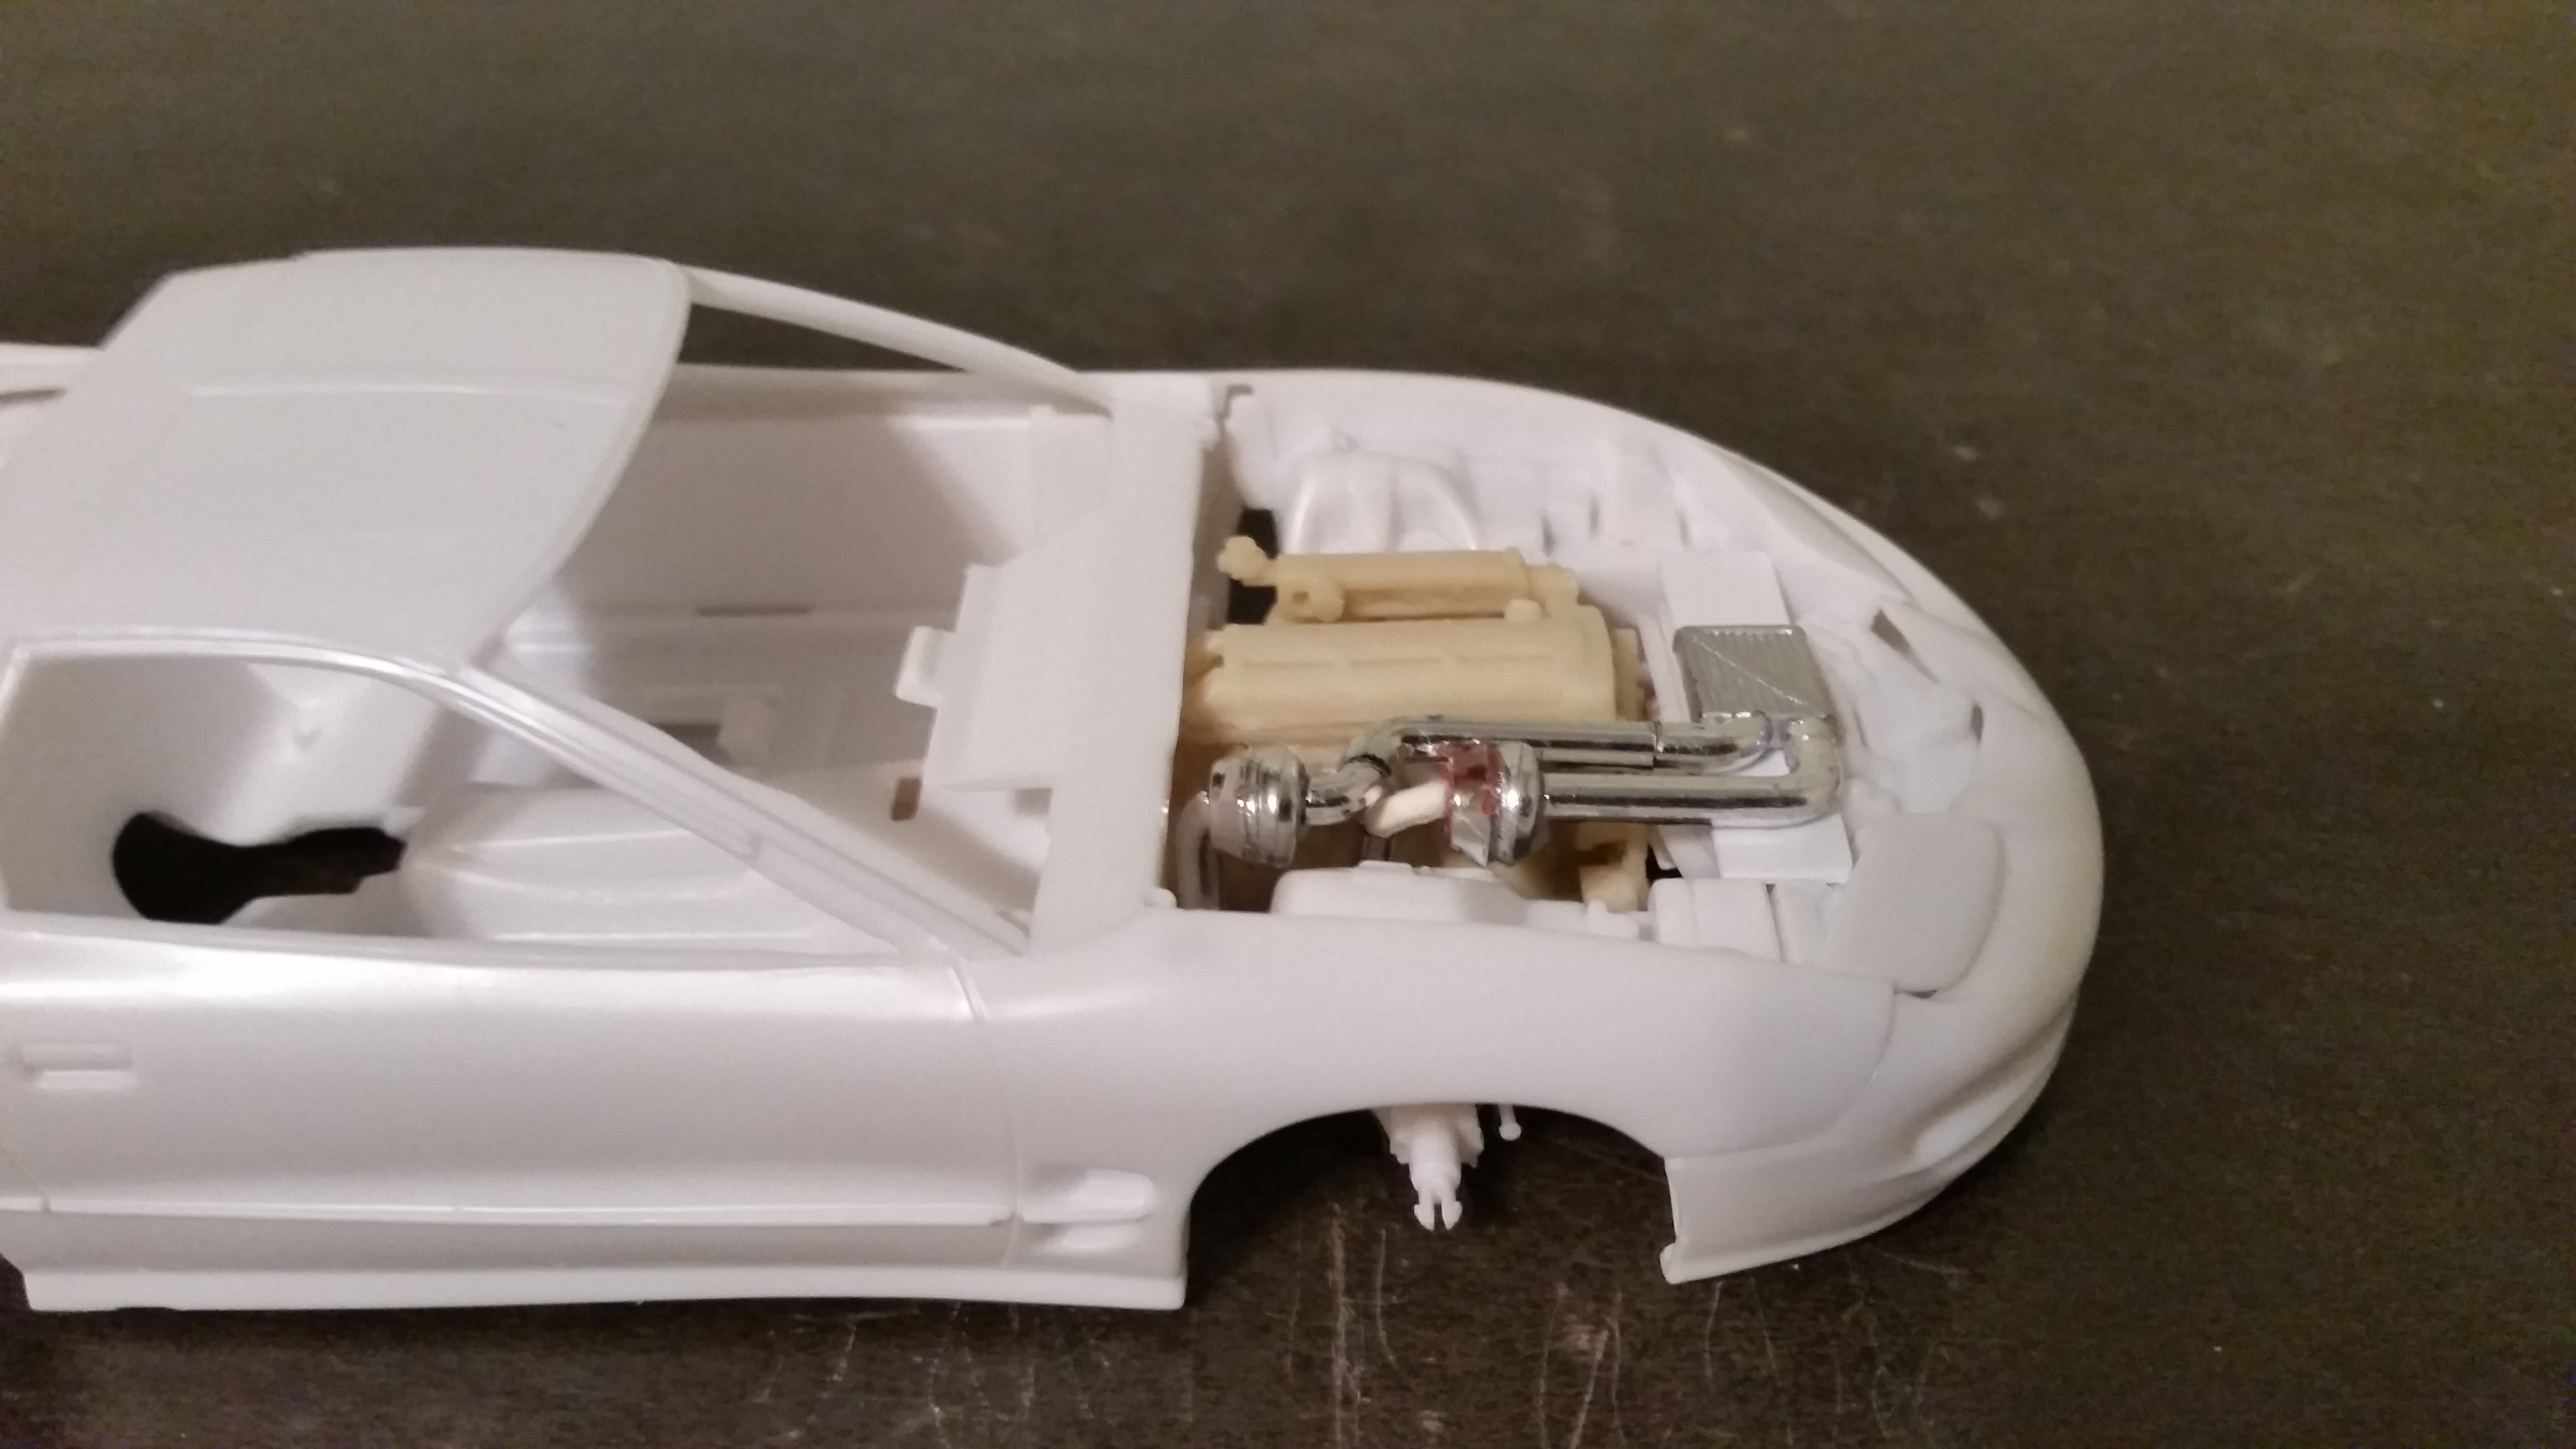
 I have been working the Revell Porsche 918 and the Revell Mazda Rx-7 kits for quite a while and really want to finish them to start some new ones, but I am being held back from finishing them. Both of the chassis' are warped. I have already painted them and want to know if you have any suggestions on how to fix the warp and also if anyone else is having the same problem. Thanks, Matt.
-
 finished up this one, painted with craft paints. tire decals are from a powerslide nascar tire sheet, the dog is from some dollar store toys.
 -
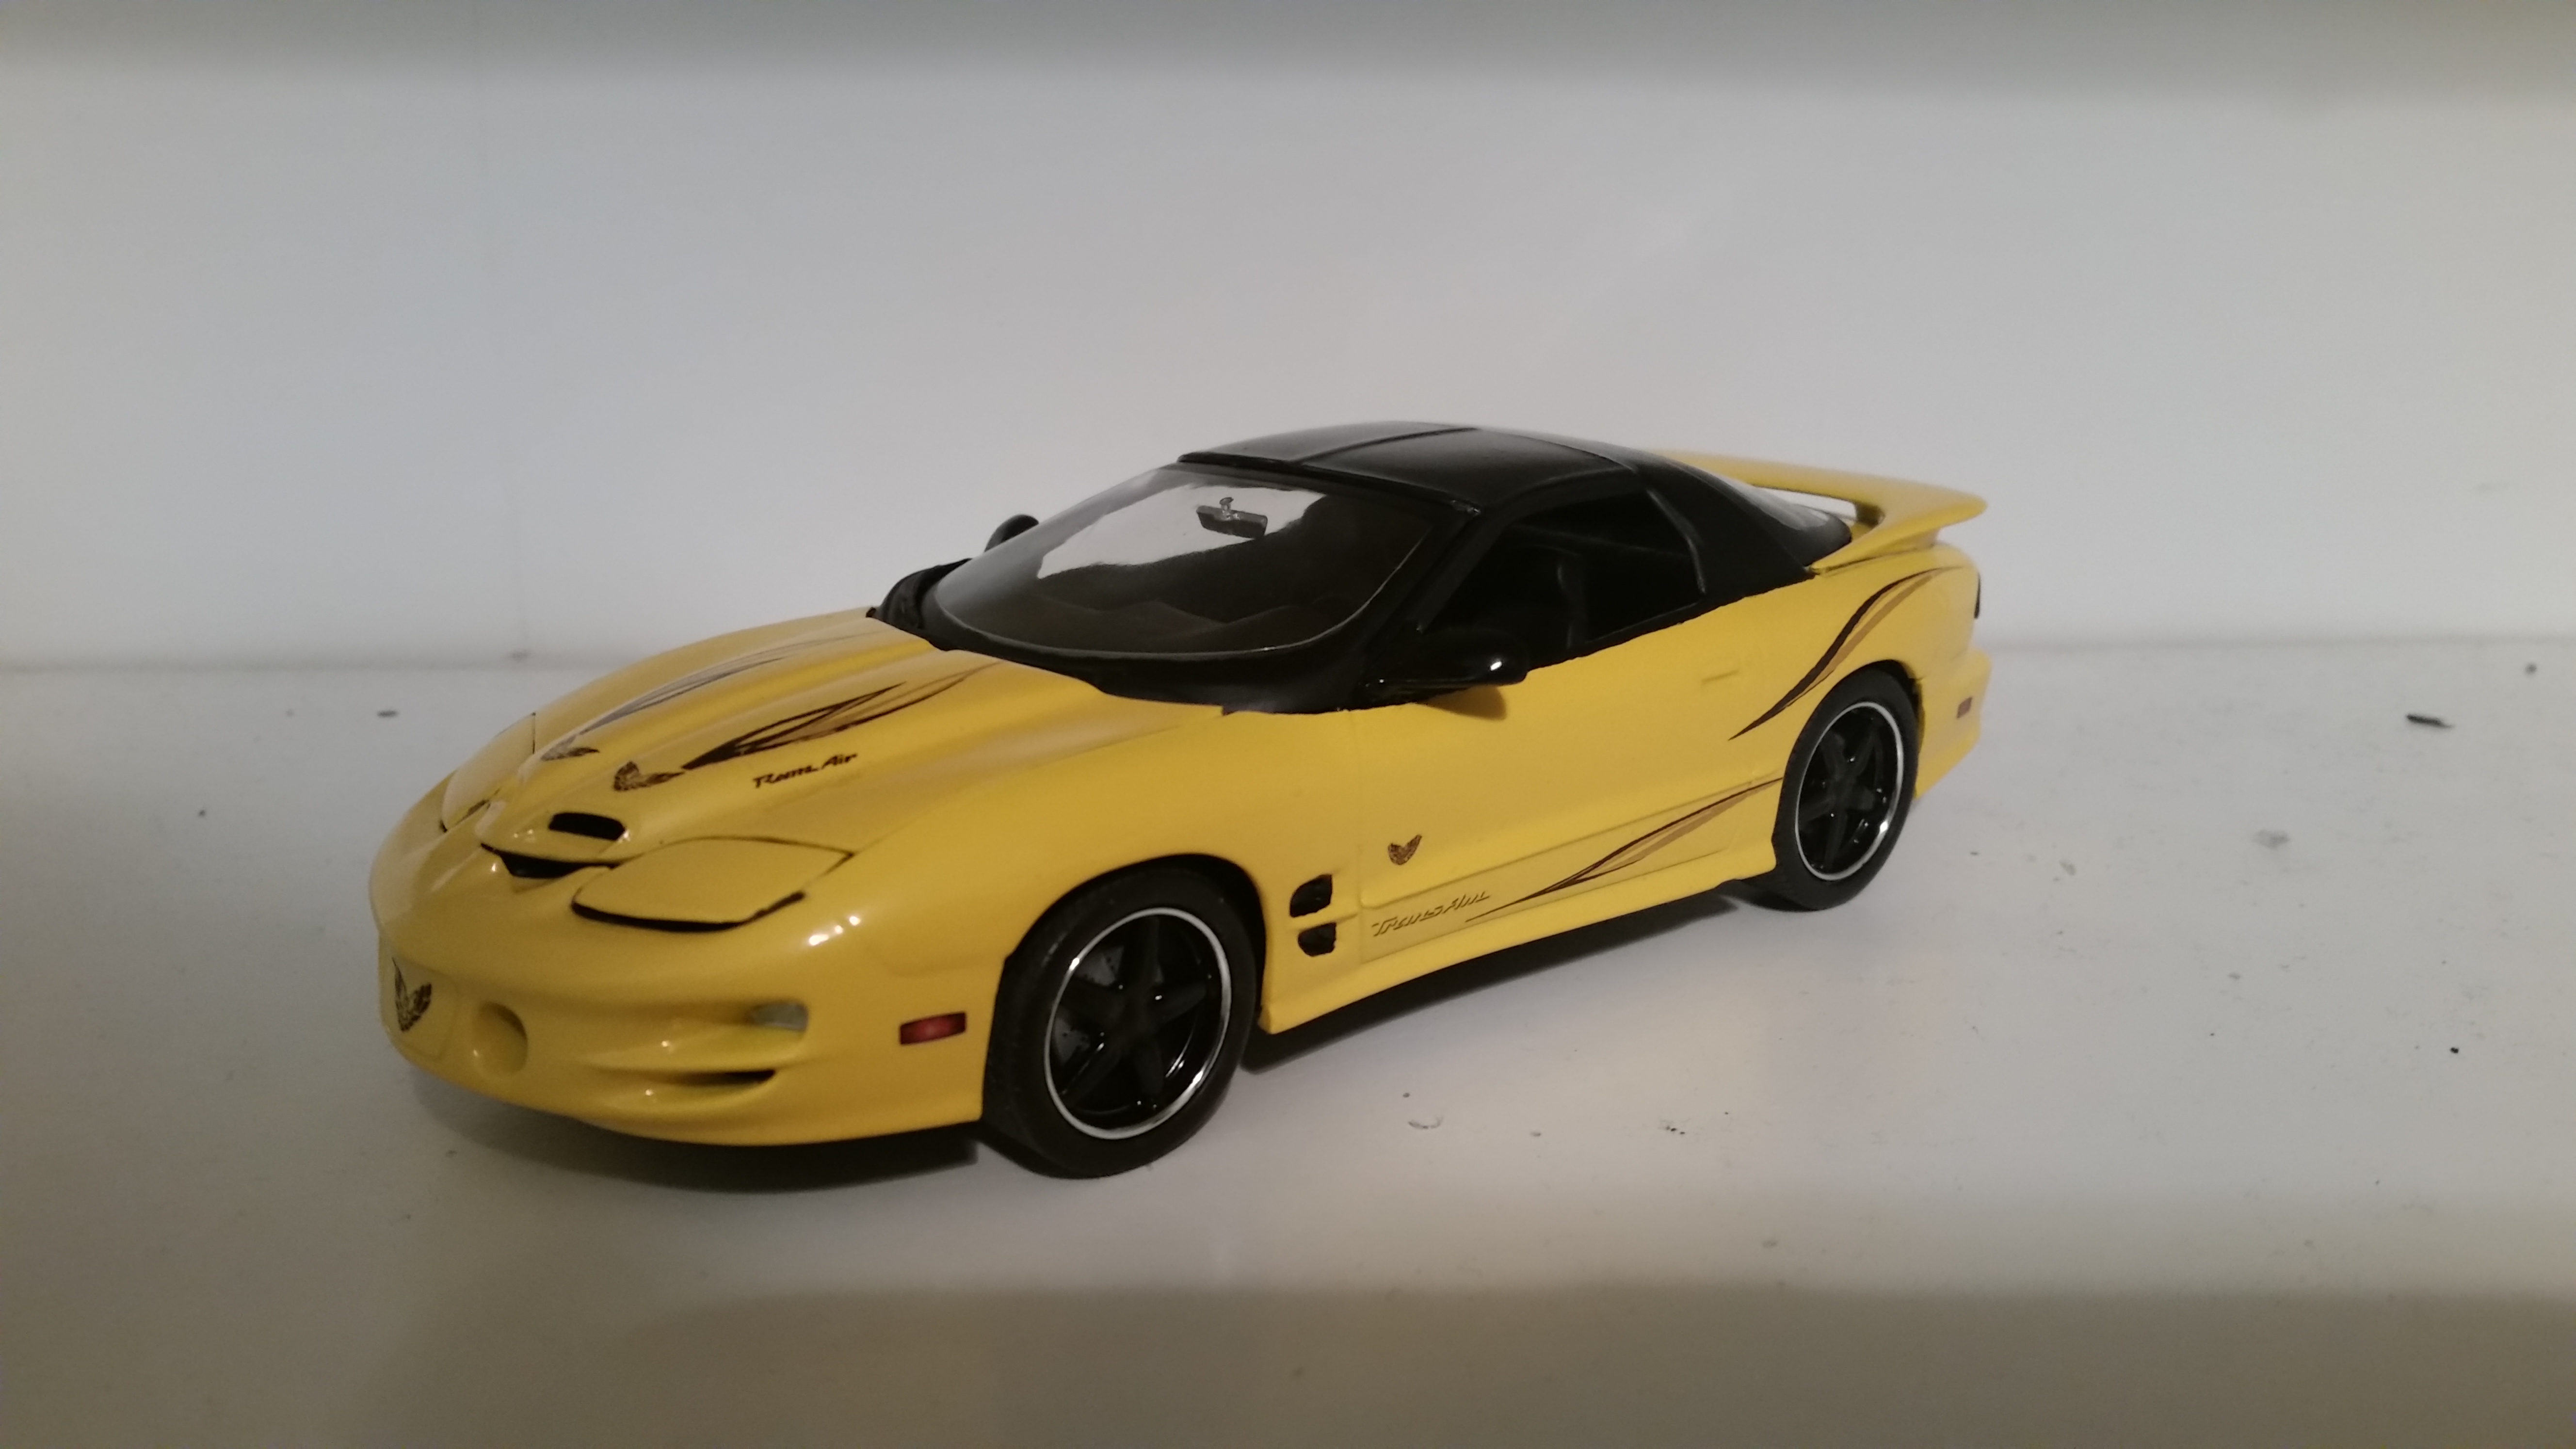
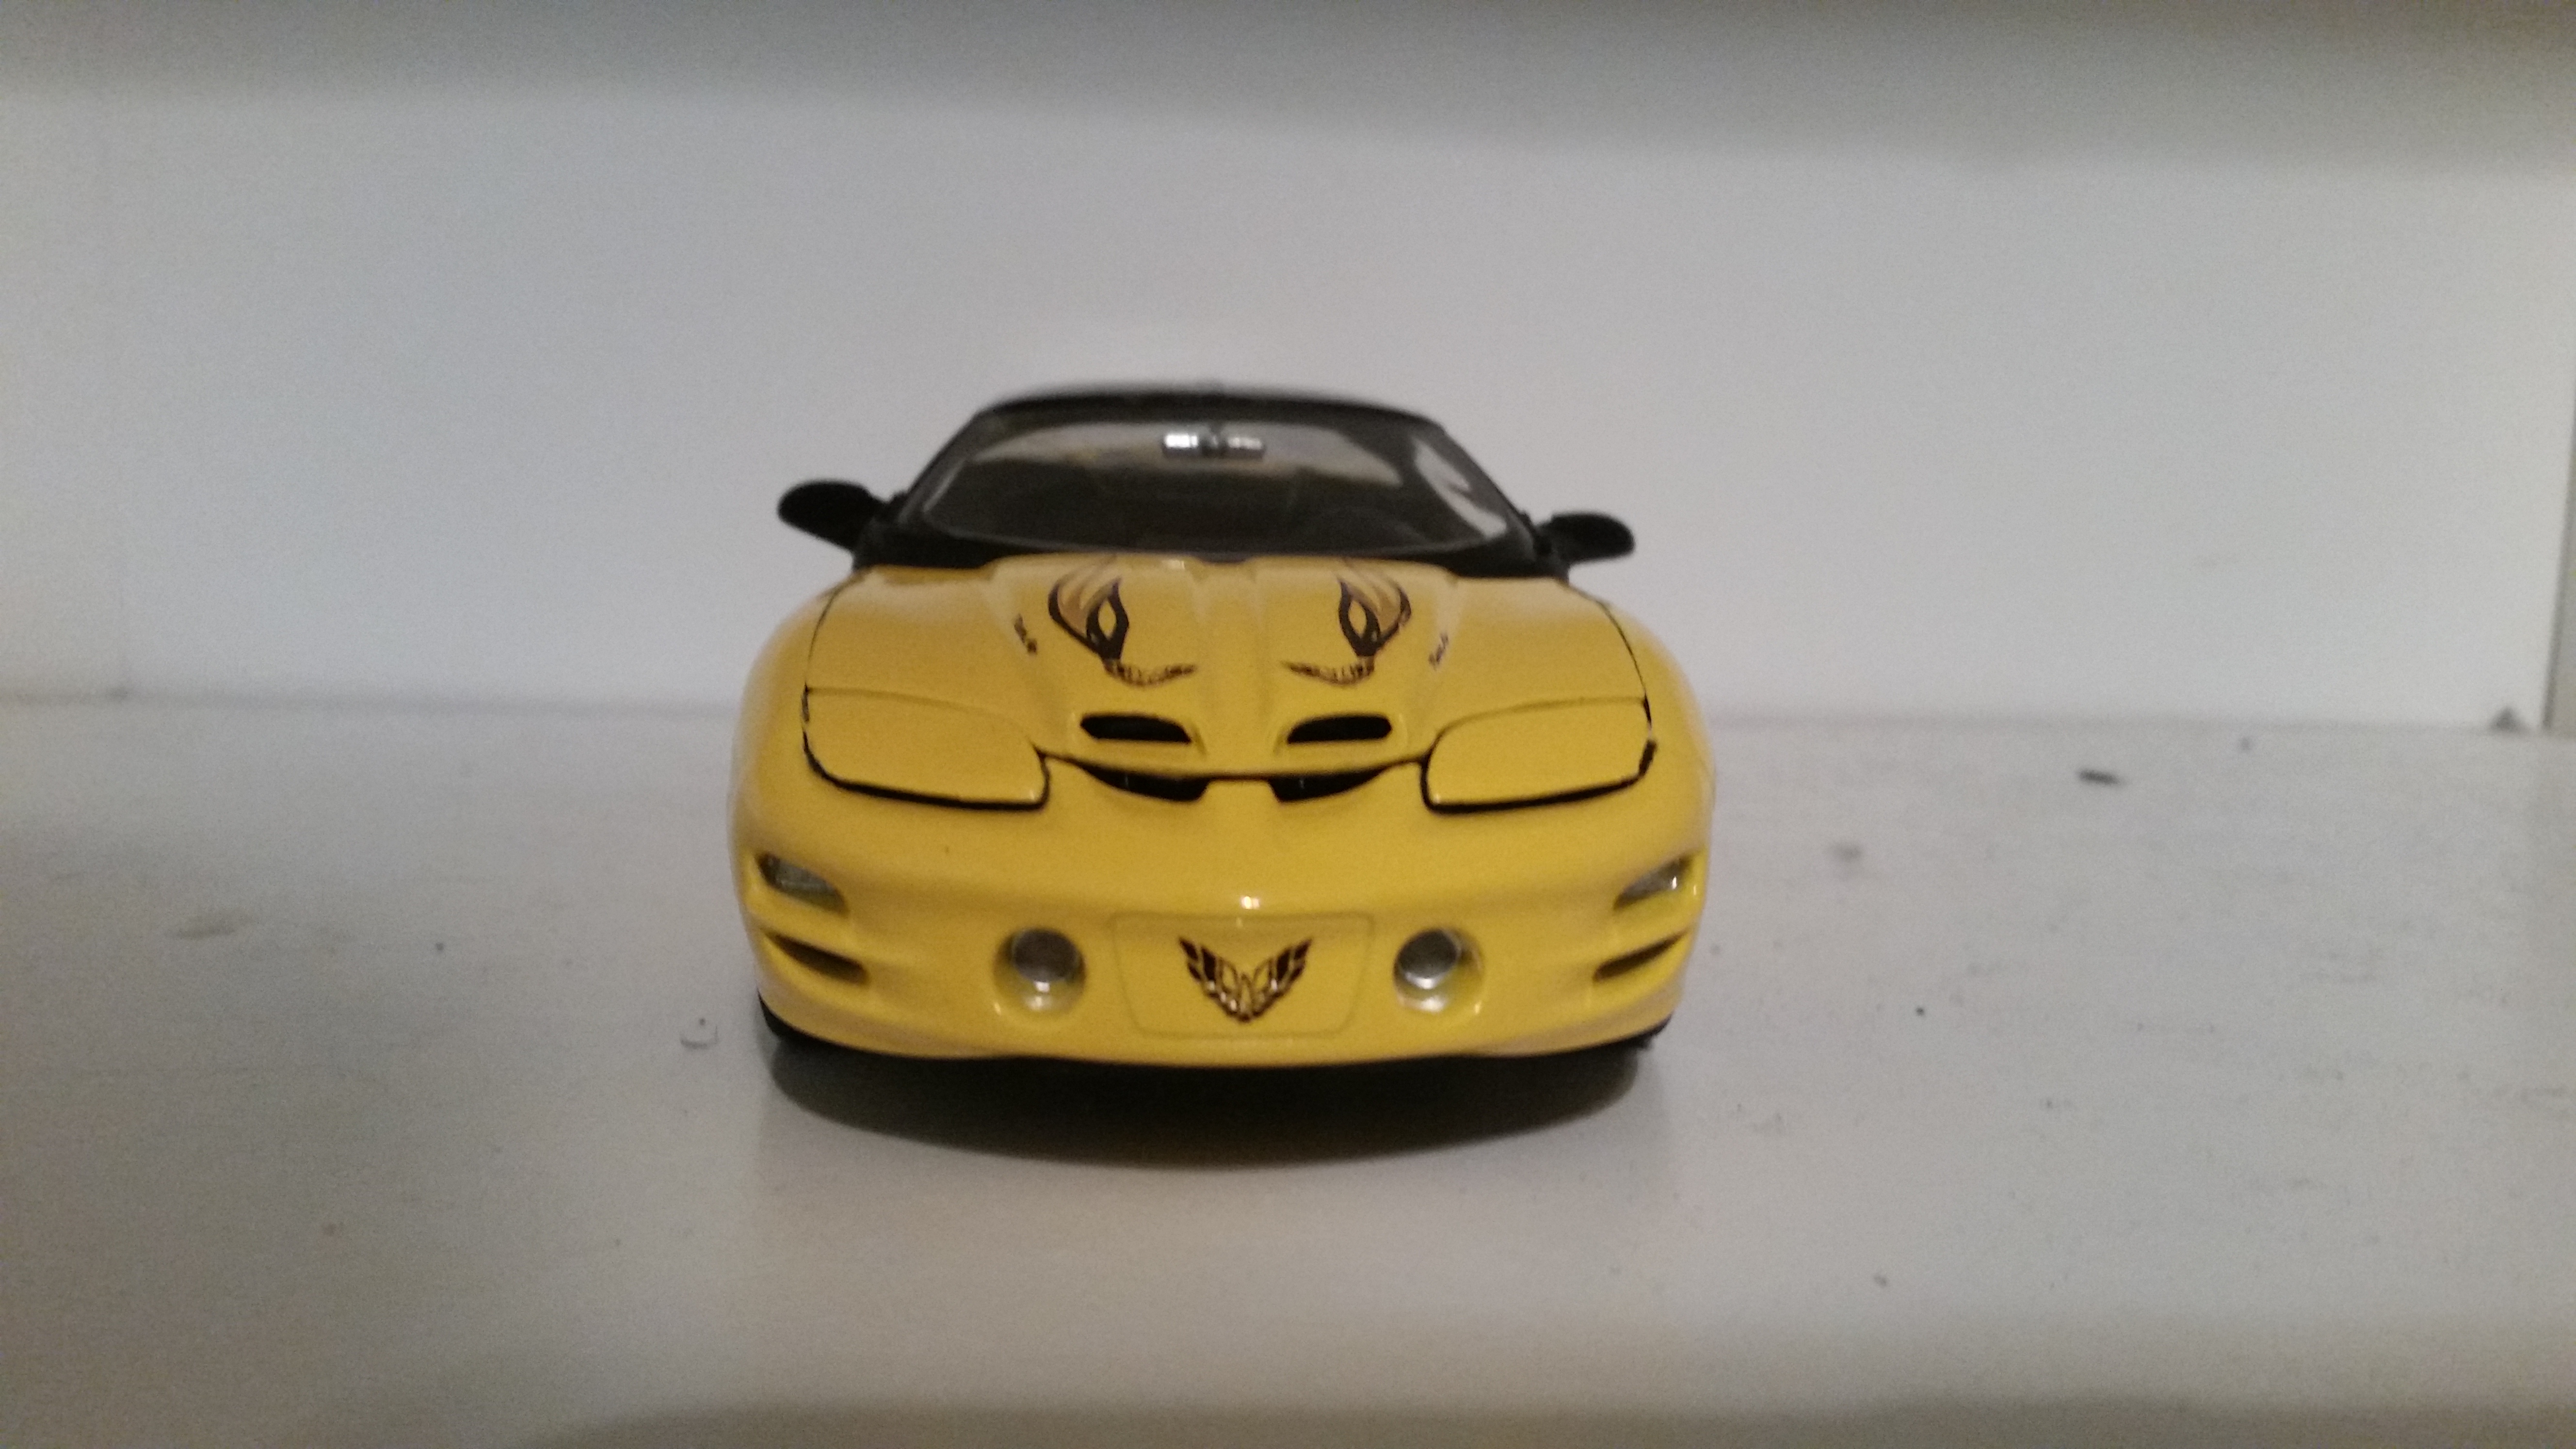
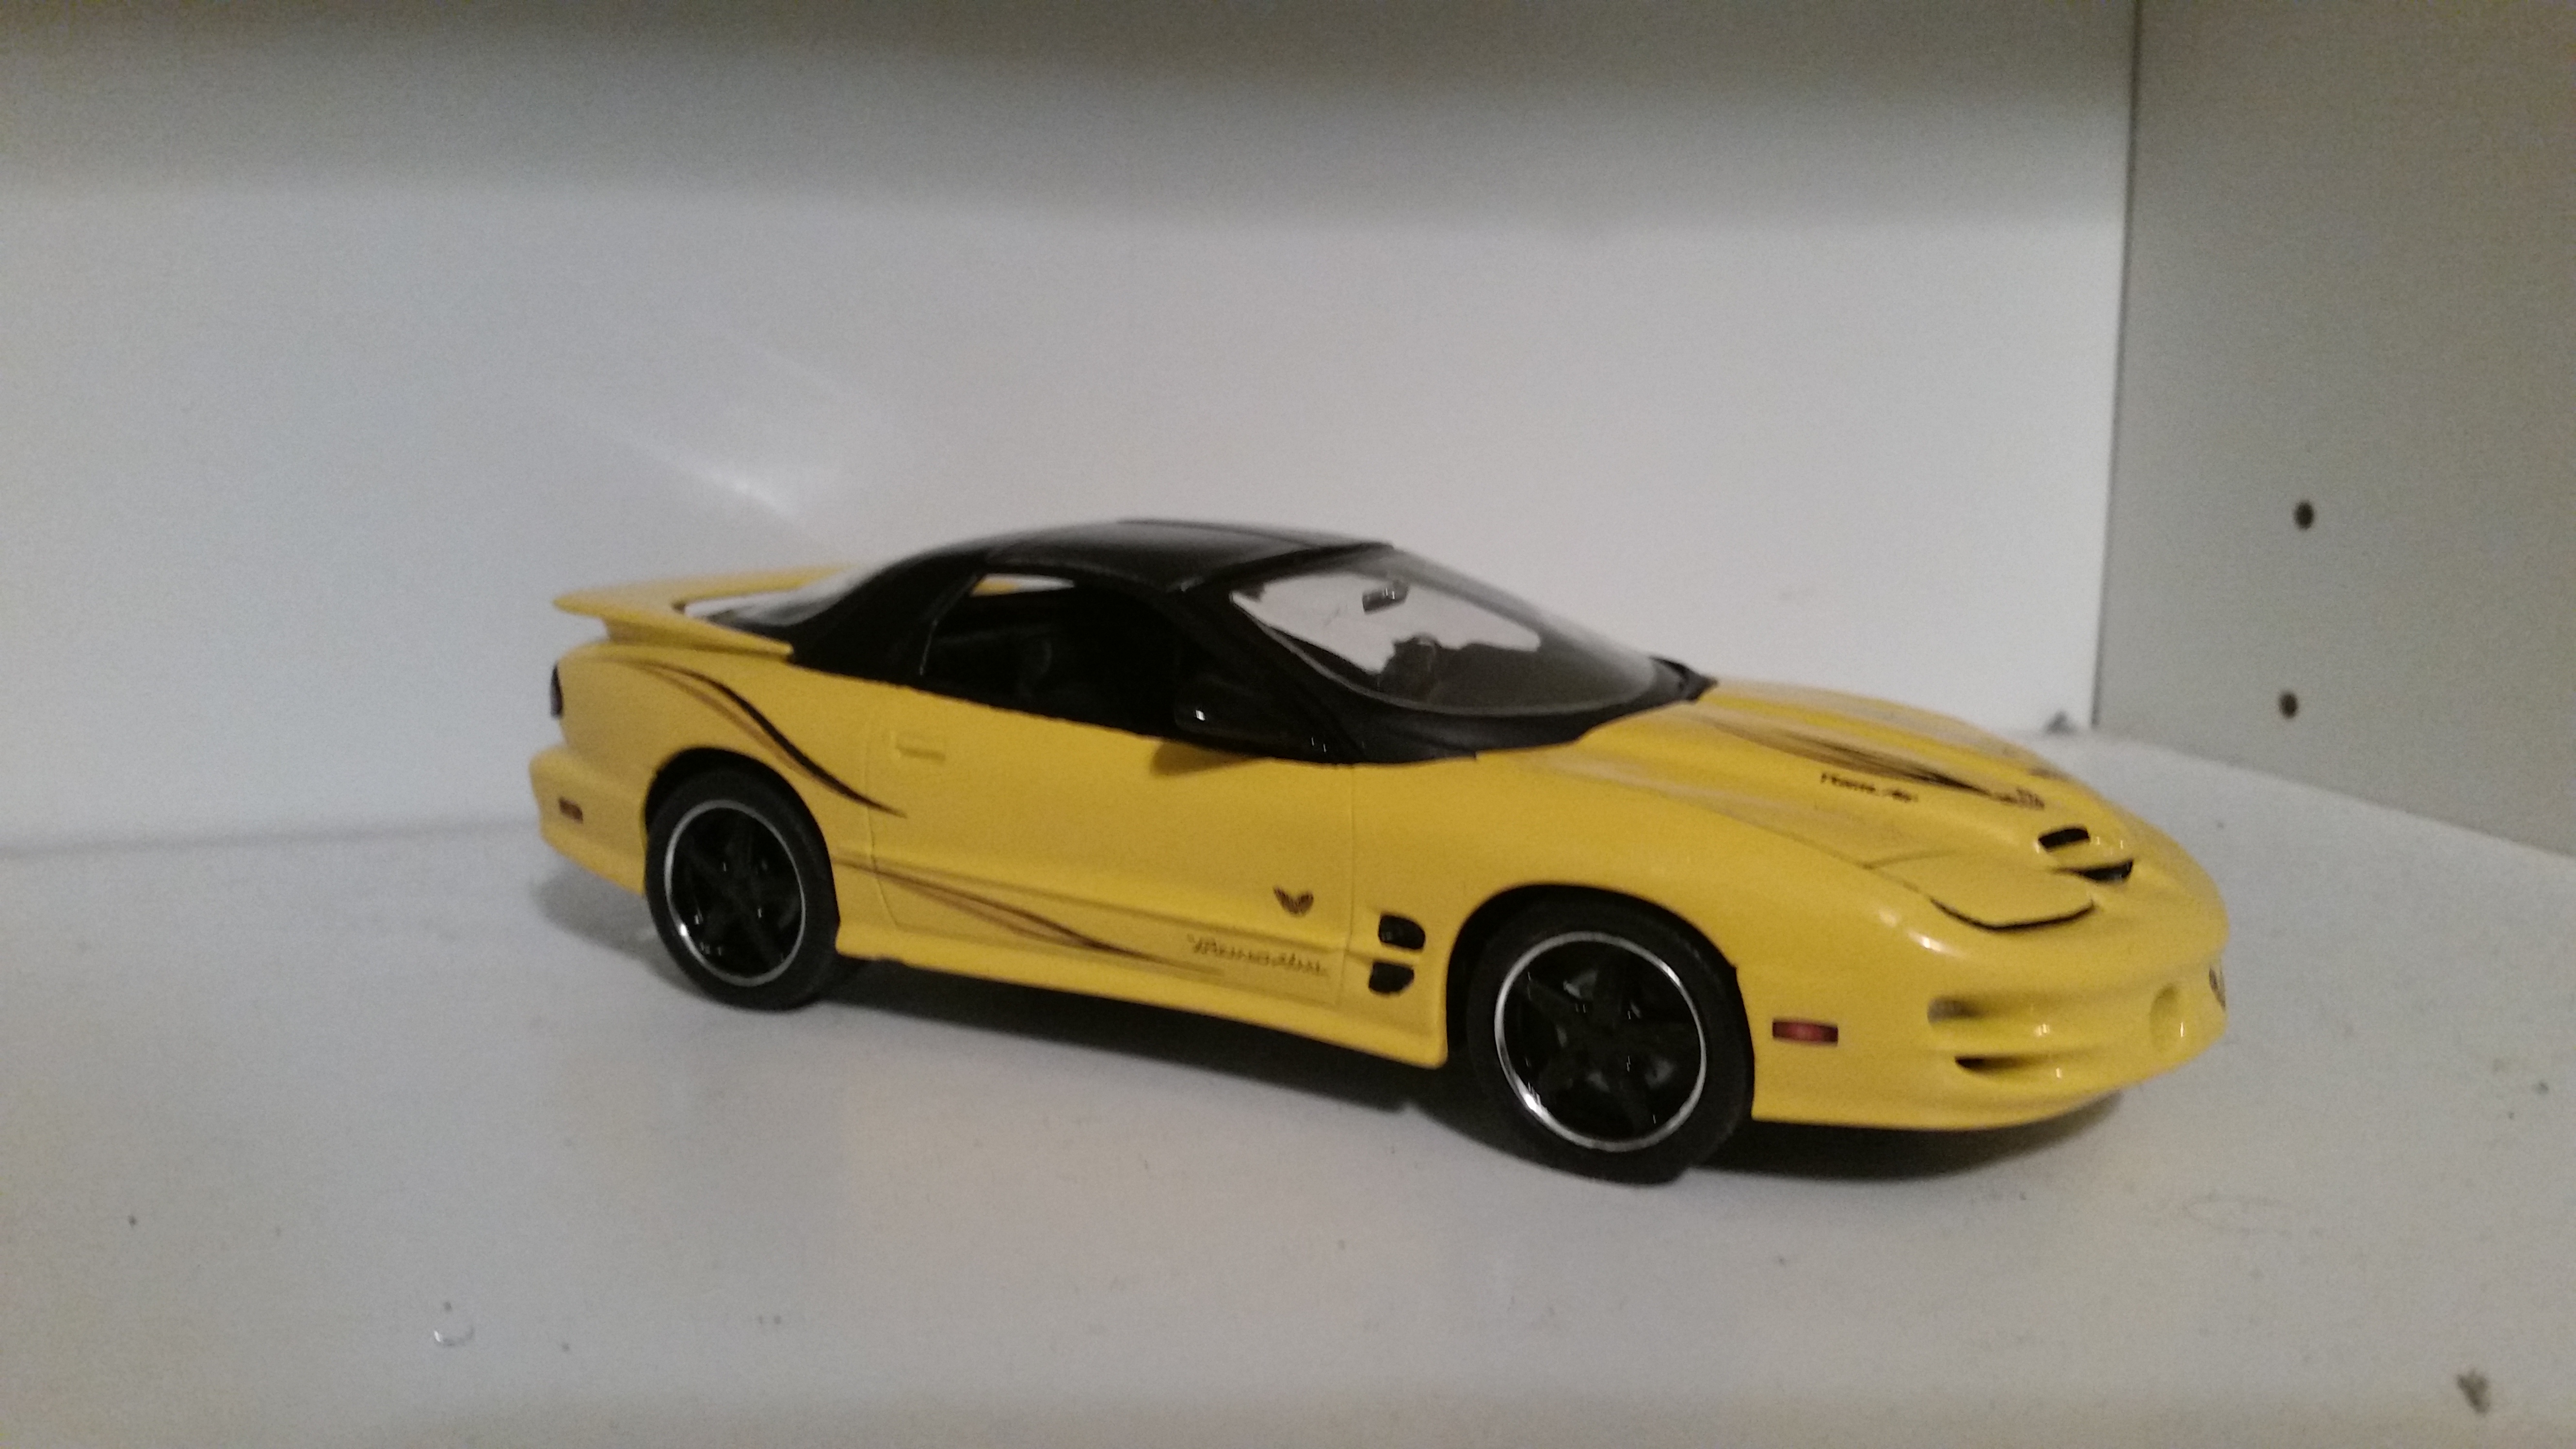
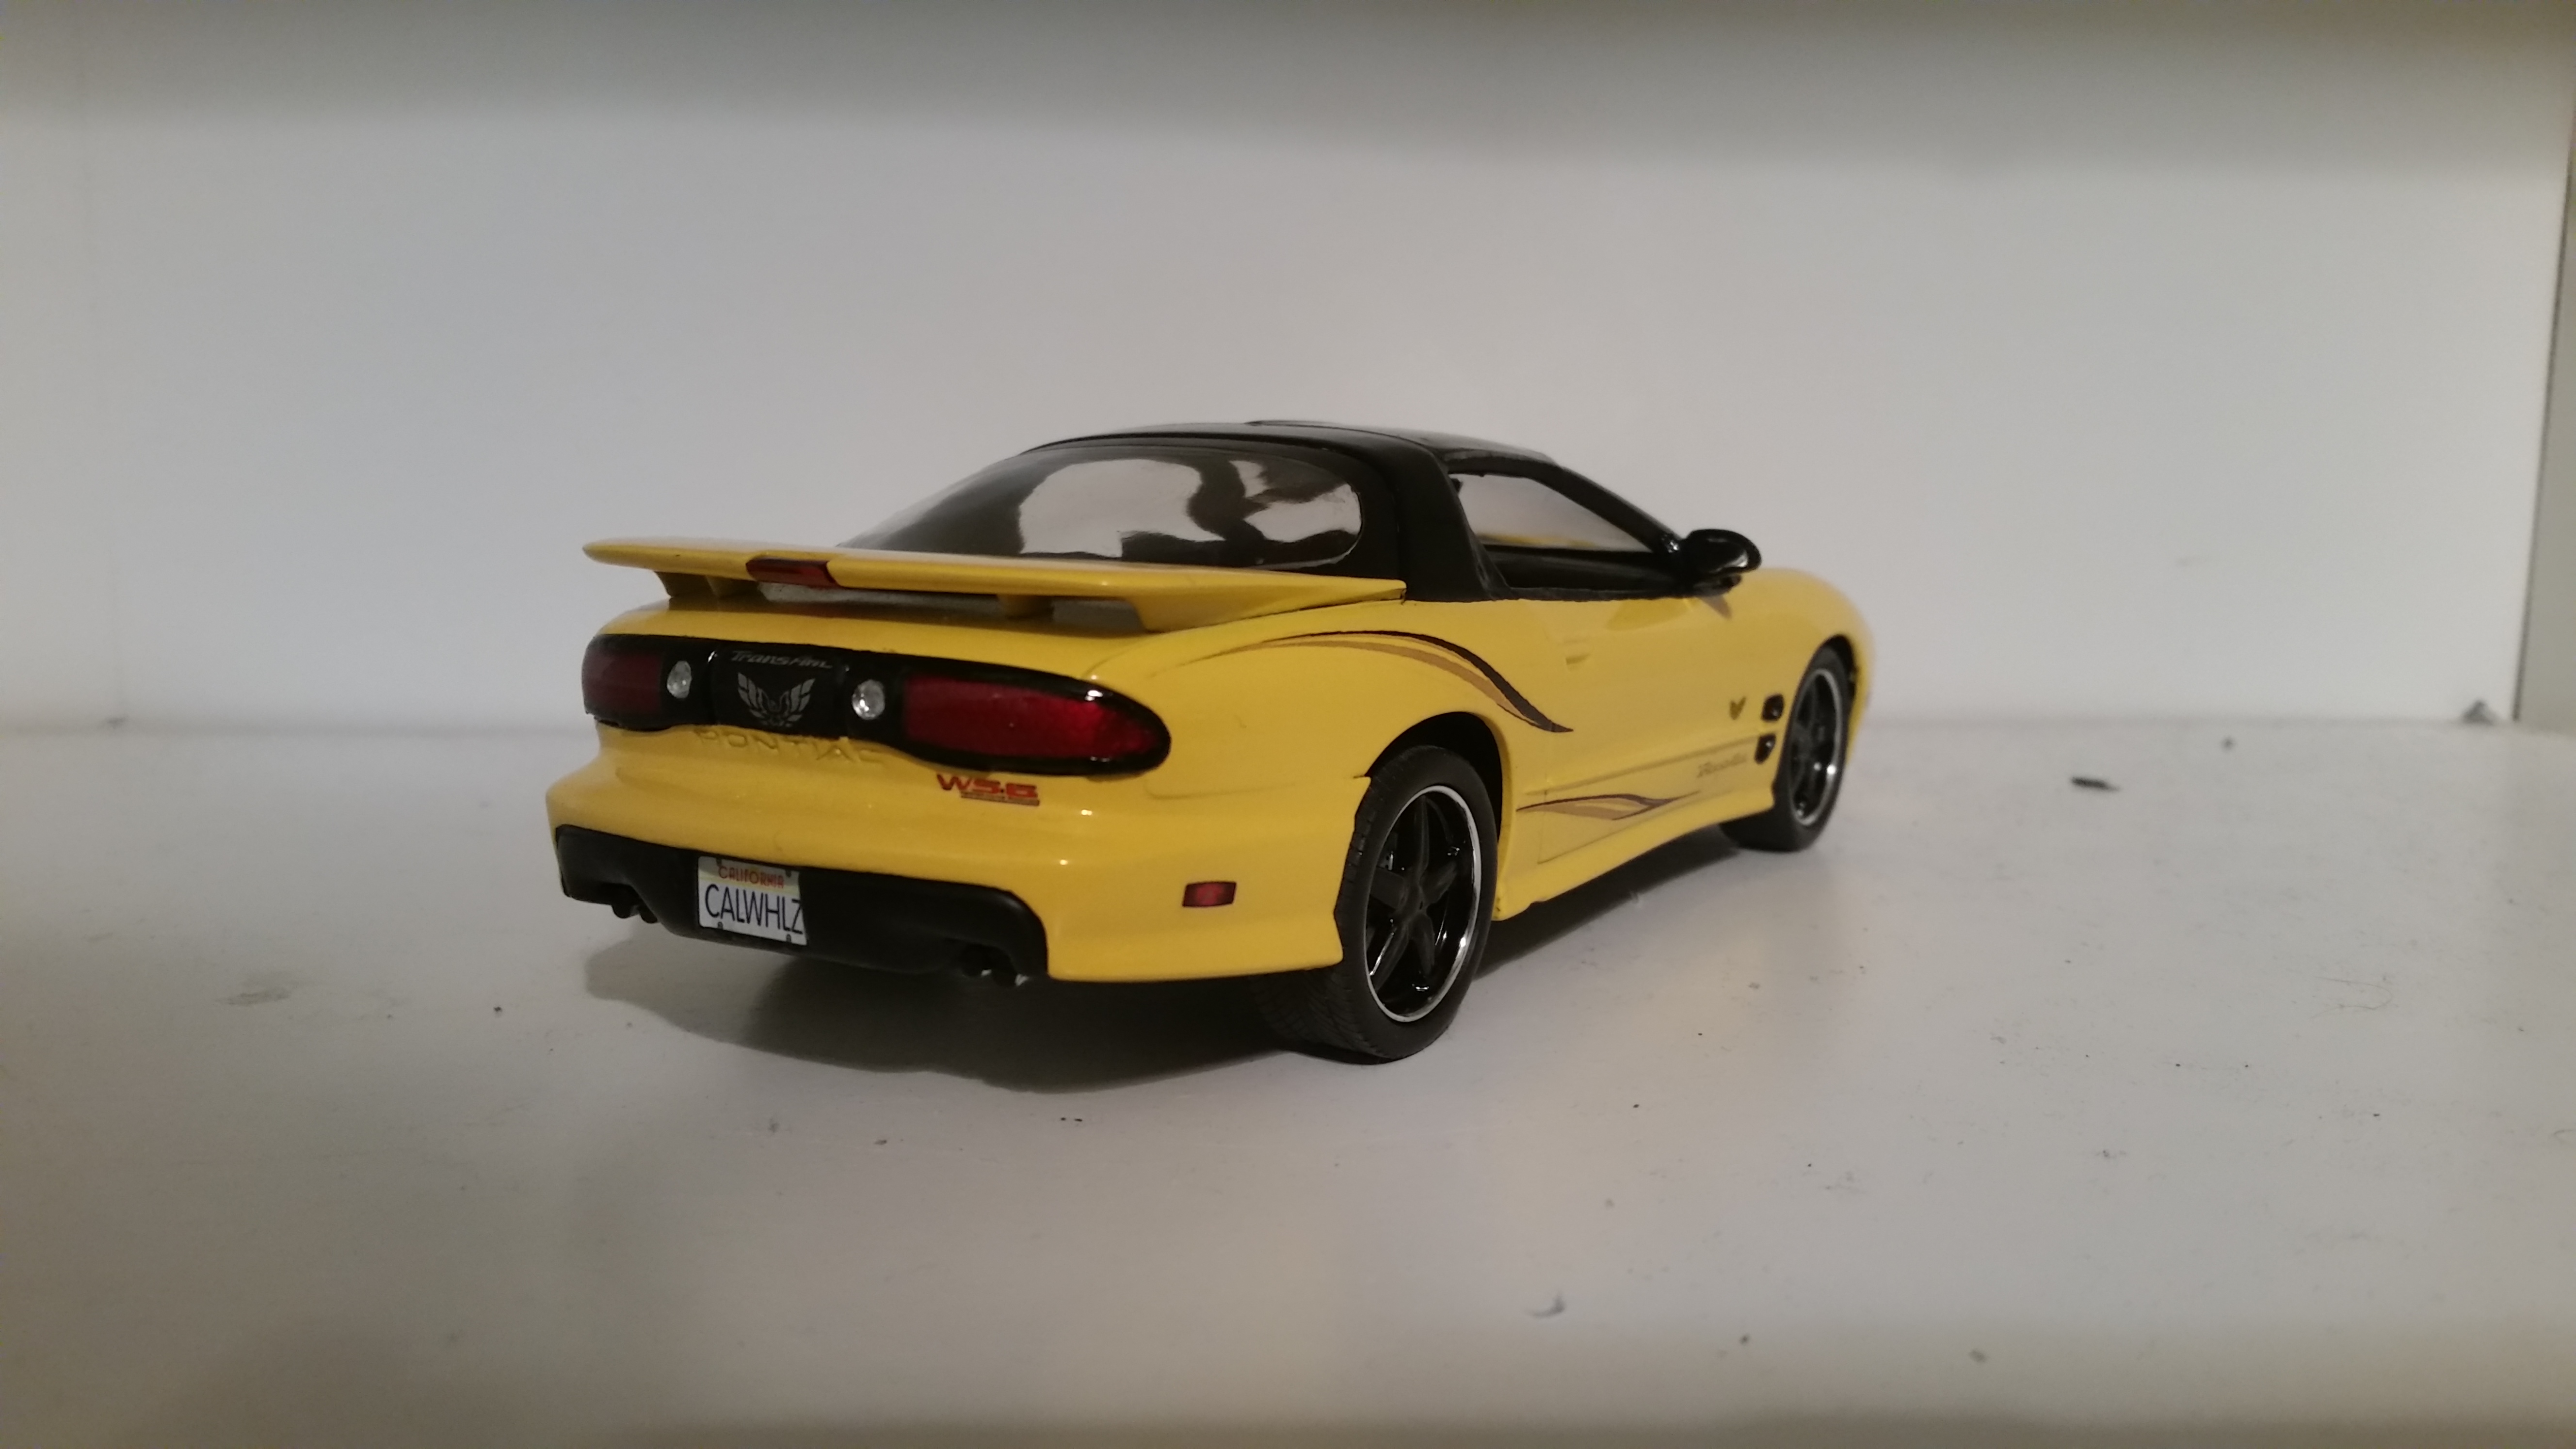
A few months ago at one of the local mtgs, a member was selling some kits and aftermarket decal sheets cheap. Bought some deals and the decals were mostly Slixx drag car decals and 80s-90s era sheets from kits like monogram drag cars and some 90s AMT, but one he had that struck me was a Trans Am Collectors Edition decal sheet (in a baggie marked 2002 Firebird, no manufacturer name) that appeared to fit the Revell 98 Firebird, and it was only a buck so I bought it. Since I had a 2005 Revell reissue of the 98 Firebird on hand and these decals, I looked up photos of the 1:1s to get an idea of what the decals were for and that would give me a spark for a quick fun future project (after dealing with all the work on a incomplete Monogram 41 Lincoln which I also plan to post here). Paint is Rustoluem Yellow (close enough match for the 1:1 sun yellow) and Colorplace black for the roof, all cleared with future. Decals were ok-ish at best, a bit thin and transparent (the silver stripes on the 1:1s are kinda a transparent darkish color here thou) but they did the job well, and I wasn't gonna sweat this being factory stock since I had a plans to do light custom work anyway. Part of the ram air intake had a bit of a short shot so that was cut off and plastic tubing painted silver was used to as an intake pipe to connect to what wasn't half molded. The stock wheels were too small so the custom wheels were used and the toy-ish chrome backings were painted black with rotor decals from another kit to livin it up. The 98 had a single exhaust for some odd reason so that piece was swapped from a snap-tite '93 a friend of mine traded me for another 98 I had that he wanted (he's in love with 4th gen F-bodies and wants to try to build one of these too since I bought the decals first and wonders who originally made them). Apologies if a few of the pics came out kinda blurry, but I didn't notice them on my phones screen (OLEDs must have some kind of magic that hides imperfections that show on normal HDTVs).
-
untilLaski Scale Specialties is proud to present the Third Annual Model Car Event at the LA Roadster Show and Swap! Father’s Day Weekend June 15th & June 16th, 2018! Friday 7:00 AM - 5:00 PM Saturday 7:00 AM - 5:00 PM **NEW DAYS- NO SUNDAY SHOW!!! ** Awards Presentation at 2:00 PM SATURDAY! Fairplex in Pomona 1101 W McKinley Ave Pomona, CA 91768 * In the Vendor Building 4
-
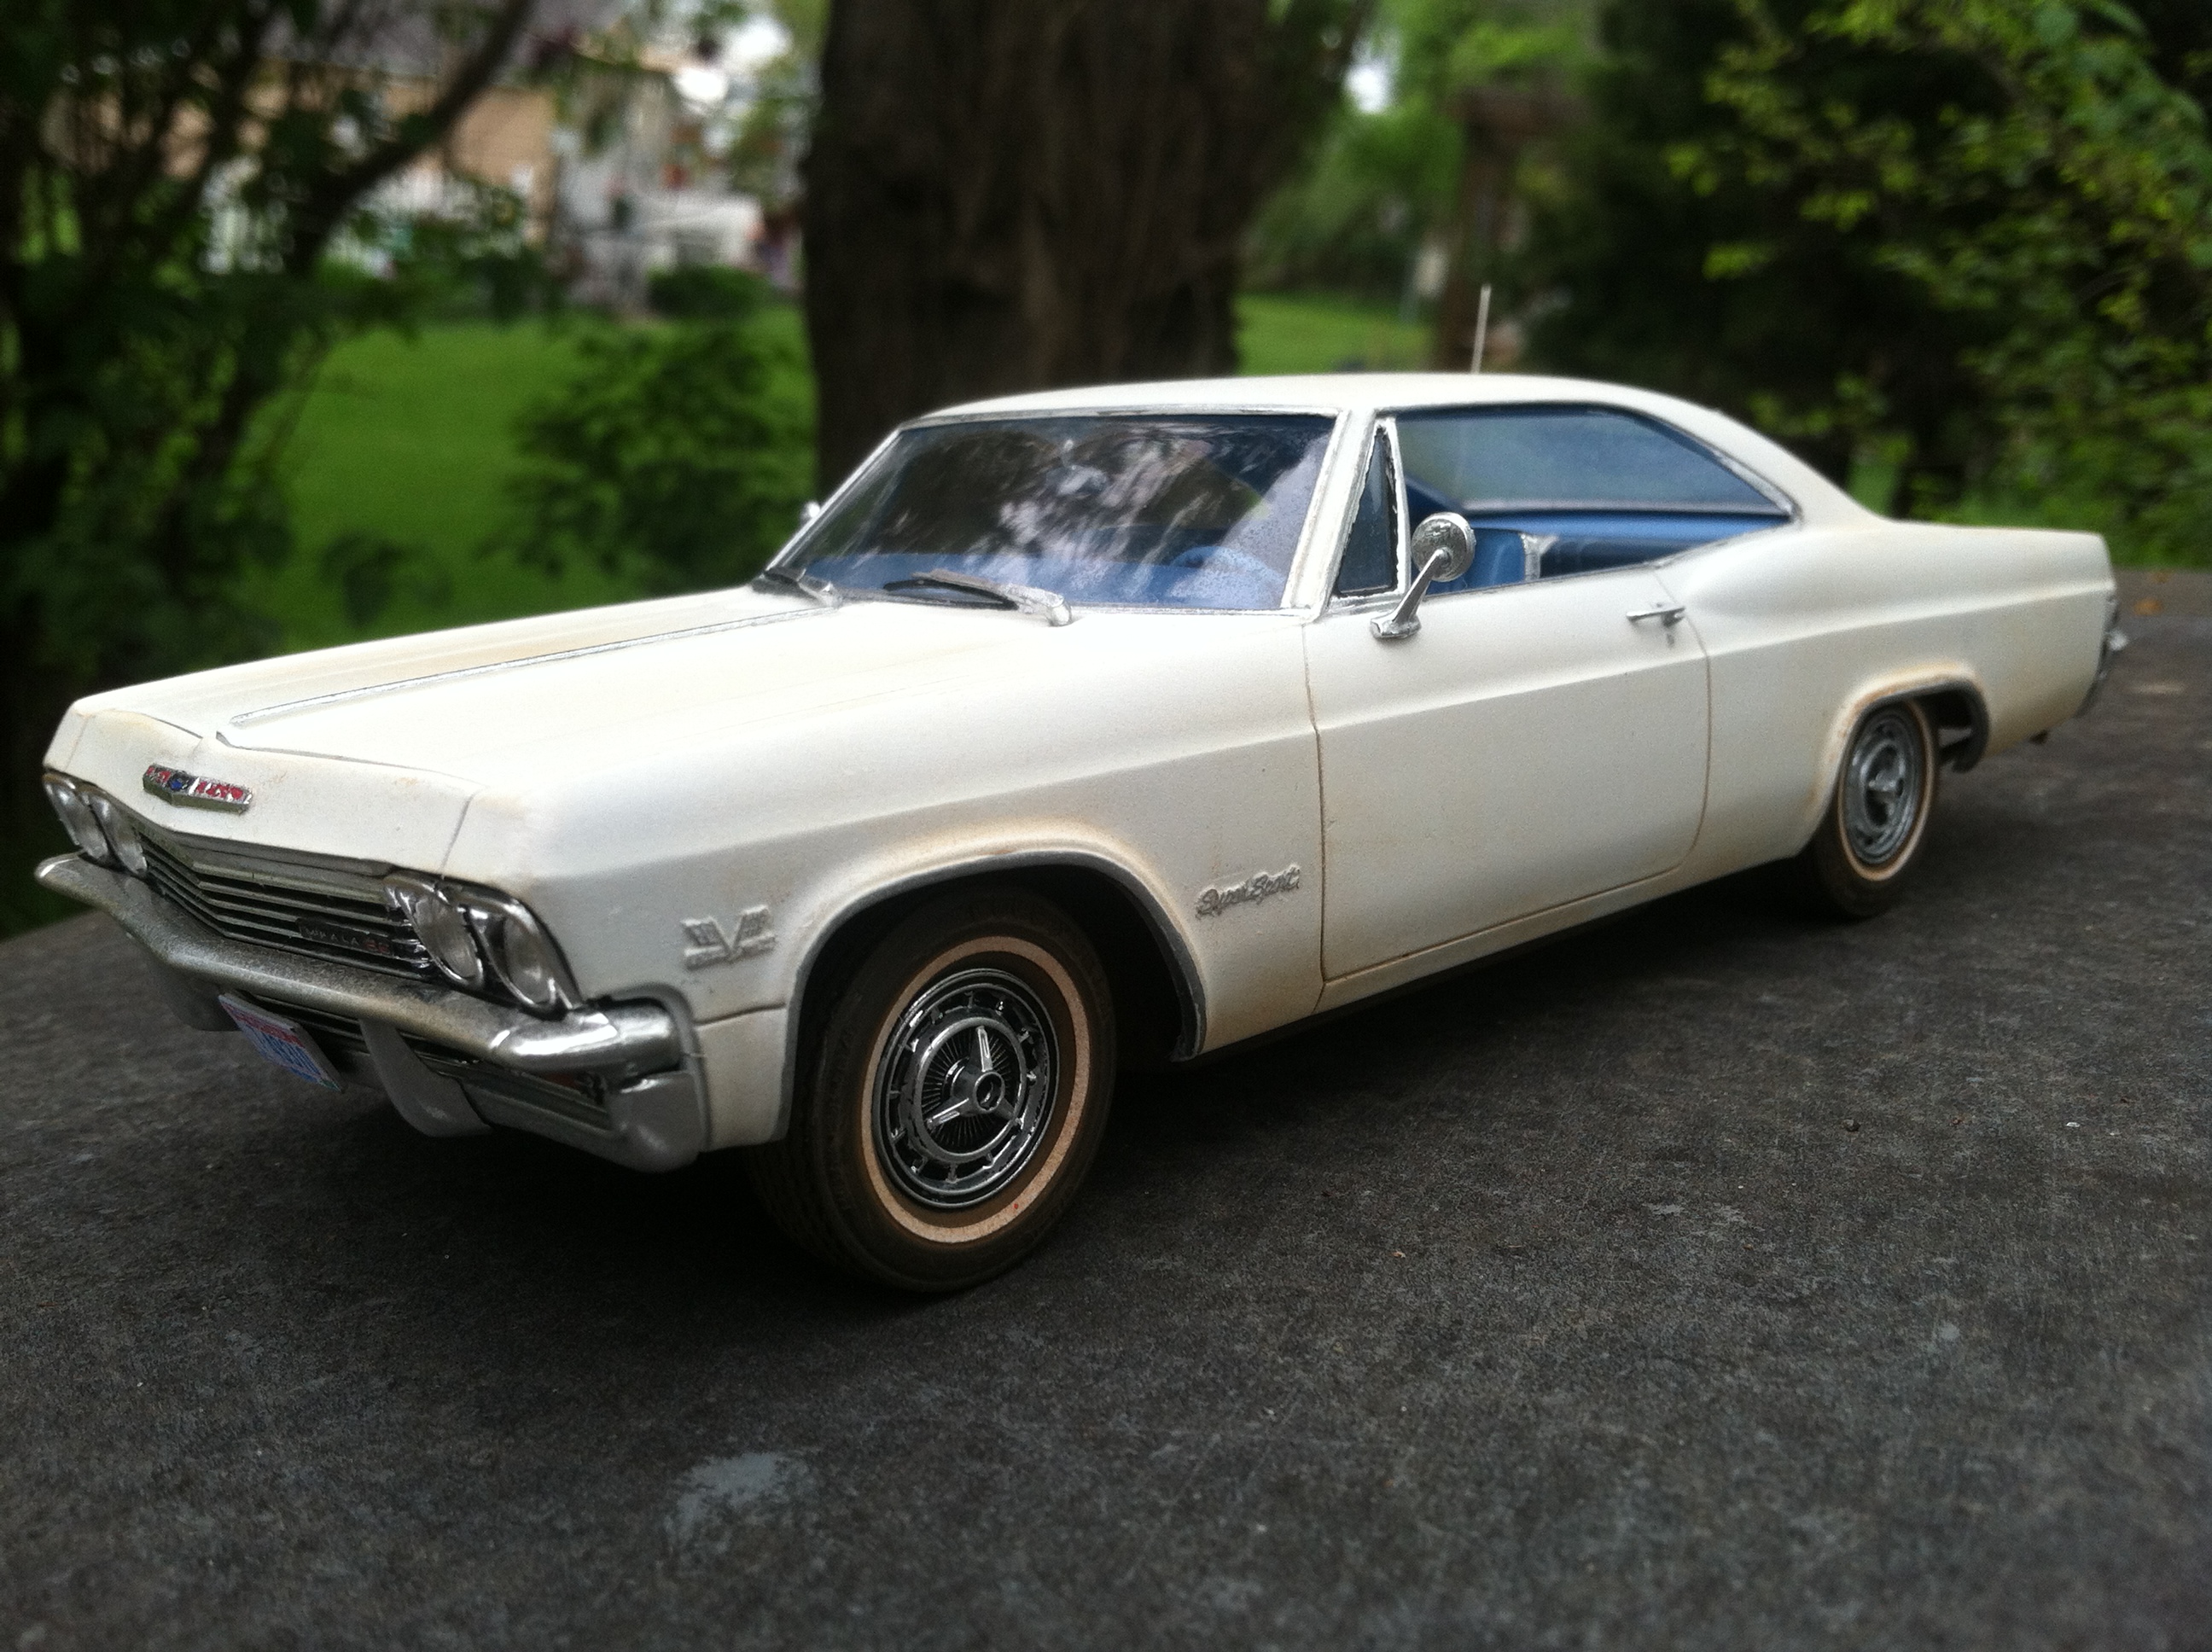
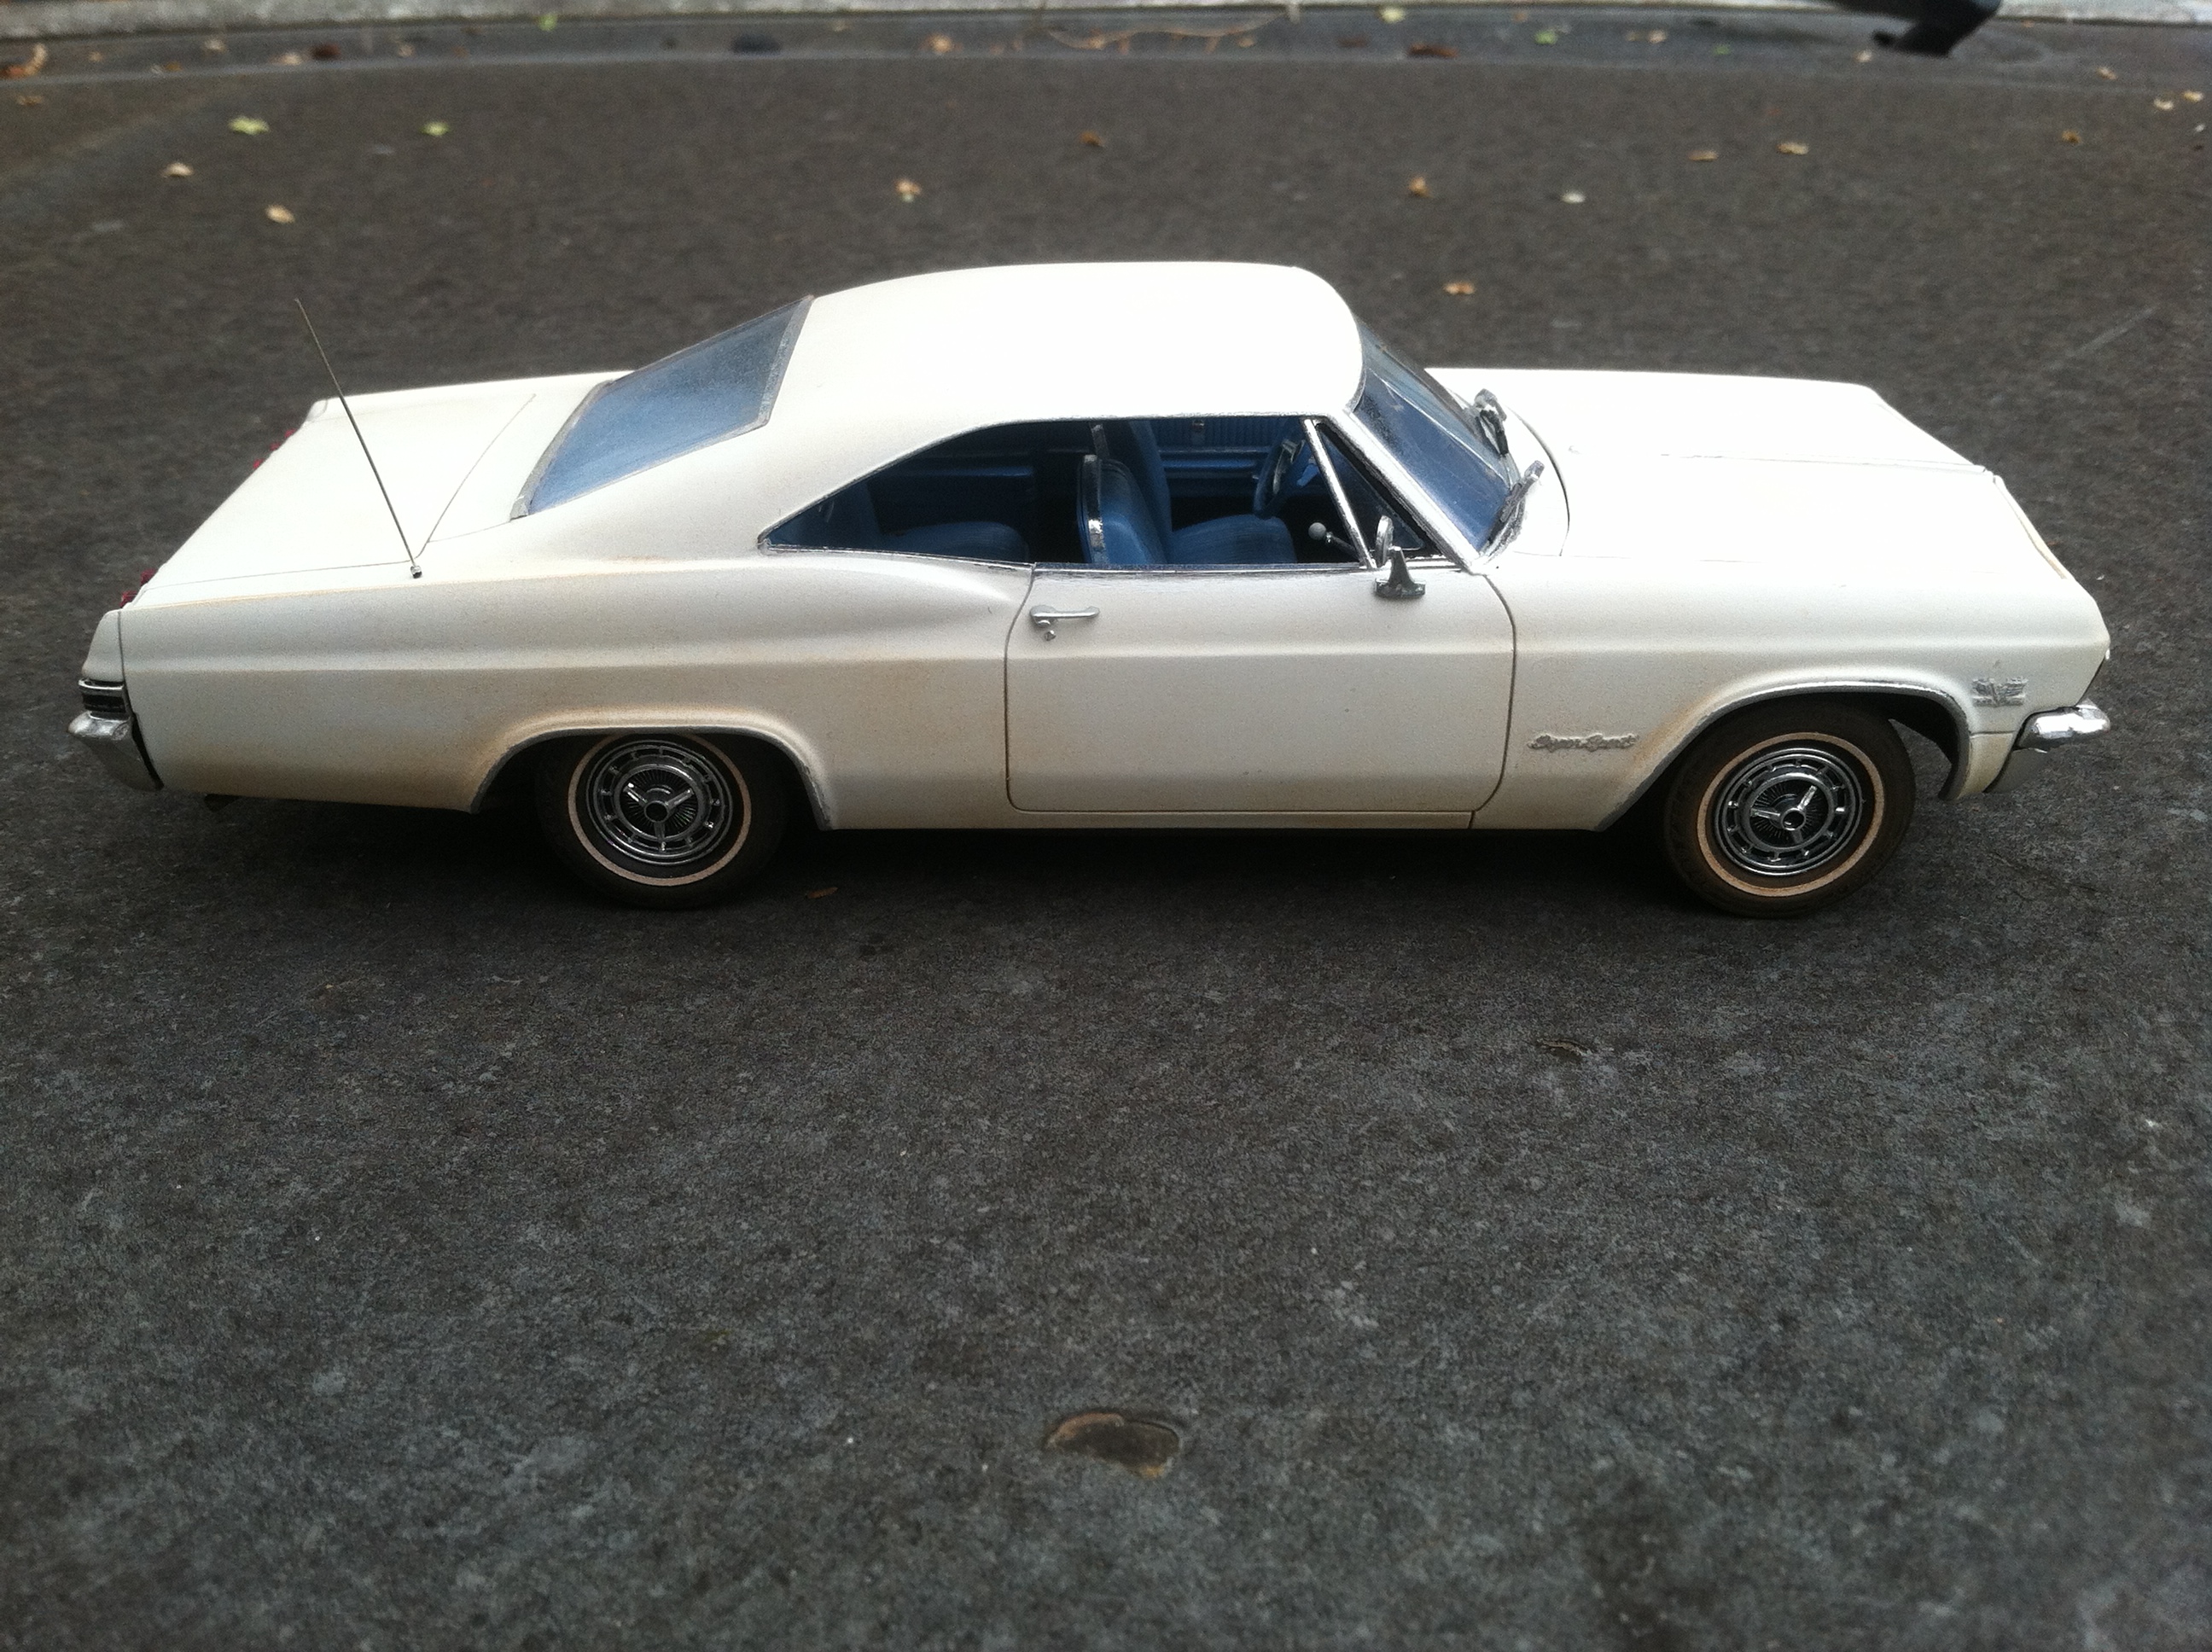
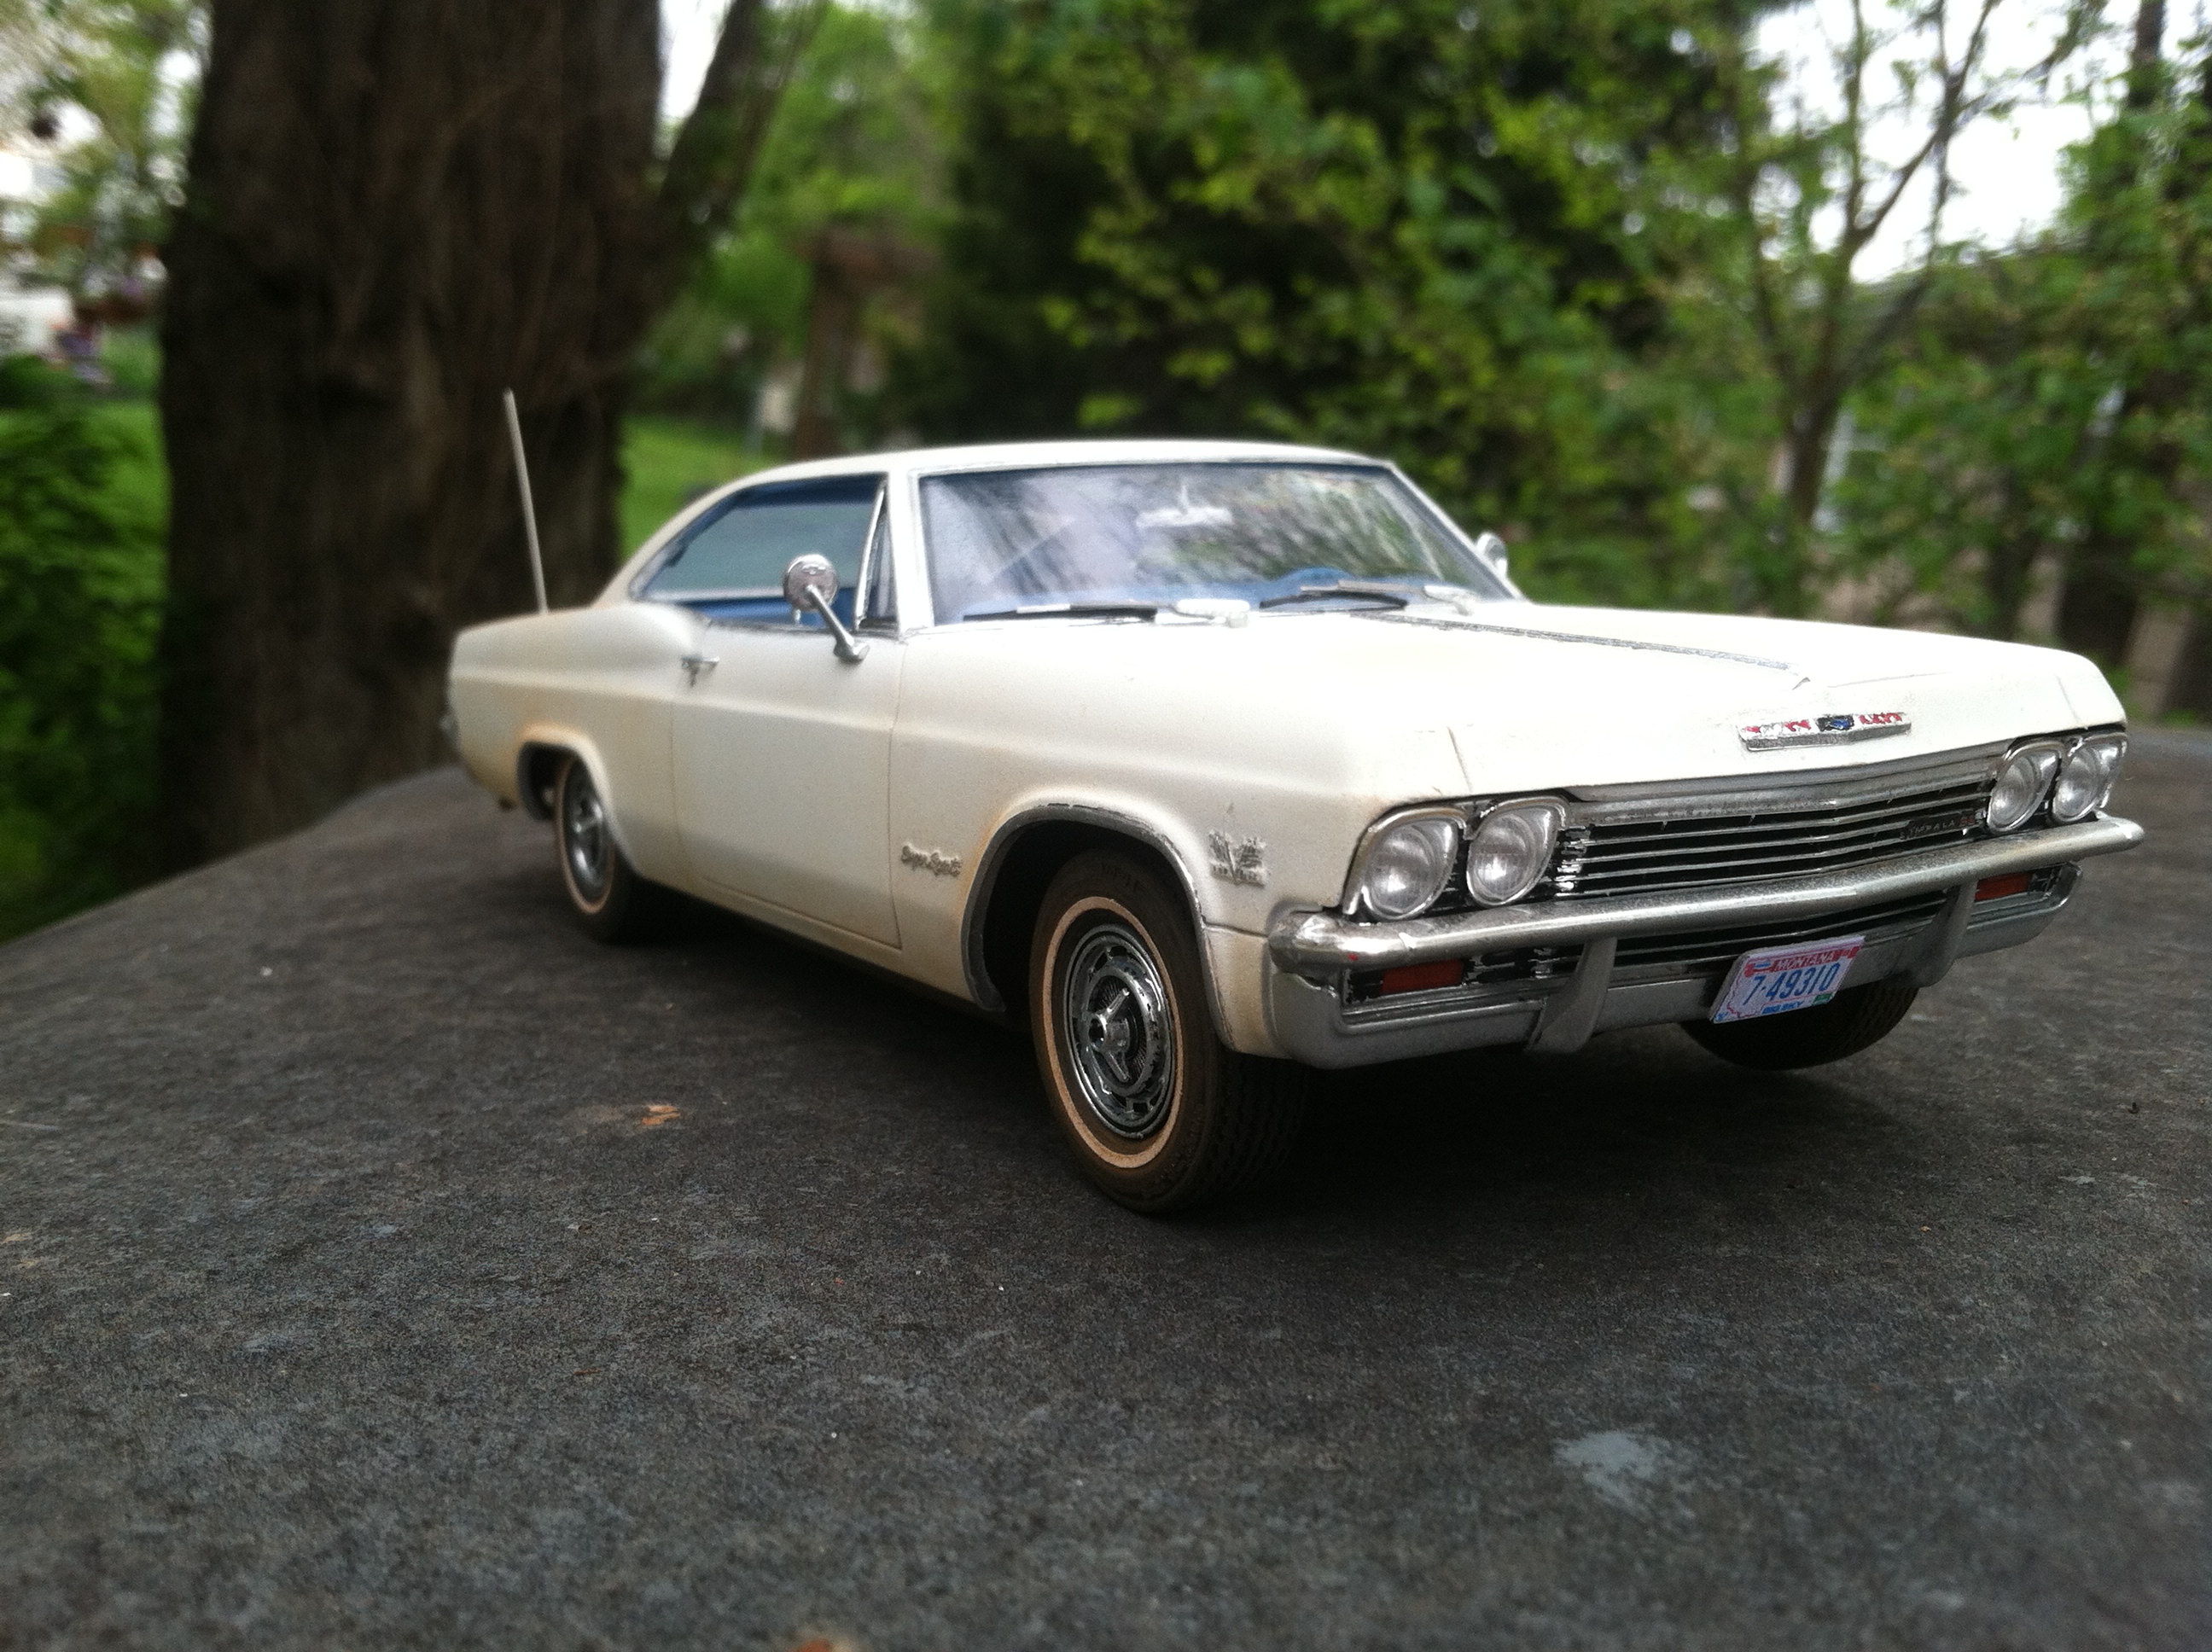
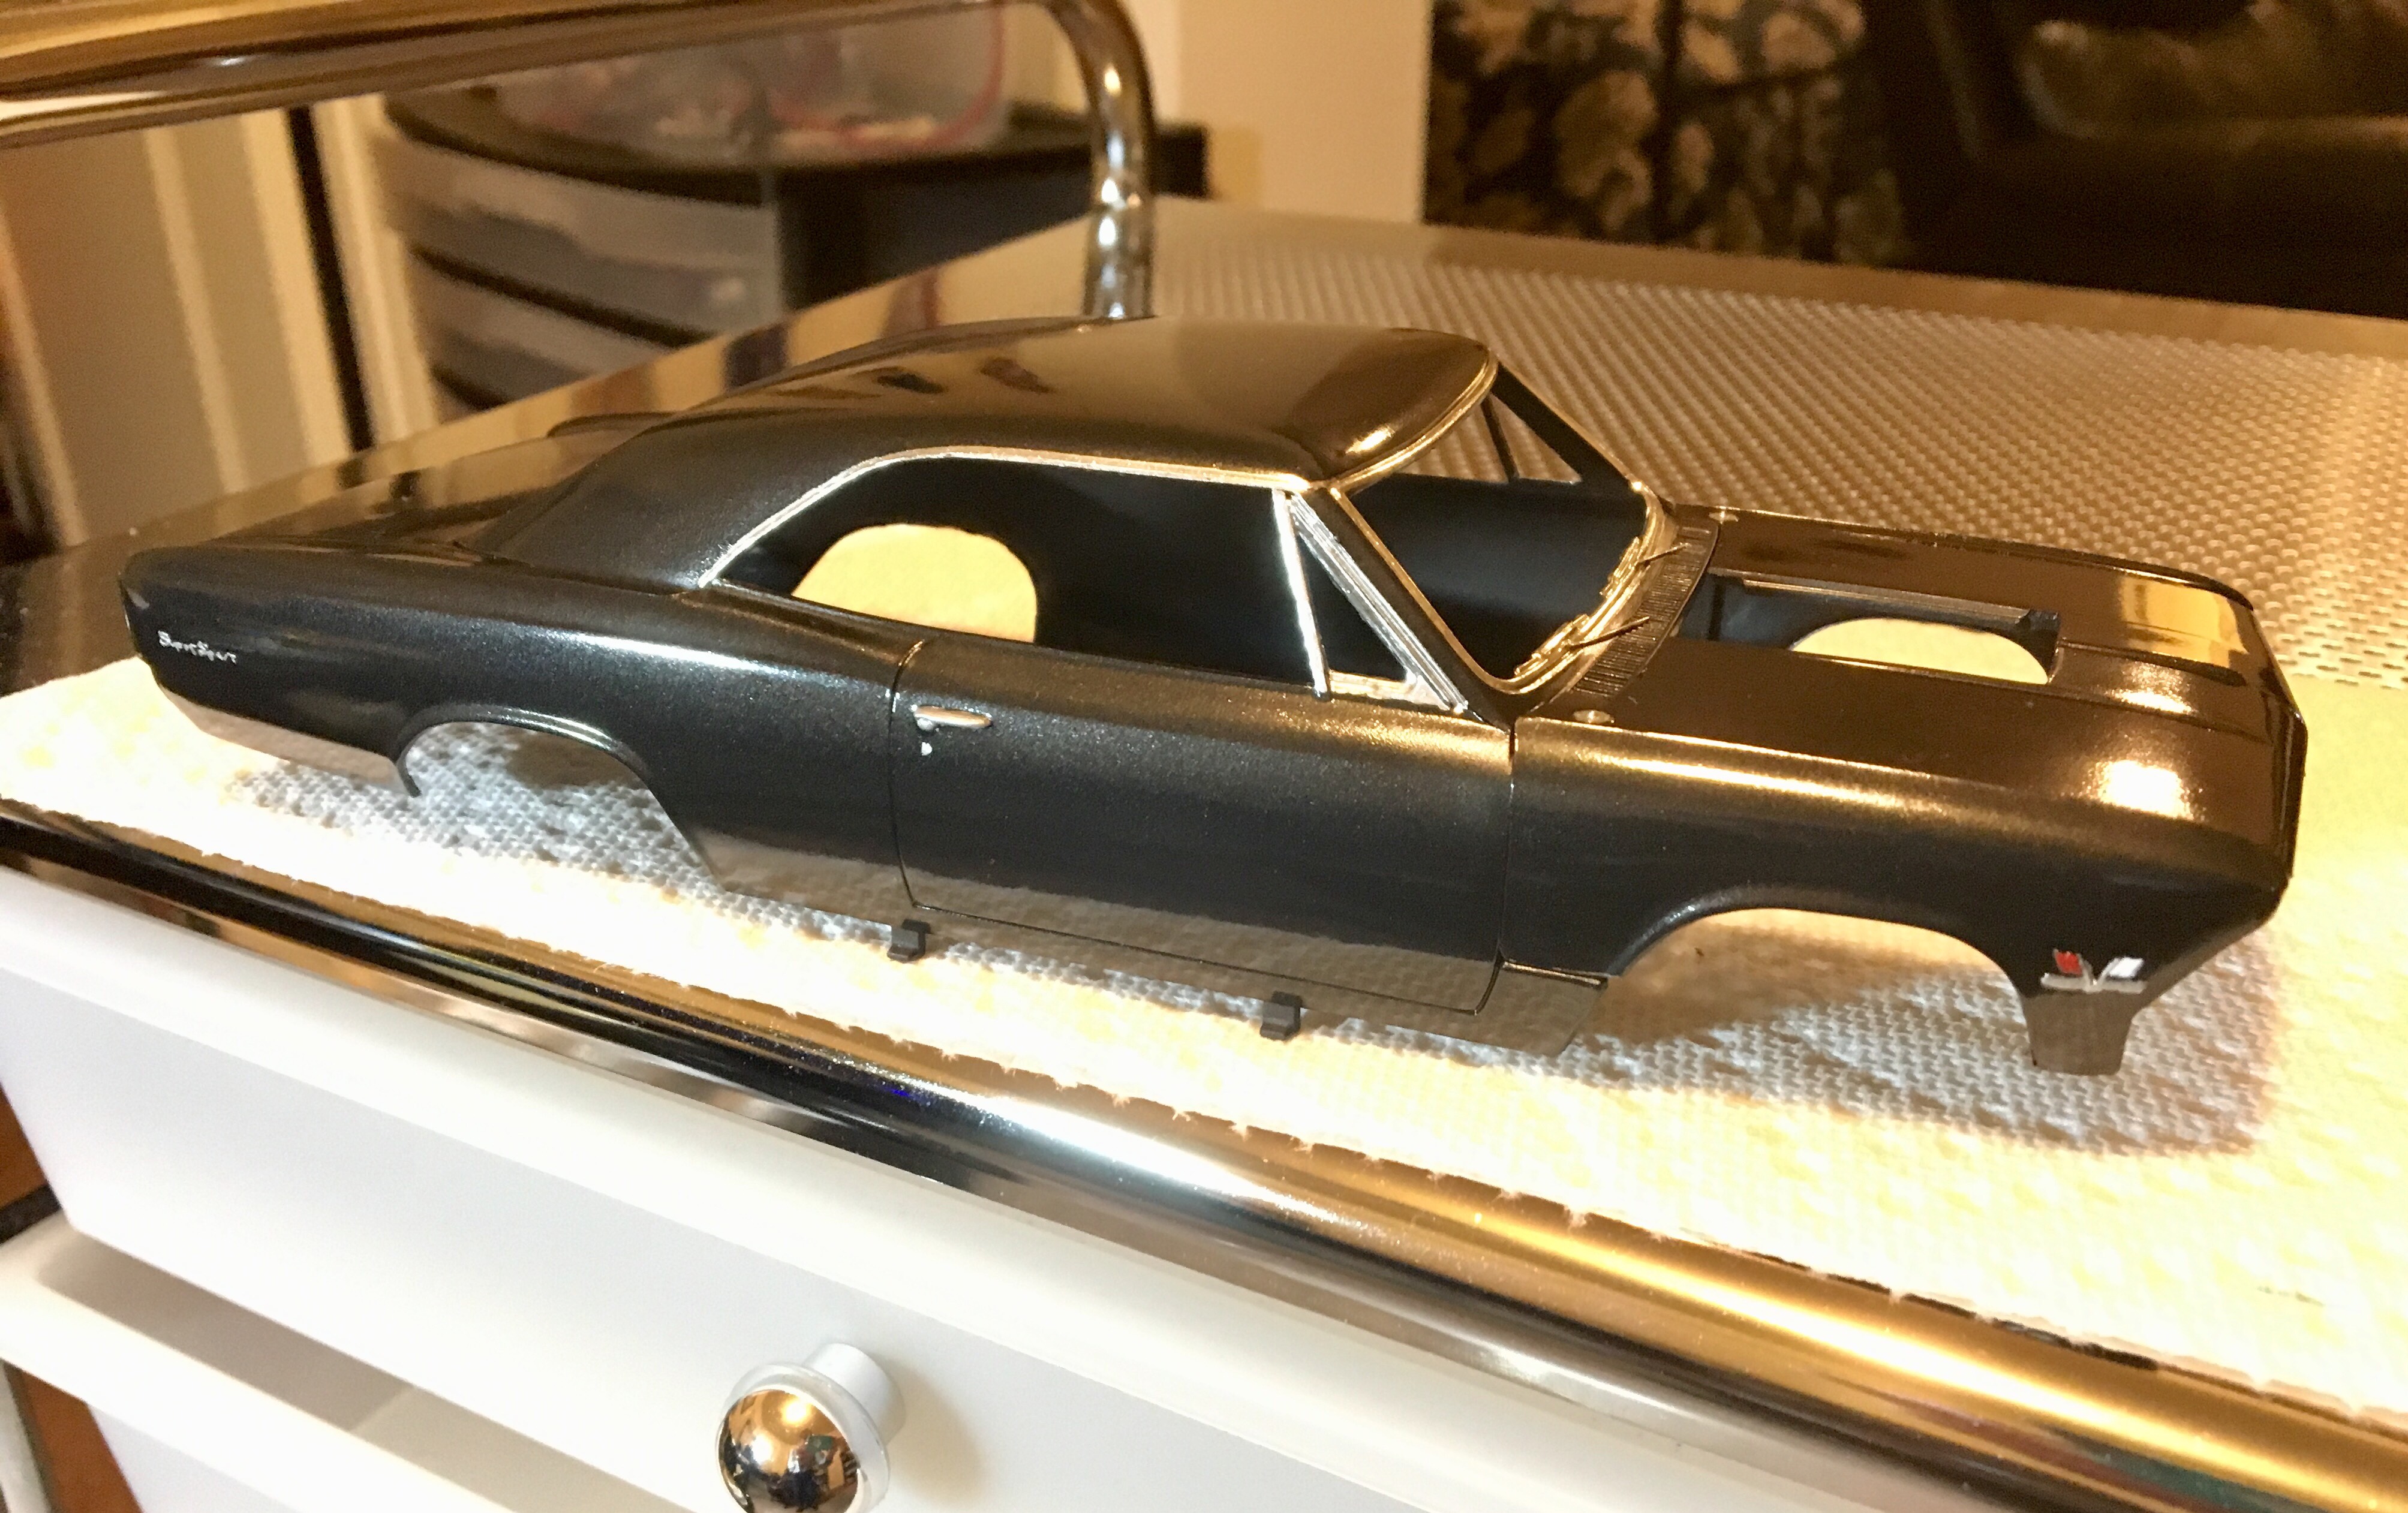
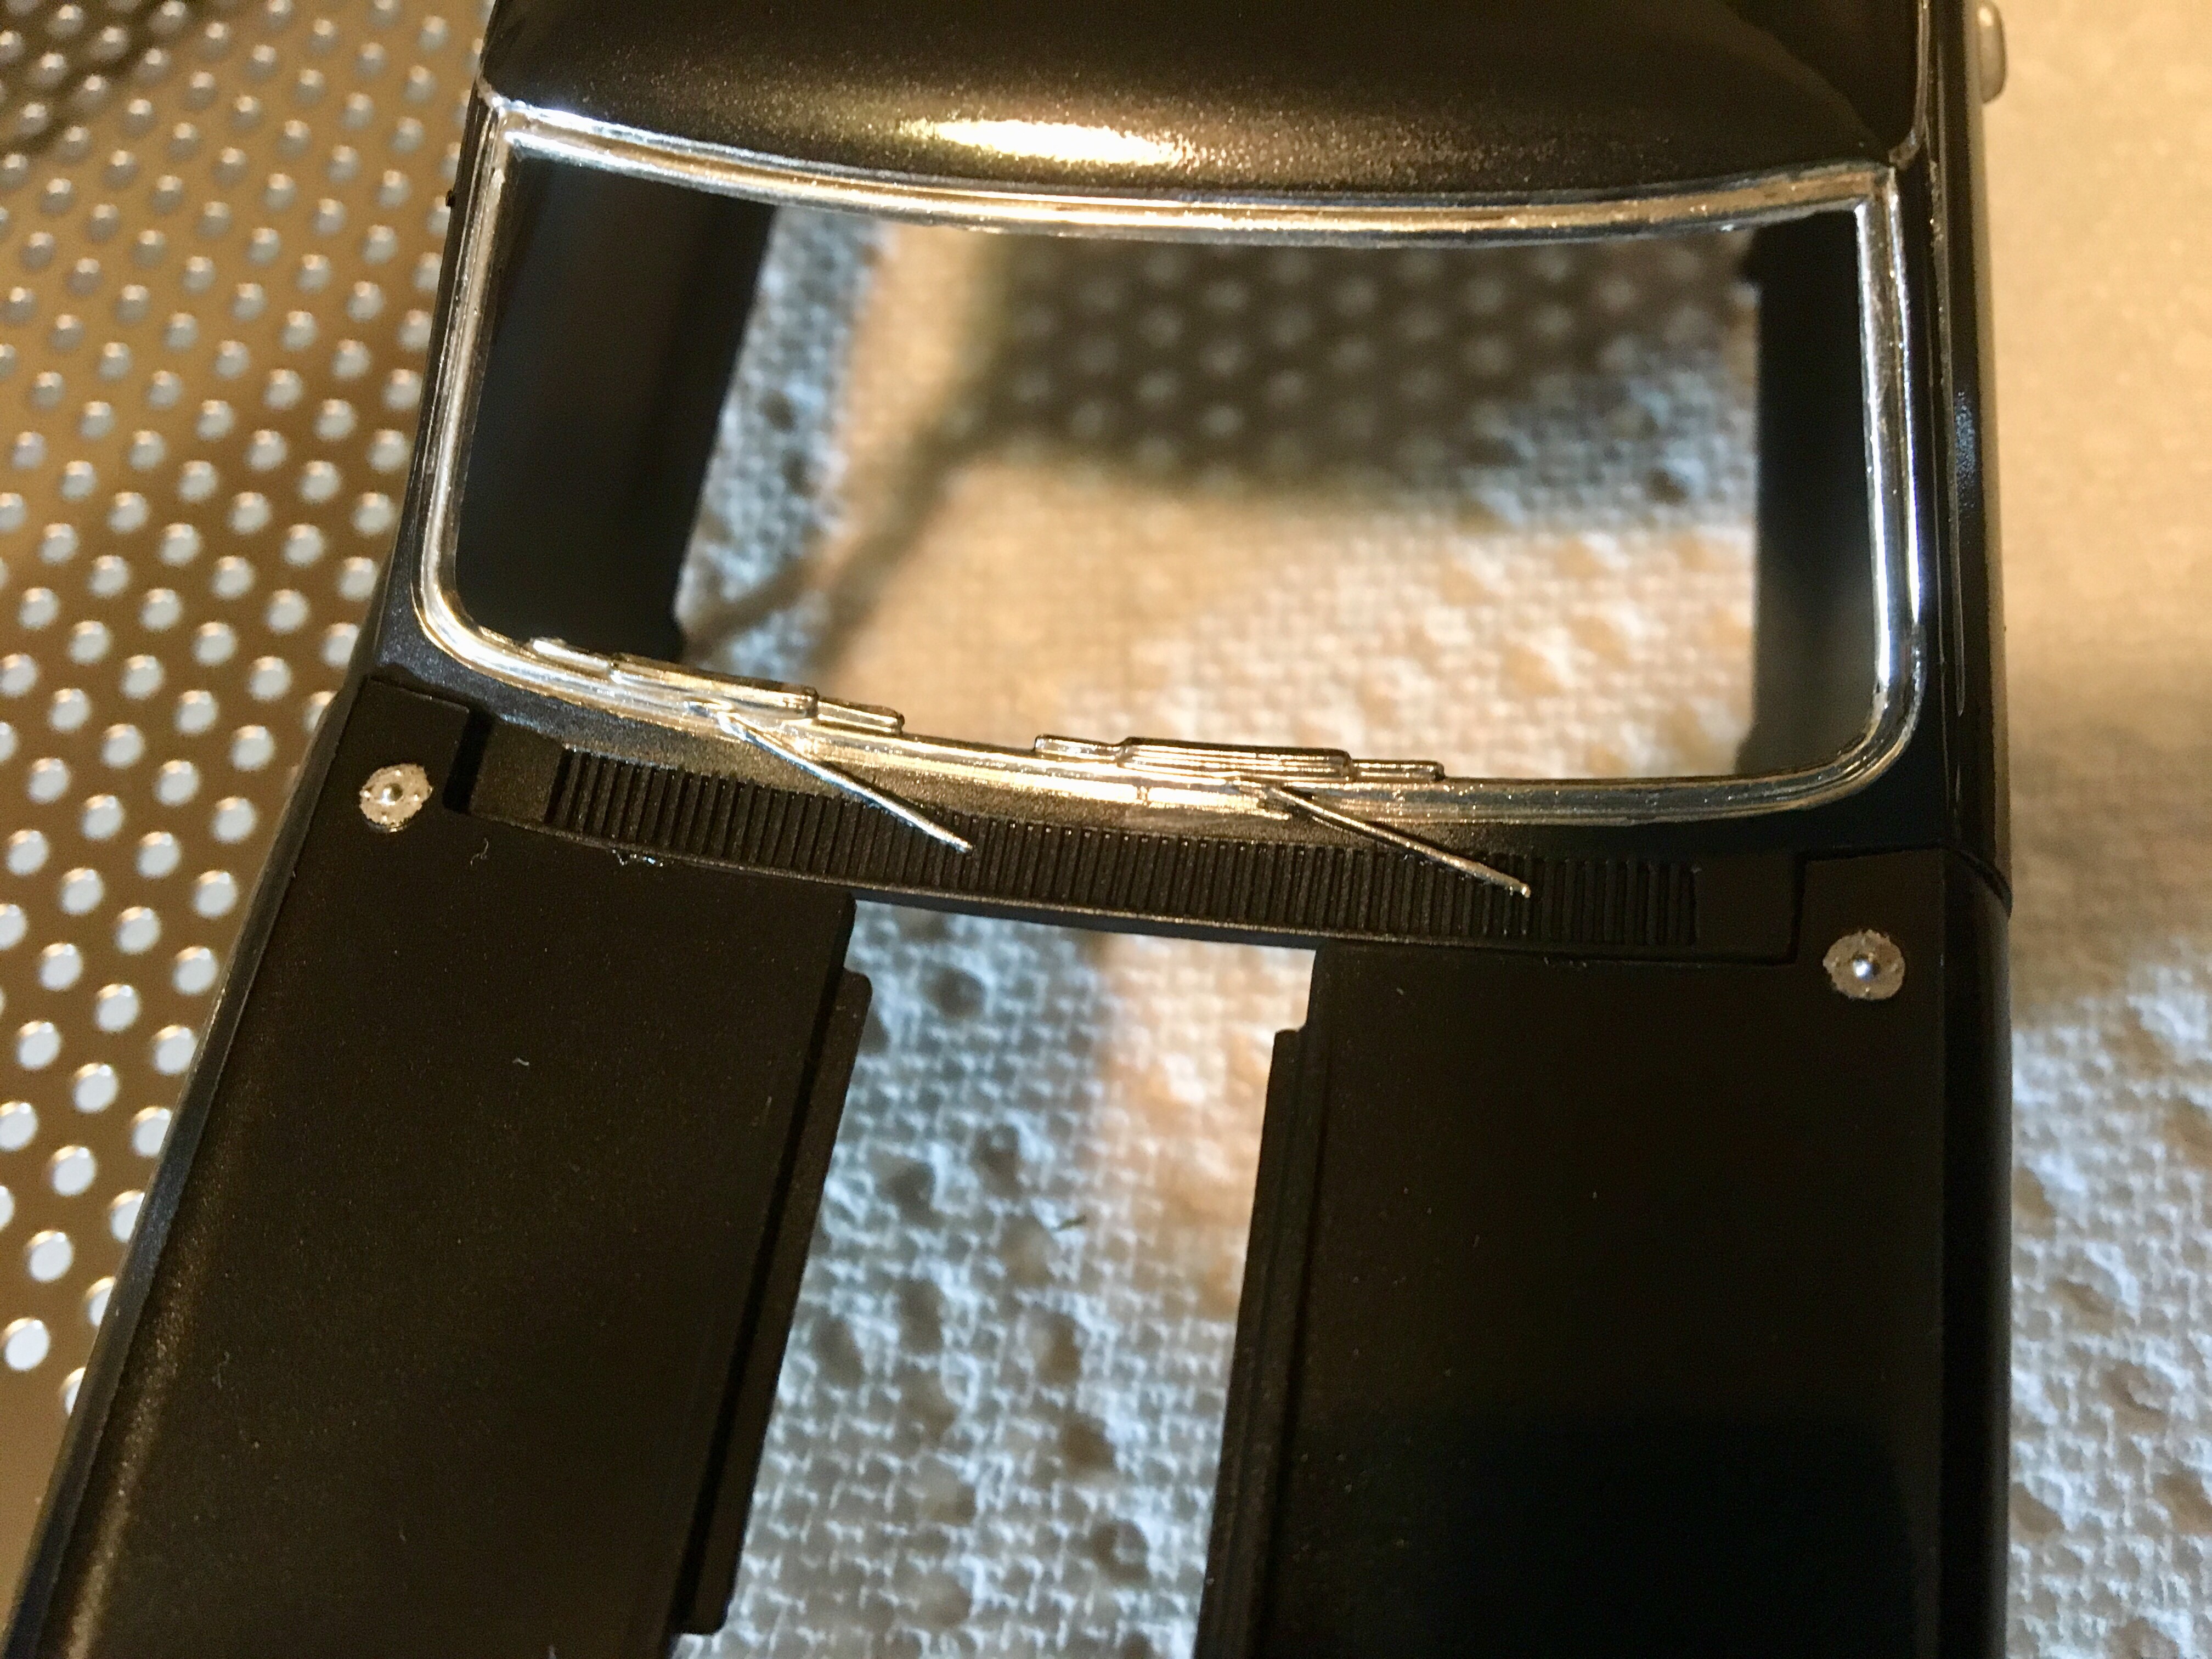
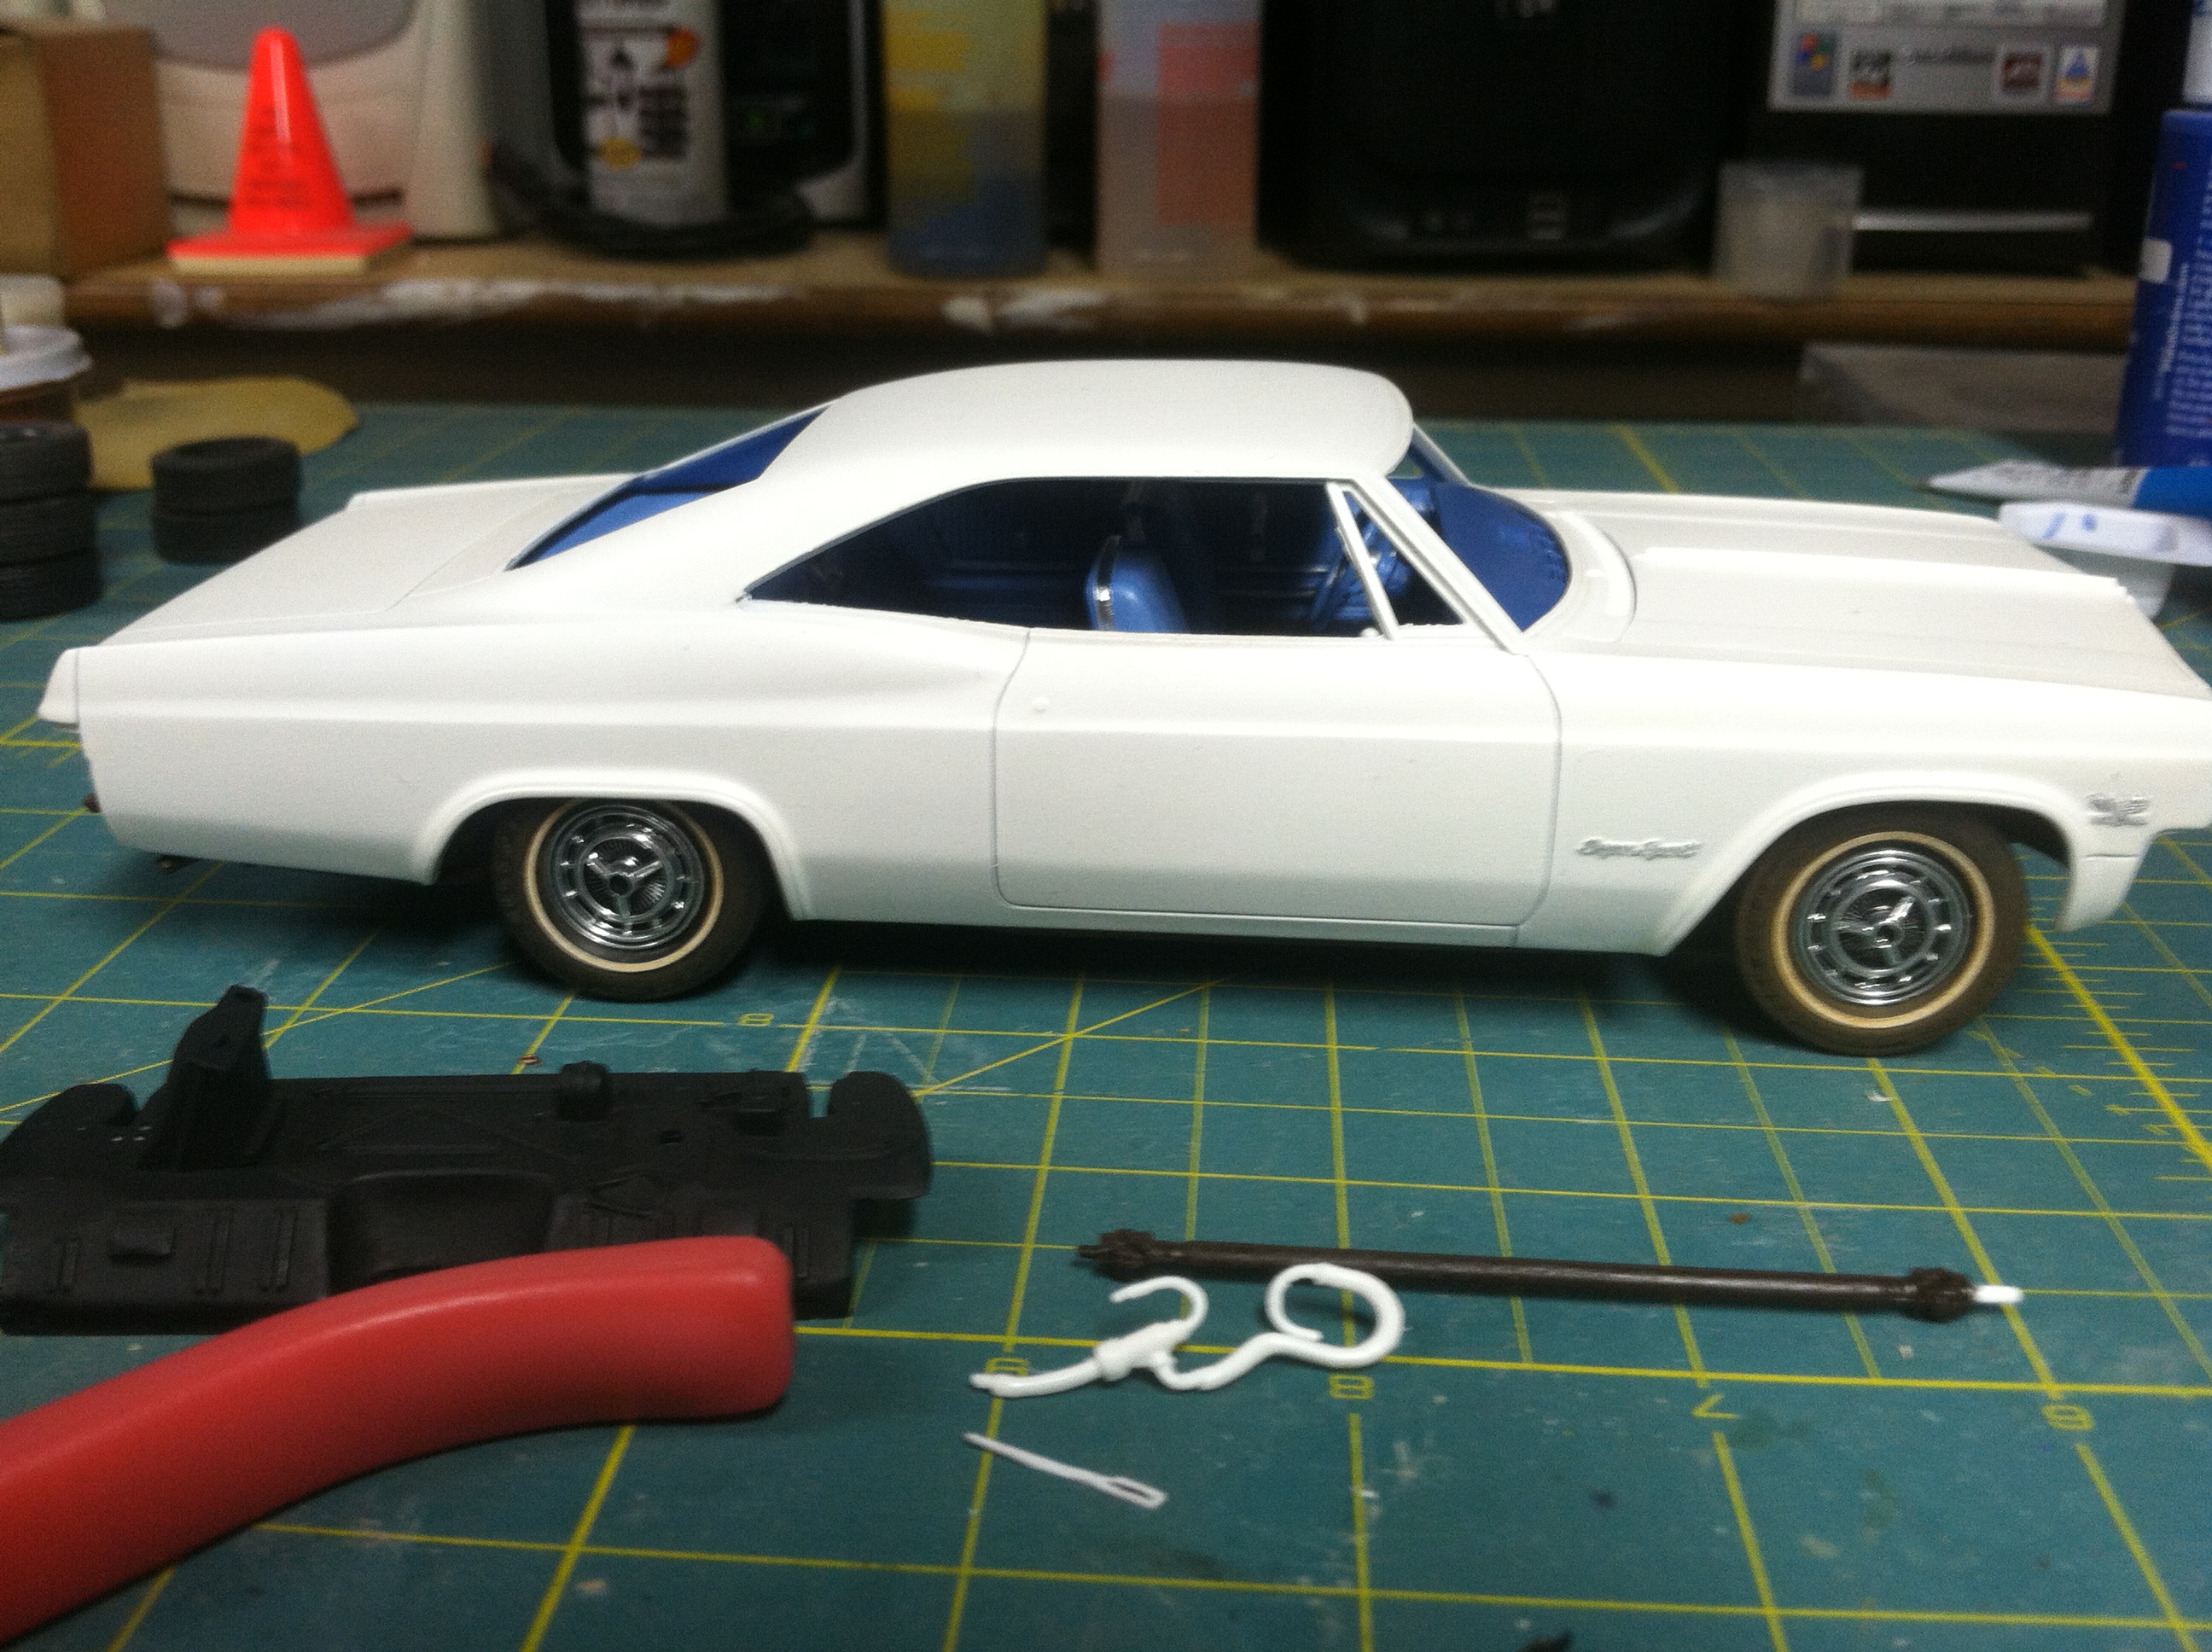
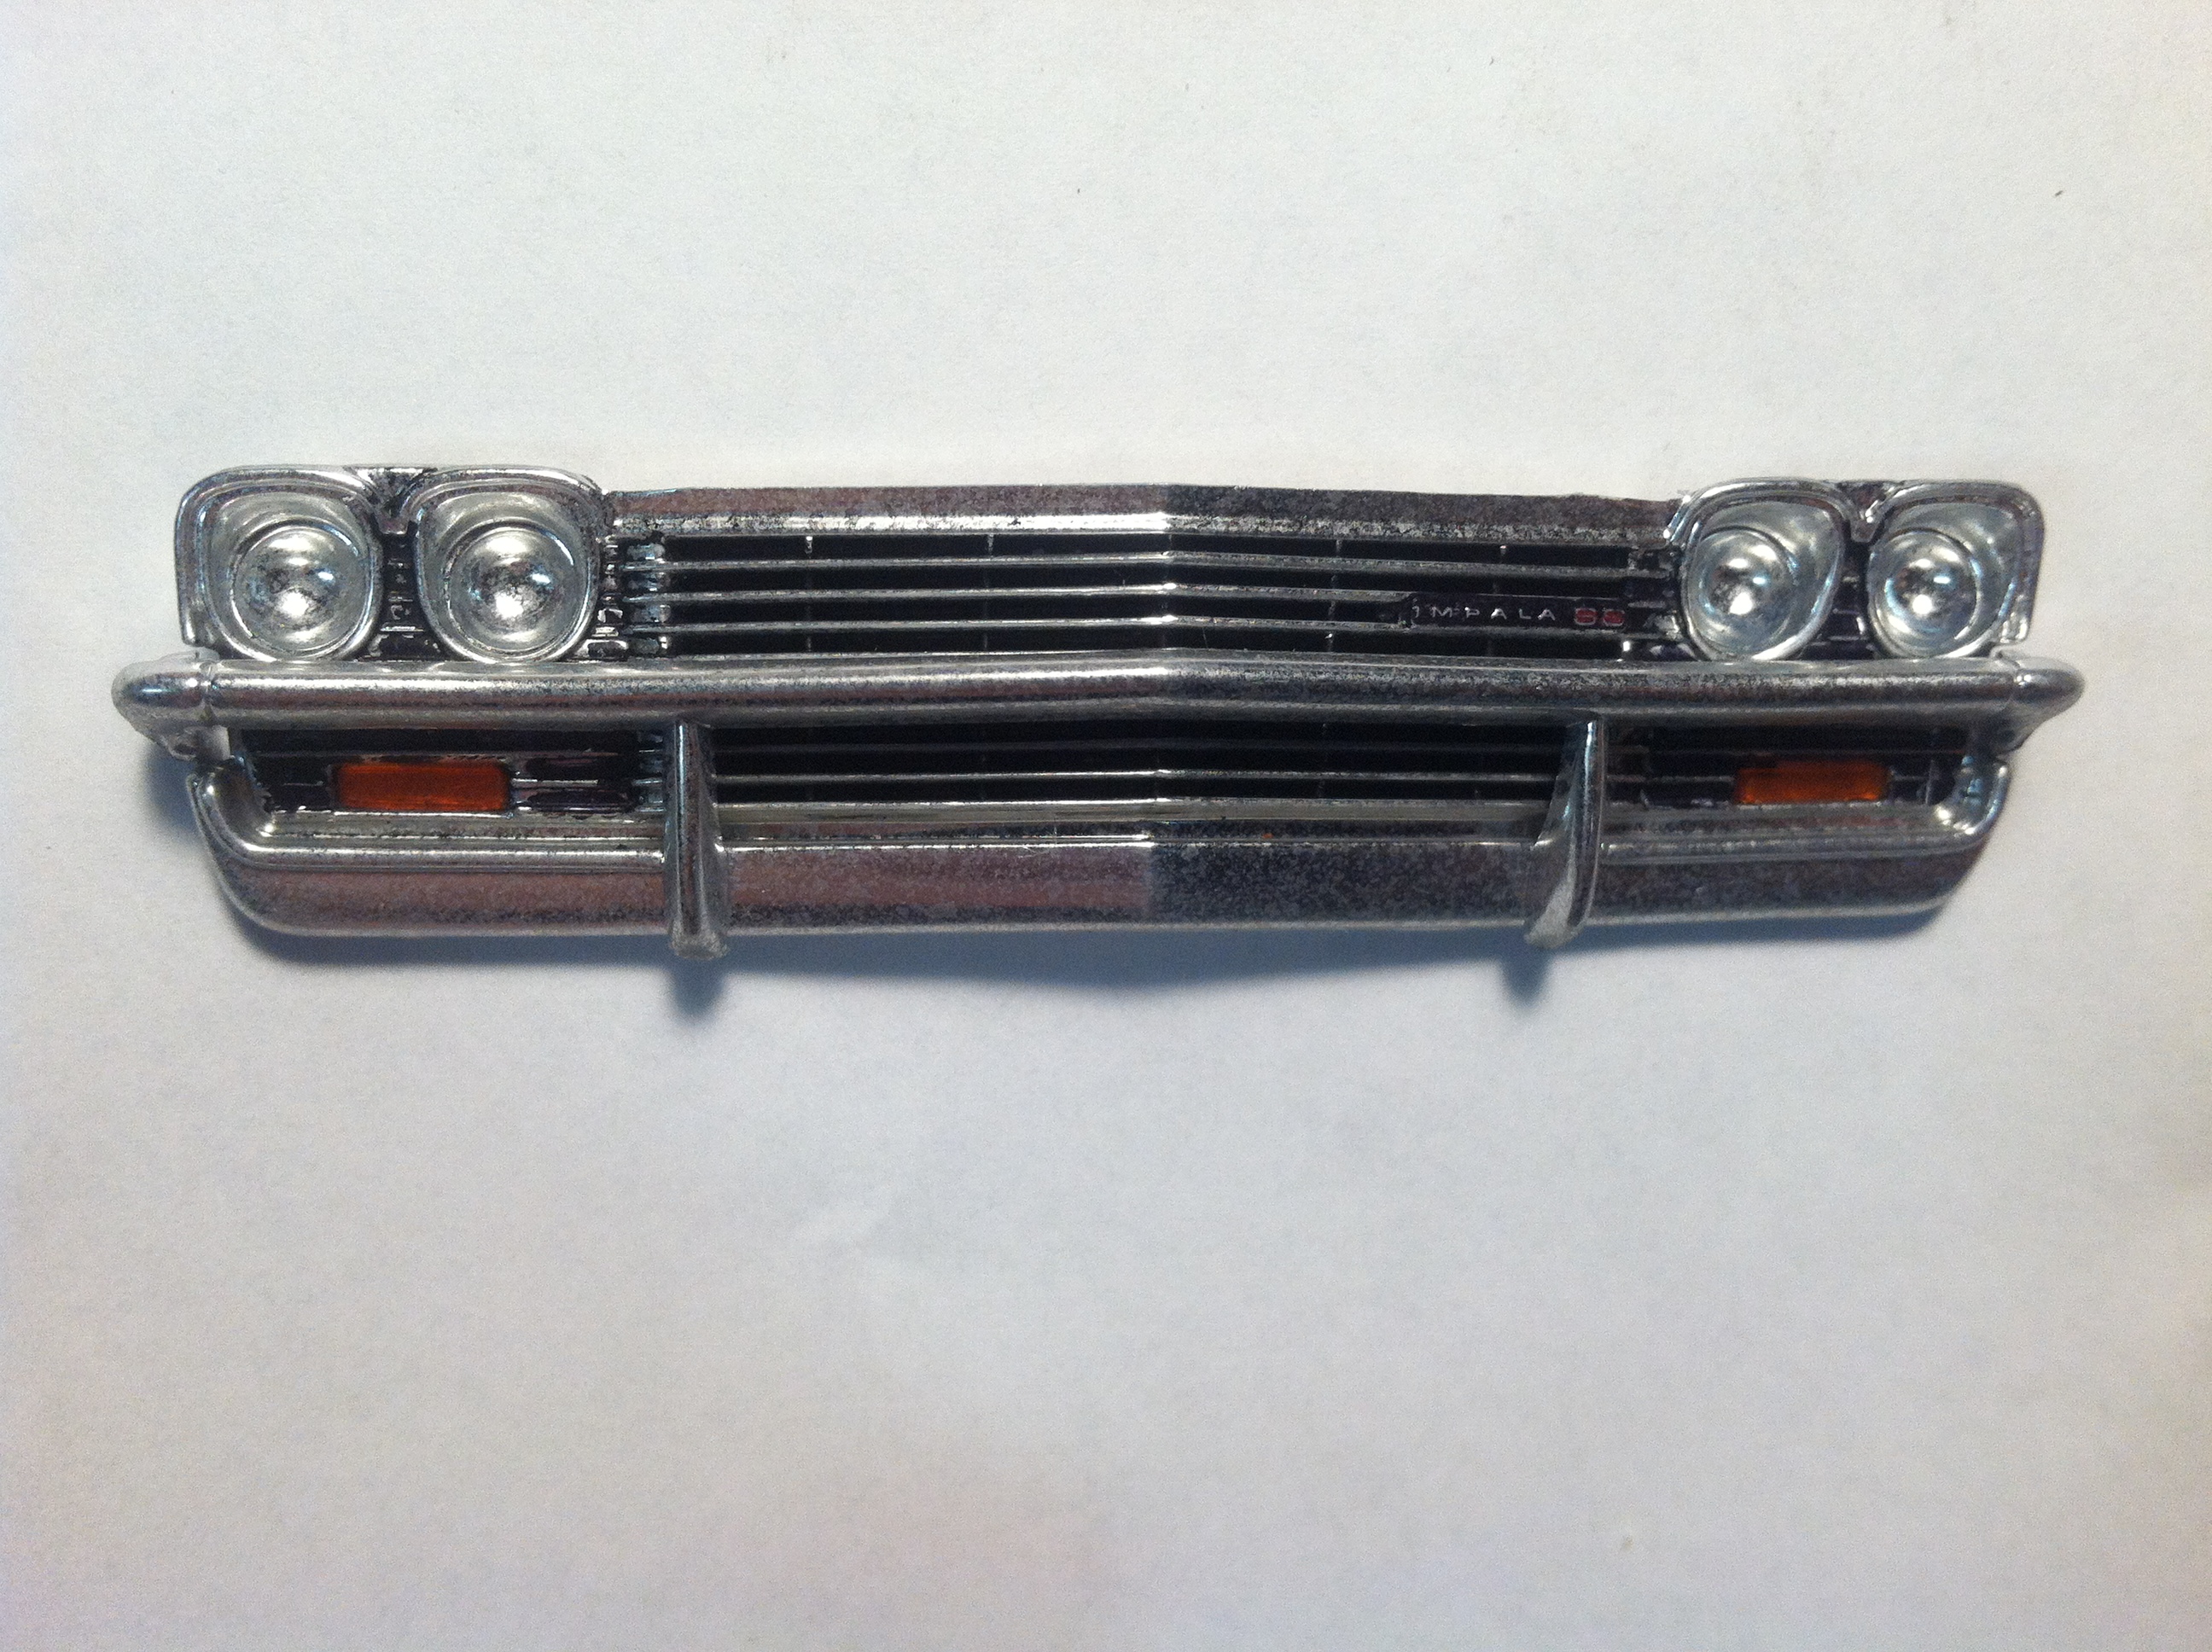
This is a '66 Malibu SS (Revell Monogram). The body paint is Testors Metallic Black enamel. The interior is Testors Yellow enamel. I used a Molotow Chrome pen on the windows. On the rear chrome I painted with Model Master flat black acrylic, and then used a toothpick to scrape off the raised letters. The lettering on the tires was originally flat white enamel, but I found after 2 weeks that it never dries. I rubbed it off with thinner and repainted with white acrylic. I used flat black acrylic in the radiator and on the engine heads. I put a coating of Future on, but didn't think it was glossy enough, so I kept layering on coatings until it became a big mess. Then I sprayed it down with Windex and ran it under the sink faucet and all the Future rubbed off easily. But not before I accidentally scraped up some of the paint. Two coatings of Future with a Q-tip eliminated almost all the scratches. This model has a poor design for fitting parts together. The side frames for the engine actually interfere with the exhaust pipes. I had a really tough time with that. Also, I had a tough time getting the front to stay on and had to end up using superglue, which unfortunately shows up on the seams. The workbench thread is here.
-
Hello everyone, here is my fifth build for my “a day in 1979” series of models for a future diorama. It represents my uncle’s car as I remember it back in the 70’s. It was his daily driver and his only car for many years. I weathered it slightly to show some day to day use. I hope you enjoy it and let me know what you think. Thanks for looking!
- 27 replies
-
- 1
-

-
- revell
- daily driver
- (and 1 more)
-
Trying to remember the lineup of all the Revell 16th scale drag cars: Funny Cars Jungle Jim Vega Mickey Thompson Grand Ams ( Revellleader, U.S.MARINES) Army Vega Mongoose Duster Revellution Dusters ( blue/white, burgundy/white/black) Snowman Charger Snowman Vega Chi-town Hustler Hawaiian Charger ( old 73', new 14'/15'?) Top Fuels Snake Army R/E Mongoose Navy R/E Big Daddy R/E Da Fast Guys R/E Jeb Allen Praying Mantis R/E California Charger F/E Tony Nancy F/E Prudomme F/E Beebe & Milligan F/E Did I miss any??? Ep
-
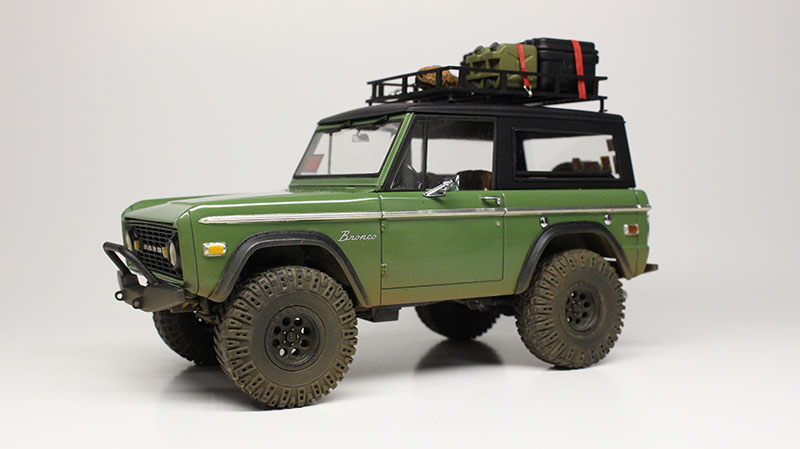
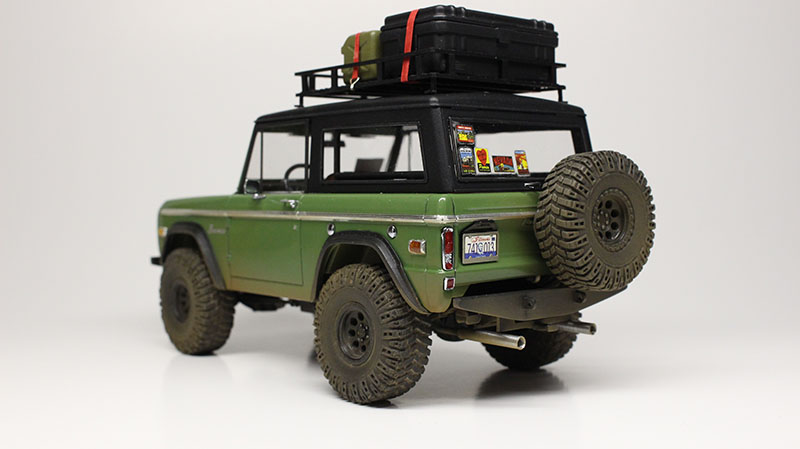
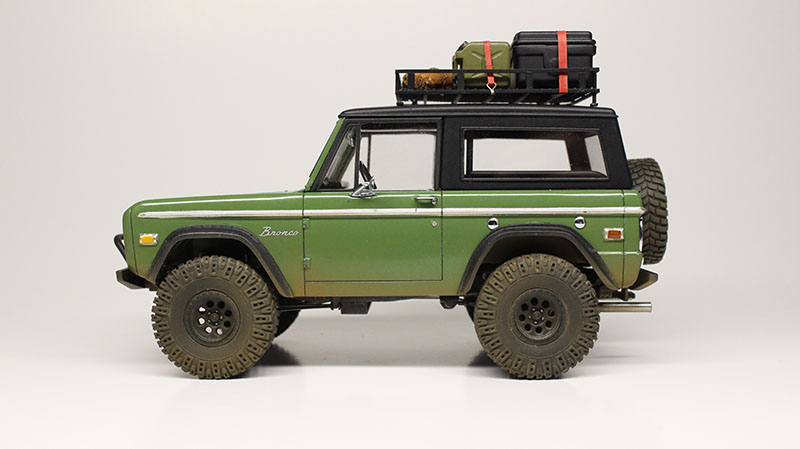
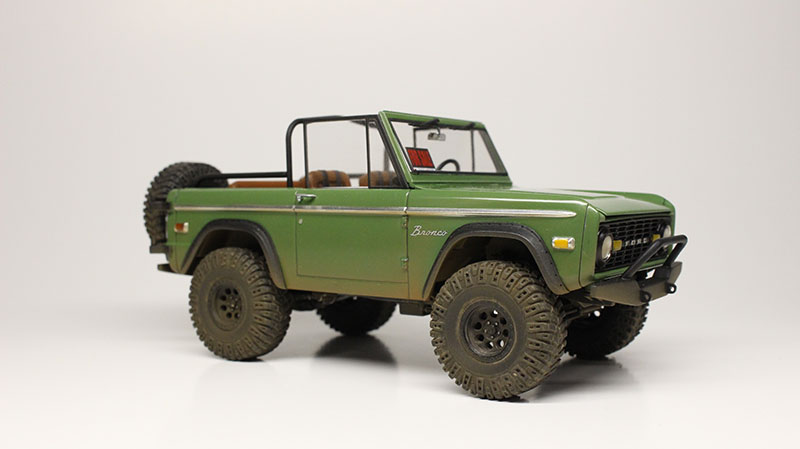
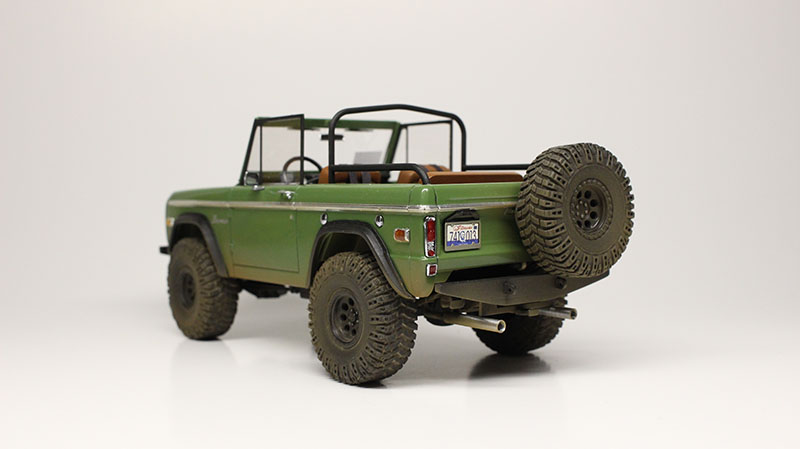
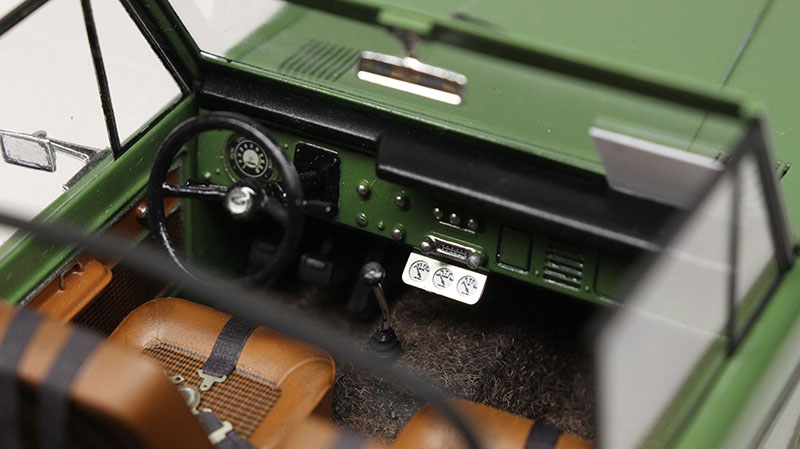
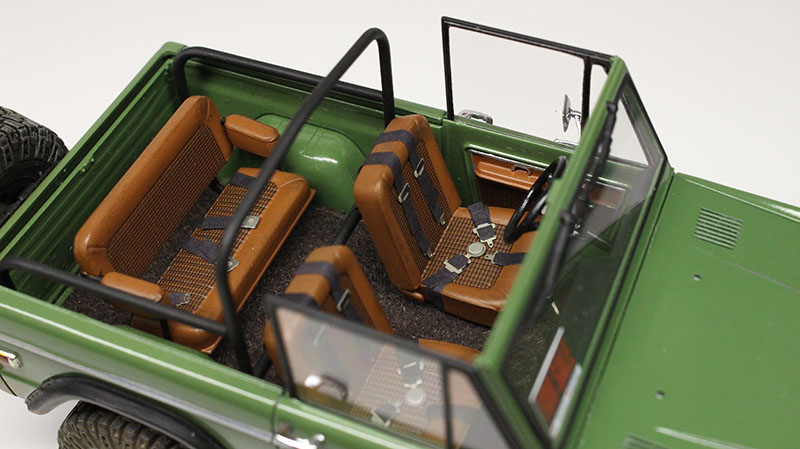
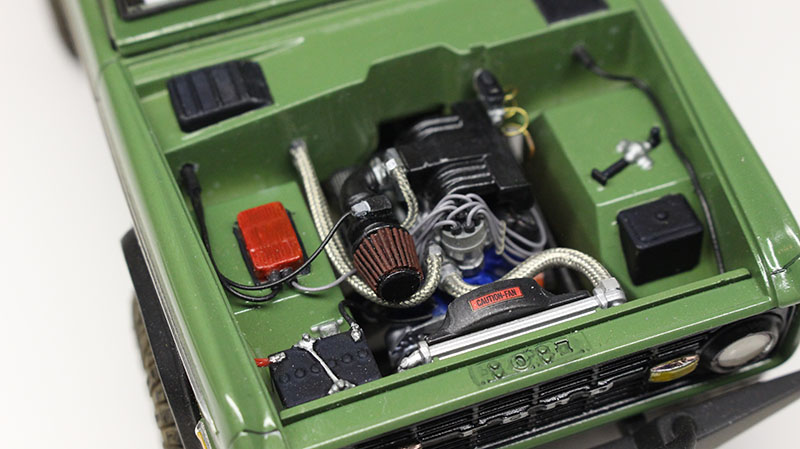
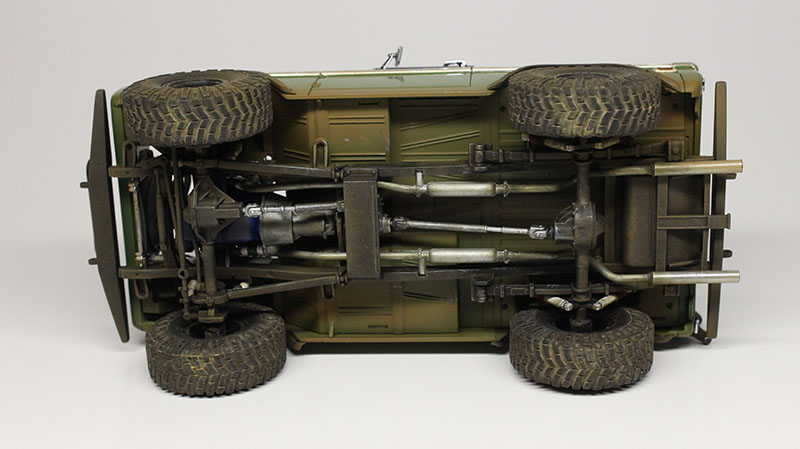
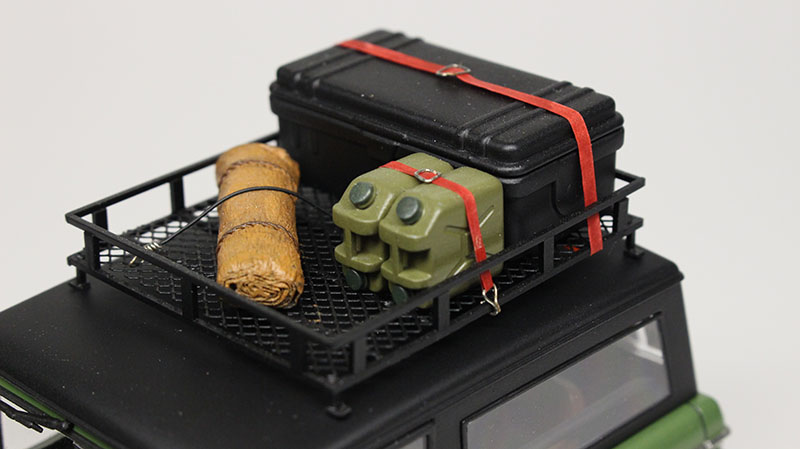
Hi all, Here is my completed build of the Revell Bronco. The body is painted with craft acrylic paint. Scratch-built parts include the front and rear bumper, 2 inch body lift, roof rack and tie downs. The interior is finished up with brown flocking, 5 point racing harnesses for the front seats and under dash gauges from Pro Tech. The rear seatbelt hardware is from Model Masters. I used the kit engine block and transmission, but replaced the intake and valve cover with the EFI set up from the 5.0 engine in the Revell 32 5 window coupe kit. All of the wiring, and pluming and flex fan are parts from Pro Tech. The wheels and tires are from the Revell Jeep Rubicon kit. The fender flares are from Fireball Model Works. Also, I added aluminum tubing for the exhaust tips. Thanks for looking.
-
I've been working on this '66 Malibu SS by Revell Monogram. The painting is mostly done, and I've just started assembly. The kit called for a gloss black exterior and red interior. I'm using a metallic black exterior and yellow interior. The trim is done using Molotow chrome pen.
-
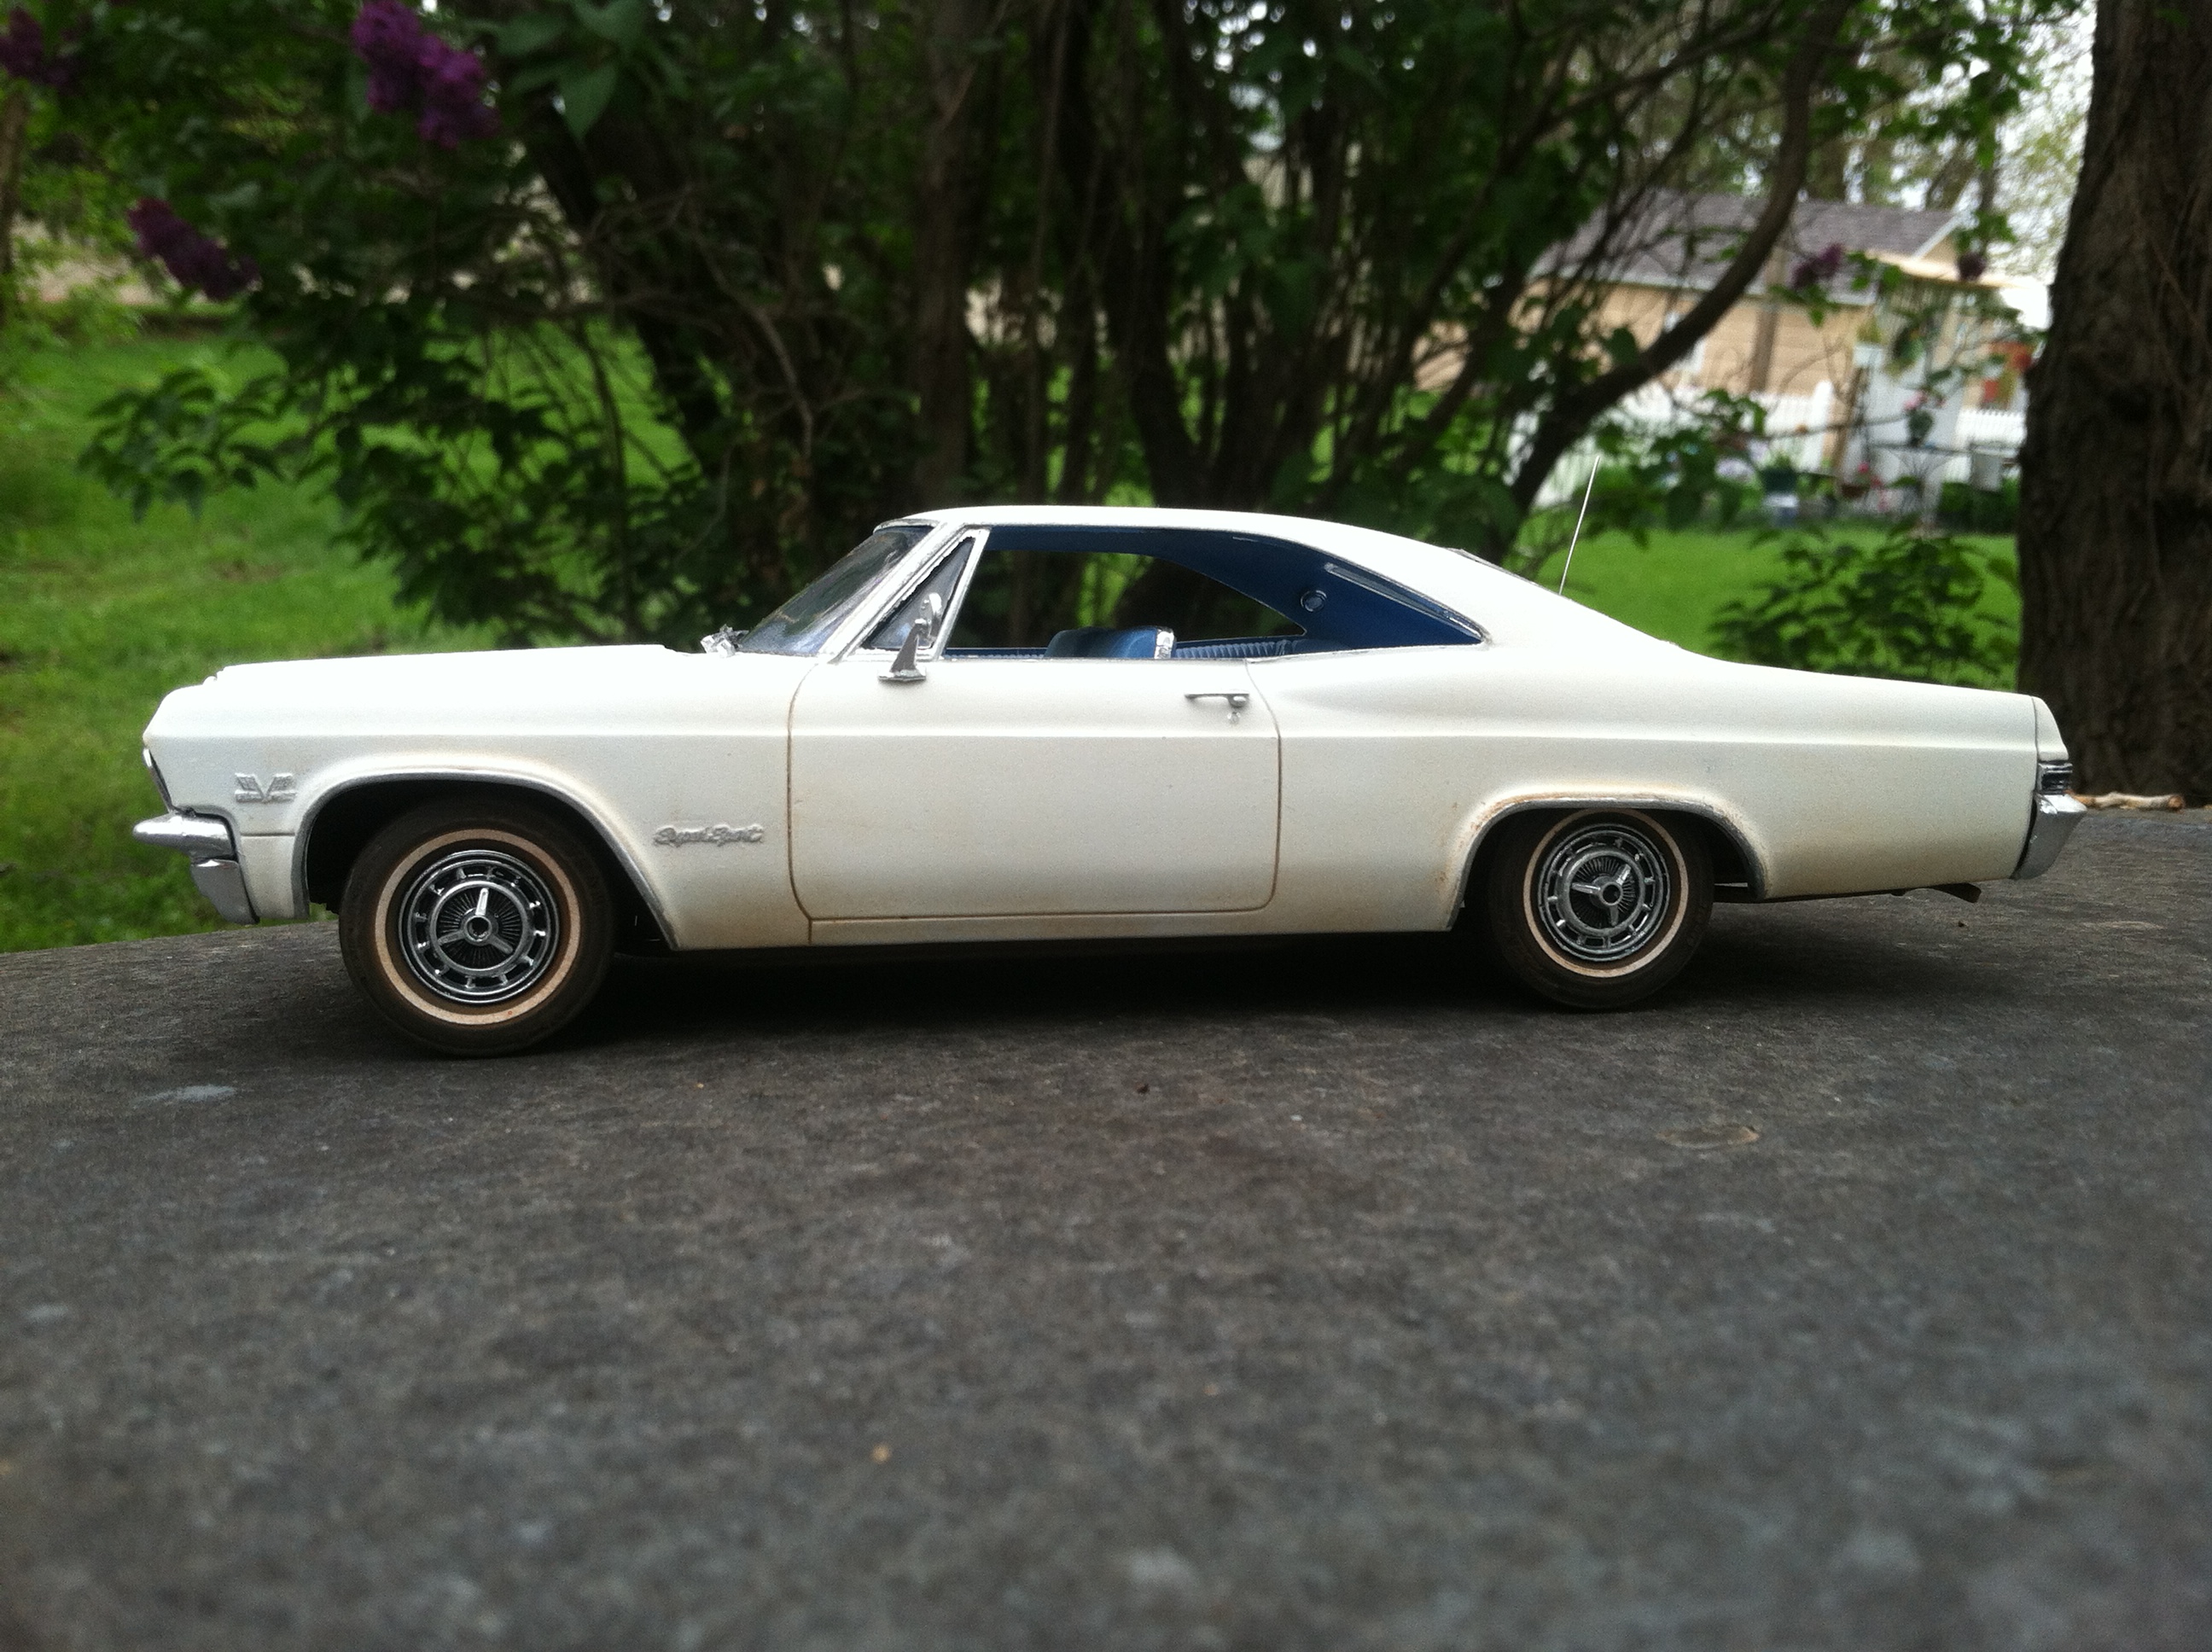
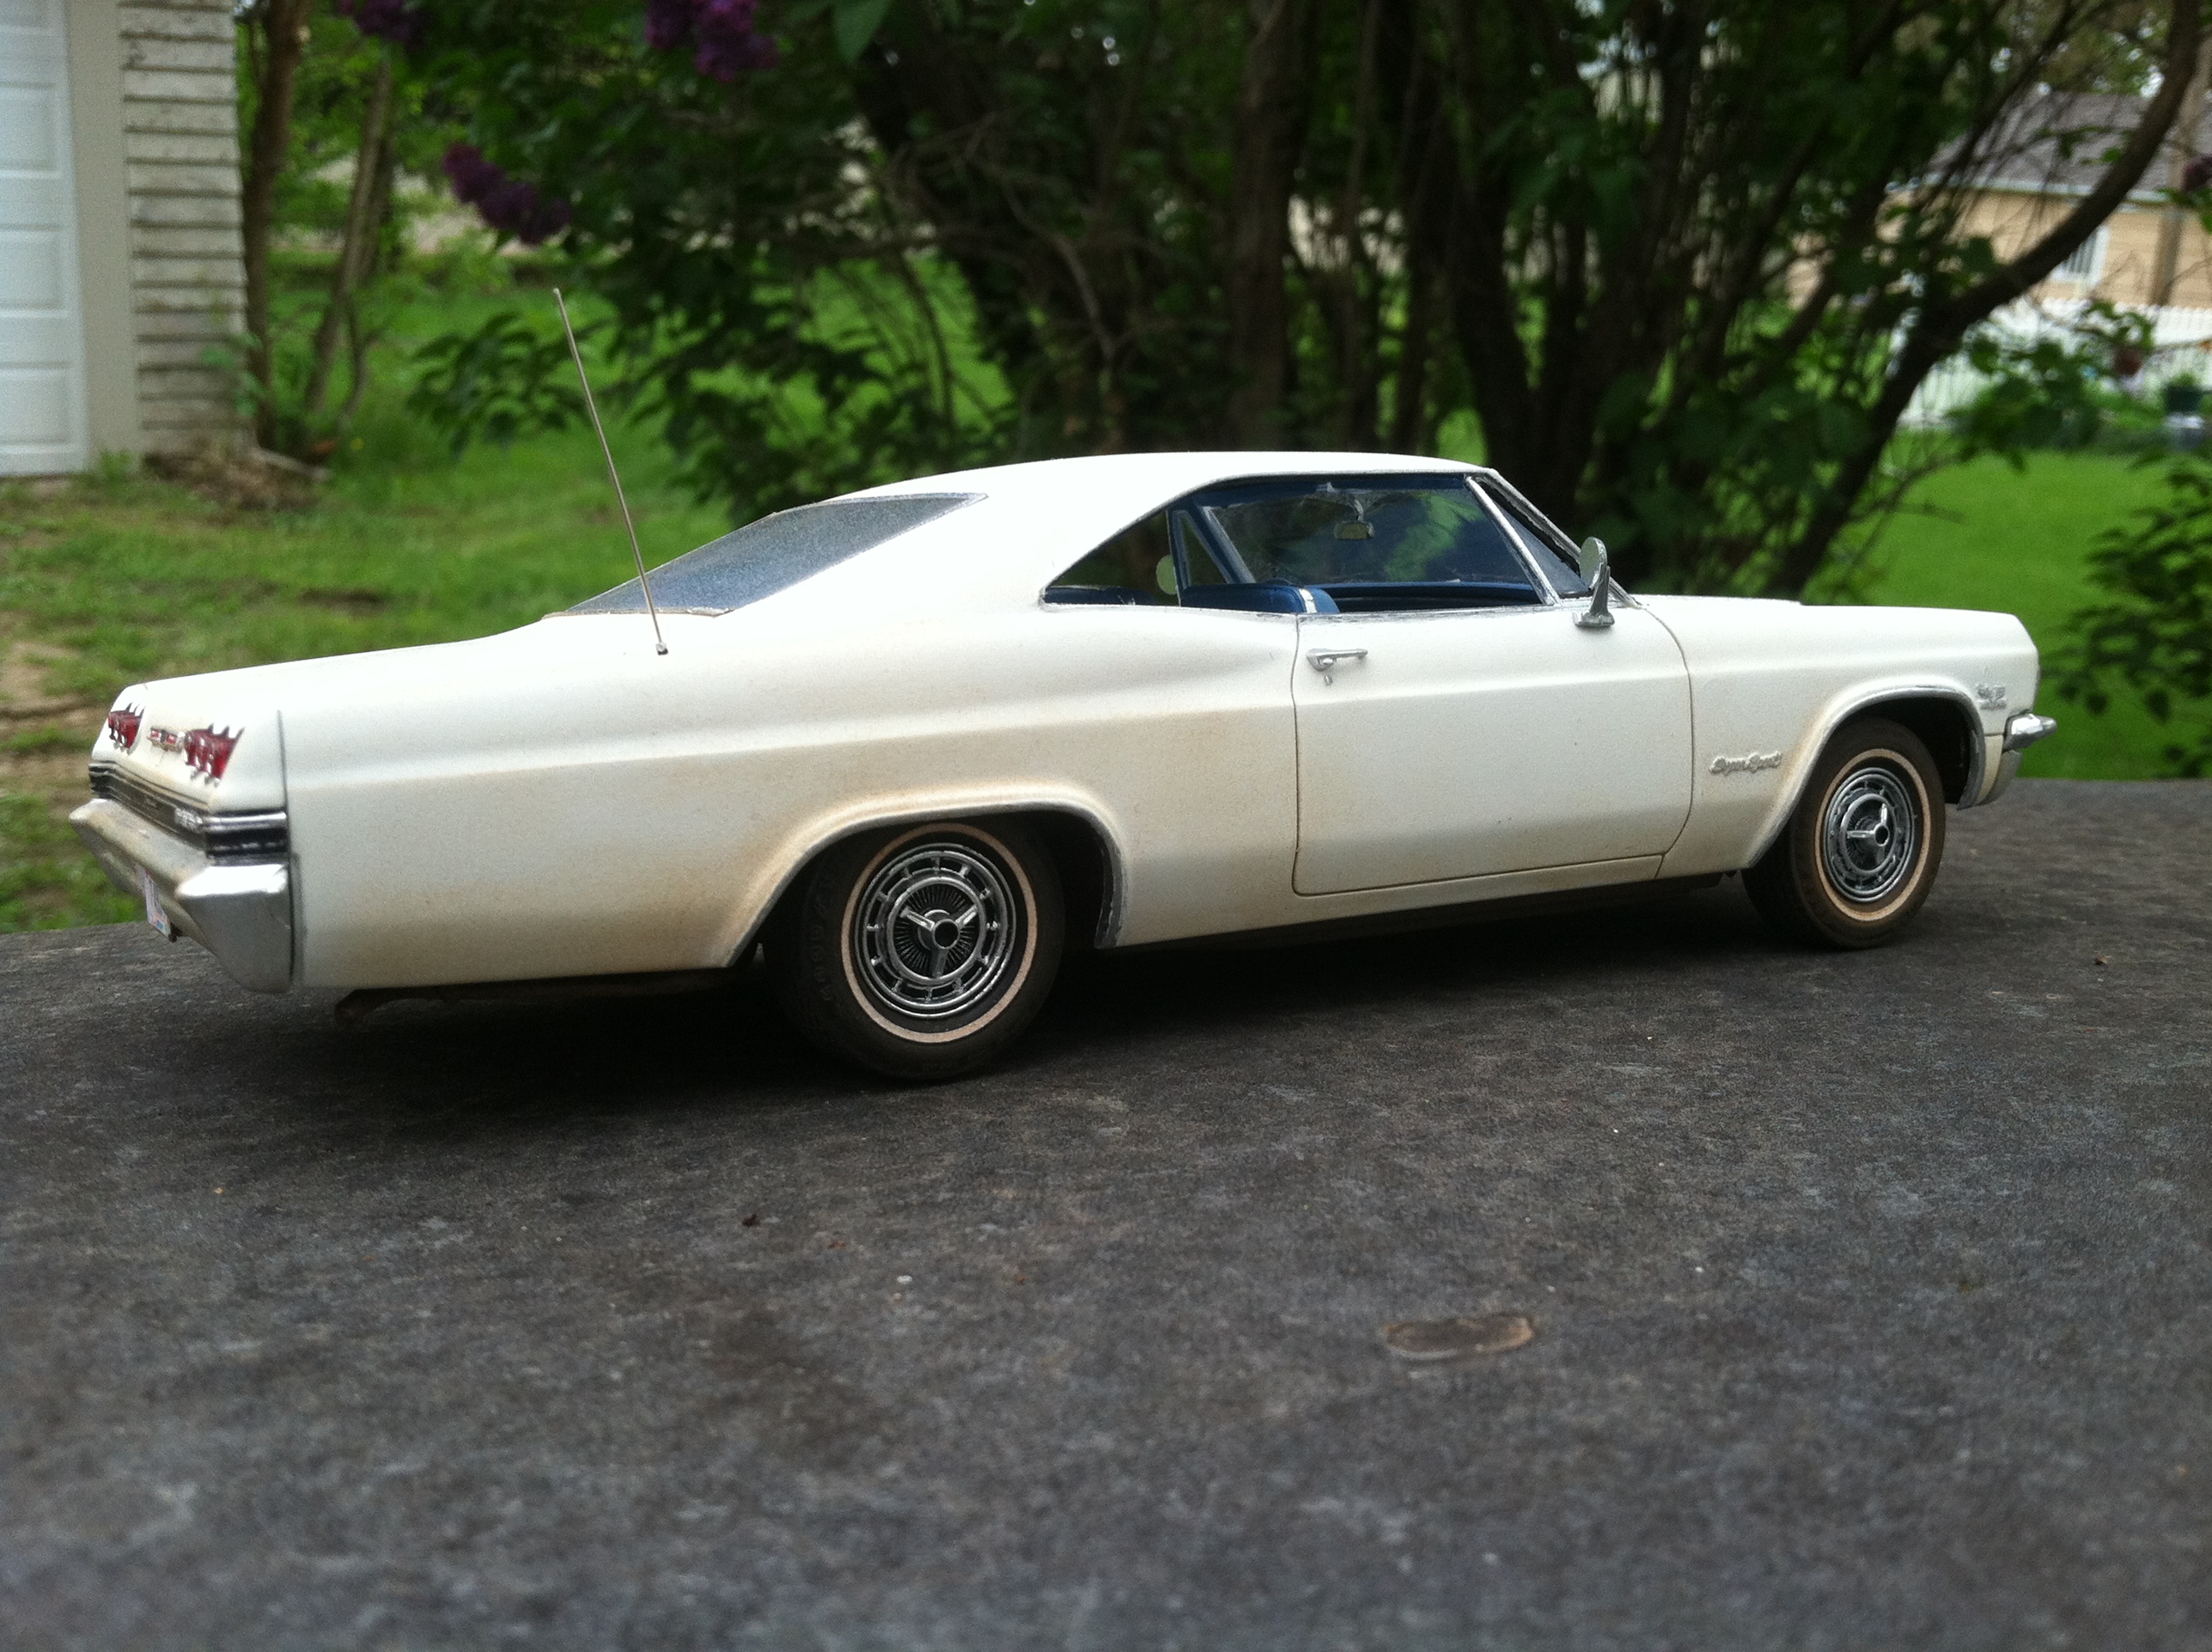
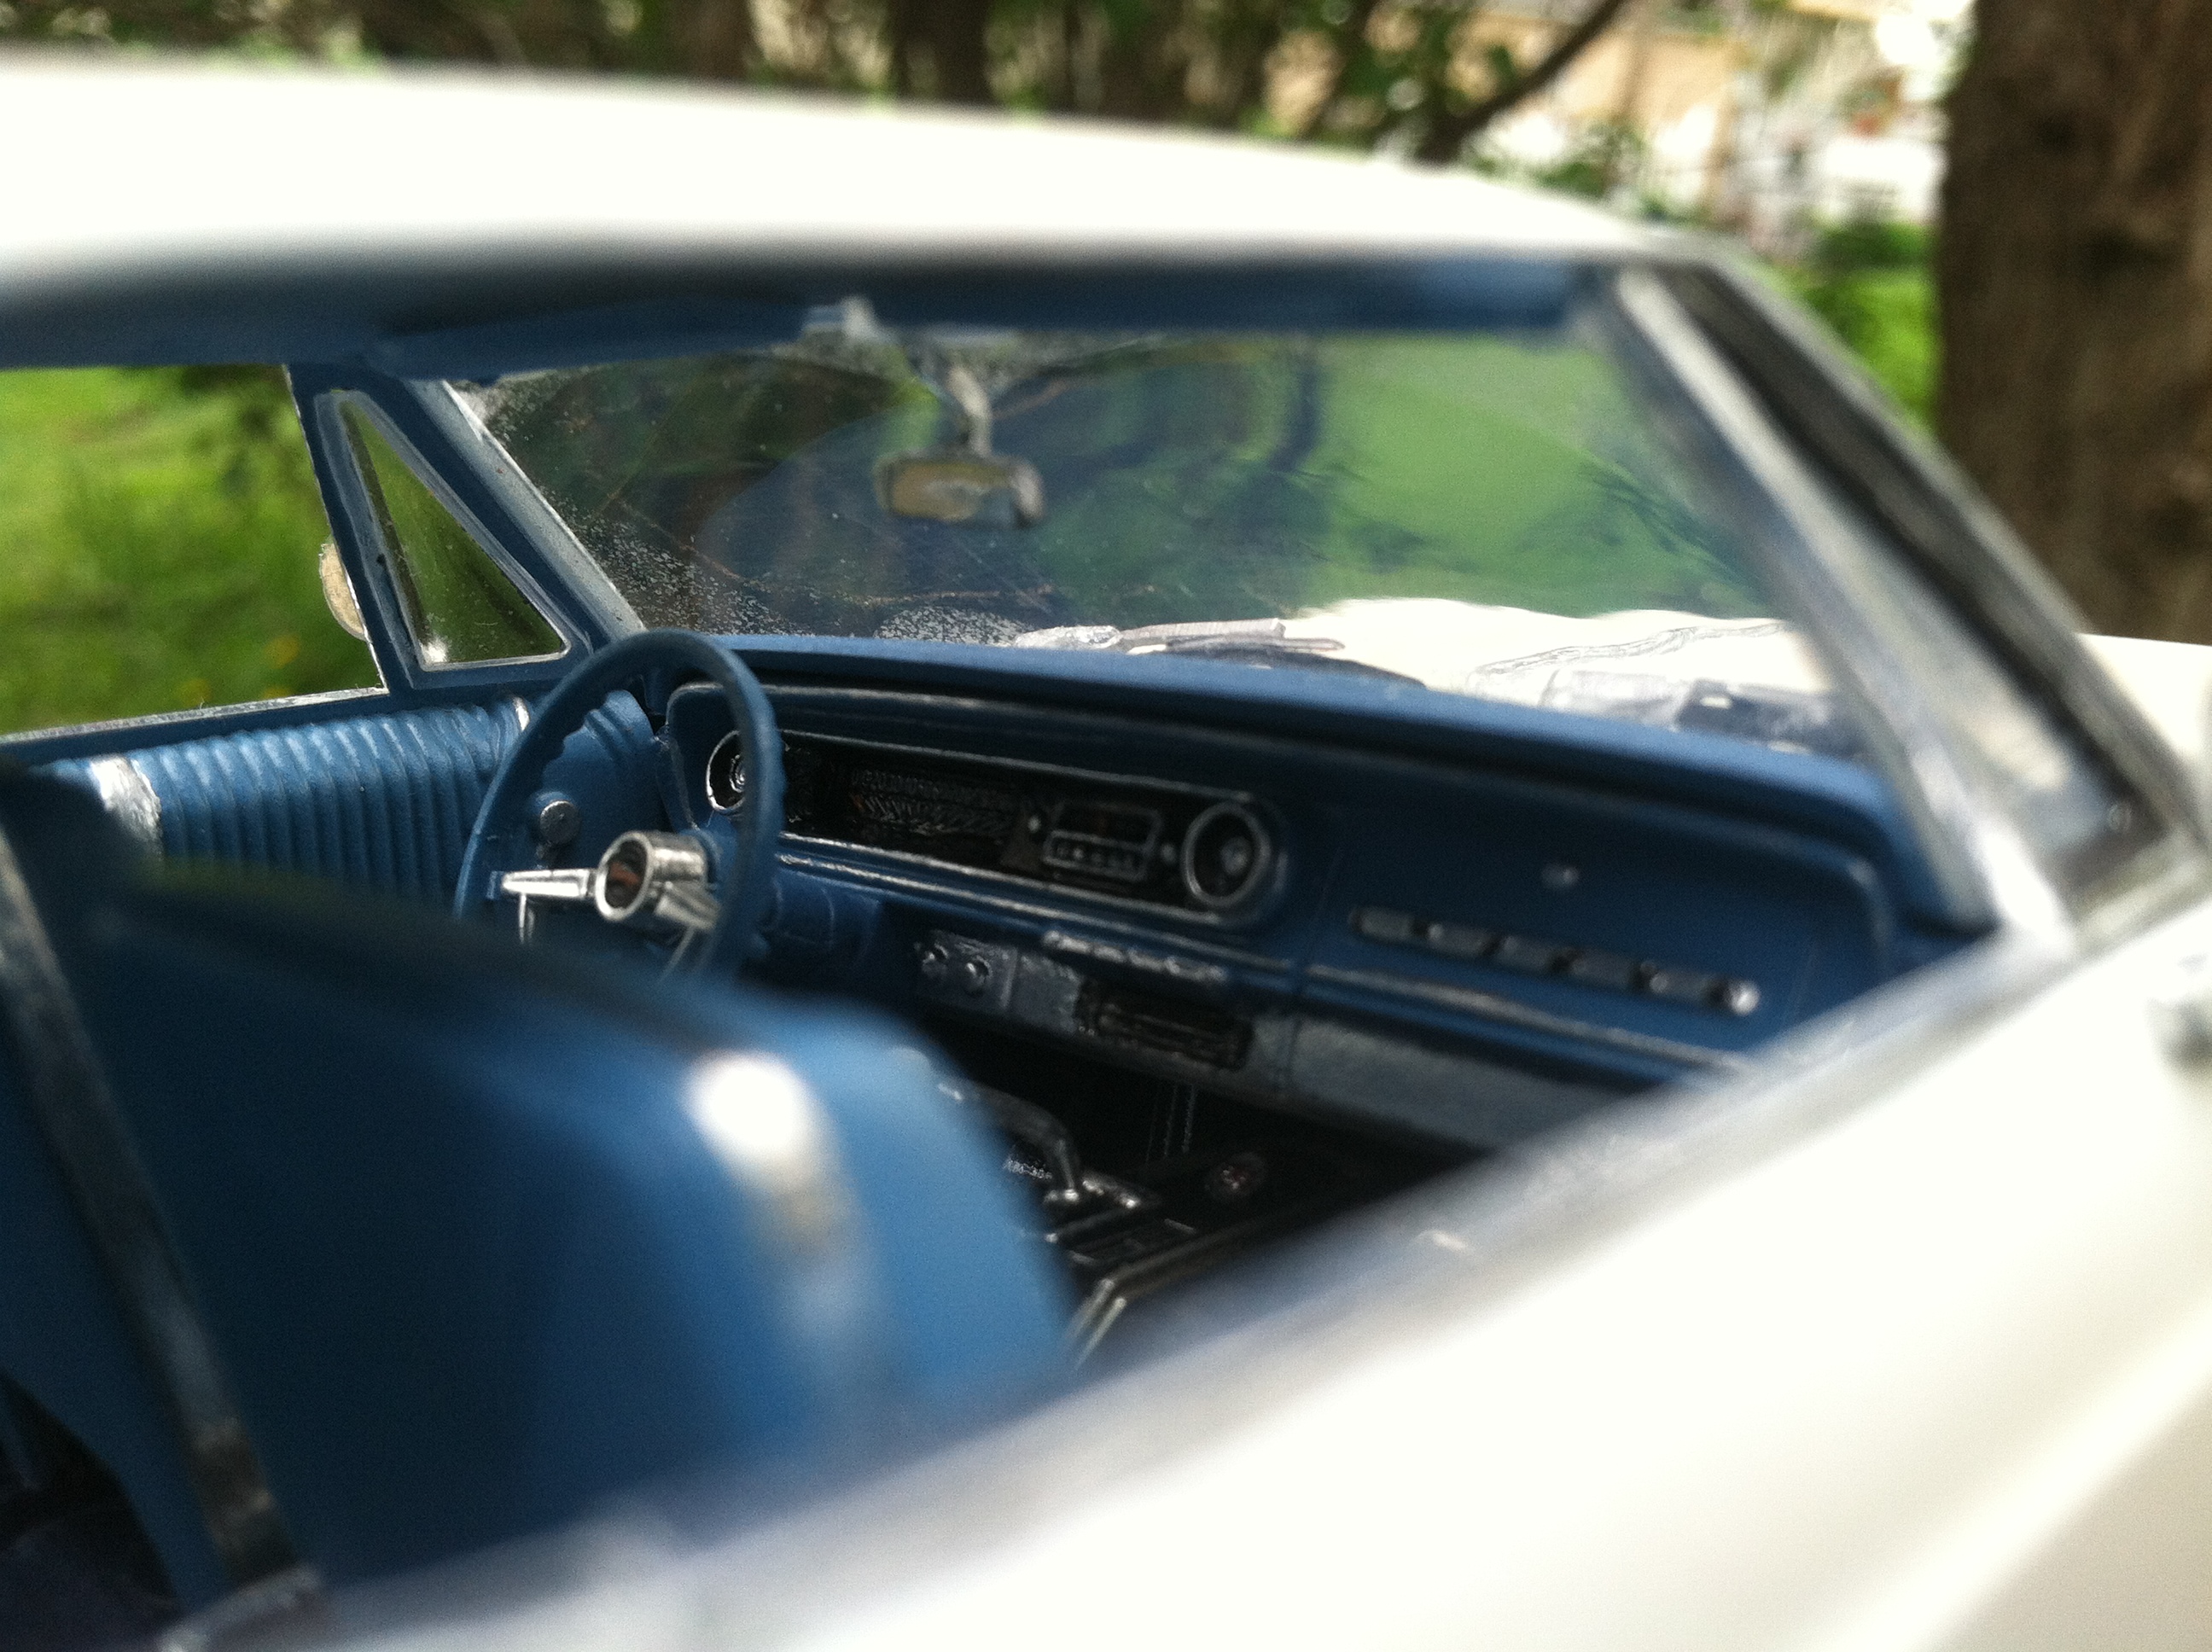
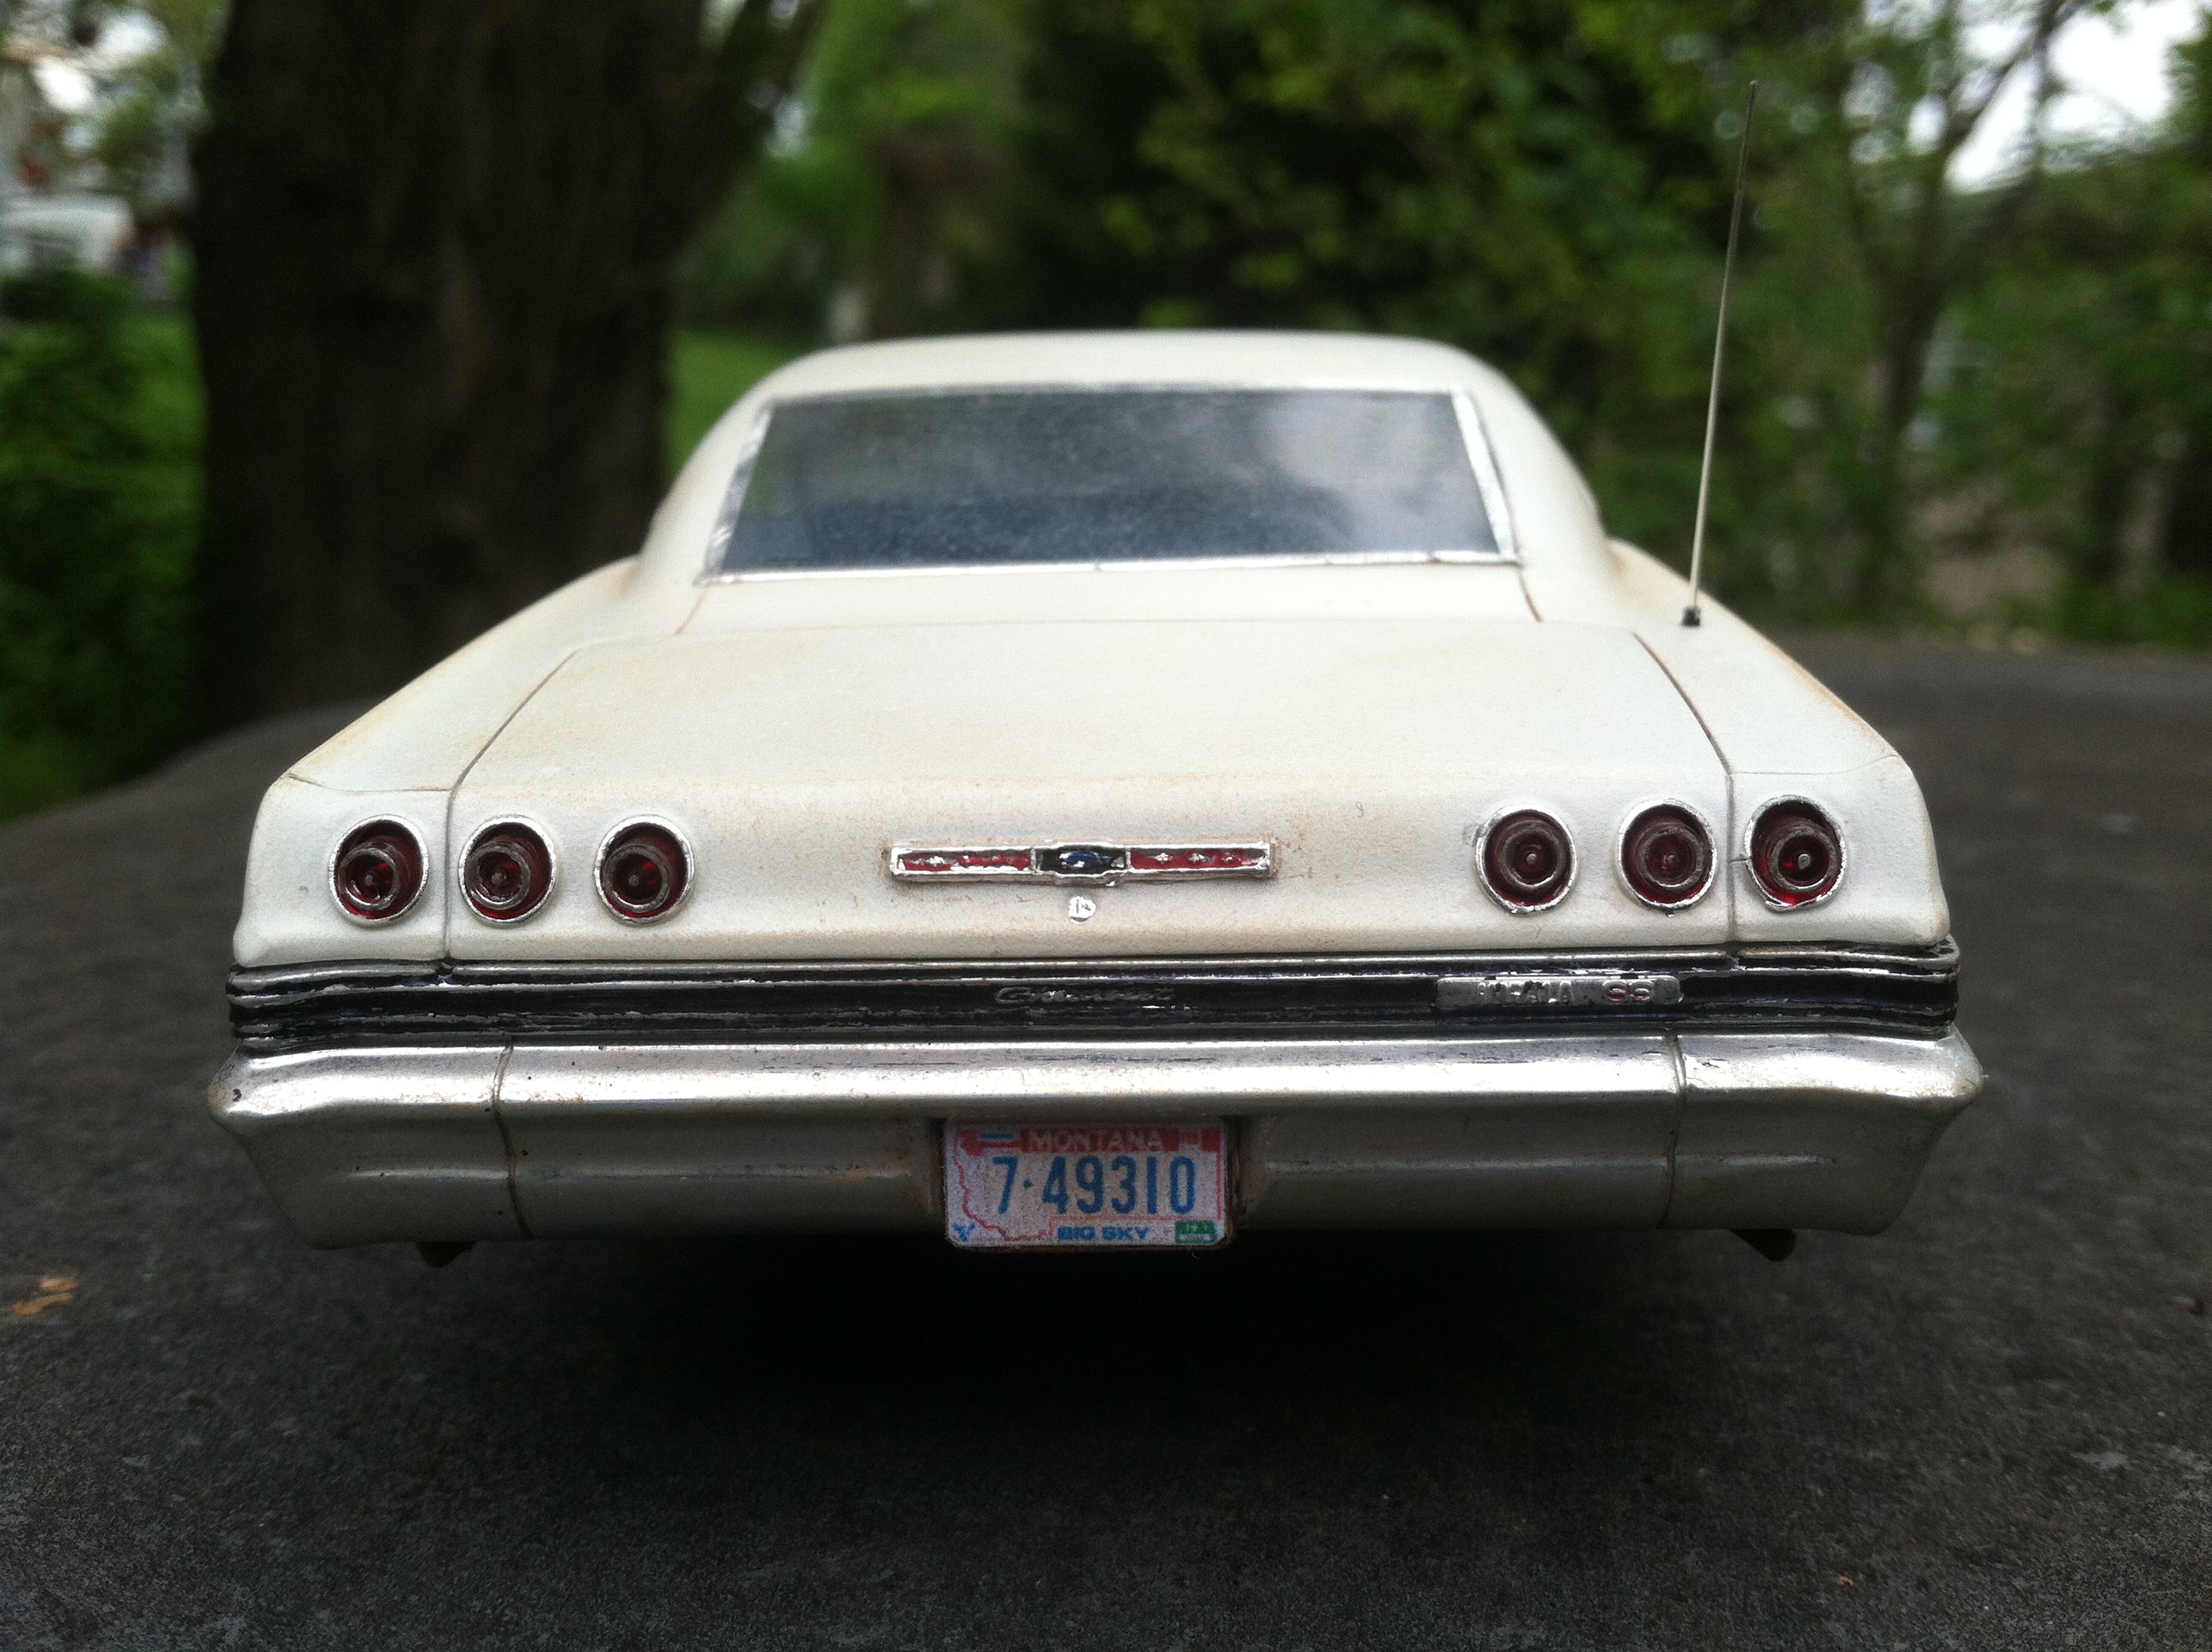
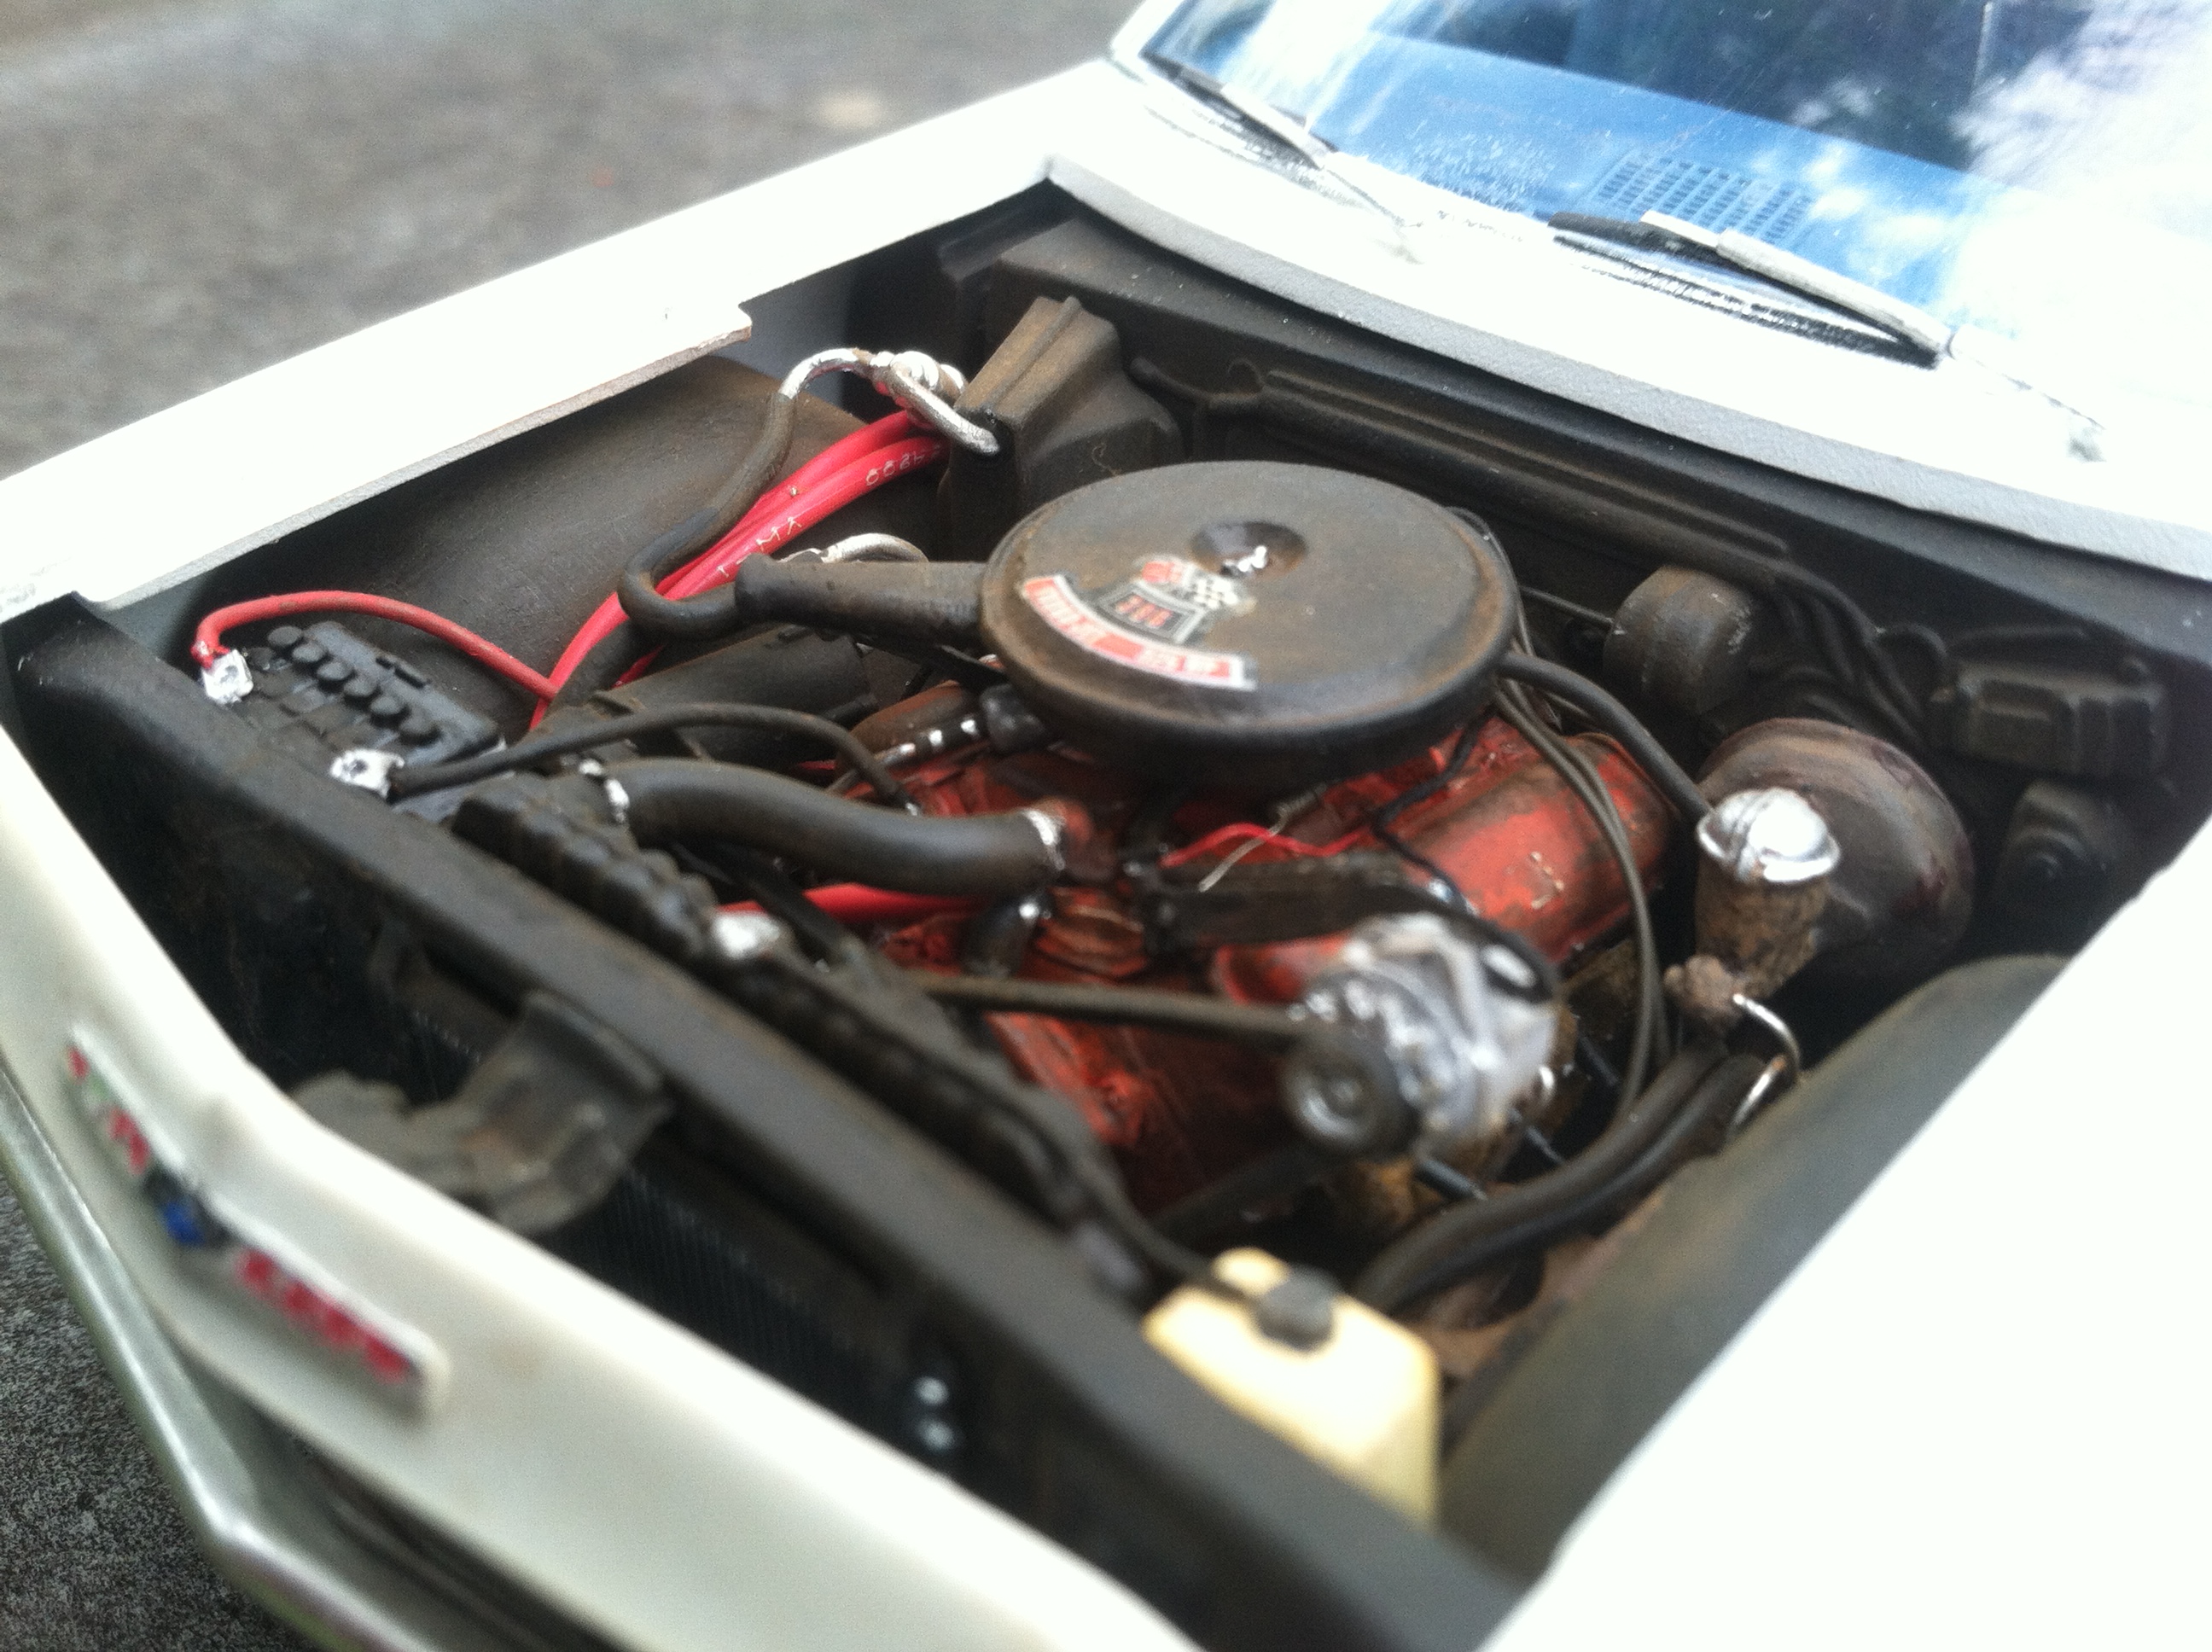
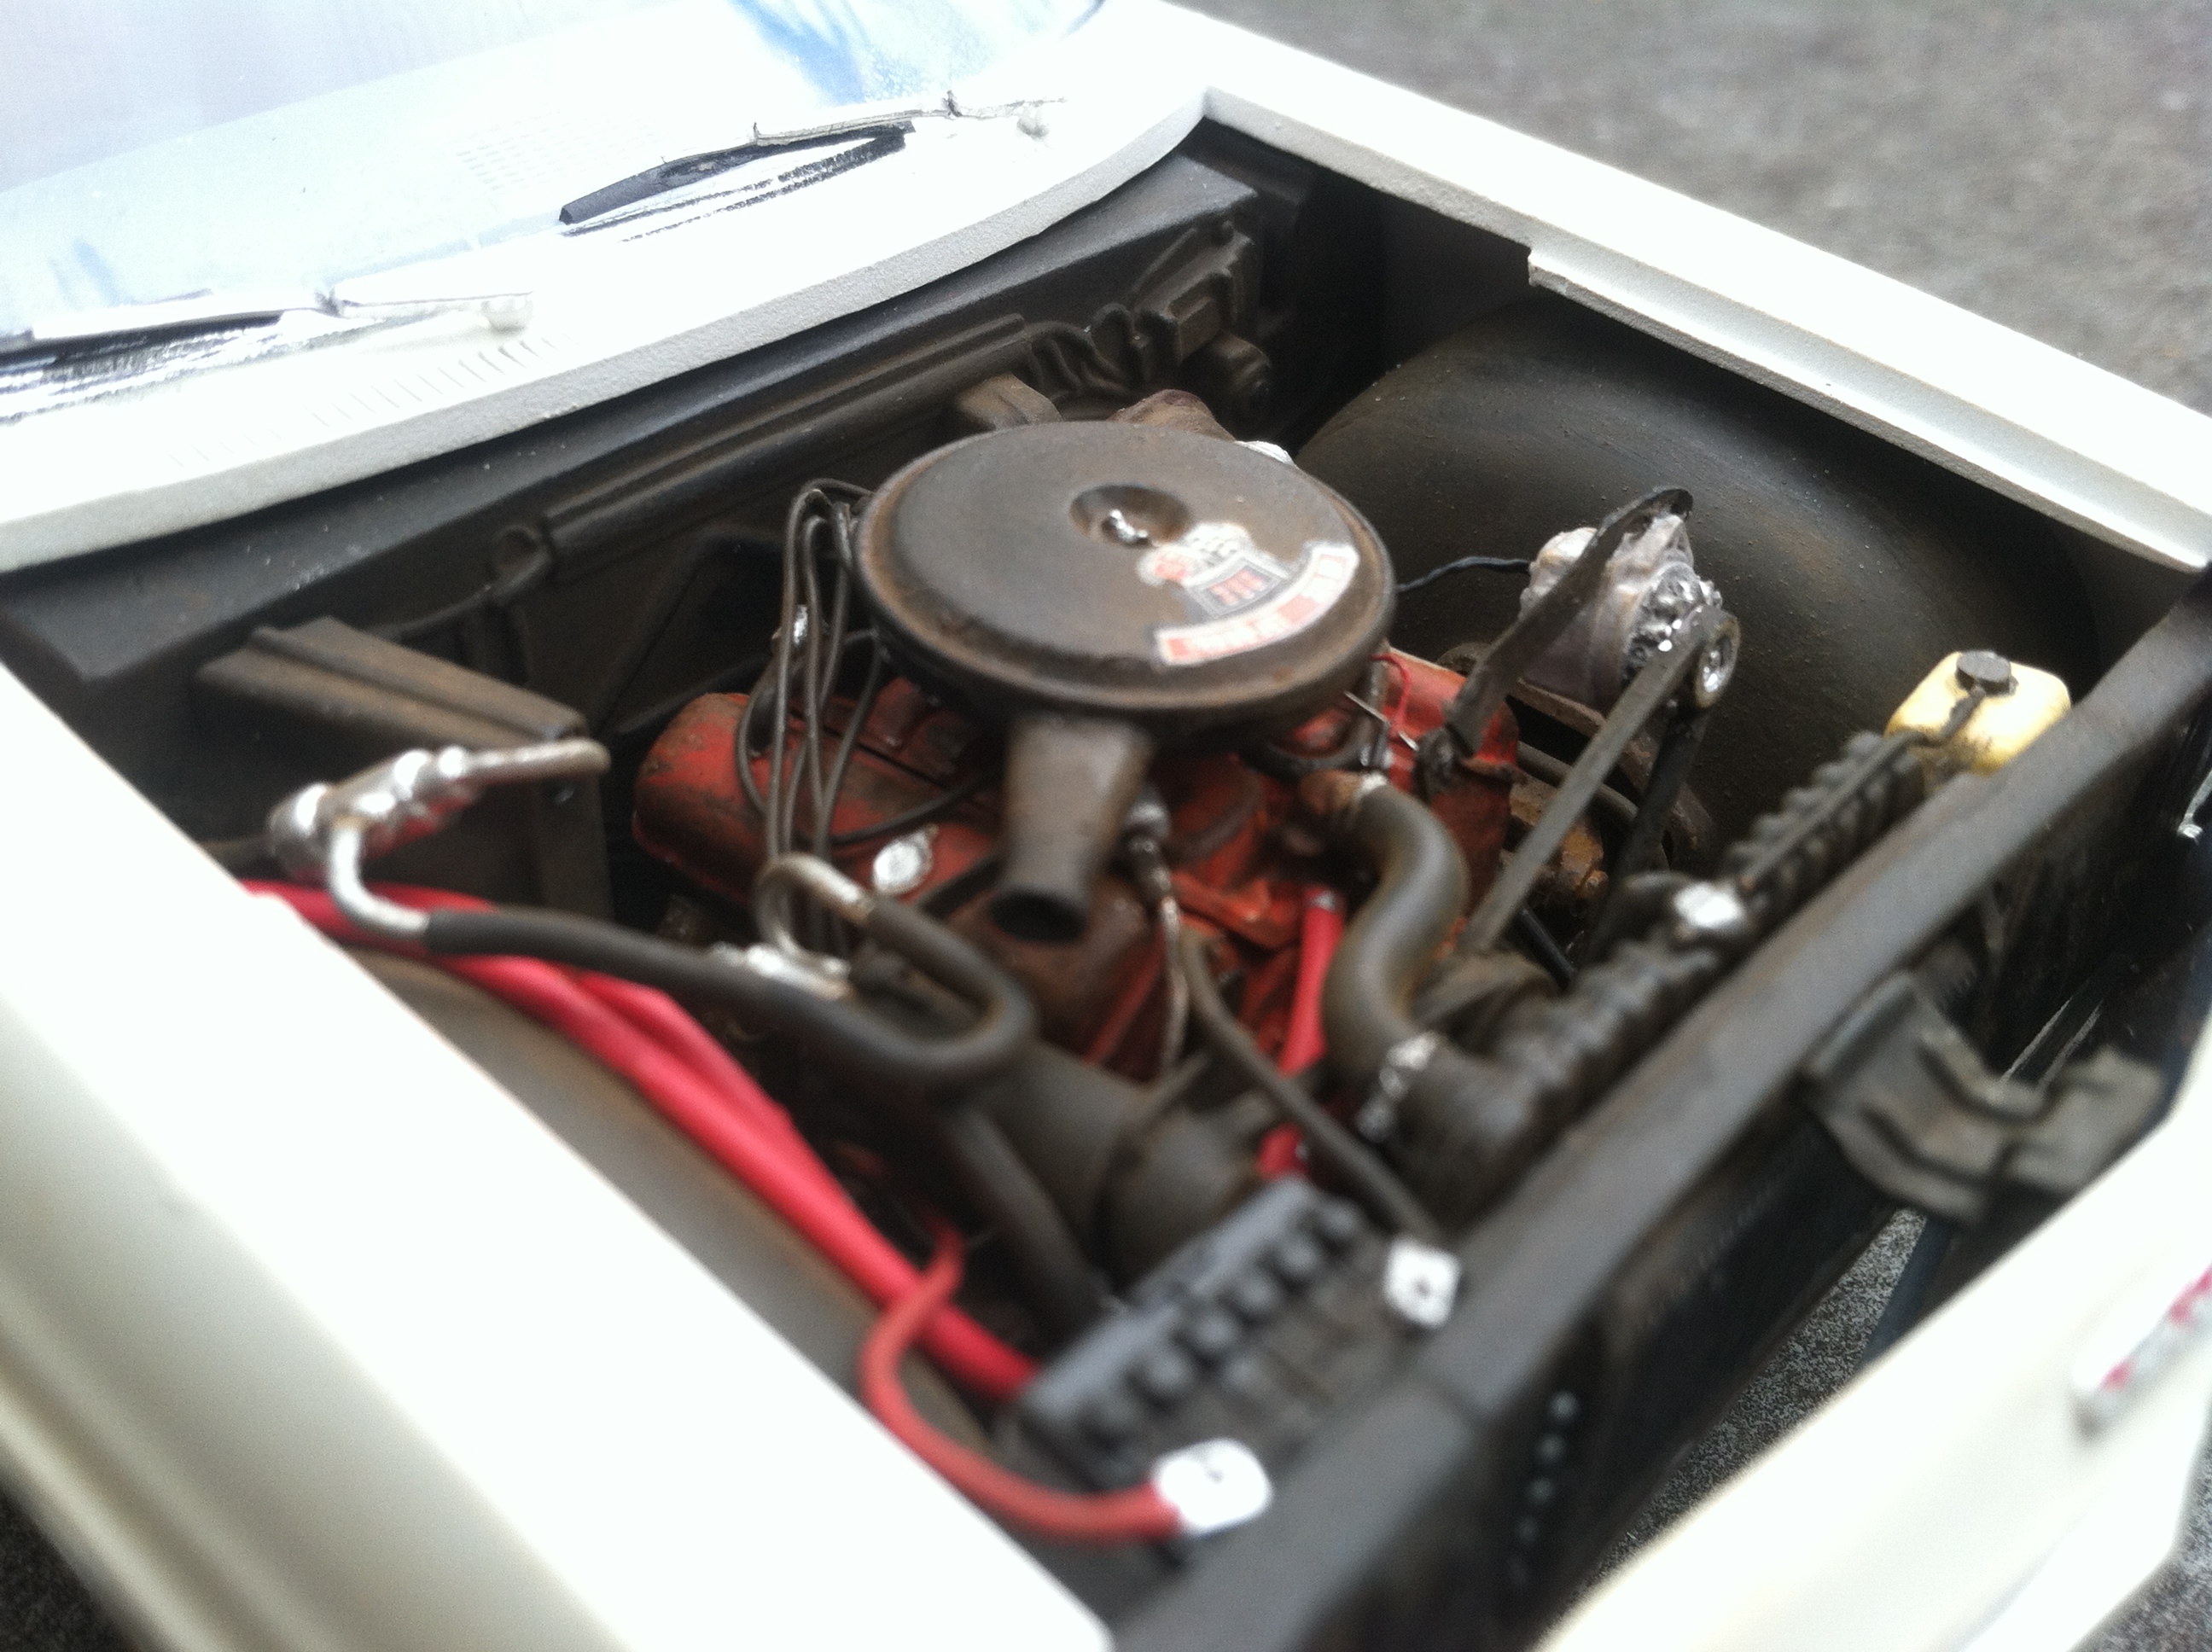
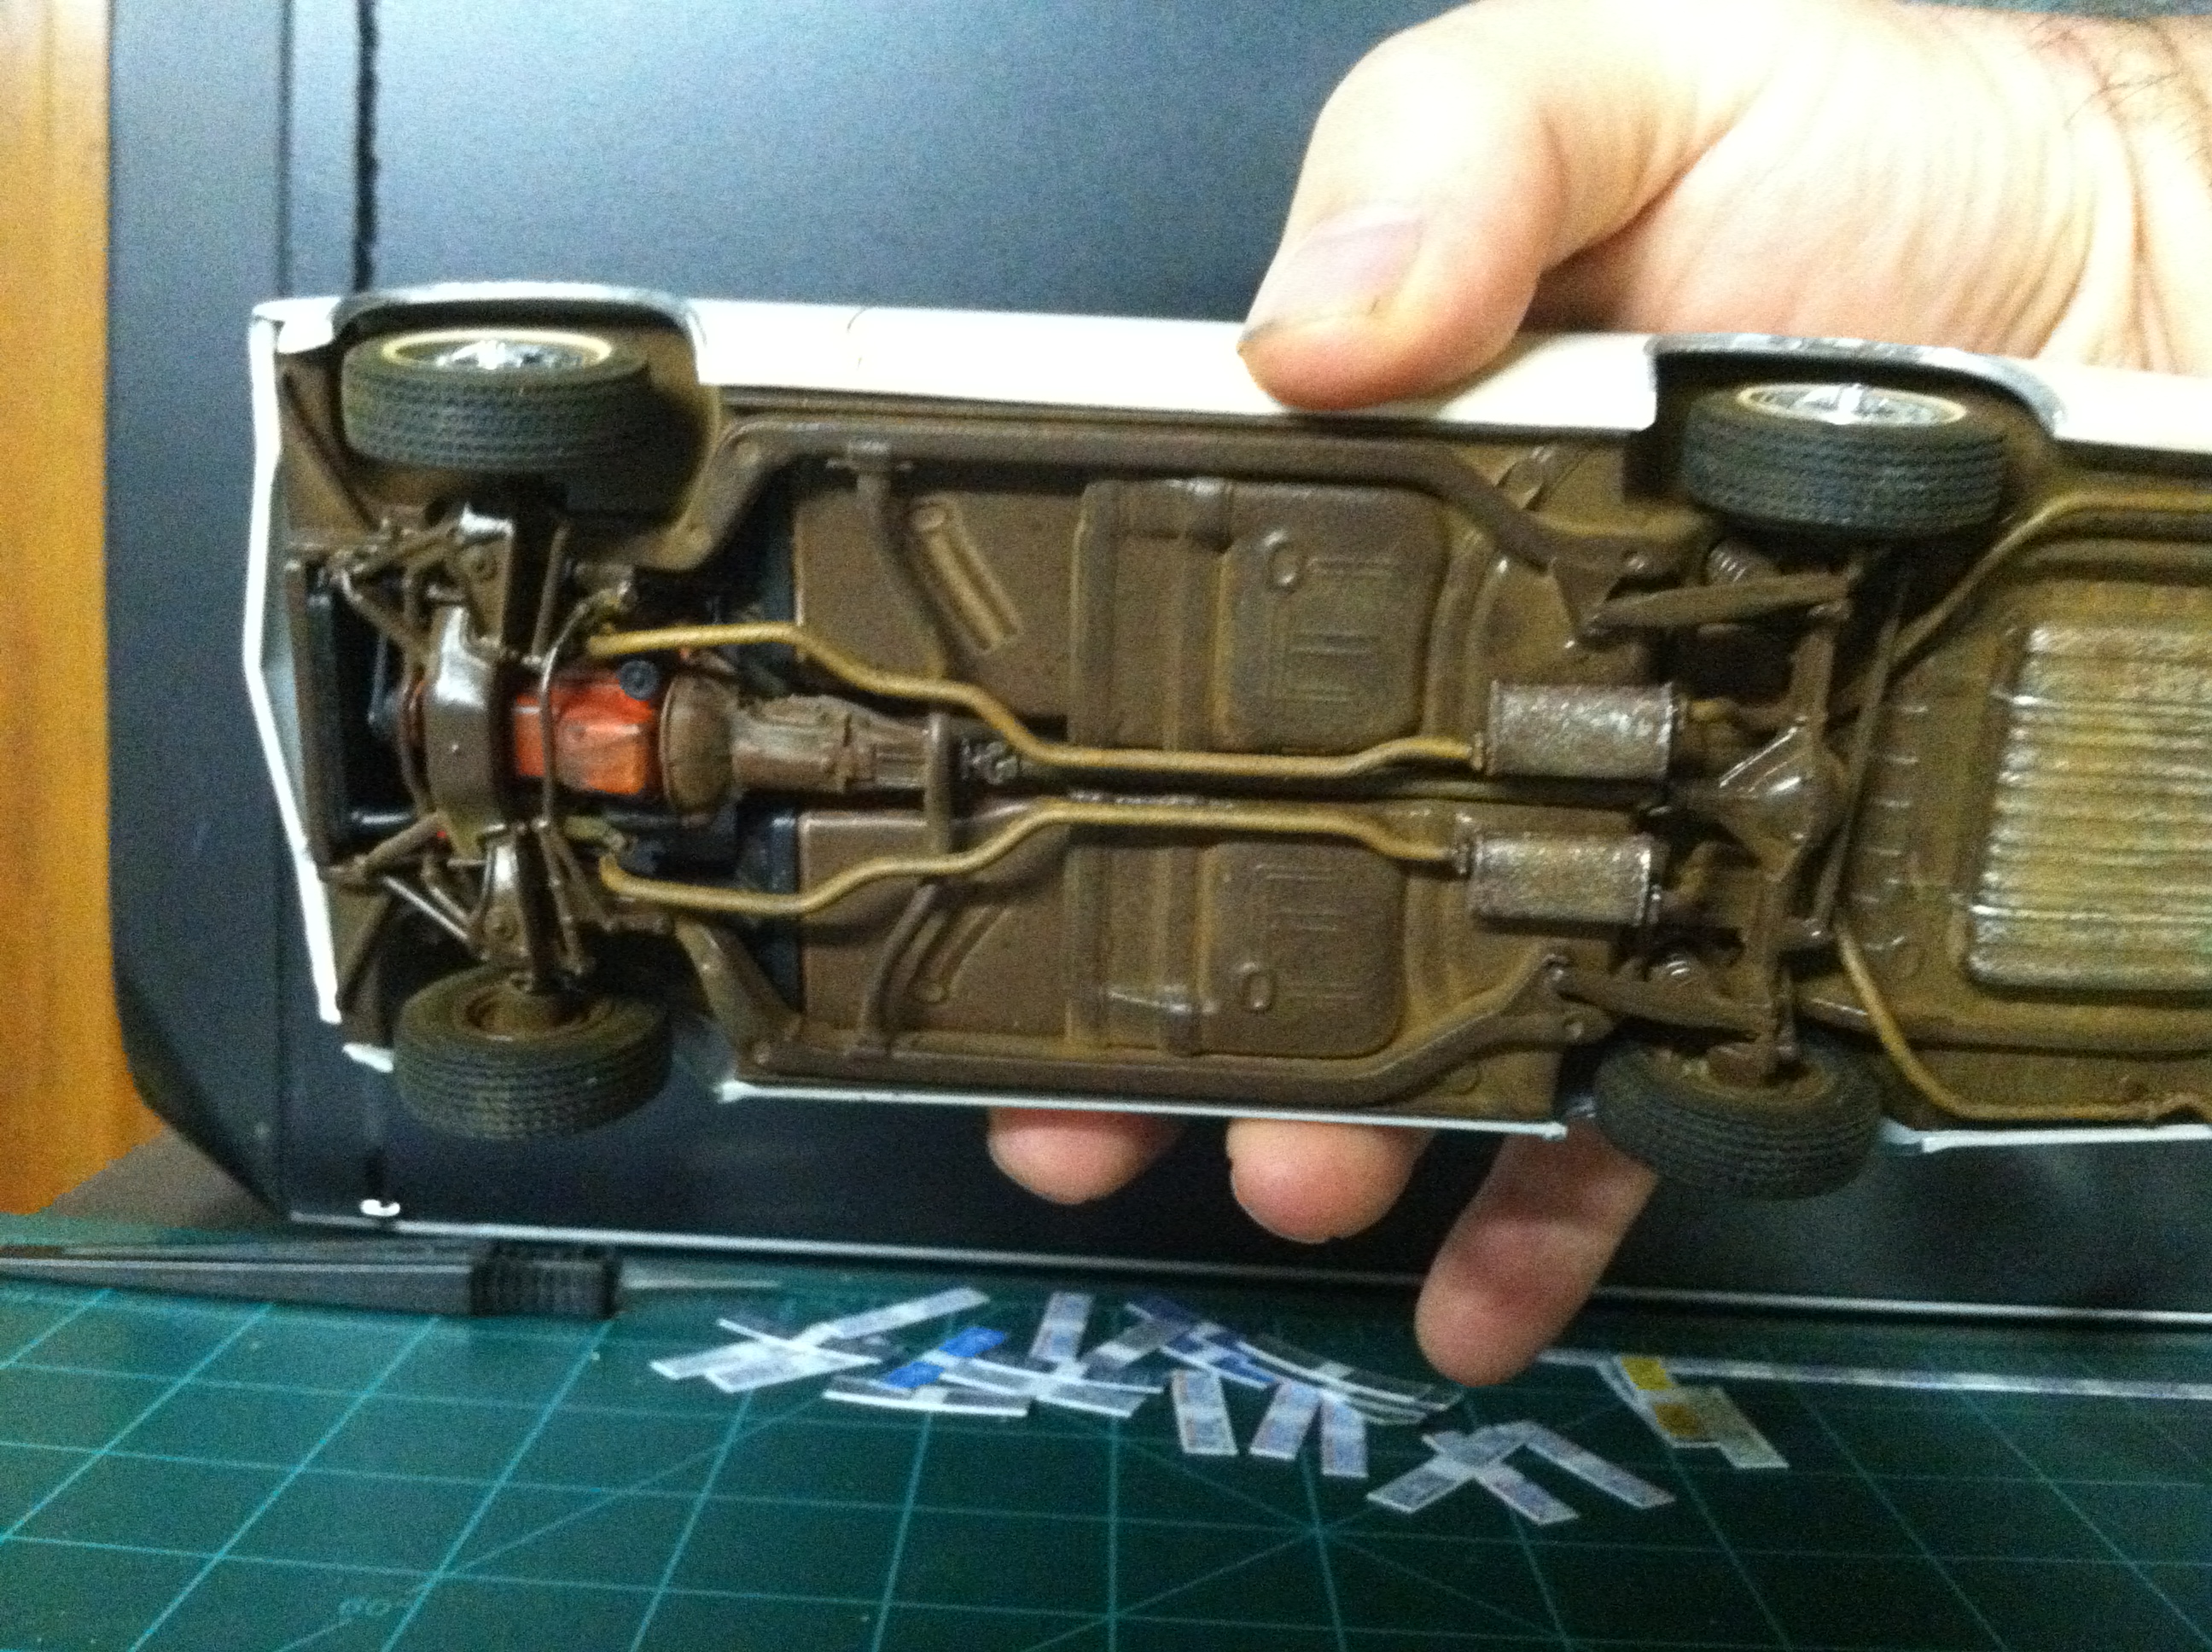
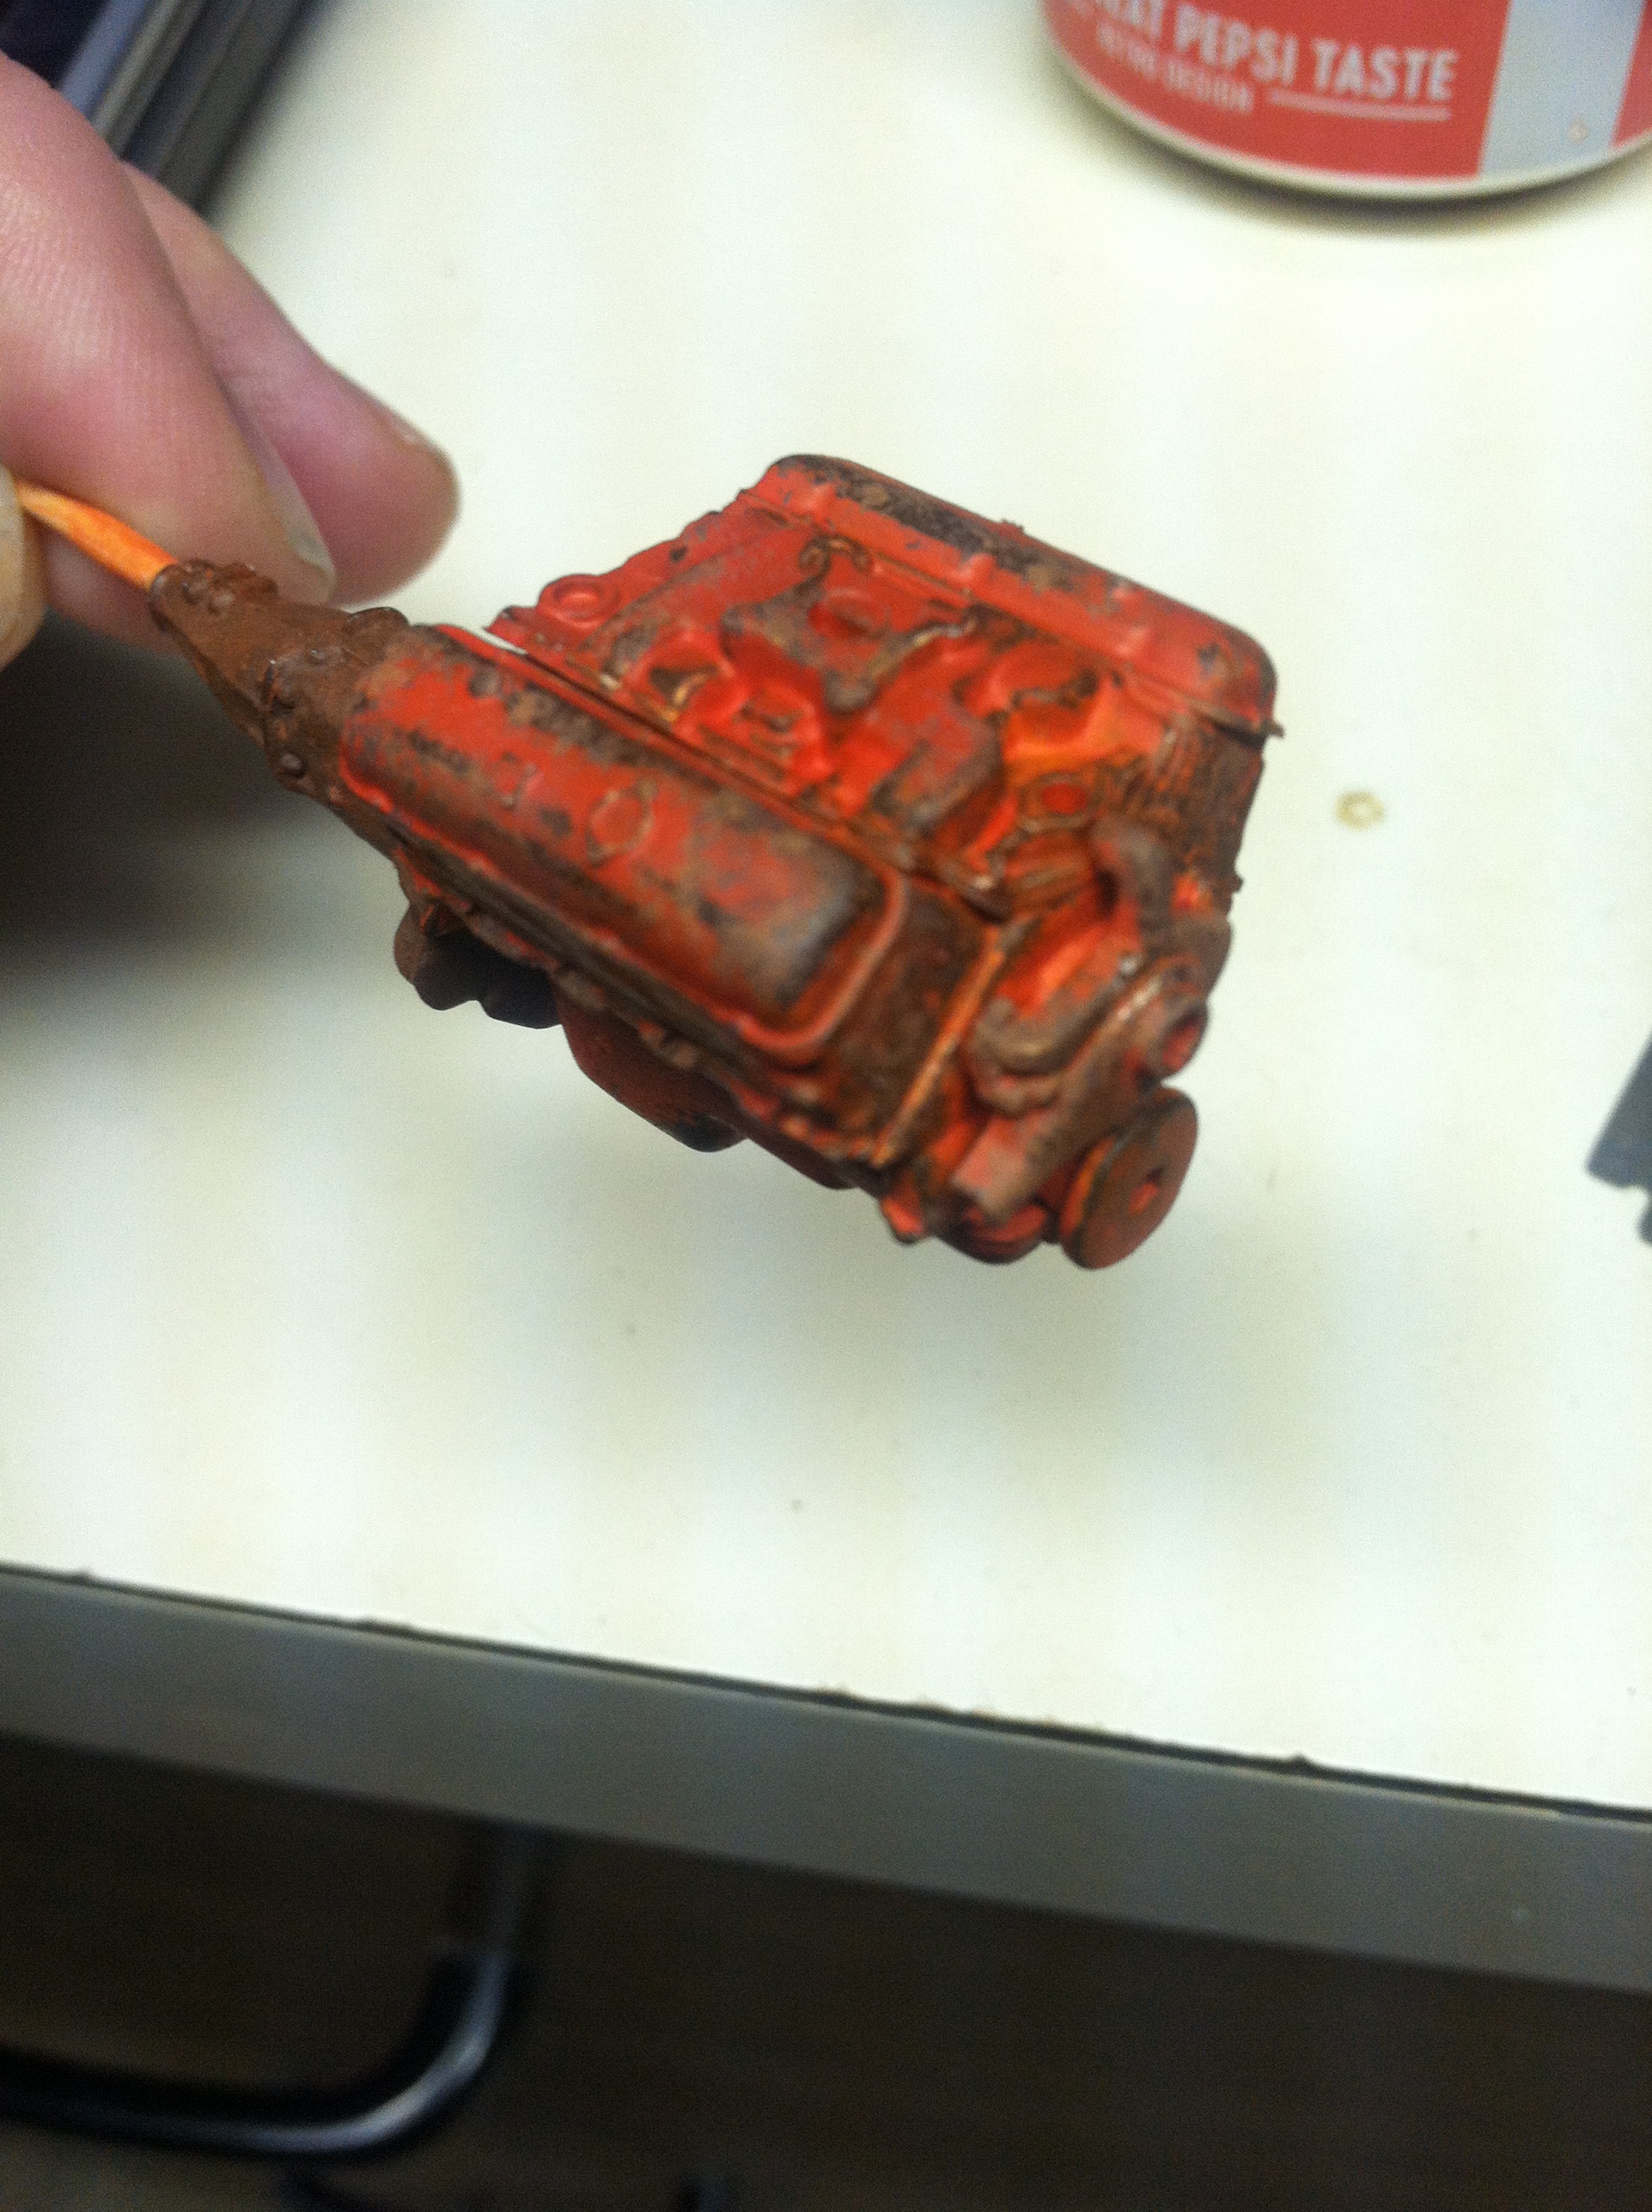
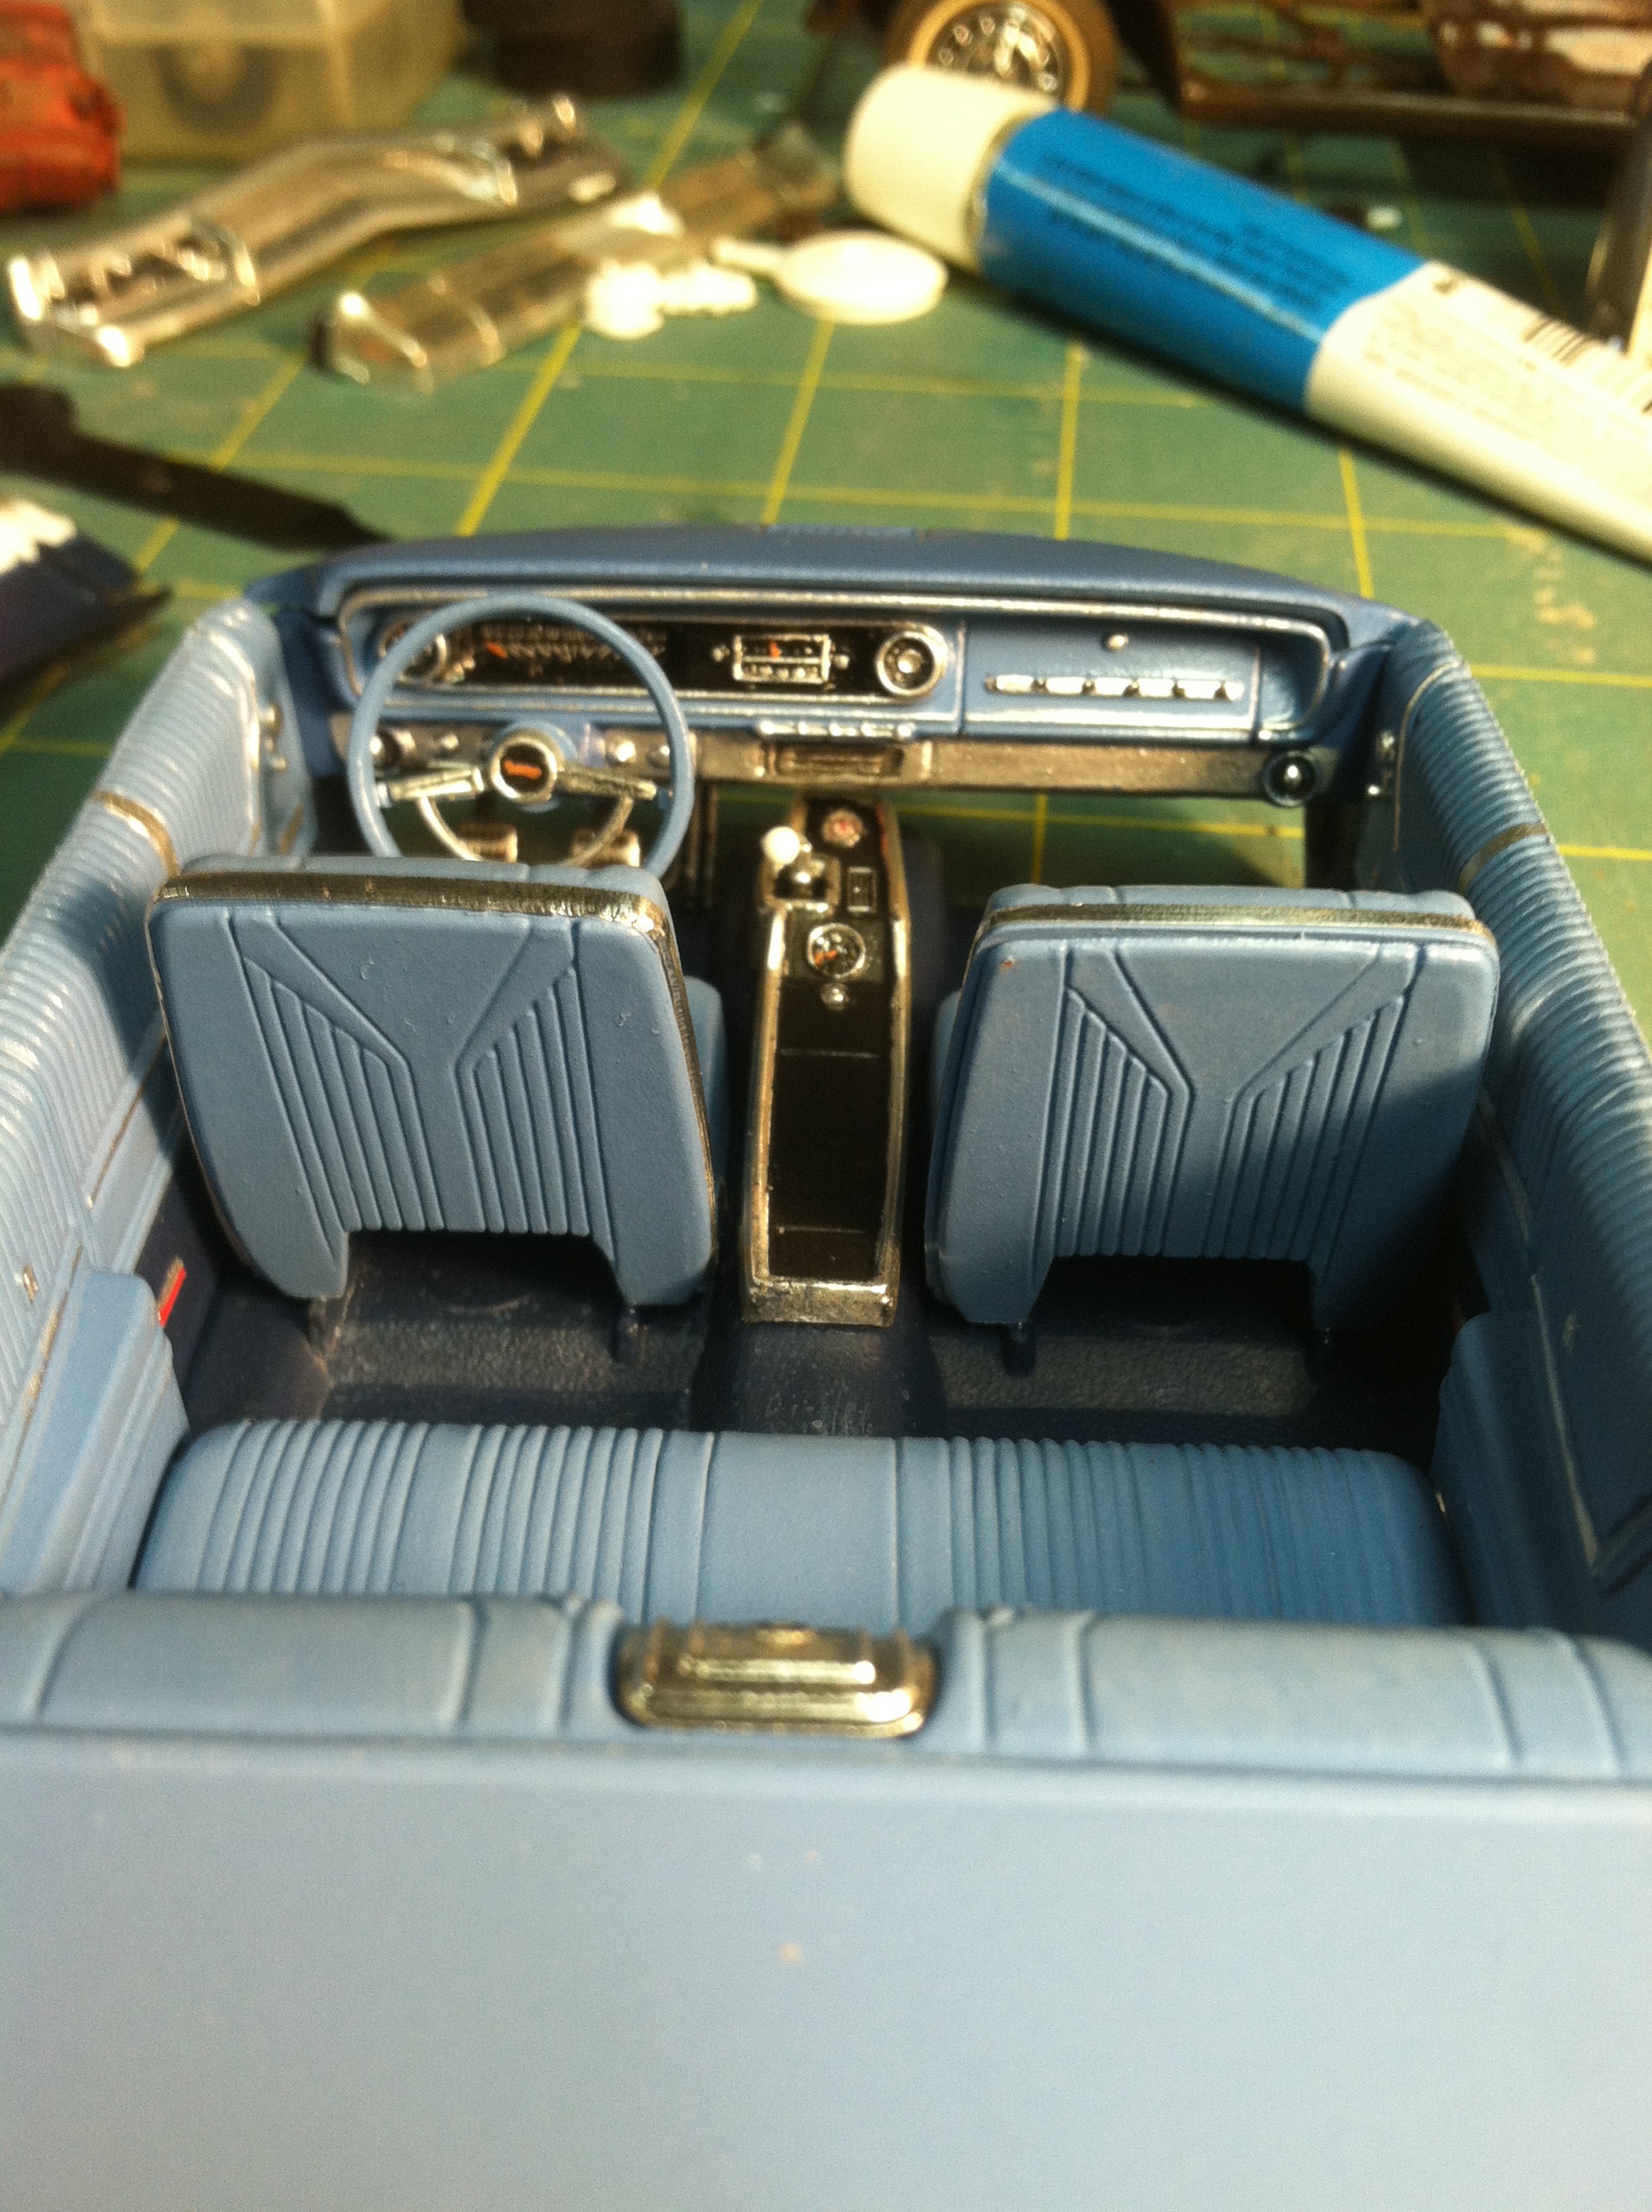
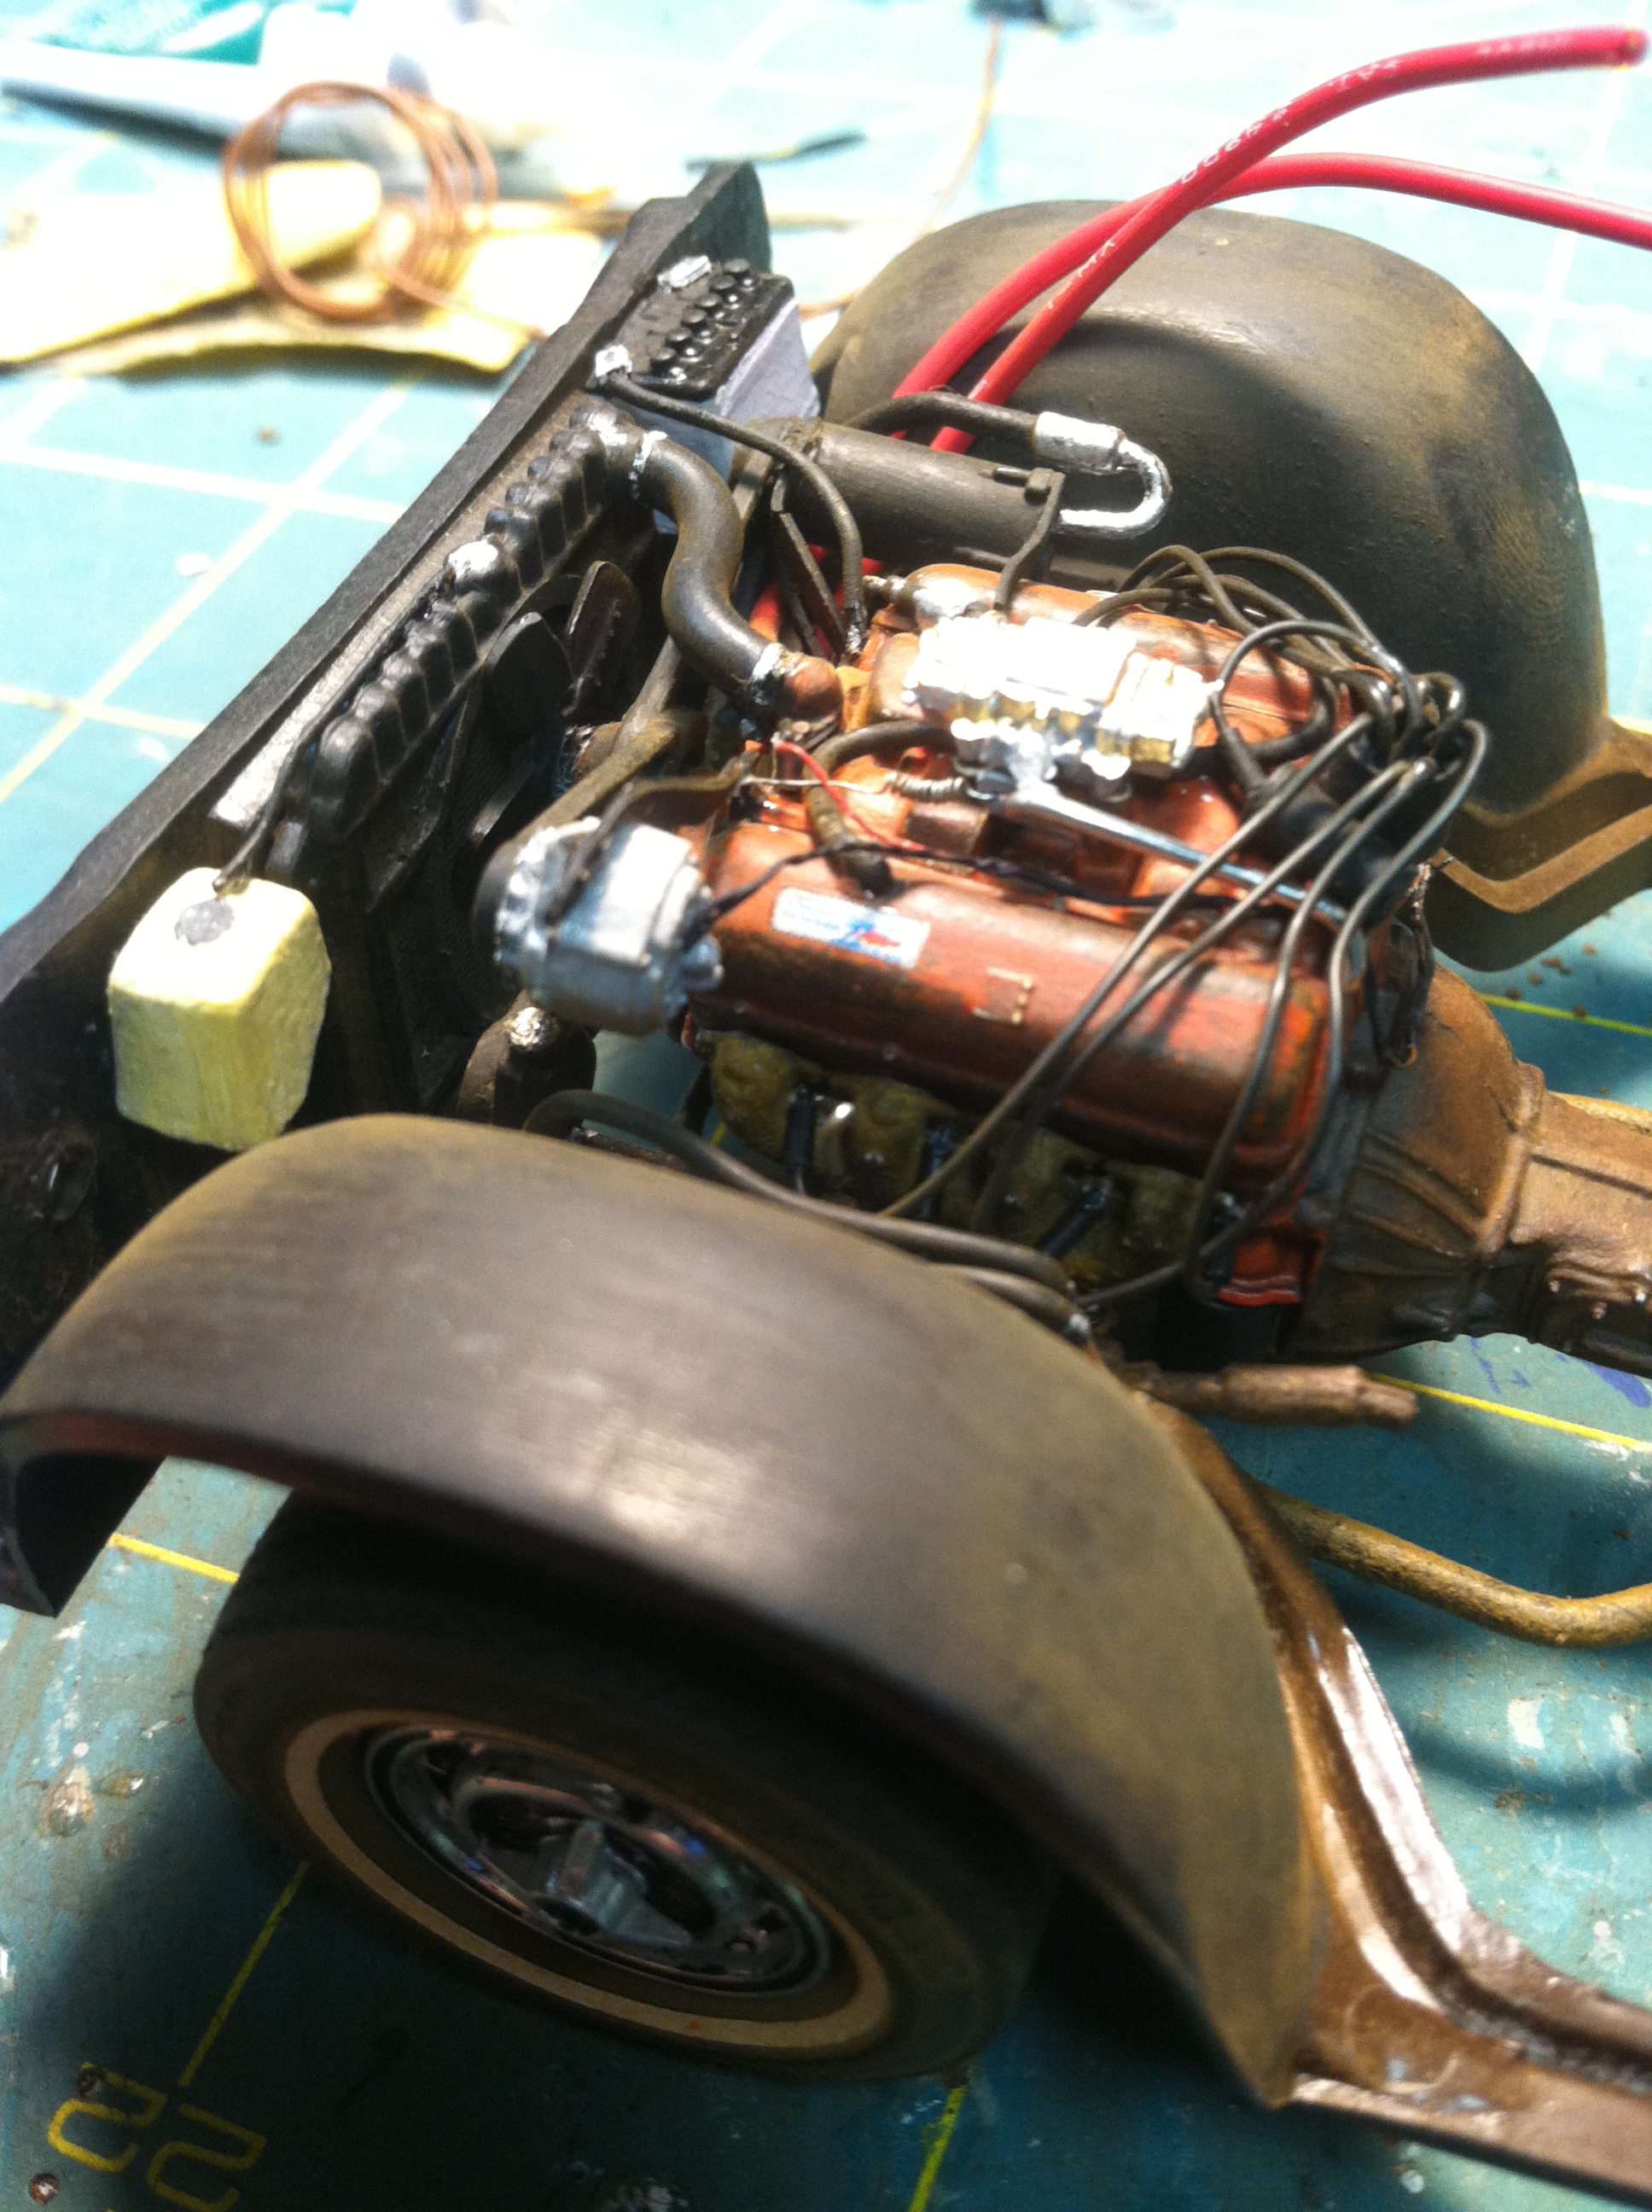
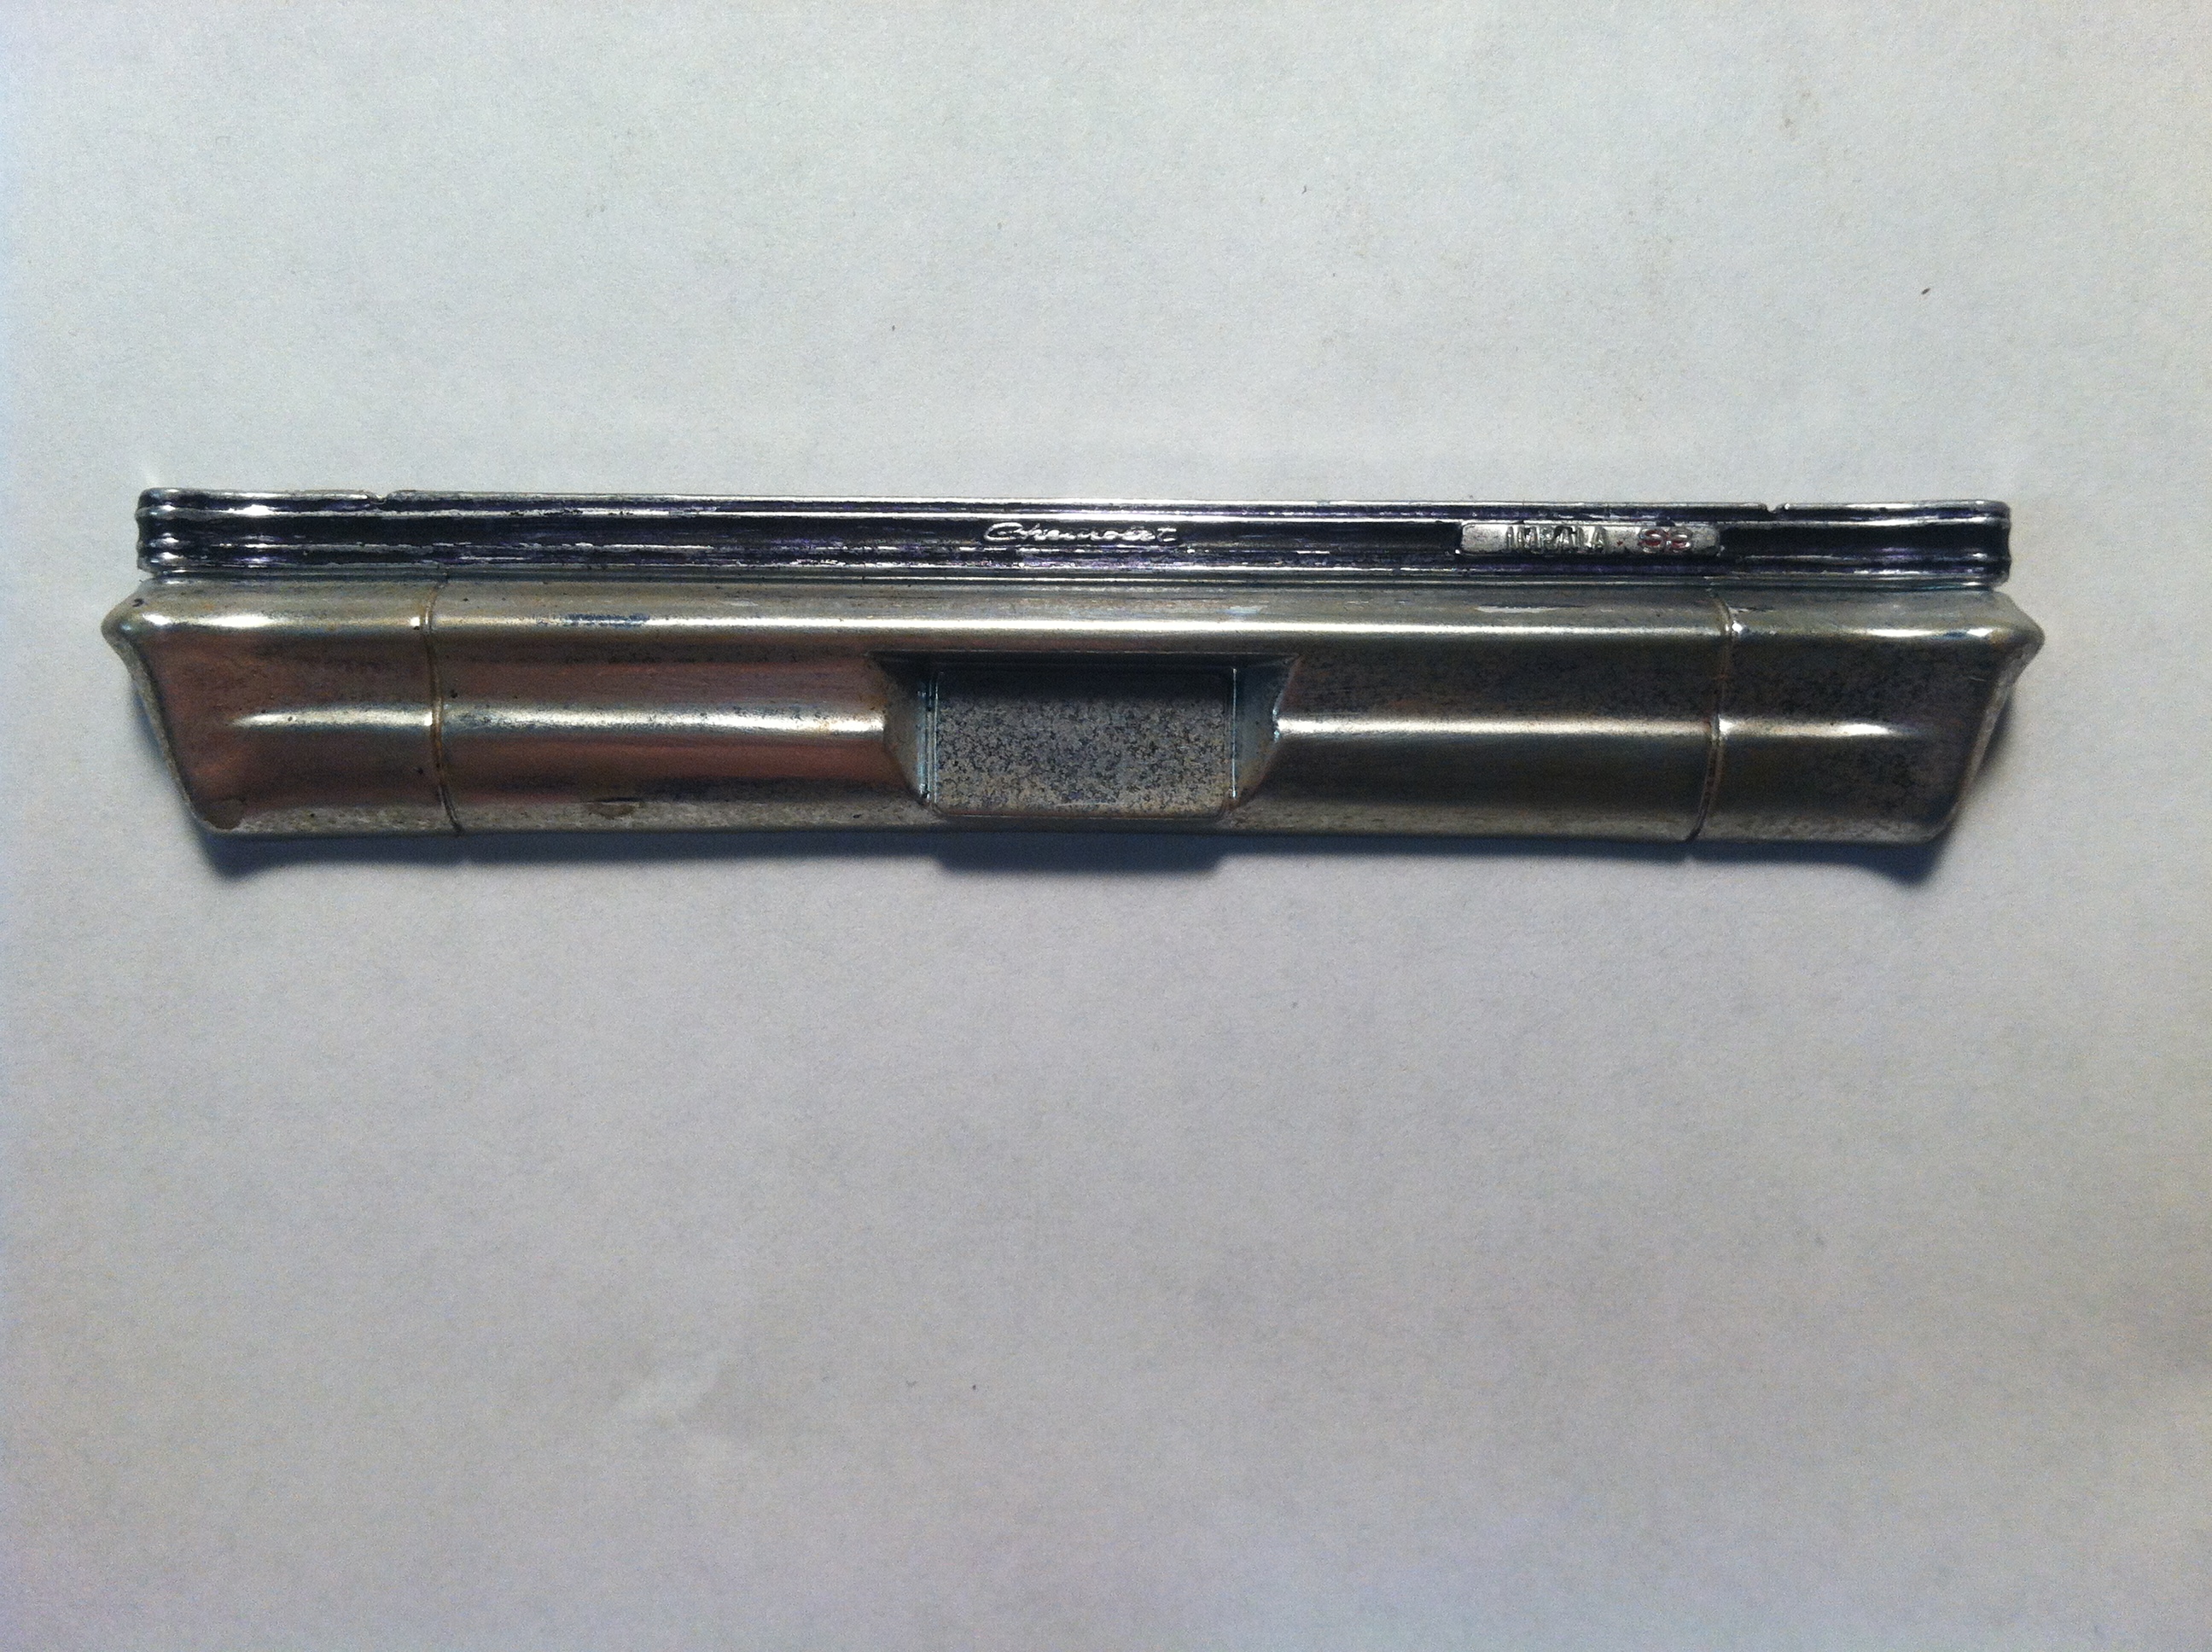
In keeping with my theme of building cars and trucks as I remember seeing them back in the 70’s, I decided to build a replica of my Uncle’s Impala SS. As a youngster I remember those rare occasions of my Aunt and Uncle coming all the way from Montana to visit. Is it sad that I remember more about their car than my relatives???? I drooled over this car every time I saw it. It was their everyday driver and only car they owned for many years. This is build number 5 for me and will eventually be a part of my large diorama I’ve been planning for years. Hope you enjoy it….thanks for looking! I started with the tires. The kit tires did not have whitewalls evenly placed on the tire so I found a Youtube video of a modeler using a compass style cutter and label paper to create his. I found some tires out of my parts box and gave it a shot. I am more than pleased with the outcome! I then weathered the tires with some road grime , sanding and stuff and this was the result. I am aware of the slight difference in tire sizes, its on purpose (fronts and backs). Next up was the engine. I did my usual weathering technique to achieve the worn daily driven look. Back to the chassis.....weathered and worn, but maintained. I need to dull down the mufflers yet! Gas tank is done. . Started the interior. I chose not to flock this as I felt it wasn't necessary due to closed doors and good texture on the kit parts. The dash is painted and the decals were not used ....neither was the kit dash lens because it looked too toyish and covered the details too much for me. I painted the dash in 3 shades of blue. The insert is lighter than the main dash and the dash pad a hair darker as my research always showed this slight variation. It also helps to create depth and variety. I scratch built the turn signal arm. For the front and rear bumpers....I weathered and dulled them down a tad and for the front turn signal lenses I used a prescription cough medicine bottle. It worked slick as all I had to do was cut to fit and glue. Back to the engine.....I scratched out an alternator bracket, AC comp brackets front and back, wired and plumbed, dipstick and temp sending unit plus a bunch more. Created some power steering hoses. Radiator support. Painted the body and did a test fit. Thanks for looking.....will post more as it comes together!
-
Mostly OOB, only change swapped wheels from the '48 Caddy onto this (originally, I was going to strip them down and repaint them, but after seeing the purple pond take off the red trim on the wheel without getting the chrome oddly enough I changed plans). Paint is Tamiya TS-20 Metallic Green cleared with Pledge with Future. Apologies for the spotty lighting in a white bookshelf, this is only makeshift till I get things in order since I moved into a former siblings room months ago since I got anything done and still setting up.
-
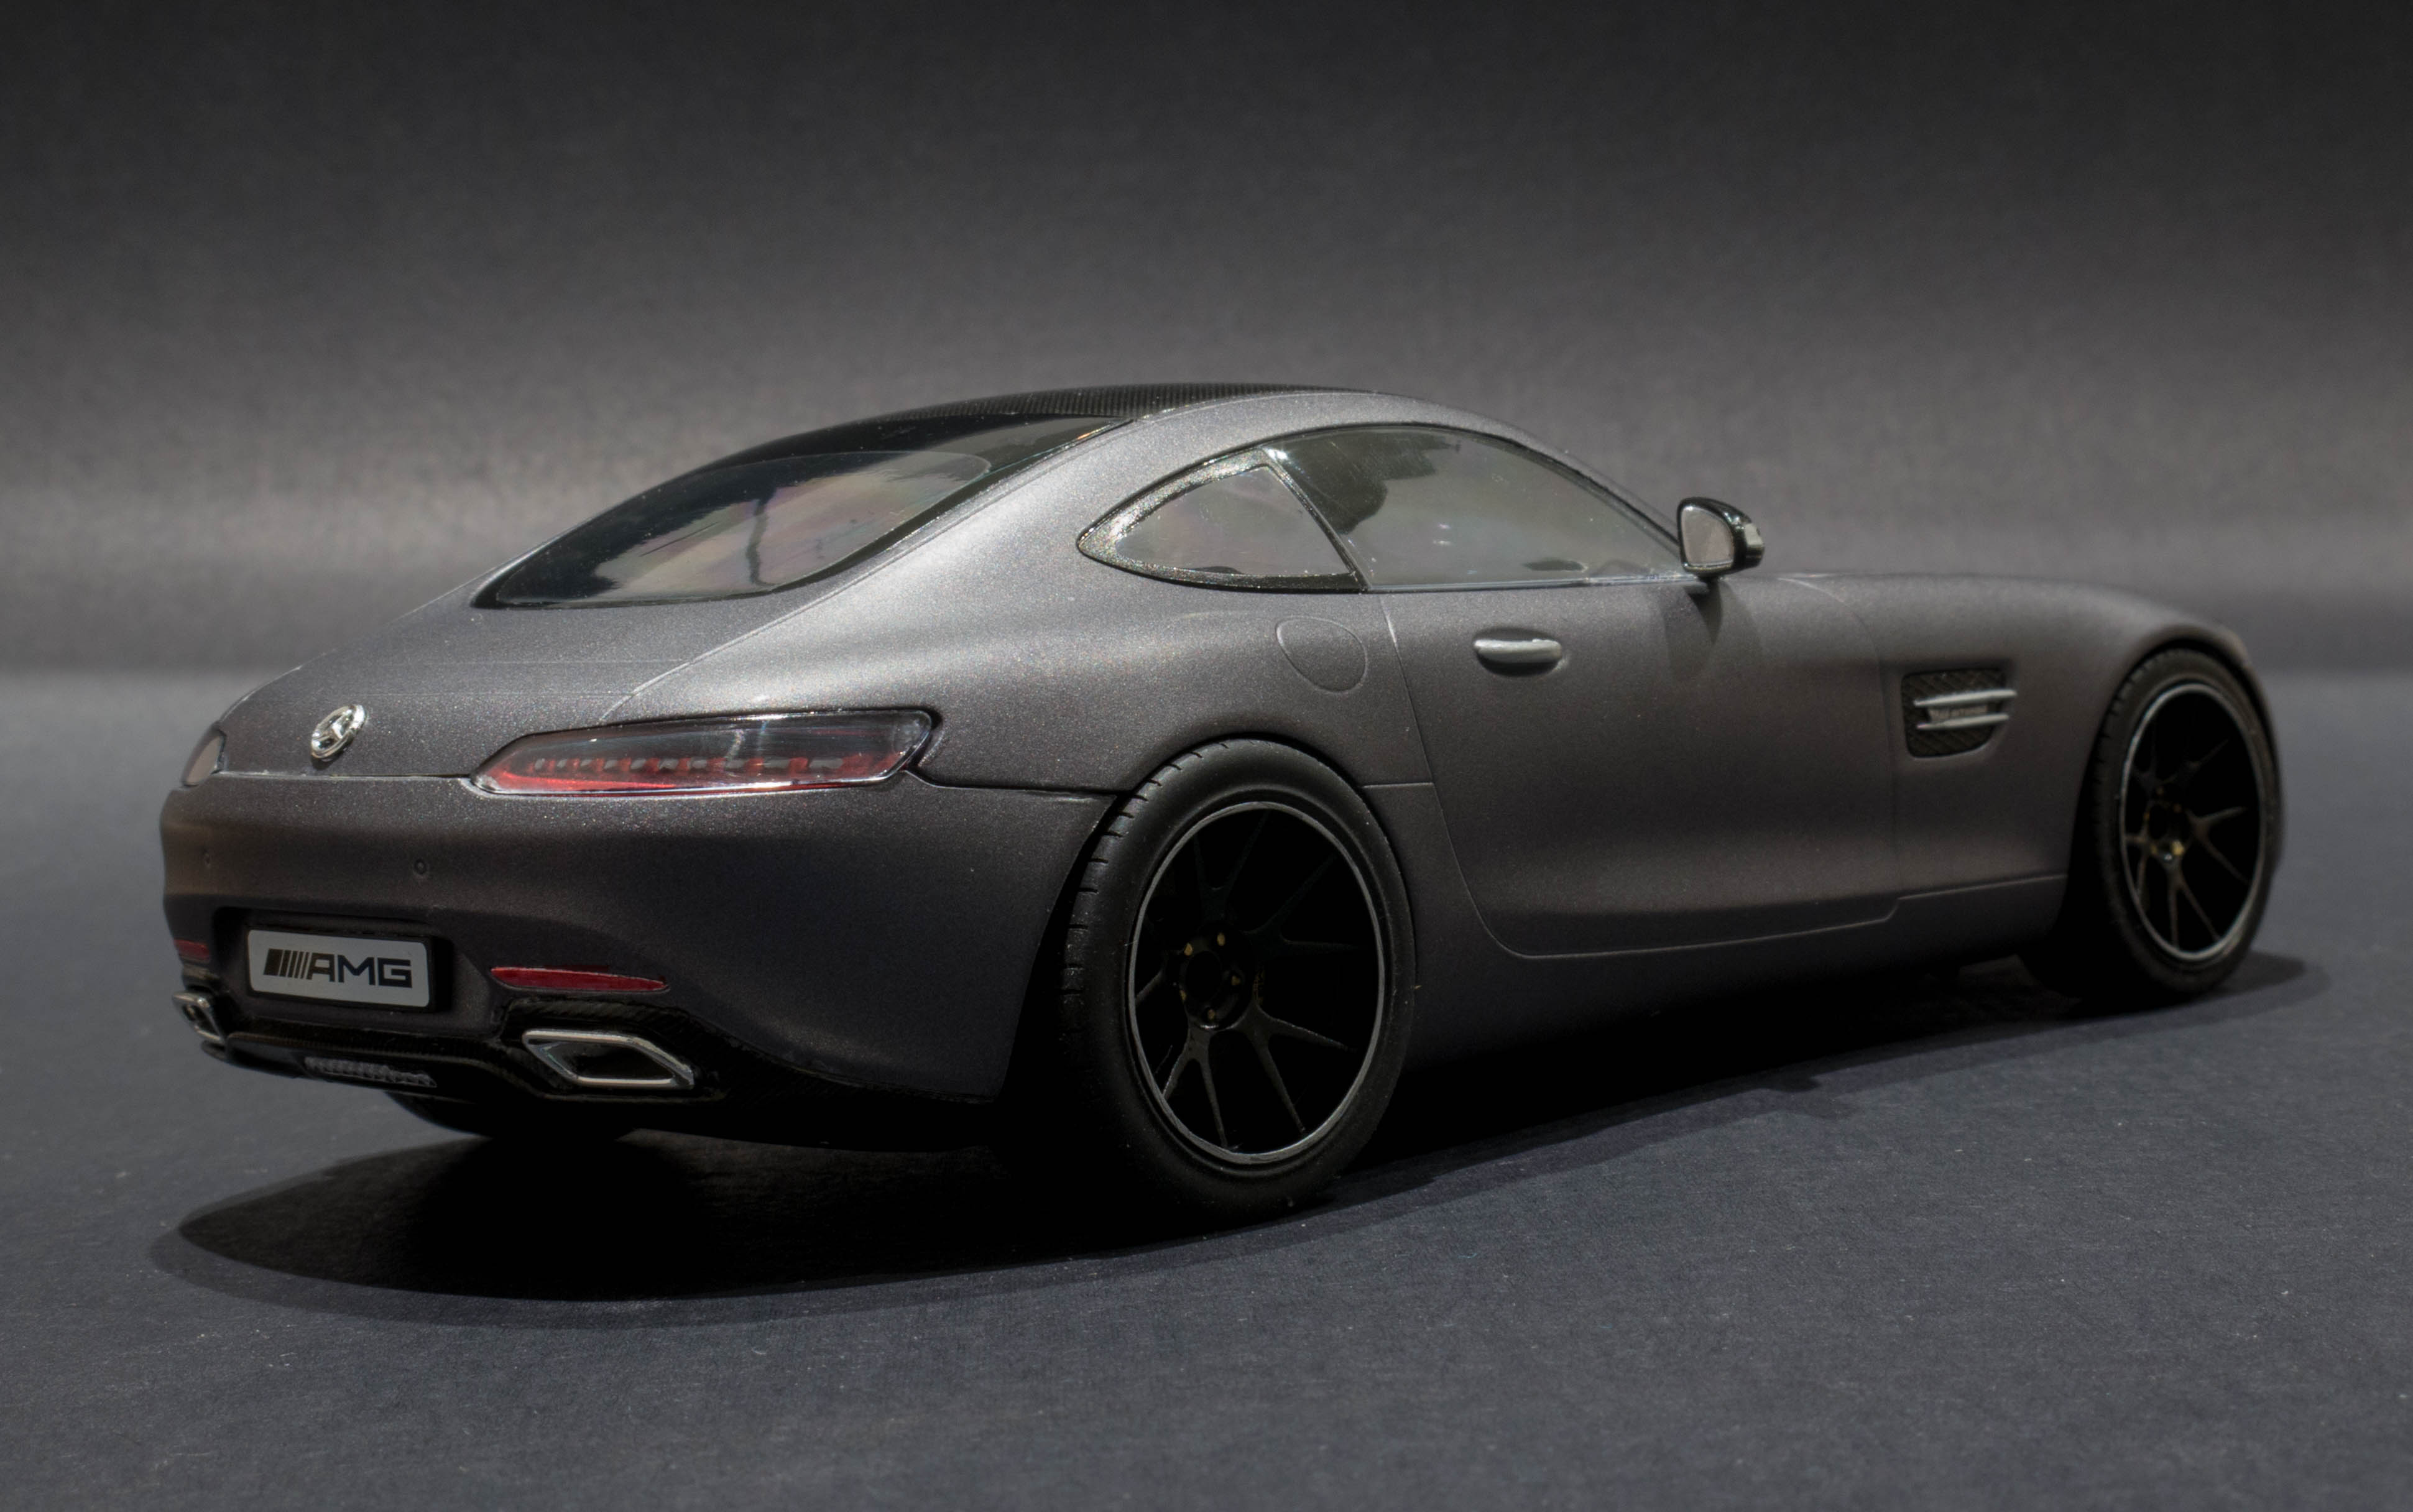
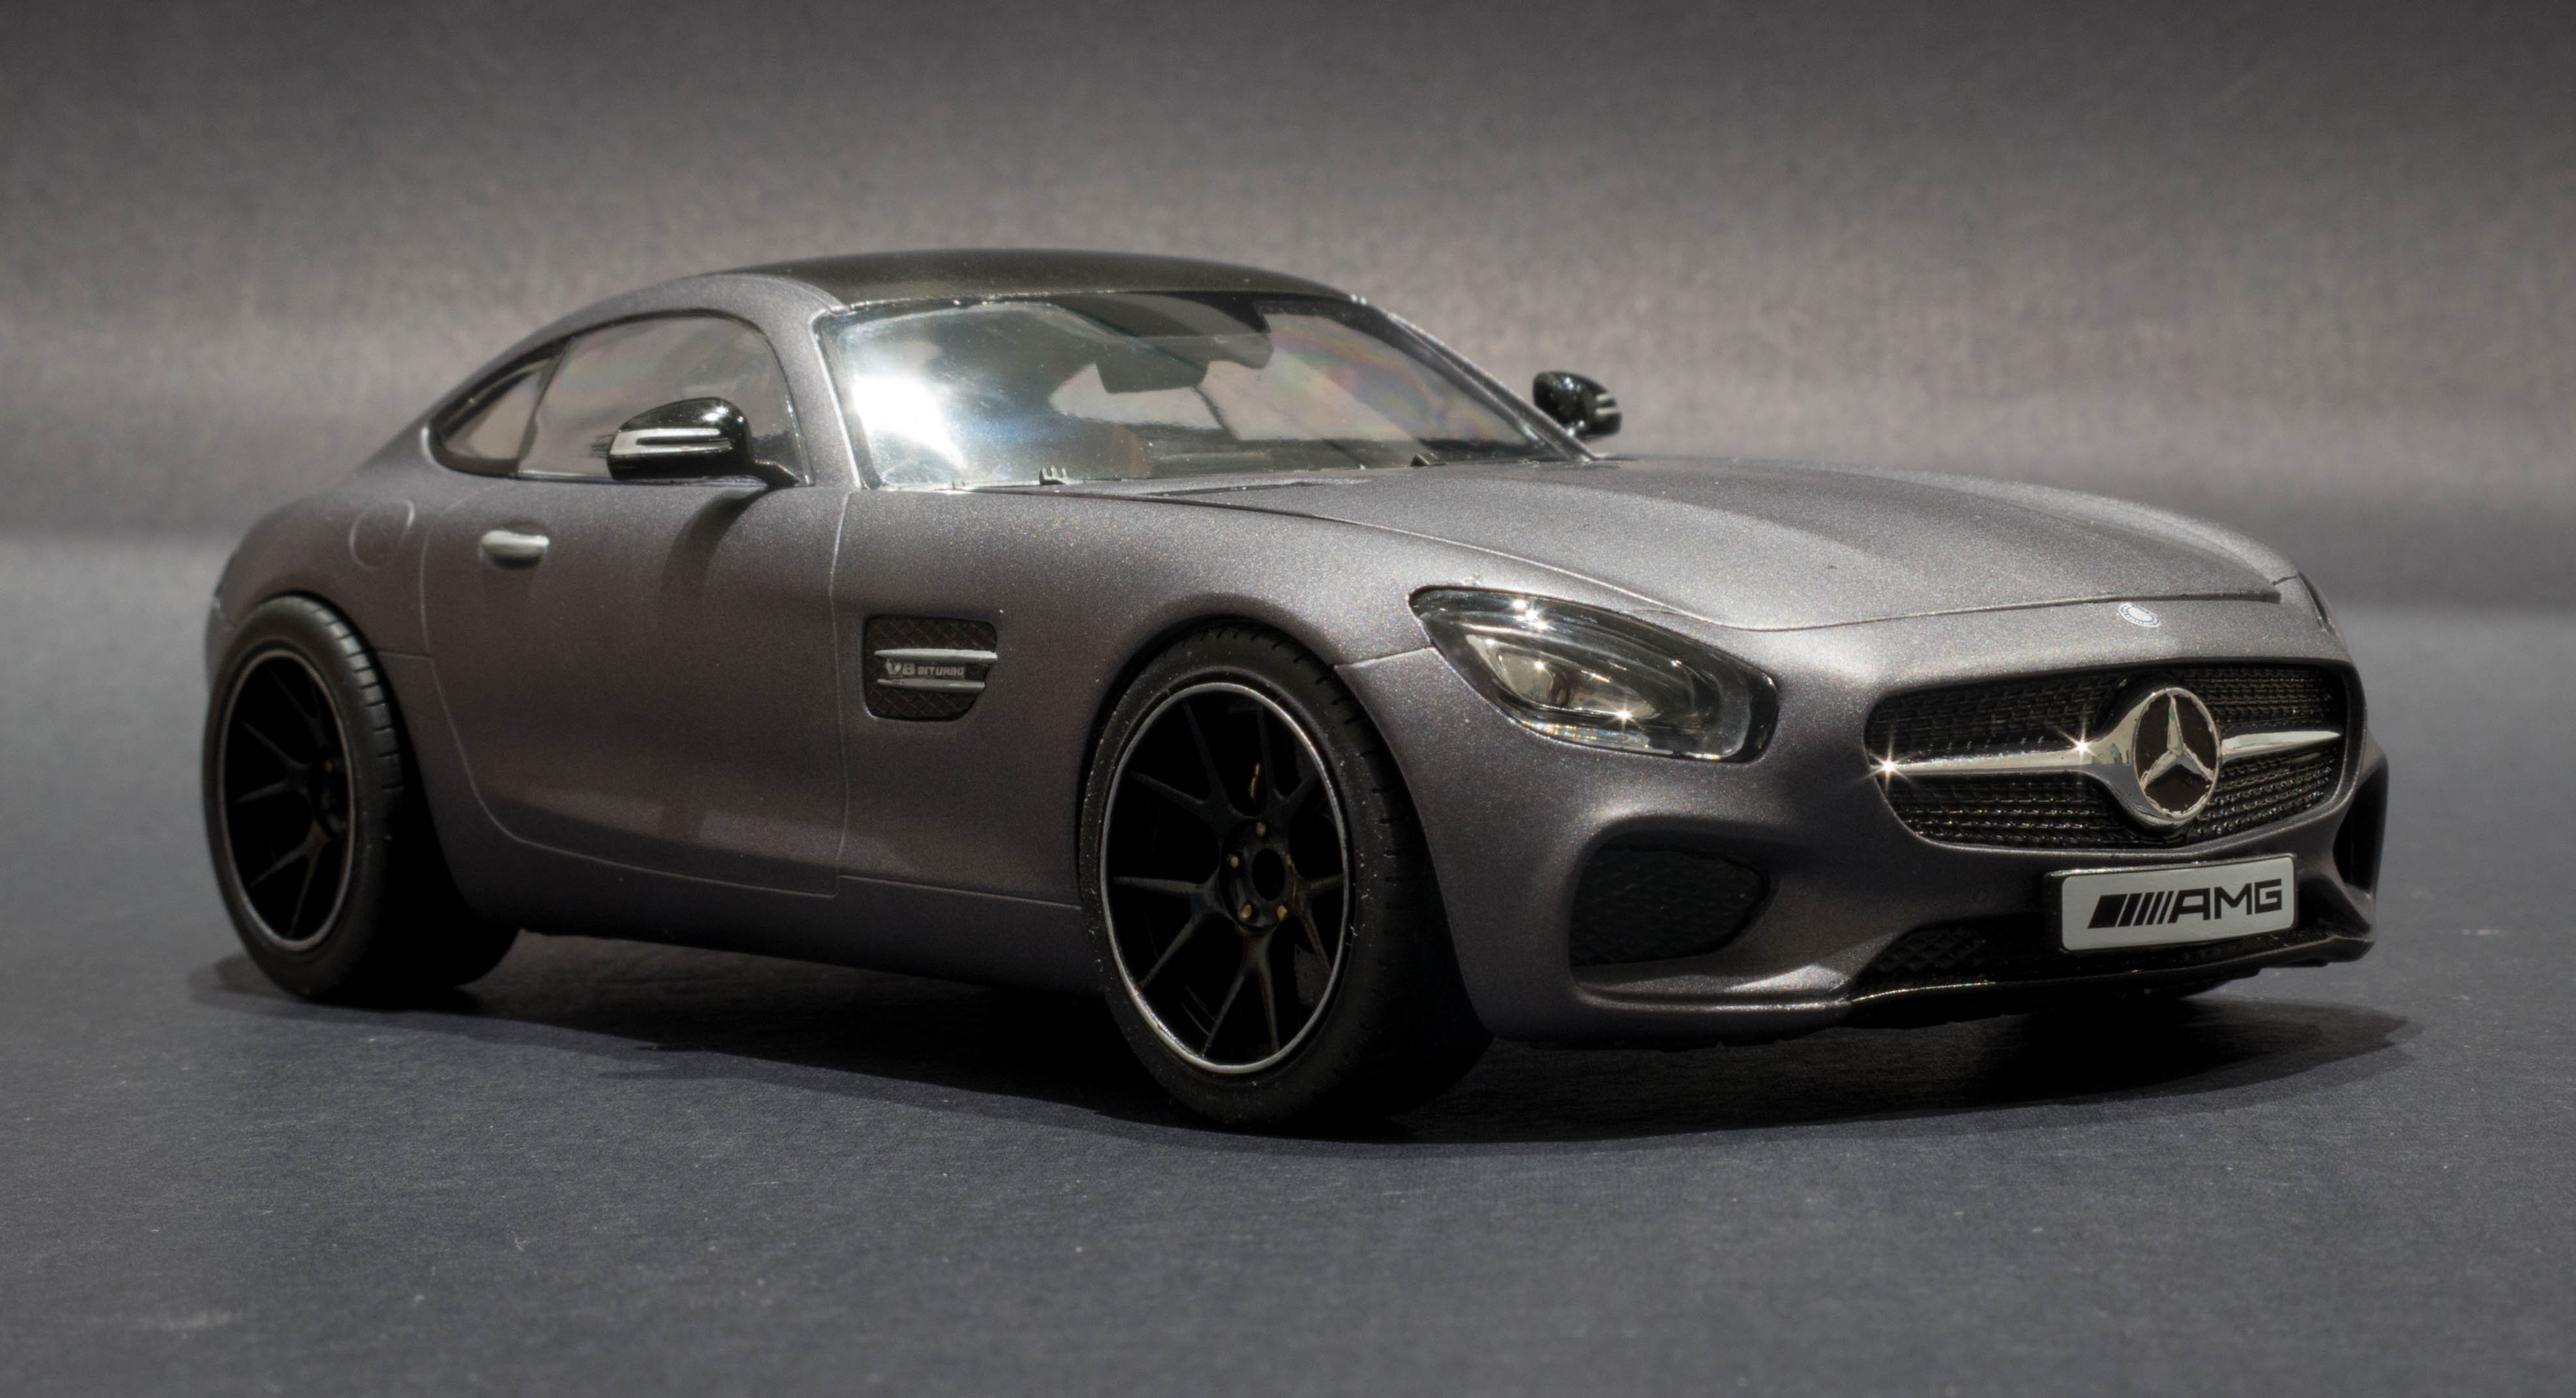
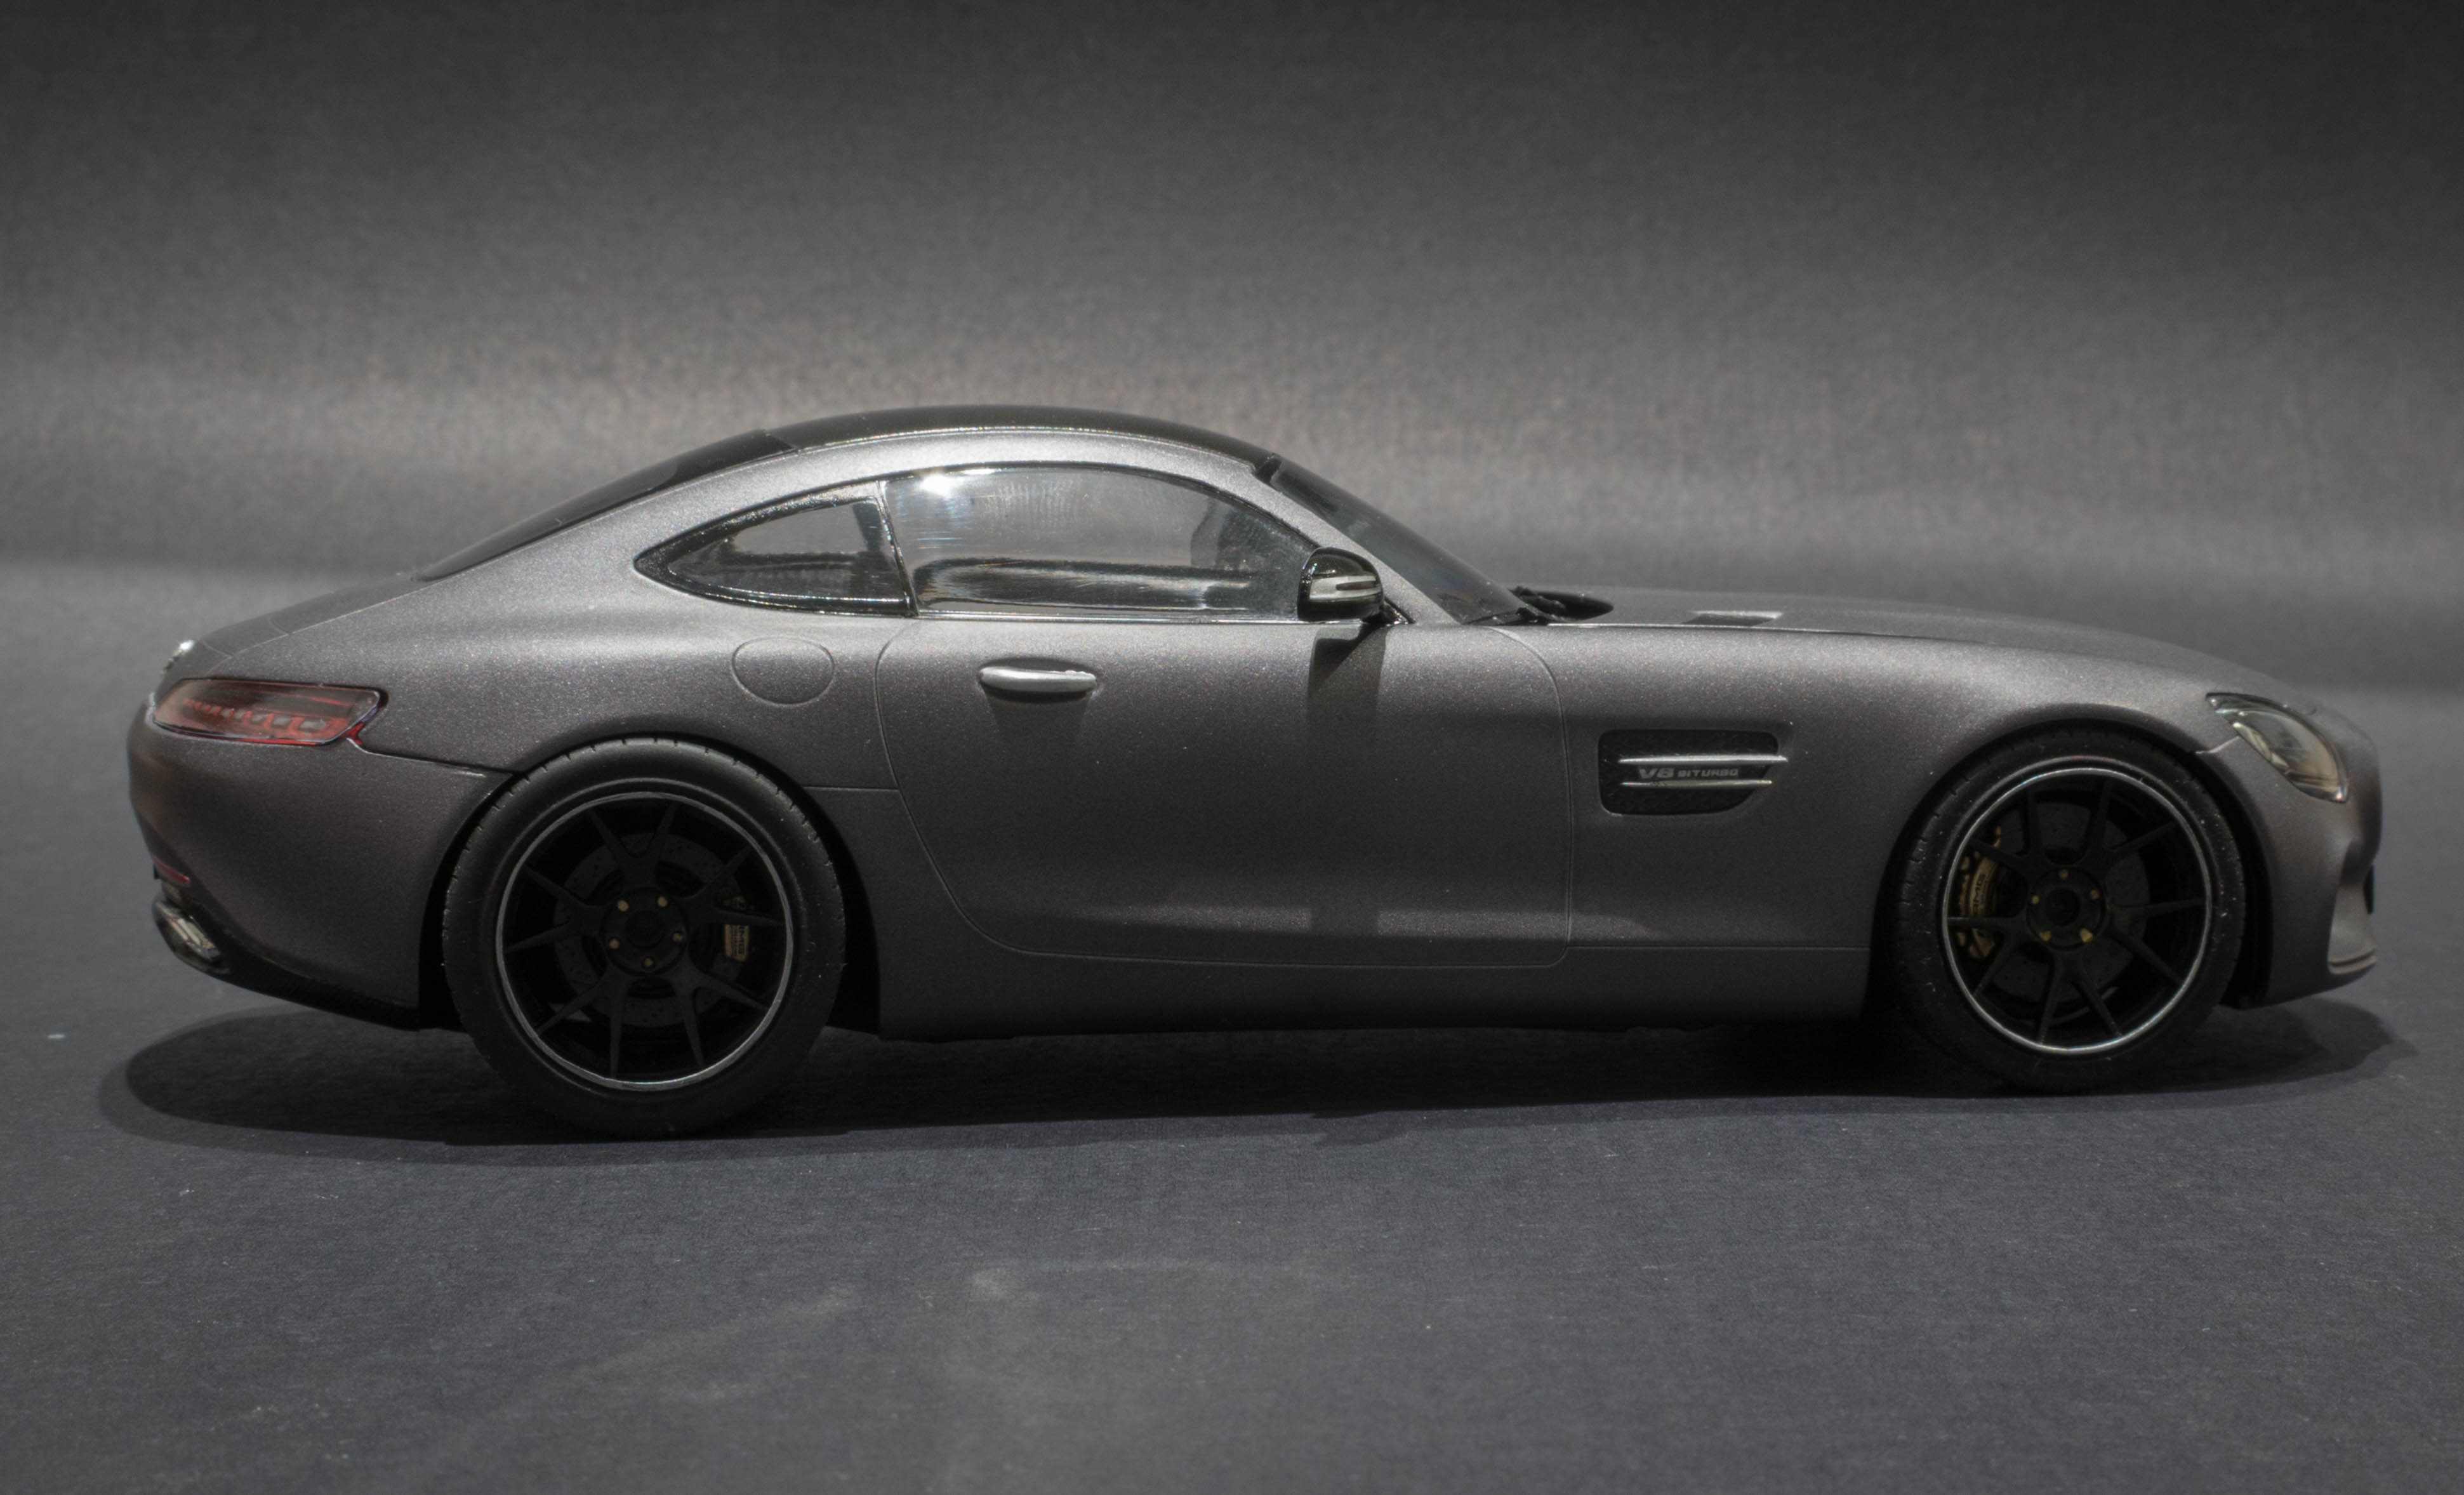
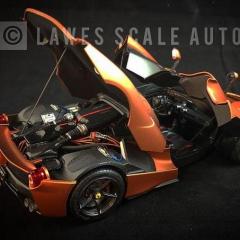
Hi All, I just completed my latest build of the AMG GT from Revell. First up, I was excited to try out this kit, as I had heard that Revell had stepped their game up with their latest kits, but was disappointed with the way the body and chassis came together. The bumpers and fenders didn't quite fit, resulting in a few bad panel gaps. I was also disappointed with the lack of detail for the headlights and taillights and how they fitted to the body. My final criticism of the kit is with the wheels and ties. The scale of these seem quite off compared to the rest of the car, so i went with aftermarket ones from Factory eighty one. Below is the final outcome of this build. Thanks Nathan
-
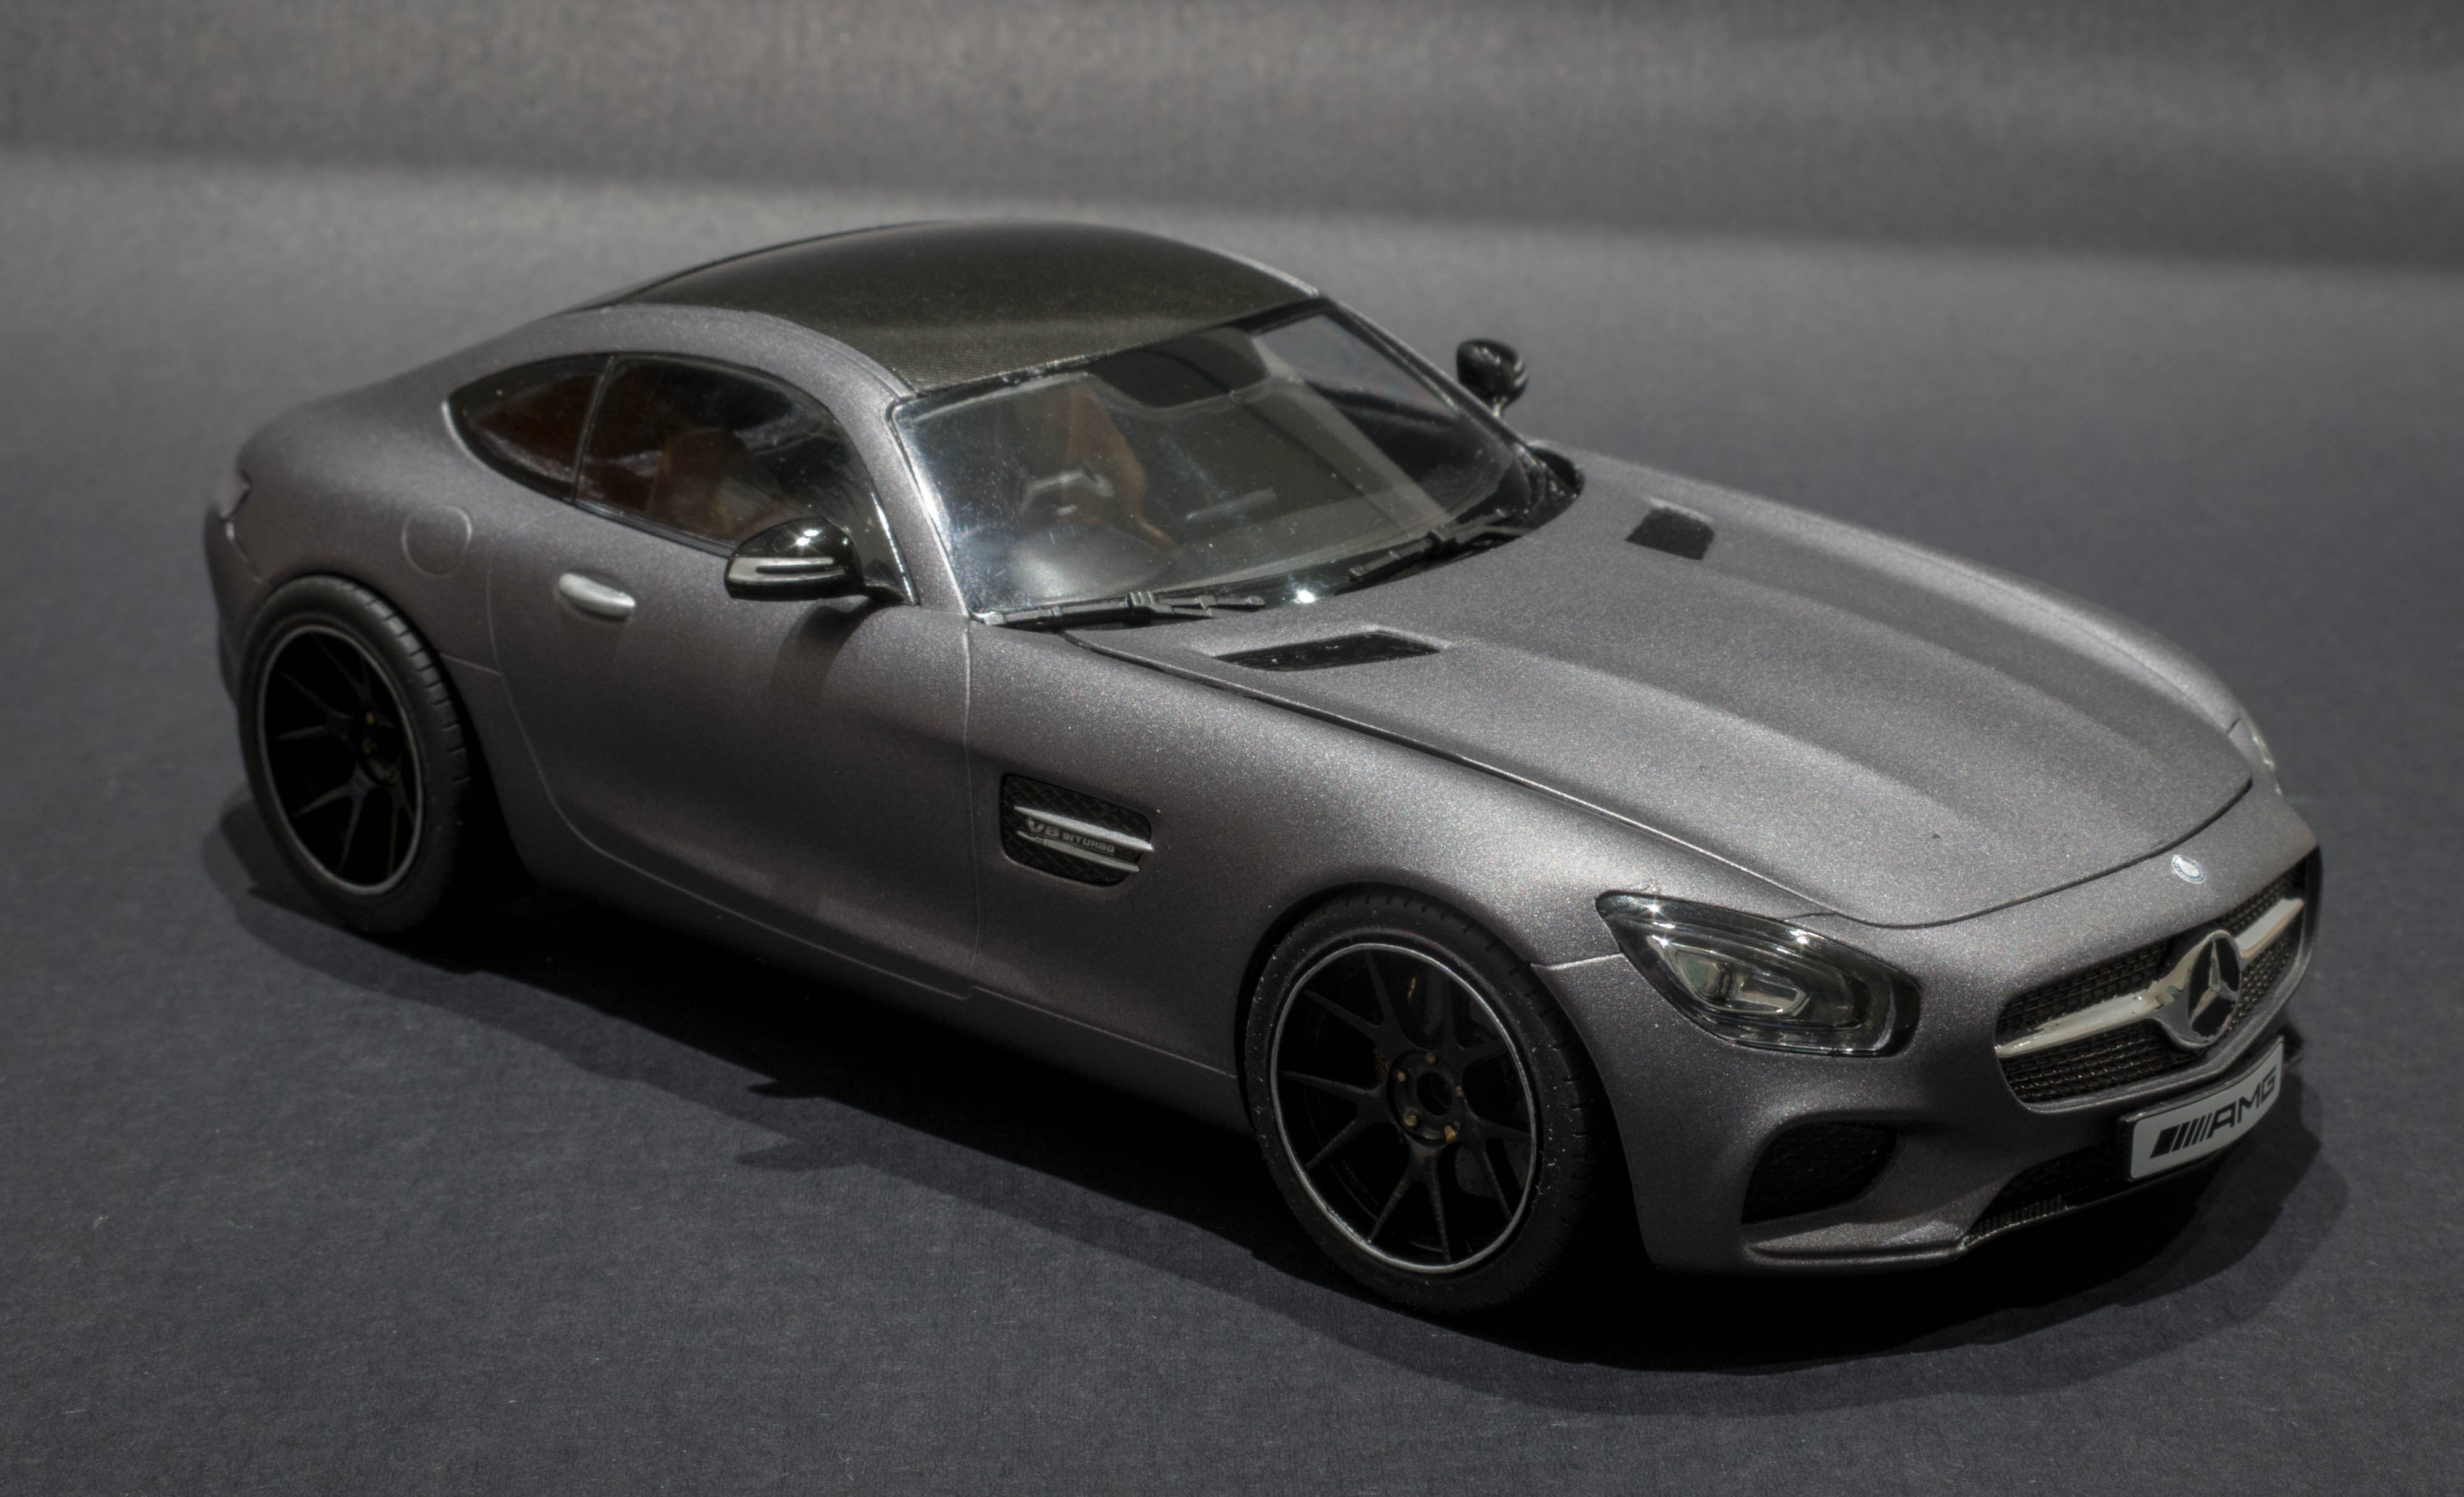
Hi All I have just finished my Reell AMG Gt, I used Gravity Colors NSX Blue and Plamoz wheels and detail up photo etch, overall I am happy with the build, Slightly ennoyed on larger screens they seem dusty!!! so make take some more images lol, had a couple of speed bumps at the end, think I have done to many Revell kits for time being and looking to do something different, Im sure my next build will be even better as I seem to progress each build as I am sure we all do, please follow my instagram should you use it instagram.com/lawesscaleauto Thanks Chris
-
 Hello friends Today I bring you an assault cannon, the most produced in Germany during the Second World War. The Stug in its version 40 Ausf. F / 8 of the Revell brand at 1/35 scale, with an exterior finish suitable for snowy areas. https://youtu.be/iwY8mKYWtwE Greetings and I hope you like it
 -
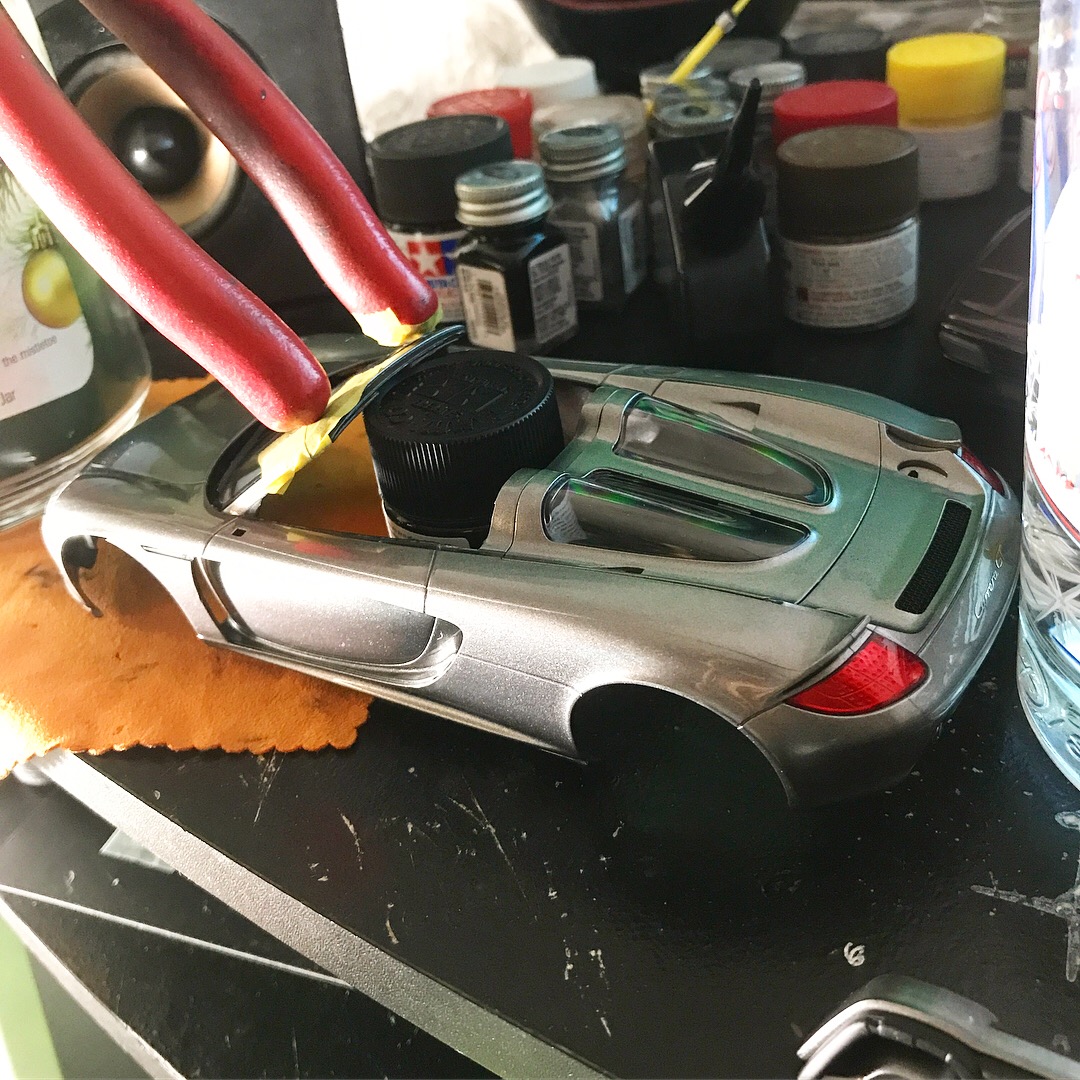
 One of more recent build. I found this kit on eBay for a great price (both rear door panels are missing) but I couldn’t refuse. Its pained model master emeral green metallic spray can with a testors high gloss enamel clear coat spray can. The interior is just flat black and wheels bare metal aluminum spray from Tamiya. Opinions??
-
So I’m new here, but this is what I currently working on. It’s almost finished but what is everyone’s honest opinions?? Its painted Tamiya light gunmetal spray paint with a testors high gloss enamel clear spray can. I used splash paints polishing compounds on the clear. The interior is painted Tamiya red brown and aluminum. Wheels are gloss black and chrome pen.
-
I'm looking to pick up one of these 2 door sedans. Plus or minus of these 2. I know the AMT is an older tool, but I read about the Revell having shape issues. I'm looking for a nice shelf model, so simple chassis is not necessarily a major drawback.
-
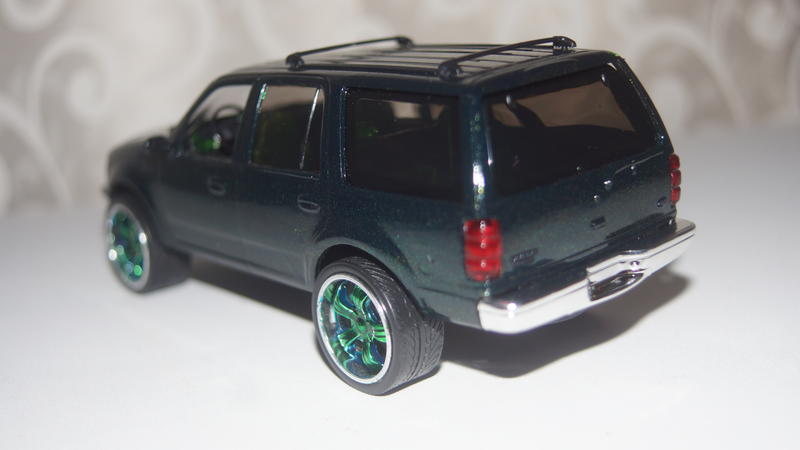
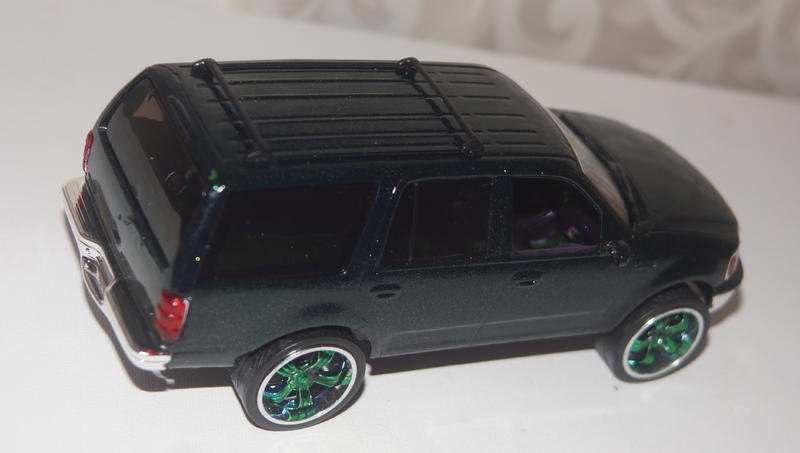
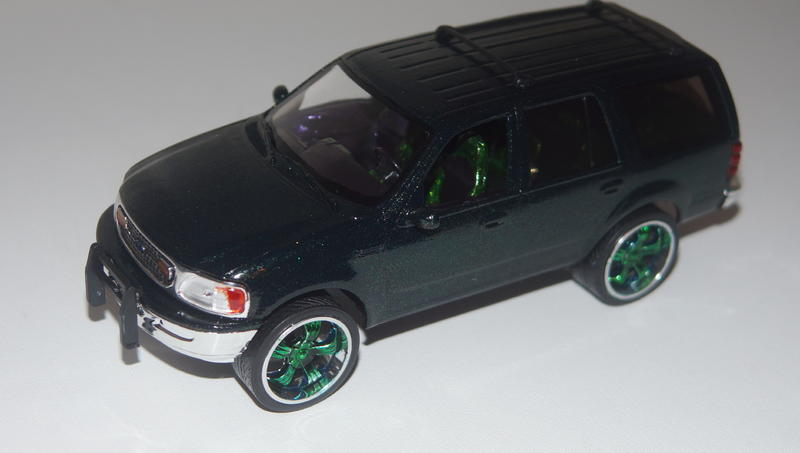
 Revell 1:25 Ford Expedition Hello friends! I would like to introduce you to my latest completed project. This is the Ford Expedition by Revell as a snap kit. He was originally set up as a police ssv. Enclosed in the kit the labels as self-adhesive ending. I didn't like that and I built the Ford as a civilian vehicle. The wheels come from another kit. Have fun watching. Paint with a gold-colored spray on black body. Over it turquoise glass paint. With the golden shade the colour is greenish. I would be very pleased about comments. Greetings from Jan