Search the Community
Showing results for tags 'revell'.
-
Hi All, The other week, i was overseas for work, and went to a toy shop near by to get some presents for my nieces and nephews. The store also had a small hobby section, so i couldn't leave without getting myself a present too I bought the Revell AMG GT kit along with the Revell Mk1 Golf GTI, which i will build sometime in the future. Normally i dont like revell kits, but i heard that they have gotten better. (we'll see) first up i sanded back a few mould/part lines on the body and prepped it for painting. My plan for this build was to do a matte or semi gloss colour to do something different. Tamiya have recently come out with a new colour for their GT3 version of this car which is a semi gloss light gunmetal. My LHS didnt have this colour in stock, so i got the Gloss version of the colour (TS42) and will do a Semi gloss clear coat over the top. This kit does have some engine detail, but like most new cars, it as a large intake manifold / engine cover which doesn't allow you to see much of it. This kind of explains the limited detail revell have added to the kit. Its decent, but not great. Because of this i didn't spend a great amount of time on it, as you wont be able to see it once the kit is complete with the engine cover piece. Another strange detail is the rear diff and exhaust. Both parts have a decent amount of detail, but these wont be seen at all once the kit is complete as the chassis covers it all. Next part was painting the chassis. This is one big piece with moulded in exhaust and transmission. The chassis was painted in semi gloss black, then masked off and then sprayed with bare metal silver. I plan to add a few extra colours to weather the exhaust, but haven't done that yet. Thanks Nathan

-
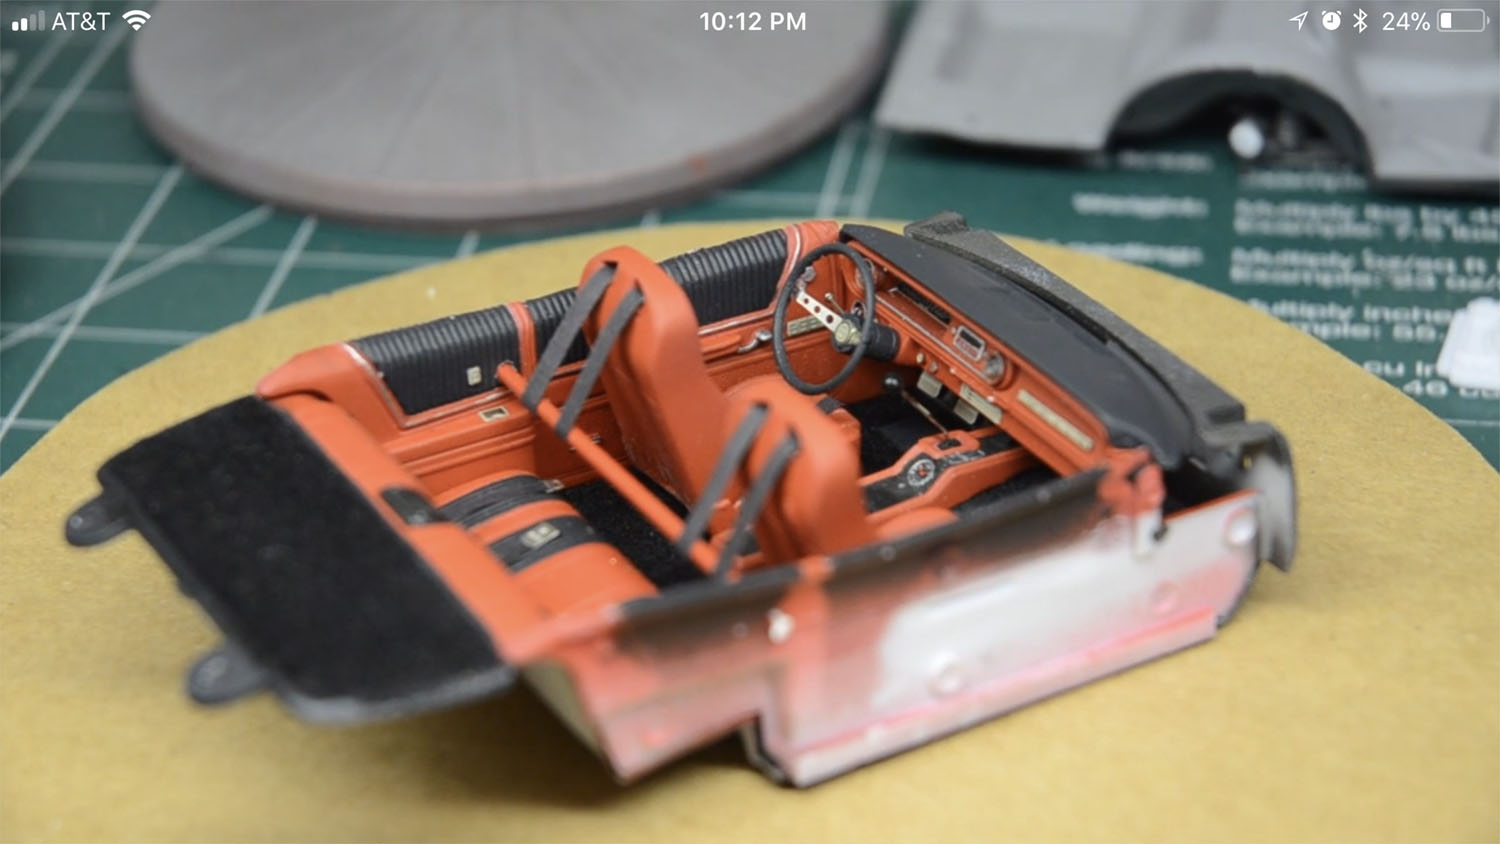
Hello, here is my current project.. Its 70`Charger from Revell Fast n`Furious kit.. Im not going to build Torettos car, since i wanted to do something else.. Paint is Tamiya Candy lime green.. Like you see, i opened headlights for grille.. Started engine wiring and plumbing.. Interior piece got some weathering.. Im doing this something like: it has fresh paint, fresh engine and chassis parts, but some pieces on body, i mean inner fenders on engine space, that interior panel where back seat should be, and chassis will be in "old" color of this car.. So its kind of middle of progress, but still in driveable condition.. I hope you got my point, my english is not well to explain it better..
-
Need some ID help. Marked "Revell 1982" Thanks Robert
-
This is one of the few cars I built that's not a Ferrari. It was built for a friend of mine who owns a 69 Cadillac Coupe Deville (I think ) The kit was a real horror story and was never going to go together stock. The agreement was he gives me the kit and I do what I want to it, this is what I came up with.
-
Which 1/24-1/25 scale kit(s) would be the better choice for a project? My goal is to replicate a GT model Mustang with today's wheels/tires/drivetrain via bashing/aftermarket.
-
Well the adventure has begun. I've taken a 4 year hiatus from model building but the bug has bit again after dusting off my neglected ones recently. My re-entry is a 57 Chevy nomad which I first built as a young kid. I loved that car so much I used to take it everywhere with me. Eventually it met it's end when I left it on the dash of my aunt's car during a hot summer day. Back then I just assembled the kits without paint but was still deeply upset when I found the twisted/warped remains after a day at the zoo. So off to fleabay and I found this opened kit for a good price and pulled the trigger. For the past 20 years I've built primarily tamiya and fujimi kits because they are straight and require little work to get them to piece together correctly. Having started on this nomad I'm reminded how terrible these older kits are in comparison. Some of the injection molding did not take completely and the chrome is awful with satin mottling everywhere as well as excessive flashing. Then there is the molded trim which is uneven and blends into the body at places. Fortunately I've been able to correct most of the body issues but the engine which suffered most from the improper injections is going in the garbage. Instead I've order a resin kit of a 400 small block chevy from BNL resins. I'm also going to try my hand at re-chroming the trim parts with molotow and an airbrush. I've never used that stuff before so this will be an experience that I hope brings satisfactory results. If not I'm going to black out the car so I haven't yet decided what the paint will be yet. I'm also going to try my hand at building leaf springs for the rear suspension using styrene strips and am pulling out the stops for all the other detailing items I typically skip over. This means it will be a slow build. So far I'm happy with the shell after 12 or so hours of filing, sanding and fitting parts. As a kid I recall it was tricky to get all the opening parts to line up so this time I've spent extra time to ensure I get the gaps even. Getting the headlight trim to sit flush has been a challenge. I'm going to have to fill and my 15 year old tube of model putty is no good so back to the hobby store. Going to toss the hood and get a resin high rise with chrome delete instead. This will allow me to toss the hood hinge and fill in the firewall where the hinge openings are currently. Finally I need some wheels. Don't want to go 20" low profile but would like to get something a little more updated. Haven't decided on anything yet so if there are suggestions please let me know your thoughts. Anyways this is the start of what I hope to be my best build yet.
-
 Been building the Revell 1967 SS-396 Chevelle , and am taking some liberties with its engine : I'm replicating an 'Aluminium' Head (think : L88 427) engine (not available from the factory in 1967) . One item stands out to me regarding the as-provided-by-Revell engine : the fan . Is that 4-paddle , direct-drive fan correct ? Perhaps the engine in the car which the model is based on was equipped with the base 325hp 396 , and was sans any axle ratio outside of the standard 3.08 / peg ? Either way , it doesn't look right to me . Shouldn't it be a 5-7 paddle fan with a clutch ? I'm fairly confident that the L78 , L71 , L72 , and L88 would have a 'real' fan . Input and images welcome !
 -
Hello, here is my Dart from Mr. Norm`s kit.. Decals were poor condition, but i used that stripe and aircleaner decals from newer Hemi Dart kit.. Added plugwires and mudflaps and some custom "Mopar" license plates and some little decals too on windows.. I lowered front just a little bit, so stance looks much nicer now.. Paint is Tamiya TS-34 called Camel Yellow.. and for vinyl top, i just brush painted it with satin black.. Some red color also to give bit more attitude.. Commets are welcome..
-
Twenty year old Revell kit, and not a bad one too. Wanted a contemporary look without changing the 'structure' too much, so de-chromed throughout, faired-in and cut down bumpers front & rear, steering wheel from a Tamiya R34, the rest is just paint. Tamiya Gunmetal, polished & buffed, not clear coated, a dark red interior which I carried through to the outside accents and finall a little carbon-fibre decalling on the valence. Ta Daaaa !! Wheels & tyres are 18" SA-70s from Aoshima and just don't look right. I'll replace them with 16" when I can, also need to source some brake discs, there's a set in the R34 spares but I'll need to perform a fair bit of surgery to get them to fit the Revell axles. Hope you like it, AFN Ian.
-
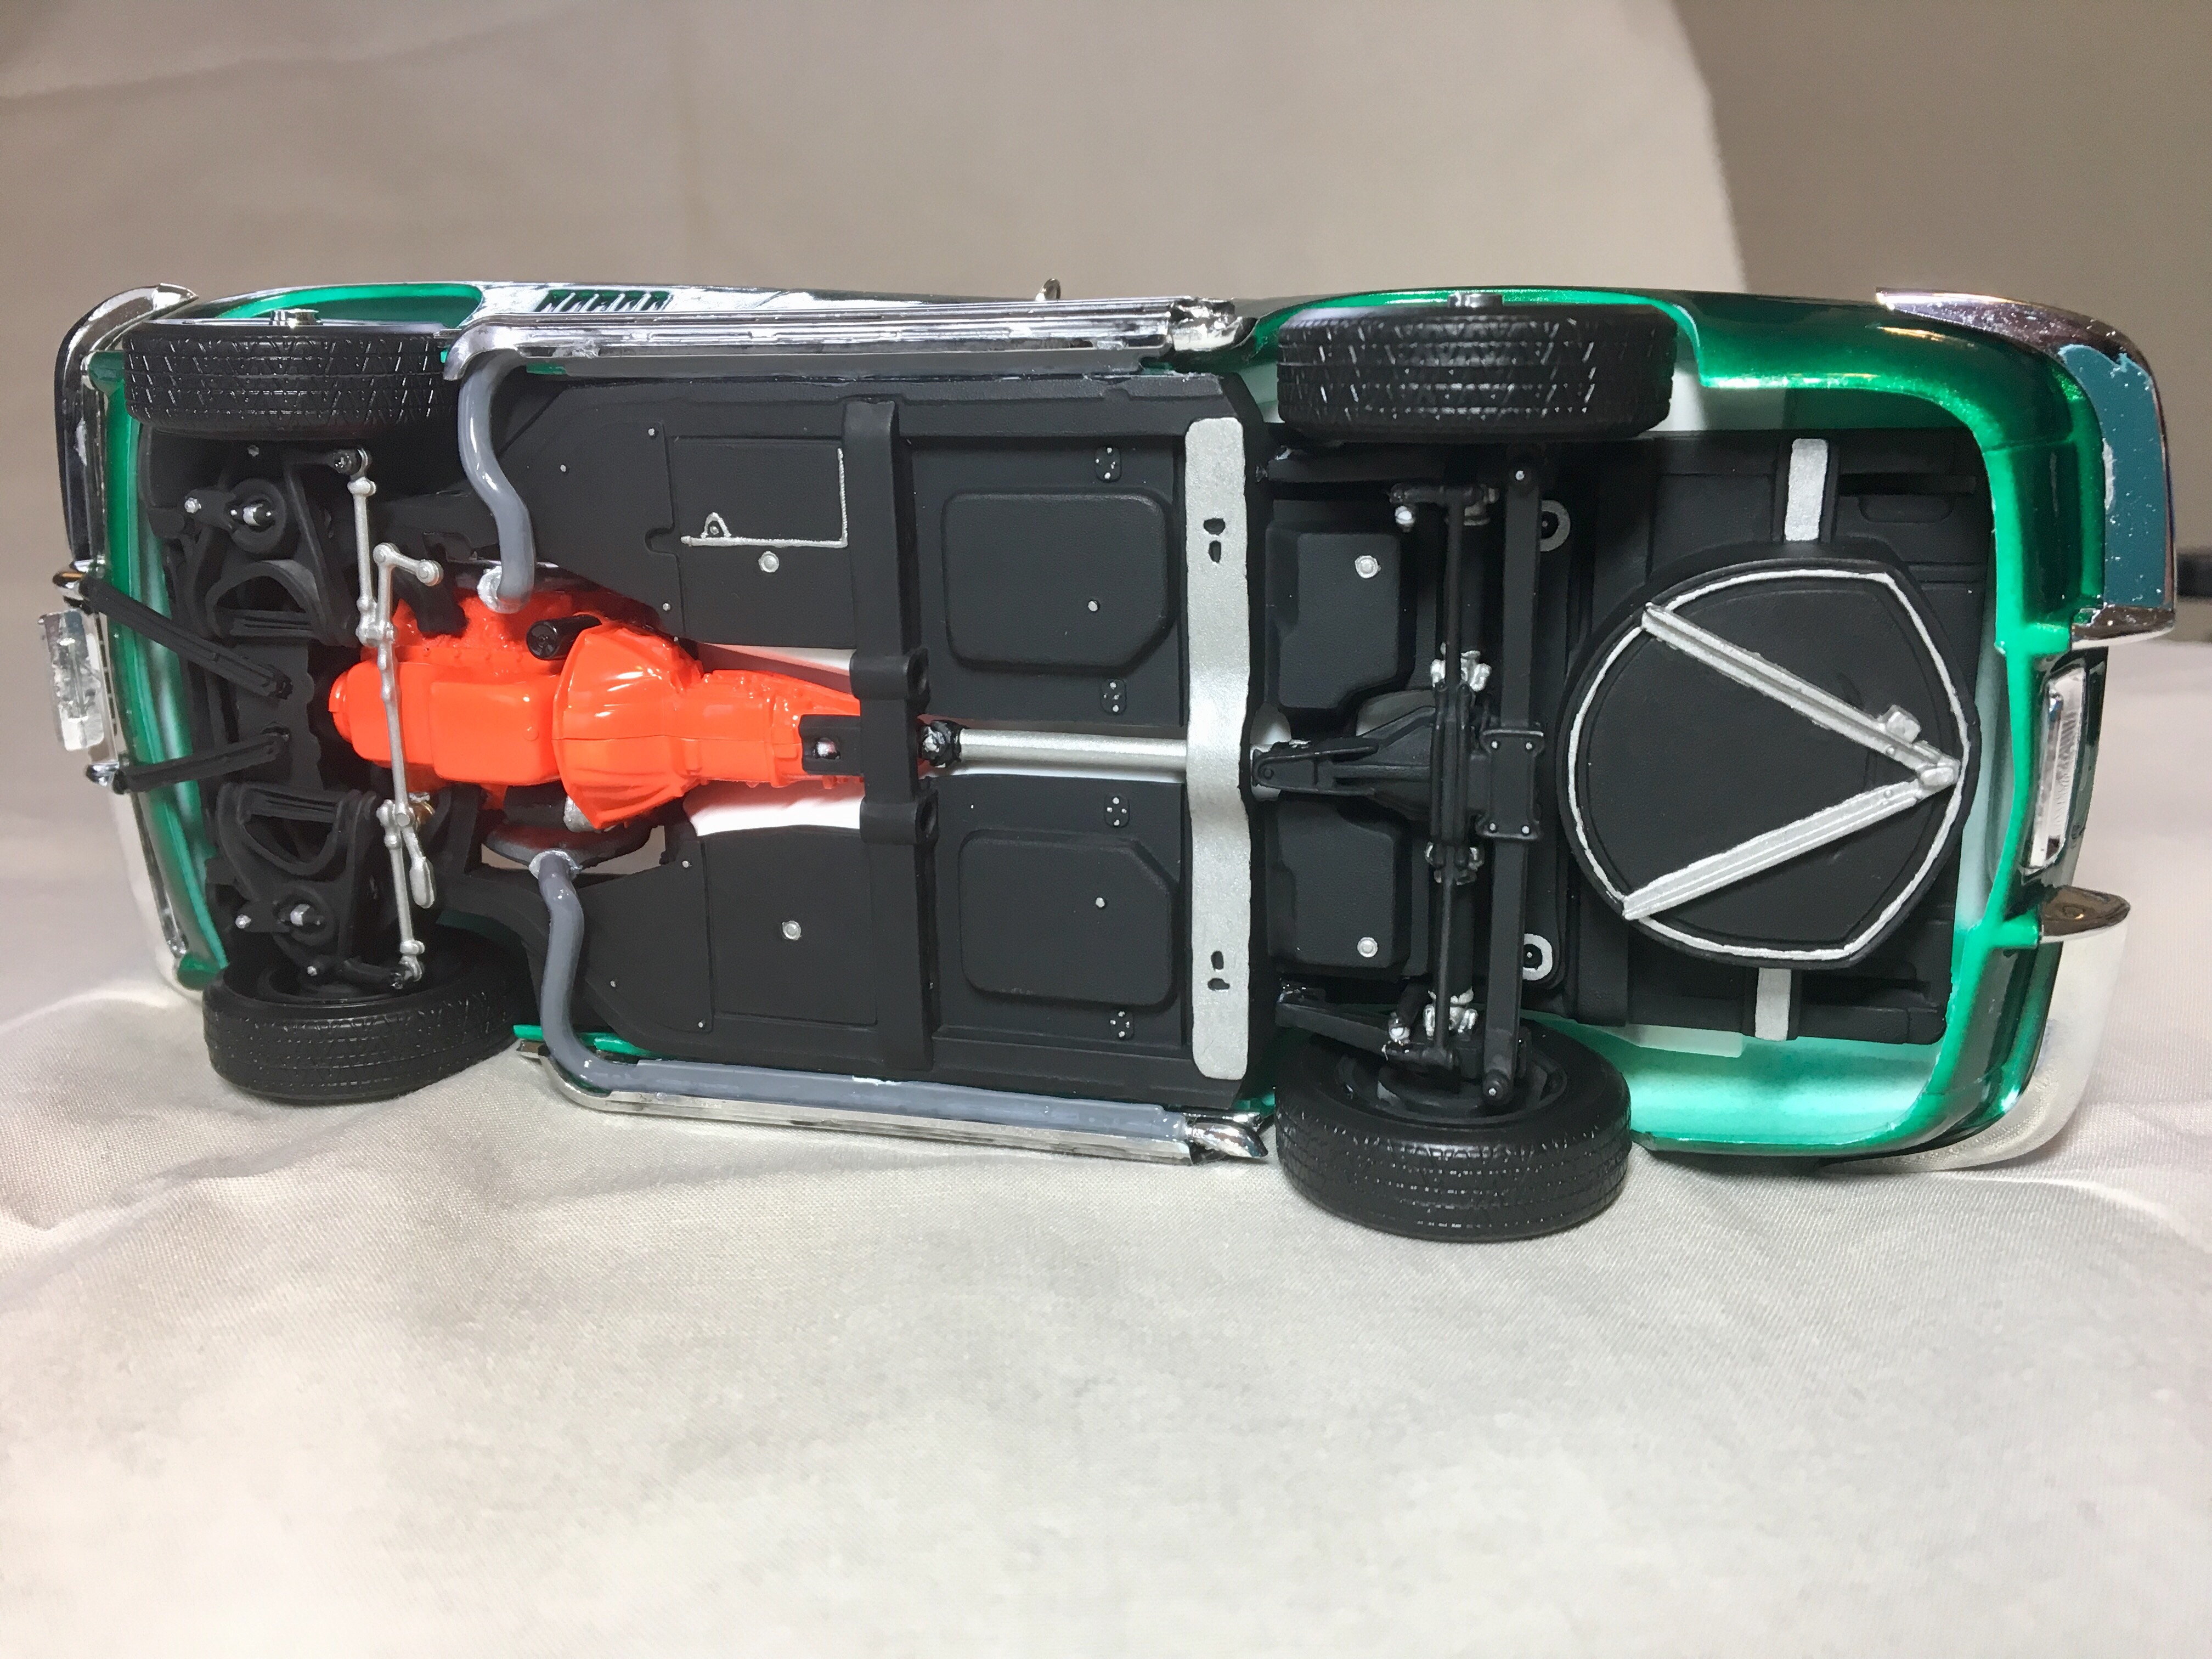
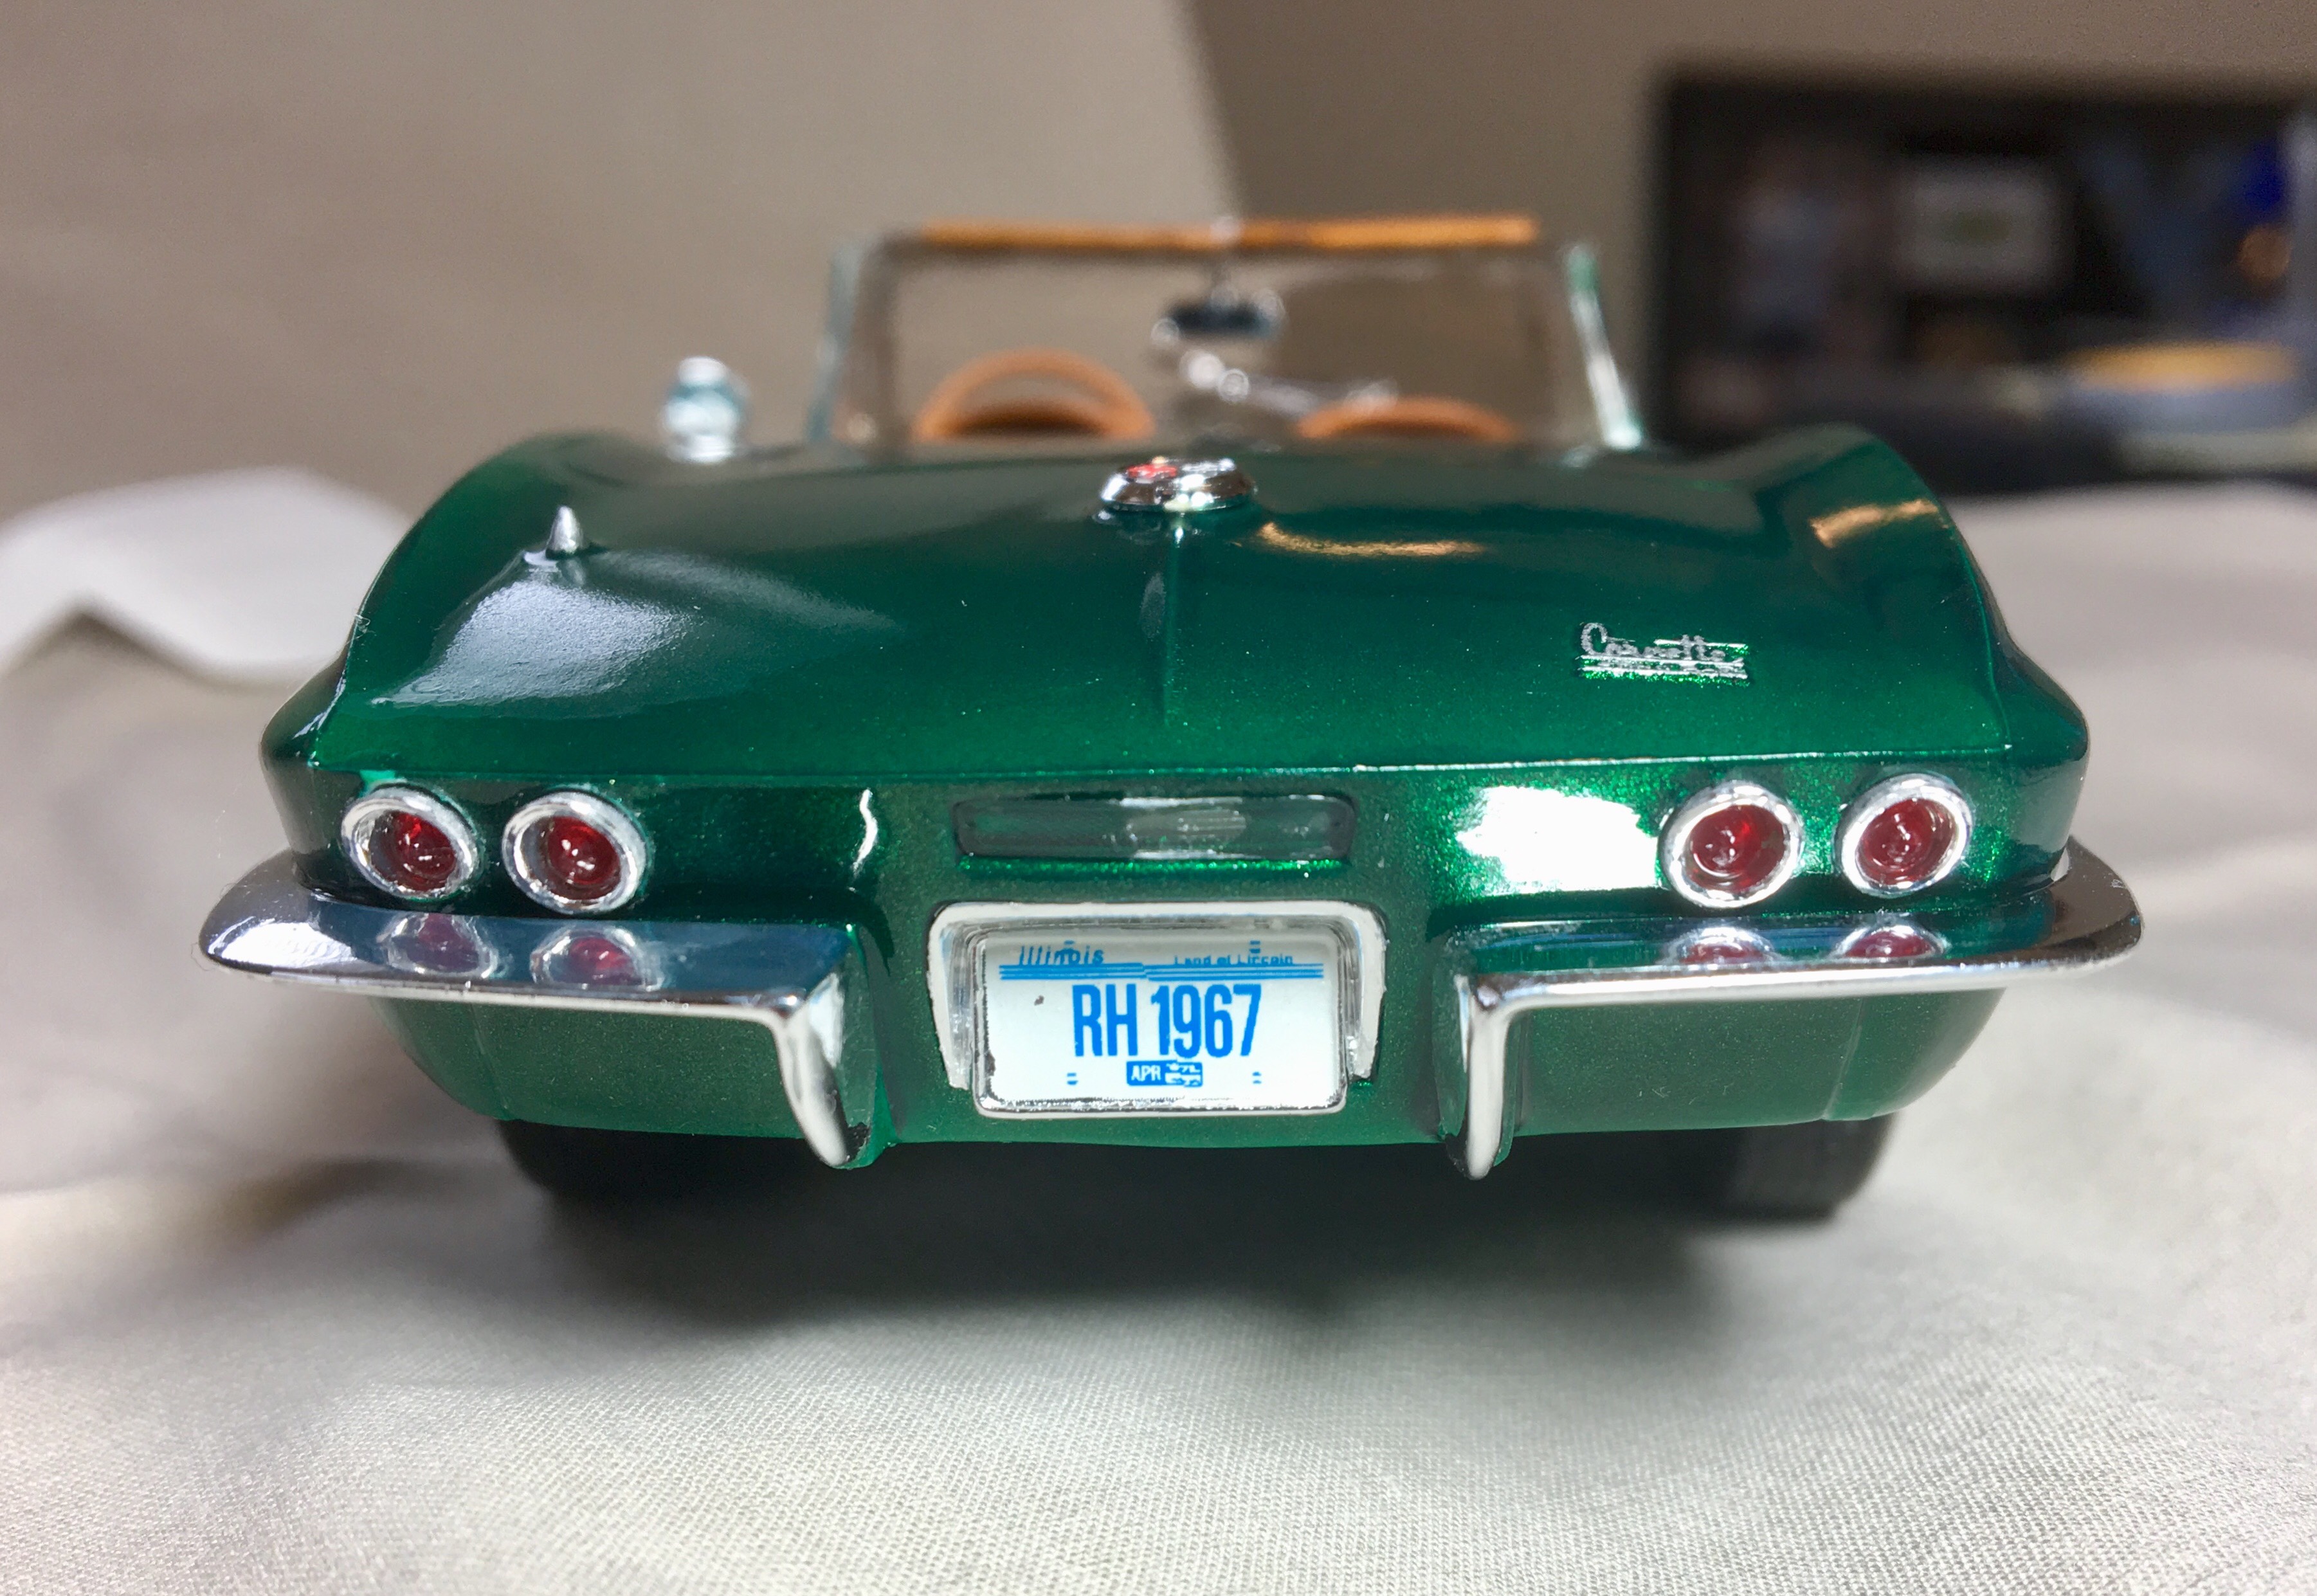
This is a 1:25 Revell Monogram kit of a '67 Corvette 427 Roadster. This is one of many kits generously given to me by a friend from work. It turned out almost exactly as I imagined it. The only differences were the omission of the white hood stripe and the redline tires. The decals were really old and had been stored in a garage with poor air conditions. Some of the decals disintegrated in water. I found a product online, a brush-on film for preserving old decals I can use on future models. Most of the parts under the hood and in the interior have a color scheme based on Corvette part pictures I found online. The Workbench thread is located here:
-
Hi guys! Since im on winter vacation at this week, i was able to finish another build.. Had some serious issues with chassis, interior body combo.. and im bit unhappy how tail lights came out.. Other than those i liked this kit.. also AMT polyglass tires did not fit so well on kit wheels, but in the dark corner of display shelf its all good.. After i did upload photos i realized that door locks are still in body color, little Molotow will solve that.. Color is Tamiya TS-95 pure metallic red.. Now less talk, and more photos
-
Just saw the video review of the Revell Olds Cutlass/FE3-X today. Here it is.
-
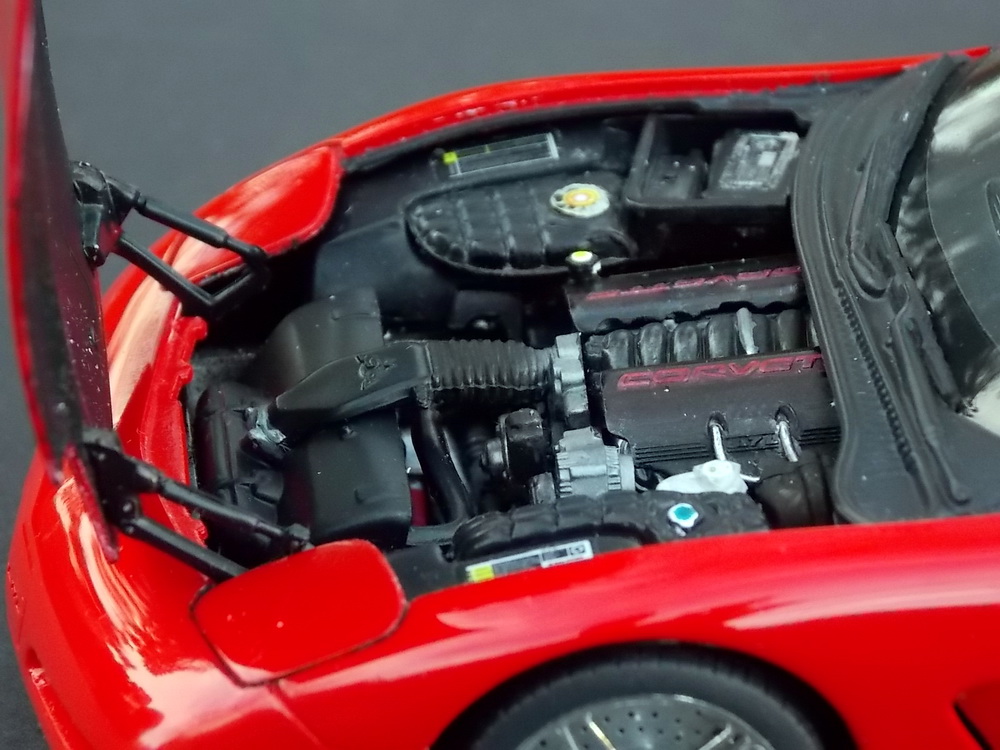
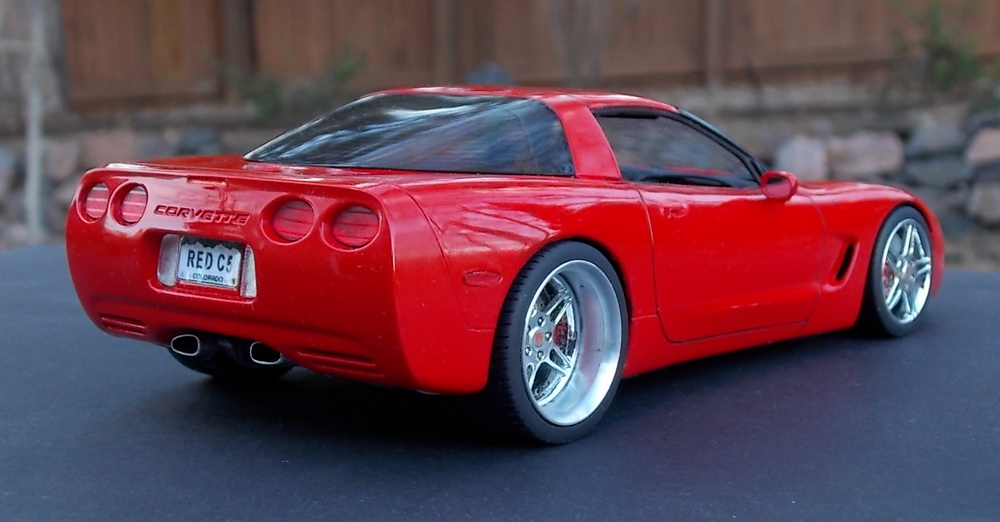
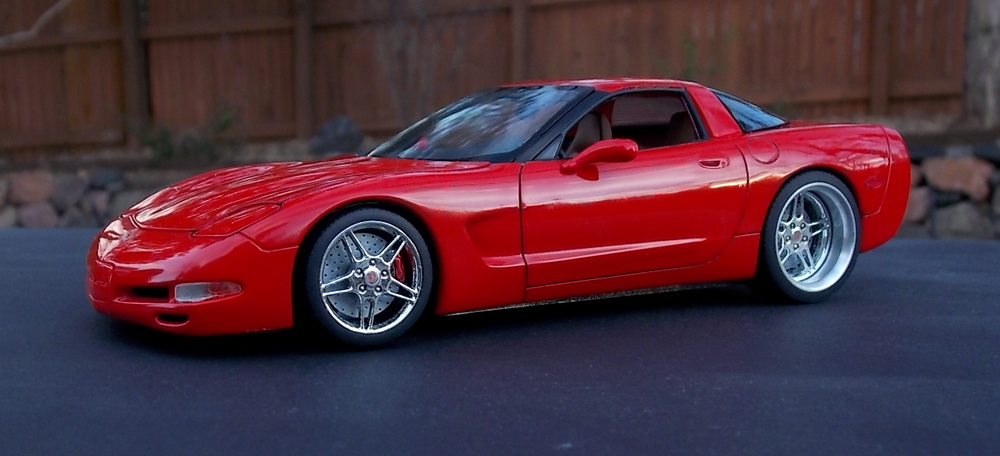
First finished build of 2018, Revell 1997 Corvette Coupe. Excellently detailed kit, so much better than the AMT versions. This the second build of a series of Corvette Coupes I'm building Bright Red with tan/black interior and with the same custom wheels (Pictured C2) Paint is Duplicolor Bright Red with several polished clear coats. Only custom part is the aluminum exhaust tips. C2 in the series
-
Nice kit and love that box cover.. Whats in box.. Check link to finnish modeling site https://forum.fcma.fi/viewtopic.php?f=23&t=12986
-
Hi guys and merry christmas for you all!! Here is my last one for year 2017, its Revell 29` roadster.. I did plug wires and exhaust end on rear, then i robbed those flames and pinstripes from 32 sedan kit.. Paint is Tamiya TS-89 pearl blue, paint job came out nice and shiny, only panel lines did run off paint, well better luck next time... Here are photos, enjoy
-
The kit: * * * First thing to do, trace the mold lines with a marker and sand & polish them out: ]* * * Next, for my own reference, highlight the lift-off nose section, because I'm planning to build this one all opened-up and plumbed/wired to the best of my ability. * * * Ughhh, ugly cut: * * * All separated now, the red 'scars' are where the knife & saw blades slipped and gouged the surface. After the photos, I filled them with Squadron fine (grey) filler and sanded them back with various grades of wet'n dry. * * * This is my 'serious' project to take me through the holidays and well in to the New Year. Stay tuned it could be fun, or it could be a complete dogs dinner, we'll find-out together. AFN Ian.
-
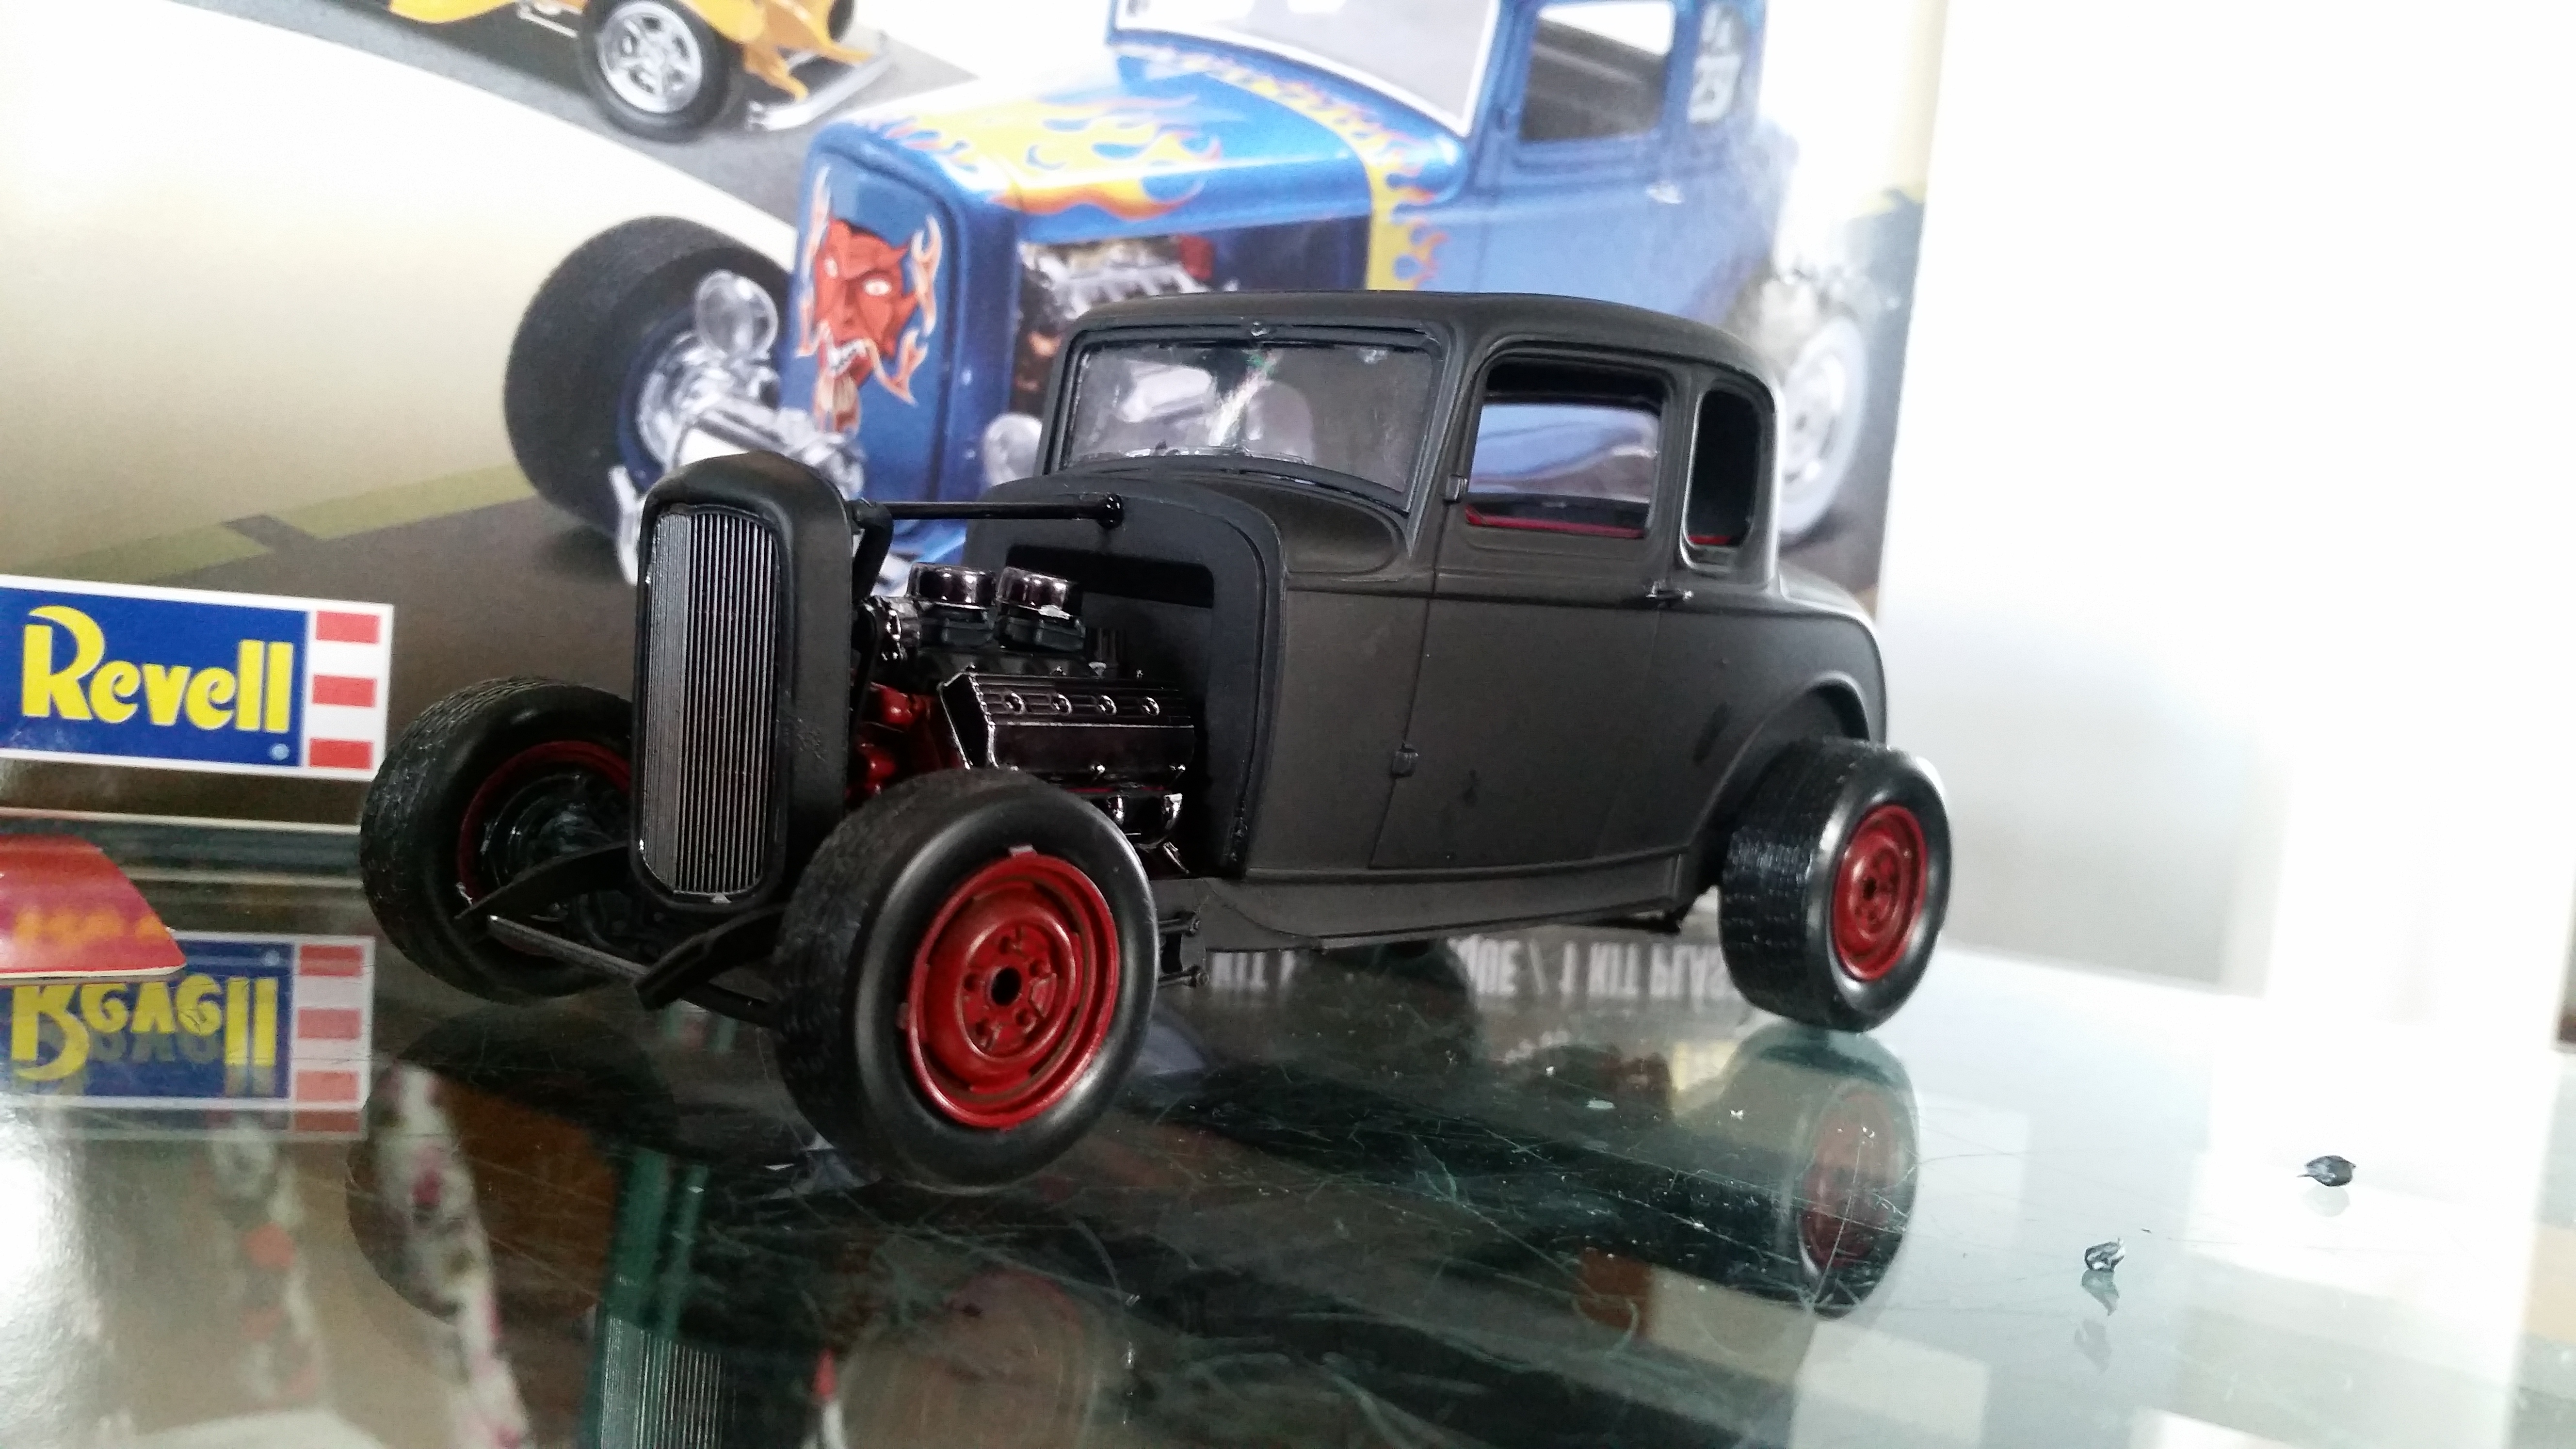
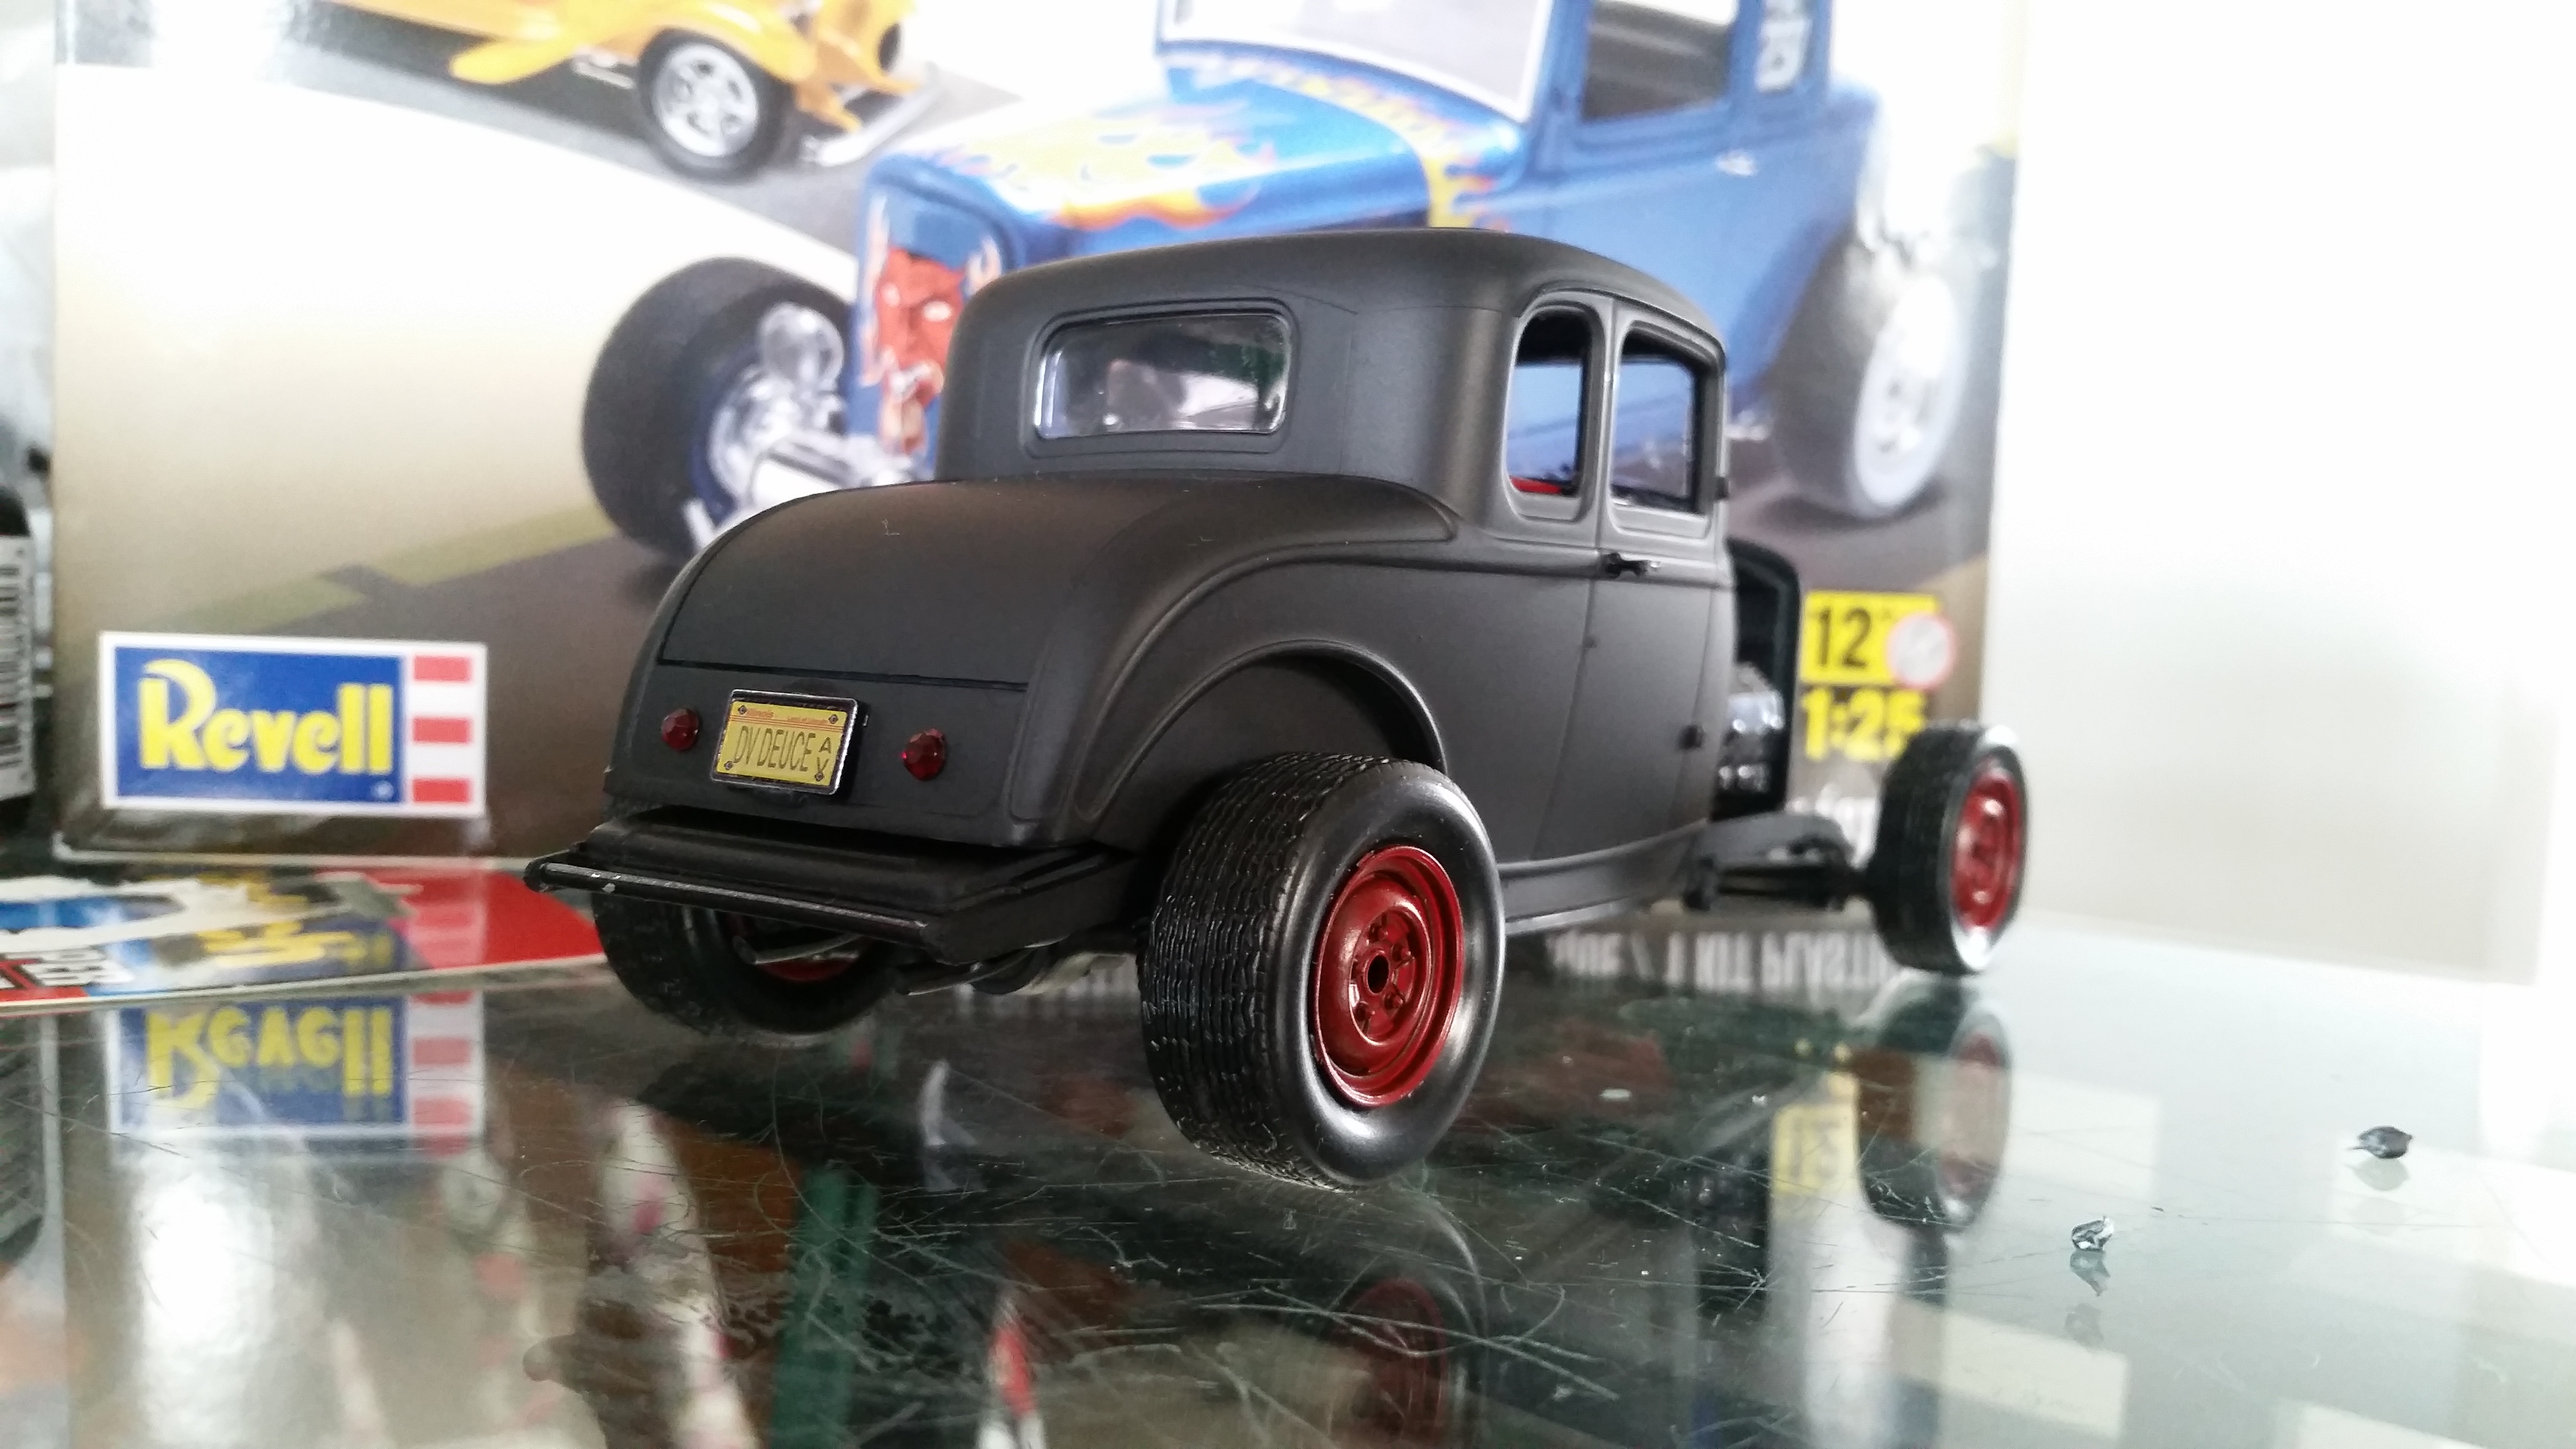
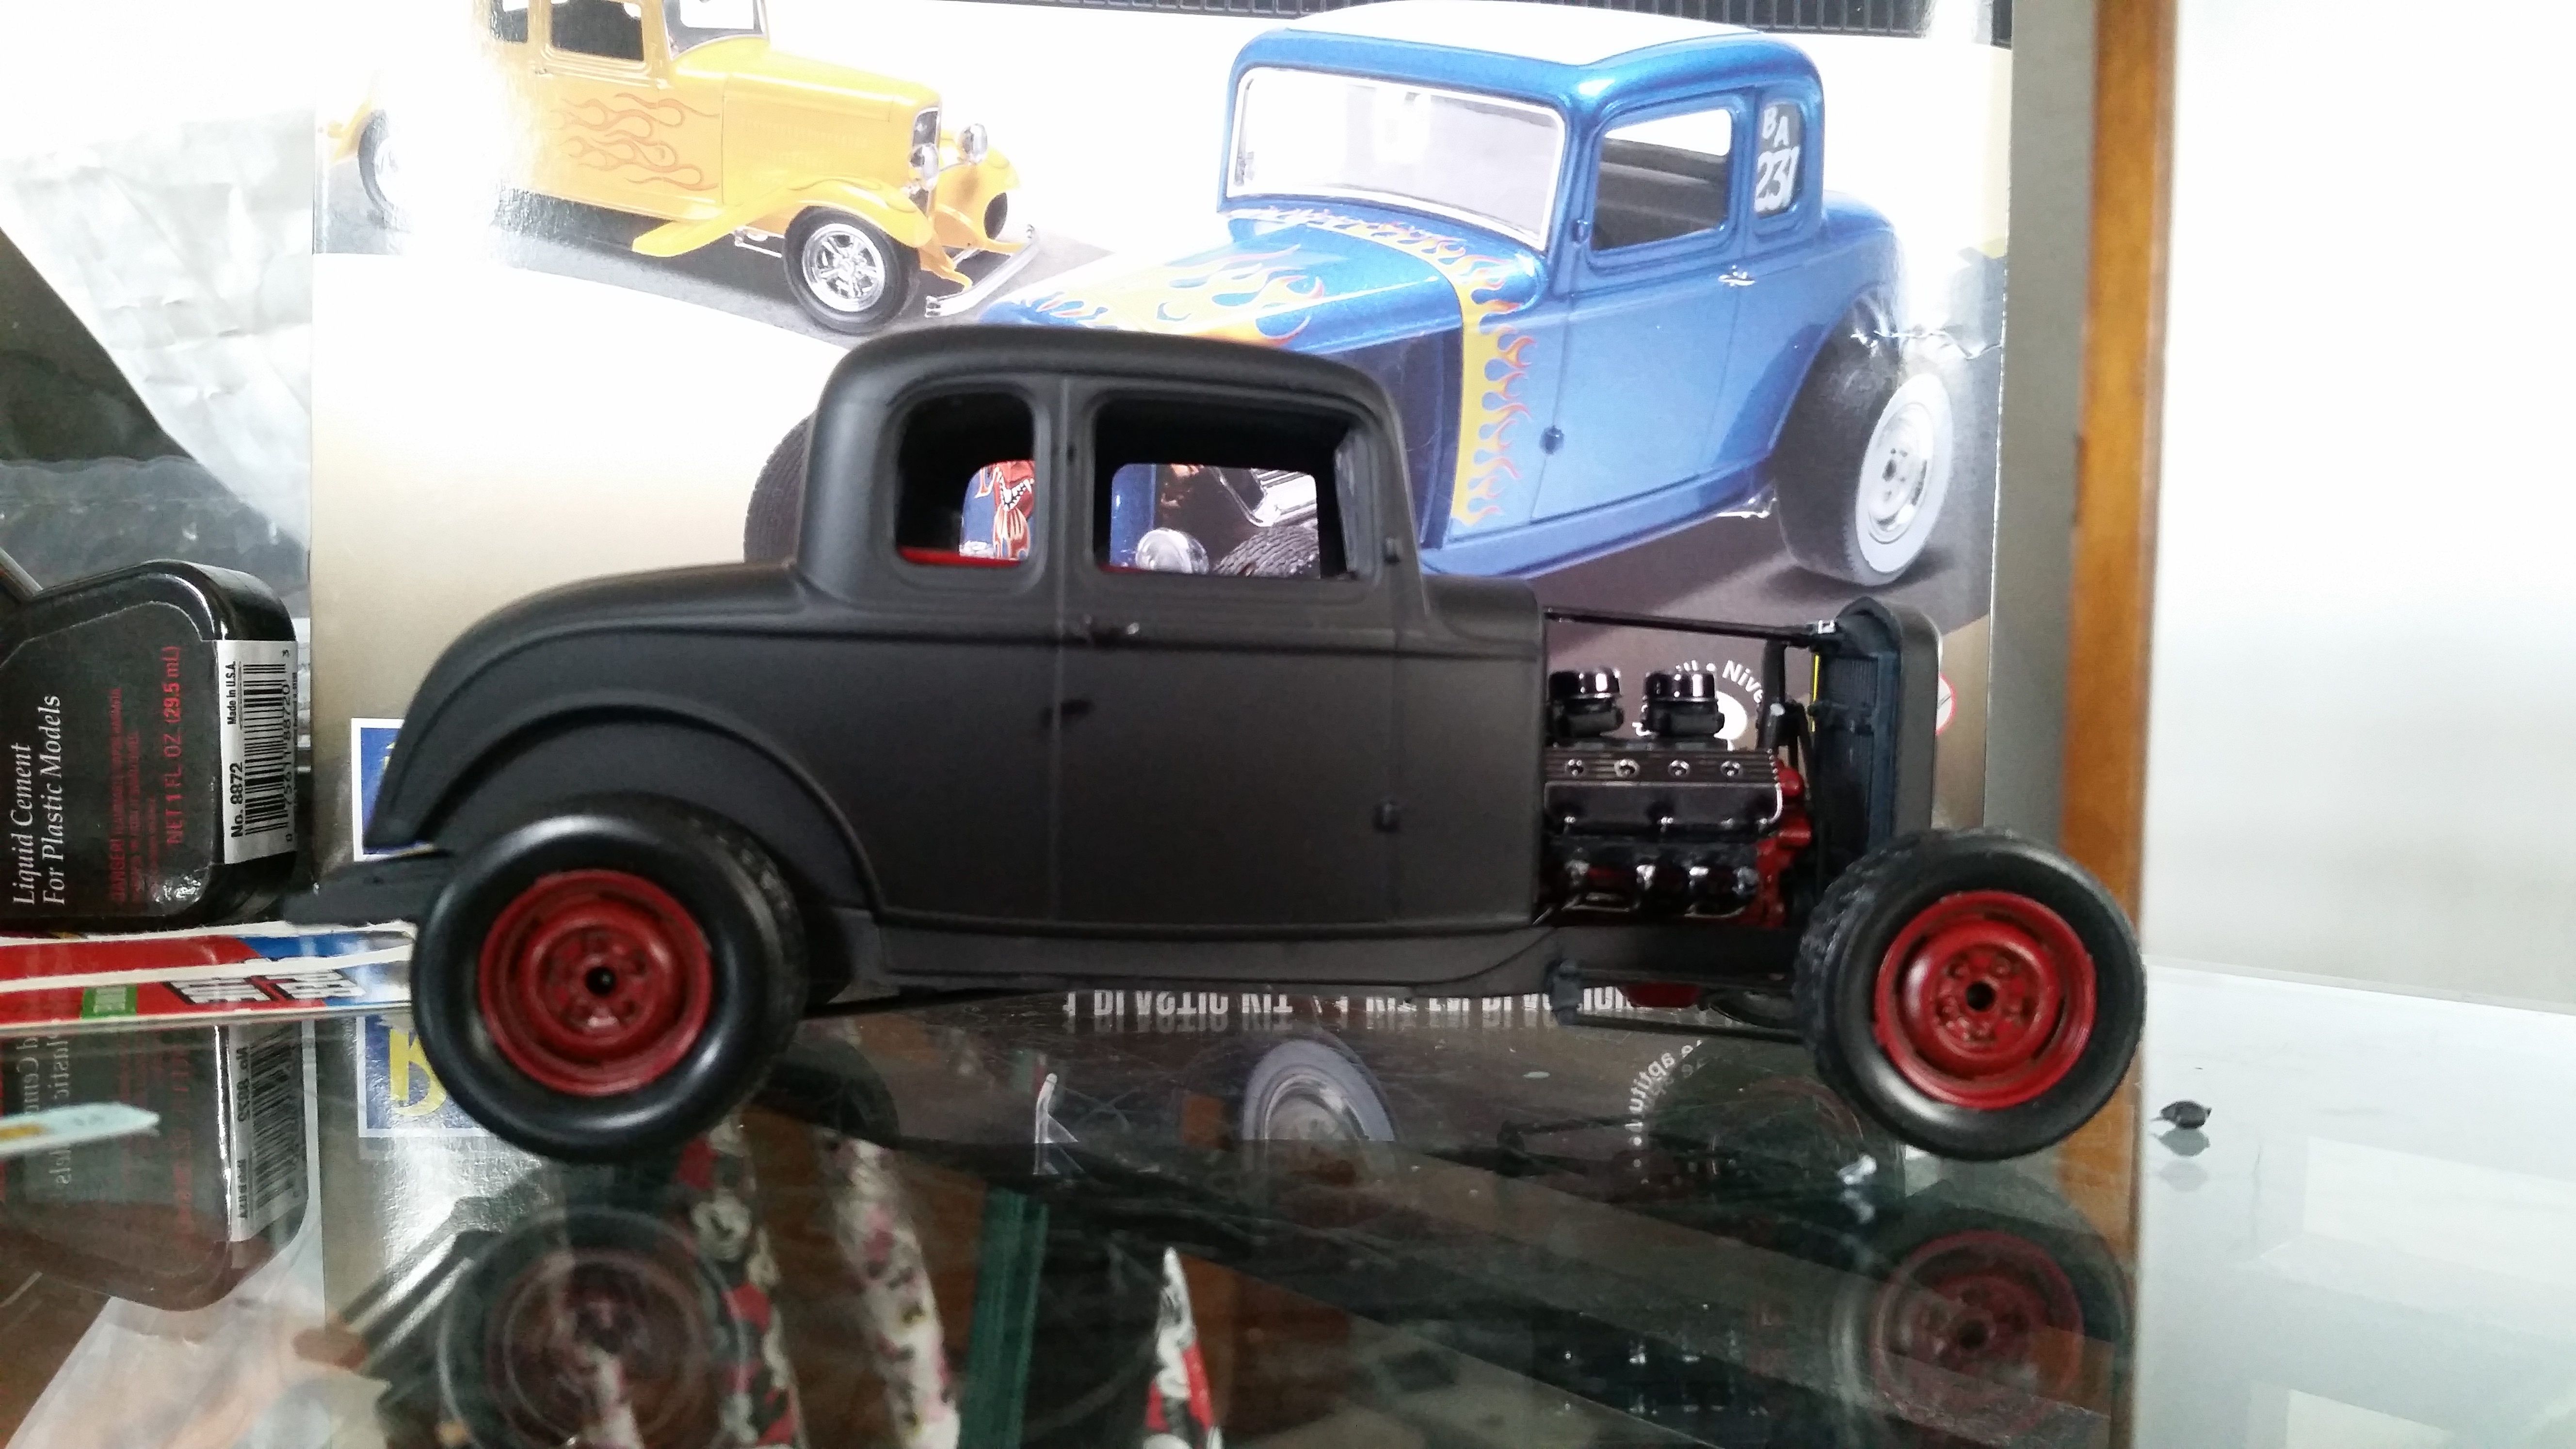
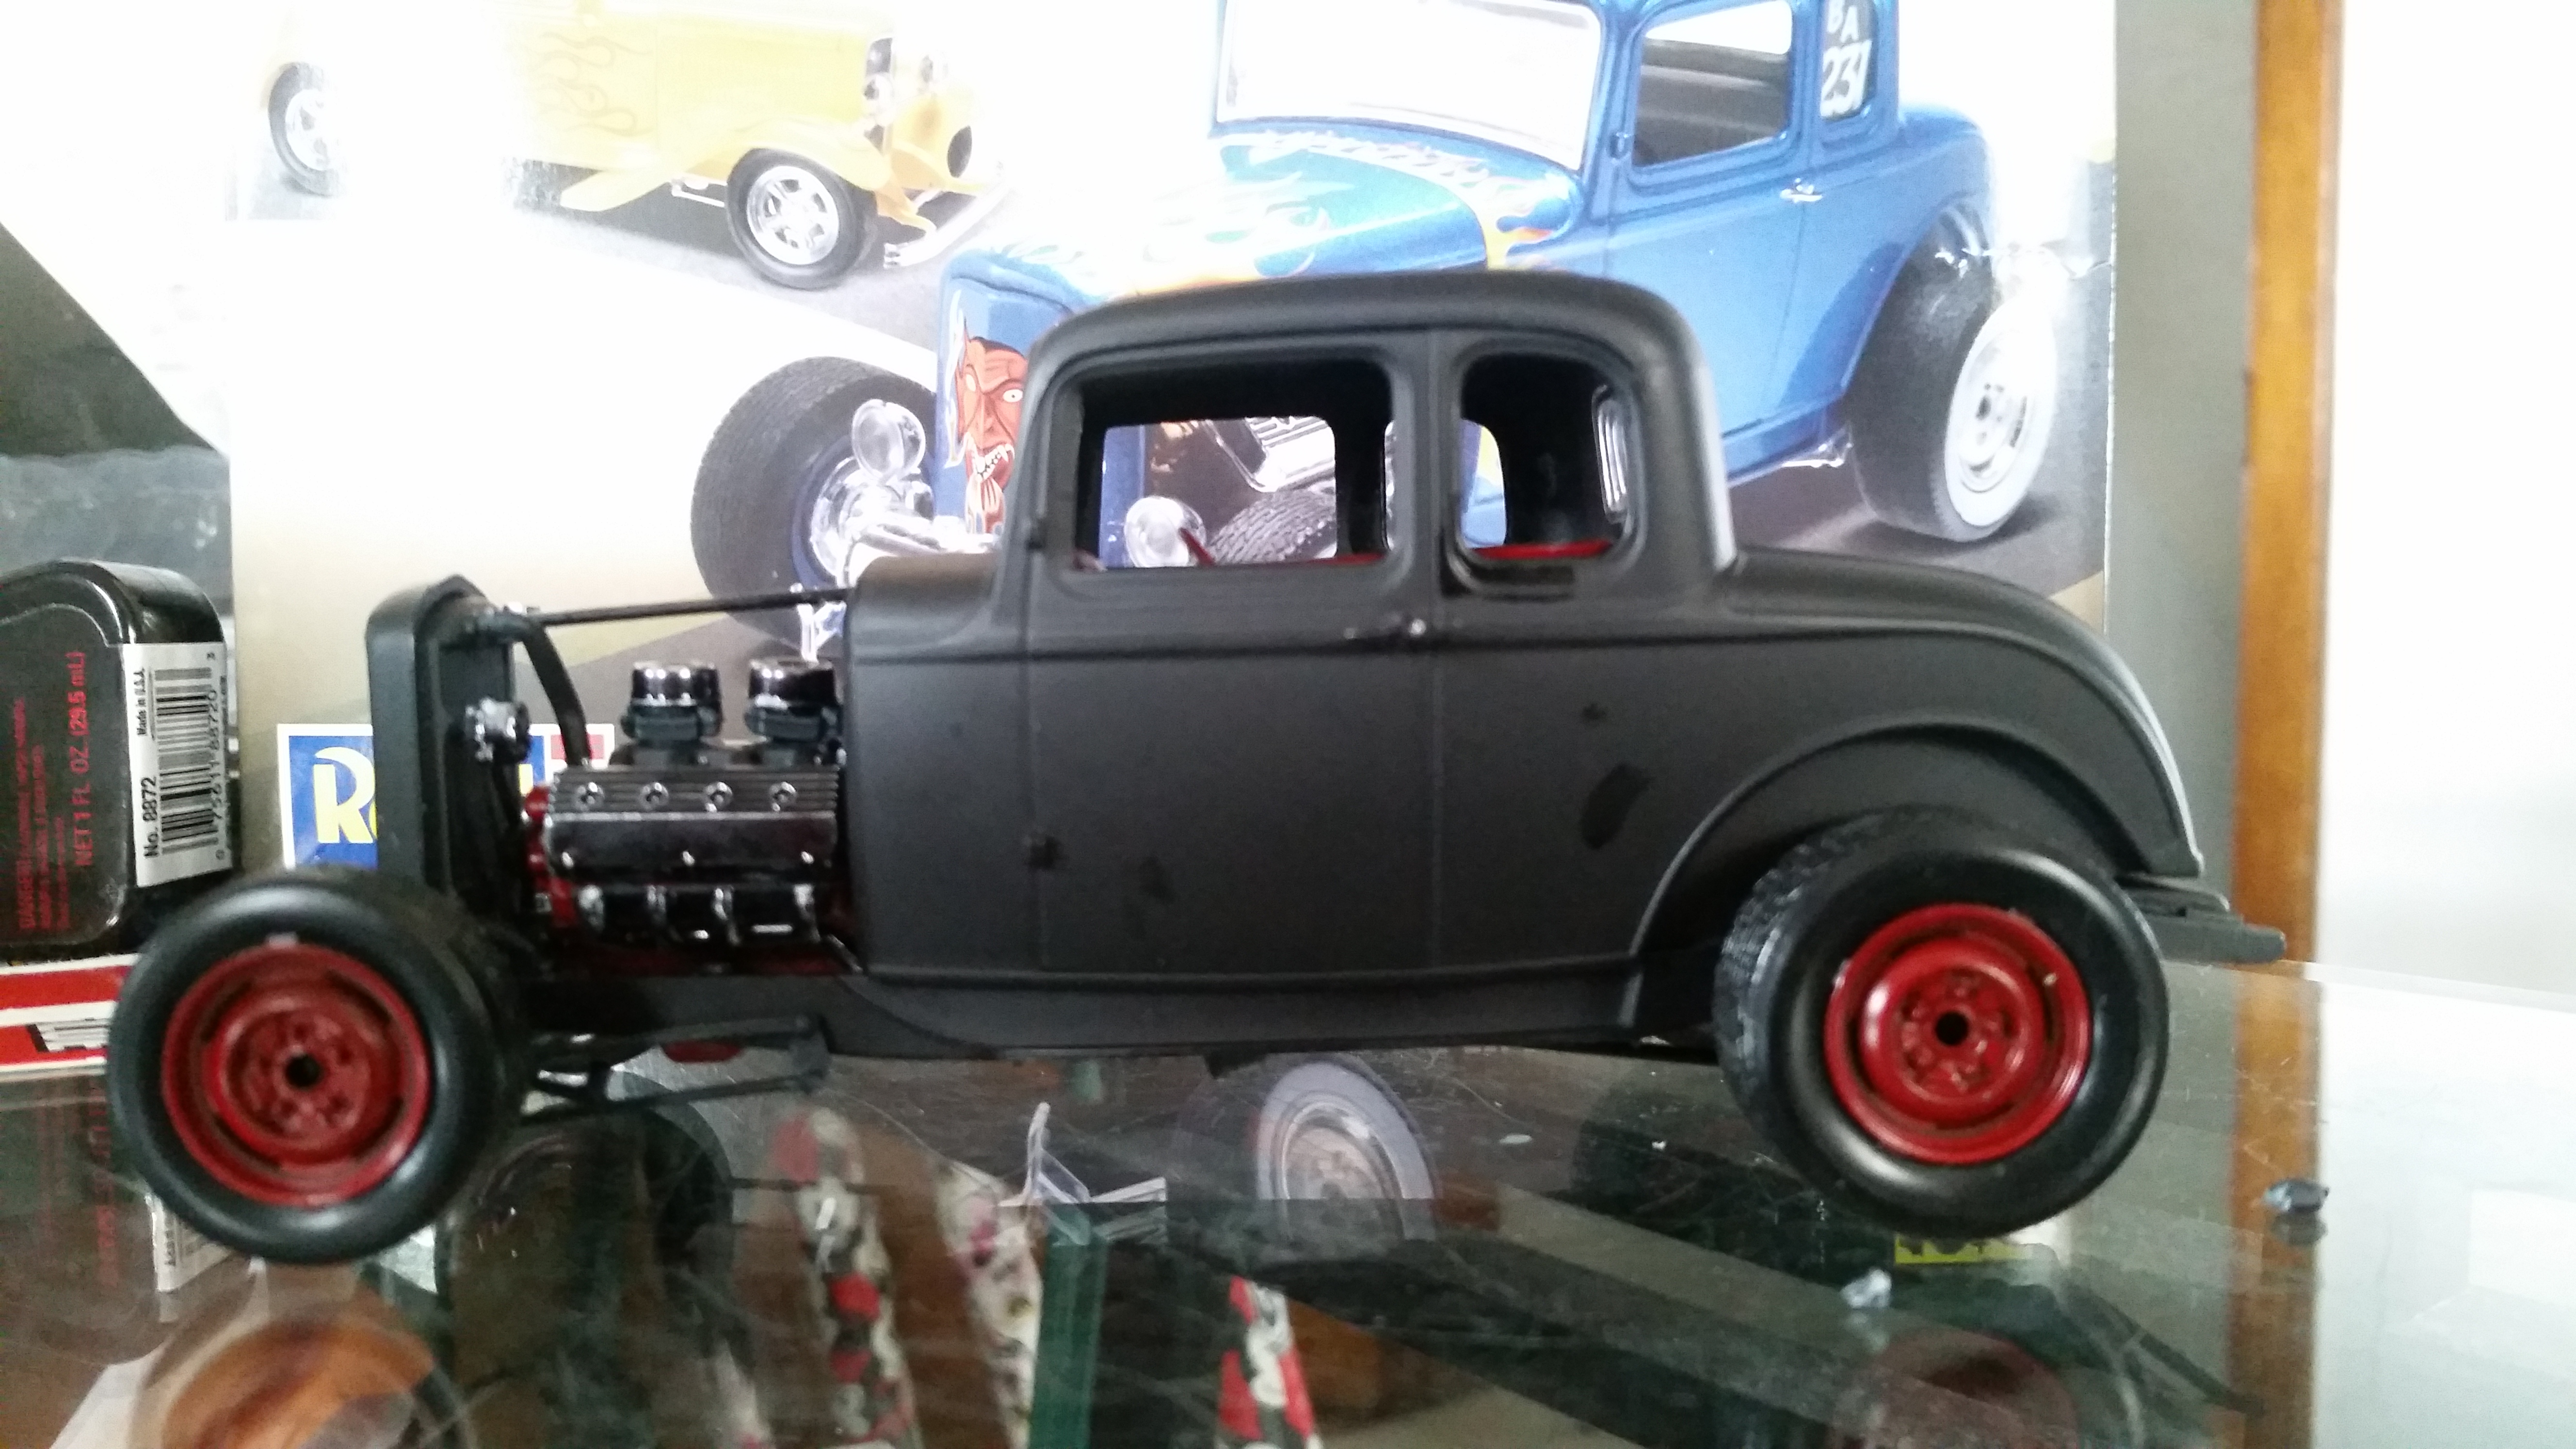
Threw this together for the club build project. I've known about it for a while, but with how the last 4-5 months have been, so I kinda threw this together in the last couple days between work, visiting Mom after work, and sleep, which is why I don't have many build pics of it. Not my best work, and I have a few things I'll do different if I build another one of the '32 Kits. The headlights and shocks/brackets are in the purple pothole (I used a prescription bottle), but those will be in flat black as well and I may paint the shock portion with Future once the black primer is dry.
-
HI! Got this puppy finished.. Still realized while taking photos that it had side mirrors missing.. I have glued on them now, but does not shown in these pics... Out of box models, but exhaust ending, wheels and tires i did pick up from part box.. I had to use 6-lug wheels since they were only steelies i had free for this build.... But you sure want to see photos?
-
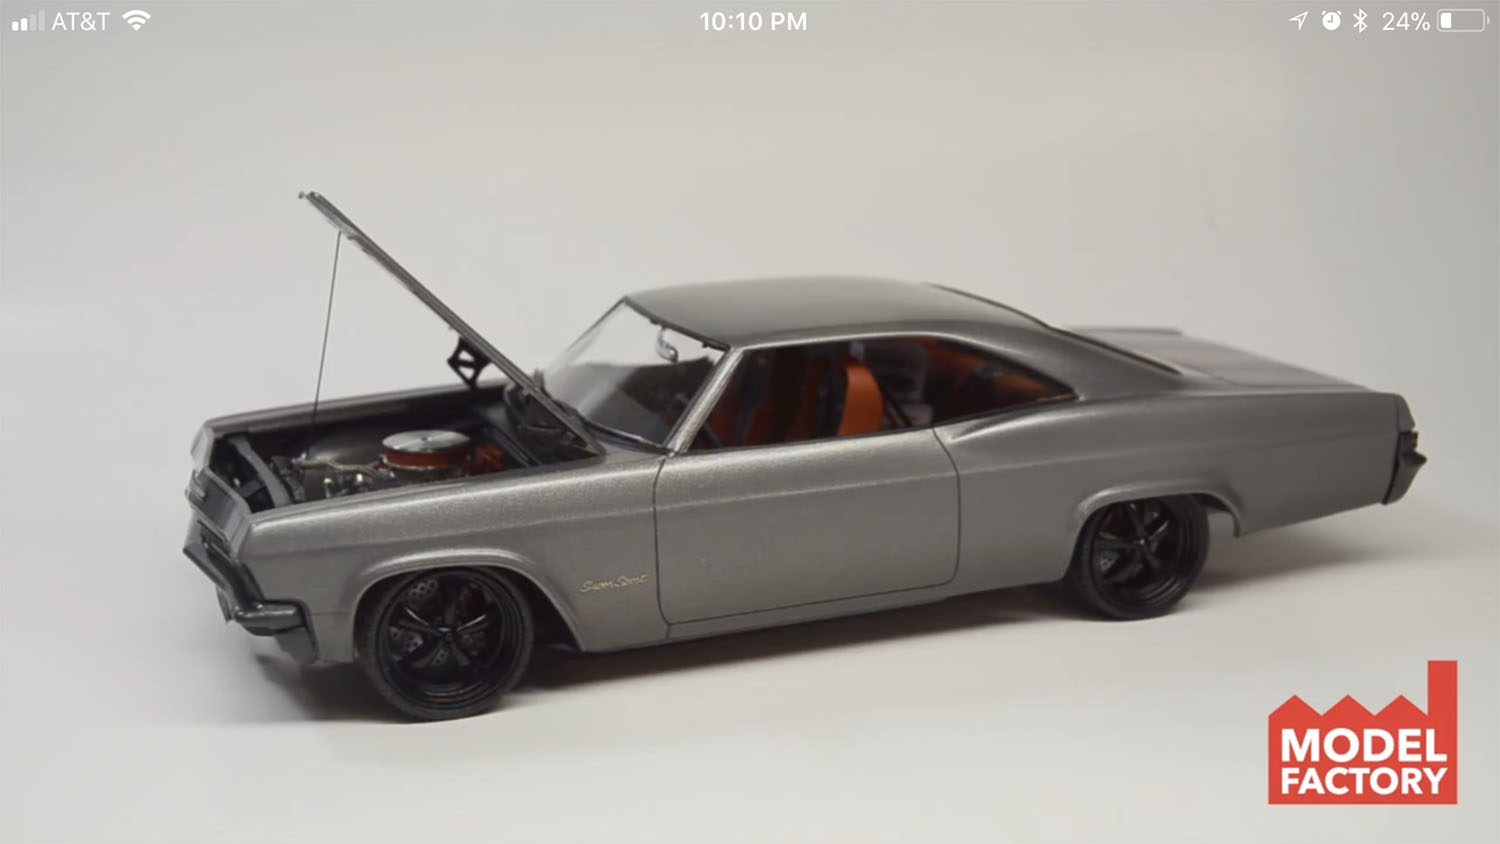
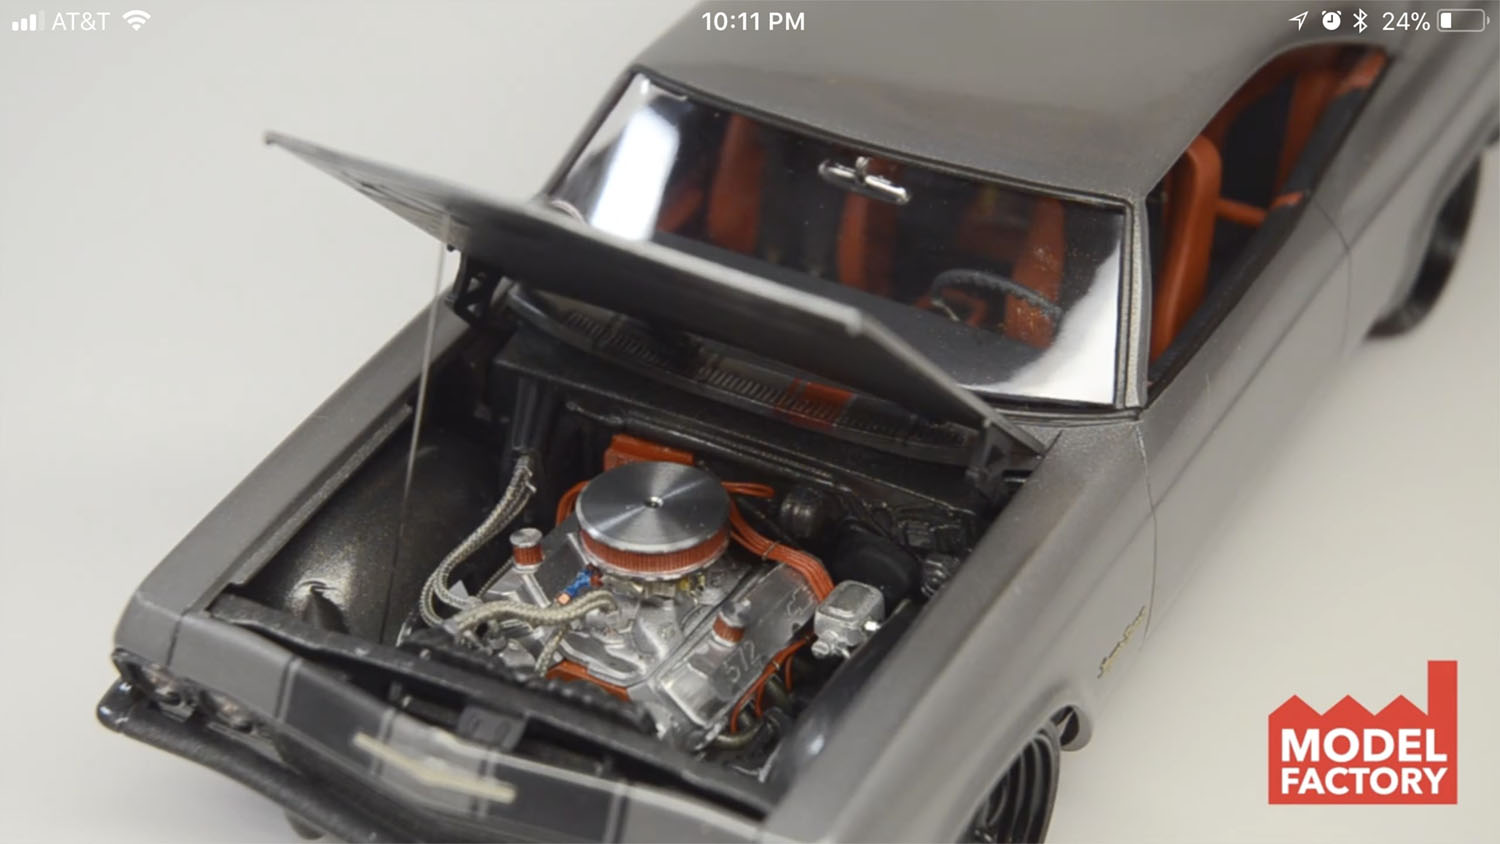
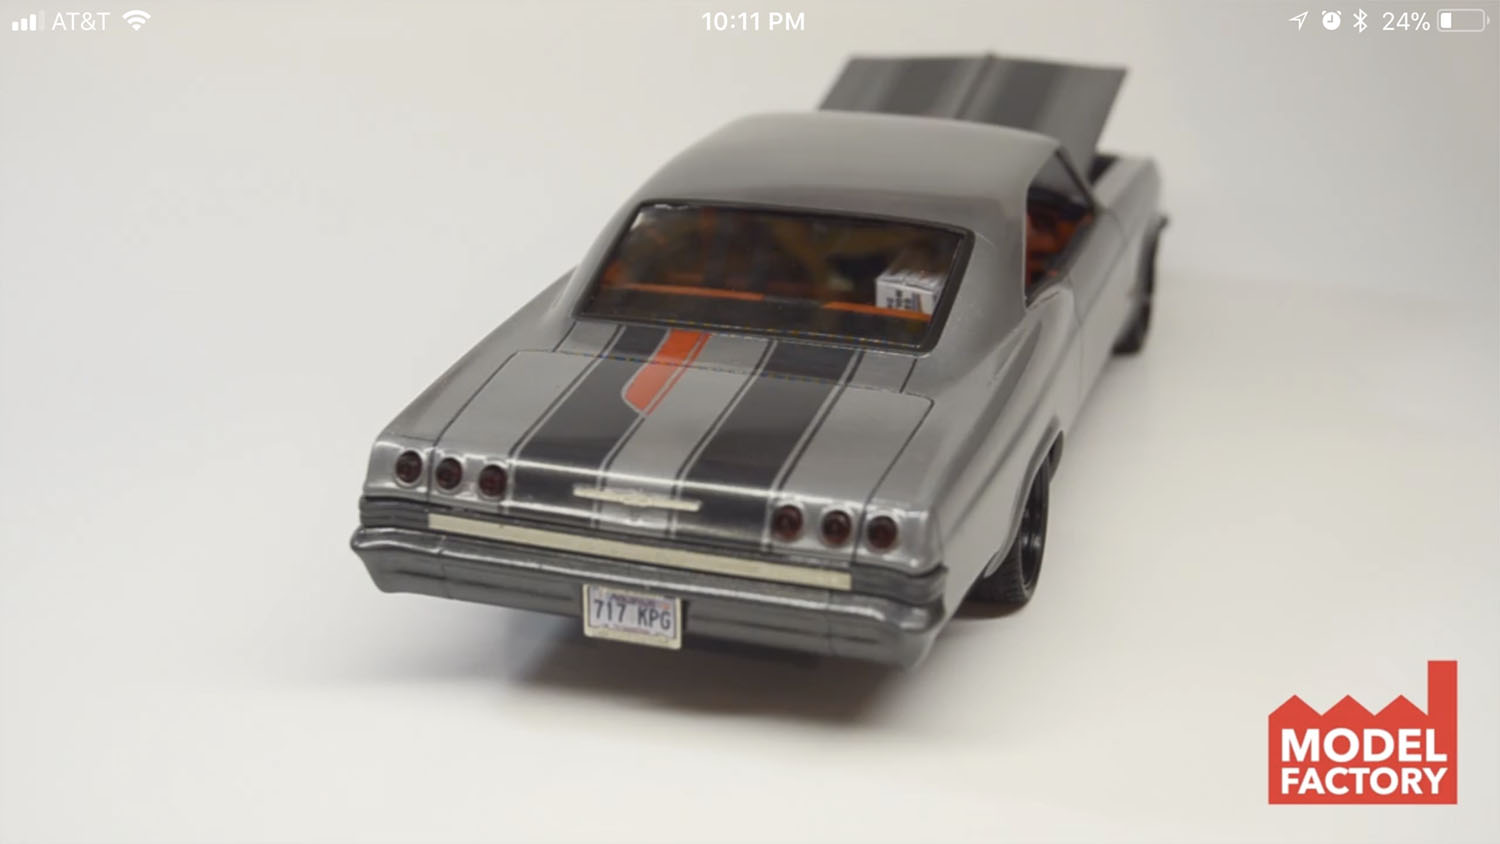
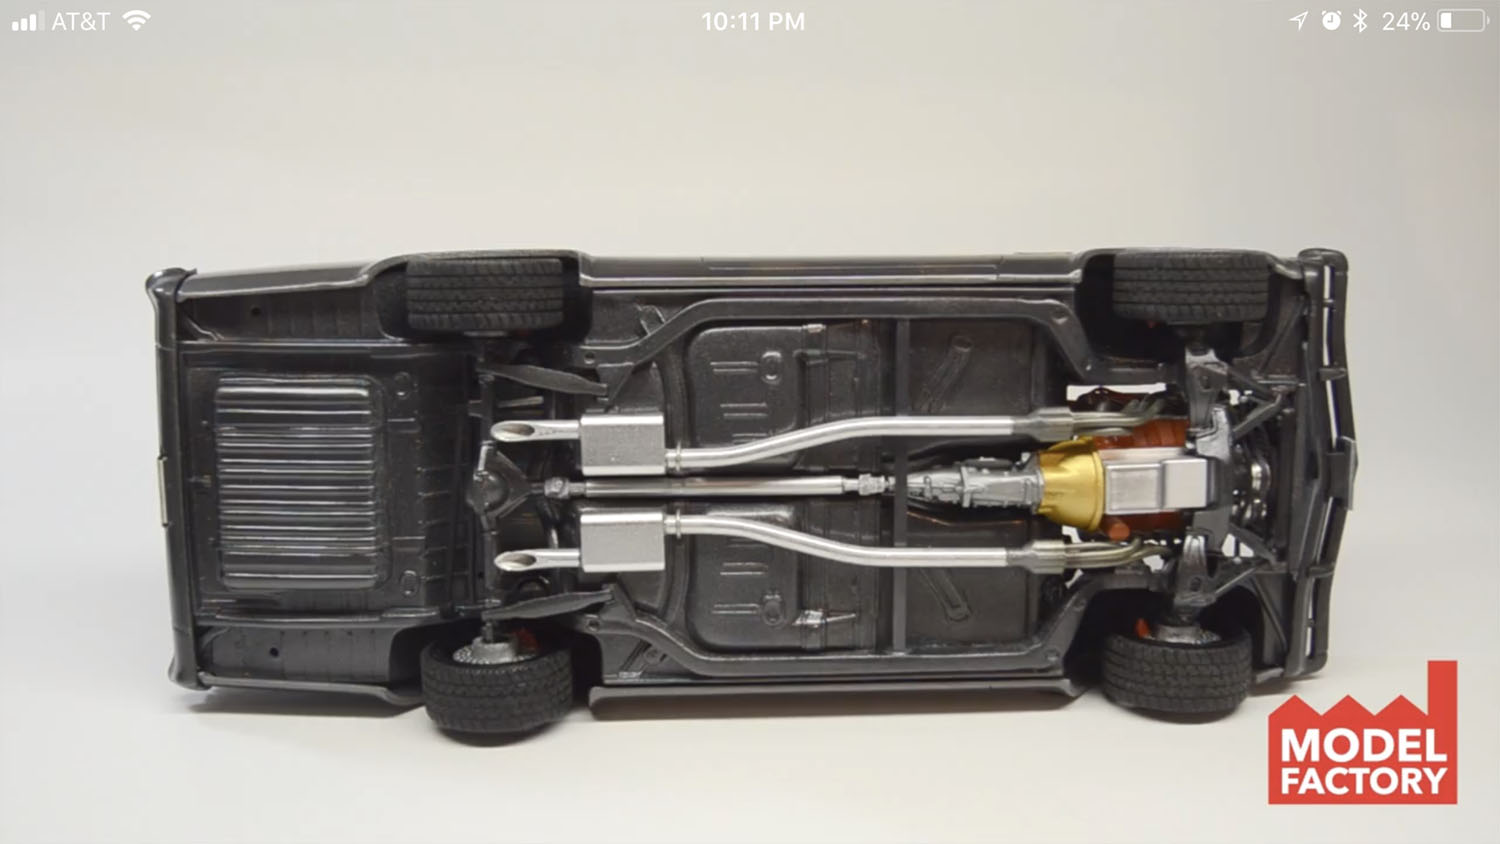
Hi all, Been a while since I posted one of my builds on here. This is the Revell Foose 65 Impala that I finished up a couple of months ago. I used a lot of engine and interior detail parts from Pro Tech Such as all wiring, plumbing, fittings, carb, air cleaner, oil breathers, oil filter, throttle linkage, distributor setup and seatbelt harness. Also a complete Resin and Aluminum Big Block 572 engine, full exhaust and custom racing seats from Sweet Scale detail. The wheels are parts box wheels that I took off of an old Di-cast a few years ago. There is a PE set form The Model Car Garage used also for the emblems and dash detail. Hope you all enjoy the pics.
-
 Hello friends Being the first jet fighter jet in the world to enter service, my duty had to be to have it in my collection. Although it was late his introduction in service could have recovered the air supremacy for the Luftwaffe in the Second World War. The model is from the Revell brand at 1/48 scale. https://youtu.be/CJK4ZyCcjqE Greetings and I hope you like mates
 -
Have the the HL stores gotten in the Revell/Monogram 70 Charger yet?
-
 Checking out everything that's in the box with the new 70 Charger. Wonderful kit, crisp molds and sweet redline tires. Will make a great complement to their excellent 68 and 69 kits. Hemi is the only engine option on this one, but other mills ca be purchased all over the interwebs. https://www.youtube.com/watch?v=TelIknzQz6A
 -
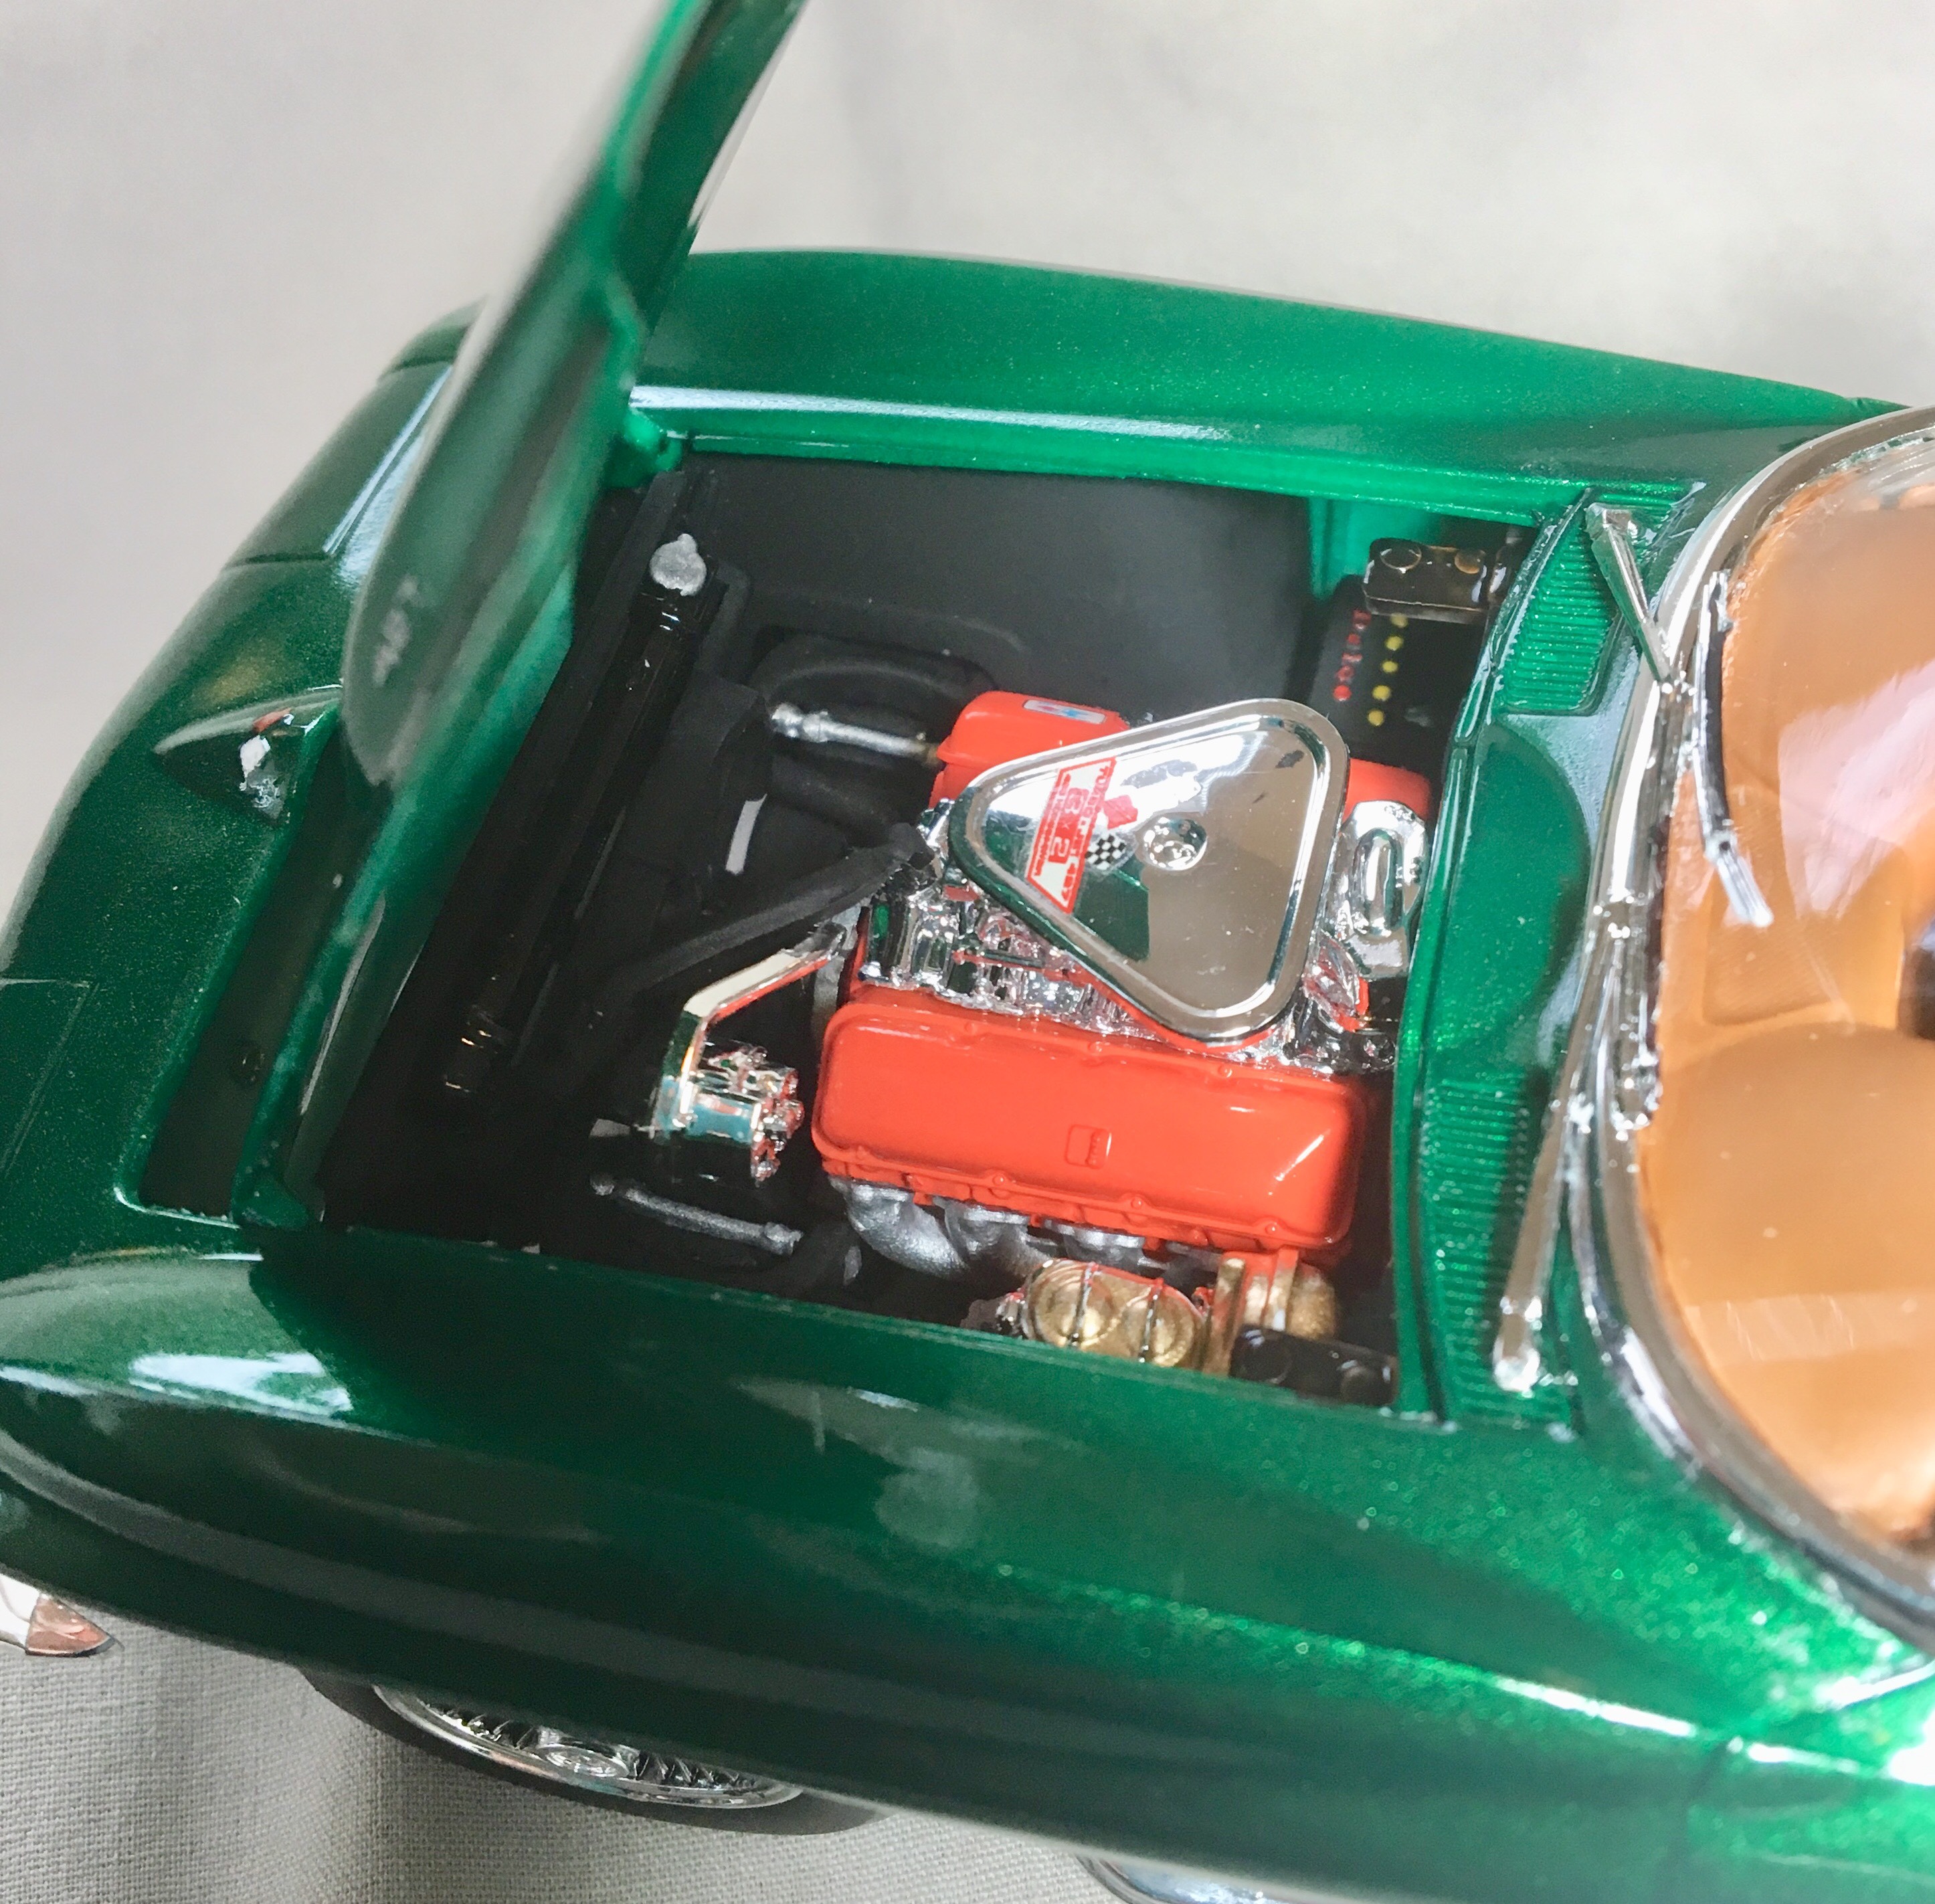
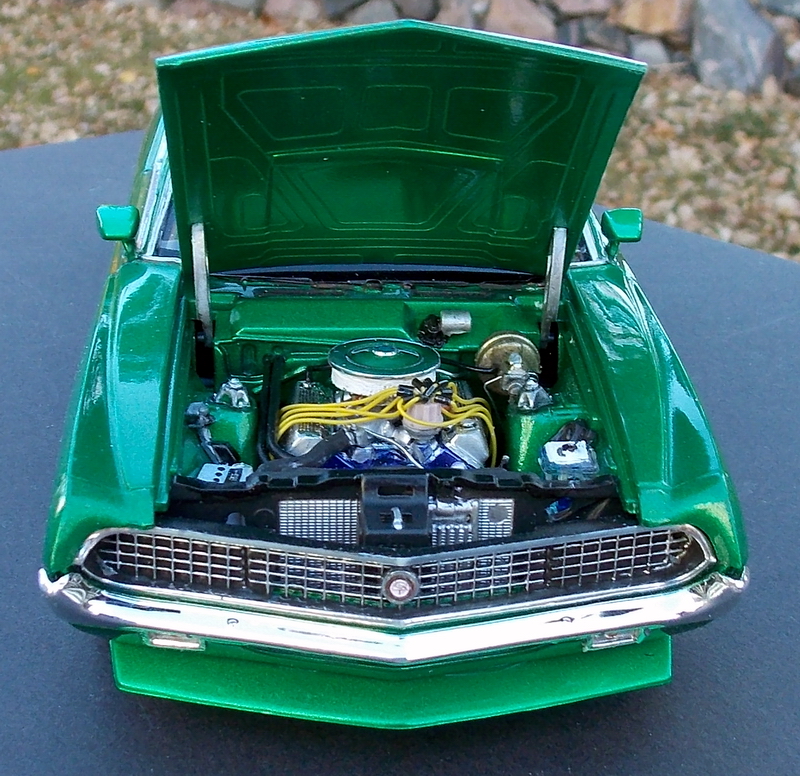
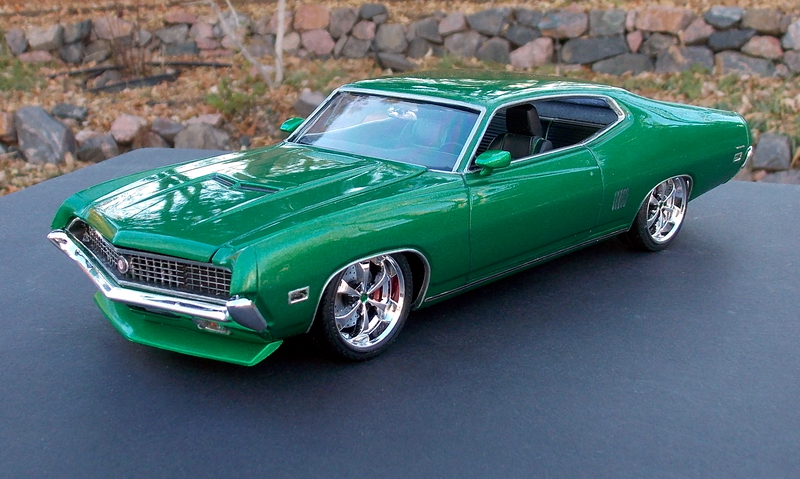
Just finished a long-time build of the Revell 70 Torino GT. I have to say, one of the best detailed kits I've built. Kept it mostly stock with exception of a custom Emerald Green pearlized and highly polished paint job. Lots of detail, opened the front grill center section, and spent some time on engine compartment detailing, which I actually do not enjoy doing unless I'm in a specific mood. Lowered front and rear suspension to "stance" the car better than stock and added some Aoshima custom 6-spoke wheels
-
I did this as a slump buster. Was disappointed when I opened the box and found no decals, just stickers. Surprisingly they went down pretty well and conformed to curves better than I expected. I am looking forward to the full detail kits of the Ford and Chevy, I have not picked up either yet. Comments welcome, thanks for looking.
-
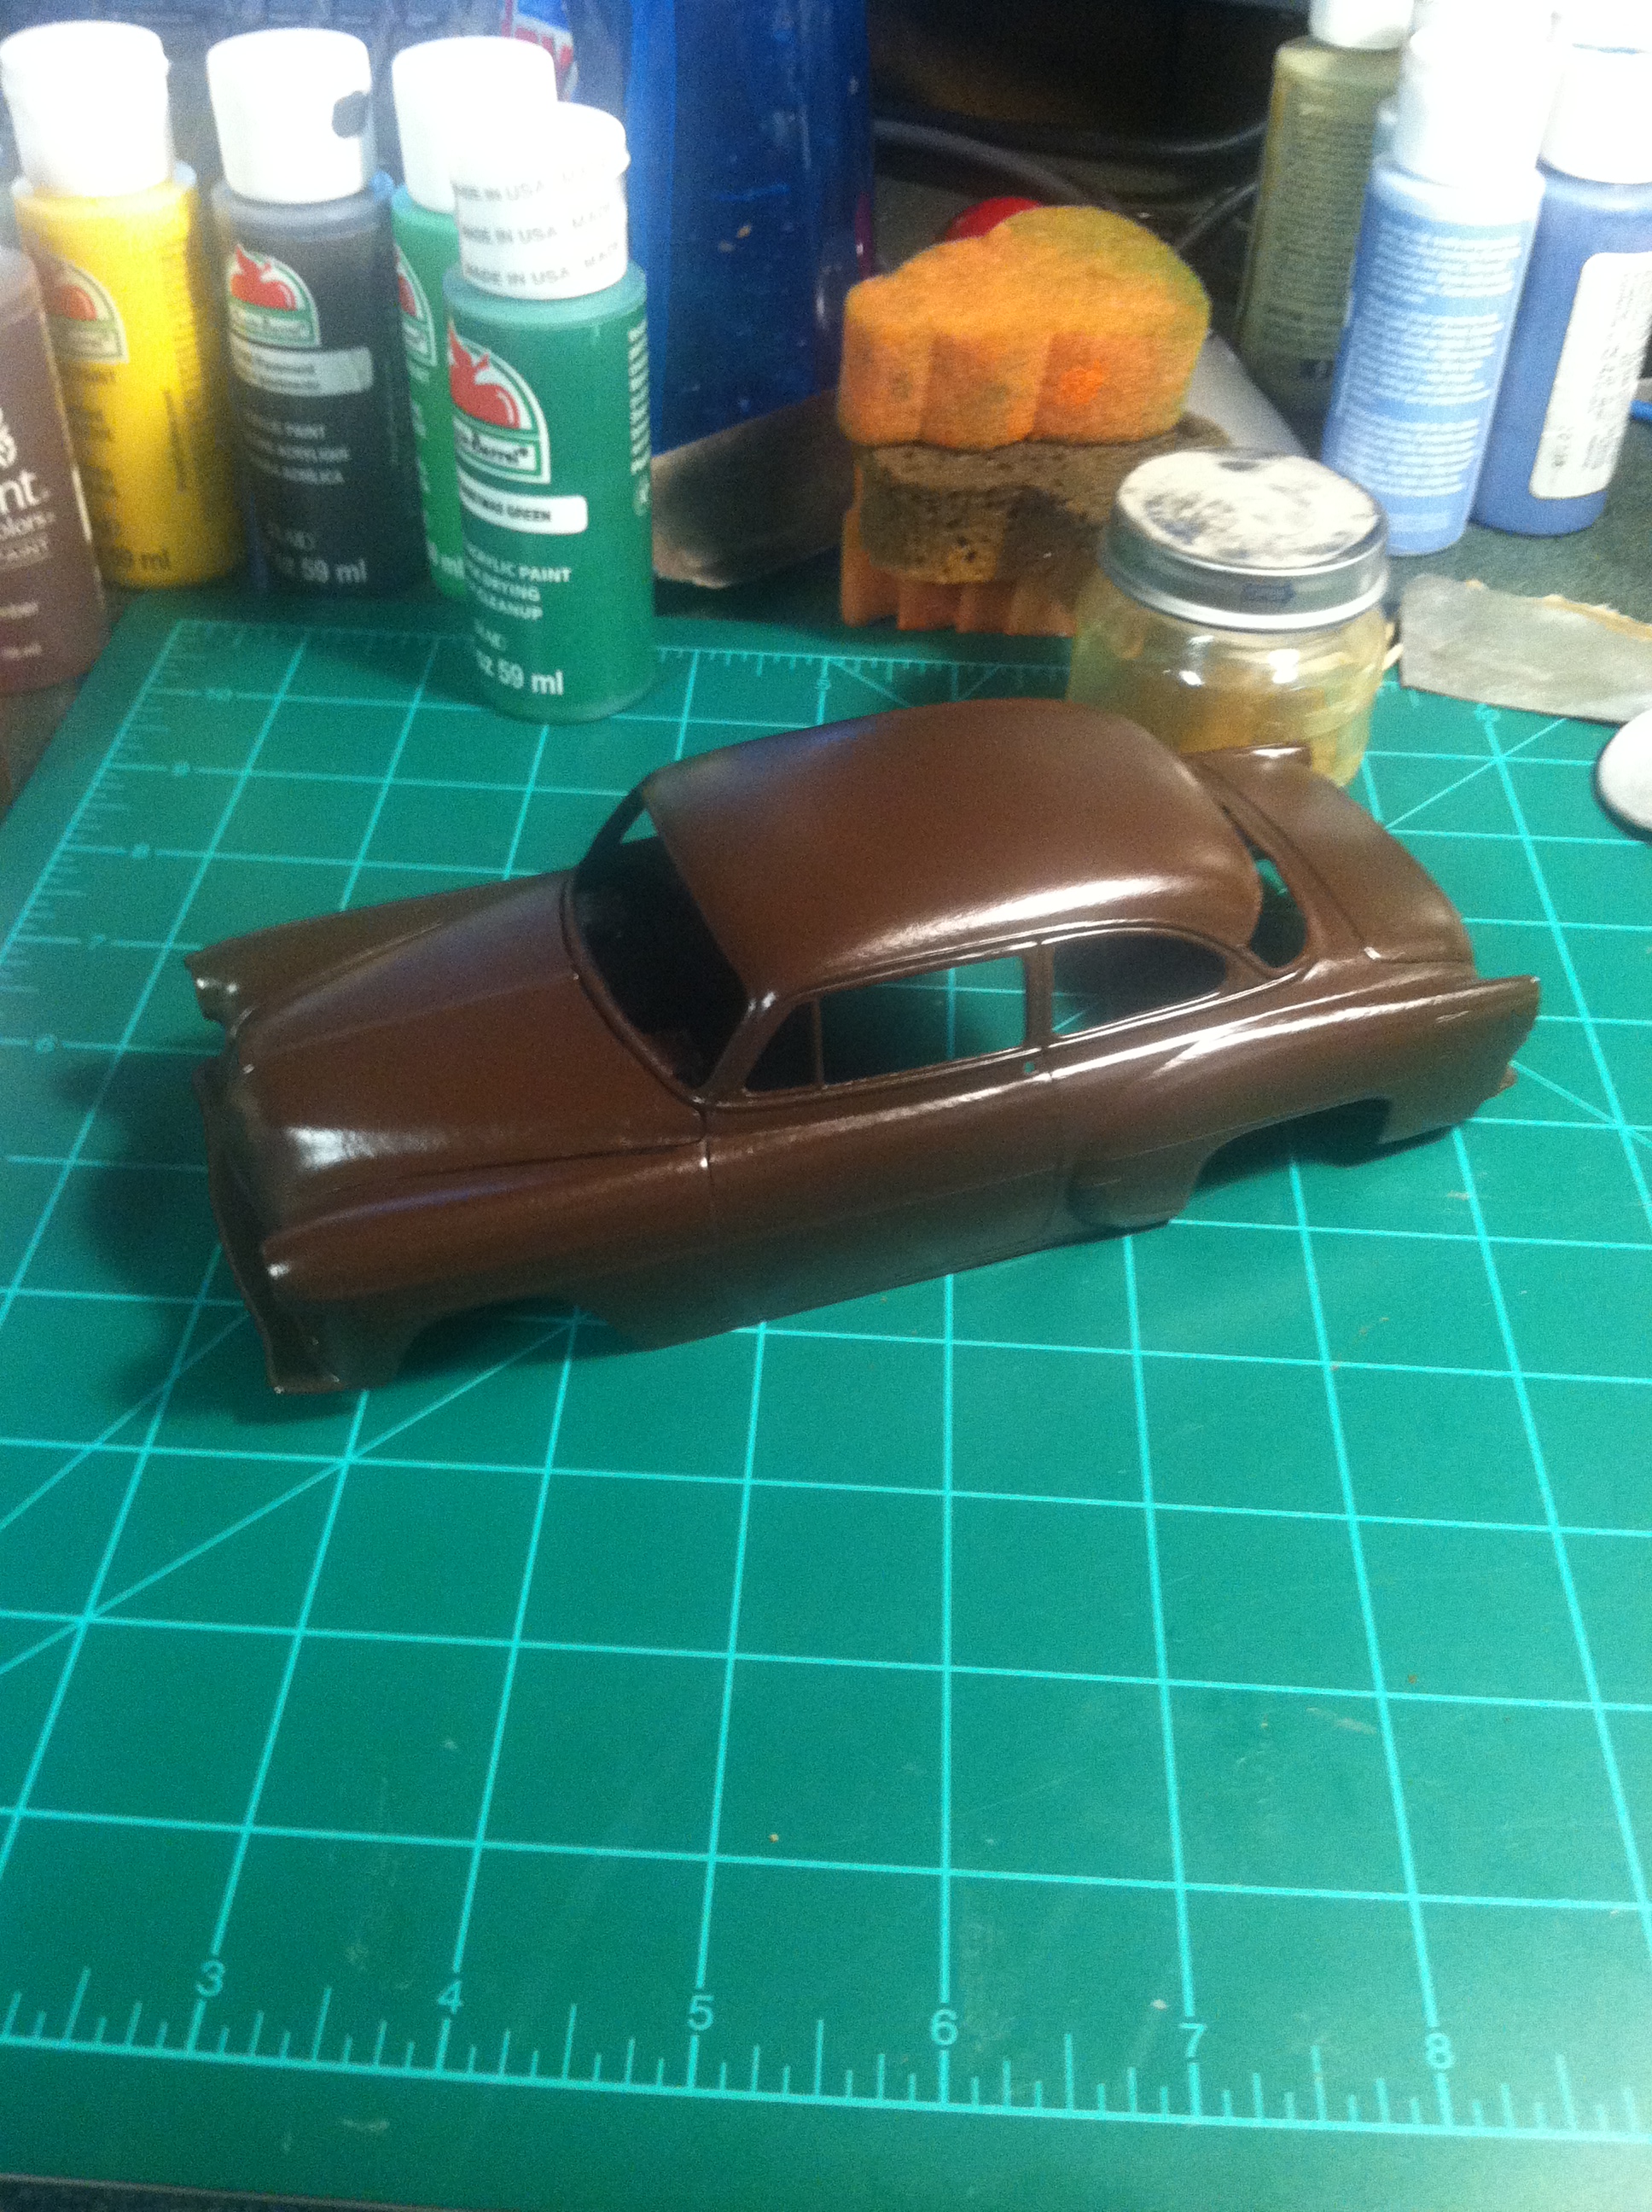
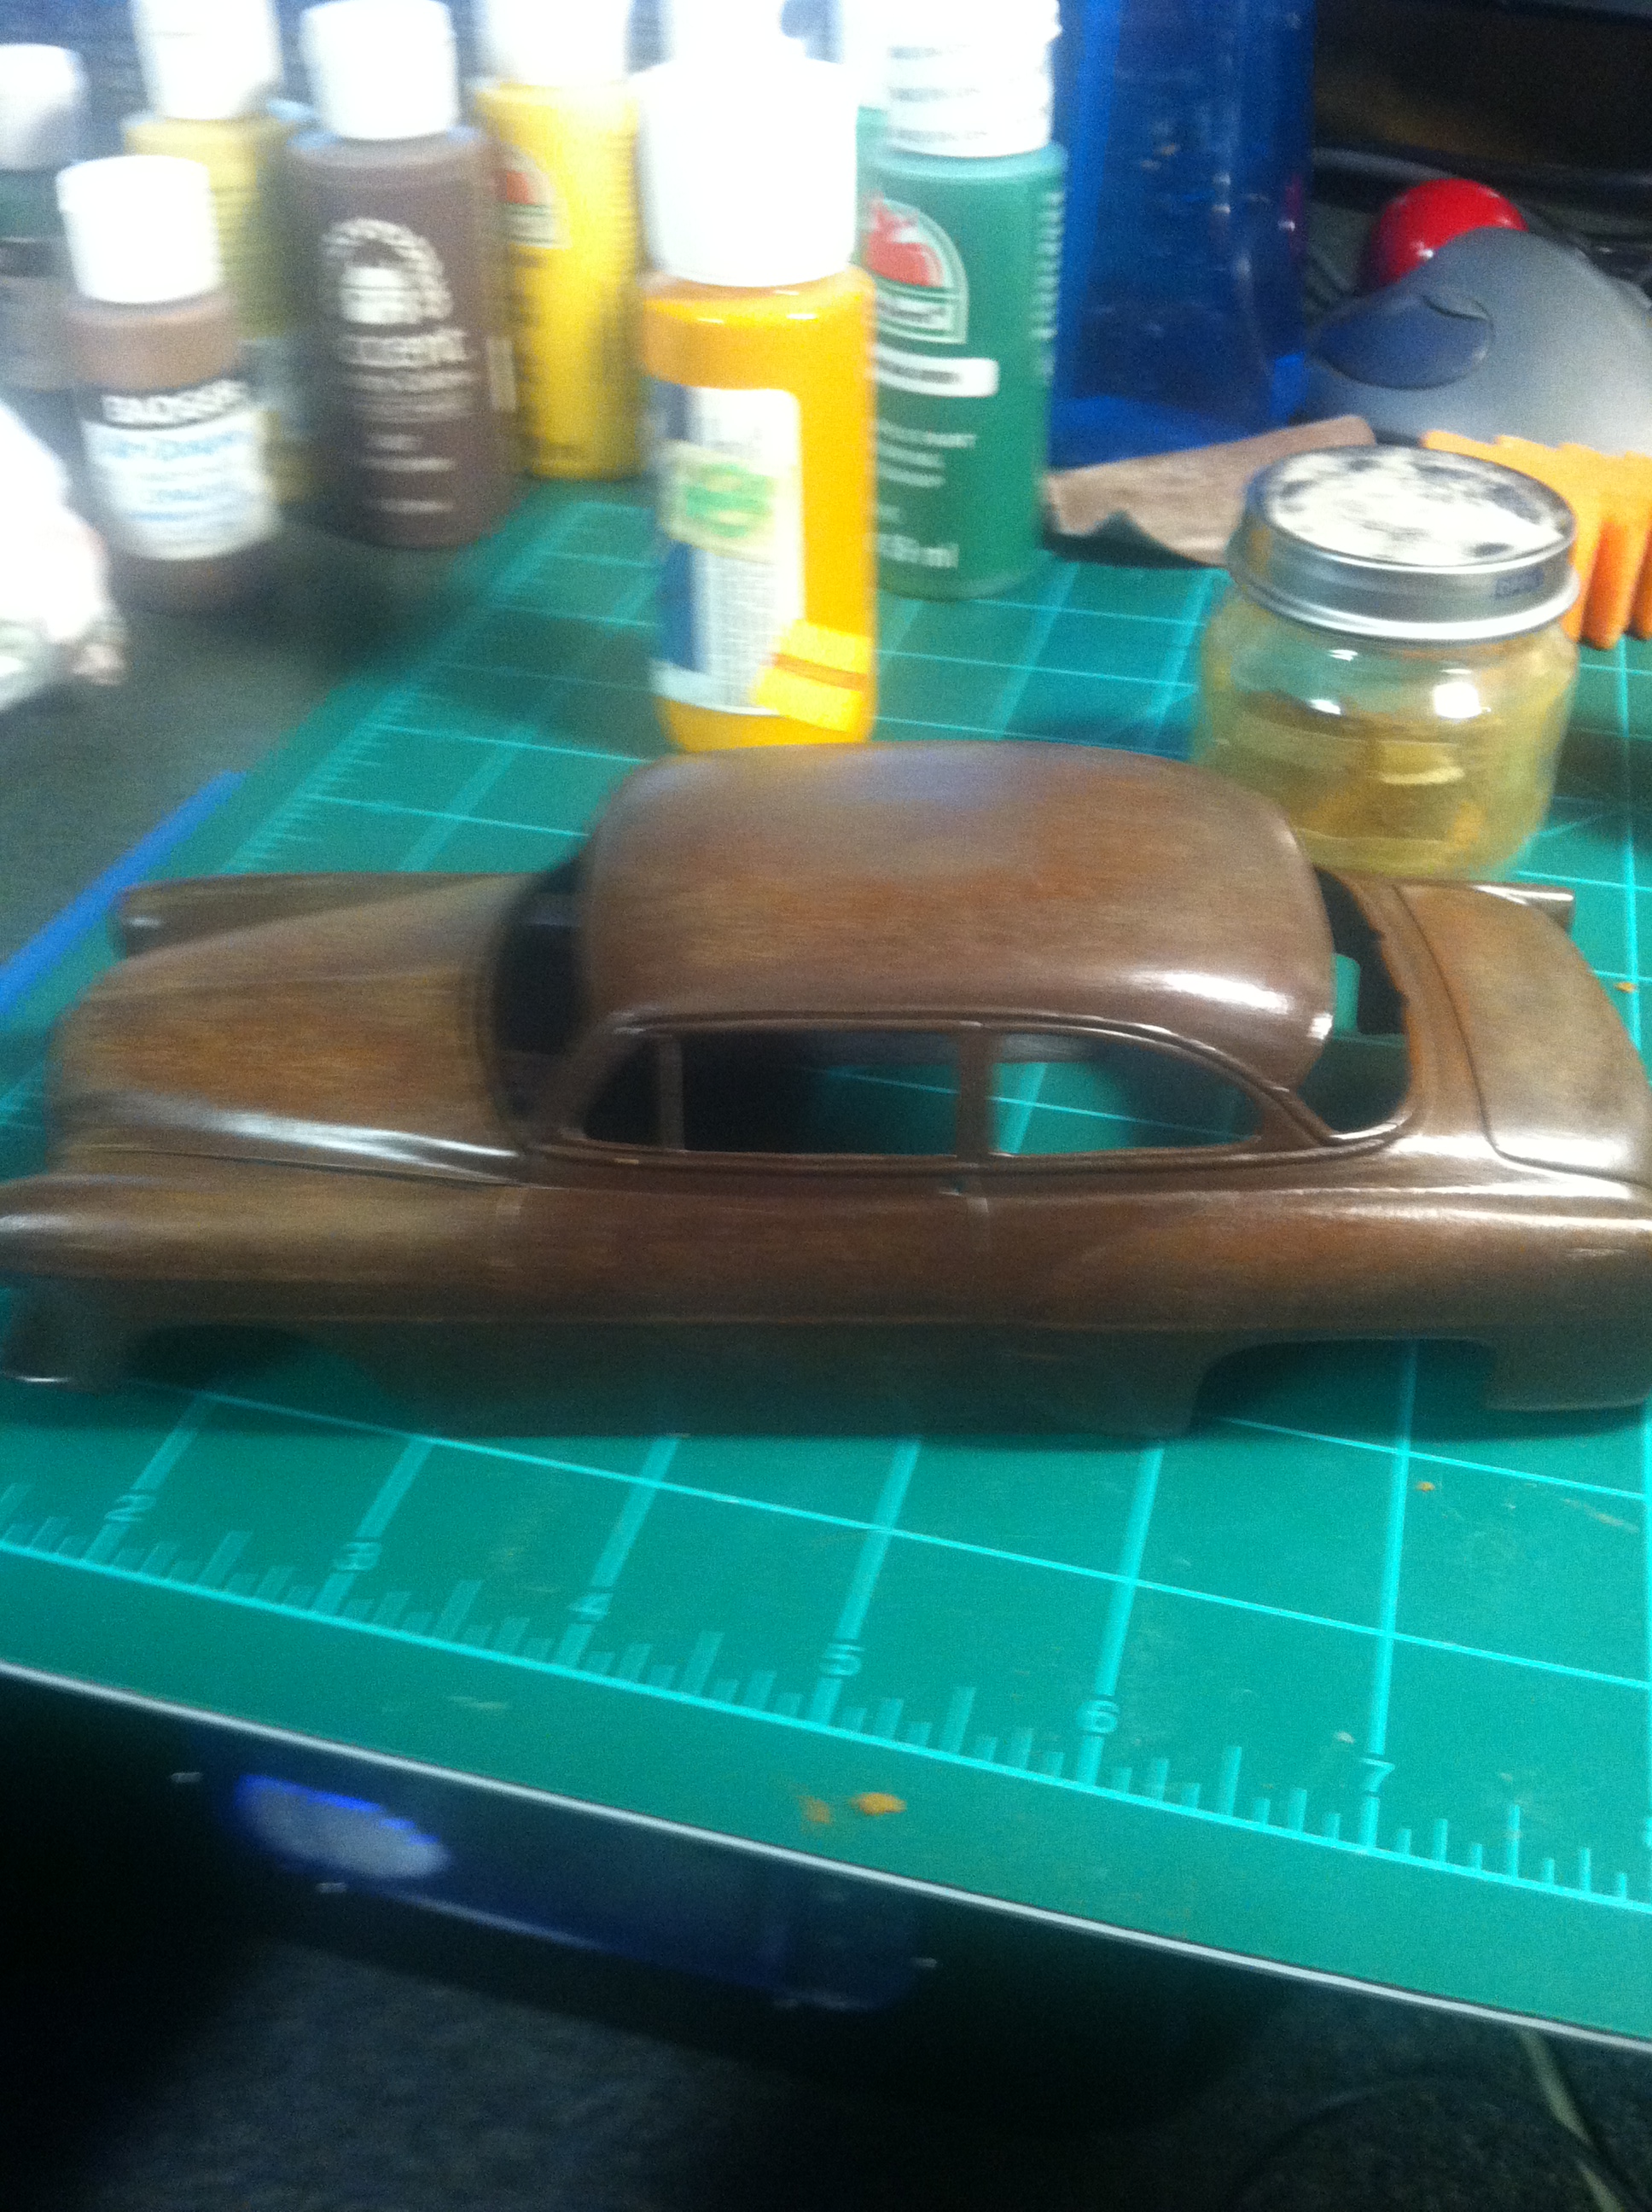
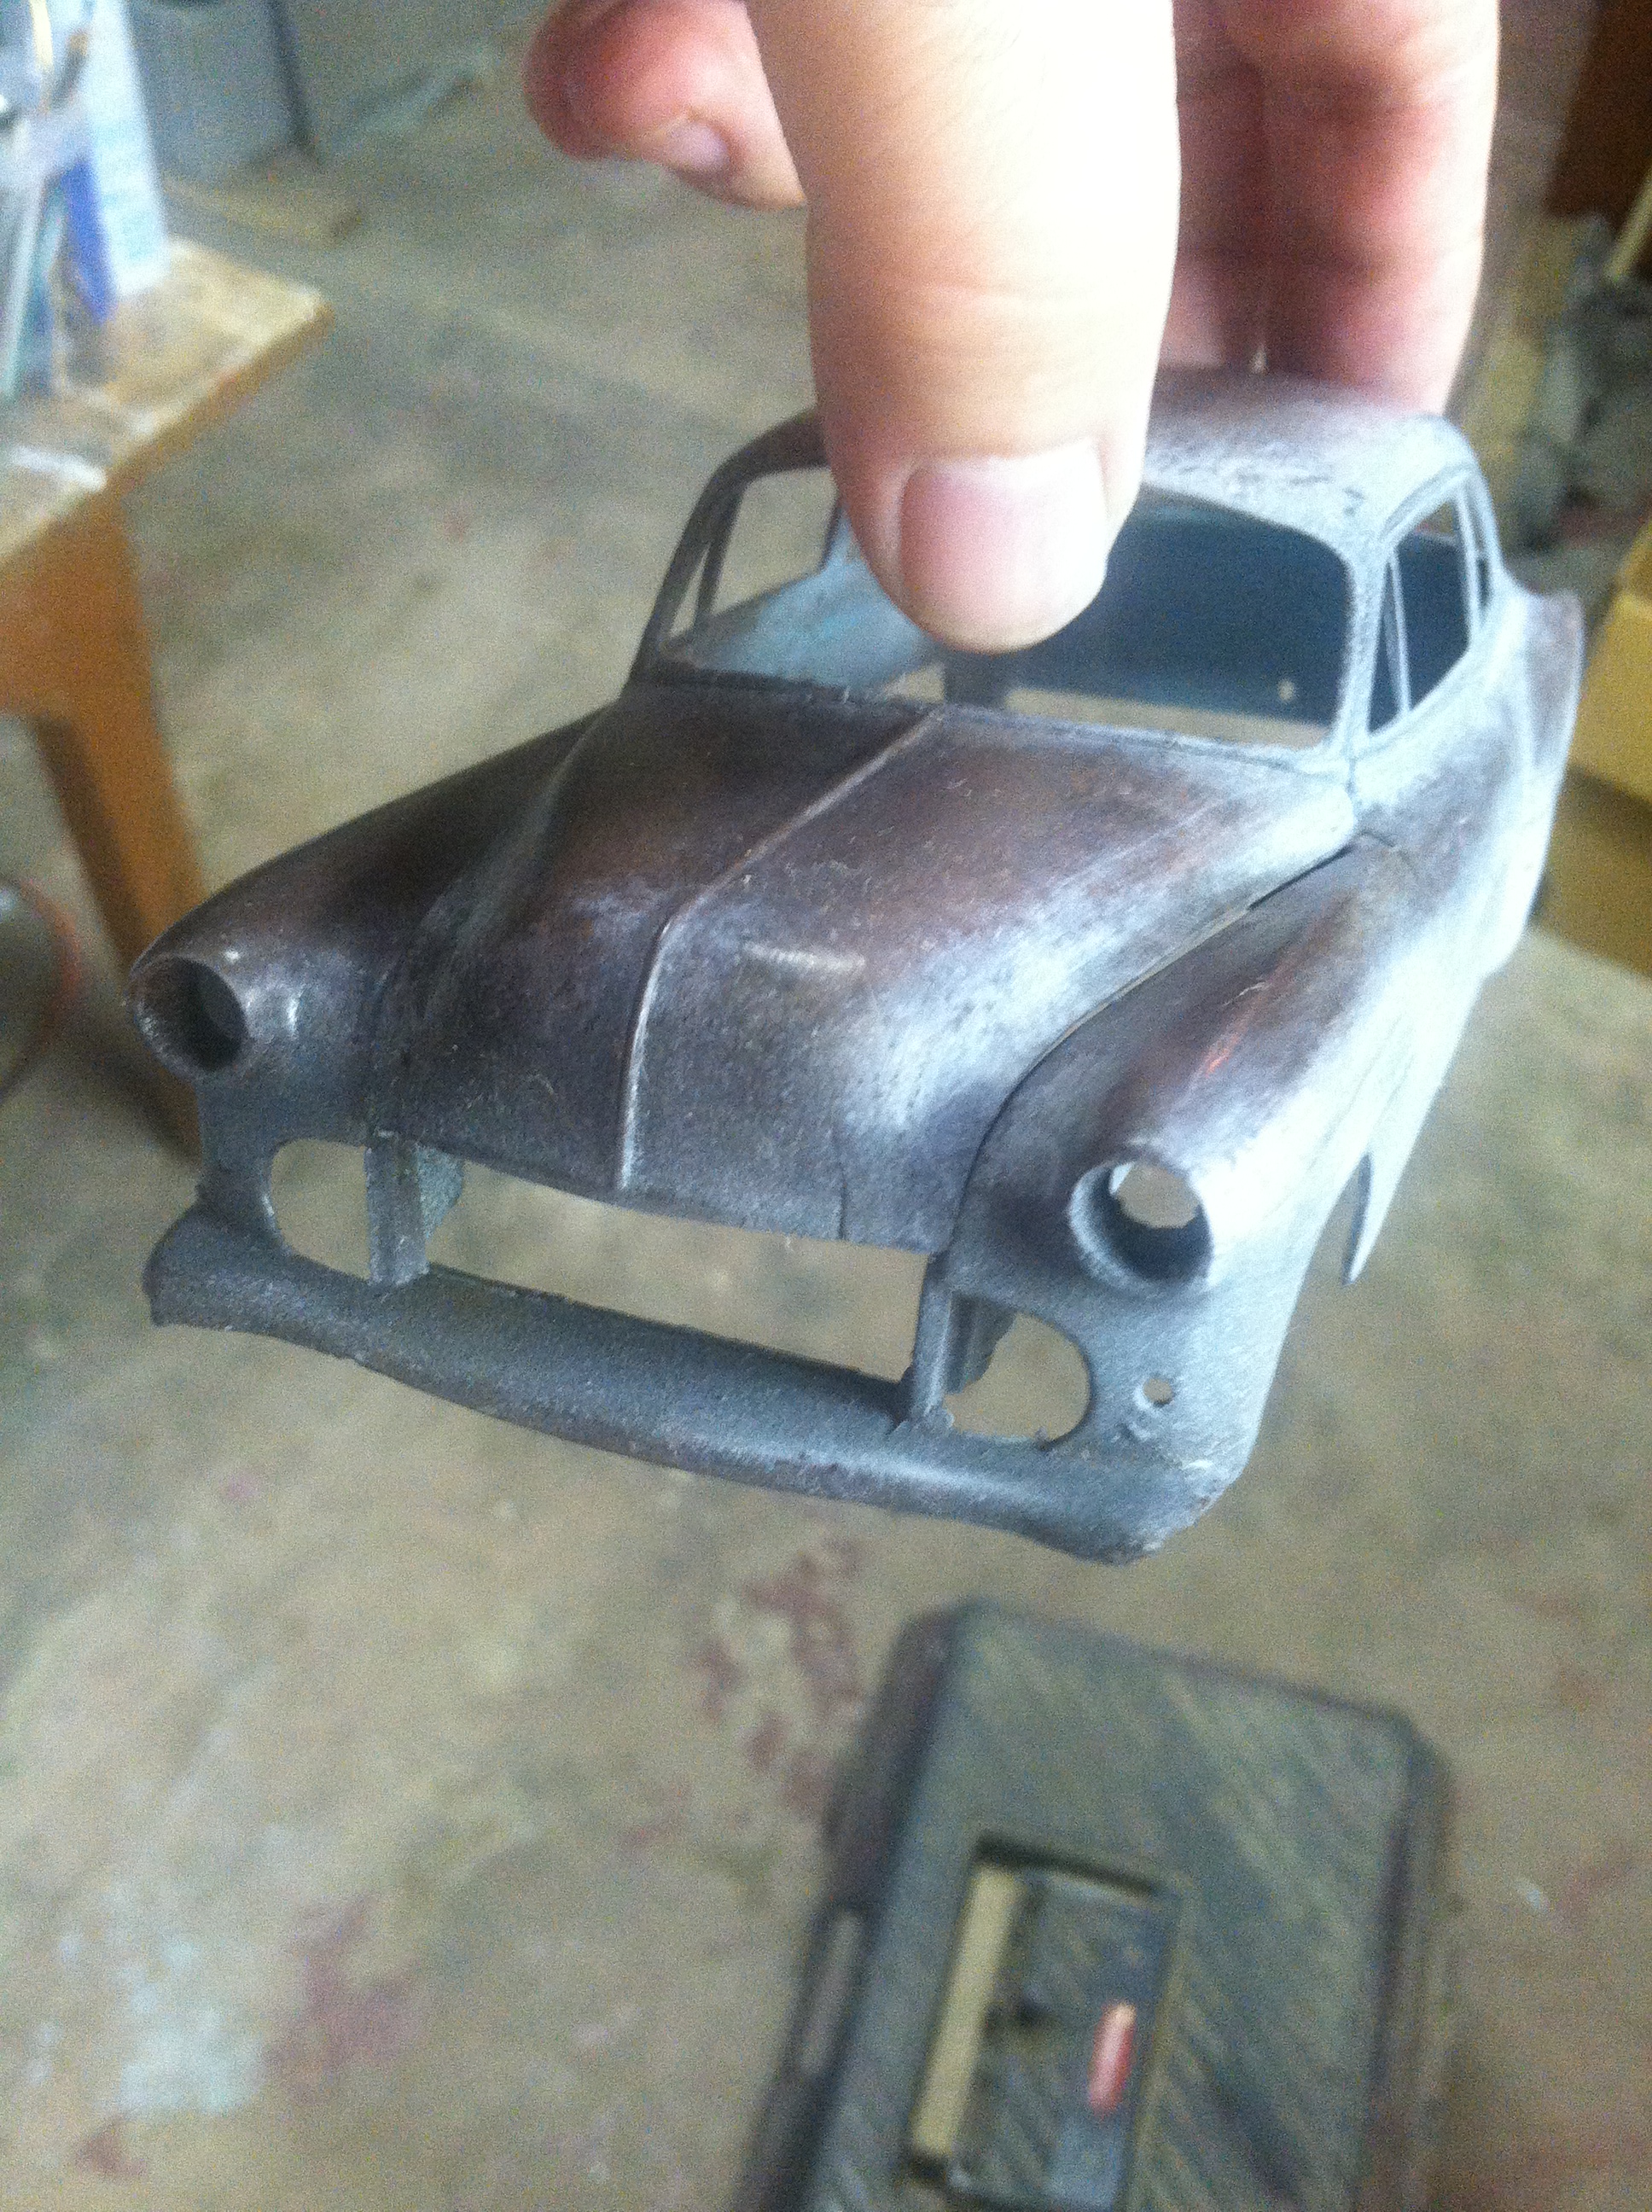
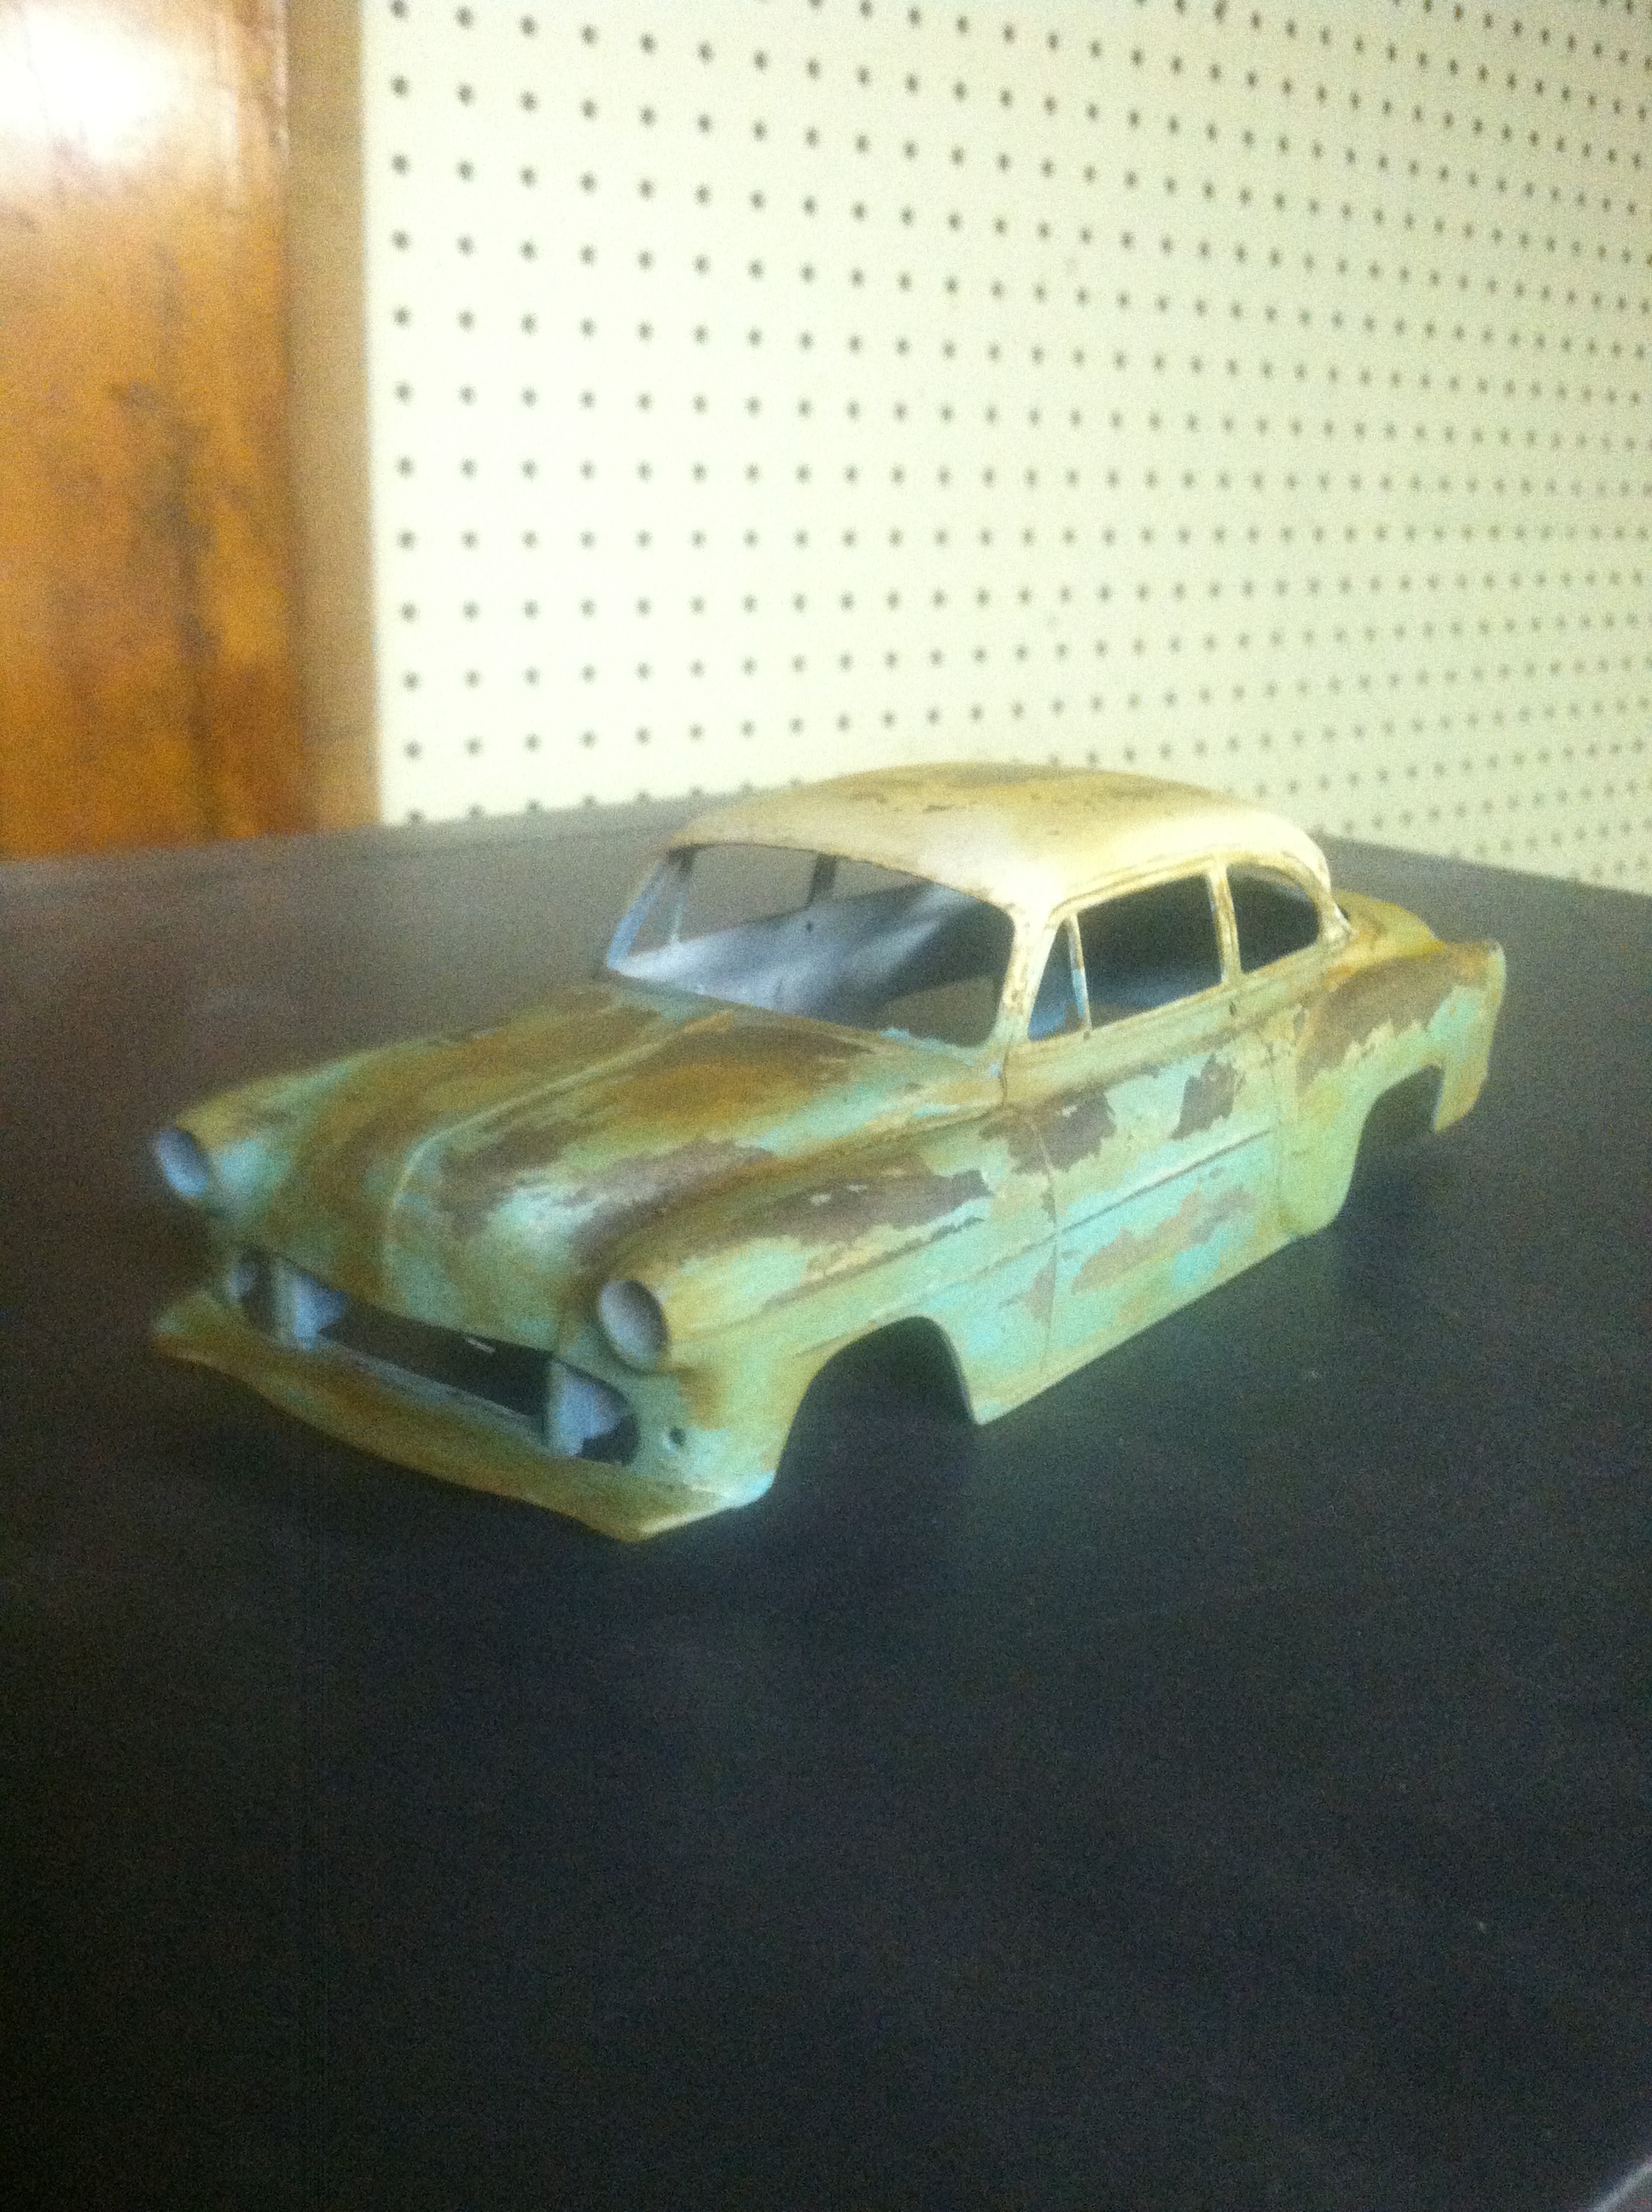
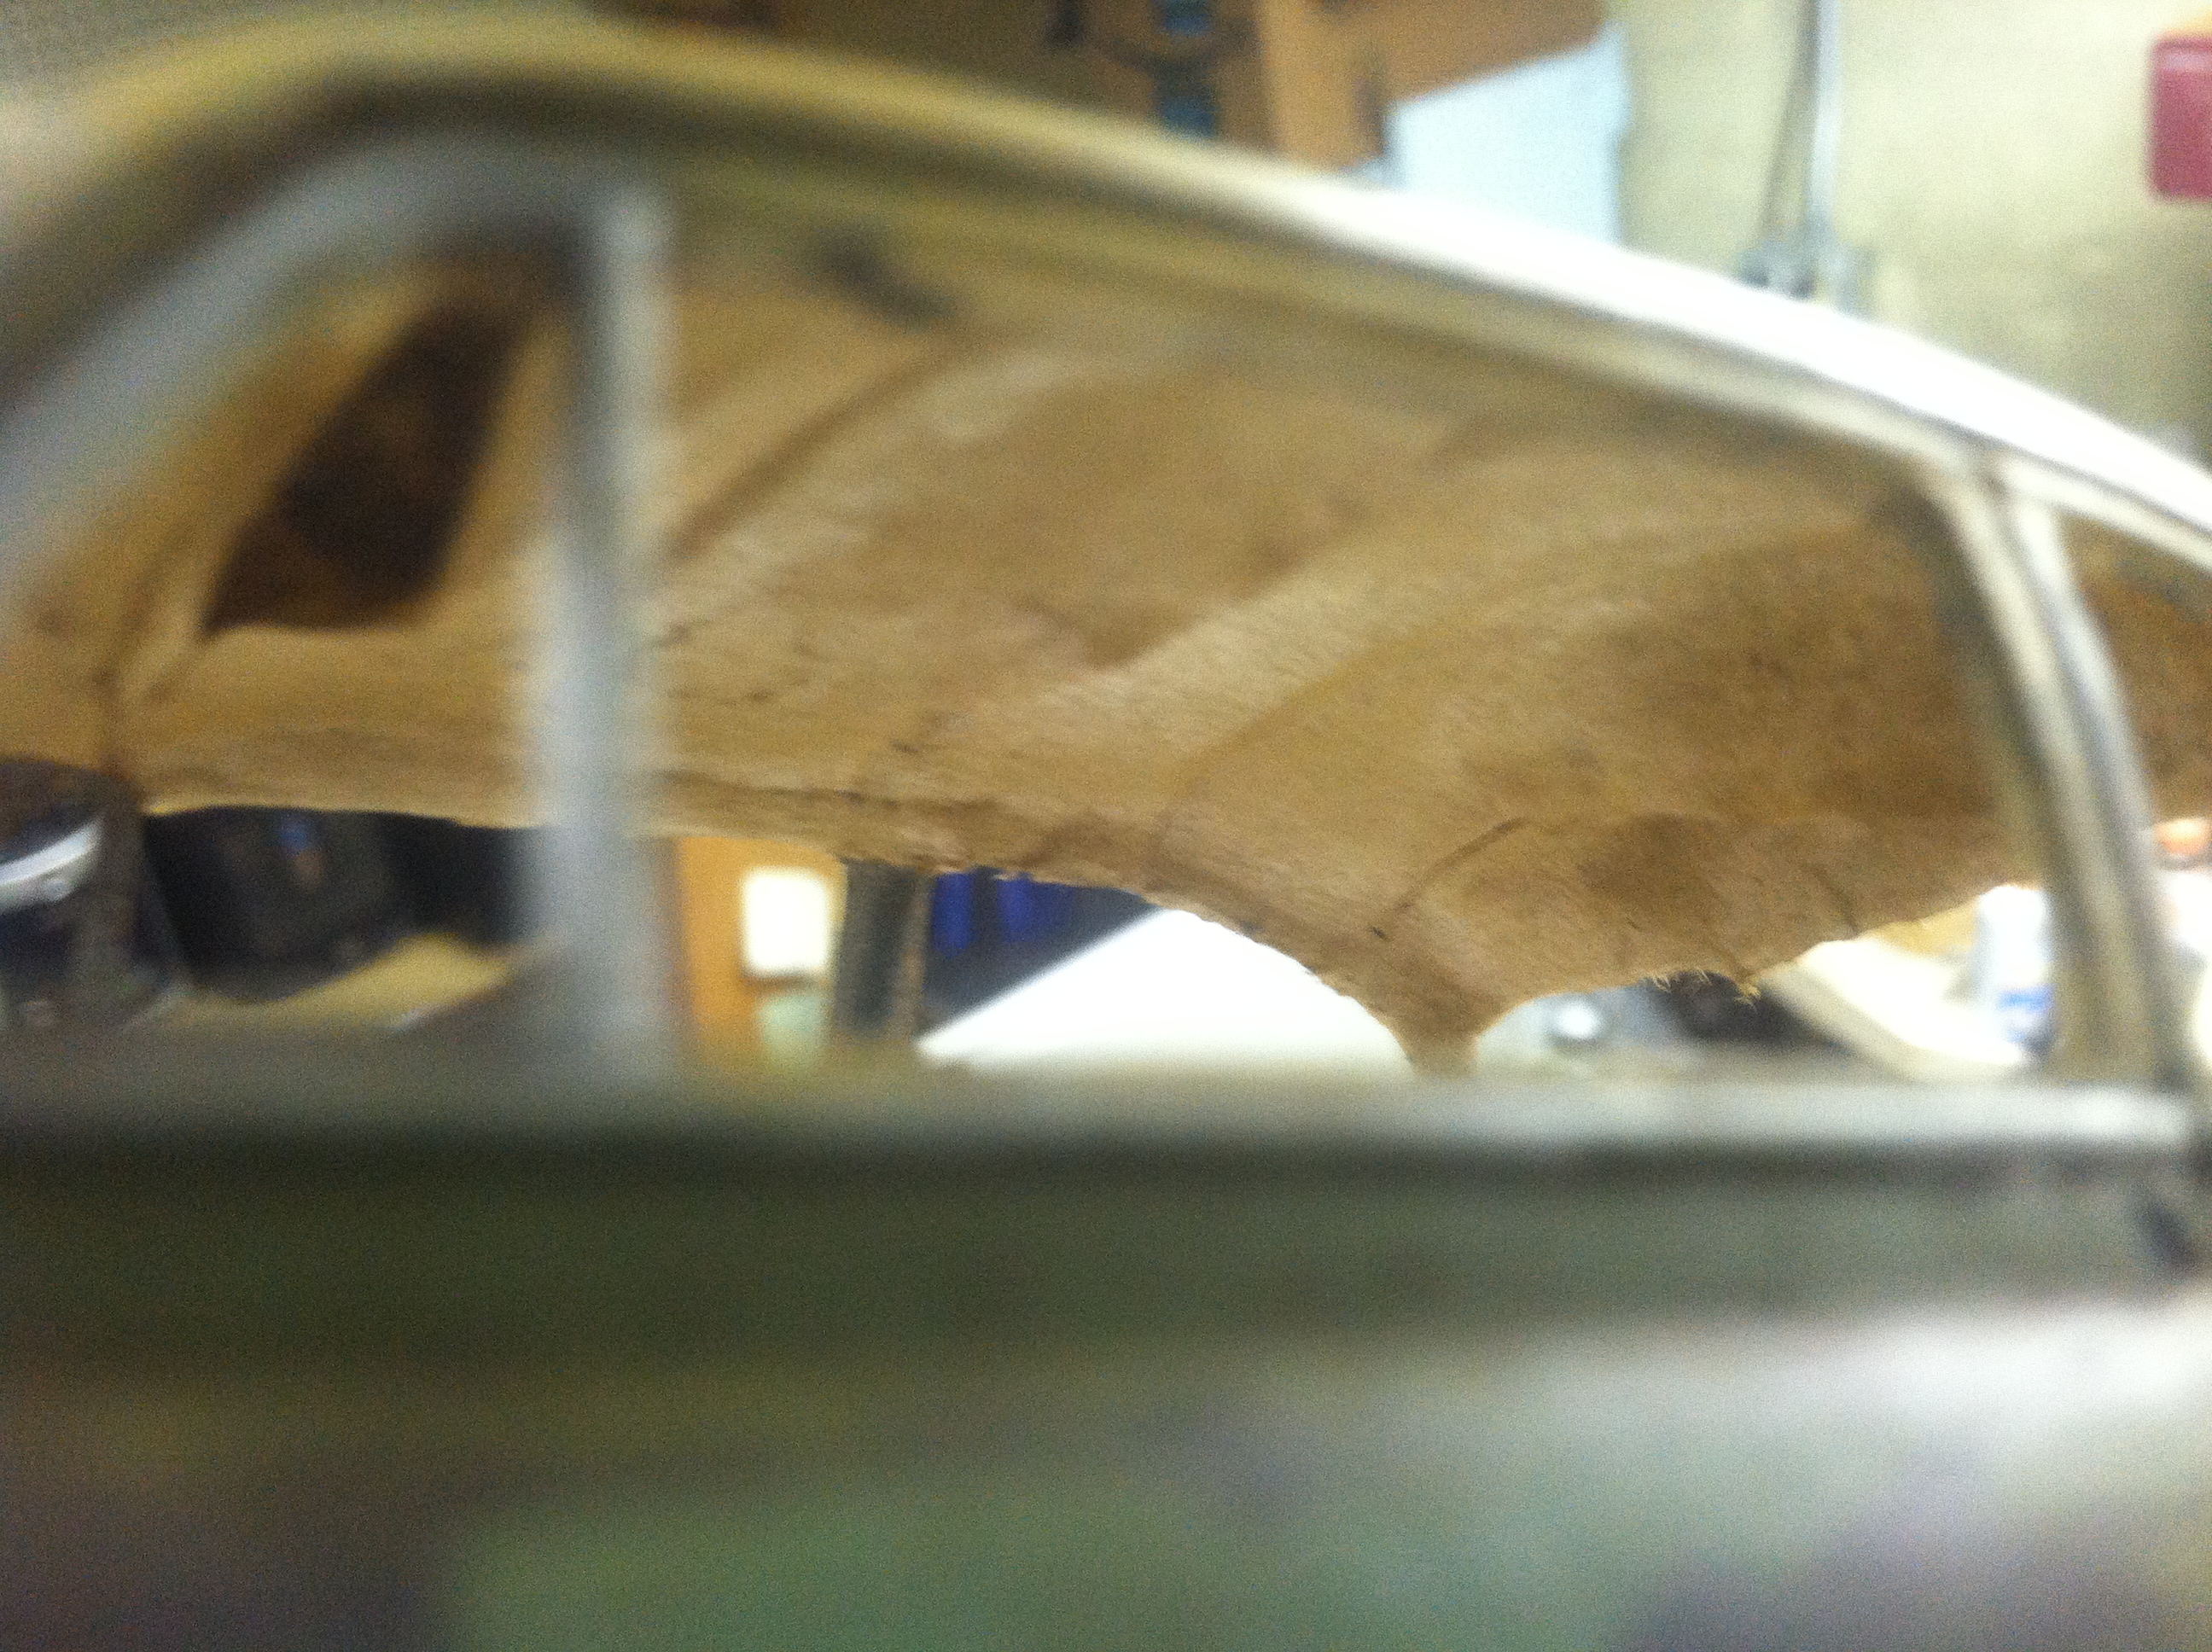
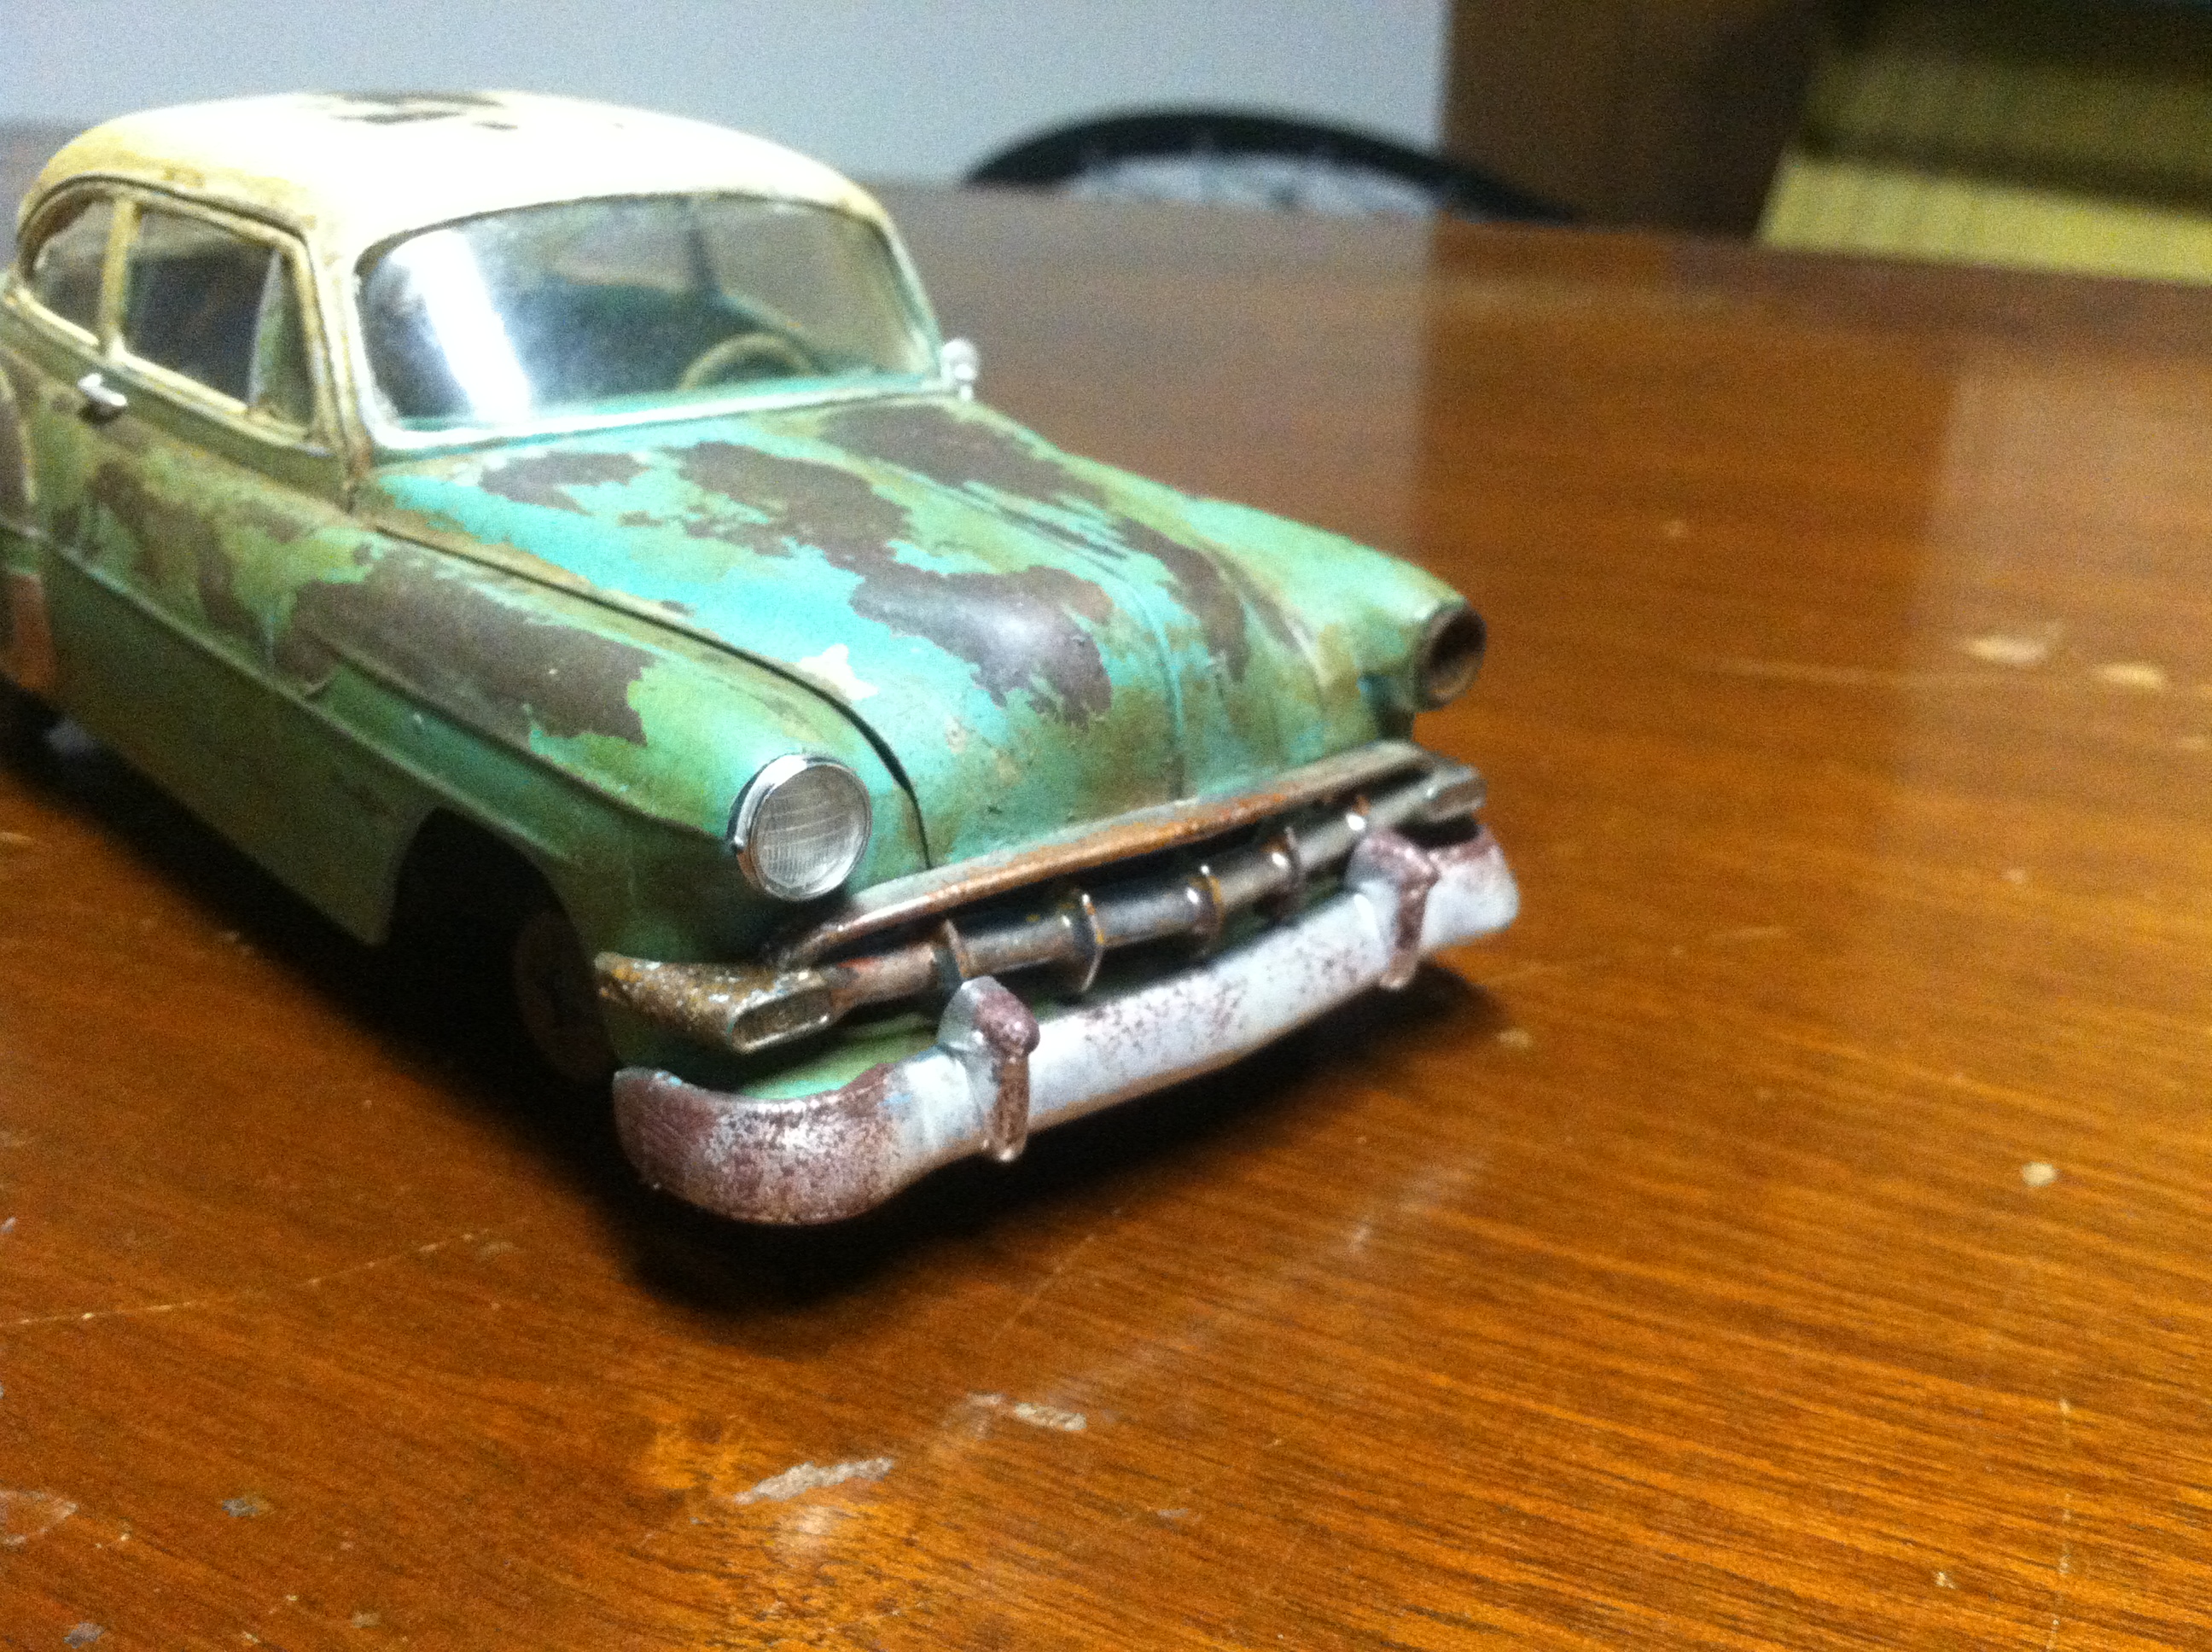
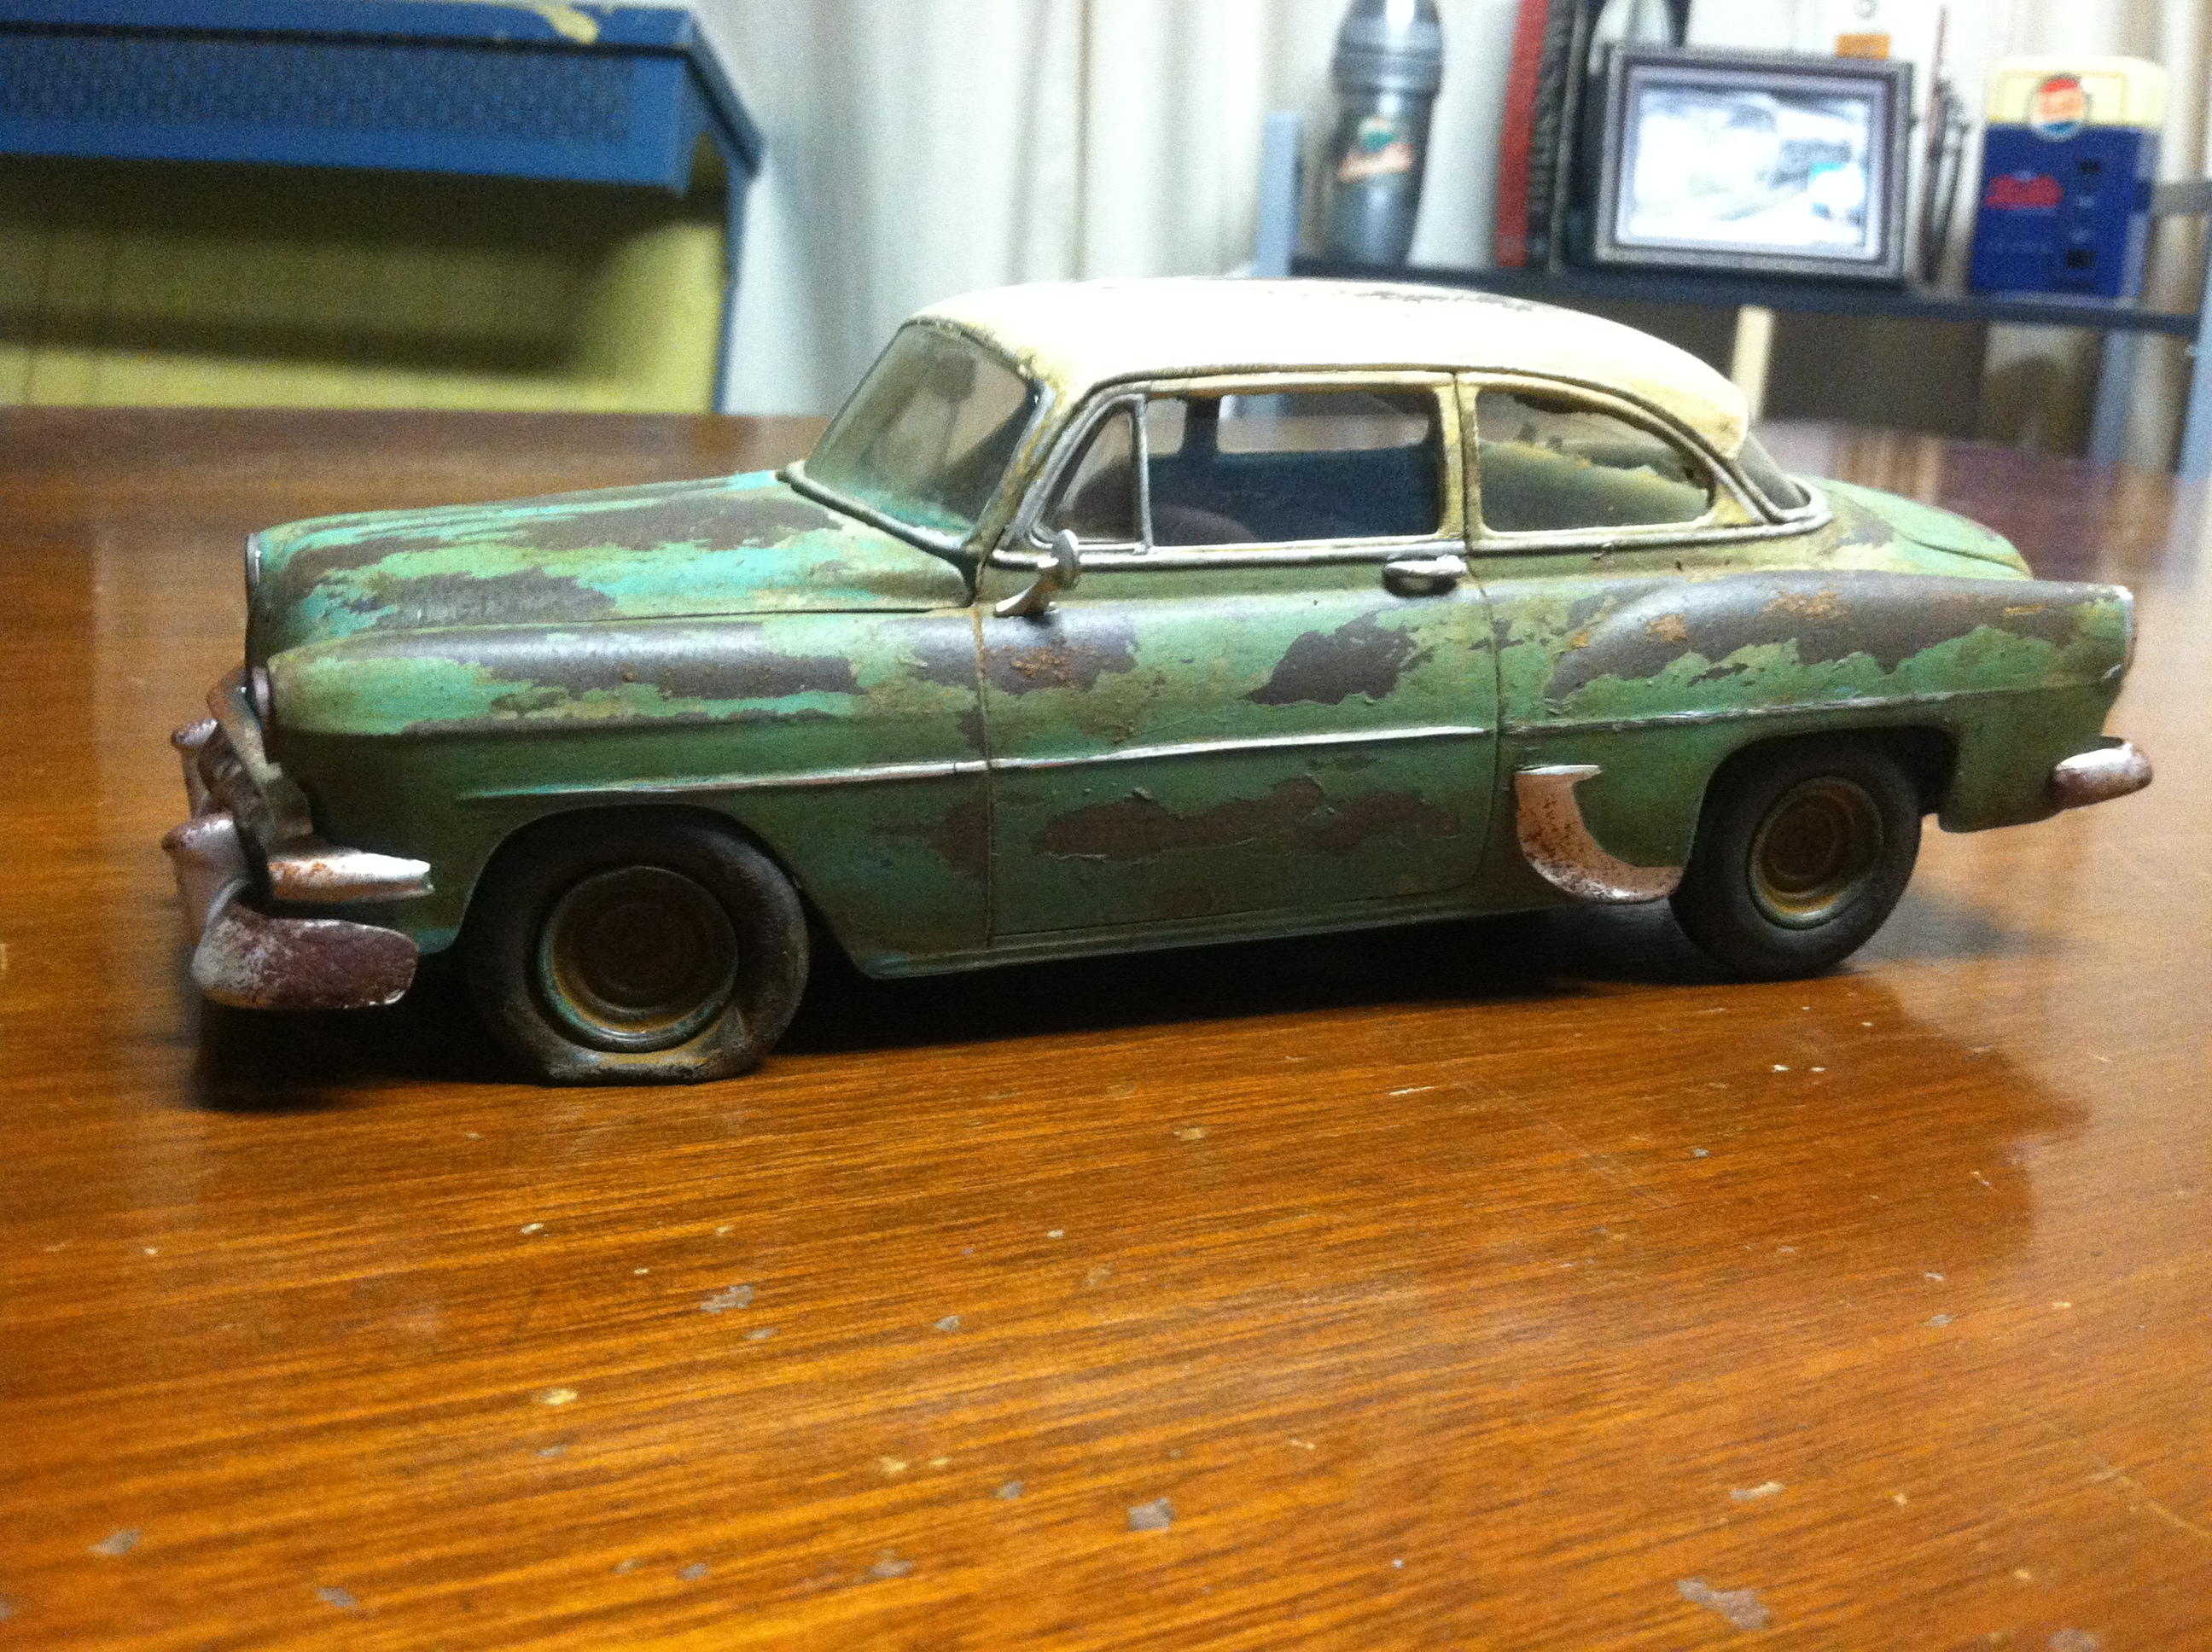
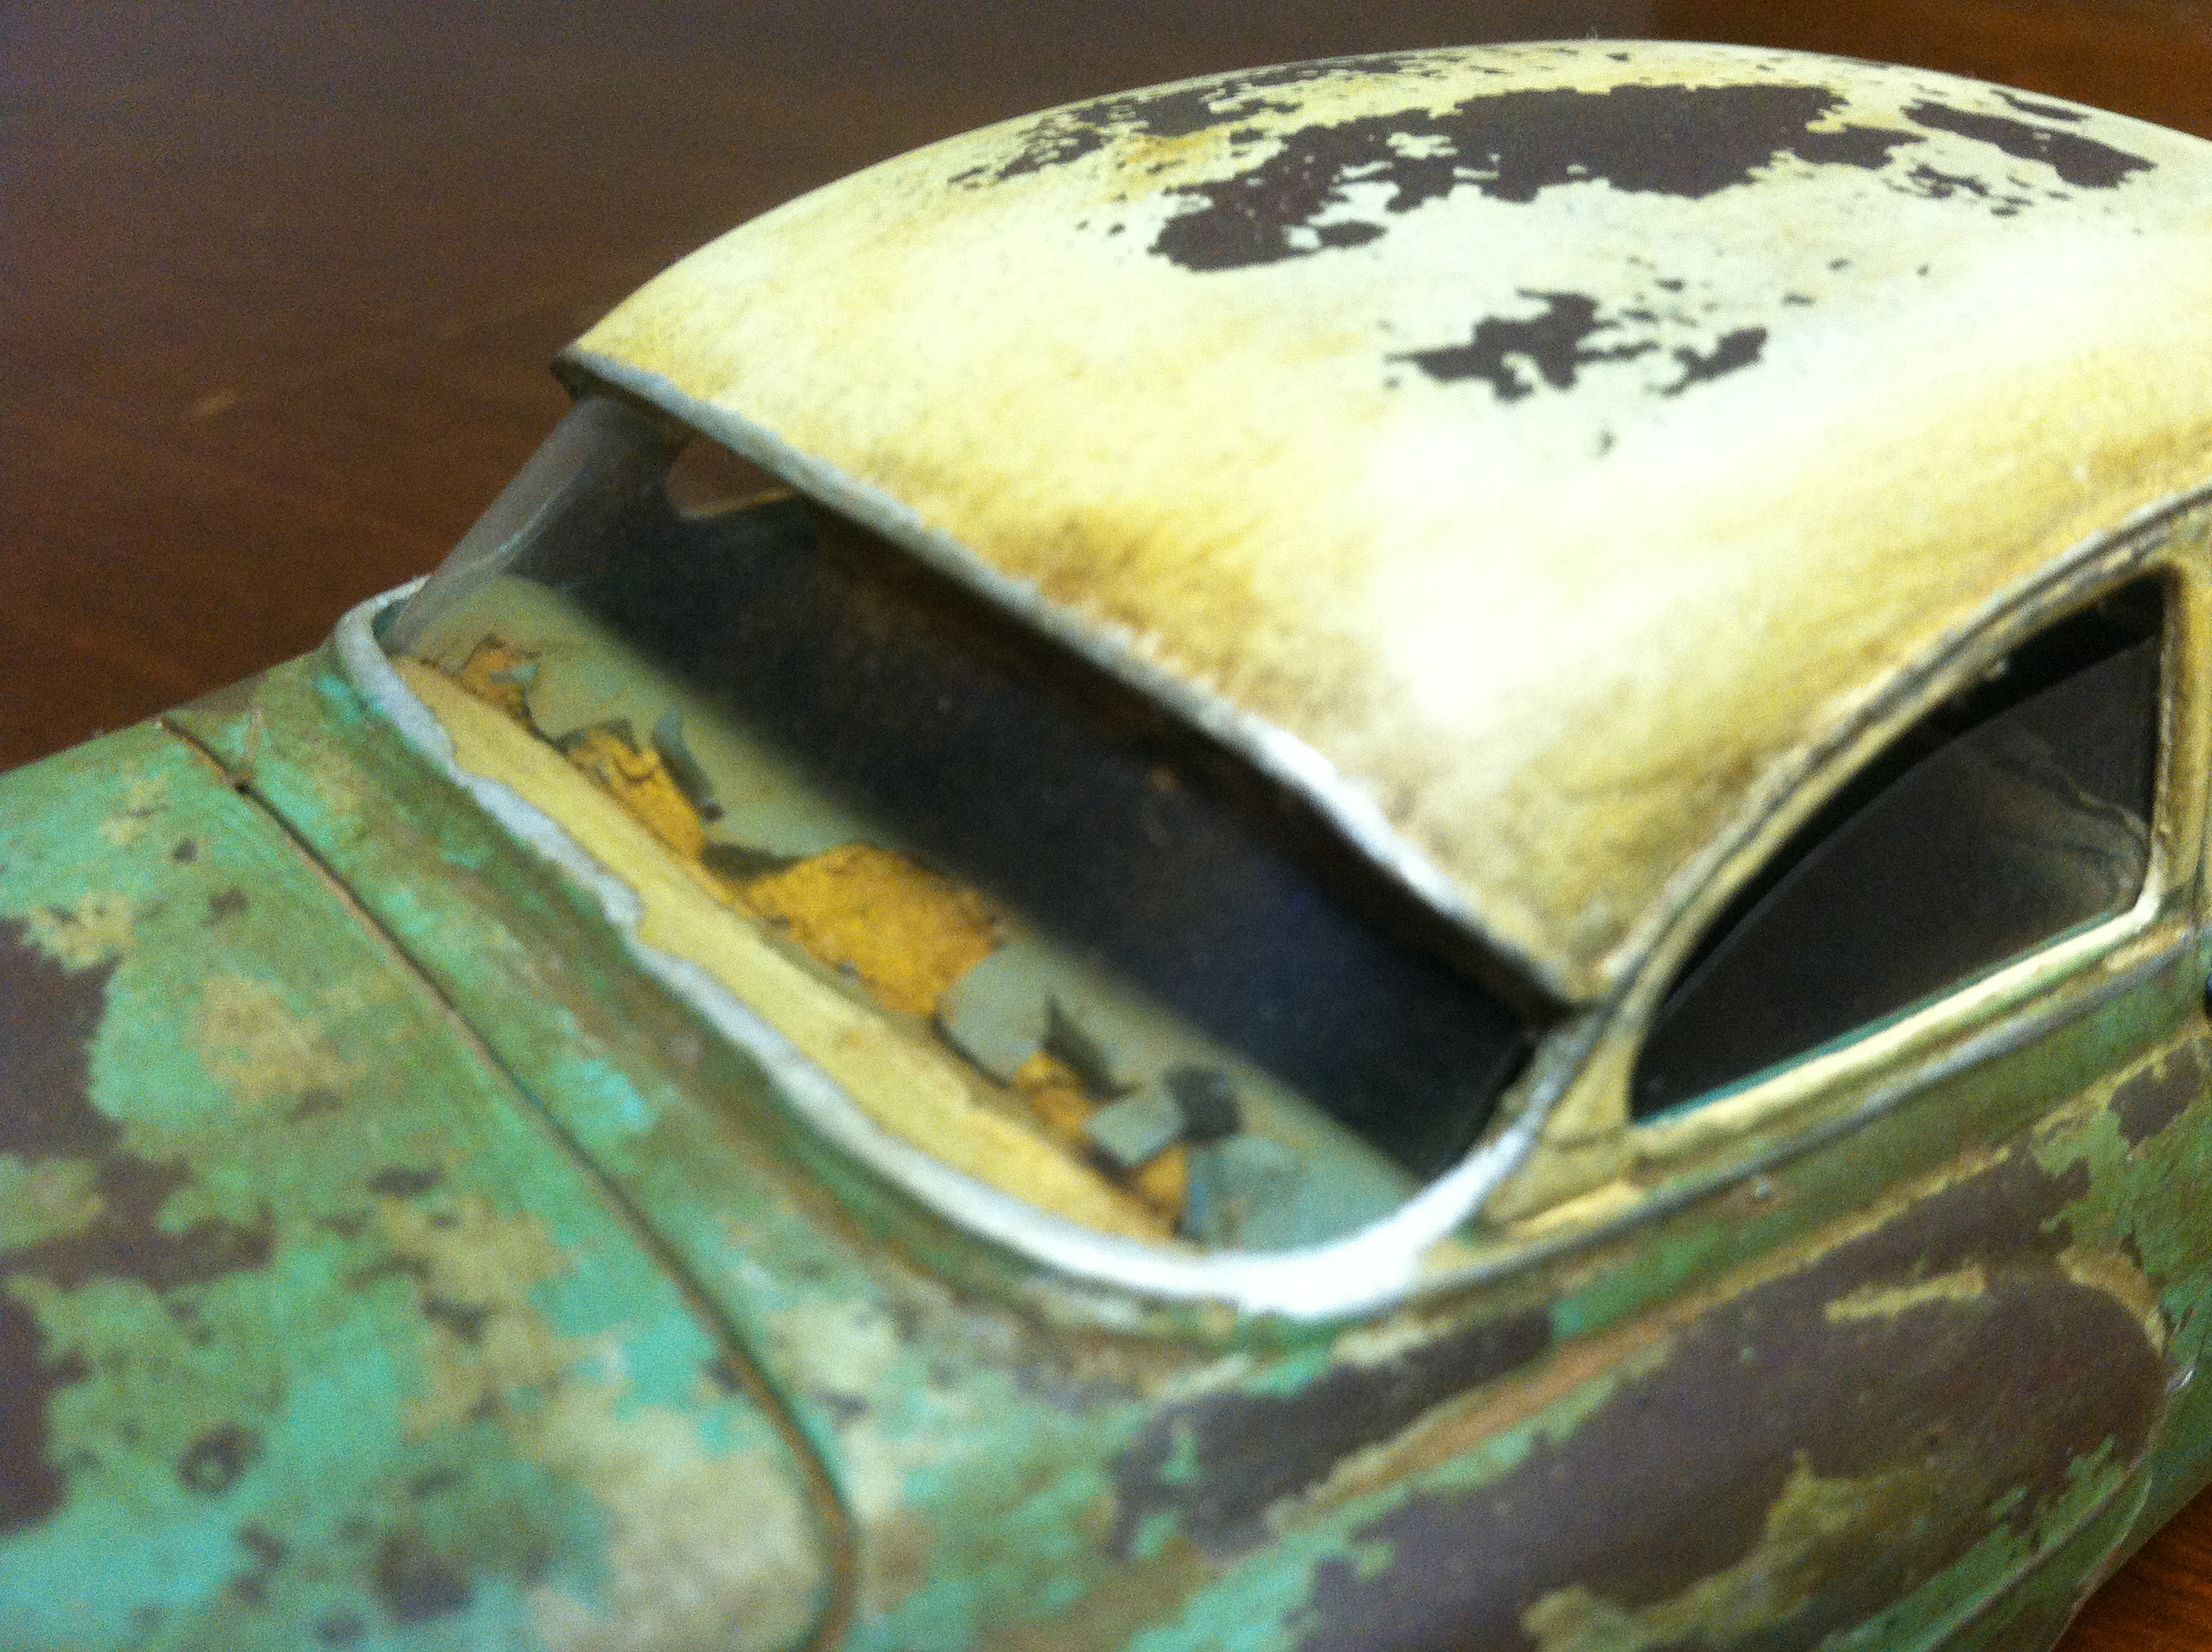
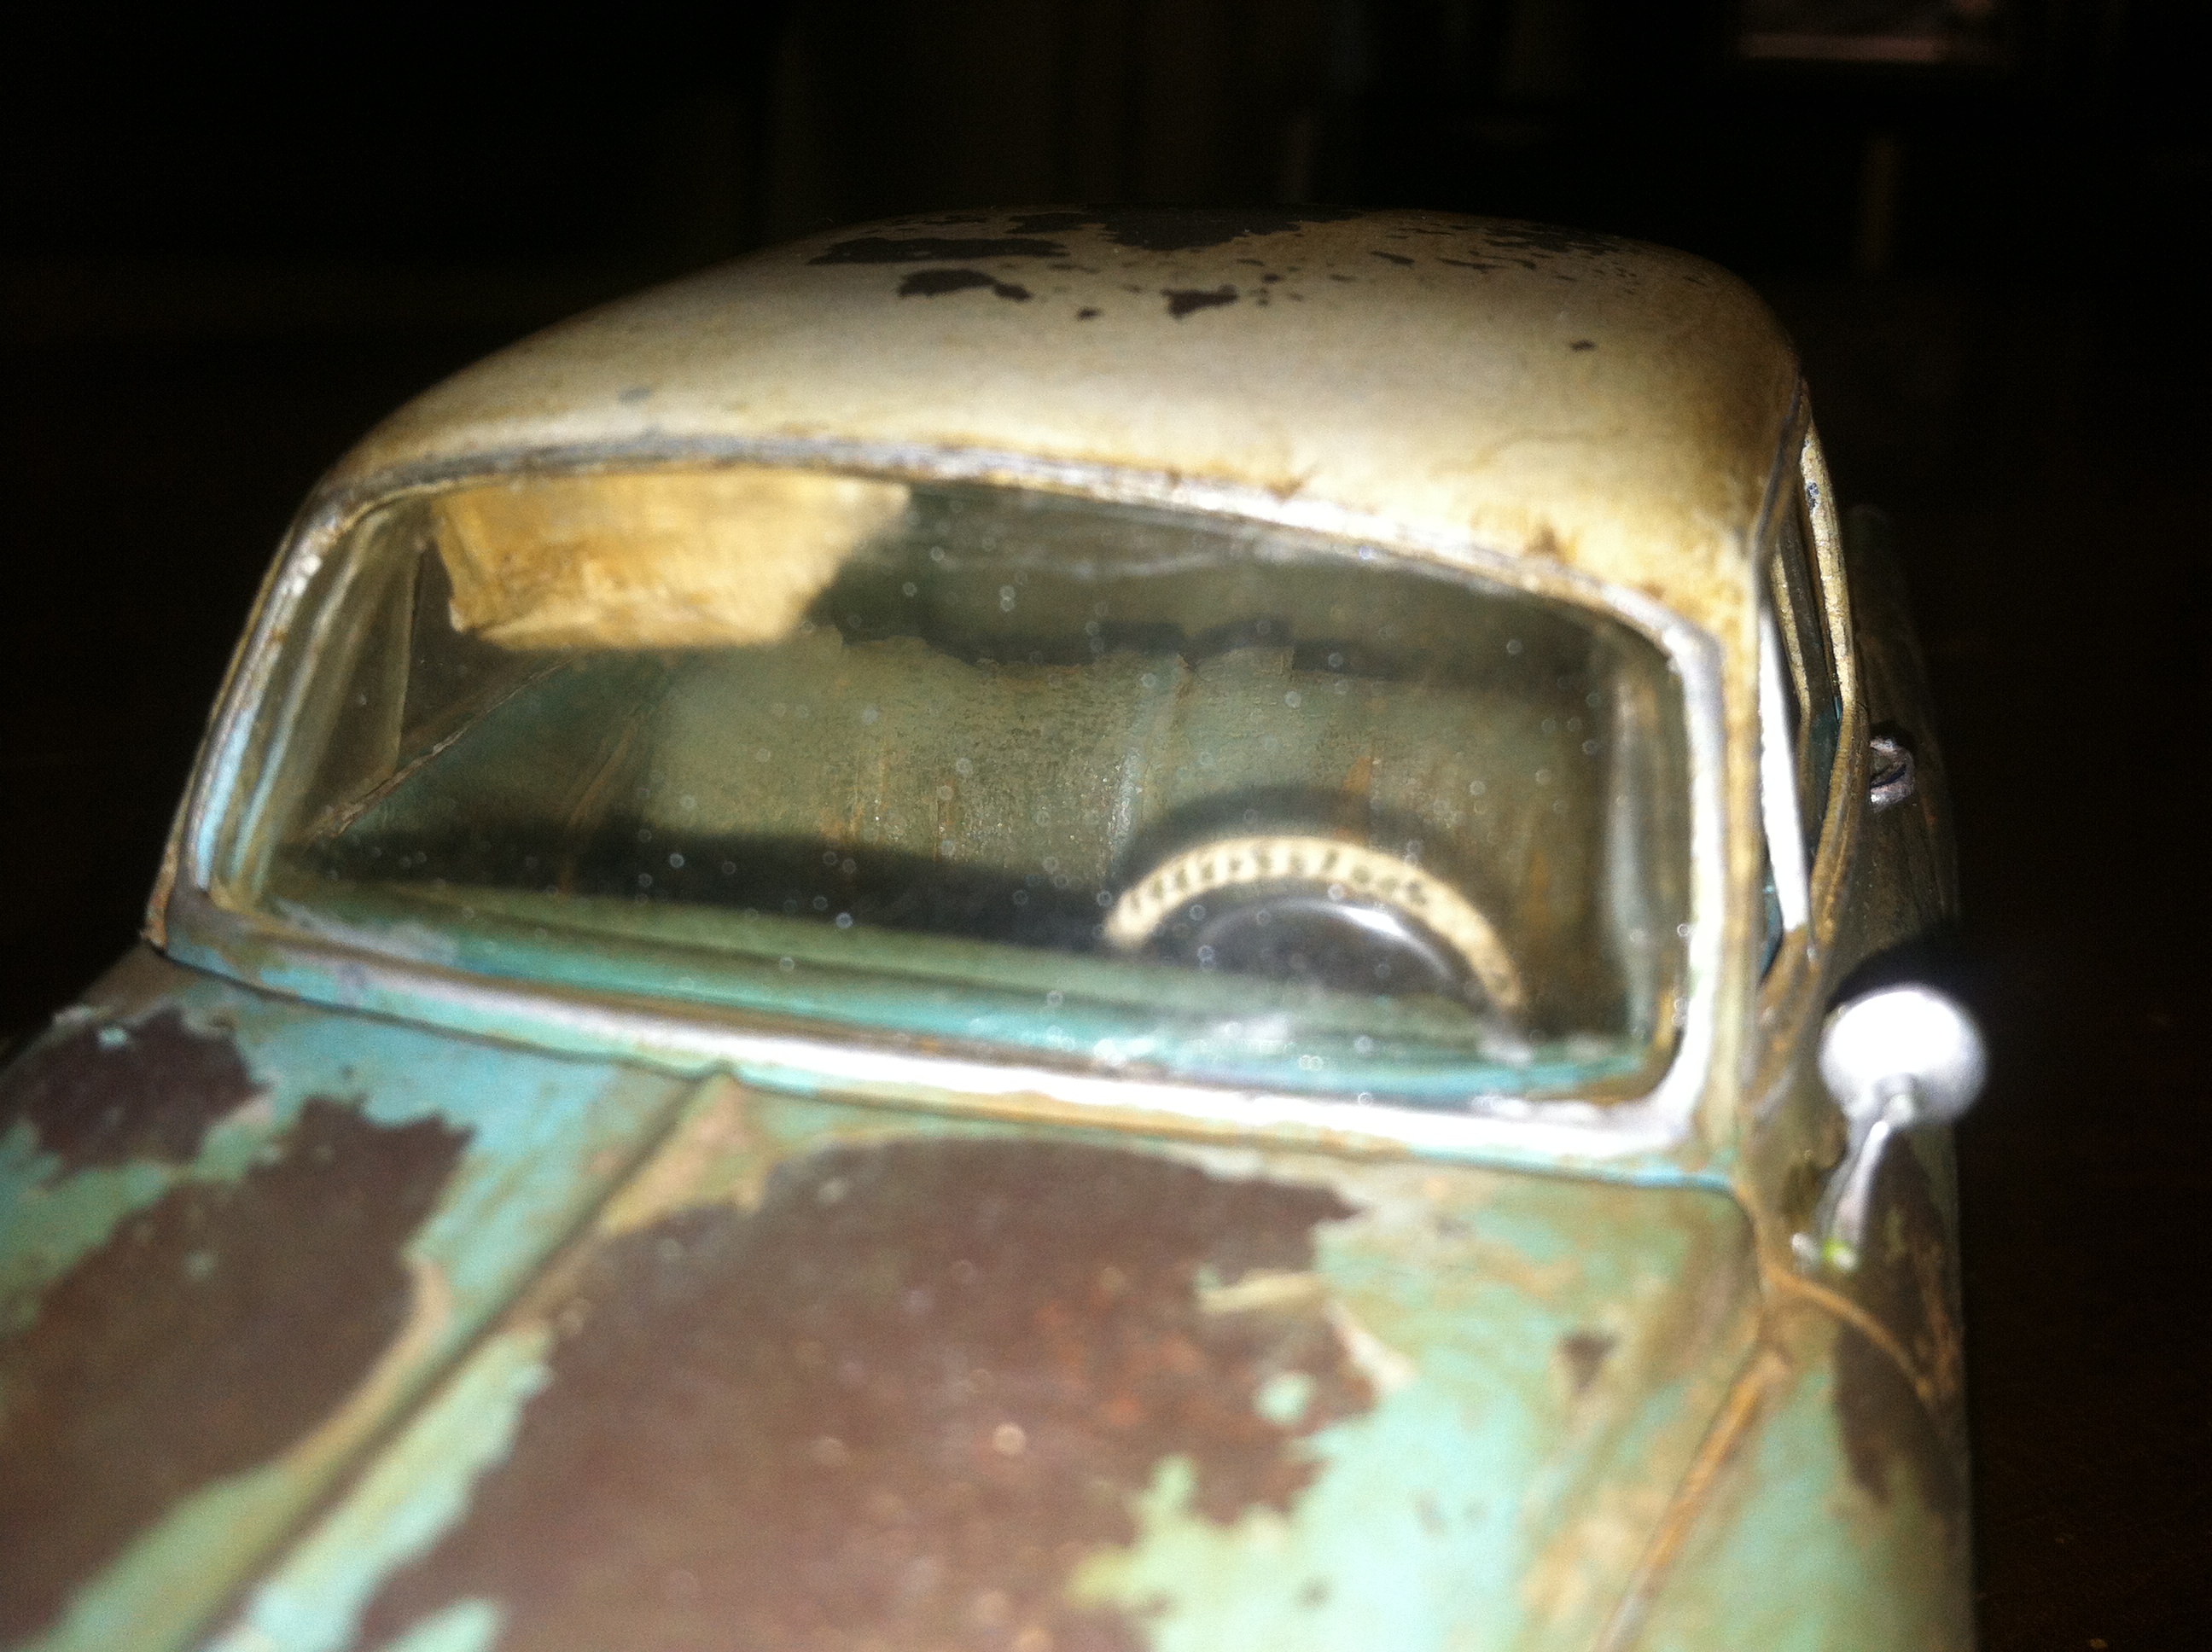
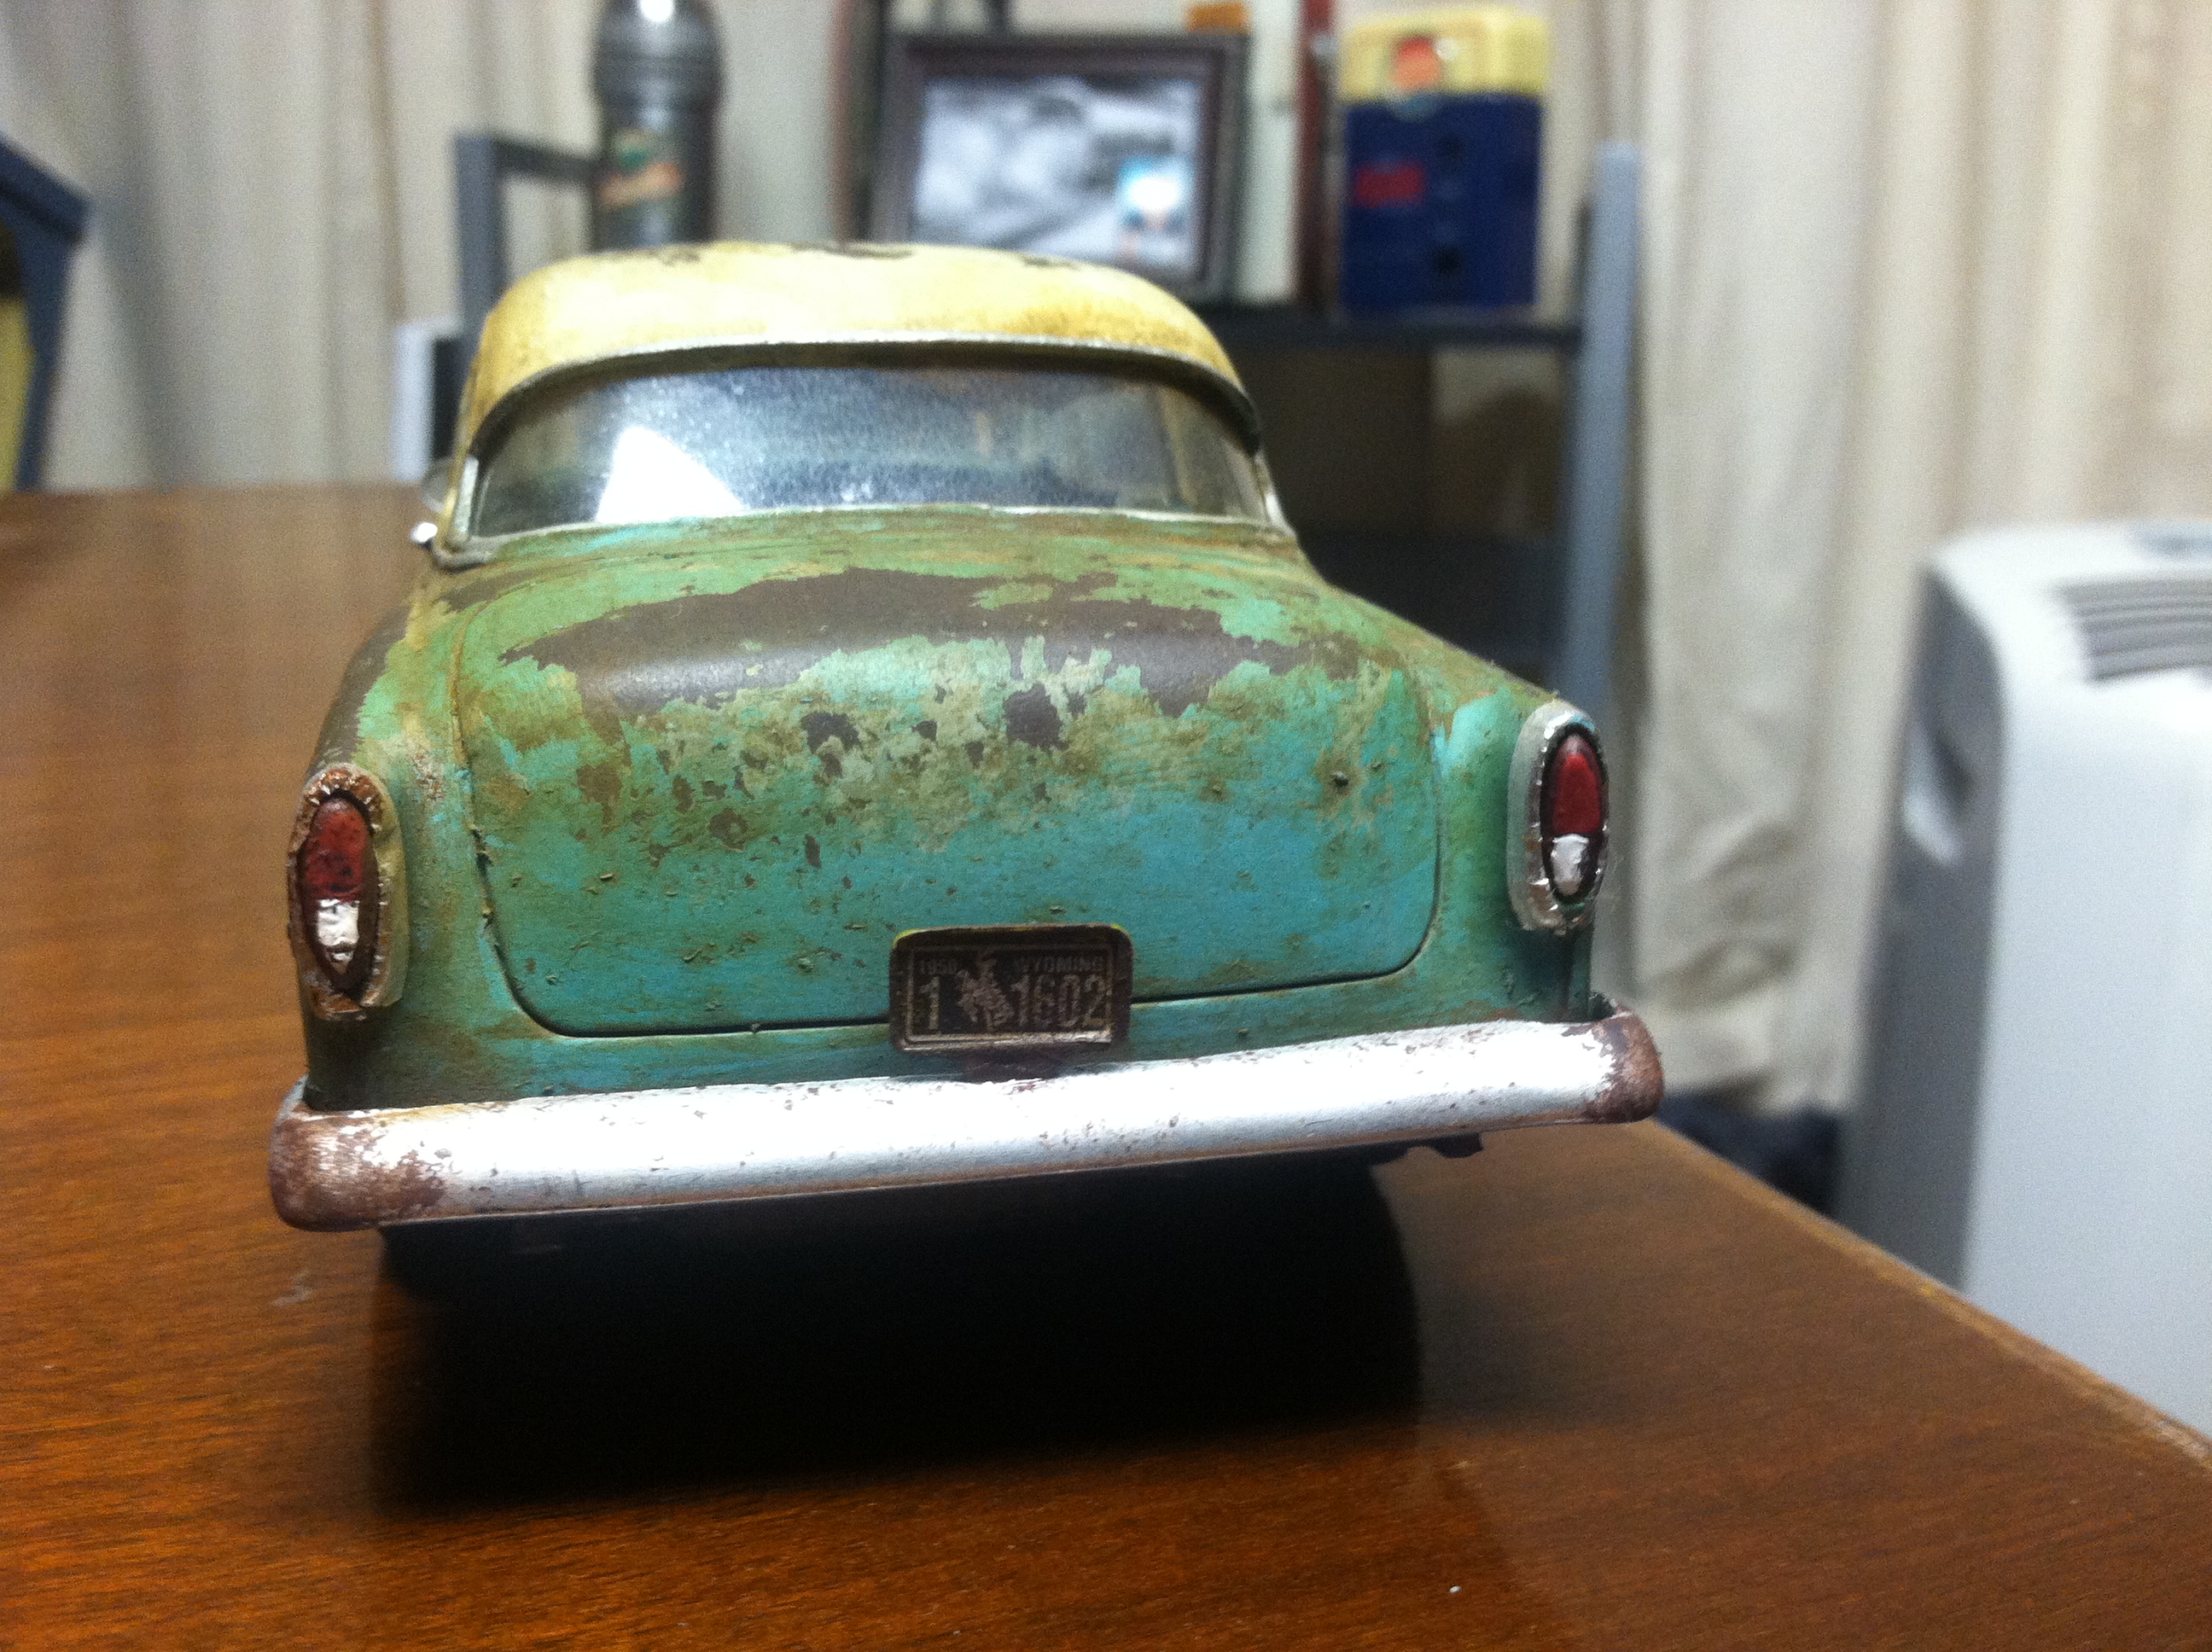
My first build in almost 30 years. This is an old issue Revell 54 Chevy gasser kit that was sitting on my shelf. It was missing quite a few parts like the front door panels, front and rear bumpers, front and rear suspensions, engine, and tranny among other things. What was there was a broken back window, cracked front valence panel and the body was so thin you could almost see through it. I thought about finding a re-issue version but opted for fabrication and robbing my parts boxes. I began with weathering the body to hide some of glue stains and went from there. I used a combination of methods (salt chipping and windex and dusting to achieve the effects you see. The windshield, side windows and back window are scratch built using clear projection sheets from the old style school overhead projectors. This was my first time using BMF and am still learning its challenges and realized this was probably not the best one to start with as most of the body lines were pretty minimal and faint.