Search the Community
Showing results for tags '3D printing'.
Found 7 results
-
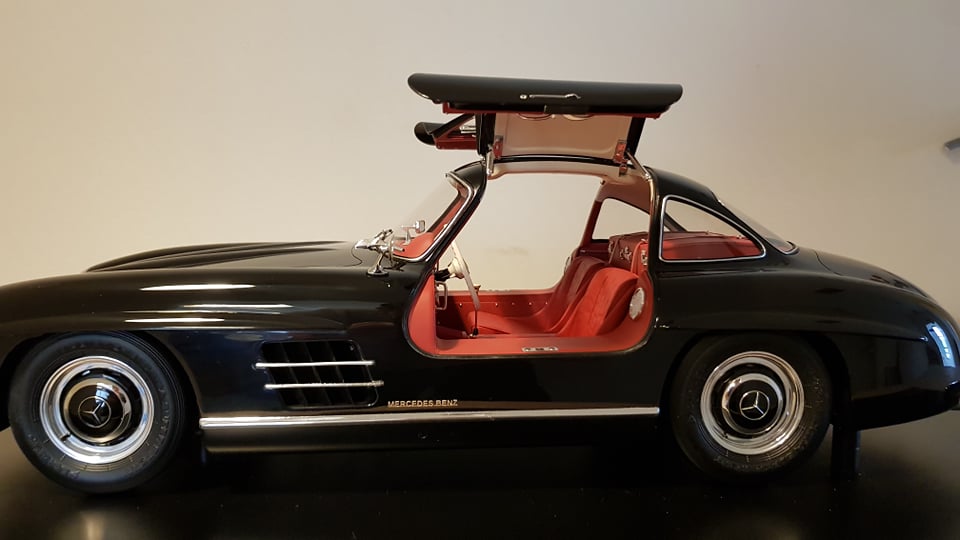
 Here is my interpretation of the graphite grey Mercedes Benz 300 SL Gullwing that John Fitch drove to victory in the famous "Mille Miglia" race in 1955 (5th overall and 1st in his own class GT +1.3 !). At that time, it was numbered 417 (which indicates, for the curious, the authorized starting time of this car for the race, 4 :17 AM). This model that I entirely built on a Tamiya base at 1/24 scale – with addition of more than 200 scratched, 3D printed parts, or self-made decals- is to my knowledge the second scale model in the world of this mythical car to have been entirely built by a modeler. It's been achieved last December . I was able to find this during my documentary research that the first one was built over 2 months between September and October 2015, on a FROG kit n°705 base, by a modeler named Ian, whose work is exposed on the “themotormuseumminminature.co.uk” website (link : http://www.themotormuseuminminiature.co.uk/1955-mercedes-300sl-mm-fitch.php). Ian voluntarily omitted the chassis and the engine, glued the bonnet and the rear trunk lid, and made though not only a very nice model, but a remarkable work, in spite of some mistakes and omissions, if you compare it with the pictures of this car taken during the race, some of which can be found quite easily on the Internet. I have to say that he was less lucky than me, who benefited from a wealth of advice and documents, such as those kindly and generously provided by a member of the Britmodeller.com forum, E.J Boyd, a Mercedes Benz 300 SL Gullwing enthusiast from New York. It must be said that it was Edward Boyd who suggested, not to say asked, that I make this car, after seeing my first silver Gullwing, and I gladly accepted the challenge. I didn't know yet what I was getting myself into, and had no idea of the difficulties I was going to encounter in creating or recreating certain indispensable and characteristic parts of this car. In the end, it will have cost me 2 Tamiya kits, more than 400 hours of documentary study, drawing in Fusion 360, 3D printing, assembly, a lot of hardware and supplies I didn't have, a few nervous breakdowns and a lot of beers I also discovered and sometimes mastered new techniques, which improved my modelling skills. Of course, there are still many imperfections (At least, my clear coat, which is covered with a lot of micro-scratches, because I sanded it too early after application) or mistakes on this model, but I assure you I don't intend to build it a third time. During the building, I noticed that the first chassis had a little and un-fixable defect, which would lead to the impossibility to close the bonnet. So, I built a second one, avoiding to repeat the same mistakes, and this is the one I’ve incorporated in the body of the finished model. The first bare chassis has been even more improved, and is exhibited naked below with the car. And now some pictures (Sorry for the dust particles, they wasn't visible with the naked eye nor on my iPhone's screen ) I hope you enjoyed this journey Here is my interpretation of the graphite grey Mercedes Benz 300 SL Gullwing that John Fitch drove to victory in the famous "Mille Miglia" race in 1955 (5th overall and 1st in his own class GT +1.3 !). At that time, it was numbered 417 (which indicates, for the curious, the authorized starting time of this car for the race, 4 :17 AM). This model that I entirely built on a Tamiya base at 1/24 scale – with addition of more than 200 scratched or 3D printed parts - is to my knowledge the second scale model in the world of this mythical car to have been entirely built by a modeler. I was able to find this during my documentary research that the first one was built over 2 months between September and October 2015, on a FROG kit n°705 base, by a modeler named Ian, whose work is exposed on the “themotormuseumminminature.co.uk” website (link : http://www.themotormuseuminminiature.co.uk/1955-mercedes-300sl-mm-fitch.php). Ian voluntarily omitted the chassis and the engine, glued the bonnet and the rear trunk lid, and made though not only a very nice model, but a remarkable work, in spite of some mistakes and omissions, if you compare it with the pictures of this car taken during the race, some of which can be found quite easily on the Internet. I have to say that he was less lucky than me, who benefited from a wealth of advice and documents, such as those kindly and generously provided by a member of this Britmodeller.com forum, @ejboyd5, a Mercedes Benz 300 SL Gullwing enthusiast from New York. It must be said that it was Edward Boyd who suggested, not to say asked, that I make this car, after seeing my first silver Gullwing, and I gladly accepted the challenge. I didn't know yet what I was getting myself into, and had no idea of the difficulties I was going to encounter in creating or recreating certain indispensable and characteristic parts of this car. In the end, it will have cost me 2 Tamiya kits, more than 400 hours of documentary study, drawing in Fusion 360, 3D printing, assembly, a lot of hardware and supplies I didn't have, a few nervous breakdowns and a lot of beers. I also discovered and sometimes mastered new techniques, which improved my modelling skills. Nothing would have been possible and I would not have succeeded in completing this model if I had not benefited from the support and sometimes the suggestions of all my contributors, whom I will not mention all, for fear of forgetting one, but they will recognize themselves without difficulty. I could never thank them enough for their enthusiasm and for giving me the courage to go through with it. Of course, there are still many imperfections (At least, my clear coat, which is covered with a lot of micro-scratches, because I sanded it too early after application) or mistakes on this model, but I assure you I don't intend to build it a third time. During the building, I noticed that the first chassis had a little and un-fixable defect, which would lead to the impossibility to close the bonnet. So, I built a second one, avoiding to repeat the same mistakes, and this is the one I’ve incorporated in the body of the finished model. The first bare chassis has been even more improved, and is exhibited below with the car. And now some pictures (Sorry for the dust particles, they wasn't visible with the naked eye nor on my iPhone's screen ) I hope you enjoyed this journey And I invite you to follow my thread on the assembly of this car by following this link: MB 300 SL Gullwing n° 417, class winner of Mille Miglia 1955
- 29 replies
-
- 9
-

-
- scratch-built
- 3d printing
- (and 1 more)
-
This model has been finished this year, end April. It took me 2 years, give or take 4 days, with many interruptions along the way, to assemble this very difficult Heller kit. Everyone here and elsewhere who assembled it has experienced mishaps, disappointments, and probably some anger too, and has solved or tried to solve, each in his own way, the major problems of body parts adjustment, especially the bonnet. 2 kits were needed to make one, because of broken or damaged parts during assembly, as usual. This kit includes 160 parts, I replaced some of them, and added probably as many, both scratchbuilt from various metals, plastics, fabrics, UV resin, and modelled with Fusion 360 and 3D printed with an Elegoo Mars Pro. The windows were shown open, the bonnet was articulated in 4 parts with 3 functional hinges, the bonnet retainers when open, as well as the bonnet latches to close it were added, and the engine compartment was highly detailed. The spoked wheels themselves are 3D printed. I tried to take the utmost care in making the smallest exterior details, the ones that make the model look bad when they are roughly made or not added, but that bring the model to life when they are right (I'm thinking in particular of the front and rear lights, the side indicators, the bonnet clips, the exhaust line that has been redone in aluminium tube). I was greatly helped by the abundance of documentation that can be found on the Internet, sometimes by searching a bit for precise details... And now, a flurry of photos, some outside in day light and others in my spray booth with additional lights: You can see more following my thread in Britmodeller.com WIP section: Delahaye 135 1938, coachwork Henri Chapron 1:24 Heller - WIP Hope you enjoyed the journey
- 26 replies
-
- 3
-
-
- delahaye 135
- scratch built
- (and 2 more)
-

Serious 3D printing inquiry...
Dann Tier posted a topic in General Automotive Talk (Trucks and Cars)
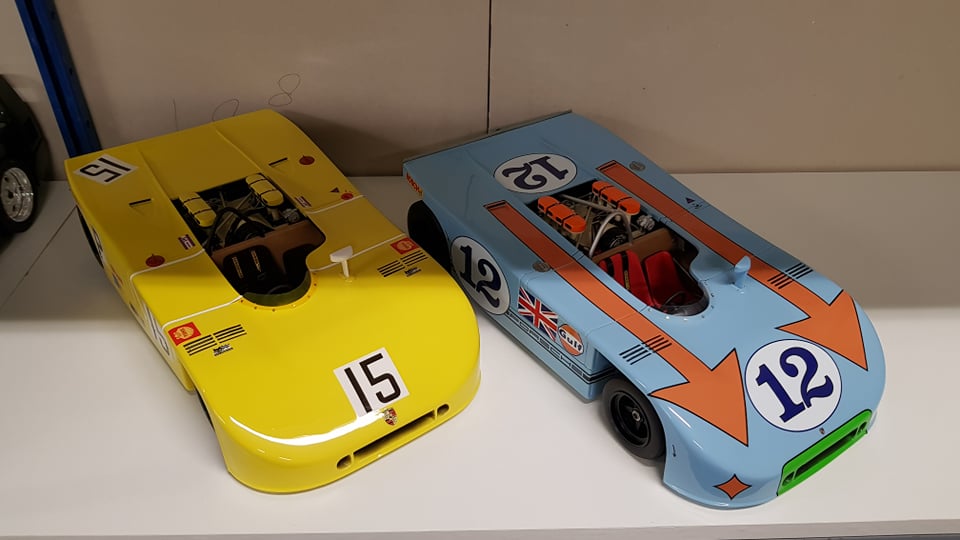
Hey, everyone!, I have a serious inquiry here. For those of you who have followed me before, you will know my opinion of 3D printed parts is NOT favorable. I think the technology will get there for us, but the stuff that's out there now, I wouldn't use on ANY of my builds. However, a certain company PM'd me, and showed me his work....his work is AMAZING!!!!!, and i'm in talks with him about building one of his kits. He asked me what i'd like in a kit, and I gave him four of my interests; 1) Lotus Excige, 2) Hennessey Venom, 3) a large scale Pagani Huayra, and 4) a Lotus Esprit GT3 V8, which he said he will look into for a limited run. My question is; how many of you would be interested in an Esprit GT3 V8? Here is some of his work:
-
15% off sitewide on shapeways.com for Cyber Monday, code is HAPPYMONDAY. (Good until midnight ET Monday only). https://www.shapeways.com/
-
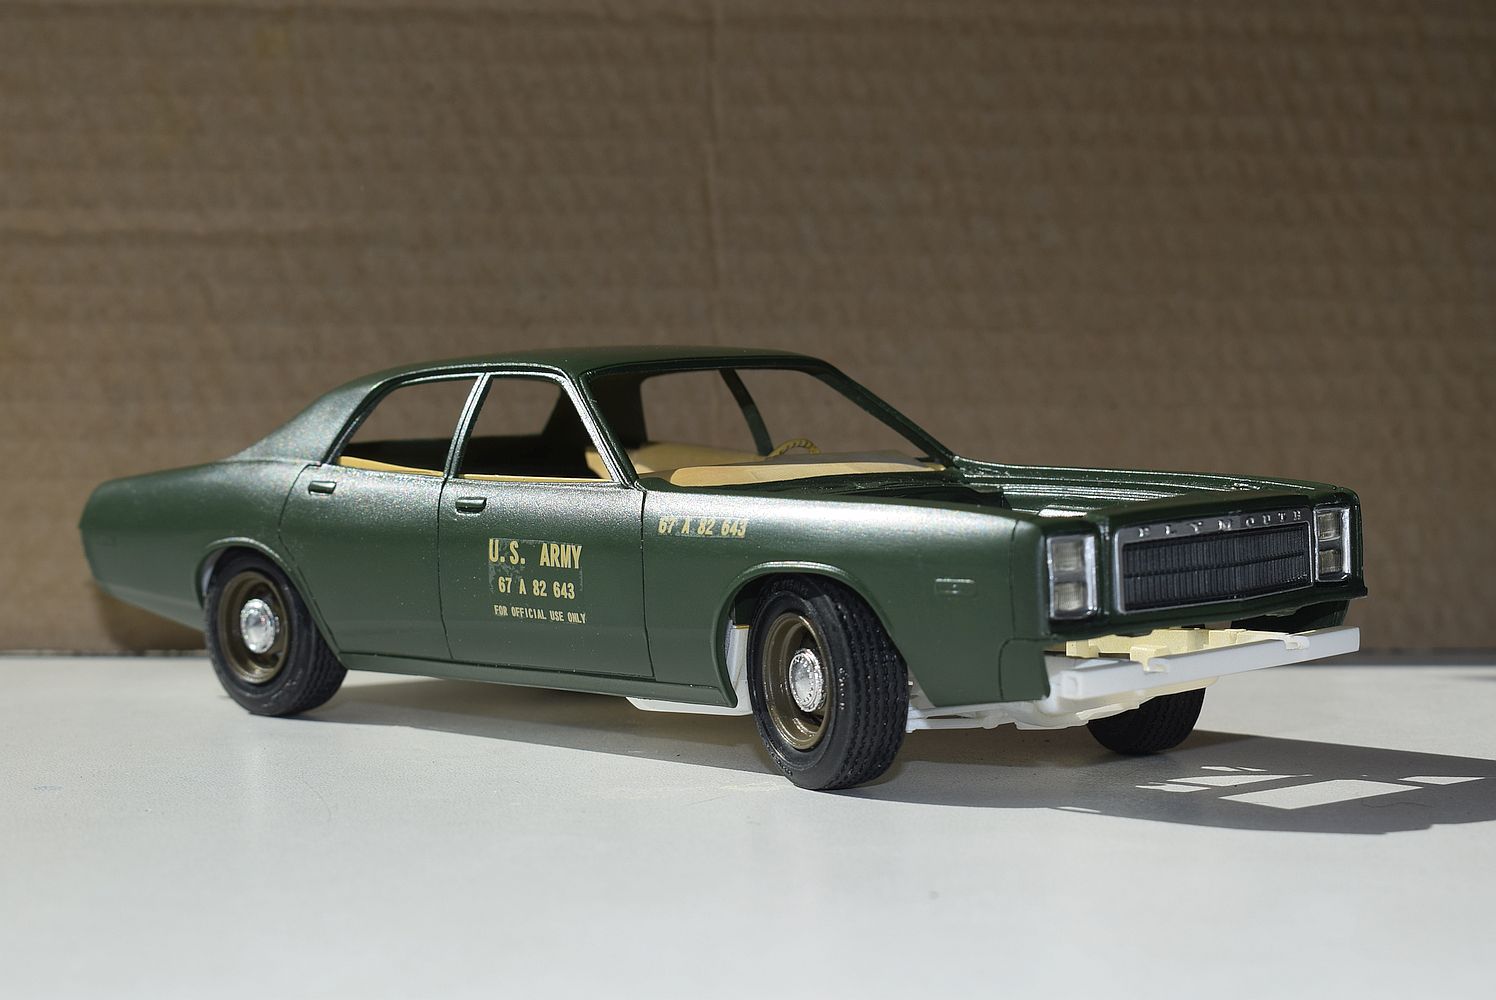
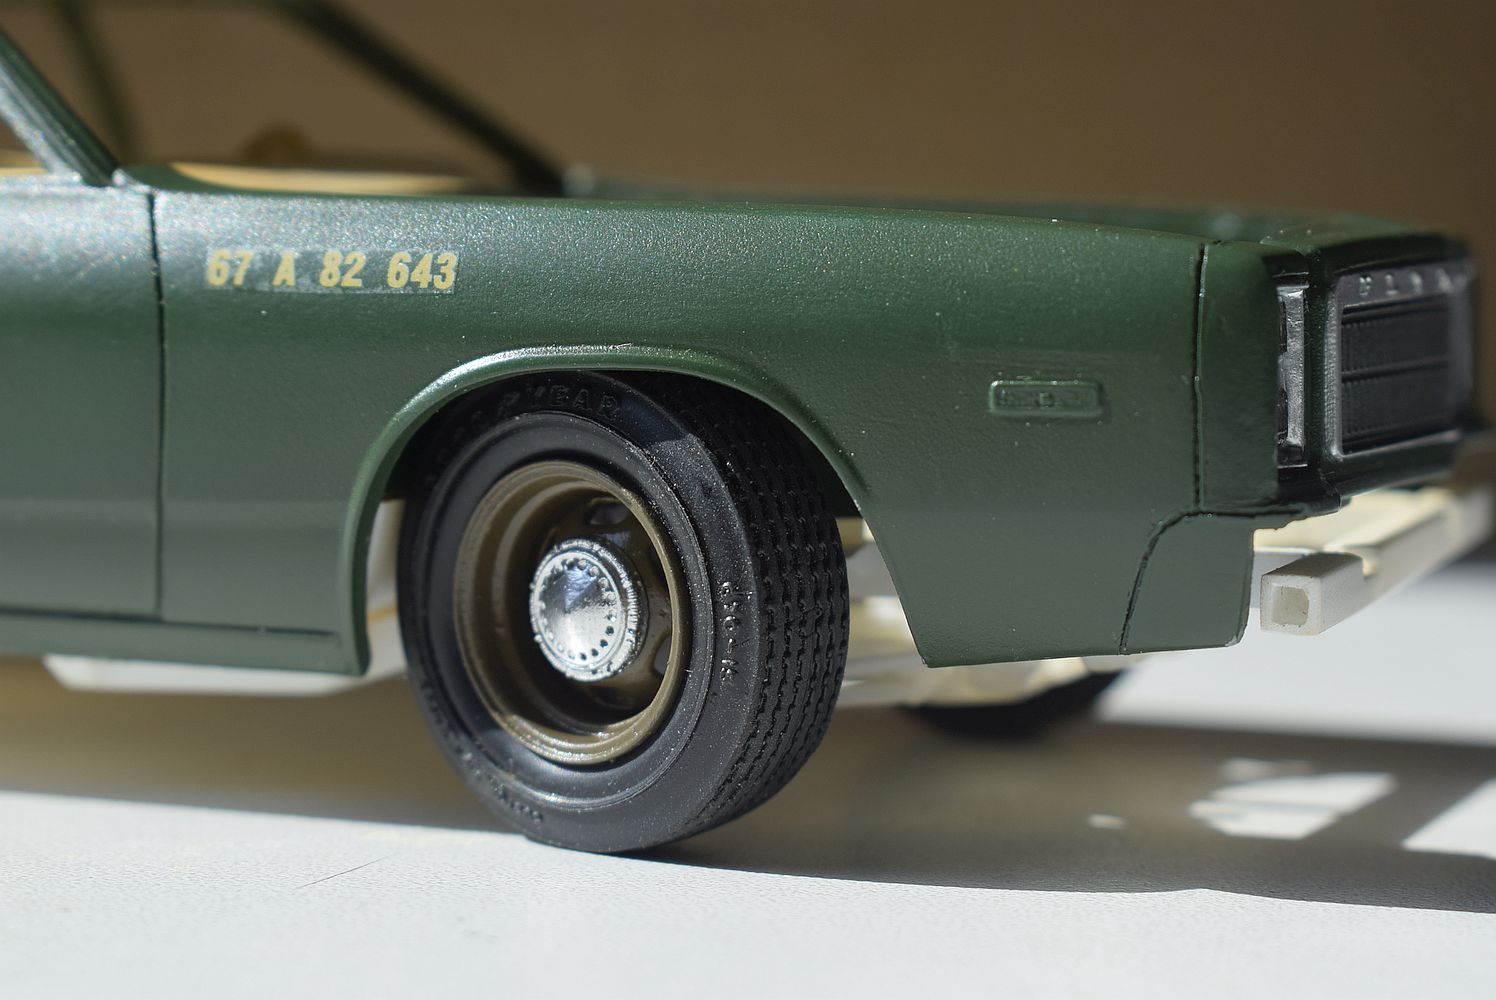
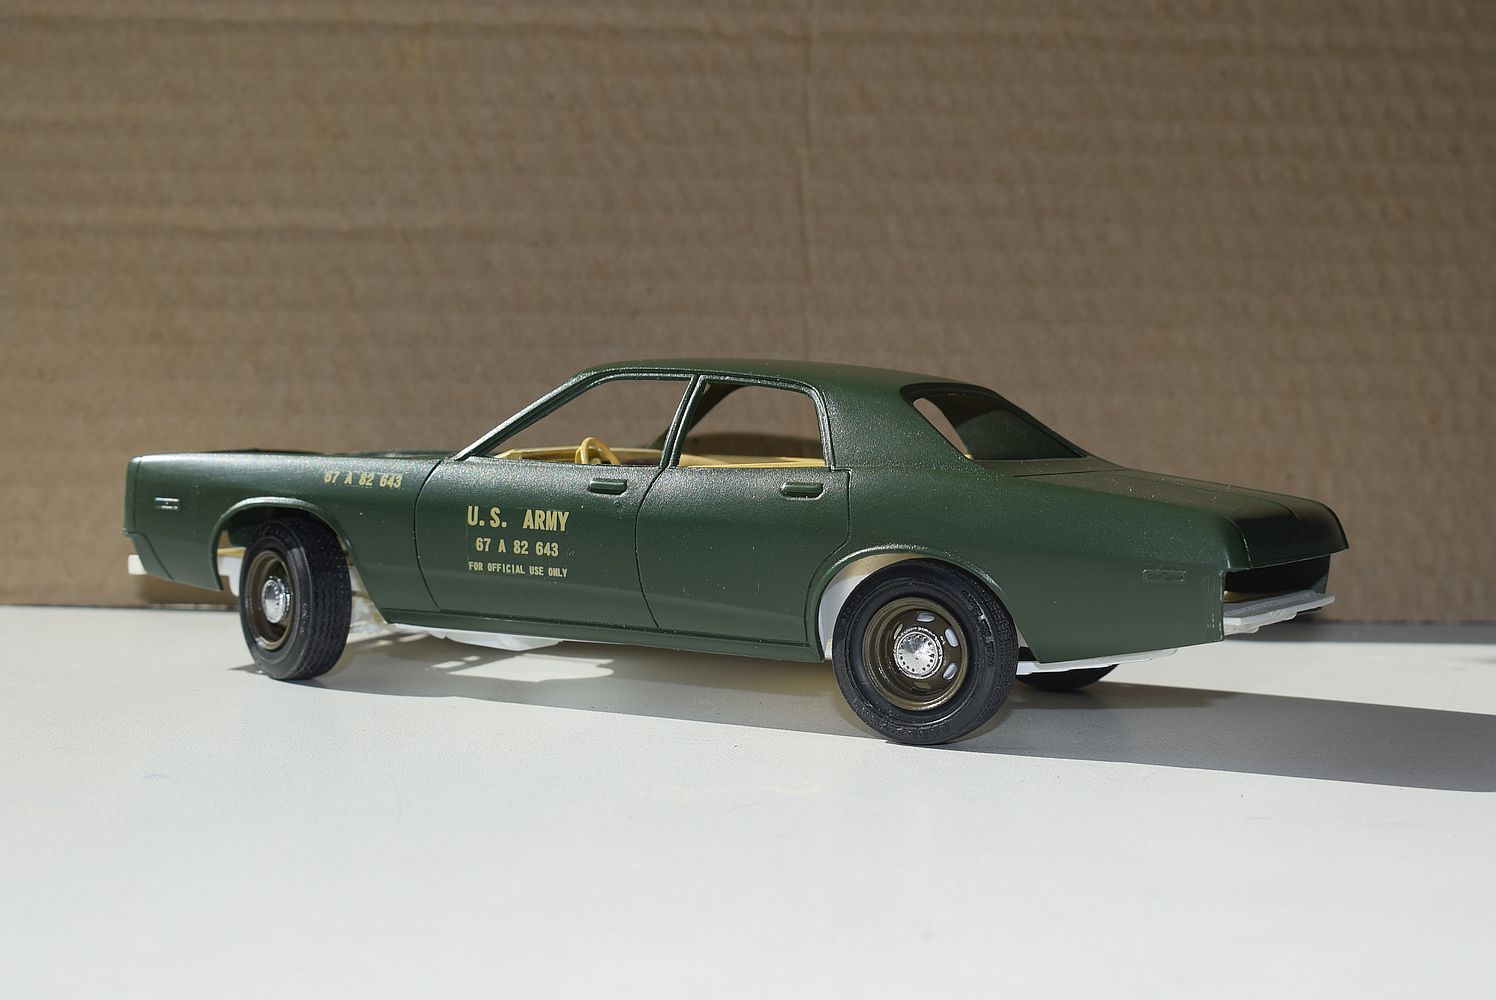
Hey guys, this is a long time project started about over a year ago. I thought it would be cool to do a car chasing scene from the TV-series "The A-Team". That´s why it leans to the passengers side. The car should came out of a corner in a little diorama I want to build for both cars too. So let´s get started... The only things of the original AMT Joker Goon Car I use are the body parts and the dashboard. Chassis and Interior pan come from the 71 AMT Dodge Charger. Tires are from the 72 Chevy Fleetside. The grill and headlight bezels are 3d printed parts as well as the taillights, the door panels and the wheels. Decals are selfmade and the interior became a little washing already. The engine bay I cutted out of the charger and glued it to the Monacos body. After posting this at another forum a guy told me that I´ve choosen the incorrect color. So next to come is to strip the paint from the body and repaint it. BTW the wheels color is the one the body will become later too. Also the turning of the front wheels isn´t correct so I have to this again too. But I don´t want to cry because it´s learning by doing... The bumpers chrome I stripped off and redone it with a rattle can. The bumper guards are made out of the inner part of a bicycle tire. Now I let speek the pics... Overview Front wheel Rear wheel 3d printed grill Door panels Monaco dashbord with Charger steering wheel Front again Overview from the other side Bumpers
-
I know we've beat this topic to death, but I'm really intrigued. I subscribe to Computerworld at work and this came up today. Just amazing stuff in a seemingly short amount of time! http://www.computerworld.com/slideshow/detail/121544/18-supercool-objects-made-with-3D-printers?source=CTWNLE_nlt_dailyam_2013-09-27#slide1
-
So this definitely seems to be an up and coming technology useful to modelers. I know there are a few out there who are using this technology to prototype parts for resin casting. I've been playing with the 3d design program Sketchup, and am getting the hang of it. have managed to draw up some tires, and some misc parts. I was hoping perhaps some who have made that next step might be willing to start a discussion here to help people like me make that next step to actually getting a part printed. I am aware of Shapeways, but believe there are others out there who will take on print work from a 3d drawing. Any and all tips, pitfalls, encouragement or even well meaning discouragement welcome. A start to finish description of your experience getting a part printed would be very welcome. Thanks