Search the Community
Showing results for tags 'scratchbuilt'.
Found 23 results
-
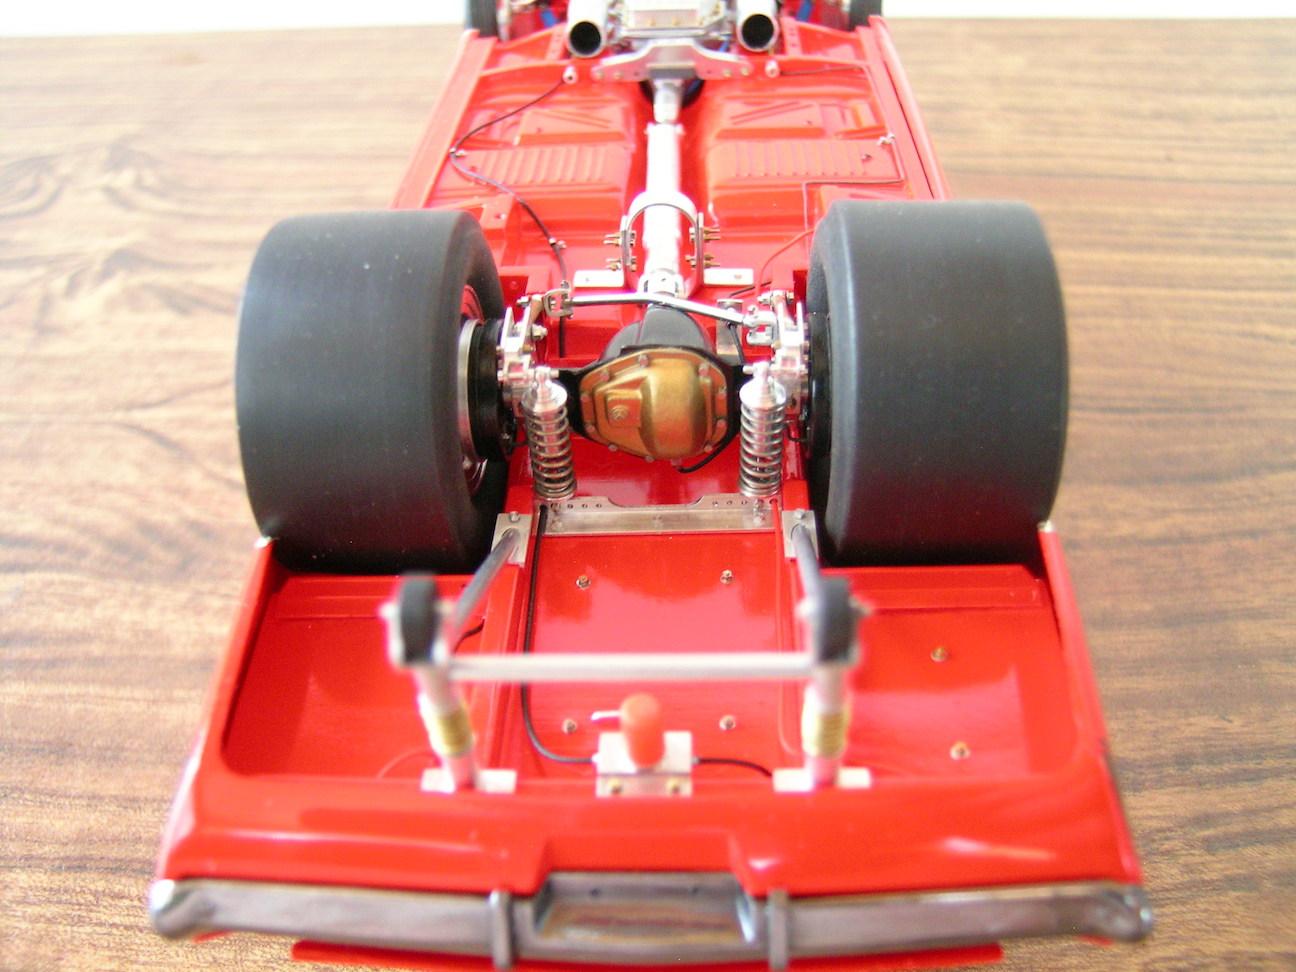
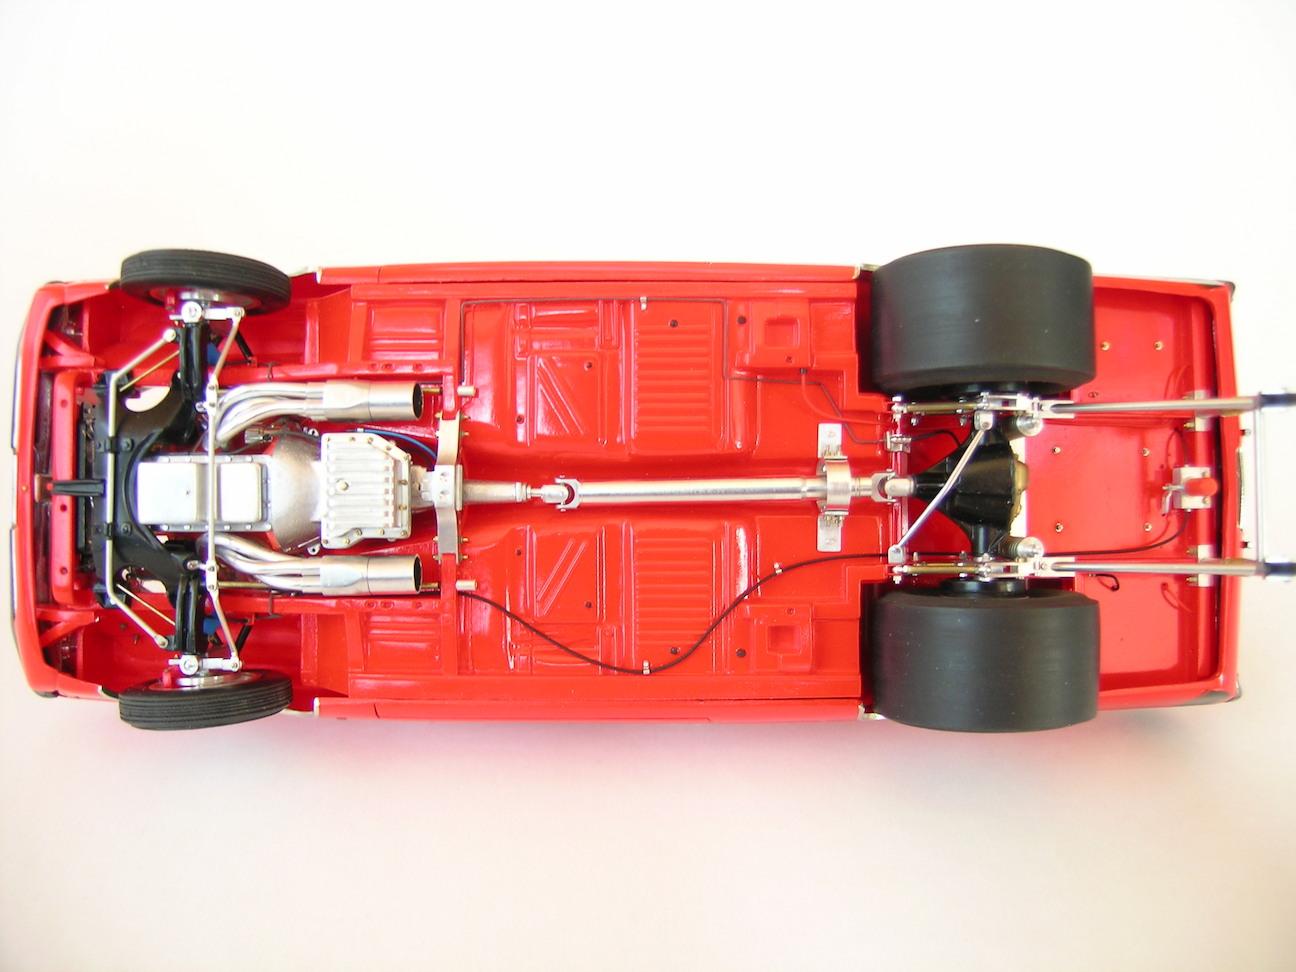
I completed this last Monday, but I was unsatisfied with the "glamour" shots I took at the time. I spent several days trying to find the posters I use for a backdrop to shoot on. I couldn't imagine what I'd done with them. This apartment is small, and I had looked everywhere those things could possibly have been! Except one. I looked there, earlier this evening, and shot a huge batch of photos. These are somewhat better than the previous session's results, so, here she is, in all her glory. I am very happy with this model! The result, here, is pretty true to the vision I had, for it, back in 1997, when I first began work on it. I got it fairly along--the chassis was built, the first body was built; I had begun work on the cockpit and driveline details, when I began to doubt my confidence in being able to complete it. I likely had the skills to do it, I just didn't believe that I had those skills, so it got shelved, until November of 2022. At that time, I knew it was time. Roughly 14 months later, I submit these photos of my proudest achievement, to date. Thanks to everyone who followed along on the construction thread: And, thanks for looking!

- 50 replies
-
- 6
-

-
- scratchbuilt
- brass
- (and 1 more)
-
HI! Say what you want, Boyd and his numerous collaborators were a powerhouse for a while. I was mostly impressed by the string of unique coachbuilt cars that came out of his shop, via Marcel Delay Custom Metal in Corona. AMBR anyone? One car that floored me was the Ron Craft 33 roadster, precursor of the 33 Boydster as it may. And the unique IFS that Boyd created for Buz DiVosta Roadstar was impressive. So, why not pay hommage to all of the above? Start with Monogram's ZZ Top coupe, discard the roof, put on AMT's 36 Ford roadster upper cowl, Monogram's 35 Mercedes hood, and FD100 powertrain + Phantom Vicky rollingstock & Dodge Sidewinder IRS (all extensively modified). Scratchbuild the frame, IFS, floorpan, beltline reveal, hoodsides, dash,interior, hinges, etc. And throw in a few parts box leftovers. Metallic gold with ghost flames, Molotow chrome, and VOILÀ! Hope you like it. It was a long and tedious built! CT
-
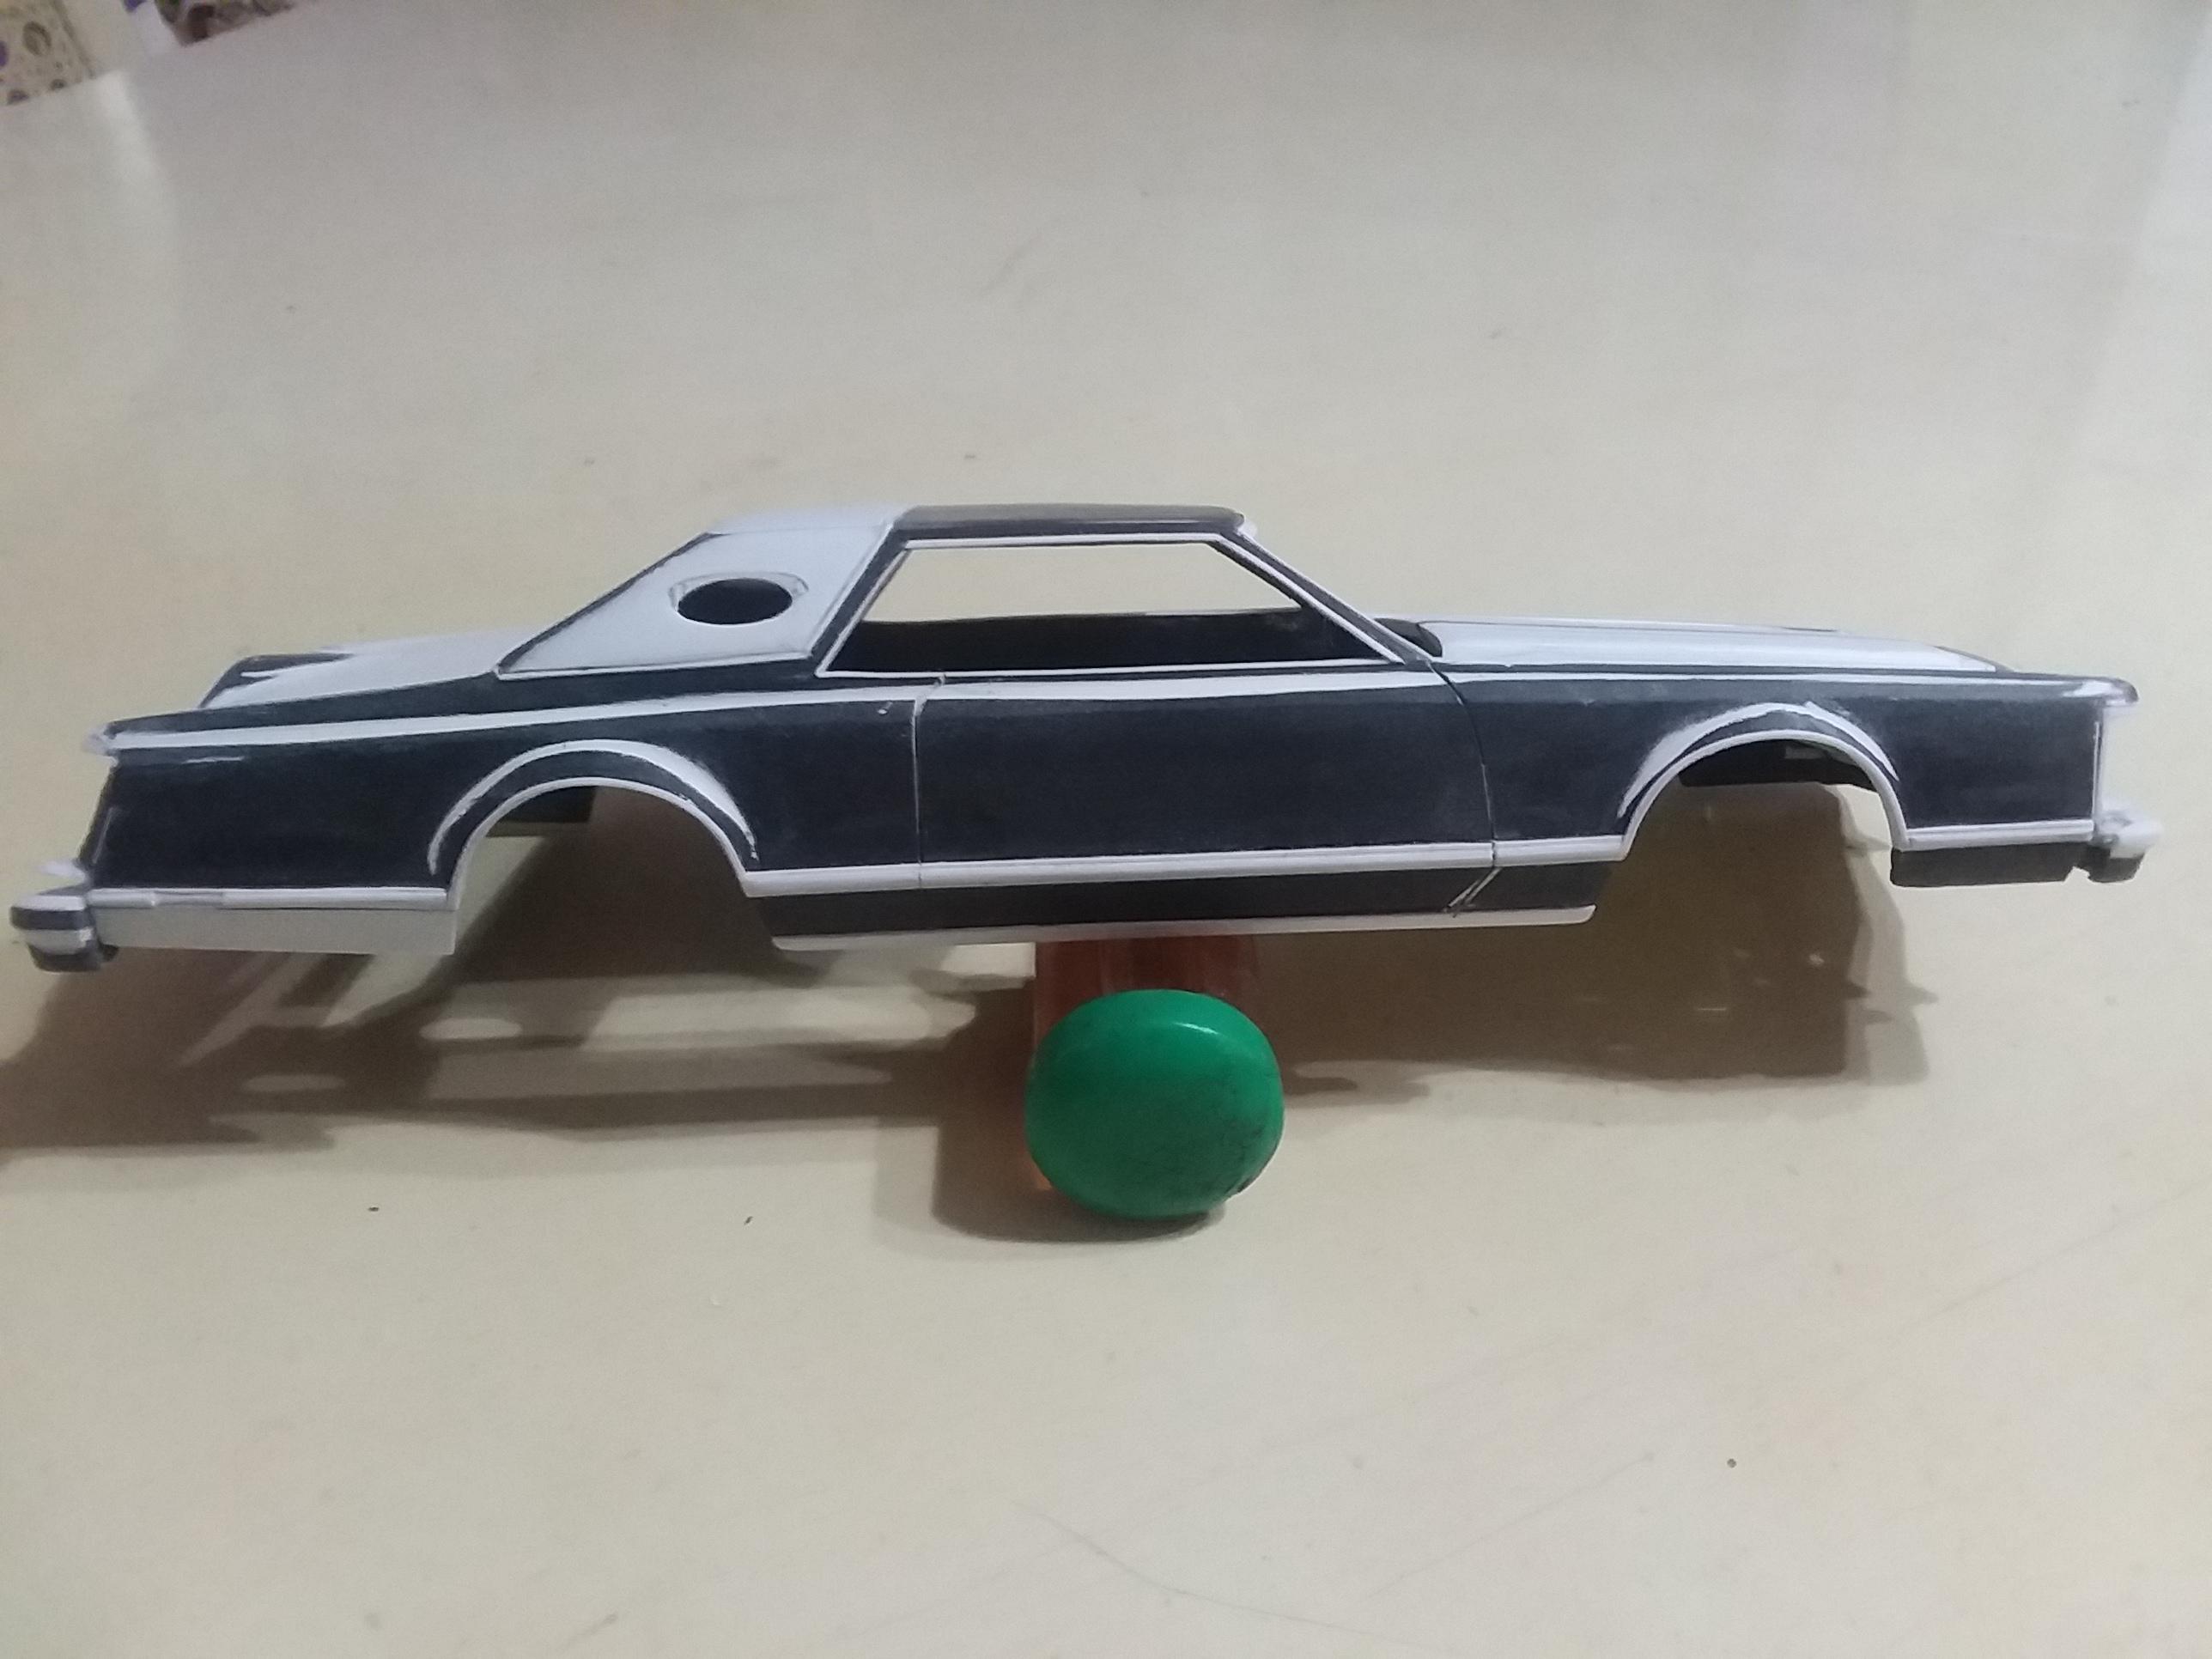
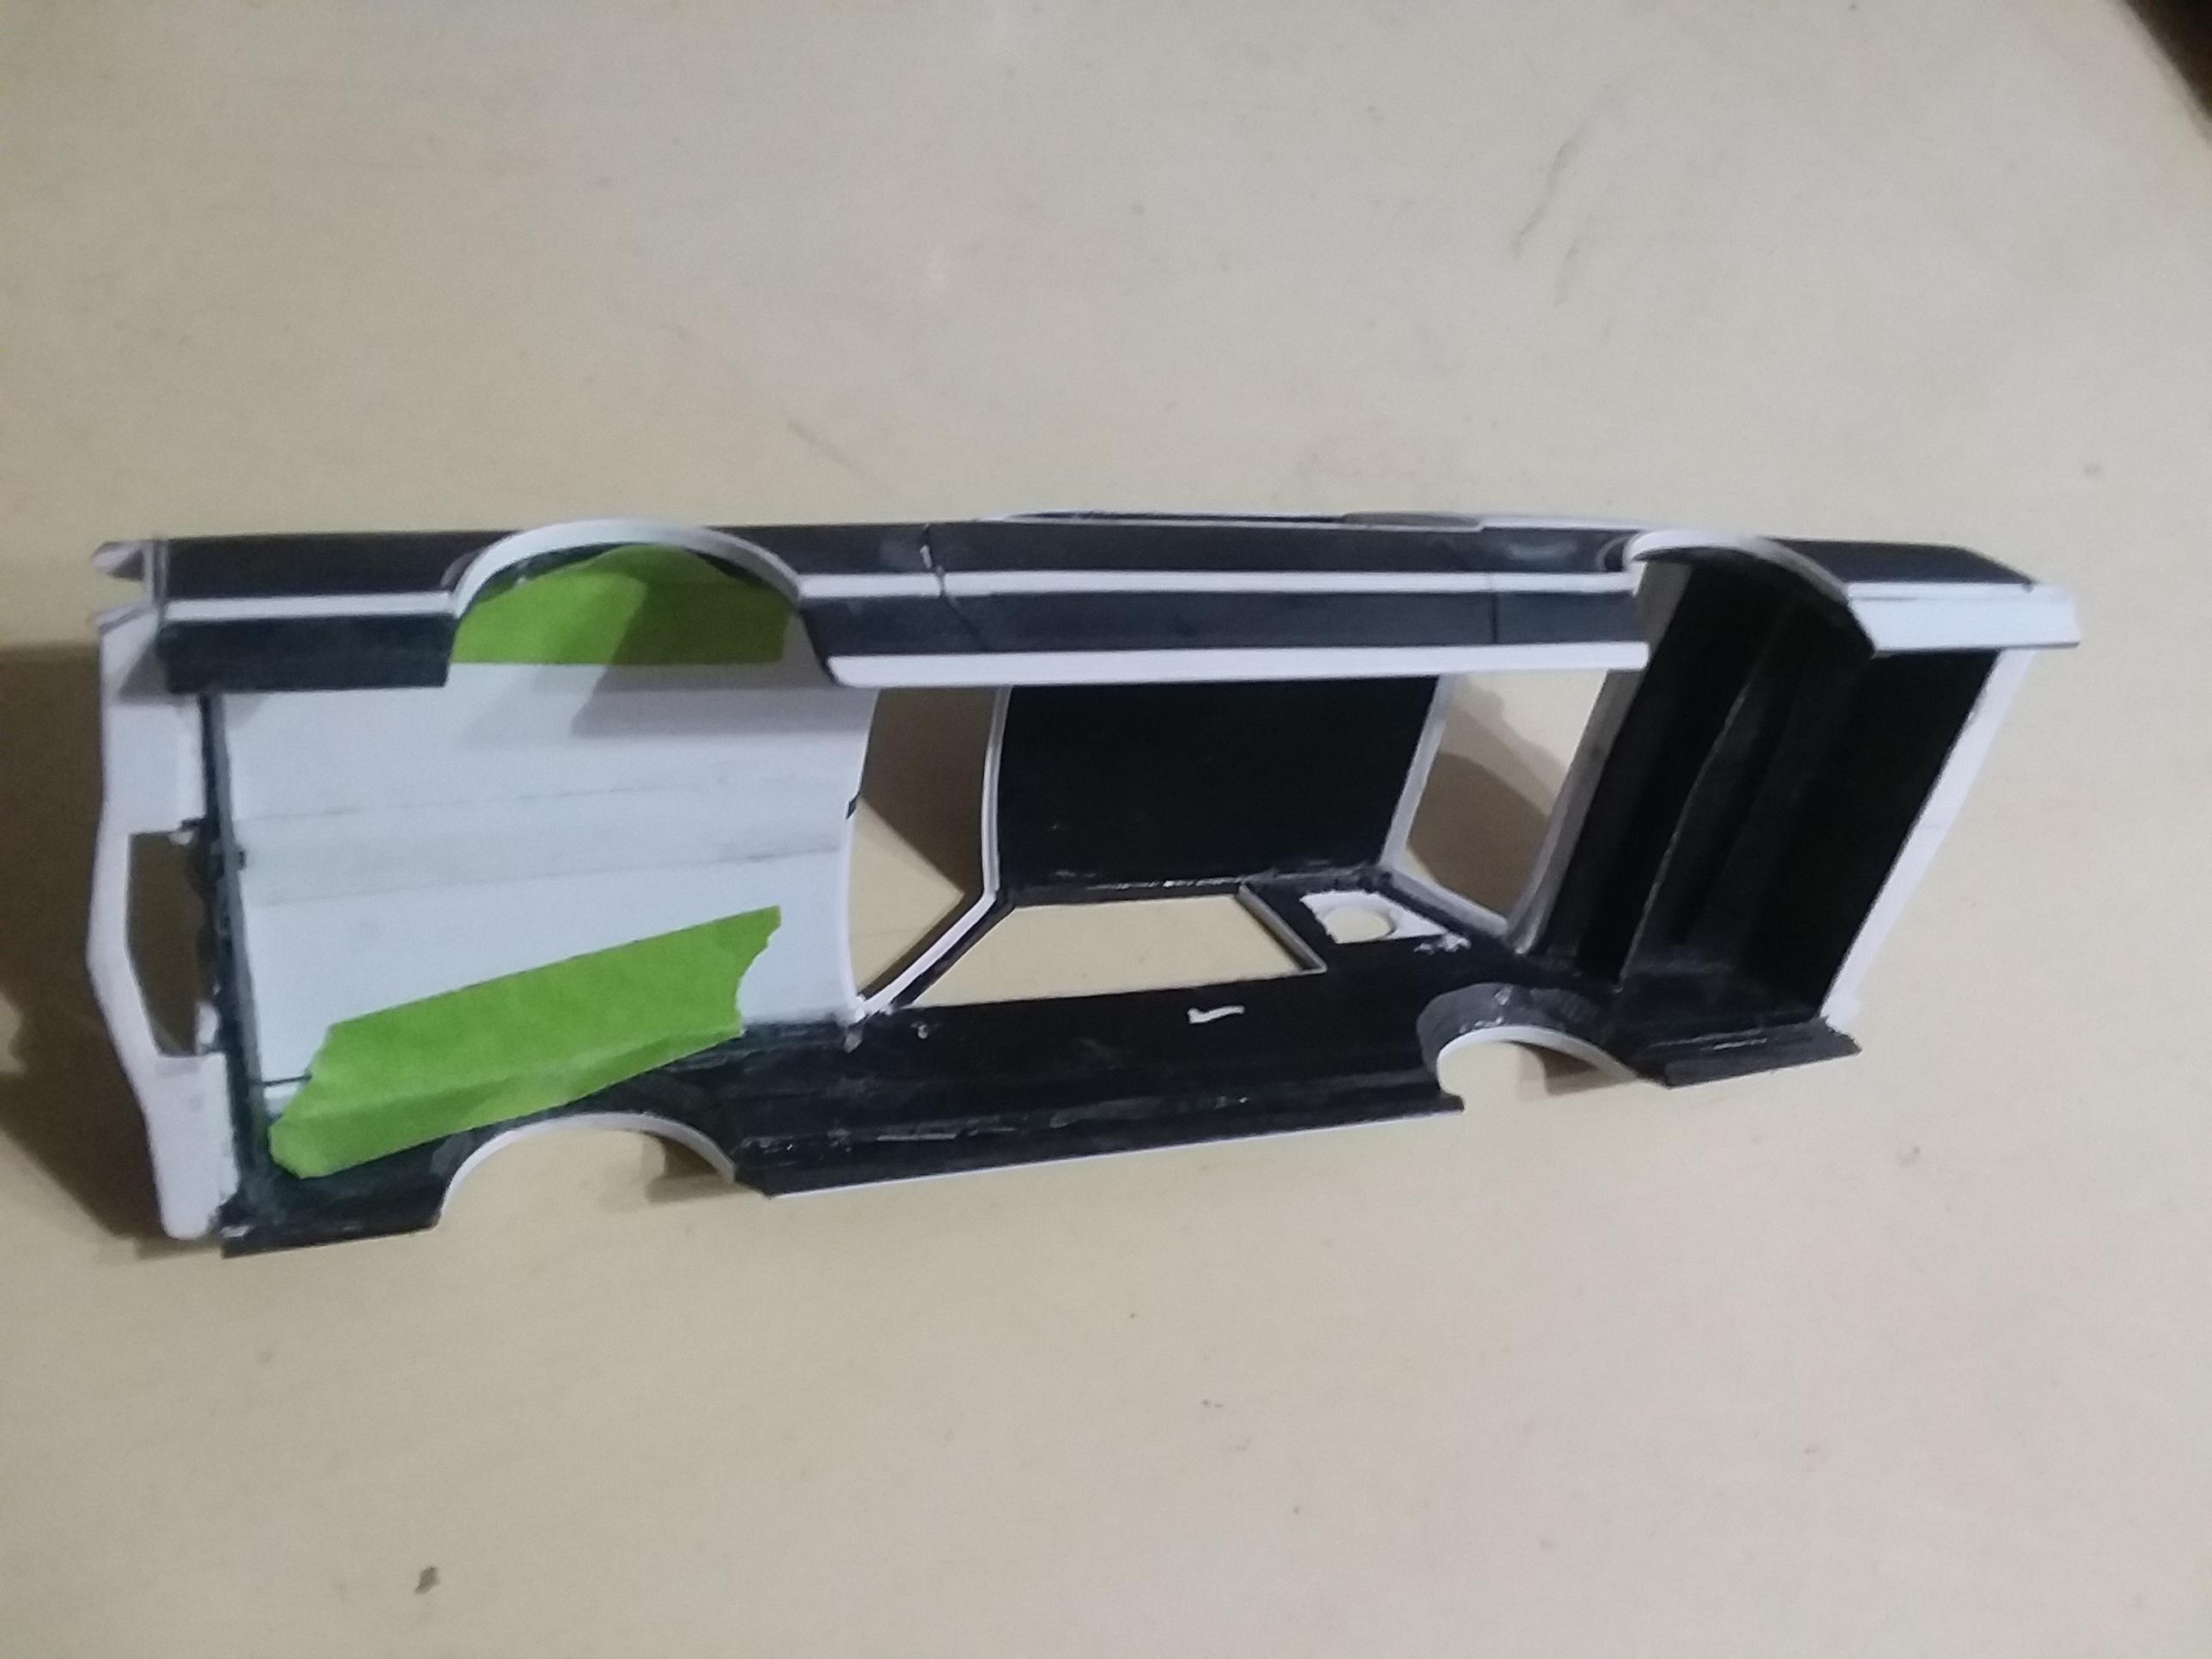
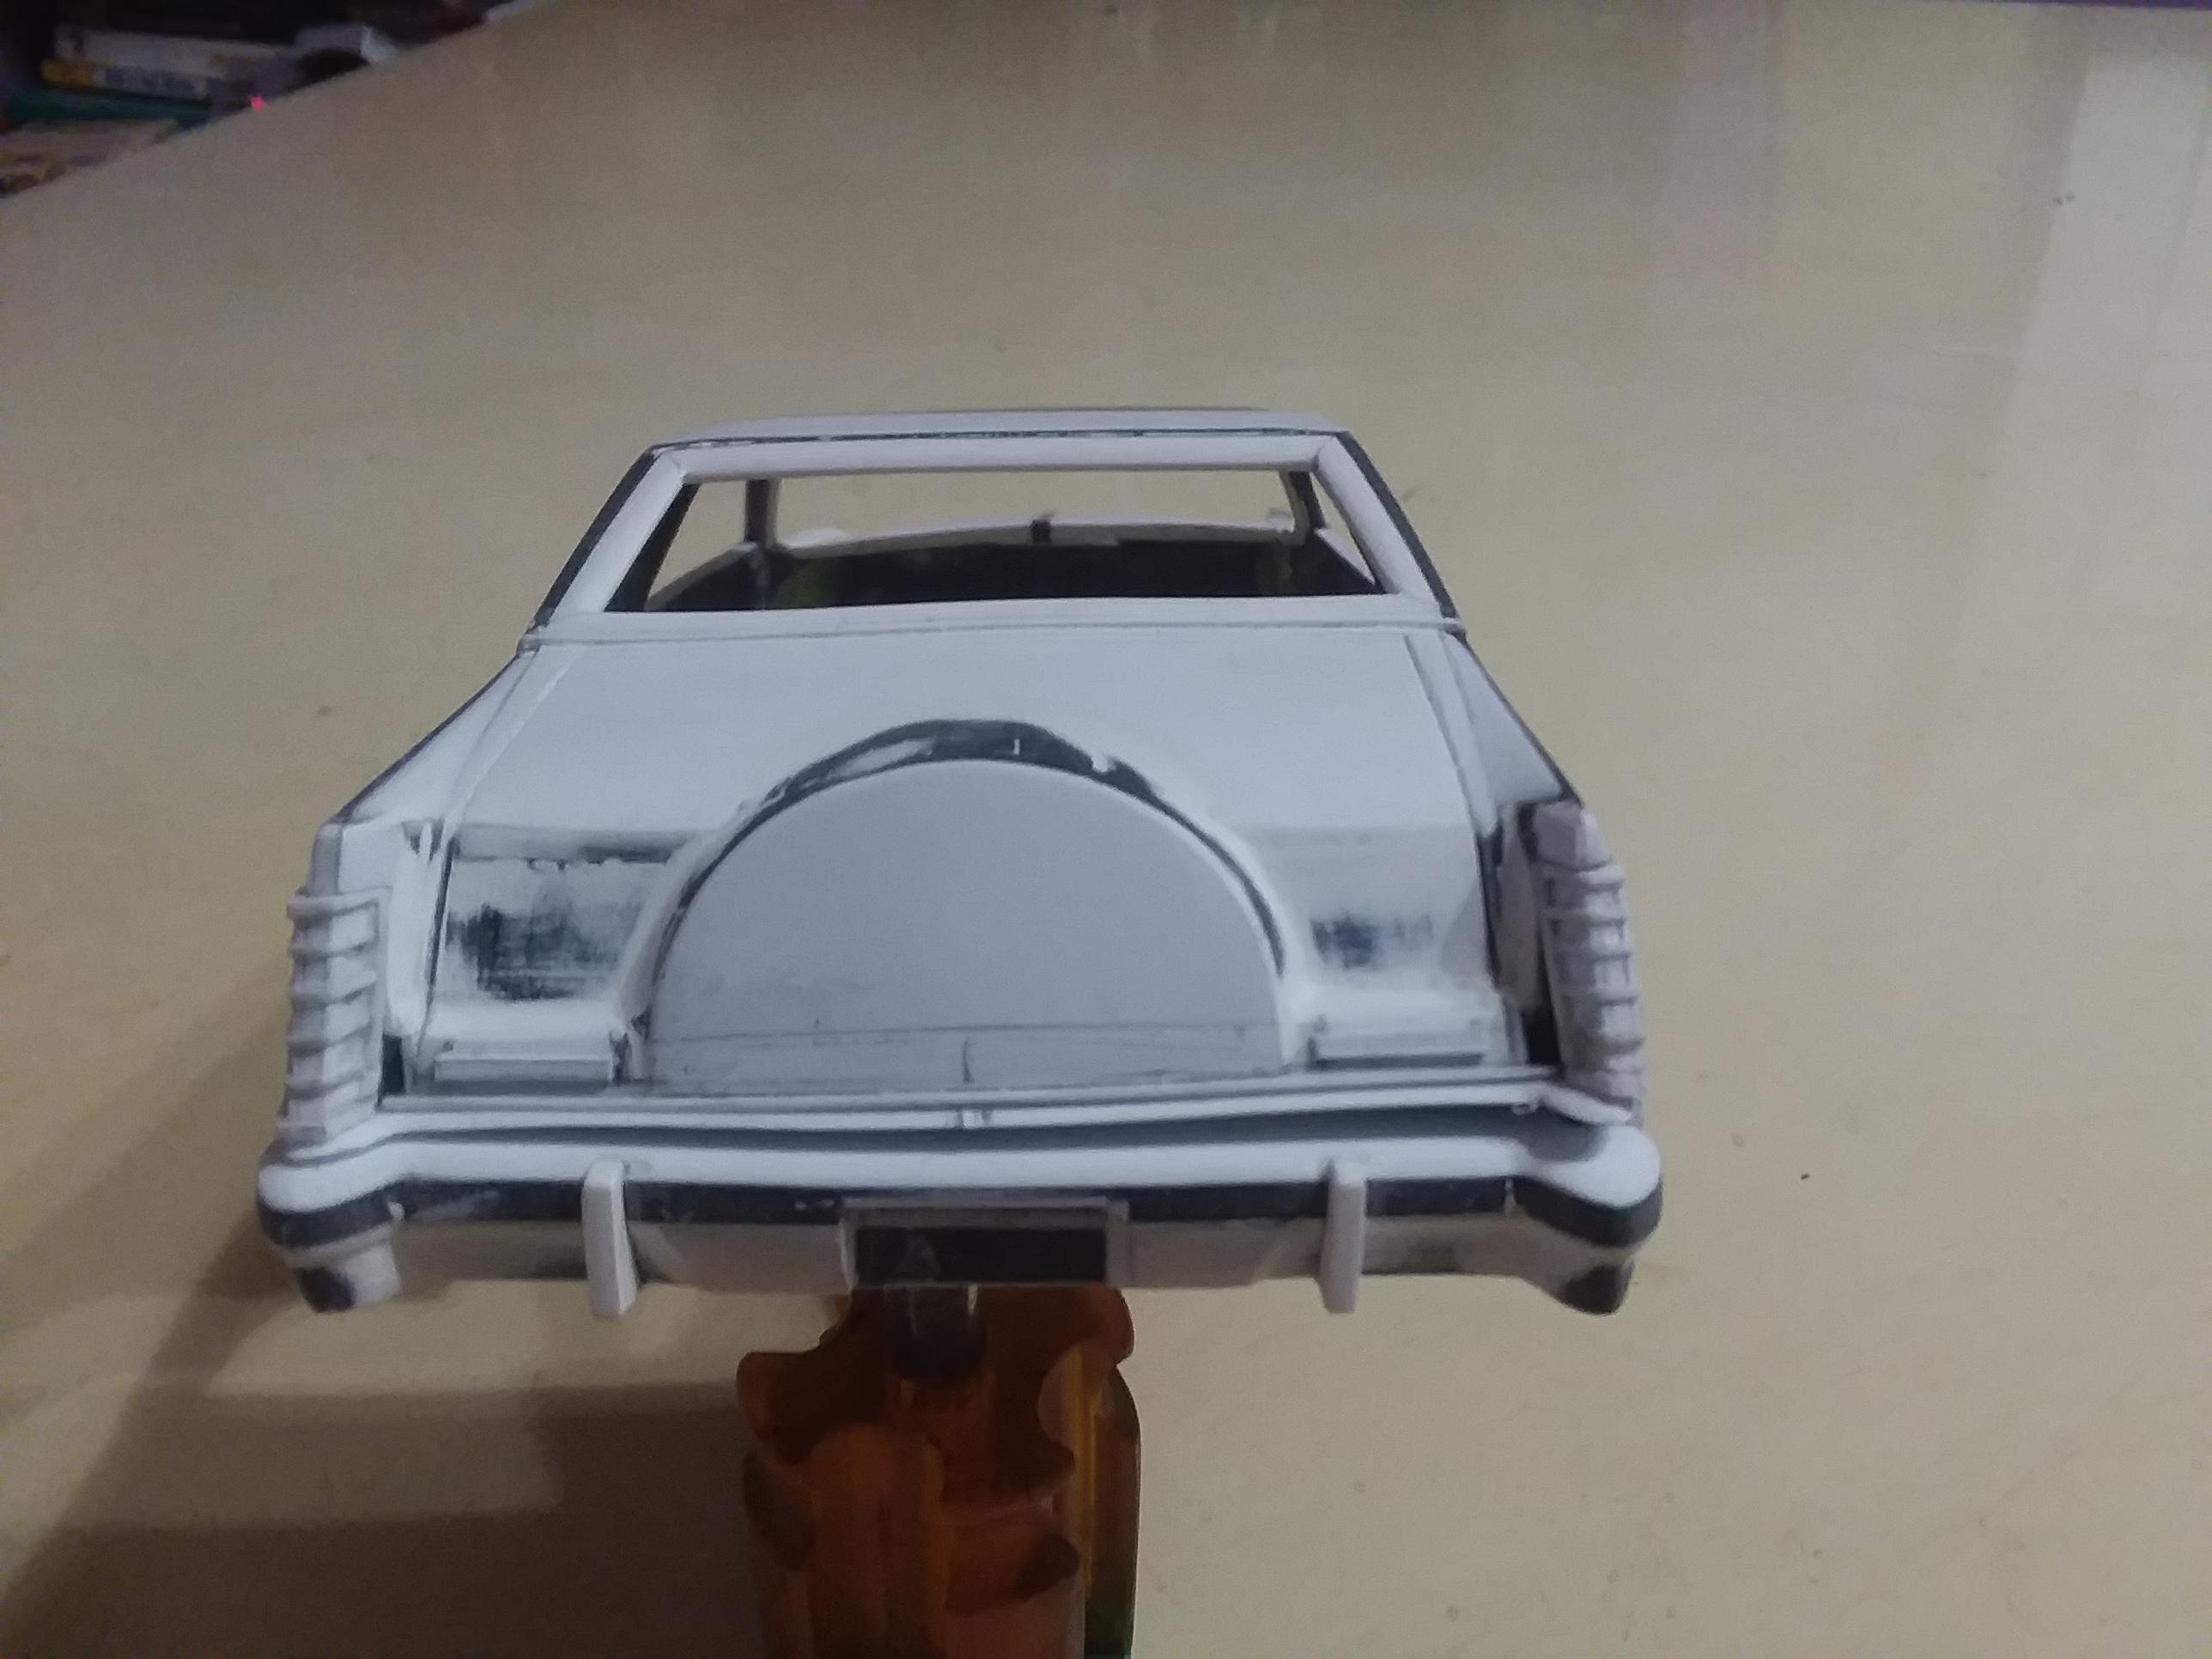
After looking at a lot of photos of the 1:1 and a lot of planning, I figured I could try to see if I could create one of these from scratch. I have lots of sheet plastic that I acquired from my work, so I had nothing to lose if it didn't work out. Here is the side view I used for reference. Scaled it to 1:25 and printed it out on my computer. Sorry, I didn't take any "in progress" photos. I wasn't sure if this was even going to work. I just kept cutting, fitting and gluing. I didn't want to stop to photograph. I picked this Lincoln because it had flat panels, was basically square, was an attractive design that has never and may never be done as a kit. Plus, I could layer all the folds using different thicknesses of plastic. The black areas are (I think) .080 PVC plastic as it has a semi-hard outside, with a softer more porous internal and is very strong. When super glued together, it will not break at the fused joint! I began with the sides and copied the exact profile from my printed picture. Starting with the largest flat panel, and then copied the next smaller panel and beveled the edges to match the beltline folds. I then slightly curved the A and C pillars in. Next was the lower rocker areas - more PVC strips beveled to make the "roll under" like on the real car. Wheelwell flares were made by taking another piece of PVC cutting it into a half circle the size of the largest part of the flare and beveling it to the circumference of the smaller part. Made 4 and super glued them to the proper wheelbase. BTW - these wheels are what got me to thinking about doing a Lincoln in the first place. I have a set but don't remember where they came from. They will be used on the finished piece. Hood and trunk were sheets of .060 plastic, bent and curved to match the 1:1. I added the hood peak and the hood and trunk lines before gluing them to the sides of the body panels. Black stripe in the middle of the hood is where I had to add width to the front to match the trunk - otherwise, it was going to look like a wedge. Roof was done the same way with PVC bent and curved as well as the shape of the windshield and backlight openings. Spare tire was done with another half circle and small wedges shaped to mimic the crescent dome on the top of the trunk. Filed, filled and sanded to blend. Front end was made with PVC split and bent to create the headlight shape and a small strip inserted in the middle to hold the angle. Filed to shape. Pardon the grille angle, it's only taped in place for the pic. Transition to the grille was made with small strips and wedges shaped to fit. Grille area was made from two '34 Ford p/u grilles. Bumpers were made from horizontal layers of plastic cut to shape, rounded and beveled. Glued together and blended with putty. Taillights were originally built up on the body sides, but ended up being too low, so they were carefully cut off and the areas trimmed to fit the lights higher up. They were left as removable. All trim was added with strips of sheet plastic that will be foiled later. These are the underside pics to show how the pieces were attached. Next up windows, turn signals and paint.
-
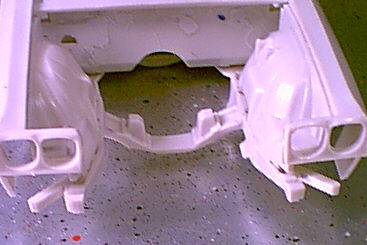
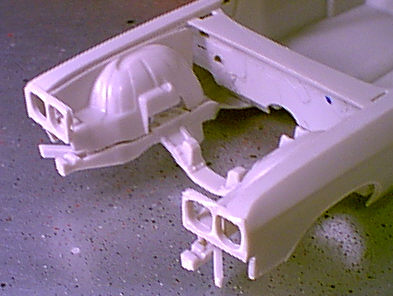
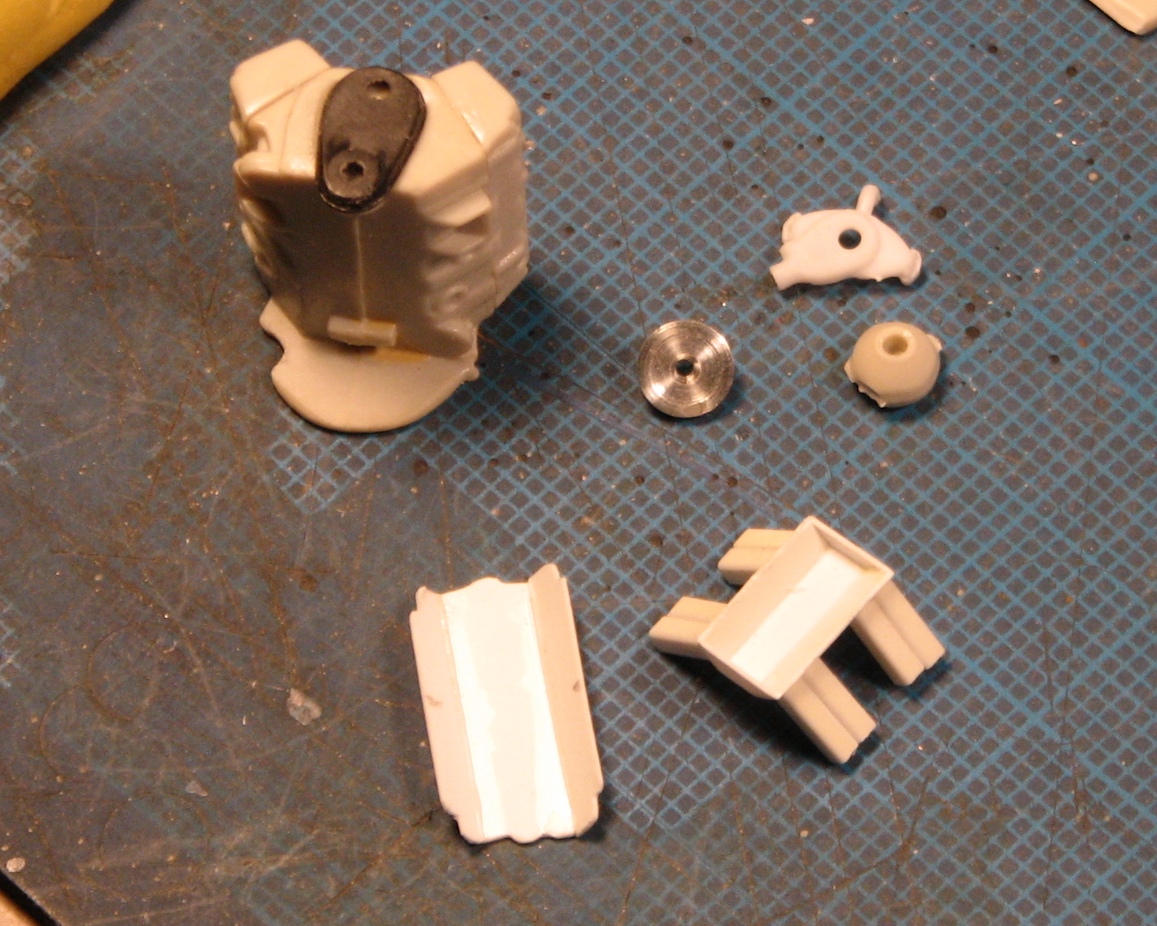
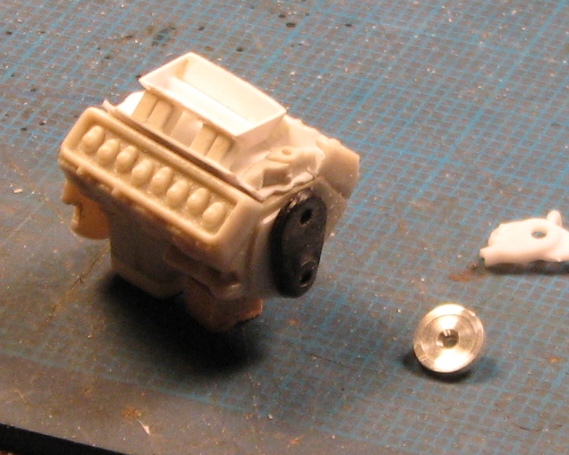
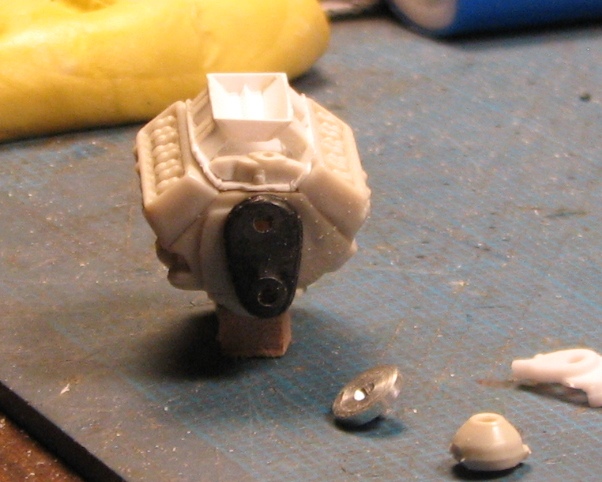
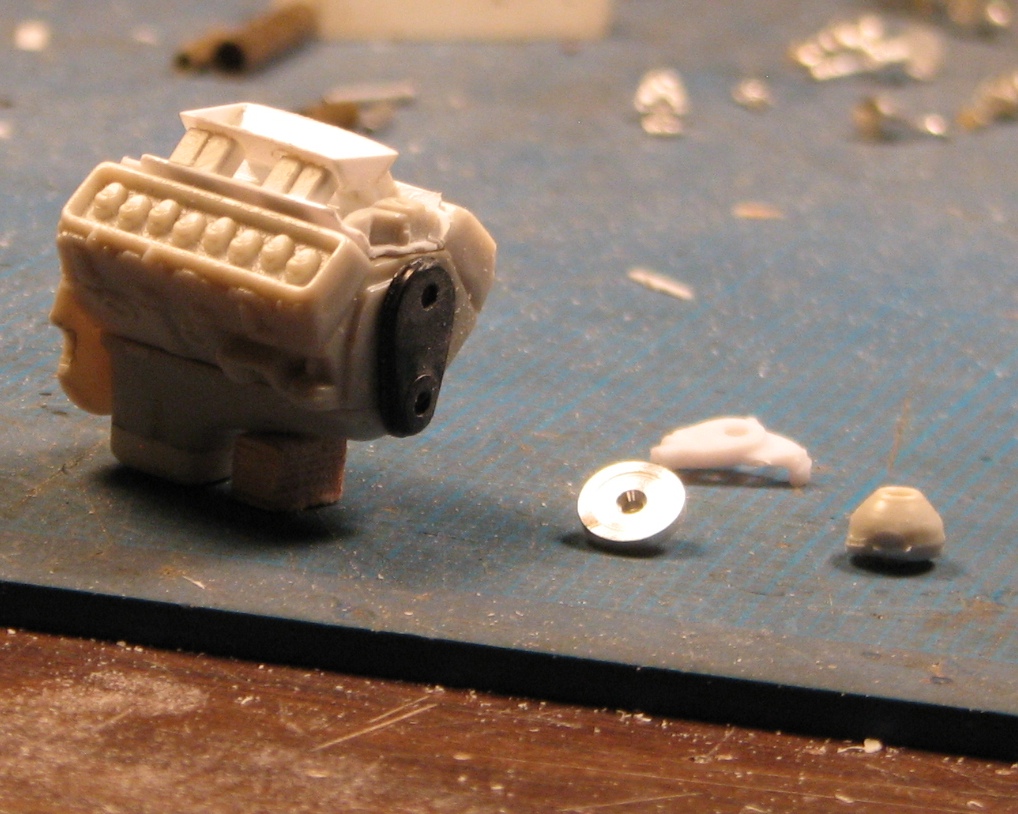
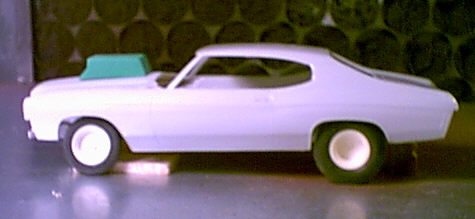
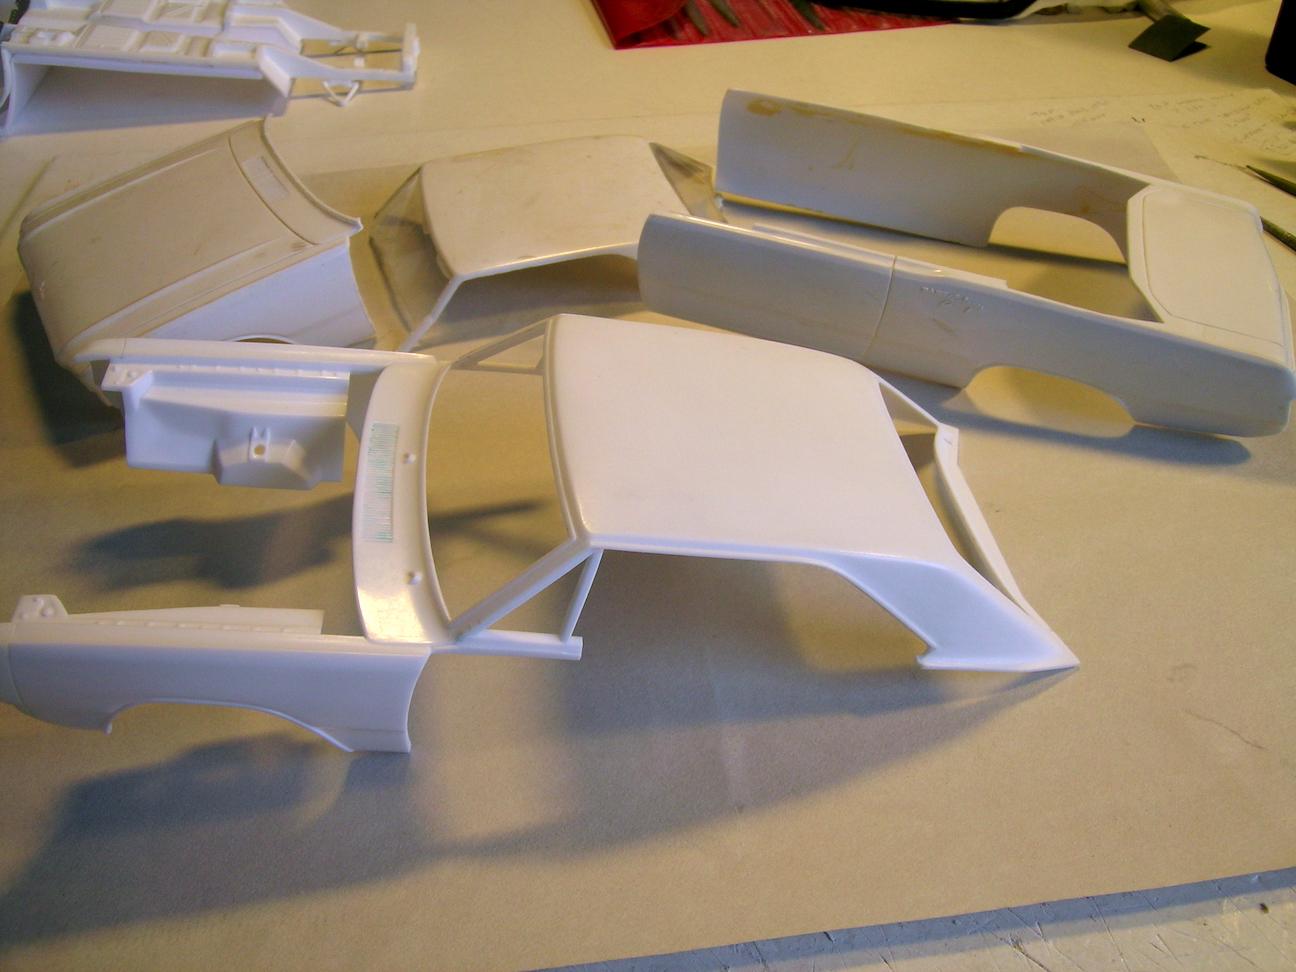
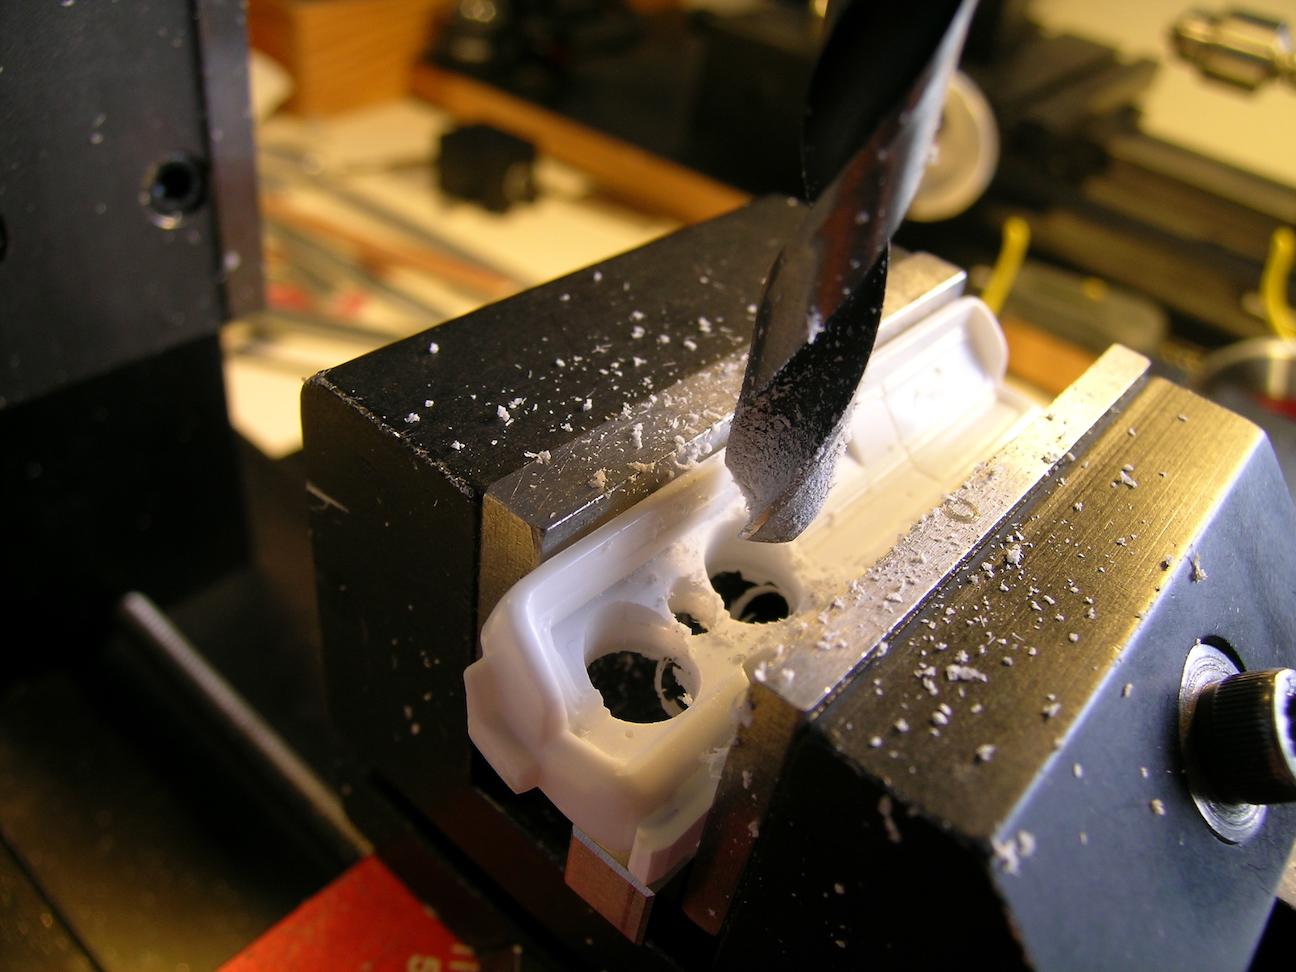
 Having recently moved back to Colorado, and finally having my workshop up and running, I came across this project I started fifteen years, ago--or so. It's AMT's '70 Malibu, to be built to comply with the NHRA's 1975 rules for Modified Production. I began by replacing the Chevelle's front inner fenderwells and front clip with those from AMT's '70 Monte Carlo, along with the Monte's front suspension including its steering box. I replaced the single-piece cast timing cover/water pump/harmonic balancer assembly with a timing cover from the parts box, a water pump from a Revell Camaro and a harmonic balancer turned from aluminum. The manifold is scratchbuilt from 23 pieces of styrene. I also deepened the sump on the oil pan. The lower control arms have been boxed, and a few minor details thrown at them. Changes to the front suspension revolve mostly around the removal of the swaybar/tierod assembly. The steering will be built to be posable. The brass pins you see will mount the steering arm and the stabilizer arm, on the opposite side. I have already built a new sway bar, but, a friend of mine questioned its necessity on a drag car, so I removed it, just in time for another friend to tell me he'd removed the one from his racer, and after one pass, decided that he wanted it back on the car! So, I am yet undecided, as to which way I'll go, in that regard. This is a mixture of photos from back when I began work on it (had a crappy camera!), and from the past few days, when I've done most of the chassis "details", and all of the engine work. Comments, compliments and poo-flinging are welcome!
-
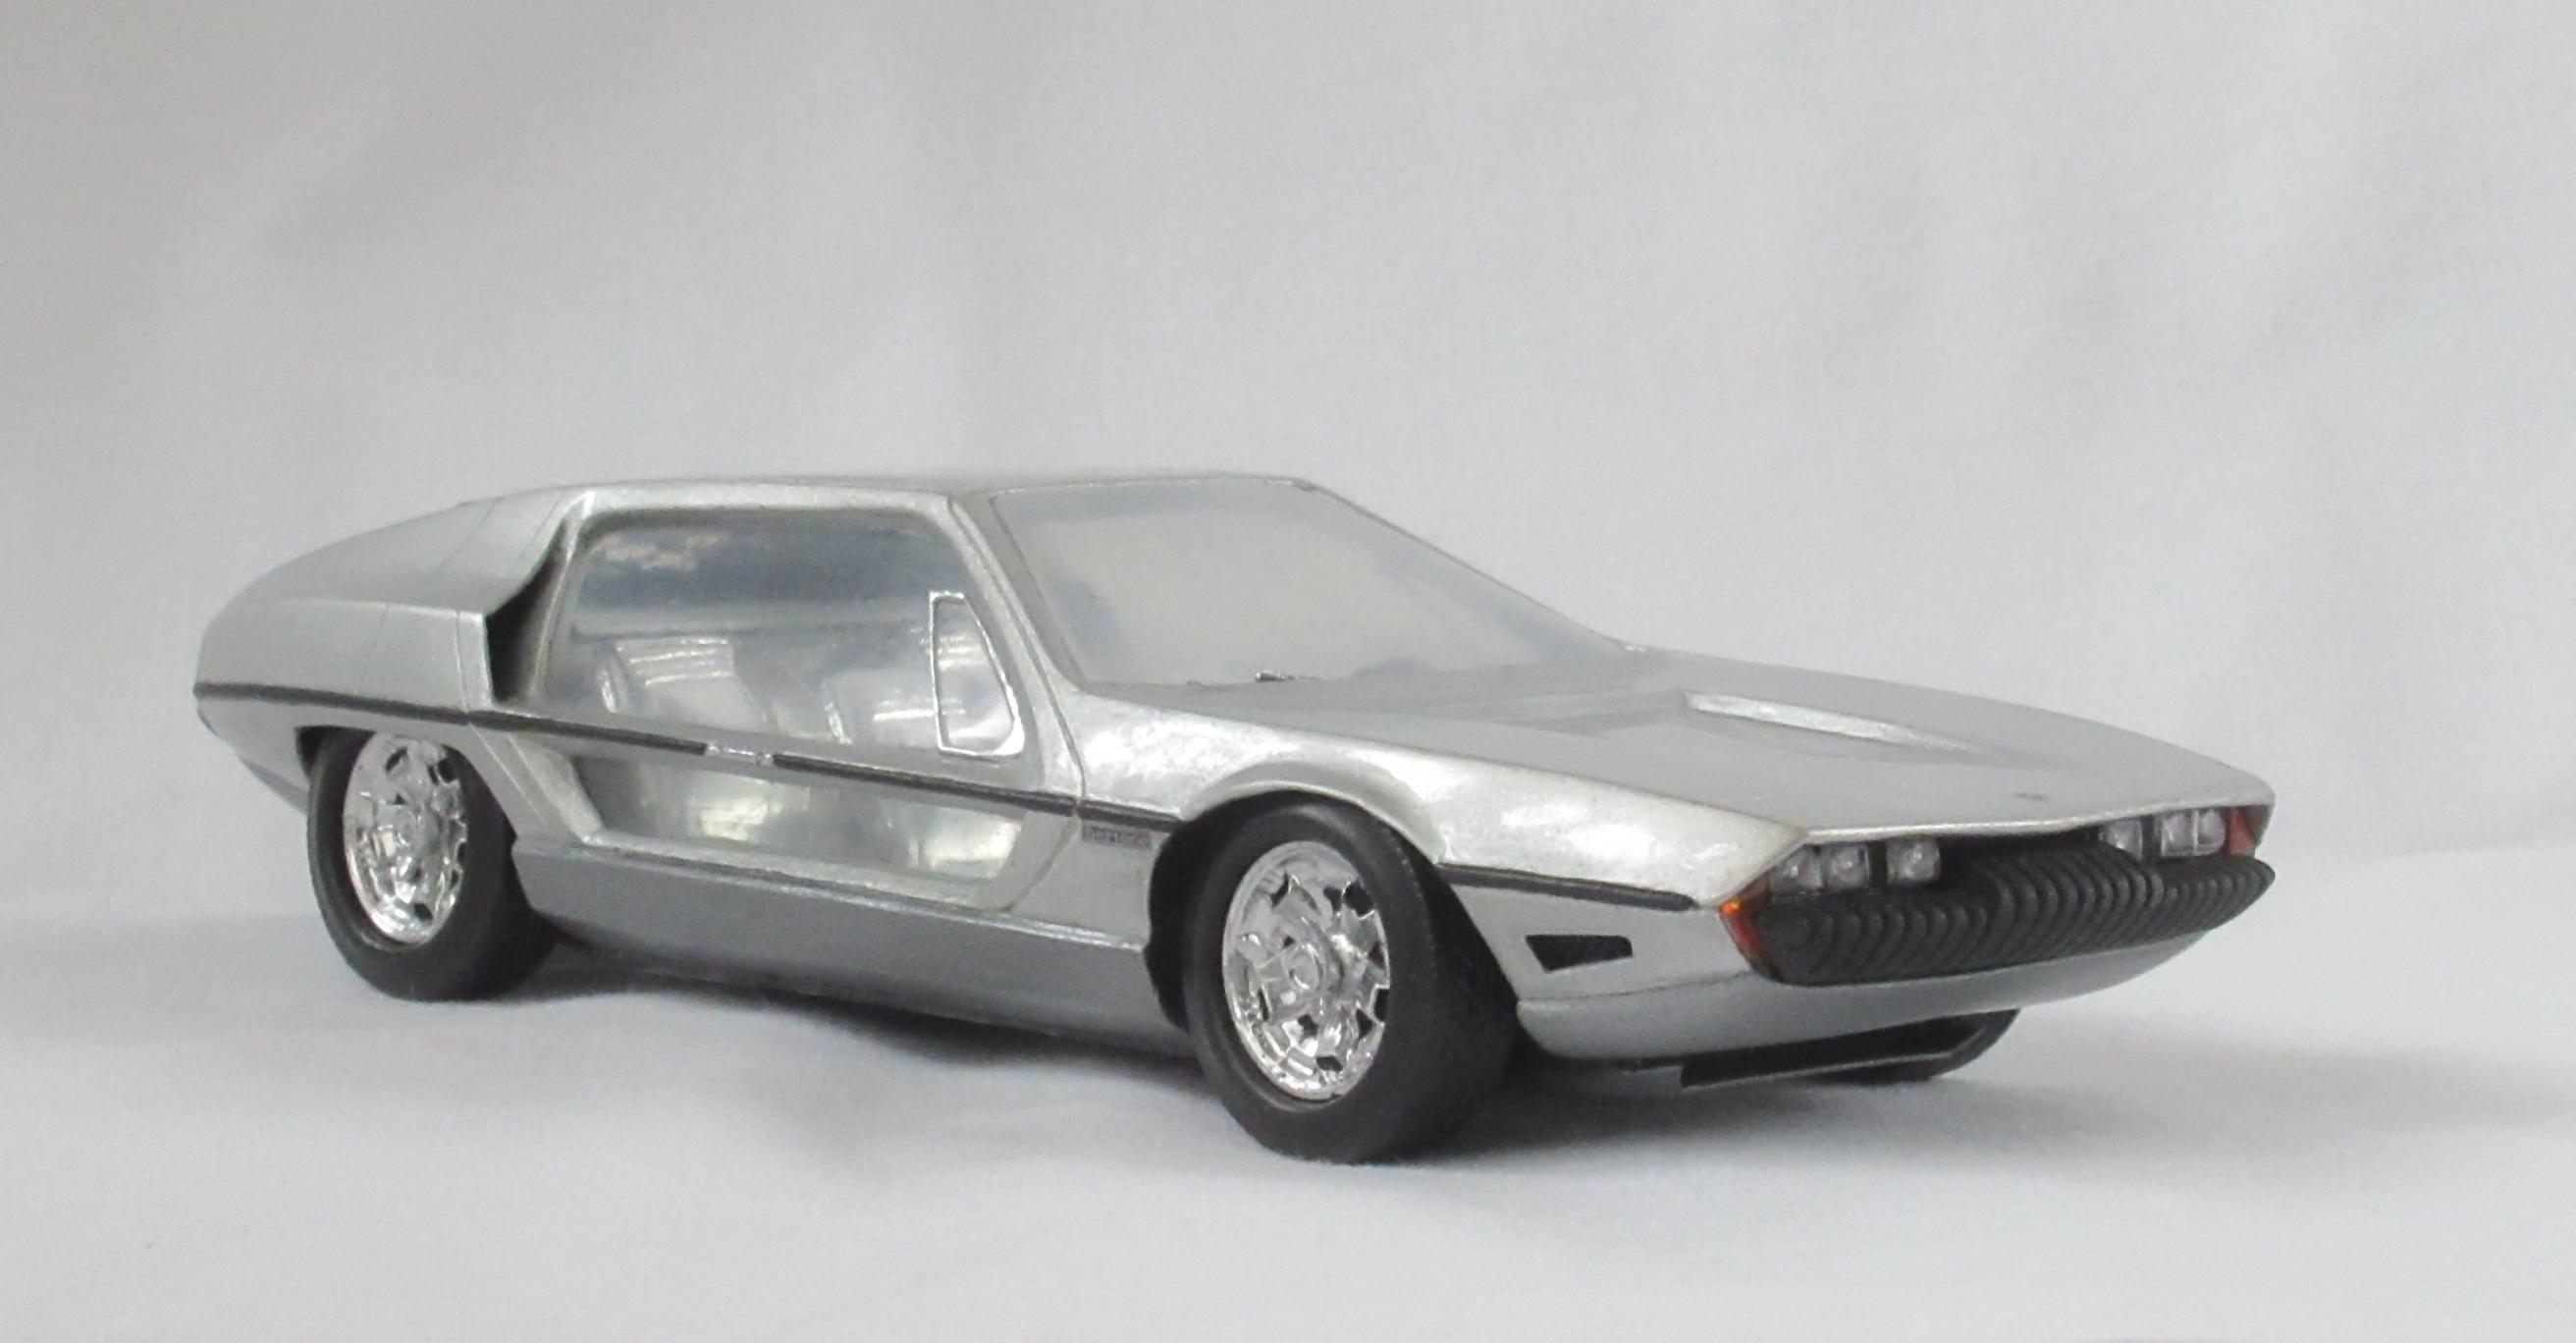
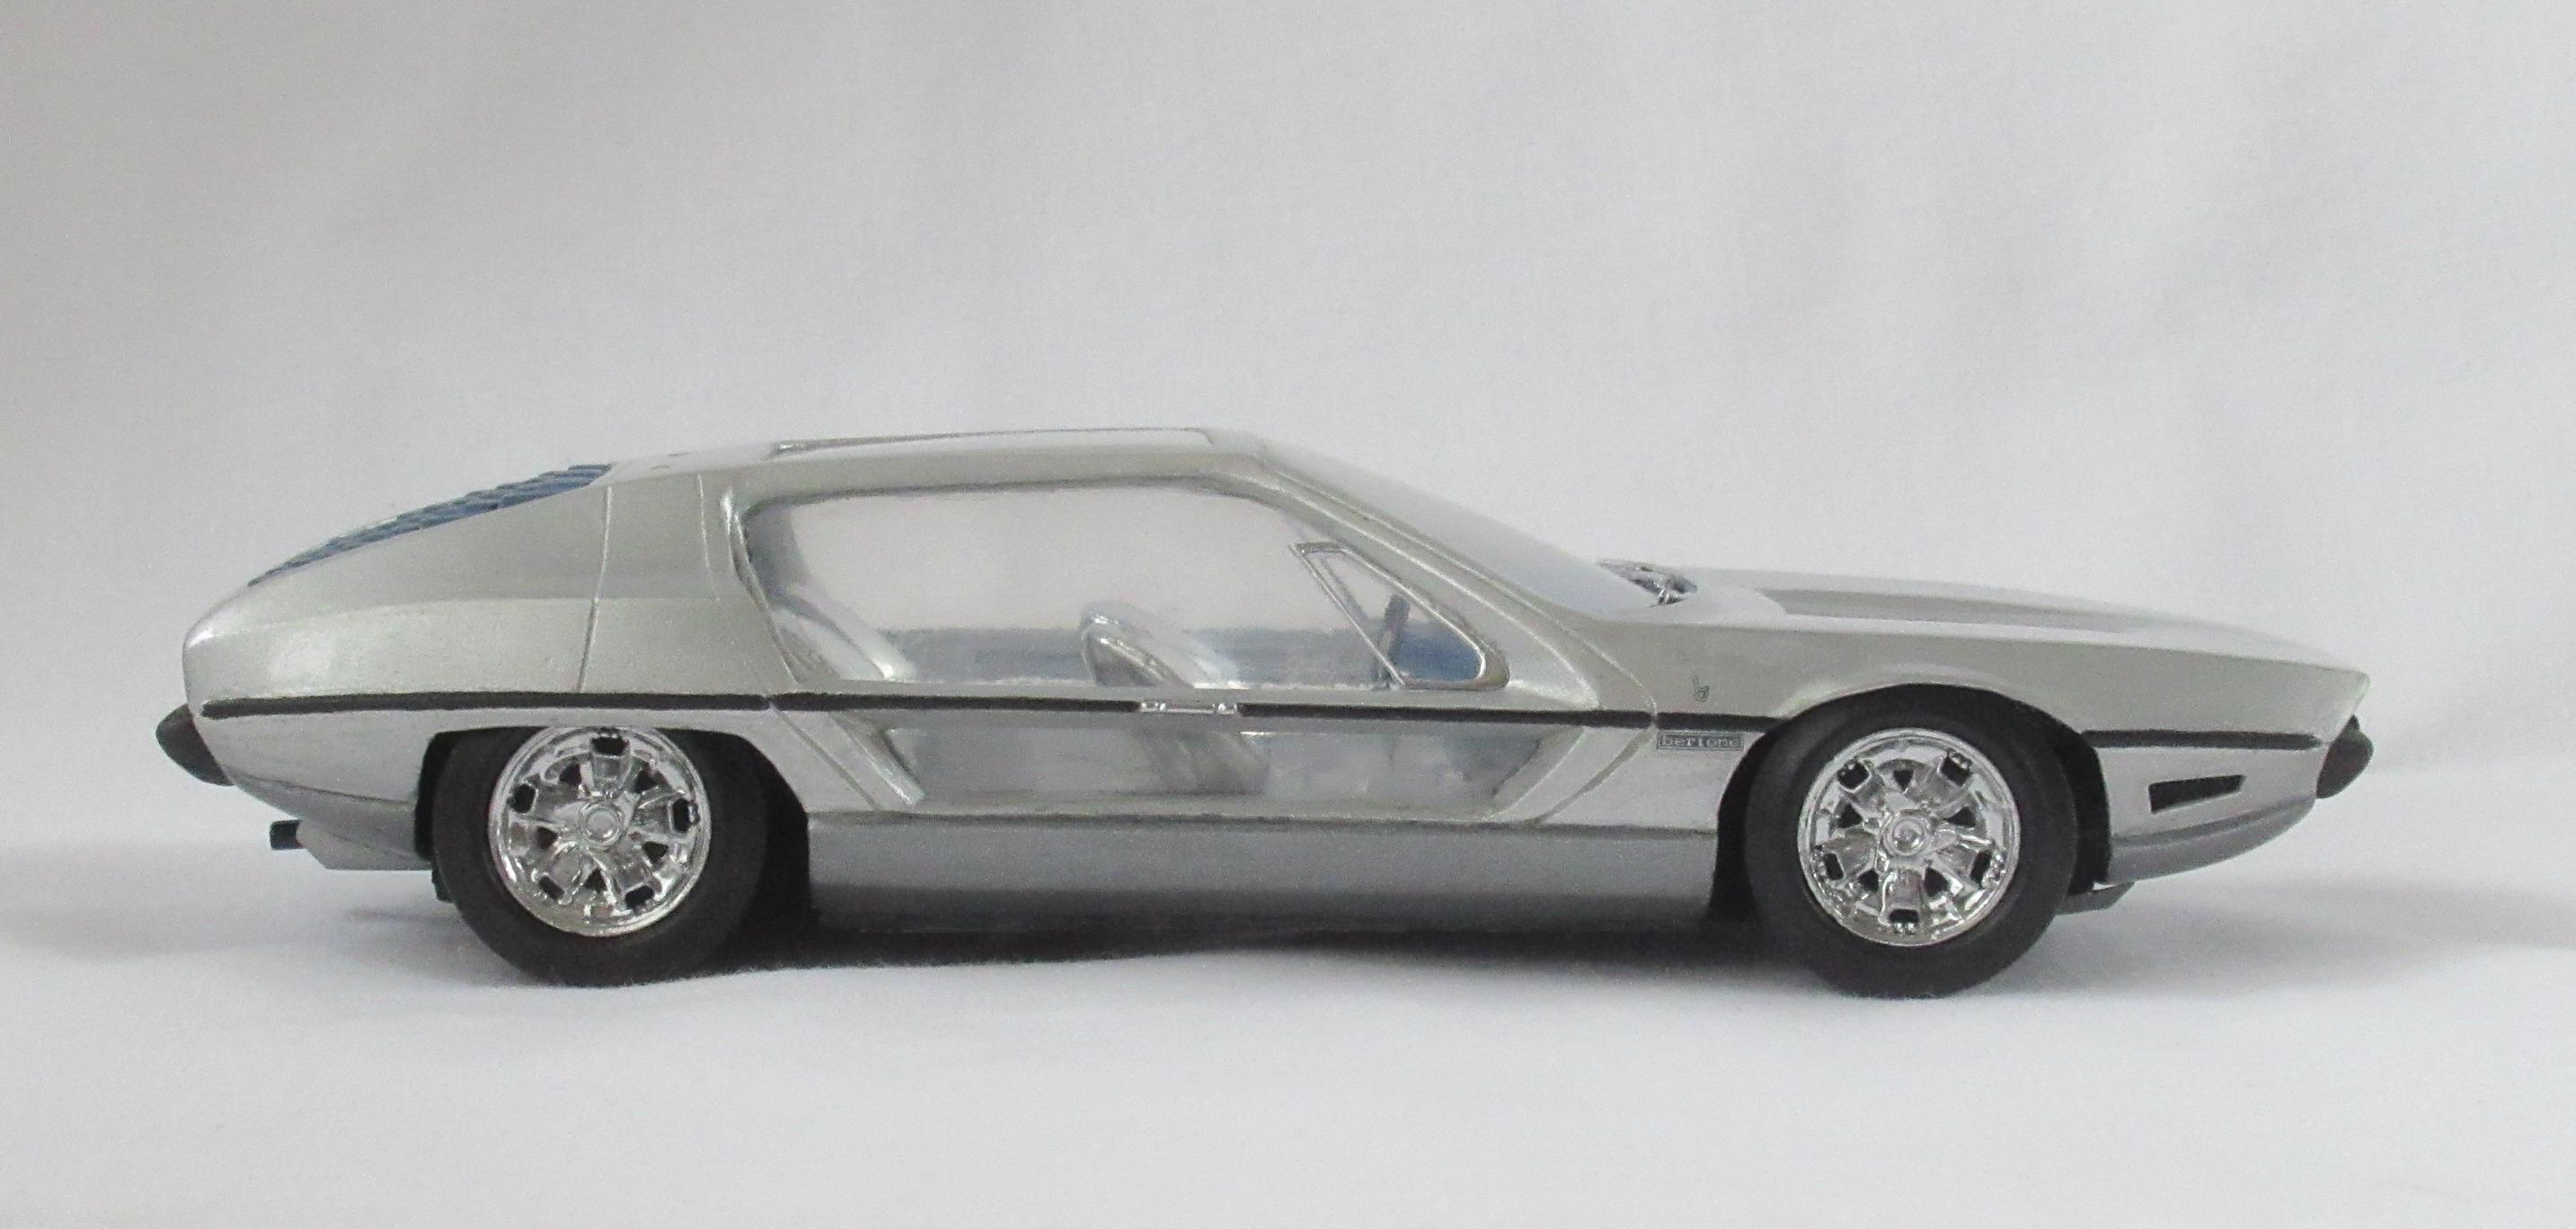
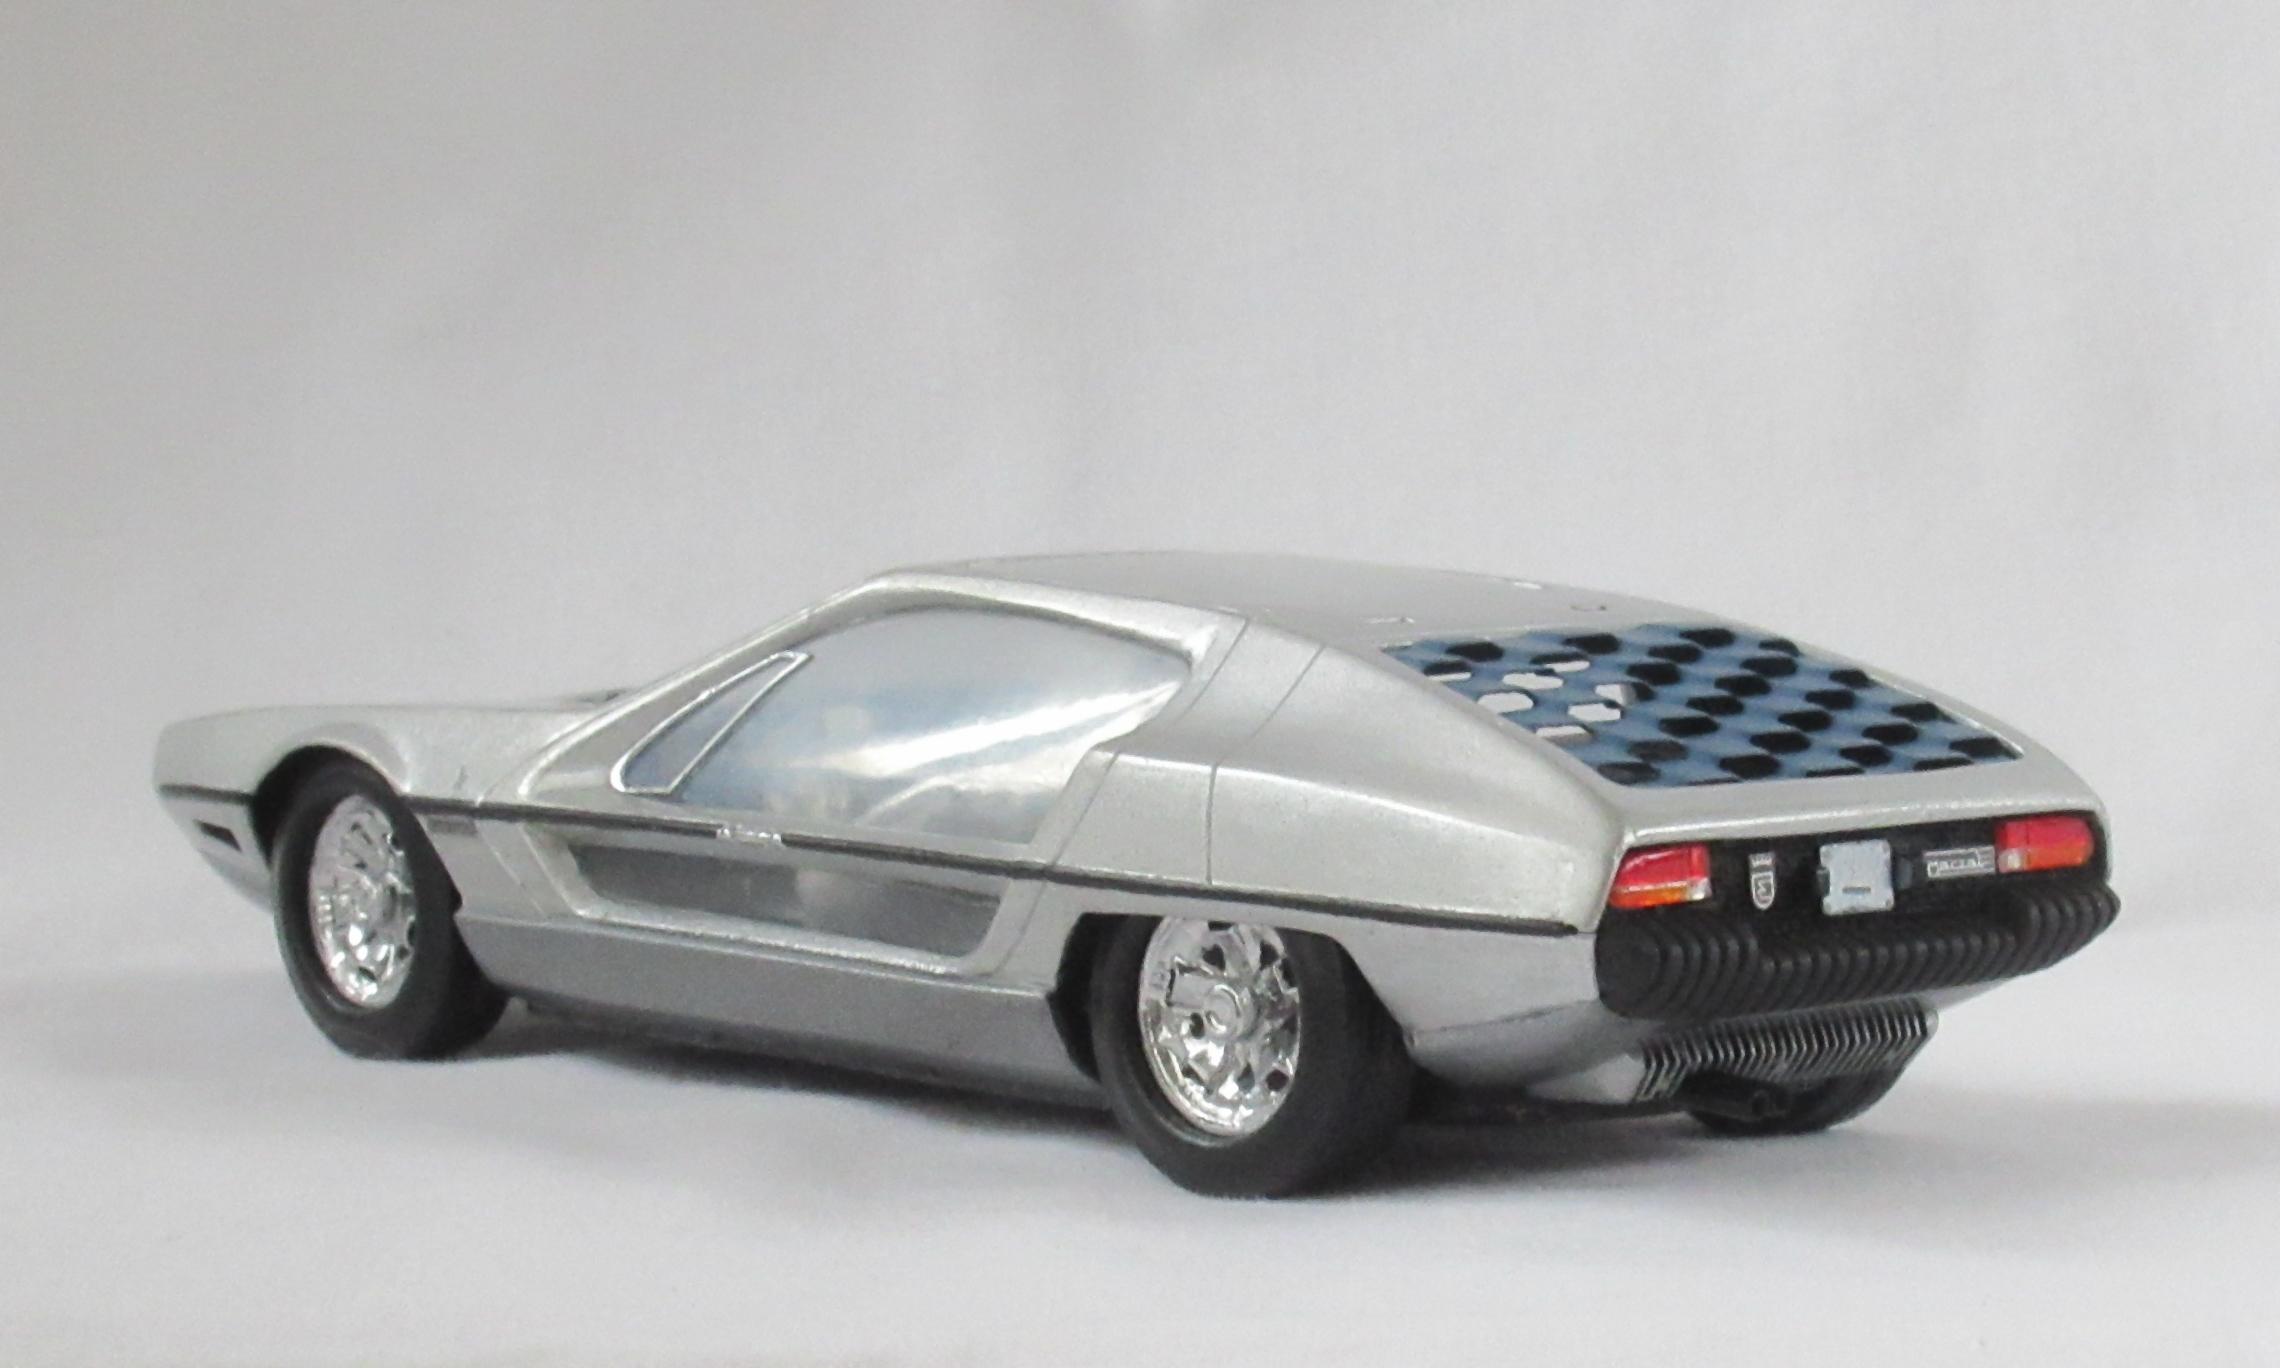
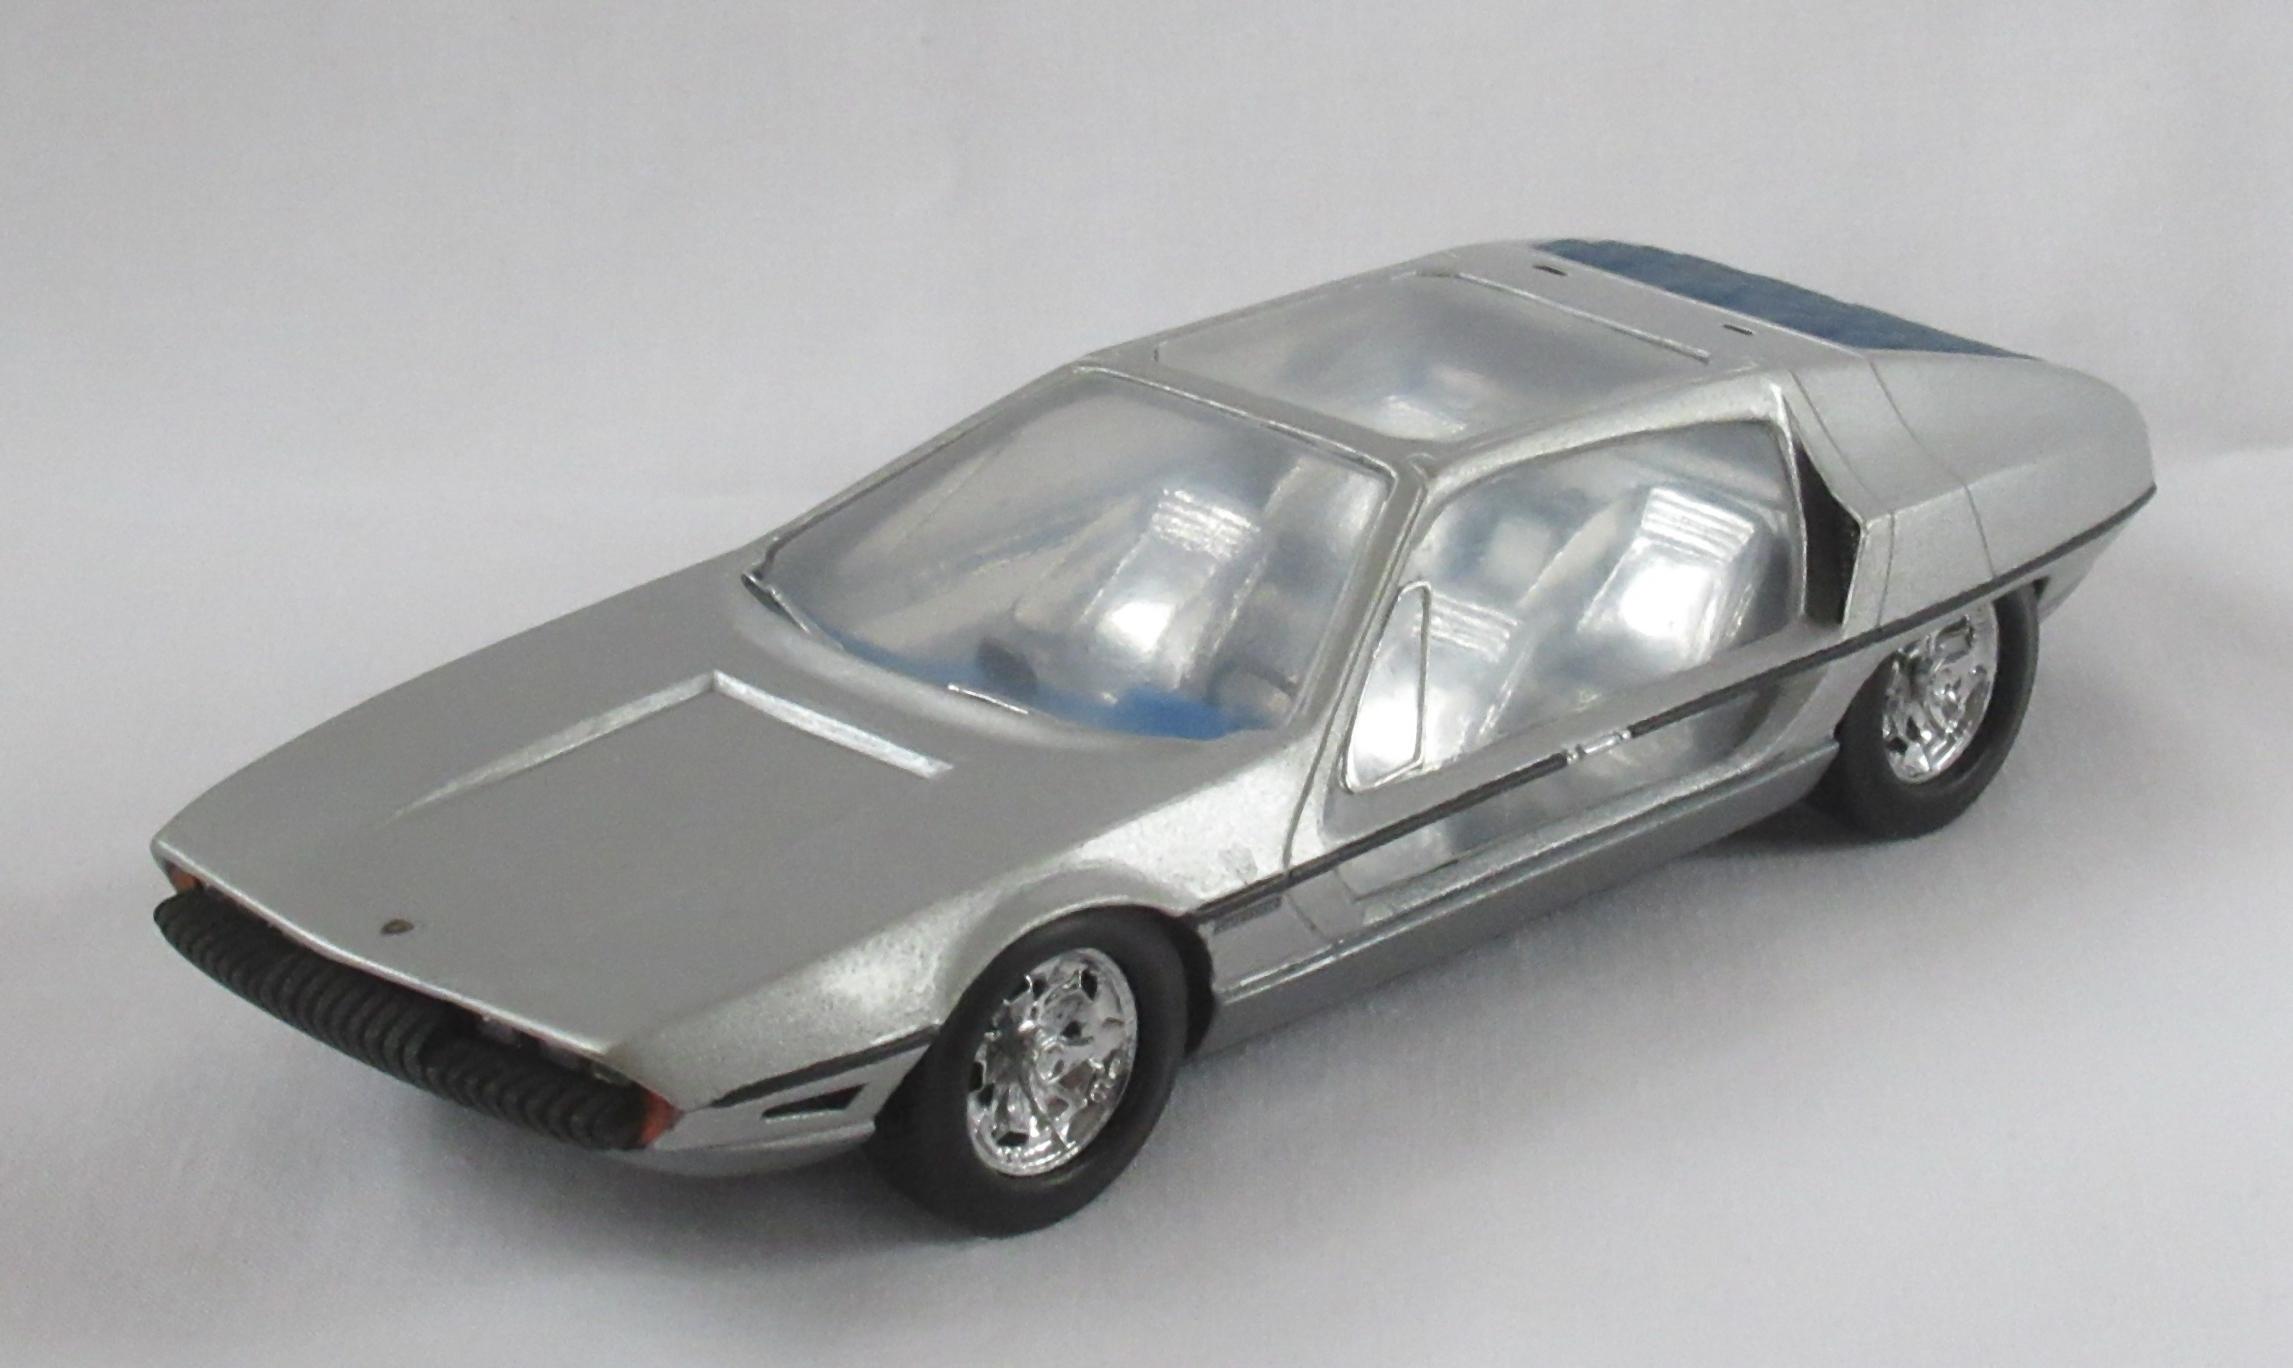
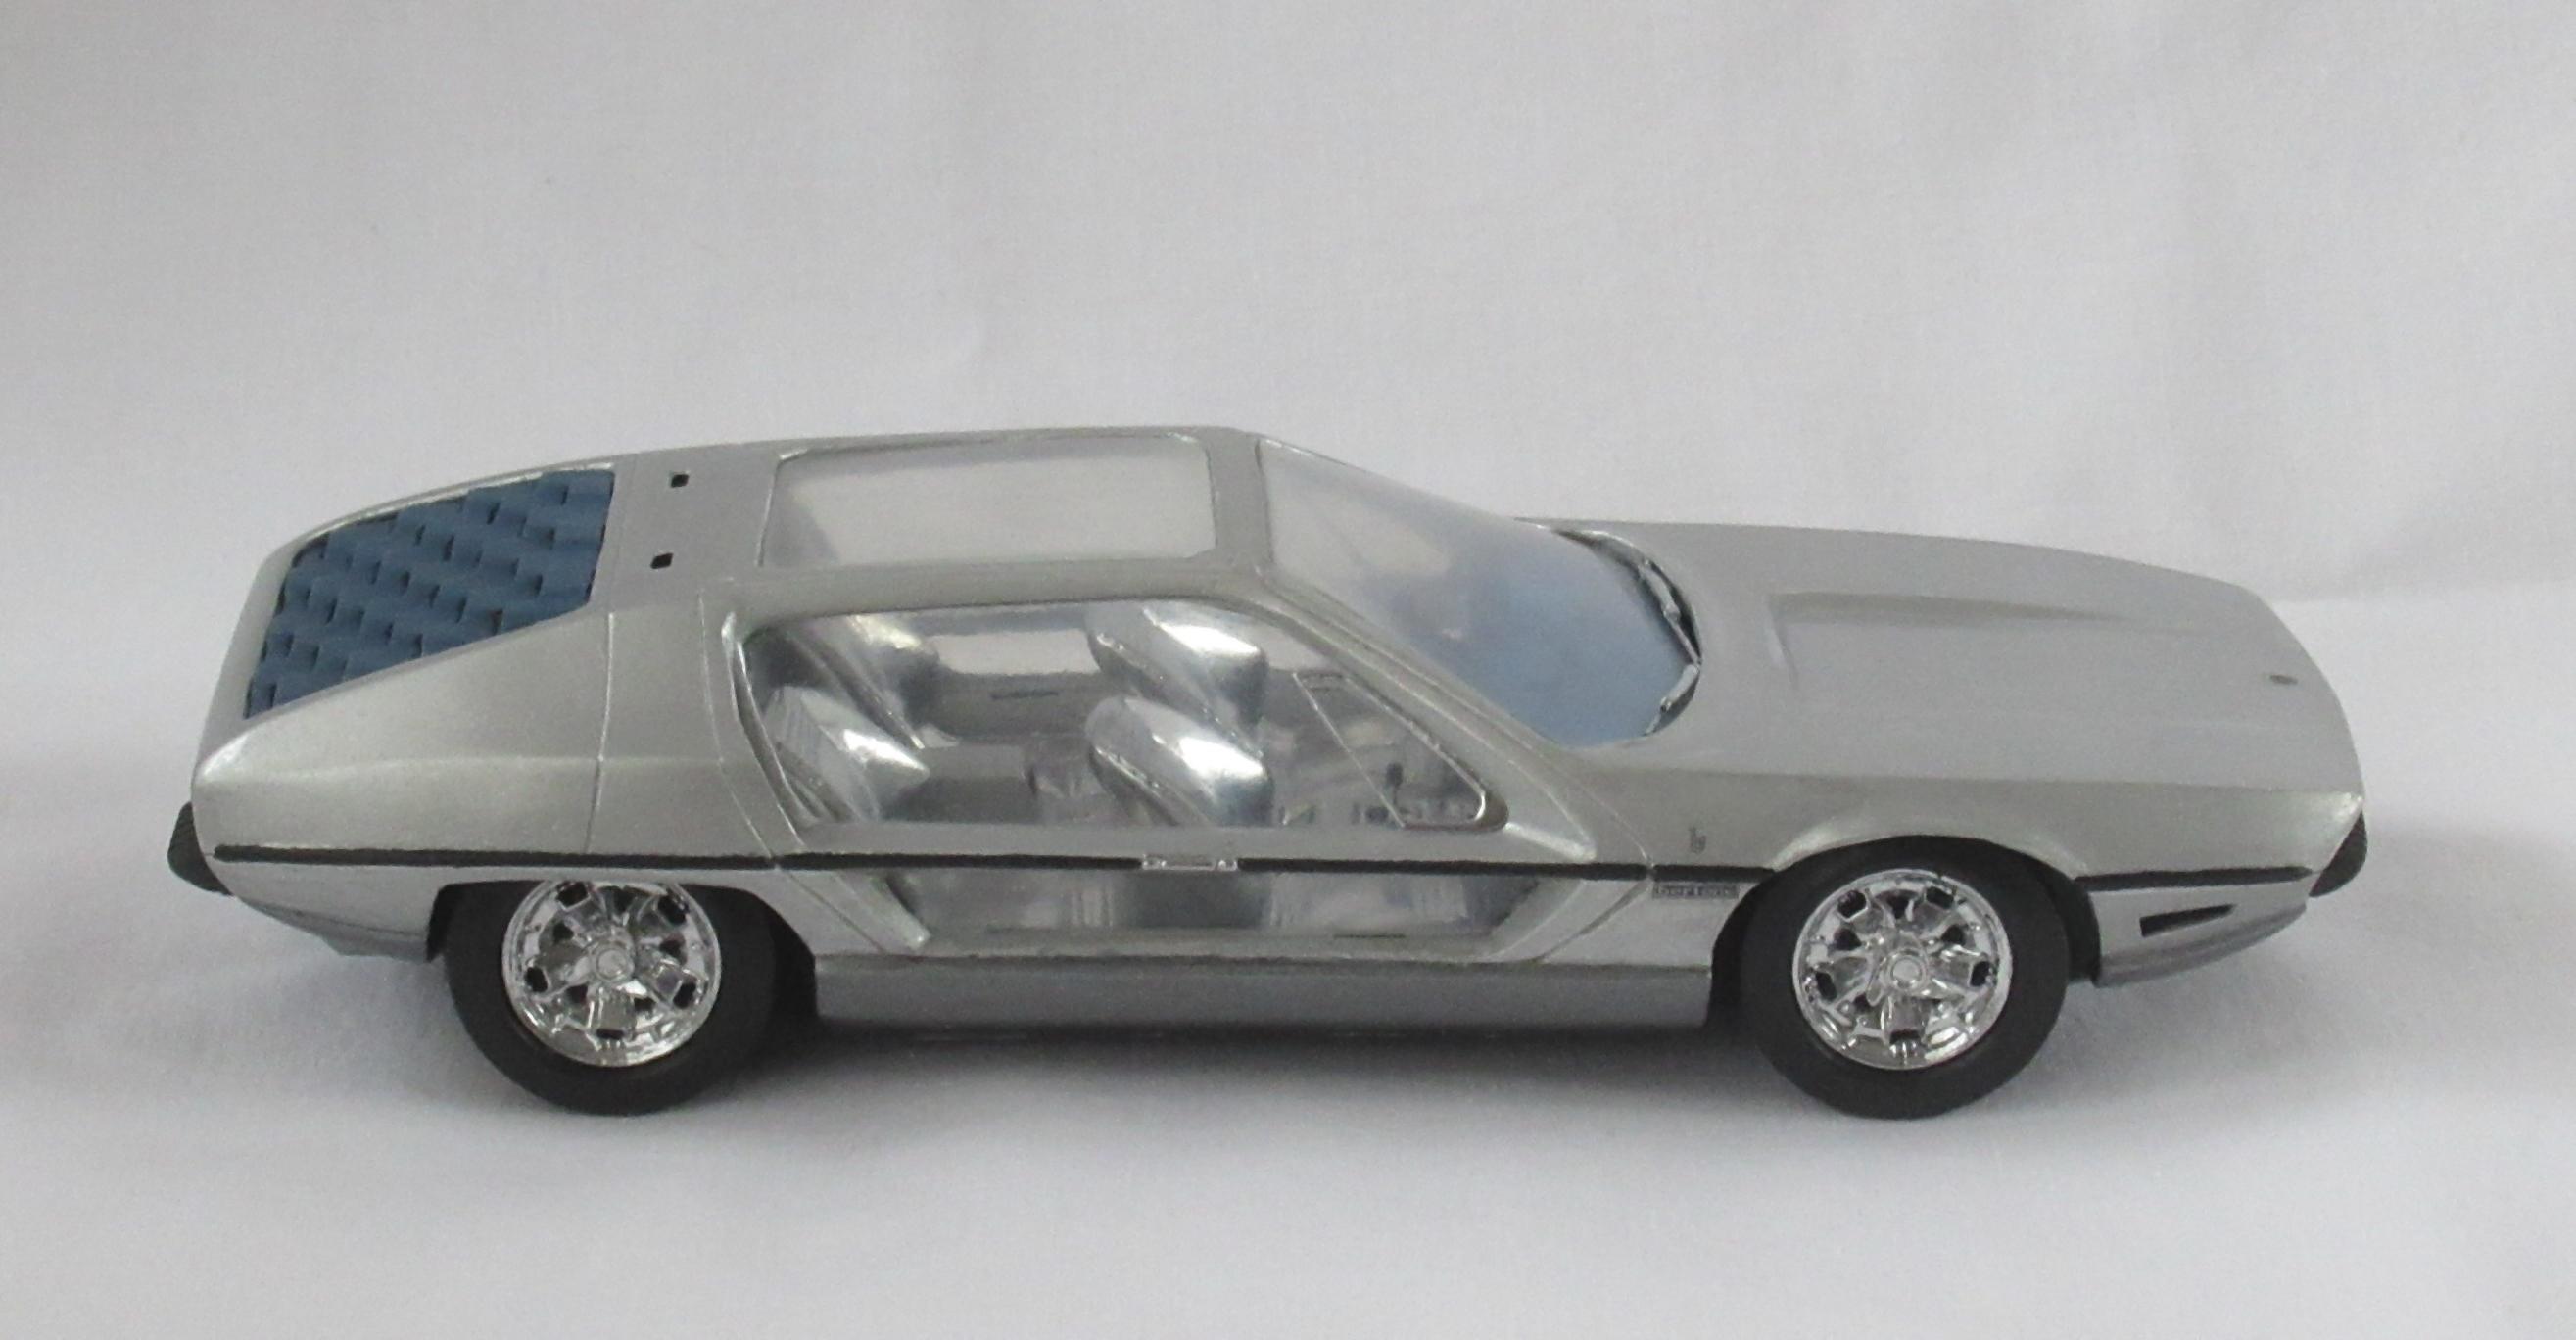
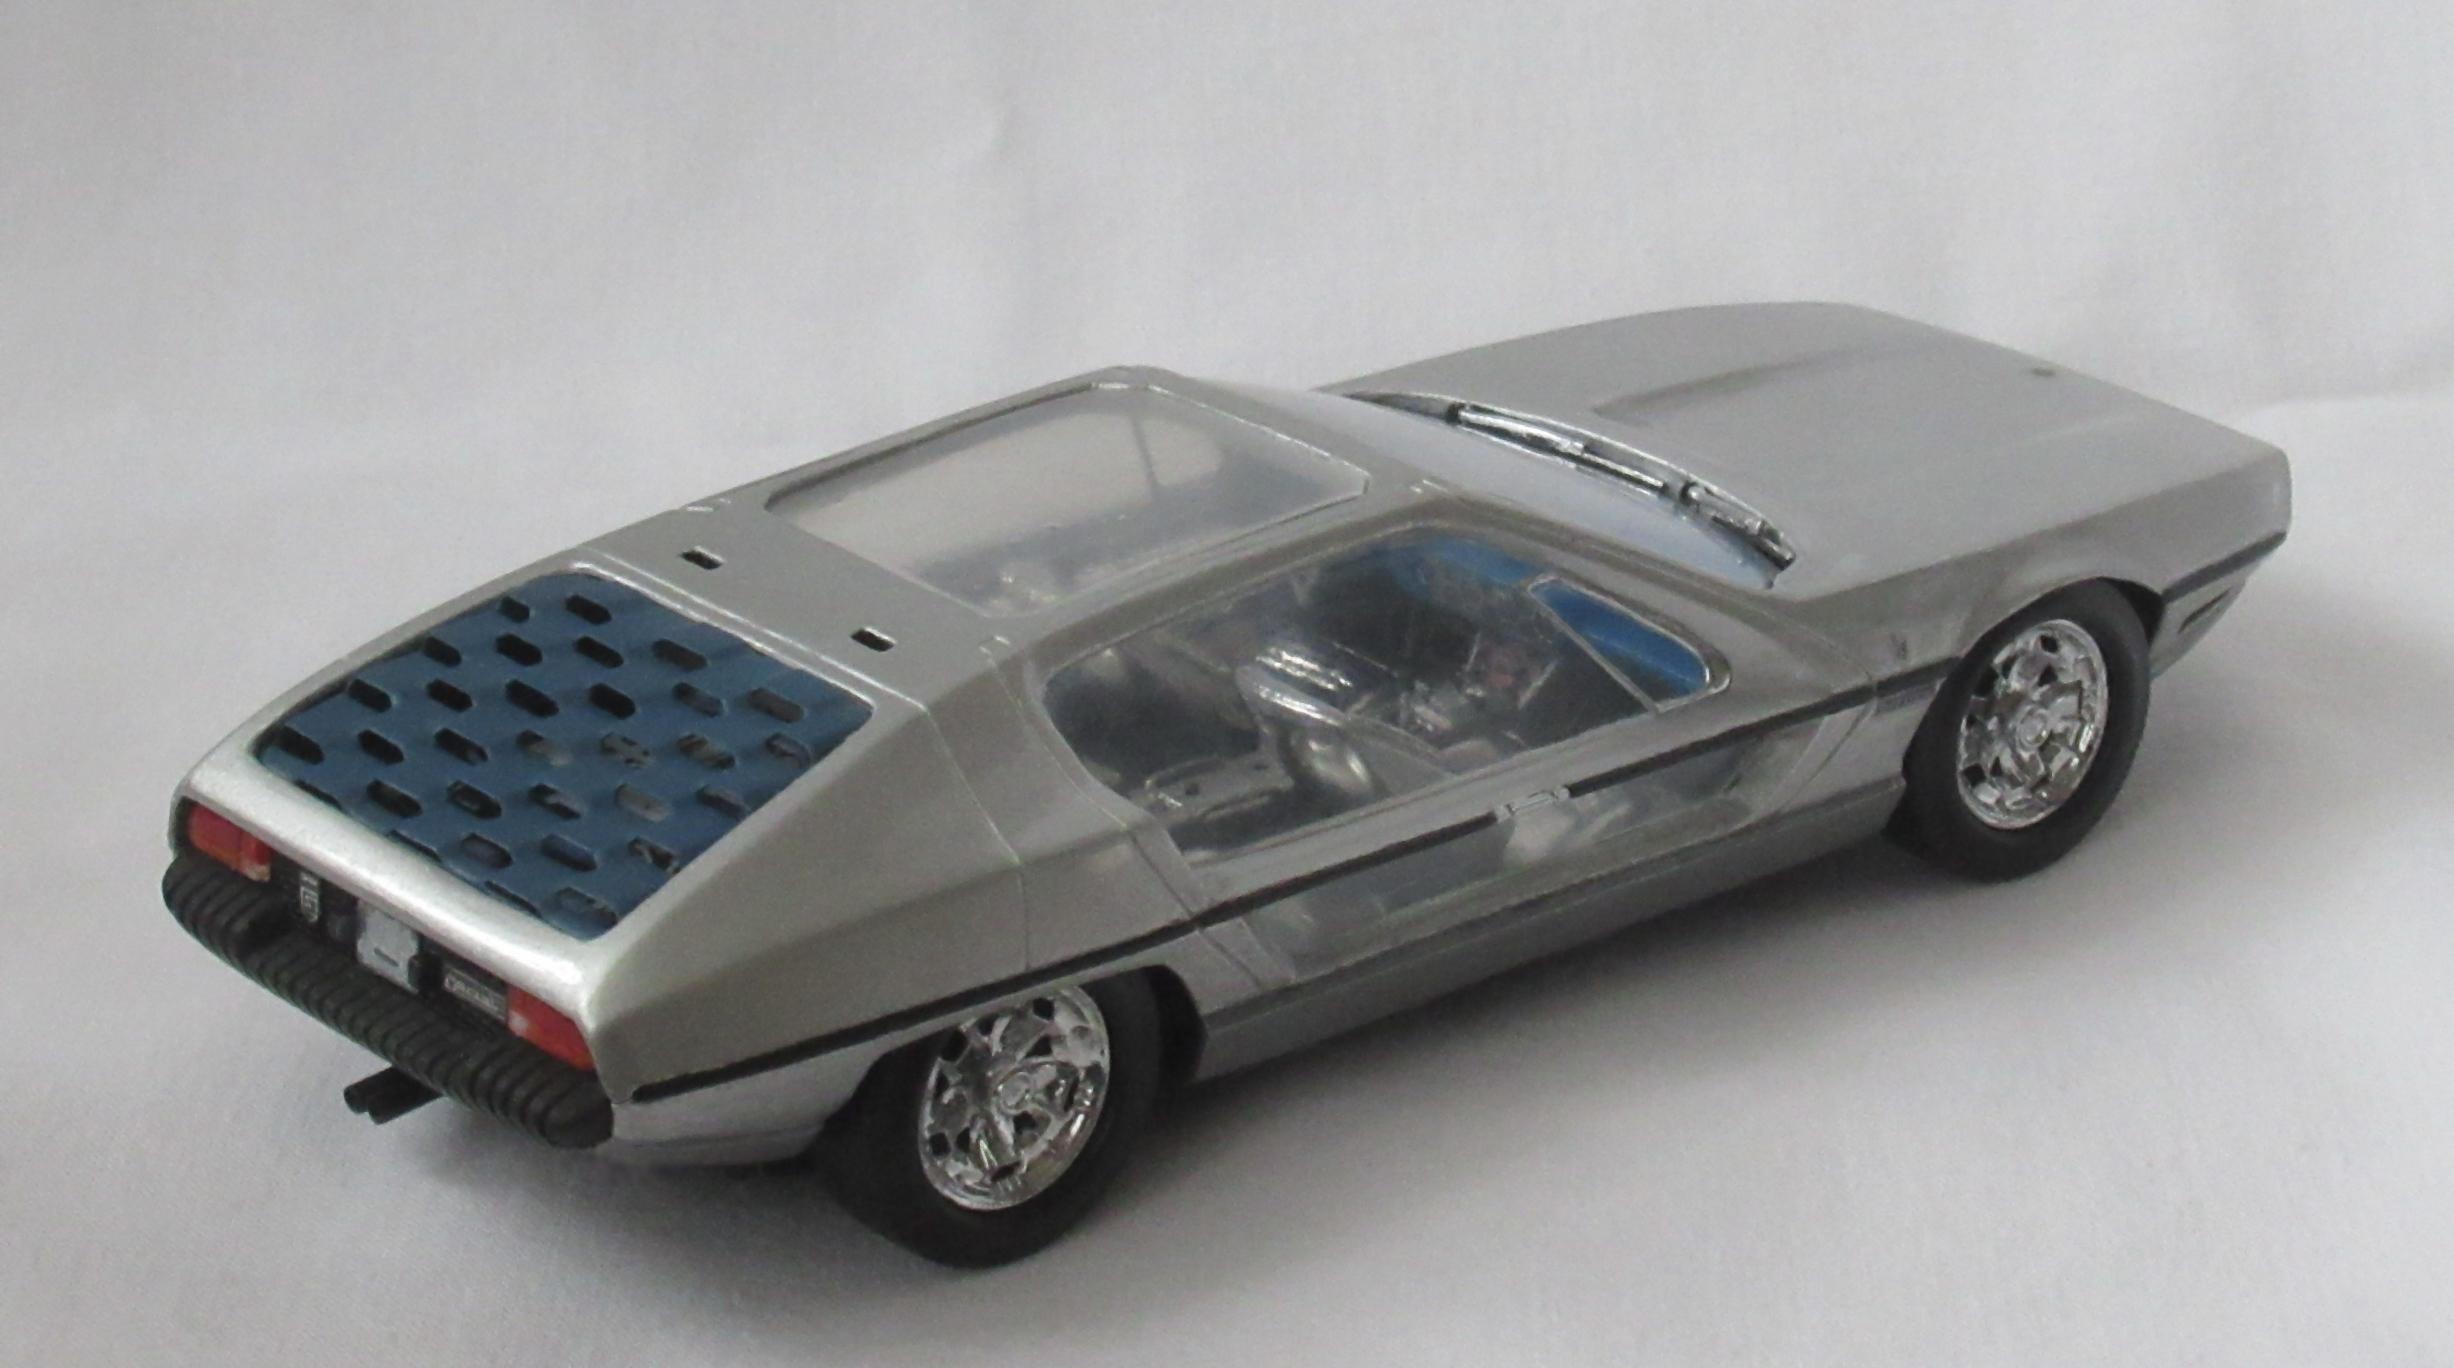
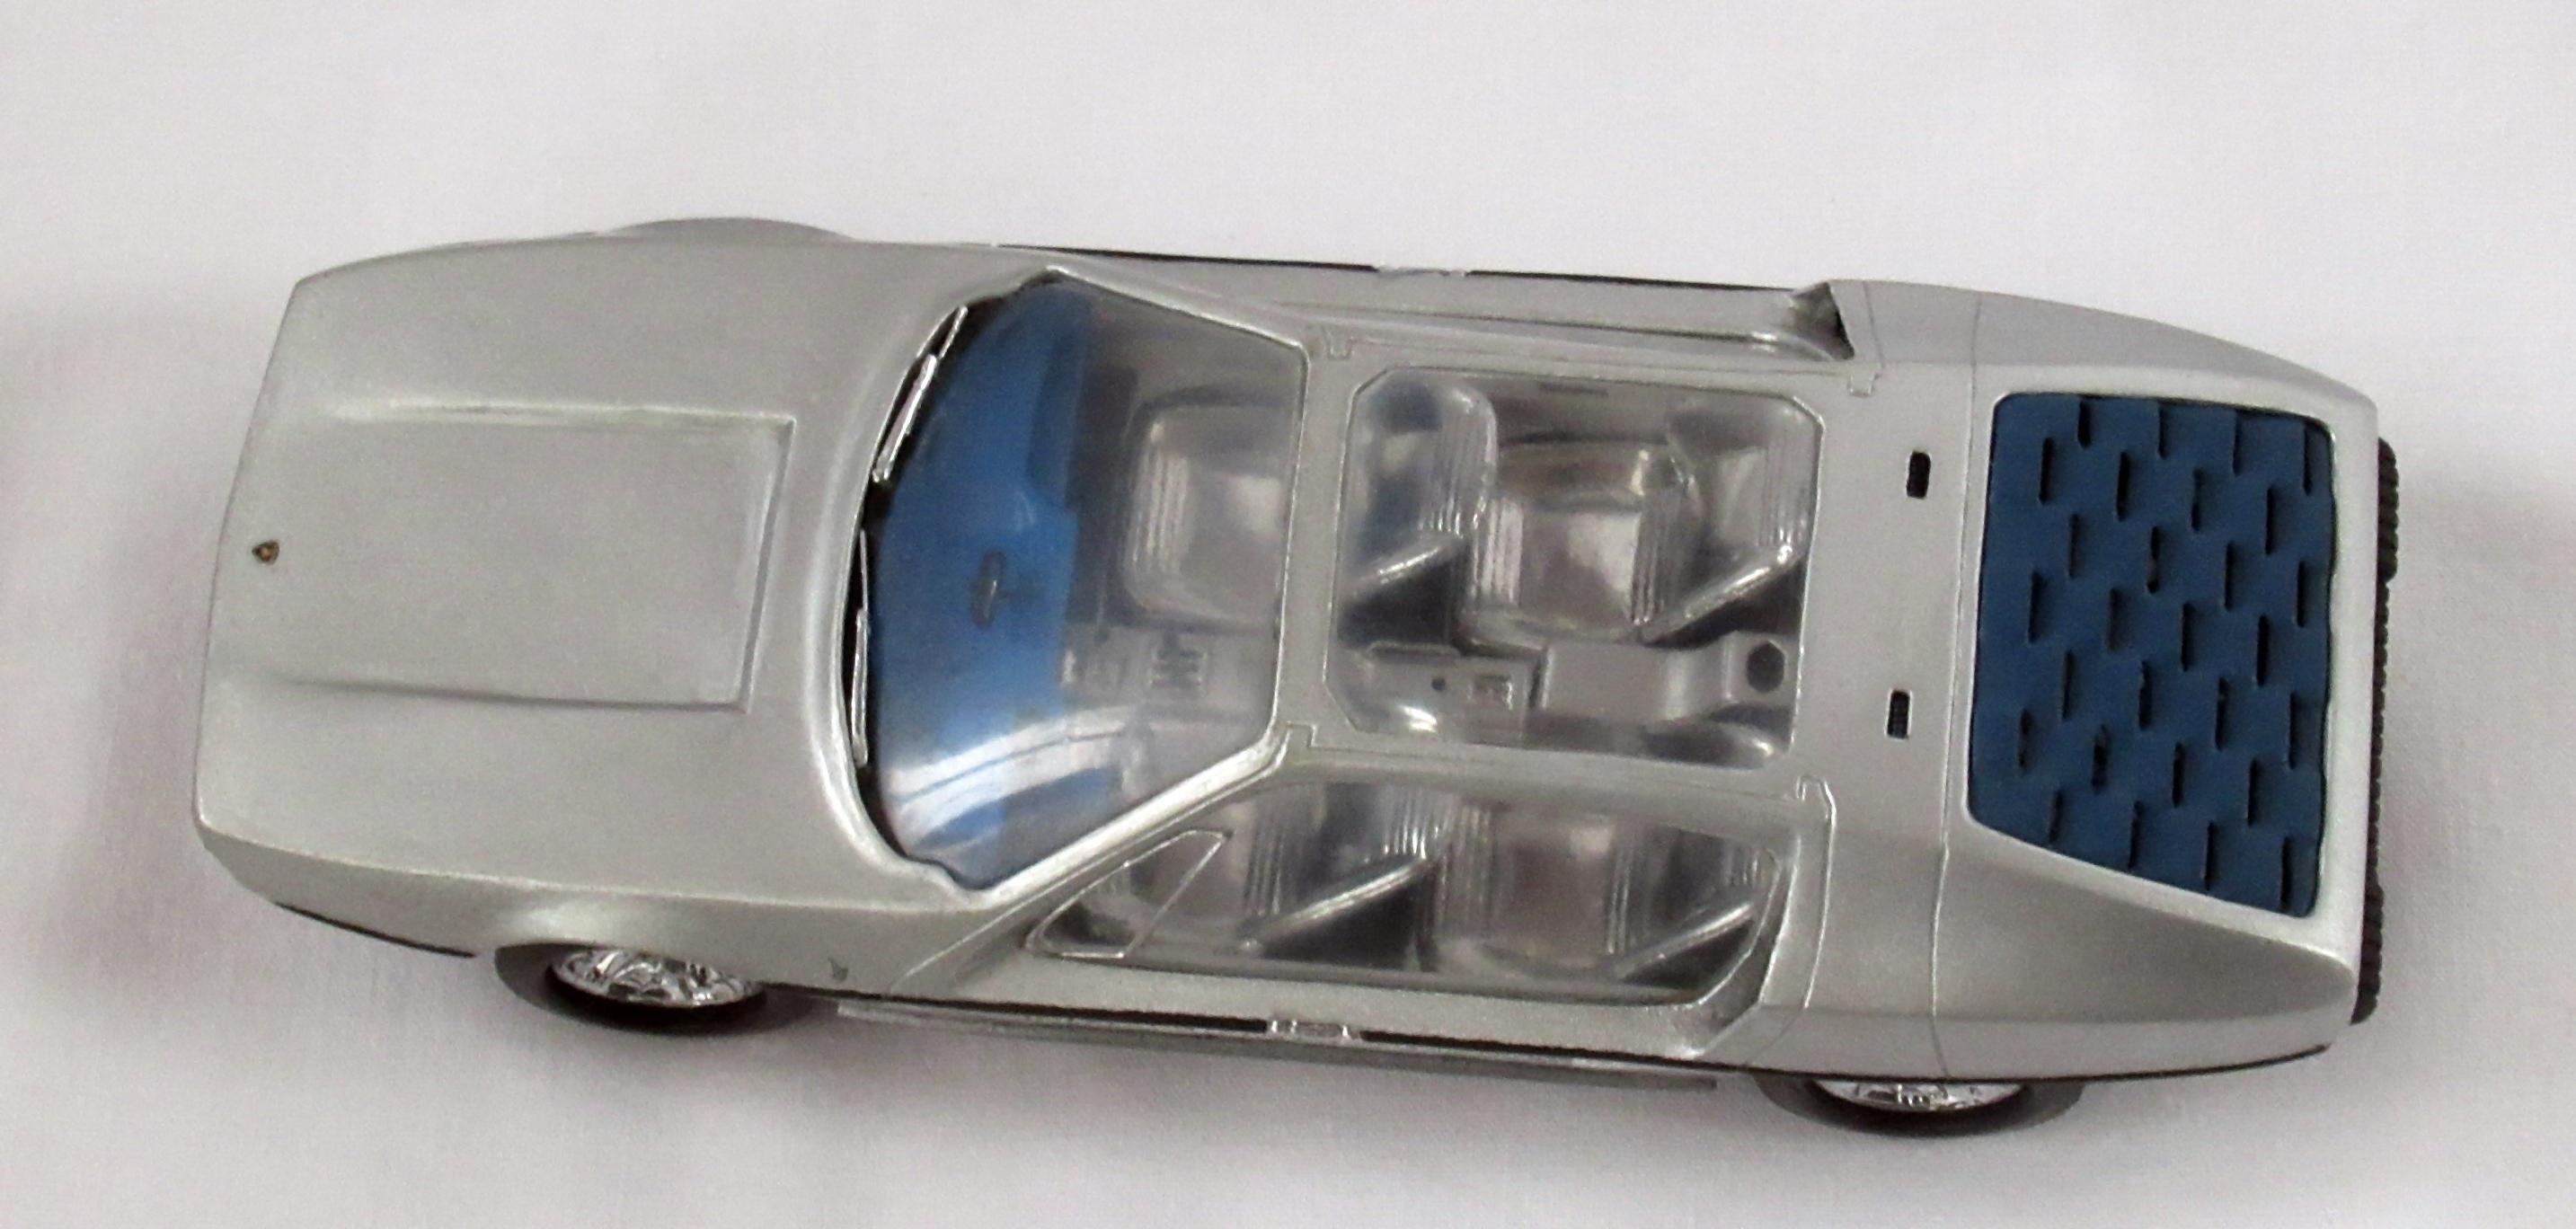
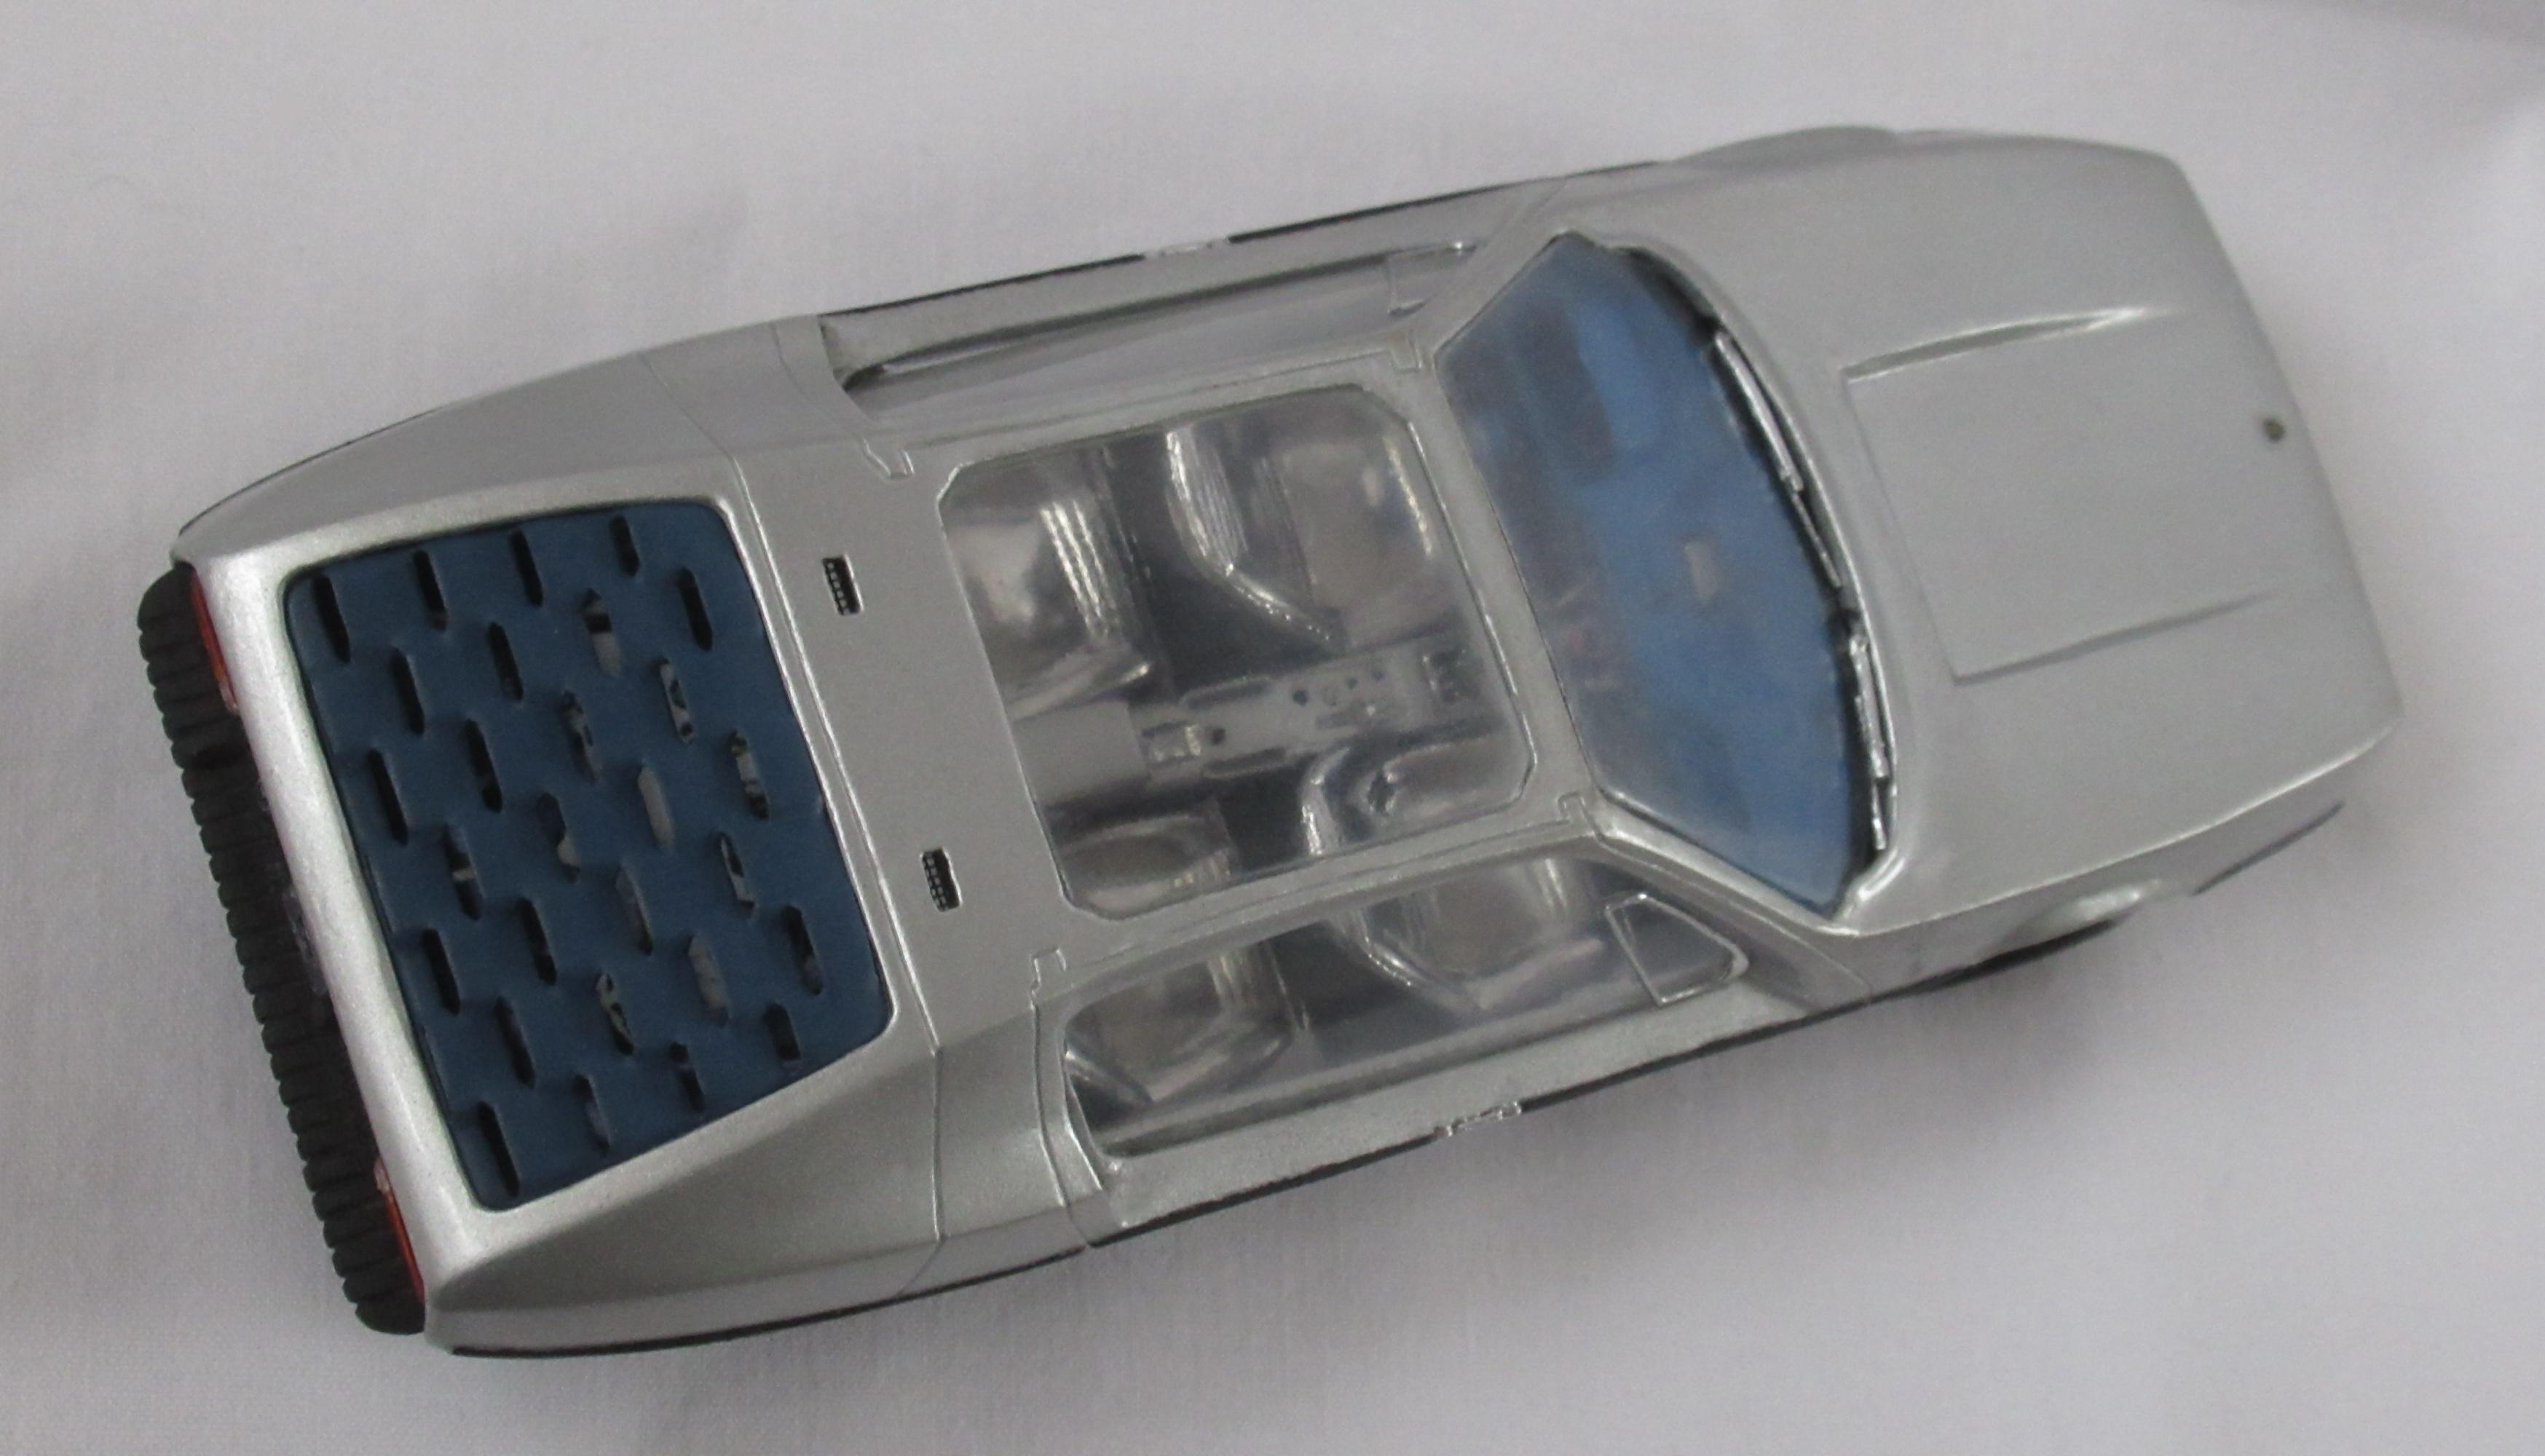
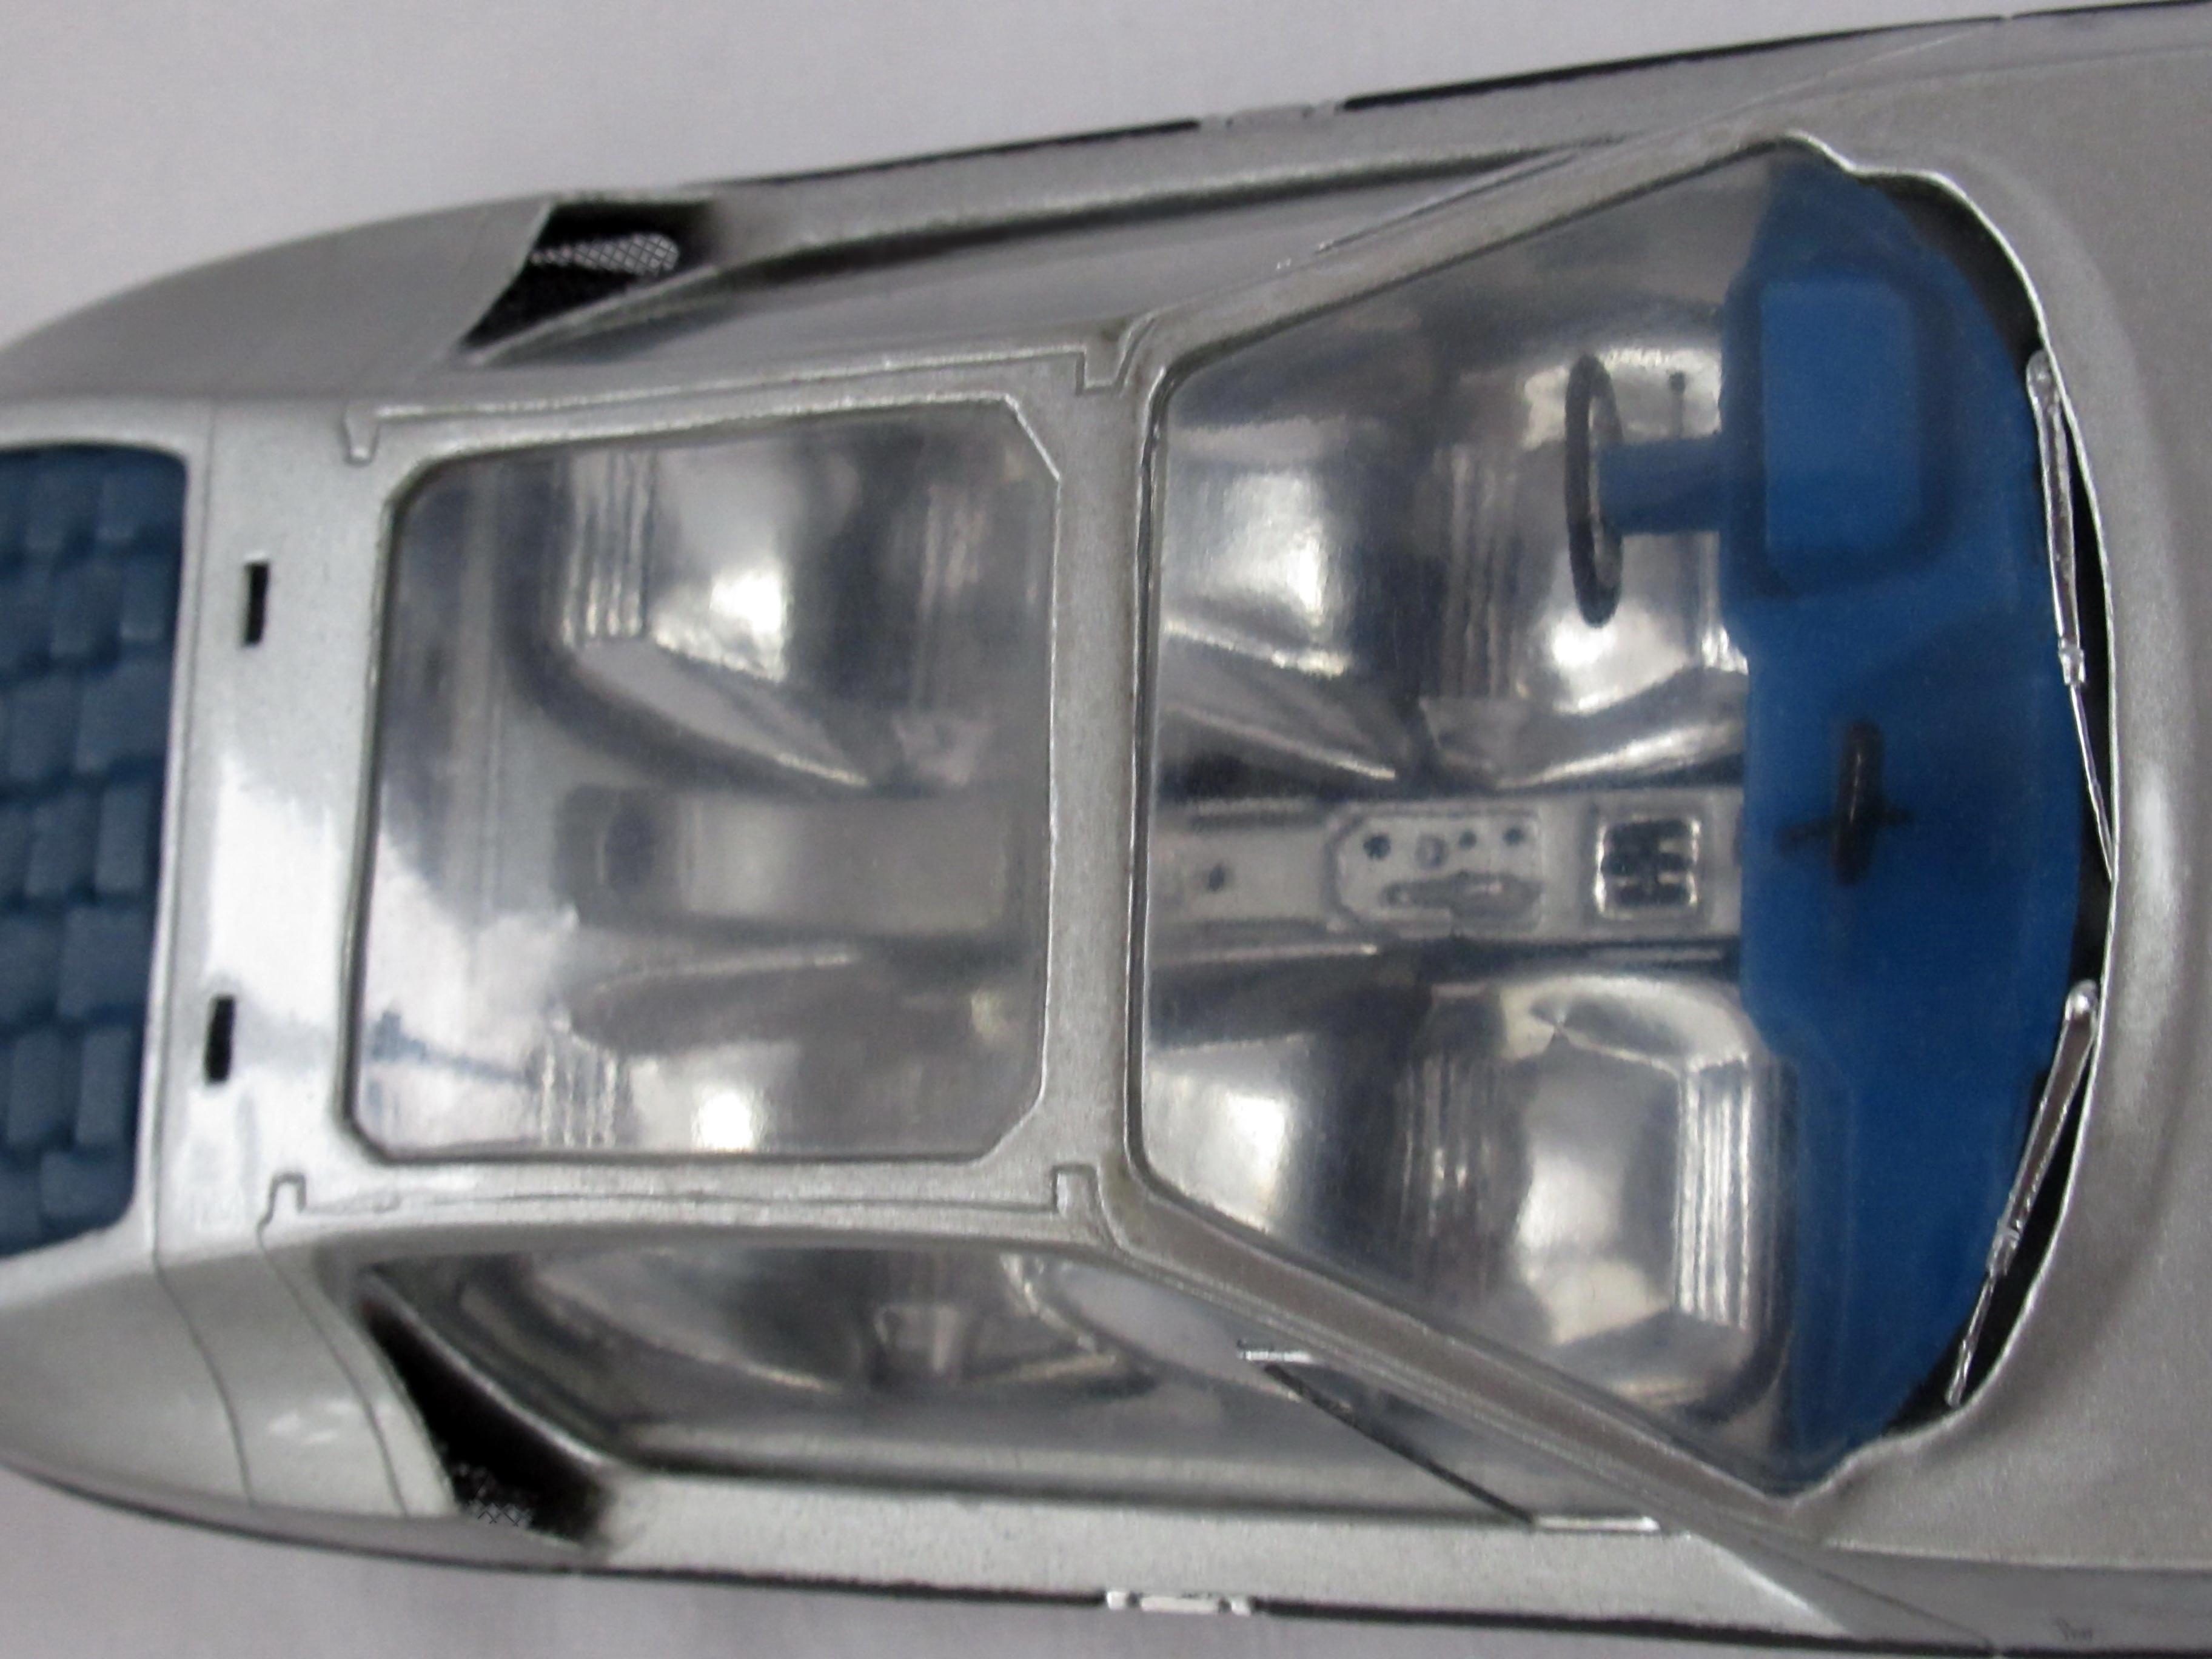
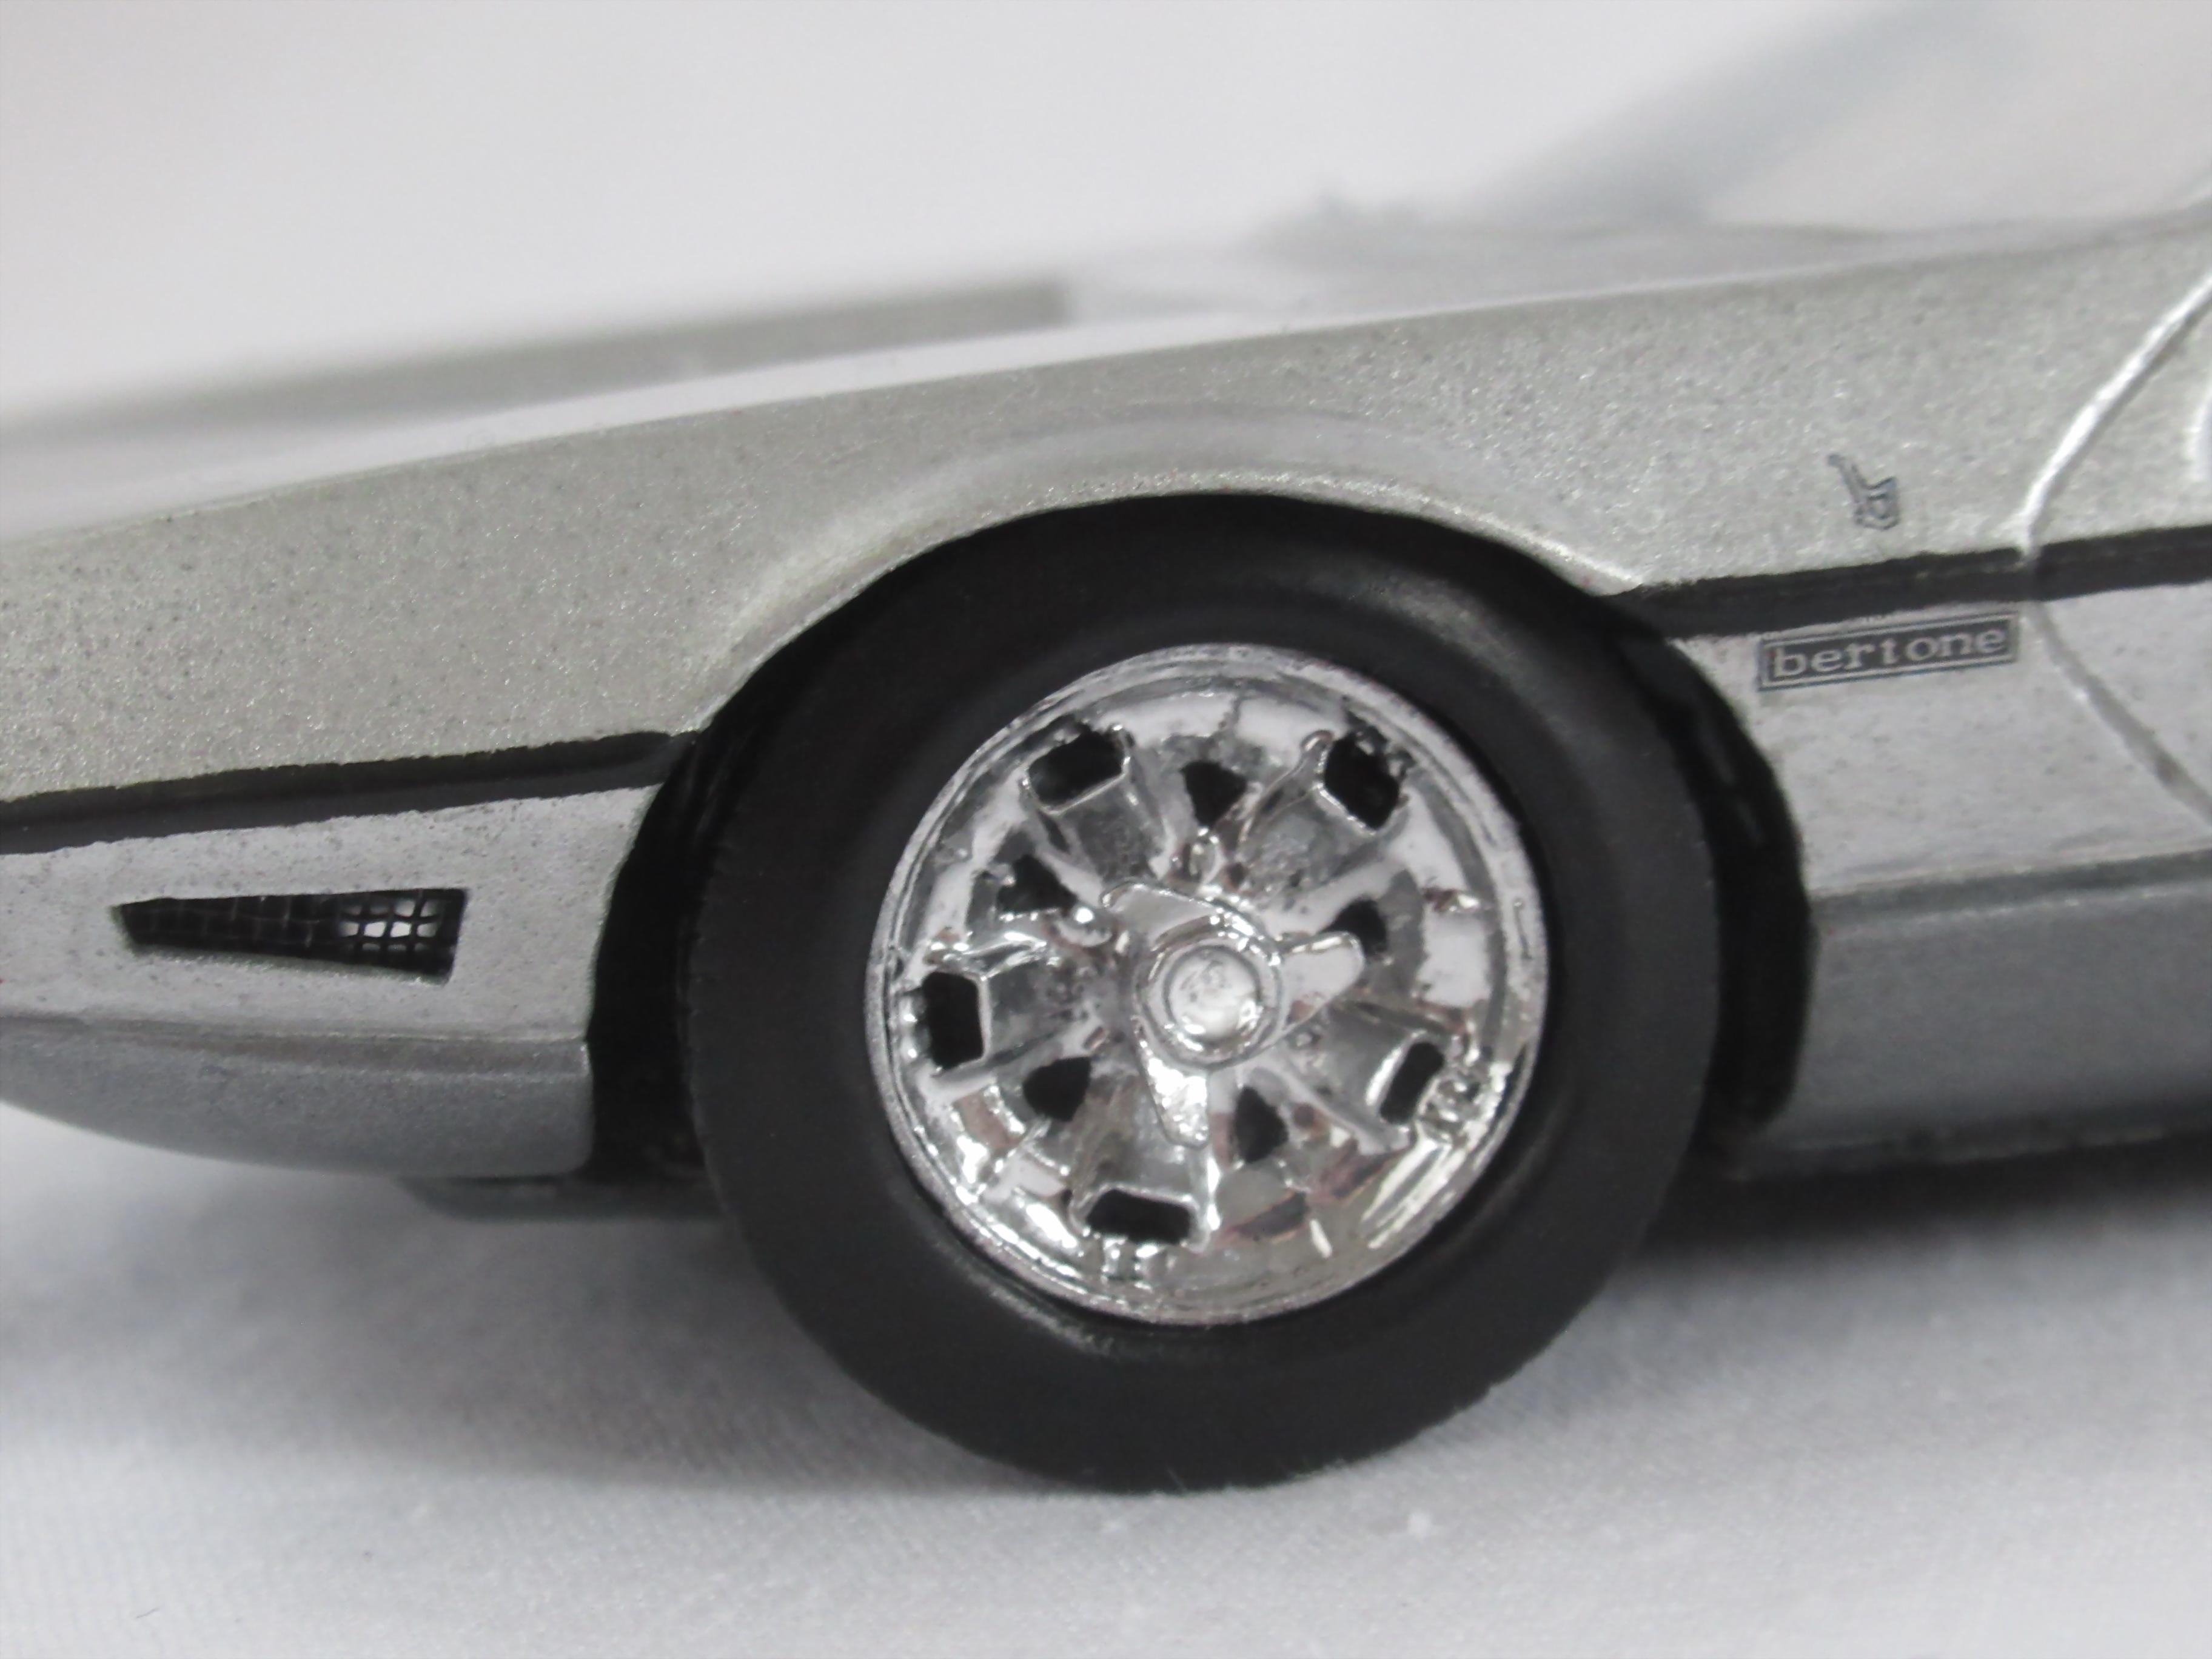
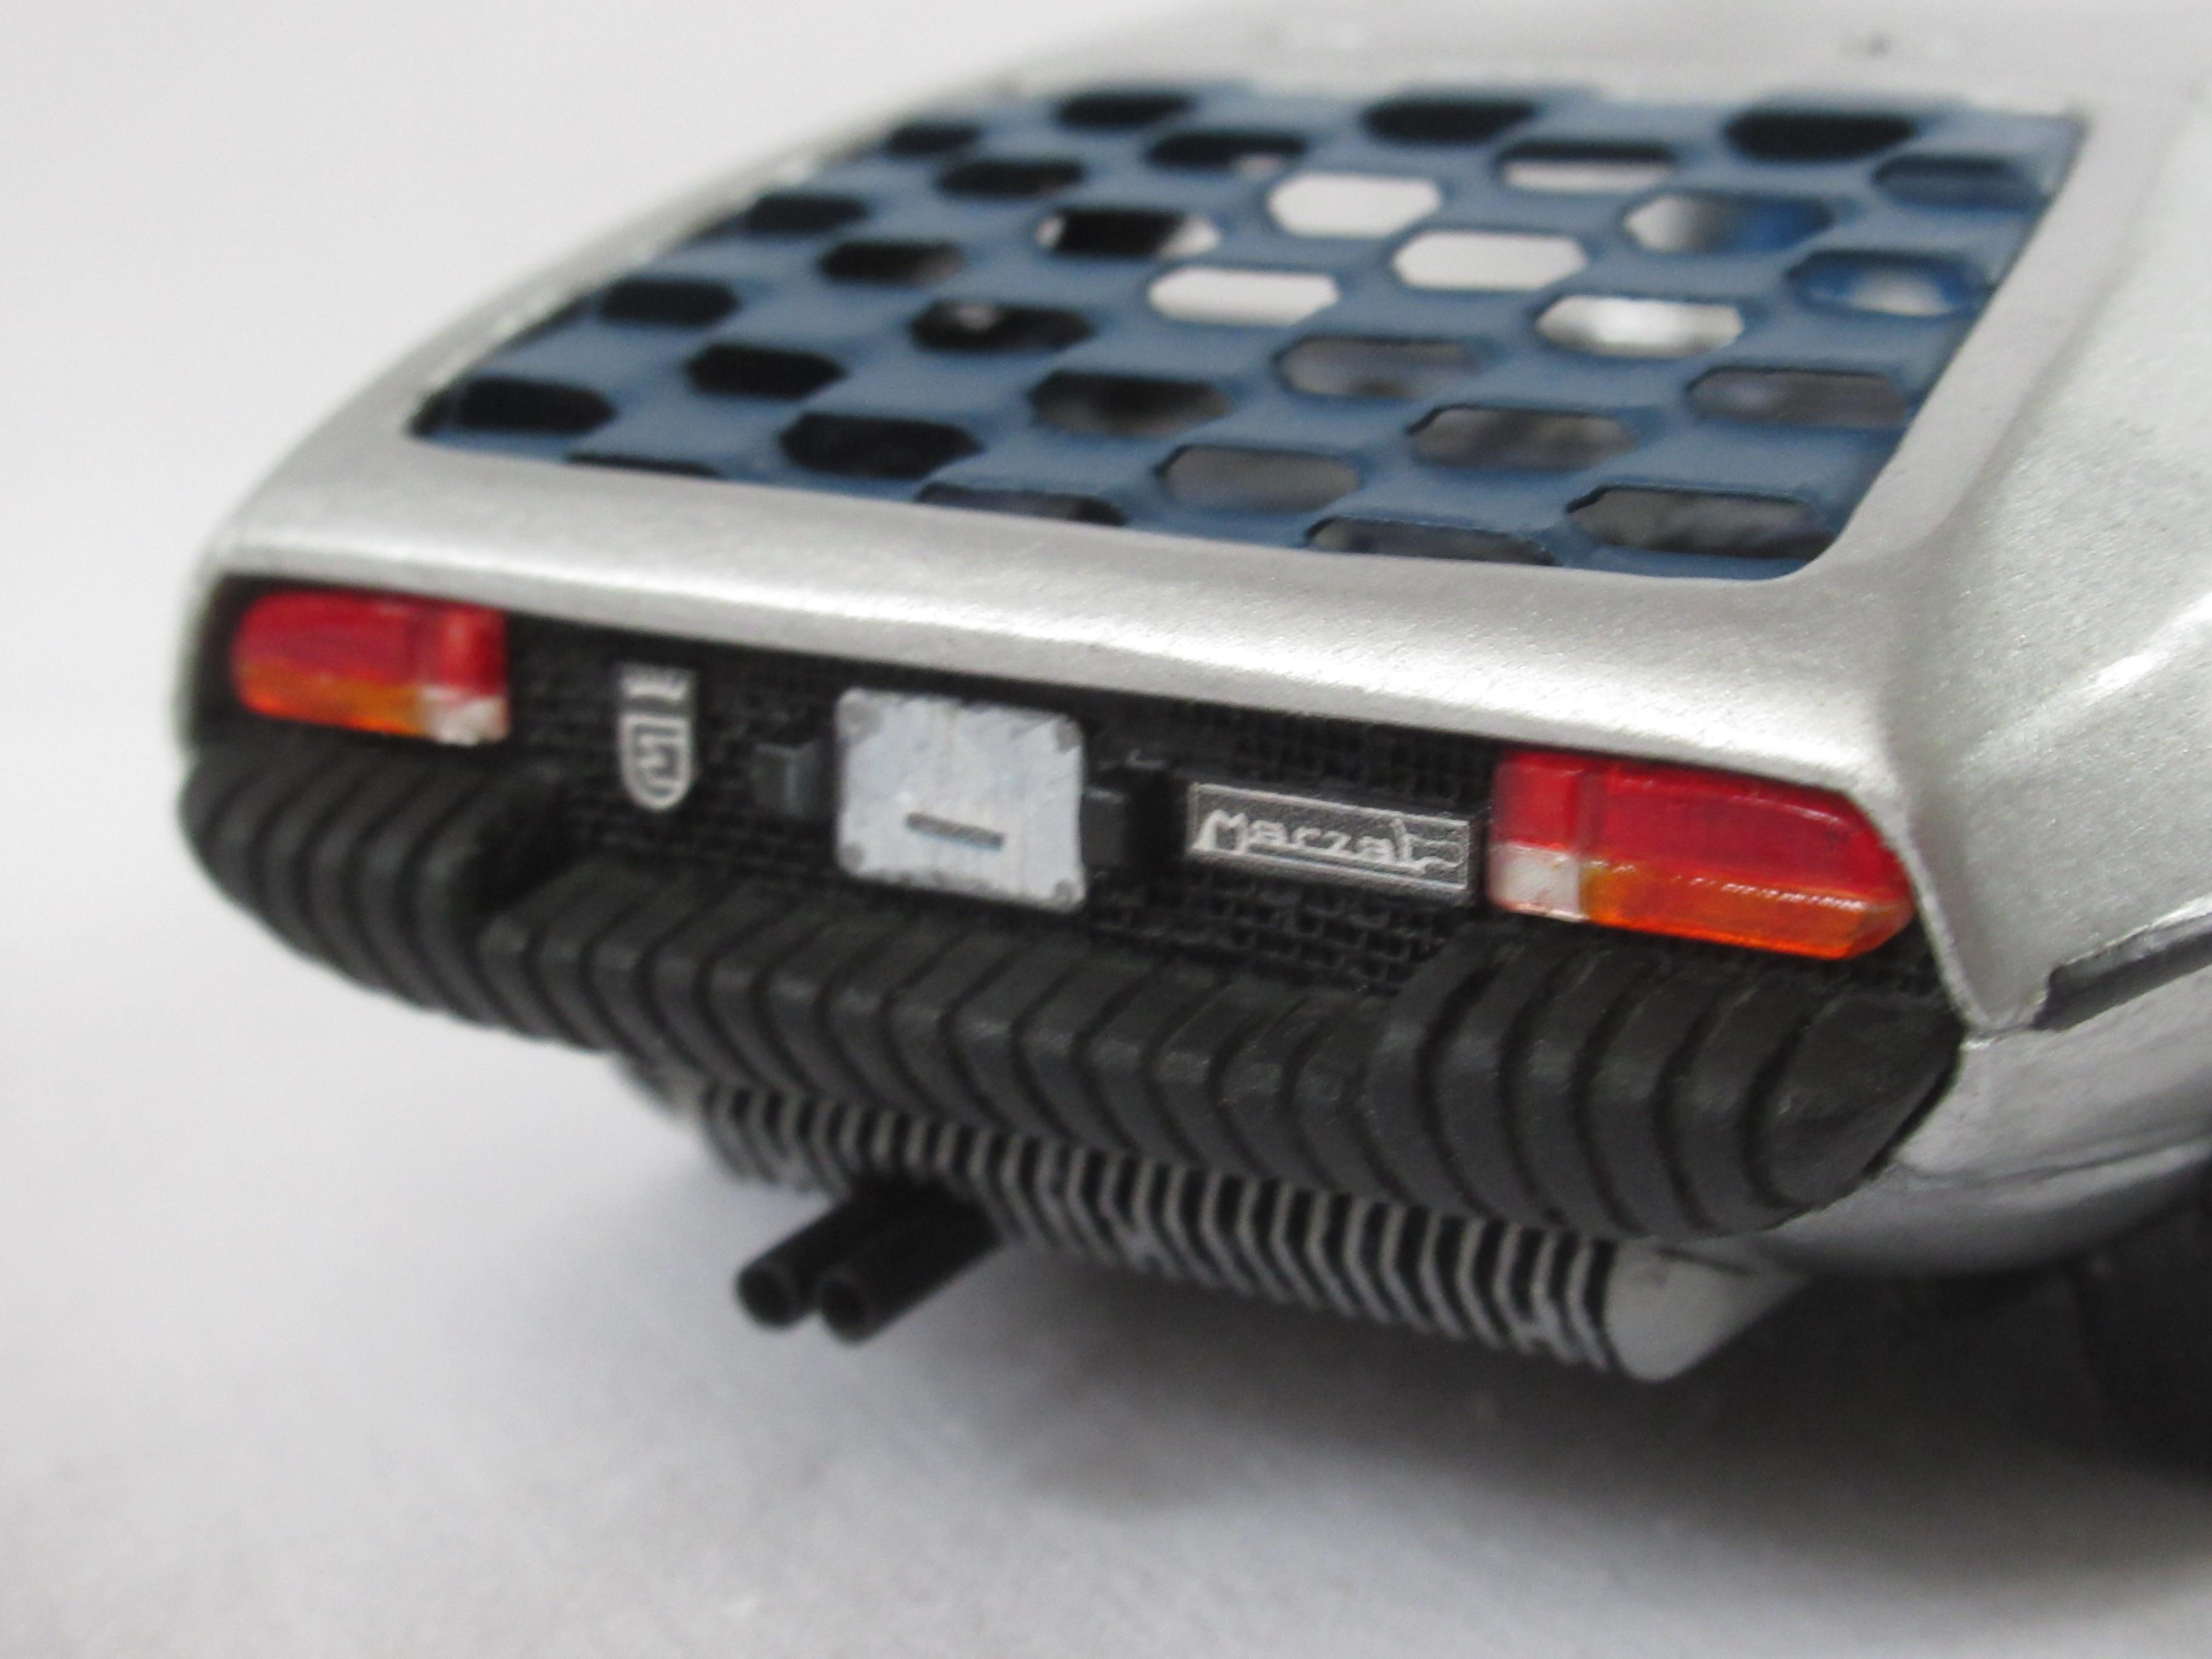
WOLOMOPRO say Worlds Longest Modeling Project: It began in early 1968 as I saw first time pictures of the Lamborghini Marzal in the hungarian Auto-Motor magazine. I fell in love with in no time. I was a young draftsman and I made the 4 views based on the photos and main dimensions. And with my ambition to be ones an auto-body designer. Naturally my goal was to make a model . I took a block of polystyrene foam (insulation) and curved the body. My idea was to laminate some layer of newspaper with epoxi on the surface and remove the polystyrene foam after . But this would give a very thin lamella so I cut grooves first in the styrene for drag-wires glued with the same epoxi. After some sanding the body looked better as I hoped. In the 70`s I started to make dashboard, front and rear panels with rubber bumper, etc. I came to realize before long that windows should be made too. But I had no idea what material can I get and with which technology can I make this huge windows. The initial momentum die down slowly . At end of the 80`s I made seats with similar method as the body and tried to make wheels but I couldn`t make the fine details. During the 90`s could gear my workshop with more and more tools and my technological knowledge broadened materially. So I could make the wheels higly detailed. I made a negativ by candel wax from the wheel had been made formerly and scratched the details negativ in wax. After than I dilute the mixed epoxi by nitro thinner and „painted” the form inside. As the nitro evaporated I molded with normal epoxi much like a pasta. Next I copied a tyre and made „rubber” tyres by black silicon sealing-compound. Since I retired have more time. I made a little vacuum table and made more windows for 1:64 and similar. The only problem of Marzal remained the window furthermore. I coudn`t found any water-clear plastic for vauumforming. Before 2- 3 years my son asked me why don`t make the Marzal ? I told him the problem. I visited him January 2020 and FOUND material ! As I finished the Bugatti Royale Berline de Voyage I gone on the Lamborghini Marzal projeckt to finish. With the help of reference pictures I could make many details. What I made during the 5 decades was not all of the parts good enough . So I could use only the body, dashboard and the wheels. The other parts must be corrected or made new. Totaly I build the model from 234 pieces - scratchbuilt, molded, printed, curved, cut, bended or vacuum formed and plus 4 pc pins from 1968. (they are the axles) The body upper half painted with Strato Silver the under one with Nimrod Grey metalic by Holts Repair Paint. The inside is brush painted with Revell Aquacolors. Chrome made by Molotow pen. (I apologize for my poor english)
-
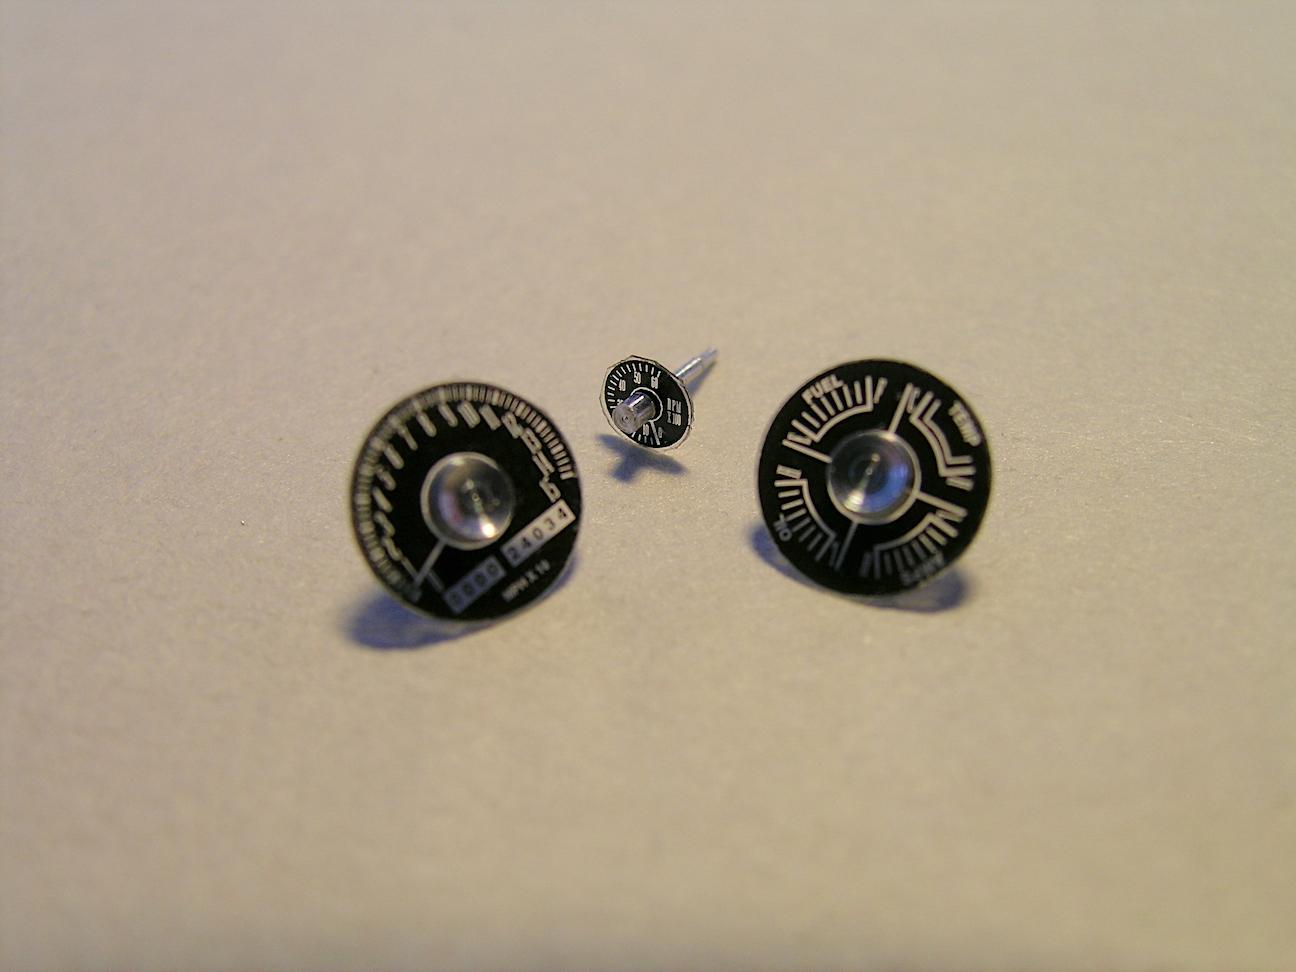
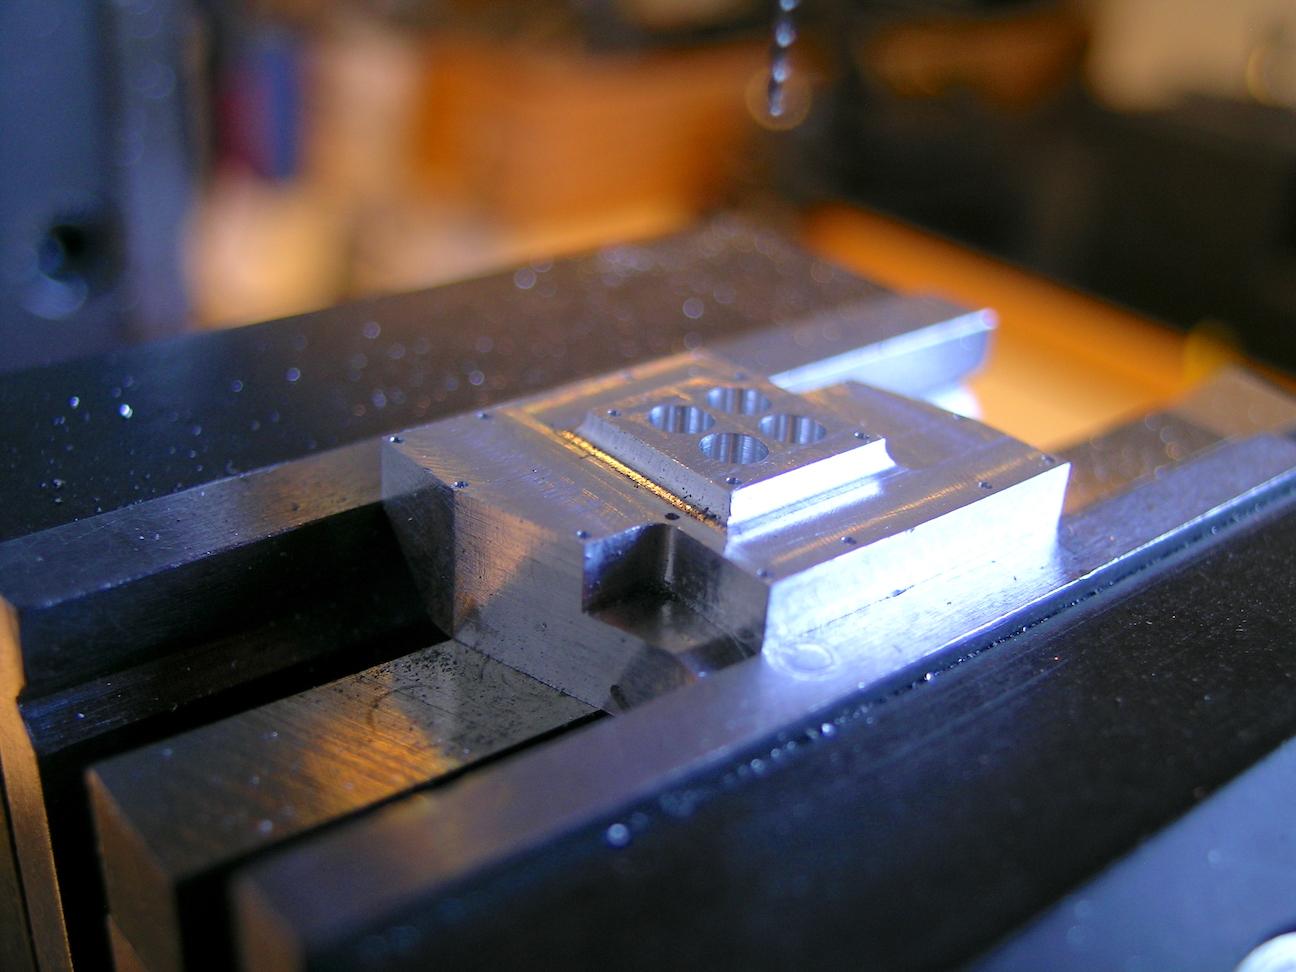
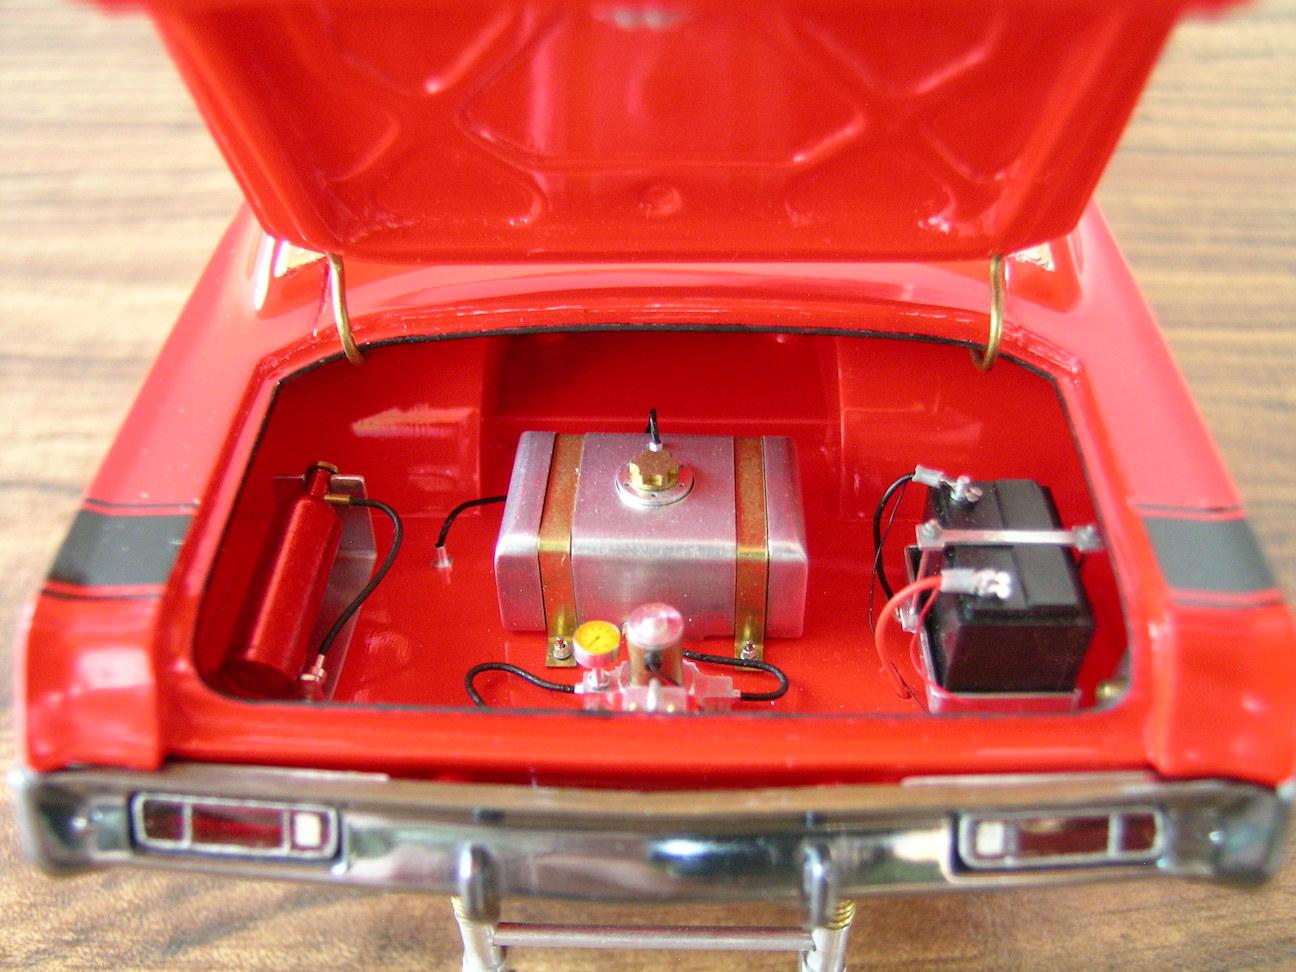
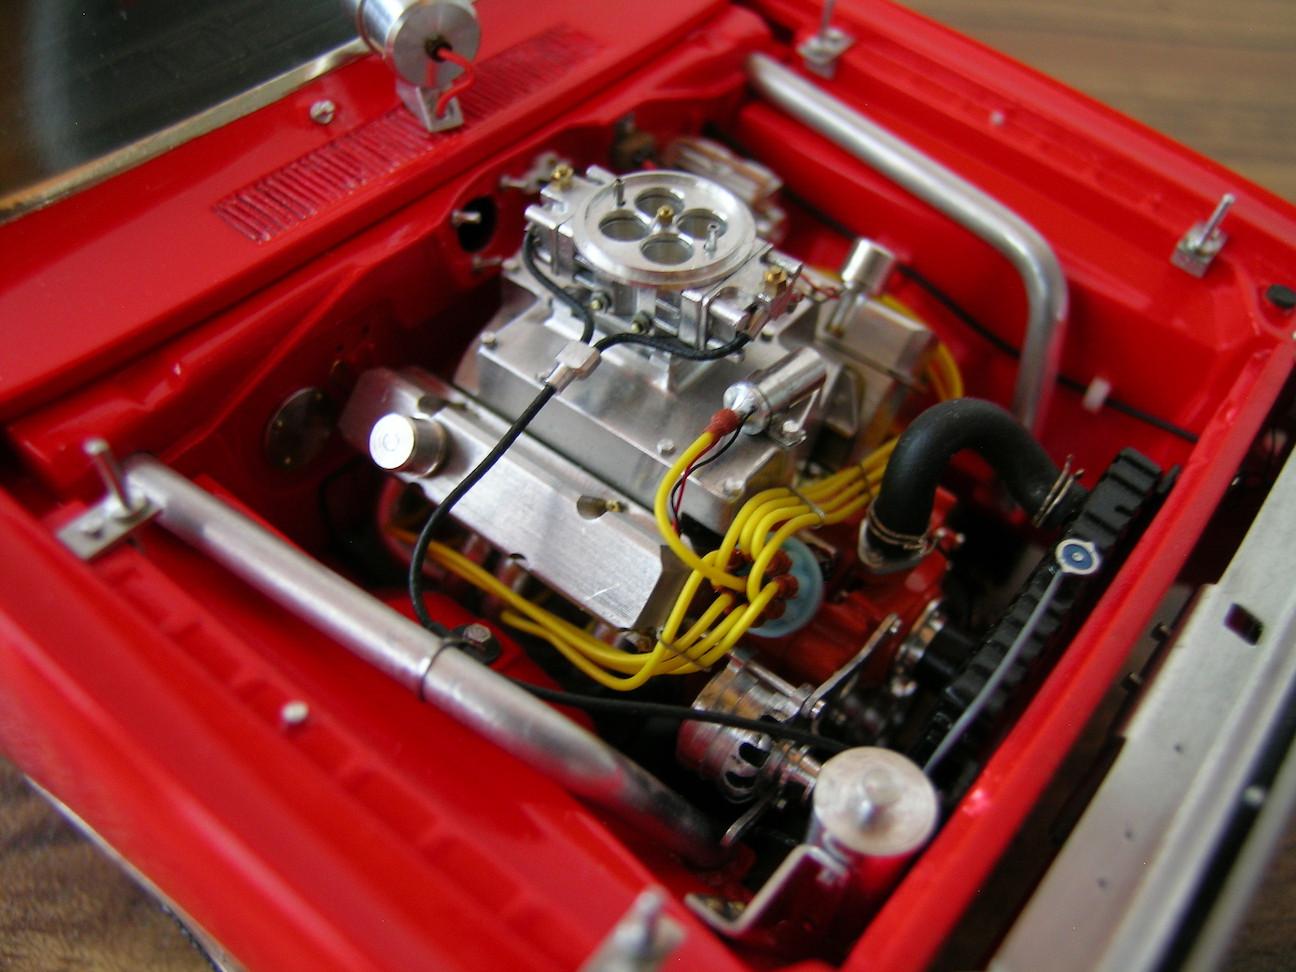
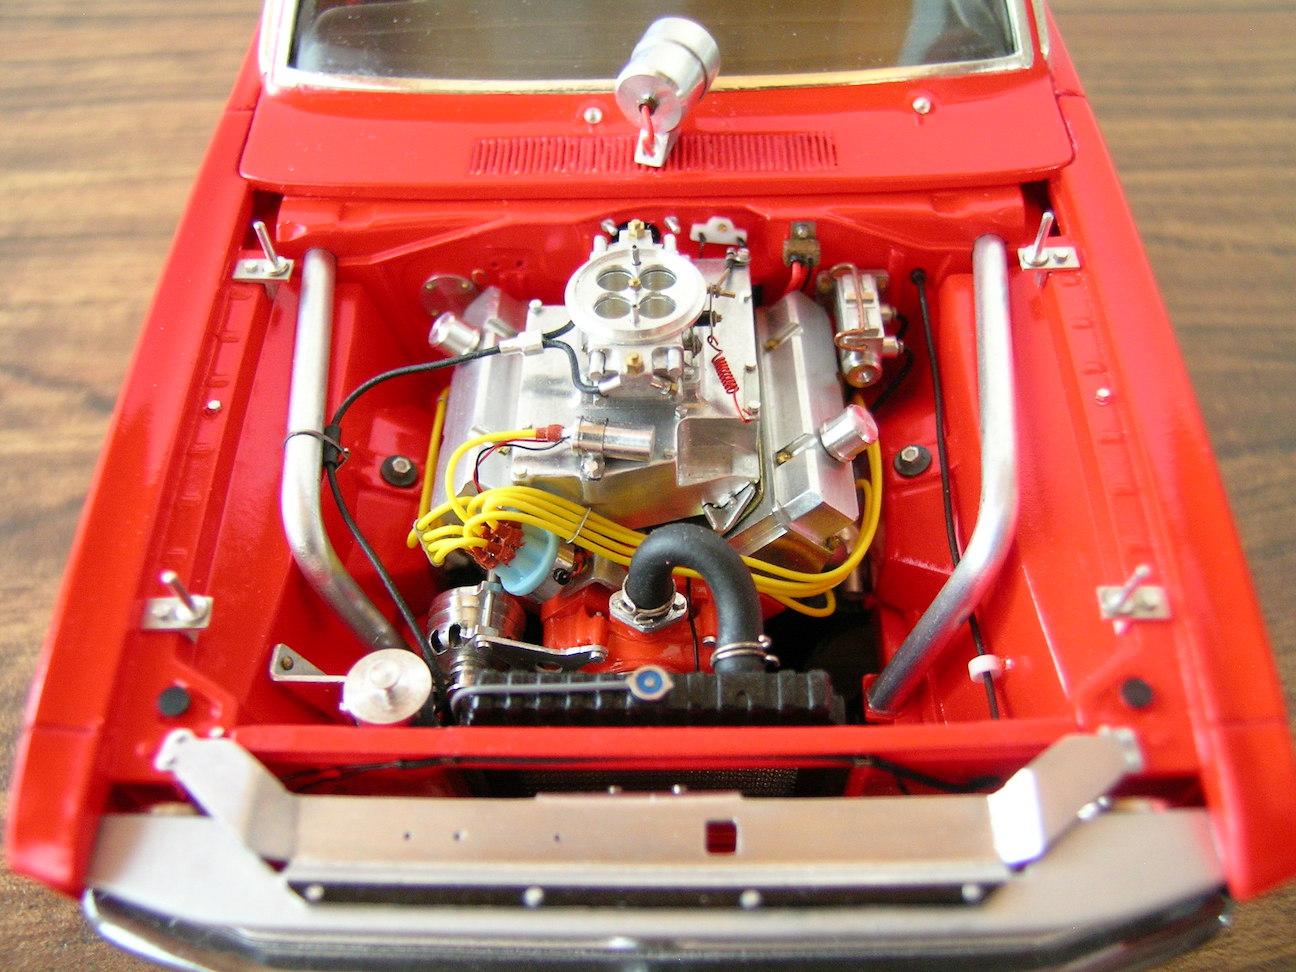
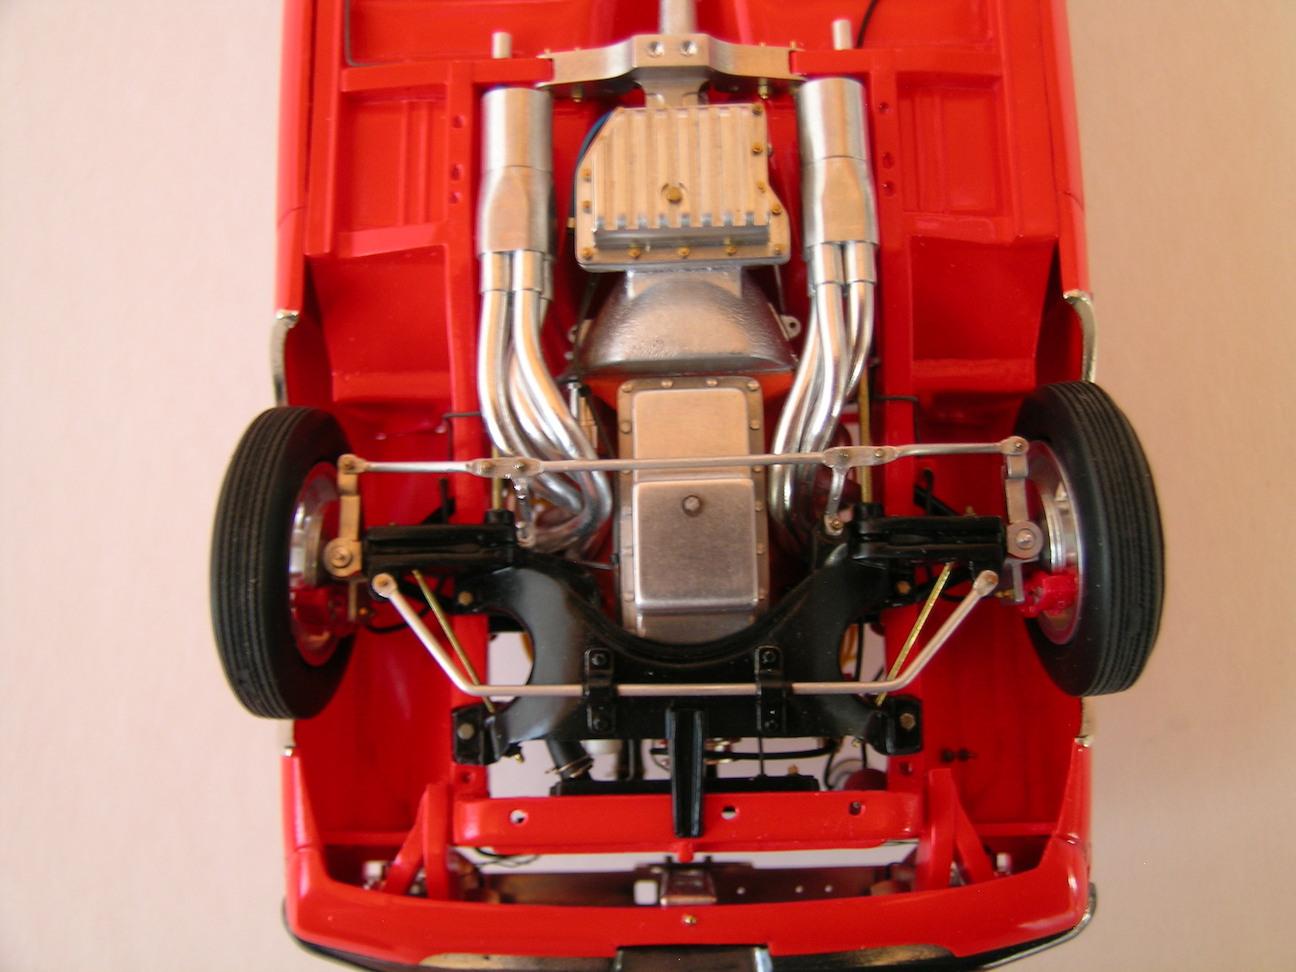
 Hello Everyone! Following the requests of some fellow members I'm starting another thread of one of my completed model. This one is less detailed than the ’70 Plymouth GTX and it will be like that for the subsequent posts since they are older builds (you are the judge so I hope you will be indulgent for the flaws). On this thread you will see my drag version of a 1970 Dodge Dart Swinger 1/25 scale. I don’t recall if I had taken many pictures during the build but I can’t find more than what is posted in this thread. I wanted to build this small Dodge pony car for a long time so I bought a resin kit on internet but I wasn’t satisfied with the rendering so I decided to start my own styrene version with extensive scratch building. I recreated the body by using 3 different kits including the recent Revell ’68 Dart Mr Norm, a used MPC ’70 Dart Ramchargers Funny Car body and the remains of a junk MPC ’71 Dodge Demon. The first operation was to cut the body of the ’68 Dart at the door line, keeping the front fenders and at the base of the back top pillars and between the back window and the trunk lid. I made the inverse operation on the ’70 Ramchargers body keeping the doors and back portion of the body. The Ramchargers front fenders were unusable because the wheel openings were enlarged and at the wrong position, close to the front bumper since it was a Funny Car body. I did cut the front fender extensions on the ’71 Demon body and glued them on the ’68 Dart front fenders. I also used the front grille, valance and hood of the ’71 Demon. A lot of operations but the mock-up picture is self explanatory. I did use the ’68 Dart floor pan as well and add large wheels tubs, recreate the trunk floor in order to add the fuel cell, an electric fuel pump, the battery and a fire extinguisher (all scratch built). The interior has been done using the ’68 Dart door panels, modified to represent a drag racing car. The ’68 Dart dash has been modified to receive the round style cluster like the Dodge Demon and instrument faces made on my computer using Adobe Illustrator and printed on negative film at high resolution (same technique as for the ’70 Plymouth GTX). I spent around 800 hours on a 2 years span working on from mid 2011 to May 2013 on this build. Cheers, Francis
-
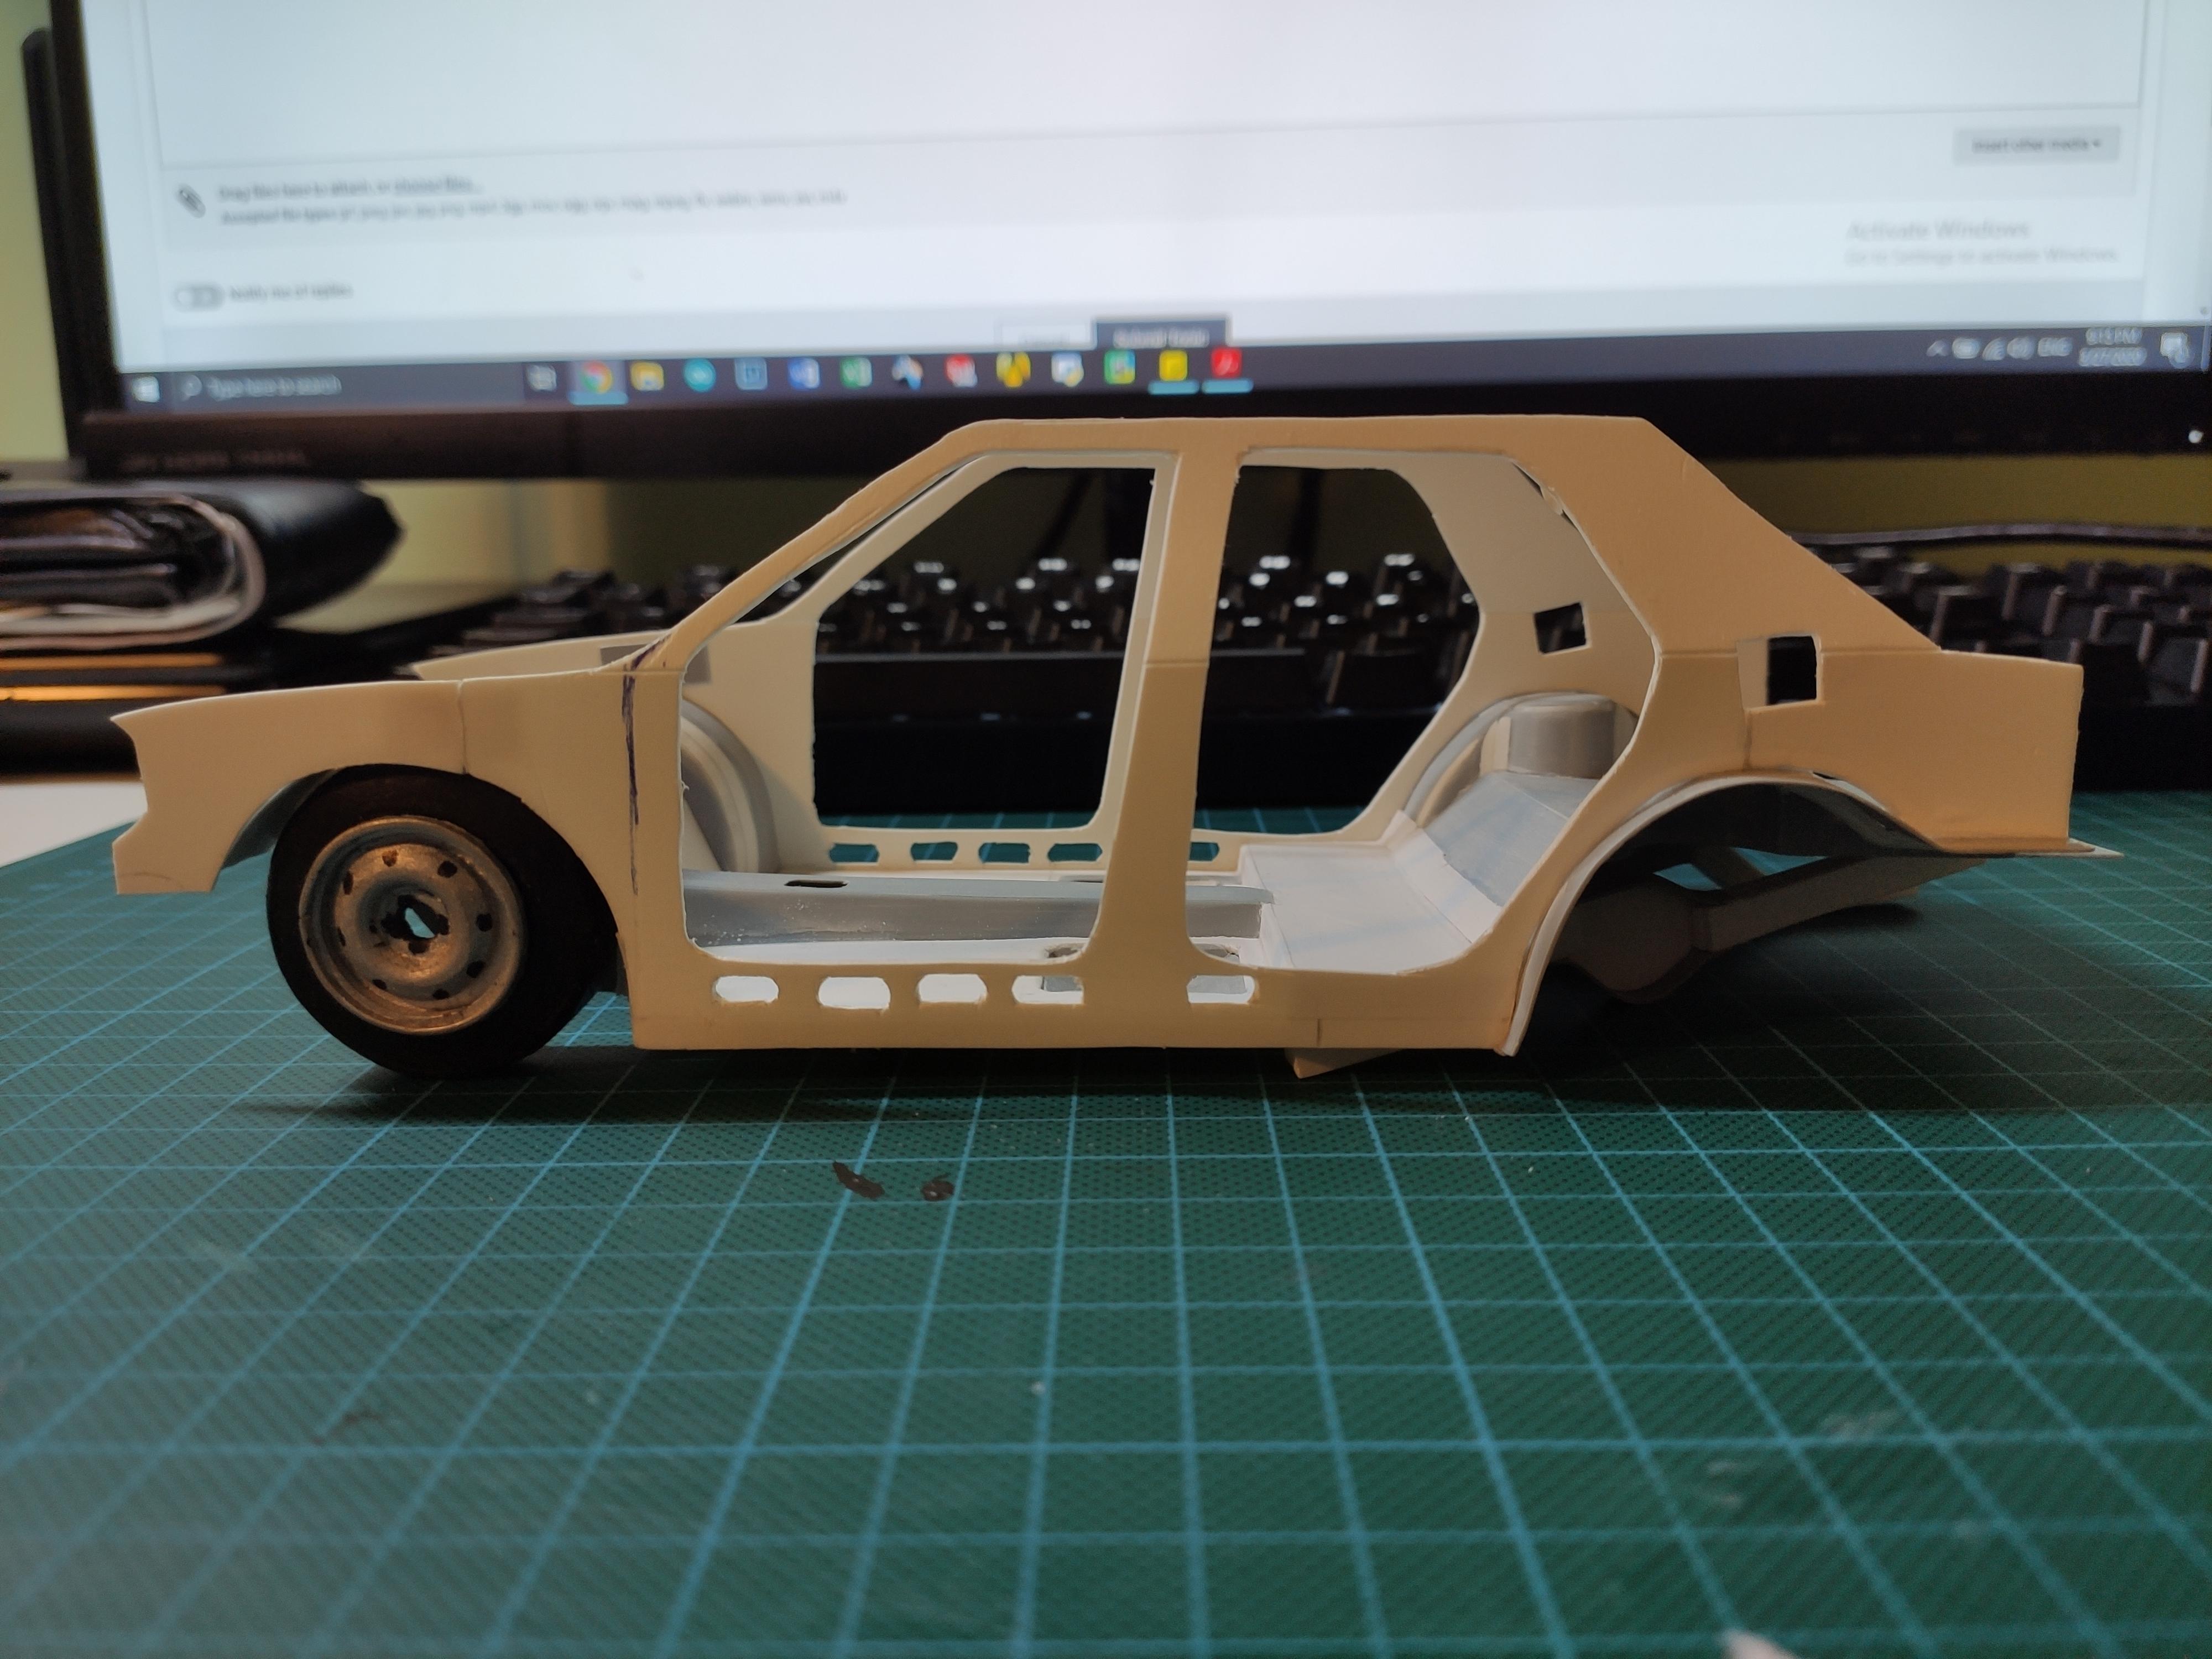
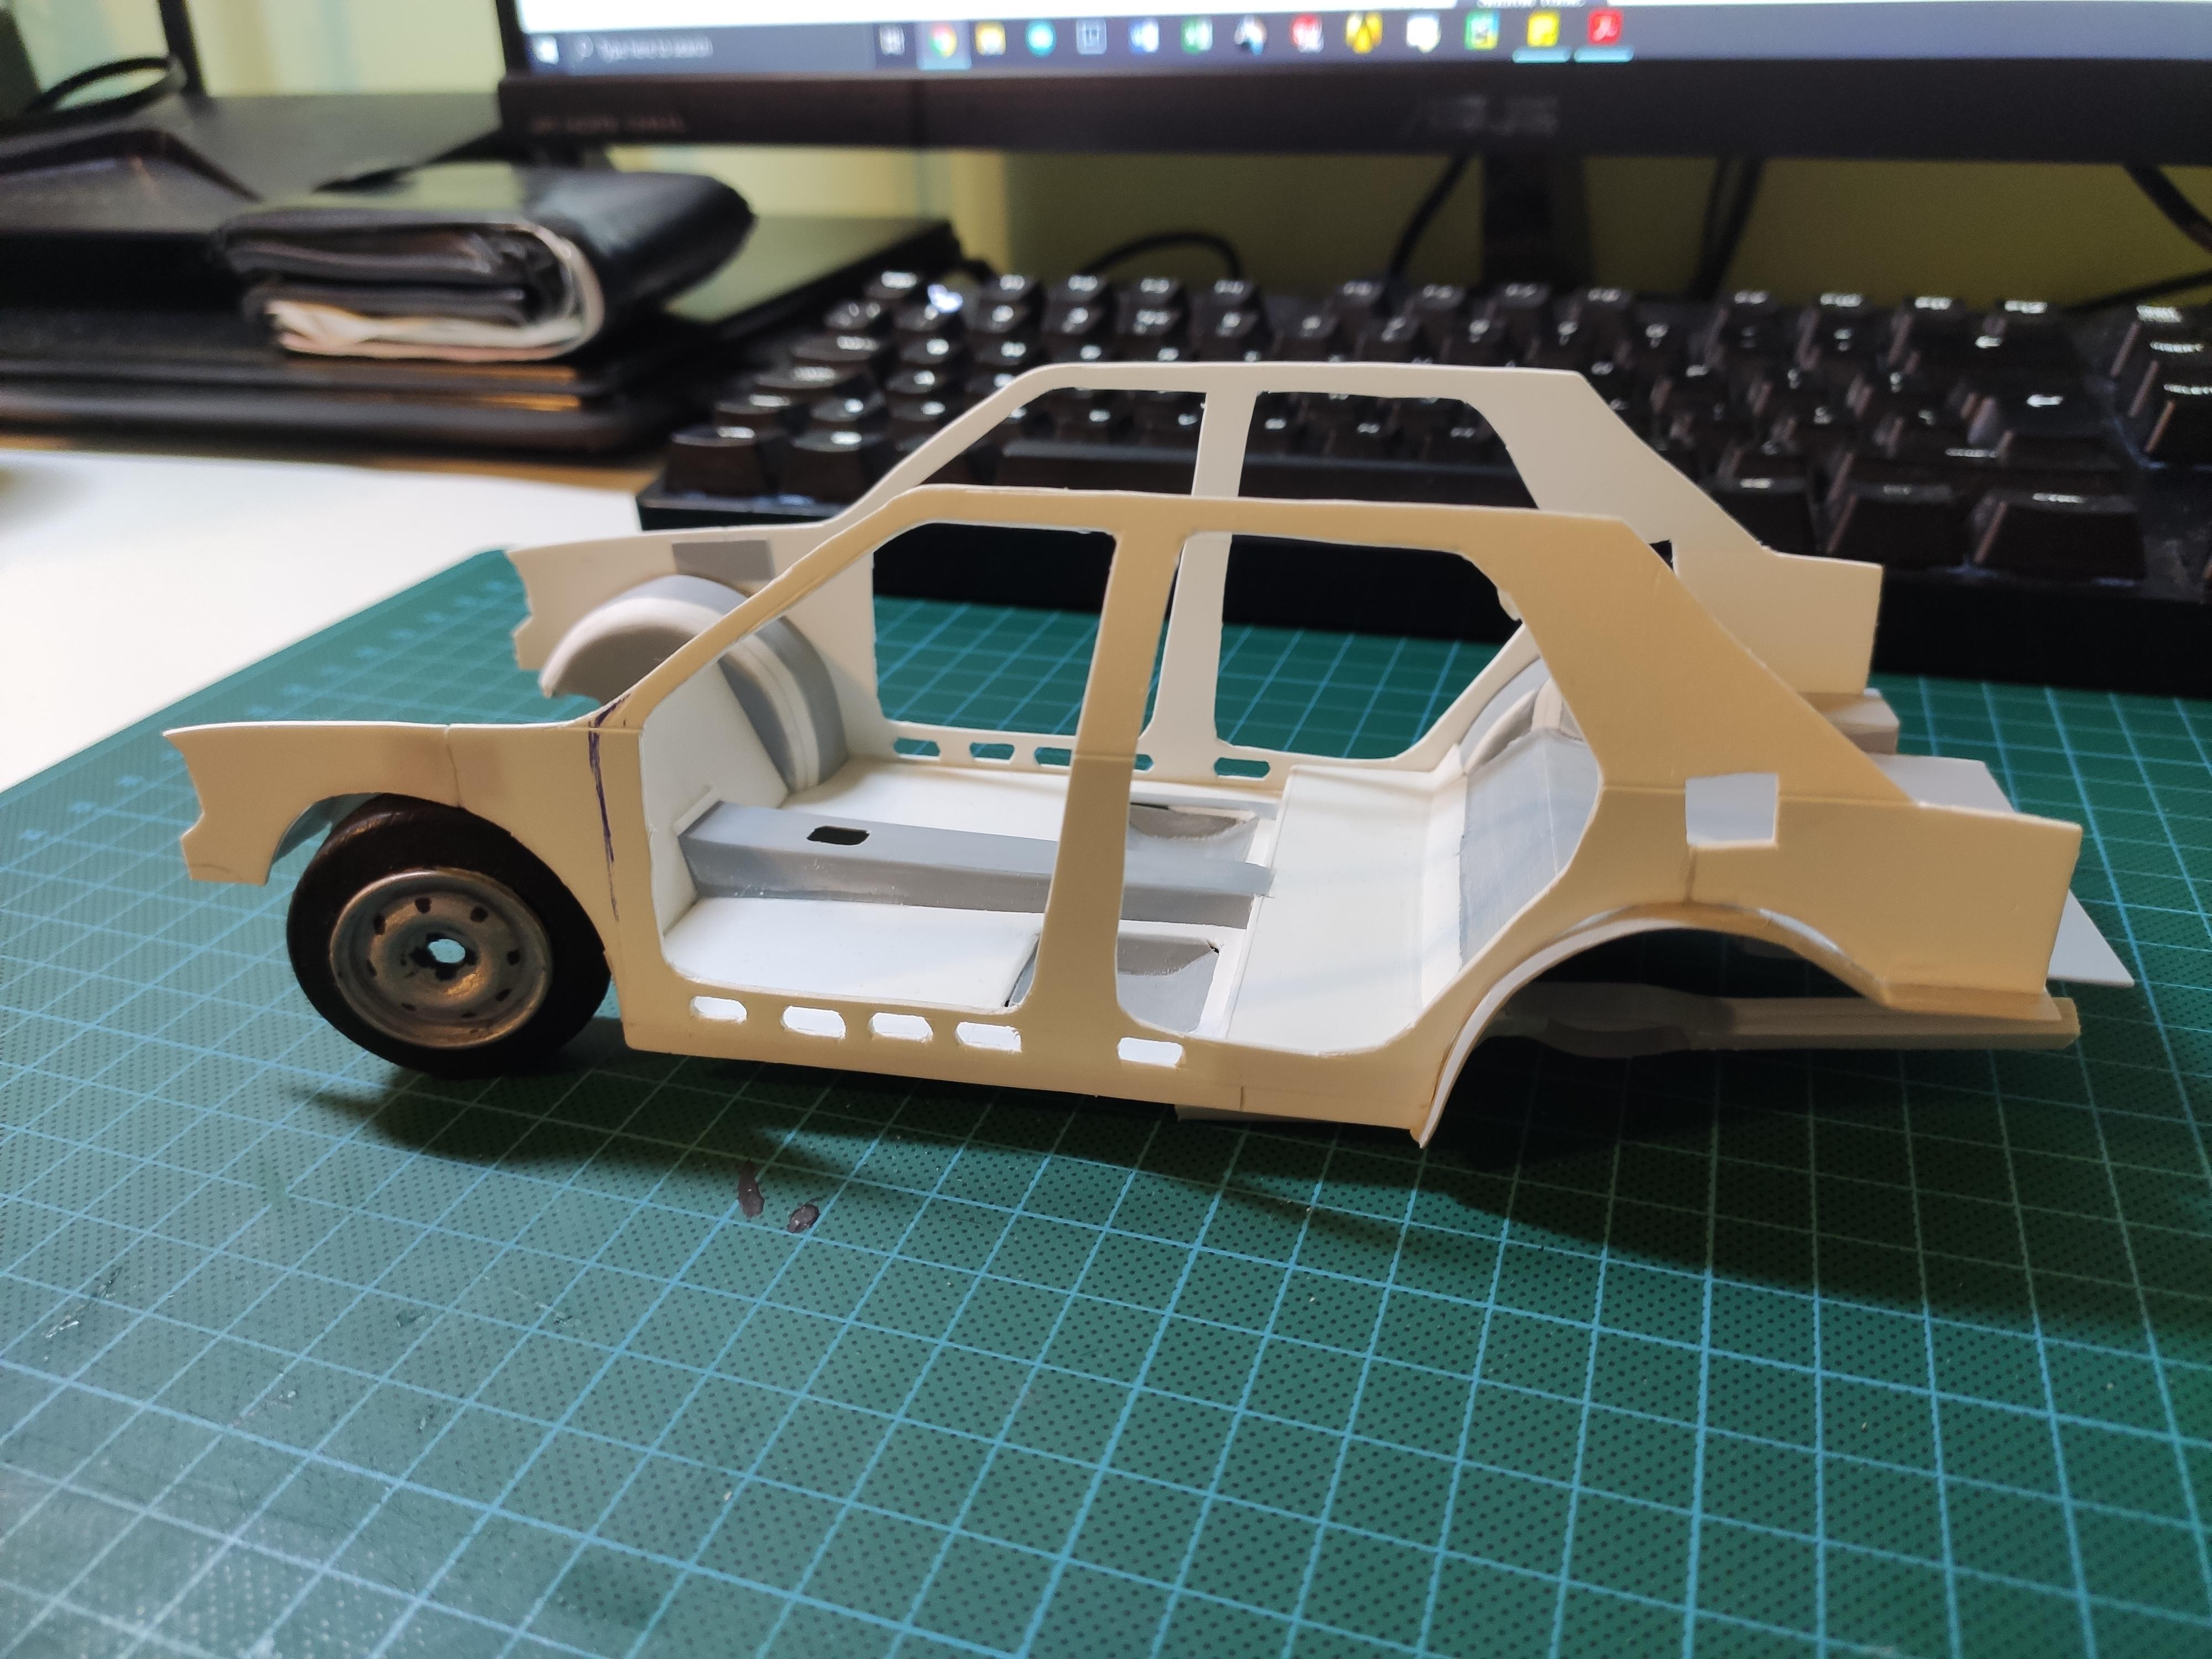
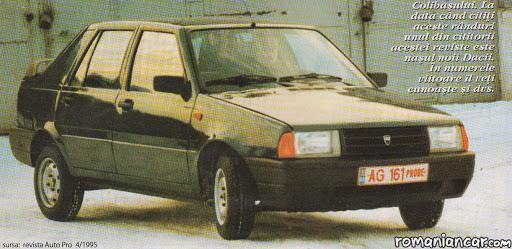
 Hello there peeps! First of all, let me introduce myself - I am Mihai, from Romania and I'm 24. I was in love with cars ever since I was a small cellular body - looking at them, drawing them, memorizing names, reading technical books before i even knew how to read because the technical drawings seemed fascinating to me, you name it. But, like every kid from Eastern Europe, annoyed by my parents answering the question "Can I have that nice, expensive model car?" with "No", I decided to start building my own models - at the age of 6. Initially build out of cardboard boxes and wheels from plastic bottles, they eventually evolved and started to look more realistic. Long story short, I made model cars when I was young, and now I'm trying to recapture that tranquillity, but at a more advanced level and out of plastic. So now, a Dacia what? You might, or might not heard about Dacia, our national car manufacuter that started out building copies (licenced copies) of Renaults in the late '60, only to eventually be brought entirely by Renault in 1999 and becoming a successful manufacturer in Europe based on their low-cost no-frills motors. The Dacia Nova is a model entirely created by the romanian automotive engineering highness - it was supposed to become the successor of the aging Dacia 1310 (Renault 12), with a more modern layout and configuration. But the development was slow, and with emerging economical restrictions from Ceasescu's Regime in the late '80, the project was delayed, taking almost 10 years to become a reality. It started in '85 and was launched in a democratic Romania in 1995, looking heavily outdated. But the quirkiness of the car and the stories of the struggle always fascinated me, and with the mk1 having a Renault 11/Peugeot 309 look - with the wrap-around hatch window and 80s black plastic trim, I always had a soft spot for this shitbox. So, here are some pictures of the car as it is, I didn't made pictures from the start because I didn't anticipated that I will share anything until it was somewhat finished. It is build from 1mm Forex PVC sheet and 0.5mm HIPS (styrene) sheet so far, indeed - having no previous experience of plastic modelling, the ticknesses are a bit over the top, but it's ok so far. Also, I have a ton of questions for the community and feedback would be appreciated! Thx
-
I don't know if this is old news, but it's something that just occurred to me to try. I was yakking over the fence with a visitor when I got to looking at the moss growing out of the cedar boards. This time of year, the stuff is everywhere and comes in a wide variety of forms and colors. Very detailed and visually interesting. I grabbed a putty knife and scraped a couple of samples off and set them on top of the furnace to dry. After a little trimming for size and structure, I glued them to my 1/64th scale diorama as Hosta plants around the house. I really like the look. Not sure how durable they're going to be, they might dry out completely and turn to dust. If so, I'll try some different ways to preserve them.
-
 These lovely 1:24 or 1:25 scale fire trucks are part of the collection of a small fire-fighting museum in Brockton, Massachusetts. My notes credit Dave Frazer as their builder. There are also a few examples of horse-drawn apparatus among the collection that I believe were built or modified from a particular range of mixed-media "craftsman kits" produced here in Mass. in the late '40s / early '50s era. Two pages worth of pictures of the models in my album: I wish their website was more informative: https://www.brocktonhistoricalsociety.org/bhs/firemus.html
 -
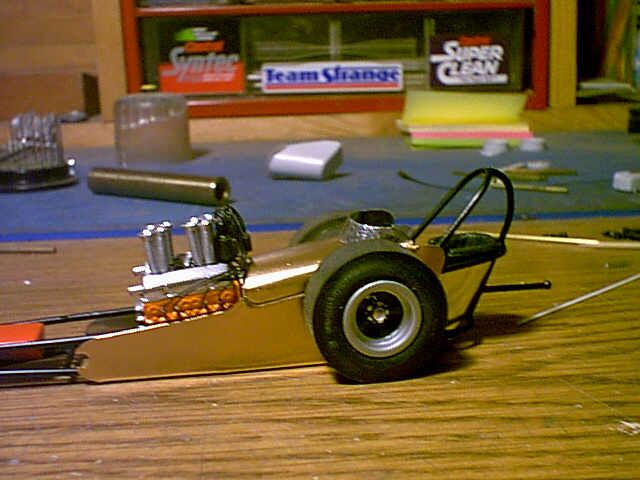
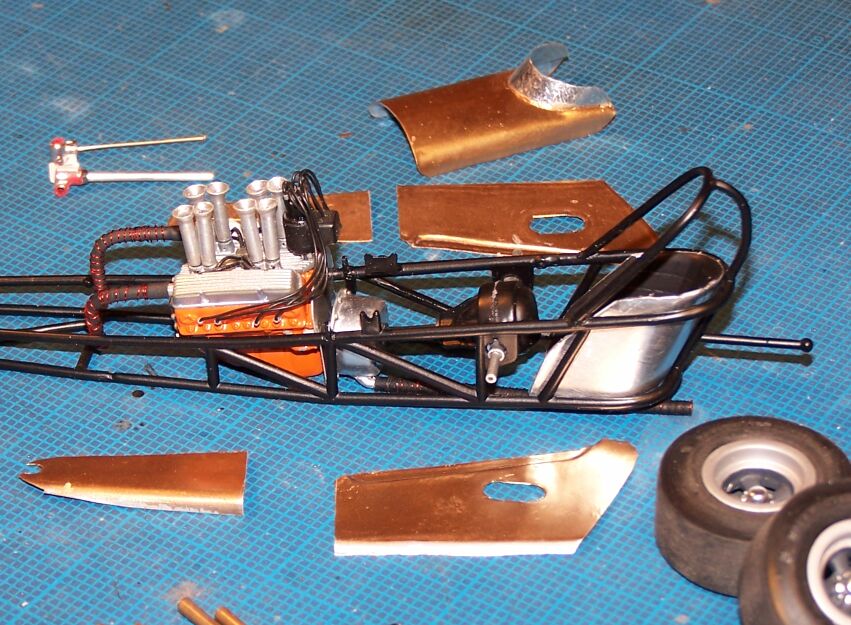
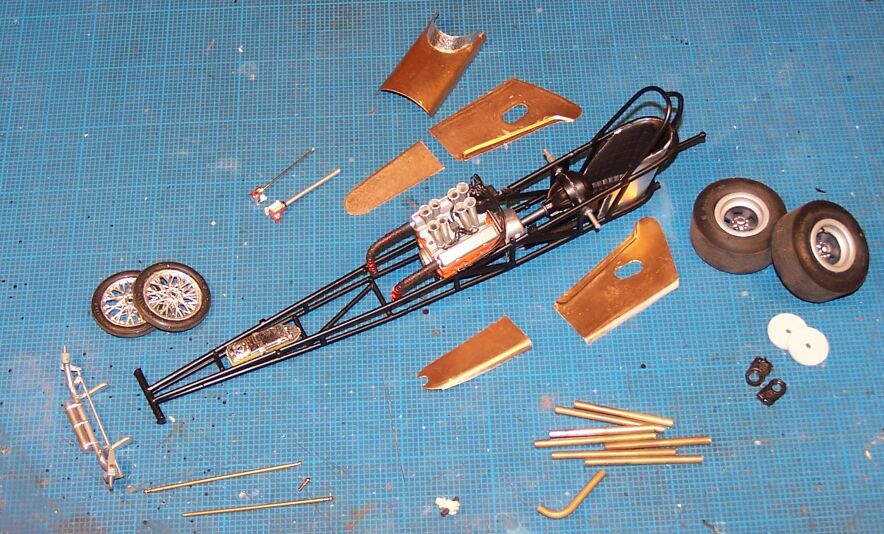
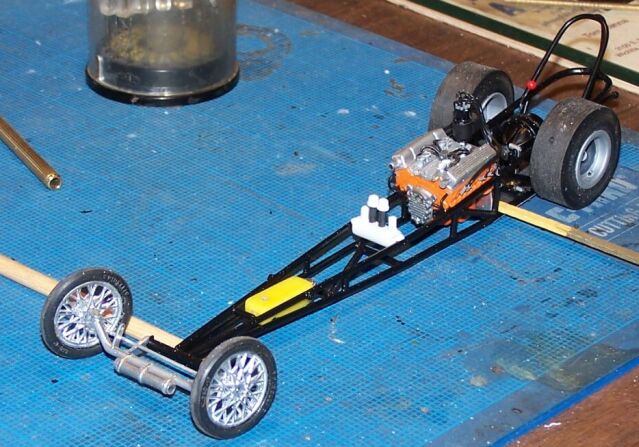
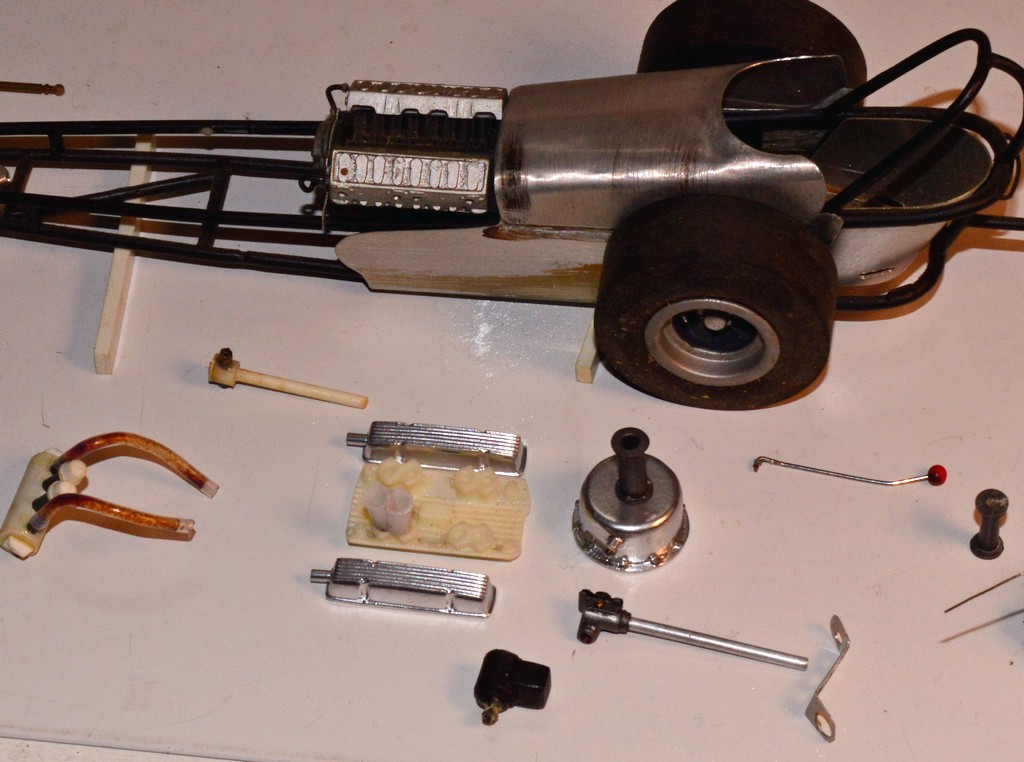
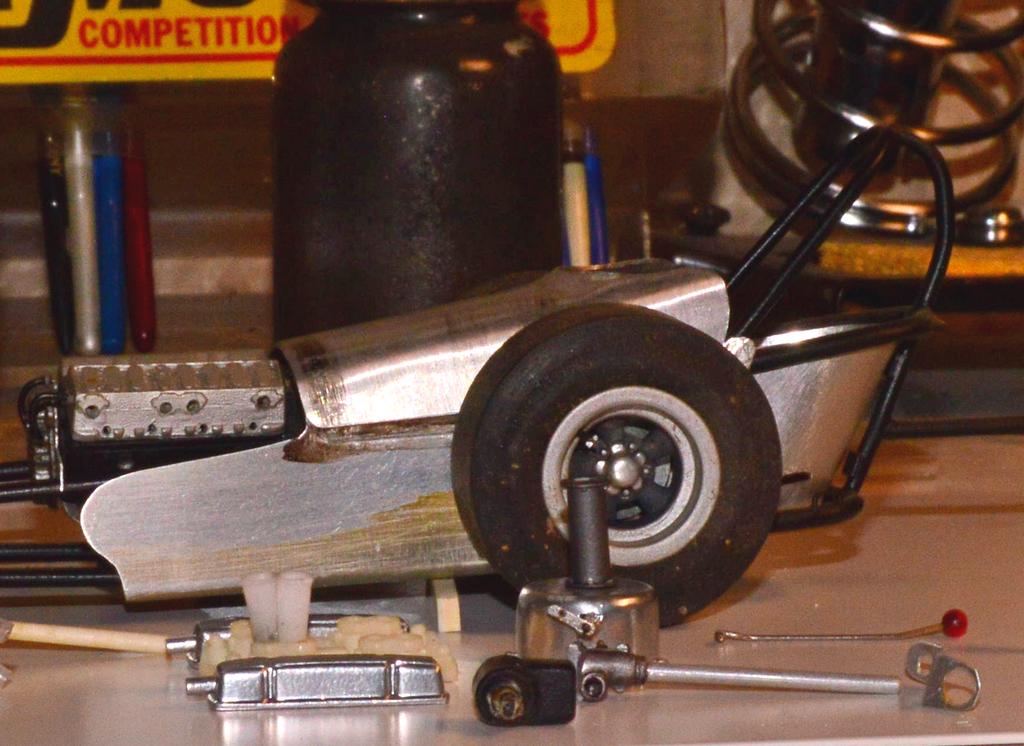
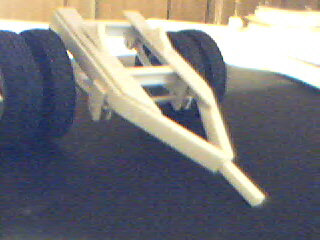
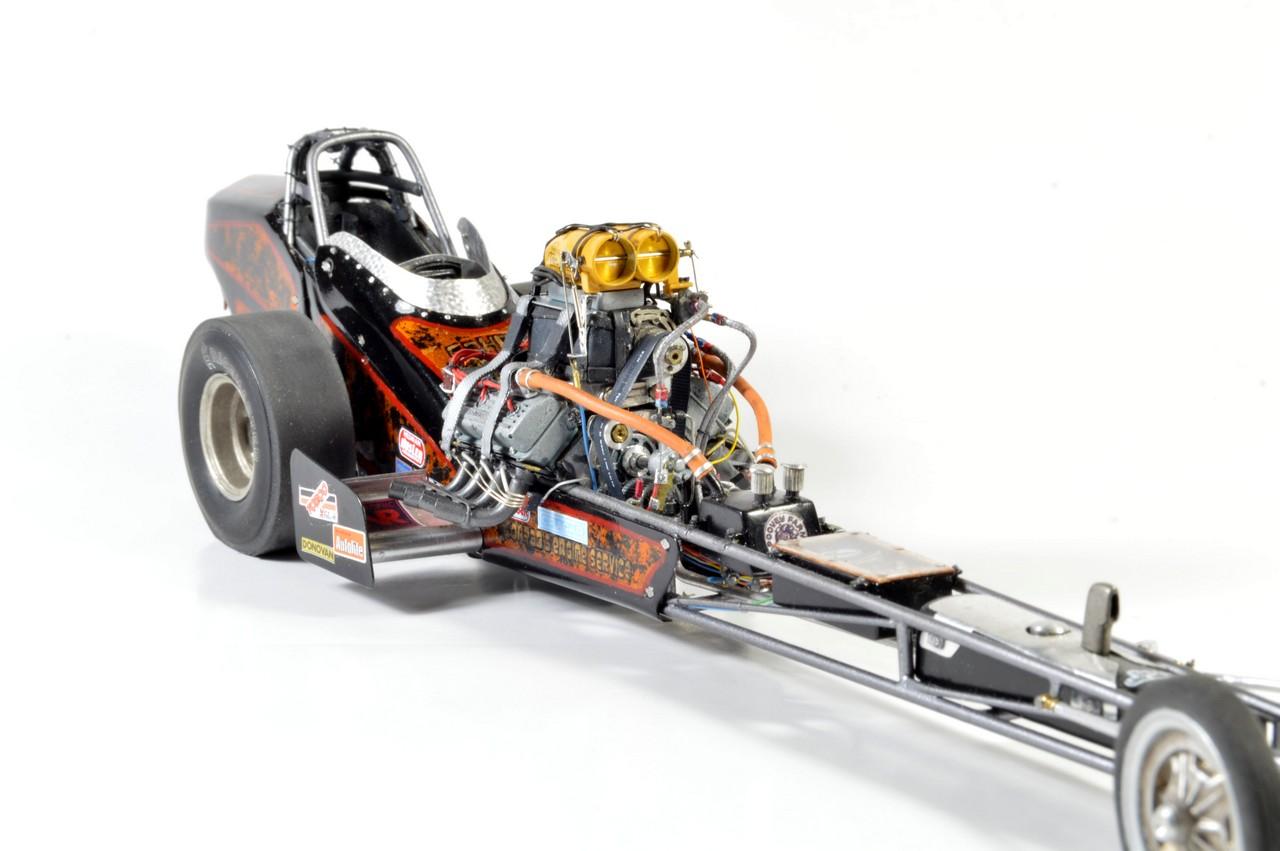
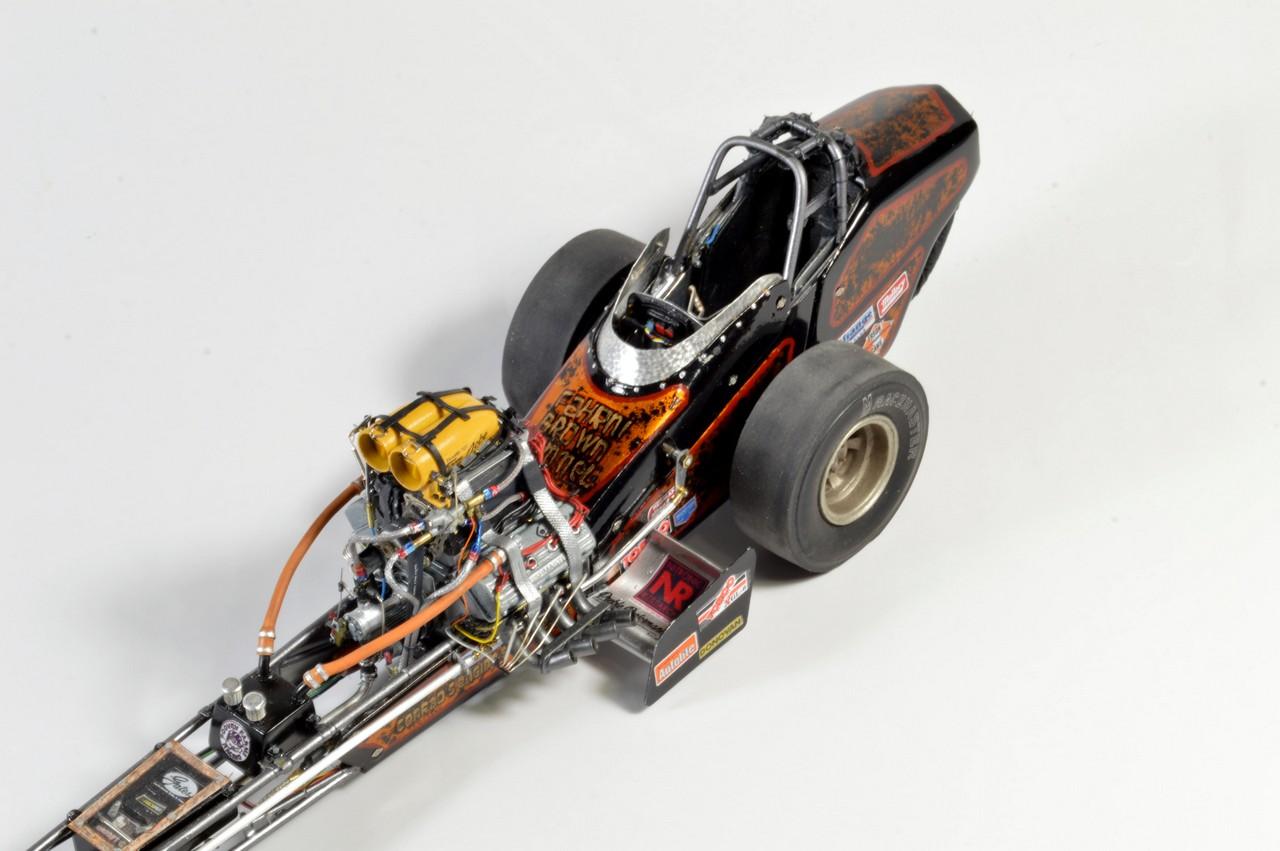
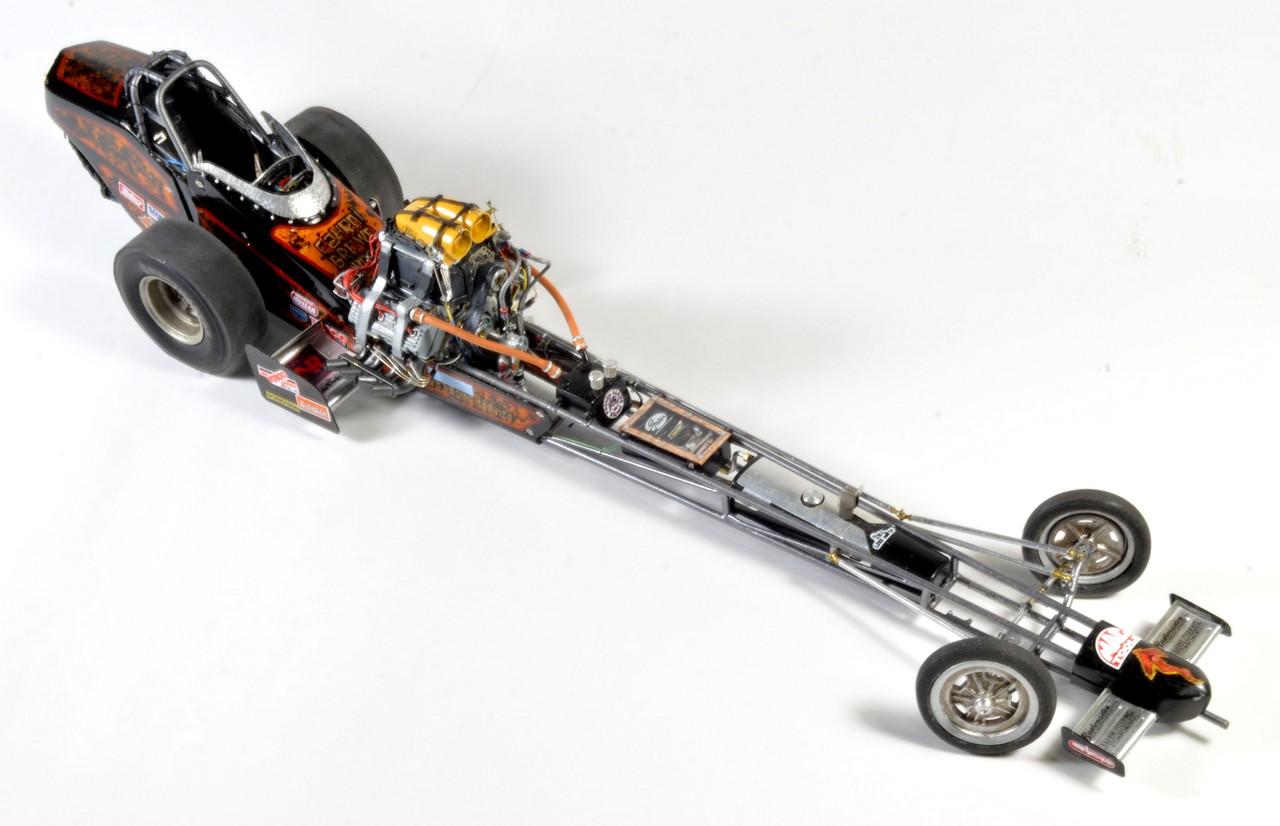
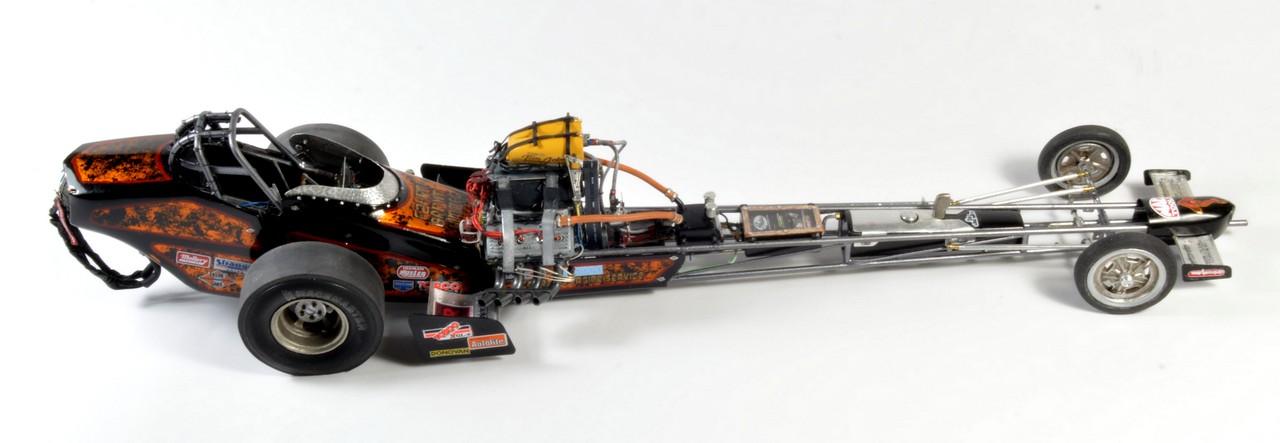
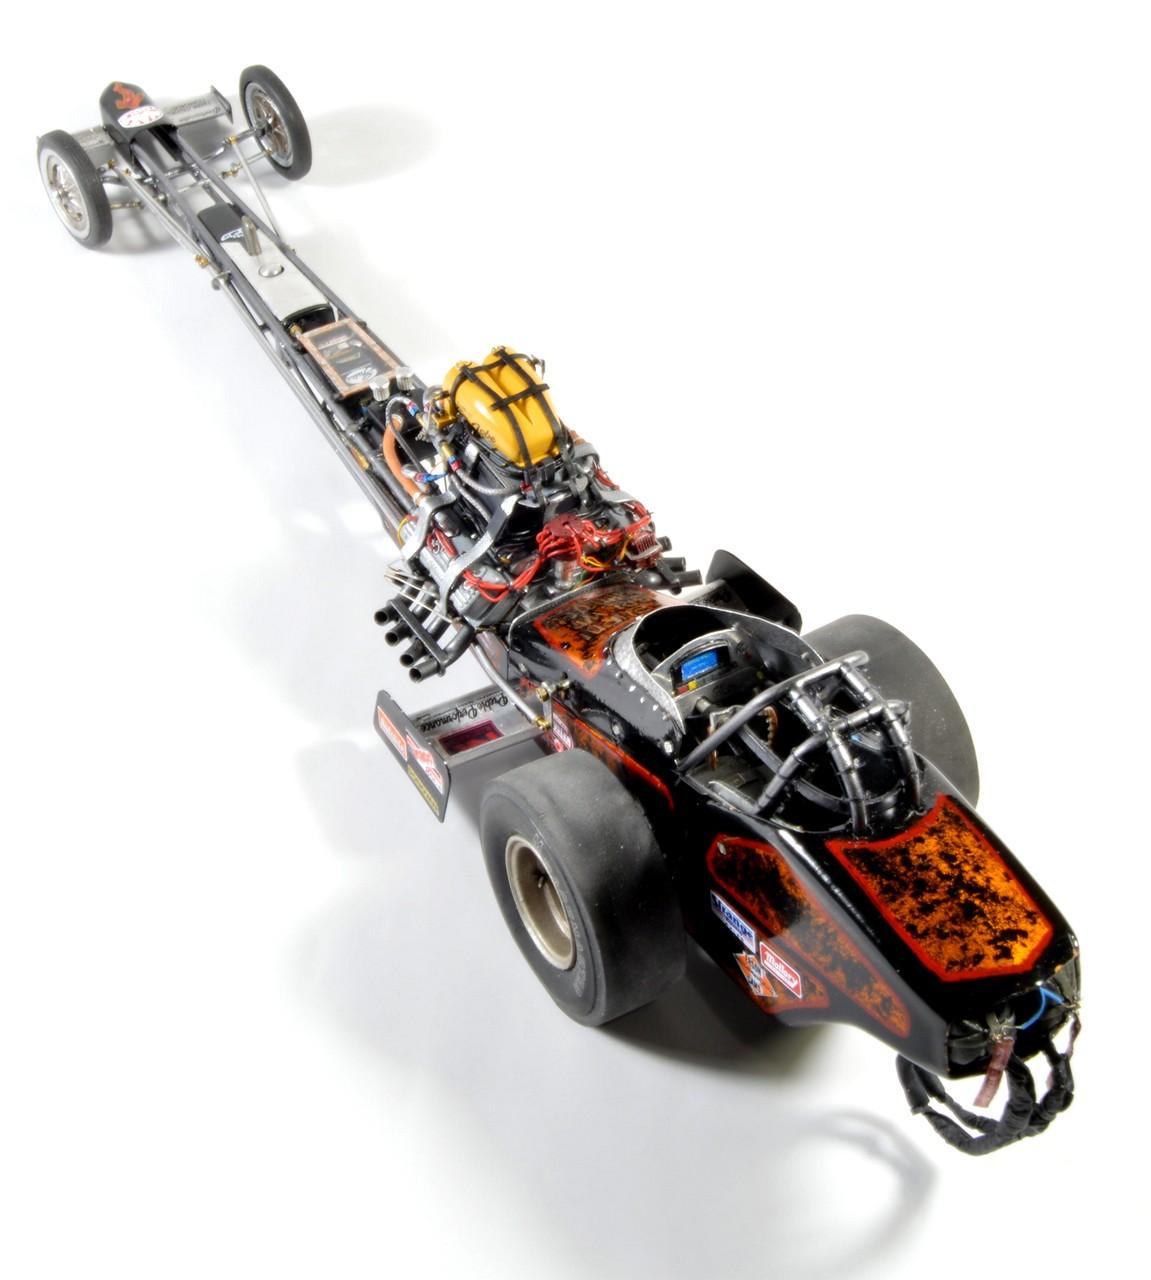
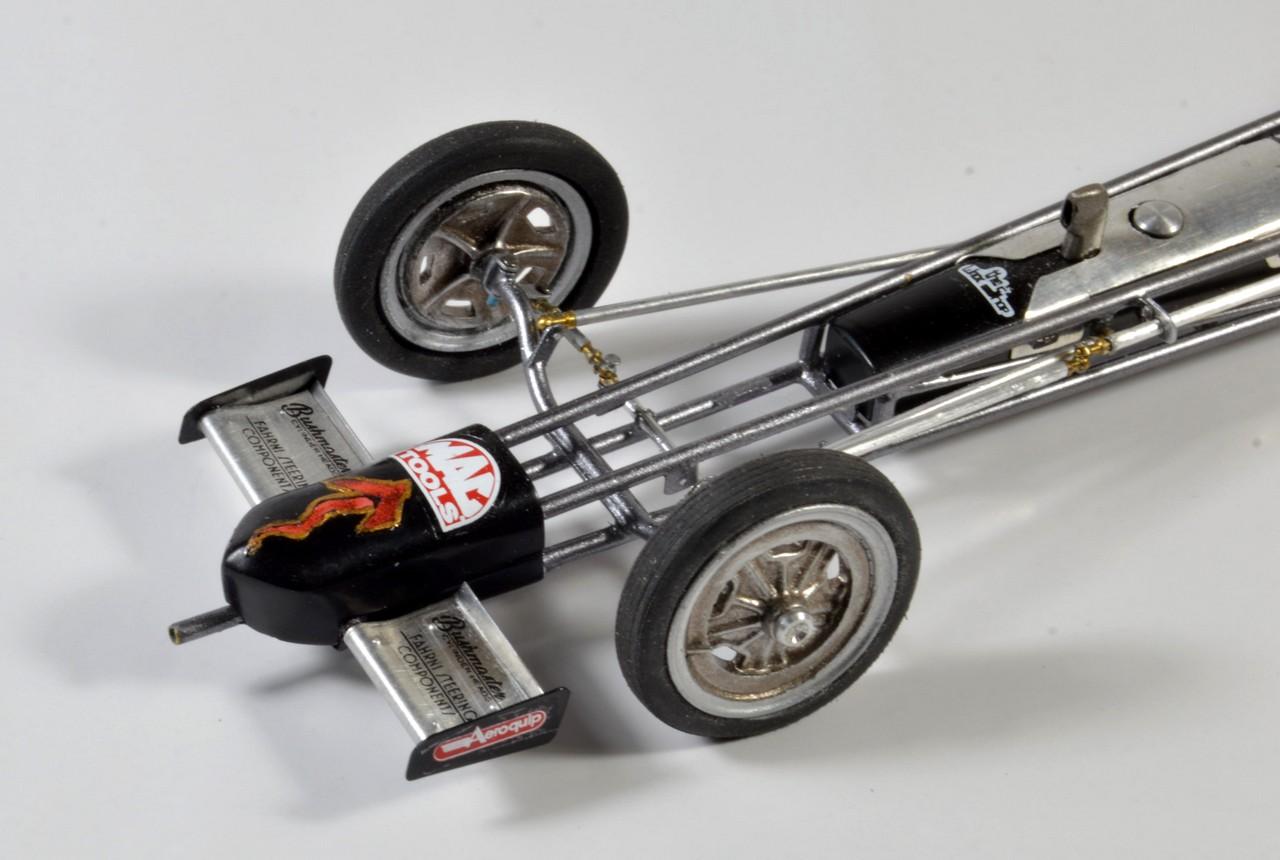
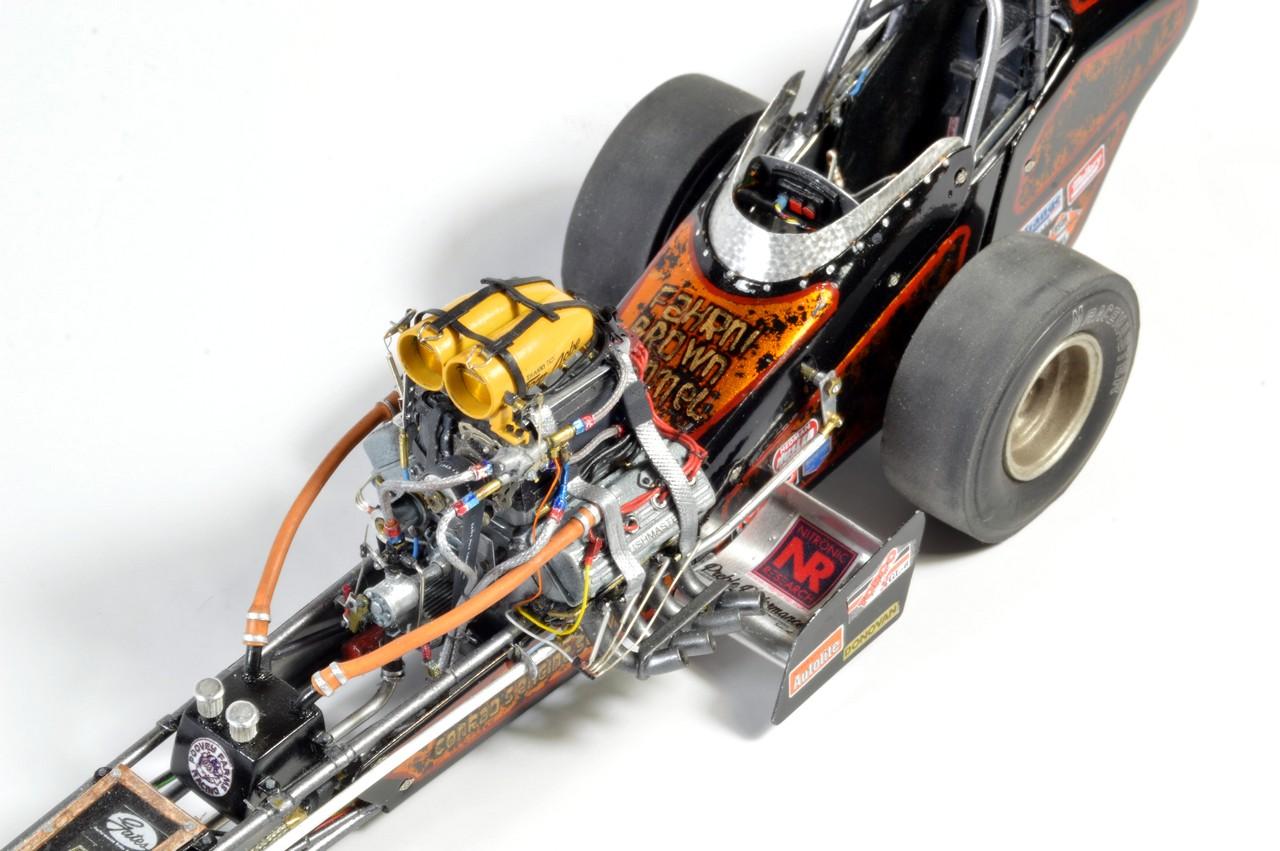
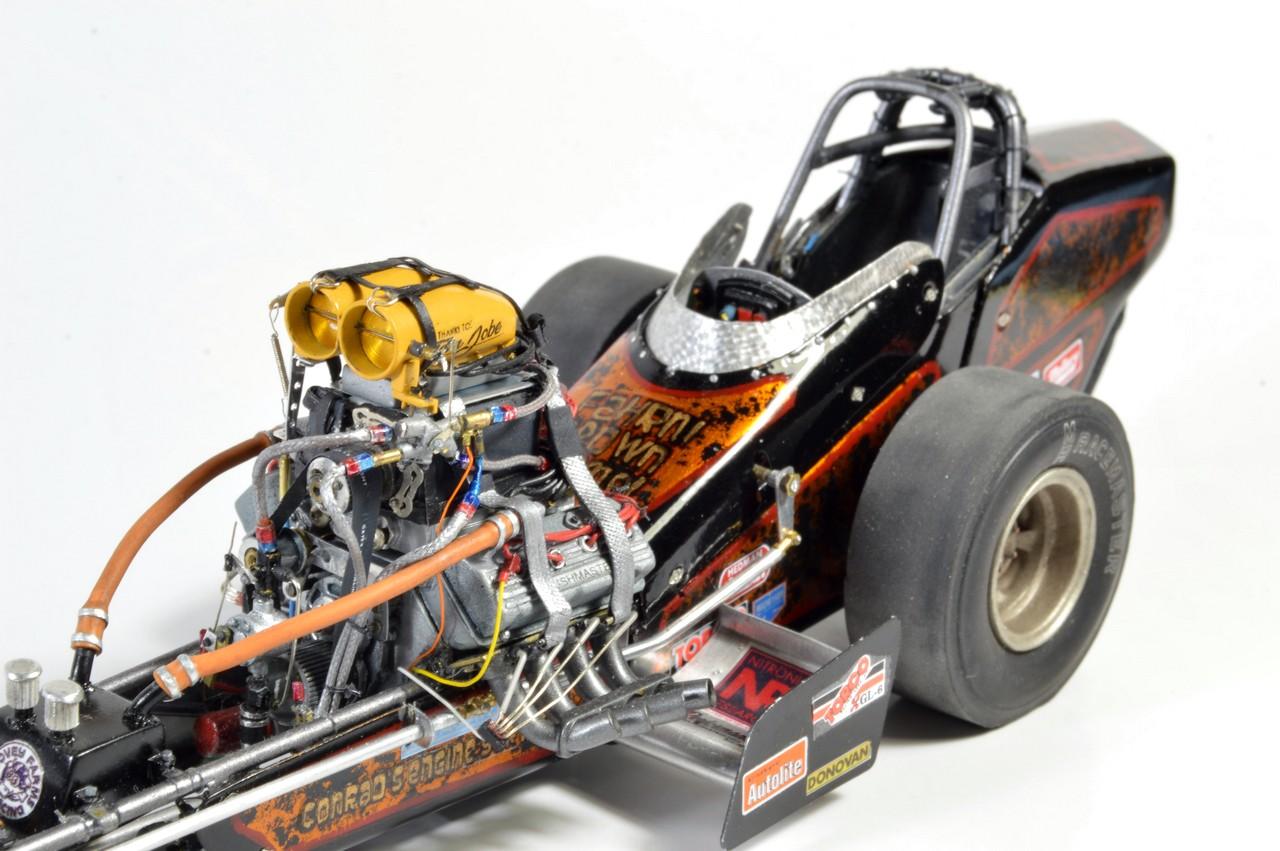
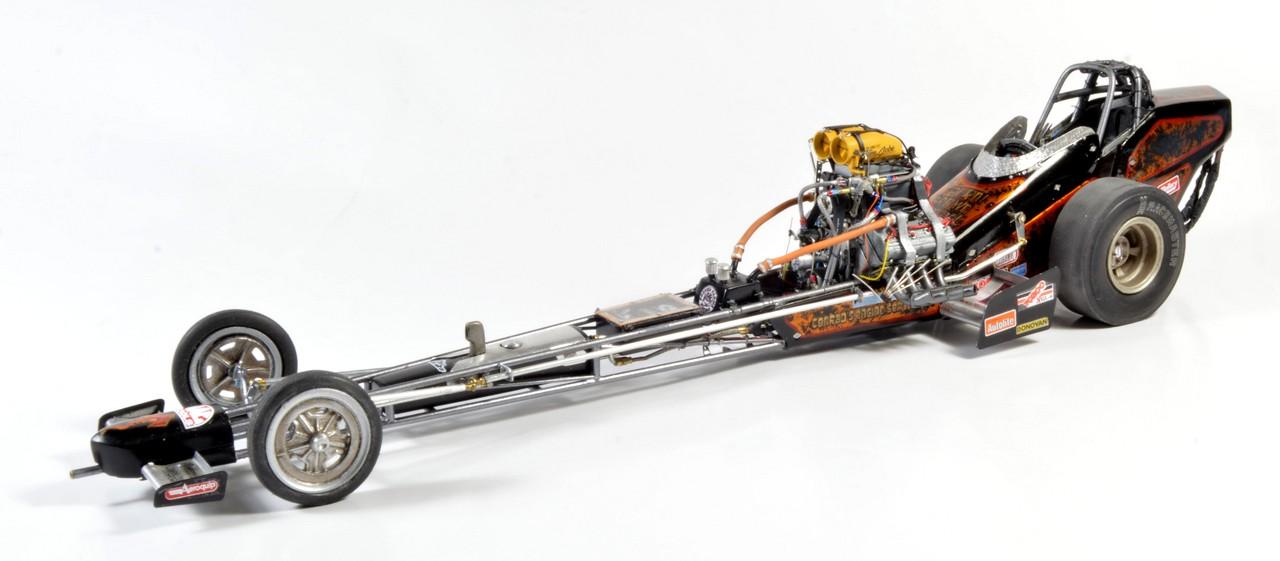
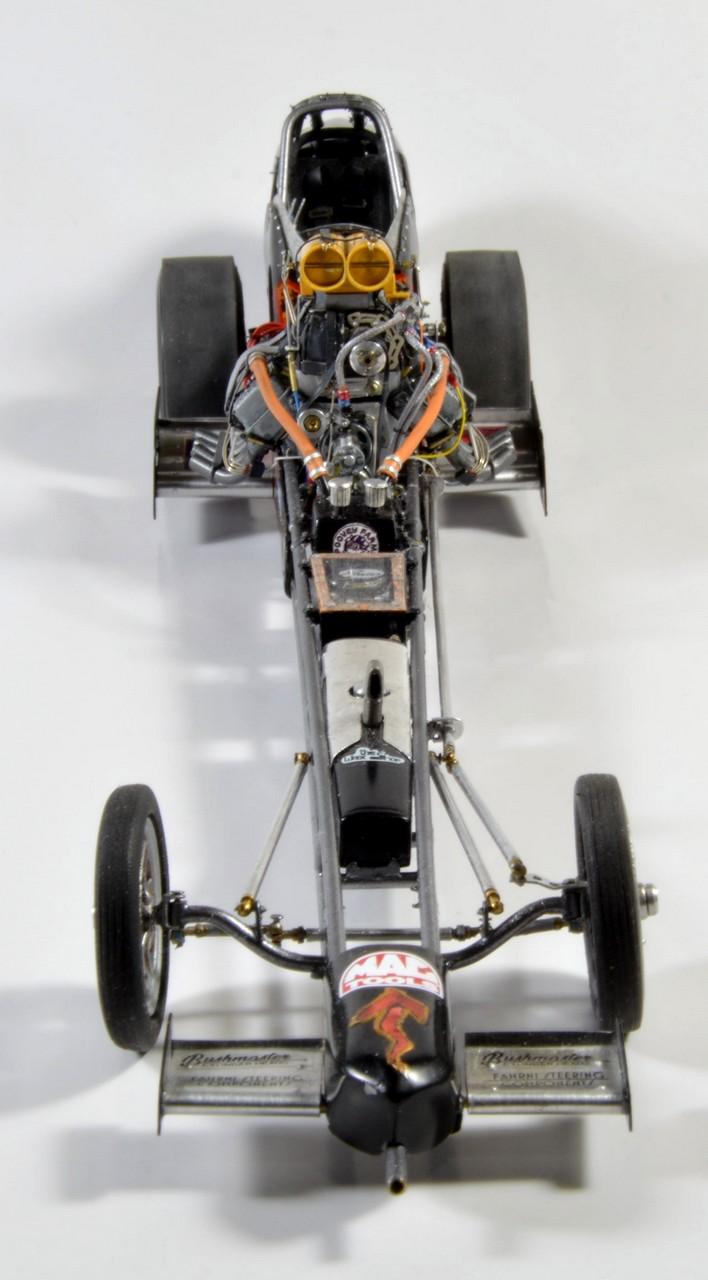
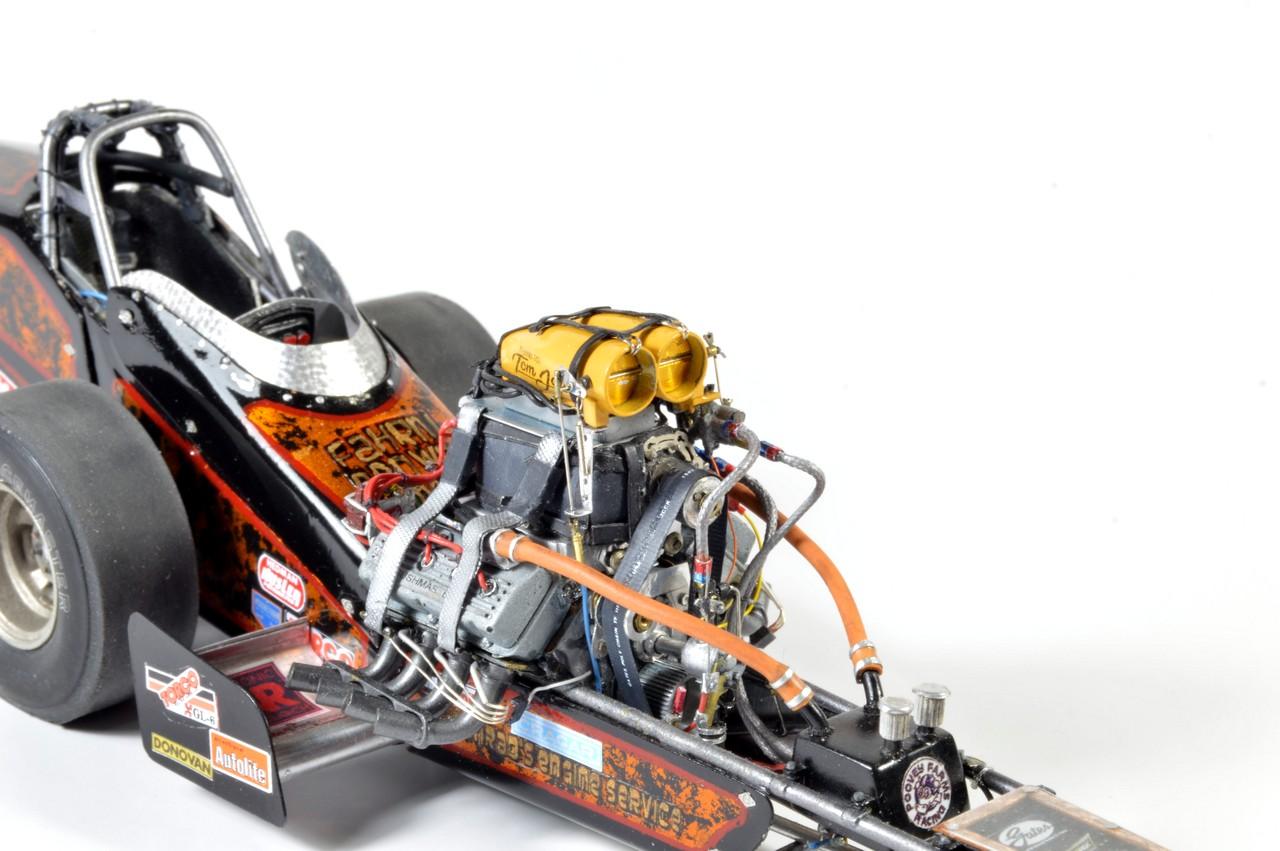
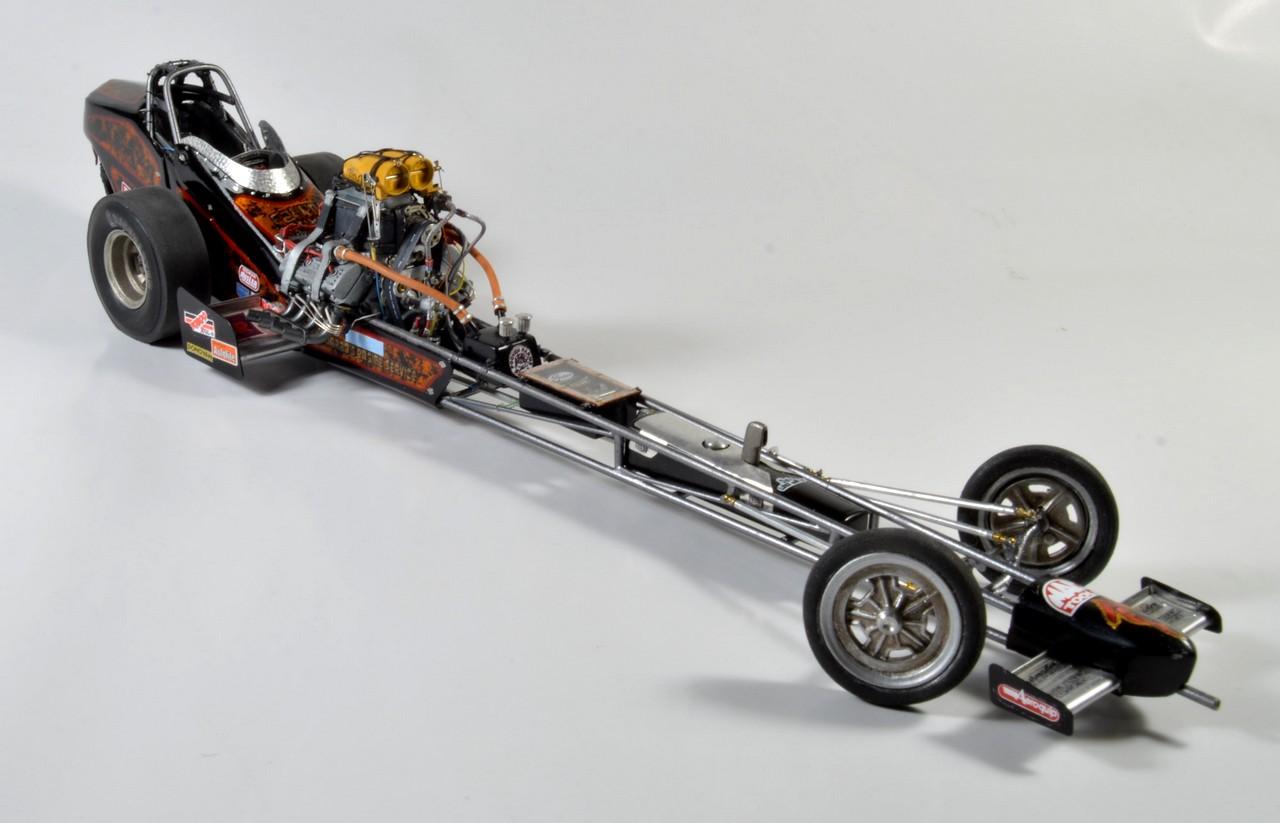
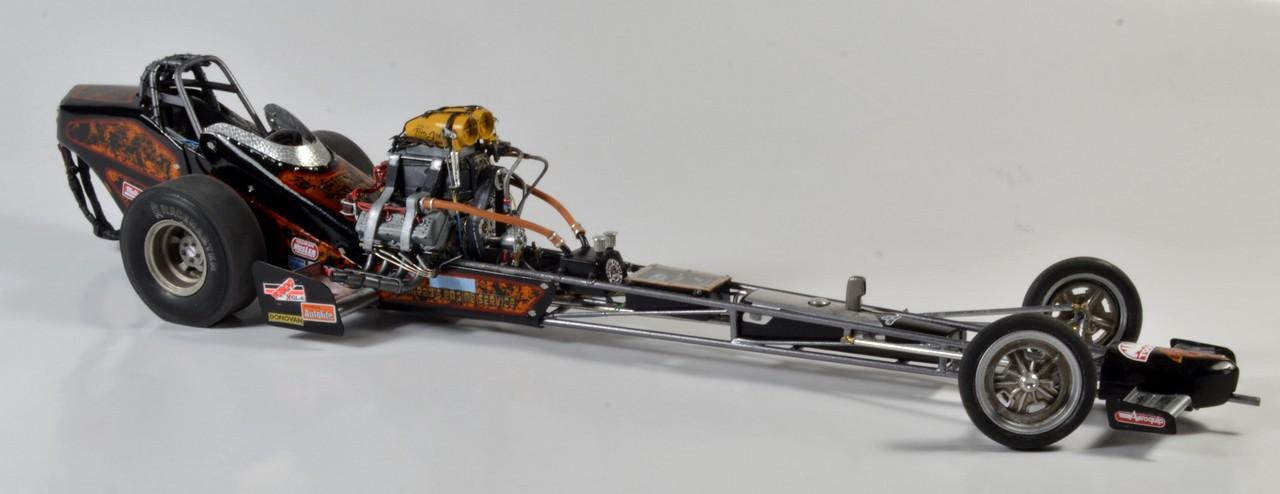
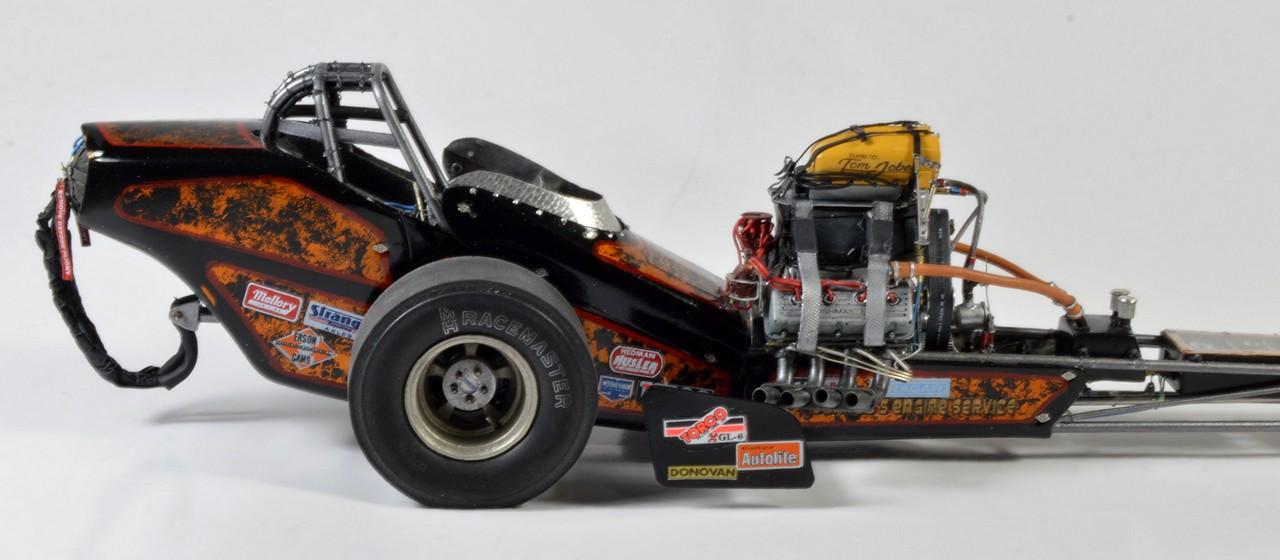
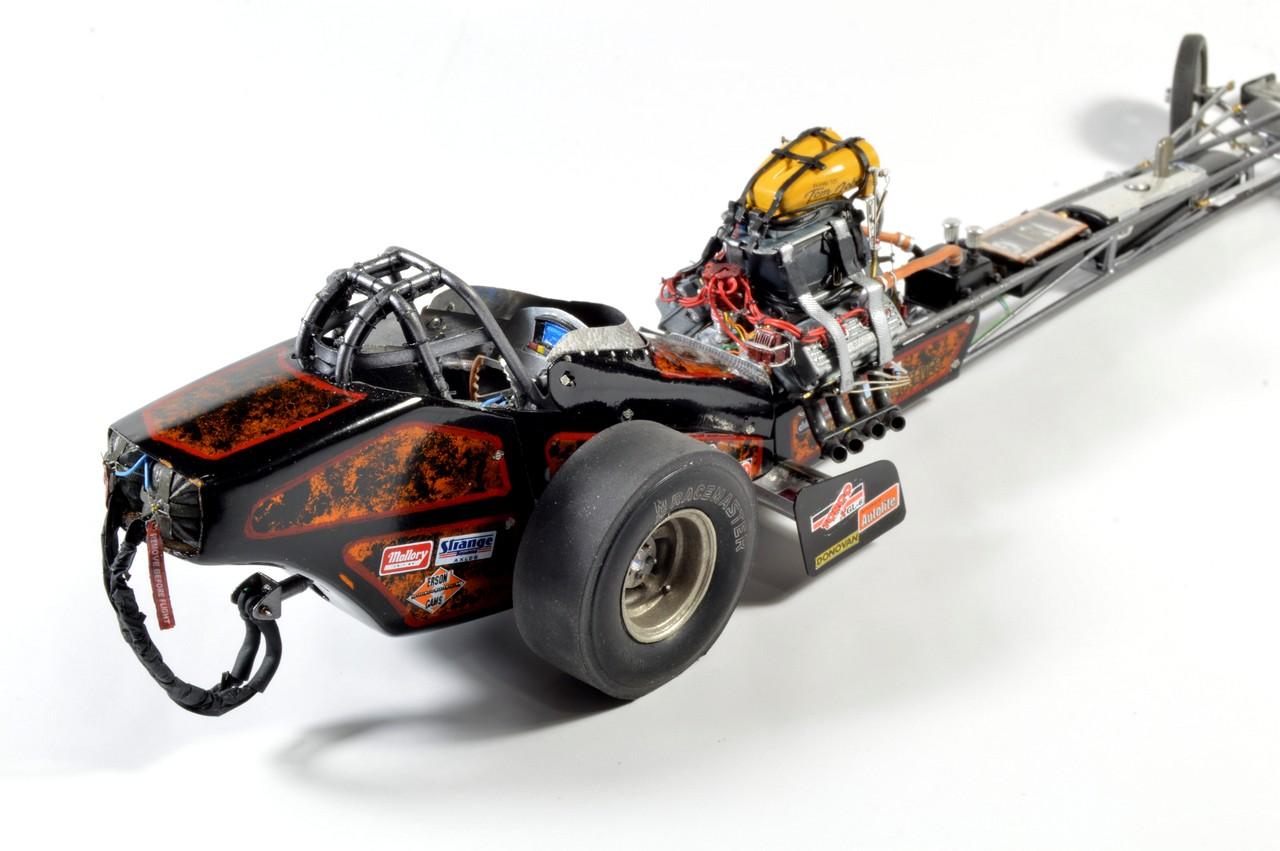
This model, like many of my models, has a long story. Begun in 2000 or 2001, it has been near completion perhaps a couple of times. The first time it stalled due to my dissatisfaction with the first body I built. That body was built from tooling aluminum, which, although very malleable, doesn't have much tolerance for compound curves--at least as far as dragster cowls are concerned. Then, while I pondered building a new body from aluminum flashing, I decided I didn't like the Hilborn injection setup, as compared to Enderle's. So, I tore the engine down, and began to explore possibilities for Enderle stacks. Turns out,there aren't any good ones from a kit (this was still several years before the Slingster was released. Those are the best kitted versions, but those leave something to be desired, too). I began to make sets of stacks, hoping to come up with a pair of tubes that were good enough to mate into a single unit and have them cast. That turned out to be relatively fruitless, until, within the past year, or so, I made a mold of one of the units I made, in which one of the stacks was a bit "off". I used two of those castings, and cut them apart, and mated two of the "good" stacks into a single unit (small, cropped photo below) that makes me happy enough to believe I can complete four units, and finally finish the injector setup. I may use the pictured resin manifold (it's from one of the better known casters, but, I can't recall where I got it from, at the moment), or, I may use one of the manifolds I began building. At any rate, I think I see the light at the end of that tunnel! Now, I am working on a new cowl. I like the older one--it fits decently, and is well-formed, but, I've always wanted it to be a bit "taller", at the rear of the cowl, so... I found an article in an old Hot Rod Magazine Yearbook that features several junior fuel dragsters, and I collected the ideas I liked from them, and began to conglomerate them into my own version of one of these bad little rides. Here's where it all began, and, where it is, today. As always, queries and comments are welcome!
-
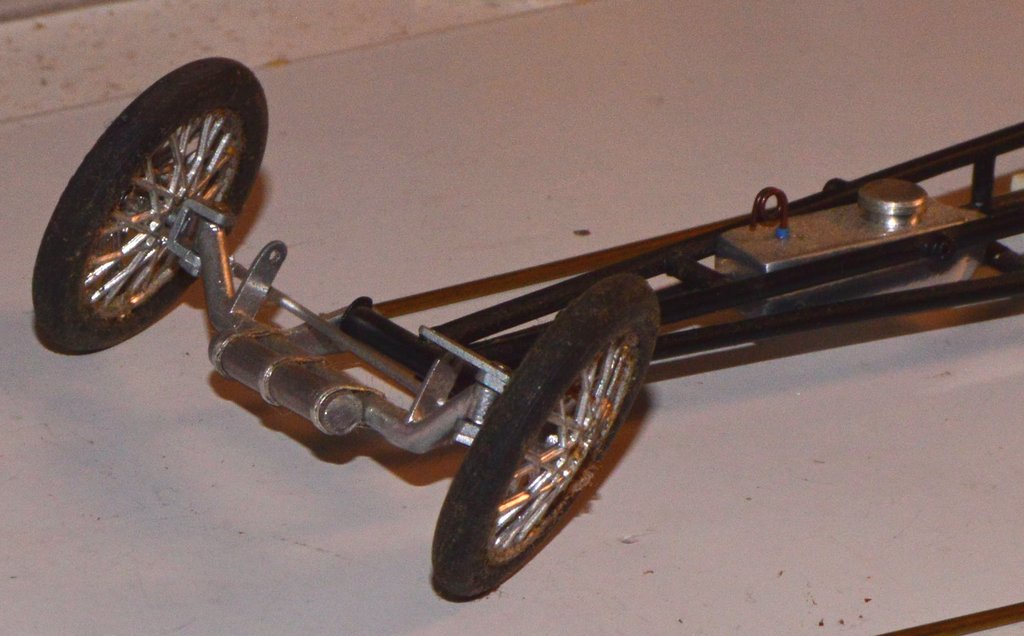
A project I started many years ago. It's an AMT 1/43 KW cabover that I began converting to a day cab. The chassis is scratchbuilt, as is the dolly for the wiggle wagons. Trailers are shortened AMT exterior post vans. I hope to make a chain "curtain" for one of the trailers, in place of doors, given that this is intended for shagging stuff around the city. The steering is poseable. I did some detailing to the Cummins, and made a shorty bumper from aluminum sheet. Obviously, it has a long way to go. I'll try to find some time to get it out and take some better photos, at some point. In the meantime, I apologize for the less than stellar pics! Questions and comments always welcome!
-
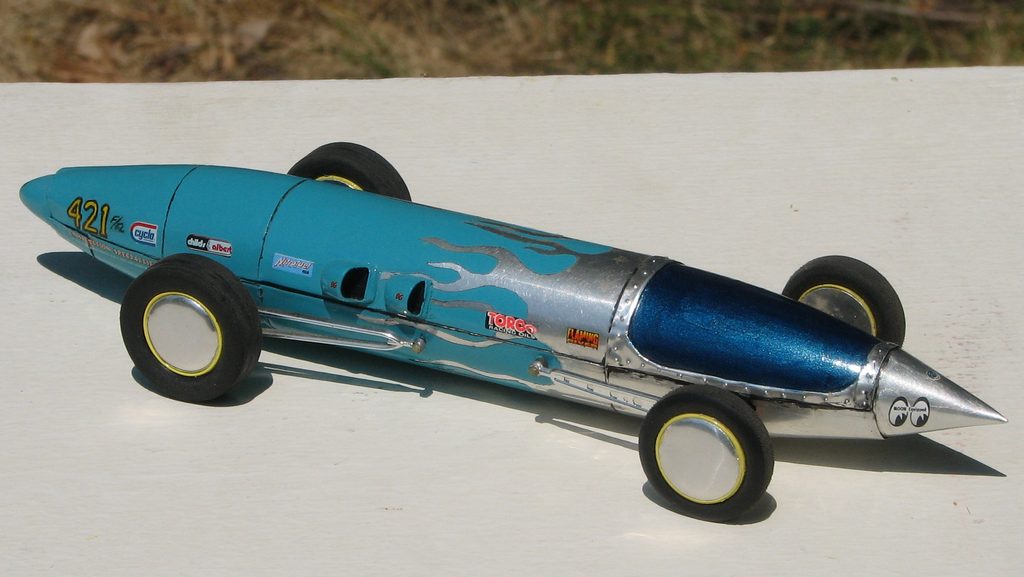
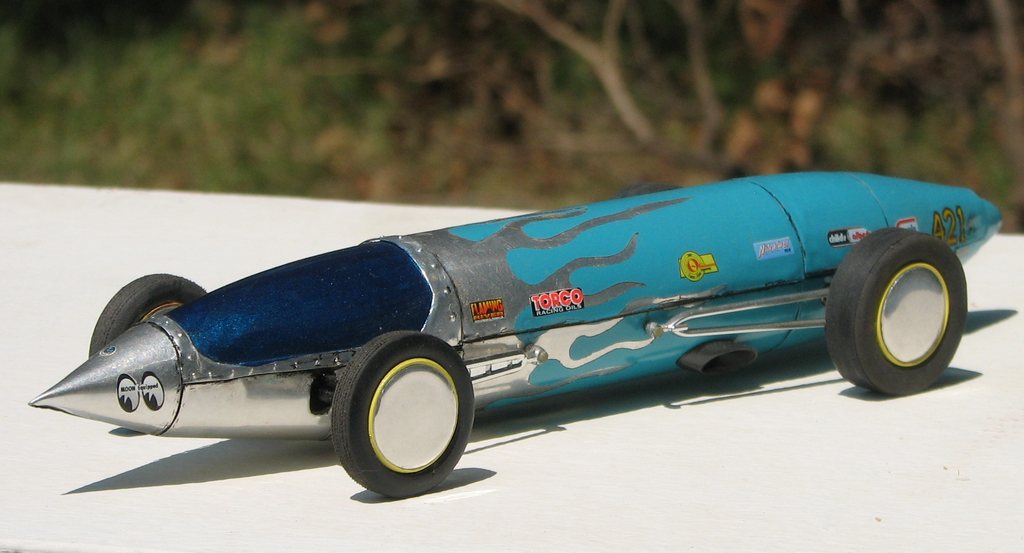
I built this 20 years, or so, back. It was built using a vac-formed drop tank that I found in a closeout pile at a local shop. I covered it with tooling aluminum. Tires and wheels are from the parts box. Rear tires were made by contact cementing two inserts from Revell's dragster/pro stock/FC kits together, then covering the seam with electrical tape. Wheel discs were punched from tooling aluminum sheet, as well. Radius rods, etc. are from the parts box. Rivets were made using the time-tested "scriber" method. I carved wood bucks to heat-form the scoops, and used an aircraft prop cone for the tail. The model was an exercise in trying new techniques, and design, and, clearly was never intended to be a detailed "replica" of a salt flats/dry lakes racer. Comments/criticisms welcome, as always! Mods, feel free to move it to wherever you think it needs to go!
-
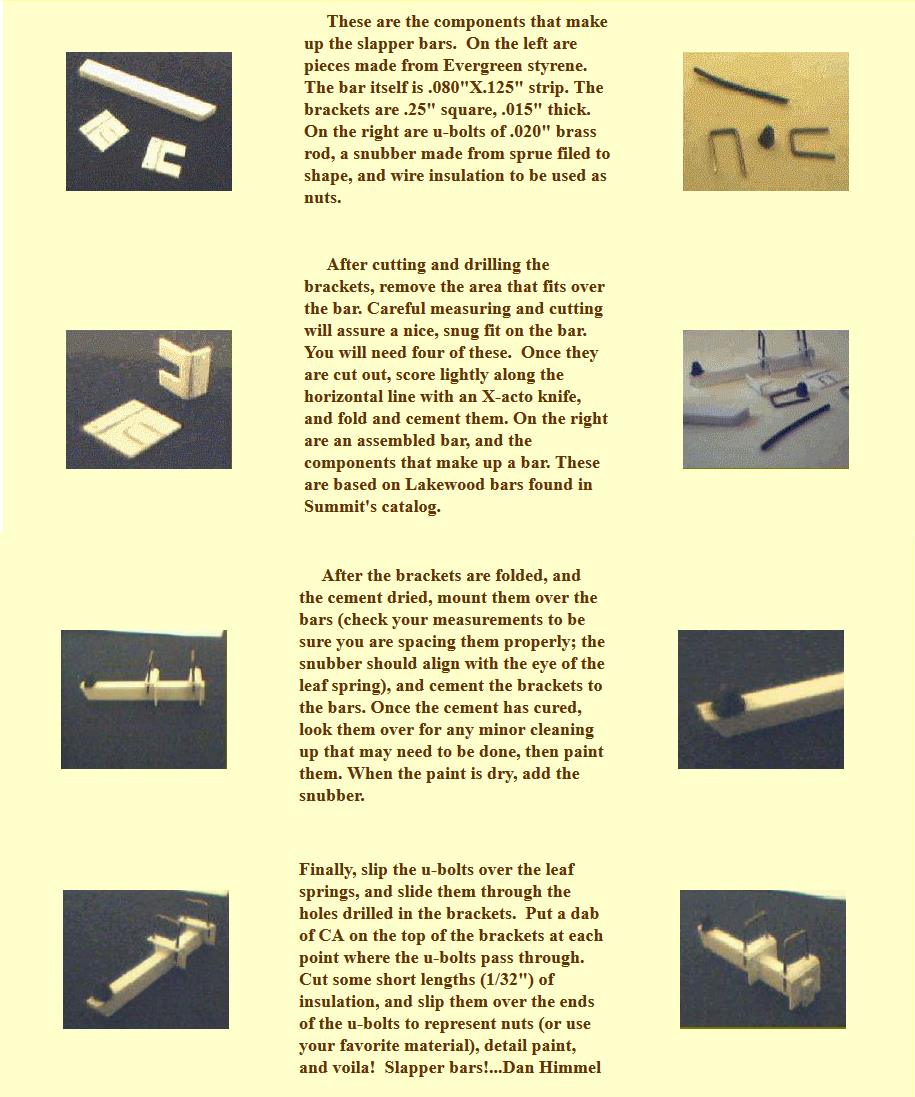
This is something from the old SLM website I thought I'd share, because that is what it's all about! I thought perhaps this should go in the tips, etc., but, they're used almost exclusively for drag racing, so, I opted for this page. I reckon an admin should feel free to move it, if that's a more appropriate location. They are so easy to build, that there's really no excuse not to, if you need a set!
-
 Hi, regarding their racers and road cars it often recedes into the background that Mercedes is the world's oldest and (still?) largest truck manufacturer. Among many of their interesting designs the 1937 L 10000 is outstanding. To my mind it is the most atractive and most impressive Mercedes truck ever made. In 1937 it looked like this (photos by courtesy of Daimler-Benz AG/ Daimler AG): Unfortunately no original vehicle has survived. Only a O 10000, i. e. a bus, equipped as a rolling post office of the pre-war German Reichspost, is displayed at the fantastic new Mercedes museum in Stuttgart since the museum opening. Compiling information for a scratchbuild was unsufficient for years, but the Mercedes museum archives were extremely helpful. They sent me lots of photos and photostats with most measurements absolutely free. However all original scale drawings had been lost during WW2, hence a lot of drawing, arithmetics and eyeballing was necessary. The model is completely scratchbuilt except the rims (modified Revell parts), the headlights and the Mercedes star on top of the radiator. In 2005 I spent more than 1000 hours building it. This is the result:
 -
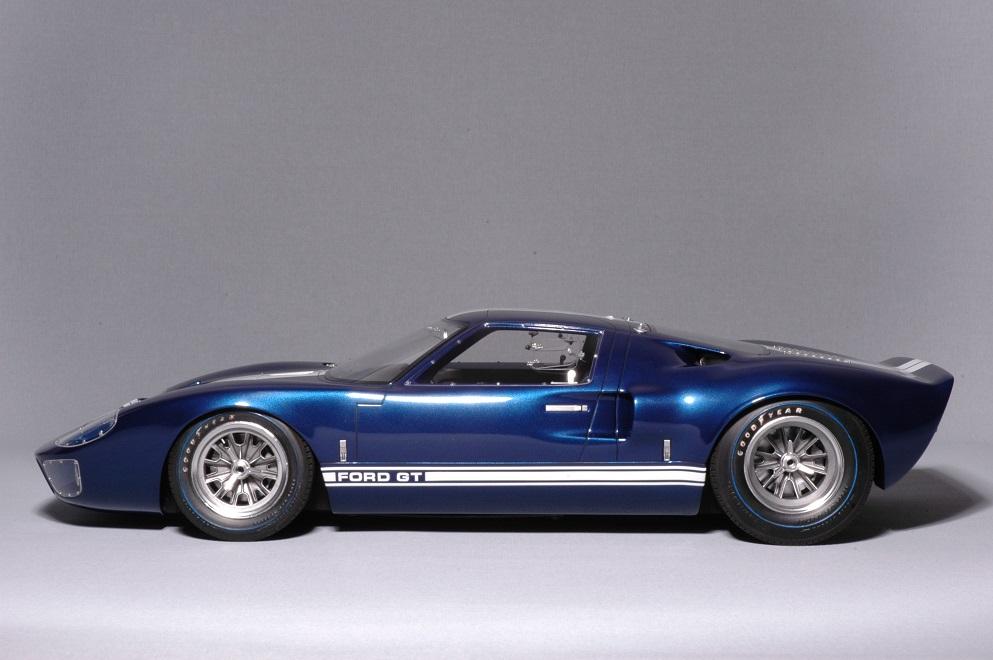
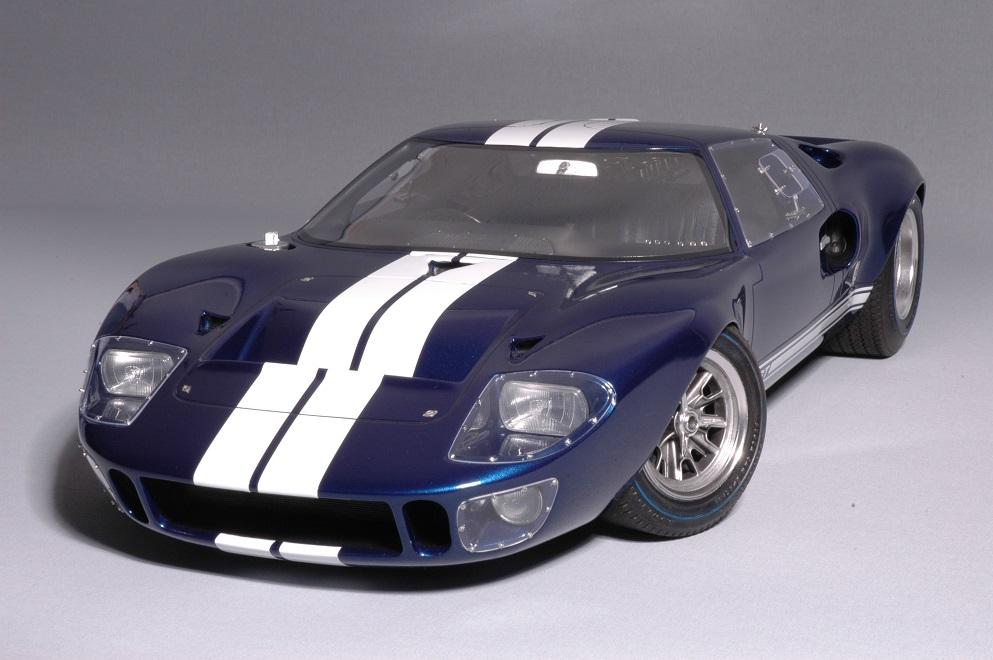
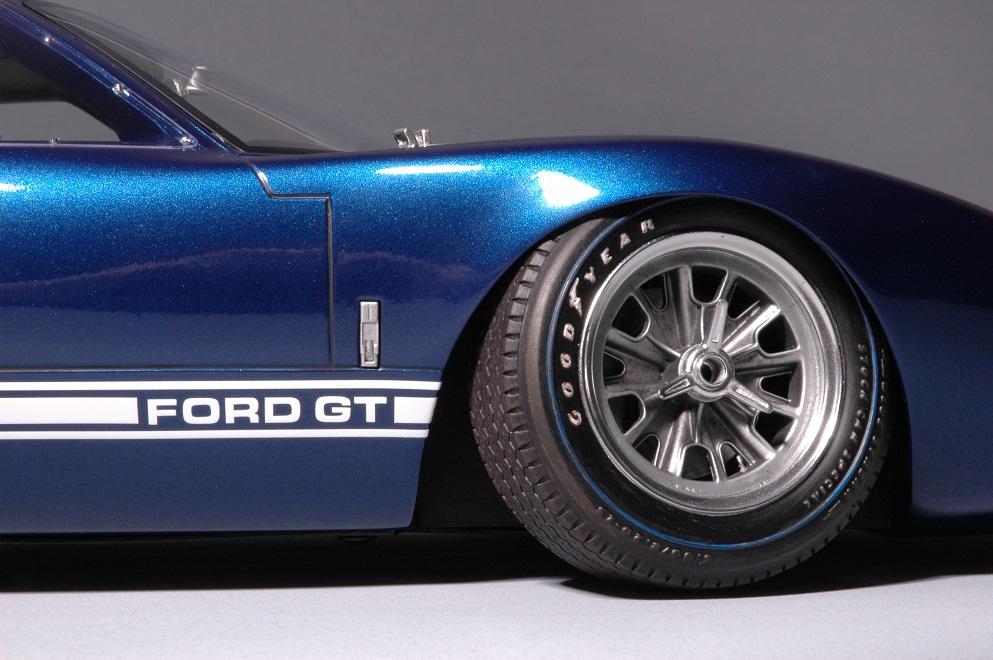
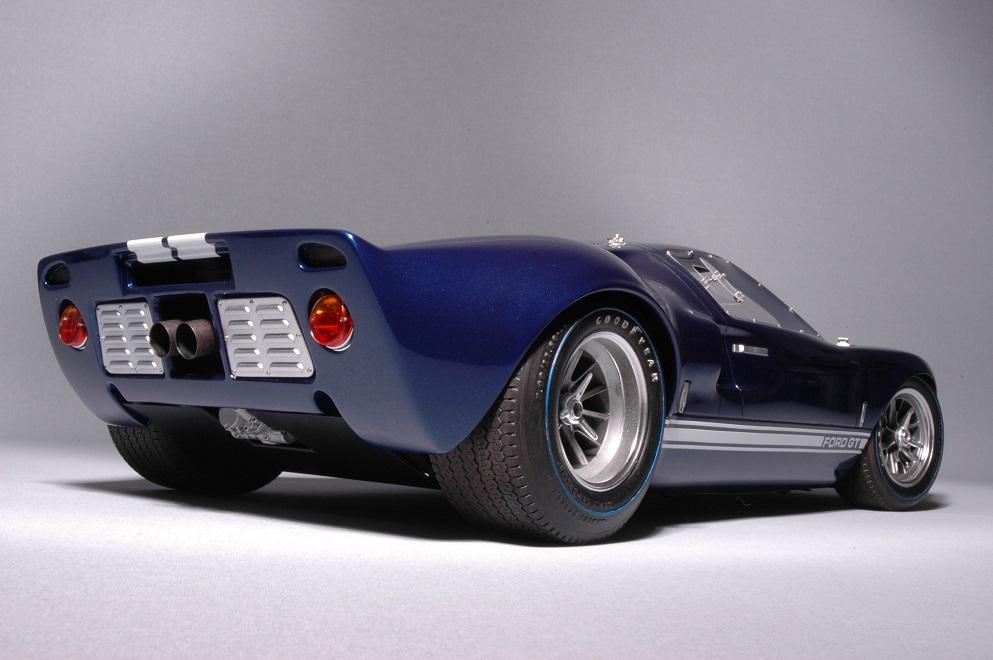
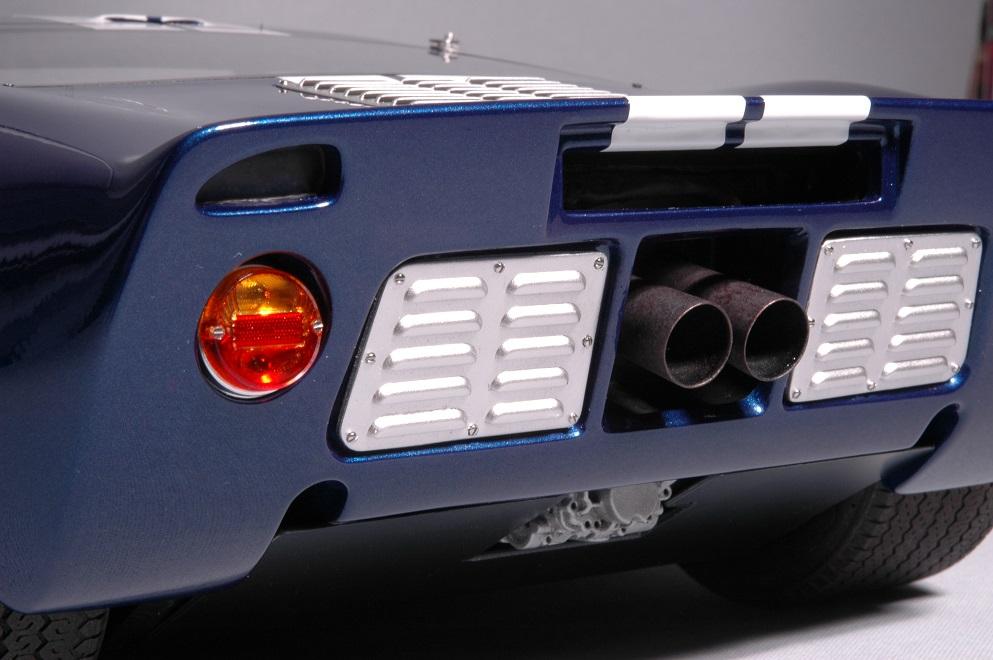
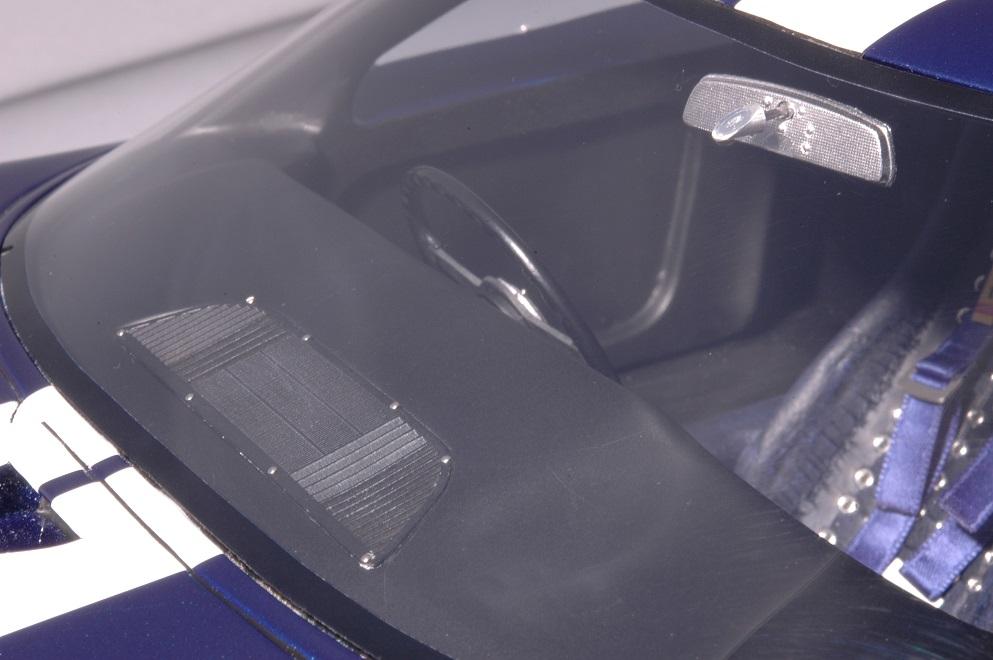
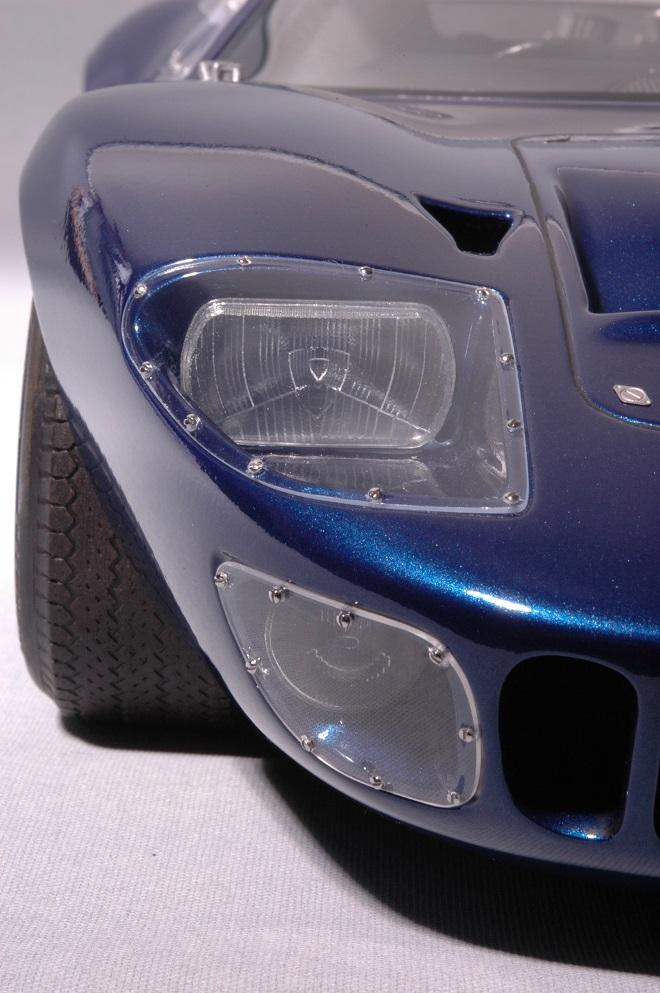
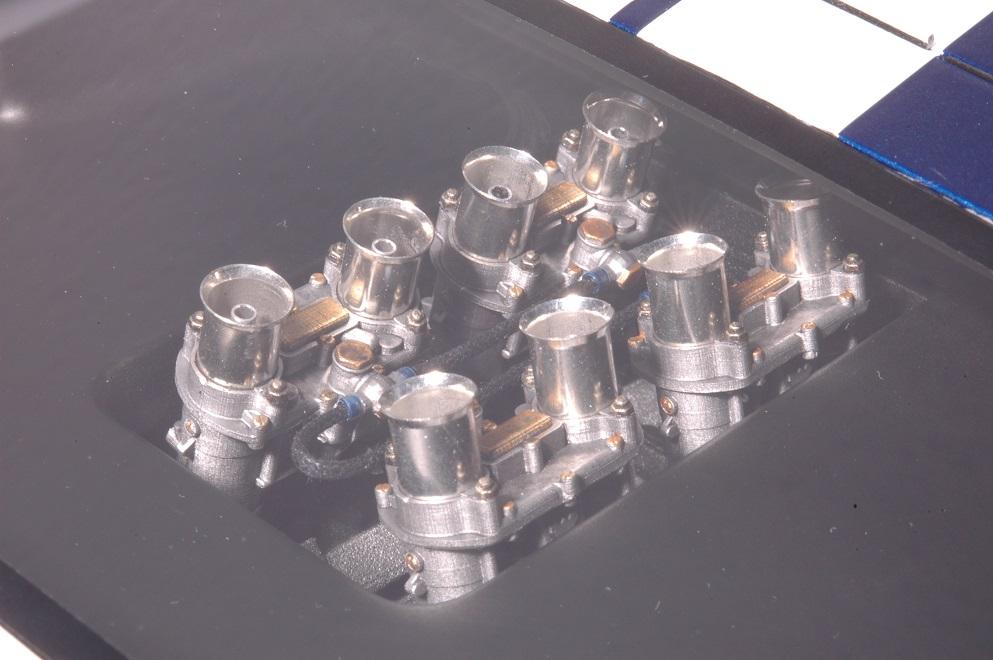
Hello everyone, here is the second member of my Shelby gang: The 1969 Ford GT40 Mk1. Since no one has managed to make a decent 1/8 kit of this famous and beautiful racer I had to build him from scratch, as usual. I used the 1/18 Rodriguez Gulf car from Spark as template. As with my other cars I made the body from polyurethane block material, copied it via silicone mould and carved the cockpit out. The roof was made from glass-fibrereinforced epoxy and the small parts are cast off - 3d printed parts. It's curbside, nothing can be opened, the wheels turn and can be steered though. The engine is scratchbuilt too, but you can buy a kit that used my engine as prototype on www.fein-design-modell.de see here too http://www.modelcarsmag.com/forums/topic/106153-18-scale-ultra-detail-gt40-engine/ If anyone who reads this has an idea where to get chassis plans of this car I'd be really, really thankful for a hint. I'd like to build a full model since I already got the engine done too, but I won't build stuff like the suspension without proper plans. Thank you for looking, comments and questions are welcome!
-
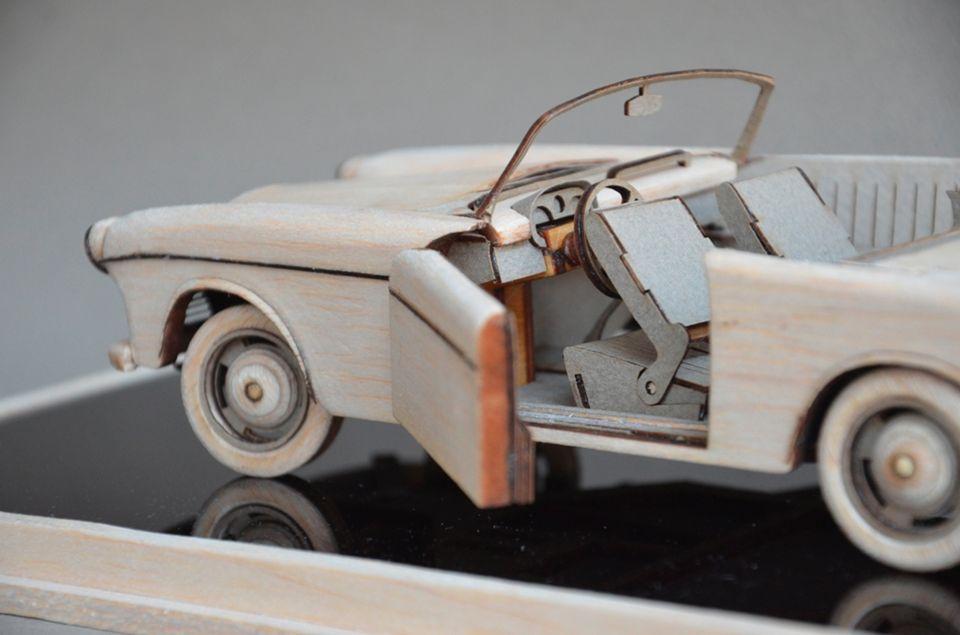
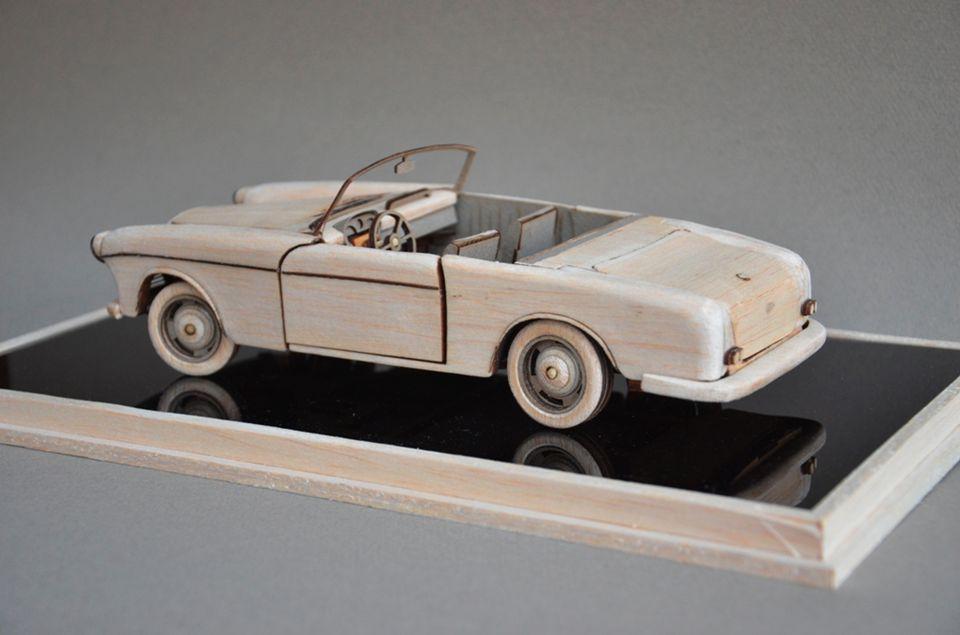
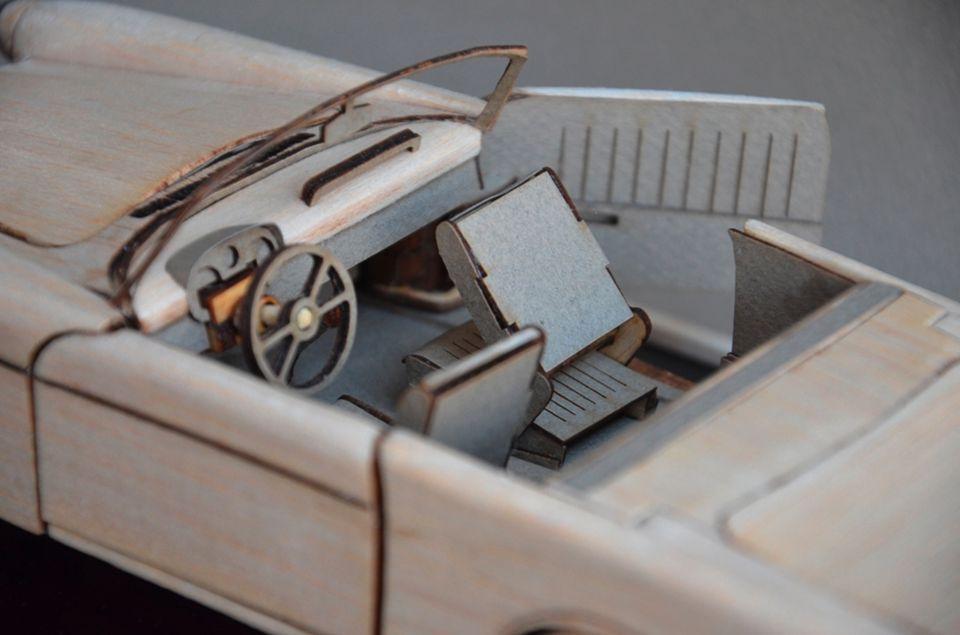
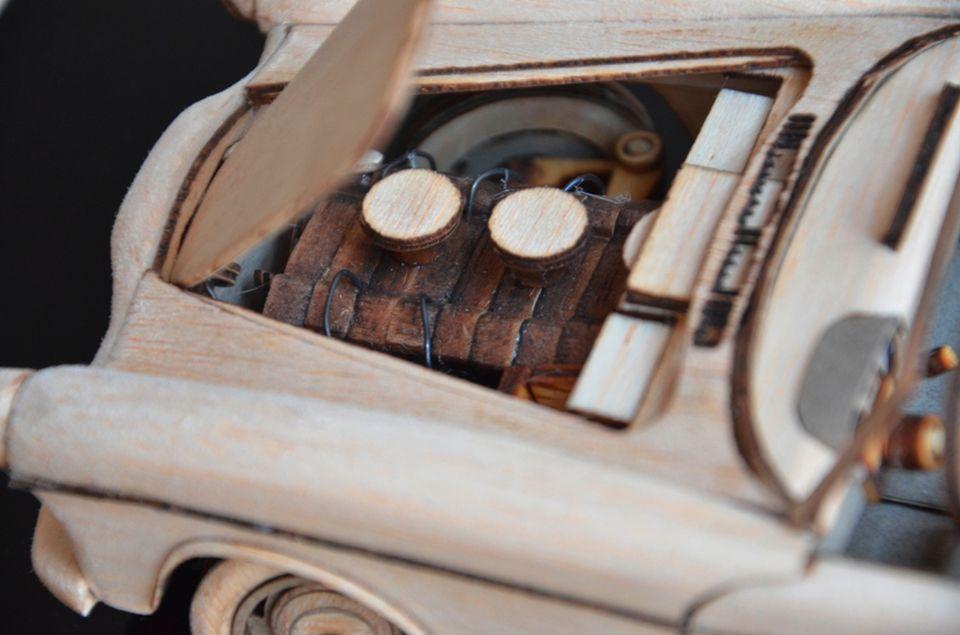
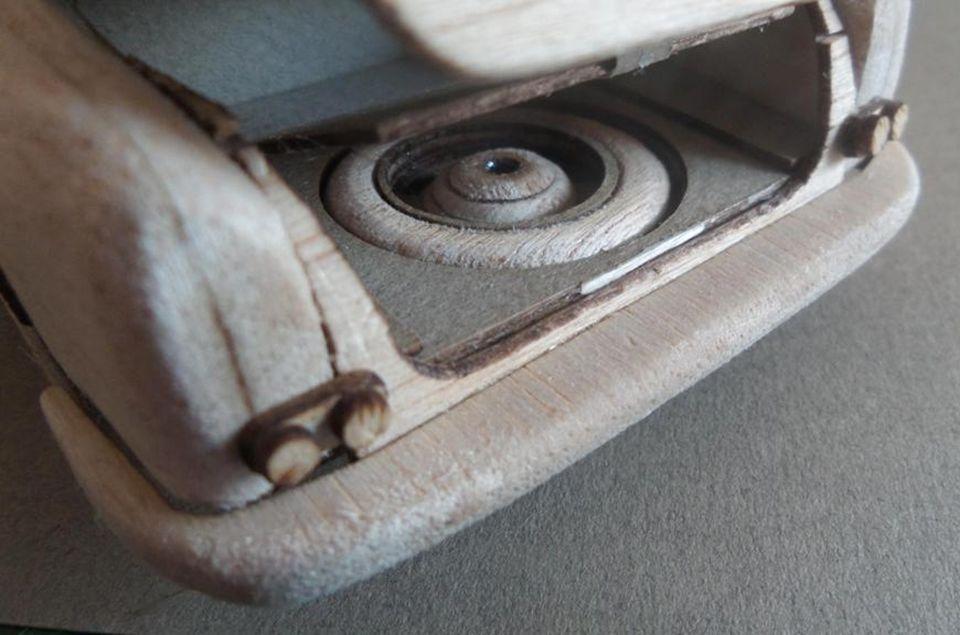
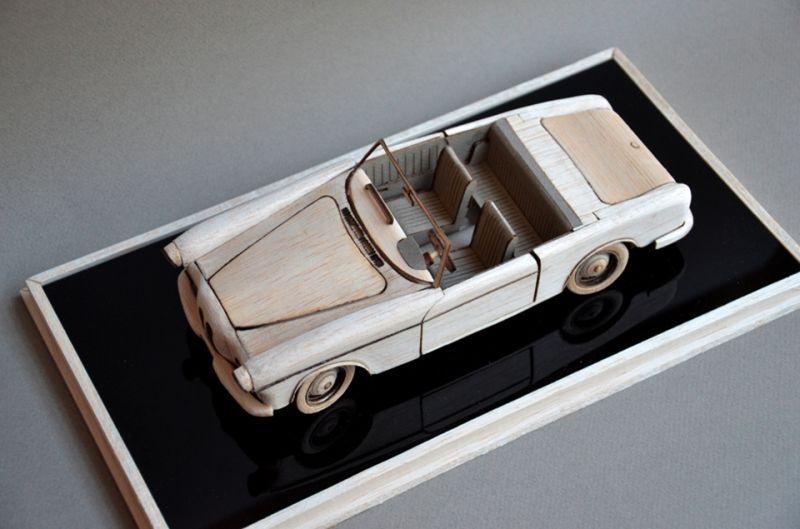
Hello ... a new baby. i thought it would be easier to build more modern forms, but then I added a lot of details ... 310 pieces in the end assembled, all scratchbuilt scale 1:20 in balsa wood
-
 This is the only model I finished in 2015. Hope to do better next year. Calling this one "Bagged Wood" !
-
 A couple of pics of a heavily modified pre-war Lionel 225E 2-6-2 into a Pacific 4-6-2 based on the Canadian Pacific #2317. The tender is scratch built with modified Lionel trucks.
-
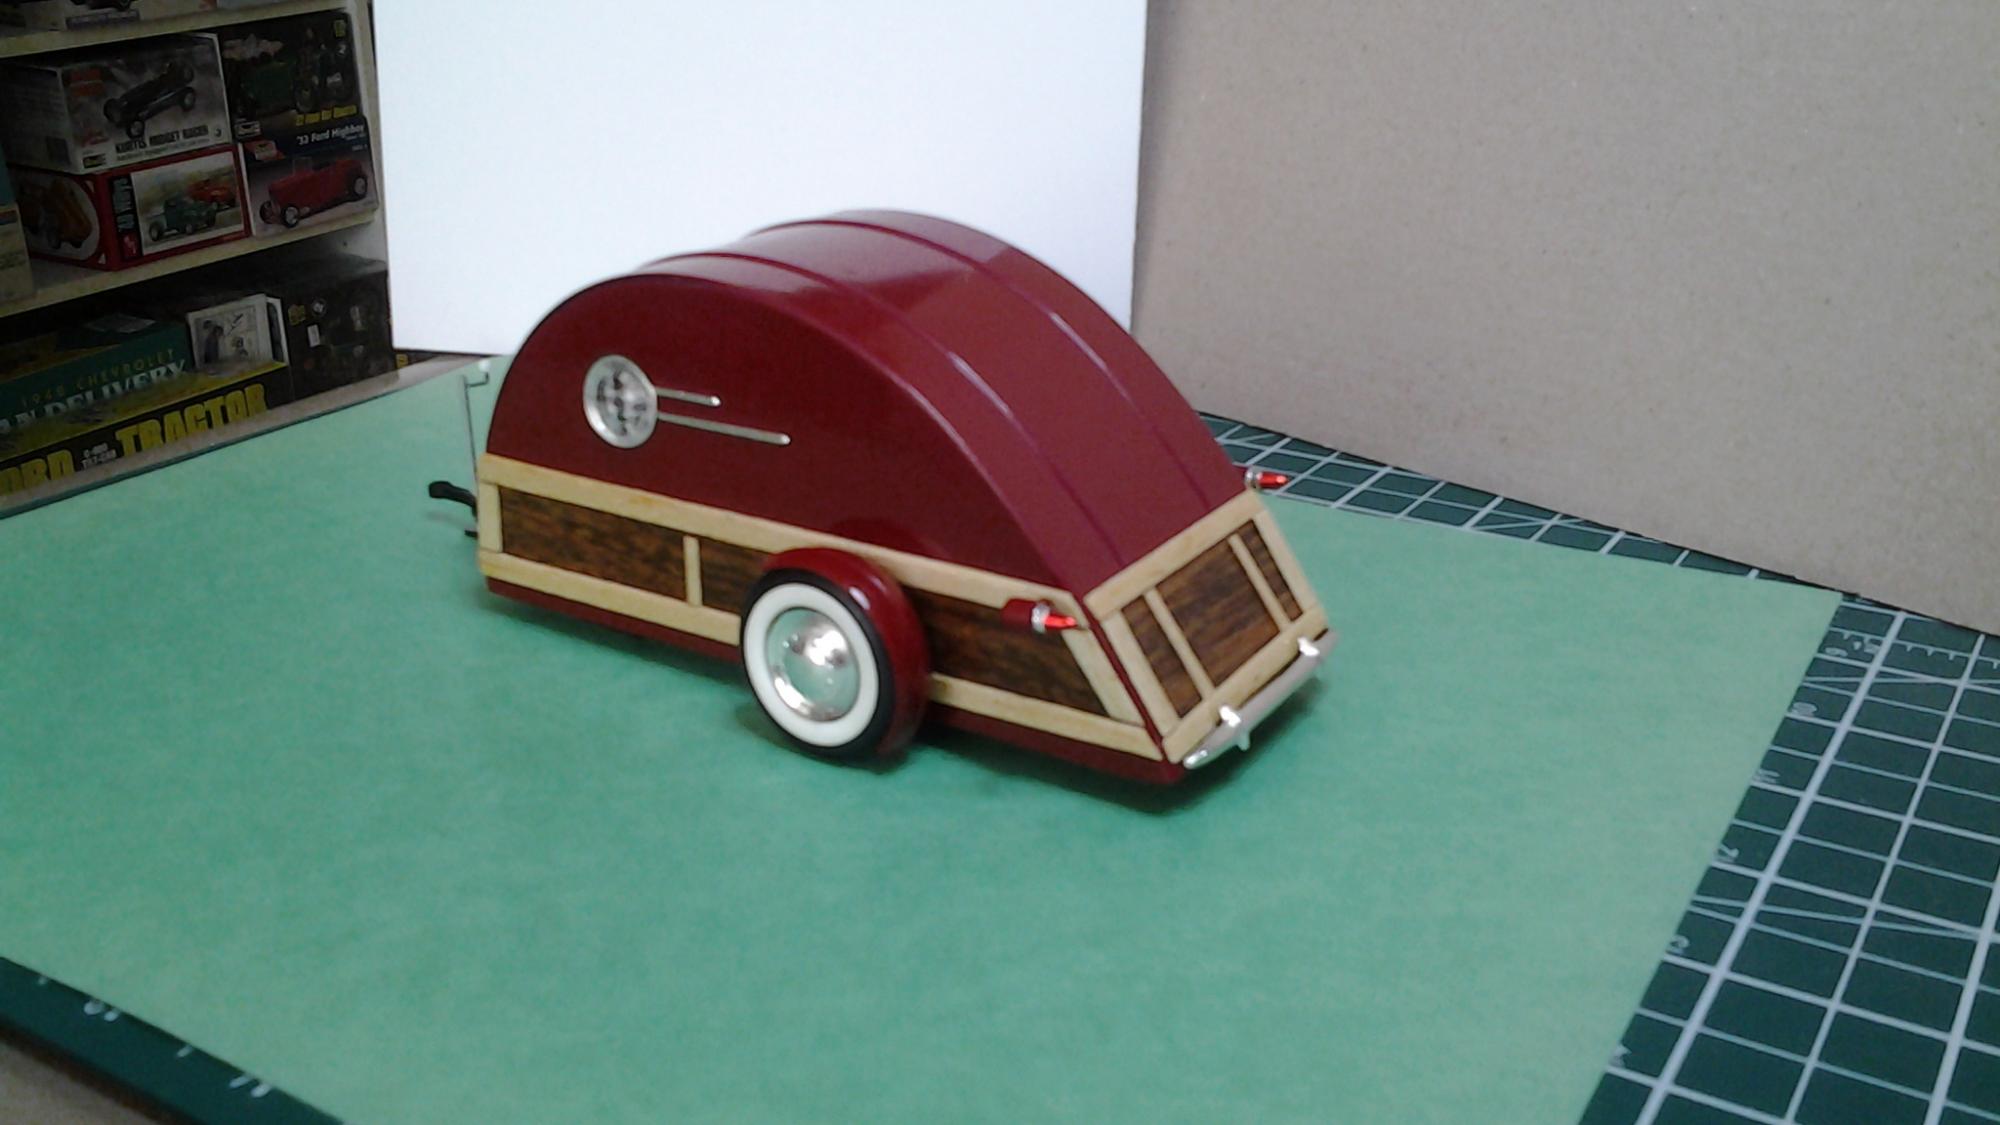
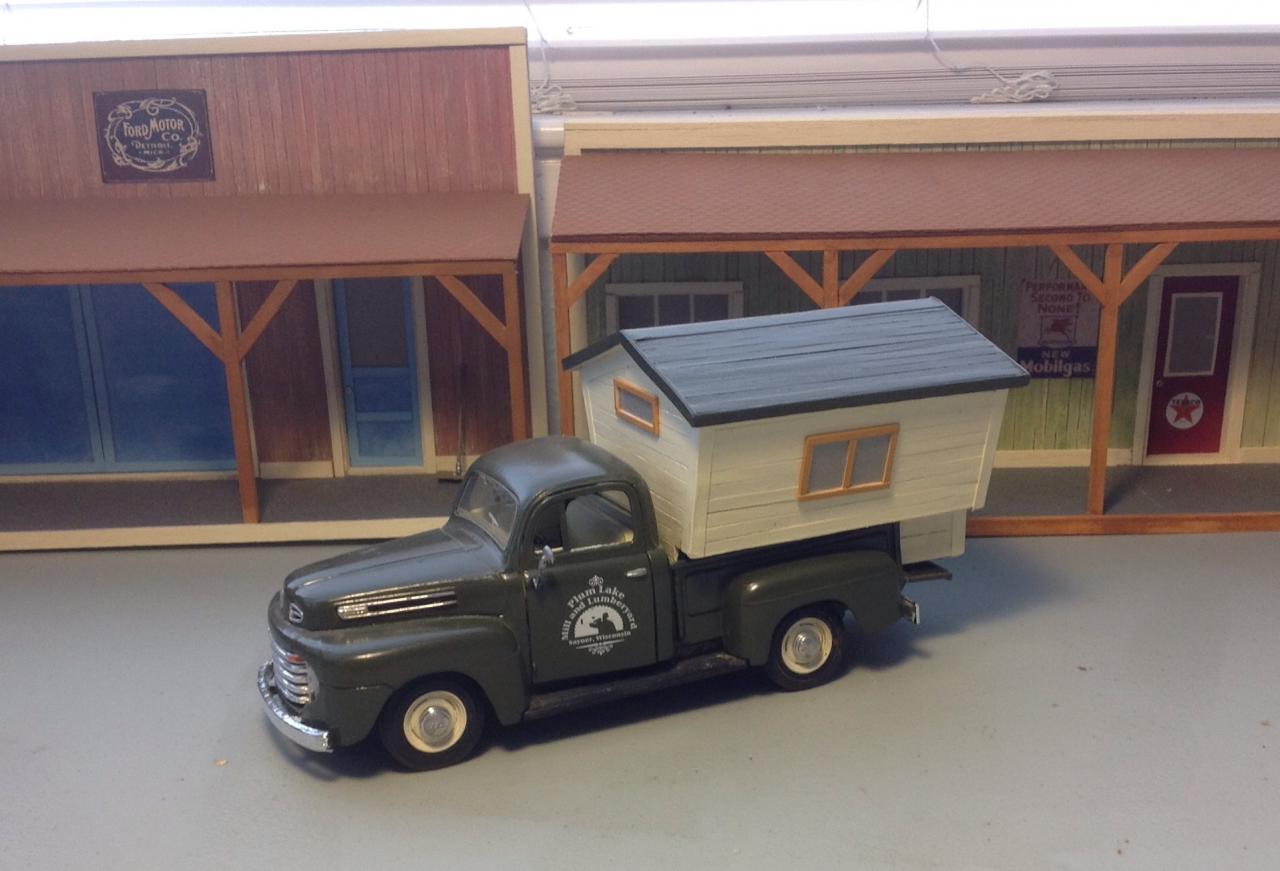
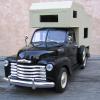 I am working on these Campers. I made them entirely from coffee stir sticks. I need to find, or make, all sorts of details, like outlets, vents, etc. It's fun to build and cost practically nothing.
-
this is the one and only model I have completed in 2012, devoting all of my spare time to this, it took a year to complete, I bought it in June of 2011 and completed it in June of 2012
-
Just a few pics of a heavily modified Ivo dragster into a Nostalgia dragster. Has a Ross Gibson resin engine, Slixx rear tires and a lengthened chassis. I'll put some WIP pics up depending on interest, this is a very heavily modified version of the AMT Ivo kit.
-
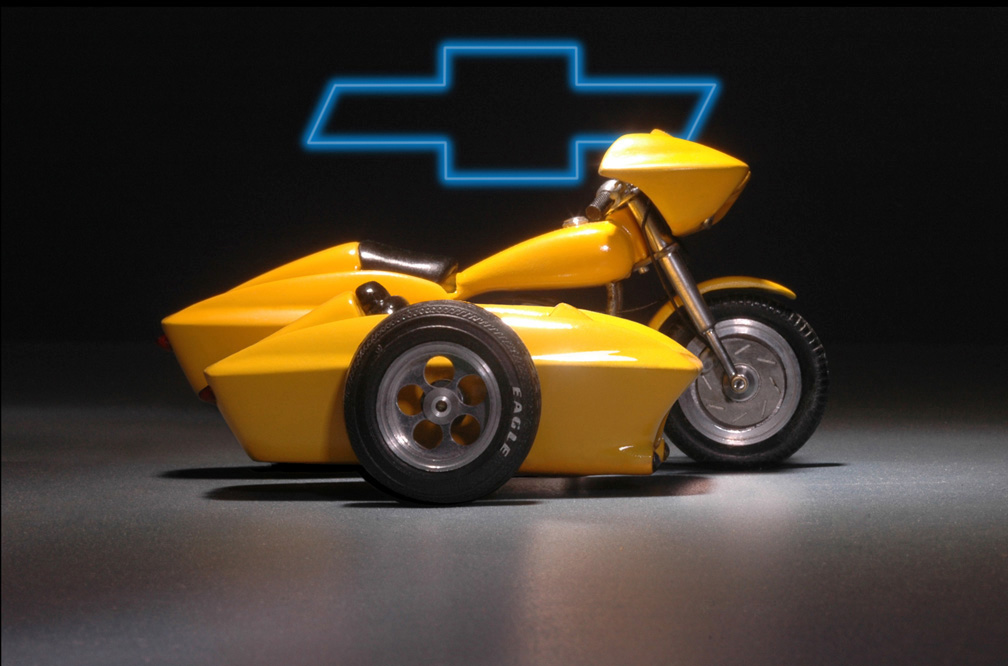
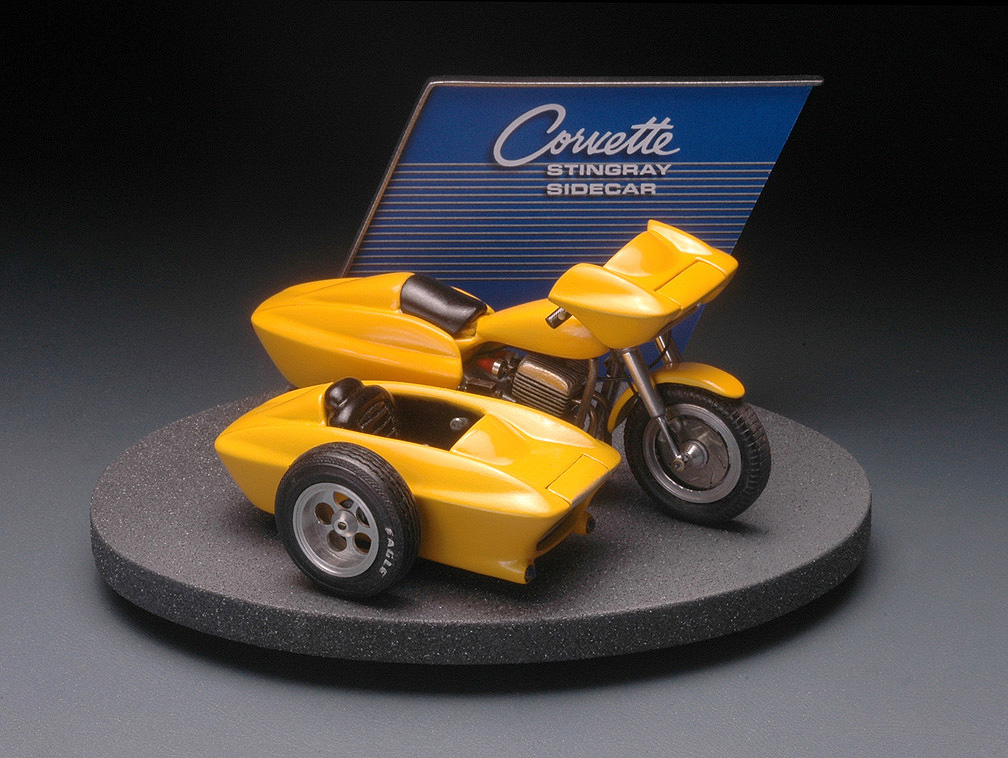
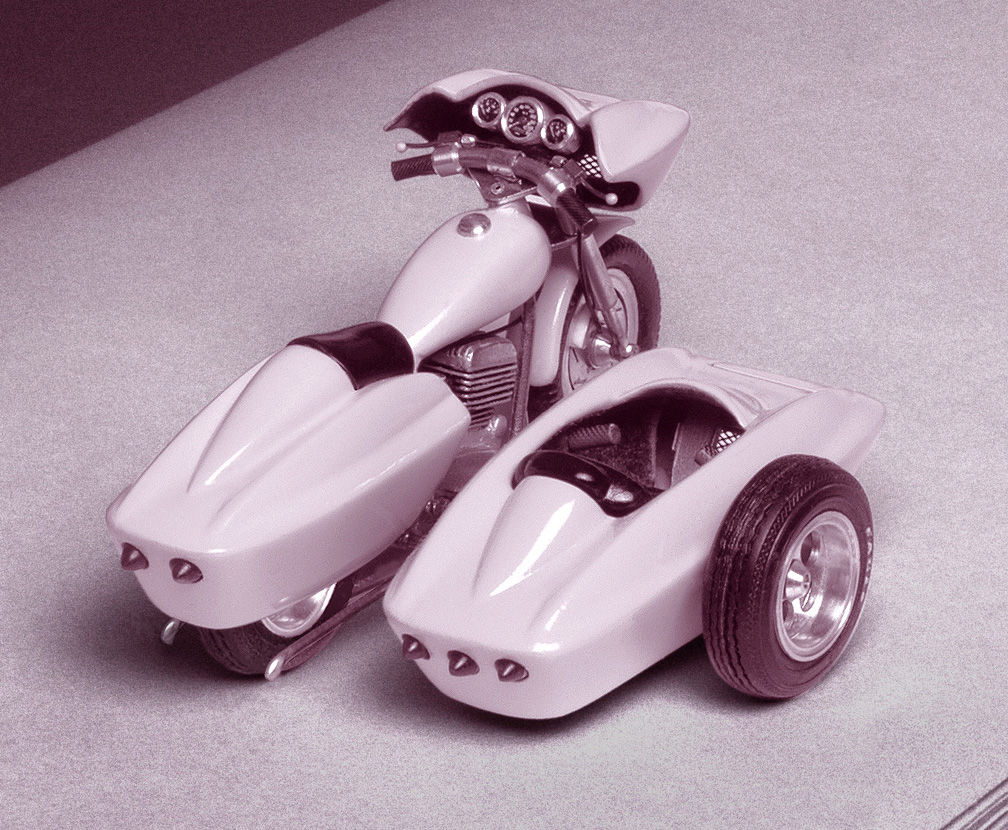
Hi guys, I made this Corvette Stingray Sidecar concept out of two AMT kits, cutting apart the fender corners and bringing them back together. The tank, basic engine block and front tire are from an old (Entex?) Kawasaki street bike that I found in the parts box. The PE front disk and two other tires are orphan parts. The rest is scratch built. I turned aluminum wheels, gas cap, instrument pods and trim rings out of aluminum and turned some red toothbrush handle for the tail lights. The instrument faces are just reduced laser prints that were gotten from the VDO website. The front forks are telescoped brass tubing, while the exhausts were bent from solder. My fake display base is balsa wood painted with hardware store speckle paint with a styrene + laser print display panel. Paint is airbrushed Testors Yellow #1114 from the 1/4 oz. glass bottles. Thanks!
-
Well heres my latest project, its an AMT camaro concept with a revell 69 camaro front and rear molded on, it will have a ZR1 corvette drivetrain and suspension and a custom interior


.JPG.fa4d17d2d48a8ea2fe331e78b36b11e3.JPG)
.JPG.86b9e1ae1750f89ba4f743f573944215.JPG)
.JPG.29601c7d61d8af5ec96ee4804dd1bd63.JPG)
.JPG.492a26cb3681e10dcf62e4c3c2ef23ed.JPG)
.JPG.c1b941af547e3a697ee710bb67898ae1.JPG)
.JPG.be5cda74eba05dbdd22001719d44bde3.JPG)
.JPG.0f2d32b09c2f984db9caa44397bdac51.JPG)
.JPG.cf4705ccd34cd12555cb5e1027df0e43.JPG)
.JPG.3085e9b8a06233a4d445d64d7e82eb4a.JPG)
.JPG.54bf90b0fba0b5c80d945f9857612322.JPG)
.JPG.15a9a3386f6fa2dc458f08360a839b13.JPG)
.JPG.9e644bcb6b53b87ad0e58f9505e63289.JPG)
.JPG.ae35acbc1ced4b702876e59e13a0d871.JPG)


.jpg.46e4193f91ee771d63a8894805adaed0.jpg)