dino246gt Posted June 9, 2015 Share Posted June 9, 2015 Yeah, that looks really great what you've done so far, can't wait to see more!!! Quote Link to comment Share on other sites More sharing options...
DumpyDan Posted June 10, 2015 Share Posted June 10, 2015 Obviously you got talent Quote Link to comment Share on other sites More sharing options...
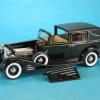
Luis Ayala Posted June 15, 2015 Author Share Posted June 15, 2015 (edited) As I promised, another small update… First coat of primer under the lower body to check for unfinished spots. It just need some small fixes and it is ready for paint. It took a while but I am very happy with the results so far. The Custom Grill will be painted body color so I removed the chrome and shot some primer on it to mock it in place. The engine valve covers and the front cover received the same treatment. The engine is primed and ready for paint. I decided to go with the three carb option to have some room for a custom cover inside the engine bay. I started working on the front suspension and rear axle so as soon as I have the correct rims set up I will post more progress. Hope you like it and thanks for looking!!!! Edited June 15, 2015 by Luis Ayala Quote Link to comment Share on other sites More sharing options...
10thumbs Posted June 15, 2015 Share Posted June 15, 2015 Looking good, Luis! Smooth and flawless. Also, the attention you paid on getting the motor parts smooth and shaped up will make for a beauty. Quote Link to comment Share on other sites More sharing options...
Sledsel Posted June 15, 2015 Share Posted June 15, 2015 Lookin good Quote Link to comment Share on other sites More sharing options...
Spex84 Posted June 15, 2015 Share Posted June 15, 2015 Lookin' smooth so far! Quote Link to comment Share on other sites More sharing options...
AUGIEDOGGIE Posted June 20, 2015 Share Posted June 20, 2015 looks great so far cany wait to see more! Quote Link to comment Share on other sites More sharing options...
Luis Ayala Posted June 22, 2015 Author Share Posted June 22, 2015 (edited) Thank you all for your comments!!! I really appreciate you like the work I have done so far. It was a long time off the bench so I am working on a slow pace and having a lot of fun. The top trim of the front windshield was not molded correctly and since I didn’t wanted to cut off everything to scratch build, I decided that the best way to go was to try to carefully carve it out and finish the body work. It took time and was not perfect but after some sanding and scraping I am really happy with the results. I managed to get some primer on the body today so below are a few pics to keep you updated. To get the custom look I wanted I decided to shave the running boards and remove the molded rubber inserts to paint them on one solid color. Soon I will post more progress on the suspension, rear axle, engine and interiors. Hope you like it and thanks for looking!! Edited June 22, 2015 by Luis Ayala Quote Link to comment Share on other sites More sharing options...
Speedfreak Posted June 22, 2015 Share Posted June 22, 2015 That looks cool Luis, nice job on that windshield frame. Quote Link to comment Share on other sites More sharing options...
Roadrunner Posted June 22, 2015 Share Posted June 22, 2015 Great, I really like the full fendered cars. Quote Link to comment Share on other sites More sharing options...
10thumbs Posted June 22, 2015 Share Posted June 22, 2015 Hi Luis, I really like the attention you show for the paint preparation. Very good info and incentive here, thanks for showing. Since you've shaved the running boards I'll bet this cool old sled will be sitting in the weeds when it's done. Real low and cool. Michael Quote Link to comment Share on other sites More sharing options...
bonehead23 Posted June 22, 2015 Share Posted June 22, 2015 That's one of those "Why didn't I think of that?" not only for the hood sides. Nice work. Quote Link to comment Share on other sites More sharing options...
Renaz Posted June 23, 2015 Share Posted June 23, 2015 Great man! Quote Link to comment Share on other sites More sharing options...
Darren B Posted June 23, 2015 Share Posted June 23, 2015 wow just came across this beauty!!! love all the custom work including the grill and designs in the door panels and hood panels will be watching this one with great interest. Quote Link to comment Share on other sites More sharing options...
Luis Ayala Posted July 8, 2015 Author Share Posted July 8, 2015 (edited) I have been very busy at work but finally had some spare time during the long weekend to start painting the engine parts. I wanted to try a different color out of my comfort zone so I went to the $0.99 store to pick up some nice nail lacquer color. These paints are really good for airbrushing, you can thin them 1:1 put many coats over the parts and they won’t build up and cover the parts details or drip easily. They dry fast, the pearl is just the size to fit the scale, there are many nice colors to choose and the best part is that you can get a 0.5 ounce jar, mix it and make 1 ounce of ready to airbrush paint for just $0.99 cents. One thing though,I preffer to use Bondo automotive lacquer primer, it has been the best so far for me and I always test new paint products on some spare parts from the kit first to make sure they blend, don't bleed or hurt the plastic. Long time ago I had a disaster with a Tamiya kit and since then I don't take any chances... The color I picked was “Teal Envy” from “Kleancolor”. You can use any hardware store lacquer thinner to mix it, I used Harris brand to mix it 1:1 and for a top coat I used Harris Acrylic Enamel Clear. The paint scheme for the build will be a two tone Teal/Silver. I used Harris clear cote on the engine because I just wanted to protect the paint finish and bring it to a nice shine. In the past I have used urethane clear for the engines and it looks like a mirror, but for me it is just too much shine. I will use some “Zymol” wax later just to make it crisp a bit more. Below are some pics in different shades and you will notice that he color changes a bit depending on the amount of light as a result of the fine silver pearls on it. I am really happy with the results so hope you like it and thanks for looking!!! Hey I almost forgot!!! One more thing… keep more than a jar handy just in case your daughter or wife spot it over your workbench… Edited July 8, 2015 by Luis Ayala Quote Link to comment Share on other sites More sharing options...
wayne swayze Posted July 8, 2015 Share Posted July 8, 2015 Smooth and stylish '36 and should look wicked in your colour choices! Sure hope it'll sit LOW!! Quote Link to comment Share on other sites More sharing options...
10thumbs Posted July 8, 2015 Share Posted July 8, 2015 Hi Luis, I love the idea about nail polish, also making your hotrod motor have a cool color. I tried the nail polish thing and had only limited success, maybe it wasn't thinned out enough. After gathering experience with lacquer paints and shooting them really thin, I ought to try the nail polishes again. Let those motors shine! Will you be painting the body with nail polish too? Good update. Hahaha, the wife asked me where I got the nail polish from. She was more interested in knowing what the heck I wanted to do with it! She was relieved when I showed the motor to her. Michael Quote Link to comment Share on other sites More sharing options...
Sean W Posted July 8, 2015 Share Posted July 8, 2015 Outstanding work Luis. Lots of ideas to harvest as well Keep up the great work! Quote Link to comment Share on other sites More sharing options...
Luis Ayala Posted July 9, 2015 Author Share Posted July 9, 2015 Hi Luis, I love the idea about nail polish, also making your hotrod motor have a cool color. I tried the nail polish thing and had only limited success, maybe it wasn't thinned out enough. After gathering experience with lacquer paints and shooting them really thin, I ought to try the nail polishes again. Let those motors shine! Will you be painting the body with nail polish too? Good update. Hahaha, the wife asked me where I got the nail polish from. She was more interested in knowing what the heck I wanted to do with it! She was relieved when I showed the motor to her. Michael Hi Michael!!! Yes, I wil be painting the body with nail polish next weekend. Hahaha!!!! my wife and daughter ask me the same thing the first time they found me digging in their stash of nail colors... Now they always ask if I have spare colors... Quote Link to comment Share on other sites More sharing options...
Luis Ayala Posted July 9, 2015 Author Share Posted July 9, 2015 Thank you all for your comments, I am glad you like the progress of the build!!!! I am having a lot of fun after all these years off the bench. It will definately sit close to the gound so as soon as I have the right rims and tires I wil post some mock up pics. Quote Link to comment Share on other sites More sharing options...
10thumbs Posted July 9, 2015 Share Posted July 9, 2015 Luis, I had to hide my nail polish! The wife found a cool red one and she borrowed it. I did get it back though, but she had spilled the stuff and the cap didn't fit properly anymore. Then it leaked out all over the place! Typical. I didn't feel good about making a fuss over my nail polish, so I let it be. The stuff is really cheap. Have fun painting. Michael Quote Link to comment Share on other sites More sharing options...
Luis Ayala Posted July 10, 2015 Author Share Posted July 10, 2015 Just a small update to show you the stance I am looking for. The rear axle and the front suspension have been modified. Still some minor adjustments and everything will be ready for primer. I am using these rims just for testing the high of the tires and the center alignment. Hope you like it and thanks for looking!!! Quote Link to comment Share on other sites More sharing options...
10thumbs Posted July 10, 2015 Share Posted July 10, 2015 Oh yeah! Down and dirty! I'm liking the stance. I'm not a fan of modern wheels and big tire sizes, but I do like them on a 36 and 37 Ford, the body style goes good with the modern setup, my opinion. 40 Ford is cool too with these, I'd like to build one too. Have fun painting Luis, this is a cool car. Michael Quote Link to comment Share on other sites More sharing options...
misterNNL Posted July 10, 2015 Share Posted July 10, 2015 Looking pretty slick at this point.This a kit I very seldom see built.Great work.Welcome back to the bench and thanks for sharing. Quote Link to comment Share on other sites More sharing options...
3100 chevy Posted July 10, 2015 Share Posted July 10, 2015 Cool I like it! Quote Link to comment Share on other sites More sharing options...
Recommended Posts
Join the conversation
You can post now and register later. If you have an account, sign in now to post with your account.
Note: Your post will require moderator approval before it will be visible.