Speedfreak Posted July 10, 2015 Share Posted July 10, 2015 Looks 'really' good Luis! Quote Link to comment Share on other sites More sharing options...
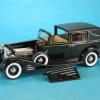
Luis Ayala Posted July 13, 2015 Author Share Posted July 13, 2015 (edited) I was ready to paint the body but we had a rainy weekend so I continued the work on the interiors. I was really disappointed with the molded interior details so I decided to cut off the sides of the interior tub and make some flat panels where I can put some nice details later on. One of the sides was thicker than the other as you can see below. Also the dashboard was not sitting correctly so with the new panels I can get it to fit correctly on its place. I was wondering what to do to make some custom details to the interior and I came up with the idea of building a folding console in the middle of the seat, so below you will see a few pics of the process and the almost finished piece. First Part of the Process: Almost Finished Piece: I still have to make some minor adjustments and make the holes for the “refreshments”, but I am really happy with the results. The tub also needs some sanding and filling but so far the fit is so much better especially for the side windows. Hope you like it and thanks for looking!!!! Edited July 13, 2015 by Luis Ayala Quote Link to comment Share on other sites More sharing options...
wayne swayze Posted July 13, 2015 Share Posted July 13, 2015 Your idea for the console is great...so's your workmanship. I'm enjoying this build. Quote Link to comment Share on other sites More sharing options...
10thumbs Posted July 13, 2015 Share Posted July 13, 2015 Luis, this is a pretty slick idea, I haven't seen it done yet and it's looking good. Good idea with the refreshments being safe. We don't want any mishaps on Saturday Nights. Michael Quote Link to comment Share on other sites More sharing options...
Luis Ayala Posted July 13, 2015 Author Share Posted July 13, 2015 Thank you all for your comments!!! I will finish the interior details and post more progress soon!! Quote Link to comment Share on other sites More sharing options...
Skip Posted July 14, 2015 Share Posted July 14, 2015 Mr. A., You have some amazing skills there Sir!!! Really like what you have done so far. My only change would be a LaSalle grill. Now comments. 1. Stance, How about picking up the front 1/16" and the rear 1/8"? I realize you're going for an aired out bagged look, but things got limits. 2. Interior is excellent so far, if you hadn't already thought about it. How about adding caps to the inner door and could wrap all the way around, would give proper bullnose on the doors and a transition to a headliner elsewhere. Quote Link to comment Share on other sites More sharing options...
Renaz Posted August 5, 2015 Share Posted August 5, 2015 Holly S… Quote Link to comment Share on other sites More sharing options...
Luis Ayala Posted August 6, 2015 Author Share Posted August 6, 2015 (edited) Time for a small update!!! The console is almost finish, I made the holes for the refreshments and added an additional piece of styrene to make it look also like an arm rest. I just need to fix some minor details and it will be ready for primer. I added some extra styrene to the under body to cover the exposed tail under the rumble seat and make it look more realistic. Below you can see the difference on the before and after pics. I am working on the interior panels for the doors and rumble seat so soon I will post more progress. Hope you like it and thanks for looking!!! Mr. A., You have some amazing skills there Sir!!! Really like what you have done so far. My only change would be a LaSalle grill. Now comments. 1. Stance, How about picking up the front 1/16" and the rear 1/8"? I realize you're going for an aired out bagged look, but things got limits. 2. Interior is excellent so far, if you hadn't already thought about it. How about adding caps to the inner door and could wrap all the way around, would give proper bullnose on the doors and a transition to a headliner elsewhere. Hi Skip!!! Thank you for your comments, I am glad that you like the work so far!!! For the Stance, the look I am looking is closer to what you see in the mock up pics. When the right rims are in it will sit just a little bit higher. For the interiors I am still working on the upholstery panels so hopefully I will post more progress soon. Edited August 6, 2015 by Luis Ayala Quote Link to comment Share on other sites More sharing options...
10thumbs Posted August 6, 2015 Share Posted August 6, 2015 Hi Luis,That's some really fine prep work you're doing! The setup for the refreshments looks very cool also, and usable!As you know I took a look at my 36 kit and man there are some serious trimming issues to deal with to get tit looking as smooth as yours. Respect.Michael Quote Link to comment Share on other sites More sharing options...
Luis Ayala Posted January 20, 2016 Author Share Posted January 20, 2016 (edited) Hello Everyone and Happy New Year!!!! Long time after the last update so here’s a small one… Just finished getting primer over all parts: Now is time to install the brakes, still need some adjustments but pretty much close to the final position. A quick black wash to sharpen the rotor details, still need some additional cleanup but look much better…I will paint the Calipers later when the final assembly is closer. Since this paint is very thin, it will reveal any sanding scratches, so I took some time to double check, fix them, applied a few more primer coats to the body and sand it down to 800 grit. After all these years I just got infected again with the “started too many projects syndrome” so that’s one of the reasons it took me so long to post again. I will post my new projects as soon as I get this one painted. Hope you like it and thanks for looking!!! Edited January 20, 2016 by Luis Ayala Quote Link to comment Share on other sites More sharing options...
ismaelg Posted January 22, 2016 Share Posted January 22, 2016 Hey! I had not seen this! Welcome back! Good to see we are coming out of hibernation Looking good so far. May suggest a color? how about...... BLUE? Thanks, Quote Link to comment Share on other sites More sharing options...
Luis Ayala Posted January 23, 2016 Author Share Posted January 23, 2016 Hey! I had not seen this! Welcome back! Good to see we are coming out of hibernation Looking good so far. May suggest a color? how about...... BLUE? Thanks, Hi Ismael!!! I am glad you like the work so far!!! Did yoy mentioned "Blue"???? Quote Link to comment Share on other sites More sharing options...
MrObsessive Posted January 23, 2016 Share Posted January 23, 2016 Lookin' Good Luis! I'll go so far as to say that will be a giant killer when done! Quote Link to comment Share on other sites More sharing options...
crazyrichard Posted January 23, 2016 Share Posted January 23, 2016 whouw awsome build and details !! Quote Link to comment Share on other sites More sharing options...
espo Posted January 23, 2016 Share Posted January 23, 2016 Outstanding build. I'll apologies now because I'm going to use your fold down arm rest on my next big car build. Quote Link to comment Share on other sites More sharing options...
Dogfish_7 Posted January 23, 2016 Share Posted January 23, 2016 Very thorough! Time well spent. Quote Link to comment Share on other sites More sharing options...
Bob Ellis Posted January 23, 2016 Share Posted January 23, 2016 Great idea on removing the exhaust from the frame. I have done the same on interior tubs. Quote Link to comment Share on other sites More sharing options...
Luis Ayala Posted January 23, 2016 Author Share Posted January 23, 2016 Thank you all for your comments !!! I will post more progress son!!! Quote Link to comment Share on other sites More sharing options...
Luis Ayala Posted January 23, 2016 Author Share Posted January 23, 2016 Outstanding build. I'll apologies now because I'm going to use your fold down arm rest on my next big car build. Hi David!!! Great to hear that you will use the arm rest on your next big car build, this is what the hobby is all about to share ideas. Quote Link to comment Share on other sites More sharing options...
JustanotherKiwi Posted January 23, 2016 Share Posted January 23, 2016 Great work, when builders like yourself post in such detail it helps the rest of us aim a bit higher, so Thanks.What colour is the motor? I have the earlier kit with the convertible option, and want the engine in factory colours. Quote Link to comment Share on other sites More sharing options...
Jantrix Posted January 24, 2016 Share Posted January 24, 2016 Awesome work. Top marks. Quote Link to comment Share on other sites More sharing options...
Luis Ayala Posted January 24, 2016 Author Share Posted January 24, 2016 Lookin' Good Luis! I'll go so far as to say that will be a giant killer when done! Thanks Bill !!!! Quote Link to comment Share on other sites More sharing options...
Luis Ayala Posted January 24, 2016 Author Share Posted January 24, 2016 Great work, when builders like yourself post in such detail it helps the rest of us aim a bit higher, so Thanks.What colour is the motor? I have the earlier kit with the convertible option, and want the engine in factory colours.Thanks Paul!!!I really appreciate it. Since I am building a custom version, the color I picked is “Teal Envy” a $0.99 nail lacquer from “Kleancolor”.If you are looking for a factory look, up to 1941 it was dark green, but Dupli-Color DE1617 on spray can is an acceptable shade.Hope this helps!!! Quote Link to comment Share on other sites More sharing options...
Skip Posted January 24, 2016 Share Posted January 24, 2016 (edited) Luis - Just went back and reread this from the start. From the "slotted openings" on the hood sides I'm assuming that you're going with a more modern "Pre-Billet Everything" Street Rod. Depending on your intended time period aimed at there are a couple more ways you could go on those sides. Over the years I've seen both of these used. 1. Form a backer on each of the slots which tapers open to form a ducted air inlet at either the front or rear of the slot. (Think NASA Ducts to the shapes in your hood sides.) 2. Easier than the first, use thin spacers to create stand offs on the backside of the hood. Then use sheet to form the Shape of the slots, slightly larger than the slot. Would give the appearance of vented hood. Lou Edited January 24, 2016 by Skip Quote Link to comment Share on other sites More sharing options...
Skip Posted January 24, 2016 Share Posted January 24, 2016 Well something must have got lost in quotation!Luis - I distinctly remember adding that I really like what you have done with this kit. You've massaged a ton of little stuff out of the model, your hard work shows. I'm highly impressed with te panel fit and finish from top to bottom, it's first rate modern Street Rod quality.Bill didn't mention another popular '50's / '60's treatment to the top inserts. Many Hot Rodders / Customizers upholstered the insert with the same pattern as the interior, seats and door panels. I've seen rollsand pleats, diamond tuck to name a few. Most later Street Rods had the top filled. Whatever way you go I'm sure it's going to look good! Quote Link to comment Share on other sites More sharing options...
Recommended Posts
Join the conversation
You can post now and register later. If you have an account, sign in now to post with your account.
Note: Your post will require moderator approval before it will be visible.