72 Charger Posted October 3, 2015 Share Posted October 3, 2015 DANG Peter there sweet . You paint really well Quote Link to comment Share on other sites More sharing options...
Crusader101 Posted October 3, 2015 Share Posted October 3, 2015 DANG Peter there sweet . You paint really well+1Your paint jobs are jewel-like.Do you decant the TS-13 clear or spray it directly from the can? Quote Link to comment Share on other sites More sharing options...
peekay Posted October 3, 2015 Author Share Posted October 3, 2015 Thanks a lot Dave and Mike.Mike the clear (and black) is out of the can and if I could take a more in-focus photo you would see that I have a fine-ish orange-peel in all these surfaces. I've never been able to do it any other way and have simply learned to polish them out - although that sometimes doesn't go too well either; the Coupe DeVille has a couple of spots where I've polished through to primer and I've managed to make it worse trying to touch up. Oh well.I've just ordered some 2K clear from Standox in Germany in the hope of overcoming such problems. Quote Link to comment Share on other sites More sharing options...
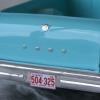
peekay Posted October 8, 2015 Author Share Posted October 8, 2015 Just a quick update. I got the grille and rear bumper detailed. A little sloppy in places but it might be about as good as I can get it. I have two of these kits and noticed that one had the sun-roof glass and the other not. I wanted to use the piece with the sun-roof but it had a cracked rear window so I removed the rear segment and replaced the three rear windows with clear sheet. I have also found appropriate mirrors in my parts box - the kit is an unassembled promo with 20 pieces (that's including the tyres) so it didn't have mirrors. I will probably now construct poseable steering. Quote Link to comment Share on other sites More sharing options...
StevenGuthmiller Posted October 8, 2015 Share Posted October 8, 2015 Looking good Peter! Steve Quote Link to comment Share on other sites More sharing options...
RAMBENNA Posted October 9, 2015 Share Posted October 9, 2015 LOOKS GREAT SO FAR Quote Link to comment Share on other sites More sharing options...
slusher Posted October 9, 2015 Share Posted October 9, 2015 Looking Sharp, i always like that body style Cadillac... Quote Link to comment Share on other sites More sharing options...
peekay Posted October 9, 2015 Author Share Posted October 9, 2015 Thanks Steve, Cliff and Carl.In 1974, when this style was new, I remember thinking they looked too square and I didn't appreciate all the vertical lines - but they've grown on me. I'm still not sure if this is a 77 or a 78. Quote Link to comment Share on other sites More sharing options...
Ron Hamilton Posted October 9, 2015 Share Posted October 9, 2015 Some other models I'm working on, all fresh from the paint booth. The Eldorado was done with Gravity Colours Alcoa Aluminum with TS13 clear, not yet polished out. The Alcoa has very fine metallic particles and I'm using to mix other metallic colours. The Nomad was done with Zero paints - their Extra Fine Metallic Base mixed with their candy blue and green till I liked it, and a mint green for the roof. TS 13 clear, yet to be polished. And the Revell XK120, done with Tamiya TS14 gloss black, also yet to be polished. Wish me luck! You are bringing out My '70's show with that Eldo. I love the silver. I was able to get all of JoHan's '70's Eldorados to build, including the elusive '74 and '75. My big problem is painting, as I cannot paint in the house. I have to get back on the '71 as it is so close to being finished. That Nomad and Jag are sure tobe beautiful when done. Quote Link to comment Share on other sites More sharing options...
peekay Posted October 9, 2015 Author Share Posted October 9, 2015 Thanks Ron. I feel your pain - I also couldn't paint at home for a decade or so, really slows you down! Quote Link to comment Share on other sites More sharing options...
72 Charger Posted October 9, 2015 Share Posted October 9, 2015 Peter that grille looks good . How did you do the black rub strips on the bumper ? Quote Link to comment Share on other sites More sharing options...
peekay Posted October 10, 2015 Author Share Posted October 10, 2015 Thanks Dave. Not having the steady hand and good eyes I used to have, I resorted to a bunch of tricks to get the grille done.I masked the rubber strips top and bottom with BMF and brush painted them as one unit with Humbrol flat black. I then foiled the gap between the two strips to separate them.The black line between the bumper and the grille is a length of Letraline tape. The orange lights are pieces cut from a flame decal. The very thin black lines around the lights are and above them are done with watered down acrylic, flowed into the molded-in troughs. I will fix up a few small problem areas visible in the photo. Quote Link to comment Share on other sites More sharing options...
Jeremy Jon Posted October 11, 2015 Share Posted October 11, 2015 That is some fantastic & impressive workmanship Peter, bravo!!! I'm looking forward to seeing more of your excellent work! Quote Link to comment Share on other sites More sharing options...
peekay Posted October 11, 2015 Author Share Posted October 11, 2015 Thanks a lot, Jeremy. I hope to finish this one in the next few days before a family member comes to stay.I messed up the sun-roof glass and will leave it off. I also won't be doing poseable steering - it would expose the kit's inadequate inner fenders - so there won't be anything more of interest to show in this WIP. Look for the model in Under Glass soon. Quote Link to comment Share on other sites More sharing options...
Recommended Posts
Join the conversation
You can post now and register later. If you have an account, sign in now to post with your account.
Note: Your post will require moderator approval before it will be visible.