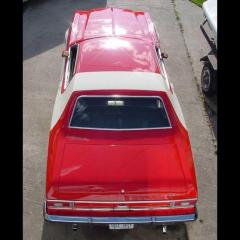
J007KLEIN Posted February 18, 2016 Share Posted February 18, 2016 (edited) My best friend built a replica '69 Hurst Olds convertible as his first car back in the day. During his stint in the Air Force, he had the Olds along with the family car and when his enlistment was up, the decision was made to return to West Virginia from Holloman AFB in Alamogordo, NM. The problem he faced was they could only tow back one car behind the U-Haul, so the decision was made to sell the Olds before heading home. Like many of us, he now regrets that decision and dreams of one day having another '69 H/O clone.Since my numbers for the recent billion dollar PowerBall didn't hit, I decided to instead build him a more affordable desktop model. Since there is no diecast made of the '69 H/O convertible (or a 442 or Cutlass convertible for that matter) I picked up an Ertl 1/18 scale '69 H/O hardtop diecast model and plan on attempting to convert it into a drop top. Doing so may require a total respray which means the H/O and Olds fender emblem decals may possibly be lost, so I'll need to source the 1/18 scale Hurst Olds decals just in case. I also located a white convertible up top so the H/O can be displayed open or closed.The diecast has arrived, so prior to disassembly and customization beginning, here are a few before photos..... Edited February 18, 2016 by J007KLEIN Quote Link to comment Share on other sites More sharing options...
J007KLEIN Posted February 18, 2016 Author Share Posted February 18, 2016 First order of business was to get the car blown apart. The removal of about 10 small Phillips head screws and the body separated easily from the frame. A few more screws removed and the dash, doors and hood were free from the body and then popped out the front to rear "glass"...... Quote Link to comment Share on other sites More sharing options...
J007KLEIN Posted February 18, 2016 Author Share Posted February 18, 2016 I determined where I wanted to make the initial cuts to the roof and marked and masked off the body to protect the original paint (which hopefully I'll be able to match) and the markings. Did a test of my Foredom motor tool V stone cutter to see how easily it would cut the metal and quickly decided I needed a better style cutter.... Quote Link to comment Share on other sites More sharing options...
J007KLEIN Posted February 20, 2016 Author Share Posted February 20, 2016 (edited) With the Foredom tool fitted with a cutoff wheel, I made my initial cut to remove the roof so I could get a better idea where to cut the quarters..... With the roof out of the way, I located and ground a slot just behind the windshield to allow the convertible top to be installed so I could mark the quarters for the first rough cut..... The convertible top was placed approximately into position and the quarters were cut..... The top is really nice and has a very realistic texture to it...... but it looks like I may have to split it so I can widen it a bit to fit the Cutlass' windshield header and possibly the rear quarter flanks..... She seems to be working out pretty smoothly thus far. I need to thin down the windshield header to the proper thickness so I can make the final cut at the quarters and then create a filler panel between the decklid and the top. I notice too from looking at pics of the actual cars that the decklid tapers in a bit from the tail lights forward so I may need to rework the panel lines too. Edited February 20, 2016 by J007KLEIN removed excess white space, corrected photo Quote Link to comment Share on other sites More sharing options...
J007KLEIN Posted February 21, 2016 Author Share Posted February 21, 2016 After thinning down the windshield header, I untaped the body to get my first look at the fitment of the convertible top..... It's obvious that the rear of the top needs to go a bit lower because it looks too high. I needed to get an idea of how the interior was going to be affected so I dropped the body onto the chassis..... Looks like the interior won't need too much modification, just a bit of work in the back seat to replicate the folded top well. I next taped the front of the top to the windshield header and swung it up into position from within the body to find it's true rear surface location.... SUCCESS... I think that located the top perfectly into position! Now to mark the location on the inside of the body and cut it away. Quote Link to comment Share on other sites More sharing options...
Yenkocamaro Posted February 21, 2016 Share Posted February 21, 2016 Nice Job! Thanks for sharing. Is that a Lane or GMP convertible top? I'll be watching your progress Cheers, Lance Quote Link to comment Share on other sites More sharing options...
J007KLEIN Posted February 21, 2016 Author Share Posted February 21, 2016 Thanks Lance! I believe it's from the GMP GTO Judge. I've contacted Tom to see if he has the down top boot as well. Quote Link to comment Share on other sites More sharing options...
AzTom Posted February 22, 2016 Share Posted February 22, 2016 Hello Joe, It looks great. Yes, that top is from the GMP GTO. Quote Link to comment Share on other sites More sharing options...
J007KLEIN Posted February 23, 2016 Author Share Posted February 23, 2016 With the top located and marked on the body, I made the next cuts. The top now set pretty well onto the body... As you can see the windshield is a bit wider than the convertible top. My first thought was to widen the top, but after looking at it a bit more, I think it might be easier to make the windshield header a bit narrower. By moving the top completely to one side, looks like I need to remove about 3/16" from the header.... Stuck the doors and hood on to get a look at the finished profile and I think the back of the top needs to drop down just a bit more.... I think cutting the rear quarter down about the width of the chrome band along the bottom of the top may drop it just enough to make it right! Quote Link to comment Share on other sites More sharing options...
Yenkocamaro Posted February 23, 2016 Share Posted February 23, 2016 The top may be too long? front to back. Check this video. Cheers, Lance Quote Link to comment Share on other sites More sharing options...
J007KLEIN Posted February 23, 2016 Author Share Posted February 23, 2016 (edited) Lance,Thanks for the video! One thing I notice was that the H/O chrome trim along the back of the top is more tapered towards the deck lid rather than being so straight and blunt like on the GMP top, so I'll have to bevel that trim to replicate the real deal. Looking at the profile of the diecast top compared to the Olds top, it looks about right and the length appears correct as well.... they both stop about the back edge of the rear tire.I think it's a combination of the roof being kicked up too far and the blunt trailing edge making it look odd... if you look at the post above where it's taped into position from the underside of the body, it looks about dead nuts! Time will tell. Edited February 23, 2016 by J007KLEIN added comment about post above Quote Link to comment Share on other sites More sharing options...
Yenkocamaro Posted February 23, 2016 Share Posted February 23, 2016 I agree, the photos with the tape holding the top in place, looks really good. I stopped the video, right at the point the rear of the vert top was showing to look at the angles. It looks like your on the right track. Cheers,Lance Quote Link to comment Share on other sites More sharing options...
vintagercr Posted March 1, 2016 Share Posted March 1, 2016 Nice! Quote Link to comment Share on other sites More sharing options...
jerseyjunker1 Posted March 4, 2016 Share Posted March 4, 2016 this is a great conversion. it just keeps looking better as you go. some people may not realize how difficult it is to do this. i had to convert a 25th scale 1962 Cadillac promo model from a hardtop into a convertible and it was no simple thing. so great job on the olds. i love it Quote Link to comment Share on other sites More sharing options...
J007KLEIN Posted March 14, 2016 Author Share Posted March 14, 2016 Had some time on Sunday to work a bit on the convertible. Trimmed a little more off the quarter panel and interior side panels to get the back end of the top lower onto the body. Getting it pretty close....... Now to reshape the top of the quarter panel a little and drop the leading edge of the deck lip to match before tackling the trunk filler panel. Quote Link to comment Share on other sites More sharing options...
Dandy Dan Posted March 15, 2016 Share Posted March 15, 2016 On the real cars, the leading edge of the trunklid is higher on the 2-door fixed roof cars vs the convertible and that's where a lot of your issues are coming from. Good Luck ! Quote Link to comment Share on other sites More sharing options...
jerseyjunker1 Posted March 15, 2016 Share Posted March 15, 2016 great job. anytime you have to cut up a diecast model you will have to solve a lot of issues. i have done a few of them and everyone is a challenge. when i did the 1/24th scale bonnie and clyde car i had to use 2 diecast models and 1 resin model in order to get it to look right. so i know how hard it is to do. again great job. Quote Link to comment Share on other sites More sharing options...
J007KLEIN Posted March 15, 2016 Author Share Posted March 15, 2016 On the real cars, the leading edge of the trunklid is higher on the 2-door fixed roof cars vs the convertible and that's where a lot of your issues are coming from. Good Luck !Yeah Dan, the next item on the TO DO list is to get the quarter panel profile correct, then re-contour the leading edge of the deck lid to match the quarter and then tackle the trunk filler panel!Manny, any tips on re-contouring the deck lid? How malleable is the zinc(?) body and will it bend a bit before fracturing?Thanks guys! Quote Link to comment Share on other sites More sharing options...
J007KLEIN Posted May 1, 2016 Author Share Posted May 1, 2016 (edited) Finally had a few minutes this afternoon to work a bit on the HO. Laid out the approximate profile on the rear quarters with some 1/16" fine line, masked off the surrounding area and then broke out the motor tool with the cutoff wheel. I initially made my cut along both sides of the trunk gutter to maintain the panel size then slowly trimmed the top edge of the quarters along my layout line.... I think I'm slowly getting there! Need to trim the interior package tray area a bit on the passenger side to drop the chrome trim down into the body like it is on the driver side and then figure out how to slowly roll the leading edge of the deck lid to match the contour of the quarters. Edited October 25, 2016 by J007KLEIN corrected tape size Quote Link to comment Share on other sites More sharing options...
Yenkocamaro Posted May 2, 2016 Share Posted May 2, 2016 Hey Joe, good to see you had time to work on this again. Got to tell you, with the work you have done, that top looks spot on. Good job Looking forward to your progress. Cheers, Lance Quote Link to comment Share on other sites More sharing options...
J007KLEIN Posted May 2, 2016 Author Share Posted May 2, 2016 Thanks Lance.I think the hardest task is going to be getting the deck lid reshaped without breaking the material... have no idea how giving the zinc is going to be?? Was hoping Manny or one of the other members with experience reworking the diecast bodies would offer some tips or tricks on how I should approach that feat.....Wish me luck! Quote Link to comment Share on other sites More sharing options...
J007KLEIN Posted August 3, 2016 Author Share Posted August 3, 2016 (edited) Had some feedback from traditional (Cliff) about how to re-contour the decklid using a heat gun to get the material hot and a bit pliable, then use some flat blade pliers to reform the leading edge to match the quarter panel profile.I'll document the process for others to follow should they try their hand at customizing diecasts in the future......Wish me luck! Edited August 3, 2016 by J007KLEIN Quote Link to comment Share on other sites More sharing options...
J007KLEIN Posted September 11, 2016 Author Share Posted September 11, 2016 (edited) Well finally had some time this weekend to try out an idea I had while recently doing some sheetmetal work at the house (creating a pair of gable doors in the corrugated steel siding on my garage). I bought a pair of duck-billed vice grips... to help flatten the ridges and I thought that they might be just the thing for lowering the leading edge of the deck lid in line with the re-contoured quarter panels on the H/O build.... TA DA..... I think now I may be coming into the final stretch!Looks like I may need to shorten the top length a little, create the filler panel between the deck lid and the top well as well as the top well itself and narrow the windshield header a bit to match the top. I also need to get creative for making the molding that follows the quarter panel profile at the beltline and figure out how retain/recreate the H/O & Olds emblems & decals.A lot of smaller things yet to do but I think the hard part is behind me!Until next time.... Edited September 11, 2016 by J007KLEIN removed excess whire space Quote Link to comment Share on other sites More sharing options...
J007KLEIN Posted October 16, 2016 Author Share Posted October 16, 2016 (edited) With all the major trimming and cutting complete, I decided to put it all together to get a feel for how it was progressing.... Looks like she's moving in the right direction! Next up on the agenda will be to construct a bridge between the quarters to positively locate the rear of the convertible top not only from side to side but the depth into the body to allow me to form the deck lid filler panel to sweep more gracefully into the back edge of the top to more closely mimic the real H/O convertibles.... I'll also need to recontour the body transition into the rear quarter windows a bit so it blends more smoothly into the quarter panel top return.... I'll also need to narrow up the windshield header to match the with of the convertible top...... then trim down the width of the windshield to match the header as well as trimming away the clear material around the sun visors and forming an opening between them for the top locating tab it fit into.Once the all the top up mods have been made I will turn my attention to the interior modification to replicate the Olds interior.Stay tuned! Edited October 16, 2016 by J007KLEIN removed excess white space Quote Link to comment Share on other sites More sharing options...
J007KLEIN Posted July 8, 2018 Author Share Posted July 8, 2018 (edited) WOW, can't believe it's been almost two years since my last update! I decided I best get back after it because my buddy's 55th birthday is the end of October... So today I formed the body opening for the top well and the filler panel between the well and the deck lid. I used an old manila folder to act as my form for the two part Epoxy I'm using as my body material. I plan on soaking the body in water once I've got the shape nailed and then slowly peel away the paper down to the Epoxy. So I trimmed the folder into shape and taped it all together and on the body... then I mixed three packages of the two part epoxy and drizzled it into place... once the epoxy had set up, I pulled away as much of the folder as I could to see how it did... and then put the interior and chassis with the body to see how the convertible top fit. The top is a bit too blunt on the back, so once I have the body tweeked into shape, I'll see about flaring the trailing edge of the top a bit to make it blend a little better. Edited July 9, 2018 by J007KLEIN corrected wording Quote Link to comment Share on other sites More sharing options...
Recommended Posts
Join the conversation
You can post now and register later. If you have an account, sign in now to post with your account.
Note: Your post will require moderator approval before it will be visible.