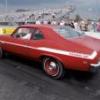
69NovaYenko Posted April 14, 2016 Share Posted April 14, 2016 (edited) Finally finished the `67 Camaro 396 Revell kit build. The kit went together fairly easily with only a few challenges along the way. The biggest one was I had to fiddle with the front valance to make it to fit properly. The exterior and interior color is Arctic White from Tru-Color. It was my first time using Tru-colors lacquers. They are known for their railroad paints; however they have recently branch off into the automotive arena. Even though the manufacturer claims it is "airbrush ready" out the bottle I found I had to thin it further to get it to flow consistently through my airbrush. I recommend you use Tru-Color brand of thinner for best results. The three passes of Arctic White went on smoothly and we finished it off with three passes of Mr. Hobby Super Clear lacquer. I decided to accent the scribed body panel lines with a wash of Tamiya XF-19 Sky Grey. To finish the body off I applied Bare-Metal foil and a two liberal coats of The Treatment carnuaba wax. I used the kitted tires but opted to use a set of "Goodyear Polyglass" white lettering decals from Mikes Decals under a pass of Tamiya semi-gloss acrylic verses the kit supplied red-line tire decals. Edited April 26, 2016 by 69NovaYenko Quote Link to comment Share on other sites More sharing options...
69NovaYenko Posted April 14, 2016 Author Share Posted April 14, 2016 (edited) Revell incorrectly kitted the `67 Camaro with multi-leaf springs. The `67 Camaro was fielded with a single leaf which resulted in excessive rear wheel hop under heavy acceleration; however the next model year 1968 this issue was resolved by incorporating a multi-leaf spring setup. This was easily corrected with a sanding stick; turning the mutli-leaf springs into a single leaf spring. Note photo with leaf spring modification. Also, contributing to the rear wheel hop issues was Chevy`s engineers decision to mount both rear shocks forwarded of the rear axle. In 1968 they corrected this problem by staggering one shock forward and one shock aft the rear axle. However, in 1967 a number of Camaro owners resolved this issue through the addition of slap style traction bars. I sourced a nice pair of resin cast Lakewood style slap traction bars from the Revell Monogram `70 Ford Torino GT Pro-Modler kit and give them a splash of Tamiya flat yellow. We also sourced the steering column mounted tach from the Revell `69 Daytona 2-N-1 Pro-Modler kit. I also enhanced the appearance of the dash and center console with Keith Marks `67 Camaro decal set by adding air vents, gauges, in-dash radio and Camaro scripts. Additionally, I mounted an 8-track player to the top of the center console courtesy of Replica & Miniatures of Maryland `67 Deluxe Interior Package kit to give the interior a true sixties vibe. I opted to use a Morgan Automotive Detail pre-wired distributor for the engine and I also did some minor firewall wiring. I took a moment to enhance the chassis detail by pulling out the engraved fuel and break lines as well as the muffler hangers brackets with a Prismacolor metallic silver art pencil. I also used a black wash on the "Fly-eye" style air cleaner to bring out the very meticulous engraving Revell did on the piece. Additional items like photo-etched radiator cap and battery terminals from Detail Master were used to enhance the engine bay appearance. Era correct "Chevy #1" decals on the valve covers, "Delco" battery logo and fan shroud "Caution" logos were conveniently supplied by the Revell kitted decal sheet. Thanks for looking. Your questions, comments and critiques are welcomed. Edited April 26, 2016 by 69NovaYenko Quote Link to comment Share on other sites More sharing options...
69NovaYenko Posted April 14, 2016 Author Share Posted April 14, 2016 (edited) http://http://i6.photobucket.com/albums/y207/454chevelle/67Camaro-Revell-/DSC_0272 copy.jpg Edited April 14, 2016 by 69NovaYenko Quote Link to comment Share on other sites More sharing options...
slusher Posted April 14, 2016 Share Posted April 14, 2016 Sharp clean build Greg,... Quote Link to comment Share on other sites More sharing options...
Harry P. Posted April 14, 2016 Share Posted April 14, 2016 Who is this mysterious "we" you keep referring to? Quote Link to comment Share on other sites More sharing options...
'70 Grande Posted April 14, 2016 Share Posted April 14, 2016 A beautiful build with outstanding work to correct some of the kit's issues and excellent detailing and paint work! In 1973 thru 1975 this 1:1 Camaro lived in my hometown, (except it had a completely Black interior). I lusted after that car those couple of years and still think of it today, over 40 years later! When I start my build of this kit, that's the car I'll be modeling, and I'll be using your great build as further inspiration! Quote Link to comment Share on other sites More sharing options...
V8 Trucker Posted April 14, 2016 Share Posted April 14, 2016 classic built, very nice Quote Link to comment Share on other sites More sharing options...
espo Posted April 14, 2016 Share Posted April 14, 2016 Great looking build. I share your love of these cars. I owned a Hugger Orange '69 Camaro for a total of 18 years. I was the second and forth owner of the car and sold it in '95 to get a new pickup. Now I couldn't afford to buy a Camaro of that quality for less than the cost of a new car. You build looks just the way I remember these cars when they were everywhere. Quote Link to comment Share on other sites More sharing options...
Fanof69 Posted April 14, 2016 Share Posted April 14, 2016 Beautifully built Camaro!! Nicely detailed interior. Is it just me or are the tire decals on backwards? Anyway really like this one Quote Link to comment Share on other sites More sharing options...
mikemodeler Posted April 14, 2016 Share Posted April 14, 2016 Looks good, nicely detailed and clean execution. I need to finish mine, maybe this weekend! Quote Link to comment Share on other sites More sharing options...
69NovaYenko Posted April 14, 2016 Author Share Posted April 14, 2016 Thanks for the kind word everyone. This is my first time posting any of my finished projects. I`m contemplating doing the Revell `67 NICKEY Camaro as my next project. But, I have to many half finished and stalled projects laying around gathering dust or taking up precious workbench space. So, I think I will get those done before I start anything new. Thanks for looking. Quote Link to comment Share on other sites More sharing options...
69NovaYenko Posted April 14, 2016 Author Share Posted April 14, 2016 (edited) A few more shots of the finished project. http://http://i6.photobucket.com/albums/y207/454chevelle/67Camaro-Revell-/DSC_0279 copy.jpg Edited April 14, 2016 by 69NovaYenko Quote Link to comment Share on other sites More sharing options...
69NovaYenko Posted April 14, 2016 Author Share Posted April 14, 2016 (edited) http://http://i6.photobucket.com/albums/y207/454chevelle/67Camaro-Revell-/DSC_0272 copy.jpg Edited April 14, 2016 by 69NovaYenko Quote Link to comment Share on other sites More sharing options...
Hubert Rollins Posted April 14, 2016 Share Posted April 14, 2016 Super sharp model! Knocked it out of the park for sure!! Quote Link to comment Share on other sites More sharing options...
GTJUNIOR Posted April 14, 2016 Share Posted April 14, 2016 Beautiful! Quote Link to comment Share on other sites More sharing options...
mrm Posted April 14, 2016 Share Posted April 14, 2016 Wow! You don't see many of these done in white. But I love it. I think it looks fantastic in white. Quote Link to comment Share on other sites More sharing options...
bigzm125 Posted April 15, 2016 Share Posted April 15, 2016 Great work sir!! That firewall is one of the best I have ever seen. Just wondering what gauge wire it is. Thanks! Quote Link to comment Share on other sites More sharing options...
69NovaYenko Posted April 15, 2016 Author Share Posted April 15, 2016 (edited) Great work sir!! That firewall is one of the best I have ever seen. Just wondering what gauge wire it is. Thanks! Thank you for the kind remarks. The firewall was done with "detailing wire" from Detail Master DM-1102 the package says .0075 diameter. Got it in several different colors from them a number of years ago...not sure if they still carry it. Edited April 15, 2016 by 69NovaYenko Quote Link to comment Share on other sites More sharing options...
69NovaYenko Posted April 15, 2016 Author Share Posted April 15, 2016 Beautifully built Camaro!! Nicely detailed interior. Is it just me or are the tire decals on backwards? Anyway really like this one No its not you, I accidentally flipped the image around when loading files...oooppps! Quote Link to comment Share on other sites More sharing options...
drodg Posted April 15, 2016 Share Posted April 15, 2016 Very nice factory stock look. Great job. Quote Link to comment Share on other sites More sharing options...
RestoModGuy Posted April 15, 2016 Share Posted April 15, 2016 well done! This is an awesome detailed kit and you honored it with your craftsmanship Quote Link to comment Share on other sites More sharing options...
Harry P. Posted April 15, 2016 Share Posted April 15, 2016 Is it just me or are the tire decals on backwards?His first posted photo is backwards. The "Camaro" script on the side of the car is backwards. Quote Link to comment Share on other sites More sharing options...
Davewilly Posted April 15, 2016 Share Posted April 15, 2016 looks great! Quote Link to comment Share on other sites More sharing options...
Recommended Posts
Join the conversation
You can post now and register later. If you have an account, sign in now to post with your account.
Note: Your post will require moderator approval before it will be visible.