John Clutch Posted August 30, 2016 Posted August 30, 2016 It just really hit me that you stuffed all that into a Datsun 510, and it doesnt look as cluttered as I would have imagined. Really nice work LeadFred.
bytownshaker Posted September 4, 2016 Posted September 4, 2016 This build is off the wall...looking forward to more of your build.Edgar
LeadFred Posted September 4, 2016 Author Posted September 4, 2016 (edited) Hi guys, Thanks you for comments,Leonard,John and Edgar. No one has a proposal in which class this car can fit into ? , Anyway, we'll go ahead with some new pictures of the painting and assembly of the bodywork. The first picture shows the primed body,tamiya white fine surface primer is used. The taillights lenses are masked off so i still have them clear. Here is the body painted and also decaled and the red stripe with the thin white line over the hole body is painted. it is also one layer of clear over the body, only for decals should stay in good condition. As you can see , the surface is a little rough so far, but after a little sanding between clearcote layers as you build up a nice and smooth varnish that ultimately did not need much polishing , because the paint is already very smooth . I have done a impression from a uncut body and making a support/stand for the body,that i will polish now. This is a must,because the body is so fragile when it is cut open like this,and when you do the polish and want to rub up the shine you have to rub a little harder and the body would just get broken if it does not have the support. Edited September 5, 2016 by LeadFred
LeadFred Posted September 4, 2016 Author Posted September 4, 2016 (edited) Here you see the uncut body that i use for the impression. Now,i can polish the fragile body,without worry to broke anything. I do not want to sand to deep on the first layer of gloss as you see, Here you see the third layer if gloss and it is sanded down to a smooth flat finish, Here is the final layer (4) of gloss, a little bit moore polish,just little,and the finish is ok. Edited September 5, 2016 by LeadFred
LeadFred Posted September 4, 2016 Author Posted September 4, 2016 (edited) Some more pictures when the body is on the chassi. One thing about this body is that it was not symmetric , and I discovered it too late, so I pulled out the stripes from the roof position , so they came not in the middle of the rear panel , so that's why it is a compromise of the stripes on the rearpanel.. But fortunately, there will be more details that will focus later in the build, so this will probably be pretty good in the end. You can see that the right stripe is a little bit thinner than the left side Some test fits on the chassi. Ok guys, this is it,for the moment, strange that i have to do 3 updates to get all photos upploaded that i want do show you, Comments are welcome, Fred. Edited September 4, 2016 by LeadFred
MrObsessive Posted September 4, 2016 Posted September 4, 2016 Wow! This is something else!! I LOVE all the details so far! Bummer about the stripe, but that happens to the best of us. This will definitely be a show stopper when finished!
LeadFred Posted September 4, 2016 Author Posted September 4, 2016 Thank you Bill. The picture of the rearpanel was a very close-up picture,but i can show you another picture,and if you think that there will be mountings for a parachute that will take some focus from the spotlight,perhaps the stripe does´nt make such a big notice,If so.......i will put some decals over it. Hope this is a picture that is more "natural" of the rear panel. Fred
MrObsessive Posted September 4, 2016 Posted September 4, 2016 From that pic I don't see much difference at all. If you're going to put the parachute mounting brackets and such over that, I really wouldn't sweat it! We can be our own worse critics sometimes!
vintagedragcrazy Posted September 5, 2016 Posted September 5, 2016 That looks awsome when it's done it's going to be a show stopper and bills right you can barely notice it in fact if you would not have said anything I doubt anyone would. I would just camo it with a decal or the chute mount and not worry about it!vince
DrKerry Posted September 6, 2016 Posted September 6, 2016 That's looking sharp as you know what!!!!!!!!!!!
John Clutch Posted September 8, 2016 Posted September 8, 2016 Ahhhhhhh yes!!!!! Paint ! That can only mean one thing
DumpyDan Posted September 12, 2016 Posted September 12, 2016 Nice work so far, keep them pic's coming
LeadFred Posted September 13, 2016 Author Posted September 13, 2016 (edited) Hi again all of you, and thanks for comments,Bill,Vince,Carl,Kerry,Walter,John,Dan ! When the body is glued/fixed to the chassie the assembly of the doors and front begins. It was quite difficult to get the doors in place, while they should be placed nicely in the closed position and at the same time be opened. Anyway, so I installed some hinge made of metal pins and then I 'll catch on rod ends , which I then assemble in the door. I made a little larger hole in the door where the rod ends to be attached , just to bond with an epoxy adhesive. then I can only catch on rod ends onto the metal pin and ,,,then fit on the door and place the door closed in the body , and let the epoxy glue harden. This way, everything is in the correct position,Open or closed . Here i testfit the door. The holes in the door are there. The Metalpins glued in place. I have used a soft metal pin, so i can adjust the hinge if i need. Sorry for the bad picture,but you can see that the rod ends are mounted in the door and it all work. From another angle. The front are just mocked up to see that it will fit. Next move will be to paint the doors and front in the same color,and i will use the same diluted paint and, exactly the same pressure when i do this painting as the earlier painting,that is very important when you paint a metallic paint in more stages than once. Just because you can easily get a shade of difference if you are unlucky. Normally, i spray the entire body at the same time. but i knew that i would have to do it over again after fitting the doors and front. Paint rubbed off easily when you have to use your fingers on the panels . Comments are welcome, Fred Edited September 13, 2016 by LeadFred
DeeCee Posted September 13, 2016 Posted September 13, 2016 This is one incredible looking build, and so much scratch building and detailing . JUST SUPERB so far..
LeadFred Posted September 13, 2016 Author Posted September 13, 2016 (edited) Thank you, Dale Yes, indeed it is . I will compile an inventory of all the parts that I have used for this construction , and it will also contain what I scratch myself. But that list will be in the last uppdate for this build. Thanks again. Glad you like my little dragcar . Fred Edited September 13, 2016 by LeadFred
Davewilly Posted September 13, 2016 Posted September 13, 2016 Its coming together nicely! Great work on the detail and the doors so far.
John Clutch Posted September 13, 2016 Posted September 13, 2016 Looks fantastic. Now with the fenders/hood in place, you can see just how much space that motor takes. What are you gonna do for a radiator?
John Clutch Posted September 13, 2016 Posted September 13, 2016 Im building a 1/12 Camaro to X275 class specs. It will be a single turbo set up, with the turbo being placed in the center, right behind the front spoiler. So I will make two independent cooling systems for each side of the engine. In through the cylinder head, out through the block. That could be a consideration for you also.
LeadFred Posted September 13, 2016 Author Posted September 13, 2016 Thank you, Dave and John.-John, i have to build a small scratch build radiator. I have already done the mounting for the radiator in the front of the Tubeframe. One of the most tricky mounting of this build is just to mount the radiator. Because i have very limited space left between the engine and the front/grille. If i place the radiator too near the grille, it Will push out the front and it Will be to much space between the Doors and fenders. So i guess i Will sweat a lot to get it right.One of My goal, When i Cut up a body like this is that the body should Look realistic in both closed and Open Doors/panels. It would be easier if i had took a Bigger car/body.so this is a challenge for me.My plan in the future is also to build the 1/12 Camaro in a drag version.but i have not found Any great rear slicks in 1/12. I have never before build a big scale model,but thinking a lot to " Do it". If i find Any slicks .?Fred
maltsr Posted September 13, 2016 Posted September 13, 2016 Terrific build, Fred - keep up the good work!
LeadFred Posted September 14, 2016 Author Posted September 14, 2016 Thanks Paul, This is the painted doors,front,hood and trunk lid. And all panellines are better for the eye when all body parts have the same color. And it turned out pretty good, exactly the same color. Comments are welcome, Fred.
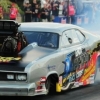
LeadFred Posted September 15, 2016 Author Posted September 15, 2016 Thank you Bruce !, About the engine,carburators and wheels. Here are some pictures.
Recommended Posts
Create an account or sign in to comment
You need to be a member in order to leave a comment
Create an account
Sign up for a new account in our community. It's easy!
Register a new accountSign in
Already have an account? Sign in here.
Sign In Now