gasser59 Posted November 14, 2017 Share Posted November 14, 2017 (edited) Oh man, you must be dancin' right about now. Can't wait to see the saga of this block unfold.Will you be attending our MM meeting this Saturday? Edited November 14, 2017 by gasser59 Quote Link to comment Share on other sites More sharing options...
Mooneyzs Posted November 14, 2017 Share Posted November 14, 2017 Paul.... it's great to see you back. It looks like you are going to have a blast with thus new 1:1 project. I am looking forward to when you are able to get back to the bench and make some progress on this Chevelle. Quote Link to comment Share on other sites More sharing options...
comp1839 Posted November 14, 2017 Share Posted November 14, 2017 it looks like christmas came early, paul!!!!!!!! that......... is a thing of beauty. any thoughts on what cylinder heads you'll be running? congrats on your new acquisition!!!!!!!!! Quote Link to comment Share on other sites More sharing options...
mr68gts Posted November 15, 2017 Author Share Posted November 15, 2017 (edited) Brad, initial answer to your question is yes but that may change. I dont have anything but we will see what how I feel come Saturday lol.Chris, thank ya brotha! It will be good to take my mind off of things while building.Dave, christmas came way early lol. I really need to put the block on a stand. There isnt much in the way of heads worth a darn for a small block mopar unfortunately. Mopar w8 or w9's seem to be it. The new Eddy victor heads flow decent but are not 18 bolt pattern. (Dummies used the 10 bolt pattern lol.) Either mopar head will run me over 2500 for cnc'd castings bare. Victors about 2500 complete without the potential or clamping. Just have to see. Was thinking 450 inch but turbos like under 400 so maybe 3.79 stroke with the 4.130 bore.One part at a time....lol Edited November 15, 2017 by mr68gts Quote Link to comment Share on other sites More sharing options...
Codi Posted November 26, 2017 Share Posted November 26, 2017 Paul, I don't know how you guys like you and Dave juggle all of this. Amazing and always look forward to your updates too. cheers, Tim Quote Link to comment Share on other sites More sharing options...
mr68gts Posted November 30, 2017 Author Share Posted November 30, 2017 On 11/26/2017 at 6:42 AM, Codi said: Paul, I don't know how you guys like you and Dave juggle all of this. Amazing and always look forward to your updates too. cheers, Tim Tim, thanks, sometimes it gets a bit busy lol. Little bit of an update. Got some time on the computer finally! Managed to get the hat spacer almost done. (i need to move the top foward lip out more to match up with the scoops flange.) Oil pump is next. Hopefully by the end of the weekend I can put in an order at Shapeways for these parts. I think that's all that is left of the engine parts anyway! Paul Quote Link to comment Share on other sites More sharing options...
Mooneyzs Posted November 30, 2017 Share Posted November 30, 2017 Paul... Man that is looking great!!! I can't wait to see these pieces after you have them printed. Loving the work you have done here. Seeing you get some CAD work in makes me want to get back to some parts I need to finish up myself. Nice Job!! Quote Link to comment Share on other sites More sharing options...
mr68gts Posted November 30, 2017 Author Share Posted November 30, 2017 14 hours ago, Mooneyzs said: Paul... Man that is looking great!!! I can't wait to see these pieces after you have them printed. Loving the work you have done here. Seeing you get some CAD work in makes me want to get back to some parts I need to finish up myself. Nice Job!! Thank ya brotha! Pretty nice to be able to concentrate on this now that we are all moved out. I finished up the spacer and the scoop this morning so onto the oil pump I go! I will holler at you this weekend if your going to be around. Paul Quote Link to comment Share on other sites More sharing options...
Mooneyzs Posted November 30, 2017 Share Posted November 30, 2017 Paul... I will be around all weekend other than Saturday evening I have my companies Christmas party that night. Quote Link to comment Share on other sites More sharing options...
comp1839 Posted December 5, 2017 Share Posted December 5, 2017 your 3d stuff looks great paul!!! that'll be the supercharged icing on the 481x cake. Quote Link to comment Share on other sites More sharing options...
mr68gts Posted December 28, 2017 Author Share Posted December 28, 2017 So, the house is no longer ours and we are officially homeless... lol I did order the scoop and spacer and added the 4 link brackets to the order as I had to replace the ones that got broke in the trip from GSL when the chassis got smashed. I still need the oil pump and have a good start on it at this point but it's not ready for printing yet. I am also going to change the engine over to a dry sump style setup which requires a new pan and different pump that what I have started on. (sort of, the basic pump is the same if I am copying an RCD style pump but it is longer for obvious reasons.) With the scoop here I had to mock it up in the chassis with the rear body section in place to see how it looks. It's hard to tell in the photos but the thing is seriously bad a$$. Off to chop up some brass since I have the place to myself for the week! Paul Quote Link to comment Share on other sites More sharing options...
bobthehobbyguy Posted December 28, 2017 Share Posted December 28, 2017 Nice work on the scoop. The chassis looks great. Definitely looking forward to seeing more,. Quote Link to comment Share on other sites More sharing options...
blackbeard Posted December 28, 2017 Share Posted December 28, 2017 The new scoop looks right at home and your chassis is looking great Quote Link to comment Share on other sites More sharing options...
Mooneyzs Posted December 28, 2017 Share Posted December 28, 2017 Paul... Nice work!! That scoop looks killer sitting on the blower. No detail is being missed on this build. Glad to see you getting bench time in on this build. I am already looking forward to your next update. Keep on with the awesome work. Quote Link to comment Share on other sites More sharing options...
gasser59 Posted December 28, 2017 Share Posted December 28, 2017 Man Paul, that scoop looks hungry!! Great work and it looks great up there standing tall and proud. You'll be able to get a bunch of work done with the house empty. Quote Link to comment Share on other sites More sharing options...
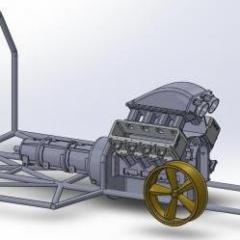
mr68gts Posted December 29, 2017 Author Share Posted December 29, 2017 Thank you guys. Got in there again tonight but progress is slow up till now as I needed to draw up bottom rails for the back half to get the bend right and in scale to dimensions I have for a chassis and it's shock mounting points. The back half is smaller tube than the main rails so I used 3/32 K&S tube. (which is correctly scaled) The issue with K&S is that it is hardened. I discovered with a bit of experimenting that if you anneal the tube slightly it will be malleable enough to bend without breaking or kinking and yet retain much of it's strength. By using a round belt pulley that I have laying around that I am going to use to update the Unimat lathe I was able to bend the tube fairly easily! Quote Link to comment Share on other sites More sharing options...
Mooneyzs Posted December 29, 2017 Share Posted December 29, 2017 Paul... looking good my friend. Nice progress on this. I experimented a while back where i anneled some brass tubing by heating it up with a torch nd it made it way easier to bend. Wish I would of done this back when I made the headers for the F/C. I can't wait to see more of this brass chassis. Keep up the stellar work. Quote Link to comment Share on other sites More sharing options...
Adhsdad Posted December 10, 2018 Share Posted December 10, 2018 Any updates on this build? Ep Quote Link to comment Share on other sites More sharing options...
Mooneyzs Posted December 11, 2018 Share Posted December 11, 2018 Ahem ... oh Paul... you getting any bench time at all on this bad boy?? Quote Link to comment Share on other sites More sharing options...
matad311 Posted May 18, 2020 Share Posted May 18, 2020 On 11/29/2017 at 8:47 PM, mr68gts said: Tim, thanks, sometimes it gets a bit busy lol. Little bit of an update. Got some time on the computer finally! Managed to get the hat spacer almost done. (i need to move the top foward lip out more to match up with the scoops flange.) Oil pump is next. Hopefully by the end of the weekend I can put in an order at Shapeways for these parts. I think that's all that is left of the engine parts anyway! Paul On 11/29/2017 at 8:47 PM, mr68gts said: Tim, thanks, sometimes it gets a bit busy lol. Little bit of an update. Got some time on the computer finally! Managed to get the hat spacer almost done. (i need to move the top foward lip out more to match up with the scoops flange.) Oil pump is next. Hopefully by the end of the weekend I can put in an order at Shapeways for these parts. I think that's all that is left of the engine parts anyway! Paul Hi mr68gts! I was wondering you are still working on this project! You are doing great work on this Bohr-Hammer hat! Well I just wanted to chime in and ask if you need any help on the injector hat because I am the designer of it! My name is Matt Bohr, I am the CAD designer for Bohr Racing Products that work with Hammer Superchargers in developing this. You did such an awesome job at somehow reverse engineering it I am curious how you did it! I was scrolling though google and was wondering how someone got my CAD files hahaha. Feel free to reach out if you have any questions on actual sizes and dimensions! Quote Link to comment Share on other sites More sharing options...
Jantrix Posted May 19, 2020 Share Posted May 19, 2020 18 hours ago, matad311 said: Hi mr68gts! I was wondering you are still working on this project! You are doing great work on this Bohr-Hammer hat! Well I just wanted to chime in and ask if you need any help on the injector hat because I am the designer of it! My name is Matt Bohr, I am the CAD designer for Bohr Racing Products that work with Hammer Superchargers in developing this. You did such an awesome job at somehow reverse engineering it I am curious how you did it! I was scrolling though google and was wondering how someone got my CAD files hahaha. Feel free to reach out if you have any questions on actual sizes and dimensions! Matt, Paul hasn't been around in a couple years. People join and fall off the forums pretty frequently. Quote Link to comment Share on other sites More sharing options...
gasser59 Posted May 19, 2020 Share Posted May 19, 2020 Now that's really cool. Welcome Matt. I sent Paul a text letting him know you added a post. Quote Link to comment Share on other sites More sharing options...
matad311 Posted July 20, 2020 Share Posted July 20, 2020 On 5/19/2020 at 7:34 PM, gasser59 said: Now that's really cool. Welcome Matt. I sent Paul a text letting him know you added a post. Very good! Thanks for that! Quote Link to comment Share on other sites More sharing options...
mr68gts Posted August 1, 2020 Author Share Posted August 1, 2020 (edited) well, I've been working on this thing in the back ground. Still getting files done but I've had to redo all the files as I'm no longer using Shapeways services. I've since closed down the store which has caused me to have to redo every file for every part I've printed through them and reprint them as they are much better quality than the parts I was getting from Shapeways! There has also been a lot of chat back and forth as I work through this thing which has caused a few changes to the parts. The rear end has changed as have the wheels. I've added things to the bell housing to reflect a real one. I completely redesigned the rear end to be more like a Tim McAmis billet. The ENTIRE engine has been reprinted and detail added to the intake manifold. It now has the ports in the manifold! Lol. Edited August 1, 2020 by mr68gts Quote Link to comment Share on other sites More sharing options...
mr68gts Posted August 1, 2020 Author Share Posted August 1, 2020 The new front wheels! I need to redo the back side for disk brakes then they are god to go. Also going to print CORRECT tires for the fronts. These are just sitting in my M&H's from my old Racing scenes chassis kit. New supercharger with new intake manifold that has the ports in the model! Semi assembled mocked up engine with Magneto assembled. I still need to machine the angled adapter so it fits the block. (common with pretty much every engine that has this location for a magneto/distributor. Also shows the pocketed heads.(ends are pocketed to save weight) Modeled fuel pump assembly Quote Link to comment Share on other sites More sharing options...
Recommended Posts
Join the conversation
You can post now and register later. If you have an account, sign in now to post with your account.
Note: Your post will require moderator approval before it will be visible.