mecklm Posted August 30, 2017 Share Posted August 30, 2017 You have me intrigued with the sculpting of this injector hat. I don't get to do this much with the kind of parts I design so when I encounter it, I merely loft between two sketches and then shell the result. Without bogging you down with a tutorial, can you describe in some basic words how you achieved that shape? Fascinating stuff! Quote Link to comment Share on other sites More sharing options...
mr68gts Posted August 31, 2017 Author Share Posted August 31, 2017 Paul.......what your doing with this is just KILLER man.......this is truly a talent to be able to do this......this Pro Mod willbe the Bomb......hope you have it finished for GSL 2019 so that you and Chris can walk away with all the awards......you guys truly deserve it Thank ya brotha! I'm pushing for 2018 but I'm not sure. (may have to borrow someones next year crown....hint hint) There's a ton of work still to do and still a few more things to model up before I can manage to complete it but the list of modeled parts is getting shorter. Plus the brass is on the way (be here tomorrow in fact) so I can rebuild the chassis. Should have just done it in brass this last go around and been done with it. Live and learn lol. Plus there's a little 1:1 project I'm pulling together parts for! You have me intrigued with the sculpting of this injector hat. I don't get to do this much with the kind of parts I design so when I encounter it, I merely loft between two sketches and then shell the result. Without bogging you down with a tutorial, can you describe in some basic words how you achieved that shape? Fascinating stuff! What I have is 3 drawings that are lofted together and because they have to go from the shape of the scoop opening and curve down into the throat of the scoop (supercharger entry) it goes cadi wompas onme when I loft it out. So I add "guide lines" to aide in telling the computer what shape I am looking for. Quote Link to comment Share on other sites More sharing options...
mr68gts Posted September 1, 2017 Author Share Posted September 1, 2017 I've done a few adjustments playing with the scoop. It's still not quite there yet but it's getting closer. Just a little more playing around and I think I can get it where I want it. Quote Link to comment Share on other sites More sharing options...
mr68gts Posted September 1, 2017 Author Share Posted September 1, 2017 (edited) You have me intrigued with the sculpting of this injector hat. I don't get to do this much with the kind of parts I design so when I encounter it, I merely loft between two sketches and then shell the result. Without bogging you down with a tutorial, can you describe in some basic words how you achieved that shape? Fascinating stuff! Here's what I ended up doing and since you seem to know somewhat about Solidworks I thought I'd just picture it for ya. And this is for everyone else that wants to see what's involved with something like this! There is a lot of time trying to figure out things and sometimes you have to basically fool the program to do what you want it to. When I started this scoop I have various guide lines to basically "guide" the shape. (think connect the dots but with whole sides and curves instead of just lines) Your guidelines are the shape you want to hold when it connects the various drawings. What you see is the final shape as it comes along from drawing to final. (without all the time involved and racking of thy brain lol) Pics 1,2, and 3 are the shape and guide lines. Pic 4 is that shape lofted. Pic 5 is where I extended the scoop forward. Pic six shows you not only what's going on (look on the left of the pic) but where it sits as far as progression. Not including the mirrored shape. (I can mirror the part and choose the mating face and it will make a duplicate of it) Also in Pic 6, the blue outline is a previous part of the model that was "extruded" but hiding so to speak so it didn't get in the way of the loft as I was trying to work it. That was done first as that had the basic shape from the front that I wanted then I copied the drawing into another "plane" for the loft. Pic 7 is the final part. And one I'm happy with I might ad! So minus the base of the scoop (mounting surface) it is completed. Whew! Edited September 1, 2017 by mr68gts Quote Link to comment Share on other sites More sharing options...
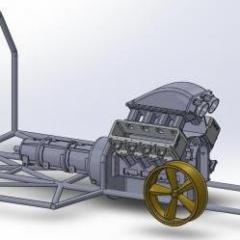
mr68gts Posted September 1, 2017 Author Share Posted September 1, 2017 The final assembled supercharger with the scoop currently. I added the mounting flange on it. Paul Quote Link to comment Share on other sites More sharing options...
Randy D Posted September 3, 2017 Share Posted September 3, 2017 Man, I wish I had your skills buddy !!!!!Randy Quote Link to comment Share on other sites More sharing options...
mr68gts Posted September 3, 2017 Author Share Posted September 3, 2017 (edited) Randy,Thank you sir! Time to brush up on my soldering skills.... Edited September 3, 2017 by mr68gts Quote Link to comment Share on other sites More sharing options...
mr68gts Posted September 3, 2017 Author Share Posted September 3, 2017 (edited) Chassis update. Since I have most of the brass I started on it this weekend. Got a little bit done. Fish mouthing everything is a pain in the butt however will be worth it in the final result. Hope to have the bottom rails completed this week then I have to order the rear 4 link brackets since they got broke in the accident. I can continue on with it but it will be easier to build up with those in place because I have to do the top rails. Much easier to solder in without all the other stuff in the way. Also need to figure out a way to bend this Albion brass. May have to turn something on the lathe to make a tubing bender. Edited September 5, 2017 by mr68gts Quote Link to comment Share on other sites More sharing options...
mecklm Posted September 4, 2017 Share Posted September 4, 2017 Many thanks for the detailed explanation. In a nutshell, your technique is pretty much how I envisioned doing it. When I loft nowadays I almost always use guide lines in order to control the final solid. More often than not, if I don't use them the results are usually not what I'm expecting. I was really hoping you wouldn't go to all the trouble of crafting a tutorial, as I hate to be responsible for holding up your modeling time, but I appreciate your explanation. Take care. Quote Link to comment Share on other sites More sharing options...
mr68gts Posted September 5, 2017 Author Share Posted September 5, 2017 Quote Link to comment Share on other sites More sharing options...
blackbeard Posted September 5, 2017 Share Posted September 5, 2017 that looks great paul Quote Link to comment Share on other sites More sharing options...
Codi Posted September 5, 2017 Share Posted September 5, 2017 Annndddd, we're off and running. The info you shared on how you've drawn up that beautiful blower hat makes my head hurt. I could never do what you do and admire those of you that can. Awesome stuff and should be something that the younger, more computer savvy kids should find intriguing. I hope your efforts inspire many others to take up the hobby Paul. Nice to see you beginning the brass work too. Cheers, Tim Quote Link to comment Share on other sites More sharing options...
mr68gts Posted September 6, 2017 Author Share Posted September 6, 2017 Annndddd, we're off and running. The info you shared on how you've drawn up that beautiful blower hat makes my head hurt. I could never do what you do and admire those of you that can. Awesome stuff and should be something that the younger, more computer savvy kids should find intriguing. I hope your efforts inspire many others to take up the hobby Paul. Nice to see you beginning the brass work too. Cheers, TimTim<Thank you sir! It's either going to inspire kids or sadly make them run away. There are those modelers that are the "lunatic fringe" and it's those that many see and think I can't do that so why try. It's different from when I grew up. I was taught I can do anything, all I have to do is try. (and don't give up!) I enjoy doing what I do on the computer and thanks to a few people I am able to do it and have fun doing it. And because I can somewhat do it it's even landed me a job. (never thought in my wildest dreams that my hobby could help me in my job lol) I've got a decent start on the chassis and will be stalled soon as I figure out some sort of bender. I saw your answer to my question so I will look at the Rio Grande catalog and see what I can find. I did see another one that kind of intrigued me on YouTube also. I may turn something on the lathe too. I've done it before because I needed a certain radius to make some exhaust for a model I built for the Model Car Museum. Worked pretty good actually but that takes time away from building. I'll keep plugging away at this chassis though. I do need to draw up the back half of the chassis so I can have some sort of template to go off of.back to our regularly scheduled program...he hePaul Quote Link to comment Share on other sites More sharing options...
Mooneyzs Posted September 6, 2017 Share Posted September 6, 2017 Paul.... I am super excited to see you back at this and taking a stab at it in brass. You are off to a great start and it's definitely an inspiration. It's making me want to get the funny car done so I can move on to the next project and tackle my first brass chassis as well. I am with you where I would love to come up with some kind of bender to be able to bend tubing better. I have kind of an idea that we will have to talk about. I remember having to bend some tubing for a test stand that I designed for another job that the bender would work. We would just need to be able to make a miniature version of it is all, I think.... lol. I think it's doable would just require some time to design and fabricate it. You said it best thst we can do anything all we need to do is try. Looking forward to your next uodate. Quote Link to comment Share on other sites More sharing options...
gasser59 Posted September 6, 2017 Share Posted September 6, 2017 I would also like to be in on that tubing bender discussion. I feel a brass chassis in my near future. Quote Link to comment Share on other sites More sharing options...
mr68gts Posted September 12, 2017 Author Share Posted September 12, 2017 Got a little progress on the chassis tonight. Going slow but it's getting there. The floor is just about done at this point. I have a couple more tubes to put in the middle then I can start on the hoop! I need to also figure out placement of the engine per proper rules. Paul Quote Link to comment Share on other sites More sharing options...
Mooneyzs Posted September 12, 2017 Share Posted September 12, 2017 Paul... Awesome work... I am loving the progress you are making on the new chassis. It's looking great so far. Keep plugging away and it the chassis will be done in no time. I am looking forward to more. By the way that injector hat looks familiar.... Quote Link to comment Share on other sites More sharing options...
mr68gts Posted September 12, 2017 Author Share Posted September 12, 2017 Paul... Awesome work... I am loving the progress you are making on the new chassis. It's looking great so far. Keep plugging away and it the chassis will be done in no time. I am looking forward to more. By the way that injector hat looks familiar.... Can't imagine why that hat would look familiar? lol. I needed a hat for looks and yours is sitting in my 3d printed parts organizer bins so it got set up there he he. Not the one I will be using but it gives me a good idea of looks anyway. I decided to do the hoop before I went to bed last night so it's in place now too. Looks pretty good on there. Need to finish up the floor tonight though and then I can do the uprights for the firewall. The main rails, and hoop are Albion 2.5mm solid rod which is the only thing I could find close to .101 dimension and is a real bear to cut compared to their thin wall tubing. I may contact them at a later date and see if they can run some 2.5mm tube but for this chassis it will be solid. Usually the front of the tubes are capped off anyway. They do custom orders so they may do it for a nominal fee of course! Can't wait to get home and get some more done after work.... Paul Quote Link to comment Share on other sites More sharing options...
Mooneyzs Posted September 12, 2017 Share Posted September 12, 2017 Can't imagine why that hat would look familiar? lol. I needed a hat for looks and yours is sitting in my 3d printed parts organizer bins so it got set up there he he. Not the one I will be using but it gives me a good idea of looks anyway. Paul... I knew it wasn't the one you would be using and thought it was just funny you mocked it up on there. It's a little too small for this build anyway...lol. awesome news that you got the hoop in last night. Just like you I can' wait to get home from work and get some bench time. Seeing your brass chassis make me really want to start on one. Soon I will be able to.but first I have to finish another build, ar least that's what I am telling my self. I am not letting myself start anything new yet. I am looking forward to seen more of this chassis. Keep up the great work. Quote Link to comment Share on other sites More sharing options...
mr68gts Posted September 16, 2017 Author Share Posted September 16, 2017 mocked up the engine some more (trans) and got the correct placement and height for it so I made a mock up tube in plastic to keep the engine in place. Makes the engine easily removable while I add more tubes.... back to the bench I go! Quote Link to comment Share on other sites More sharing options...
Mooneyzs Posted September 16, 2017 Share Posted September 16, 2017 Paul... It's great to see you back at the bench on this guy. Looking good and its coming together piece by piece one bar at at time. Keep up the great work and I can't wait to see more. You are another that is making me want to jump in and start building a Brass chassis like right now... Quote Link to comment Share on other sites More sharing options...
Randy D Posted September 17, 2017 Share Posted September 17, 2017 Love the chassis construction my friend !!!! Randy Quote Link to comment Share on other sites More sharing options...
gasser59 Posted September 17, 2017 Share Posted September 17, 2017 I was fortunately able to view this in person last night at our club meeting. Pictures are nice but in person...wow. Can't wait for the next update. Well done Paul. Quote Link to comment Share on other sites More sharing options...
Codi Posted September 18, 2017 Share Posted September 18, 2017 Lucky you Brad, we're just going to have to wait patiently for some more of Paul's progress pics but I'm not complaining that's for sure. Nicely done Paul. cheers, tim Quote Link to comment Share on other sites More sharing options...
mr68gts Posted November 14, 2017 Author Share Posted November 14, 2017 (edited) Back after a brief recess.... little bit of life has gotten in the way of this for a while. We have finally as of Sunday completely moved out of our house in the mountains. ( I swear everything multiplied every time we left and went back for more stuff.) The house has been sold and should close soon I hope. (nothing on our end of things) Then this shows up on my doorstep he he. I am a car guy after all! What you are looking at is a Mopar 410 Sprint Car block! Only it is NOT going into a sprint car he he! Hopefully twin turbo it will be my longest build yet....lol. (and most expensive too!) This block came from Mopars back room storage. It is a small block, all aluminum (with water capacity) I did buy the special gear drive and cover for it also. Just gotta collect the rest of the parts.....$$$$ Any who look forward to having some bench time soon! Just in time for the holidays right? lol. Edited November 14, 2017 by mr68gts Quote Link to comment Share on other sites More sharing options...
Recommended Posts
Join the conversation
You can post now and register later. If you have an account, sign in now to post with your account.
Note: Your post will require moderator approval before it will be visible.