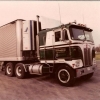
KJ790 Posted March 1, 2017 Share Posted March 1, 2017 As some of you may have noticed, I love building cabover Kenworths. Last month I decided to start on another one inspired by this truck: I started with an AMT K123 kit. First I filled the "peep window" in the passenger side door, then filled the headlight panels so that I could add single headlights, then filled the holes for the kit door handles and moved the upright in the vent windows forward to represent an early 70's model cab. I also added a rear window and mounts for cab mounted exhaust and intake. Then it was time to lay some paint. Next I assembled the chassis, and added a resin torsion bar suspension to the rear. For the wheels, I am using a cast resin spokes with split ring rims on the drives. I cut the center hub out on a pair of kit steer wheels from an AMT Diamond Reo kit, and added them to a pair of resin rims. This made it easier to paint the parts separately. I added some cast rubber tires all the way around for a vintage look. I added some weathering to the wheels and chassis using a light coat of grey paint through an airbrush, then a thin black wash. I used the kit engine, as the real truck had a 350 Cummins. I replaced the transmission with a 4x4 transmission from the AMT Diamond Reo kit, as the real truck had a twin stick 4x4. Quarter fenders were scratch built using corrugated styrene sheet and some brass rod. Quote Link to comment Share on other sites More sharing options...
72 Charger Posted March 1, 2017 Share Posted March 1, 2017 Really nice paint work KJ Quote Link to comment Share on other sites More sharing options...
KJ790 Posted March 2, 2017 Author Share Posted March 2, 2017 I stole a trick from Rob Nagle and used brass rod to make the grab handles. I also added a 3D printed grille and 3D printed interior cab fans. It is hard to see, but there is a cowboy hat resting on the dash waiting for the driver. Here is a mock-up of the cab resting on the chassis. The exhaust and intake were scratch built. Quote Link to comment Share on other sites More sharing options...
vincen47 Posted March 2, 2017 Share Posted March 2, 2017 Great job, looks awesome! Quote Link to comment Share on other sites More sharing options...
DRIPTROIT 71 Posted March 2, 2017 Share Posted March 2, 2017 You've done it again! Somehow you just capture the real truck perfectly!! This is really my kind of build!!! Great work!! Quote Link to comment Share on other sites More sharing options...
redneckrigger Posted March 2, 2017 Share Posted March 2, 2017 Very nice replication of a 1:1 truck! The paint is spot on, and the truck just the look! Awesome! Quote Link to comment Share on other sites More sharing options...
Jim B Posted March 2, 2017 Share Posted March 2, 2017 Very nicely done, KJ. I really like it. Quote Link to comment Share on other sites More sharing options...
Force Posted March 2, 2017 Share Posted March 2, 2017 Looks great!! Quote Link to comment Share on other sites More sharing options...
gotnitro? Posted March 2, 2017 Share Posted March 2, 2017 Awesome work Quote Link to comment Share on other sites More sharing options...
Tesla Posted March 2, 2017 Share Posted March 2, 2017 Fantastic work KJ! I plan to use Rob's method also. Quote Link to comment Share on other sites More sharing options...
k100 Posted March 2, 2017 Share Posted March 2, 2017 Looks real nice Quote Link to comment Share on other sites More sharing options...
bigred63 Posted March 2, 2017 Share Posted March 2, 2017 KJ, what a great looking Truck! I like the paint combination you used, just awesome. Those rear tires give it that special look. Quote Link to comment Share on other sites More sharing options...
tbill Posted March 3, 2017 Share Posted March 3, 2017 you're a building machine here lately that looks incredible KJ, nicely done so far Quote Link to comment Share on other sites More sharing options...
KJ790 Posted March 4, 2017 Author Share Posted March 4, 2017 Thanks guys! I worked on making a bumper this morning. Quote Link to comment Share on other sites More sharing options...
Bennyg Posted March 4, 2017 Share Posted March 4, 2017 Very nice. Ben Quote Link to comment Share on other sites More sharing options...
DRIPTROIT 71 Posted March 4, 2017 Share Posted March 4, 2017 Wow!! Very impressive!! Quote Link to comment Share on other sites More sharing options...
redneckrigger Posted March 5, 2017 Share Posted March 5, 2017 Typical superb work KJ! Nice! Quote Link to comment Share on other sites More sharing options...
gatorincebu Posted March 5, 2017 Share Posted March 5, 2017 Kurt, Some really good looking work here. Some nice extra details as well. Be Well Gator Quote Link to comment Share on other sites More sharing options...
purepmd Posted March 10, 2017 Share Posted March 10, 2017 Well done, KJ. Another awesome tribute to the golden age of trucking. I think you could build a hundred of these and each would be unique and spectacularly done. Keep it up. Quote Link to comment Share on other sites More sharing options...
extmcdriver Posted March 10, 2017 Share Posted March 10, 2017 Great work as usual. I love the old KW cabovers more than any other make. A few years back when I was a "driver", I drove a Freightliner for Schneider, a Petercar for TMC, and a W900L for a friend. Nothing beats the KW!!!!! Quote Link to comment Share on other sites More sharing options...
KJ790 Posted March 15, 2017 Author Share Posted March 15, 2017 I have been making some more progress lately. I finished up the plumbing under the cab, scratch-built the spring supports that hold the intake and exhaust up. The cab is set in place to see how everything lines up. I still need to finish the mirrors, wipers, and a few other small details. Quote Link to comment Share on other sites More sharing options...
KJ790 Posted March 15, 2017 Author Share Posted March 15, 2017 Quote Link to comment Share on other sites More sharing options...
kilrathy10 Posted March 15, 2017 Share Posted March 15, 2017 Sweet.....This is a really nice version.....Great job....Looks awesome with that trailer on the back..... Quote Link to comment Share on other sites More sharing options...
Warren D Posted March 16, 2017 Share Posted March 16, 2017 Nice looking rig! Quote Link to comment Share on other sites More sharing options...
tbill Posted March 19, 2017 Share Posted March 19, 2017 another beauty KJ, so life like. Quote Link to comment Share on other sites More sharing options...
Recommended Posts
Join the conversation
You can post now and register later. If you have an account, sign in now to post with your account.
Note: Your post will require moderator approval before it will be visible.