talon63 Posted March 14, 2017 Share Posted March 14, 2017 While I tend to focus mostly on Fords, sometimes I like something a little different. Saw this AMT 1941 Plymouth Four Passenger Coupe on clearance at Hobby Lobby, and decided to take a chance. So here are the first few shots, starting with the engine build. While I'm going with the stock engine, I am making a few mods to it, like spacing the intake and exhaust off of the block slightly and adding the two missing exhaust bits on the manifold. Other scratch parts include the the bracket for the oil sump air filter, the top mounted horn, relocating the generator bracket to the top of the generator, and the distributor. The bits on the "ground" are the upper and lower radiator hoses and the "glass" fuel filter. The bit in the tweezers is a scratch up of the steering box and column to tie into the kit column at the firewall. Still need to wire it and plumb it, decide on the finish for the oil pan, and scratch up one more little detail forward of the thermostat housing and bolt heads for the fan. Still, not a bad couple of hours so far. The hoses are some rubber coated twist-tie wire that was holding something in some packaging. and the fuel filter is two tiny pieces of clear sprue. All of the other scratched bits are styrene sheet, rod and tube. Thanks for looking, and as always, comments are welcome. T. Quote Link to comment Share on other sites More sharing options...
talon63 Posted March 15, 2017 Author Share Posted March 15, 2017 Small update as the engine progresses. Other real-life projects requiring attention. Got the fuel line and fuel filter in place and attached using .8mm brass fittings. Spark plug wires going in. Still need to drill the distributor and make up the little bit that holds the plug wires together I keep seeing in the 1:1 reference pics.. Also working on labels for bypass oil filter, and the air cleaner, then touch up a few spots that need a little more paint. If I have the space, thinking about adding the oil filter lines back down to the block, and adding the wiring for the starter, generator, and horn. Also noticed from some reference pics that this engine would be a good base for the flat head 6 used in a bunch of vehicles from the De Soto Airflow to the Dodge Power Wagon.in that era. Anyway, thanks for looking. Feel free to comment. T. Quote Link to comment Share on other sites More sharing options...
talon63 Posted March 18, 2017 Author Share Posted March 18, 2017 Able to put in a little bench time today. Engine is nearing completion. Got the decals for the air cleaner created and applied. Same with the oil filter. Decal created and applied, and the oil lines put in place. Touched up some paint. final attachment of hoses, and finishing the oil pan will happen when the chassis starts to come together. Now, on to the interior. Starting on the interior woodgrains. Here's the top of the dash. Two-toned, mahogany and burled oak. Sorry the pic is a little blurry, will get a better shot when I start foiling the face of the dash and getting the instrumentation done. The wood trim will be carried into other parts of the interior. Also opening up the gap in the front bench seat. Ground out the molded in pedals so they can be replaced by something more realistic. More to come. Comments welcome and happy building! Quote Link to comment Share on other sites More sharing options...
lordairgtar Posted March 19, 2017 Share Posted March 19, 2017 Nice little motor. Great job adding missing details. I think that engine has been used until 1959 ( JoHan Mopar build?) until the slant six came into use in 1960 I think. I would try and find smaller gauge wire for your plug wires. Quote Link to comment Share on other sites More sharing options...
Foxer Posted March 19, 2017 Share Posted March 19, 2017 I like the engine detailing .. I had a version of this in my '52 Plymouth that never started in winter, but ran forever once it was forced to start. Quote Link to comment Share on other sites More sharing options...
Tom Geiger Posted March 19, 2017 Share Posted March 19, 2017 Still need to drill the distributor and make up the little bit that holds the plug wires together I keep seeing in the 1:1 reference pics.. Here's two photos I used when I was building mine.. And yes, that same engine was pretty much used in cars though 1959. I believe it was still used in trucks for a few years after that. Also, the engine itself was made into the 1970s as a commercial power plant type engine. Quote Link to comment Share on other sites More sharing options...
talon63 Posted March 19, 2017 Author Share Posted March 19, 2017 Thanks for the feedback, guys. And for the reference pics. The first I had seen, the second one will come in in handy, for crafting that part. I know the plug wires are a bit out of scale, but once I get the routing shield created I can pull the current wires and use the right scale. Meanwhile, working on the interior. As stated, burled oak and mahogany on the dash, with wood panels on the doors. Two-tone grey cloth and carpet. Since I added the wood to the door panels, I had to scratch up new arm rests, door handles and windo cranks. Also added a knob to the top center of the dash. Saw it in a few reference pics, but have no idea what its for yet. Added a turn signal level, also scratch built from a period photo. Seats and dash are just dry fit right now. Still some detailing left to do. Faking seat covers on the seats, upcoming pics will reveal some wrinkles that were deliberately worked into the surface. Making the badge that goes in the upper left of the grill on the dash. The little red dot is a badge. Also, once I've decided on the final body color, the area on the door panels above the wood will be redone to match the exterior color. Got the body in primer at this point, after fixing a seam issue where the front piece that holds the grill goes joins the body and cleaning up around the headlamps. Again, thanks for looking and for the comments. Happy building! Quote Link to comment Share on other sites More sharing options...
Foxer Posted March 20, 2017 Share Posted March 20, 2017 Your details look very good, ill have to save this for future reference. Were those decals you used for the dash wood?This is a L-Head I'm still working on .. Quote Link to comment Share on other sites More sharing options...
talon63 Posted March 20, 2017 Author Share Posted March 20, 2017 Your details look very good, ill have to save this for future reference. Were those decals you used for the dash wood?This is a L-Head I'm still working on ..Thanks for the feedback. I do like the detail work on your engine as well. Next time I tackle one of these, I'll be using your build as a reference.The panels in the doors are printed and clear coated with Elmers' clear glue. The dash is mostly done with furniture touch-up markers, except for the mahogany bit along the very top - that one is printed and clear coated. To create the burled look, I lay a thin layer with the furniture marker, then using smallest part of the tip, touch the surface, this creates small rings, and if I touch the edge of the rings with the marker, it distorts and creates smaller rings. Eventually ending up with what you see. The marker creates its own gloss finish.Again, thanks for looking! Quote Link to comment Share on other sites More sharing options...
Michael in Illinois Posted March 20, 2017 Share Posted March 20, 2017 Great work, I'm building the Plymouth right now, The engine pictures are helping with my detailing of the engine. The dash looks great as well. Keep us up-dated with your progress. Quote Link to comment Share on other sites More sharing options...
talon63 Posted March 21, 2017 Author Share Posted March 21, 2017 Had a few minutes this evening. Crafted some pedals to replace the molded in ones. need to go back now and fill in the hole for the steering column as it's off center from the tabs on the dash, and also comes in behind the inner fender, as well as being to low on the firewall. Should be just below where the firewall starts to angle back and almost 3/16 of an inch to right of where the base of the column would sit if you use the molded in guide. Probably should have gotten a shot or two of the pedals before painting them. Also need to see if I can pop off the window crank shown and move it down and forward to be in the right place. I managed to get it right on the other side. Got the frame and most of the suspension painted. Testing body colors I have on hand against the factory colors available in 41, and finishing up the body prep for final primer. Quote Link to comment Share on other sites More sharing options...
David G. Posted March 21, 2017 Share Posted March 21, 2017 I built one of these a few months ago, it's a fun kit. You're adding a bit more detail to yours than I did to mine- looks great so far.David G. Quote Link to comment Share on other sites More sharing options...
talon63 Posted March 21, 2017 Author Share Posted March 21, 2017 Thanks, Dave. I agree it is a fun kit. And kind of like your sig says, the details I'm putting this one are practice for another build. Most of this detail won't be easily seen once this one is assembled, but on a future build I'm planning they will be. Quote Link to comment Share on other sites More sharing options...
Olderisbetter Posted March 21, 2017 Share Posted March 21, 2017 Great detail. I did one of these as basic plain jane model. The knob on the dashboard is probably windshield wiper control. Double check. Quote Link to comment Share on other sites More sharing options...
espo Posted March 21, 2017 Share Posted March 21, 2017 Your extra efforts on the detailing is really paying off. You mentioned the knob on the dash. I'm not 100% but most cars of this era used a ventilation system to duct fresh air into the interior. Chrysler products tended to use a popup door in front of the windshield. Most often there was a leaver under the dash to open this, but I recall some of the models had a knob that you could turn and that would open the vent. Quote Link to comment Share on other sites More sharing options...
talon63 Posted March 21, 2017 Author Share Posted March 21, 2017 Your extra efforts on the detailing is really paying off. You mentioned the knob on the dash. I'm not 100% but most cars of this era used a ventilation system to duct fresh air into the interior. Chrysler products tended to use a popup door in front of the windshield. Most often there was a leaver under the dash to open this, but I recall some of the models had a knob that you could turn and that would open the vent.Thanks for the feedback! Yeah this one is a bit tricky in that respect. Reference pics show the knob on top of the dash (I'm going to surmise it's the cowl vent control) and also show a knob below the dash under the center grill, possibly a diverter?. None of the reference pics are in high enough resolution that I can make out if they are labeled. There's also another knob or two missing on the dash to the right of the steering column, but it varies depending on the specific model of coupe. Quote Link to comment Share on other sites More sharing options...
Foxer Posted March 21, 2017 Share Posted March 21, 2017 probably the most worn knob is the Choke from winter starts (attempts)! ... thinking back to mine, but controls probably changed too much by that time. FYI I came on this 36-41 Plymouth Shop Manual ... a nice reference Quote Link to comment Share on other sites More sharing options...
talon63 Posted March 21, 2017 Author Share Posted March 21, 2017 FYI I came on this 36-41 Plymouth Shop Manual ... a nice referenceVery cool. Thanks for the link. Quote Link to comment Share on other sites More sharing options...
Foxer Posted March 23, 2017 Share Posted March 23, 2017 (edited) had this on hand ... shows knobs under dash and at top. From a '41 Plymouth Manual Edited March 23, 2017 by Foxer Quote Link to comment Share on other sites More sharing options...
talon63 Posted March 23, 2017 Author Share Posted March 23, 2017 had this on hand ... shows knobs under dash and at top. From a '41 Plymouth ManualThanks so much for that. So, it is the Wiper Control! Now I can add the Ignition Switch, Choke Control and Cowl Vent control. Not going to worry so much about the starter pedal. It's a closed coupe and it will be hard enough to see the pedals that are already there. If this were a convertible, or one with opening doors, I'd put in the effort. With that bit of info, I might be able to get the interior finished off this weekend, and start work on the chassis. Possibly even get the first color coat on the body. I may go with the Flight Gray Medium Opalescent if I can find a suitable match when I paint shop tomorrow. Quote Link to comment Share on other sites More sharing options...
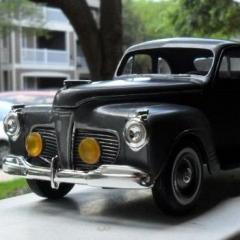
talon63 Posted March 25, 2017 Author Share Posted March 25, 2017 (edited) Interior almost complete. Replete with wrinkled seat covers. Also got the first color coat on the body. Ended up going with the Gunmetal Grey, as it was the closest match I could find to the original paint chart. The parts on the trailer fender between the interior and the body are for lights to be mounted on the front bumper. Tomorrows' tasks include black-washing the chrome parts, finishing the suspension, hopefully finish the paint so I can begin the BMF of the body trim. I do have one last bit of scratch building to do for this kit. It doesn't come with hinges for the hood, so I need to rectify that. It looks like there is just enough room to get some working hinges in there if I can find the right reference pic. As always, thanks for looking and for your comments. Happy building! Edited March 25, 2017 by talon63 typo Quote Link to comment Share on other sites More sharing options...
socal76 Posted March 25, 2017 Share Posted March 25, 2017 I like the color of the body. Might have to use it on a '50 Ford P/U Custom I am building. Checking to see if the Hemi out of the later Revell '41 Willys will fit without too many mods, so I can use theflathead in another project. Quote Link to comment Share on other sites More sharing options...
talon63 Posted March 25, 2017 Author Share Posted March 25, 2017 I like the color of the body. Might have to use it on a '50 Ford P/U Custom I am building. That's a Duplicolor BGM0344/DSGM344 Gunmetal Metallic (84 WA7782) rattle can color from the local auto parts store. Quote Link to comment Share on other sites More sharing options...
moparfarmer Posted March 25, 2017 Share Posted March 25, 2017 Very nice work on your model..The 41 Plymouth was an ugly car compared to the equivelent Ford and Chev..No wonder the model companies never made this car..It can be found anywhere at low prices..They are not scarce..Yours is going to look killer... Quote Link to comment Share on other sites More sharing options...
PARTSMARTY Posted March 25, 2017 Share Posted March 25, 2017 Wow-what a cool project-right on !!! Quote Link to comment Share on other sites More sharing options...
Recommended Posts
Join the conversation
You can post now and register later. If you have an account, sign in now to post with your account.
Note: Your post will require moderator approval before it will be visible.