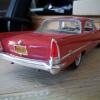
restoman Posted June 1, 2017 Share Posted June 1, 2017 This is the Fuzz Duster kit, but I'm building it as a 1980 Volare, not a Road Runner. Lots of subtle mods to the body to make it look more like it should. I'm using one of my resin cast engines from the '71 Duster, with a MAD distributor, Fireball Holley carb and one of my resin copies of a dual snorkel air breather. Ditched the kit rear end and used on of my 8.75 copies. Headers are from the Hemi Charger kit - a little on the big side and the port spacing is wrong but... better than manifolds. Tires are from the '67 GTO kit and those nice cop car wheels are Fireball products. Love 'em! The paint is Testors red, cleared with One Coat Clear. Not sure if I'll polish it out or not... It's a basic kit, but with a little effort it's turning out all right. Comments welcome. Quote Link to comment Share on other sites More sharing options...
Custom Mike Posted June 1, 2017 Share Posted June 1, 2017 Looks good so far Mike, and some great mods so far. I just picked this one up today, mainly for the tires! What did you do to the body that needed correcting? I may go Pro-Mod, or factory stock Road Runner, I'm not sure yet. But it'll get the same engine swap you've done for sure! Quote Link to comment Share on other sites More sharing options...
Ron Hamilton Posted June 1, 2017 Share Posted June 1, 2017 I want to see more of this one!!!!! Quote Link to comment Share on other sites More sharing options...
superbike-shaun Posted June 1, 2017 Share Posted June 1, 2017 Turning out to be a nice build! Good solid building,my friend! Quote Link to comment Share on other sites More sharing options...
restoman Posted June 1, 2017 Author Share Posted June 1, 2017 Looks good so far Mike, and some great mods so far. I just picked this one up today, mainly for the tires! What did you do to the body that needed correcting? I may go Pro-Mod, or factory stock Road Runner, I'm not sure yet. But it'll get the same engine swap you've done for sure! I eliminated the T roofs for starters. I didn't think I could get them to look right, so they were sanded smooth and the thin cut-areas on the underside got filled in. Spent a fair bit of time scribing around the side drip rail (which relly isn't a drip rail in 1:1) and the quarter glass moldings. They were almost non-existent in places. Discarded that factory fuel cap and scribed a more-correct-to-me looking one in the body. Deepened the rear bumper filler lines, extending them fully from side to side. Scribed some front fender extension seams and front bumper filler seams. Deepened the door and deck lid seams, as well as the rocker molding trim for some better definition. Ditto for the front and rear glass reveal moldings. I also put in the lower front fender seam along the rocker panel. The body contours on the front fenders and doors seemed too sharp to me so I smoothed them a bit. The rear spoiler - not pictured - I cut into three pieces to simulate the gaps a real one would have. From the kit, the spoiler was too wide, so this lets me fit it properly. I'll paint it matte black but as of right now, I'm still undecided whether it'll get used or not. Not done yet, but the foiling will be done in chrome, as would it would be on a simple Volare. Also working on clear rectangular headlamps to replace the molded in ones. Might do the same for the front signal light lenses...? It took a couple hours at least for all this stuff, but I like how it turned out. Quote Link to comment Share on other sites More sharing options...
espo Posted June 1, 2017 Share Posted June 1, 2017 Great looking build. Your extra work on body prep really paid off. The paint looks perfect in the picture. I personally like the understated look of the steal wheels and would forgo the spoiler. But it's your build so do it your way. Quote Link to comment Share on other sites More sharing options...
restoman Posted December 14, 2017 Author Share Posted December 14, 2017 Back at it... Lots of fitting, sanding, filing and shaving to get that chassis tucked under there and with a stance that I can live with. I've worn through the chassis paint in a few places, it's been handled so much! Comments always welcome. Quote Link to comment Share on other sites More sharing options...
Curt Posted December 14, 2017 Share Posted December 14, 2017 Very nice, Mike, and not overstated. I like it! Quote Link to comment Share on other sites More sharing options...
Tom Geiger Posted December 15, 2017 Share Posted December 15, 2017 I like that you added the underhood stiffner bars and the interior air intake on the top of the firewall. Otherwise it was just blank! Another issue with the kit (at least on my earlier Volare) is the lack of a gas pedal. Quote Link to comment Share on other sites More sharing options...
restoman Posted December 15, 2017 Author Share Posted December 15, 2017 This one has a gas pedal molded into the tub. I added a better one in front of it, along with a brake pedal hanging from the dash. Quote Link to comment Share on other sites More sharing options...
b-body fan Posted December 15, 2017 Share Posted December 15, 2017 I actually had one. My second car. Two tone green with a green interior. It had an intake leak. Little shot of ether and it would run all day! L. O. L. Quote Link to comment Share on other sites More sharing options...
disabled modeler Posted December 15, 2017 Share Posted December 15, 2017 I like it..! I want to build a Aspen R/T like we owned once someday..if I can ever find the right base model/promo to. Quote Link to comment Share on other sites More sharing options...
El Caballo Posted December 15, 2017 Share Posted December 15, 2017 I can't remember the last time I saw one of the Aspen/Volare's on the road, neat concept on the model. Quote Link to comment Share on other sites More sharing options...
randyc Posted December 15, 2017 Share Posted December 15, 2017 Love it! If this were the round headlight version, I'd be all over it. But oddly, the square headlights just do nothing for me. But I do like what you are doing on this one. Quote Link to comment Share on other sites More sharing options...
Maindrian Pace Posted December 16, 2017 Share Posted December 16, 2017 Stunner! All business, plain and clean - just how I like them. A friend built a '77 1:1 in a similar way, one of my favorite friend cars of all time. I have pics somewhere... Quote Link to comment Share on other sites More sharing options...
Recommended Posts
Join the conversation
You can post now and register later. If you have an account, sign in now to post with your account.
Note: Your post will require moderator approval before it will be visible.