vc273 Posted June 16, 2017 Share Posted June 16, 2017 (edited) Started this one about 10 years ago in the days that I didn't use primer and the paint work turned out okay but chipped real easy so decided to strip it and start over. Have a couple of pro street rear floor pans that I am checking at the moment and may use the chevelle rear end but will cut the axles from the diff and install a dana center. Using rims from the parts box and the fronts are from the ford woody street rod and the rears from the willys pro street kit. Going to use the 440 out of the revell limited edition dart kit and will be using a big single 4 barrel for the induction. Havent worked out interior details yet but thinking of more modern buckets for the front and either 3 buckets in the back or leaving the rear seat out altogether. Not sure on color yet but thinking of adding some styrene to the rear pillars so I can have the roof a different color from body. Have posted a couple of mock up pics and will be a build that I will be progressing with over the winter. Cheers and thanks for looking Steve Edited February 21, 2018 by vc273 Quote Link to comment Share on other sites More sharing options...
PARTSMARTY Posted June 16, 2017 Share Posted June 16, 2017 I'm a stoned cold mopar freak and love where this going.Can't wait to see more. Quote Link to comment Share on other sites More sharing options...
Slotto Posted June 16, 2017 Share Posted June 16, 2017 You are off to a great start! Cant wait to see more Quote Link to comment Share on other sites More sharing options...
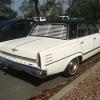
bytownshaker Posted June 18, 2017 Share Posted June 18, 2017 Ride height and the view from the rear looks so tough. Can't wait for more progress. Quote Link to comment Share on other sites More sharing options...
vc273 Posted June 18, 2017 Author Share Posted June 18, 2017 (edited) Thanks everyone for your comments. Playing around last night was thinking of possibly injecting the motor so after looking through my induction parts box found the induction from one of the chev kits that I parted out. After dropping it on the 440 found the plenum chamber just looked to skinny and small so decided to scratch up my own. Not a 100% if I like it or not will decide after I clean it up and prime it. Will also have to modify the manifold to suit the 440 as well but in using this set up will have to scratch up a cowl induction scoop. Cheers and thanks for looking Steve Edited February 21, 2018 by vc273 Quote Link to comment Share on other sites More sharing options...
mustang1989 Posted June 18, 2017 Share Posted June 18, 2017 Good to see this one over here as well Steve!! Will be watching in. Quote Link to comment Share on other sites More sharing options...
vc273 Posted June 21, 2017 Author Share Posted June 21, 2017 (edited) Have been working on this over the past couple of nights and now have modified the firewall for a cleaner appearance and will also be smoothing of the inner guards. Found the interior tub for the chevell in one of the parts box that was more detailed rear firewall and cut it out to replace the dodges one and then re installed the dodges rear parcel shelve. Going to use a set of buckets from the dodge superbee pro street kit and the roll cage started as the dodges original one that I modified with some extra bracing. Also primed the plenum chamber and removed the chrome from the horns and drilled them out. Still have yet to modify the manifold and will be scratching my own valve covers as I dont have any suitable aftermarkets ones for this build. Cheers and thanks for looking Steve Edited February 21, 2018 by vc273 Quote Link to comment Share on other sites More sharing options...
vc273 Posted June 24, 2017 Author Share Posted June 24, 2017 (edited) Have been working the rear end the past couple of nights. Thought I would have the rear done an half an hour but because the chevelle kit that I am using was started by someone else the bracing and wheelie bars were either bent, twisted or broken so had to scratch up my own parts or straighten what was salvageable. All the white parts of the rear end are styrene and although not a big fan of wheelie bars on a street car decided to keep them for a different look. Also got a light coat of color on the inner guards and firewall just to see how the color would look and am happy with it and thinking of doing the roof in white and possibly a beige interior. Cheers and thanks for looking Steve Edited February 21, 2018 by vc273 Quote Link to comment Share on other sites More sharing options...
Dann Tier Posted June 26, 2017 Share Posted June 26, 2017 One of my all-time favorite Mopars, and you are making it look SWEEEET!!!! Quote Link to comment Share on other sites More sharing options...
vc273 Posted June 26, 2017 Author Share Posted June 26, 2017 (edited) Thanks Dann for your comment. Got some paint on the floor pan and have mocked up the engine in the engine bay which I had to cut a hole in the hood to peek out. Cheers and thanks for looking Steve Edited February 21, 2018 by vc273 Quote Link to comment Share on other sites More sharing options...
bytownshaker Posted June 27, 2017 Share Posted June 27, 2017 Coming along nicely. I agree with Dann I love 64 Dodge's Quote Link to comment Share on other sites More sharing options...
Slotto Posted June 27, 2017 Share Posted June 27, 2017 Looking good! Nice color choice Quote Link to comment Share on other sites More sharing options...
Dann Tier Posted June 28, 2017 Share Posted June 28, 2017 Love the intake too!! -nice bit of scratchbuilding! Quote Link to comment Share on other sites More sharing options...
vc273 Posted February 21, 2018 Author Share Posted February 21, 2018 (edited) Hi been a while since posting on the forum and with the issue of photobucket am now slowly re upping most of my pics and adding any updates since then. Have now opened up the trunk and added a fuel cell and also scratched up a battery and cables. Made up a flat floor for the trunk and have painted it in duplicolor. Have also given the body a couple of coats of color and still waiting for my delivery of bmf so I can give it a clear coat. Have the majority of the interior painted and finished still need flocking then I can assemble it. Cheers and thanks for looking Steve Edited February 21, 2018 by vc273 Quote Link to comment Share on other sites More sharing options...
PARTSMARTY Posted February 21, 2018 Share Posted February 21, 2018 (edited) I'm a mopar freak and working on a few 64 dodge 330's.The one in phoenician yellow is the closest to being done.Yours looks awesome plus !!! Edited February 21, 2018 by PARTSMARTY Quote Link to comment Share on other sites More sharing options...
Slotto Posted February 22, 2018 Share Posted February 22, 2018 Wow, that is very nice! Quote Link to comment Share on other sites More sharing options...
mustang1989 Posted February 22, 2018 Share Posted February 22, 2018 Very nice stance on this bad boy Steve. Quote Link to comment Share on other sites More sharing options...
High octane Posted February 22, 2018 Share Posted February 22, 2018 That's some "beast" you're building there, and I just love dem Mopars! Quote Link to comment Share on other sites More sharing options...
vc273 Posted February 23, 2018 Author Share Posted February 23, 2018 Thanks everyone for your comments, hope to have a delivery of bmf in the next week or so, so I can try to get this one finished off Quote Link to comment Share on other sites More sharing options...
Recommended Posts
Join the conversation
You can post now and register later. If you have an account, sign in now to post with your account.
Note: Your post will require moderator approval before it will be visible.