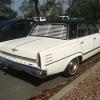
vc273 Posted February 21, 2018 Share Posted February 21, 2018 Hi here is another one I have on another forum that I thought I would post up and show its progress. Started this one while I am waiting for paint to dry on other projects. This is the amt 57 chrysler 300c custom and have to admit it the body in this kit was really poor. On the side that the spruce was on the sill panel was all over the place. Had to sand most of it down and used styrene and super glue as a filler, then sanded the whole thing down and now looks the same as the other side. Have checked with another kit I have that is the stock amt kit and that body is the same. As its a custom decided to fill in the antenna hole, rear view mirror hole, trunk license plate recess, fuel filler door, lettering on the hood and the door handles for a smoother look. Also filled in some areas on the inner guards and smoothed them off for a cleaner look. Couldn't bring myself to removing the side chrome trim as I think it does make the car and have given it its first coat of primer followed by a sand down. Hopefully will have a chance to get another coat of primer on it tomorrow. Will be using the hemi supplied in the kit and is quite detailed, with fuel lines and carb linkage, but had to replace the air filter assembly for these filters from the amt 70 superbee pro street kit. Although the kit already has lowered suspension wasn't low enough for me so lowered it some more by modifying the rear springs, adding lowering blocks and removing the shaft front the front stub axles and moving it up higher. Still deciding on if I will be running caps or rims as the stock kit I have will have the stock caps on it. First couple of pics are stock caps that I modified with drilling a hole in the center and added amt ford Edsel spinners to them, the second set of pics are with the rims of the polar lights dodge coronet pre painted kit and the next set of caps are from the parts box. Have mocked it up to see how it looks and think it looks okay. Cheers and thanks for looking Steve . Painted in duplicolor light silver and have given the hood a cut back and polish, still have to clear coat it yet and then another polish. Will get stuck into polishing the body tonight then get it ready for the roofs color. Here is a few pics after spending about 8 hours of polishing up the body, then will get the roof painted and polished, then the bmf and clear coat and then the polishing starts again.r Have some color on the roof now, just need a day or two before polishing it. Have polished up the roof and hope to have the bmf done tonight and weather permitting will have some clear coat on it tomorrow. Here is a few pics of the roof polished up. Cheers and thanks for looking Steve Got some paint on the chassis and floor pan today and hope to be able to polish them up tomorrow before detailing them. Also shot the engine with paint and clear coat in the hope I can finish off assembling and detailing tonight providing it has cured enough. Have a small update on the interior, used the back of my knife on all the pleat lines on the door trims and seats to bring them out more after painting and installed electric window switches.Have painted it red rattle can from the cheap shop, bmf on the door trims and my first time flocking. Wanted to see how it all looked in the car and one thing that I forgot about was the mod I made to the firewall and rear location of the floor pan was that I had shaved them down to get the floor pan to sit higher in the body to get the body to sit lower so had to carefully shave a bit off the bottom of the door trims as they were sitting way to high. Cheers and thanks for looking Steve Paint looks like its turning out good so may have this one finished in a couple of days, only have the motor to do then starts the assembling. Cheers and thanks for looking Steve This build is nearing completion now, got most of the engine done apart from painting and installing the engine accessories. Also got half the exhaust done and rims and tyres installed. Next is glass and installing the interior and should be done. Cheers and thanks for looking Steve Quote Link to comment Share on other sites More sharing options...
DumpyDan Posted February 21, 2018 Share Posted February 21, 2018 Wow man that is nice, I thought the first pictures with the car all silver was nice but then.......Bam looks real good Quote Link to comment Share on other sites More sharing options...
vc273 Posted February 22, 2018 Author Share Posted February 22, 2018 Thanks Dan thought the body needed a little contrast and over here in Australia our Holden commodores had a similar color contrast that I always liked, so I went with it. Cheers Steve Quote Link to comment Share on other sites More sharing options...
Mercuryman54 Posted February 22, 2018 Share Posted February 22, 2018 Very sharp Chrysler!! Its going to be very nice when finished! I'll keep watching. Dennis Quote Link to comment Share on other sites More sharing options...
peekay Posted February 22, 2018 Share Posted February 22, 2018 That body looks really sharp! Quote Link to comment Share on other sites More sharing options...
espo Posted February 23, 2018 Share Posted February 23, 2018 I really like how your build looks. I think you were right to leave the side trim in place as it breaks up the broad flat quarter panel. I like the modifications on the rear deck lid, but wonder about the large hole for the trunk key. Quote Link to comment Share on other sites More sharing options...
Spex84 Posted February 23, 2018 Share Posted February 23, 2018 Nice work! I'm a fan of these cars when they're shaved and 2-toned; I have a project coming up that will be similar Quote Link to comment Share on other sites More sharing options...
vc273 Posted February 24, 2018 Author Share Posted February 24, 2018 Thanks everyone for the comments, soon as the bmf arrives will be getting stuck back into this one. David there is a chrome badge going there thats why I left it, just to break up the rear look Quote Link to comment Share on other sites More sharing options...
bisc63 Posted February 27, 2018 Share Posted February 27, 2018 Very nice color combo; the top adds just such a nice splash of color without detracting from that sweeeeeet silver! Quote Link to comment Share on other sites More sharing options...
milo1303s Posted February 27, 2018 Share Posted February 27, 2018 Love it wonder what a set of pinner whitewalls would look like withe the Cragers? Quote Link to comment Share on other sites More sharing options...
vc273 Posted March 5, 2018 Author Share Posted March 5, 2018 Thanks Rusty and Bob for your comments. Bob thought about it but all my decals for whitewalls are now getting old and cracked so decided to save myself the grief and left it as is Quote Link to comment Share on other sites More sharing options...
Recommended Posts
Join the conversation
You can post now and register later. If you have an account, sign in now to post with your account.
Note: Your post will require moderator approval before it will be visible.