Steve Osbourne Posted April 3, 2018 Author Share Posted April 3, 2018 And here is the result. I'm now going to let it sit for a week or so and then go back and mask off the areas that will get painted matt black. After all that is done I'll go back and wax the entire body with Meguiars Show Car Wax #7. I'm not sure if I mentioned earlier but the big block is going in the next Corvette (78, also C3). This one will still get the original kit small block 350 with upgrades to headers, Holley carb, manifold and air cleaner. Quote Link to comment Share on other sites More sharing options...
Steve Osbourne Posted April 3, 2018 Author Share Posted April 3, 2018 I forgot to point out one small detail on this photo. Note the air vent on the dashboard has been opened up and the radio speakers are gone. I was going to try and replace the speakers with metal mesh or similar but made a mess of it so now we'll just call it radio delete. Quote Link to comment Share on other sites More sharing options...
ATHU Posted April 3, 2018 Share Posted April 3, 2018 (edited) Looks awesome. Great job so far!! Edited April 3, 2018 by ATHU Quote Link to comment Share on other sites More sharing options...
Steve Osbourne Posted April 9, 2018 Author Share Posted April 9, 2018 I spent some time working on the TDR Muncie 4-speed transmission with Hurst shifter. I made the rod adjusting buttons from 3/32" dia. aluminum tube with a slightly longer piece of 1/16" aluminum rod inserted. I then drilled out both pieces together to accept the rods. The pivot arms are made from 2 levels of .030 Evergreen sheet with quarter-round strip added to both sides where the 2 pieces transition. I made extras. I'm using 0-80 hardware for the pivot bolts. They will attach to the side cover and extension using 0-80 threaded inserts. The fake mainshaft is an assembly aid only. It will attach to a corresponding tube I'll build into the engine block. Quote Link to comment Share on other sites More sharing options...
Steve Osbourne Posted April 17, 2018 Author Share Posted April 17, 2018 some more detail work on the Muncie tranny and added bolts to the oil pan. Quote Link to comment Share on other sites More sharing options...
Steve Osbourne Posted April 21, 2018 Author Share Posted April 21, 2018 Update. I finished painting all the trim on the body and then polished with Meguairs #7 Show Car Wax. I also finished painting the mirrors (matt black), rocker panels (gloss black) and side air scoops (matt black). I should be able to attach those items and the window glass by tomorrow. Quote Link to comment Share on other sites More sharing options...
Belugawrx Posted April 22, 2018 Share Posted April 22, 2018 Looking good Steve I like the extra details on the engine Cheers Quote Link to comment Share on other sites More sharing options...
Steve Osbourne Posted April 22, 2018 Author Share Posted April 22, 2018 Thanks Bruce. I ran into very a minor snag with the mirrors. For some reason the Monogram engineers decided to put the mirror glass on the aluminum sprue instead of the chrome meaniung there was absolutely no reflection. I sanded the face and edges of the mirrors smooth and then glued some craft store mirror paper (ususally in the scrapbooking section of your LHS) and then used a black sharpie on the edges. I then glued the faces to the mirror body using black CA. Check out the new reflection... Note the 0-80 studs & nut on the mirror body which is how the mirrors will cleanly attach to the body. Quote Link to comment Share on other sites More sharing options...
Steve Osbourne Posted April 22, 2018 Author Share Posted April 22, 2018 Mirrors test fit. Quote Link to comment Share on other sites More sharing options...
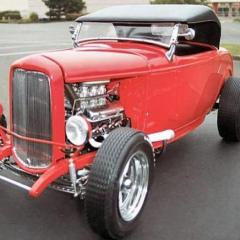
Steve Osbourne Posted April 23, 2018 Author Share Posted April 23, 2018 I finished mounting the rocker panels, side scoops, front grill mesh and 'gascap'. The license plates (from MINIPL8S) are test fir on;e and will be mounted with mini-hardware. I may make rims also. I couldn't adjust the light to where I could get a good shot of the rocker panels and side scoops. I'll try and get some outdoor shots tomorrow, I also added some details to the tail lights and they should be ready to mount tomorrow I forgot that I won't be installing the window glass until final assembly. This is because I added studs to the body, interior and chassis that will securely join these sub-assemblies later with nuts. I'll be sure to point this out later. Quote Link to comment Share on other sites More sharing options...
Steve Osbourne Posted April 23, 2018 Author Share Posted April 23, 2018 here is the window glass, after using a black Sharpie on the edges... Quote Link to comment Share on other sites More sharing options...
Steve Osbourne Posted April 23, 2018 Author Share Posted April 23, 2018 And here are the outdoor shots which show more contrast and detail. Quote Link to comment Share on other sites More sharing options...
Steve Osbourne Posted April 23, 2018 Author Share Posted April 23, 2018 A few more... Quote Link to comment Share on other sites More sharing options...
Steve Osbourne Posted April 24, 2018 Author Share Posted April 24, 2018 I finished the tail lights last night. I tried painting the back side of the back-up light lens flat white but it looked way too white from the other side. Also, the stem that mounts the lens shows as a small clear dot in the middle. So I cut off the stem and sanded the lens back smooth. I then used a Molotow 2mm chrome pen to color the back. Much better. I used the same pen to highlight the edges of all the lights, similar to an earlier C3 Corvette. The red lens' clashed with the maroon body color without the chrome trim. Next up is the license plate. Quote Link to comment Share on other sites More sharing options...
Steve Osbourne Posted April 25, 2018 Author Share Posted April 25, 2018 I apolgize for the redundancy. I just get excited when I start to see my vision start to take shape and I want to share both the build and the techniques that I use in real time. There are many professional and expert modelers here that have much more to offer than me and I have learned much from them. I'll suspend posting until I have something substantial to post. Thanks for the comments Quote Link to comment Share on other sites More sharing options...
disabled modeler Posted April 25, 2018 Share Posted April 25, 2018 WOW...! Amazing work...! Quote Link to comment Share on other sites More sharing options...
Belugawrx Posted April 25, 2018 Share Posted April 25, 2018 Doing a great job here Steve Nice work on the taillights too! Quote Link to comment Share on other sites More sharing options...
LaughingIndian Posted April 27, 2018 Share Posted April 27, 2018 On 4/25/2018 at 6:36 AM, Steve Osbourne said: I apolgize for the redundancy. I just get excited when I start to see my vision start to take shape and I want to share both the build and the techniques that I use in real time. There are many professional and expert modelers here that have much more to offer than me and I have learned much from them. I'll suspend posting until I have something substantial to post. Thanks for the comments Speaking for myself Steve, I see no redundancy ... your pics are great and all are “substantial” and beyond . Nice work! Quote Link to comment Share on other sites More sharing options...
Steve Osbourne Posted May 7, 2018 Author Share Posted May 7, 2018 Quote Link to comment Share on other sites More sharing options...
Steve Osbourne Posted May 7, 2018 Author Share Posted May 7, 2018 Quote Link to comment Share on other sites More sharing options...
DumpyDan Posted May 7, 2018 Share Posted May 7, 2018 Hey Steve this is really nice work very impressive, the detailing is awesome. Gonna keep watching. Quote Link to comment Share on other sites More sharing options...
Cien1986 Posted May 10, 2018 Share Posted May 10, 2018 Nice..... i like to see the engine detailup work Quote Link to comment Share on other sites More sharing options...
Steve Osbourne Posted May 10, 2018 Author Share Posted May 10, 2018 Thanks guys. Test fit pulleys, made alternator bracket and adjustment rod. Almost time to start permanently attaching assemblies. Quote Link to comment Share on other sites More sharing options...
Cien1986 Posted May 10, 2018 Share Posted May 10, 2018 Your craftmanship is real thing...... Quote Link to comment Share on other sites More sharing options...
Maindrian Pace Posted May 15, 2018 Share Posted May 15, 2018 Fabulous work, the engine looks like the real thing. This is going to be very nice. Quote Link to comment Share on other sites More sharing options...
Recommended Posts
Join the conversation
You can post now and register later. If you have an account, sign in now to post with your account.
Note: Your post will require moderator approval before it will be visible.