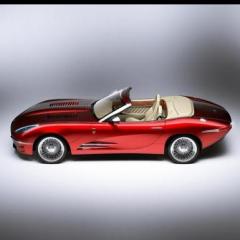
Kennyboy Posted January 1, 2019 Share Posted January 1, 2019 (edited) This is my build of Bo Zolland's digital rendering of a new age Jaguar E-type, he referred to it as the Lyonheart. I started with a builtup of an original Monogram Jaguar E-type that I purchased at a local meeting for $2. I stripped it apart which was quite easy and put it in the pond for a few days to strip off the paint from the 70's. Next task was to take all the body parts and glue them together to create a one piece body that would be the starting point for the long road of cutting, gluing, filling, sanding, etc. I made a 1/24 scale printout of the sideview of the digital rendering of the Lyonheart and realized the E-type was 10 mm too short on the total length....sigh here we go. Cut the body at the front of the doors and added 10 mm of plastic from a Nascar body (which had the exact contour I needed) carefully sanded the mating surfaces, squared up, and glued the body back together. Next step was to add the necessary height to the side profile. Added in the center pieces from the beltline to the rocker from another Nascar kit (nice smooth sides). Next, on the rear quarter I had to pie cut and add in plastic to match up with the center. After all that dried I sanded smooth and got ready for the next step....had to widen the body 8 mm. Cut the body down the middle and added 8 mm of plastic on the hood, trunk, and front and rear valance. Amazingly (!), it sits dead level on the table and is now a scale 1/24 which is correct for my plans. Edited January 10, 2019 by Kennyboy Quote Link to comment Share on other sites More sharing options...
Kennyboy Posted January 1, 2019 Author Share Posted January 1, 2019 Smoothed out and leveled the body to prepare it for the next steps. Adding a proper windshield frame, and the dreaded side coves. The windshield frame came from the Shelby Series 1 kit and was a perfect fit and looks almost identical to the reference. The coves were not at all as easy. Ended up using the side pieces from the Pontiac Banshee to create the interesting curvy shape I needed for the coves. Laid out the stencil for the cove cutouts, penciled, and cut the side out for the new piece from the Banshee. Side note, realized that the interior, and several other items from the Series 1 were an exact (almost) fit for this build. Quote Link to comment Share on other sites More sharing options...
Kennyboy Posted January 1, 2019 Author Share Posted January 1, 2019 Unfortunately, I am usually not that forthright at taking photos of ongoing progress....so there will be a bit of "skipahead". The vents in the hood of the original car were way too small to match those needed on the Lionheart so I cut them out and enlarged them as needed. Also, the headlights shape was wrong and needed to be filled. To fill the hole of the old headlight I used the bomb halves from an old p51 mustang, they had the correct convex shape and when sanded and fitted, they made the hole disappear. Laid out and cut the new shape of the headlight and set out to build the new housing and lens. Quote Link to comment Share on other sites More sharing options...
misterNNL Posted January 1, 2019 Share Posted January 1, 2019 Kudos om having the "eye" to recognize and adapt the correct shapes you need to fit the panels in this project from a wide variety of model subjects. Looking very smooth. Thanks for sharing. Quote Link to comment Share on other sites More sharing options...
Kennyboy Posted January 1, 2019 Author Share Posted January 1, 2019 The new headlight housing was sourced from parts I had in a parts box from a Tamiya r35 gtr. They looked like some sort of intakes maybe....looked at the instruction sheet and they weren't labeled. Oh well, extra parts. Moving on the fit of them was darn good and was able to find some projector housings and lenses in the parts box as well. Added a piece of beadwire for the led tube and the white piece was made using a bristle from a scrub brush. The lens was made using a water bottle for the convex clear plastic. Quote Link to comment Share on other sites More sharing options...
Kennyboy Posted January 1, 2019 Author Share Posted January 1, 2019 6 minutes ago, misterNNL said: Kudos om having the "eye" to recognize and adapt the correct shapes you need to fit the panels in this project from a wide variety of model subjects. Looking very smooth. Thanks for sharing. Thank you sir. Got more photos to put up as this is quite far along at the moment. Quote Link to comment Share on other sites More sharing options...
Kennyboy Posted January 1, 2019 Author Share Posted January 1, 2019 Quote Link to comment Share on other sites More sharing options...
Kennyboy Posted January 1, 2019 Author Share Posted January 1, 2019 The convertible boot cover was made using a waterfall from a c6 Corvette. Trimmed it up and sanded it to fit the interior. Vents in the hood are individually laid strips of styrene sanded to fit widthwise. Quote Link to comment Share on other sites More sharing options...
Kennyboy Posted January 1, 2019 Author Share Posted January 1, 2019 Ah the backend, taillights were sourced from the parts box, aluminum tubing cut and fit for the round lights, and the center piece was made from that same Nascar donor body, lots of sanding and fitting on that piece. The lower rear splitter was donated from a Carrera GT builtup I bought for $3. Cut and fit it to the car and bam a little more sanding and filling back there...oh and the red inserts for the aluminum tubing...check. Quote Link to comment Share on other sites More sharing options...
Belugawrx Posted January 1, 2019 Share Posted January 1, 2019 Looking good so far Ken Quote Link to comment Share on other sites More sharing options...
Kennyboy Posted January 1, 2019 Author Share Posted January 1, 2019 Have decided to use a different wheel/tire combo than the wire wheels of the reference photos. Mostly because the only wires I can find are from Donk kits. Will be using 19 inch Weds LXZ Kranze wheels from Aoshima. Quote Link to comment Share on other sites More sharing options...
Kennyboy Posted January 1, 2019 Author Share Posted January 1, 2019 3 minutes ago, Belugawrx said: Looking good so far Ken Thanks my friend ? Quote Link to comment Share on other sites More sharing options...
Modlbldr Posted January 1, 2019 Share Posted January 1, 2019 Beautiful work that you are doing. I love the look of the digital rendering and your work looks spot on! Nice and clean too! I love the fact that you are using what works from other kits. It proves the idea of never throwing out anything model-wise. You never know when it could contain the right piece or the right shape. I'll be watching this one. Later- Quote Link to comment Share on other sites More sharing options...
Kennyboy Posted January 1, 2019 Author Share Posted January 1, 2019 17 minutes ago, Modlbldr said: Beautiful work that you are doing. I love the look of the digital rendering and your work looks spot on! Nice and clean too! I love the fact that you are using what works from other kits. It proves the idea of never throwing out anything model-wise. You never know when it could contain the right piece or the right shape. I'll be watching this one. Later- Thank you Tom. I appreciate your support, and you are right....almost everything has a use. Quote Link to comment Share on other sites More sharing options...
Lowlife ! ! Posted January 1, 2019 Share Posted January 1, 2019 Wow I love the original rendering, what a beautiful design ! Your doing a fantastic job so far, with both working out the dimensions and altering the body, and your choice of parts to create the lights etc ! Good luck with the rest of the build, think you may want to consider taking molds of this too ! Quote Link to comment Share on other sites More sharing options...
Kennyboy Posted January 1, 2019 Author Share Posted January 1, 2019 Where I am at today....the chassis fitment. I will have to section the interior tub heightwise 3 mm. Should be easy, cut out the floor and sand walls with beltsander and re-attach floor. Pictures show modified exhaust and chassis pan....both were lengthened by 10 mm just like the original body. Quote Link to comment Share on other sites More sharing options...
89AKurt Posted January 1, 2019 Share Posted January 1, 2019 Watching this build! Quote Link to comment Share on other sites More sharing options...
djflyer Posted January 1, 2019 Share Posted January 1, 2019 (edited) Excellent as usual KennyB ! Having seen this on your workbench I am glad you're posting this because its a great challenge and you are crushing it ! Edited January 1, 2019 by djflyer Quote Link to comment Share on other sites More sharing options...
moparfarmer Posted January 1, 2019 Share Posted January 1, 2019 If that is a model it sure is excellent work..VERY,VERY nice.. Quote Link to comment Share on other sites More sharing options...
landman Posted January 1, 2019 Share Posted January 1, 2019 (edited) 2 hours ago, moparfarmer said: If that is a model it sure is excellent work..VERY,VERY nice.. I second that.. Edited January 1, 2019 by landman Quote Link to comment Share on other sites More sharing options...
Kennyboy Posted January 1, 2019 Author Share Posted January 1, 2019 Thank you yet again guys.... The absolutely beautiful Aoshima wheels came today...they are magnificent, the tires that came with them are not. The set of wheels came with stanced out rubberbands that are equal to putting a 205 width tire on a 8.5 inch width rim. Sidewall is around a 20 series height. Fortunately though I had a set of tires in the parts box that will save the day. Quote Link to comment Share on other sites More sharing options...
Kennyboy Posted January 1, 2019 Author Share Posted January 1, 2019 Quote Link to comment Share on other sites More sharing options...
Spex84 Posted January 2, 2019 Share Posted January 2, 2019 This is ambitious and looking very cool so far. Nice work on the headlights!! Quote Link to comment Share on other sites More sharing options...
cobraman Posted January 2, 2019 Share Posted January 2, 2019 What a great looking auto. You are doing a fine job on the model. Quote Link to comment Share on other sites More sharing options...
Modlbldr Posted January 2, 2019 Share Posted January 2, 2019 This is amazing work that you are doing. I'm not trying to knock your work in any way but, your side coves don't look to be as big as the rendering. Was this done on purpose? Later- Quote Link to comment Share on other sites More sharing options...
Recommended Posts
Join the conversation
You can post now and register later. If you have an account, sign in now to post with your account.
Note: Your post will require moderator approval before it will be visible.