mitchy Posted January 28, 2019 Share Posted January 28, 2019 As if I didn’t have enough going on, I picked up a few more projects his week- I found a cheap 1957 Fairlane 500 built model with some home-made ‘mods’, jacked up back end, an upside down rear bumper and blacked-out glassware: Somewhere out of this ‘beauty’ I shall create a beast (or should that be vice-versa?) I think its going to be very smooth and low, as yet undecided on the colour, but I have a few ideas. I won some custom wheels and rubber on the ‘bay that will be added to this fine auto, perhaps some drag slicks squeezed under there.... As bought..... wheel choice? Thanks for looking, more to come. Quote Link to comment Share on other sites More sharing options...
espo Posted January 28, 2019 Share Posted January 28, 2019 This glue bomb reminds me of something out of the '60's with the jacked up stance. Looks fairly complete and I'm sure you're going to strip the paint. The slicks you have look good but unless you intend to open up the quarters for tire clearance you might want to start planning a narrowed rear end and some inside wheel well work for them to fit. Quote Link to comment Share on other sites More sharing options...
mitchy Posted January 28, 2019 Author Share Posted January 28, 2019 (edited) You’re right, I’m planning on some chassis/drivtrain mods to get the rubber tucked underneath. Its my first glue bomb resurrection so I’m happy to get my teeth stuck in and get cutting. I’m not sure exactly what style yet, but I’m aiming in the direction of these Googled pictures: Thanks to the photo donors Edited January 28, 2019 by mitchy Quote Link to comment Share on other sites More sharing options...
mitchy Posted February 7, 2019 Author Share Posted February 7, 2019 Luckily this model was built some time ago using rubbery tube glue, some of which now looks and feels almost like beeswax. -Some gentle wiggling by hand and prying by fingernail has got the stripdown to this point without breakages: The body is great, though perhaps the relief logos and ‘fairlane500’ details were sanded and will be hard to restore- I may end up sanding them out completely: We’ll see better when the scruffy matt blue coat is removed. The twin headlamp cowls are removeable, I may leave them off and create single custom bezels. I am not going for a factory resto. The chassis popped out without drama, as did the interior and engine. One of the door hinge arms is missing and the doors were semi glued shut. I want them to open. The interior has some futuristic bucket seats in there, I will keep it more or less the same, but sit the seats lower and paint a different scheme. Next up is the paint strip, and perhaps some suspension/chassis mods and repairs. Thanks for looking, more to come. Quote Link to comment Share on other sites More sharing options...
Kool Kat Posted February 7, 2019 Share Posted February 7, 2019 I like that the engine is injected and supercharged...... Quote Link to comment Share on other sites More sharing options...
mitchy Posted February 7, 2019 Author Share Posted February 7, 2019 Ha yeah, the fact that the inlet stacks poke out of the bonnet, gasser style, guarantees that the resto will not be factory stock. Customizing is so much fun Quote Link to comment Share on other sites More sharing options...
Gumball Posted February 7, 2019 Share Posted February 7, 2019 (edited) It looks pretty good for a glue bomb. interested in seeing it when its done! Edited February 7, 2019 by Gumball Quote Link to comment Share on other sites More sharing options...
mitchy Posted July 29, 2019 Author Share Posted July 29, 2019 (edited) Ooohkay back at the bench again for a little while. Other projects- work and home had taken over! Finally got around to some paint removal of the shell to see what’s what- looks better than I thought. Not sanded, so the ‘Fairlane’ and ‘500’ logos remain. The body had been primed in blue metallic, then a thick layer of white (primer?), and finished with a thick layer of blue metallic. No lacquer. Not pretty. As you can see, the layers are coming off thick!! cracked A pillars, no big deal... Edited July 29, 2019 by mitchy Quote Link to comment Share on other sites More sharing options...
mitchy Posted July 29, 2019 Author Share Posted July 29, 2019 (edited) Edited July 29, 2019 by mitchy Quote Link to comment Share on other sites More sharing options...
Rider Posted July 29, 2019 Share Posted July 29, 2019 I'll be watching with interest. Good luck. Quote Link to comment Share on other sites More sharing options...
Tom Geiger Posted July 30, 2019 Share Posted July 30, 2019 A great start! That's one of my favorite kits. The seats are from the kit, along with the console, were the custom interior. The trim on the trunk lid is faint and hard to detail. The door hinges didn't work well and you will be better off making your own hinges from wire. Quote Link to comment Share on other sites More sharing options...
mitchy Posted July 30, 2019 Author Share Posted July 30, 2019 (edited) Thanks for the tips; one of the door hinges was missing/snapped and the door was ‘gunged’ shut. The other works. I may end up sanding some of the trim detail, as you said; the trunk detail especially is a tricky one to show well. As the model is a glue bomb, and with custom parts abound, I am going to concentrate on clean lines and a mono or duo-colour deep paint finish, and lose some of the fine detail to get a smoother look. There are many fine stock examples on this forum, so I’m going to play with this one. Tamiya putty in the sink holes and preliminary sanding:: Thanks for Lkn’ Edited July 30, 2019 by mitchy Quote Link to comment Share on other sites More sharing options...
mitchy Posted July 30, 2019 Author Share Posted July 30, 2019 A light coat of Tamiya’s fine primer to hunt out the many minor imperfections. Time now to leave to dry, and maybe pick out some other parts for treatment. I have decided to go for this kind of thing; simple but potent. This is a 57’ 300 (not my pic) with twin headlamp mod: Quote Link to comment Share on other sites More sharing options...
Tom Geiger Posted July 30, 2019 Share Posted July 30, 2019 Here's some inspiration for you. My trio of '57s! I built the pink one fairly stock about 30 years ago. The other two are restorations of old builds. Quote Link to comment Share on other sites More sharing options...
mitchy Posted July 30, 2019 Author Share Posted July 30, 2019 (edited) 25 minutes ago, Tom Geiger said: Here's some inspiration for you. My trio of '57s! I built the pink one fairly stock about 30 years ago. The other two are restorations of old builds. Great! Love them! -getting close to my plans for this model with old ‘Blue’ there...Are those frontal treatments (blue and green cars) custom builds or kit options? Thanks a lot. Edited July 30, 2019 by mitchy Quote Link to comment Share on other sites More sharing options...
Tom Geiger Posted July 30, 2019 Share Posted July 30, 2019 35 minutes ago, mitchy said: -getting close to my plans for this model with old ‘Blue’ there...Are those frontal treatments (blue and green cars) custom builds or kit options? Thanks a lot. Everything you see were kit options offered sometime over the life of this kit. Note that it's been reissued over and over since the early 1960s. The green car is the earliest set of custom parts. I found this car in the bottom of a dealer's scrap box at a show. It had no roof or suspension. But it was so cool that i restored it. I also bought the blue car, and cleaned it up. It was missing the hood and I knew I wasn't going to match the paint, so I two toned it with the Tamiya Coral Blue. The tail lights on this one are the Edsel wagon ones that came in the kit too. Quote Link to comment Share on other sites More sharing options...
mitchy Posted July 30, 2019 Author Share Posted July 30, 2019 Wow, I had no idea of the options available. Those rear end treatments are something. Thank you for the information, more food for thought! Quote Link to comment Share on other sites More sharing options...
misterNNL Posted July 31, 2019 Share Posted July 31, 2019 Looking promising. Only thing I would have done differently was fill in that hole in the hood. Thanks for sharing. Quote Link to comment Share on other sites More sharing options...
mitchy Posted July 31, 2019 Author Share Posted July 31, 2019 11 hours ago, misterNNL said: Looking promising. Only thing I would have done differently was fill in that hole in the hood. Thanks for sharing. Thanks I like the air inlet stacks so the hole must stay Quote Link to comment Share on other sites More sharing options...
David G. Posted July 31, 2019 Share Posted July 31, 2019 Should be an interesting rescue, you're off to a good start. David G. Quote Link to comment Share on other sites More sharing options...
mitchy Posted July 31, 2019 Author Share Posted July 31, 2019 Playing with airbrush colour. L-R spoons: Faskolor Faspearl red over grey primer. Faspearl red over black Faschange red highlight over black, shown outdoors in low light too. Looks way more intense. I need to lacquer them now and make a choice. Quote Link to comment Share on other sites More sharing options...
Oldschool4x4 Posted August 1, 2019 Share Posted August 1, 2019 I like the dark one Quote Link to comment Share on other sites More sharing options...
mitchy Posted August 2, 2019 Author Share Posted August 2, 2019 13 hours ago, Oldschool4x4 said: I like the dark one Aha? ...me too! Quote Link to comment Share on other sites More sharing options...
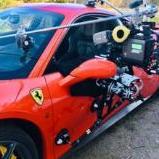
mitchy Posted August 5, 2019 Author Share Posted August 5, 2019 (edited) And here is the result. All black, sprayed over with Faskolor Faschange red and Vallejo Acrylic gloss clear. The roof is solid black with gloss for some contrast. I’m happy withe the resulting colour, but the finish has suffered due to not servicing my cheapo airbrush properly. The Vallejo gloss acrylic lacquer is also more difficult to apply cleanly than the Tamiya x22. It will need a light sand and rub to get that polished deep gloss. The colour is great, a little more coarse flake than I expected, but it makes a decent scale metal flake effect. These effects never seem to look as good in photos! Direct sunlight and interior daylit comparison: This paint has the ‘deep purple’ when lit from front, which changes to a warm golden hue when viewed into the sunlight: Edited August 5, 2019 by mitchy Quote Link to comment Share on other sites More sharing options...
larman Posted August 5, 2019 Share Posted August 5, 2019 That is really nice paint! Quote Link to comment Share on other sites More sharing options...
Recommended Posts
Join the conversation
You can post now and register later. If you have an account, sign in now to post with your account.
Note: Your post will require moderator approval before it will be visible.