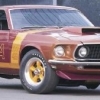
bogger44 Posted April 28, 2019 Share Posted April 28, 2019 Earlier in the week I finally managed to put the wraps on this one. These Polar Lights kits aren't the easiest to build, but not the worst either. That being said it was still a fun build and look forward to the days when I build the other ones I have lurking in the stash. The decals gave me some headaches as, even with a coat of Microscale decal film applied, they cracked in several areas. I just patched them up the best I could and did some small paint touch-up work to them. The rubber supercharger drive belt broke on me, so I made one out of Tamiya masking tape. I drilled out the ends of the headers as well, and the rest of the build is box stock. Paint is Model Master GTS Blue Pearl lacquer. Thanks for checking it out and any comments/questions. Quote Link to comment Share on other sites More sharing options...
cobraman Posted April 28, 2019 Share Posted April 28, 2019 Really nice ! Quote Link to comment Share on other sites More sharing options...
Scott8950 Posted April 28, 2019 Share Posted April 28, 2019 very nice build Quote Link to comment Share on other sites More sharing options...
shoopdog Posted April 28, 2019 Share Posted April 28, 2019 Turned out extremely nice! Quote Link to comment Share on other sites More sharing options...
Snake45 Posted April 28, 2019 Share Posted April 28, 2019 Very clean build, well done! Quote Link to comment Share on other sites More sharing options...
Chris in Berwyn Posted April 28, 2019 Share Posted April 28, 2019 That looks NICE!! Quote Link to comment Share on other sites More sharing options...
sflam123 Posted April 28, 2019 Share Posted April 28, 2019 Good Job!! That turned out well!! Quote Link to comment Share on other sites More sharing options...
PappyD340 Posted April 28, 2019 Share Posted April 28, 2019 Excellent build Quote Link to comment Share on other sites More sharing options...
afx Posted April 28, 2019 Share Posted April 28, 2019 Very nice Tony. Quote Link to comment Share on other sites More sharing options...
Hmann68 Posted April 28, 2019 Share Posted April 28, 2019 Super job! Very clean and nice ? Quote Link to comment Share on other sites More sharing options...
Codi Posted April 29, 2019 Share Posted April 29, 2019 Tony, that is such a cleanly executed build. Great colors and decals as well. congrats on it! cheers, tim Quote Link to comment Share on other sites More sharing options...
gasser59 Posted April 29, 2019 Share Posted April 29, 2019 Nicely done Tony. Great execution of the colors and decals. The gold rims really make it. Quote Link to comment Share on other sites More sharing options...
DumpyDan Posted April 30, 2019 Share Posted April 30, 2019 Wow that looks great, haven't seen many of these built. It is a beauty! Quote Link to comment Share on other sites More sharing options...
bogger44 Posted April 30, 2019 Author Share Posted April 30, 2019 Thanks guys! Quote Link to comment Share on other sites More sharing options...
ChrisR Posted May 1, 2019 Share Posted May 1, 2019 Very nice! Quote Link to comment Share on other sites More sharing options...
AAFC Posted May 3, 2019 Share Posted May 3, 2019 On 4/27/2019 at 8:26 PM, bogger44 said: Earlier in the week I finally managed to put the wraps on this one. These Polar Lights kits aren't the easiest to build, but not the worst either. That being said it was still a fun build and look forward to the days when I build the other ones I have lurking in the stash. The decals gave me some headaches as, even with a coat of Microscale decal film applied, they cracked in several areas. I just patched them up the best I could and did some small paint touch-up work to them. The rubber supercharger drive belt broke on me, so I made one out of Tamiya masking tape. I drilled out the ends of the headers as well, and the rest of the build is box stock. Paint is Model Master GTS Blue Pearl lacquer. Thanks for checking it out and any comments/questions. This is a fantastic build. I have this kit and the Gas Ronda Mustang in my stash. I have heard many comments about all the Polar Lights funny cars having issues. Never heard specifics in those comments. Could you tell me what you encountered? Quote Link to comment Share on other sites More sharing options...
Bainford Posted May 3, 2019 Share Posted May 3, 2019 Cool build. That rear 3/4 view looks mean. Quote Link to comment Share on other sites More sharing options...
gtx6970 Posted May 3, 2019 Share Posted May 3, 2019 I had the exact same decal issues, Mine turned out nice , but not as nice as yours. Quote Link to comment Share on other sites More sharing options...
bogger44 Posted May 3, 2019 Author Share Posted May 3, 2019 (edited) Thanks again guys, it's not my best work but it still looks good on the shelf. 13 hours ago, AAFC said: This is a fantastic build. I have this kit and the Gas Ronda Mustang in my stash. I have heard many comments about all the Polar Lights funny cars having issues. Never heard specifics in those comments. Could you tell me what you encountered? Thanks James. All in all it goes together fairly well, with just a few hiccups along the way. I'm not sure if what I experienced is what other folks come across when building these, but heres what I dealt with. Nothing super frustrating or overly complicated but a smidge aggravating.... The biggest problem I'd say was the rear suspension. Even with the chassis square and true, when installing it the left ("drivers") side of the axle was tucked up farther to the chassis than the other side, causing the right front tire to catch air. Not sure why, everything was mounted and installed properly. With finding no real answer why, I just trimmed off the top side of the mounting hub on the brake caliper and glued it/tire assembly to the axle at a location where all four tires were on the ground. I had a bit of a time getting the roll cage to stay squared up, the right rear corner kept wanting to pop up. Eventually super glue, holding it in place, and patience won out. The drivers side lower tin work needed to be trimmed a bit on the top side to get it to fit better and not show past the bottom of the body. The rear window needed to be trimmed down a little for better fitment. I should have done a little more as mine still doesnt sit quite right (bottom left corner). That's pretty much it I believe other than the relatively vague instructions and the aforementioned decals. While not a pain free build, they are still quite a bit of fun to work on and are great subjects to boot. I think you'll enjoy building your's (hopefully Lol) and wish you good luck! Edited May 3, 2019 by bogger44 Quote Link to comment Share on other sites More sharing options...
GoatGuy Posted May 7, 2019 Share Posted May 7, 2019 Terrific build. Quote Link to comment Share on other sites More sharing options...
GaryR Posted May 15, 2019 Share Posted May 15, 2019 Looks good! fiddly kits. The gold wheels look really good, what did you use? Quote Link to comment Share on other sites More sharing options...
bogger44 Posted May 17, 2019 Author Share Posted May 17, 2019 Thanks guys. On Tuesday, May 14, 2019 at 9:57 PM, GaryR said: Looks good! fiddly kits. The gold wheels look really good, what did you use? I agree, they are definitely fairly fiddly. It was an old can of Plastikote Odds n Ends Antique (I think) Gold. There was barely enough paint left in the can to get those wheels painted, so it got tossed out afterward. Quote Link to comment Share on other sites More sharing options...
Recommended Posts
Join the conversation
You can post now and register later. If you have an account, sign in now to post with your account.
Note: Your post will require moderator approval before it will be visible.