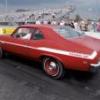
69NovaYenko Posted May 4, 2019 Share Posted May 4, 2019 After devoting a substantial amount of time over several months, effort, money for era correct paint (Scale Finishes), photo-etched parts & "custom" made decals etc for this project I was finally down to the final steps of completion when this happened. My LHB guy had recommended Max 2X high gloss clear coat as a final topcoat. I`m was devastated. I attempted to strip it but it was to no avail. the Max 2X was harder than petrified rock. So it become a junk body in my parts box. My question is what did "I" do wrong. How can I avoid this from happening again. ANY and All advise and input is welcome. Thanks in advance Quote Link to comment Share on other sites More sharing options...
StevenGuthmiller Posted May 4, 2019 Share Posted May 4, 2019 (edited) Use a different clear coat. I have always had pretty good luck with Duplicolor clear top coat in a rattle can. I haven't tried it yet over Scale Finishes paint, but will be soon. Of course, you can't use Duplicolor clear lacquer over enamel, so unless you're using an automotive type lacquer color coat, the Duplicolor will not work. I'm pretty certain that it won't work over decals either. You would have to apply your decals after clear coating. Steve Edited May 4, 2019 by StevenGuthmiller Quote Link to comment Share on other sites More sharing options...
Daddy Mack Posted May 4, 2019 Share Posted May 4, 2019 Sheesh! Looks like water or incompatible thinner mixed in with the clear. Quote Link to comment Share on other sites More sharing options...
69NovaYenko Posted May 4, 2019 Author Share Posted May 4, 2019 Your are correct that the top coat was Scaled-finishes era correct enamel. This is the Max 2K High Gloss Clear Coat that I used. Quote Link to comment Share on other sites More sharing options...
69NovaYenko Posted May 4, 2019 Author Share Posted May 4, 2019 (edited) Are you saying that this "quizzing" (for the lack of a better word) was due to a reaction between the K2 clear-coat and the enamel color coat.. If that is the case, do you have any recommendations on what would be the correct type of clear-coat to apply over an enamel color-coat. Edited May 4, 2019 by 69NovaYenko Quote Link to comment Share on other sites More sharing options...
Rider Posted May 4, 2019 Share Posted May 4, 2019 Oh man that is rough, sorry to see this. If I can offer a potential solution, I would wet sand the clear and the spray Tamiya Lacquer over the current clear. It might take a few coat for it to level off, the Tamiya lacquer is great stuff for wet sanding and polishing. Or as another solution you could turn the build into a forgotten race car left to rot in a field. There are a number of option for you, but don't scrap it, you put a ton of time into this. Good luck Greg. Quote Link to comment Share on other sites More sharing options...
69NovaYenko Posted May 5, 2019 Author Share Posted May 5, 2019 (edited) 45 minutes ago, Rider said: Or as another solution you could turn the build into a forgotten race car left to rot in a field. Lol..not a bad idea!! It took several months recouping emotionally from that train wreck.LOL But, I just finished building another body from a second kit I had..if you first don't succeed try again! Guess, its all part of the learning curve, unfortunately. So, do any of you knowledgeable folks have any recommends for a clear- coat that will not harm the enamel color-coat and decals. Edited May 5, 2019 by 69NovaYenko Quote Link to comment Share on other sites More sharing options...
Rider Posted May 5, 2019 Share Posted May 5, 2019 (edited) Why not use an enamel clear? If you have an air brush I would use a true 2 part poly urethane. It's used in the auto paint world as a barrier on custom painting when using different types of paint. I use it all the time, (when I am building), I have never had an issue going over or under any paint. The car in my avatar has enamel, acrylic and lacquer, (nail polish) with a clear top coat of 2 (3) part poly, I also used as a barrier between those paints. I buy it from an auto paint supplier in small 1/4 pint tins. Edited May 5, 2019 by Rider Quote Link to comment Share on other sites More sharing options...
StevenGuthmiller Posted May 5, 2019 Share Posted May 5, 2019 2 hours ago, Rider said: Why not use an enamel clear? If you have an air brush I would use a true 2 part poly urethane. It's used in the auto paint world as a barrier on custom painting when using different types of paint. I use it all the time, (when I am building), I have never had an issue going over or under any paint. The car in my avatar has enamel, acrylic and lacquer, (nail polish) with a clear top coat of 2 (3) part poly, I also used as a barrier between those paints. I buy it from an auto paint supplier in small 1/4 pint tins. You can use a enamel clear, but I would be careful. Some clear enamels, like Testors, will yellow badly over time. This is another example of why I stopped using enamel paint. You have to be very careful about the compatibility of anything you're putting over it. With Lacquer, you can spray virtually anything on top. Steve Quote Link to comment Share on other sites More sharing options...
69NovaYenko Posted May 5, 2019 Author Share Posted May 5, 2019 (edited) Thanks for all the advise about the "Pro`s" of using clear lacquers over enamels. However, at this juncture the body has already has been color-coated in enamel. So, is airbrushing Future my most safest/cost effective option for a non-yellowing clear-coat that wont harm the color coat and decals at this juncture? Edited May 5, 2019 by 69NovaYenko Quote Link to comment Share on other sites More sharing options...
StevenGuthmiller Posted May 5, 2019 Share Posted May 5, 2019 1 hour ago, 69NovaYenko said: Thanks for all the advise about the "Pro`s" of using clear lacquers over enamels. However, at this juncture the body has already has been color-coated in enamel. So, is airbrushing Future my most safest/cost effective option for a non-yellowing clear-coat that wont harm the color coat and decals at this juncture? To be perfectly honest with you, I think you might be screwed on this one. Just from looking at your photos, I have real doubts that you will be able to save it. At this point, you might want to cut your losses and give it about a month long soak in something like brake fluid and see if that will remove the paint. You might have to start over on this one. At least I don't have any answers for you. Steve Quote Link to comment Share on other sites More sharing options...
Dave G. Posted May 5, 2019 Share Posted May 5, 2019 (edited) As I understand it at this point, you painted up a second body also with enamel and are ready to clear coat it. You are asking about using Future as the clear coat. I don't have Future but it's spin off Pledge Floor Care and have put that over Model Master enamel paints with very good results. And it will be safe, Future is basically the same thing. It does take some polishing though. Two things: Make sure the enamel is well cured before clearing with any clear. Then make sure the clear is well dried before attempting to polish it. Keep clear lacquer away from enamel finishes. That 2k clear you have will probably go over lacquer color coat and probably acrylic color coat just fine. But when ever you clear anything make sure the color coat is well cured/dried or what ever other adjective fits the situation. Also you should be testing these various systems on some test subject before putting it down on a model. To me at least, the testing itself is a part of the hobby, rather fun and very revealing. Edited May 5, 2019 by Dave G. Quote Link to comment Share on other sites More sharing options...
Ace-Garageguy Posted May 5, 2019 Share Posted May 5, 2019 Yup. Sorry to see you having this issue, but it's just another chapter in the continuing saga of TEST FIRST all the materials you want to use together, including decals, on something other than the model you care about. Expert recommendations, though often very helpful, can't always anticipate every variable than can affect a finish involving multiple products that aren't specifically designed to work together. Quote Link to comment Share on other sites More sharing options...
Oldcarfan27 Posted May 5, 2019 Share Posted May 5, 2019 If it's hard as a rock, can it be color sanded out? Making it smooth? Or is there other damage besides the texture, that I'm not seeing? Quote Link to comment Share on other sites More sharing options...
Ace-Garageguy Posted May 5, 2019 Share Posted May 5, 2019 18 minutes ago, Oldcarfan27 said: If it's hard as a rock, can it be color sanded out? Making it smooth? Or is there other damage besides the texture, that I'm not seeing? That's a good point. You may also be able to scuff it thoroughly and shoot a few coats of another clear to build some film thickness, and then color-sand and polish that out. But if you try it, be sure to test on a relatively inconspicuous place first. And as Mr. Guthmiller mentioned, the only stripper that will touch the stuff will probably be a long soak in brake fluid. I've had a couple of built-ups I bought that had been shot in real automotive 2K, and all that worked was brake fluid. Be aware though...brake fluid can turn some plastics so brittle they crumble while you handle them afterwards. Quote Link to comment Share on other sites More sharing options...
StevenGuthmiller Posted May 5, 2019 Share Posted May 5, 2019 6 hours ago, Dave G. said: As I understand it at this point, you painted up a second body also with enamel and are ready to clear coat it. If this is the case and you have already started over, consider one of Testors clear lacquers, like Testors "wet look clear". Yeah....I know, you're saying, "I thought I couldn't spray lacquer over enamel!" Well, Testors lacquer is only lacquer in name. It's so mild that you can spray it over virtually anything. Yes, I have tried it......many times. I've used it over lacquer, enamel and acrylic. You might still want to test before you try it, but I can almost guarantee you success. Be certain that your color coats are fully cured before using it though. The only issue I have had with Testors clear is cracking, which I have decided was from base layers not being dry enough. Steve Quote Link to comment Share on other sites More sharing options...
gman Posted May 5, 2019 Share Posted May 5, 2019 The old Testors glosscote could cover enamel- as mentioned, best over fully cured enamel. I shot a '29 Ford in Testors enamel orange many years ago, and pushing the envelope covered it with glosscote just after the thin coats of enamel tacked up. I was expecting a science experiment of a paint job to result, but it had no adverse effects. It wasn't as shiny as it could have been, but no cracking, clouding, nothing. I have used the newer Testors Wet Look clear (which are IMHO a big improvement over older Testors clears for gloss and the ability to polish out), but have only sprayed them over Testors and Tamiya lacquers. I would do a spoon test over your chosen enamel before spraying a whole model with it, but wouldn't anticipate it being too "hot" to use if the enamel has cured and fully gassed out. It might be worth a shot at this point. Quote Link to comment Share on other sites More sharing options...
69NovaYenko Posted May 5, 2019 Author Share Posted May 5, 2019 (edited) Thanks for all the replies and info. By the way, how can you tell when the enamel has "cured" and "fully gassed out". Edited May 5, 2019 by 69NovaYenko Quote Link to comment Share on other sites More sharing options...
Daddy Mack Posted May 5, 2019 Share Posted May 5, 2019 (edited) Lulz! If it is uncatalyzed enamel it can take a few YEARS to set up! How can you tell? Fingernail test. I still say you thinned the clearcoat with something that did not want to mix with the clear. Water, WD-40, wrong thinner, whatever. Edited May 5, 2019 by Daddy Mack Quote Link to comment Share on other sites More sharing options...
StevenGuthmiller Posted May 5, 2019 Share Posted May 5, 2019 36 minutes ago, Daddy Mack said: Lulz! If it is uncatalyzed enamel it can take a few YEARS to set up! How can you tell? Fingernail test. I still say you thinned the clearcoat with something that did not want to mix with the clear. Water, WD-40, wrong thinner, whatever. I don't think he thinned it at all. My understanding was that he shot it straight from the can. Steve Quote Link to comment Share on other sites More sharing options...
69NovaYenko Posted May 6, 2019 Author Share Posted May 6, 2019 3 hours ago, StevenGuthmiller said: I don't think he thinned it at all. My understanding was that he shot it straight from the can. Steve You are correct..it was shot straight from the can. Quote Link to comment Share on other sites More sharing options...
mod3l Lover Posted May 6, 2019 Share Posted May 6, 2019 I always shoot a spoon with the same (primer, paint, clear) paints all the way through my (rattle can) paint process. And if I put the model away for any reason, I write down what type of paint, and brand of paints that I used. Because there is no way that this old man will remember on his own!! But I got to say, something about your clear choice just screams hot paint to me!?! I would have thought crazing would have been the issue here!! I'm not sure what that is!!?!! David S. Quote Link to comment Share on other sites More sharing options...
gman Posted May 6, 2019 Share Posted May 6, 2019 17 hours ago, 69NovaYenko said: Thanks for all the replies and info. By the way, how can you tell when the enamel has "cured" and "fully gassed out". Enamel is fully cured or gassed out when it no longer smells of solvent and is hard all the way through. It usually dries on the outer surface or skin, and takes a loooooong time to cure all the way to the base plastic or paint- this can take weeks for thin coats, to practically forever for thick coats. Ironically, it usually takes relatively thick coats to get a smooth surface on an enamel paint job. 12 hours ago, 69NovaYenko said: ..it was shot straight from the can. Was the two part clear mixed and shaken exactly as directed? The surface of your cleared model almost looks like the two components of the clear were not completely mixed with one another during application over the enamel. That is one of the reasons I have not taken the plunge with the new 2K type clears. Quote Link to comment Share on other sites More sharing options...
Ace-Garageguy Posted May 6, 2019 Share Posted May 6, 2019 28 minutes ago, gman said: 28 minutes ago, gman said: Was the two part clear mixed and shaken exactly as directed? The surface of your cleared model almost looks like the two components of the clear were not completely mixed with one another during application over the enamel. That is one of the reasons I have not taken the plunge with the new 2K type clears. The "two-part" clear in question isn't. It's a pre-mixed rattlecan product that contains the same isocyanates used in hardeners in real two-part products that have to be mixed prior to application. The problems the OP has in his photos look very much like a reaction to surface contamination in some places, almost mimicking the dreaded "fisheyes" you get when you have contamination from silicone, wax, or in some cases, even skin oils. Quote Link to comment Share on other sites More sharing options...
gman Posted May 6, 2019 Share Posted May 6, 2019 2 hours ago, Ace-Garageguy said: The "two-part" clear in question isn't. It's a pre-mixed rattlecan product that contains the same isocyanates used in hardeners in real two-part products that have to be mixed prior to application. The problems the OP has in his photos look very much like a reaction to surface contamination in some places, almost mimicking the dreaded "fisheyes" you get when you have contamination from silicone, wax, or in some cases, even skin oils. It suggests there is a separate compartment in the can that has to be activated after initial shaking to mix the separated components (the hardener part) inside the can for use. I was trying to post a link to the user .pdf from the manufacturer's website, but it posts as an image of the page header. spraymax.com/fileadmin/user_upload/Downloads/Produkte/Prospekte/992466-SprayMax-Produktfolder_USA.pdf ^^ try this with "www." inserted in front of the text to read manufacturer's instructions Quote Link to comment Share on other sites More sharing options...
Recommended Posts
Join the conversation
You can post now and register later. If you have an account, sign in now to post with your account.
Note: Your post will require moderator approval before it will be visible.