littlfron Posted May 7, 2019 Share Posted May 7, 2019 hello , my new project a Pocher model K91 1934 a basic first assembly to see the fititng issue and possibly missing parts , then process of painting all parts , a lot of upgrade part from a famous 1/8 Pocher model website . A lot o issue to solve , and the satisfaction of finding ingenious solution sometimes . with the only goal of the precision in details , and a good looking finish close to reality 1:1 . it is my second model , limited in place , as I am doing this in an apartment ( guest toilet ) painting outside when weather condition are ok ( living in Dubai ) or under a tent on the balcony . I will post Photo on the under going re built , as I am currently doing the re assembly of the engine .. any questions , feel free , thanks Quote Link to comment Share on other sites More sharing options...
littlfron Posted May 7, 2019 Author Share Posted May 7, 2019 (edited) the basic assembly Edited May 7, 2019 by littlfron Quote Link to comment Share on other sites More sharing options...
littlfron Posted May 7, 2019 Author Share Posted May 7, 2019 (edited) The rear wheels position have been left a bit closer to the fender outside line ( to avoid the impression ) of a heavy visual ... sanding the fender to continue with the curve of the wheels . The windshield have been hours of fight to keep it as close as possible to embrace the curve of the body frame . as it is one piece, when fixing one side was compromising the other side. not perfect to my eyes but it will do , had to cut the windshield glass in two. The radiator upgrade not available on the Pocher website store, have to improvise with a kitchen pan protector cover , look great , cost nothing . the idea on the exhaust is to keep them a bit longer on the outside of rear bumper , this will go perfect with the line . maybe not that much as on the picture , will see at the end with a general and global view . Edited May 7, 2019 by littlfron Quote Link to comment Share on other sites More sharing options...
Modlbldr Posted May 7, 2019 Share Posted May 7, 2019 That is an amazing job you are doing, especially considering the space limitations that you appear to have. I can't wait to see how this turns out. Later- Quote Link to comment Share on other sites More sharing options...
littlfron Posted May 8, 2019 Author Share Posted May 8, 2019 After doing the fitting, time for the painting will only do the paint for the frame , engine , as I am running out of time and summer condition in Dubai doesn' t allow you to paint ( 50 degres ) when this will be done , will work on the fitting of the body frame fender and door , and will paint it in the next winter coming ... dismantle an old camera ( and took out the little screw to upgrade a bit the engine part ) .. engine was primer , followed by coat of gloss black , then Alclad II ( chrome/ stainless steel, polished Aluminium , polished brass) to make different tone of colors on different part of the engines ) frame part was TS 38 gun metal tamiya Quote Link to comment Share on other sites More sharing options...
peteski Posted May 8, 2019 Share Posted May 8, 2019 Looks good! I build the K74 kit some years ago - it was part fun, and part frustration. Using real screws for detailing the engine is a good idea, but you used Philips-head screws. I'm not sure that Mercedes used Philips-head screws back in 1934. I think they were all slotted-head screws back then. Quote Link to comment Share on other sites More sharing options...
littlfron Posted May 8, 2019 Author Share Posted May 8, 2019 2 hours ago, peteski said: Looks good! I build the K74 kit some years ago - it was part fun, and part frustration. Using real screws for detailing the engine is a good idea, but you used Philips-head screws. I'm not sure that Mercedes used Philips-head screws back in 1934. I think they were all slotted-head screws back then. you must be right for the slotted head .. I re-visit the classic without knowing it ... K91 said to be the easiest one.. still a great challenge ... Quote Link to comment Share on other sites More sharing options...
littlfron Posted May 8, 2019 Author Share Posted May 8, 2019 (edited) When I open the box, all the parts in metal were corroded , I slightly sand them with low abrasive sand paper ( 4000 ) if I remember , i do think they will deteriorate again , so I give a Mr Hobby top coat , hopping to reduce the process ... The spring suspension were clean and not attacked , I still give them a coat , like this no jealous Edited May 8, 2019 by littlfron Quote Link to comment Share on other sites More sharing options...
Modelbuilder Mark Posted May 11, 2019 Share Posted May 11, 2019 Nice! Quote Link to comment Share on other sites More sharing options...
littlfron Posted May 11, 2019 Author Share Posted May 11, 2019 engine assembly under process , even after fitting before painting, still a lot of challenge to keep the paint nice, Alclad II is delicate and doesn' t like to much manipulation . Quote Link to comment Share on other sites More sharing options...
Johnt671 Posted May 12, 2019 Share Posted May 12, 2019 That engine sure looks sweet. Nice work! Quote Link to comment Share on other sites More sharing options...
littlfron Posted May 13, 2019 Author Share Posted May 13, 2019 last step of the assembly , connecting all wires/ pipes the final details before moving to the next step Quote Link to comment Share on other sites More sharing options...
littlfron Posted May 14, 2019 Author Share Posted May 14, 2019 (edited) engine partially done , will continue the wires connection and fitting when it will be connected on to the frame ... just missing the top cover with the MERCEDES Benz inscription , need to re do it as I was not happy with the result ... and by trying to much I damage it , Marvin from modelmotorcars.com save me as he had an extra one . I got it , and will do it later on . next step : frame body assembly / wheels and rims / triangle suspension front and rear / gas tank exhaust line and muffler . Edited May 14, 2019 by littlfron Quote Link to comment Share on other sites More sharing options...
afx Posted May 14, 2019 Share Posted May 14, 2019 Pocher are impressive kits, looks like you are doing a fine job with it. Quote Link to comment Share on other sites More sharing options...
littlfron Posted May 15, 2019 Author Share Posted May 15, 2019 wheels and rims .... hard to decide how to paint those rims and then insert them as the original tires are very hard and lack of flexion . I decided to paint the rims then trying without damage to fit them inside . it was a risk . i did a thin white line on the tires , the rims have been paint in gloss back first then Alclad chrome , then end of the spoke have been re paint in black manually with a brush , a brass bolt have been added to simulate a valve that doesn't exist ... the Pocher wheels use to be amazingly done , but the K91 model was a disgrace on that part . try my best to upgrade the final looking. I unfortunately loose the mirror effect of the Aclad paint during the assembly as I had to put Vaseline as it was nearly impossible . will have to to do the trim . this will be later on . Quote Link to comment Share on other sites More sharing options...
peteski Posted May 16, 2019 Share Posted May 16, 2019 Yes, those vinyl tires are not very flexible. On my model I put them in hot water to soften them, then I was able to install them on the wheels. Interesting how you handled the whitewall - most tires from that time period had wide whitewalls. On my model I also had to assemble the metal spokes and nipples. Yours has molded-plastic spokes. Makes the assembly a lot easier. Here is a scan of a photo of my model (I built it over 30 years ago, before digital cameras existed). I hope you don't mind. Quote Link to comment Share on other sites More sharing options...
littlfron Posted May 16, 2019 Author Share Posted May 16, 2019 3 hours ago, peteski said: Yes, those vinyl tires are not very flexible. On my model I put them in hot water to soften them, then I was able to install them on the wheels. Interesting how you handled the whitewall - most tires from that time period had wide whitewalls. On my model I also had to assemble the metal spokes and nipples. Yours has molded-plastic spokes. Makes the assembly a lot easier. Here is a scan of a photo of my model (I built it over 30 years ago, before digital cameras existed). I hope you don't mind. Very nice model . Do you still have it ? My goal was entire white wall , but was not sure at the result on the border edge close to the rims . That why on the rim you can see a black lane n case the tire doesn’t fit perfectly .. , then the plan was to put the writing details in white as well , on the tires number 6 that I will not put . (Only 1 spare at the back ) . Impossible to get a clean work . So then I back up on a single small line .. finally am happy with the ending result .. and was scare with hot water and the white to melt or make a mess .. not sure yet what I will do with the trim and the upgrade metal logo I have .. Quote Link to comment Share on other sites More sharing options...
peteski Posted May 16, 2019 Share Posted May 16, 2019 Yes, I still have is in a display case in a 2nd bedroom. When I built it, I was not very experienced. It is pretty much box stock. I look at it now and I would do many things differently. But I did send out many of the nickel-plated metal parts to be chrome plated. It is possible that back then metal parts on real cars were nickel plated, but to me nickel looked too dull. Hot (but not boiling - you should be able to put your hand in it without burning) will not damage those tires. I sprayed the whitewalls using paint for vinyl, so it adhered to the tire well, and it did not flake off when flexed. And if I remember correctly, when I was installing he tires I was stretching the back (unpainted) side over the wheel. Quote Link to comment Share on other sites More sharing options...
littlfron Posted May 19, 2019 Author Share Posted May 19, 2019 Brake pad painted Alclad II polished brass Quote Link to comment Share on other sites More sharing options...
littlfron Posted May 19, 2019 Author Share Posted May 19, 2019 Quote Link to comment Share on other sites More sharing options...
littlfron Posted May 31, 2019 Author Share Posted May 31, 2019 Quote Link to comment Share on other sites More sharing options...
littlfron Posted May 31, 2019 Author Share Posted May 31, 2019 Quote Link to comment Share on other sites More sharing options...
littlfron Posted June 22, 2019 Author Share Posted June 22, 2019 Quote Link to comment Share on other sites More sharing options...
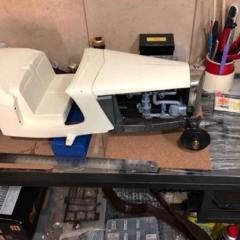
littlfron Posted June 22, 2019 Author Share Posted June 22, 2019 detail of the engine and all pipes , wires connection . my stage 2 of the completion is done , stage 1 was the fitting , stage 2 the painting and re assembly , stage 3 will be the body frame fitting, then painting , leather seat upgrade dashboard aluminium and mother of pearl , and all finals details . painting should be a blue .. still searching the one that will be matching the light beige or white leather seat ... Quote Link to comment Share on other sites More sharing options...
Gramps46 Posted June 22, 2019 Share Posted June 22, 2019 The detail is amazing. Quote Link to comment Share on other sites More sharing options...
Recommended Posts
Join the conversation
You can post now and register later. If you have an account, sign in now to post with your account.
Note: Your post will require moderator approval before it will be visible.