bbowser Posted June 23, 2019 Share Posted June 23, 2019 Outstanding work. One question,, where did you source the spark plug wires? The look very authentic. Quote Link to comment Share on other sites More sharing options...
littlfron Posted June 24, 2019 Author Share Posted June 24, 2019 thank you , the yellow wires are from the Pocher website of Marvin https://www.modelmotorcars.com/ There is a shop section with all upgrade parts available depending on your model you are building . the black ( head) part connecting are the original one from the kit ( you cut and remove the original black wire , drill a small hole in the head and connect the yellow one inside .) then for the red and black one , taken from an old digital camera that I open apart , and took small screws that I added to the engine part for more realism , the red & black wire were thin enough and adding some different colors, for more detailing final impression. ( improvisation is Pocher philosophy.) !!!!! Quote Link to comment Share on other sites More sharing options...
peteski Posted June 25, 2019 Share Posted June 25, 2019 Nice! I like it! Quote Link to comment Share on other sites More sharing options...
littlfron Posted July 12, 2019 Author Share Posted July 12, 2019 dashboard completed , aluminium panel fixed with brass bolt , gauge inserted in mother of pearl panel , glove compartment in white leather . Quote Link to comment Share on other sites More sharing options...
sjordan2 Posted July 13, 2019 Share Posted July 13, 2019 Spectacular. Quote Link to comment Share on other sites More sharing options...
littlfron Posted July 17, 2019 Author Share Posted July 17, 2019 (edited) I am currently preparing the fitting of the doors before the paint , got one question without answer about the overall layer of paint and the gape I need to leave to be able to open and close the doors... tried to see online the average thickness of a paint Tamiya TS rattle can , not sure at all , considering that there will be 2 coats primer , 2 coats undercoat , 2 final coats , and possibly 2 coats clear,, total will be 8 coats in total , I won 't be sanding on the under edge of the door , ....what will be the final extra thickness ? 0.6....... 0.4 ......... 0.3 mm ... that the question ? if anyone have an idea ... !!!!!! Edited July 17, 2019 by littlfron Quote Link to comment Share on other sites More sharing options...
littlfron Posted August 17, 2019 Author Share Posted August 17, 2019 I remove the seat from the main body frame section to be able to work it more easily , and start to create future line where the leather will be attached, the already existing line have been accentuate for the leather connection to be better . on the last picture I found a knife case with this back kind of sponge material quite flexible and easy to cut , that will be to create volume on the leather .hope the result will be nice as I just have one piece of leather to work on ... no second chance available Quote Link to comment Share on other sites More sharing options...
littlfron Posted August 17, 2019 Author Share Posted August 17, 2019 creating footprint for a metal sheet that will support the seat and my fight to get all the leathers dimension pieces fitting inside the small fabric I got . forgot the inside panel door at one point , had to squeeze a bit more . Quote Link to comment Share on other sites More sharing options...
littlfron Posted August 23, 2019 Author Share Posted August 23, 2019 must be one of the most difficult part , working the leather , giving a shape , hiding the connection , to get an acceptable result . this leather was so thick , but quality ... it was a one shot attempt as I had no spare fabric . As I cut the seat part to be able to work it in good condition , I created a bottom support , no idea yet how I will re fix the seat on this ... improvisation still on .... next step the leather on inside door panel .. Quote Link to comment Share on other sites More sharing options...
littlfron Posted September 2, 2019 Author Share Posted September 2, 2019 Quote Link to comment Share on other sites More sharing options...
littlfron Posted September 2, 2019 Author Share Posted September 2, 2019 leather on the inside panel is done , some details remain to be worked on , I also upgrade the the gauge with a glass cover ( a clear plastic bottle cut and insert inside the gauge ... result is ok exception on the first left one ... might re do them later , I let it sit like this for the moment .. and I start the body frame work , the handle that open the back seat compartment will be in a central position as I damage the part 2 , so only one left , re adjustment .... I worked on the central line were the handle will be positioned , will put 4 nice bolt at the initial fixing nuts in each corner and an extra bolt wit a pin will be on the left side . Quote Link to comment Share on other sites More sharing options...
ThreeThree Posted September 2, 2019 Share Posted September 2, 2019 Great detail in this build. The seats are looking great. Quote Link to comment Share on other sites More sharing options...
redneckrigger Posted September 2, 2019 Share Posted September 2, 2019 Outstanding work........................upholstery is amazing! Quote Link to comment Share on other sites More sharing options...
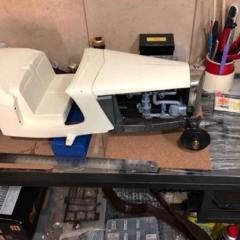
littlfron Posted September 11, 2019 Author Share Posted September 11, 2019 preparing all the body , before painting , the trim aluminium have been reduce , they don't go until the rear bumper anymore , all line of the back seat cover have been improved and will be filled with a black kind of foam to give a more realistic impression , a reduce the size of the rear light as only one spare tires will be put on , it was going a bit out of proportion so I cut , drill a hole for a screw and fix the headlight on it , with a small black rubber rim between the 2 part ( and it look not so bad ) . on the fender , the impression next to the rear wheel was not looking nice . the line was not in harmony and loosing the curvy surrounding the wheels ( that cover the wheels) hard to explain ahahah , so I fill the gap with putty , as you can see , also fill the hole as I remove the supposed little light on the front fender , the original from the kit not giving visual satisfaction . sometimes nothing is better , and there is enough light ( 3 in front ) and 2 next to the doors .. Quote Link to comment Share on other sites More sharing options...
littlfron Posted November 5, 2019 Author Share Posted November 5, 2019 used some clothes hanger to create a kind of metallic frame to give some volume behind the seat .. still working on it ... and on the other side , started to work on the display case ... stain the kind of composite wood I had to give an impression of legitimate wood ... color is dark walnut with a gloss polycrylic water base for the finish , that doesn t become yellow over the year . I order a mirror that will be under to show the details . Quote Link to comment Share on other sites More sharing options...
littlfron Posted November 5, 2019 Author Share Posted November 5, 2019 (edited) replace the original exhaust pipe from the Pocher kit who are not very nice by metallic straw founded in DAYSO .. Cheap , the exact same size and looking way better . finish my spoon testing paint .. this blue will be the one, a pearl blue .. and the rims are done with the Mercedes logo .. this project is getting closer to the end . next step is the real deal with the paint of all the part ... Edited November 5, 2019 by littlfron writing mistake Quote Link to comment Share on other sites More sharing options...
littlfron Posted April 9, 2020 Author Share Posted April 9, 2020 Project finished .... 2 years time.. Quote Link to comment Share on other sites More sharing options...
littlfron Posted April 9, 2020 Author Share Posted April 9, 2020 Quote Link to comment Share on other sites More sharing options...
peteski Posted April 9, 2020 Share Posted April 9, 2020 Gorgeous! Quote Link to comment Share on other sites More sharing options...
Bugatti Fan Posted April 9, 2020 Share Posted April 9, 2020 A really lovely build. I have a Pocher Merc to build, so found your pictures very inspirational. Quote Link to comment Share on other sites More sharing options...
unclescott58 Posted April 10, 2020 Share Posted April 10, 2020 Amazing. Well beyond my model building abilities. Still, I'm impressed. . Quote Link to comment Share on other sites More sharing options...
littlfron Posted April 11, 2020 Author Share Posted April 11, 2020 The embossed registration was the last added part, done manually from a coke can and painted !!! Quote Link to comment Share on other sites More sharing options...
Twokidsnosleep Posted April 16, 2020 Share Posted April 16, 2020 Oh my, this is superb Modelling at its highest level Quote Link to comment Share on other sites More sharing options...
beeRS Posted April 26, 2020 Share Posted April 26, 2020 I'm lost for words. What a stunning build! Quote Link to comment Share on other sites More sharing options...
Recommended Posts
Join the conversation
You can post now and register later. If you have an account, sign in now to post with your account.
Note: Your post will require moderator approval before it will be visible.