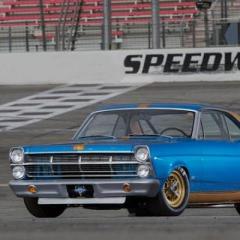
zakdoggi Posted June 2, 2019 Share Posted June 2, 2019 (edited) I got asked a couple of years ago by a friend in my car club if I could build him and his partner (car owner) a model replica of their race car. They provided me with the base kit and a tin of matching blue paint to start with. I've taken a pile of reference photos of the race car to help me build a reasonably accurate replica. Most of my work will be based on "eyeball engineering"- it might not be perfect but it has to "look right". Finally I've been able to make a start on it. I'm starting with the Trumpeter kit and will need to make a number of changes and a fair bit of scratch building to accomplish the final product. I hope by committing to this On The Workbench that it will keep me inspired enough to push through to the finish line. I have gathered a few bits and pieces to start the build. The Trumpeter kit will provide the body, chassis and interior. Wheels and seats are resin from The Parts Box and the 327 Chevy engine was scavenged from the 1966 Nova pro street kit by AMT. Hopefully posting at least weekly updates will keep me on track!! All comments and words of encouragement will be greatly appreciated ? Thanks in advance........cheers Geoff Edited June 2, 2019 by zakdoggi change of details Quote Link to comment Share on other sites More sharing options...
zakdoggi Posted June 2, 2019 Author Share Posted June 2, 2019 First thing to do is get rid of the side body trims and hole for antenna on rear deck. Side trim channels and antenna mount hole filled with styrene strip/stretched spruce and sanded smooth. Quote Link to comment Share on other sites More sharing options...
Straightliner59 Posted June 2, 2019 Share Posted June 2, 2019 I like that! A lot! My first car was a '63 four door, with a 194. I really loved that car. I bought a 283 that I was going to build, and put in it, but never got around to finishing the engine... Looking forward to watching this come together. Quote Link to comment Share on other sites More sharing options...
zakdoggi Posted June 2, 2019 Author Share Posted June 2, 2019 Decided to tackle the fuel tank/cell next. Evergreen sheet plastic and superglue. Quote Link to comment Share on other sites More sharing options...
zakdoggi Posted June 2, 2019 Author Share Posted June 2, 2019 Just now, Straightliner59 said: I like that! A lot! My first car was a '63 four door, with a 194. I really loved that car. I bought a 283 that I was going to build, and put in it, but never got around to finishing the engine... Looking forward to watching this come together. Thanks! Quote Link to comment Share on other sites More sharing options...
Snake45 Posted June 2, 2019 Share Posted June 2, 2019 The car you're modeling is a sedan. The kit you're using is a hardtop. Big difference in roof shape. Model Car World makes a resin sedan body for this kit that's a direct drop-on. I bought one last year and found the price reasonable, the quality very high, and the delivery speed quick. If you want to build an accurate model (and it looks like you do), you might want to check it out. Quote Link to comment Share on other sites More sharing options...
vintagercr Posted June 2, 2019 Share Posted June 2, 2019 I will be watching this build. Quote Link to comment Share on other sites More sharing options...
afx Posted June 2, 2019 Share Posted June 2, 2019 Great project Geoff, I'll be following. Quote Link to comment Share on other sites More sharing options...
Gramps46 Posted June 2, 2019 Share Posted June 2, 2019 Good progress so far. Please keep us posted. Quote Link to comment Share on other sites More sharing options...
zakdoggi Posted June 2, 2019 Author Share Posted June 2, 2019 37 minutes ago, Snake45 said: The car you're modeling is a sedan. The kit you're using is a hardtop. Big difference in roof shape. Model Car World makes a resin sedan body for this kit that's a direct drop-on. I bought one last year and found the price reasonable, the quality very high, and the delivery speed quick. If you want to build an accurate model (and it looks like you do), you might want to check it out. Good spotting Snake. That's one of the body mods I'll be making. Already got the evergreen strips on the bench ready. Thanks for the call out. Quote Link to comment Share on other sites More sharing options...
zakdoggi Posted June 2, 2019 Author Share Posted June 2, 2019 Thanks guys for your words of encouragement. Hopefully I'll do this one justice in a reasonable timeframe! Thankfully there's no time pressure from my "clients" ? Quote Link to comment Share on other sites More sharing options...
Snake45 Posted June 2, 2019 Share Posted June 2, 2019 4 hours ago, zakdoggi said: Good spotting Snake. That's one of the body mods I'll be making. Already got the evergreen strips on the bench ready. Thanks for the call out. "Evergreen strips" aren't going to fix it correctly. The C-pillars are completely different, as is the profile of the whole roof. All depends on how much accuracy you want in the finished product, but that's entirely up to what makes YOU--and your client--happy. Quote Link to comment Share on other sites More sharing options...
zakdoggi Posted June 3, 2019 Author Share Posted June 3, 2019 I know I might be biting off more than I can chew....but.....you gotta challenge yourself sometimes...lol Here's what I've got to accomplish. Top pic is the same profile as actual car. Bottom pic is the kit's profile. Time will tell whether I can nail this one!! Wish me luck Quote Link to comment Share on other sites More sharing options...
zakdoggi Posted June 6, 2019 Author Share Posted June 6, 2019 Spent some time at the bench today sorting out how to approach the roofline conversion. Think I've got a start on it. Pics tomorrow. Quote Link to comment Share on other sites More sharing options...
zakdoggi Posted June 7, 2019 Author Share Posted June 7, 2019 Ok, made a start on the roofline changes. First thing was to get the door and window frames in. Next I'll cut away the existing C pillars and fashion the new ones. Taking my time....... Think twice or more, then cut once!! Quote Link to comment Share on other sites More sharing options...
Reuhkapelti2 Posted June 7, 2019 Share Posted June 7, 2019 Wow I like this project. I'll be watching closely your building, as this kind of modelling is fascinating. Quote Link to comment Share on other sites More sharing options...
beeRS Posted June 10, 2019 Share Posted June 10, 2019 Good start. I love that you are correcting the roofline. This is what has put me off this, otherwise very nice, kit. Good luck - will be watching. Quote Link to comment Share on other sites More sharing options...
zakdoggi Posted June 10, 2019 Author Share Posted June 10, 2019 Ok. Spent an hour or so today fixing the door frames and B pillars into place. Then some time on the computer and Mr Google looking at images of the real cars. Traced off a pic to get the angles I needed onto a post it note. Cut it out and taped into place. Time now to sit back and ponder...... "Does it look right?" Cheers......Geoff Quote Link to comment Share on other sites More sharing options...
zakdoggi Posted June 13, 2019 Author Share Posted June 13, 2019 Finally plucked up the courage to pick up the Dremel and cut the C pillar out. Fashioned a new pillar out of 0.5mm evergreen sheet and superglued it into place. Needed a small fillet along the belt line. Once the glue has set up securely, I'll bend the top corner around to meet the rear roofline. Phew!!! Cheers...... Geoff Quote Link to comment Share on other sites More sharing options...
zakdoggi Posted June 13, 2019 Author Share Posted June 13, 2019 Confidently he shapes the left side pillar and glues it into place. After letting the glue do it's job, I cut the right side pillar out and fitted the replacement. The stars are shining on me today!!! Cheers....... Geoff Quote Link to comment Share on other sites More sharing options...
TarheelRick Posted June 13, 2019 Share Posted June 13, 2019 Looks like you have nailed the look. Great work. Quote Link to comment Share on other sites More sharing options...
Straightliner59 Posted June 13, 2019 Share Posted June 13, 2019 Excellent work! Thanks for sharing this project. I love it! Quote Link to comment Share on other sites More sharing options...
espo Posted June 13, 2019 Share Posted June 13, 2019 Great job on the roof conversion. I usually chicken out on major plastic surgery like this. Quote Link to comment Share on other sites More sharing options...
zakdoggi Posted June 13, 2019 Author Share Posted June 13, 2019 Thanks Ricky and Daniel. So far, so good! 8 hours ago, espo said: Great job on the roof conversion. I usually chicken out on major plastic surgery like this. Cheers David. Yeah, I was holding my breath as I picked up the Dremel ? Thankfully, the added B pillars did their job in holding the roof in place whilst I performed the surgery. Cheers....... Geoff Quote Link to comment Share on other sites More sharing options...
ChrisBcritter Posted June 14, 2019 Share Posted June 14, 2019 I like the way you build and write, Geoff! Quote Link to comment Share on other sites More sharing options...
Recommended Posts
Join the conversation
You can post now and register later. If you have an account, sign in now to post with your account.
Note: Your post will require moderator approval before it will be visible.