Mike Williams Posted July 5, 2019 Share Posted July 5, 2019 (edited) Here's a model I finished up just last month. This is the AMT Ford Kit, only body and a few elements are in the box. Very similar to the "Wild Willie Borsch" model, just this AMT kit has a much finer and thinner mold, a nice piece. Included is a dashboard, a Tonneau cover and a grill shell and a view linkage parts. It's called "Ford Model T Roadster Racing Body". Starting with the finished frame, a few pics will be posted showing progress to the final and finished model. Here a look at the bare frame painted Hammerite gold from spray can, with the rear axle and tire support still attached. I'll need this setup till the rear end is mounted; Here with the mounted motor mock up and rear end positioned; A view of the rear end set up and ready to go; The fitment of the kit tonneau cover was miserable. After some researching, some cars had aluminum coverings for the interior so I was glad to find this out; The kit grill shell was way too thick, so I had to make one in brass sheet; Here a fuel tank in brass, all shiny because sometimes I hate to have to paint brass, Here more mockup, with motor and grill shell and tank; Thanks for viewing, critique, comments or questions are welcomed. Mick.. Edited July 7, 2019 by Mike Williams Quote Link to comment Share on other sites More sharing options...
Roadracer Posted July 5, 2019 Share Posted July 5, 2019 Very nice work! Your craftsmanship is superb! Quote Link to comment Share on other sites More sharing options...
Straightliner59 Posted July 5, 2019 Share Posted July 5, 2019 Excellent work, Mike! Your metalworking skills are readily apparent. Beautiful... Quote Link to comment Share on other sites More sharing options...
cobraman Posted July 5, 2019 Share Posted July 5, 2019 Wow ! That's nice ! Quote Link to comment Share on other sites More sharing options...
CabDriver Posted July 6, 2019 Share Posted July 6, 2019 (edited) Wow! I can’t wait to see more! Stunning craftsmanship! Beginner brass-worker question - what do you like to use to cut your brass sheet and rod? Edited July 6, 2019 by CabDriver Quote Link to comment Share on other sites More sharing options...
Mike Williams Posted July 6, 2019 Author Share Posted July 6, 2019 @Roadracer, Straightliner59 and cobraman, your viewing and commenting is greatly appreciated. A wonderful incentive, many thanks. CabDriver, thanks, and good question. Aluminum and brass sheet that I use is rarely thicker than 0.3mm, a good scissors is a great and easy way to cut away what's needed. The edges and corners will bend up a little, both on the cut piece as well as the bulk sheet that's left. No problem, lay them flat on a hard surface and run a rounded instrument or steel edge along the perimeter and it's all flat again. For rods and tubes, a thin separating disc using a Dremel or similar tool makes for a quick cut. For tubes, you can place a thin, sharp blade on the tube and roll it till it cuts through, just the pieces fly all over the place and I hate looking for things. Discs are efficient. If you don't mind, these burs here are about all that you'll need for shaping up metal. Thin disc for slicing, carbide burs for rough grinding and shaping, diamond points, rubber wheels and points for smoothing up solder joints; Good luck with your brass building, it's addictive though... Quote Link to comment Share on other sites More sharing options...
CabDriver Posted July 6, 2019 Share Posted July 6, 2019 That’s really helpful, thank you Mike! Great tips, I’ll bookmark this for future brass-adventures! Quote Link to comment Share on other sites More sharing options...
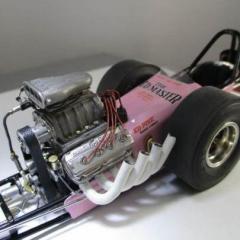
Mike Williams Posted July 6, 2019 Author Share Posted July 6, 2019 (edited) Thanks Jim. Here the next step with the buildup. The front end mounted and steering unit. My next build is a Top Fuel dragster from around 1967, and I needed practice for lacing the wire wheels. Since I didn't have any 12 spoke wheels at hand, might as well use some wire wheels up front, after lots of internet searching, a few Ford T Altereds were found with wire wheels up front. Good enough for me. Here a few build pics; This time for the radius rods, I found a steel wire that polished up like chrome and the metal can be soldered too; Here the wire wheels, laced with a silver coated copper wire, solders up nicely and looks like polished metal. This wire is in 0.3mm, next time around I'll use 0.25mm for the 32 spokes. The rims are a scale 18", copper rims. Each half has 16 soldered wires. A problem is though the silly dragster tires are really skinny. Here the 1st attempt, meanwhile they look a little different; The paint is just primer. Thanks for looking, Mick.. Edited July 6, 2019 by Mike Williams Quote Link to comment Share on other sites More sharing options...
Straightliner59 Posted July 6, 2019 Share Posted July 6, 2019 The wheels look great! I discovered that, if I keep the surface of the sheet of aluminum that I am using to make the part I'm cutting flat against the cutting surface of the scissors (I use regular old Fiskar's), that it cuts, virtually distortion-free. I'm so convinced of its effectiveness, that I bought a pair of left-handed scissors, too. I figure they're basically my shears/snips, so I might as well set myself up to be able to cut on either side of a line, without distortion. Quote Link to comment Share on other sites More sharing options...
Mike Williams Posted July 6, 2019 Author Share Posted July 6, 2019 Hi Dan, thanks for the info. I don't quite understand what you mean about "flat against the cutting surface". Can you post a pic of how you mean to hold the sheet/scissors? Mick.. Quote Link to comment Share on other sites More sharing options...
Straightliner59 Posted July 7, 2019 Share Posted July 7, 2019 (edited) 7 hours ago, Mike Williams said: Hi Dan, thanks for the info. I don't quite understand what you mean about "flat against the cutting surface". Can you post a pic of how you mean to hold the sheet/scissors? Mick.. Here is one I took for an article I was doing on working with sheet metal to make dragster bodies. The other is a photo of the result. Note that the motor plate is still flat, while the "falloff" is curled. Edited July 7, 2019 by Straightliner59 Quote Link to comment Share on other sites More sharing options...
Mike Williams Posted July 7, 2019 Author Share Posted July 7, 2019 (edited) OK, I think I see what you mean now. I think though, the "falloff" would be to the other side of the scissors, away from the cut. I see too about the "flat side". This is interesting, also about the scissors for lefties. As soon as my bench is free of laced wheels and jigs, I'll look into this further. Dan, thanks for posting. Mick.. Edited July 7, 2019 by Mike Williams Quote Link to comment Share on other sites More sharing options...
Mike Williams Posted July 7, 2019 Author Share Posted July 7, 2019 (edited) Here a few shots of the interior, getting ready for the final buildup. Some tinwork, rear tubs; Trunk; Belly pan; Small windshield; Looking at the rear wheels before mounting, the lug nuts are way too big. I used these for a truck, so these were changed for smaller ones; Getting closer now; Here the finished car…..well, except the paint. It will be painted a simple red, I think the color looks good on these cars. As soon as my paint booth is finished in the basement. ….and finally, this car sits alongside the two other cousins. 3 Altereds, built the same way. This car will be my last altered for a while, time to move on to dragsters. That's it. Edited July 9, 2019 by Mike Williams Quote Link to comment Share on other sites More sharing options...
Straightliner59 Posted July 7, 2019 Share Posted July 7, 2019 Love it, Mike! It just looks badass! You're welcome, RE: the cutting of sheet. I've been doing it that way for at least a decade, now, and, in most cases, it works, flawlessly. Quote Link to comment Share on other sites More sharing options...
Rider Posted August 25, 2019 Share Posted August 25, 2019 Wow! Awesome work, a great looking group of models, LOVE the brass work! Quote Link to comment Share on other sites More sharing options...
Claude Thibodeau Posted August 25, 2019 Share Posted August 25, 2019 Hi Sir! This is very impressive. World class built, for sure. Bravo! CT Quote Link to comment Share on other sites More sharing options...
Old Coyote Posted August 25, 2019 Share Posted August 25, 2019 Your work is phenomenal Mike, simply out of this world. Quote Link to comment Share on other sites More sharing options...
Richard Bartrop Posted August 25, 2019 Share Posted August 25, 2019 That is pretty amazing. Quote Link to comment Share on other sites More sharing options...
iBorg Posted August 25, 2019 Share Posted August 25, 2019 On 7/6/2019 at 9:55 PM, Straightliner59 said: Here is one I took for an article I was doing on working with sheet metal to make dragster bodies. The other is a photo of the result. Note that the motor plate is still flat, while the "falloff" is curled. What article and magazine? Quote Link to comment Share on other sites More sharing options...
Sixties Sam Posted August 26, 2019 Share Posted August 26, 2019 Amazing work! Looks great! Sam Quote Link to comment Share on other sites More sharing options...
Straightliner59 Posted August 26, 2019 Share Posted August 26, 2019 5 hours ago, iBorg said: What article and magazine? It's from the article I was doing for the SLM site, Mike. Yeah, I know! ? Quote Link to comment Share on other sites More sharing options...
Chris in Berwyn Posted August 26, 2019 Share Posted August 26, 2019 Fantastic! Quote Link to comment Share on other sites More sharing options...
gasser59 Posted August 26, 2019 Share Posted August 26, 2019 Absolutely stunning metal work. I was trying to find the parts I liked the best but I just can't, they're all liked best. Also quite an impressive array of altereds, my favorite drag racers. Quote Link to comment Share on other sites More sharing options...
Scott8950 Posted August 26, 2019 Share Posted August 26, 2019 awesome work Quote Link to comment Share on other sites More sharing options...
ThreeThree Posted August 27, 2019 Share Posted August 27, 2019 What a line up! Top knotch craftsmanship. The raw frame looks awesome. Really like the belt guard and gas tank. Quote Link to comment Share on other sites More sharing options...
Recommended Posts
Join the conversation
You can post now and register later. If you have an account, sign in now to post with your account.
Note: Your post will require moderator approval before it will be visible.