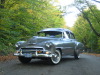
brewsterg6 Posted October 2, 2008 Share Posted October 2, 2008 (edited) I bought this at the show in Toronto last week. Paid $18 while there was another guy asking $40 for the same kit in a nicer box... but we don't build the box, do we??!! First thing I did was cut all the flash off of the pieces with the Dremel. Two hrs into it so far, and I'm only half done! The other thing I did was chop the top to make it look a little more in perspective. It also lets the wind shield set back right. Thanks for checking it out... Post 'em if you got 'em!! Here's my goal... Before and after the chop... Edited April 8, 2009 by brewsterg6 Quote Link to comment Share on other sites More sharing options...
brewsterg6 Posted February 4, 2009 Author Share Posted February 4, 2009 (edited) Well, I wasn't expecting many replys... since it's not a deuce streetrod!! This suckers been kicking my butt! Mocked up the chassis and motor, and fabricated interior door panels from an AMT '37 Chev kit. Still need to shave the window cranks off of them and work on the fit. Just working out how to tackle the body. Two pieces with a nasty seam down the middle. I bought Bondo... but am open to suggestions! Edited February 4, 2009 by brewsterg6 Quote Link to comment Share on other sites More sharing options...
plumnuts Posted February 4, 2009 Share Posted February 4, 2009 brewster I think the thing is cool. Im not use to working with that type of metal but what about solder? might be worth a test run some where, I would amagine bondo would be hard to sand at that scale. Quote Link to comment Share on other sites More sharing options...
brewsterg6 Posted February 4, 2009 Author Share Posted February 4, 2009 (edited) I tried solder... and it just ran off like water! It's white metal, and it doesn't seem to take to the iron. I don't want to risk melting it with too much heat. Thanks for the suggestion though! Edited February 4, 2009 by brewsterg6 Quote Link to comment Share on other sites More sharing options...
DR Dubois Posted February 4, 2009 Share Posted February 4, 2009 Looks like you've got quite the job ahead of you. I have no experience with these kits, but I'll definitely be watching! Looks good. Quote Link to comment Share on other sites More sharing options...
Smart-Resins Posted February 4, 2009 Share Posted February 4, 2009 I had eyed one of those kits on the Bay for cheap! A metal chassis I thought would be kinda cool to toy with! Sure looks like a ton of flashing though! Like to see the final results. Jody Quote Link to comment Share on other sites More sharing options...
ismaelg Posted February 4, 2009 Share Posted February 4, 2009 I missed this the first time around. Looks like a very interesting project been mostly metal. For the seam I would recommend Milliput fine grain putty. It doesn't shrink and sands beautifully. The car in the reference pic is gorgeous. I'll follow this one, as long as you don't hot rod it Thanks, Quote Link to comment Share on other sites More sharing options...
monkeyclaw Posted February 4, 2009 Share Posted February 4, 2009 I like it! In fact: I won my very first model car contest with this very model, whaen I was 12 yrs old....brings it right back.... any HOOOO . Brewster.....A good seam joint can be obtained with careful black snading down each side of th joint....a bit of bondo will do the job as well...bur emember to put primer on 1st....or th bondo won't stick .........matt Quote Link to comment Share on other sites More sharing options...
CB Posted February 4, 2009 Share Posted February 4, 2009 Boy does this bring back memories! Built a lot of Hubleys while I was growing up. Don't think I ever did paint any of them........oh yeah, I did build up a Vicki for my Mom and did a maroon candy on it. I like the look of the primered fenders on yours Bruce. I'm gonna hafta find me one and make a rod outa it. I seem to remember the kits came with a small file for filing all that flash off. Good luck with yours. Looking forward to seeing it all smoothed up and painted Quote Link to comment Share on other sites More sharing options...
E St. Kruiser50 Posted February 4, 2009 Share Posted February 4, 2009 (edited) I would amagine bondo would be hard to sand at that scale. Hey Brewster Glad to see someone being adventurous and diving into a die-cast. I've done several, including some customs, and have a die-cast project on the bench - a '57 Pontiac Safari wagon, using Danbury Mint and Franklin Mint bodies for the build. MR. OBSESSIVE would like it. As to "plumnuts" comment, a bondo type polyester filler works really well on metals. That's sorta what they were made for . Not a criticism of you plumnuts. It's actually nicer on metals than plastic, because it adher's really well when prepped properly and the metal has more resistance to being sanded away. Plastic you have to be very careful with, that's why I use quite a bit of the "Red" "GLAZING AND SPOT PUTTY" by Bondo. It's a lacquer based filler and attacks the plastic for adhesion really well, sand's and finishes easily, and takes primers nicely. Me, I don't use Bondo polyester filler, I use Evercoat "RAGE" and have for years. It costs more than Bondo, but to me gives much better results IMHO. Hope this helps All the best,and good luck - dave Edited February 4, 2009 by Treehugger Dave Quote Link to comment Share on other sites More sharing options...
pstreet Posted February 4, 2009 Share Posted February 4, 2009 Me, I don't use Bondo polyester filler, I use Evercoat "RAGE" and have for years. It costs more than Bondo, but to me gives much better results IMHO. Evercoat is a far more superior product than bondo brand filler hands down. less pinholes, easier to spread, easier to sand etc. for the few dollars in price difference its well worth it. also, im not sure how the two body halves are held together but you might want to put a jb weld type product on the underside of the seam so that the body filler isnt the only thing holding the two pieces together if thats the case. looks great so far, id really like to pick one of these up now. Quote Link to comment Share on other sites More sharing options...
Gray Smith Posted February 4, 2009 Share Posted February 4, 2009 Looking good man, I've got the 32 Chevy from MPC in 1/25th myself to work on one of these days. The 32 Chevy provides a nice departure from the usual 32 Ford. I'm a big fan of these cause of the elegant grill and the the hood sides. Look forward to seeing more progress on this. Gray Quote Link to comment Share on other sites More sharing options...
brewsterg6 Posted February 4, 2009 Author Share Posted February 4, 2009 Looking good man, I've got the 32 Chevy from MPC in 1/25th myself to work on one of these days. The 32 Chevy provides a nice departure from the usual 32 Ford. I'm a big fan of these cause of the elegant grill and the the hood sides. Look forward to seeing more progress on this. Gray Thanks for the replies, guys. I guess I'll be sorting this out on the weekend. Gray... I built the same kit a few years back... Quote Link to comment Share on other sites More sharing options...
Modelmartin Posted February 5, 2009 Share Posted February 5, 2009 Most diecasts are made from a zinc alloy and conventional soldering techniques won't work. I once tried to use a propane torch and I puddled a 1/43rd!! Jb Weld, epoxy putty, various auto body fillers are all good ideas. Quote Link to comment Share on other sites More sharing options...
torinobradley Posted February 6, 2009 Share Posted February 6, 2009 I picked up this kit a few months back and have been toying with the idea of what to do with it. While I would love to do a 32 Chevy street rod, I would be stymied by the lack of 1/20th scale parts. The only 1/20th scale parts I have are an old build up of a yellow 80's Corvette and a set of aftermarket directional wheels & tires. My advice on this is to clean the body, get it alighned and clamped/rubberbanded/strapped in place and run jbweld along the inside seam. Then dress the top/exterior as needed with body putty. Prime with etching primer, then spray all the parts needing paint, be they plastic or metal with the same shade of primer before you put on the color coats. I would enjoy the challenge of the kit, considering the two part body and all. As I don't build vehicles in stock trim, I will most likely end up trading it away. Let me know if anyone is interested. Quote Link to comment Share on other sites More sharing options...
goldfinger Posted February 7, 2009 Share Posted February 7, 2009 (edited) I bought some of that non ferrous welding rod..you know the one you see on tv where the guy repairs all kind of aluminum etc. I tried it on an old hubley kit and started to puddle the pot metal before the rod even melted. JB weld amnd bondo work just fine. Edited February 7, 2009 by goldfinger Quote Link to comment Share on other sites More sharing options...
Uncle Mike Posted February 7, 2009 Share Posted February 7, 2009 As to "plumnuts" comment, a bondo type polyester filler works really well on metals. That's sorta what they were made for . Not a criticism of you plumnuts. It's actually nicer on metals than plastic, because it adher's really well when prepped properly and the metal has more resistance to being sanded away. Plastic you have to be very careful with, that's why I use quite a bit of the "Red" "GLAZING AND SPOT PUTTY" by Bondo. It's a lacquer based filler and attacks the plastic for adhesion really well, sand's and finishes easily, and takes primers nicely. ******************************************************************************** ************** I don't step on toes, so in advance, 'Treehugger' and 'plum': I hate bondo. I was a lead ("led") user since body solder in a can was available. I have forced myself to glaze stuff with 'bondo', and have kept an open mind all the way through to 'tiger hair'...The red glaze I have found to shrink, (much like the nitrocellulose properties it contains) so much I wondered why I ever squeezed that plastic sh!t in the first place! Bondo doesn't stick to primer. Glazing does. Fiberglass doesn't stick to metal. Bondo does! Bondo the metal, then apply the fiberglass resin. I use a pick-hammer and file (1:1) in the trade. But as for the matter at hand: The "magic stuff" comes in a tube, much like the 'bondo' stuff...BUT! It's acrylic. Can only be had through Automotive Paint stores, it is a large tube, (20+ ounce) Acryl or Acrylic is the name, and it is Shrink-Proof. Sands nice, finishes beautifully. This is the good stuff for 'white metal'. Try it! Quote Link to comment Share on other sites More sharing options...
Art Anderson Posted February 7, 2009 Share Posted February 7, 2009 Most diecasts are made from a zinc alloy and conventional soldering techniques won't work. I once tried to use a propane torch and I puddled a 1/43rd!! Jb Weld, epoxy putty, various auto body fillers are all good ideas. Sorry, but conventional soldering techniques do work with Zamak, which is the white metal alloy that Hubley/Gabriel/JLE Scale Model used, Andy. The problem with Zamak always will be the flux used, not so much the heat. There was, at one time, a soldering flux called "SALMET" (meaning "solders all metals"), which Walthers (the model train folks) and hardware stores sold. If you can find this stuff, then yes, a large soldering iron will do the job. While I have no pics of the project, I soldered the body shell of a Hubley Duesenberg Dual Cowl Phaeton with this stuff back about 40yrs ago, for the guy who owned the real thing in a town about 20 miles from me. Surely, SALMET, or the same stuff under another name, is still available, but I haven't found it anywhere (who solders stuff other than say, copper plumbing, anymore?). That said, at least with those old Hubley kits, structural integrity isn't a problem, considering that the body shells are held together with self-tap screws. Products such as JB Weld Epoxy, and any of the catalysed putties will handle any filling of seams, and self-etching primers make painting this metal a breeze. Art Quote Link to comment Share on other sites More sharing options...
brewsterg6 Posted February 11, 2009 Author Share Posted February 11, 2009 I've been at it a little more.... first coat of Tamiya flat acrylic White on the white walls, and a coat of primer on the body. I Dremeled off the cowl vent, and am going to make a new one, possibly out of brass, to eliminate the seam that went through the old one. The Bondo will have to fill the seam, and even out the sink mark in the rumble seat lid, and the cowl. The kit came with chrome head lights, so I found some clear ones in a Jo-han 1931 V16 Cadillac kit that fit right in with minimal sanding. The glass is in the '32 assembly on the tree... Two of the Jo-han assemblies are below. Quote Link to comment Share on other sites More sharing options...
brewsterg6 Posted February 17, 2009 Author Share Posted February 17, 2009 I'm attacking the body gap this week. This is my first time using Bondo on a model, and I am really impressed with how easy it is to use. It took two cracks at getting the halves to join properly, and may take more. As I sanded the Bondo down, It became thin on top of the body, and cacked at the joint. I also made a filler for the hole in the fire wall from an AMT '37 Chev firewall. It has an indent behind the motor about the same size, so it fit well. Used the Bondo to cement it in as well. Quote Link to comment Share on other sites More sharing options...
brewsterg6 Posted March 18, 2009 Author Share Posted March 18, 2009 Well, It's been a while again! Here's a quick update... Finished wiring the motor today, getting the correct firing order off of my internet pic. I'll touch up the hand made distributer after it dries, as it has some glue residue on it. I did the gas line, but will likely redo it, as it seems to not be close enough to the motor. The fire wall needs finishing, then hopefully it will be nice enough outside to paint! Quote Link to comment Share on other sites More sharing options...
brewsterg6 Posted March 22, 2009 Author Share Posted March 22, 2009 I may be regretting spending so much time on this one, as I'm not even sure if I'm going to display it with my plastic stuff! I painted the wheels Hugger Orange and put the tires on...What a disaster!!! The white walls all cracked. I kind of expected this was going to happen after I was half way through painting the white walls on. I stripped the paint off, and mounted the tires, so I'll paint them later. I hand painted the stitching around the top as well. It was off to the hobby store for the body colour today. I couldn't match the cream on the pic I've been going by, so I'm going to take some liberties on colour! Quote Link to comment Share on other sites More sharing options...
brewsterg6 Posted March 24, 2009 Author Share Posted March 24, 2009 This is really coming together now... I have the body painted, the interior ready, and the dash completed. I used the sticker of the gauges that came with the kit, cutting each gauge out and gluing it to the console. I used left over photo etch for the free wheeling knob, and the knobs on the panel. Not far to go now, just plumbing under the hood, pinstriping, and assembly...Are you guys still watching? Quote Link to comment Share on other sites More sharing options...
brewsterg6 Posted April 8, 2009 Author Share Posted April 8, 2009 Well, the paint is finally on!! I have zero experience doing metal bodies, so I am sure this could have turned out better! The colours are Tamiya Deck Tan over Classic Black with a Dark Earth belt line. I added some detail to the firewall... not sure what the screws hold in the 1:1, but they are there! I have to make the rad support rods, then some final assembly and it's done! (That wonky rear tire is just mocked up...) Quote Link to comment Share on other sites More sharing options...
Bernard Kron Posted April 8, 2009 Share Posted April 8, 2009 All your carefrul work is paying off. This is gonna be a beautiful model when completed. I would proudly display it next to mr plastic models. Quote Link to comment Share on other sites More sharing options...
Recommended Posts
Join the conversation
You can post now and register later. If you have an account, sign in now to post with your account.
Note: Your post will require moderator approval before it will be visible.