delta99 Posted February 2, 2020 Share Posted February 2, 2020 I started in on my next project. I lived in Washington State for a few years, and I really miss it there. We want to move back one day. I used to drive up to the Cascades, or out 101 to the Olympics. I used to see loggers zipping around all over the place. I wanted to build a logger to remind me of the Pacific NW. Here are a few photos of my inspiration. They aren't autocars, but it's the direction I'm going with this build. Here is the start I started off with the engine. I went with Cummins beige. This is going to be a hard worked, tired looking truck. I grimeyed up the engine a bit I made the tires muddy, and put some rust on the wheels. Looks like the hubs are leaking too. I'm going to work with the weathering some more, I'm not totally happy with how it looks. It's headed in the right direction though That's all I did this weekend. Thanks for looking! Quote Link to comment Share on other sites More sharing options...
iamsuperdan Posted February 3, 2020 Share Posted February 3, 2020 Wheel weathering looks pretty bang on to me! Quote Link to comment Share on other sites More sharing options...
gotnitro? Posted February 3, 2020 Share Posted February 3, 2020 Nice and dirty ! Definitely watching this develop Quote Link to comment Share on other sites More sharing options...
DRIPTROIT 71 Posted February 8, 2020 Share Posted February 8, 2020 You've got my attention! Quote Link to comment Share on other sites More sharing options...
delta99 Posted February 9, 2020 Author Share Posted February 9, 2020 I need to add a "stinger" at the back of the frame. I ordered some channel from plastuct, so I'm waiting on that. But I worked on some chassis pieces, and the cab, First I sprayed the cab in red primer Then I dry brushed on some rusty color Then I did the salt masking technique. I applied some rock salt. All I had in salt that big was garlic salt, so there is some garlic in there as well, lol. It worked though Then I shot some yellow Then I air brushed in a bit darker detail Then I sanded a little bit more rust in Then I worked on the hood Some rusty dry brushing A little salt masking and shot some green A little bit of air brushing some lighter green The hood and some touch up work on the cab And I got some chassis pieces weathered Here's how she sits now, thanks for looking Quote Link to comment Share on other sites More sharing options...
Vince66 Posted February 10, 2020 Share Posted February 10, 2020 Very nice weathering Quote Link to comment Share on other sites More sharing options...
tbill Posted February 10, 2020 Share Posted February 10, 2020 Wow Quote Link to comment Share on other sites More sharing options...
gotnitro? Posted February 10, 2020 Share Posted February 10, 2020 Now that's awesome work! You nailed the rust on those parts Best part is how simple the technique Quote Link to comment Share on other sites More sharing options...
CRUSADER2 Posted February 10, 2020 Share Posted February 10, 2020 Excellent work on the weathering, definitely watching this build Quote Link to comment Share on other sites More sharing options...
DRIPTROIT 71 Posted February 11, 2020 Share Posted February 11, 2020 I'm liking what I see!! Quote Link to comment Share on other sites More sharing options...
am73grand Posted February 11, 2020 Share Posted February 11, 2020 Fantastic job weathering! I really like where this build is headed! Quote Link to comment Share on other sites More sharing options...
delta99 Posted February 16, 2020 Author Share Posted February 16, 2020 Got some more work done today. I'm on call at work tomorrow, so probably won't make any progress. I started out making some frame extensions for the rear stinger. I cut the sides from sheet, and attached strips for the top and bottom. I also filled in the weird vertical slots that didn't seem to correspond to anything. I put together the frame, and realized that I had lost a cross member. Spent a long time looking for it. Wound up building a new one from scratch. Once I was done for the day and cleaning up, I found the missing piece under the instruction sheet. Oh well (shrug) The instructions were pretty vague for the rear suspension, so I spent a while test fitting stuff. Finally figured it out Then I got busy on the front suspension. The steering linkage was a bit of a challenge, but I got it all together. Then I got the engine mounted Then I got the wheels on Then I air brushed a light coat of dust. I will finish to dust coat up once the rest of the build is complete. It doesn't really look great at this point, but I don't want to over do it And for some reason, everytime I make a post, it always adds extra pictures at the end. So any pictures that appear after this are ghosted?? Quote Link to comment Share on other sites More sharing options...
Vince66 Posted February 16, 2020 Share Posted February 16, 2020 Coming along great I like what you've done with this build. Quote Link to comment Share on other sites More sharing options...
gotnitro? Posted February 16, 2020 Share Posted February 16, 2020 Very well executed Quote Link to comment Share on other sites More sharing options...
DrKerry Posted February 16, 2020 Share Posted February 16, 2020 Nice weathering! Looking good! Quote Link to comment Share on other sites More sharing options...
CRUSADER2 Posted February 18, 2020 Share Posted February 18, 2020 Enjoying watching this build, great work, love the weathering technique, I want to give it a go, trouble is every thing I am building at the moment have aluminium or fiberglass cabs, I will have to think of something, maybe the chassis or a trailer? any way, top job!! Quote Link to comment Share on other sites More sharing options...
DRIPTROIT 71 Posted February 21, 2020 Share Posted February 21, 2020 Looks great! Quote Link to comment Share on other sites More sharing options...
Warren D Posted February 21, 2020 Share Posted February 21, 2020 On 2/15/2020 at 7:51 PM, delta99 said: Got some more work done today. I'm on call at work tomorrow, so probably won't make any progress. I started out making some frame extensions for the rear stinger. I cut the sides from sheet, and attached strips for the top and bottom. I also filled in the weird vertical slots that didn't seem to correspond to anything. IIRC those slots are for the mudflaps. The brackets have a hook shape on the end that fits into the slots. Quote Link to comment Share on other sites More sharing options...
delta99 Posted February 22, 2020 Author Share Posted February 22, 2020 9 hours ago, Warren D said: It looks like the mud flaps attach to the dump bed Quote Link to comment Share on other sites More sharing options...
Warren D Posted February 22, 2020 Share Posted February 22, 2020 I think it's the same frame as the A-Car tractor which attach that way. Quote Link to comment Share on other sites More sharing options...
delta99 Posted February 24, 2020 Author Share Posted February 24, 2020 On 2/22/2020 at 4:17 AM, Warren D said: I think it's the same frame as the A-Car tractor which attach that way. Oh ok, that makes sense Quote Link to comment Share on other sites More sharing options...
slusher Posted February 29, 2020 Share Posted February 29, 2020 Really great weathering and fine progress! Quote Link to comment Share on other sites More sharing options...
delta99 Posted March 3, 2020 Author Share Posted March 3, 2020 I'm now at the point of adding the fuel tanks to the frame. I'd like to weather them a bit. Does anyone know if the tanks were made of steel or aluminum? I don't know whether to add a little rust or maybe just some chipped paint exposing aluminum. How about the steps also. Can anyone help me? Quote Link to comment Share on other sites More sharing options...
gatorincebu Posted March 3, 2020 Share Posted March 3, 2020 Andrew, I really like the weathering on the cab and chassis thus far . It is looking pretty from here . Be Well Gator Quote Link to comment Share on other sites More sharing options...
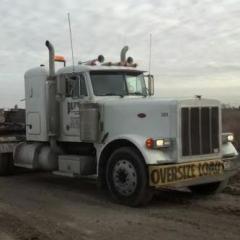
delta99 Posted March 8, 2020 Author Share Posted March 8, 2020 A bunch of progress made on this. First I got the fuel tanks and battery boxes mounted. And the weird muffler Then I worked on the interior Next I got the radiator mounted I got the roof accessories mounted Masked off bumper stripes Skid plate mounted I made custom decals, got air filter, lube finer and power steering resevrior mounted Mounted the cab Hood and fenders And bumper I got the stack mounted from the weird muffler. As you can see in the photos, I used mirrors from the snap pete kit. Since the provided mirror brackets are a scale 1 1/2" diameter, I decided to scale it down a bit. It's now time to start on the logging bunk Quote Link to comment Share on other sites More sharing options...
Recommended Posts
Join the conversation
You can post now and register later. If you have an account, sign in now to post with your account.
Note: Your post will require moderator approval before it will be visible.