Mike Williams Posted March 17, 2020 Share Posted March 17, 2020 (edited) Hello drag racing fans, I kind of like the mid to late 60's dragsters. This one is a modified Kent Fuller chassis. This car will be built to a scale 150" wheelbase in 1:25. Thanks for looking. Edited March 20, 2020 by Mike Williams Quote Link to comment Share on other sites More sharing options...
echo Posted March 18, 2020 Share Posted March 18, 2020 Nice work. I like that era FED, even a bit earlier with the weed burner headers and chute pack aluminum bodies, will be looking for any updates. Stay well. Quote Link to comment Share on other sites More sharing options...
PappyD340 Posted March 19, 2020 Share Posted March 19, 2020 Very nice work! Quote Link to comment Share on other sites More sharing options...
Mike Williams Posted March 19, 2020 Author Share Posted March 19, 2020 On 3/18/2020 at 2:13 PM, echo said: Nice work. I like that era FED, even a bit earlier with the weed burner headers and chute pack aluminum bodies, will be looking for any updates. Stay well. Thanks Ed, North Coast, Jax here. There are indeed excellent cars to be built, restorations with weed burners. This one will be with zoomies and the then newly introduced 426 Hemi, just not supercharged. We've seen enough of these. A nice and clean stack injection might be nice on a shorter dragster. Quote Link to comment Share on other sites More sharing options...
Mike Williams Posted March 19, 2020 Author Share Posted March 19, 2020 5 hours ago, PappyD340 said: Very nice work! Hi Larry, thanks! When I see NC, your area.... I think you boys know what to do with a motor. Read NASCAR. Special attention will be given to this build, which will be stack injected, not a blower motor. We want something different here. Quote Link to comment Share on other sites More sharing options...
Bainford Posted March 20, 2020 Share Posted March 20, 2020 Beautiful chassis. Cheers for going unblown. Quote Link to comment Share on other sites More sharing options...
Mike Williams Posted March 20, 2020 Author Share Posted March 20, 2020 (edited) @Bainford, many thanks. I feel the motor choice is a good one. Still a Hemi though, without a hat. UPDATE: Driveline setup. Short block and the rearend housing all lined up, with an 8° motor dump. The firewall is 23.5" out from the axles. The rear wheels are Comp Resins, cast in a nickel alloy. Edited March 20, 2020 by Mike Williams Quote Link to comment Share on other sites More sharing options...
STYRENE-SURFER Posted March 20, 2020 Share Posted March 20, 2020 Lookin good Mike. I think I saw a thread of yours on the HAMB. Is this a legs under chassis? ? Quote Link to comment Share on other sites More sharing options...
Mike Williams Posted March 20, 2020 Author Share Posted March 20, 2020 Hi Kurt, thanks, appreciated. Yes, I have an ongoing query about mechanical fuel injection. Lots of knowledgeable guys there. No, legs over. This car is about vintage 1968. Mike.. Quote Link to comment Share on other sites More sharing options...
STYRENE-SURFER Posted March 20, 2020 Share Posted March 20, 2020 (edited) I'm sure you're aware, but this thread on the HAMB is a goldmine of inspiration/information. https://www.jalopyjournal.com/forum/threads/the-induction-thread.1042950/ Proly some vintage pics of what your creating included in that thread. ? Edited March 21, 2020 by STYRENE-SURFER Darn this iPad Quote Link to comment Share on other sites More sharing options...
Mike Williams Posted March 21, 2020 Author Share Posted March 21, 2020 Kurt, excellent link, thanks. I saved it. Yes, HAMB is a gold mine. Mike.. Quote Link to comment Share on other sites More sharing options...
Mike Williams Posted March 22, 2020 Author Share Posted March 22, 2020 (edited) Update; a few interior details added, and the motor got some paint. The heads are prepped with studs on top for the injection setup, and with tubes for the zoomies. Edited March 22, 2020 by Mike Williams Quote Link to comment Share on other sites More sharing options...
Claude Thibodeau Posted March 22, 2020 Share Posted March 22, 2020 Hi! Impressive work, for sure. Your welds are "blending" well with the parent metal. It shows great mastery of the technique. Mr. Fuller would be admirative, I'm certain. Keep up the great work. Bravo! CT Quote Link to comment Share on other sites More sharing options...
AmericanMuscleFan Posted March 22, 2020 Share Posted March 22, 2020 Hello Mike! Superb job on the frame and nice progress on the drive train. I always loved models made with a blend of styrene and brass/aluminum. Furthermore, it has a HEMI so it can't be nothing but a great build!!! Question: Did you weld the brass frame using a small torch or a resistance solder unit; the joints are very clean? Take care, Francis Quote Link to comment Share on other sites More sharing options...
slusher Posted March 22, 2020 Share Posted March 22, 2020 Great work so far... Quote Link to comment Share on other sites More sharing options...
Mike Williams Posted March 22, 2020 Author Share Posted March 22, 2020 Hello CT, I'm happy you enjoy the progress, much appreciated. Greetings Francis, yes a Hemi is a must, I do believe they model the best. Concerning the soldering, I have a simple $50 analog soldering station, with high, medium and low temperature settings, and two different tips for the "pencil iron". The main tip is a 2.5mm wide spatula, and a very thin "pencil" shape for ultra tiny parts. My opinion, I don't need anything other soldering method. The joints are only reduced and smoothed up with small diamonds or burs, then rubber points to reduce the grinding marks. A clean solder joint is more pleasing to the eye. I'm at these silly joints all of the time, getting them smaller and smaller. Hi Carl, I'm pleased with the progress. This build is going quickly. Just last November another FED was finished, so the momentum is still moving forward. Mike.. Quote Link to comment Share on other sites More sharing options...
Mike Williams Posted March 24, 2020 Author Share Posted March 24, 2020 (edited) Things are closed down everywhere, lots of modeling time now. The aluminum seat was bent and fitted, the header pipes have been roughly bent, and the front axle fabricated. Also a nice and easy method for making scale banjo fittings figured out. Stay safe. Mike.. Edited March 24, 2020 by Mike Williams Quote Link to comment Share on other sites More sharing options...
Mike Williams Posted March 28, 2020 Author Share Posted March 28, 2020 (edited) UPDATE; wire wheel lacing. This time around I thought to try a revised method for lacing the front wire wheels. They were made to fit the Revell Tony Nancy dragster tires, which are a scale 19", just right for a scratch build. First off, we need a sturdy station to attach the studs for the wires to be wrapped around, here a nice block of hardwood flooring, with a "clock" showing at first 8 studs. This will make a 32 spoke wheel. Here the rims being prepped. Since the wheels will be soldered, copper tubing from a plumber supply shop will be perfect., here 18mm with a 1mm wall thickness; Here two slices cut off, making rims which should be no larger than 1mm thickness. There will be two rims coming together, which will fit perfectly inside the Revell tires; Then a silver plated copper wire from a 100yd. roll....Amazon. At first 0.25mm was used, later on for a 40 spoke wheel, 0.20mm is the preference. Cheap too, about $5; Now, returning to the clock, start by numbering the studs. This clock will be for a 40 spoke wheel, 10 studs. Wrap wire around securely and do around the middle post, then choose a number directly across, then minus two. In this case this would be stud number 10 at the top, go around and wrap the 1st wire counterclockwise being number 4; Then from #4 straight across then 1 counterclockwise, this would be number 8. And so on....; After the last wrap, the final single wire leftover would be wrapped around just exactly where you started. Secure tightly, then solder each wire to the rim. When all wires are attached securely to the rim, cut off the excess and lift the rim off the "axle stud". Here the outside, visible surface; One rim with 10 studs, makes for 20 spokes. Important now to trim off the excess, right down to the rim itself. If using solder, the spokes must be flush with the outside surface of the rim, or a floating of the wires during the process of soldering two rims together might happen! Catastrophe! You can use other rim material, like hard plastic, and with a good CA you can use fly-fishing line!! Also very realistic! Here the period correct 40 spoke laced wire wheel on 17", 18" or 19"" tires, with super thin spokes. Then compared to the 1:25 kit wheels. Your choice. which is better?; Left the 32 spoke wheel, right the 40 spoke; Finally, another view of the 32 spoke wheel, I like the 40 deal better though; Thanks for looking, hopefully maybe someone can use the method. Mike.. Edited March 28, 2020 by Mike Williams Quote Link to comment Share on other sites More sharing options...
AmericanMuscleFan Posted March 28, 2020 Share Posted March 28, 2020 WOW!!! These spoked wheels are gorgeous! Very ingenious trick... Thanks so much for sharing the technique! Cheers, Francis Quote Link to comment Share on other sites More sharing options...
Mike Williams Posted March 28, 2020 Author Share Posted March 28, 2020 5 hours ago, AmericanMuscleFan said: WOW!!! These spoked wheels are gorgeous! Very ingenious trick... Thanks so much for sharing the technique! Cheers, Francis Well thank you Francis, much appreciated. I believe many fellows might be interested in this technique. After several attempts a while ago, this seems to be the easiest method. Mike.. Quote Link to comment Share on other sites More sharing options...
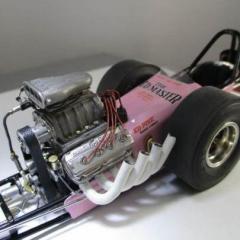
Mike Williams Posted March 28, 2020 Author Share Posted March 28, 2020 UPDATE: Today the cowl is finished, and the fuel tank, plus a few more shots of the 40 spoke fronts. The axle isn't attached yet, this will be done when all other units are installed. This car will keep the unpainted aluminum body. This one is a natural. Next up are the side panels and a few other needful things. Mike.. Quote Link to comment Share on other sites More sharing options...
AmericanMuscleFan Posted March 29, 2020 Share Posted March 29, 2020 I'm lovin it Mike! Great build so far and very cool subject! I do love those old school dragster! I'll be back for sure! Cheers, Francis Quote Link to comment Share on other sites More sharing options...
GoatGuy Posted March 29, 2020 Share Posted March 29, 2020 Mike, what a great build. I'm looking forward to more. You would love seeing Bruce Larson's dragfest here in PA. It is every November and quite a few vintage drag cars show up. I think I might have posted pics on here. Keep up the good work. Quote Link to comment Share on other sites More sharing options...
Len Woodruff Posted March 29, 2020 Share Posted March 29, 2020 Wow! Quote Link to comment Share on other sites More sharing options...
Scott8950 Posted March 29, 2020 Share Posted March 29, 2020 (edited) Extremely impressive and the wire wheels are absolutely amazing. WOW Edited March 29, 2020 by Scott8950 Quote Link to comment Share on other sites More sharing options...
Recommended Posts
Join the conversation
You can post now and register later. If you have an account, sign in now to post with your account.
Note: Your post will require moderator approval before it will be visible.