carl63_99 Posted March 29, 2020 Share Posted March 29, 2020 Been working through my backlog. '67 Goat with chassis and engine from the '67 Chevelle. Quote Link to comment Share on other sites More sharing options...
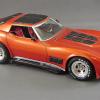
carl63_99 Posted March 29, 2020 Author Share Posted March 29, 2020 Not the Teal that I wanted, as I couldn't get the blue and yellow I wanted to mix. But I found a blue metallic and pearl orange, mixed them and got this. It'll work! Quote Link to comment Share on other sites More sharing options...
carl63_99 Posted March 29, 2020 Author Share Posted March 29, 2020 Used the gauge decals from a Hasagawa 328. Hard to see in the pic, but you can see them when assembled. Quote Link to comment Share on other sites More sharing options...
gman Posted March 30, 2020 Share Posted March 30, 2020 2 hours ago, carl63_99 said: Not the Teal that I wanted, as I couldn't get the blue and yellow I wanted to mix. But I found a blue metallic and pearl orange, mixed them and got this. It'll work! Holy smokes- that turned out beautifully. Quote Link to comment Share on other sites More sharing options...
Hotrod 97 Posted March 30, 2020 Share Posted March 30, 2020 I really like that body color, Carl. Will be following this build. Quote Link to comment Share on other sites More sharing options...
RichCostello Posted March 30, 2020 Share Posted March 30, 2020 I had the same idea, I just need to get the GTO, I'm waiting for HL to put it on clearance. Looks like it's fitting together pretty good. Any problems? I think the color looks great too! Quote Link to comment Share on other sites More sharing options...
RickRollerLT1 Posted March 30, 2020 Share Posted March 30, 2020 (edited) I applaud your take and ideas on improving this steaming hunk of garbage. Now I see 67 GTO becomes a totally different kit when you dump the janky frame, motor and interior and swap it out with anything else. Is that the AMT 67 Pro Street Chevelle frame you used? It looks different to the Revell 67, but then I remembered the AMT kit had inner fenders in the frame compared to the Revell with them in the engine compartment. Edited March 30, 2020 by RickRollerLT1 Quote Link to comment Share on other sites More sharing options...
carl63_99 Posted March 30, 2020 Author Share Posted March 30, 2020 The Chevelle kit is the AMT one, box shows in pic #1. The two go together pretty nice. I had to add a bit to the rear of the chassis to match up with the GTO body. The huge tabs in the back of the GTO body make for perfect alignment of the chassis. A builder could cut down the firewall to get the body over the chassis better, but for now I'm leaving it alone as it gives the hood something to rest on. Quote Link to comment Share on other sites More sharing options...
carl63_99 Posted March 30, 2020 Author Share Posted March 30, 2020 Work on the dash. Using gauge decals from the Hasagawa Ferrari 328. Pedals also came from the Chevelle kit, as the GTO ones sucked. Quote Link to comment Share on other sites More sharing options...
Nazz Posted March 30, 2020 Share Posted March 30, 2020 16 hours ago, Hotrod 97 said: I really like that body color, Carl. Will be following this build. Same here ,going to be an interesting build. Quote Link to comment Share on other sites More sharing options...
Funkychiken Posted March 31, 2020 Share Posted March 31, 2020 (edited) I can't believe orange and blue gave you that colour, but it looks amazing! Edited March 31, 2020 by Funkychiken Quote Link to comment Share on other sites More sharing options...
EL LOCO Posted March 31, 2020 Share Posted March 31, 2020 That paint job has come out awesome. The stance looks mean. Cant wait to see how the interior turns out. Quote Link to comment Share on other sites More sharing options...
carl63_99 Posted April 1, 2020 Author Share Posted April 1, 2020 An example of the work in progress. I like to Bare Metal Foil emblems after primer. Check the first pic of the driver's side and see chrome on the "GTO" emblem. Then, when I polish the paint off, they really pop. It's taking longer and more work than usual to get this paint smooth. Probably a couple more days of work on the paint. Quote Link to comment Share on other sites More sharing options...
Geno Posted April 1, 2020 Share Posted April 1, 2020 Another cool Pontiac build I'll be watching. I'd done the opposite kitbashing these two kits to get me a stock 1/24 '66 Chevelle to fit in with my 1/24 diecast collection. Quote Link to comment Share on other sites More sharing options...
LouO Posted April 1, 2020 Share Posted April 1, 2020 That color and paint laid out nice! Good stance on that ol' goat! I like this. Quote Link to comment Share on other sites More sharing options...
carl63_99 Posted April 2, 2020 Author Share Posted April 2, 2020 So we all know what a POS the original kit is. Case in point, chrome. I stripped the grill of chrome, cut off the back and replaced with railroad modeling screen (one of my FAV mods). I cut the "GTO" script off the extra grill inserts from the kit, BMF'ed it added black wash, and superglued it on. I'm currently thinking I'm not going to put the turn signals back on, looks cleaner. For these old kits that have ugly chrome passing for headlights, I take a drill bit and grind them back to buckets. some polishing before paint and new clear lenses make them look very real. Alclad II did the rechroming duties. Quote Link to comment Share on other sites More sharing options...
carl63_99 Posted April 2, 2020 Author Share Posted April 2, 2020 On 3/30/2020 at 12:08 AM, RichCostello said: I had the same idea, I just need to get the GTO, I'm waiting for HL to put it on clearance. Looks like it's fitting together pretty good. Any problems? I think the color looks great too! Rich, as I am ditching everything but the body, trim and window piece, I'd have to say THESE parts fit good. The original engine, chassis and interior; not even saving them. Quote Link to comment Share on other sites More sharing options...
carl63_99 Posted April 6, 2020 Author Share Posted April 6, 2020 Almost there! Few details on the engine to go and then hope for some sunshine to get final pics! Quote Link to comment Share on other sites More sharing options...
Southern Fried Posted April 9, 2020 Share Posted April 9, 2020 I like your direction...but, I would have to have used a Pontiac "mill"... Quote Link to comment Share on other sites More sharing options...
carl63_99 Posted April 9, 2020 Author Share Posted April 9, 2020 3 hours ago, Southern Fried said: I like your direction...but, I would have to have used a Pontiac "mill"... I would have liked to. Problem was the Poncho engine was a POS. Quote Link to comment Share on other sites More sharing options...
ZTony8 Posted April 9, 2020 Share Posted April 9, 2020 How did you resolve the dash/ interior panel fit issue( for those who don't know, the GTO dash is a bit too narrow for the Chevelle interior pieces and the Malibu dash is a different shape at the cowl)? Quote Link to comment Share on other sites More sharing options...
carl63_99 Posted April 10, 2020 Author Share Posted April 10, 2020 16 hours ago, ZTony8 said: How did you resolve the dash/ interior panel fit issue( for those who don't know, the GTO dash is a bit too narrow for the Chevelle interior pieces and the Malibu dash is a different shape at the cowl)? A technique I use for projects with substitute dashes is to build a tab to mount the dash under the area in front of the windshield. As shown, this allows me to mount the dash tight against the inside of the windshield and adjust for a proper fit. Quote Link to comment Share on other sites More sharing options...
mustang1989 Posted April 10, 2020 Share Posted April 10, 2020 Very nice paint work. That looks totally awesome!!! Quote Link to comment Share on other sites More sharing options...
Recommended Posts
Join the conversation
You can post now and register later. If you have an account, sign in now to post with your account.
Note: Your post will require moderator approval before it will be visible.