Gumball Posted May 4, 2020 Author Share Posted May 4, 2020 (edited) Some new solder exhaust, and some more progress with the front end. I ended up breaking off the rear end. it was kinda out of wack, the wheel wells didn't quite line up so I heated it back up to straighten it out. I got another neat "more then one tone" paint job, give it a cool 60s-70s look. Edited May 4, 2020 by Gumball Quote Link to comment Share on other sites More sharing options...
Gumball Posted May 9, 2020 Author Share Posted May 9, 2020 Just made some disc brakes as well as the rack for the pit man arm steering setup. Also rear end is getting fixed I'm slowly straightening it out. I actually ran out of both superglue and paint stripper, I ordered in both. Luckily the hardware stores opened up to the public this morning meaning I was able to go in and buy some glue. Paints tripper will have to wait. Just chipping away at it every day. Quote Link to comment Share on other sites More sharing options...
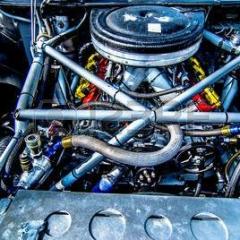
Dr Cobra Posted May 10, 2020 Share Posted May 10, 2020 On 4/13/2020 at 4:02 PM, Gumball said: yeah its kinda weird, although the original box art for the kit shows the turbo almost the exact same way the turbo is super cool and all, but i'm probably going to end up not using it due to my plans for some supercharged velocity stacks. Actually forget that, perhaps i can figure out a way to accommodate both the turbo and the supercharger together while allowing velocity carbs above that. i'm just trying to figure out how that would all work the way i'm thinking it, perhaps for now ill save the turbo for another future project. It's supposed to be a Accel Turbosonic setup. The carb set on top of the adapter and the turbo drew the air/fuel mixture through the carb and blew it through the bottom half of the adapter into the intake. Quote Link to comment Share on other sites More sharing options...
Gumball Posted May 11, 2020 Author Share Posted May 11, 2020 19 hours ago, Dr Cobra said: It's supposed to be a Accel Turbosonic setup. The carb set on top of the adapter and the turbo drew the air/fuel mixture through the carb and blew it through the bottom half of the adapter into the intake. Oh now that's cool! It makes a little more sense now. Quote Link to comment Share on other sites More sharing options...
Gumball Posted May 15, 2020 Author Share Posted May 15, 2020 (edited) Not much of an update but it is something. Got both exhausts in, still waiting on the paint stripper and other things coming in the mail. Edited May 15, 2020 by Gumball Quote Link to comment Share on other sites More sharing options...
Gumball Posted May 18, 2020 Author Share Posted May 18, 2020 (edited) Well it's comming along now! Finally in the final stages of fixing the horrifically unallighned rear end! Still needs alot of work, but it makes me that much closer to finishing the kit! Edited May 18, 2020 by Gumball Quote Link to comment Share on other sites More sharing options...
cobraman Posted May 18, 2020 Share Posted May 18, 2020 Looking good to me. I have to try that trick with making exhaust sometime. Quote Link to comment Share on other sites More sharing options...
Ian McLaren Posted May 18, 2020 Share Posted May 18, 2020 Great project Quote Link to comment Share on other sites More sharing options...
Gumball Posted May 18, 2020 Author Share Posted May 18, 2020 4 hours ago, cobraman said: Looking good to me. I have to try that trick with making exhaust sometime. Believe it or not i use solder for a lot of things now not just exhaust, for example the throttle return spring on the gasser engine is just a piece of solder wrapped around a needle. Another example is the turbo I built for the 75 Datsun pickup, the idea came from the tips and tricks page (which I cant find anymore probably buried) the solder is nice to work with, but your better off bending the stuff by hand as using pliers marks up the solder. Quote Link to comment Share on other sites More sharing options...
Misha Posted May 29, 2020 Share Posted May 29, 2020 Wow, things have certainly progressed since the last time I checked in. Quite outrageous! No surf buggy... Cheers Misha Quote Link to comment Share on other sites More sharing options...
David G. Posted June 1, 2020 Share Posted June 1, 2020 Great progress on this! You have a lot of great looking work going on there. David G. Quote Link to comment Share on other sites More sharing options...
Gumball Posted June 3, 2020 Author Share Posted June 3, 2020 (edited) On 5/29/2020 at 7:31 PM, Misha said: Wow, things have certainly progressed since the last time I checked in. Quite outrageous! No surf buggy... Cheers Misha No sadly no buggy, although I can attempt to make some surf boards for the top just for fun? It would have to go well with the paint scheme I have in mind, but I think I could make it work. All Iv done in the way of paint rn is just this half fast drawing with my idea in case your curious. The idea is a flat black body with a yellow and orange stripe. I just can't keep away from those more then one tone paint jobs! Edited June 3, 2020 by Gumball Quote Link to comment Share on other sites More sharing options...
Gumball Posted June 3, 2020 Author Share Posted June 3, 2020 On 6/1/2020 at 8:24 AM, David G. said: Great progress on this! You have a lot of great looking work going on there. David G. Thanks! Im hoping to put the same amount of detail of that in the engine bay to the interior and suspension, so a lot more work to come. Quote Link to comment Share on other sites More sharing options...
John Pol Posted June 3, 2020 Share Posted June 3, 2020 On 5/18/2020 at 2:23 PM, Gumball said: Well it's comming along now! Finally in the final stages of fixing the horrifically unallighned rear end! Still needs alot of work, but it makes me that much closer to finishing the kit! looking good so far but why do you have slicks on the front Quote Link to comment Share on other sites More sharing options...
Gumball Posted June 3, 2020 Author Share Posted June 3, 2020 2 hours ago, John Pol said: looking good so far but why do you have slicks on the front Just the tires I had, they are off a F1 car. I didn't want to just use the back because I wouldn't have wheels that would properly fit the front, and as well the rear wheels wouldn't match up with any front wheels I may have sitting around. Also I like the good year lettering I did on them. Quote Link to comment Share on other sites More sharing options...
Gumball Posted June 24, 2020 Author Share Posted June 24, 2020 So the break fluid paint stripper suggestion worked out well and iv managed to strip the paint off the 4 link and am currently stripping the paint on the 500k as well. Ill hopefully follow up with a picture of the progress tomorrow. Great thing too is the hobby shops reopened recently and supply are alot more obtainable, which means (if I don't get horribly busy) progress should begin again soon... Hopefully... Quote Link to comment Share on other sites More sharing options...
Gumball Posted July 1, 2020 Author Share Posted July 1, 2020 Progress has been a little slow, as I find myself mostly focused on the mercedes build of mine. So far iv managed to repaint the rear end, re glue the rear struts together, and iv managed to strip most of the paint off of the body pannels. I apologise for any waiting. Quote Link to comment Share on other sites More sharing options...
GeeDub Posted July 1, 2020 Share Posted July 1, 2020 I'm really impressed with your use of rattle can caps to create the wheel tubs. Excellent idea I must store for future use. Quote Link to comment Share on other sites More sharing options...
TransAmMike Posted July 1, 2020 Share Posted July 1, 2020 Wow what an undertaking. Impressive work there Johnny. Was the leaf spring front axle setup on the original Kit? Quote Link to comment Share on other sites More sharing options...
Gumball Posted July 5, 2020 Author Share Posted July 5, 2020 On 7/1/2020 at 1:18 PM, TransAmMike said: Wow what an undertaking. Impressive work there Johnny. Was the leaf spring front axle setup on the original Kit? Actually what I ended up doing was using the original rear springs in the front by heating them up and bending them alot, giving them alot more of an arch for more of what I come to think as a gasser look, and I kept the wheels in place by using the stock front axle holder shaft, steering knuckle thing and the stock rear shocks. So essentially yeah it was in the kit but I just modified it Quote Link to comment Share on other sites More sharing options...
Gumball Posted July 5, 2020 Author Share Posted July 5, 2020 On 7/1/2020 at 12:27 PM, GeeDub said: I'm really impressed with your use of rattle can caps to create the wheel tubs. Excellent idea I must store for future use. Well if theres two things I am is cheap and reasorcefull, heck you should see my last daily driver before it kicked the bucket, nothing but zip ties and duck tape I tell ya! Quote Link to comment Share on other sites More sharing options...
Gumball Posted July 9, 2020 Author Share Posted July 9, 2020 Well some more progress is coming along. I ended up taking some time out to clean my bench to make some more room for the 55 now that the mercedes is practically done. Hopefully I didn't loose anything off the engine as I just dropped it a few moments ago, currently reglueing it back together... Quote Link to comment Share on other sites More sharing options...
Gumball Posted July 11, 2020 Author Share Posted July 11, 2020 (edited) Back again finally with some real good progress this time. I think this may be the first time i have ever brushed a paint design onto a car, with it suprizingly turning out far better then I hoped! The car is now sitting on 4 wheels, the dashboard is now complete along with a nifty little CB cop radio to go along with it, the floor and inner door panels have now been stripped, as well as all the body panels are now painted, except that the clear coat ran on the hood so ill be having to repaint it. Sadly my phone recently broke and i dont have any picture of the body cleared and chromed yet. im also currently racking my brains about the flip front and how im going to go about it, i cant do a hinge with a single pivot point as the front end wouldn't move because it sits on the frame rail, i would need to make a hinge that not only tilts forward but lifts upwards as well, the only problem is mounting at that point as there would be no where to mount it. If anyone has built any of these old AMT 55 Chevy kits as a flip front, i would be interested in how exactly you made and installed the hinge. Edited July 11, 2020 by Gumball Quote Link to comment Share on other sites More sharing options...
GeeDub Posted July 11, 2020 Share Posted July 11, 2020 Looking real good! My only dislike, and this is just my own personal opinion, is the front tires. I personally prefer skinny front tires on drag cars. Perhaps not top fuel dragster skinny, but none the less. Standard width road tires being the max I would go with. As I understand the reasoning for skinny front tires, there is less resistance on the track surface which results in faster reaction times/getting the car moving quicker . Quote Link to comment Share on other sites More sharing options...
Gumball Posted July 11, 2020 Author Share Posted July 11, 2020 1 hour ago, GeeDub said: Looking real good! My only dislike, and this is just my own personal opinion, is the front tires. I personally prefer skinny front tires on drag cars. Perhaps not top fuel dragster skinny, but none the less. Standard width road tires being the max I would go with. As I understand the reasoning for skinny front tires, there is less resistance on the track surface which results in faster reaction times/getting the car moving quicker . Although i couldn't agree with you more, the tires i decided to use are off of some old Tamiya F1 car. They happen to be the closest things i got to drag radials that would fit onto a 1/16th scale. I would use the back tires and save the fronts for another project except for the fact that i dont have any extras of these wheels unless i start picking apart my already 100% still all together F1 kits. On the flip side i do like the look of the big GOODYEAR lettering on the tires, and the rims look pretty sharp as well. So i do understand your issue, and i do agree that it doesn't look right, but really its all i got and it doesn't look half bad. Quote Link to comment Share on other sites More sharing options...
Recommended Posts
Join the conversation
You can post now and register later. If you have an account, sign in now to post with your account.
Note: Your post will require moderator approval before it will be visible.