Aerodyne03 Posted September 14, 2020 Share Posted September 14, 2020 Here I am with a new wip ... a short while ago I got hold of this monogram fire truck and today I start it, I have a half idea for the body color which will not be yellow, for now I will work on the interior and the chassis?? , there is a lot to mask as the body has been printed with many parts already incorporated?? Quote Link to comment Share on other sites More sharing options...
Chariots of Fire Posted September 14, 2020 Share Posted September 14, 2020 (edited) Those are nice easy kits to work with. Even though they are snap kits, a lot can be done with them. Here are some examples with some extra things added. If you are going to paint the model a different color be sure and use a good primer first. The yellow tends to bleed through, especially if the color you chose is white. I've also used the spare tires from another kit to fill in the backs of the tires since they are open. Slice off the sidewall of the extra tire, sand it smooth and glue it to the back of the tire you are going to use for the model. The look is improved a lot that way. For the aerial ladder below I used more than one kit to extend the cab and make the body. The aerial came from a Hess promotional toy and was modified with a new turntable. Note also that the windshield is one piece in the kit. The actual windshield has a divider in the middle. That can be done using a piece of plastic strip stock. The Providence, Rhode Island engine was built using two cabs. Other details were scratch built. The last one is almost as it comes from the box but I cut out the molded in cross lay hoses, filled in the hole and added some sewing elastic for hose. The hose on the reel is small solder wire. I made up a tutorial on how to create a hose load for the bed that I can post if anyone is interested. Edited September 14, 2020 by Chariots of Fire Quote Link to comment Share on other sites More sharing options...
Aerodyne03 Posted September 14, 2020 Author Share Posted September 14, 2020 Thank you for showing us your models, they are really beautiful, it's amazing what you can build , even starting from such a simple base !! ??? Feel free to post your tutorial !! ??? Quote Link to comment Share on other sites More sharing options...
GLMFAA1 Posted September 14, 2020 Share Posted September 14, 2020 Lucky to have a yellow version. Many different apparatus can be made from this kit including commercial cab added to pumper body. have fun enjoy your build you are the fire chief, built to your specifications greg Quote Link to comment Share on other sites More sharing options...
Aerodyne03 Posted September 14, 2020 Author Share Posted September 14, 2020 Yes, it's a nice kit??, as a fire chief I never imagined but it suits me??? Quote Link to comment Share on other sites More sharing options...
Chariots of Fire Posted September 15, 2020 Share Posted September 15, 2020 (edited) I'll do this one step at a time. The first is how to make up the hose that will be placed in the bed. So we start with the materials. Those nice old Floquil colors shown below you can't get anymore but there are plenty of acrylics out there that will work just as well. The hose is made of sewing elastic. Shoelaces just do not work as the weave is way to thick. The elastic comes in 1/8" and 1/4" wide pieces. I use the 1/8" elastic for working lines and the larger elastic for supply lines. You also need some aluminum tubing for modern couplings and brass tubing for earlier couplings. The Mack CF could use the aluminum tubing just fine. First stain the elastic with some light earth colors to imitate cotton jacket rubber lined hose. If you are using new synthetic hose you can leave it white as most of it comes that way. More modern hose is even different colors than that. You can cut the tubing to make couplings like I have made below. Since the hose is not charged it would look something like what is below. Note I joined an older cotton jacket type hose with the newer hose on the right. Nozzles can be made from brass tubing or in this case I got them from Don Mills Hobbies. Now on to actually filling a hose bed. Here is the back of one of the Monogram Mack CF trucks. In the photo below I have made a shallow box that will fill up part of the hose bed. This is done to cut down on the amount of elastic you have to use to fill the bed correctly. Also in the photo are some small sections of elastic that I have folded over and glued. They are temporarily clamped until the glue dries. You will need to make several of these. The shallow box is now in the bed and I have begun to fill up the rear of the bed with the short pieces of elastic. In this case I stained the elastic first. Note that the hose is lying flat. This is known as a flat lay. The entire rear of the bed needs to be filled with the short elastic pieces until the bottom is completely covered and is filled to the level of the shallow box. With the end of the hose bed filled begin to fill in the rest of the hose bed over the shallow box. Try and hide the end of the elastic underneath. Start by running a full length of elastic from the front of the hose bed to the rear beginning to cover the short pieces of elastic previously put in place. Just continue this procedure over the full width of the bed until at least two layers cover the entire box. You don't want any of the box to show through the layers of hose. They don't have to be placed perfectly. Real hose beds rarely are. If you want to you can add couplings along the way. Just make sure that the elastic hides the fact that it does not fully fill up the tubing you use for couplings. Once you get the hose in position the nozzle can be added to the end as shown in the photo. Below is an example of a horseshoe lay. The hose runs from one side of the hose bed around the front to the opposite side and then back again. Ultimately it meets in the middle. Not too many hose beds are loaded this way today. In the example below the hose is loaded in what is known as the accordion lay. It starts on one side, returns on the same side and extends across the hose bed as shown until the bed is full. It is placed in more than one layer to fill the bed with as much hose as it can carry. On the left is 1/8" elastic and on the right is 1/4" elastic. And here is another example. This time I used 3M yellow tape to simulate large diameter synthetic hose. I folded the tape in thirds in long strips and then placed it in the bed. Along side is some of the white elastic for regular cotton jacket supply lines. I hope this has helped in providing some ways of making a model fire truck look more realistic. A model fire truck without hose looks pretty empty! Edited September 15, 2020 by Chariots of Fire Quote Link to comment Share on other sites More sharing options...
Aerodyne03 Posted September 15, 2020 Author Share Posted September 15, 2020 Thank you so much for sharing your tutorial !! ?? Almost certainly I will make your additions too?? Here is the progress, there is a lot to mask, I love the color !! ??? Quote Link to comment Share on other sites More sharing options...
Jim B Posted September 15, 2020 Share Posted September 15, 2020 (edited) Looking really nice, Enrico. Not exactly Vigili del Fuoco, is it? Edited September 15, 2020 by Jim B Quote Link to comment Share on other sites More sharing options...
Aerodyne03 Posted September 15, 2020 Author Share Posted September 15, 2020 The "vigili del fuoco" have bored me, I preferred to use a slightly more modern and intriguing color, I like that high visibility green ??, like the airport ones?? Quote Link to comment Share on other sites More sharing options...
Aerodyne03 Posted September 15, 2020 Author Share Posted September 15, 2020 And thank you so much for the compliments!!?? Quote Link to comment Share on other sites More sharing options...
GLMFAA1 Posted September 15, 2020 Share Posted September 15, 2020 Nice progress, It's nice to see an Italian building American apparatus. Here is an American who built an Italian fire apparatus IVECO ladder with Prieser model used as master Using the base kit for the ladder equipment Used this for the cab. Enjoy fire apparatus building greg 1 Quote Link to comment Share on other sites More sharing options...
Aerodyne03 Posted September 15, 2020 Author Share Posted September 15, 2020 Thank you very much Greg for the compliments !! ??, rally,rally nice, you did a really great job with those colors I see them every day and I tell you it's identical !! ?? I love American trucks, I find them more beautiful than Europeans, they have an inimitable style, it is paradoxical that the trucks that I have seen Americans live could be counted on your fingers??, I also love the United States, they are my nation favorite and I assure you that at least once in my life I will come there!!?? Quote Link to comment Share on other sites More sharing options...
Chariots of Fire Posted September 15, 2020 Share Posted September 15, 2020 Great paint job, Enrico! That is going to be special! Here's another one I did many years ago using a 1/32 scale Volvo cab. This type of rig was popular in rural areas of New England back in the 1960's and '70's where they did not have a hydrant system. They simply laid out long lengths of large diameter hose and used that instead. After the fire was over, they rolled it back up on the large reels. The body is two of the Macks cut so as to create a longer body with tandem rear axles. Quote Link to comment Share on other sites More sharing options...
Aerodyne03 Posted September 15, 2020 Author Share Posted September 15, 2020 Thank you so much Charles !! ?? Very nice volvo, you all do great scratchbuilding jobs???, really spectacular, tomorrow if I can I will go and buy your tutorial material?? Quote Link to comment Share on other sites More sharing options...
Rockford Posted September 15, 2020 Share Posted September 15, 2020 Hey Aerodyne, very well done on the progress. So glad you went with the high impact green! Looking great mate! Quote Link to comment Share on other sites More sharing options...
Aerodyne03 Posted September 16, 2020 Author Share Posted September 16, 2020 Thank you very much Stefano, ??yes, I find this green very impressive and it gives it a touch of originality??? Quote Link to comment Share on other sites More sharing options...
Aerodyne03 Posted September 16, 2020 Author Share Posted September 16, 2020 sorry I meant Stephen, translator's joke?? Quote Link to comment Share on other sites More sharing options...
Rockford Posted September 16, 2020 Share Posted September 16, 2020 Hey don't apologise, Stefano sounds more sophisticated! Quote Link to comment Share on other sites More sharing options...
kilrathy10 Posted September 16, 2020 Share Posted September 16, 2020 I'm liking all the work you've done... That green is looking awesome... The work on the whole setup looks really cool... I don't know why I've never purchased this kit... They have these things at Hobby Lobby all the time at a reasonable price... I'm going to have to snag a couple of them... You're doing a great job... Quote Link to comment Share on other sites More sharing options...
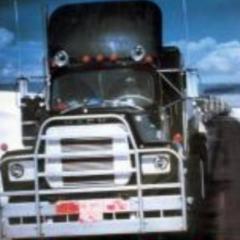
Aerodyne03 Posted September 16, 2020 Author Share Posted September 16, 2020 Stephen??, Thanks a lot for the compliments JT !! ??? I advise you if you like to buy it, it is a good kit even if old... A little progress ... Quote Link to comment Share on other sites More sharing options...
Aerodyne03 Posted September 16, 2020 Author Share Posted September 16, 2020 i don't know why i duplicated the image?♂️?♂️ Quote Link to comment Share on other sites More sharing options...
GLMFAA1 Posted September 16, 2020 Share Posted September 16, 2020 Nice job on the Mack Truck. One suggestion is the rims need to be revised. Here is a picture of a yellow Mack kit I built so you can see how the wheels are. I like your color. What paint is it? They are re releasing the AMT Ladder Chief this year. greg Quote Link to comment Share on other sites More sharing options...
Aerodyne03 Posted September 16, 2020 Author Share Posted September 16, 2020 A few more details ... ?? Quote Link to comment Share on other sites More sharing options...
Aerodyne03 Posted September 16, 2020 Author Share Posted September 16, 2020 Greg, Yes, the rims need to be revised a bit, thanks for the pic??, I'll see what to do soon The paint is a commercial can to which I added a fine sprayer The AMT models are beautiful, it's a pity that here in Italy they are not very easy to get ... Italians are more common here in Italy ... ?? Sorry but the written in the cap are in Italian? Quote Link to comment Share on other sites More sharing options...
Chariots of Fire Posted September 16, 2020 Share Posted September 16, 2020 That is a nice looking piece! Do you think you would do another one?? Quote Link to comment Share on other sites More sharing options...
Recommended Posts
Join the conversation
You can post now and register later. If you have an account, sign in now to post with your account.
Note: Your post will require moderator approval before it will be visible.