charlie libby Posted January 29, 2021 Author Share Posted January 29, 2021 heres a few pictures of the stamping die for the aluminum panel. the brass pins are for alignment of the 2 halfs. being clear lexan they are hard to see.also a few new pictures. i need someone with tiny fingers to put the 1 mm nuts on these carb studs. also the beginning of my 65 mustang steering wheel. i want a stock looking wheel.heres a picture of one from the kit. Quote Link to comment Share on other sites More sharing options...
AmericanMuscleFan Posted January 30, 2021 Share Posted January 30, 2021 WOW Charlie, your stamping die is very interesting and i never thought about using clear lexan for this and it is just smart, I'm going to have to make an inventory of all these types of fancy plastics... I really love the plumbing on your rear end and your steering wheel is stunning! If I lived closer to you I would be happy to help you with the 1mm nuts as I probably have smaller fingers than you and I would be happy to take a look at your fantastic work in person my friend!!! 👌 Quote Link to comment Share on other sites More sharing options...
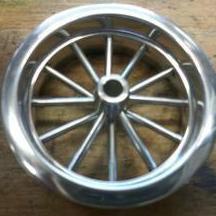
charlie libby Posted February 1, 2021 Author Share Posted February 1, 2021 finished machining my steering wheel.the previous picture is the plastic from the kit.the wheel is one piece except the little center hud horn button.the outside of the ring is grooved and i will fit a thin rubber oring on to it.this is an aftermarket type of column and the car has doors so i skip the quick release. in two pictures you can see how not to finish a part. Quote Link to comment Share on other sites More sharing options...
AmericanMuscleFan Posted February 3, 2021 Share Posted February 3, 2021 Awesome technique Charlie! Clearly you like to improve things and you succeeded, your steering wheel is superb my friend! 👍 Quote Link to comment Share on other sites More sharing options...
charlie libby Posted February 4, 2021 Author Share Posted February 4, 2021 got started on my carb linkage and air cleaner. had to come up with a way to do the radius on both ends of the air cleaner. waiting for parts from rb motion for the linkage. i m almost finished with the transmission linkage. i drilled and reamed 2 holes on carburetor centerline and pressed a .500 pin in the hole to locate the part for milling. milled one end then changed the pin to the other end. this worked great for the bottom. the top will be another issue. Quote Link to comment Share on other sites More sharing options...
Tortuga Kustomz Posted February 5, 2021 Share Posted February 5, 2021 Beautiful details man Quote Link to comment Share on other sites More sharing options...
Codi Posted February 24, 2021 Share Posted February 24, 2021 Hey Charlie, enjoying your posts and learning along the way too. Thanks for posting as you progress and sharing the pics on the bench/mill. cheers, tim Quote Link to comment Share on other sites More sharing options...
TransAmMike Posted February 24, 2021 Share Posted February 24, 2021 Geez, the shifter looks like it's ready to row thru the gears. Awesome. Quote Link to comment Share on other sites More sharing options...
charlie libby Posted March 6, 2021 Author Share Posted March 6, 2021 been in and out of the hospital lately,havent got much done.back at it again. old age is not for the weak. pretty happy with my driveshaft. took incentive from francis and gave it a try and i think its ok. starting to finish some parts and preparing for paint. thank goodness for rb motion.his small parts are awesome. they are hard to see but the studs and nuts on the oilpan are great. making the drain for the radiator. will have some finished pictures of the headers next week. hope you are all well.thanks for looking and please comment good or bad its all a help in the end. Quote Link to comment Share on other sites More sharing options...
charlie libby Posted March 6, 2021 Author Share Posted March 6, 2021 forgot one picture Quote Link to comment Share on other sites More sharing options...
Tortuga Kustomz Posted March 6, 2021 Share Posted March 6, 2021 Awesome detail Quote Link to comment Share on other sites More sharing options...
AmericanMuscleFan Posted March 6, 2021 Share Posted March 6, 2021 It's very high quality work Charlie! The details on the engine, driveshaft yokes and universal joints are just fantastic, your good job is paying off my friend! 👌 Quote Link to comment Share on other sites More sharing options...
Ian McLaren Posted March 6, 2021 Share Posted March 6, 2021 I am so envious of you guys with this level of equipment and more importantly the skills to produce these kind of results. It's great to be able to see what can be accomplished in this hobby. I really like your in progress shots of the machining process for different types of parts, very educational. Thank you. Quote Link to comment Share on other sites More sharing options...
Bainford Posted March 6, 2021 Share Posted March 6, 2021 Very impressive work. Much fun watching this thing come to life. Quote Link to comment Share on other sites More sharing options...
charlie libby Posted March 16, 2021 Author Share Posted March 16, 2021 things are slowly getting done. i shouln't paint all the scratch made parts but i like them as they would be if i built it full size. Quote Link to comment Share on other sites More sharing options...
AmericanMuscleFan Posted March 16, 2021 Share Posted March 16, 2021 The engine is absolutely awesome Charlie, it is to be mistaken with a real one! The fan is cool for not making puns and I like the way you made it! 👌 Quote Link to comment Share on other sites More sharing options...
Mike Williams Posted March 17, 2021 Share Posted March 17, 2021 What a wonderful creation here! Machining skills, wonderful detailing....and yet the gall to paint an all aluminum motor block and oil pan! I love it! Excellent. Mike.. Quote Link to comment Share on other sites More sharing options...
TransAmMike Posted March 17, 2021 Share Posted March 17, 2021 On 3/6/2021 at 1:01 PM, Ian McLaren said: I am so envious of you guys with this level of equipment and more importantly the skills to produce these kind of results. It's great to be able to see what can be accomplished in this hobby. I really like your in progress shots of the machining process for different types of parts, very educational. Thank you. Ditto this. And the finishes are super impressive also. Quote Link to comment Share on other sites More sharing options...
Codi Posted March 27, 2021 Share Posted March 27, 2021 Charlie, this thread quite frankly deserves more views & posts. The parts and fabrication you're doing are top drawer. Hopefully more members/guests will stop by and enjoy your creation as much as I have/am. I particularly appreciate the time you've taken to post pics & methods to make certain parts. Love learning new things and there is plenty to learn from here. cheers, tim Quote Link to comment Share on other sites More sharing options...
bytownshaker Posted March 28, 2021 Share Posted March 28, 2021 Simpley Amazing work being done here !!! Quote Link to comment Share on other sites More sharing options...
charlie libby Posted April 1, 2021 Author Share Posted April 1, 2021 thank you all for your comments and encouragement. it means alot coming from such a talented group .i dont get on here as often as i should and i have to constantly remind myself to take pictures.here are a few of my master cylinder and the start of the pedal assy. wilwood as you can see. and the colors i have chosen.i hope it will look good in these 2 colors . i pinted the doors and trunk for practice and to see if the colors went together well the door is just set in the opening to show the colors. what do you think,are they going to look good together ? Quote Link to comment Share on other sites More sharing options...
Bainford Posted April 1, 2021 Share Posted April 1, 2021 The master cylinder looks great. Excellent work. Really digging the colours, too. That Mustang is going to look freaking cool. Quote Link to comment Share on other sites More sharing options...
Tortuga Kustomz Posted April 2, 2021 Share Posted April 2, 2021 awesome work on the master cylinder Charles Quote Link to comment Share on other sites More sharing options...
AmericanMuscleFan Posted April 3, 2021 Share Posted April 3, 2021 Great job on the Wilwood master cylinder Charles, you have nailed the shape perfectly! I do love your color choice, absolutely gorgeous my friend! 👍 Quote Link to comment Share on other sites More sharing options...
Ian McLaren Posted April 3, 2021 Share Posted April 3, 2021 The colors definitely work together, good choice. Having sold Wilwood for a number of years your replicas are superb. Awaiting the next update. Quote Link to comment Share on other sites More sharing options...
Recommended Posts
Join the conversation
You can post now and register later. If you have an account, sign in now to post with your account.
Note: Your post will require moderator approval before it will be visible.