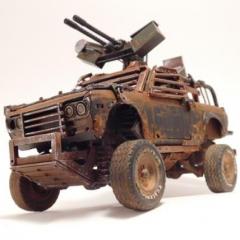
Daxman Posted December 5, 2020 Share Posted December 5, 2020 Here is the build of my 63 Jetvette. I hesitated on this one for the longest time. I'm a big fan of weathered and rusted vehicles. Being that the Corvette body is Fiberglass, I had a tough time figuring out what the final product was going to look like. I just started building it. It's often the way these jet cars work out for me. I almost always start by crafting the turbines. These are made from 3/8" and 1/2" Styrene tube. I also cut away the body for some vents that I plan to add. I also cut out of each front fender from the top of the wheel arch to the door. I marked where the door relief will be on the photo above. I used the piece that was removed, along with some Styrene to create the door reliefs. Don't want that Fiberglass to melt! The front turbine exhaust will fit on the channel of the door. I wish that I had taken better photos of the parts that make up the four "wheel" turbines. They come from the leg/calf section of one of the Gundam kits that I've scavenged. I had two of these legs, which split into 4 usable turbines. 2 right and 2 left. I doctored them up with some Styrene tubes for exhaust and a front intake grill. I'll get more pics up soon! Quote Link to comment Share on other sites More sharing options...
misterNNL Posted December 5, 2020 Share Posted December 5, 2020 You are driving me crazy with how easy you make this look! I have two anti-grav vehicles under way and am stuck on both so I'll watching. Quote Link to comment Share on other sites More sharing options...
Steve H Posted December 5, 2020 Share Posted December 5, 2020 Hi Dax, I agree with Tom, you make this look easy. Then I think, hmmmm.... no way I could pull that off. Brilliant sir! Cheers, Steve Quote Link to comment Share on other sites More sharing options...
Daxman Posted December 5, 2020 Author Share Posted December 5, 2020 (edited) 1 hour ago, misterNNL said: You are driving me crazy with how easy you make this look! I have two anti-grav vehicles under way and am stuck on both so I'll watching. 1 hour ago, Steve H said: Hi Dax, I agree with Tom, you make this look easy. Then I think, hmmmm.... no way I could pull that off. Brilliant sir! Cheers, Steve Thank you both! I couldn't do these without the excessive use of Gundam kits and Styrene. The amount of Gundam parts that I used on the Foose truck was ridiculous. The undercarriage, the front power plant, the front and rear turbines are mostly Gundam. I wish that I could give you the names of each of the kits that I used, but I don't have the original boxes or instructions anymore. Just a bin full of parts. I do know that the front turbines on the Foose truck were from Gundam Virtue. A few parts from Gundam Denial as well. I always try to build in sub-assemblies. The four corner turbines are removable even on the completed model. Using Styrene tube to hold pegs on it's adjacent part. There's some Mustang tail lights in there as well. The fuel tanks are blood test strip containers. I'm a type 1 Diabetic. I have plenty of these. As for the large turbines that are sticking out back of the Jetvette, I've made similar on my last 5 or 6 jet cars. Just use different diameter Styrene tube overlapping each other. I cut the center of a rim out for the front of the intake. Split some Styrene tube lengthwise to fit over the first. I'll use the strip of Styrene as a flat gluing surface to mount it to the vehicle.. Split more Styrene tube and fit over the second. I cut some of the tube into small strips. Glued them with even separation between. The split some more of the tube to hide the seams. Happy to answer any questions. Thanks guys!!! Edited December 5, 2020 by Daxman removed duplicate photo Quote Link to comment Share on other sites More sharing options...
Lunajammer Posted December 5, 2020 Share Posted December 5, 2020 The king of Pinterest starts another one. I'm with Tom and the rest regarding stalled efforts to do a flying car. The days prior to starting my 57 T-Bird Custom, I was working on a jet car. It doesn't come naturally to me and I spent a lot of time pooling through your other builds trying to digest it. Haven't given up yet, I just need more lessons. So... carry on. Quote Link to comment Share on other sites More sharing options...
cobraman Posted December 5, 2020 Share Posted December 5, 2020 Very creative ! Quote Link to comment Share on other sites More sharing options...
TooOld Posted December 5, 2020 Share Posted December 5, 2020 It's always interesting and fun to watch you put one of these together . I feel like I'm learning a lot that I could never do ! Quote Link to comment Share on other sites More sharing options...
NOBLNG Posted December 5, 2020 Share Posted December 5, 2020 Quite the fertile imagination there Dax. It never fails to amaze me. Keep up the good work! Quote Link to comment Share on other sites More sharing options...
Belugawrx Posted December 5, 2020 Share Posted December 5, 2020 Alright! Another Dax anti-grav build...I'll be watching ?? Quote Link to comment Share on other sites More sharing options...
Mattilacken Posted December 5, 2020 Share Posted December 5, 2020 Cool! Nice to see how you actually makes the parts! Will be following as always! Quote Link to comment Share on other sites More sharing options...
misterNNL Posted December 5, 2020 Share Posted December 5, 2020 Where do you get your inspiration? I wonder if you have some favorite web/Pintrest sites you look at on a regular basis. I do have a Pinterest album for anti-gravity vehicles but those are mostly fantasy or computer generated and as such do show many if any details.Anything you share will be greatly appreciated.. Quote Link to comment Share on other sites More sharing options...
Beamerman Posted December 6, 2020 Share Posted December 6, 2020 This is so cool! Quote Link to comment Share on other sites More sharing options...
Daxman Posted December 7, 2020 Author Share Posted December 7, 2020 You all really know how to make a guy feel special. Thank you so much for the comments. ? On 12/5/2020 at 10:40 AM, misterNNL said: Where do you get your inspiration? I wonder if you have some favorite web/Pintrest sites you look at on a regular basis. I do have a Pinterest album for anti-gravity vehicles but those are mostly fantasy or computer generated and as such do show many if any details.Anything you share will be greatly appreciated.. Tom I'm glad you asked about my inspiration. If you go to the link below, you'll see my work in progress of my very first hover car. In that post, I mention my inspiration for that build (check that link as well). A very talented builder indeed. His weathering and kitbashing skills are excellent. I've since found him on Instagram and we follow each other on that platform. I did use Pinterest a lot for my early hover car research. I'm now mostly on Instagram. Andre Tkachenko is a Russian artist that I follow. He has a style that I admire. Although not hover cars, but car design. It sounds ridiculous, but I also try to stick to this alternate reality timeline when I build these. In my mind these vehicles are from a post apocalyptic world of some sort. Think Mad Max but a little more civilized. Maybe 15-20 years after the event, the population starts to rebuild. These cars are taken from junkyards and reassembled as jet cars. Maybe they race for competition or for credits. The people have pride in their jet cars, so they do try to make them look cool. Much like we do to our cars today. I try to make the cars reflect that world in my head. The two grey parts above are used on the undercarriage below. Each had to be modified. I do modify most of the Gundam parts that I use. I'd prefer that they weren't recognizable. Lots of parts covering up other parts. The undercarriage is one of my favorite areas to scratchbuild. The four identical turbines under each wheel well are unique to this model. All of my other builds have different turbines from the front to the back. Vents, vents and more vents. It's gotta breathe. Thank you all for looking. I'll update soon. 1 Quote Link to comment Share on other sites More sharing options...
misterNNL Posted December 9, 2020 Share Posted December 9, 2020 Are you harvesting your Gundam parts from new kits? I did some surfing on the interweb for parts only and all that comes up is new accessory or add-on parts some of which are IMO very expensive. Quote Link to comment Share on other sites More sharing options...
NOBLNG Posted December 9, 2020 Share Posted December 9, 2020 That is looking extremely, radically cool! Quote Link to comment Share on other sites More sharing options...
Daxman Posted December 9, 2020 Author Share Posted December 9, 2020 4 hours ago, misterNNL said: Are you harvesting your Gundam parts from new kits? I did some surfing on the interweb for parts only and all that comes up is new accessory or add-on parts some of which are IMO very expensive. My son gave me around 6 Gundam kits that were brand new. Plus a few more that had been built. I've used the majority of the usable parts, but still keeping the extras just in case. At my local hobby shop they carry Gundam kits that are under $20. I'm getting to the point where I'm going to have to start buying new kits. I'll be posting more photos soon. I'll try to get a few pictures of the type of parts that I look for when kitbashing. I just posted all my jet cars in one post. In the finished models section. 10 jet cars including this one. I'm trying my first race livery. I need to start making my own futuristic sponsor decals. I'm procrastinating...... Quote Link to comment Share on other sites More sharing options...
Kit Karson Posted December 9, 2020 Share Posted December 9, 2020 (edited) Dax, What is your diet consist of... I see you starting with a bowl of Sugar JETS Puffed cereal (or surreal) watching the Jetson reruns on the top tv and under it the The Fifth Element with Bruce Willis on the big screen! Toasted Space Cakes waiting in the Atom Powered oven! I do have a picture of your Chief Designer: I've been watching a few of these builds & have a couple of ideas! But, having the vision and the follow through don't always fall on the same day. Edited December 12, 2020 by Kit Karson Quote Link to comment Share on other sites More sharing options...
Big John Posted June 9, 2021 Share Posted June 9, 2021 (edited) Fett's Vet! Thanks for the WIP shots, it looks like most of your work is from scratch do you also kit bash Trasformer and Robo warrior kits for details too? Thanks again! Edited June 9, 2021 by Big John typo Quote Link to comment Share on other sites More sharing options...
Len Woodruff Posted June 9, 2021 Share Posted June 9, 2021 Love the Vettes. Quote Link to comment Share on other sites More sharing options...
Daxman Posted June 10, 2021 Author Share Posted June 10, 2021 On 6/8/2021 at 7:50 PM, Big John said: Fett's Vet! Thanks for the WIP shots, it looks like most of your work is from scratch do you also kit bash Trasformer and Robo warrior kits for details too? Thanks again! Hi John. I'd say 70% of the extra details are from Gundam kits. 20% Styrene tube/rod or sheet, and 10% spare car parts. I often try to use the existing suspension to mount the wheel turbines to. Recently I've tried using parts from Kotobukia model kits. They have a few model kits that are space military. Lots of usable parts. If you want to see those parts, look at my 63 Nova station wagon. The big intakes on the roof and most of the rear power plant are from the Kotobukia kits. Quote Link to comment Share on other sites More sharing options...
Sandboarder Posted June 11, 2021 Share Posted June 11, 2021 This is an awesome build and you’ve detailed the process nicely!! Maybe instead of doing the usual ’rusty’ weathering you could go more dirty and grimy. Adds lots of diets and dusty details or most damp and moist effects like water or moss. Check out the Starship Filth paint as well. What scale of Gundam are you using the 1/144 HGs or 1/100 MGs? Also Wave make Wave Vernier option packs which might help make the most of your spare parts. I’ll be reading back through your other build threads soon. Great motivational work again 👍 Quote Link to comment Share on other sites More sharing options...
Big John Posted June 11, 2021 Share Posted June 11, 2021 My thought is "what ever work is good" ball point pen caps, rocket nose cones, blister packs. I like your use of wheel covers, turbo mags etc. make great jet engine parts. I can see where the Gundam kits would offer lots of bits and pieces to work with. I really like the Maschinen Krieger kits, much too pricey for kit bashing but a great reference source for detail like you have. I rememer going to a show of Star Wars models and seeing a large section of a Star Destroyer side trench. It was made up of all kinds of bits and pieces including a Peterbuilt truck cab, battle ship turrets and superstructure, doll furniture, etc. In the movie it all went by so quickly you never noticed except that it was texture that gave it interest. Thanks again for sharing your process. Quote Link to comment Share on other sites More sharing options...
Recommended Posts
Join the conversation
You can post now and register later. If you have an account, sign in now to post with your account.
Note: Your post will require moderator approval before it will be visible.