camaro69 Posted February 16, 2021 Share Posted February 16, 2021 Hey Bruce, thanks for the info about the oil pumps. I´d prefer the steelies on your build. Rico Quote Link to comment Share on other sites More sharing options...
disconovaman Posted February 16, 2021 Author Share Posted February 16, 2021 (edited) It's been awhile since I updated the Roster... It seems like for the most part everyone is on Cruise Control... Nice progress and some great engineering happening! Cannonball!🎵 Cannonball! 🎶 🎵 Cannonball!🎵 2021 Cannonball Roster #1. Sam I am - Indy car disguised as a Gremlin. 🏁#2. Oldmopars - Thunderbird Nascar disguised as a 60 Impala. #3. avidinha - Honda Accord. #4. Jhedir6 - Ford Mustang GT disguised as a Shelby GT-350. #5. Pete 75 - 81 Audi Quatro WRC. #6. Intmd8r - 67 L88 Corvette. #7. Snake45 - 70 Superbird & 65 Chevelle. #8. Jantrix - 1975 Matador. #9. Erik Smith - Buick Regal Nascar. #10. Danno - Nascar Truck Series Chevrolet 1500. 🏁 # 11. 89AKurt - Subaru Impreza WRC. # 12. stitchdup - 1975 Ford Escort MK2. # 13. stinkybritches - 34 Slammer Modified. # 14. Pat Minarick - Pontiac Grand Prix Nascar. #15. 426 pack - Ford Fusion Nascar disguised as a 69 Pontiac GTO. #16. LouO - 90 Mustang LX. #17. spencer1984 - 1964 Dodge. #18. Misha - 1983 Camaro. #19. Mattilacken - Corvette C5-R disguised as Chevy Silverado. #20. Fat Brian - IMSA Mustang GTO. #21. Spottedlaurel - Skyline GT-R disguised as a Nissan Leopard. #22. kermn8r - 41 Willys Gasser. #23. Northwindcustoms - Toyota GT ONE disguised as a Lexus LS600hl. #24. KWT - 82 Monte Carlo. #25. camaro69 - Monte Carlo Nascar disguised as a 2003 Chevrolet Impala. #26. Chynese Randy - 2010 Camaro on a Nascar chassis. #27. disconovaman - Ford Fusion Nascar disguised as a Police car. #28. Belugawrx - Monte Carlo Nascar disguised as a 57 Cameo. #29. Meat Man - C7 Corvette. Edited February 18, 2021 by disconovaman Quote Link to comment Share on other sites More sharing options...
Pete75 Posted February 20, 2021 Share Posted February 20, 2021 #5 Audi Quattro Gone quiet here - nothing but the sound of Anthony screwing down his hobby room floor! 😄 Got the body painted & clear coated the other day: Really pleased with the colour, which is Tamiya light gunmetal. Not so pleased that I didn't put enough undercoat on the roof after re-scribing the panel line & now have the dreaded "white line" that reveals itself after you finish the clear coar and take a flash photo! ☹️ Not the first time it's happened & I've developed a hack where I mask it off & touch up with a brush before the panel wash. Also started assembling the interior: Installed the scratch built gear shifter, plus the PE pedals & co-driver footplate together with some foot scuff marks. Decided to run the wiring loom into a SB junction box so I don't have to think about where it all goes after that! Thanks for looking & get Cannonballing, y'all! 😁 Quote Link to comment Share on other sites More sharing options...
Mattilacken Posted February 20, 2021 Share Posted February 20, 2021 Good work everyone! Like seeing the different projects coming together! I really like this theme! #19 Silverado over a Corvette C5-R I made the decision to start gluing the frame rail to the chassis and suspension and paint it all in one go. The chassis is flimsy and I think it will aid my engineering process when things stay in place. Problem I had was that I some how need to get the transmission and parts in after gluing the rear bulkhead and tanks in place. At the same time I notice that the tunnel for the propchaft is of center since they have no passenger seat. So I will make a new transmission túnel so I can glue the tanks in with the frame rails and then ad the tunel after assembly of the transmission and before assembly of the interior and cage. This week a new bed will arrive so I can glue it to the cab, decided to get a new one to save me some time in this project, also needed mirrors and som other misc parts.. the other one I plan to make into a pre runner later. After I get the bed fixed to the cab, due to everything being carbon fiber they decided to secure everything together so it will be fixated better, I can sort the lift of the rear suspension and start extending the Venturi to stretch to the rear valance. Quote Link to comment Share on other sites More sharing options...
disconovaman Posted February 20, 2021 Author Share Posted February 20, 2021 11 hours ago, Pete75 said: Gone quiet here - nothing but the sound of Anthony screwing down his hobby room floor! 😄 🤣🤣🤣 Yeah, that sums it up... If that doesn't fix it, I think I'm gonna build a bridge over it. 😆 Carpet is going in next Wednesday... then storage cabinets, built in TV stand, L shaped desk, and a small reclining sofa... then I'll be back in business... I'm getting restless! Quote Link to comment Share on other sites More sharing options...
Spottedlaurel Posted February 21, 2021 Share Posted February 21, 2021 18 hours ago, Mattilacken said: Good work everyone! Like seeing the different projects coming together! I really like this theme! Agreed, it's made me build something different to what I'd normally do. I'm considering building another one with a NASCAR kit that doesn't otherwise get me very excited. 19 hours ago, Pete75 said: #5 Audi Quattro Gone quiet here - nothing but the sound of Anthony screwing down his hobby room floor! 😄 Got the body painted & clear coated the other day..................... Great progress Pete. I'm just finishing a build where I used the Light Gunmetal, I like it. My stepdad recently saw this rather smart Quattro: 1982 Audi Quattro by Spottedlaurel, on Flickr 1982 Audi Quattro by Spottedlaurel, on Flickr I bet it sounded great driving up that high street. Quote Link to comment Share on other sites More sharing options...
Pete75 Posted February 21, 2021 Share Posted February 21, 2021 20 minutes ago, Spottedlaurel said: Great progress Pete. I'm just finishing a build where I used the Light Gunmetal, I like it. My stepdad recently saw this rather smart Quattro.... I bet it sounded great driving up that high street. Thanks very much, Nigel. That's a well looked after example with nice wax job! @Mattilacken posted a picture of one he lives near in Sweden on my WIP thread the day. It seems the majority of surviving examples have the smoked rear lights & it's my intention to do this too. It may not be the most discreet look, but I've decided it's a must have!😄 Quote Link to comment Share on other sites More sharing options...
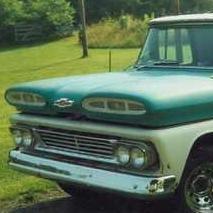
camaro69 Posted February 22, 2021 Share Posted February 22, 2021 (edited) Hey guys, nice progress everyone. I did some progress too. It took three attempts to hinge the hood but now I did it. Not 100% accurate but I´m pleased with how it turned out. I also corrected the wheelbase... cutted the front frame off from the main chassis and put 1.2 mm of styrene between both parts... then glued together all the things and it turns out great. Here´s the result... open... and closed. Made the wheels steered in but haven´t corrected the steering linkage yet... (don´t worry they are not glued yet)😇😇😇 Rico Edited February 22, 2021 by camaro69 Quote Link to comment Share on other sites More sharing options...
Mattilacken Posted February 22, 2021 Share Posted February 22, 2021 (edited) 1 hour ago, camaro69 said: Hey guys, nice progress everyone. I did some progress too. It took three attempts to hinge the hood but now I did it. Not 100% accurate but I´m pleased with how it turned out. ... Rico Good work there! Must be the best looking Impala of that year I have ever seen, and right sort of drive wheels as well! A competitor to chargers, 300C and CTS-V! Edited February 22, 2021 by Mattilacken Quote Link to comment Share on other sites More sharing options...
spencer1984 Posted February 25, 2021 Share Posted February 25, 2021 Some great progress here, and congrats to Oldmopars and Kurt for crossing the line! I've hardly touched a model in weeks, apparently 2021 didn't get the memo that everything being a PITA was 2020's thing. What little I did do went towards making a little progress on the Little Old Lady's Dodge: Glued the engine bay and transmission crossmember in place so they could be painted together, and plugged the holes Lindberg included for the stock exhaust (even though the kit's exhaust stops at the headers). I also started doing some work inside. I'll use the kit -supplied roll cage, so I left those holes alone, but saw no need for a back seat. So using the '64 Richard Petty Plymouth for inspiration, I detailed the rear seat area. Quote Link to comment Share on other sites More sharing options...
kermn8r Posted February 26, 2021 Share Posted February 26, 2021 On 2/15/2021 at 3:19 PM, camaro69 said: Thanks Anthony ! Maybe anyone can help me with this... What should the red marked area be? In the second step there is a pulley mounted to it too (green marked) 🤔🤔🤔 Thank you all in advance, Rico As Bruce explained this is for a dry sump oil system common to NASCAR. However, if you don't want to mess with the plumbing or finding space for the oil tank you can just eliminate it and call it a wet sump oiling system. From the instructions, the oil pan looks like it might be deep enough to pass as a wet sump or you can swap out an oil pan from a street based small block Chevy. Quote Link to comment Share on other sites More sharing options...
MeatMan Posted February 27, 2021 Share Posted February 27, 2021 I didn't do a lot but here is a quick end of month update on my Corvette. I cleared out the interior of all of the electronics and other stuff. I also added some length to the exhaust pipe to represent side pipes. Still loud but legal (barely). I'll cut an exit just in front of the rear wheels to accommodate. I'll get to it in earnest after I clear the bench. Quote Link to comment Share on other sites More sharing options...
Pat Minarick Posted March 1, 2021 Share Posted March 1, 2021 Hey this is not this year's Cannonball, but last year's. Got it all in primer and should be finished in the next couple off weeks. Just wanted to see if anyone has an idea for the Rolls radiator cap. Been trying to make one , but not having any luck Quote Link to comment Share on other sites More sharing options...
Northwindcustoms Posted March 2, 2021 Share Posted March 2, 2021 I haven’t fallen off the face of the earth yet been working on other projects I do a bit here and there on the cannonball car not enough to take a new picture there are some awesome builds going on here Quote Link to comment Share on other sites More sharing options...
stinkybritches Posted March 5, 2021 Share Posted March 5, 2021 Is the Street Burner version of the 64 Fairlane Thunderbolt eligible? If so, I would like to change my entry to that. I have the Tasca Ford version packed away somewhere, but I can't find it. And to help disguise it's competition intentions, I'm going to use a Jimmy Flintstone Fairlane wagon body. Quote Link to comment Share on other sites More sharing options...
Snake45 Posted March 5, 2021 Share Posted March 5, 2021 21 minutes ago, stinkybritches said: Is the Street Burner version of the 64 Fairlane Thunderbolt eligible? If so, I would like to change my entry to that. I have the Tasca Ford version packed away somewhere, but I can't find it. And to help disguise it's competition intentions, I'm going to use a Jimmy Flintstone Fairlane wagon body. That box art looks identical to the full-race issues, so I vote OK, if that means anything. Quote Link to comment Share on other sites More sharing options...
stinkybritches Posted March 5, 2021 Share Posted March 5, 2021 To the best of my limited knowledge it's the same kit with different decals. There is nothing but race oriented parts in the box. Quote Link to comment Share on other sites More sharing options...
Pete75 Posted March 7, 2021 Share Posted March 7, 2021 If anyone is feeling a bit left on the starting line then I can cheer you up a bit: I had to get a replacement body from a second kit and start over... 🤬 The tale is too long & painful to recount in detail. I've lost track of the number of hours spent this week redoing the front bumper mods, cleaning up & prepping - and I still haven't got any undercoat on! I'm sure others know the feeling when you spend longer on a project than you thought, or that you wanted to, and you get progressively slower because you feel the end result needs to justify all the previous hassle? Not very healthy...🤪 Quote Link to comment Share on other sites More sharing options...
Fat Brian Posted March 7, 2021 Share Posted March 7, 2021 1 hour ago, Pete75 said: If anyone is feeling a bit left on the starting line then I can cheer you up a bit: I had to get a replacement body from a second kit and start over... 🤬 The tale is too long & painful to recount in detail. I've lost track of the number of hours spent this week redoing the front bumper mods, cleaning up & prepping - and I still haven't got any undercoat on! I'm sure others know the feeling when you spend longer on a project than you thought, or that you wanted to, and you get progressively slower because you feel the end result needs to justify all the previous hassle? Not very healthy...🤪 I know your pain, my build for last year got painted five times and stripped four before I got something I could live with. Quote Link to comment Share on other sites More sharing options...
Snake45 Posted March 7, 2021 Share Posted March 7, 2021 2 hours ago, Pete75 said: I'm sure others know the feeling when you spend longer on a project than you thought, or that you wanted to, and you get progressively slower because you feel the end result needs to justify all the previous hassle? Not very healthy...🤪 Been there Done that Got the T-shirt, Got the hat! Quote Link to comment Share on other sites More sharing options...
Misha Posted March 7, 2021 Share Posted March 7, 2021 Been busy with this build of the IMSA Camaro between sessions spent on my Porsche 934 RSR. Most of the time has been spent on scratch building interior details and getting the body to the primer stage. Opened up the slits at the bottom of the faux Naca scoops on the hood. The kit provides very good detail on the underside of the hood for the ram air install. Also scribed over panel lines to make them deeper and applied Tamiya black panel line wash. Used that wash quite liberally in the interior to increase the depth of the detail. Some of the added detail on the interior included a dead pedal for the driver’s left foot, hanger for brake and gas pedals, belt attachment points on the roll bar. Panel lines on the seats and shoulder harness access were added. This shot displays the various additions planned for the build. At the top the the radiator is shown with the scratch built engine oil cooler below it. It will eventually be in the grill recess in front of the rad, along with a tranny cooler. On the right is the new gas tank. Only the leading edge will be visible due to a rear belly pan. Directly below are the tow hooks and a rear differential cooler. The centre section features interior bits and pieces. A WINK mirror with radar and a video camera mounted below it was based on a NASCAR kit piece. The overhead console houses controls and system indicators. On the left is the new digital instrument panel with an iPad next to it. In the centre is the console mounted nav and back up screen. Brake and gas pedals follow with the fire bottles and its mount. The bar houses the rear central brake light along with radar and video looking out the rear window. The final two items are a roof antenna and rear window radar pod. The engine for the Camaro is a 1967 Vette L-71 featuring the triple deuce carb set up. I’m using the big block out of the AMT 68 El Camino as it offers an automatic with all the accessory belts with PS, AC, Alt including attachment brackets. For the intake and valve covers I raided the R/M 67 Vette roadster. The engine has been mocked up and appears to fit well with chassis and interior. This brings to to this morning when I primed the body and completed the Champagne Gold TS 75 top coat. The front roof section will receive a white vinyl treatment. Overall quite satisfied with the construction & paint process. All comments are welcome! Cheers Misha Quote Link to comment Share on other sites More sharing options...
disconovaman Posted March 7, 2021 Author Share Posted March 7, 2021 I must admit it's been awhile since I checked in guys, and I do appoigise fo that. I've seriously had a transition in life since my model stuff has been packed up. I have got back into running/jogging on a daily basis. That alone is a stress reliever. I've also started going back to the gym. I need to focus on my physical health for awhile. Soon I will get unpacked and set up again. On 3/4/2021 at 10:28 PM, stinkybritches said: 64 Fairlane Thunderbolt You are clear for take off sir... 😁 I was really surprised to see all the activity on the thread, real good progress and some set backs but keep marching on we'll get there soon. Thanks again for the support, I appreciate it! Quote Link to comment Share on other sites More sharing options...
camaro69 Posted March 7, 2021 Share Posted March 7, 2021 The race goes on... Nice progress here. @pete75: I´m feeling with you. Wish you luck for the second body. @misha: Your Camaro is looking good. Nice details at all. I have done some things too over the last days. Cutted out the trunk lid but on the rear I did a fail 😡 and cutted it above the taillights. Here´s stage 1. Stage 2: corrected it and did the water drip rails... My wife (and me too) wasn´t happy with the Monte Carlo´s roll cage because it would be seen through the rear side windows. So we (I) decided to scratchbuild a new one for a four door sedan... It´s nearly done even with some pads... After finishing the cage I will try to lift it of the chassis for easier painting then reconnect it. That´s for this week. Rico Quote Link to comment Share on other sites More sharing options...
Pete75 Posted March 7, 2021 Share Posted March 7, 2021 (edited) Thanks for the sympathy guys! @camaro69 that's a really neat job on that trunk - looks like it came out of the box like it. Great entire rollcage too! @Misha some serious detailing going on with a lot of thought behind it - very impressive. Loving the gold! Oh, and @disconovaman no apologies required, you're great group leader! Good luck with your fitness regime - I keep looking at my bicycles and use the weather as an excuse not to get out, but it was bright sunshine today so that won't work much longer! Edited March 7, 2021 by Pete75 Quote Link to comment Share on other sites More sharing options...
426 pack Posted March 8, 2021 Share Posted March 8, 2021 I finally got to get some more work done on the gto today. the motor and chassis are painted and I got the intake located. Also realized that the wheelbase is about 2mm to short on the nascar frame so I’m going to need to extend it a little bit and I’m considered lowering the rear suspension 2-3mm so it sits almost level. Quote Link to comment Share on other sites More sharing options...
Recommended Posts
Join the conversation
You can post now and register later. If you have an account, sign in now to post with your account.
Note: Your post will require moderator approval before it will be visible.