minkos Posted February 14, 2021 Share Posted February 14, 2021 Hello, I have noticed that in many of the newer AMT kits, the bare styrene bodies and hoods have these random "scar" lines in them. It almost looks like a fracture, but I don't think it is. It may have something to do with the way the styrene was cured. These "scars" reflect through paintwork, even though they are not visible through prime coats. I have tried sanding the bare styrene over the "scar" with 400 paper to no avail. Has anyone else encountered this and if so, do you have any suggestions? thanks. Quote Link to comment Share on other sites More sharing options...
Paul Payne Posted February 14, 2021 Share Posted February 14, 2021 I have an idea about this, but no hard evidence. Anyone else with sure knowledge please correct me! All molds have parting fluid applied before each shot. Is it possible that a too generous application actually got incorporated into the styrene, causing a difference in the material? This would explain the paint failure. As far as I know, styrene doesn't need to cure like resin does- it gets heated to where it flows, then cools before ejection from the mold. If it's too warm during ejection, that is when warping can occur. Quote Link to comment Share on other sites More sharing options...
Casey Posted February 14, 2021 Share Posted February 14, 2021 Can you post a pic or two as an example? There is often a noticeable meeting point, where molten plastic flows from opposite directions, but at the pressures used for injection molding, there will not be any gap no what I normally think of when I hear "scar" at that joint. Quote Link to comment Share on other sites More sharing options...
Deuces ll Posted February 14, 2021 Share Posted February 14, 2021 I think he was referring to "ghost" lines in the plastic..... I've seen some in a few of my bodies and hoods....😞🙄 Quote Link to comment Share on other sites More sharing options...
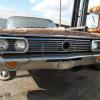
minkos Posted February 14, 2021 Author Share Posted February 14, 2021 Hello, here is a picture of the '63 nova underside of the hood, you can see the "ghost" line by on the left side by the different shading on each side of the line. Quote Link to comment Share on other sites More sharing options...
DRIPTROIT 71 Posted February 14, 2021 Share Posted February 14, 2021 The only way that I’ve gotten rid of them is to wet sand the first coat of paint (lacquer duplicolor) and then top coat. This isn’t an option though on textured surfaces such as the underside of the hood as shown or in the case that I have had before on the side of a Mercury sleeper. Sanding the primer doesn’t seem to get rid of them for me. They seem to bleed through. Quote Link to comment Share on other sites More sharing options...
935k3 Posted February 14, 2021 Share Posted February 14, 2021 They are also suspectable to breaking or cracking at these points. Quote Link to comment Share on other sites More sharing options...
Can-Con Posted February 14, 2021 Share Posted February 14, 2021 3 hours ago, Casey said: Can you post a pic or two as an example? There is often a noticeable meeting point, where molten plastic flows from opposite directions, but at the pressures used for injection molding, there will not be any gap no what I normally think of when I hear "scar" at that joint. 1 hour ago, minkos said: Hello, here is a picture of the '63 nova underside of the hood, you can see the "ghost" line by on the left side by the different shading on each side of the line. That's exactly what Casey said, it's where the plastic meets in the mold when coming from different directions. I bet that's a nice coat of Duplicolor lacquer that you sprayed on that hood and the texturing and line wasn't there before you painted it. Every plastic kit has that somewhere, not just the new ones. It's just a matter of how the plastic interacts with the paint. A couple light coats of BIN over the primer to seal it before the color coats and that's not an issue. Quote Link to comment Share on other sites More sharing options...
Oldcarfan27 Posted February 14, 2021 Share Posted February 14, 2021 Looks like you've got crazing in there. Start by trying to sand the texture out - esp. on the top, and use a better primer before spraying the black paint on. I think the black paint is too "hot" for the primer you're currently using. Think of the scar as the marbling effect you see on plastic kits molded in metallic colors. The plastic flows in the tool and meets at the other end, but doesn't mix together - thus the swirl look. It also creates a plastic variance where they meet, which is why the paint won't hide the mark. Quote Link to comment Share on other sites More sharing options...
peteski Posted February 14, 2021 Share Posted February 14, 2021 (edited) 7 hours ago, Paul Payne said: I have an idea about this, but no hard evidence. Anyone else with sure knowledge please correct me! All molds have parting fluid applied before each shot. Is it possible that a too generous application actually got incorporated into the styrene, causing a difference in the material? This would explain the paint failure. As far as I know, styrene doesn't need to cure like resin does- it gets heated to where it flows, then cools before ejection from the mold. If it's too warm during ejection, that is when warping can occur. I was told that no mold release agent is used in the injection-molded polystyrene process. And you right, unlike urethane resins which cure by a chemical reaction, Polystyrene is a thermoplastic, which for injection is heated until it is a thick liquid, then it hardens when it cools . As others have mentioned, those lines seem to be where the injected plastic (from multiple injection points) meets inside the mold. This is readily visible in metallic-color (like silver) polystyrene bodies or other large parts. The metallic particles clearly show the plastic flow patterns. But those artifacts are not supposed to affect the plastic surface. I wonder if the molds were too cold when being injected, causing each flow of the plastic not fully fusing with the other flow, creating a seam-like artifact. Ore like Casey mentioned, the here was insufficient injection pressure. I would consider those defective parts. Edited February 14, 2021 by peteski Quote Link to comment Share on other sites More sharing options...
pack rat Posted February 14, 2021 Share Posted February 14, 2021 Definitely crazing. I have a few old scrap parts in my stash that look just like that; leftovers from my early experiments with Duplicolor. As mentioned above; sealing with BIN or using a paint that isn't so hot should solve your issue. Quote Link to comment Share on other sites More sharing options...
Mark Posted February 14, 2021 Share Posted February 14, 2021 Again, nothing new...early Sixties annual kits had this too. Years ago, I built a previously unbuilt '62 Fairlane to match my 1:1 car. I painted it with Duplicolor touch-up spray in the correct color. It took a bunch of priming and wet sanding to get similar marks off of the body. I also removed some of the raised lettering on the underside of the hood (carryover from the promo) that didn't pertain to my car...that was fun too. I'm glad AMT left the V8 emblems off of the front fenders of that body... Quote Link to comment Share on other sites More sharing options...
peteski Posted February 14, 2021 Share Posted February 14, 2021 (edited) 5 hours ago, pack rat said: Definitely crazing. I have a few old scrap parts in my stash that look just like that; leftovers from my early experiments with Duplicolor. As mentioned above; sealing with BIN or using a paint that isn't so hot should solve your issue. I think you guys are missing the point. The discussion is not about what looks like crazed black paint on the underside of that hood. The discussion is about the curved line on the lower left quarter of the hood. That line is at the place where the color of the paint (or the light reflection) also changes, so the area to the left of that line is slightly darker than the rest of the hood. I had to look at the photo for a while to figure out where the problem was. BTW, this model woudl never win anything at any IPMS contest: the prominent ejection-pin marks have not been dealt with. Edited February 14, 2021 by peteski Quote Link to comment Share on other sites More sharing options...
Mark Posted February 14, 2021 Share Posted February 14, 2021 No, it has been mentioned...the line is a swirl mark at the meeting point of molten styrene coming together from different entry points. Not really a flaw in and of itself, but the hot primer sure did make it stand out. Quote Link to comment Share on other sites More sharing options...
pack rat Posted February 14, 2021 Share Posted February 14, 2021 17 minutes ago, peteski said: The discussion is about the curved line on the lower left quarter of the hood. I was referring to the curved line on the hood, very similar to the line on the door of this old green Pinto. Call it crazing or call it something else....it's caused by too-hot paint. Quote Link to comment Share on other sites More sharing options...
Can-Con Posted February 14, 2021 Share Posted February 14, 2021 It's not caused by too hot paint. The paint just makes it more visible. Quote Link to comment Share on other sites More sharing options...
peteski Posted February 14, 2021 Share Posted February 14, 2021 (edited) 2 hours ago, pack rat said: I was referring to the curved line on the hood, very similar to the line on the door of this old green Pinto. Call it crazing or call it something else....it's caused by too-hot paint. Yes, looks like we are talking about the same thing. But "crazing" is the rough surface on the entire painted part, caused by the solvent in the paint partially melting the plastic. Like Steve said, hot paint that causes crazing also makes the "scar", this thread is about, more visible. The artifact your arrows point to (the "scars") would be visible, even on unpainted plastic (before the crazing takes place). Edited February 14, 2021 by peteski Quote Link to comment Share on other sites More sharing options...
Mark Posted February 15, 2021 Share Posted February 15, 2021 The primer that was used could certainly have been "hot". But, an otherwise usable lacquer primer will cause those swirl marks to show up if it is not sufficiently shaken prior to application. There's been a general cheapening of these primers in recent years; less "solids" or pigment, more reducer. If the primer isn't shaken thoroughly, you run a good chance of spraying what is essentially lacquer thinner, leaving the solids settling at the bottom of the can. A good shaking (you should be able to roll the agitator around the bottom of the can) and applying the first coat from further away than usual, will often eliminate or reduce these problems. Quote Link to comment Share on other sites More sharing options...
peteski Posted February 15, 2021 Share Posted February 15, 2021 (edited) As described in the initial post "Hello, I have noticed that in many of the newer AMT kits, the bare styrene bodies and hoods have these random "scar" lines in them. It almost looks like a fracture, but I don't think it is", the flaw is already visible on bare plastic, before painting. Spraying the body with hot paint just makes the flaw more visible. The problem is not with paint, but with the manufacturing process. Edited February 15, 2021 by peteski Quote Link to comment Share on other sites More sharing options...
Mark Posted February 15, 2021 Share Posted February 15, 2021 It isn't the manufacturing process, but rather the choice of material. These marks are present in every part where molten styrene enters the cavity in more than one place for a particular part. Plastic of a different color and/or opacity would reduce or eliminate the visibility of such marks. Quote Link to comment Share on other sites More sharing options...
peteski Posted February 15, 2021 Share Posted February 15, 2021 53 minutes ago, Mark said: It isn't the manufacturing process, but rather the choice of material. These marks are present in every part where molten styrene enters the cavity in more than one place for a particular part. Plastic of a different color and/or opacity would reduce or eliminate the visibility of such marks. Well, the way I interpreted the problem is that the "scars" or lines are not only visible, but can be physically felt (maybe when running a fingernail over the surface). But whether the material, the injection temperature or pressure are not optimal, I believe the problem is with the manufacturing process (not the painting process). I have painted models which clearly had those injection artifacts in the p(usually metallic colored) plastic, and the the scars did not emerge after painting. Quote Link to comment Share on other sites More sharing options...
minkos Posted February 15, 2021 Author Share Posted February 15, 2021 Thanks for the different ideas. I think the "line" or "scar" is a manufacturing defect that reflects through paint especially when the paint and primer are not compatible. I had used Tamiya red oxide primer and then Duplicolor on the underside of the hood and they were obviously not compatible. the same goes for the top side of the hood, where the Tamiya primer did not play well with the MCW lacquer body color. so I sanded everything down on both sides, re-shot them with MCW's red oxide lacquer, then used MCW's lacquer color (black on the underside and body color on the topside) and the line was almost invisible. I think I should be able to make it go away completely by color sanding. Quote Link to comment Share on other sites More sharing options...
Modelbuilder Mark Posted February 15, 2021 Share Posted February 15, 2021 This is not really new, but may simply be more noticeable. As was previously stated, these lines are caused when two streams of molten styrene meet,. Think of it less of a "flaw" in the process, but certainly a quirk. If you look hard enough, you will see this on most all kits, typically seen on larger parts with more sprue connections. Having said that, if you see it on bare plastic, hot paints certainly do bring them to the surface, just like ghosting if you scrape of an emblem, sand it smooth as a babies bottom, and paint without sealing. I have seen ghosting where the paint is not hot enough to craze. That which crazes the plastic will certainly raise this line. As others have also stated, if you seal them properly, (as you would if you would for body work, or removed emblems/trim etc) there are no issues. Quote Link to comment Share on other sites More sharing options...
Rick L Posted February 15, 2021 Share Posted February 15, 2021 This is a flaw of the injection molding process. The styrene plastic is melted and pressured into the mold through different ports strategically located so that the plastic will connect at the same time all around and push the air out through a sprue. If the plastic from one port starts to cool quicker than the plastic from its adjoining port, it will form a microscopic vein at its intersection. This vein forms a weak boding joint and is exposed when a strong solvent attacks the plastic. Your primer probably went on quickly and gassed out before it could attack the vein but the paint went on thicker and attacked the vein, exposing it’s flaw as it dried. The only way to avoid this is to take your time and apply paint in light steps until you have enough dried paint underneath to put on that last heavy coat. Quote Link to comment Share on other sites More sharing options...
Recommended Posts
Join the conversation
You can post now and register later. If you have an account, sign in now to post with your account.
Note: Your post will require moderator approval before it will be visible.