charlie libby Posted November 30, 2021 Author Share Posted November 30, 2021 i andrew ,the pictures are pretty cool. hi francis. put the wheels together, ran out of rivets after the third wheel. i had ordered more but they are not here yet. i think they look good they came out the way i planed. started on the front axle. should be finished soon. then i will polish it and anodize clear.got the alt. mounted . and started final assembly of the engine. Quote Link to comment Share on other sites More sharing options...
absmiami Posted December 1, 2021 Share Posted December 1, 2021 Anodize clear ?? To prevent tarnish ?? Quote Link to comment Share on other sites More sharing options...
Straightliner59 Posted December 1, 2021 Share Posted December 1, 2021 Very cool, watching this come together. Craftsmanship. Quote Link to comment Share on other sites More sharing options...
AmericanMuscleFan Posted December 1, 2021 Share Posted December 1, 2021 WOW I love the rivets on the wheels (among others...) it takes a lot, it lowers an inventory... Quote Link to comment Share on other sites More sharing options...
charlie libby Posted December 2, 2021 Author Share Posted December 2, 2021 yes andrew,just anodized with no dye for color . just keeps them from corroding. i think it leaves a nice finish.hi daniel, thanks for looking. hope you enjoy.128 rivets. 3 pieces in the center of the wheels. 3 times 128 holes ,thats alot of holes. i havent counted how many allen head bolts i need from rb motion just for the engine side plates.i am going to get a part time job so i can afford this project. Quote Link to comment Share on other sites More sharing options...
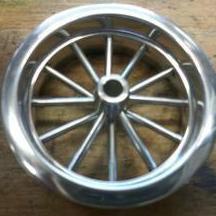
charlie libby Posted December 9, 2021 Author Share Posted December 9, 2021 got alot of the frontend parts made. the rivets arrived so i put the last wheel together. large 6 piston wilwood calipers. got to try to find some wilwood decals. does anyone know where i might be able to purchase some really thin leather? Quote Link to comment Share on other sites More sharing options...
Straightliner59 Posted December 9, 2021 Share Posted December 9, 2021 1 hour ago, charlie libby said: got alot of the frontend parts made. the rivets arrived so i put the last wheel together. large 6 piston wilwood calipers. got to try to find some wilwood decals. does anyone know where i might be able to purchase some really thin leather? Beautiful work, Charlie! Look on Ebay for bookbinding leather. You'll want 1oz. Or 1.5oz. weight. I bought some 1.5oz. It's about .015" thick. Quote Link to comment Share on other sites More sharing options...
charlie libby Posted December 20, 2021 Author Share Posted December 20, 2021 i have finished the tires and wheels. i think they look pretty good. i am working on the steering and i have to finish the front rotors. i cast the tires over size and machined them to size. i used ziploc disposable bowls to make the rough casting.i got a good start on the front end . got the 4 bars end mounts made and now the coilovers and steering. i have to remove the crossmember in the front. hope you all have a nice holiday. Quote Link to comment Share on other sites More sharing options...
absmiami Posted December 21, 2021 Share Posted December 21, 2021 Cool if I follow - you poured resin into the bowls and machined the castings - right ?? Quote Link to comment Share on other sites More sharing options...
Bugatti Fan Posted December 21, 2021 Share Posted December 21, 2021 (edited) Really interesting project. Makes a real change from all the more modern subjects. As an engineer I always find scratch built models fascinating, and this one is coming along really nicely. Regarding thin leather, bookbinding leather has already been suggested. Another source is the craft fraternity. Some time ago I purchased a bundle of soft leather off cuts in different colours from the outlet store of a glove manufacturer Pittards in the UK that they sold for crafters. If all you want is enough to cover a single seat, maybe taking apart an old soft leather wallet or an old pair of ladies thin leather gloves might be enough for your project. Edited December 21, 2021 by Bugatti Fan Quote Link to comment Share on other sites More sharing options...
charlie libby Posted December 21, 2021 Author Share Posted December 21, 2021 hi andrew ,yes , ijust used the bowls as a cheap way to make a round piece thicker than i needed from black 2 part polyurethane , it worked as planed but its not very black after machining. i felt that i could machine the tires better than i could machine molds for the 2 different size tires. have a great holiday. hi noel,nice to hear from you. i have purchased 2 sf. of black 1.5 oz leather and i think it will work fine. i appreciate the suggestions. the thin ladies gloves never occured to me. happy holidays Quote Link to comment Share on other sites More sharing options...
charlie libby Posted December 22, 2021 Author Share Posted December 22, 2021 hi noel, here is a few pictures i think you might like being a bugatti fan. this was a project of mine . never got finished because i sold it. Quote Link to comment Share on other sites More sharing options...
AmericanMuscleFan Posted December 22, 2021 Share Posted December 22, 2021 The tires are fantastic Charlie! The Bugatti you sold was another piece of art... You are truly a talented man!!! 👌 Quote Link to comment Share on other sites More sharing options...
Claude Thibodeau Posted December 22, 2021 Share Posted December 22, 2021 Hi Charlie! Well, we knew you were a Master of metal... But now, those molded and turned tires? Master of all media would be more appropriate. Wow! Your 1/1 car reeks of metal mastery, and the rear section alone comprises so many compound curves, one can only imagine the english wheel or hammering sessions to get to that point. Truly impressive. Regards, CT Quote Link to comment Share on other sites More sharing options...
Bainford Posted December 22, 2021 Share Posted December 22, 2021 The build is coming along nicely, Charlie. Those wheels are a work of art. Beautiful work on everything. Really digging that Bug project, too. Man, that would have been a wild looking machine. Quote Link to comment Share on other sites More sharing options...
charlie libby Posted December 27, 2021 Author Share Posted December 27, 2021 i made a lite for my mill 4 or5 years ago and it stoped working. i could not figure out why. put it in my tool box and forgot about it. i took it out the outhr day and decided to work on it. i ended up removing all the leds and installing new ones and its working fine . glad to have it back. if i were to make another one,i would drill the holes for the leds at a about 5 degrees to the middle but it works fine. it attaches with magnets. i did not like the size of the front brakes so i made new that are much larger.hope u all had a great christmas and have a happy newyear. Quote Link to comment Share on other sites More sharing options...
Bugatti Fan Posted December 28, 2021 Share Posted December 28, 2021 Charlie, did whoever bought your Bugatti Bodysbell finish the model? The stage you got to with it looks very impressive as is this current build. Quote Link to comment Share on other sites More sharing options...
absmiami Posted December 28, 2021 Share Posted December 28, 2021 Light is good Quote Link to comment Share on other sites More sharing options...
charlie libby Posted January 4, 2022 Author Share Posted January 4, 2022 hi noel, he has not had time to finish the car. he owns 2 autobody shops and has been very busy. got some new shocks made for the front and threaded them to make them adjustable. i don't know if any of you has heard of a 1930's aftermarket headlite called woolite headlites. i have allways thought they were very cool and unique so i decide to carve them for this car. the front covers that hold the lenses i have not figured out how to make them yet . the originals have no lite in the top 1/3 but i am going to put the directional in there. i machined a front shock mount and headlite bar.could also be a bumper. am going to nickel plate an polish the bar and the lites. have a happy and prosperous new year. Quote Link to comment Share on other sites More sharing options...
CabDriver Posted January 5, 2022 Share Posted January 5, 2022 Those Woodlites look AMAZING! Nice job! Quote Link to comment Share on other sites More sharing options...
charlie libby Posted January 7, 2022 Author Share Posted January 7, 2022 got a little further along on the headlites.plating and polish and started the trim for the lenses. i think i will make a similar bumper type mount for the tail lites. starting to think alot about paint colors. Quote Link to comment Share on other sites More sharing options...
charlie libby Posted January 7, 2022 Author Share Posted January 7, 2022 hi jim thanks for the comment. not many people know about the woodlites. 1 Quote Link to comment Share on other sites More sharing options...
absmiami Posted January 8, 2022 Share Posted January 8, 2022 Interesting. I think you’re using some copper for some of the susp components - always liked the look … Quote Link to comment Share on other sites More sharing options...
AmericanMuscleFan Posted January 8, 2022 Share Posted January 8, 2022 The Woodlite headlights and adjustable shocks are fantastic Charlie, you never cease to amaze us my friend, you have certainly spent a lot of time on them! 👌 Quote Link to comment Share on other sites More sharing options...
NOBLNG Posted January 11, 2022 Share Posted January 11, 2022 Hi Charles. I saw your post musing about how to make some wheels for an upcoming project in Francis’s thread. So….I looked you up and found this thread (and others) and I must say I am astounded by your work. It is truly a delight to see such skill, artistry and determination. Kudos to you my man!👍 Quote Link to comment Share on other sites More sharing options...
Recommended Posts
Join the conversation
You can post now and register later. If you have an account, sign in now to post with your account.
Note: Your post will require moderator approval before it will be visible.