KJ790 Posted July 28, 2021 Share Posted July 28, 2021 I thought that I would post my work so far on truck that I have wanted to build for a long time, a first generation 1964 Kenworth K100. I am using an AMT K123 kit and backdating as much as I can. The cab was an old glue-bomb that was damaged. I stripped the old paint and started working away at it. I made new luggage doors on the side of the cab, filled the "peep" window in the passenger's side door, shaved off the protrusions on the roof, moved the passenger's side vent door towards the back of the cab, added a rear window opening, and made new lower front quarter panels and headlight housings. The rivets were made using a punch and die set with .010" thick styrene sheet. First coat of primer: Quote Link to comment Share on other sites More sharing options...
leafsprings Posted July 28, 2021 Share Posted July 28, 2021 Great subject, will be following the transformation! Quote Link to comment Share on other sites More sharing options...
KJ790 Posted July 28, 2021 Author Share Posted July 28, 2021 I drew up a back-dated grille in 3D cad and had it 3D printed. Then sprayed the first coat of white paint on everything: I also started on the chassis. This was a frame from the parts-box. Up until 1969, the K100 used tapered frame rails to make room for the popular V8 configuration engines of the era. I modified the kit rails to represent this. I also shortened the frame slightly. I cut the kit fuel tanks down shorter and shifted them forward on the frame slightly. I made a step for the driver's side tank out of diamond plate styrene sheet. I added a resin torsion bar suspension and steerable front axle with the front brakes cut off. The battery box was lowered on the frame rails to reflect the 1:1 I am using as a reference. Quote Link to comment Share on other sites More sharing options...
Mopar - D Posted July 28, 2021 Share Posted July 28, 2021 Nice start KJ looking forward to seeing your progress on this one. Quote Link to comment Share on other sites More sharing options...
KJ790 Posted July 28, 2021 Author Share Posted July 28, 2021 I was not happy with the first paint job that I did, so into the strip it went. The second attempt came out better, but still not perfect. Luckily this truck is going to have some weathering to help hide some of the flaws. Decals from Firebird designs were applied. The permit decals are from CMT. 1 Quote Link to comment Share on other sites More sharing options...
Jim B Posted July 28, 2021 Share Posted July 28, 2021 Great looking cab, KJ. Quote Link to comment Share on other sites More sharing options...
KJ790 Posted July 28, 2021 Author Share Posted July 28, 2021 The chassis was painted. I used individual letter decals from microscale on the fuel tanks, what a task those were to line up. Not perfect, but it will have to do. I drew the spoke hubs in CAD and had them 3D printed. The rims were a set of resin cast rims that I had made a while back. The 1:1 truck I am using as inspiration did not have very aggressive tires, so I am using a set of tires from the AMT Papa Truck kit. I sanded off the "Tyrone Malone" logos with fine sandpaper. Weathering of the chassis has begun. Quote Link to comment Share on other sites More sharing options...
Bills72sj Posted July 28, 2021 Share Posted July 28, 2021 Thank you for sharing. Following. Quote Link to comment Share on other sites More sharing options...
Force Posted July 28, 2021 Share Posted July 28, 2021 So nice. Quote Link to comment Share on other sites More sharing options...
DRIPTROIT 71 Posted July 31, 2021 Share Posted July 31, 2021 KJ, you are most definitely the cabover Kenworth king! I’m taking notes on this one! Excellent work!! Quote Link to comment Share on other sites More sharing options...
Warren D Posted August 1, 2021 Share Posted August 1, 2021 Great work as usual! Quote Link to comment Share on other sites More sharing options...
gotnitro? Posted August 2, 2021 Share Posted August 2, 2021 Fantastic work 👏 👍 Whats the plan for a trailer on this build ? Quote Link to comment Share on other sites More sharing options...
Bennyg Posted August 3, 2021 Share Posted August 3, 2021 Awesome work KJ! Auslowe makes those spoke wheels too. Yours look ace too. Ben Quote Link to comment Share on other sites More sharing options...
KJ790 Posted August 4, 2021 Author Share Posted August 4, 2021 On 8/2/2021 at 11:54 AM, gotnitro? said: Fantastic work 👏 👍 Whats the plan for a trailer on this build ? Thanks everyone! I have a couple trailer ideas, but I will likely scratch build a mid-50's Great Dane reefer to go with this one. I have been working on the interior. The dash is scratch built. I drew the gauges and surrounds in Microsoft Word, then laid the decals in either side of a piece of clear plastic so that the gauges would have a small amount of depth to them. The front of the dash is littered with what every driver needs, a road atlas, log book, envelope for receipts, and some hand written directions. Quote Link to comment Share on other sites More sharing options...
doorsovdoon Posted August 4, 2021 Share Posted August 4, 2021 Very nice work. I'm liking this. Quote Link to comment Share on other sites More sharing options...
Mopar - D Posted August 5, 2021 Share Posted August 5, 2021 Looking good KJ Quote Link to comment Share on other sites More sharing options...
Jim B Posted August 5, 2021 Share Posted August 5, 2021 Great looking interior. Quote Link to comment Share on other sites More sharing options...
KJ790 Posted August 6, 2021 Author Share Posted August 6, 2021 The interior is mostly complete and I had to do a quick mock-up to make sure that everything fit right. I had to modify my cab hinges slightly, as the interior seemed to spread the base of the cab out just enough to mess up the alignment on my hinges. I added R.B.'s signature cowboy hat on the dash as well. Quote Link to comment Share on other sites More sharing options...
gotnitro? Posted August 8, 2021 Share Posted August 8, 2021 The interior details really bring the truck to life adding that driver touch. Love the cowboy hat too Quote Link to comment Share on other sites More sharing options...
DRIPTROIT 71 Posted August 9, 2021 Share Posted August 9, 2021 This thing is awesome in more ways than I can count! Quote Link to comment Share on other sites More sharing options...
KJ790 Posted August 10, 2021 Author Share Posted August 10, 2021 Finally finished all of the little details of the cab. I added some slight weathering and attempted a couple splattered bugs on the front. Next onto the engine. Quote Link to comment Share on other sites More sharing options...
Jim B Posted August 10, 2021 Share Posted August 10, 2021 Great looking cab, KJ. Quote Link to comment Share on other sites More sharing options...
Force Posted August 14, 2021 Share Posted August 14, 2021 So nice. Quote Link to comment Share on other sites More sharing options...
KJ790 Posted August 16, 2021 Author Share Posted August 16, 2021 Engines have always been a weak point for me, but fortunately you can't typically see them on the finished model. Since the radiator will be slightly visible through the grille, I made a set of louvers from .080" half-round rod. The engine is an attempt to make an early 60's 335 Cummins from the kit NTC. I added a 4x4 married transmission out of a Diamond Reo kit, as that is what the real truck had. Getting the "bells" on the exhaust and intake connection to line up with the plumbing mounted to the back of the cab was quite a task. Quote Link to comment Share on other sites More sharing options...
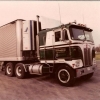
KJ790 Posted August 16, 2021 Author Share Posted August 16, 2021 Cab is fitted to the chassis. Just a few more details to finish up. Quote Link to comment Share on other sites More sharing options...
Recommended Posts
Join the conversation
You can post now and register later. If you have an account, sign in now to post with your account.
Note: Your post will require moderator approval before it will be visible.